

Page 1

IEEE 802.11n Draft 2.0 Wireless
USB Adapter
User’s Manual
English
Deutsch
Italiano
Español
Page 2

User’s Guide
IEEE 802.11n Draft 2.0 Wireless
USB Adapter
- 2 -
Page 3

FCC Certifications
Federal Communication Commission Interference Statement
This equipment has been tested and found to comply with the limits for a Class B digital device,
pursuant to Part 15 of the FCC Rules. These limits are designed to provide reasonable protection
against harmful interference in a residential installation. This equipment generates, uses and can
radiate radio frequency energy and, if not installed and used in accordance with the instructions, may
cause harmful interference to radio communications. However, there is no guarantee that interference
will not occur in a particular installation. If this equipment does cause harmful interference to radio or
television reception, which can be determined by turning the equipment off and on, the user is
encouraged to try to correct the interference by one of the following measures:
-Reorient or relocate the receiving antenna.
-Increase the separation between the equipment and receiver.
-Connect the equipment into an outlet on a circuit different from that to which the receiver is connected.
-Consult the dealer or an experienced radio/TV technician for help.
This device complies with Part 15 of the FCC Rules. Operation is subject to the following two conditions:
(1) This device may not cause harmful interference, and (2) this device must accept any interference
received, including interference that may cause undesired operation.
FCC Caution: Any changes or modifications not expressly approved by the party responsible for
compliance could void the user's authority to operate this equipment.
IMPORTANT NOTE:
FCC Radiation Exposure Statement:
This equipment complies with FCC radiation exposure limits set forth for an uncontrolled environment.
This equipment should be installed and operated with minimum distance 20cm between the radiator &
your body.
This transmitter must not be co-located or operating in conjunction with any other antenna or transmitter .
- 3 -
Page 4

CE Mark Warning
This equipment complies with the requirements relating to electromagnetic compatibility, EN 55022
class B for ITE, the essential protection requirement of Council Directive 2004/108/EC on the
approximation of the laws of the Member States relating to electromagnetic compatibility.
Company has an on-going policy of upgrading its products and it may be possible that information in thi s
document is not up-to-date. Please check with your local distributors for the latest information. No part of
this document can be copied or reproduced in any form without written consent from the company.
Trademarks:
All trade names and trademarks are the properties of their respective companies. Copyright © 2009, All
Rights Reserved.
- 4 -
Page 5

OVERVIEW
Thank you for purchasing this product. Read this chapter to know about your IEEE
802.11n Wireless Ada p ter.
Unpacking information
Before getting started, please verify that your package includes the following items:
1. IEEE 802.11n Wireless Adapter
2. One Utility/ Manual CD
- 5 -
Page 6
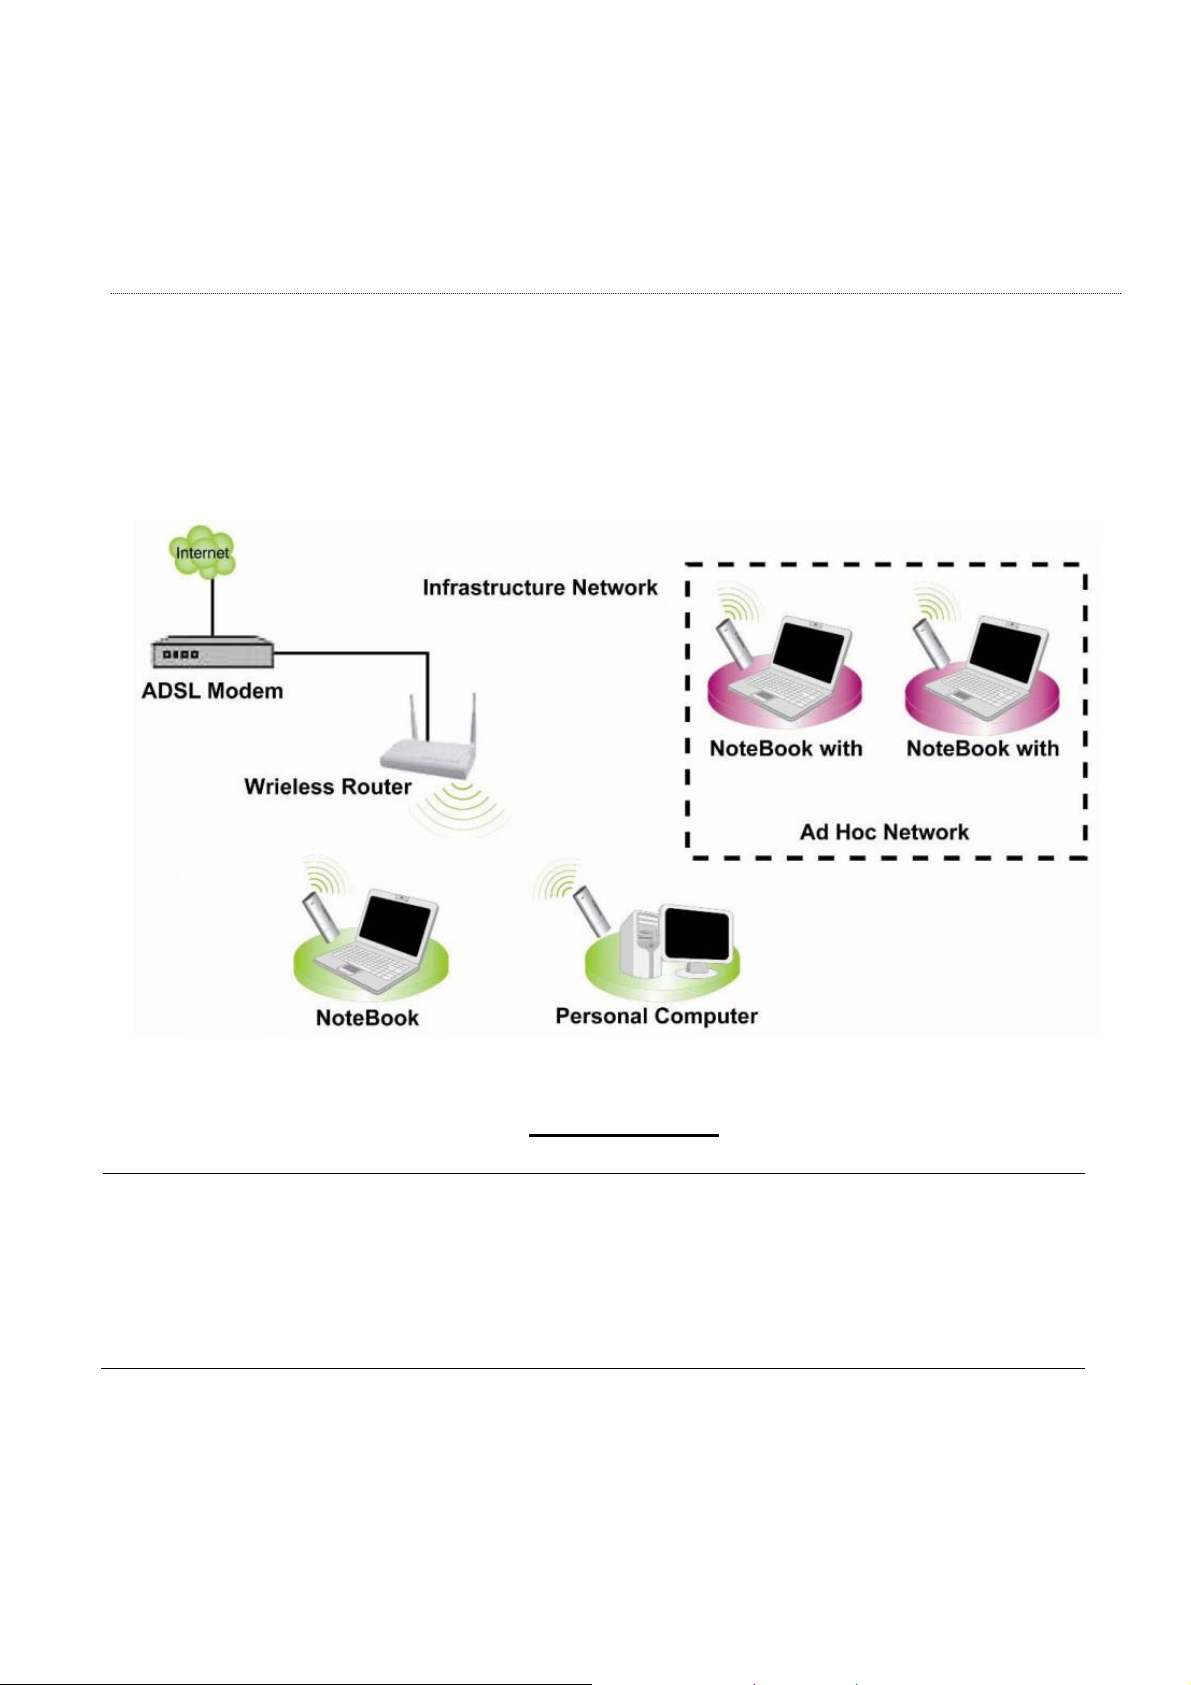
Introduction to the IEEE 802.11n Wireless Adapter
The IEEE 802.11n Wireless adapter provides users to launch IEEE 802.11n wireless network at 150
Mbps in the 2.4GHz frequency, which is also compatible with IEEE 802. 11b /g wireless devic es. Y ou
can configure this adapter with ad-hoc mode to connect to other 2.4GHz wireless computers or with
Infrastructure mode to connect to a wireless AP or router for accessing to Internet. This adapter
includes a convenient Utility for scanning avail able networks and saving preferred networks that users
usually connected with. Security encryption can also be conf igured by this utility.
Key Features
Complies with IEEE 802.11 n/b/g wireless
standard
High Speed transfer data rate up to 150 Mbps
Support QoS Enhancement ( WMM, WMM-PS
Client mode)
Support frame aggregation, Power saving
mechanism, channel management and
co-existence
Supports auto-installation and diagnostic utilities.
Support wireless data encryption with 64/128-bit
WEP, WPA (TKIP with IEEE 802.1x) and AES
functions.
- 6 -
Page 7
INSTALLATION GUIDE
Installation
Note: The following driver installation guide uses Windows XP as the presumed operation system.
The procedures and screens in Windows 98se, 2000 and Vista are familiar with Windows XP.
1. Unplug the power cord of your computer from outlet. Remove the cover of your computer.
2. Install the adapter into a PCI socket, PCMCIA slot or USB port.
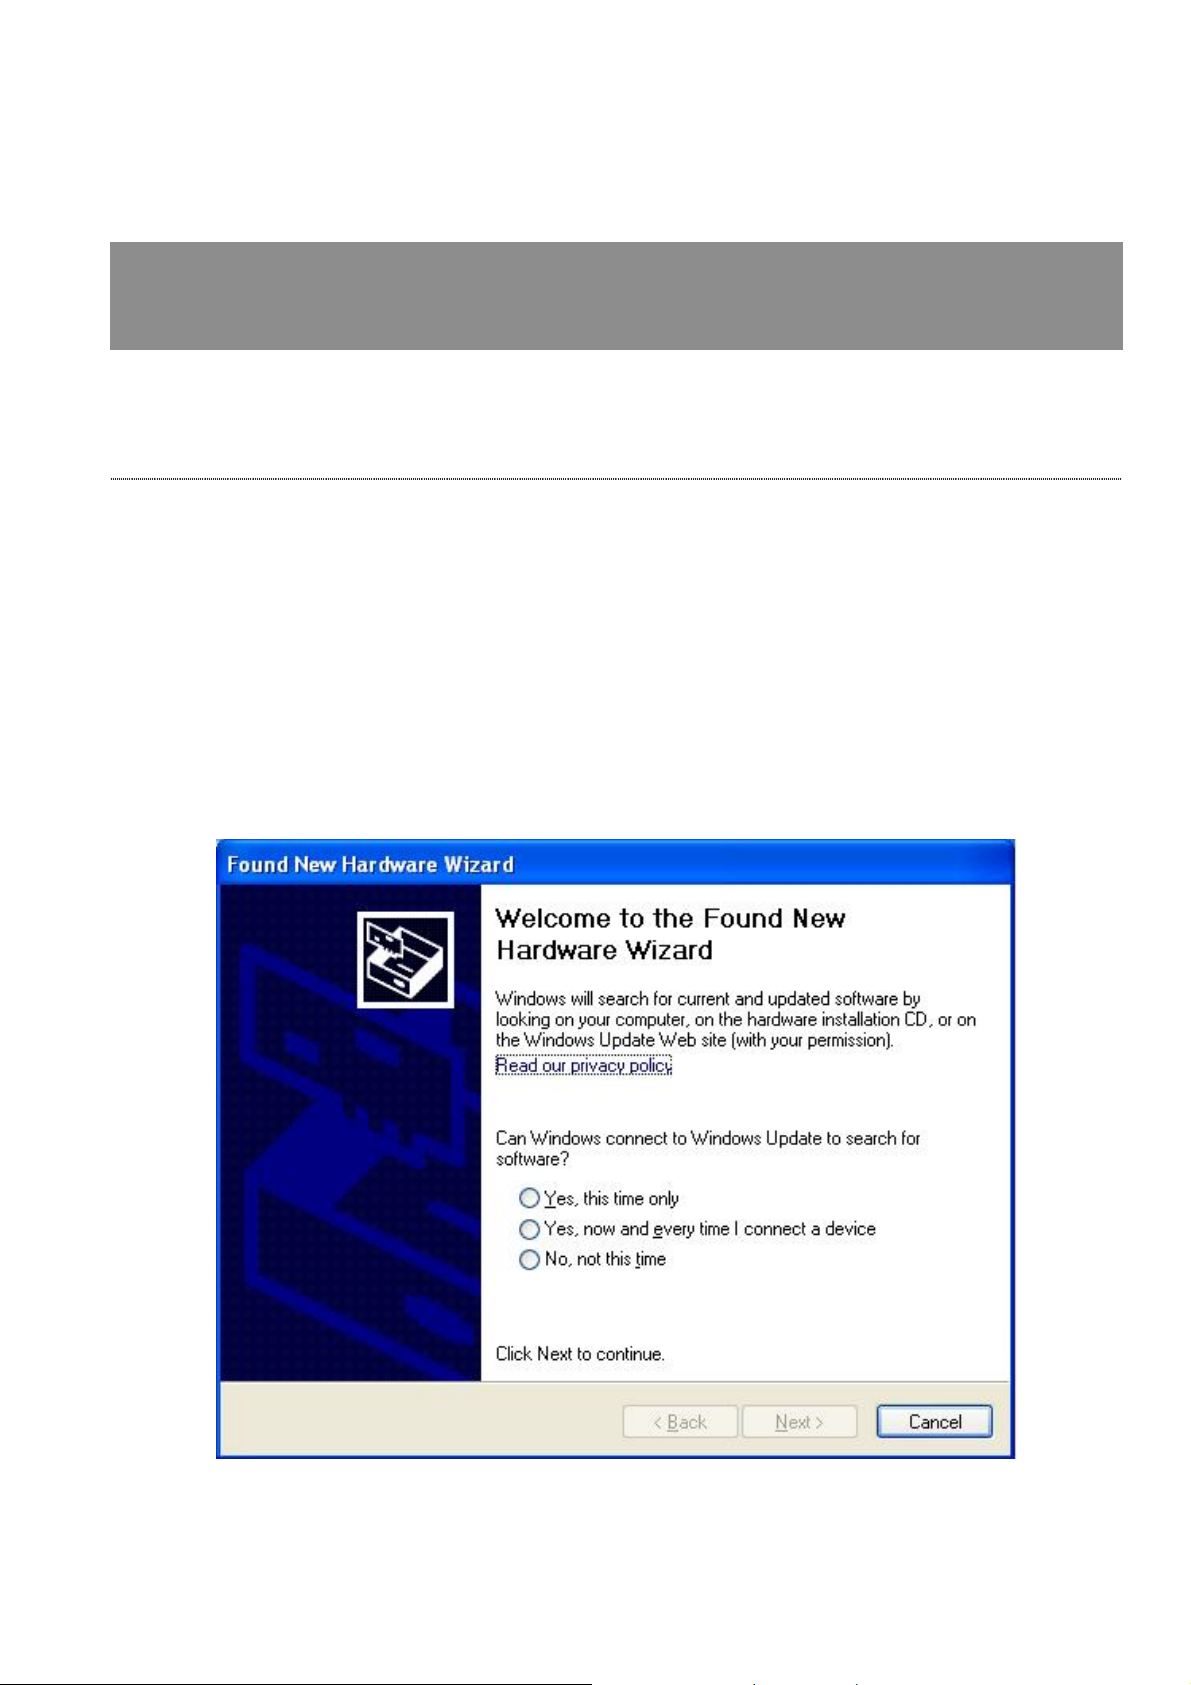
3. The “Found New Hardware Wizard“ pops up . (Note: This wizard won’t pop up in Windows 98 and
ME. The system finds the new hardware and installs the hardware automatically. Please skip the
following steps and restart the system after installation.)
4. Click the “Cancel” button.
Insert the CD-Rom that came with this product to your CD-Rom drive. The menu window pops up
automatically. Please click the
Driver> Win button of this product.
- 7 -
Page 8
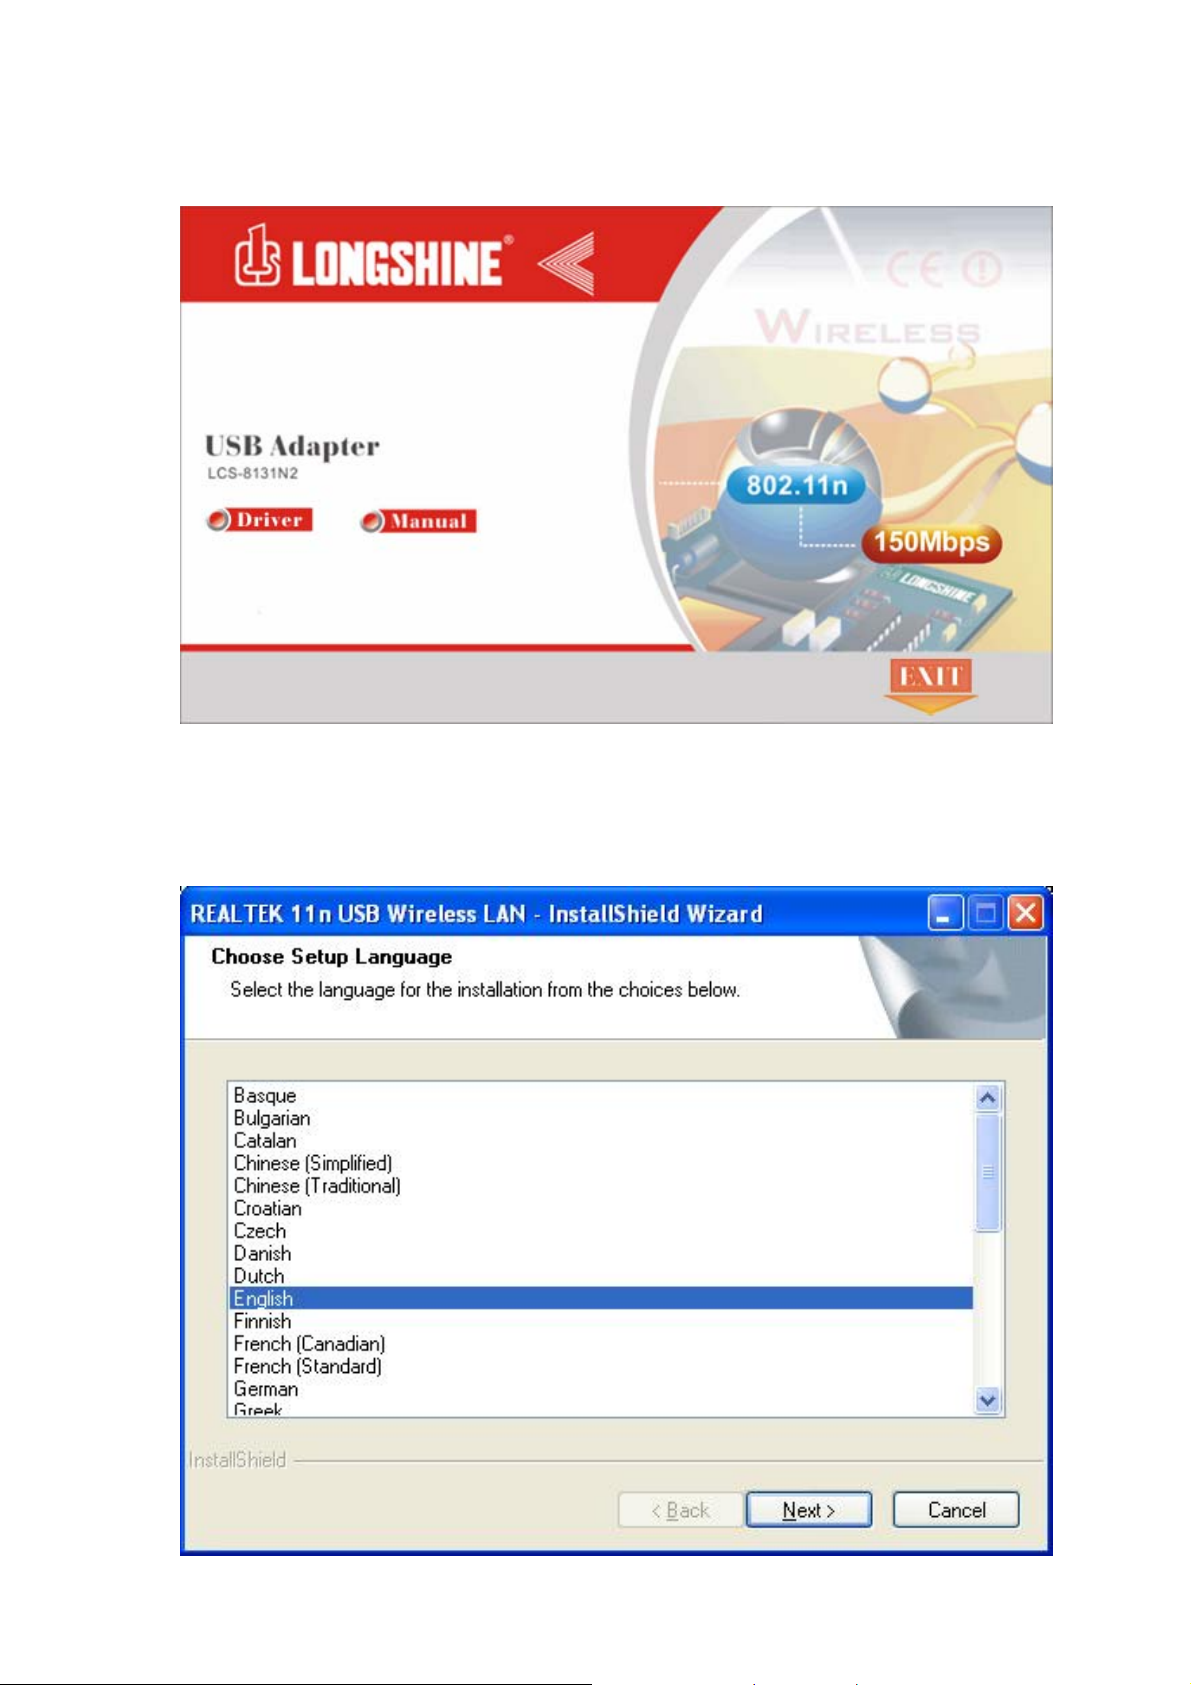
Note: If the CD-Rom fails to auto-run, please click on “My Computer” your CD-Rom Drive then
double-click the “Setup” icon to start the this menu.
1. The language-selecting window pops up. Please select the language you use and click Next.
- 8 -
Page 9
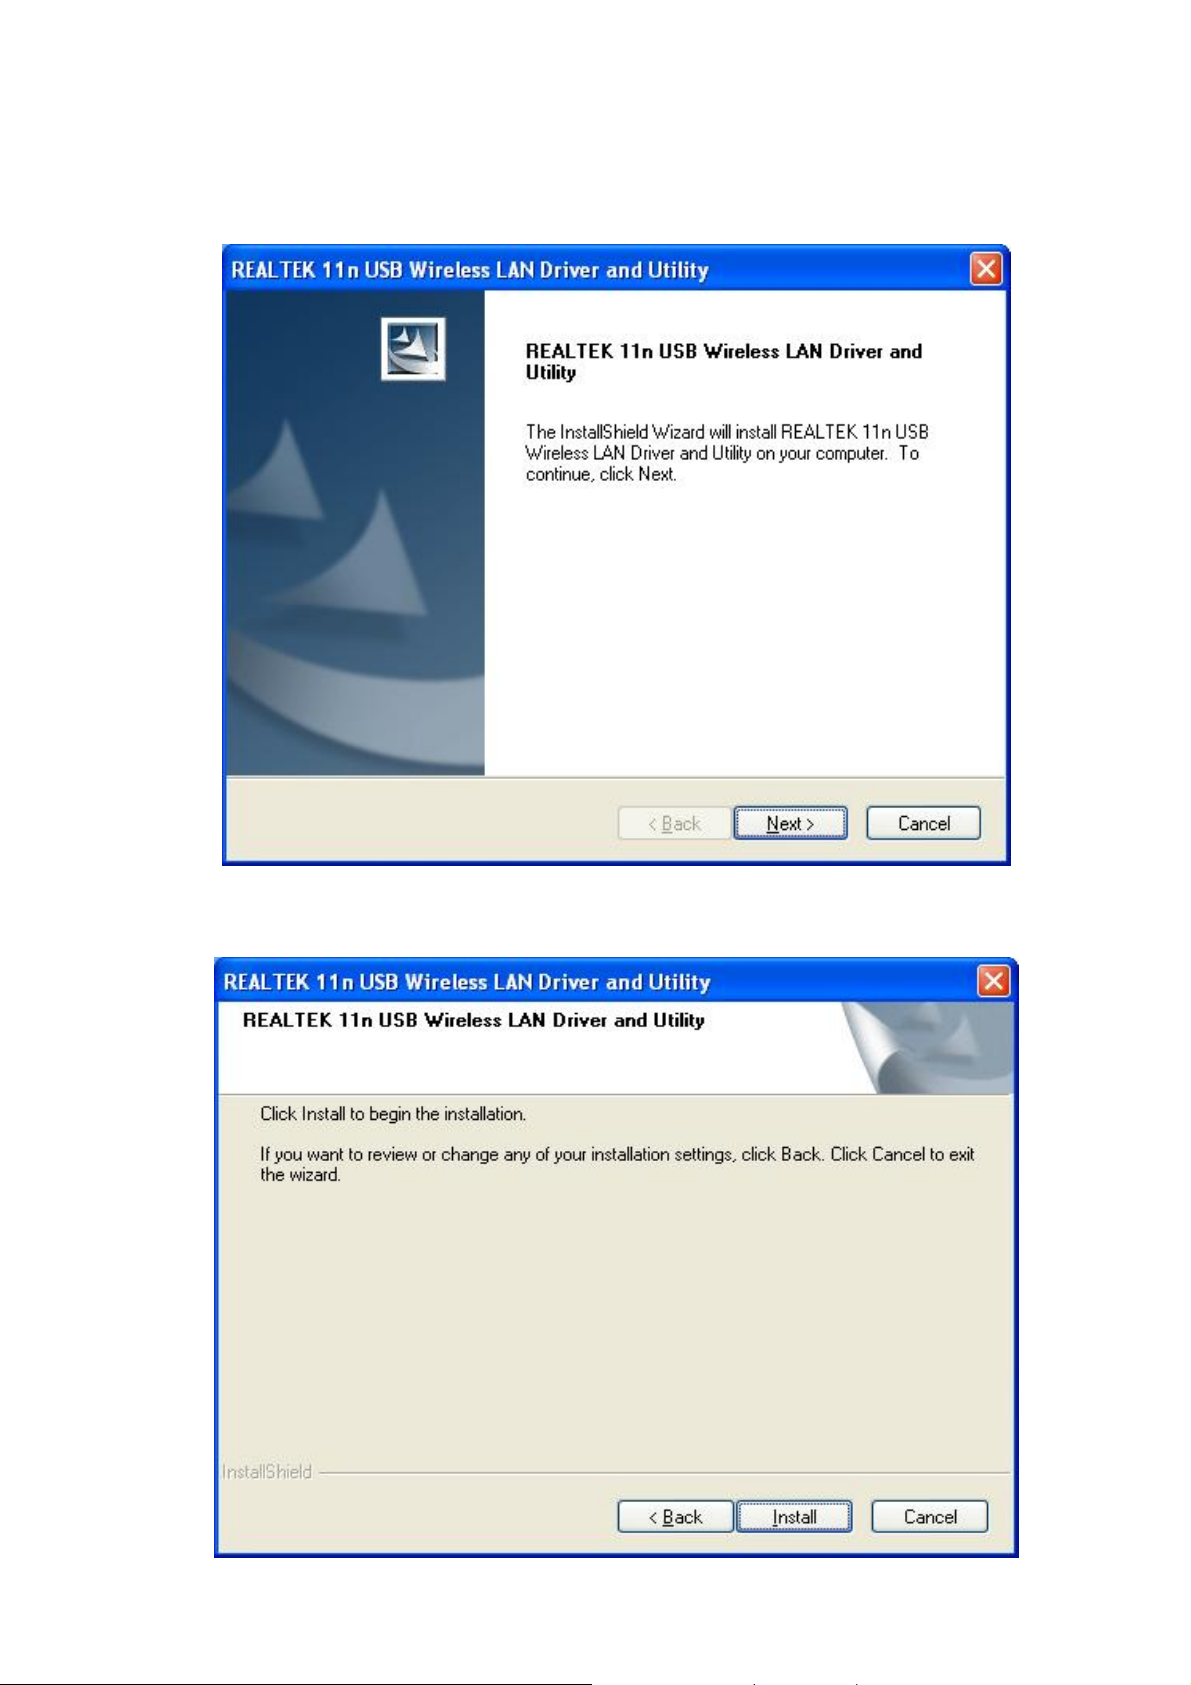
2. The
welcome window pops up. Click the “Next” button to proceed.
3. .
Click the “Install” button to start installing.
- 9 -
Page 10
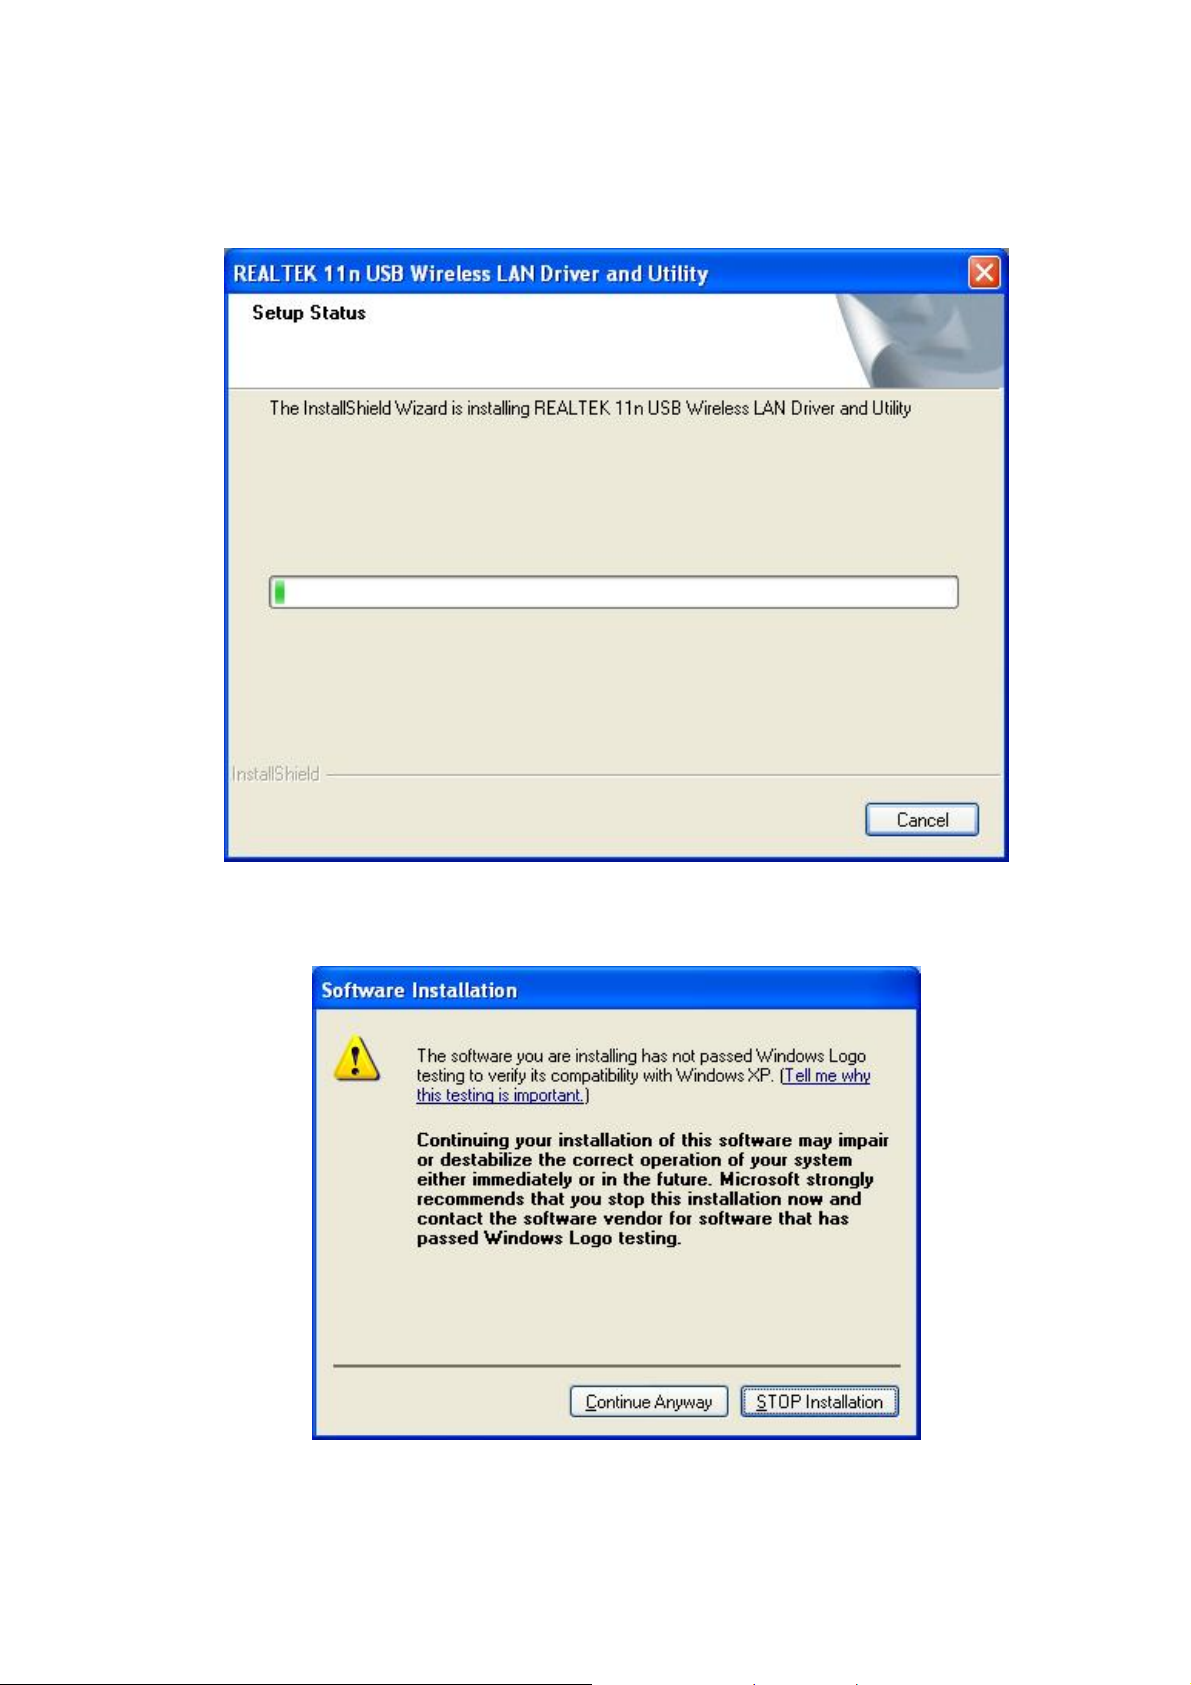
lease wait while installation
4. P
5. This Windows Logo testing warning window may pop up upon installation. Please click the
“Continue Anyway” to continue.
- 10 -
Page 11

6. Please wait again while installation
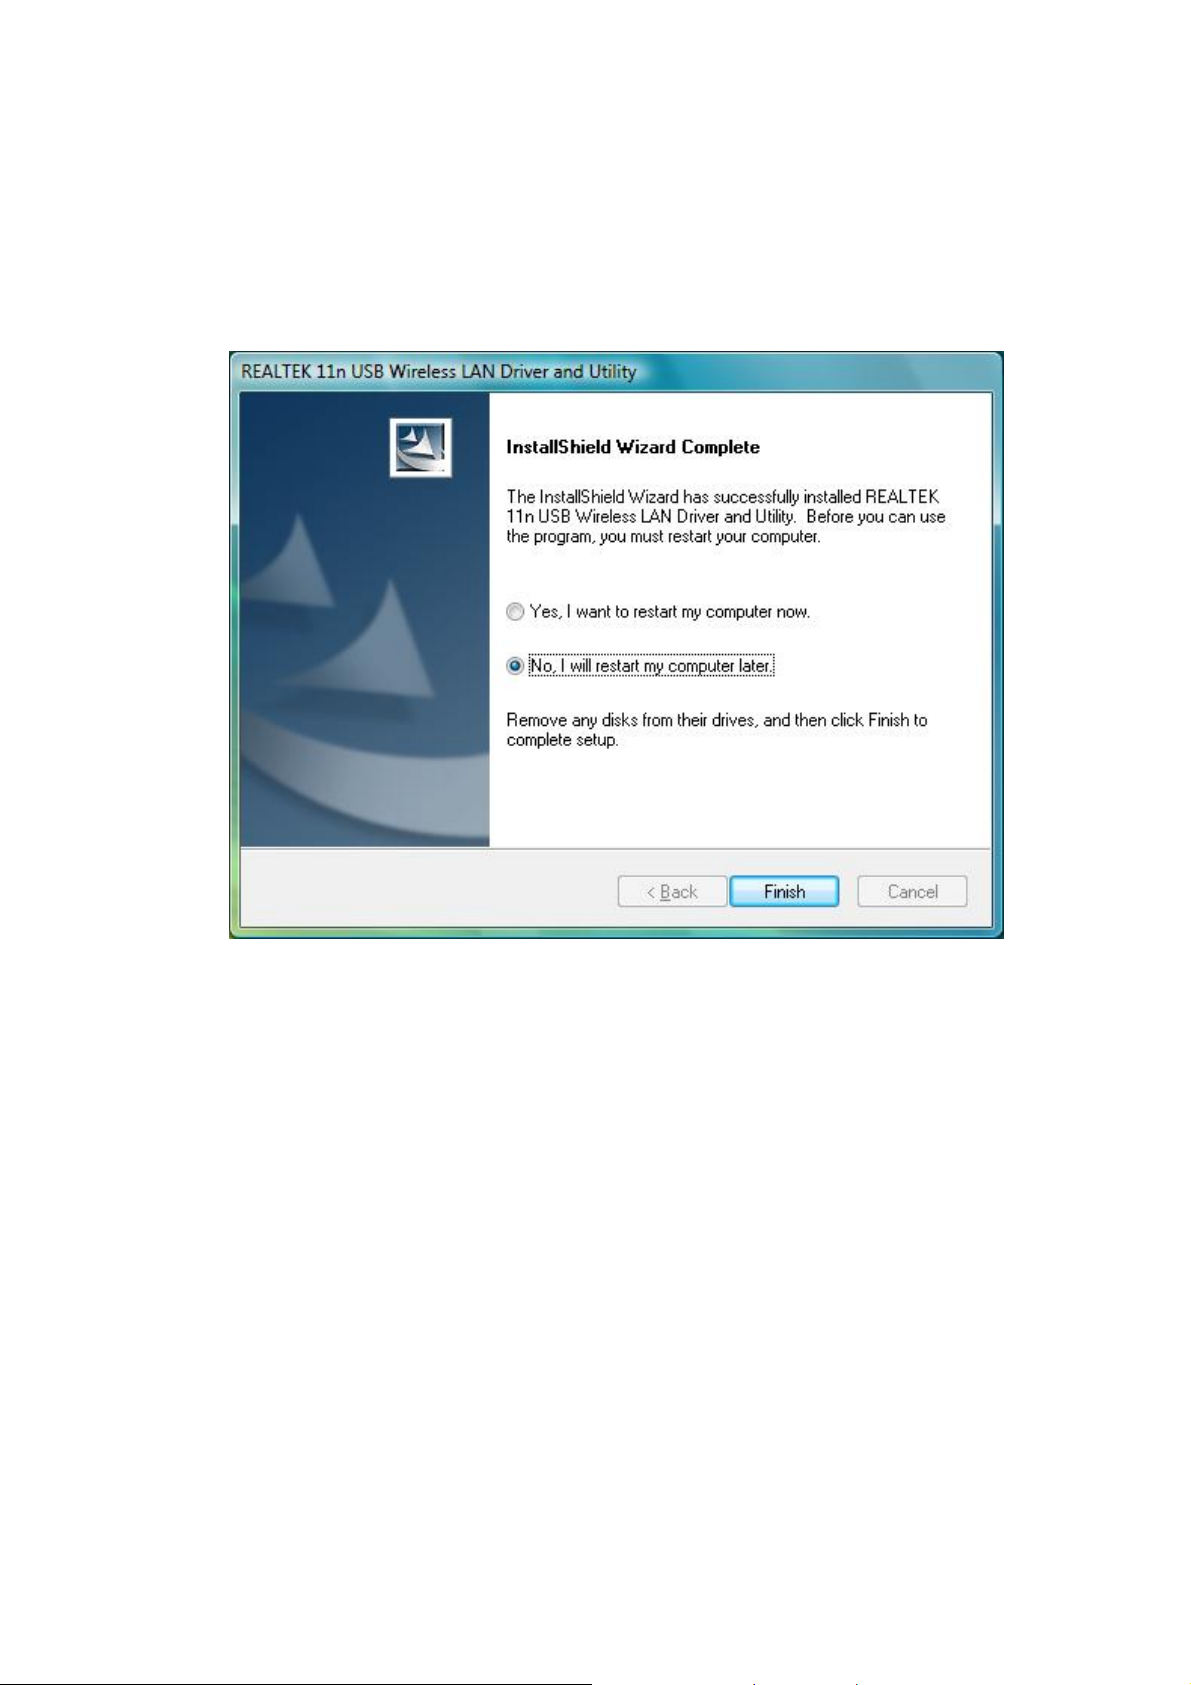
7. For Windows XP and 2000 users, please shut d own the computer. If you are using Windows 98se
or ME, the system may ask for restarting. Please select “No, I will restart my computer later.”
and then shut the computer down. Click the “Finish” button to complete driver and utility
installation.
- 11 -
Page 12
MANAGEMENT GUIDE
Read this chapter to understand the management interface of the device and how to
manage the device.
Making a Basic Network Connection
Connecting with Microsoft Zero Configuration tool
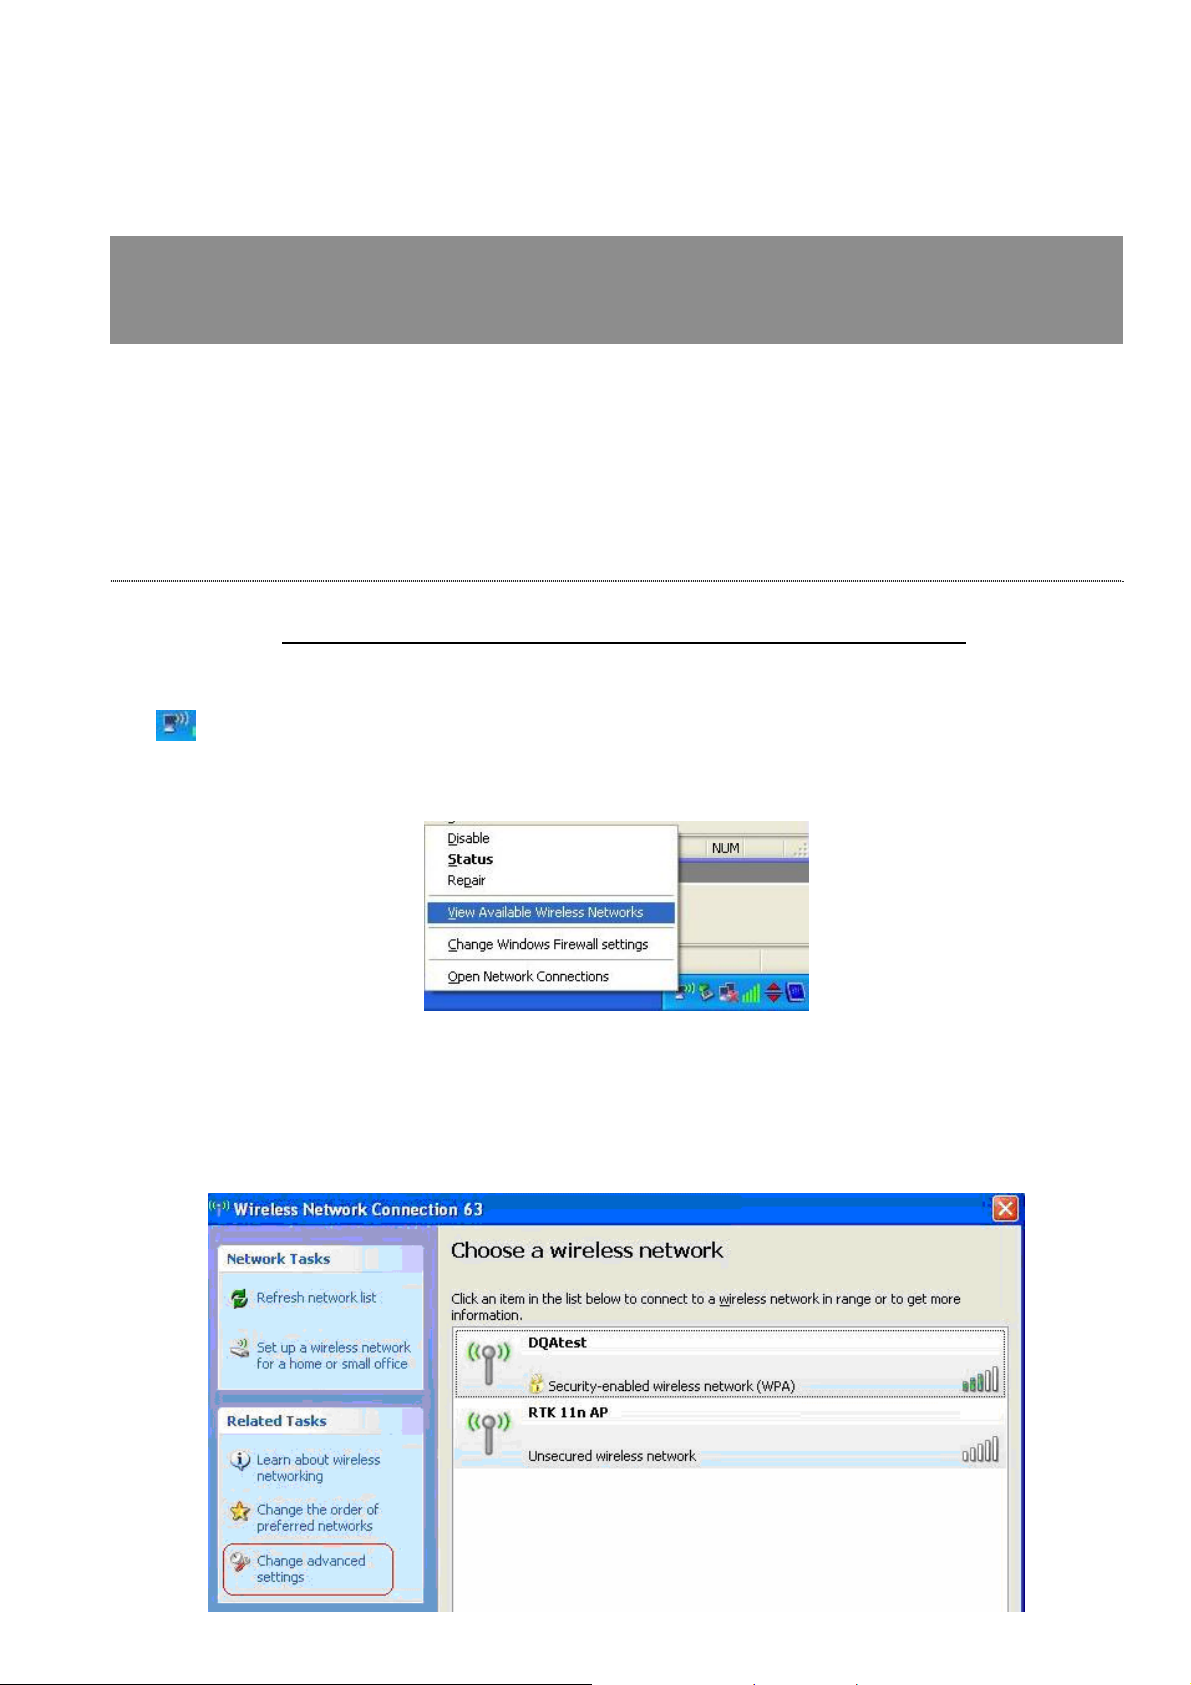
After specifying the Microsoft Ze ro Configuration tool to configure your wireless network, right click on
the
network.
The tool shows the available wireless networks. Select your demanding network to connect with. To
connect to a wireless network, please click Change advanced settings to be compatible with your
wireless network settings.
icon on system tray. Select “View Available Wireless Networks” to specify your wireless
- 12 -
Page 13
Connecting with 802.11n Wireless LAN Utility
We provide this Utility for users to connect to a wireless network easily. It provides more information
and configuration for this adapter. As default, the Utility is started automatically upon starting your
computer and connects to a connectable wireless network with best signal strength and with no
security setting. Right click on the icon
Utility does not start. Please refer to the following chapters to get information regarding to the
functions of this Utility.
in the system tray and select Open Config utility if the
Starting the Wireless LAN Utility
Double click the
shortcut on your desktop. The Wireless LAN Utility pops up.
- 13 -
Page 14
ou may click on the tabs abo ve to configure this adapter. The checkboxes below provide the following
Y
functions:
Check this checkbox to show the utility icon on your system tray, which
Show Tray Icon
Radio Off
Disable Adapter
is in the notification area at the lower-right corner of the windows
desktop. You may also uncheck it to remove the utility icon from system
tray.
Check this checkbox to prevent this adapter form transmitting or
receiving signals. Uncheck it to communicate.
Check this checkbox to disable this wireless adapter. Uncheck it to
enable this adapter again.
To use this adapter in Station Mode
1. Double click the
2. Click the “Available Network” button to scan available wireless network adapters. Double click
on the network adapter that you are going to connect to.
icon on your desktop.
- 14 -
Page 15
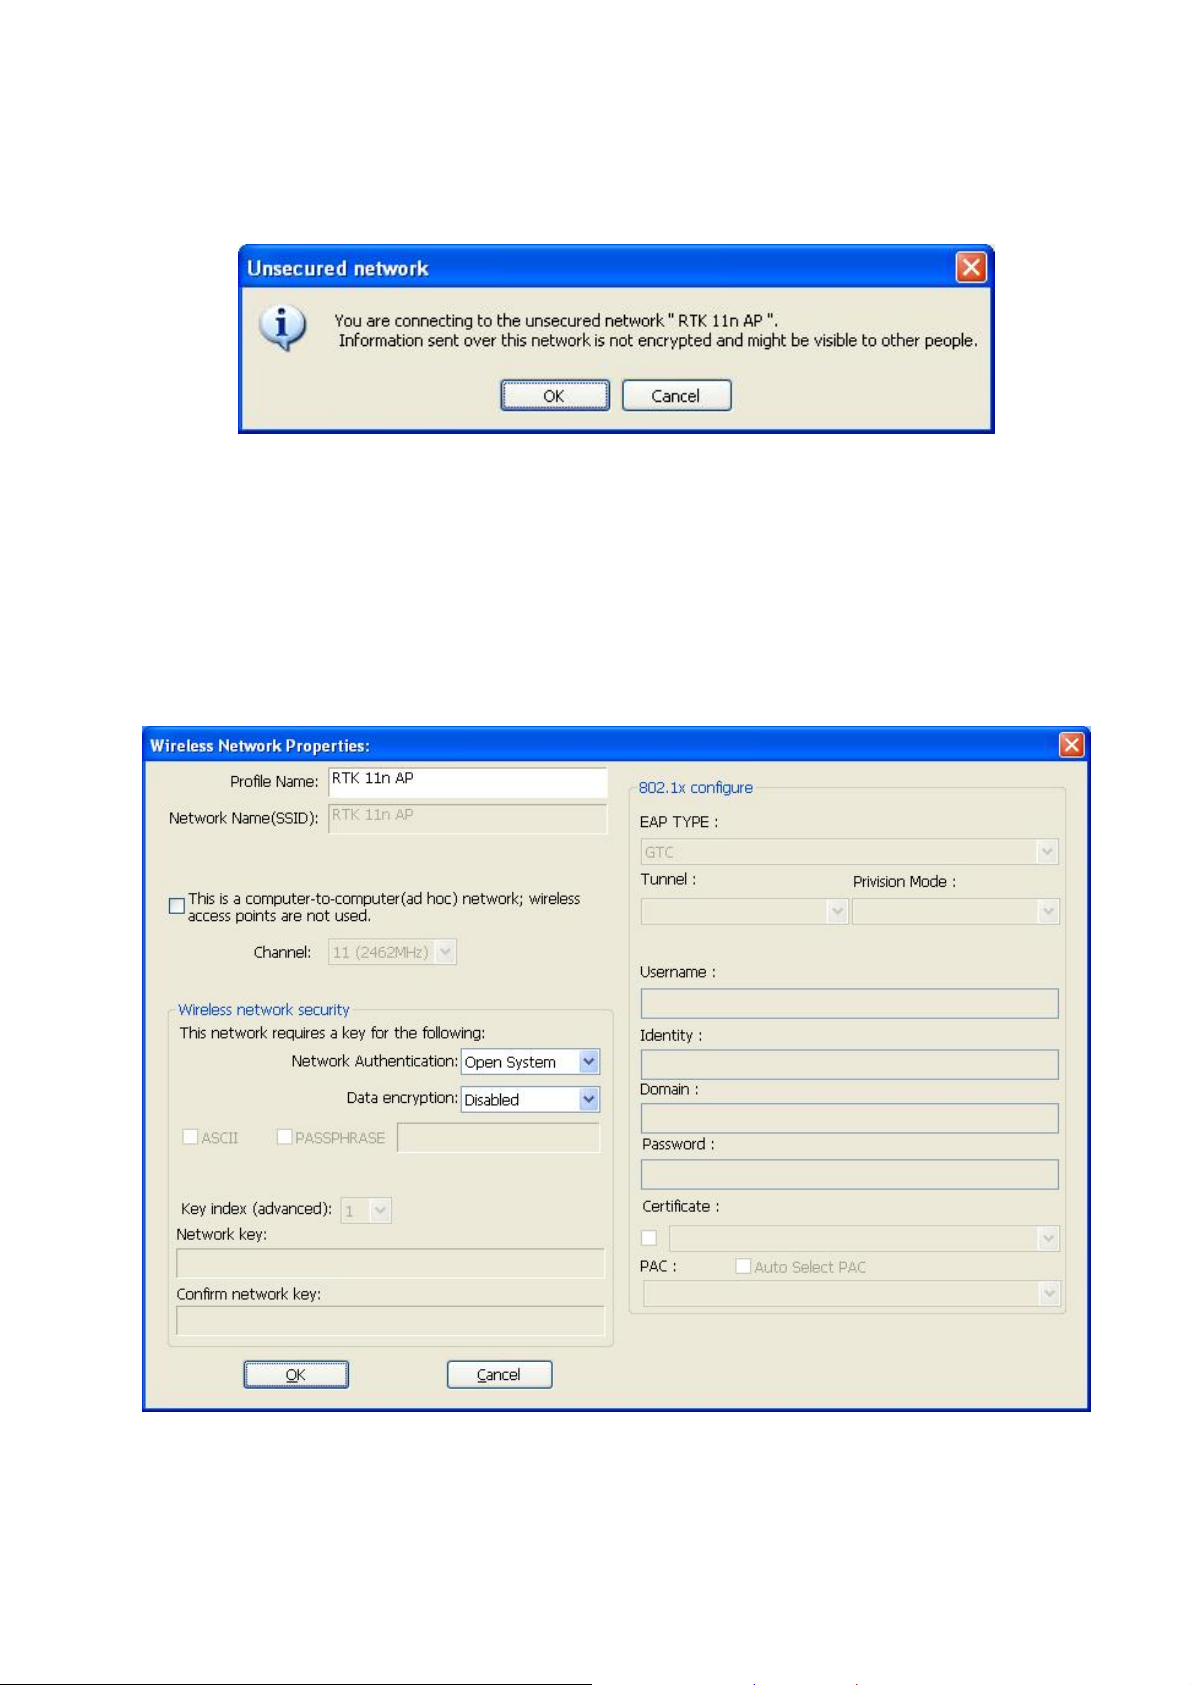
ick the OK button to confirm that you are connecting to an open wireless network.
3. Cl
4. Click OK to add this network into the profile list.
Note: This example is an open wireless network. If you are going to connect to a Wireless adapter
with security protection, you will have to configure the encryption settings in this profile to be
corresponding to the other wireless adapter. Please click on the “Network Authentication” drop list
to select an authentication method, and then select a “Data encrypti on” type. Fill in each required
blanks and click “OK”.
- 15 -
Page 16
Introduction to the Wireless LAN Utility
Note: This management instruction uses Windows XP as the presumed operation system. Some
functions are not supported in Windows 98se or Windows ME.
General
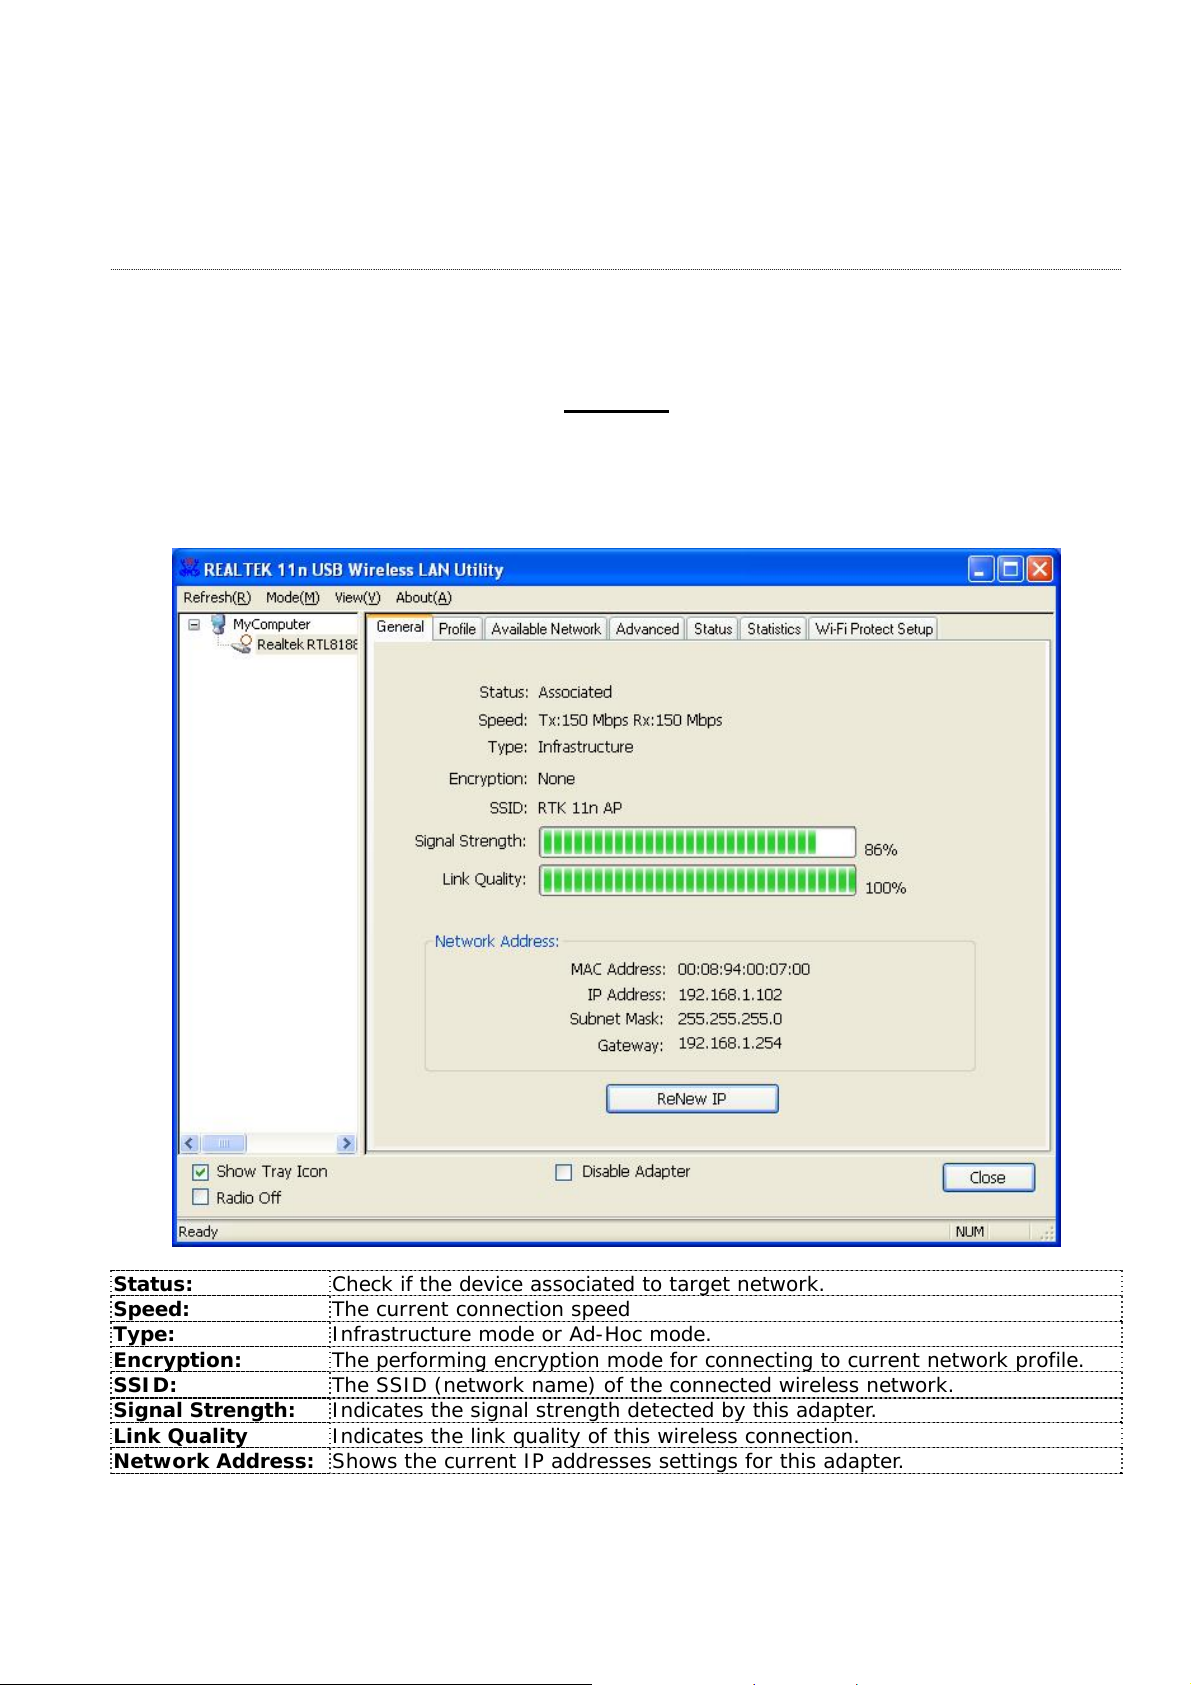
After starting the utility, the general page pops up This General tab provides the information of your
current wireless network connection. You may click the Renew IP button to refresh those listed
information.
Status: Check if the device associated to target network.
Speed: The current connection speed
Type: Infrastructure mode or Ad-Hoc mode.
Encryption: The performing encryption mode for connecting to current network profile.
SSID: The SSID (network name) of the connected wireless network.
Signal Strength: Indicates the signal strength detected by this adapter.
Link Quality Indicates the link quality of this wireless connection.
Network Address: Shows the current IP addresses settings for this adapter.
- 16 -
Page 17
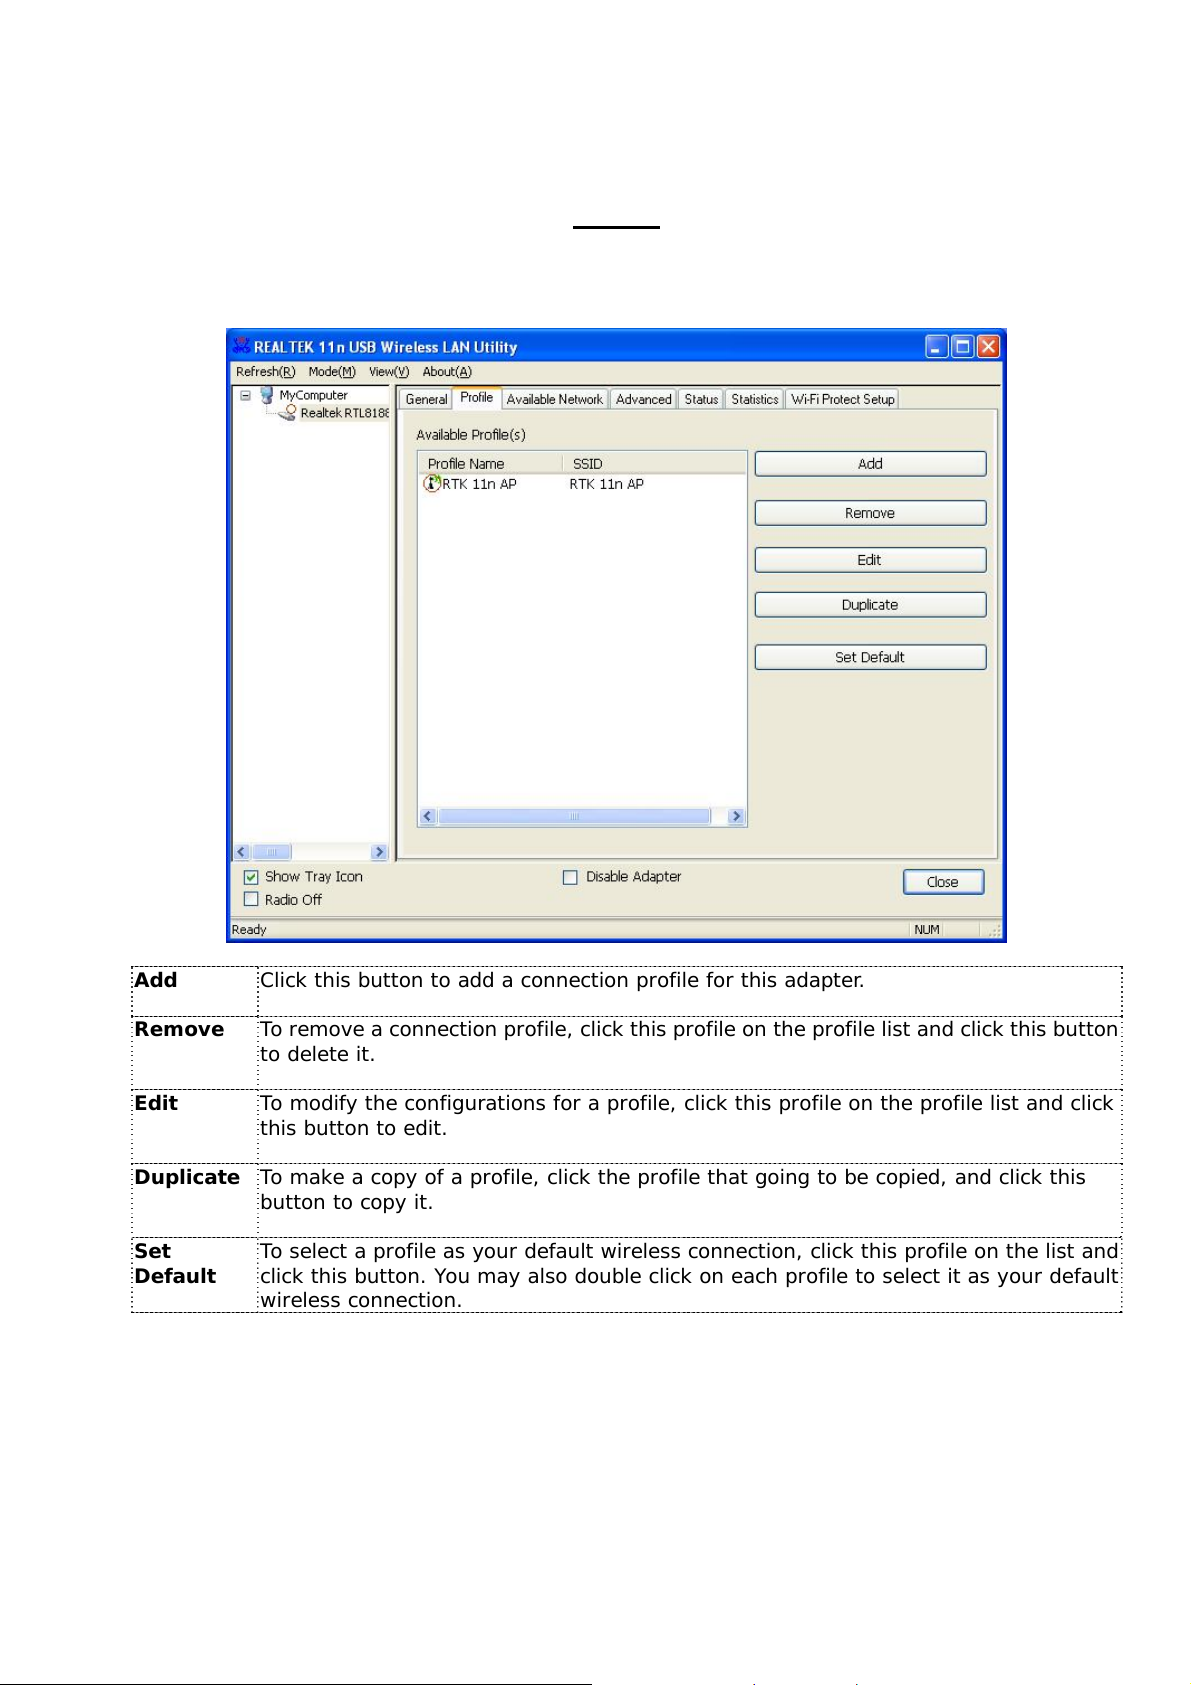
Profile
The Profile tab lists the preferred connections. You can click the buttons beside to do configure each
connection.
Add
Remove
Edit
Duplicate
Set
Default
Click this button to add a connection profile for this adapt er.
To remove a connection profile, click this profile on the profile list and click this button
to delete it.
To modify the configurations for a profile, click this profile on the profile list and click
this button to edit.
To make a copy of a profile, click the profile that going to be copied, and click this
button to copy it.
To select a profile as your default wireless connection, click this profile on the list and
click this button. You may also double click on each profile to select it as your default
wireless connection.
- 17 -
Page 18
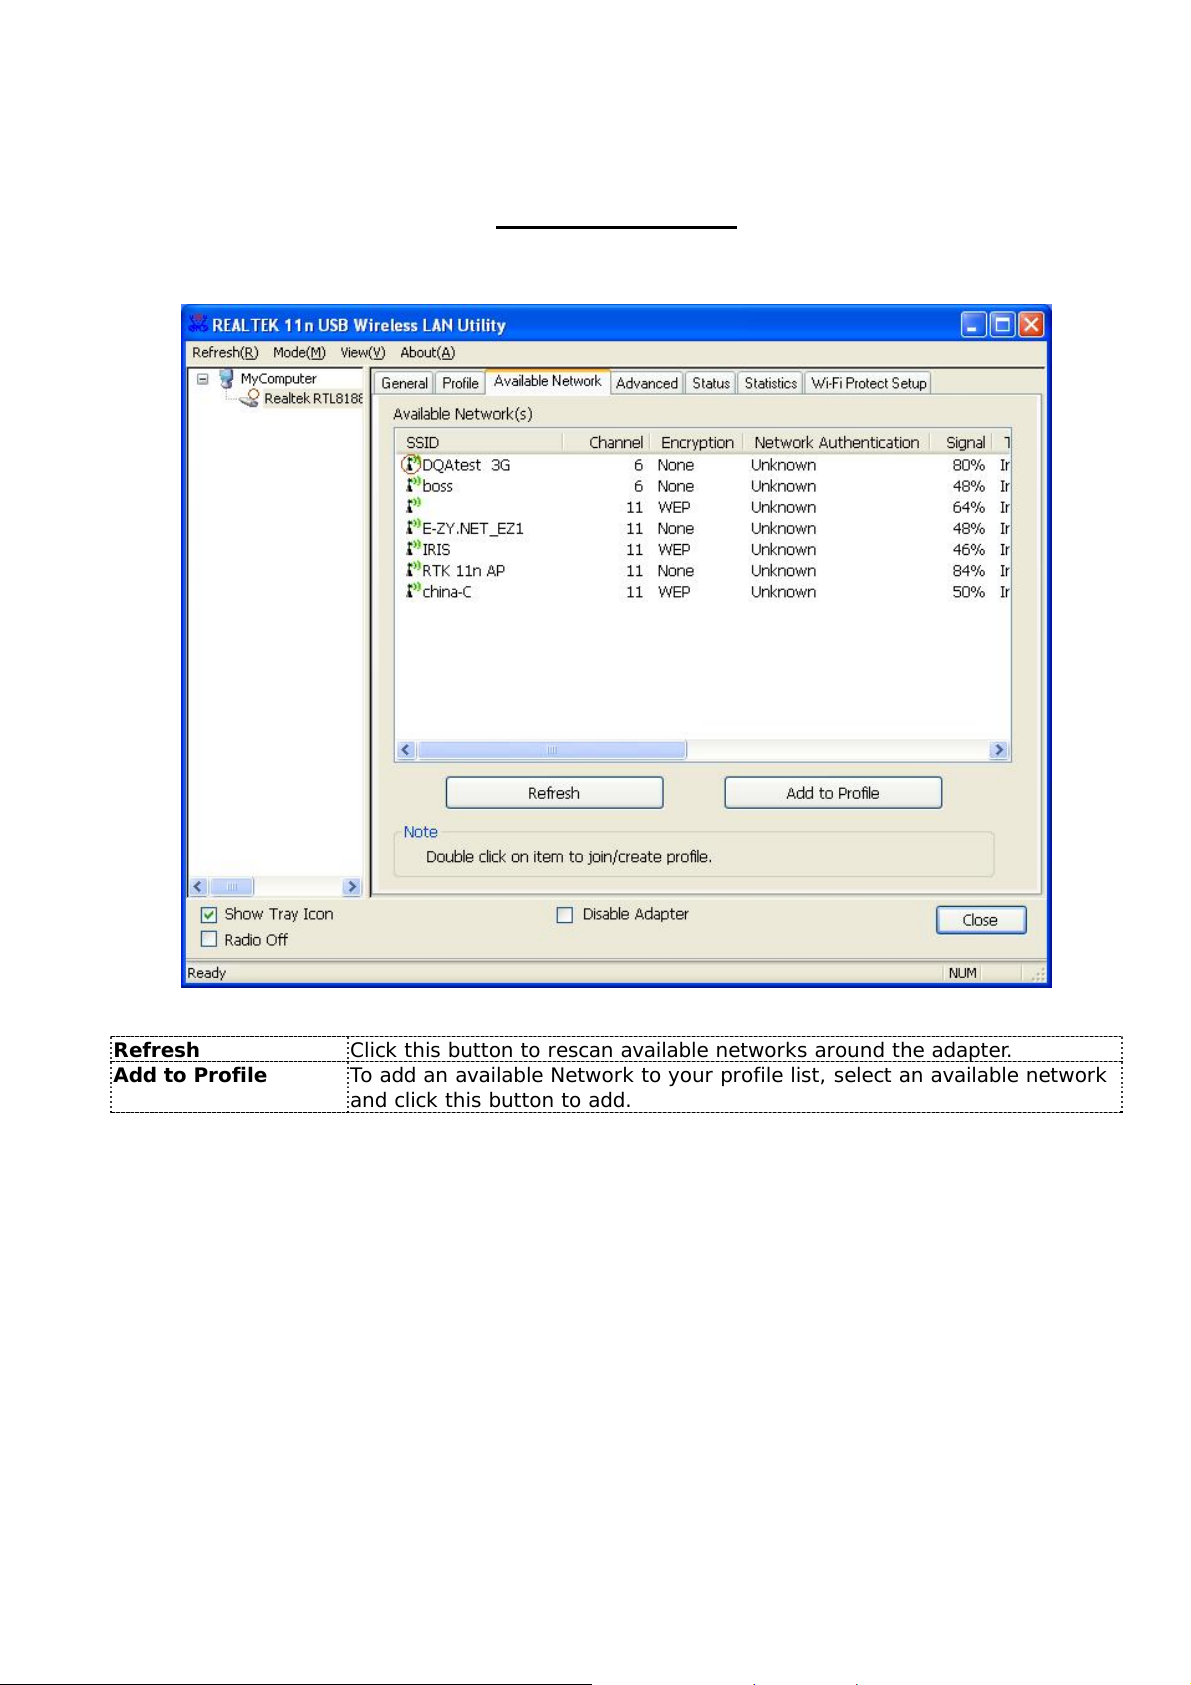
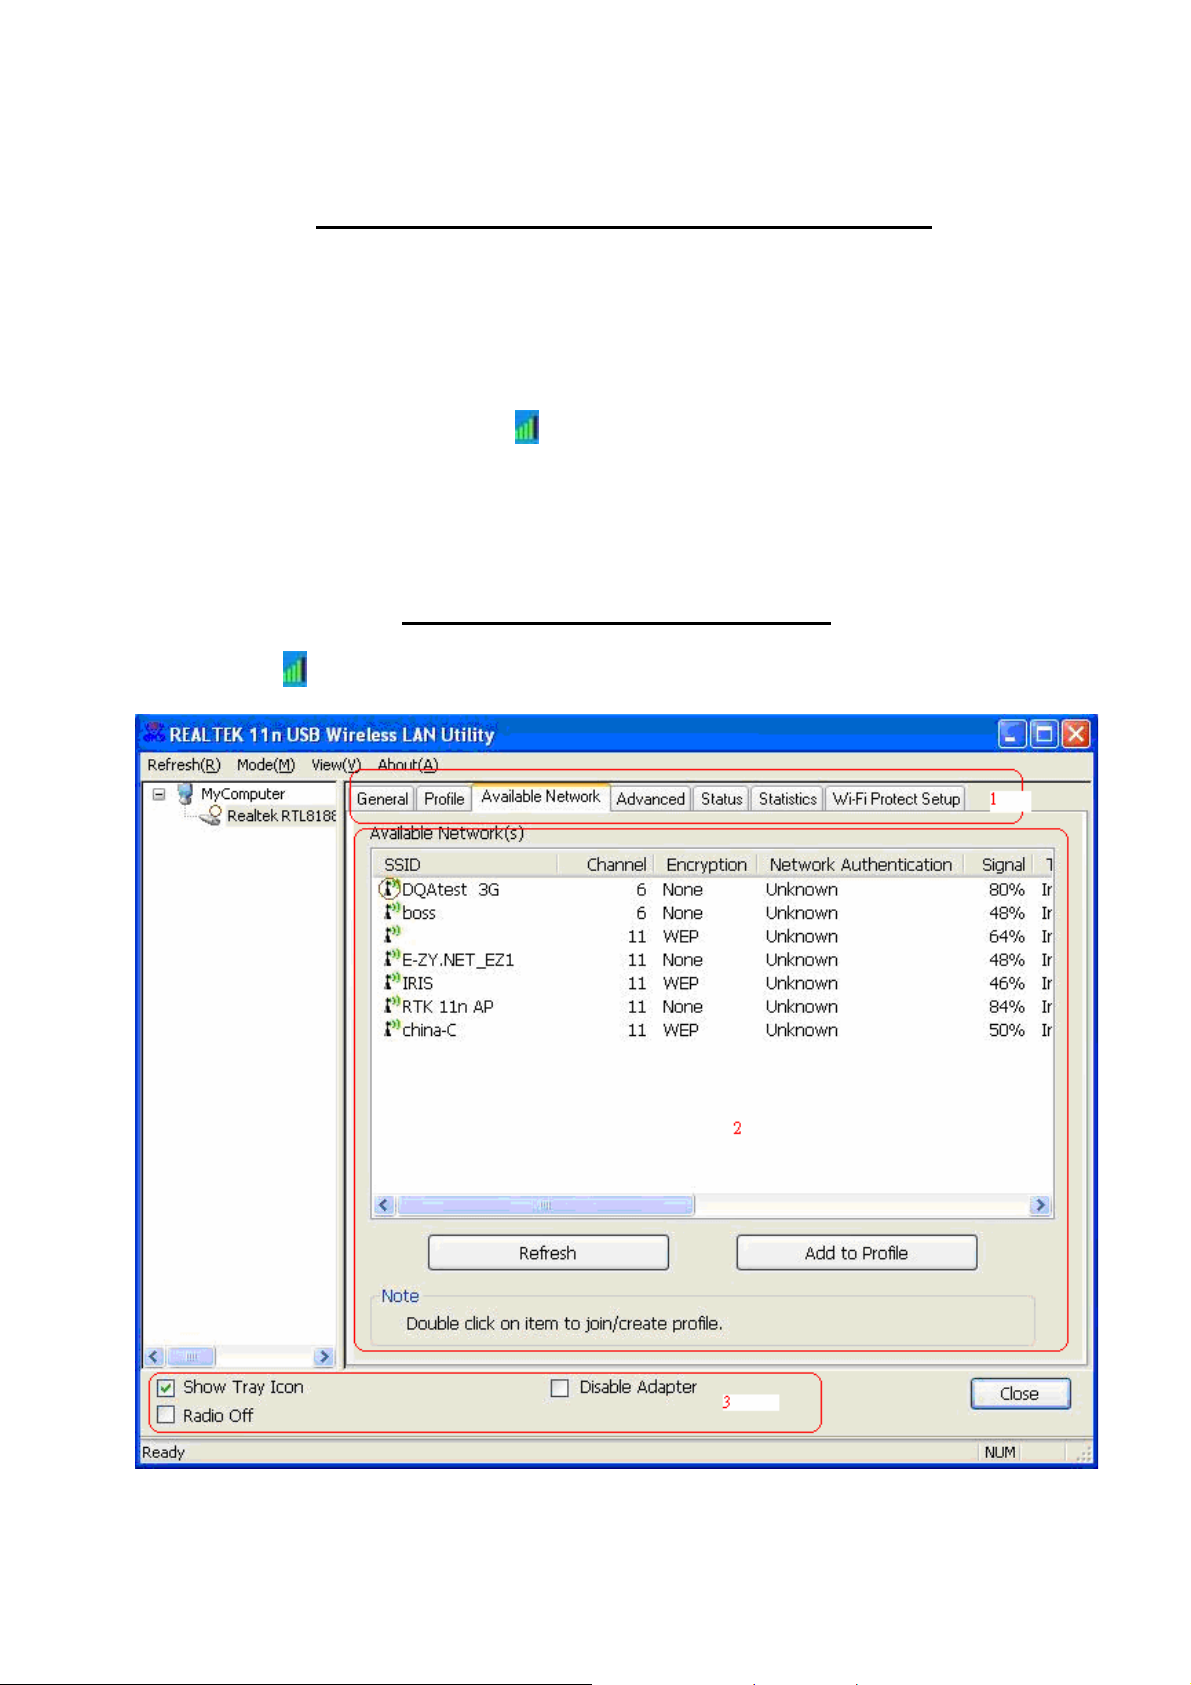
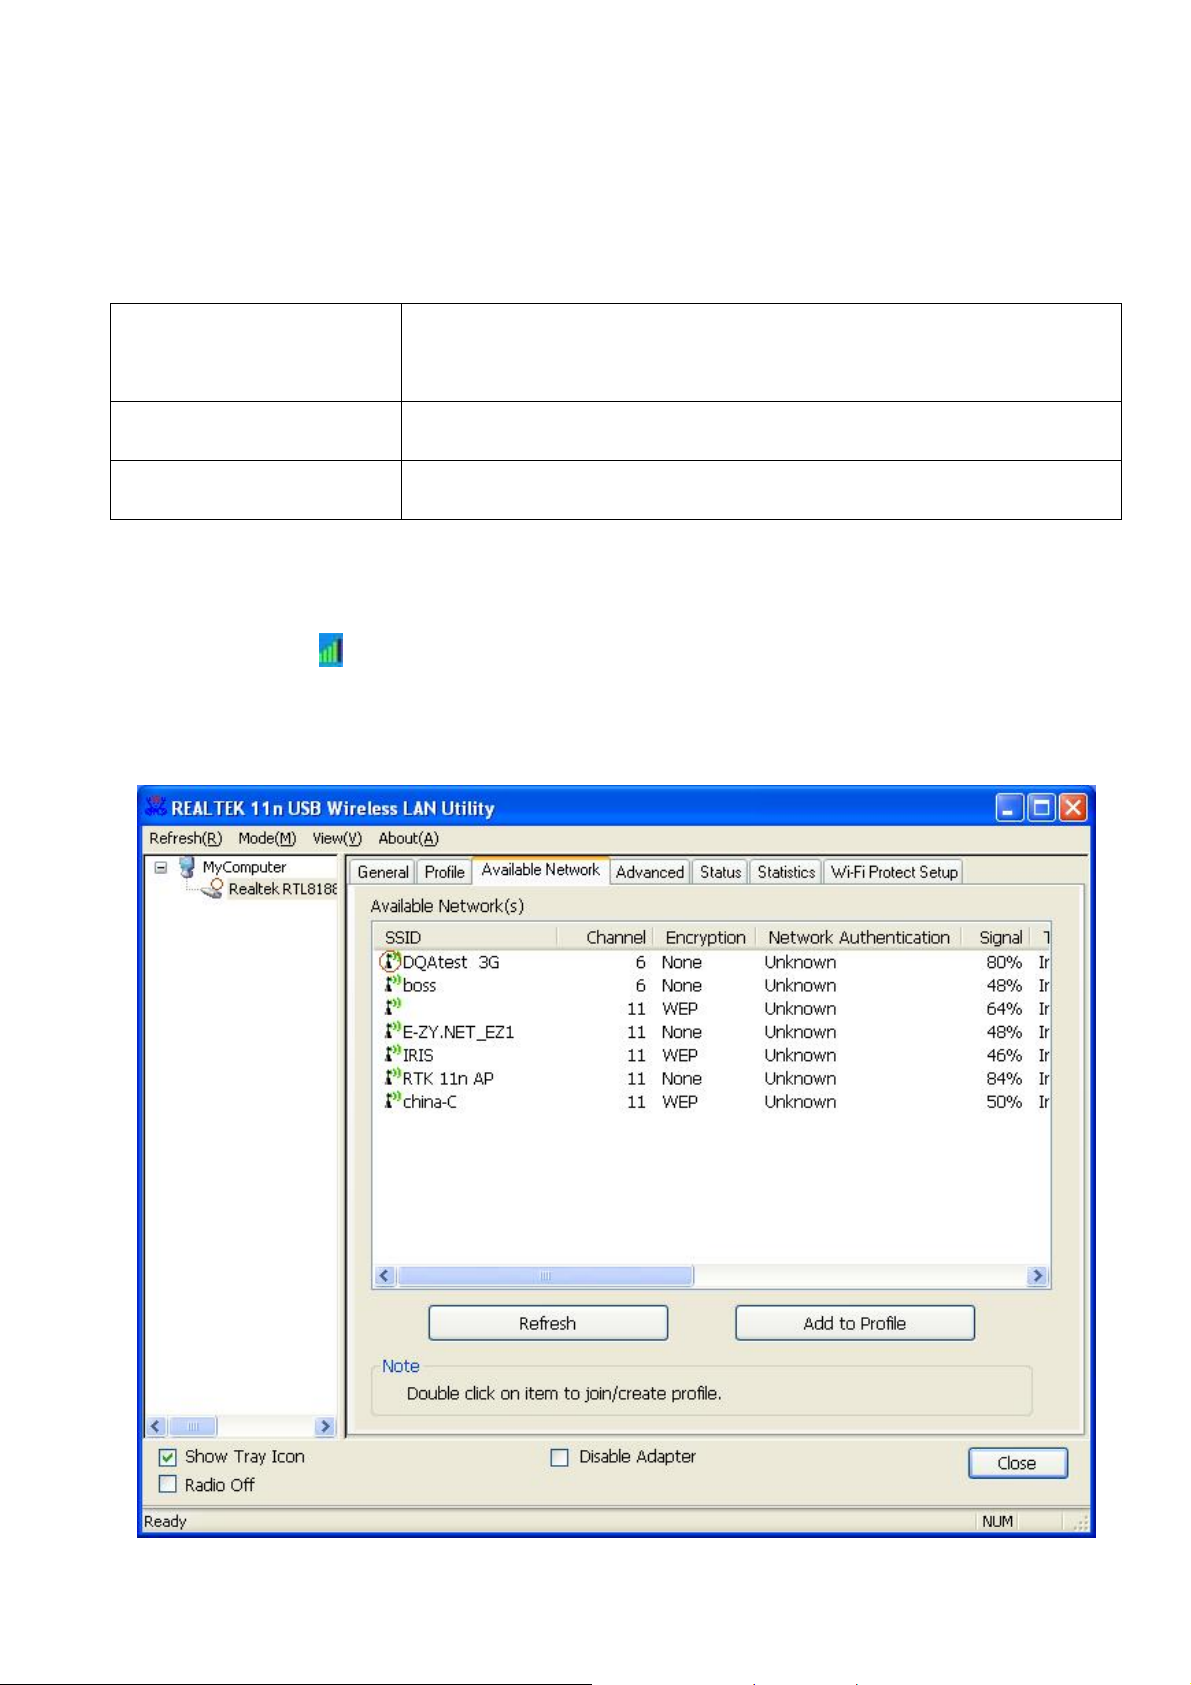
Available Network
This available tab lists the reachable wireless network of this adapter.
Refresh Click this button to rescan available networks around the adapter.
Add to Profile To add an available Network to your profile list, select an available network
and click this button to add.
- 18 -
Page 19
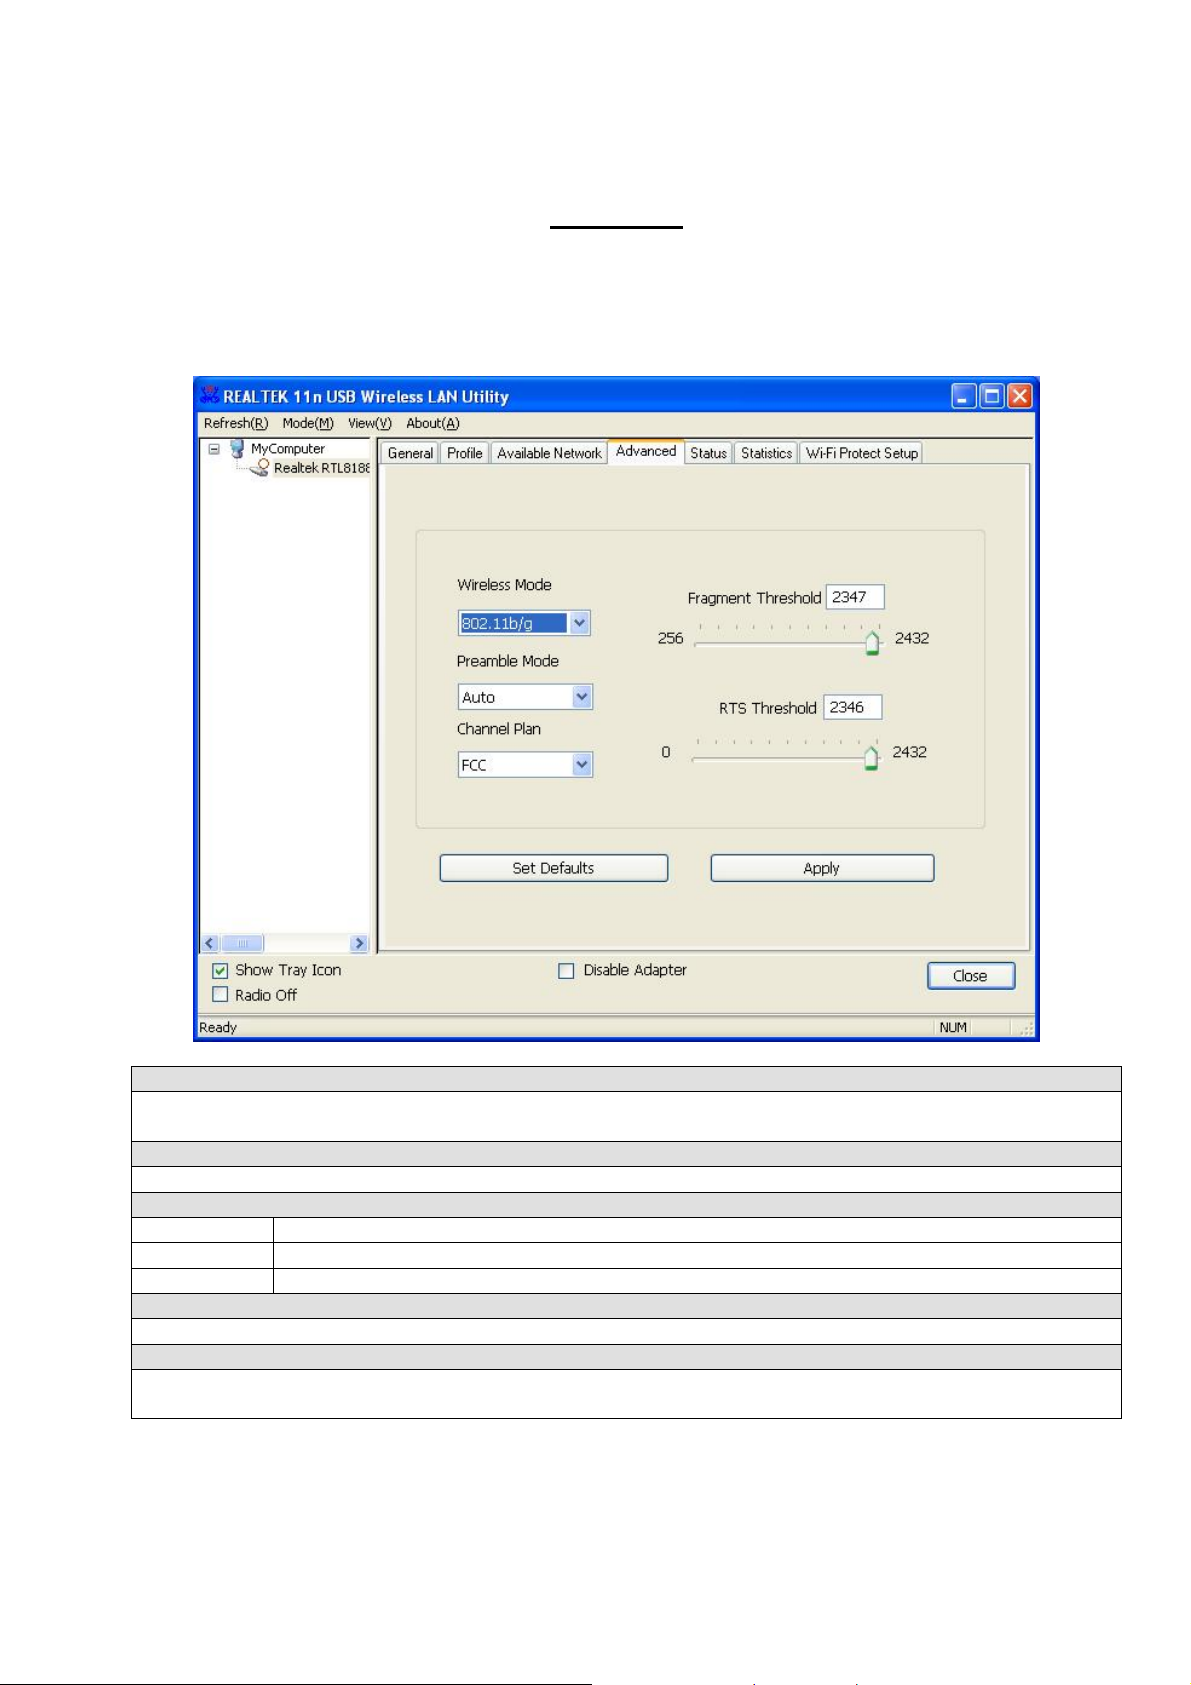
Advanced
This Advanced tab provides adv anced configurations to t his adapter . Every modification in this tab will
be performed after clicking the Apply button.
To restore the default settings of the advanced tab, click the Set defaults button to perform
restoring.
Fragment Threshold
The maximum size of a packet that is going to be segmented and transmitted. Select the size from
256 to 2432(default) bytes.
RTS Threshold
Select the RTS Threshold form 0 to 2432(default)
Wireless Mode
802.11g/b Connect to a 802.11b/g network (2.4GHz/54Mbps)
802.11b Connect to a 802.11b network (2.4GHz/11Mbps)
802.11n Connect to a 802.11n network (2.4GHz/150Mbps)
Preamble Mode
Select the preamble mode to be long, short or auto detection mode.
Channel Plan
Select your channel from the drop list. Please note that it is necessary for you to select a correct
channel. Selecting an incorrect channel may again the applicab le law.
- 19 -
Page 20
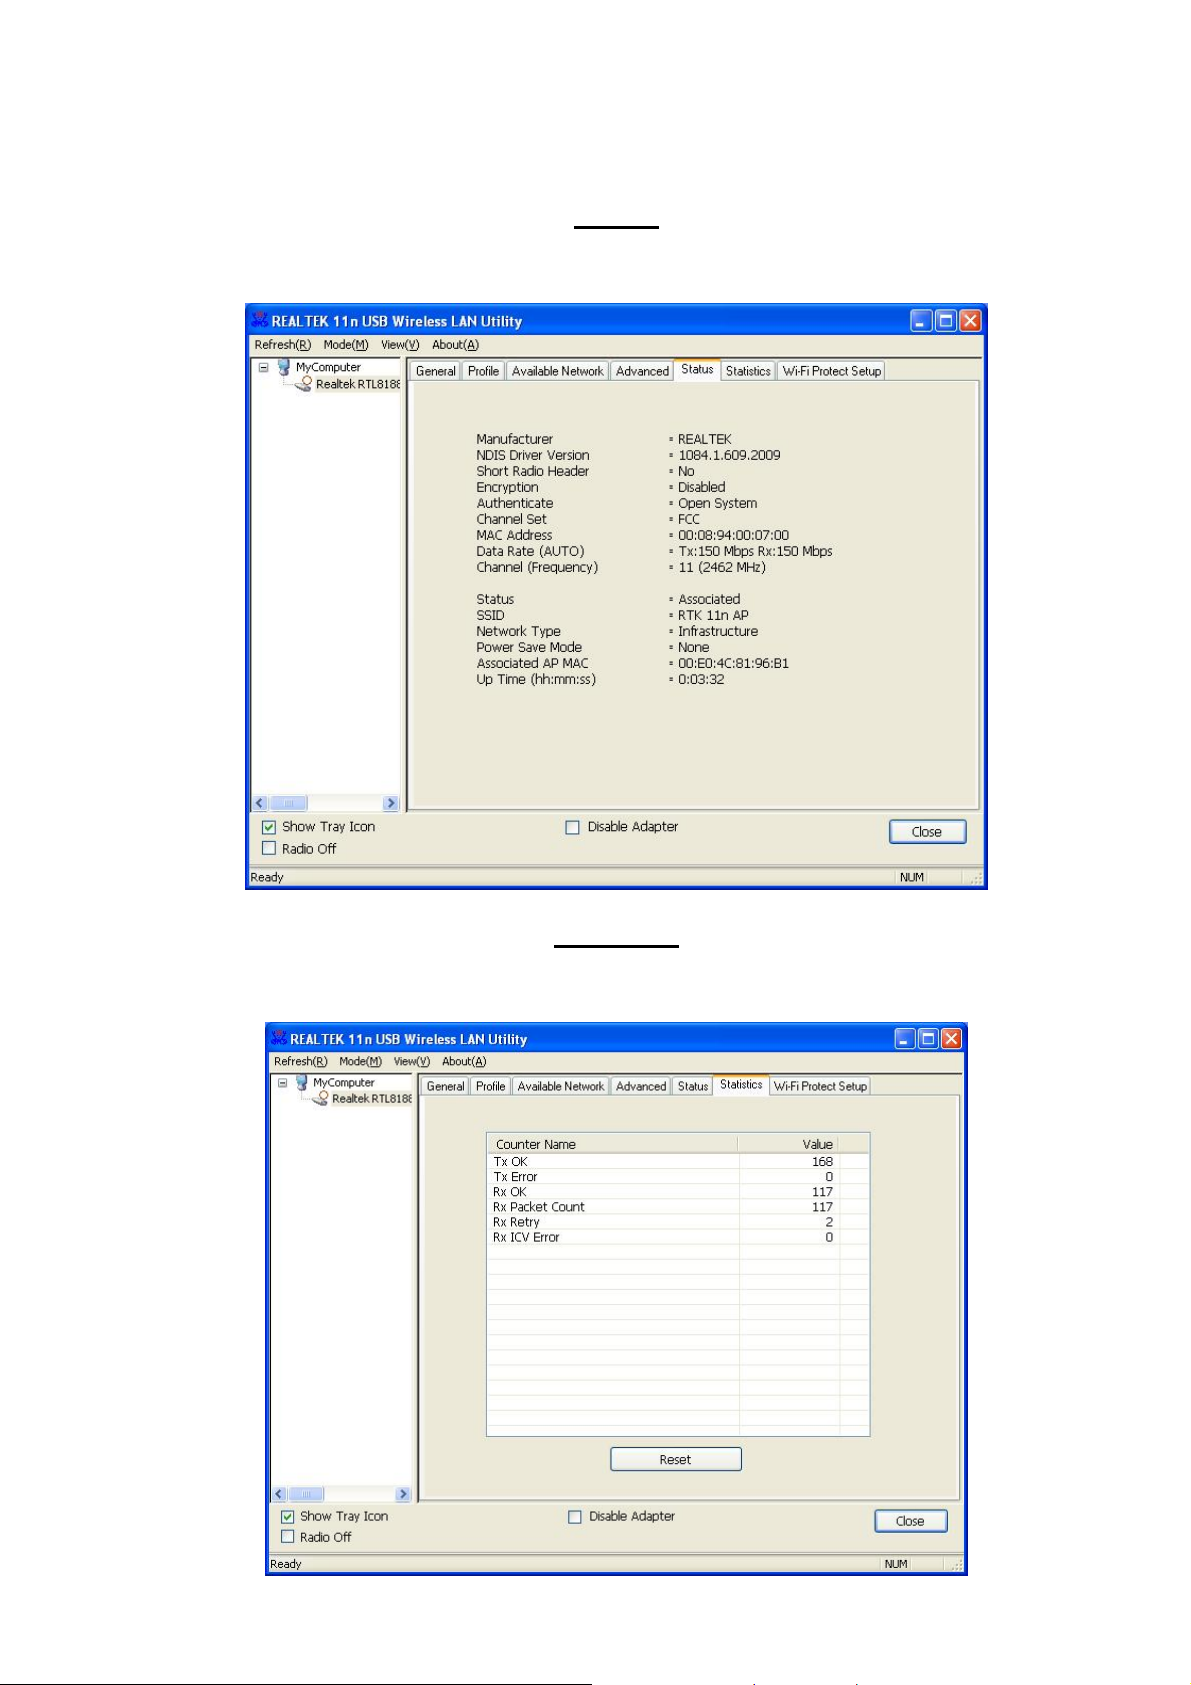
Status
This tab shows the current connection status of this adapter.
Statistics
See this tab to show the transmission activity record. Cli cking the “Reset” button recounts the values
from zero.
- 20 -
Page 21
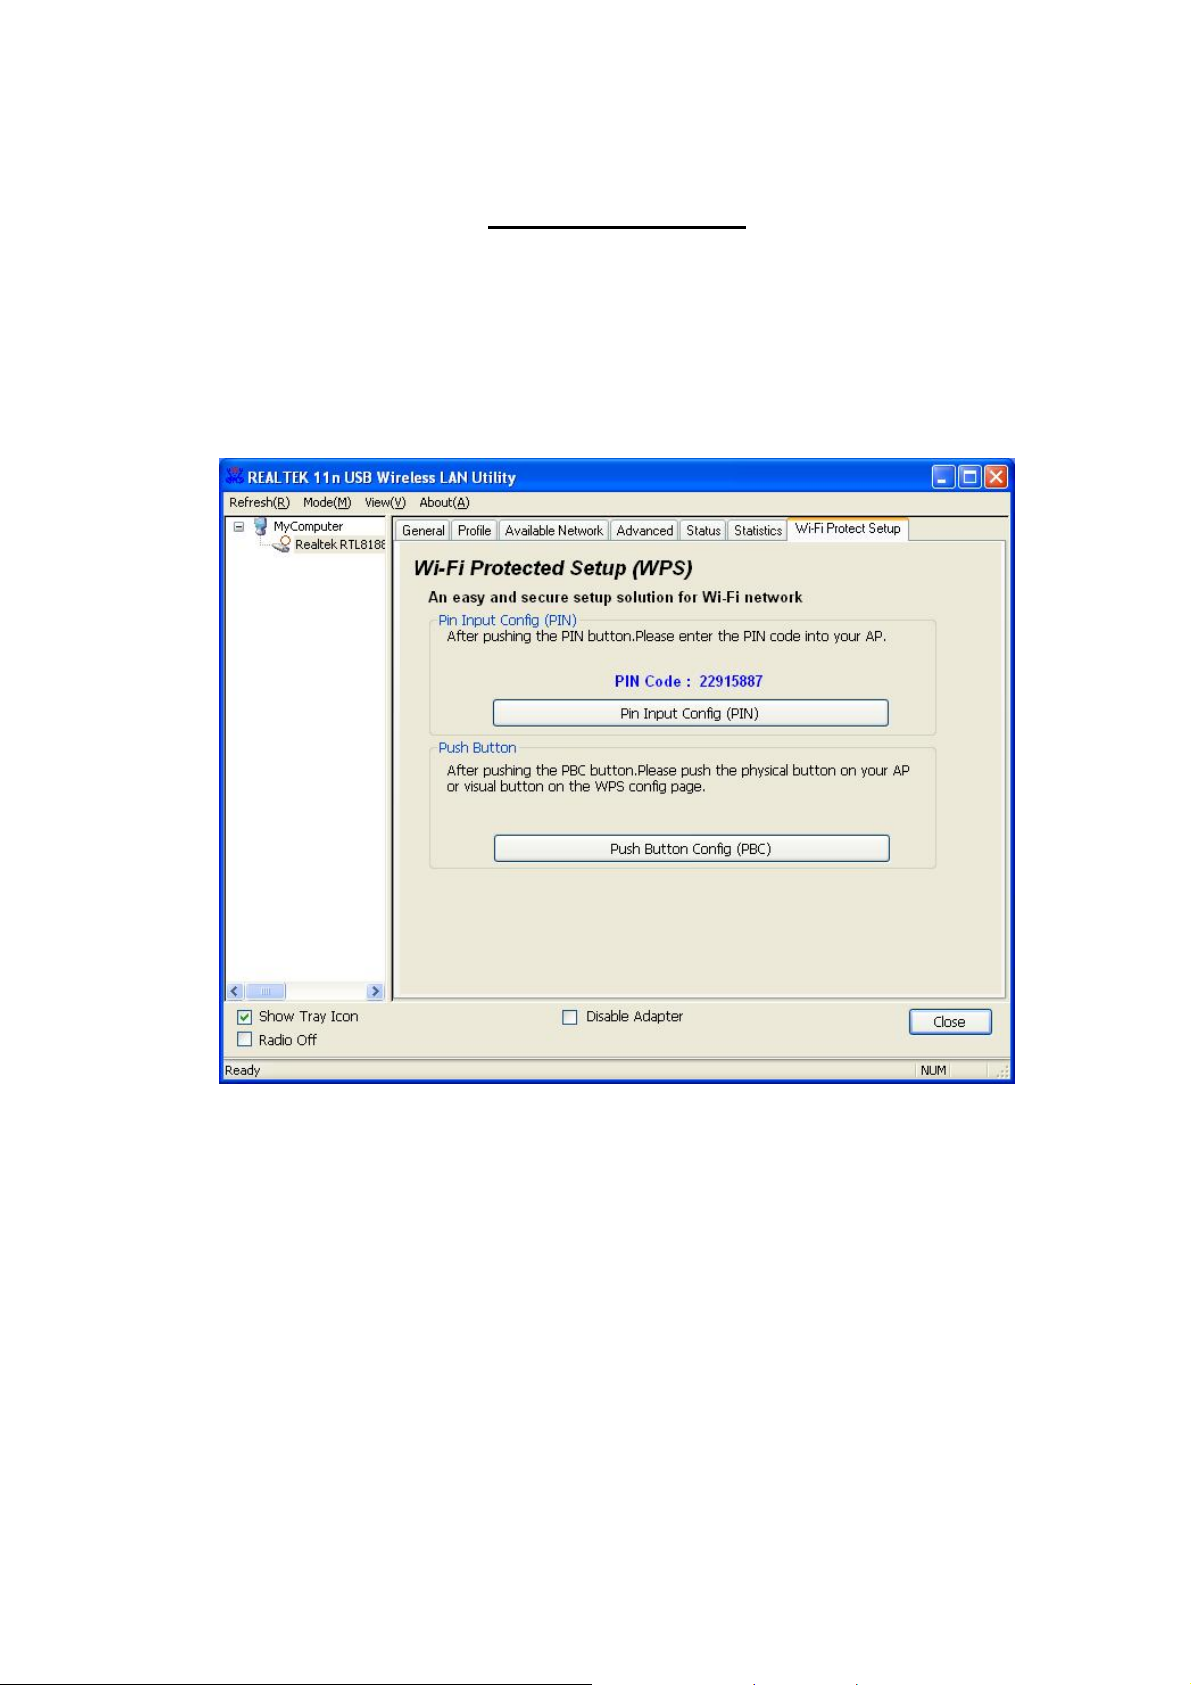
Wi-Fi Protect Setup
The primary goal of Wi-Fi Protected Setup (Wi-Fi Simple Configuration) is to simplify the security
setup and management of Wi-Fi networks. This adapter supports the configuration setup using PIN
configuration method or PBC configuration method. If the wireless card supports Wi-Fi Protected
Setup (WPS), you can establish a wireless connection between wireless card and router using either
Push Button Configuration (PBC) method or PIN method.
Here we will introduce two ways to configure the QSS
(QSS is known as rapid security settings, by pressing the wireless router and wireless card on the QSS
button to automatically set up WPA2 secure connection level without the router or network adapter
management software to conduct the cumbersome interface settings, greatly simplifying the
operation of the wireless security settings.)
Pin Code: 8-digit numbers. It is randomly generated from system
- 21 -
Page 22
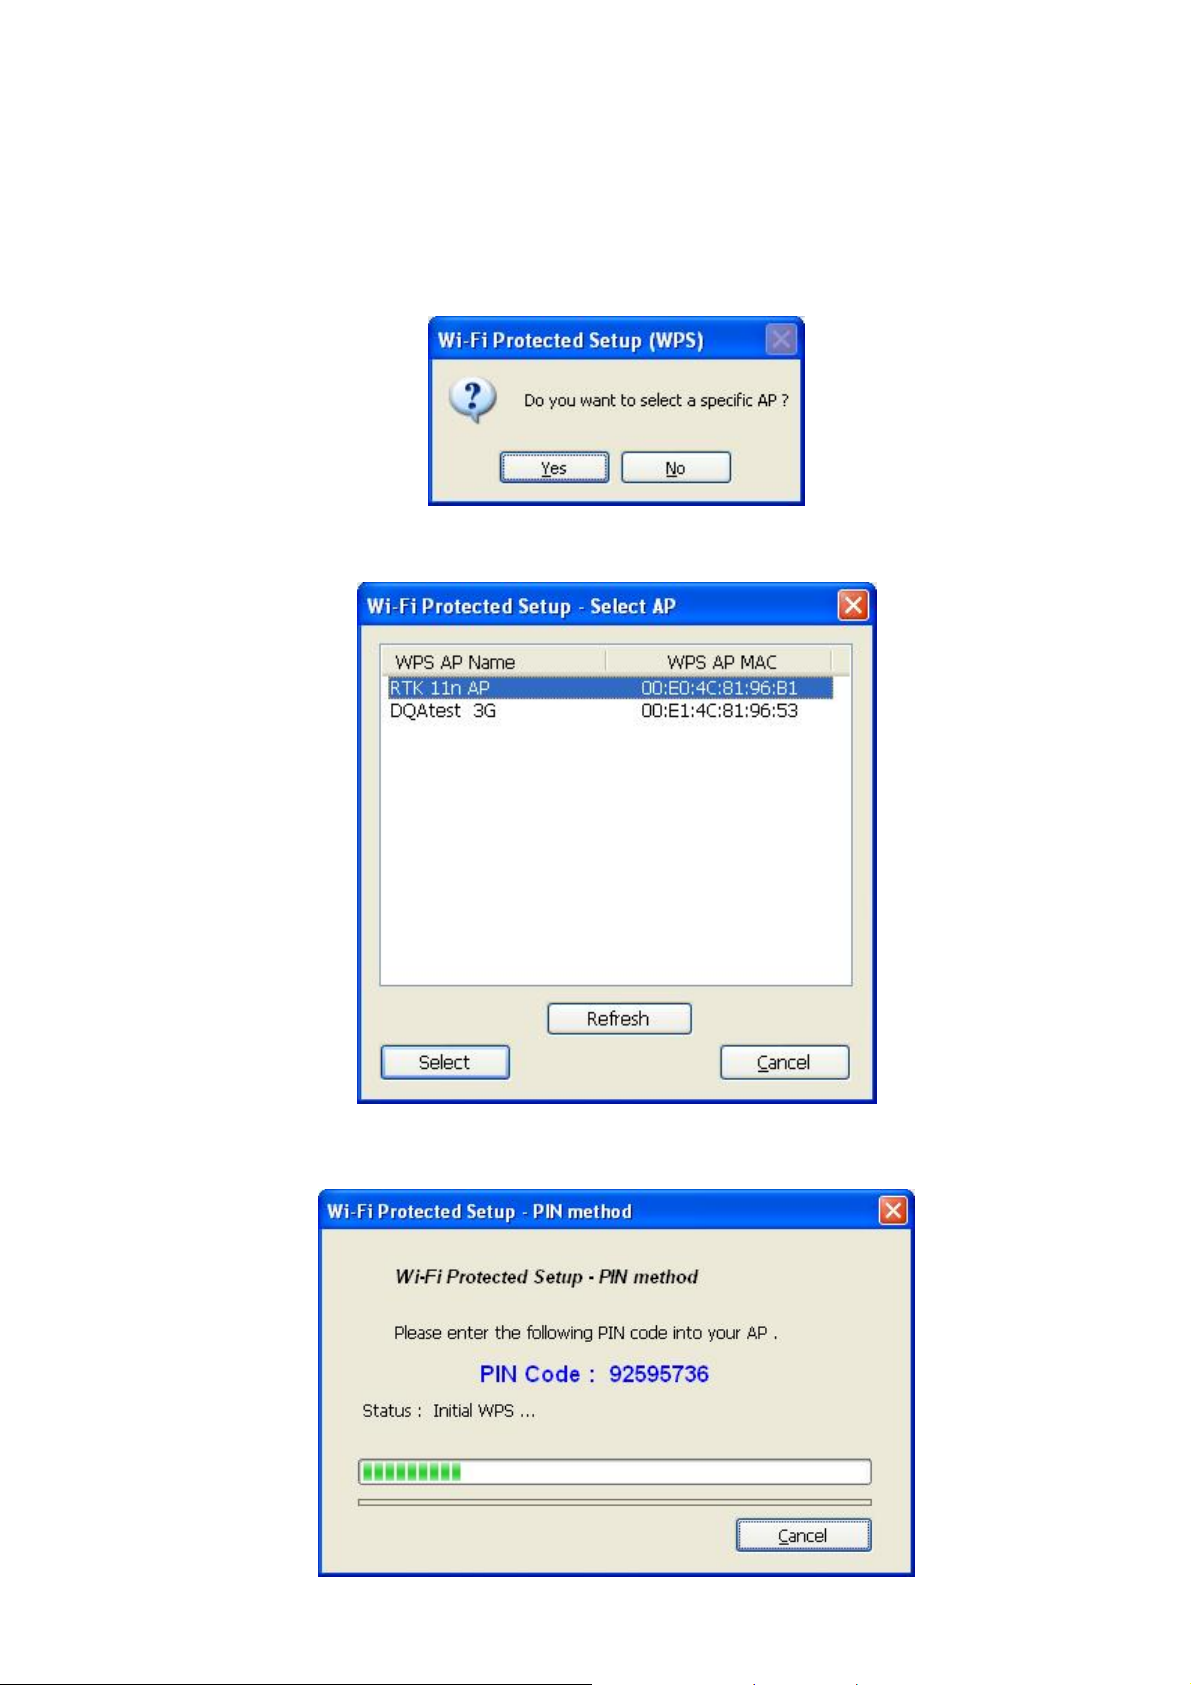
1. PIN met
Click the button “Pin Input Config (PIN)”, and then come to the following figure.
Click the button “Yes”, you can select one of the AP.
hod
In this figure, you can operate these buttons “Refresh / Select / Cancel”. Select the name of one AP,
then click “Select” button, you could use PIN method to configure the QSS.
- 22 -
Page 23
D
ouble click the Internet WEB browser icon on your desktop screen. Type the IP address of you
selected router/AP into the URL and press Enter, and then you can enter the configuration.
Please enter the WPS ( Wi-Fi ) configuration page, type th e PIN code of adapter and click confirm
button to build WPS connection.
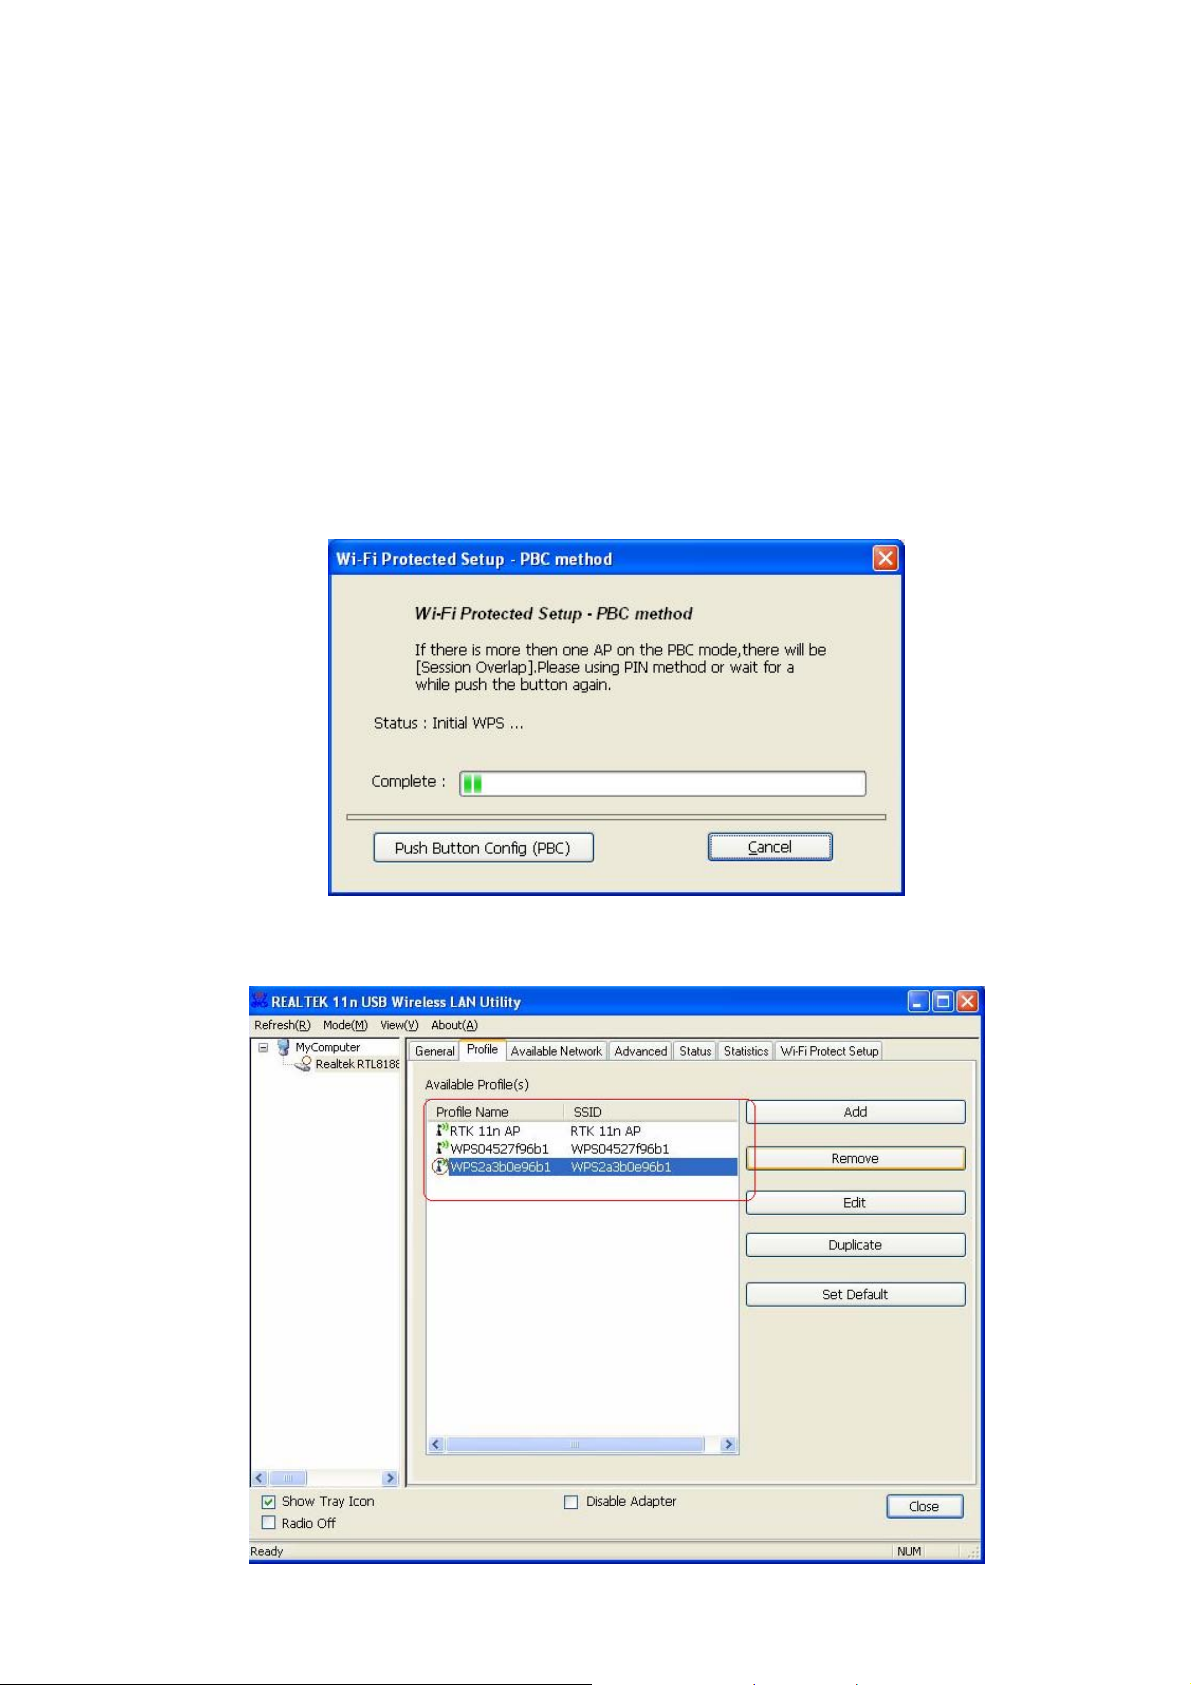
2. PBC (Push Button Configuration) method
After pushing the PBC button, please push the physical button on your AP or visual button on the WPS
config page, then come to the following figure.
Please enter the WPS ( Wi-Fi ) configuration page of your desired router/AP, and then start PCB
connection.When WPS is configured successfully, the available profile(s) is changed.
- 23 -
Page 24
APPENDIX
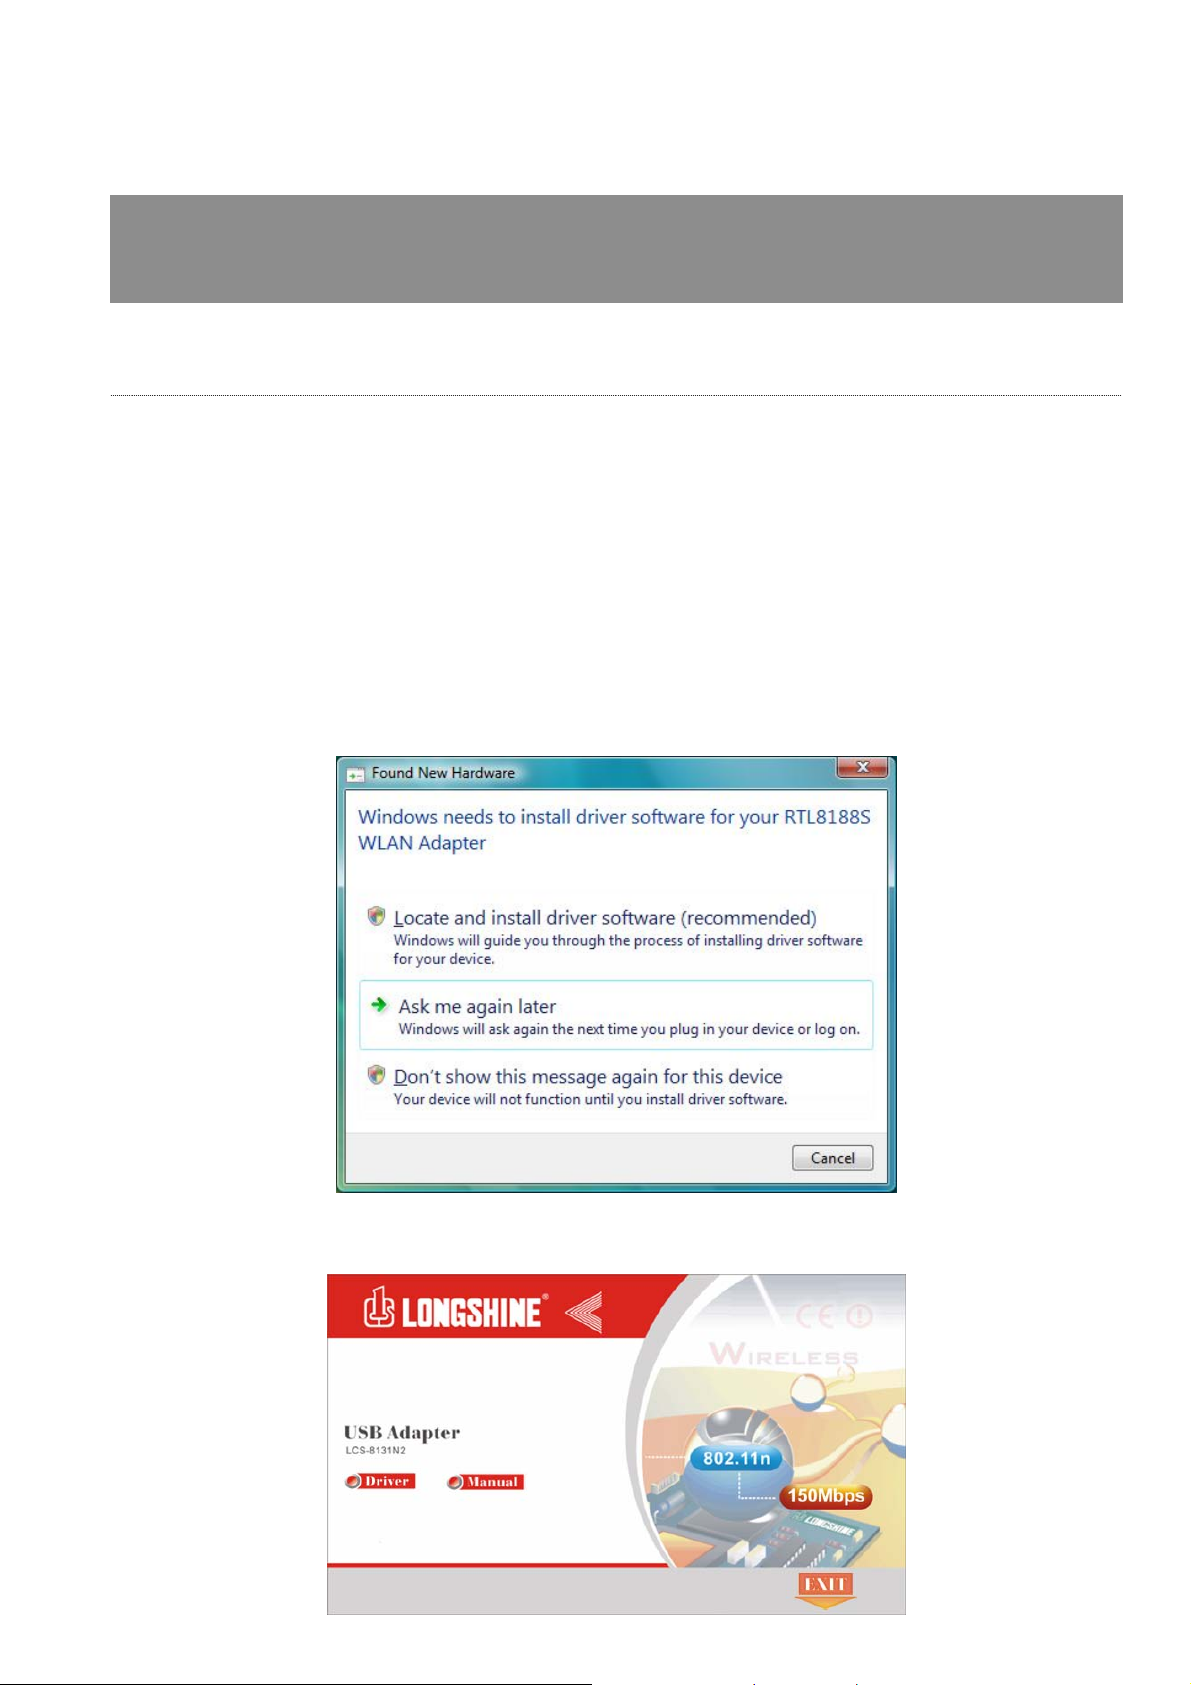
Windows Vista Driver Installation
Note: The following driver installation guide uses Windows XP as the presumed operation system.
The procedures and screens in Windows 98se, 2000 and Vista are familiar with Windows XP.
1. Unplug the power cord of your computer from outlet. Remove the cover of your computer.
2. Install the adapter into a PCI socket, PCMCIA slot or USB port.
3. The “Found New Hardware Wizard“ pops up . (Note: This wizard won’t pop up in Windows 98 and
ME. The system finds the new hardware and installs the hardware automatically. Please skip the
following steps and restart the system after installation.)
4. click Cancel, and run the Setup Wizard program on the CD-ROM.
Insert the CD-Rom that came with this product to your CD-Rom drive. The menu window pops up
automatically. Please click the
Driver> Win button of this product.
- 24 -
Page 25
Note: I
f the CD-Rom fails to auto-run, please click on “My Computer” your CD-Rom Drive then
double-click the “Setup” icon to start the this menu.
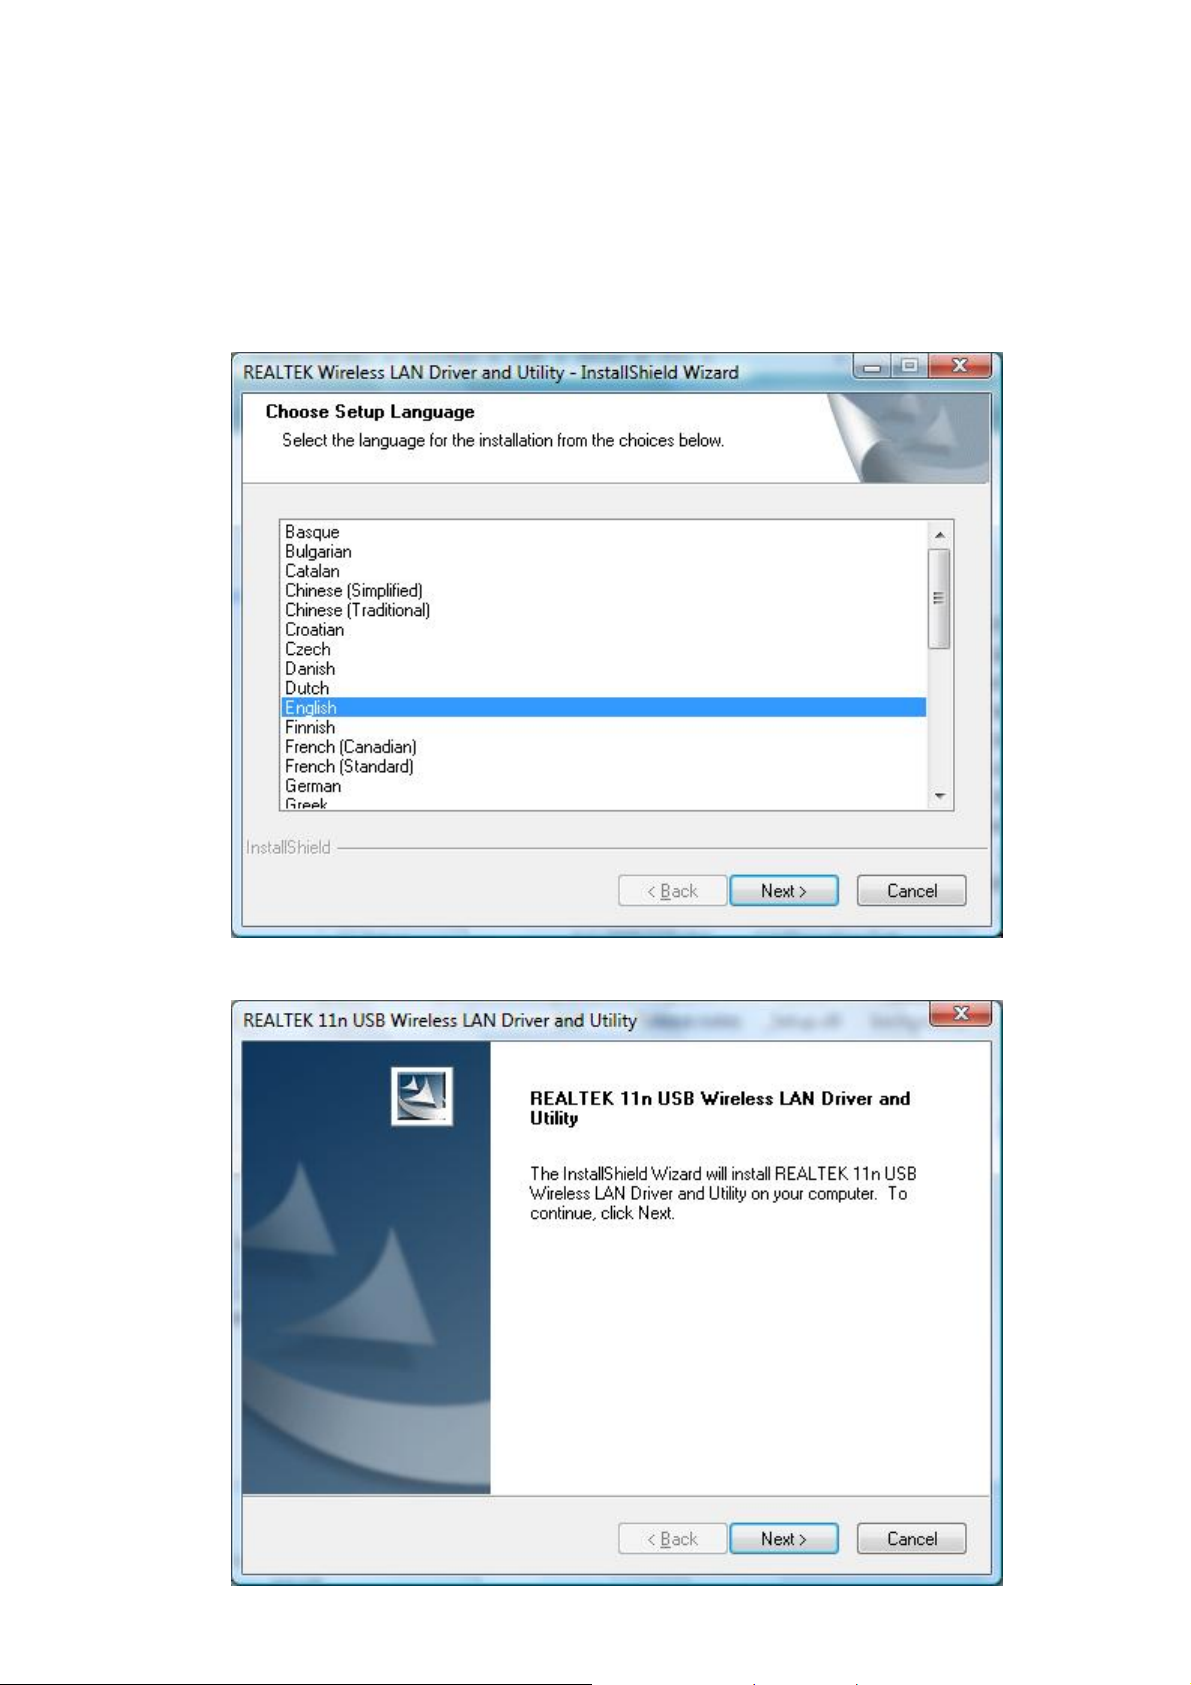
5. The language-selecting window pops up. Please select the language you use and click OK.
6. The welcome window pops up. Click the “Next” button to proceed.
- 25 -
Page 26
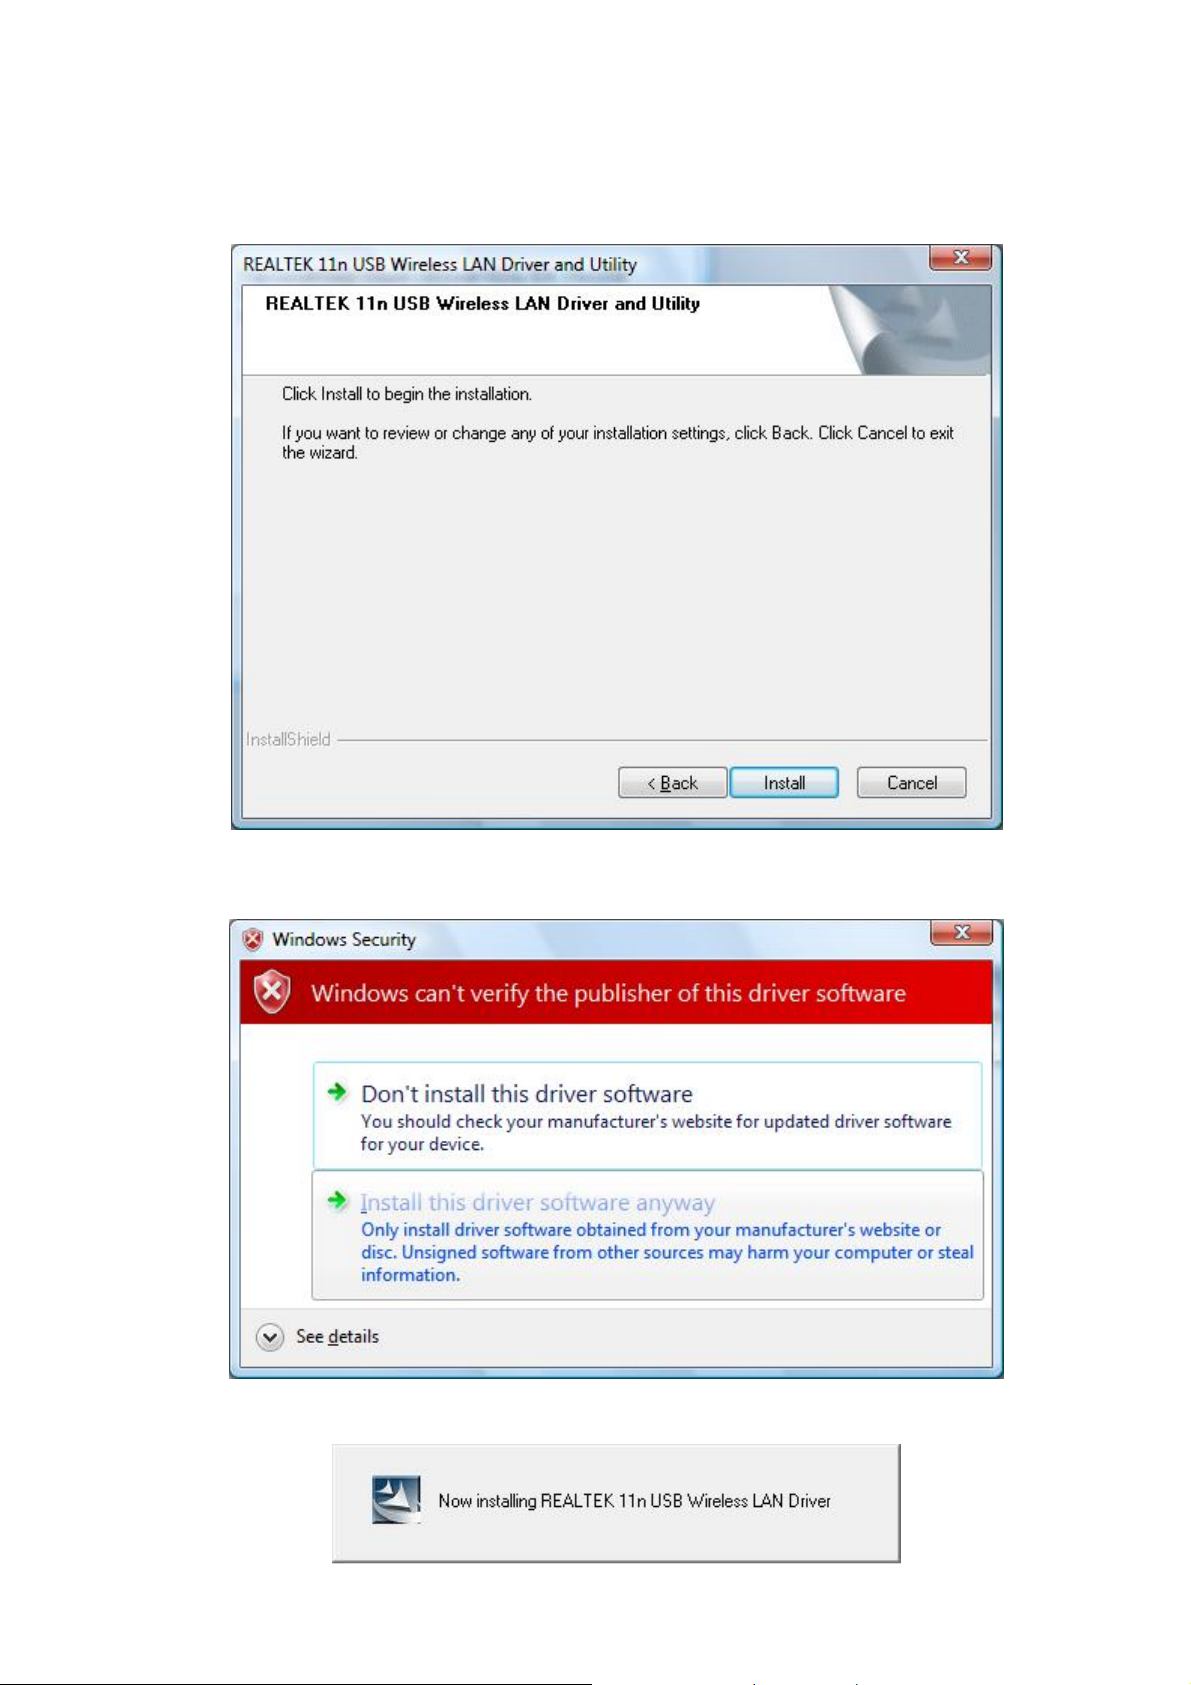
Click the “Install” button to start installing.
7. .
8. This Windows Logo testing warning window may pop up upon installation. Please click the
“Install this driver software anyway” to continue.
9. Please wait again while installation
- 26 -
Page 27
or Windows XP and 2000 users, please shut down the computer. If you are using Windows 98se
10. F
or ME, the system may ask for restarting. Please select “No, I will restart my computer later.”
and then shut the computer down. Click the “Finish” button to complete driver and utility
installation.
- 27 -
Page 28
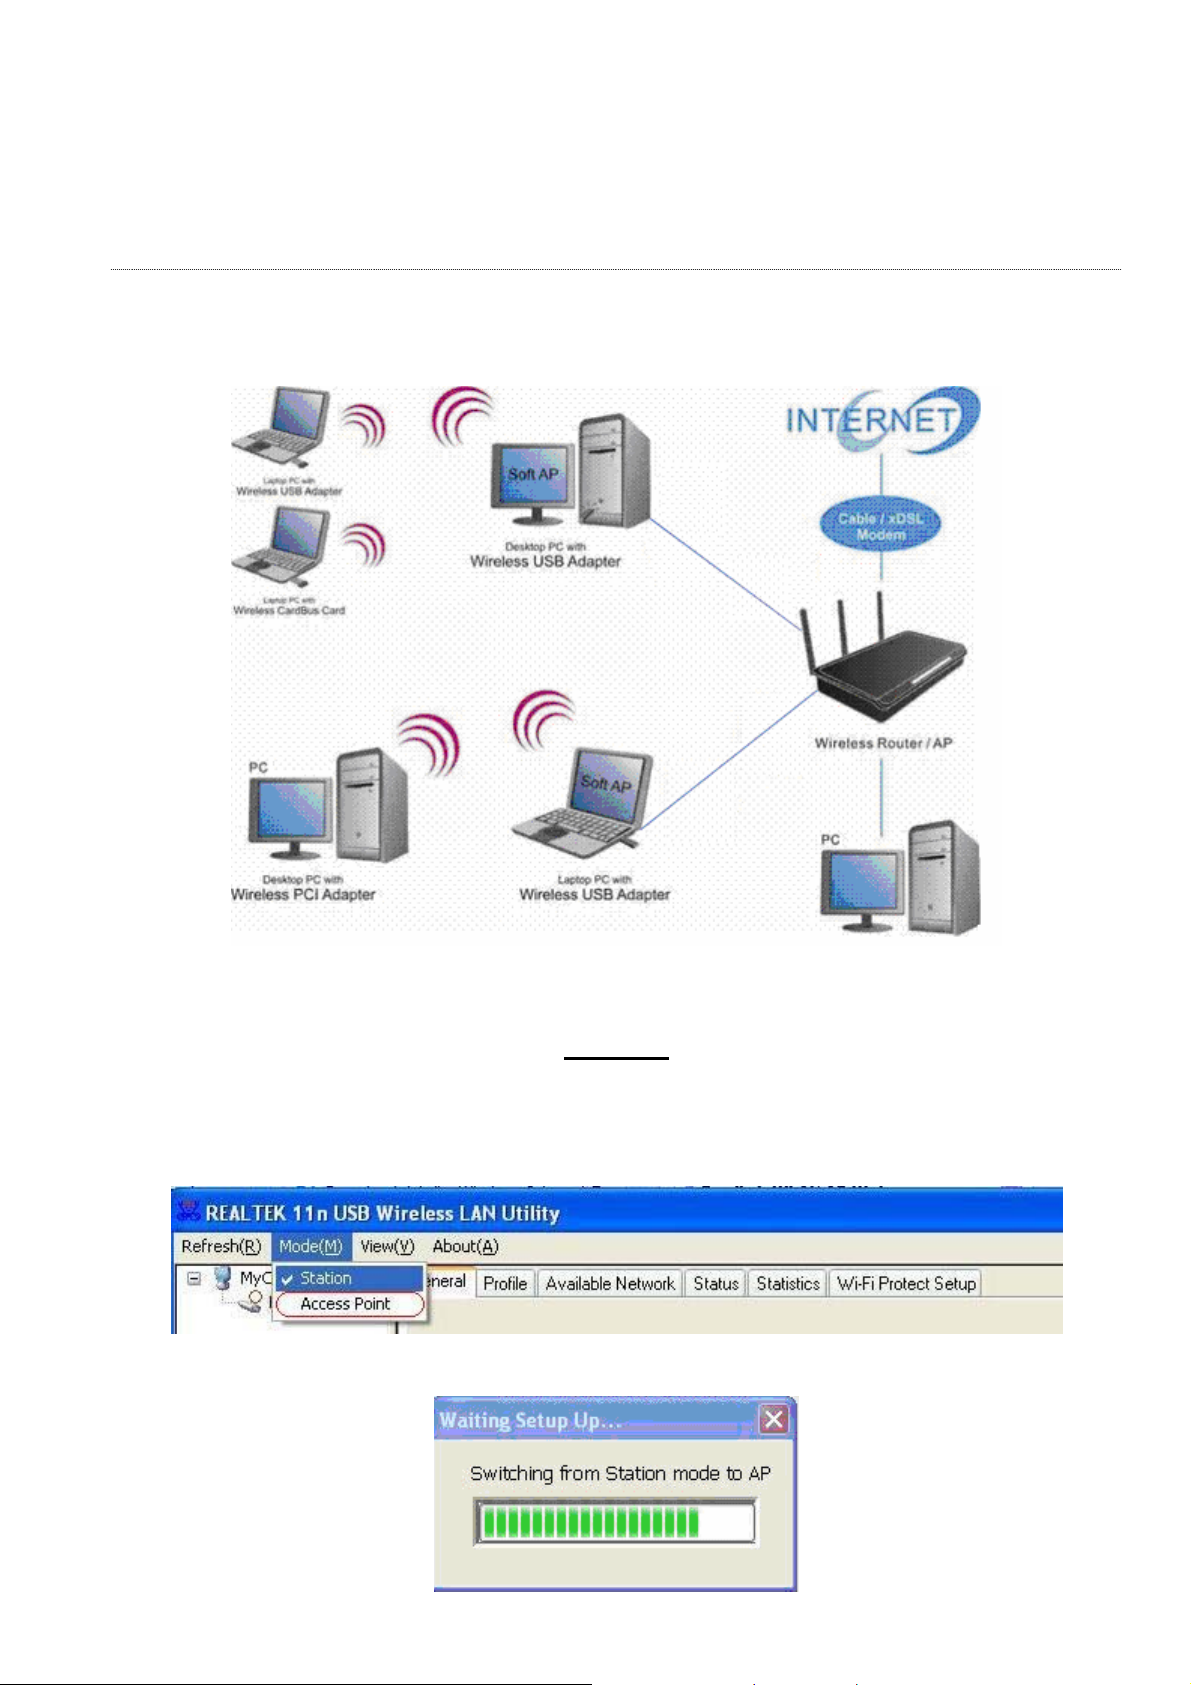
AP mode management guide
Software Access Point (Soft AP) Application:
General
To use this adapter as an access point, please click the “Mode” on Functional menu and select
“Access Point”.
Then switch from station mode to AP:
- 28 -
Page 29
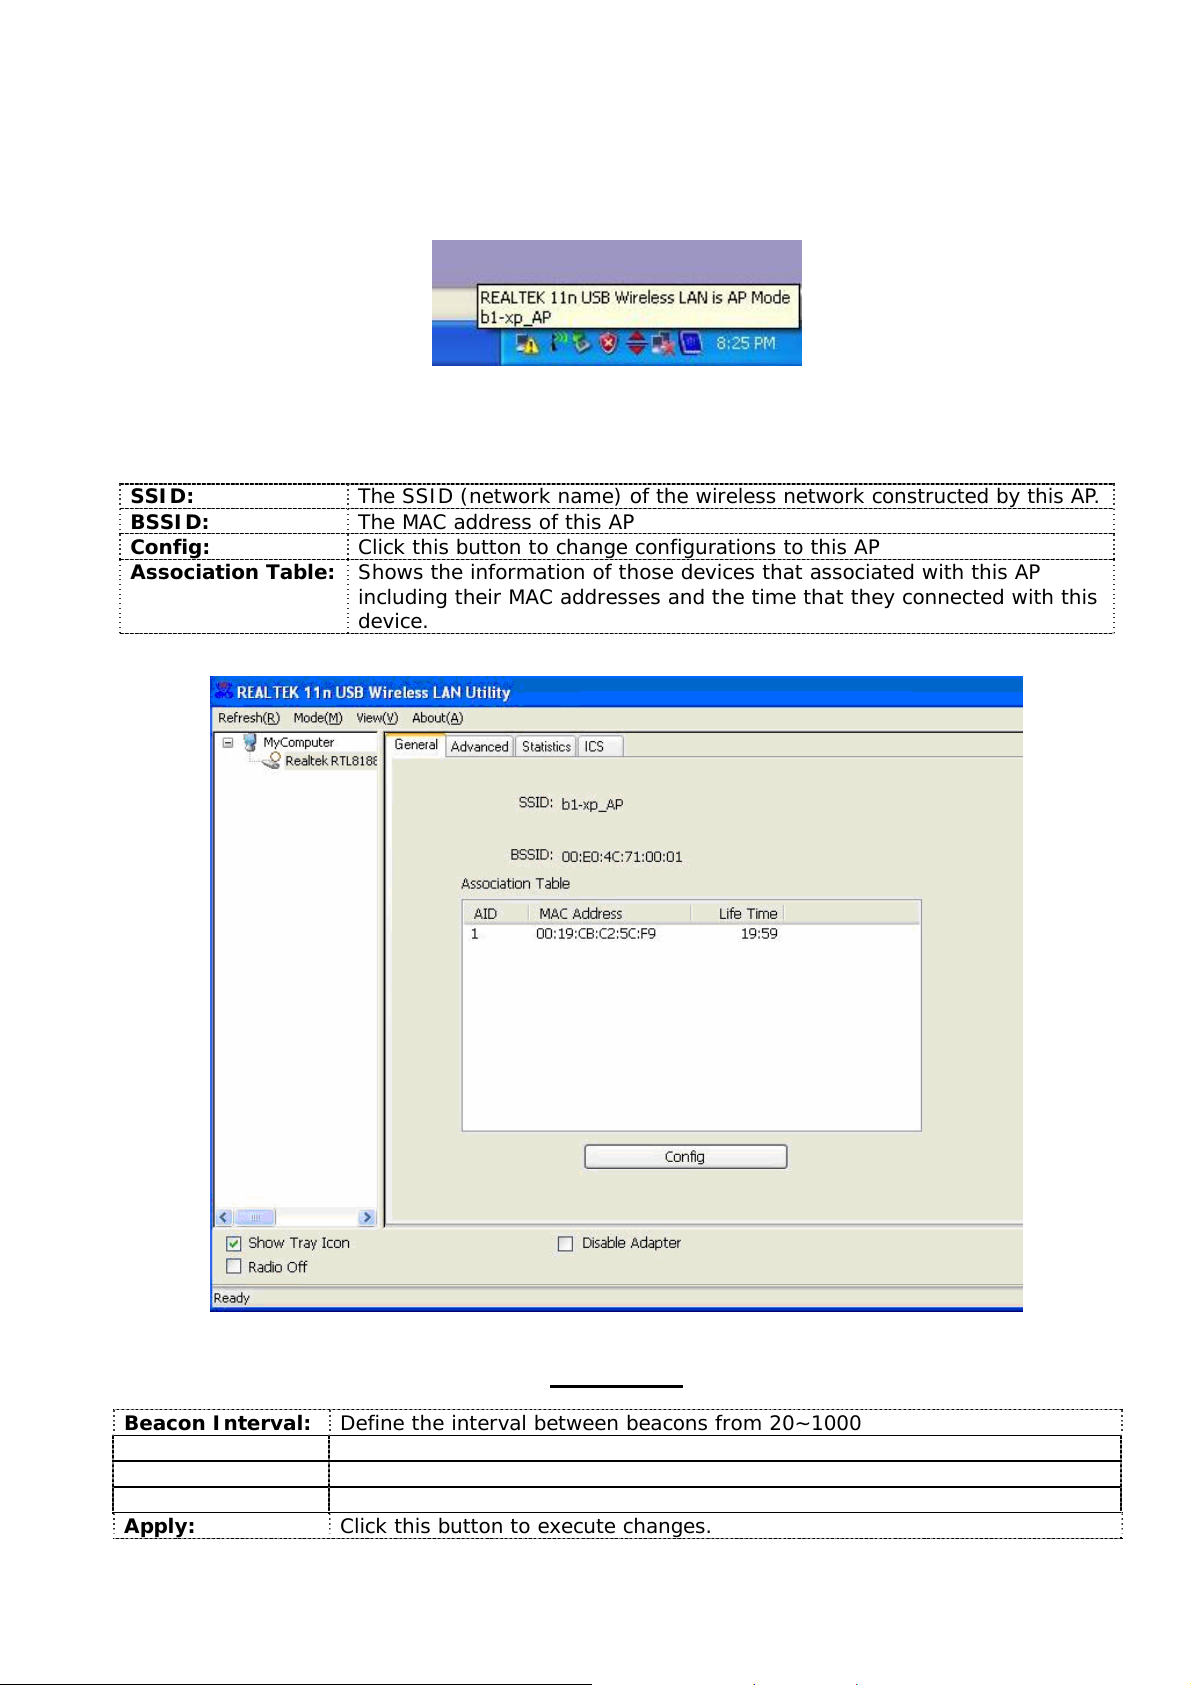
t the same time, you will find that the icon on the system tray is changed.
A
After configuring the adapter in AP mode, this “General” page shows up, which shows the general
information of this AP.
SSID: The SSID (network name) of the wireless network constructed by this AP.
BSSID: The MAC address of this AP
Config: Click this button to change configurations to this AP
Association Table: Shows the information of those devices that associated with this AP
including their MAC addresses and the time that they connected with this
device.
Advanced
Beacon Interval: Define the interval between beacons from 20~1000
DTIM Period: Set the DTIM period between 1~255
Preamble Mode: Click the drop list to select the preamble to be long, short or auto
Set Defaults: Click this button to restore the settings above to default
Apply: Click this button to execute changes.
- 29 -
Page 30

Statistics
See this tab to show the transmission activity record. Cli cking the “Reset” button recounts the values
from zero.
- 30 -
Page 31

ICS
This page allows users to select the adapter for connect to public network.
Please click on the device that are used for connecting to public network, and then click the “Apply”
button to execute.
- 31 -
Page 32

PRODUCT SPECIFICATION
Standard
IEEE 802.11n draft 2.0, IEEE 802.11g, IEEE 802.11b, IEEE 802.3, IEEE 802.3u
Interface
Complies with USB 2.0
Security
64/128-bit WEP, WPA (TKIP with IEEE 802.1x), AES
Receiver Sensitivity
802.11n Typical -68 dBm
802.11g Typical -73 dBm
802.11b Typical -84 dBm
Data Rate
802.11b: 1, 2, 5.5 and 11Mbps
802.11g: 6, 9, 12, 18, 24, 36, 48, and 54Mbps
802.11n: up to 150 Mbps
Transmit Power
16 dBm typically @ 802.11b
14 dBm typically @ 802.11g
13 dBm typically @ 802.11n
LED indicator
Link(Green)
Operating Temperature
0- 40 0C (32 – 104 0C)
Operating Humidity
10% ~ 90% (non-condensing)
Emission
FCC Class B, CE, VCCI Class B
- 32 -
Page 33

Benutzer Handbuch
IEEE 802.11n Draft 2.0 Wireless
USB Adapter
- 33 -
Page 34

FCC Zertifizierungen
FCC (Federal Communication Commission) Störungsmitteilung
Dieses Gerät ist getestet worden und, gemäß Teil 15 der FCC Vorschriften, als den Beschränkungen
eines digitalen Gerätes der Klasse B befunden worden. Diese Einschränkungen sind dazu bestimmt,
angemessenen Schutz gegen schädliche Störungen bei der Benutzung im Wohnbereich zu bieten.
Dieses Gerät generiert und benutzt Funkfrequenzenergie, kann sie abstrahlen, und kann, falls es nicht
gemäß der Anleitung installiert und benutzt wird, schädliche Störungen bei Funkkommunikationen
bewirken. Es gibt jedoch keine Garantie dafür, dass keine Störungen bei speziellen Installationen
auftreten. Falls dieses Gerät schädliche Störungen beim Radio oder Fernseh Empfang verursacht, die
durch das Ein- und Ausschalten des Gerätes beendet werden können, kann der Benutzer versuchen, die
Störungen mit Hilfe einer oder mehr der folgenden Maßnahmen zu korrigieren:
-Neuausrichtung oder Neulokalisierung der Empfangsantenne.
-Vergrößerung des Abstandes zwischen Gerät und Empfänger.
-Verbindung des Geräts mit einer Steckdose, die an einen anderen Stromkreis angeschlossen ist als die
Steckdose, mit der der Empfänger verbunden ist.
-Bitten Sie den Händler oder einen erfahrenen Radio- oder Fernsehtechniker um Hilfe.
Dieses Gerät entspricht Teil 15 der FCC Vorschriften. Das Funktionieren ist abhängig von den zwei
folgenden Bedingungen: (1) Dieses Gerät darf keine schädlichen S törungen verursachen, und (2) dieses
Gerät muss jede empfangene Störung akzeptieren, einschließlich der Störungen, die unerwünschtes
Funktionieren bewirken.
FCC Vorsicht: Bitte beachten Sie, dass Veränderungen oder Modifizierungen, die nicht ausdrücklich
genehmigt sind durch diejenigen, die für die Einhaltung verantwortlich sind, Ihre Erlaubnis zur Benutzung
des Gerätes ungültig werden lassen können.
Wichtige Anmerkung:
FCC Erklärung zur Strahlungsaussetzung
Dieses Gerät entspricht den FCC Strahlungsaussetzungsbeschränkungen, die für eine unkontrollierte
Umgebung herausgegeben worden sind. Dieses Gerät sollte mit einem Mindestabstand von 20 cm zu
Ihrem Körper installiert und bedient werden.
Dieser Sender darf nicht zusammen mit einer anderen Antenne oder einem anderen Sender lokalisiert
oder betrieben werden.
- 34 -
Page 35

CE-Hinweis
Dieses Gerät erfüllt die Anforderungen an die elektromagnetische Verträglichkeit gemäß EN 55022
Klasse B für ITE sowie die wesentlichen Anforderungen der Direktive des Europ arats 2004/108/EC über
die Annäherung der Gesetze der Mitgliedsstaaten im Hinblick auf die elektromagnetische Verträglichkeit.
Da das Unternehmen seine Produkte permanent verbessert, kann es möglich sein, dass die in diesem
Dokument enthaltenen Informationen nicht aktuell sind. Die aktuellsten Informationen erhalten Sie bei
Ihrem lokalen Vertriebshändler. Kein Teil dieses Dokuments darf ohne die schriftliche Zustimmung des
Unternehmens kopiert oder vervielfältigt werden.
Warenzeichen:
Alle Handelsnamen und Warenzeichen sind Eigentum der jeweiligen Unternehmen.
Copyright © 2009. Alle Rechte vorbehalten.
- 35 -
Page 36

ÜBERSICHT
Danke, dass Sie sich für dieses Produkt entschieden haben. Lesen Sie dieses Kapitel,
um sich mit Ihrem IEEE 802.11n Wireless Adapter vertraut zu machen.
Auspacken
Prüfen Sie bitte zunächst, ob die Verpackung die folgenden Artikel enthält:
1. IEEE 802.11n Wireless Adapter
2. Eine Dienstprogramm- /Handbuch-CD
- 36 -
Page 37

Einführung in den IEEE 802.11n Wireless Adapter
Der IEEE 802.11n Wireless Adapter ermöglicht Ihnen die Einrichtung eines IEEE 802.11g
Funknetzwerks mit 150 Mbps und einer Frequenz von 2,4 GHz, das ebenfalls mit IEEE 802.11b/g
Wireless-Geräten. Sie können den Adapter im Ad-hoc-Modus konfi gurieren, um einen Internetzugang
über einen Wireless AP (Access Point / Zugangspunkt) oder einen Router herzustellen. Der Adapter
umfasst ein komfortables Dienstprogramm für die Suche nach verfügbaren Netzwerken und das
Speichern von bevorzugten Netzwerken, mit denen Benutzer sich üblicherweise verbinden. Die
Sicherheitsverschlüsselung kann ebenfalls mit diesem Dienstprogramm konfiguriert werden.
Haupteigenschaften
Entspricht dem IEEE 802.11n/b/g
Funk-Standard
Hohe Datenübertragungsgeschwindigkeit
von bis zu 150 Mbps
Unterstützt QoS: WMM, WMM-PSClient
mode
Unterstützt Paketbündelung,
Stromsparfunktion,
Unterstützt Auto-Installation und
Diagnose-Tools
Unterstützt Funk-Datenverschlüsselung
64/128-bit WEP, WPA (TKIP mit IEEE 802,1x)
und AES-Funktionen
- 37 -
Page 38

INSTALLATIONSANLEITUNG
Installation
Hinweis: Die folgende Installationsanleitung für Treiber bezieht sich auf Windows XP als
Referenz-Betriebssystem. Die Verfahren und Bildschirmanzeigen von Windows 98se und 2000 sind
ähnlich wie bei Windows XP.
1. Ziehen Sie das Stromkabel Ihres Computers aus der Steckdose. Öffnen Sie das Gehäuse Ihres
Computers.
2. Stecken Sie den Adapter in einen PCI-Sockel, PCMCIA-Steckplatz oder USB-Port.
3. Der „Hardware-Installationsassistent“ wird eingeblendet (Hinweis: Der Installationsassistent
wird unter Windows 98 und ME nicht angezeigt. Das System findet und installiert die Hardware
automatisch. Bitte überspringen Sie die folgenden Schritte und starten Sie den Computer nach
der Installation neu.).
4. klicken Sie auf Cancel (Weiter).
Legen Sie die enthaltene CD-Rom in Ihr CD-Rom-Laufwerk ein. Das Menüfenster erscheint
automatisch. Klicken Sie auf den Driver-WIN-Button (Treiber) dieses Produkts.
- 38 -
Page 39

Hinweis: Wenn die CD-Rom nicht automatisch startet, klicken Sie bitte auf Arbeitsplatz
CD-Rom-Laufwerk und anschließend doppelt auf das Setup- Symbol in diese m Menü.
1. Das Sprachauswahlfenster erscheint. Wählen Sie Ihre Sprache und klicken Sie auf Next.
- 39 -
Page 40

2. Das Begrüßungsfenster erschei
nt. Klicken Sie auf Next (Weiter), um fortzufahren.
3. Klicken Sie auf die Schaltfläche "Install", um den In stallationsvorgang
- 40 -
Page 41

4. Bitte w
arten Sie, während die Software installiert wird.
5. Während der Installation kann dieses Windows-Warnfenster eingeblendet werden. Klicken Sie
bitte auf Continue Anyway (Trotzdem fortfahren), um fortzufahren.
- 41 -
Page 42

6. Bitte warten Sie während des Installationsvorgangs.
7. Bei Windows XP und 2000 Nutzern: Bitte fahren sie Ihren Computer runter. Wenn Sie Windows
98se oder ME nutzen, kann das System einen Neustart fordern. Bitte wählen Sie “Nein, ich starte
meinen Computer später neu.” Und fahren Sie den Computer runter. Drücken Sie “Beenden”, um
die Komplettinstallation fortzuführen.
- 42 -
Page 43

MANAGEMENT-ANLEITUNG
Lesen Sie dieses Kapitel, um die Management-Benutzeroberfläche des Geräts
kennenzulernen und sich mit dessen Steuerung vertraut zu machen.
Standard-Netzwerkverbindung herstellen
Verbindung mit dem Microsoft Zero Configuration tool
Nachdem Sie das Microsoft Zero Configuration tool für die Konfiguration Ihres wireless Netzwerkes
auswählen, klicken Sie auf das
Wireless Networks” aus, um Ihr gewünschtes wireless Netzwerk auszuwählen.
Das tool zeigt die verfügbaren wireless Netze. Wählen Sie das Netz, mit dem Sie verbunden werden
möchten. Um mit einem wireless Netzwerk verbunden werden zu können, klicken Sie auf Change
advanced settings, Ihre Einstellungen sind jetzt kompatibel zueinander.
Symbol im Infobereich der T askleiste. Wählen Sie “View Available
- 43 -
Page 44

Verbindung mit dem 802.11n Wireless LAN Utility
T
Wir bieten dieses Utility für Nutzer , die Ihr Netzwerk möglichst einfach herstellen möchten. Das Utility
startet automatisch, wenn Sie den Computer hochfahren, und baut automatisch eine Verbindung zu
einem wireless Netzwerk mit der besten Signalstärke auf, das über keine Sicherheitseinstellungen
verfügt.
Klicken Sie auf dieses Symbol
wenn das Utility nicht automatisch startet. Bitte lesen Sie sich die folgenden Kapitel durch, um
Informationen über die Funktion dieses Utility zu bekommen.
im In fobereich der Taskleiste und öffn en Sie Open Config utility,
Start des Wireless LAN-Dienstprogramms
Klicken Sie doppelt auf das Symbol auf Ihrem Desktop. Das Wireless LAN-Programm wird
geöffnet.
Show Tray Icon
(Ablagesymbol zeigen)
Radio Off (Funk aus) Markieren Sie dieses Kontrollkästchen, um zu verhindern, dass dieser
Disable Adapter
(Adapter deaktivieren)
Markieren Sie dieses Kontrollkästchen, um das Symbol des
Dienstprogramms in Ihrer Systemanlage anzuzeigen, d.h. dem
Anzeigebereich in der unteren rechten Ecke Ihres Windows Desktops
(System- Tray). Um das Dienstprogramm-Symbol aus dem System-
zu löschen, entfernen Sie einfach das Häkchen in diesem
Kontrollkästchen.
Adapter Signale überträgt oder empfängt. Entfernen Sie das Häkchen,
um die Kommunikation zu ermöglichen.
Markieren Sie dieses Kontrollkästchen, um den Wireless-Adapter zu
deaktivieren. Entfernen Sie das Häkchen, um ihn wieder zu aktivieren.
- 44 -
ray
Page 45

erwendung dieses Adapters im Station-Modus
V
1. Klicken Sie doppelt auf das
2. Klicken Sie auf den Available Network-Button (Verfügbares Netzwerk), um nach verfügbaren
Netzwerk-Adaptern zu suchen. Klicken Sie doppelt auf den Netzwerk-Adapter, zu dem Sie eine
Verbindung herstellen möchten.
Symbol auf Ihrem Desktop.
3. Klicken Sie auf OK, um zu bestätigen, dass Sie eine Verbindung zu einem offenen Funknet zwerk
herstellen möchten.
4. Klicken Sie auf OK, um dieses Netzwerk zur Profilliste hinzuzufügen.
- 45 -
Page 46

weis: Dieses Beispiel bezieht sich auf ein offenes Funknetzwerk. Wenn Sie eine Verbindung zu
Hin
einem Wireless-Adapter mit Sicherheitsschutz herstellen, müssen Sie die
Verschlüsselungseinstellungen in diesem Profil entsprechend dem anderen Wireless-Adapter
konfigurieren. Klicken Sie bitte auf die Dropdown-Liste Network Authentication
(Netzwerk-Authentifizierung), um eine Authentifizierungsmethode auszuwählen. Wählen Sie unter
Data encryption die Datenverschlüsselungsart. Füllen Sie alle erforderlichen Felder aus und klicken
Sie auf OK.
- 46 -
Page 47

Einführung in das Wireless LAN-Dienstprogramm
Hinweise: Diese Anleitung bezieht sich auf Windows XP als Referenz-Betriebssystem. Einige der
Funktionen werden von Windows 98se oder Windows ME nicht unterstützt.
Allgemein (General)
Nach dem Start des Dienstprogramms wird das allgemeine Menü angezeigt. Der Reiter General
(Allgemein) bietet Informationen über Ihre aktuelle Funknetzwerk-Verbindung. Sie können die
Angaben aktualisieren, indem Sie auf Renew (Aktualisieren) klicken.
Status: Prüft, ob das Gerät mit dem Zielnetzwerk verbunden ist.
Speed
(Geschwindigkeit):
Type (Typ): Infrastruktur-Modus oder Ad-hoc-Modus
Encryption
(Verschlüsselung):
SSID: Der SSID (Netzwerkname) des verbundenen Funknetzwerks
Signal Strength
(Signalstärke):
Link Quality
(Verbindungsqualität):
Network Address
(Netzwerkadresse):
Die aktuelle Verbindungsgeschwindigkeit
Die verwendete Verschlüsselungsart für die Verbindung mit dem
aktuellen Netzwerkprofil
Zeigt die von diesem Adapter erkannte Signalstärke an.
Zeigt die Qualität dieser Funkverbindung an.
Zeigt die aktuellen Einstellungen der IP-Adressen für diesen Adapter an.
- 47 -
Page 48

Profile (Profil)
Der Reiter Profile (Profil) bietet eine Liste der bevorzugten Verbindungen. Sie können auf die
nebenstehenden Buttons klicken, um jede einzelne Verbindung zu konfigurieren.
Add (Hinzufügen) Klicken Sie auf diesen Button, um diesem Button ein Verbindungsprofil
hinzuzufügen.
Remove (Entfernen)
Edit (Bearbeiten)
Duplicate
(Duplizieren)
Set Default (Als
Standardverbindung
nutzen)
Um ein Verbindungsprofil zu löschen, klicken Sie auf den entsprechenden
Eintrag in der Liste und anschließend auf diesen Button, um das Profil zu
löschen.
Um die Konfiguration eines Profils zu bearbeiten, klicken Sie auf dieses Profil
in der Liste und anschließend auf diesen Button.
Um eine Kopie eines Profils herzustellen, klicken Sie auf das zu kopierende
Profil und anschließend auf diesen Button.
Um eine Profil als Standard-Funkverbindung zu nutzen, klicken Sie auf den
entsprechenden Eintrag in der Liste und anschließend auf diesen Button. Sie
können ein Profil auch durch Doppelklick auf den Eintrag als
Standardverbindung auswählen.
- 48 -
Page 49

Available Network (Verfügbares Netzwerk)
Dieser Reiter enthält eine Liste der für diesen Adapter erreichbaren Funknetzwerke.
Refresh
(Aktualisieren)
Add to Profile (zu
Profilen
hinzufügen)
Klicken Sie auf diesen Button, um erneut nach verfügbaren Netzwerken in der
Umgebung des Adapters zu suchen.
Um ein verfügbares Netzwerk Ihrer Profilliste hinzuzufügen, wählen Sie ein
verfügbares Netzwerk aus und klicken Sie anschließend auf diesen Button.
- 49 -
Page 50

Advanced (Erweitert)
Der Reiter Advanced (Erweitert) bietet erweiterte Konfigurationsmöglichkeiten für diesen Adapter.
Jede Änderung in diesem Reiter wird nach Klick auf den Apply-Button (Anwenden) ausgeführt.
Klicken Sie auf Set defaults (Standardeinstellungen wiederherstellen), um die
Standardeinstellungen wiederherzustellen.
Power Save (Energiesparmodus)
None (Keine) Deaktiviert die Energiesparfunktion.
Min (Minimum) Minimaler Stromverbrauch.
Max (Maximum) Maximaler Stromverbrauch.
Turbo Mode (Turbomodus)
OFF (AUS) Deaktiviert den Turbomodus.
ON (EIN) Aktiviert den Turbomodus.
AUTO
(Automatisch)
Fragment Threshold (Fragmentierungsschwelle)
Die maximale Größe eines Datenpakets, das segmentiert und übertragen wird. Wählen Sie die
Größe zwischen 256 und 2432 (Standard) Bytes aus.
RTS Threshold (RTS-Schwelle)
Wählen Sie den RTS-Schwellenwert zwischen 0 und 2432 (Standard) aus.
Wireless Mode (Funk-Modus)
802,11g/b Verbindung mit einem 802,11b/g Netzwerk (2,4GHz/54Mbps)
802,11b Verbindung mit einem 802,11b Netzwerk (2,4GHz/11Mbps)
802.11n Verbindung zu einem 802.11n Netzwerk (2.4GHz/150Mbps)
Preamble Mode (Präambel-Modus)
Wählen Sie den Präambel-Modus – lange, kurze oder automatische Erkennung – aus.
Kanal Auswahl
Wählen Sie den Kanal aus dieser Liste. Beachten Sie, dass es wichtig ist, den richtigen Kanal zu
wählen. Wenn Sie einen falschen wählen, kann das gegen geltendes Recht verstoßen.
Aktiviert oder deaktiviert den Turbomodus automatisch entsprechend der
erkannten Umgebung.
- 50 -
Page 51

Status
Dieser Reiter zeigt den aktuellen Verbindungsstatus dieses Adapters.
Statistics (Statistik)
Dieser Reiter zeigt eine Aufzeichnung der Übertragungsaktivitäten. Klicken Sie auf den Reset-Button
(Zurücksetzen), um die Werte wieder von 0 an zu zählen.
- 51 -
Page 52

Wi-Fi Sicherheits Setup
Das Hauptziel des Wi-Fi Sicherheits Setups (Wi-Fi Simple Configuration) ist es, das Einrich ten der
Sicherheitsdienste und deren Verwaltung im Wi-Fi Netzwerk zu vereinfachen. Dieser Adapter
unterstützt die Konfi guration mittels PIN oder PBC ( Push button configuration, Knopfdr uck). We nn
der wireless Adapter Wi-Fi Protected Setup (WPS)( Wi-Fi Sicherheits Setup) unterstützt, können Sie
eine wireless Verbindung zwischen wireless Adapter und Router einrichten, indem Sie entweder die
PBC (Knopfdruck-) Methode oder PIN Methode anwenden.
Hier stellen wir Ihnen 2 Wege der Konfiguration des QSS vor.
(QSS ist bekannt als schnelles Instrument zur Sicherheitseinstellung, indem man den QS S Knopf des
wireless routers und wireless Adapters gedrückt hält, um automatisch WPA2 Verschlüsselung
einzurichten.)
Pin Code: 8-stellige Nummer. Wird nach dem Zufallsprinzip zugeordnet
1. PIN Methode
Klicken Sie auf “Pin Input Config (PIN)”, und erhalten nachfolgendes Bild.
- 52 -
Page 53

icken Sie “Yes”, um einen AP auszuwählen ( you can select one of the AP).
Kl
In diesem Bild haben Sie 3 Wahlmöglichkeiten “Refresh / Select / Cancel”.( Erneuern/ Auswählen/
Abbrechen) Wählen Sie den Namen eines APs aus und klick en dann auf “Select” , Sie können die PIN
Methode wählen, um QSS zu konfigurieren.
Doppelklicken Sie auf den Internet WEB browser icon Ihres Desktops. Geben Sie die IP Adresse Ihres
ausgewählten Routers/AP in die URL und drücken Sie “Enter”, dann gelangen Sie zur Konfigur ation.
Bitte öffnen Sie WPS ( Wi-Fi ) Konfigurationsseite, geben Sie die PIN des Adapters ein und klicken Sie
die „confirm“ Taste ( Bestätigungstaste ), um eine WPS Verbindung herzustellen.
- 53 -
Page 54

2. PBC (Push Button Configuration) Methode ( Knopfdruck Methode)
Nach dem Drücken der PBC Taste, drücken Sie bitte den physikaliscken Knopf des APs oder visuellen
Knopfes auf der WPS config Seite, es erscheint folgendes Bild.
Bitte wählen Sie die WPS ( Wi-Fi )Konfigurationsseite Ihres gewünschten Routers/ APs aus, und
starten Sie die PCB Verbindung. Wenn die WPS Konfiguration erfolgreich war, ist das Profil
entsprechend geändert.
- 54 -
Page 55

ANHANG
Treiber-Installation unter Windows Vista
Hinweis: Die folgende Installationsanleitung für Treiber bezieht sich auf Windows XP als
Referenz-Betriebssystem. Die Verfahren und Bildschirmanzeigen von Windows 98se und 2000 sind
ähnlich wie bei Windows XP.
1. Ziehen Sie das Stromkabel Ihres Computers aus der Steckdose. Öffnen Sie das Gehäuse Ihres
Computers.
2. Stecken Sie den Adapter in einen PCI-Sockel, PCMCIA-Steckplatz oder USB-Port.
3. Der „Hardware-Installationsassistent“ wird eingeblendet (Hinweis: Der Installationsassistent
wird unter Windows 98 und ME nicht angezeigt. Das System findet und installiert die Hardware
automatisch. Bitte überspringen Sie die folgenden Schritte und starten Sie den Computer nach
der Installation neu.).
4. Klicken Sie auf Abbrechen, und starten Sie das Setup-Assist
enten auf der CD-ROM
Legen Sie die enthaltene CD-Rom in Ihr CD-Rom-Laufwerk ein. Das Menüfenster erscheint
automatisch. Klicken Sie auf den Driver-WIN-Button (Treiber) dieses Produkts.
- 55 -
Page 56

Hinweis: Wenn die CD-Rom nicht automatisch startet, klicken Sie bitte auf Arbeitsplatz
CD-Rom-Laufwerk und anschließend doppelt auf das Setup- Symbol in diese m Menü.
5. Das Sprachauswahlfenster erscheint. Wählen Sie Ihre Sprache und klicken Sie auf Next.
- 56 -
Page 57

6. Das Begrüßungsfenster erschei
nt. Klicken Sie auf Next (Weiter), um fortzufahren.
7. Klicken Sie auf die Schaltfläche "Install", um den In stallationsvorgang
- 57 -
Page 58

8. W
9. Bitte warten Sie während des Installationsvorgangs.
ährend der Installation kann dieses Windows-Warnfenster eingeblendet werden. Klicken Sie
bitte auf Install this driver software anyway (Trotzdem fortfahren), um fortzufahren.
10. Bei Windows XP und 2000 Nutzern: Bitte fahren sie Ihren Computer runter. Wenn Sie Windows
98se oder ME nutzen, kann das System einen Neustart fordern. Bitte wählen Sie “Nein, ich starte
meinen Computer später neu.” Und fahren Sie den Computer runter. Drücken Sie “Beenden”, um
die Komplettinstallation fortzuführen.
- 58 -
Page 59

AP-Modus Management-Anleitung
Software Access Point (Soft AP) Anwendung:
Allgemein
Um diesen Adapter als Accesspoint zu nutzen, Klicken Sie “Mode” im Menü und wählen Sie “Access
Point” aus.
Nun wechselt er vom station mode zum AP:
- 59 -
Page 60

Gleichzeitig
sehen Sie, dass sich das Symbol im Infobereich der Taskleiste geändert hat.
Nach der Konfiguration des Adapters im AP-Modus wird das Fenster General (Allgemein) mit
allgemeinen Informationen zu diesem Zugangspunkt eingeblendet.
SSID: Die SSID (Netzwerkname) des durch diesen Zugangspunkt
geschaffenen Funknetzwerks
BSSID: Die Mac-Adresse dieses Zugangspunkts
Config (Konfiguration): Klicken Sie auf diesen Button, um die Konfiguration dieses
Zugangspunkts zu ändern.
Association Table
(Verbindungstabelle):
Zeigt Informationen zu den Geräten an, die mit diesem
Zugangspunkt verbunden sind – einschließlich der MAC-Adresse
und der Dauer der Verbindung zu diesem Gerät.
- 60 -
Page 61

Advanced (Erweitert)
Beacon Interval
(Signalintervall):
DTIM Period
(DTIM-Dauer):
Preamble Mode
(Präambel-Modus):
Set Defaults
(Standardeinstellungen):
Apply (Anwenden): Klicken Sie auf diesen Button, um die Änderungen auszuführen.
Definiert das Intervall zwischen den Signalen von 20~1000.
Legt den DTIM-Dauer zwischen 1~255 fest.
Klicken Sie auf die Dropdown-Liste, um die Präambel auf lang, kurz
oder automatisch einzustellen.
Klicken Sie auf diesen Button, um die Standardwerte der obigen
Einstellungen wiederherzustellen.
Statistics (Statistik)
Dieser Reiter zeigt eine Aufzeichnung der Übertragungsaktivitäten. Klicken Sie auf den Reset-Button
(Zurücksetzen), um die Werte wieder von 0 an zu zählen.
- 61 -
Page 62

ICS
In diesem Fenster können Benutzer den Adapter für die V erbindung mi t einem öffentlichen Netzwerk
auswählen.
Klicken Sie auf das Gerät, das für die Herstellung der Verbindung zu dem öffentlichen Netzwerk
verwendet werden soll. Auf Apply (Anwendung), um die Verbindung herzustel l e n.
- 62 -
Page 63

PRODUKT-SPEZIFIKATIONEN
Standard
IEEE 802.11n draft 2.0, IEEE 802.11g, IEEE 802.11b, IEEE 802.3, IEEE 802.3u
Schnittstelle
USB (23413)
Sicherheit
64/128-bit WEP, WPA (TKIP mit IEEE 802,1x), AES
Empfänger-Empfindlichkeit
802.11n Typical -68 dBm
802.11g Typical -73 dBm
802.11b Typical -84 dBm
Kanal
USA 11, Europa 13, Japan 14
Datenübertragungsrate
802,11b: 1, 2, 5,5 und 11Mbps
802,11g: 6, 9, 12, 18, 24, 36, 48, und 54Mbps
802.11n: bis zu 150 Mbps
Übertragungsleistung
16 dBm typically @ 802.11b
14 dBm typically @ 802.11g
13 dBm typically @ 802.11n
Reichweite
Innenräume 35~100 Meter
Außenbereiche 100~300 Meter
LED-Anzeige
Verbindung (Grün)
Betriebstemperatur
0- 40 0C (32 – 104 0F)
Relative Luftfeuchtigkeit bei Betrieb
10% ~ 90% (nicht kondensierend)
Emission
FCC Klasse B, CE, VCCI Klasse B
- 63 -
Page 64

Manuale d'uso
Adattatore wireless USB
IEEE 802.11n Draft 2.0
- 64 -
Page 65

Certificazioni FCC
Dichiarazione della FCC sulle interferenze
L'apparecchiatura è stata collaudata e riscontrata conforme ai limiti per i dispositivi digitali di classe B ai
sensi della Parte 15 della normativa FCC. Tali limiti sono stati studiati per fornire una ragionevole
protezione contro le pericolose interferenze negli impianti residenziali. L'apparecchiatura genera,
utilizza e può emettere energia a radiofrequenza e se non viene install at a ed utilizzata come indicato nel
manuale di istruzioni può provocare pericolose interferenze sulle radiocomunicazioni. Non è comunque
possibile garantire che in installazioni particolari tali interferenze non si verifichino. Qualora
l'apparecchiatura dovesse provocare interferenze sulla ricezione di apparecchi radiotelevisivi – il che si
può facilmente verificare spegnendola e riaccendendola – l'operatore può cercare di eliminare
l'interferenza procedendo come di seguito indicato:
- Riorientare o riposizionare l'antenna di ricezione.
- Aumentare la distanza tra l'apparecchiatura e il ricevitore.
- Collegare l’apparecchiatura ad una presa su un circuito diverso da quello al quale il ricevitore è
collegato.
- Consultare il rivenditore o un tecnico esperto in impianti radiotelevisivi.
Questo dispositivo è conforme con la Parte 15 della normativa FCC. L'utilizzo è soggetto alle due
condizioni seguenti: (1) il dispositivo non deve causare interferenze pericolose, e (2) il dispositivo deve
accettare qualsiasi interferenza ricevuta, comprese quelle che possano provocarne un funzionamento
indesiderato.
Precauzione FCC: eventuali cambi o modifiche non espressamente approvati dal soggetto responsabile
della conformità potrebbero annullare l'autorizzazione all'uso dell'apparecchiatura da parte dell'utente.
NOTA IMPORTANTE:
Dichiarazione della FCC sull'esposizione alle radiazioni:
Questa apparecchiatura è conforme ai limiti di esposizione alle radiazioni st abiliti dalla FCC per ambienti
privi di controllo. Questa apparecchiatura deve essere installata ed azionata avendo cura di frapporre
una distanza minima di 20 cm tra l'antenna trasmittente e il corpo dell'utente.
Questa apparecchiatura non può essere abbinata o azionata congiuntamente ad altre antenne o
trasmettitori.
- 65 -
Page 66

Marchio di conformità CE
Questo apparecchio è conforme ai requisiti riguardanti la compatibilità elettromagnetica, EN 55022
classe B per ITE ovvero ai requisiti essenziali della Direttiva del Consiglio 2004/108/EC
sull’armonizzazione delle leggi degli Stati Membri in materia di compatibilità elettromagnetica.
La politica dell’azienda prevede l'aggiornamento costante dei propri prodotti; è quindi possibile che le
informazioni contenute in questo manuale non siano aggiornate. Rivolgersi ai rivenditori locali per
ottenere le informazioni più recenti. Non è consentita la copia o la riproduzione di alcuna parte di questo
documento in qualsiasi forma senza l'esplicito consenso scritto dell'azienda.
Marchi commerciali:
Tutti i nomi di marchi e i marchi commerciali sono proprietà dei rispettivi titolari.
Copyright © 2009, Tutti i diritti riservati.
- 66 -
Page 67

PRESENTAZIONE
Grazie per avere acquistato questo prodotto. In questo capitolo sono presentati i
componenti in dotazione all’adattatore wireless IEEE 802.11n.
Volume della fornitura
Prima di utilizzare l’apparecchio verificare che la confezione conten ga i seguenti componenti:
1. Adattatore wireless IEEE 802.11b/g/n
2. CD con programmi e manuale
- 67 -
Page 68

Introduzione all’adattatore wireless IEEE 802.11n
L’adattatore wireless IEEE 802.11n consente agli utenti di installare la rete senza fi li IEEE 802. 11n a
150 Mbps con una frequenza di 2.4GHz ed è compatibile anche con dispositivi senza fili IEEE
802.11b/g. Grazie a questo adattatore è possibile configurare una modalità ad hoc per collegarsi ad
altri computer 2.4GHz oppure una modalità infrastruttura per collegarsi a un punto d’accesso senza fili
oppure a un router per la connessione a Internet. Questo adattatore include un comodo programma
per la scansione delle reti disponibili e la memorizzazione delle reti preferite, utilizzate solitamente per
il collegamento. Il programma consente anche di configurare una codice crittografico di sicurezza.
Caratteristiche principali
Conforme agli standard senza fili IEEE
802.11b/g/n
Trasferimento dati ad alta velocità fino a
150Mbps
Supporta sevizi QoS (WMM, WMM-PS Client
mode)
Supporta aggregazione frame, meccanismo di
risparmio energetico, gestione canali e
co-esistenza
Autoinstallazione e programmi diagnostici
Crittografia dati wireless con WEP, WPA (TKIP con
IEEE 802.1x) 64/128 bit e funzioni AES
- 68 -
Page 69

GUIDA D’INSTALLAZIONE
Installazione
Nota: la seguente guida di installazione del driver si basa sul sistema operativo Windows XP. Le
procedure e le schermate dei sistemi operativi Windows 98se e 2000 sono simili a quelle di Windows
XP.
1. Estrarre il cavo di alimentazione del computer dalla presa. Rimuovere il coperchio del computer.
2. Collegare l’adattatore a una presa PCI, a uno slot PCMCIA oppure a una porta USB.
3. Compare la finestra “Trovato nuovo hardware“. (Nota: questo assistente non comparirà in
Windows 98 e ME. Il sistema trova il nuovo hardware e lo installa automaticamente. Tralasciare i
passaggi successivi e riavviare il sistema dopo l’installazione).
4. Clic sul pulsante “Next”.
Inserire il CD in dotazione nell’unità CD Rom. Compare automaticamente la finestra del menu. Fare
clic sul pulsante “Driver-WIN” del prodotto.
- 69 -
Page 70

Nota: se il CD non si apre automaticamente, fare clic su “Risorse del computer” Unità DVD-RW
poi fare clic due volte su “Setup” per avviare il menu.
1. Compare la finestra di selezione della lingua. Selezionare la lingua che si vuole utilizzare e fare clic
su Continua.
- 70 -
Page 71

ompare la finestra iniziale. Fare clic sul pulsante “Continua” per procedere.
2. C
3. Fare clic sul pulsante "Installa" per avviare l'installazione
- 71 -
Page 72

ttendere che l’installazione venga complet a ta.
4. A
5. Durante l’installazione potrebbe comparire la finestra di verifica del logo Windows. In questo caso
premere “Continua” per proseguire comunque l’operazione.
- 72 -
Page 73

6. Attendere prima di effettuare l’installazione
7. Per utenti Windows XP e 2000 si prega di spegnere il computer. Se si utilizza Windows 98SE o ME,
il sistema può chiedere di riavviare il computer. Si prega di selezionare "No, riavviare il computer
in seguito" e quindi spegnere il computer. Fare clic su “Fine" per completare l'installazione del
driver e utility.
- 73 -
Page 74

UTILIZZO DELL’APPARECCHIO
Questa sezione illustra le caratteristiche dell’interfaccia dell’apparecchio e fornisce
istruzioni in merito al suo utilizzo.
Stabilire una connessione di rete
Collegamento con Microsoft Zero Configuration tool
Dopo aver specificato lo strumento Microsoft Zero Configuration per configurare la rete wireless,
cliccare l'icona
senza fili disponibili per specificare la propria rete wireless.
Lo strumento mostra le reti wireless disponibili. Selezionare la rete a cui collegarsi. Per collegarsi
a una rete wireless con più impostazioni di sicurezza, cliccare su Modifica impostazioni avanzate
per stabilire la
compatibilità con le impostazioni di sicurezza della propria rete wireless.
sulla barra di sistema. Con il tasto destro del mouse. Selezionare Visualizza reti
- 74 -
Page 75

Per connettersi usando l‘utility 802.11n Wireless LAN
uesto utility viene fornita a corredo per conse tire agli uten i di collegarsi facilmente a una re
Q n t te
ireless. Fornisce più informazioni e possibilità i configurazi ne per questo adattatore. A livello
w d o
predefinito, l'utility si avvia automaticamente all'avvio del computer e si connette alla rete wireless
dispon
v
S
qu
selezionano le seguenti opzioni:
ibile dotata del segnale più potente. Cliccare con il tasto destro sull’icona e selezionare la
oce Open Config utility (Apri configurazione Utilit y) qualora l’utility non si avvia.
i prega di fare riferimento ai seguenti capitoli per ottenere informazioni in merito alle funzioni di
esta utility.
Avviare la funzione Wireless LAN
are doppio clic sull’icona F del desktop. Compare la finestra Wireless LAN.
i Facendo clic sulle schede in alto è possibile configurare l’adattatore. Tramite le caselle di spunta s
Swow Tray Icon
Radio Off
Disabile Adapter
Selezionare questa casella di spunta per visualizzare l’icona del programma
sulla barra delle applicazioni nell'area di notifica situata nell’angolo inferiore
destro del desktop. Deselezionando questa casella si elimina l’icona del
programma dalla barra delle applicazioni.
Selezionare questa casella per impedire che l’adattatore riceva o trasmetta
segnali. Deselezionare per effettuare la comunicazione.
Selezionare questa casella per disattivare l’adattatore wireless .
Deselezionare per riattivare l’adattatore.
- 75 -
Page 76

Per utilizzare l
. Fare clic sull’icona
1 del desktop.
Cliccare due volte sull’adattatore di rete a cui collegarsi.
’adattatore in modalità Station
2. Fare clic sulla scheda “Rete disponibile” per visualizzare gli adattatori di rete wireless disponibili.
3. Fare clic sul pulsante OK per confermare che è in corso una connessione a una rete wireless non
protetta.
4. Fare clic su OK per aggiungere la rete alla lista ili.
dei prof
- 76 -
Page 77

Nota: in questo esem ttersi a un
pio c’è una rete senza fili non protetta. Se l'utente intende conne
adattatore wi ittografia di questo profilo in modo
che sia corrispondente a quella stabilita per l’altro adattatore wireless. Fare clic sulla lista a discesa
“Autenticazione rete” per selezionare un m
“Crittografia dati”. Compilare tutti gli spazi necessari e cliccare su “OK”.
one di sicurezza, dovrà stabilire la crreless con protezi
etodo di autenticazione e poi scegliere il tipo di
- 77 -
Page 78

ntroduzione alla funzione Wireless LAN I
Nota: queste istruzioni si basano sul sistema operativo Windows XP. Alcune funzioni non sono
supportate in Windows 98se oppure in Windows ME.
Generale
Dopo l’avvio del programma si visualizza la pagina con le informazioni generali. La scheda General
fornisce le informazioni sulla connessione di rete wireless attuale. Fare clic sul pulsante Renew per
aggiornare le informazioni.
Status: Controlla se il dispositivo è connesso alla rete.
Speed: Velocità di connessione attuale
Type: Modalità Infrastruttura oppure Ad Hoc.
Encryption: Il modello crittografico per la connessione ai profili di rete attuali.
SSID: Il codice SSID (nome della rete) della rete senza fili connessa.
Signal Strength: Indica la forza del segnale rilevato dall’adattatore.
Link Quality Indica la qualità del collegamento senza fili.
Network Address: Mostra l’indirizzo IP corrente per questo adattatore.
- 78 -
Page 79

Profili
La scheda Profile elenca le connessioni preferite. Ciccando sui pulsanti a lato è possibile configurare
ogni connessione.
Add
Remove
Edit
Duplicate
Set Default Pe ault, farer selezionare un profilo da attivare come connessione wireless di def
Fare clic su questo pulsante per aggiungere un profilo di connessione
all’adattatore.
Per eliminare un profilo fare clic sul profilo stesso e poi su questo pulsante.
Per modificare la configurazione di un profilo, cliccare sul profilo stesso nella lista
profilo e poi sul pulsante per modificarlo.
Pe su questo
r fare una copia di un profilo, fare clic sul profilo da copiare e poi
p
ulsante.
cl profilo,
ic sul profilo e poi questo pulsante. Anche cliccando due volte su un
q ult.
uest’ultimo viene considerato come connessione wireless di defa
- 79 -
Page 80

Questa sc
Rete disponibile
heda elenca le reti wireless disponibili per questo adattatore.
Refresh Fare clic su questo pulsante per aggiornare le reti senza fili disponibili per
l’adattatore.
Add to Profile una e
Per aggiungere una rete disponibile alla propria lista, selezionarne
fare clic su
questo pulsante.
- 80 -
Page 81

Avanzate
La scheda Advanced fornisce le impostazioni avanzate per l'adattatore. Per eseguire le modifiche è
ecessario fare clic sul pulsante Apply.
n
Per ripristinare le impostazioni di default della scheda Advanced, fare clic sul pulsante Set defaults.
Power Save
None Disattiva la funzione di risparmio energetico.
Min Minimo consumo energetico
Max Massimo consumo energetico
Turbo Mode
OFF Disattiva la funzione turbo
ON Attiva la funzione turbo
AUTO Attiva o disattiva automaticamente la funzione turbo a seconda dell'ambiente
operativo
Fragment Threshold
La dimensione massima di un pacchetto per la segmentazione l’invio. Selezionare una dimensione
compresa tra 256 e 2432 (default) byte.
RTS Threshold
Selezionare la soglia RTS da 0 a 2432 (default)
Wireless Mode
802.11g/b Connessione alla rete a 802.11b/g (2.4GHz/54Mbps)
802.11b Connessione alla rete a 802.11b (2.4GHz/11Mbps)
802.11n Connetti a una rete 802.11n (2.4GHz/150Mbps)
Preamble Mode
Impostare la modalità preambolo selezionando tra lungo, breve oppure auto-rilevamento.
Canale Piano
Selezionare il canale dalla lista drop. Si prega di notare che è necessario selezionare un canale
corretto. Selezione un canale non corretto può essere non conforme all e normative di l egge vigenti.
- 81 -
Page 82

Status
Questa scheda mostra lo stato di connessione dell’adattatore attuale.
Questa scheda
conteg ro.
gio a ze
indica le statistiche relative ai dati trasmessi. Fare clic “Reset” per riportare il
Statistiche
- 82 -
Page 83

Wi-Fi Protect Setup
L'obiettivo primario di Wi-Fi Protected Setup (Wi-Fi Configurazione sem
la configurazione e la gestione della sicurezza delle reti Wi-Fi. Questo adattatore support a
l'installazione di configurazione, util izzando il metodo di configurazione PIN o il metodo di
configurazione PBC. Se la scheda wireless supporta la Wi-Fi Protected Setup (WPS), è possibile
stabilire una connessione wireless tra il router e la scheda di rete wireless utilizzando il metodo Push
Button Configuration (PBC) o metodo PIN.
plice) è quello di semplificare
Di seguito verranno introdotti due modi per configurare il QSS
(QSS è noto come l’ impostazioni di protezione rapida, premendo il router wireless e scheda
wireless sul pulsante QSS per impostare automaticamente il livello WPA2 di connessione sicura
senza utilizzare il software di gestione del router o l'adattatore di rete, semplificando notevolmente
le procedure d’ impostazioni di sicurezza wireless.)
Codice Pin: 8 cifre. E 'generato casualmente dal sistema
- 83 -
Page 84

1. Metodo PIN
are clic sul pulsante "Pin Input Config (PIN)", e aspettare che appaia le seguente icona. F
Cliccare sul pulsante "Sì” e selezionare uno degli AP.
In questa figura, è possibile utilizzare questi pulsanti "Aggiorna / Seleziona / Annulla". Selezionare il
nome di un AP, quindi fare clic sul pulsante "Seleziona". È possibile utilizzare il metodo PIN per
configurare il QSS.
- 84 -
Page 85

F
are doppio clic sull
selezionato nella barra URL e premere Invio, e entrare nel pannello di configurazione.
Accedere al pannello di configurazione WPS (Wi-Fi), digitare il codice PIN della scheda e fare clic sul
'icona del browser Internet sul vostro desktop. Digitare l'indirizzo IP del router / AP
pulsante conferma per la costruzione di una connessione WPS.
2. Metodo PBC (Push Button Configuration)
Dopo aver premuto il tasto PBC, si prega di premere il pulsante fisico sul vostro AP o il pulsante
virtuale sulla pagina di configurazione WPS, quindi si giunge alla figura seguente.
Inserisci il WPS (Wi-Fi) pagina di configurazione del router desiderata / AP, e quindi avviare al
connessione. Quando PCB WPS è configurato correttamente, il profilo a disposizione è cambiato.
- 85 -
Page 86

APPENDICE
Installazione driver per Windows Vista
Nota: la seguente guida di installazione del driver si basa sul sistema operativo Windows XP. Le
procedure e le schermate dei sistemi operativi Windows 98se e 2000 sono simili a quelle di Windows
XP.
1. Estrarre il cavo di alimentazione del computer dalla presa. Rimuovere il coperchio del computer.
2. Collegare l’adattatore a una presa PCI, a uno slot PCMCIA oppure a una porta USB.
3. Compare la finestra “Trovato nuovo hardware“. (Nota: questo assistente non comparirà in
Windows 98 e ME. Il sistema trova il nuovo hardware e lo installa automaticamente. Tralasciare i
passaggi successivi e riavviare il sistema dopo l’installazione).
4. Fare clic su Annulla, ed eseguire il programma di installazione guidata sul CD-ROM..
Inserire il CD in dotazione nell’unità CD Rom. Compare automaticamente la finestra del menu. Fare
clic sul pulsante “Driver-WIN” del prodotto.
- 86 -
Page 87

Nota: se il CD non si apre automaticamente, fare clic su “Risorse del computer” Unità DVD-RW
poi fare clic due volte su “Setup” per avviare il menu.
5. Compare la finestra di selezione della lingua. Selezionare la lingua che si vuole utilizzare e fare clic
su Continua.
- 87 -
Page 88

6. Compare la finestra iniziale. Fare clic sul pulsante “Continua” per procedere.
7. Fare clic sul pulsante "Installa" per avviare l'installazione
- 88 -
Page 89

urante l’installazione potrebbe comparire la finestra di verifica del logo Window
8. D
s. In questo caso
premere “
9. Attendere prima di effettuare l’installazione
Install this driver software anyway” per proseguire comunque l’operazione.
10. Per utenti Windows XP e 2000 si prega di spegnere il computer. Se si utilizza Windows 98SE o ME,
il sistema può chiedere di riavviare il computer. Si prega di selezionare "No, riavviare il
computer in seguito" e quindi spegnere il computer. Fare clic su “Fine" per completare
l'installazione del driver e utility.
- 89 -
Page 90

Gestione modalità AP
Software Access Point (AP Soft) Applicazione:
Generale
Per utilizzare questa scheda come un punto di accesso, fare clic sul "M ode" nel me nu funzio nali e
selezionare "Access Point".
Quindi si passa dalla modalità stazione di AP:
- 90 -
Page 91

Allo stesso tempo, vi ac
corgerete ch
e l'icona nella system tray è cambiata.
Dopo la configurazione dell’adattatore in modalità AP, la scheda “General” indica le informazioni
generali riguardanti il punto d’accesso.
SSID: Il codice SSID (nome della rete) della rete wireless basata sull’AP.
BSSID: Indirizzo MAC dell’AP
Config: Fare clic sul pu lsante per modificare la configurazione dell’AP
Association Table: Indica le informazioni riguardanti i dispositivi abbinati all’AP , inclusi gli
indirizzi MAC e il tempo di collegamento con il dispositivo.
- 91 -
Page 92

Avanzate
Beacon
Interval:
DTIM Period: Imposta il periodo DTIM tra 1~255
Preamble
Mode:
Set Defaults: Fare clic sul pulsan te per ripristinare le impostazioni ai valori di default
Apply: Fare clic sul pulsante per eseguire le modifiche.
Definisce l’intervallo beacon tra 20~1000
Fare clic sulla lista a discesa per selezionare il preambolo: lungo, breve oppure
auto
Statistiche
Questa scheda indica l’attività di tras missione dati. Fare clic sul pulsante “Reset” per riconteggiare i
valori a partire da zero.
- 92 -
Page 93

ICS
Questa scheda con
are clic sul disposit
F ivo che si utilizza per collegarsi alla rete pubblica, infine sul pulsante “ Apply” per
l
’esecuzione.
sente agli u nessione alla rete pubblica.
tenti di selezionare l’adattatore per la con
- 93 -
Page 94

DATI TECNICI
Standard
IEEE 802.11n bozza 2.0, IEEE 802.11g, IEEE 802.11b, IEEE 802.3, IEEE 802.3u
Interfaccia
USB 2.0
Sicurezza
64/128-bit WEP, WPA (TKIP con IEEE 802.1x), AES
Sensibilità del ricevitore
802.11n tipici -68 dBm
802.11g tipici -73 dBm
802.11b tipici -84 dBm
Canale
USA 11, Europa 13, Giappone 14
Velocità di trasmissione
802.11b: 1, 2, 5.5 e 11Mbps
802.11g: 6, 9, 12, 18, 24, 36, 48, e 54Mbps
802.11n: fino a 150 Mbps
Potenza di trasmissione
16 dBm in genere @ 802.11b
14 dBm in genere @ 802.11g
13 dBm in genere @ 802.11n
Raggio di azione
Interno 35~100 metri
Esterno 100~300 metri
Indicatore LED
Link(Green)
Temperatura operativa
0- 40 0C (32 – 104 0F)
Umidità operativa
10% ~ 90% (senza condensa)
Emissioni
FCC Classe B, CE, VCCI Classe B
- 94 -
Page 95

Manual del usuario
Adaptador USB
rico IEEE 802.11n Draft 2.0 inalámb
- 95 -
Page 96

rtificaciones de la FCC
Ce
laración de interferencias de la Comisión Federal de Comunicaciones
Dec
ha comprobado que este aparato cumple los límites para dispositivos digitales de clase B, de
Se
conformidad con el apartado 15 de las normas de la FCC. Dichos límites
proporcionar una protección razonable contra interferencias dañinas en i
Este equipo genera, utiliza y puede emitir energía de radiofrecuencia, y si n
acuerdo con este manual de instrucciones puede ocasionar interfe
comunicaciones por radio. No obstante, no existe garantía de que no se
una instalación en particular. Si este aparato produce int
televisión, cosa que se puede detectar encendiendo y apagando el aparato, se recomienda al usuario
que las intente corregir mediante uno o más de los siguientes procedimientos:
- Cambiar la orientación de la antena receptora o cambiarla de lugar.
- Aumentar la distancia entre el equipo y el receptor.
- Conectar el equipo a una toma de corriente de un circuito distinto al que está conectado el receptor.
- Consultar al distribuidor o a un técnico de radio y televisión competente.
Este aparato cumple el apartado 15 de las normas de la FCC. Su uso está sujeto a las dos condiciones
siguientes: (1) este aparato no puede ocasionar interferencias dañinas, y (2) este aparato debe aceptar
erferencias dañinas en la recepción de radio o
han sido diseñados para
nstalaciones residenciales.
o se instala y se utiliza de
rencias dañinas en las
produzcan interferencias en
cualquier interferencia que reciba, incluidas aquellas que puedan causar un funcionamiento no
deseado.
Advertencia de la FCC: cualquier modificación o cambio no aprobado expresamente por la parte
responsable de la conformidad puede anular el derecho del usuario a utilizar el aparato.
NOTA IMPORTANTE:
Declaración de la FCC sobre exposición a radiación:
Este equipo cumple los límites de exposición a radiación de la FCC establecidos para entornos no
controlados; debe ser instalado de forma que quede una distancia mínima de 20 cm entre el radiador y
el cuerpo del usuario.
Este transmisor no debe ser colocado junto a cualquier otra antena o transmisor ni debe funcionar
simultáneamente con ellos.
- 96 -
Page 97

Advertencia de Marca de la C
E
Este equipo cumple los requisitos relativos a la compatibilidad electromagnét
para ITE, el requisito de protección esencial de la Directiva del Consejo 2004/108/EC sobre la
aproximación de las leyes de los Estados Miembros relativas a la compatibilidad electromagnética.
La empresa tiene una política de mejora permanente de sus productos y puede ser posible que la
información de este documento no esté actualizada. Rogamos compruebe con sus distribuidores
locales la información más reciente. Ninguna parte de este documento puede copiarse o reproducirse
en forma alguna sin el consentimiento por escrito de la empresa.
ica, EN 55022 clase B
Marcas registradas:
Todos los nombres de marcas y marcas registradas son propiedad de sus respectivas empresas.
Copyright © 2009, Reservados todos los derechos.
- 97 -
Page 98

DESCRIPCIÓN GENERAL
racias por la compra de este producto. Lea este capítulo para conocer su G
Adaptador inalámbrico IEEE 802.11n.
Información de desembalaje
A
ntes de empezar, compruebe que su paquete incluye los siguientes elementos:
1
. Adaptador inalámbrico IEEE 802.11n
2. Un CD de Utilidad /M
anual
- 98 -
Page 99

troducción al Adaptador inalámbrico IEEE 802.11n In
Adaptador inalámbrico IEEE 802.11n permite a los usuarios lanzar unaEl red inalámbrica IEEE
802.11n a 150 Mbps en la frecuencia de 2,4 GHz, que es también compatible con dispositivos
inalámbr
tros ordenadores inalámbricos de 2,4 GHz o con el modo infraestructura para conectar con un AP o
o
n router inalámbrico para acceder a internet. Este adaptador incluye una Utilidad cóm
u
explorar las redes disponibles y guardar las r
sualmente. La encriptación de seguridad también puede configurarse mediante esta utilidad.
u
icos IEEE 802.11b/g. Puede configurar este adaptador con el modo ad-hoc para conectar con
oda para
edes preferidas a las cuales los usuarios se conectan
Características clave
Cumple la norma inalámbrica IEEE
802.11b/g/n
Velocidad de transferencia de datos hasta
150Mbps
Soporta “QoS Enhancement” ( WMM,
WMM-PS Client mode)
Soporta “Frame aggregation”, Modo de ahorro
de energía y Administración y Coexistencia de
canales.
Soporta utilidades de auto instalación y
diagnóstico.
Soporta encriptación de datos inalámbrico con
WEP 64/128 bit, WPA (TKIP con IEEE 802 .1x) y
funciones AES.
- 99 -
Page 100

GUÍA DE INSTALACIÓN
Instalación
Nota: La siguiente guía de instalación del controlador utiliza Windows XP como sistema operativo
supuesto. Los procedimientos y pantallas en Windows 98se y 2000 son similares a las de Windows XP.
1. Desenchufe el cable de alimentación del ordenador de la toma de corriente. Quite la tapa del
ordenador.
2. Instale el adaptador en una toma PCI, una ranura PCMIA o un puerto USB.
3. Aparece la ventana "Found New Hardware Wizard" (Asistente de Encontrado Nuevo Hardware).
(Nota: El asistente no aparecerá en Windows 98 y ME. El sistema encuentra el nuevo hardware y
lo instala automáticamente. Omita los siguientes pasos y reinicie el sistema después de la
instalación).
4. clic en el botón "Cancel".
Inserte el CD-Rom que viene con este producto en la unidad de CD-R om. Aparece automáticamente
ventana del menú. Haga clic en el botón "Driver-WIN" (controlador) de este producto. la
- 100 -
 Loading...