

Page 1
Getting started with the
Log
itech"' Harmony"' One Remote
~
~
Logitech
@
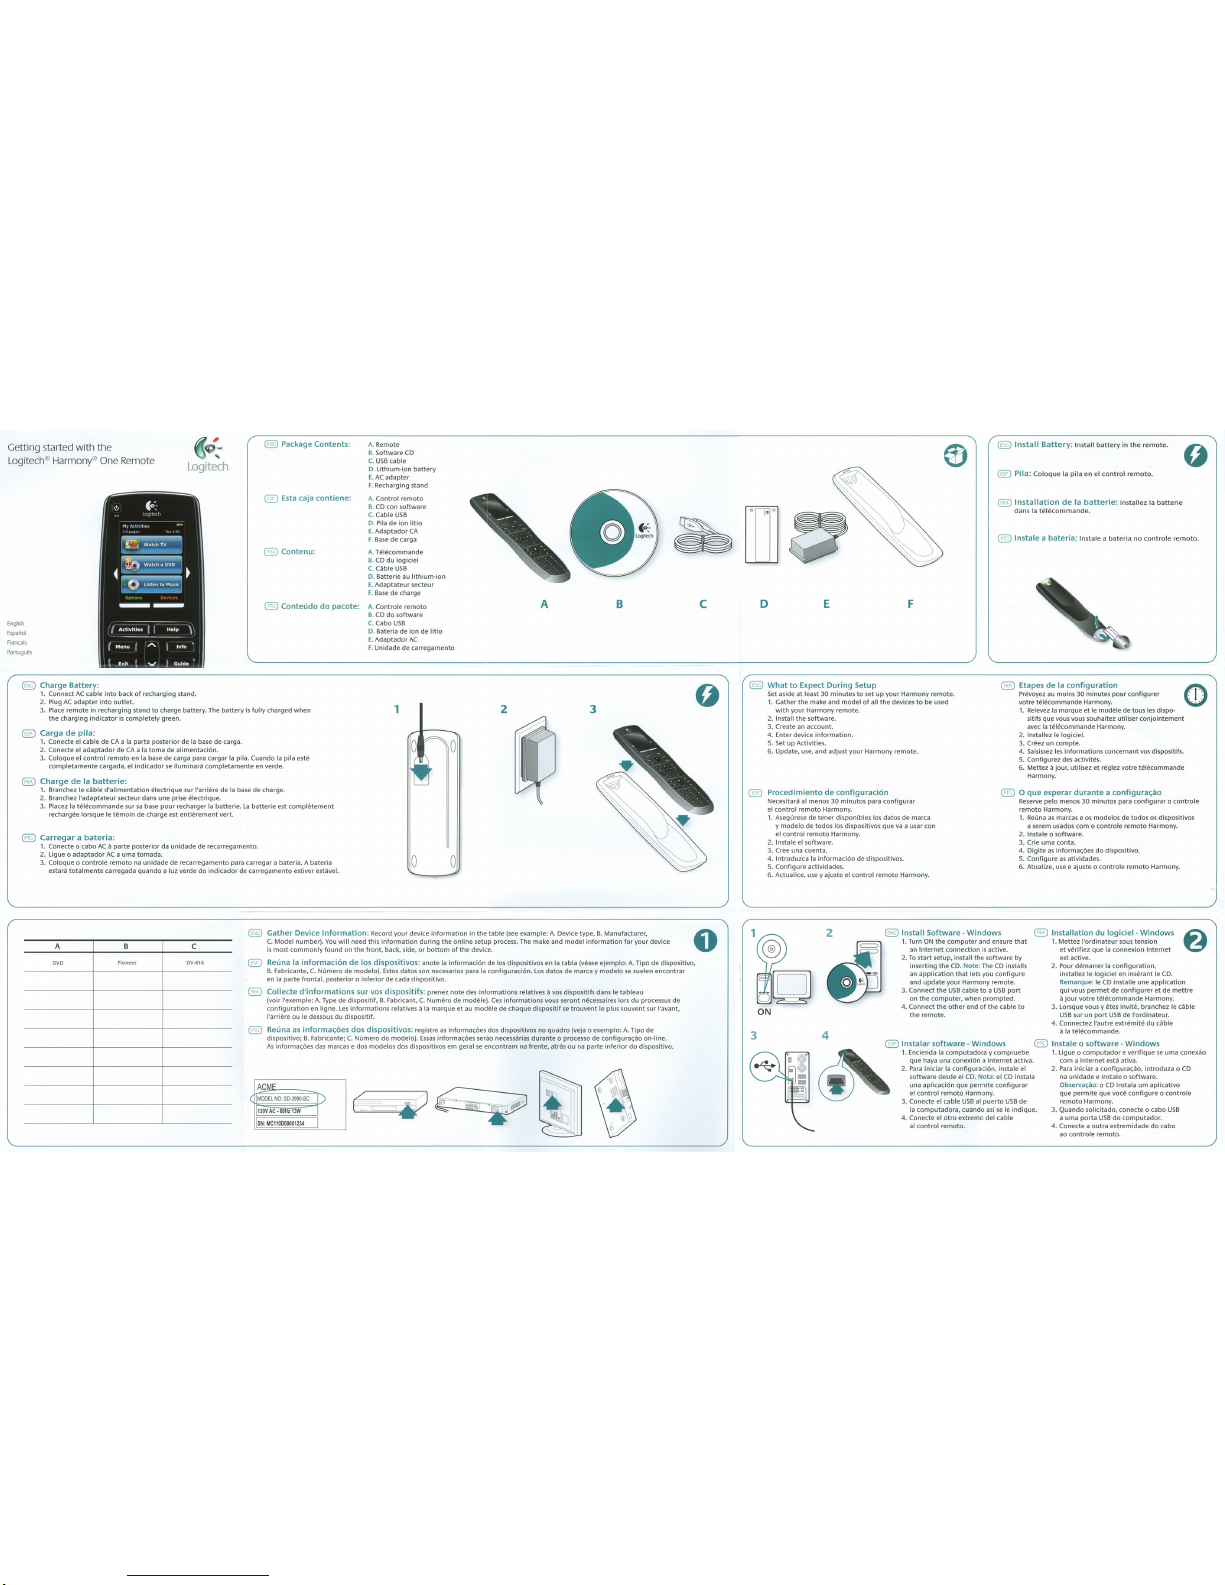
Pa
ckage Contents:
0 Esta caja
contiene:
~
Contenu:
A.
Remote
B.
Software
CD
C.
USB
cable
D.
lithium-ion
battery
E.
AC
adapter
F.
Recharging
stand
A. Control
remota
B.
CO
con software
C.
Cable
USB
D. Pita
de
ion
Jitio
E.
Adaptador
CA
F. Basedecarga
A.
Teh~commande
B.
CD
du
logiciel
C.
C~ble
USB
D.
Batterieau
lithium-ion
E.
Adaptateursecteur
F. Base
de
charge
®
Co
nteUdo do pacote:
A.
Controte
remota
English
Espanot
Fran<;ais
Portugu~
@
Ch
arge B
attery:
1.
Connect
AC
cable
into
back
of
recharging stand.
2.
Plug
AC
adapter
into
outlet.
3.
Place remote in recharging stand
to
charge battery. The battery
is
fully
charged when
the
charging
indicator
is
completely green.
@ Car
ga
de
pit
a:
1.
Conecte
et
cable
de
CA
a Ia parte posterior de
Ia
base de carga.
2.
Conecte
et
adaptador
de
CA a Ia
toma de atimentaci6n.
3. Cotoque
et
control
remota
en
Ia
base
de
carga para cargar
Ia pita.
Cuando
Ia
pita est{!
completamente
cargada, et indicador
se
iluminar~
comptetamente en verde.
~
Cha r
ge
de Ia b atteri e:
1.
Branchez te cable
d'alimentation
etectrique sur l'arriere de
Ia
base
de
charge.
2.
Branchez t'adaptateur secteur dans une prise etectrique.
3.
Placez Ia tetecommande sur
sa
base
pour
recharger
Ia
batterie.
La
batterie est
completement
rechargee lorsque te
temoin
de
charge est
entierement
vert.
@ Ca
rr
ega
r a bateria:
1.
Conecte o cabo
AC
a parte posterior da unidade de recarregamento.
2.
Ugue o adaptador
AC
a uma tomada.
3.
Coloque o controte
remota
na
unidade
de recarregamento para carregar a bateria. A bate ria
estar~
total
mente carregada quando a tuz verde
do
indicador
de carregamento estiver
est~vel.
B.
CD
do
software
C.
Cabo
USB
D.
Bateria
de
fon de
lftio
E.
Adaptador
AC
F.
Unidade
de
carregamento
0 0
A
B
2 3
@ Gather Device In
formation:
Record
your
device
information
in
the
table
(see
example:
A.
Device type,
B.
Manufacturer,
A c
C.
Model number).
You
will
need this
information
during
the
online
setup process. The make and model
information
for
your device
is
most
commonly
found
on
the
front.
back. side,
or
bottom
of
the
device.
c
0
@ Reli na Ia inf
ormaci6n
de los dispositivos: anote
Ia
informaci6n
de
los dispositivos en
Ia
tabla (vease ejemplo:
A.
Tipo
de
dispositive.
B.
Fabricante,
C.
NUmero
de
modelo).
Estos
datos
son
necesarios para
Ia
configuraci6n.
los
datos
de
marca y modele
se
suelen encontrar
en
Ia
parte frontal, posterior o
inferior
de cada dispositive.
~
Co
llecte d'inform
ations
sur vos disp
ositifs:
prenez
note
des informations relatives
avos
dispositifs dans le tableau
(voir l'exemple:
A.
Type de dispositif,
B.
Fabricant,
C.
Numero
de
modele).
Ces
informations vous seront necessaires tors
du
processus de
configuration
en ligne.
Les
informations relatives a
Ia
marque
et
au modele
de
chaque dispositif
se
trouvent
le plus souvent sur
I'
avant,
l'arriere ou le dessous
du
dispositif.
@ Relina
as informac;Oes
dos disposi
tivos
: registre
as
informa<;6es dos dispositivos no
quadro
(veja o exemplo:
A.
Tipo
de
dispositive;
B.
Fabricante;
C.
NUmero
do
modele).
Essas
informa<;6es serao
necess~rias
durante o processo de configura<;ao on-line.
As
informa<;6es das marcas e dos modelos dos dispositivos em geral
se
encontram
na
frente, atras ou
na
parte
inferior
do
dispositive.
ACME_
IIMODELNO:SD-3990-SC
l
sN:MC110D0000123-4
D E F
@
In
sta
ll
Batte
ry: I nstall
battery
in
th e
remote.
@
Pi
la: Col
oque
Ia
pita
en
el
control remota.
@)Installation
de
Ia
batterie:
insta
llez Ia
batterie
dans
Ia tel
ecommande.
@ Instate a
bate
ria: I nstate a
bateria
no
contro
le
remota.
@ W h
at
to
Expect
Dur
ing Setup
@ E
ta
pes
de
Ia configurat
ion
(i)
·.·.l·.·
..
Set
aside
at
least
30
minutes
to
set
up
your
Harmony remote.
1.
Gather the make and
model
of
all
the
devices
to
be used
w
ith
your Harmony remote.
2. Install the software.
3. Create
an
account.
4. Enter device information.
5.
Setup
Activities.
6. Update,
use,
and adjust your Harmony remote.
Prevoyez
au
moins
30
minutes pour conflgurer
votre tetecommande Harmony.
1.
Relevez
Ia
marque et le modele
de
tous l
es
dispositifs que vous vous souhaitez utiliser conjointement
avec
Ia
telecommande Harmony.
2.
lnstallez le logiciel.
3.
Creez un compte.
4.
Saisissez
les
informations concernant
vos
dispositifs.
5.
Configurezdesactivites.
6. Mettez a
jour
, utilisez
et
reglez votre tetecommande
Harmony.
B Procedi
miento
de
configur
aci6n
Necesitara
al
menos
30
minutes
para
configurar
el
control
remota
Harmony.
@ 0 qu e
es
perar
durante
a conf igurac;ao
Reserve pelo menos
30
minutes para
configurar
o controle
remota
Harmony.
1.
AsegUrese
de
tener disponibles los datos
de
marca
y
modelo
de
todos los dispositivos que
va
a usar con
el
control
remota
Harmony.
2. Instate el
software.
3. Cree
unacuenta.
4. lntroduzca
Ia
informaci6n
de
dispositivos.
5. Configure actividades.
6. Actualice,
use
y ajuste el
control
remota
Harmony.
1.
ReUna
as
marcas e
os
mode los de todos
os
dispositivos
a serem usados
como
controle
remota
Harmony.
2.
lnstaleosoftware.
3.
Crieumaconta.
4.
Digite
as
informa<;Oes
do
dispositive.
5.
Configure
as
atividades.
6. Atua lize,
use
e ajuste o controle remota Harmony.
1 2 @
In
stall
Softwa
re · Win
dows
I
tJ
1.T,m0Nthommp""""d'"'""'""
@ Install
atio
n du logiciel - W
ind
ows
an
Internet
connection 1sactive.
2.
To
start setup, install
the
software by
inserting
the
CD.
Note
: The
CD
installs
g
. -
an
application
that
lets you
configure
Q
!i
and update your Harmony remote.
3. Connect
the
USB
cable
to a USB
port
on
the
computer, when
prompted.
0 N 4.
~~;~:~t0~~~
other
end
of
the
cable
to
1.
Mettez
l'ordinateur
sous tension
et verifiez que
Ia
connexion
Internet
est active.
2.
Pour d{!marrer Ia
configuration,
installez
le logiciel en inserant le
CO.
Remarque: le
CO
installe une
application
qui vous
permet
de
configurer
et
de
mettre
a
jour
votre tetecommande Harmony.
3.
Lorsque vous y etes invite, branchez le
dble
USB
sur un
port
USB
de l'ordinateur.
4. Connectez !'autre
extremitl!
du cable
a
Ia
telecommande.
3 4
@ l
ns
ta lar s
oftware-
Windows @ Instate o software-Window
s
81
~
1.
Encienda
Ia
computadora y
compruebe
que haya
unaconexi6na
lnternetactiva.
2.
Para
iniciar
Ia
configuraci6n, instate el
software desde el
CO.
Nota:
el
CO
instala
una
aplicad6n
que permite
configurar
el
control
remota Harmony.
3.
Conecte el cable
USB
al
puerto
USB
de
Ia
computadora, cuando asi
se
le indique.
4. Conecte el
otro
extrema del cable
al
control
remota.
l.ligue o computador
e verifique
se
uma conexao
com a
lnternetesta
ativa.
2.
Para
iniciar a configura<;ao, introduza o
CD
na
unidade
e instate o software.
Observa<;iio: o
CD
instala urn aplicativo
que permite que voce
configure
o controle
remota
Harmony.
3.
Quando solicitado, conecte o cabo
USB
a uma
porta
USB
do
computador.
4. Conecte a
outra
extremidade
do
cabo
ao controle remota.
Page 2
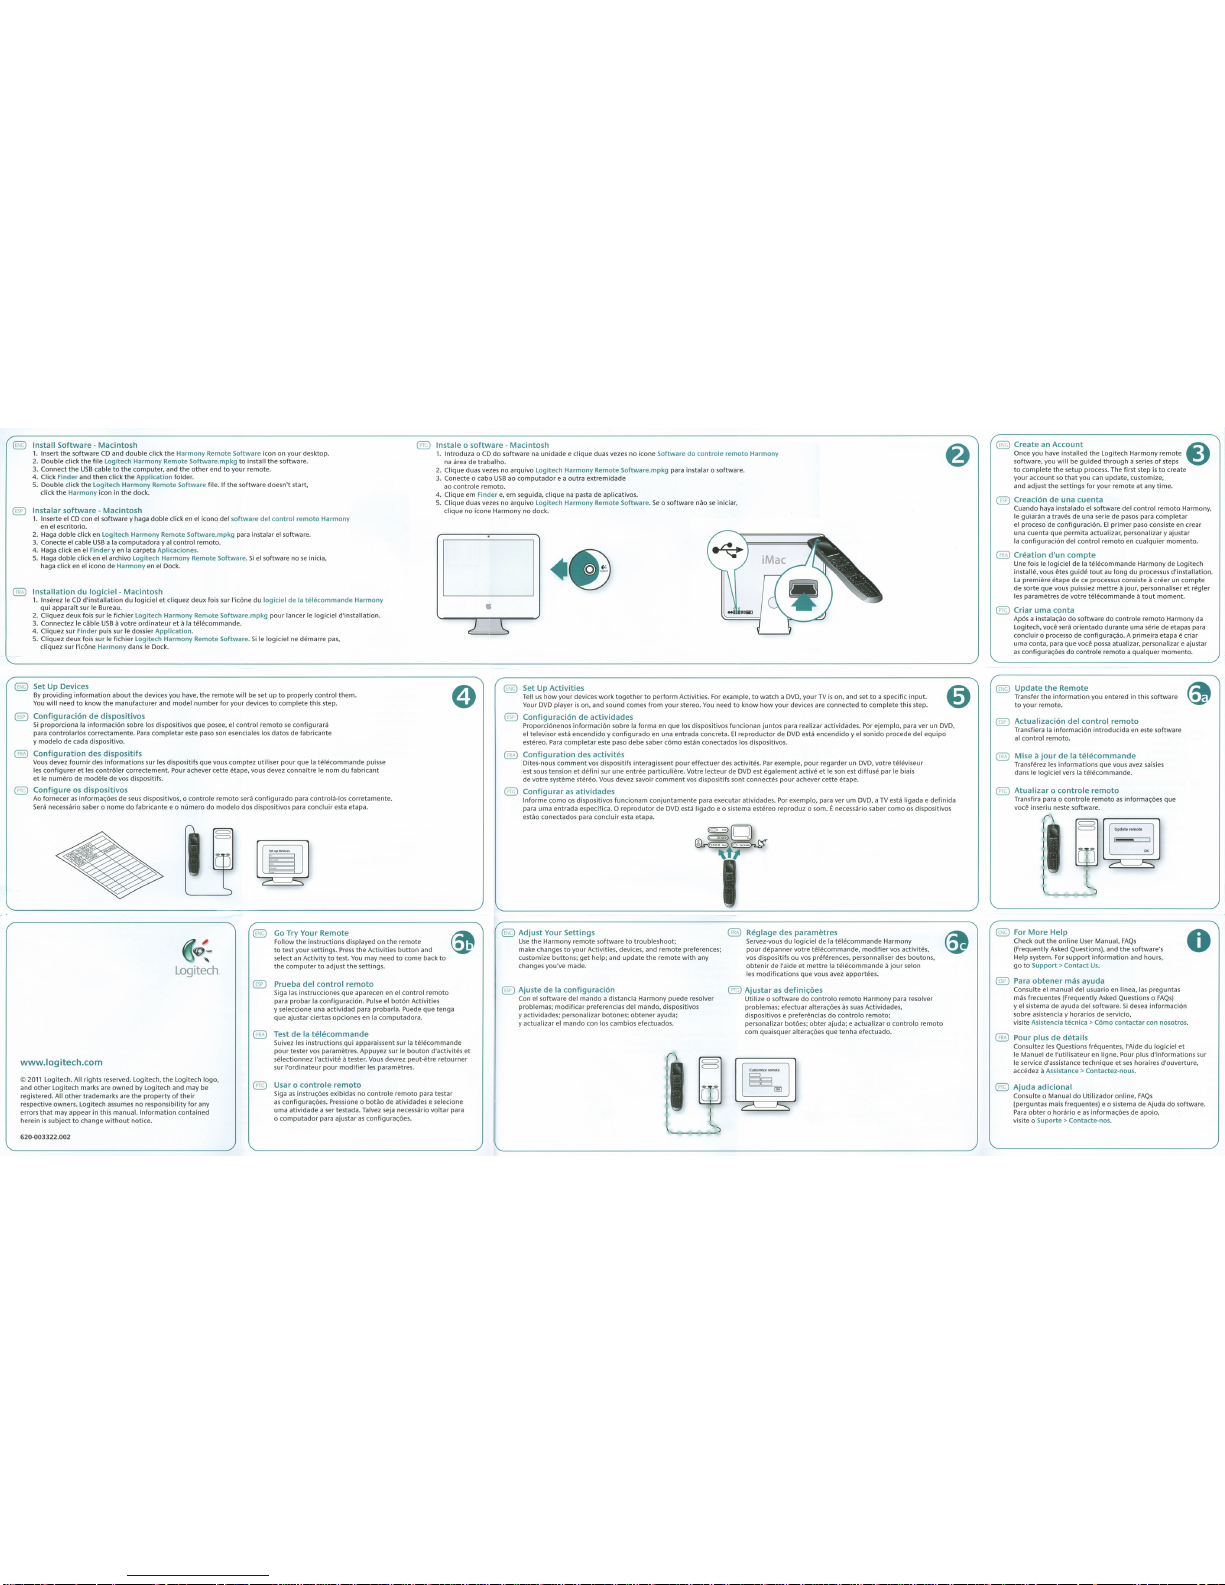
@ Install
Software·
Macintosh @ lnstale o
software·
Macintosh
1.
Insert the software
CD
and double click the Harmony Remote Software icon on your desktop.
2. Double
click the file Logitech Harmony Remote Software.mpkg
to
install the software.
1.
lntroduza o
CD
do
software
na
unidade e clique duas
vezes
no leone Software do
controle
remota
Harmony
natirea
detrabalho.
3. Connect
the
USB
cable
to
the computer, and the other end
to
your remote.
2. Clique duas
vezes
no arquivo Logitech Harmony Remote Software.mpkg para instalar o software.
4. Click Finder and then click the Application folder.
5. Double click the Logitech
Harmony Remote Software file.
If
the software doesn't start,
click the Harmony icon in the dock.
3. Conecte o cabo
USB
ao
computador
e a outra extremidade
ao controle remota.
4. Clique em Finder
e,
em seguida, clique
na
pasta de aplicativos.
@ lnstalar
software·
Macintosh
5. Clique duas
vezes
no arquivo Logitech Harmony Remote Software.
Se
o software nao
se
iniciar,
clique no fcone Harmony no dock.
1.
lnserte
el
CD
con el software y haga doble click
en
el icono del software del
control
remota
Harmony
enelescritorio.
2.
Haga
doble click en Logitech Harmony Remote Software.mpkg para instalar
el
software.
3. Conecte el cable
USB a Ia
computadora y
al
control remota.
4.
Haga
click en el Finder
yen
Ia
carpeta Aplicaciones.
5.
Haga
doble click en el archivo Logitech Harmony Remote Software.
Si
el
software
nose
inicia,
haga
click
en
el icono de Harmony en el Dock.
(§)
Installation du
logiciel·
Macintosh
D •.,
1.
lnsl!rez le
CD
d'installation du logiciel
et
cliquez deux fois sur l'ic6ne du logiciel
de
Ia
b!ll!commande
Harmony
qui apparaft sur le Bureau.
2. Cliquez deux fois sur le fichier
logitech
Harmony Remote Software.mpkg
pour
lancer
le
logiciel d'installation.
3. Connectez le
cable
USB
a votre ordinateur
eta
Ia
tl!ll!commande.
4. Cliquez sur Finder puis sur
le
dossier Application.
5. Cliquez deux fois sur le fichier Logitech Harmony Remote Software.
Si
le logiciel ne dl!marre
pas,
cliquez sur l'ic6ne Harmony dans
le
Dock.
@ Set Up Devices
By
providing
information
about
the devices you have, the remote will be set up
to
properly control them.
You
will need
to
know the manufacturer and model number
for
your devices
to
complete this step.
® Configuraci6n de dispositivos
Si
proporciona
Ia
informaci6n sabre los dispositivos que posee, el control remota
se
configurarti
para controlarlos correctamente.
Para
completar este paso
son
esenciales los datos de fabricante
y modele de cada dispositive.
@
Configuration
des dispositifs
Vous
devez
fournir
des
informations sur les dispositifs que vous comptez utiliser
pour
que
Ia
tl!ll!commande puisse
les
configurer
et
les contr61er correctement. Pour achever cette l!tape, vous devez connaitre le nom du fabricant
et
le numl!ro de modele de
vos
dispositifs.
@ Configure
os
dispositivos
Ao
fornecer
as
informat;:Oes de
seus
dispositivos, o controle remota serti configurado para controlti-los corretamente.
Serti necesstirio saber o nome do fabricante
eo
nlimero
do
modelo dos dispositivos para concluir esta etapa.
~
~
Logitech
www.logitech.com
e
2011
Logitech. All rights reserved. Logitech, the Logitech logo,
and other Logitech marks are owned by Logitech and may be
registered.
All other trademarks
are the property
of
their
respective owners.
logitech
assumes no responsibility
for
any
errors
that
may appear in this manual. Information contained
herein
is
subject
to
change
without
notice.
620-003322.002
Go
Try Your Remote
~
Follow the instructions displayed on the remote
• I
to
test your settings.
Press
the Activities
button
and
select
an
Activity
to
test.
You
may need
to
come back
to
the
computer
to
adjust
the
settings.
® Prueba del
control
remote
Siga
las
instrucciones que aparecen en el control remota
para probar
Ia
configuraci6n.
Pulse
el
bot6n
Activities
y seleccione una actividad para probarla.
Puede que tenga
que ajustar ciertas opciones en
Ia
computadora.
@ Test de
Ia
teh~commande
Suivez
les
instructions qui apparaissent sur
Ia
tl!h~commande
pour
tester
vos
parametres. Appuyez sur le bouton d'activitl!s
et
sl!lectionnez l'activitl! a tester.
Vous
devrez peut-etre retourner
sur l'ordinateur
pour
modifier
les parametres.
@ Usar o
centrale
remota
Siga
as
instrut;:Oes
exibidas no controle remota para testar
as
configurat;:Oes. Pressione o batao de atividades e selecione
uma atividade a
ser testada.
Talvez
seja
necesstirio voltar para
o computador para ajustar
as
configurat;:6es.
•
@D
Set Up Activities 0
Tell
us
how
your devices work
together
to
perform Activities. For example,
to
watch a
DVD,
your TV
is
on, and set
to
a specific input.
Your
DVD
player
is
on, and sound comes
from
your stereo.
You
need to know
how
your devices are connected
to
complete this step.
0 Configuraci6n de actividades
Proporci6nenos informaci6n sobre
Ia
forma en que los dispositivos funcionan juntos para realizar actividades.
Por
ejemplo, para ver un
DVD,
el televisor estti encendido y configurado en una entrada concreta.
El
reproductor de
DVD
estti encendido y el sonido procede del equipo
estl!reo.
Para
completar este paso debe saber c6mo estim conectados los dispositivos.
@
Configuration
des activites
Dites-nous
comment
vos
dispositifs interagissent
pour
effectuer
des
activitl!s.
Par
exemple,
pour
regarder un
DVD.
votre tl!ll!viseur
est
sous
tension et defini sur une entree particuliere. Votre lecteur de
DVD
est egalement active
et
le
son
est diffuse par
le
biais
de votre systeme
stereo.
Vous
devez savoir comment
vos
dispositifs sont connectes
pour
achever cette etape.
§)
Configurar
as
atividades
lnforme como
os
dispositivos funcionam conjuntamente para executar atividades. Por exemplo, para ver um
DVD,
a TVestil ligada e definida
para uma entrada especifica.
0 reprodutor de
DVD
estti ligado
eo
sistema estl!reo reproduz o som. E necesstirio saber como
os
dispositivos
estao conectados para concluir esta etapa.
@D Adjust Your Settings
use the Harmony remote software
to
troubleshoot;
make changes
to
your Activities, devices, and remote preferences;
customize buttons;
get
help; and update the remote
with
any
changes you've made.
@ Ajuste de
Ia
configuraci6n
Con
el software del mando a distancia Harmony puede resolver
problemas; modificar preferencias del mando, dispositivos
y actividades; personalizar botones;
obtener
ayuda;
y actualizar
el mando con los cam bios efectuados.
(10
Reglage des parametres
Servez-vous du logiciel de
Ia
telecommande Harmony
pour
dl!panner votre telecommande, modifier
vos
activites,
vos
dispositifs ou
vos
pn!fl!rences, personnaliser
des
boutons,
obtenir
de l'aide
et
mettre
Ia
tl!lecommande a
jour
selon
les
modifications que vous avez apportees.
@ Ajustar
as
definic:;6es
Utilize o software do
controlo
remota Harmony para resolver
problemas; efectuar
alterat;:Oes
as
suas
Actividades,
dispositivos
e prefer@ncias
do
controlo remota;
personalizar bot6es;
obter
ajuda; e actualizar o control a remota
com quaisquer
alterat;:Oes
que tenha efectuado.
r,
!I;~
I I
\
___
::..)
@ Create an Account
@)
Once you have installed the
logitech
Harmony remote
software, you
will
be guided through a series
of
steps
to
complete the setup process. The first step
is
to
create
your account
so
that
you can update, customize,
and adjust the
settings
for
your remote at any time.
(ill)
Creaci6n de una cuenta
Cuando haya instalado
el
software del control remota Harmony,
le
guiartin a traves de una serie de pasos para completar
el proceso de configuraci6n.
El
primer paso consiste en crear
una cuenta que permita actualizar, personalizar y ajustar
Ia
configuraci6n del control remota
en
cualquier momenta.
@)
creation
d'un
compte
Une fois le logiciel de
Ia
tl!lecommande Harmony de Logitech
installe, vous etes guide
tout
au long du processus d'installation.
La
premiere etape de
ce
processus consiste a creer un
compte
de sorte que vous puissiez
mettre
a jour, personnaliser et regler
les
parametres de votre telecommande a
tout
moment.
@ Criar uma conta
Ap6s a instalat;:ao
do
software do controle remota Harmony
da
Logitech, voce serti orientado durante uma sl!rie de eta
pas
para
concluir o processo de configurac;:ao. A primeira etapa
e criar
uma conta,
para que
voce
possa
atualizar, personalizar e ajustar
as
configurat;:Oes do controle remota a qualquer momenta.
@D
Update
the
Remote
Transfer the information you entered in this software
to
your remote.
@ Actualizaci6n del
control
remota
Transfiera
Ia
informaci6n introducida en este software
al
control remota.
@)
Mise a
jour
de
Ia
telecommande
Transfl!rez
les
informations que vous avez saisies
dans le logiciel vers
Ia
telecommande.
@
Atualizar o controle
remota
Transfira para o controle remota
as
informat;:Oes que
voce inseriu neste software.
rt~~
I I
~
____
::::_')
@ For
More
Help
Check
out
the online
User
Manual,
FAQs
(Frequently
Asked
Questions), and the software's
Help system.
For
support information and hours,
go
to
Support>
Contact Us.
® Para
obtener
mas ayuda
Consulte el manual del usuario en lfnea,
las
preguntas
mtis frecuentes (Frequently
Asked
Questions o
FAQs)
y el sistema de ayuda del software.
Si
desea informaci6n
sabre asistencia y horarios de servicio,
0
visite Asistenda tl!cnica > C6mo contactar con nosotros.
(10
Pour plus de details
Consultez
les
Questions frl!quentes, I'Aide du logiciel
et
le
Manuel de l'utilisateur en ligne. Pour plus d'informations sur
le
service d'assistance technique
et
ses
horaires d'ouverture,
accedez
a Assistance> Contactez-nous.
@ Ajuda adicional
Consulte o Manual do Utilizador online,
FAQs
(perguntas mais frequentes) e o sistema de Ajuda
do
software.
Para
obter
o hortirio e
as
informat;:6es de apoio,
visite o Suporte >
Contacte--nos.
Page 3

Logitech
Page 4
.
-
English
..
................................................................ 4
Espanol
................................................................
19
Fran<;:ais
................................................................
34
Portugues
............................................................
49
3
Page 5
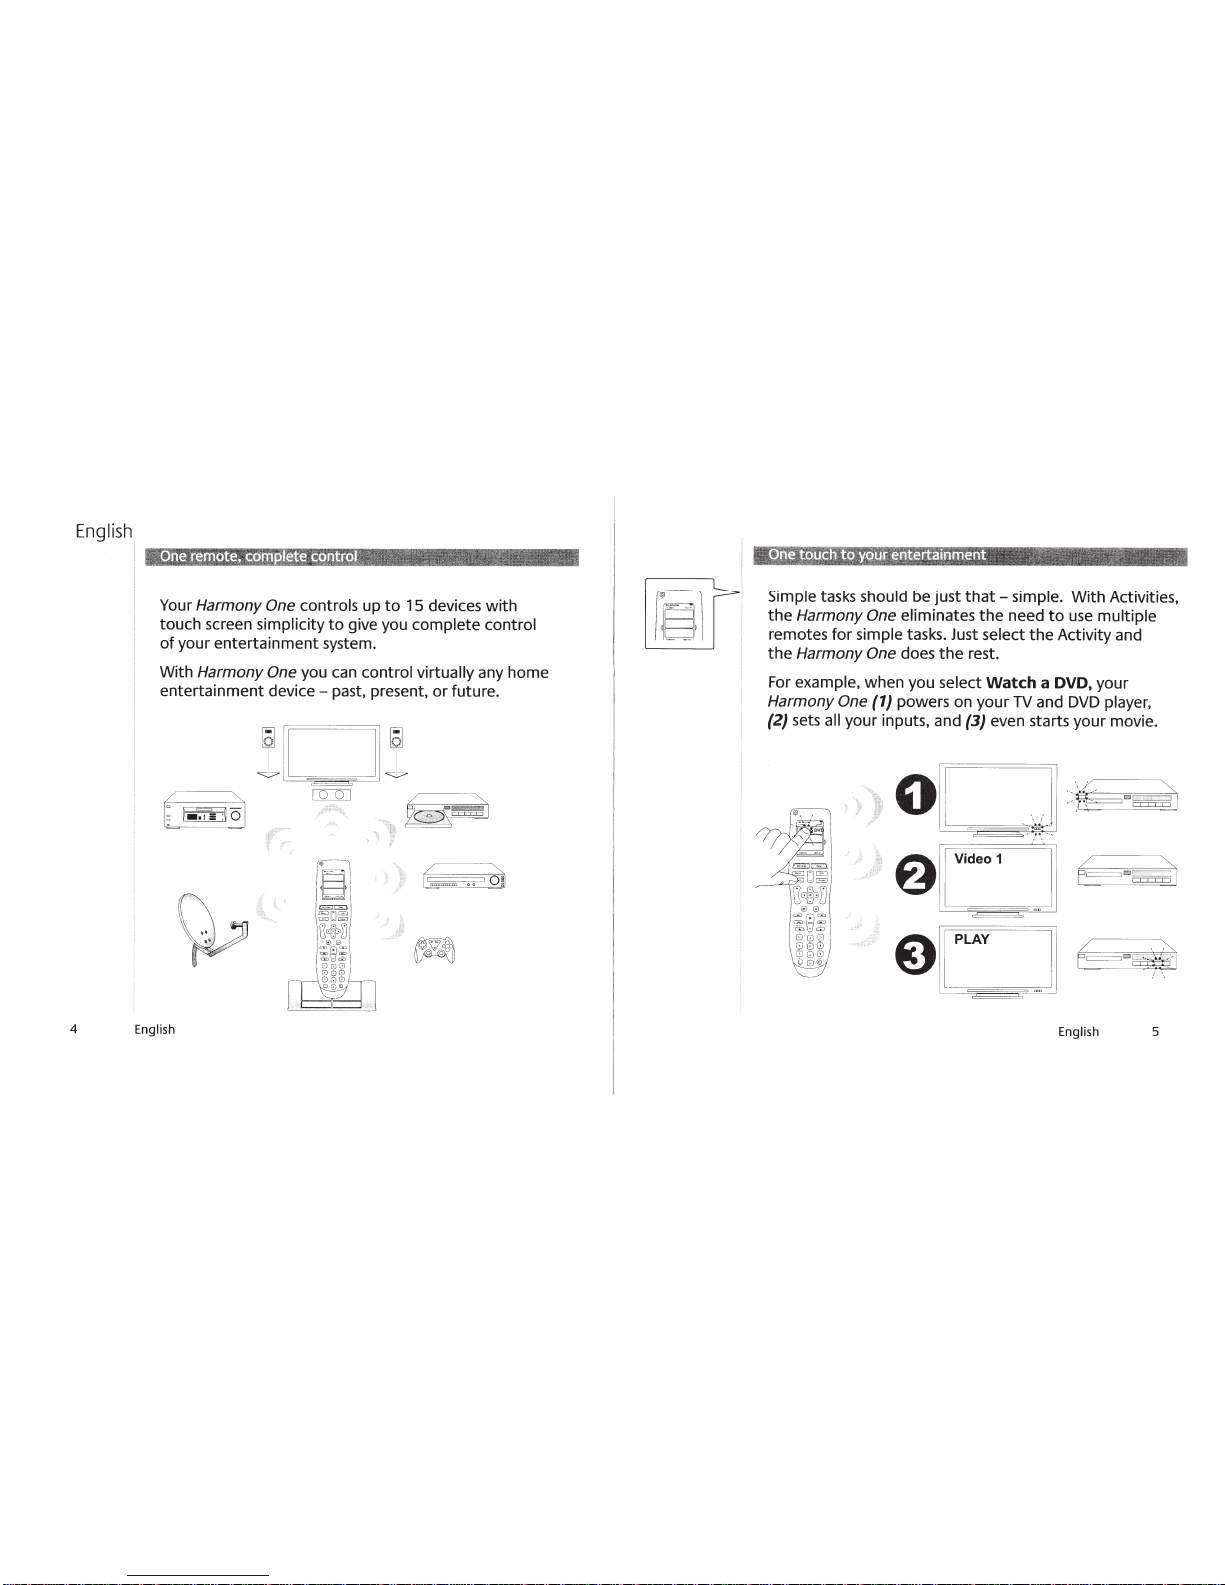
English
4
Your Harmony One
controls up
to
15 devices
with
touch
screen
simplicity
to
give you
complete
control
of
your
entertainment
system.
With Harmony One you can
control virtually
any home
entertainment
device-
past, present,
or
future.
r
~
n
..
..-=
..
l=l_o
!=· - --
English
:
11
. II!
~~
-
=
.
-
·
w
~
~
ji
--
·- ·
:
/
~
~~
[
~
!
wgu
i
Simple
tasks should
be
just
that-
simple.
With
Activiti
es,
the
Harmony One eliminates
the
need
to
use
multiple
remotes
for
simple
tasks. Just
select
the
Activity and
the
Harmony One does
th
e rest.
For
example,
when you select
Watch a DVD,
your
Harmony One
{1)
powers on
your
TV
and
DVD
player,
{2)
sets
all
your
inputs, and
(3)
even starts
your
movie.
English
5
Page 6
6
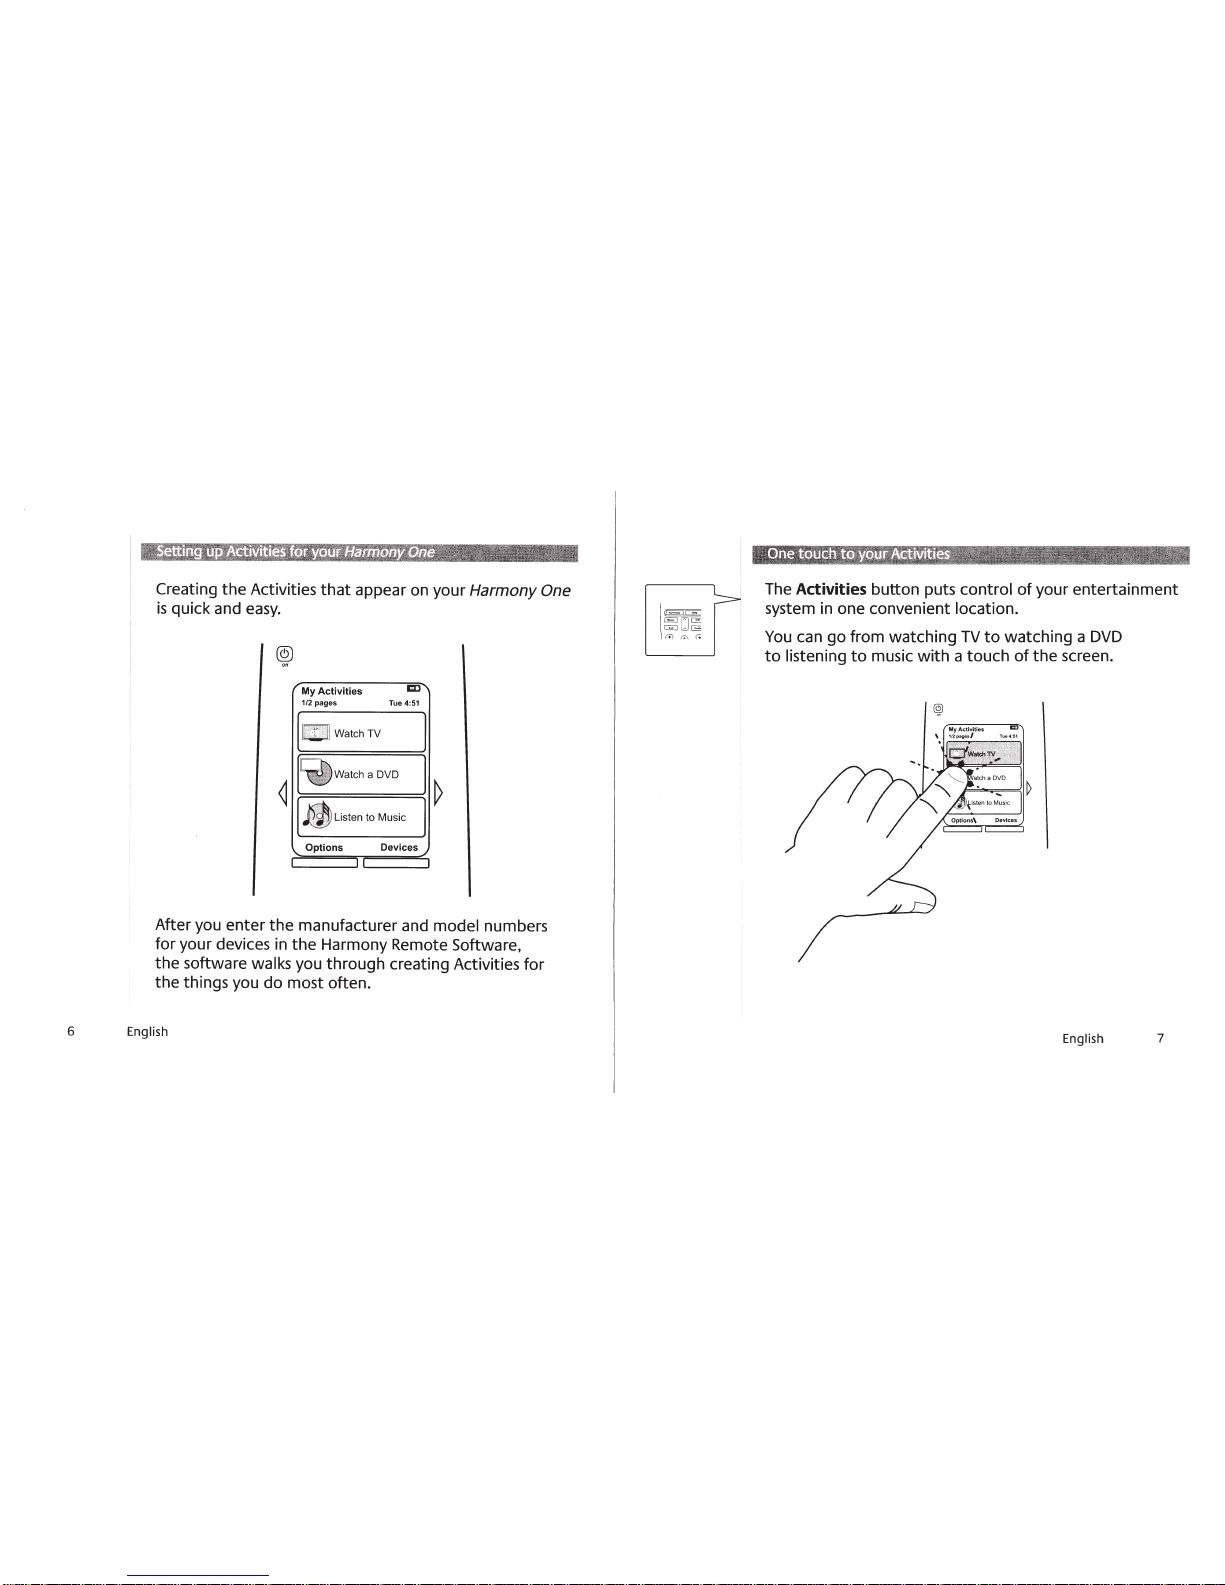
Creating
the
Activities
that
appear on your
Harmony One
is
quick and
easy.
My
Activities
1/2
pages
Options
lCD
Tue 4:
51
Devices
After you enter
the
manufacturer and
model
numbers
for your devices in
the
Harmony Remote Software,
the
software
walks
you through creating Activities
for
the
things you
do
most often.
English
The
Activities
button puts
control
of
your entertainment
system in one convenient location.
You
can
go
from watching
TV
to
watching a
DVD
to
listening
to
music
with
a touch
of
the
screen.
English
7
Page 7
8
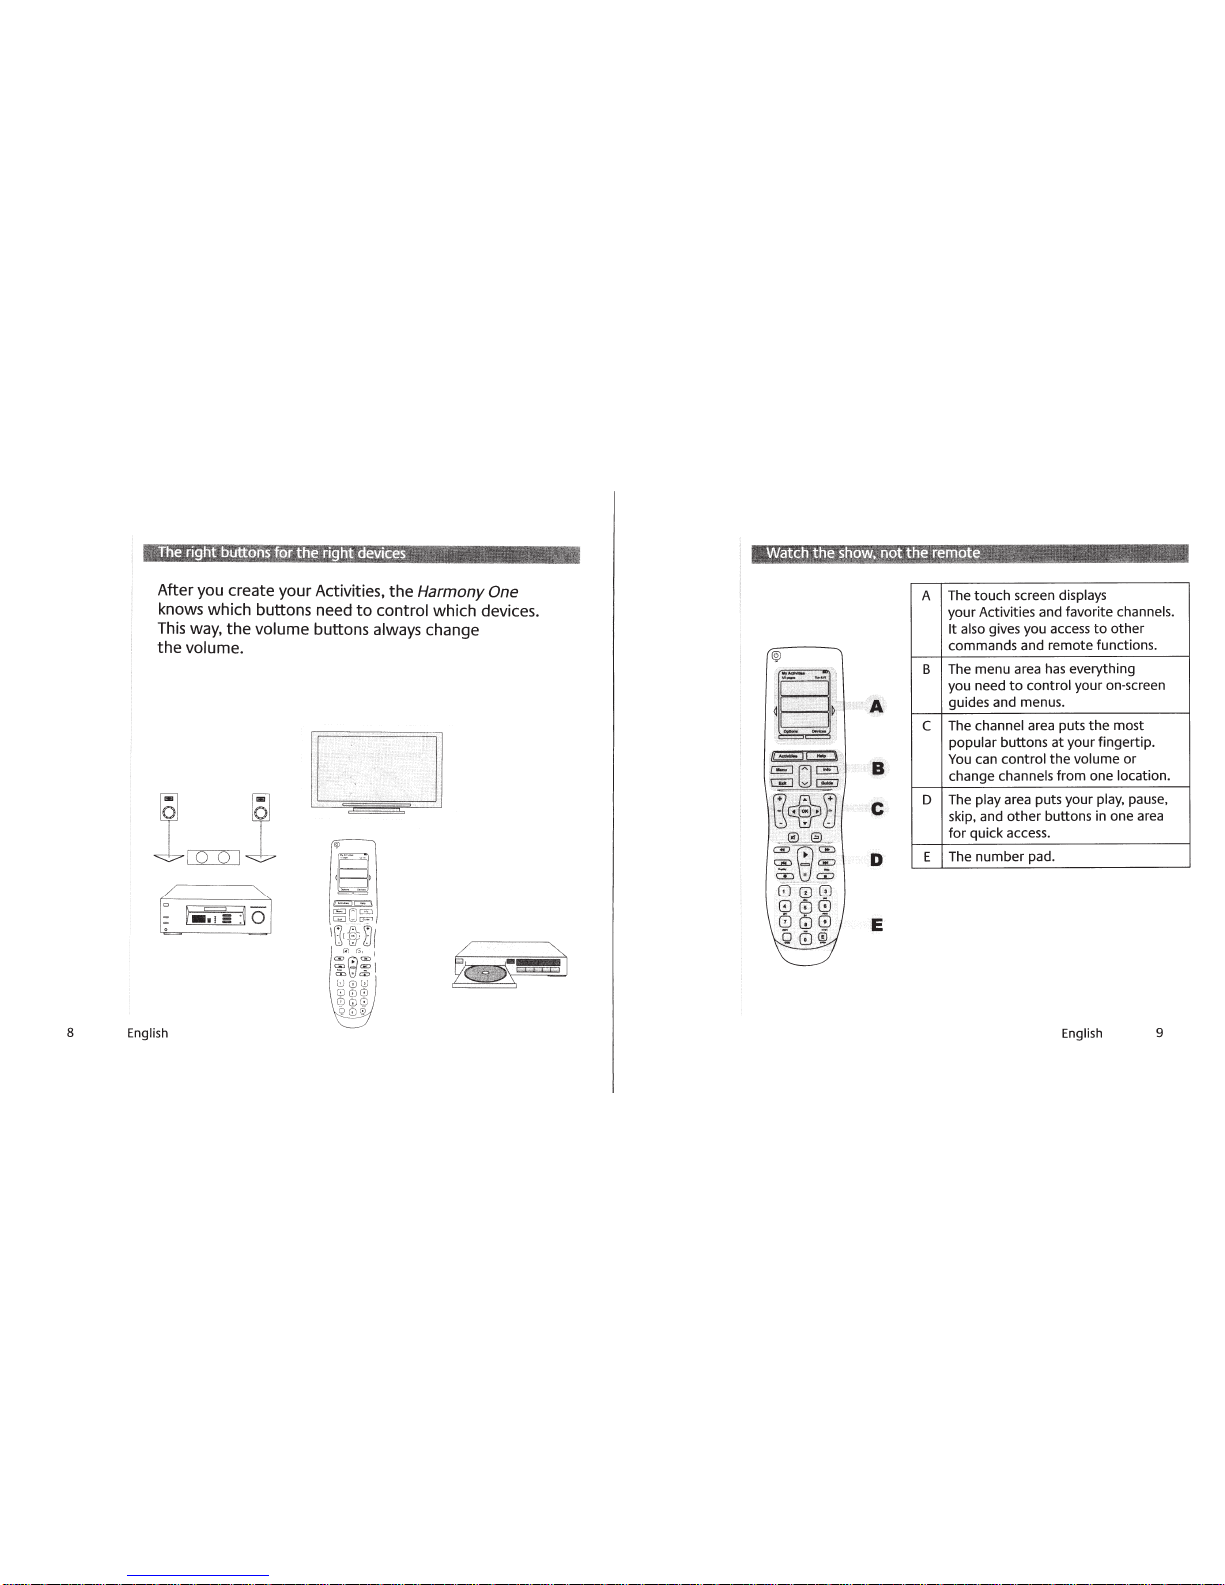
After you create your Activities, the
Harmony
One
knows which buttons need
to
control
which devices.
This
way,
the
volume
buttons
always change
the
volume.
English
A
B
c
B:
c
D
D
E
E
The
touch
sc
reen
di
splays
your Activities and favorite
channel
s.
It
also
gives you access
to
other
commands and rem
ote
functions.
The menu ar
ea
has
everything
you need
to
cont
rol
your on-screen
guides and menus.
The
channel
area puts the most
popular
buttons at y
our
fingertip.
You
can
control
the
volume
or
change channels
from
one
location.
The
play
area puts your
play,
pause,
skip, and
othe
r buttons in one ar
ea
for
quick access.
The number pad.
English
9
Page 8

10
You
can use
the
touch
screen
{A)
to
select
Activities
or
change
to
a favorite channel.
MyActlvhies
B
§
..
_
,,
,,
.......
'
.
A
t\
.
~
·v
,~
.
A
B
Use
the
navigation
arrows on
the
sides
of
the
remote's screen
{B)
to
see
more options.
The touch screen
is
color-coded
to
remind you which
menu you are in:
• Blue
for
Activities
•
•
Green
for
Remote Options
Amber
for
Devices
Using
the
Harmony Remote Software, you can even
select
different themes
for
your remote's screen.
English
Looking
for
a button
to
do
something specific?
That's
easy!
You
can
use
the
Harmony Remote Software
to
customize
the
buttons on
the
remote.
You
can even create your
own
buttons
that
appear
on
the
touch
screen.
English
11
Page 9

12
If
a device doesn't do
what
you expect
when you choose
an
Activity,
press
the
Help
button and the
Harmony
One
uses
simple
yes
or
no questions
to
guide you
through fixing
the
problem.
English
0 0
With
the
Harmony Remote Software, you can create
a slideshow
of
your favorite pictures
that
will
show on
your
Harmony
One's
screen.
English
13
Page 10

14
The
Harmony
One
puts all your favorite
channels
in
one spot!
Using
the
Harmony Remote Software, choose
the
channels
you watch most often and they will appear
in one
location
on
the
remote's screen.
You
can even add
graphics and
logos
to
each
channel
that
shows on your remote's
screen.
English
Fav.
Channels
At Logitech,
we
like
to
keep up-to-date on
the
latest
technology. That's why
we
keep updating
our device
list,
so
you can
get
the
most
out
of
your
Harmony One.
We
also
enhance
the
software
that
drives your
remote,
so
it's important
to
update
it
every
so
often!
To
update your remote, simply
connect
the
remote
to
your computer and start
the
Harmony Remote
Software.
It
will
update your remote automatically.
English
15
Page 11

16
Although
we update our device
list
often, there
are
always
new devices
in
the
market.
If
you have a device that's
not
in our
list
yet, we've
still
got
you covered:
•
You
can
use
the
Harmony
One
and
the
Harmony Remote
Software
to
learn
from your
device's
original
remote.
As
a result,
your
Harmony
One
is
never
out-of-date.
English
O
DD
DwO
CJOD
t:::i::~D
il:::::l
If
you
need a rarely-used function
from one
of
your devices'
original
remotes,
press
the
Devices
button
and
select
the
device you
want
to
control.
After you select
the device.
all
the
functions
of
the
-----
-
---..,
'
1$1
device's original
remote
are
available
using
your
Harmony One.
When you're done.
return
to
Activities for
optimal control
of
your
entertainment system.
~~l
~
--
~
-
' '
0 ..
..
®
I
····
..
....
)
English
17
Page 12

Logitech provides several places
get
help setting up
or
using your Harmony Remote:
where you can
go
to
•
• Online
Web:
www.logitech.com
User
• User Forums
• Online Help
•
Phone Support
and hours,
go
supportinfo.harmonyremote.com
(yes,
you can
Manuals
-
for
to:
actually
a
list
talk
of
support
to
a
real
information
person!)
18
English
Page 13

Logitech
'
rights reserved. Logitech, the Logitech logo,
Logitech.
2007
©
Logitech and may be registered.
by
Logitech
herein
assumes
subject
is
620-000759
All
responsibility
no
change
to
002
without
other trademarks are
All
for any errors
notice.
that
the
may appear
and other Logitech marks are owned
their respective owners.
property
in
of
manual. Information contained
this
Page 14

English
Espanol
Fran~ais
Portugues
Addendum
Logitech®
Important Information
For
Harmony®
Remotes
Page 15

English
and
Care
allow
wipe gently
void
End-of-life
able battery. Battery life
Casual
battery does
replacement information. If
local laws and regulations for proper battery disposal
concerning battery disposal, please dispose
CAUTION:
any kind. Do
way abnormal. Do
the
with
moisture
the
use
disassemble, expose
not
battery
normal precaution and discard
use
battery disposal
injury.
Keep
an
&.g
not
Maintenance.
enter
to
a dry cloth. Any changes
with
user's authority
Battery
will
not
The battery used
not
is
this and
incorrect battery type.
Disposal
extend battery life. If you suspect
recharge, please contact Logitech® Harmony®
use
not
misused,
your area. Remember
in
Do
urut.
the
operate
to
Instructions.
dependent upon usage. Heavy daily
is
you replace
in
heat above
to
or charge
leave your battery discharged or unused for extended periods
may explode or leak, causing burns and personal injury. If
it
batteries
all
remote. There are no user-serviceable parts inside.
the
open
corrode
Moisture
the
this device may present a
battery if
the
it
out
will
modifications
or
equipment and could void
device contains a replaceable lithium-ion recharge-
This
that
battery,
the
the dead battery
of
(158°
C
70°
appears
it
immediately following
a leaking battery can cause
that
of
the
reach
of
inner electronics.
the
expressly approved by Logitech®
not
the
will
use
the battery may be dead,
Customer Support for repair or
disposal instructions below.
follow
in
F),
children.
the
there are no local regulations
your area.
risk
incinerate,
be leaking, discolored, deformed,
to
the
If
a waste bin for electronic devices.
in
chemical burn if mistreated. Do
or
fire
of
immerse in
or
laws and regulations governing
explosion if battery
of
Risk
To
warranty.
result
in
burns or other personal
skin
not
Do
screen,
LCD
clean
shorter battery life.
try
the
charging it.
the
or
of
battery
time. When
is
water
Inc.
the
If
Consult
liquid
of
in
or
leaks,
replaced
any
power
Power
supply
power supply or
or subject
body.
Supply
that
Compliance.
product
at www.logitech.com
is
Warning.
comes
to
it
FCC
with
attempt
physical abuse.
Your product
and
The
your product;
repair one
to
is
compliant.
CE
harmony.
I
Inspect
UL
this product
supply
tested and should only be
more information, refer
For
for
any other power supply. Do
use
not
do
damaged. Do
is
that
power supply regularly for damage
the
for indoor
is
immerse
not
with
used
the
to
power
the
Use
only.
use
a damaged
use
not
water
power
the
to
other
software help system or online
UL
supply
its cable, plug, and
listed devices. Your
in
Page 16

English
FCC
Compliance
Rules.
Operation
interference,
may
cause
limits
for a
provide
equipment
accordance
However,
equipment
determined
undesired
Class
reasonable
generates,
with the
there
does
by
interference
antenna:
2)
increase
equipment to
the
dealer
expressly
or
approved
operate the equipment.
specified
additional
of the product, they
Canadian
emissions
DOC
from digital
entitled "Digital
and
Advisory
is
subject to the
and
2)
this
operation.
B
digital
protection
instructions,
is
no
guarantee
cause
turning the equipment off
by
one
or
the
an
outlet
an
experienced
by
the party
components
must
Statement.
apparatus
Apparatus,"
Statement.
following
device
device,
uses,
harmful
more
separation
on
must
accept
This
equipment
pursuant
against
and
that
can
harmful
radiate
may
cause
interferen~e
interference to
of the following
between the equipment
a circuit different from that to which the
radio
/TV
technician for
responsible
Where
be
shielded
used
This
or
accessories
in
order to
digital
specified
ICES-003
of the Department of
This
hardware
two conditions:
any
interference
has
to
Part
15
interference
radio
frequency
harmful
will not occur
radio
and
on,
the
measures:
for compliance
interface
cables
elsewhere
ensure
device
in
does
the
interference-causing
been
of the
interference to
or
television
user
1)
help.
have
compliance
not
exceed
device
1)
this
complies
device
received,
tested
FCC
Rules.
in
a
residential
and
energy
in
a
reception, which
is
encouraged
reorient
and
Any
could
or
the
changes
void
been
defined to
with
the
Industry.
with
Part
15
may
not
cause
including
found
These
and,
if not
radio
installation.
communications.
interference that
to comply
limits
are
designed
This
installed
with the
or
particular installation.
can
be
to try to correct the
relocate the
receiver:
receiver
the
is
or
modifications not
user's
provided
be
used
FCC
regulations.
Class
B
limits
equipment
receiving
3)
connect the
connected:
authority to
with the product
with the
for
installation
radio
standard
of the
harmful
used
If
this
4)
consult
or
noise
FCC
to
in
Page 17

English
Logitech warrants
that
your
log
itech hardware product
shall
be free from defects
in
material
and
workmanship for
one
(1)
yea
r, beginning from the date of
purchase.
Exce
pt
where
prohib
it
ed
by
applicable
law,
this warranty
is
nontransferable
and
is
limited to the original
pu
rcha
ser.
Th
is
warranty
gives
you specific
legal
rights,
and
you may
a
lso
have
other rights
that
va
ry
under local
laws
.
Remedies
.
Logitech's
enti
re liability
an
d
your
exclusive
re
med
y
fo
r
any
breach
of
warranty
sh
all
be,
at
Lo
gite
ch's
option,
(1)
to
repair or
repl
ace
the
hardware,
or
(2
)
to
refund the pri
ce
paid,
provided that the
ha
rdware
is
returned
to
the
po
int of purc
hase
or
such
other place
as
Logi
tech
may
direct with a copy of the
sa
l
es
receipt or dated itemized receipt. S
hi
pping
and
handling
charges may
apply
except where prohibited by applicable law.
lo
gi
tec
h may,
at
its
option,
use
new
or refurbished or
used
parts in good
wo
rk
ing condition
to
repair
or
replace
any
hardware
product. Any
replacement
hardware produ
ct
will
be
war
ranted for
th
e remainder
of
the
or
igi
na
l
warranty period or
thir
ty
j30)
da
ys,
whichever
is
longer
or
for
an
y
additional
period
of
ti
me
that
may be
applicable
in your
jurisdiction.
This
war
ranty does
not
cover
probl
ems
or
damage
r
esu
lt
ing
from
11)
accident, abu
se
.
misapplication,
or any unauthorized repair, modification
or
di
sassemb
l
y;
{2) i
mp
ro
pe
r operation
or mai
nt
enance,
us
age
not
in accordance with product instru
ctio
ns or connec
tion
to
improper
voltage
supp
ly;
or
(3)
u
se
of c
onsum
a
bles,
such
as
repl
ace
men
t
batteri
es,
no
t
su
pplied
by
logite
ch except where such rest r
ict
ion
is
prohibited by
applicable law.
How
to
Obtain
Warranty Support.
Before
submitti
ng a w
ar
ra
nty
cla
im,
we
re
co
m
mend
you
vi
sit
t
he
support
section
at
www.
l
og
itech.com
fo
r
techn
ical
ass
istance.
Valid
warranty
clai
ms
are
generally processed
th
rough
the
point
of purcha
se
during
the
f
ir
st t
hir
ty
(
30
)
days
after
purchase;
however
. this p
eriod
of
tim
e
ma
y
vary
de
pen
ding
on
where
you
purchased your produc
t-
pl
ease
check
with
Logitech
or
the
retail
er
wher
e you purchased
your product
fo
r
deta
ils.
Warr
an
ty
c
la
ims
that
cannot be proce
ssed
through
the poi
nt
of
purch
ase
and any other pr
oduct
re
lated
questio
ns
should be addr
essed
directly
to
Log
itech.
The addresses
and
cu
stomer
se
rvice
conta
ct i
nformat
io
n
fo
r L
og
i
tech
can
be
f
ound
in t he
docu
ment
a
tion
accom
pa
nying your
prod
uct
and
on
the
web
at
www.
logitech.
co
mf
cont
actus.
limitation
of
liability.
LOG
I
TECH
SHALL
NOT
BE
LI
AB
LE F
OR
A
NY
SPEC
IA
L,
IN
DIRECT,
I
NC
ID
ENTAL
OR
CO
NSEQUEN
TI
AL
DA
MAGES
WHATSO
EVER.
IN
CL
U
DING
BUT
NO
T
LIMI
TED
TO
L
OS
S
OF
PROFITS
,
REVENUE
OR
DATA
(WHETHER
DIRECT
OR
INDIRE
CT)
OR
COM
MERCIAL
LOS
S
FOR
BREACH
OF
ANY
EXPRESS
OR
IMPLIED
WARRAN
TY
ON
YOUR
PRO
DUCT
EVEN
IF
LOGITEC
H
HAS
BE
EN
ADV
I
SED
OF
THE
POSS
IBI
LITY
OF
SUCH
DAMA
GES.
Some
jurisdictions
do
n
ot
all
ow
the
exclusion
or
limitat
i
on
of
special,
ind
ire
ct,
in
ci
denta
l
or
conseq
uential
damages
. so
the
a
bov
e
limit
at
i
on
or
exclusi
on
may
n
ot
apply
to
you.
Duration
of
Implied
Warranties
.
E
XCE
PT
TO
THE
EXT
E
NT
PROH
IBI
TED
BY
APPLI
CAB
LE
LAW,
ANY
IMPLIED
WARRA
NTY
OR
COND
ITION
OF
MER
CH
ANTAB
I
LI
TY
OR
FI
TNES
S F
OR
A
PART
I
CULAR
PURPOSE
ON
T
HIS
H
ARD
WARE
PRODU
CT
IS
LI
MITED
IN D
URA
TI
ON
TO
THE
DURA
TION
OF
T
HE
APPLICAB
LE
LIM
ITED
WARRANTY
PER
IOD F
OR
YOU
R
PRODUC
T.
So
me
juris
dictions
do
not
allow
lim
it
a
ti
ons
on
how
long
an
imp
lied
wa
rr
anty
lasts.
so
th
e
abo
ve
limita
tion
may
not
app
ly
to
you.
National
Statutory Rights.
Consumers have
legal
rights
und
er
ap
plic
ab
le
nati
ona
l
l
egi
sl
ati
on
gove
rni
ng
the
sa
le
of
consumer
goods.
Such rig hts
are
not
a
ff
ected
by
the
wa
rr
ant
i
es
in t his
lim
ited
Warra
nty
.
No
Other
Warranties.
No
Lo
gite
ch
dealer.
age
nt.
or e mp l
oy
ee
is
authorized
to
make
a
ny
modif
ica
tion.
extension. or
add
iti
on
to
this
wa
rranty.
Warranty Period in European Union.
Please
note
th
at
in
th
e
Eu
ro
pe
an Union. a
ny
wa
rra
nt
y
pe
riod
le
ss
th
an t
wo
yea
rs
sh
all
be
i
nc
reas
ed
to
two
yea
rs
.
Logitech
Address
Logitech,
In
c.
65
05
Ka
i
se
r Drive
Fremon
t.
Ca
lifornia
94
555
U
.S
.A
.
©
20
11
Logitech.
All
rights reserved.
Log
itech. the
Lo
gitech
logo,
and
othe
r Logit ech mar
ks
are owned by
Lo
gitech and m ay be registered.
Al
l
other
trademar
ks
are
the
pr
operty
of
their
res
pe
c
ti
ve
owne
rs.
Logitech
as
s
um
es
no
respons
ib
ili
ty
for
any errors t
hat
m
ay
appear in any
manual
or
on
th
is websi
te
. Inf
or
m
at
i
on
cont
ai
ne
d h
ere
in is su
bject
to
cha
nge
wi
th
o
ut
not
ice.
Page 18

www.logitech.com
©
2011
Logitech.
All
rights reserved. Logitech,
the
Logitech logo,
and
registered.
other
Logitech marks are owned by Logitech and may be
All
other
trademarks are
respective owners. Logitech assumes no responsibility
errors
herein
620-003328
that
is
subject
may appear in this
to
change
001
the
property
manual. Information
without
notice.
of
their
for
contained
any
Page 19

www.logitech
.comjharmony
Page 20

You're
in
control.
Thanks
Harmony
Should
comments,
-before
and
everything
-The customer satisfaction team
at Logitech
we'll
for your Logitech@
purch~se.
you
have
please
contacting your
do our best to
is
just how you'd
any
feel
questions or
free to contact
ensure
retailer-
like.
that
us
Page 21

Harmony·
Customer Support Numbers: Americas
Country
Canada English 1-866-291-1505
USA
Argentina
Brazil Portugues 0800-891-4173
Mexico
Harmony~
Country
Australia
Support
Espariol
Franc;ais 1-800-392-0431
English 1-866-291-1505
Franc;ais 1-800-392-0431
Espariol
Espariol
Espariol 001-800-578-9619
languages
Customer Support Numbers: Asia Pacific
language
English
Toll-Free
1-800-499-3508
1-800-499-3508
0800-555-3284
Toll-Free
1800
Support
726
Support
063
Number
Number
Support
Monday
Monday
Saturday & Sunday:
Monday
Monday
Monday
Saturday & Sunday:
to
Friday:
to
Friday:
to
Friday:
to
Friday:
(Sao
Support
to
Friday:
Sydney
Hours
9am-7pm
9am-10pm
10am-
9am
9am-8pm
Paulo)
Hours
11am
11am-
time
5:30pm
-7pm
-11pm
8pm
ET
ET
ET
ET
Hong
Kong
Singapore
India
New
Zealand
Thailand English 1800
English
English
English
English
800
800
000
0800
966 969
6011
371
800
600
303
855
060
119
Monday
Saturday & Sunday:
Singapore f Hong Kong
Monday
1133 Saturday & Sunday:
Monday
Saturday & Sunday:
Monday
Saturday & Sunday:
to
Friday:
to
Friday:
India
to
Friday:
Auckland
to
Friday:
Bangkok
(1ST)
8am-8pm
8am-5pm
9am-9pm
9am-6pm
pm-
1
1pm
time
7am
7am
time
time
Midnight
-10pm
-7pm
-4pm
 Loading...