

Page 1
3 3 1 4 7 0 2 1
Operating Manual
Peripherals
– Viewvision DR+ DVB-T
233–33147.021
Page 2
HDD/
DVD
Brief instructions for ViewVision DR+DVB-T
Preparation
Remote control TV mode
Remote control recorder mode
Switch unit on/off
Insert disk Button on the unit – Insert disk –
Operating modes
MOVIE – 34MOVIE –
56HDD/DISC/USB –
MUSIC – 34MUSIC –
56HDD/DISC/USB –
PHOTO – 34PHOTO –
56HDD/DISC/USB –
Disk menu
Select title 3456–
Playback
Playback
Pause
Stop
Forwards (press several times)
Backwards (press several times)
Recorder/TV operation
Channel overview 3456
Select channel or P+/-
Programme magazine
Picture-in-picture during playback
Recording
Insert disk – Insert recordable disk –
Select recording medium
or – 34TV –
56TV HDD/TV DVD
Select signal source or P+/-
Start recording manually
Stop recording manually
Programme timed recording
– Enter data – –
ShowView – Enter data – –
Timer overview
Terminate menu
Recording of Loewe SAT-TV See operating instructions for Loewe TV
Next/previous section P+/-
Volume V+/-
Individual frame 3/4
Slow motion /
Jump forwards/backwards 5 mins. 3/4 (only hard disk drive HDD)
Detailed information
Title menu
- 2
(press several times)
Please fold out this page.
Page 3

Remote control Assist – recorder operation
Loewe TV: Sound off/on
LED indicator for current operating mode
Switch over to operate TV set
(Page 20) ....................... Switch over to operate Recorder
Timer recording menu; timer recording list menu
(Page 49) ................................................Timeshift Mode
(Page 36) ............................... TV: EPG; PLAY: skip 15 Sec.
(Page 40) ............................User interface of loaded DVD
MENU: Title List / original and playlist
(Page 23) ................................................... “Setup” menu
Loewe TV: Volume
(Page 35) .............. TV station list/Status display (TV, DVD)
MENU: confirm the menu selection
Switch on/off - on stand by ...............................(Page 20)
Loewe TV: Radio Digital; long: Auro Radio
Switch over to operate DVD-Player
Loewe TV: Sound settings
STOP: Select station directly ..............................(Page 35)
MENU: enter numbers
STOP: Call AV selection .....................................(Page 50)
MENU: enter numbers
PIP (picture in picture) ......................................(Page 41)
“Home” menu ...................................................(Page 23)
Info; PLAY: menu bar ........................................(Page 35)
MENU: hide menu
PLAY: Next chapter ...........................................(Page 38)
STOP: Select station up/down ...........................(Page 35)
MENU: select/set ..............................................(Page 23)
(Page 51) ............................................... ShowView menu
(Page 55) ......................................... New chapter marker
(Page 39) ........................PAUSE: short: slow motion back
(Page 38) ..................................... PLAY: search backward
(Page 50) .............................................................. Record
(Page 38, 39) .....................................Pause; single frame
Zoom ................................................................(Page 39)
short: Set marker; long: Marker search .............(Page 39)
Playback ...........................................................(Page 38)
PAUSE: slow motion forward ............................(Page 39)
PLAY: search forward ........................................(Page 38)
Stop ..................................................................(Page 38)
3 -
Page 4

Index
A
Area Code 31
AUDIO OUT 7
Auto Chapter 32
Automatic programming 24
B
Basic Settings 20
Brief instructions 2
C
Card-Reader 47
Chapter List 54
Clock set 27
COMPONENT VIDEO OUT 7
Connections
Accessories 19
Aerial 16
Amplifier 19
Camcorder 20
Decoder 18
General 16
Satellite Receiver 18
Set-top box 18
Television 16
Copy/move files/folders 44
Copy protection system 14
Copyright 14
CPRM 14
D
Delete Station 26
Digital Link 11,20
Digital Link Plus 11,24
DIGITAL OUT 7
Digital Video 52,53
Disc-related Terms 15
Disc Format 33
Disc playback 36
Disc Protect 34
Display 7
Disposal 11
DivX registration code 31
Dolby Digital 29
DTS 29
Dubbing 62
Dub from DVD to HDD 63
Dub from HDD to DVD 63
DV IN 6
- 4
E
Edit recordings 54
Add chapter markers 55
Combine chapters 60
Combine titles 59
Create new Playlist 55
Delete part 57
Divide title 60
Edit thumbnail 55
Move Playlists Chapters 61
Protect title 61
Sorting 59
Title Name 58
EPG program guide 36
F
Front Panel 6
G
Glossary 71
H
Harddisc 11
HDD 11,15
HDMI 7,37
I
Initialisation 28
Inserting/removing memory
cards 47
L
Lock System 30
M
Main menu 21
Mains cable 7
Masthead 67
Moving stations 26
MPEG 29
O
Operating additional devices
8
OPTICAL 7
P
Photo mode 46
Picture in Picture (PIP) 41
Play-Back Control 34
Playable Discs 14
Playback
Audio CD 43
Compatibility 44
MP3/WMA media 43
Program list 45
Random play 44
Playiback
DivX files 42
Playing on other devices 64
Playlist 55
Progressive Scan 16
R
Rating 30
Rear Panel 7
Recording 49
Clip recording 49
Delayed TV viewing 49
Digital Video 52
Manual Record 50
Record from external
sources 52
ShowView 51
Simultaneous record and
display 50
Timer Recording 51
Timer Record List 52
Timeshift mode 49
Regional code 15
Remote Control 16
Remote control 3,9,48
Resetting 20
Rewritable discs 13
S
S-VIDEO OUT 7
Safety 12
Scope of delivery 10
Service 70
Set Password 29
Delete 30
Switching off 30
Set up 10
Setup menu 23
Audio Menu 29
Disc Menu 33
General Menu 24
Language Menu 28
Lock Menu 29
Recording Menu 32
Slide Show 46
Symbols 15
T
Technical Specifications 67
Technische Daten 67
Title List 54
Trademark rights 10
Troubleshooting 65–66
TV Operation 35
U
USB mode 47
Page 5

Contents
Brief instructions for ViewVision DR+DVB-T ...................2
Remote control Assist – recorder operation .................... 3
Index ................................................................................4
Front Panel ...................................................................... 6
Rear Panel & Display .......................................................7
Operating additional devices ...........................................8
Setting the remote control ............................................................................8
Operating Loewe equipment .........................................................................8
Remote control Assist – TV-operation ............................. 9
Welcome ........................................................................10
Scope of delivery .........................................................................................10
Set up .........................................................................................................10
Shipping the Unit ........................................................................................ 11
Disposal ......................................................................................................11
Advantages of connection to a Loewe TV set ..............................................11
About the internal harddisc ......................................................................... 11
For your safety ..............................................................12
Essential Information ....................................................13
Rewritable discs ..........................................................................................13
Playable Discs .............................................................................................14
Notes on Discs ............................................................................................15
Disc-related Terms .......................................................................................15
Symbols ......................................................................................................15
Initial Installation ..........................................................16
Initial Remote Control Setup ......................................................................16
Switching over to Progressive Scan .............................................................16
Connections - General .................................................................................16
Connecting to the Aerial .............................................................................16
Connecting to the Television .......................................................................16
Alternative connections ...............................................................................16
Connecting to a Loewe TV System ...............................................................17
Connecting to a set-top box / Satellite Receiver...........................................18
Connecting to an External Decoder Box ......................................................18
Connecting to an Amplifier .........................................................................19
Connecting Audio/Video (A/V) Accessories ..................................................19
Connect to the mains ..................................................................................20
Basic Settings .............................................................................................20
Concealed installation .................................................................................20
Resetting the DVD Recorder ........................................................................20
Auto Setup ..................................................................................................21
Menu overview ...........................................................................................22
Main menu (HOME) ....................................................................................23
Setup menu ................................................................................................23
The General Menu .......................................................................................24
Language Menu ..........................................................................................28
Audio Menu ................................................................................................29
Lock Menu ..................................................................................................29
Recording Menu .........................................................................................32
Disc Menu ..................................................................................................33
Operating convenience ..................................................35
TV mode......................................................................................................35
Selecting a station ......................................................................................35
EPG program guide .....................................................................................36
Disc playback ..............................................................................................36
HDMI mode .................................................................... 37
Video mode ....................................................................38
Playing back a DVD or video CD ..................................................................38
Playing memory media with mixed contents ...............................................41
PIP (Picture In Picture) ................................................................................41
DivX mode ..................................................................... 42
Audio mode ...................................................................43
Copy/move files/folders ...............................................................................44
Program list ................................................................................................45
Photo mode ................................................................... 46
USB mode ...................................................................... 47
Recording ......................................................................49
Recordings on the HDD ...............................................................................49
Delayed TV viewing – Timeshift mode .........................................................49
Simultaneous record and display .................................................................50
Manual Record ...........................................................................................50
Timer Recording .......................................................................................... 51
Timer recordings with the ShowView® system ............................................51
Timer Record List ......................................................................................... 52
Record from external sources ......................................................................52
Digital Video ...............................................................................................53
Edit recordings ..............................................................54
Menu Title List and Chapter List ..................................................................54
Edit Original and Playlist .............................................................................55
Add chapter markers ...................................................................................55
Create new Playlist ......................................................................................55
Add title/chapter to the Playlist ...................................................................56
Delete title/chapter from Original/Playlist .................................................... 57
Delete part ..................................................................................................57
Title Name ..................................................................................................58
Select title start point ..................................................................................58
Select chapter .............................................................................................58
Sorting ........................................................................................................59
Combine titles .............................................................................................59
Divide title ..................................................................................................60
Combine chapters .......................................................................................60
DVD additional functions ............................................................................60
Move Playlists Chapters ..............................................................................61
Hide title/chapter ........................................................................................61
Protect title ................................................................................................. 61
Dubbing ......................................................................... 62
Dub from HDD to DVD ................................................................................63
Dub from DVD to HDD ................................................................................63
Overwrite recordings ...................................................................................64
Title List menus on other devices .................................................................64
Playing on other devices .............................................................................64
Troubleshooting ............................................................. 65
Technical Specifications ................................................. 67
Masthead ...................................................................................................67
Language Code List .......................................................68
List of country codes .....................................................69
Service ........................................................................... 70
Glossary ......................................................................... 71
5 -
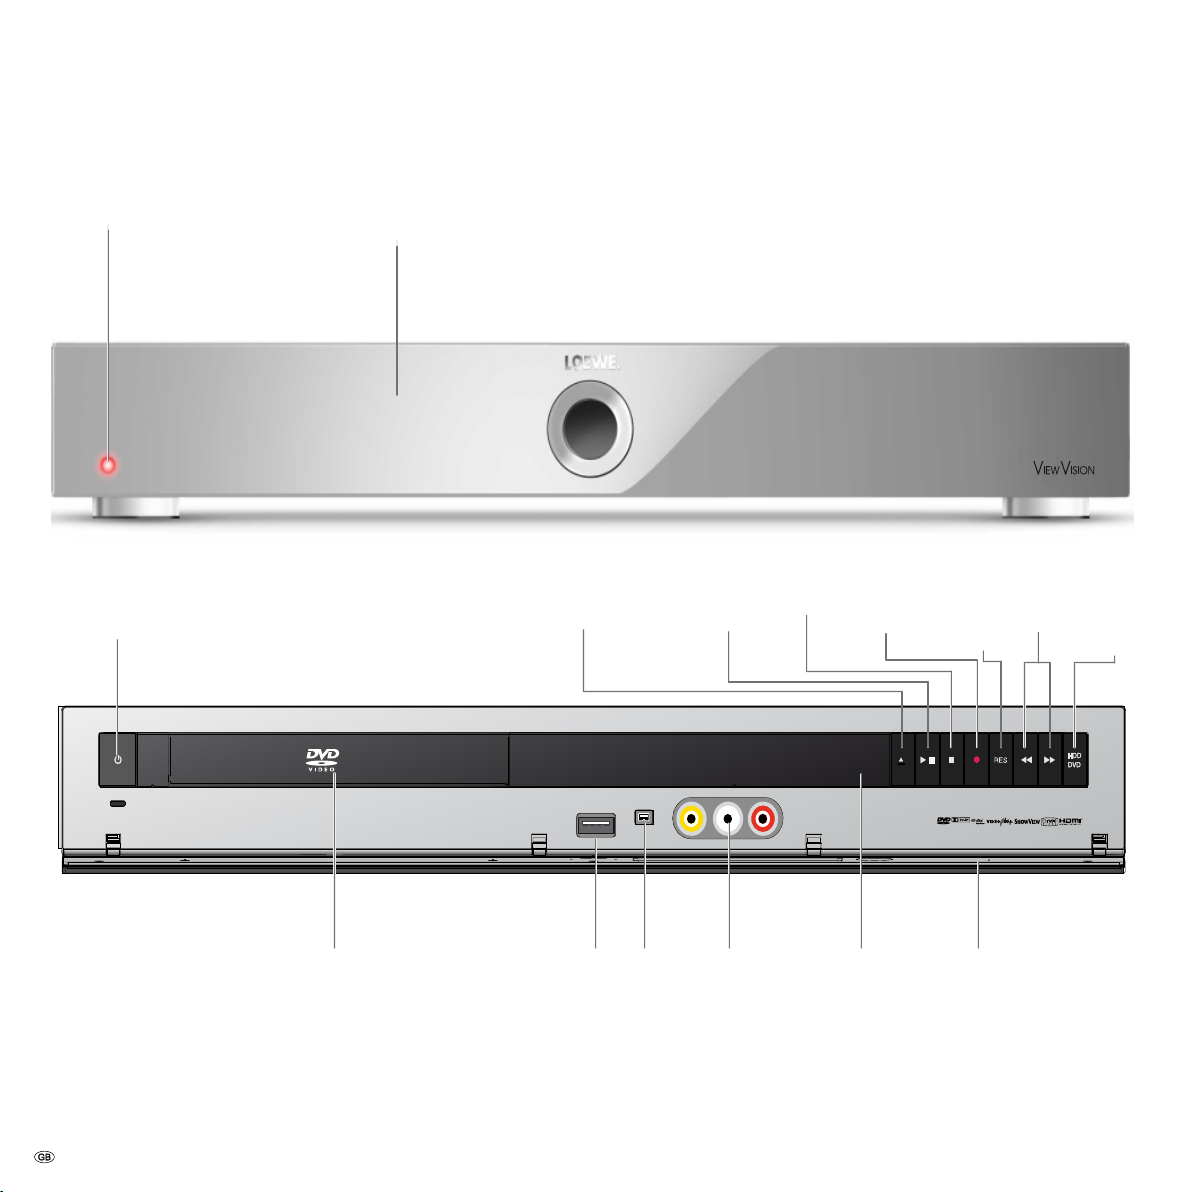
Page 6
D I G I T A L
V I DE O
Front Panel
Operating
indicator
Power button
Switch off in standby
Front flap
(closed)
Disc tray
open/close
Playback
/ Pause
Stop
Start
recording
RES
(screen
resolution)
Next/pre-
vious
chapter
Recording
media
- 6
Disc tray
USB
DV IN
AV3 Video IN
AUDIO IN L/R
Display
Front flap
(open)
Page 7

Rear Panel & Display
RECT/S
HDD DVD
IN (from ANT.)
Aerial connection
OUT (to TV)
Passes the
aerial signal
to the TV
OPTICAL
Digital, optical
audio output
DIGITAL AUDIO
Digital, coaxial
audio output
COMPONENT VIDEO
OUT (Y Pb Pr)
Connection for a TV
with component inputs
(Cinch)
S-VIDEO OUT
Connection for a
TV with S-Video
input.
AV 2 DECODER
Euro AV2 (SCART) connection for an
external source (Decoder, Set-TopBox, Video Recorder etc.).
AUDIO (L/R)
Connection for a TV with
audio inputs (Cinch)
AV 1
Euro AV1 (SCART)
connection for TV set
HDMI OUT
connection of a TV
with HDMI input
Mains cable
Caution: Do not touch the inner pins of connection sockets on the rear panel. Electrostatic discharge may cause permanent damage to the unit.
Timeshift Symbol
Display for active Timeshift
Media symbol
Display for selected
recording medium
Record symbol
Display for currently
operation
running recording
Timer symbol
Display for programmed
timer recording(s)
Character specications
time, total playing time, time elapsed, title, chapter /
track number, station, status etc.
7 -
Page 8

Operating additional devices
Setting the remote control
The different Loewe sets can be set as follows on the Assist remote control:
Device Button combination
Loewe TV (Q2500 – L2650) +
Loewe TV (Q2300 – Q2400) +
Loewe Centros 11x2 +
Loewe Viewvision, Centros 21x2 +
Loewe ViewVision DR+ DVB-T +
Loewe ViewVision 8106 H +
Loewe Auro 2216 PS/8116 DT +
Loewe Xemix 6222 PS +
Factory setting
The specified key combination must be pressed (approx. 5 s) until one of the LEDs
flashes twice.
Operating Loewe equipment
Using the remote control for a DVD player
Press the DVD button, the indicator above
it lights for about 5 seconds.
Using the remote control for a recorder
Press the REC button, the indicator above
it lights for about 5 seconds.
Using the remote control for a TV set
Press the TV button, the indicator above
it lights for about 5 seconds.
Every time you press the button, the indicator of the selected operating mode (TV
– REC – DVD – RADIO) lights up.
- 8
Page 9
Remote control Assist – TV-operation
Sound off/on
LED indicator for current operating mode
Switch over to operate TV set
Switch over to operate Recorder
Call timer list
Set picture format
Electronic Programme Guide (EPG) on/off
Teletext on/off
Show/hide menu
Volume down/up
Switch on/off - on stand by
Radio Digital on/off
Switch over to operate Auro
Sound menu on/off
Select station directly
MENU: enter numbers or letters
Call AV selection
PIP on/off (picture in picture)
Menu “ASSIST+“ on/off
Open index; MENU: info texts on/off
Status display on/off; MENU: hide menu
Select station up/down
Station list on; MENU: confirm/call
Teletext subtitles
Freeze picture; DR+: Call the DR+ archive
Select station down; DR+: Jump back/Rewind/Replay
DR+: Record
Freeze picture on/off;
DR+: Pause (Start viewing with time shift)
PIP: Position of the PIP picture; MENU: select/set
56 Move picture vertically;
34 Rotate TV
Yellow button: previous station
Blue button: programme info on/off
Freeze picture off; DR+: Playback/Set bookmark
Select station up; DR+: Jump forward/Fast forward
Freeze picture on; DR+: Stop
9 -
Page 10

Welcome
Thank you
for choosing a Loewe product. We are happy to welcome you as our customer.
At Loewe we combine the highest standards of technology, design and user friendliness. This is equally true of TV, DVD, video, audio and accessories.
Neither technology nor design is an end in itself, but both are intended to provide
our customers with the best possible audio and visual experience. Our design is
not influenced by short-term, fashionable trends. You have, after all, purchased a
high-quality piece of equipment which you do not want to get tired of looking at
tomorrow or the day after.
The set is equipped for digital reception. You can use the digital TV (DVB T) which
is already being widely broadcast.
You can control three devices with the Assist remote control. In addition to this
recorder also a Loewe TV set and a Loewe DVD player or a Loewe Audio System
(page 8).
Scope of delivery
recorder Loewe ViewVision DR+ DVB-T
•
Assist remote control with 2 batteries
•
Euro AV cable (Scart cable)
•
Antenna cable
•
HDMI cable
•
1x DVD-RW disc
•
this operating manual
•
Trademark rights
Manufactured under license from Dolby Laboratories. Dolby, ProLogic and the
double-D symbol are trademarks of Dolby Laboratories.
“DTS“ and “DTS Digital Out” are trademarks of Digital Theater Systems, Inc.
ShowView is a registered trademark of Gemstar Development Corporation.
The ShowView System is manufactured under license from Gemstar Development
Corporation.
HDMI, the HDMI Logo and High-Definition Multimedia Interface are trademarks or
registered trademarks of HDMI licensing LLC.
Set up
Place the recorder on a firm, level base.
•
Do not move the recorder during operation or just after switching it off.
•
Do not place the recorder in the vicinity of sources of intense heat or in direct
•
sunlight.
When installing in a cabinet or enclosed shelf: Leave at least 2.5 cm free around
•
the recorder to allow unhindered circulation of air and avoid build-up of heat.
Do not cover up fan and openings on the rear.
There can be interference to the images and sound of any nearby television,
•
video recorder or radio. If this is the case, do not position the unit in the direct
vicinity of a TV set, video recorder or radio, or switch the unit off after removing the disc.
Position the recorder so that the infrared signal of the remote control can
•
reach the display of the recorder unobstructed (or if this is not possible, see
“Advantages of connection to a Loewe TV set”, page 11).
Do not place strong artificial light sources in front of the device. This may affect
•
infrared reception.
Incorrect voltages can damage the device. This device may only be connected
•
to a power supply with the voltage and frequency specified on the rating plate,
using the power cable provided.
If there is an electrical storm, disconnect the antenna and mains plug. Power
•
surges caused by lightning strikes can damage the unit through the antenna
system or the mains.
The antenna and mains should also be disconnected if the unit is to remain
•
unsupervised for a long period of time.
The mains plug must be easily accessible so that the unit can be disconnected
•
at any time.
Lay the cable in such a way that it cannot get damaged. The power cable should
•
not be kinked or laid over sharp edges, not stood upon or exposed to chemicals
- the latter also applies to the device as a whole. A mains cable with damaged
insulation can cause electric shocks and is a fire hazard.
Do not tug the cable when you remove the mains plug but hold the plug by the
•
housing. The wires in the mains plug may be damaged and cause a short-circuit
when you plug it back in.
- 10
You should also read and follow the safety advice on the following pages.
Page 11

Welcome
Shipping the Unit
The original shipping box and packaging materials should be used to ship the unit.
To give the unit the best possible protection, repack it as it was originally packed
by the manufacturer.
Disposal
Cardboard box and packaging
In line with national regulations regarding the disposal of packaging materials, we
pay a fee to authorised recyclers who collect packaging from dealers. However, we
recommend that you keep the original cardboard box and the rest of the packaging
materials so that the unit can, if necessary, be transported in the safest possible
conditions.
The unit
Important: The EU Directive 2002/96/EG governs the proper
re-acceptance, handling and recycling of used electronic appliances. Old electronic appliances must therefore be disposed of
separately. Never throw this set in the normal domestic waste.
You can hand in your old set free of charge at identified collection
points or at your dealer if you buy a similar new set. Other details
about re-acceptance (also for non-EU countries) are available from
your local administration.
Remote control batteries
The batteries provided contain no harmful materials such as
cadmium, lead or mercury. Regulations concerning used batteries
mean that batteries may no longer be thrown out with the household rubbish. You can dispose of used batteries free of charge at
the collection points in commercial outlets. Your dealer will also
have a collection point for used batteries.
Advantages of connection to a Loewe TV set
With Digital Link you can install the recorder for example in a closed rack or a
cupboard without direct visual contact with the recorder. With the DVD remote
control, you operate the recorder via the Loewe TV set. Digital Link must be
switched on on the recorder (page 20).
If you use the HDMI connection, the TV set is automatically switched over to this
input if your TV set supports this function.
If you want to make timer recordings from the TV satellite tuner, Digital Link Plus
controls the recording. With Digital Link Plus the station data of the aerial and
cable stations of the TV set are transferred to the recorder so that the same stations
are saved in the same order in both devices. This enables timer recordings of aerial
and cable stations to be made comfortably on the TV set with the EPG (Electronic
Program Guide). The timer data are transferred to the recorder which then makes
the timer recording independently of the TV set. For timer data for satellite stations, the TV set starts and stops the recorder and sets it to the Euro AV 1 input.
When play is started, this is shown immediately on the TV set regardless of which
TV station you are currently watching (if the TV is switched off, it will be switched
back on automatically first).
About the internal harddisc
The internal harddisc (HDD) is very sensitive. Operate the recorder according to the
following regulations to avoid HDD errors.
Important recordings should be saved on DVDs to avoid losing data (page 62).
Do not move the recorder immediately after switching it off. To move the recorder,
proceed as follows:
Wait at least two minutes after the message POWER OFF.
1.
Pull out the mains plug.
2.
Move the recorder.
3.
Data on the HDD may be lost if the power fails during recorder operation.
The HDD is very sensitive. Improper handling or an unsuitable environment could
damage the HDD after a few years in operation.
Sudden stopping during playing and visible mosaic effects in the picture are an
indication of this. There may be no advance warning signs for an HDD defect.
Recordings cannot be played if the HDD is defective. The HDD must be replaced
in this case.
11 -
Page 12
For your safety
For your own safety and to avoid unnecessary damage to your unit, please read
and follow the safety advice below:
Use for the intended purpose and ambient conditions
This recorder is intended exclusively for the reception, recording and playing of
video and audio signals and is designed for the home and office and may not be
operated in rooms with a high humidity (e.g. bathroom, sauna) or high concentra-
tion of dust (e.g. workshops).
The terms of the warranty only cover normal use of the recorder.
If the device is used outdoors, make sure that it is protected against moisture (rain,
drips and splashes or dew). High humidity and dust concentrations lead to leak
currents in the device which may lead to electric shocks or fires.
If you have moved the device out of the cold into a warm environment, leave it
switched off for about an hour to avoid formation of condensation.
Always switch off your system (ViewVision DR+ DVB-T, TV set and any other audio
components which may be connected) before connecting or disconnecting other
devices or loudspeakers.
Do not open up the housing, or you could be directly exposed to the laser beam.
The laser beam will be visible if the unit is open.
DO NOT LOOK INTO THE LASER BEAM.
PLEASE NOTE: TO AVOID RISK OF ELECTRICAL SHOCK, DO NOT REMOVE THE
COVER (OR THE REAR OF THE UNIT). THERE ARE NO PARTS INSIDE THE UNIT
THAT CAN BE REPAIRED BY THE USER. REPAIRS SHOULD ONLY BE CARRIED
OUT BY A LOEWE DEALER.
Only use original accessories such as Loewe installation systems if possible.
Supervision
Do not allow children to use the recorder/TV set unsupervised. Do not allow children to
play in the immediate vicinity of the recorder/TV set. They could knock, push or pull the
equipment over and cause injury.
Cleaning
Only clean your recorder with a slightly damp, soft, clean cloth (without any aggressive cleaning agents).
If the recorder does not read a disc correctly, the reading unit in the device may be
soiled. Use a commercially available cleaning disc.
Keep the disc drawer closed to prevent dust from the drawer getting onto the
lens.
About this user guide
The information in this guide refers to the Loewe product Viewvision DR+ DVB-T
and Viewvision DR+ DVB-T Secam - (version for France).
Unless stated otherwise, the instructions refer to the operating elements on the
Assist remote control.
The explanations for DVDs in this guide refer to the DVDs recorded with this
recorder. They do not apply for DVDs recorded on other recorders and played on
this recorder.
Paragraphs beginning with the ➠ symbol indicate important hints, tips or conditions for perfect operation.
Protect your recorder from:
liquids and damp
•
shock and mechanical stress
•
magnetic and electrical fields
•
cold, heat, direct sunlight and extreme fluctuations in temperature
•
dust
•
anything which obstructs ventilation
•
manual interference with the unit‘s interior
•
- 12
Terms which you will find in the menu or printed on the recorder are printed in
bold type.
In the functional descriptions, the necessary operating elements are arranged to
the left of the text which contains the handling instructions.
Please read this operating manual to understand this device and its possibilities.
The individual chapters are inter-related.
The index/glossary at the end of this manual explains certain terms which are used
in the user interface of the device and in the operating manual.
Page 13

Essential Information
Rewritable discs
DVD-RW (Digital Versatile Disc - ReWritable)
DVD-RW discs can be formatted for recording in the VR mode or
in the video mode. These discs can be rewritten several times.
Recordings can be deleted and the disc can then be rewritten.
VR mode Recordings can be extensively edited.
They can only be played on VR mode compatible players (after
finalisation).
Video mode Limited editing possible.
Play on normal DVD players (after finalisation).
DVD-R (Digital Versatile Disc - Recordable)
These discs can be recorded once. A DVD-R disc cannot be rewritten or edited after finalisation. DVD-R discs can only be formatted
for recording in video mode. Play on normal DVD players (after
finalisation). Limited editing possible.
DVD+RW (Digital Versatile Disc + ReWritable)
These discs can be rewritten several times. Recordings can be deleted and the disc can then be rewritten. Play only on DVD+RWcompatible players (automatic finalisation). Edited contents can
only be played after finalisation on DVD+RW-compatible players.
Titles/chapters of recordings can be edited.
DVD+R (Digital Versatile Disc + Recordable)
These discs can be recorded once. A DVD+R disc cannot be rewritten or edited after finalisation. Play only on DVD+R-compatible
players (after finalisation). Edited contents can only be played
after finalisation on DVD+R-compatible players. Title/chapters
can be edited conditionally.
➠ This recorder cannot write to CD-R or CD-RW discs.
➠ This recorder cannot write data discs (e.g. no MP3 or JPEG files).
➠ The displayed recording time is not exact because the recorder uses a vari-
able bit rate video compression. This means that the exact recording time
depends on the contents being recorded.
➠ When recording a television broadcast the remaining recording time may be
shorter if the reception is poor or the picture contains interference.
➠ If you record only still pictures or audio, the recording time may be longer.
➠ The displayed recording time and remaining time may not always add up to
the total length of the disc.
➠The available recording time may be shorter following intensive editing of the
disc.
➠ If you use a DVD-R disc you can continue recording until the disc is full or
until you finalize it. Before you start recording check how much recording
time is available on the disc.
➠ If you use a DVD-RW disc in video mode, the available recording time is
extended again when you delete the last title recorded on the disc.
➠ The Delete Parts function (page 57) only hides the title but does not delete
it from the disc and does not extend the recording time (except for the last
recorded title on a DVD-RW disc in video mode).
➠ Overwrite recording is only possible on DVD+RW discs (Page 64).
13 -
Page 14

DIGITAL AUDIO
Recordable
ReWritable
Essential Information
Recording TV-Audio Channels
This recorder can also record NICAM audio. If the NICAM setting (page 26) is set
to “Auto“, NICAM audio will be recorded in the case of a NICAM transmission.
Restrictions on Video Recording
You cannot record movie material with copy protection with this recorder. If
•
a copy protection is encountered during recording, the recording stops or is
interrupted automatically and a message is displayed on the screen.
A video that can only be copied once can only be recorded using a DVD-RW
•
disc in VR mode with CPRM (see below).
NTSC format signals from analog or DV inputs cannot be recorded correctly
•
with this recorder.
SECAM format video signals (from an integrated TV tuner or from analog
•
inputs) are recorded in PAL format.
CPRM
CPRM is a copy protection system (with scramble system) that only allows the
recording of “copy once“ broadcasts. CPRM is the abbreviation for “Content
Protection for Recordable Media”.
This recorder is CPRM compatible. You can therefore record copy-once broadcasts
but cannot make copies of these recordings. CPRM recordings are only possible
with VR mode formatted DVD-RW discs and can only be played on players with
CPRM compatibility.
Copyright
The recording equipment should only be used for lawful copying. You should
•
find out what constitutes lawful copying in the country in which you are making a copy. Copying of copyrighted material e.g. films or music is only lawful
if permitted by a legal exception or consented to by the rights owner.
The product contains copyright protection technology through certain US pat-
•
ents and other intellectual property rights and is the property of the Macrovision
Corporation and other companies. Use of this protection technology must be
authorized by the Macrovision Corporation. It is only intended for private or
other limited use unless otherwise authorized by the Macrovision Corporation.
Reverse engineering and disassembly are prohibited.
Playable Discs
Video-DVD (8 cm- / 12 cm disc)
Video-CD (VCD, SVCD, 8 cm- / 12 cm disc)
Audio-CD
(8 cm- / 12 cm disc)
CD-R/RW
DVD-R/DVD-RW discs, DVD+R/DVD+RW discs, CDR/CD-RW discs with audio titles,
DivX, MP3/WMA or JPEG files, VCD/SVCD and Kodak Picture-CDs (JPEG) can also
be played on this unit.
including MP3 discs with ID3-Tag.
➠ DVD-R/RW, DVD+R/RW and CD-R/RW discs written to using a PC or a DVD
or CD recorder cannot be played if the disc is damaged or dirty or if there is
condensation on the recorder‘s lens.
➠ If you record a disc using a PC, even if it is in a compatible format, the disc
may not play depending on the settings of the application software used to
create the disc. (Further information can be obtained from the software provider).
➠ Depending on the recording unit or the CD-R/RW (or DVD±R/±RW) disc itself,
some CD-R/RW (or DVD±R/±RW) discs cannot be played with this unit.
➠ Do not attach any labels to either side (the labeled side or the written side)
of a disc.
➠ Do not use any irregularly shaped CDs (e.g. heart-shaped or octagonal). If
you use these discs malfunctions may occur.
➠ Fingerprints and scratches on the disc can affect playback and/or recording.
Take proper care of your discs.
- 14
Page 15
2
Essential Information
Regional code of the Recorder and DVDs
This Recorder can only play Region “2“ or “all“ coded DVDs.
The region code on the label of some DVDs shows which type of DVD recorder can
play those discs. If you play other discs the error message “Incorrect region code.
Playback not possible.“ will be displayed on the TV screen.
Some discs may not have the label with the region code even though they cannot
be played in all regions.
Notes on Discs
Handling Discs
Do not touch the prerecorded side of the disc. Hold the disc at the edges so as
not to touch the surface with your fingers. Do not stick paper or tape to either
side of the disc.
Storing Discs
After playing, store the disc in its case. Do not expose the disc to direct sunlight
or a source of heat and never leave it in a parked car exposed to direct sunlight as
there may be a considerable increase in temperature inside the car.
Cleaning Discs
Fingerprints and dust on the disc can affect the picture and sound quality. Clean
the disc before playing it with a clean cloth. Wipe the disc from the center outwards.
Do not use any strong solvents such as alcohol, benzine, thinner, commercially
available cleaners or anti-static sprays intended for vinyl records.
Disc-related Terms
Title
A title is the main movie content or the music album. You have easy access by
the title number.
Chapter (DVD)
Chapters are movie sequences or a piece of music which are parts of a title. You
have easy access by the assigned chapter number.
Track (only Video-CD or Audio-CD)
Movie sequences or a piece of music on a Video-CD or an Audio-CD. You have
easy access by the assigned track number.
Scene
On a Video-CD with PBC functions (Playback Control) the moving pictures and
freeze frames are divided into sections called “scenes”. You have easy access by
the assigned scene number.
Symbols
The symbol on the screen
During operation, may appear on the screen. This symbol means that the desired
function is not available at the moment.
Disc symbols in the operating instructions
If part of the operating instructions contains one of the symbols listed below, the
section is only applicable to the disc shown on the symbol.
Many functions of this recorder are dependent on the selected recording quality.
One or more of the symbols are displayed for each function described in the manual
so that you can immediately see whether the disc supports this function.
HDD Title on HDD
DVD ALL All DVDs listed below
-RW Video DVD-RW Disc with video mode
-RW VR DVD-RW Disc with VR mode
-R DVD-R disc
+R DVD+R disc
+RW DVD+RW disc
DVD-V DVD-Video disc
VCD Video-CD
CD Audio-CD
DivX DivX/Xvid files
MP3 MP3 files
WMA WMA files
JPEG JPEG files
15 -
Page 16

Initial Installation
Initial Remote Control Setup
To insert or change the batteries, press on the imprinted arrow. Sldie off and remove the
battery compartment cover. Insert alkaline-manganese LR 03 (AAA) type batteries and
make sure the + and – poles are aligned correctly. Then, replace the cover.
Switching over to Progressive Scan
With the “Progressive Scan” mode you get the best possible picture quality without flicker in the “Component Video” mode in display units which support this
operating mode.
➠ Your recorder must be switched on. An HDMI cable is not
plugged.
Button on the recorder.
On: 576 P appears briefly in the recorder display.
Off: 576 I appears briefly in the recorder display.
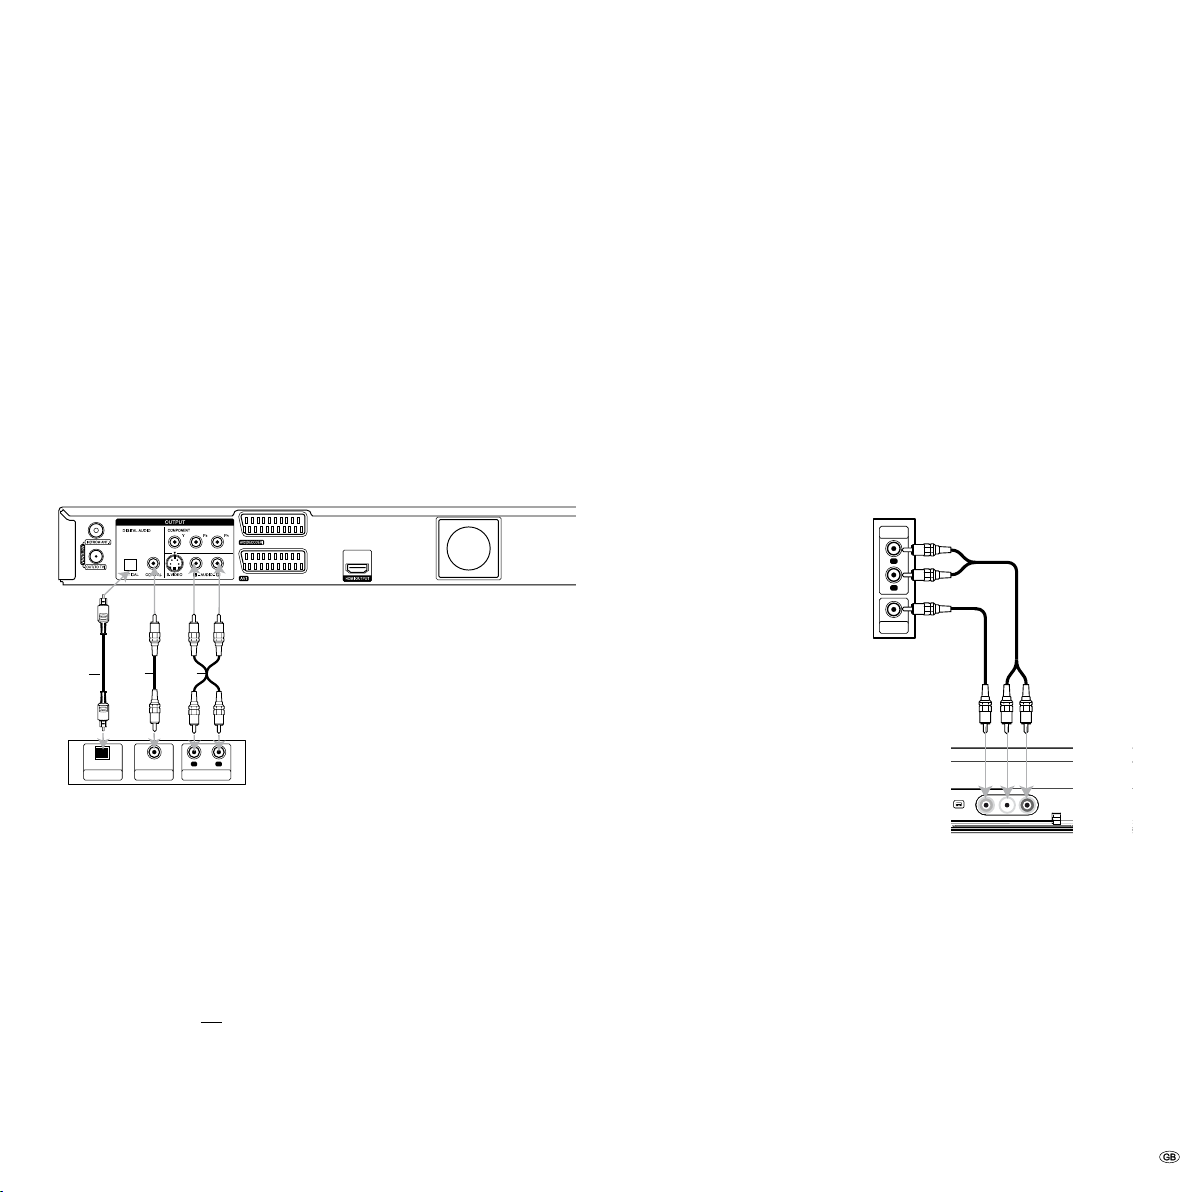
Connections - General
➠ Depending on your television set and the other units you want to connect,
there are several ways of connecting your recorder to your TV set. Only use
the connection methods described below.
➠ Refer as necessary to the manuals for your television, recorder, stereo system
and other units in order to make the best possible connections.
➠ The recorder must be connected directly to the TV set. Use the “connection
wizard” for this in Loewe TV sets.
➠ Do not connect the Recorder AUDIO OUT socket to the audio system Phono
In socket.
Connecting to the Aerial
Remove the existing aerial cable plug (R) (for analogue, terrestrial or cable TV) from
the TV and plug it into the aerial socket on the back of the recorder (IN ( from
ANT.)). Then plug one end of the aerial cable provided into the TV socket on the
recorder (OUT (To TV)) and the other end into the aerial socket on the TV.
Connecting to the Television
Make the following connections depending on the scope of functions of your
existing equipment (refer to page 17).
When connecting to a LOEWE TV set, the recorder must be logged in to the connection wizard of the TV set at the appropriate connection first.
Euro AV1 connection
Connect the AV1 socket on the recorder using the enclosed Euro AV1 cable (Scart)
with the corresponding socket on the TV.
HDMI connection
Connect the HDMI OUTPUT socket of the recorder to the HDMI input socket on
the TV set with the HDMI cable provided (HDMI socket 1 in Loewe). Make the
settings as described on page 37. The Euro AV connection is required additionally
for recording from the TV set.
Alternative connections
S-Video connection
Connect the S-VIDEO OUT socket of the recorder to the S-Video input socket of
the TV set with the S-Video cable.
Component Video connection
Connect the COMPONENT VIDEO OUT sockets on the recorder to the appropriate
input sockets on the TV set with a Y Pb Pr cable (available from your dealer).
Audio connection (left/right)
Connect the left and right AUDIO OUT socket of the recorder to the left and right
AUDIO IN sockets on the TV set with the audio cables.
Digital Audio output
Connect the DIGITAL-OUT socket of the recorder to the DIGITAL-IN socket of
the surround amplifier.
- 16
Page 17
ON
Line IN
Power OUT
OFF
230V~50/60Hz
Surr.
Front
Right
Surr.
Front
Subw.
Left
Right
Center
Left
R
R
L
C
L
Bass Intensity
Phase
Min. Max.
0 180
Crossover Frequency
Audio Link
System connector
50 250.
Initial Installation
Connecting to a Loewe TV System
Make the connections as shown here:
Audio-Link
Aerial cable
Aerial cable
Euro-AV cable
Loewe Individual Sound-System (Subwoofer)
Back of the television
HDMI cable
Back of the recorder
Mains cable
17 -
Page 18
L
R
AUDIO INPUT
VIDEO
INPUT
HDMI
INPUT
S-VIDEO
INPUT
SCART INPUT
Pr
Pb
Y
COMPONENT VIDEO INPUT
SCART AV1 SCART AV2
AERIAL
INPUT
AERIAL
OUTPUT
L
R
AUDIO INPUT
VIDEO
INPUT
HDMI
INPUT
S-VIDEO
INPUT
SCART INPUT
Pr
Pb
Y
COMPONENT VIDEO INPUT
SCART AV1 SCART AV2
AERIAL
INPUT
AERIAL
OUTPUT
SCART AV
Initial Installation
Connecting to a set-top box / Satellite Receiver
If you use a cable or satellite receiver with integrated decoder, connect it to your
recorder and television set as described below. If you use a separate decoder box
for your cable/satellite television, follow the instructions in the next section “Connecting to an External Decoder Box“.
Connect the aerial cable as shown. This enables you to watch and record TV
1.
channels.
Connect the AV1 connection to a AV socket on your TV set with the Scart cable.
2.
This enables you to view discs.
Connect the AV2 DECODER connection to a AV socket on your set-top box /
3.
your satellite receiver. This enables you to watch its TV channels.
➠ This recorder is equipped with a “Loop-Through“ function. The function
enables you to record a TV program from the integrated analog terrestrial TV
tuner of this recorder while watching a satellite or set-top box channel. Do
not connect the recorder “via“ your video recorder, satellite receiver or set-top
box.
Antenna/
cable television
wall socket
Set-top box or
satellite receiver
Connecting to an External Decoder Box
If you use an external decoder box for your satellite or cable TV system, follow the
connection procedure described below.
Connect your aerial socket in the wall to the aerial input socket on your set-top
1.
box / satellite receiver using an aerial cable.
Connect the decoder to the AV DECODER socket on the set-top box /satellite
2.
receiver using a SCART cable. Further instructions can be found in the manual
for your decoder box.
Connect the AV2 socket on the DVD recorder to a AV 2 socket on your set-top
3.
box / satellite receiver using a SCART cable.
Connect the AV1 socket on the DVD recorder to a AV 1 socket on your televi-
4.
sion using the SCART cable.
➠ Do not connect the Decoder-Box directly to the recorder but as shown in the
figure below to the satellite/set-top box.
➠ Stations from the decoder (e.g. via Pay-TV services) can only be viewed when
the recorder is switched off (standby mode).
➠ For timer recordings to work properly on this recorder, the satellite / set-top
box must also be switched on during recording.
➠ With this configuration you cannot watch one television broadcast and record
another at the same time.
Antenna/
Set-top box or satellite receiver
cable television
wall socket
Decoder
- 18
Back of the recorder
Back of the television
Back of the recorder
Back of the television
Page 19
A
X
O
DIGITAL INPUT
COAXIAL
DIGITAL INPUT
OPTICAL
R
L
AUDIO INPUT
P+ P- AV
Video
L-Audio-R
L
R
VIDEO
OUTPUT
AUDIO
OUTPUT
Initial Installation
Connecting to an Amplier
Connecting to an analog amplifier with analog 2-channel
stereo or Dolby Pro Logic II / Pro Logic
Connect the left and right AUDIO OUT socket of the recorder to the left and
right AUDIO IN sockets of the amplifier, receiver or stereo system with the audio
cables (A).
Connecting to a digital amplifier with two-channel digital
stereo (PCM) or to an audio/video receiver with a multichannel decoder (Dolby Digital™, MPEG 2 or DTS)
Connect one of the DIGITAL AUDIO OUT sockets (OPTICAL O or COAXIAL
1.
X) of the recorder to the appropriate input socket on your amplifier. Use an
appropriate digital audio cable (optical O or coaxial X - available from your
dealer).
You must configure the digital output of the recorder (Page 29).
2.
Back of the recorder
➠ If the audio format of the digital output does not correspond to the capa-
bilities of your receiver, the receiver will emit a strong distorted sound or no
sound at all.
5.1 Digital surround sound via the digital connection can only be obtained if
your receiver is equipped with a digital multi-channel decoder.
You can obtain information about the audio format of the current DVD via the
Info menu (Page 36).
Connecting Audio/Video (A/V) Accessories
Connect the input sockets (AV2 on the back of the device or AV3 = input on the
front of the device (page 6)) of the recorder to the audio/video out sockets of the
accessory components with the audio/video cables.
If you have connected a device to AV2 and switched off its power supply, the
Digital Link Plus function to the recorder is not possible.
Connector block for an
accessory component
(VCR, Camcorder, etc.)
Amplifier (Receiver)
Digital multi-channel sound
A digital multi-channel connection offers the best sound quality. You will need a
multi-channel audio/video receiver which supports one or more audio formats, e.g.
MPEG 2, Dolby Digital and DTS. You will find information in the documentation
enclosed with the receiver.
➠ Due to the DTS licensing agreement the digital output will be to DTS DIGITAL-
OUT when a DTS audio stream is selected.
This recorder does not perform a (2-channel) decoding (downmix) of a DTS
sound track internally. In order to enjoy DTS multi-channel surround sound, you
have to connect this recorder to a DTS-compatible receiver via one of the
recorder’s digital audio outputs.
Front of the recorder
19 -
Page 20
P+ P- AV
DV
IN/OUT
Initial Installation
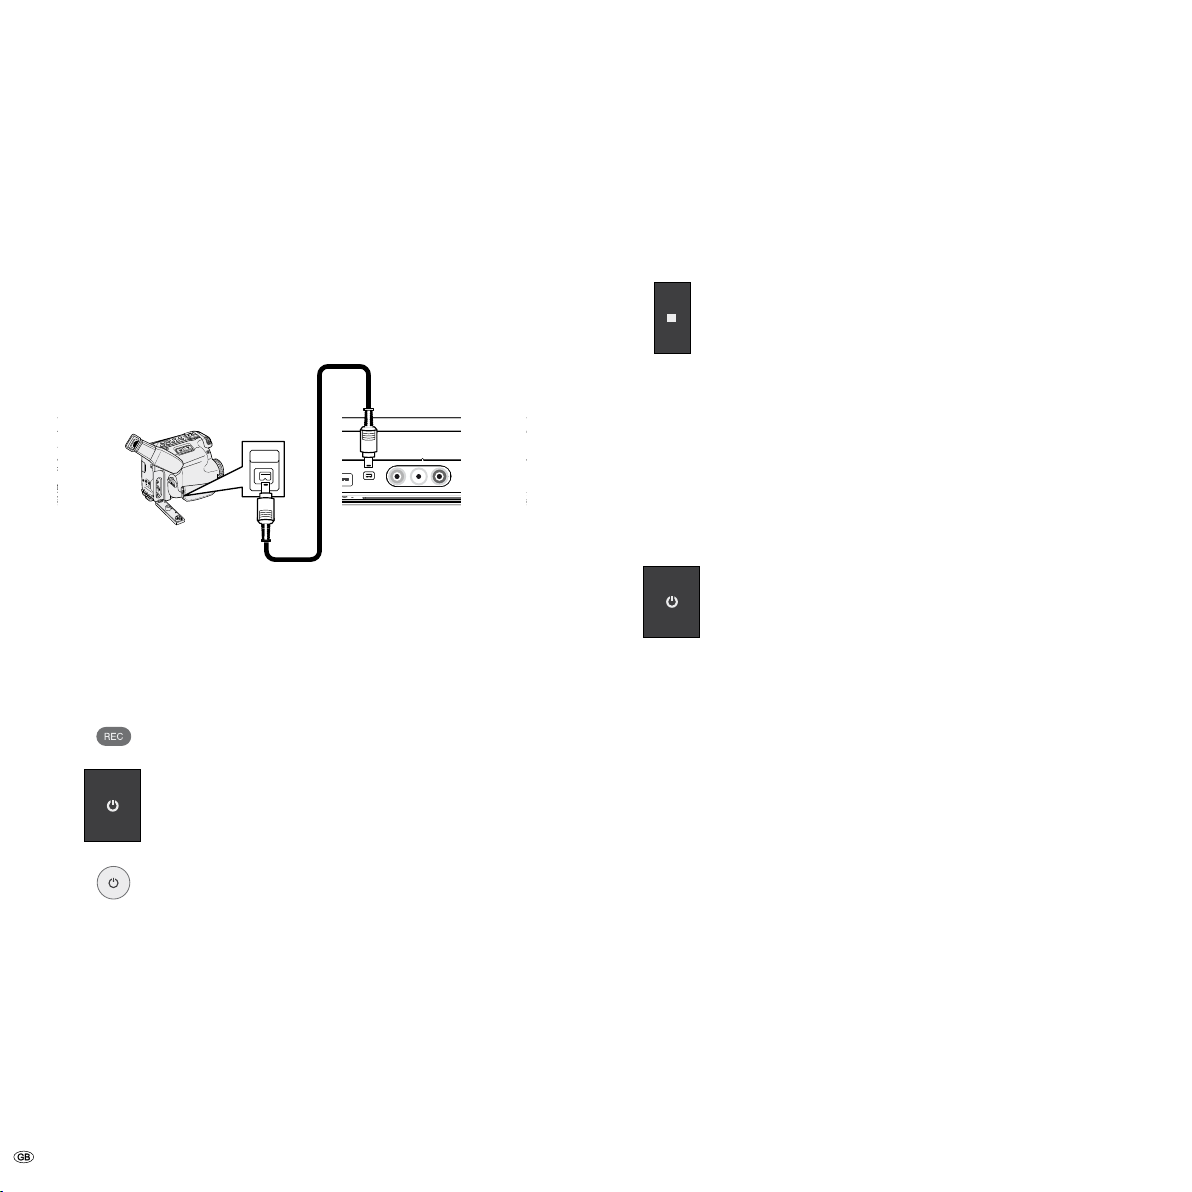
Connecting a digital camcorder
You can connect a digital camcorder (DV) or a digital DVD-R/RW recorder to the
DV IN socket and transfer contents of DV tapes or DVDs digitally.
Use a DV cable (not included in delivery) to connect the DV IN-/OUT socket of
your DV-camcorder/video deck to the DV IN socket on the front control panel of
this recorder.
➠ Only DV units can be connected to this socket (the source signal must be in
the DV-25 format; see page 53). It is not compatible with digital satellite
tuners or S-VHS video decks.
DV Digital Camcorder
Front of the recorder
Connect to the mains
First plug the small plug on the power cable into the mains connection on the
back of the recorder then plug the large mains plug into a 200-240V/50-60Hz
mains socket.
Basic Settings
Concealed installation
With Digital Link, Loewe TV sets pass on the signals from the remote control through
the Euro-AV connection on the recorder. Digital Link is useful when you want to
put the recorder in a concealed place, e.g. in a closed rack.
➠ Your recorder must be switched on.
Button on the recorder for > 3 s
Digital Link on: LINK appears in the recorder display.
Digital Link off: FRONT appears in the recorder display.
Resetting the DVD Recorder
If any of the following problems occur.
The unit is plugged in but will not turn on or off.
•
The display panel does not work.
•
The Recorder is not functioning normally.
•
the Recorder can be reset in the following way:
Hold down the button on the device for at least five seconds.
The device switches off or pull out the power cable, wait at least
20 seconds and reconnect the cable.
Press the button again to switch the device back on.
Set the remote control for recorder operation.
Push the On/Off button on the DVD recorder or
the On/Off switch on the remote control.
➠ If you aim the remote control at the recorder when switching over to
Recorder mode, the recorder will be switched on.
- 20
Page 21
Language
Select the Language.
English
OK
Next
Antenna
Prev.
Check your antenna connection.
TV
IN (from ANT.)
Antenna
Cable
Wall jack
DVDRecorder
OUT (to TV)
OK
Next
Clock Set
Manual
NextPrev.
Auto
Select a mode.
OK
Auto Programming
Start
Signal Source
Select a mode
OK
Start
Others
Prev.
DVB-T+Analogue
End
Initial Setup is Completed.
Close
Prev.
OK
Initial Installation
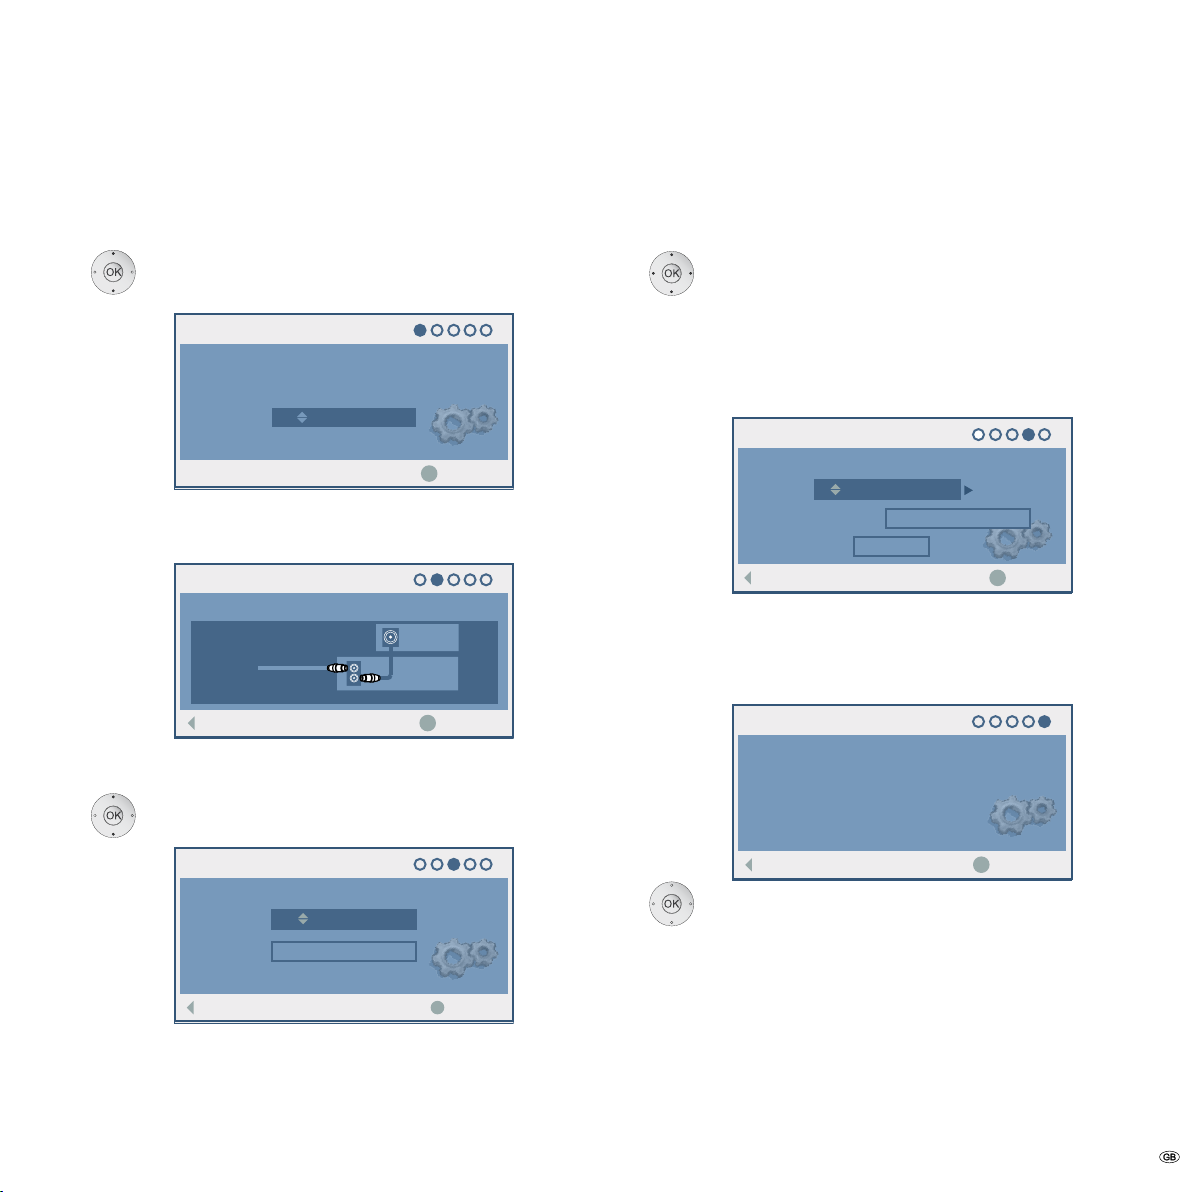
Auto Setup
After you have pressed the On/Off button for the first time or reset the device to the
factory settings, the wizard for the automatic setting starts. This sets the language
of the menus and dialogs of the recorder, the time and the stations.
5 6 Select menu Language.
Confirm selection with OK.
Check the antenna connection as illustrated.
Manual: Enter the date and time.
3 4 Move cursor.
5 6 Enter data.
Confirm with OK .
5 6 Select country.
4Press.
5 6 Select Signal Source.
4 Mark Start.
Start station search with OK.
The receiver runs through all the available analogue and digital
channels automatically and transfers the found stations to the
station list. In the DLP option the station list is transmitted by a
Loewe TV set with Digital Link Plus (page 24).
Continue with OK.
5 6 Set time. Select Auto or Manual.
Confirm selection with OK.
Auto: The current time and date are set automatically after the
station search (see ”Set time” on page 27).
Confirm selection with OK.
21 -
Page 22
Setup menu
Add Channel
Edit
Auto Programming
Program Edit
Clock Set
TV Aspect
AV2 Connection
Video output format
Power Save Mode
Antenna Feed 5V
Initialization
General
Display Menu
Disc Menu
Disc Audio
Disc Subtitle
DTV Audio
DTV Subtitle
DivX Subtitle
Language
Dolby Digital
DTS
MPEG
Sampling Freq.
DRC
Vocal
Audio
Lock System
DVD Rating
DTV Rating
Set Password
Area Code
DivX Reg. Code
Lock
Recording
Rec Mode Set
Rec Aspect
DV Rec Audio
TV Rec Audio
Auto Chapter
AV2 Recording
Timeshift
HDD
HDD DivX
DISC
USB
HDD
DISC
USB
HDD
DISC
USB
Rec Mode Set StartTV HDD
TV DVD
Timer Record
ShowView
Country
Antennae / DLP
Auto
Manual
4:3 Letter Box
4:3 Pan Scan
16:9 Wide
Decoder
Others
RGB
YPbPr
OFF
ON
PCM
Bitstream
OFF
Bitstream
PCM
Bitstream
48 kHz
96 kHz
OFF
ON
OFF
ON
Change
Delete
EQ
LQ
SQ
HQ
OFF
ON
4:3
16:9
Audio 1
Audio 2
Main+Sub
Main
Sub
None
5 Min
10 Min
15 Min
Auto
CVBS
RGB
OFF
ON
OFF
ON
Factory Set
HDD Format
Disc Format
Finalize
Disc Label
Disc Protect
PBC
Disc
Main menu
TV MOVIE
PHOTO
MUSIC
SPECIAL
SETUP
OFF
ON
OFF
ON
Finalize
Unfinalize
Initial Installation
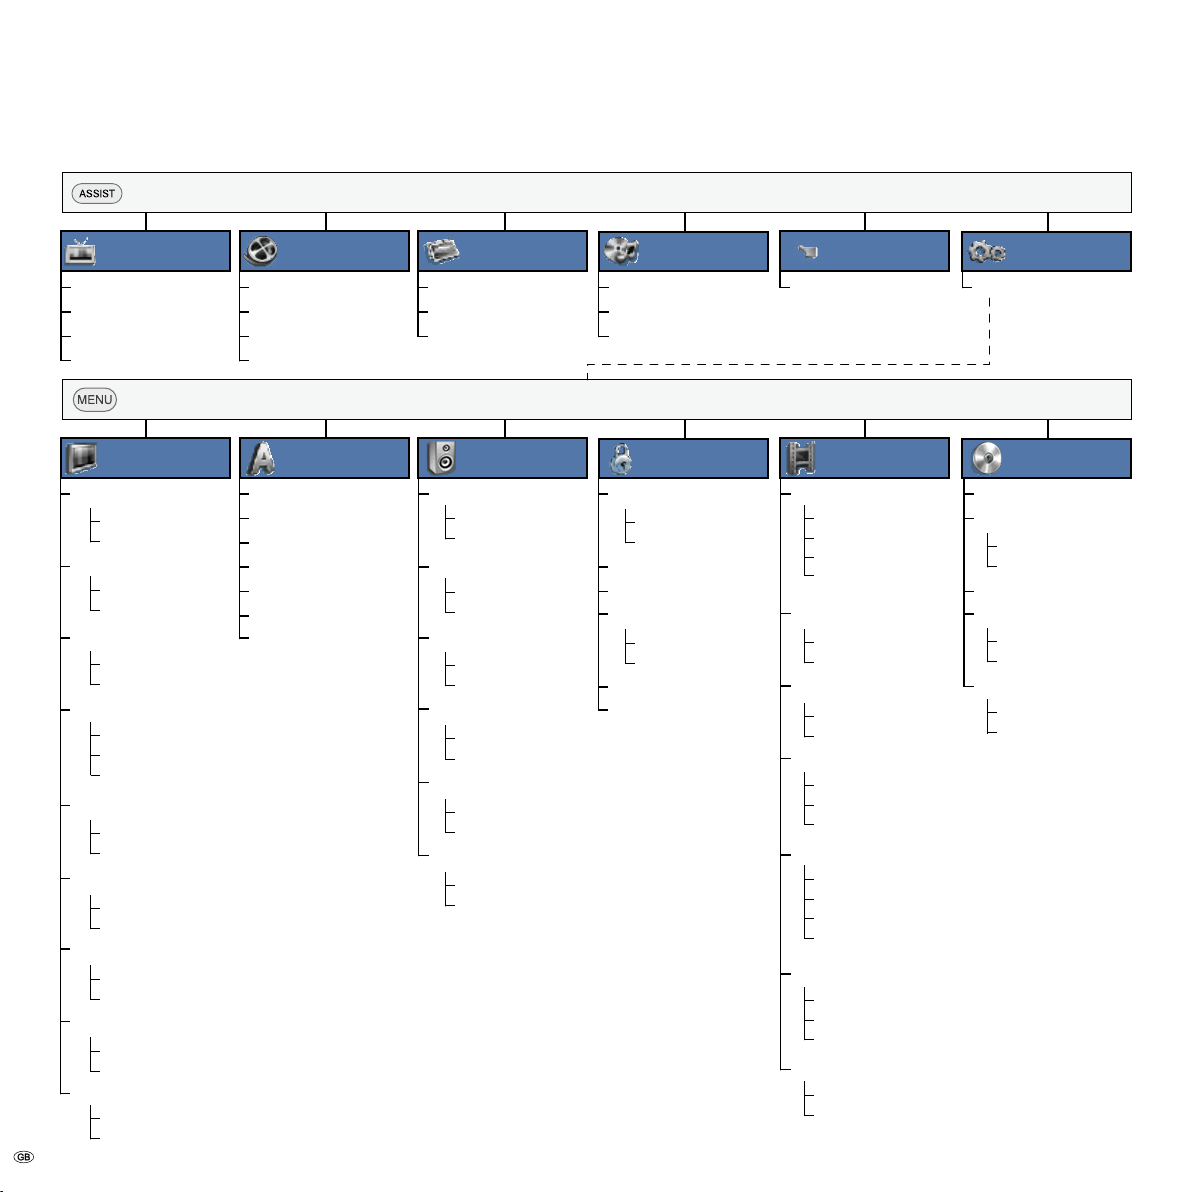
Menu overview
- 22
Page 23

HDD
DISC
USB
MUSIC
OK
Auto Programming
Program Edit
Clock Set
TV Aspect
AV2 Connection
Video output format
Power Save Mode
Antenna Feed 5V
Initialization
Auto
Manual
Prev.
SelectMove
0Time Offset
Initial Installation
Main menu (HOME)
All media files can be called from the main menu for playing and recording with
the recorder.
Call main menu.
34Select desired operating mode.
56 Call options.
Confirm selection with OK.
Exit main menu.
TV TV HDD: Live TV picture on – record on HDD.
TV DVD: Live TV picture on – record on DVD.
Timer Record: Display of Timer Record List menu (page 52).
ShowView: Display of Show View menu (page 51).
MOVIE HDD: Display the Title List menu of the HDD (page 54).
HDD DivX: Display the
DISC: a.) Display of Title List of a rewritable disc (page 54).
b.) Display of the Title List menu of a DivX disc (page 42).
c.) Play a Video-CD or DVD-Video-Disc (page 38).
USB:Display of the Movie list of the USB media.
PHOTO (page 46)
HDD: Display the Photo List menu of the HDD.
DISC: Display the Photo List menu of the disc.
USB:Display of the Photo List menu of the USB media.
MUSIC (page 43)
HDD: Display the Music List menu of the HDD.
DISC: Display the Music List menu (or Audio-CD) of a disc.
SPECIAL Display of the Rec Mode Set menu (page 32).
SETUP Call the Setup menu (this page).
USB: Display the Music List menu of the USB media.
Movie
List menu of the HDD (page 42).
Setup menu
The menu system offers several ways of changing settings. Most menus consist
of three levels for setting up options. If you press only the first and second
levels of the menu system are displayed on the screen. You can display the third
level by pressing 4. When navigating in the menus, 4 on the right side of the
menu tab shows you that the next level can be called up.
1. Level 2. Level 3. Level
Navigation in the menu
The arrow buttons of the Assist remote control are illustrated as follows in this
user guide:
The arrows correspond in the text: “5634“.
The OK function is shown in the text as OK.
Call menu.
5 6 Select desired option.
4 Call second level.
5 6 Select second option.
4 Call third level.
5 6 or 4to select the desired setting.
Confirm selection with OK.
Exit menu.
23 -
Page 24

OK
Stop
Search 20 %
DVB-T+Analogue
Others
Auto Programming
Program Edit
Clock Set
TV Aspect
AV2 Connection
Video output format
Power Save Mode
Antenna Feed 5V
Initialization
Prev.
Select
OK
Others
DLP
Start
Auto Programming
Program Edit
Clock Set
TV Aspect
AV2 Connection
Video output format
Power Save Mode
Antenna Feed 5V
Initialization
Prev.
Select
Initial Installation
The General Menu
Automatic programming
This recorder is equipped with a receiver (tuner) which can receive a maximum 88
analogue and 165 digital channels.
➠ When using Digital Link Plus the analogue station list is adapted to the TV
set (on this page).
➠ Connect the recorder to the aerial system (page 16).
Call menu.
5 6 Select General symbol.
4 Call second level.
5 6 Select Auto Programming.
4Mark country option.
5 6 Select Country.
4Press.
5 6 Select Analogue, DVB-T or DVB-T+Analogue.
Start channel search.
The tuner runs through all the available channels automatically
and transfers the found stations to the tuner memory.
Please only make all the changes to the analogue stations on the TV set when
your TV set is equipped with Digital Link Plus or with a comparable system of
another make.
If your TV set to which you have connected the recorder does not have Digital Link
Plus or a comparable system, you should match up the analogue stations lists of
the recorder and the TV set. This makes it easier for you to find the channels on
the TV set and the recorder.
➠ Connect the recorder to the TV set with Digital Link Plus with a SCART con-
nection (page 16).
➠ If the recorder has taken over the analogue stations from a Loewe TV via
Digital Link Plus (DLP), the functions Block, Program Edit, Move and Delete
are locked and cannot be used again until the analogue stations have been
overwritten again by automatic programming.
➠ When „France“ is selected as the country and „DVB-T“ is selected as the TV
standard, the VHF bandwidth for DVB-T can be set between 7 and 8 MHz
with the blue colour key.
Transfer analouge station list
Call menu.
5 6 Select General symbol.
4 Call second level.
5 6 Select Auto Programming.
4 Press 2 times.
5 6 Select DLP.
4Press. The Start button is marked.
Digital Link Plus
If you have connected the recorder to a Loewe TV set with Digital Link Plus or a
comparable system of another make (e.g. EasyLink, Mega Logic, Project 50), the
analogue station list will be transferred from the TV to the recorder. This happens
when you log in the recorder on the TV set or when you change (resort, delete,
add new ones) the analogue stations on the TV set. After such a change, the TV
will prompt you to start transfer of the changed analogue station list.
The recorder detects a connected TV set with Digital Link Plus or a comparable
system of a different make and sets the recorder accordingly. Then you can no
longer search for, delete or sort TV stations on the recorder. The menu items are
displayed in grey. Please note that all analogue stations which you receive via
antenna or cable have to be saved on station slots 1 to 88 in the TV set. If the
TV set does not prompt you to transfer the analogue station data, start transfer
on the recorder.
- 24
Start transfer of the analogue stations list from the TV to the
recorder.
This may last a few seconds. The display on the recorder shows
DLP during the transfer.
➠ (Viewvision DR+ DVB-T Secam). French analogue stations will only be trans-
ferred in the correct standard with Digital Link Plus if you select France as
the country (see above) first.
Page 25

OK
Digital
ARD
005
177.5 MHz
TV 1
RADIO 0
Move
Auto Programming
Program Edit
Clock Set
TV Aspect
AV2 Connection
Video output format
Power Save Mode
Antenna Feed 5V
Initialization
Prev. Next
Select
OK
END
01 C12 0 ARD
02 C23 0 ZDF
03 C7 0 RTL
04 C27 0 SAT1
05 C17 0 PRO7
06 C33 0 BBC
07 C34 0 CNN
08 C47 0 ABC
09 C10 0 TV5
Favourites
Delete
Move
Block
Station Rename
Program Edit
Select
CloseP+/P- Page Up/Down
PR Ch. MFT Station
PR-04 NICAM
ANALOG TV
Initial Installation
Add station manually
You can add a station manually.
➠ CIf the Lock option (page 30) is set to On, a password is required for the
Program Edit option.
Call menu.
5 6 Select General symbol.
4 Call second level.
5 6 Select Program Edit.
4 Call third level.
5 6 Mark Add Channel.
Confirm.
5 6 Select Mark Analog or Digital.
4Press.
5 6 Select PR number.
The channel search starts automatically. The search stops when
a station is found.
Add new station.
Close menu.
Station list menu
You can change (rename, move, delete, etc.) a station.
➠ Not with Digital Link Plus (DLP).
➠ CIf the Lock option (page 30) is set to On, a password is required for the
channel setting option.
Call menu.
5 6 Select General symbol.
4 Call second level.
5 6 Select Program Edit.
4 Call third level.
5 6 Mark Edit.
Confirm. The Station List menu is displayed.
The available options are displayed at the left.
Favourites Assign the selected station to the favourites list.
Delete Delete station from the station list.
Move Move station in the station list
Block Lock the station. See “Lock” page 30.
Station Rename Change name (page 58)
Program Edit search, channel input, fine adjustment
Close menu.
Switch station list
You can switch the station list to display digital, analogue and radio stations.
Open the station list menu.
5 Move the cursor to the top position.
34 Select DIGITAL TV, ANALOG TV or RADIO .
6 Go to the station list.
25 -
Page 26

25 S 23 PAL0 ONOFF OK
PR Seek Ch. MFT DECODER NICAM PAL/SECAM
Initial Installation
Change station
You can set an analogue station manually.
➠ Not with Digital Link Plus (DLP).
Open the Station list menu (page 25).
5 6 Select PR number.
Confirm.
5 6 Select Program Edit.
Confirm with OK.
The Program Edit menu is displayed.
3 4 Move the cursor to the previous / next column.
5 6 Edit the setting at the current cursor position.
Explanations of the settings
PR Indicates the selected station number (display only).
Seek Searches for stations automatically.
3 4 Select Seek and then
5 6 start search. The search is stopped when the recorder
receives a station.
Ch. Changes the channel number.
3 4 Select Channel and then
5 6 set.
MFT Changes the frequency for manual fine tuning.
3 4 Select MFT and then
5 6 set.
DECODER When option ON coded stations are received by a connected
decoder.
NICAM Switch NICAM reception on/off. Select option OFF in case of
sound interference.
PAL/SECAM changes the reception standard for Viewvision DR+ DVB-T
Secam.
3 4 Select PAL/SECAM in case of distorted negative
picture.
5 6 Select SECAM for the SECAM-L standard.
OK Save settings.
Moving stations
You can sort the order of analogue stations in the Station List menu.
➠ Not with Digital Link Plus (DLP).
➠ Not valid when receiving digital TV channels which have a permanent pro-
gramme assignment number (LCN).
5 6 Select station in the Station List menu.
Confirm with OK.
The available options are displayed at the bottom left.
5 6 Select Move.
Confirm with OK.
5 6 Select desired PR slot.
OK Save settings.
Delete Station
You can delete a station in the Station List menu.
➠ Not with Digital Link Plus (DLP).
5 6Select station in the Station List menu.
Confirm with OK.
The available options are displayed at the bottom left.
5 6 Select Delete.
OK The station is deleted.
- 26
Page 27

OK
Auto Programming
Program Edit
Clock Set
TV Aspect
AV2 Connection
Video output format
Power Save Mode
Antenna Feed 5V
Initialization
Auto
Manual
Prev.
SelectMove
0Time Offset
OK
Auto Programming
Program Edit
Clock Set
TV Aspect
AV2 Connection
Video output format
Power Save Mode
Antenna Feed 5V
Initialization
Auto
Manual
Prev. Next
SelectMove
2008Year
6 12Date
10 57:
/
Time
OK
Auto Programming
Program Edit
Clock Set
TV Aspect
AV2 Connection
Video output format
Power Save Mode
Antenna Feed 5V
Initialization
Decoder
Others
Prev.
SelectMove
Initial Installation
Clock set
When the automatic station search has finished, the date and time are set automatically (depending on the transmitting station), also when power is recovered.
The Auto option must be set for this.
Call menu.
5 6 Select General symbol.
4 Call second level.
5 6 Select Clock set.
4 Call third level.
5 6 Select Auto.
4 Select Time Offset.
5 6 Set time offset of 0, 30, 60, 90 or 120 minutes in case
the automatic set time differs from the local time.
Confirm with OK.
Exit menu.
➠ Please check by pressing in TV mode whether the year and date have
been automatically set correctly. You may have to set it manually as described
under “Manual setting of date / time”.
Manual Setting of the Date / Time
It is possible that the television station may broadcast incorrect date and / or time
information or no information at all and that the Recorder sets the incorrect time.
If this is the case we recommend that you set the clock manually.
Call menu.
5 6 Select General symbol.
4 Call second level.
5 6 Select Clock set.
4 Call third level.
5 6 Select Manual.
Confirm with OK.
Enter the date and time.
3 4 Move cursor.
5 6 Enter data.
Confirm with OK.
Exit menu.
TV Aspect
You can choose:
4:3 Letter Box Recordings in wide-screen format appear with a black bar at
the top and bottom edges of the screen.
4:3 Pan Scan The picture fills the whole screen but cuts off sections at both
sides if necessary.
16:9 Wide Select this setting if a wide-screen TV set with 16:9 picture
format is connected.
➠ If the resolution is set to 720p or 1080i, this option is not available.
AV2 Connection
You can connect the following devices to the AV2 DECODER connection on the
back of the recorder:
Decoder Connect a Pay-TV or Canal+ decoder.
Others Connect a video recorder or similar device.
27 -
Page 28

OK
Display Menu
Disc Menu
Disc Audio
Disc Subtitle
DTV Audio
DTV Subtitle
DivX Subtitle
English
Deutsch
Français
Italiano
Español
Nederlands
Svenska
Prev.
SelectMove
Initial Installation
Video output format
Select the video output format depending on which video interface you are
using (page 16):
RGB The TV set is connected to the Scart socket AV1.
YPbPr The TV set is connected to the COMPONENT VIDEO OUT
socket.
Power Save Mode
You can set the recorder so that it consumes < 1 Watt on standby. In the On position,
the decoder signal is switched from AV2 to AV1 and the display switched off.
Antenna Feed 5V
For a directly fed aerial, the aerial supply (DC 5 V/100 mA) must be activated with
On. The aerial is supplied via the IN (from ANT.) input.
➠ In case of an overload or short-circuit in the aerial supply, it is switched off
automatically. Eliminate the fault and switch the aerial supply back on.
➠ If an analogue channel is currently set, the 5 V aerial voltage is outputted for
all analogue and digital channels when On. If a digital channel is currently set,
the 5 V aerial voltage is outputted only for digital channels when On. Therefore,
external aerial change over switches can be used, for example.
Initialization
You can reset the recorder to the factory settings and format the harddisc if
necessary.
Factory Set
Select this option to reset the recorder to its works
settings.
➠ Some options cannot be reset like this (safety
stage, password, country code, station list, timer list).
Then Auto Setup is executed (page 21).
HDD Format The harddisc is formatted and all data on it are
deleted.
Language Menu
Menu Language
Select a language for the menus and dialogues displayed by the recorder.
Call menu.
5 6 Select symbol Language.
4 Call second level.
5 6 Select Display Menu.
4 Call third level.
5 6 Select English.
Confirm with OK.
Disc Languages
Select a language for the disc‘s menu, audio and subtitles.
If another language is to be used as the “original” version of the disc, select this
here if it is available on the Disc.
Original The original language of the disc is selected.
Others Select other language with Other and confirm with OK. Enter
the corresponding four-digit number from the “language code
list” on page 68 and confirm with OK.
Off Switch off disc subtitles.
- 28
DTV Audio
With digital stations several audio channels, e.g. for different languages, may be
broadcast. Select the desired language.
DTV Subtitle
With digital stations subtitles may be offered in different languages. Select the
desired language.
DivX Subtitle
Select the desired character set for DivX subtitles.
Page 29

OK
Dolby Digital
DTS
MPEG
Sampling Freq.
DRC
Vocal
OFF
ON
Prev.
SelectMove
Lock System
DVD Rating
DTV Rating
Set Password
Area Code
DivX Reg. Code
Change
Delete
Prev.
0-9 Input
New Password
OK
Initial Installation
Audio Menu
Each DVD disc offers a variety of audio formats. Set the audio format for the
recorder according to the type of audio system you are using.
Dolby Digital / DTS / MPEG
PCM Select this option if the unit is connected to a digital two
channel stereo amplifier. The DVD recorder‘s digital audio
outputs emit sound in PCM 2 channel format if you play a
DVD-Video disc with Dolby Digital audio format.
Bitstream Select Bitstream if you have a Dolby Digital decoder (or
amplifier, a Loewe TV with AC3 or DIS module or another unit
with Dolby Digital decoder) connected to the DIGITAL OUT
socket of the DVD recorder.
OFF If you select OFF the DTS signal is not emitted from the
DIGITAL OUT socket.
Sampling Frequency
If your receiver or amplifier is NOT designed for 96 kHz signals, select 48 kHz. If
you have made this selection, the unit automatically converts the 96 kHz signals to
48 kHz signals that the system can decode. If your receiver or amplifier is designed
for 96 kHz signals, select 96 kHz.
Night Mode (DRC)
Thanks to digital audio technology the DVD format enables you to hear soundtracks
in the most accurate and realistic way possible. However, you may wish to limit
the dynamics (i.e. the difference between the loudest and the quietest sounds). In
this way you can play a film with minimum volume differences. For this purpose
switch DRC to ON.
Karaoke Audio (Vocal)
Switch the singing option (Vocal) on, if you want to play a multi-channel karaoke
DVD. The karaoke channels on the disc are mixed into normal stereo sound.
Lock Menu
Set Password
Call menu.
5 6 Select symbol Lock.
4 Call second level.
5 6 Select Set Password.
4 Call third level.
If you have not yet entered a password
Enter a four-digit number with number buttons.
Confirm with OK.
Enter password to check.
Confirm with OK.
If you have already entered a password
Select Change.
Confirm with OK.
Enter current password.
Confirm with OK.
Then enter a new four-digit password.
Confirm with OK.
Enter password to check.
Confirm with OK.
➠ If you make a mistake, press 3repeatedly before you press OK to delete or
correct the password numbers one after another.
29 -
Page 30

Lock System
DVD Rating
DTV Rating
Set Password
Area Code
DivX Reg. Code
No Limit
8 (Adult)
7
6
5
4
3
2
1 (Children)
Prev.
OK
SelectMove
Initial Installation
Switching off the password
Proceed as follows if you want to switch off the password.
Open menu as under “Define password” (page 29).
Call menu.
5 6 Select Set Password.
4 Call third level.
5 6 Select Delete.
Confirm with OK.
Enter a four-digit number with number buttons.
Confirm with OK.
Delete Password
If you forget your password, proceed as follows to delete the current password.
Call menu.
Enter the six-digit number “210499” with the number
buttons.
A message is displayed.
3 4Select the yes button.
Confirm with OK.
The four-digit password is deleted. Enter a new password as
described above.
Lock System
Certain stations and DVDs can be locked. If the Lock option is set to On, locked
contents are skipped (see Station lock in the Station list menu, page 25). A password is then required for the functions in the “Lock” menu. The password is also
necessary to see a locked station/contents. If the Lock option is set to Off all the
locks are released.
Open menu as under “Define password” (page 23).
5 6 Select Lock System option.
- 30
4 Call third level.
Enter the four-digit password with the numeric buttons (page 23).
5 6 Switch Lock System On or Off.
Confirm with OK.
DVD Rating
This function prevents playing of DVDs unsuitable for children if these contain
the appropriate code.
Open menu as under “Define password” (page 23).
5 6 Select DVD Rating.
4 Call third level.
Enter the four-digit password with the numeric buttons (page 23).
Confirm with OK.
5 6 Select security stage between 1 and 8.
No Limit The disc is played completely.
Step 1 to 8 Only the scenes of the loaded disc are played which
correspond to the assigned security stage or a lower
level. Stage “1” has the most playing restrictions.
Confirm with OK.
Rating digital TV
You can lock digital TV programs above a certain age category. The classification
of the program depends on the respective program provider.
Open menu as under “Define password” (page 23).
5 6 Select DTV Rating option.
Enter four-digit password.
5 6 Select desired age limit.
No control The lock is not active. You can watch all digital TV
stations.
4 ...18 Years The lock is active for programs above the set age limit.
Lock All All programs are locked.
Confirm with OK.
Page 31

Lock System
DVD Rating
DTV Rating
Set Password
Area Code
DivX Reg. Code
G B
Prev. Next
OK
Select
Move
Lock System
DVD Rating
DTV Einstufung
Passwort festlegen
Ländercode
DivX Reg. Code
Zeige
Prev.
OK
Select
DivX® Video On Demand
Your registration code is: YJ3ZEJUR
To learn more visit <www.divx.com/vod>
OK
Initial Installation
Area Code
Enter the code for a country/region whose standards are to be used to rate the DVDVideo disc. (See “List of country code“ on page 65). For Great Britain select “G B“.
Open menu as under “Define password” (page 23).
5 6 Select Area Code.
4 Call third level.
Enter the four-digit password with the number buttons (see
“Set Password”).
Confirm with OK.
5 6 Enter data.
3 4 Move cursor.
Confirm with OK.
DivX registration code
You receive the DivX® VOD (Video On Demand) registration identification for
hiring and purchasing films through the DivX® VOD-Service. Further information
is available under:
www.divx.com/vod.
Open menu as under “Define password” (page 29).
5 6 Select DivX Reg. Code.
4 Call View.
Confirm with OK.
The “registration code” valid for your device is now displayed.
You can use this registration code to hire or buy movies through
the DivX® VOD Service under www.divx.com/vod.
See the instructions for saving movies on a disc for playing on
this recorder.
➠ All movies purchased from DivX® VOD can be played only on this
recorder.
31 -
Page 32

OK
Rec Mode Set
Rec Aspect
DV Rec Audio
TV Rec Audio
Auto Chapter
AV2 Recording
Timeshift
EQ
LQ
SQ
HQ
Prev.
SelectMove
Initial Installation
Recording Menu
Rec Mode Set
You can set the picture quality for recording:
DVD±R/RW (4,7 GB) HQ mode: approx. 1 hour.
SQ mode: 2 hours.
LQ mode: 4 hours.
EQ mode: 6 hours.
HDD (250 GB) HQ mode: approx. 67 hours.
SQ mode: approx. 125 hours.
LQ mode: approx. 237 hours.
EQ mode: approx. 355 hours.
Call menu.
5 6 Select symbol Record.
4 Call second level.
5 6 Select Rec Mode Set.
4 Call third level.
56 Set desired recording quality (EQ, LQ, SQ or HQ).
Confirm with OK.
Rec Aspect
You can adapt the picture format (16:9 or 4:3) to the material being recorded
during the recording.
DV Rec Audio
You need to use this setting if your camcorder with
32 KHz / 12-bit is connected to the DV IN socket on the front panel.
Some digital camcorders have two stereo tracks for audio. One is used for recording, the other is used for post-editing.
Audio 1 The original sound is recorded.
Audio 2 The edited sound is used.
TV Rec Audio
When recording bilingual TV you can select the audio channel to be recorded.
Main+Sub: both languages are recorded.
Main: language 1 only.
Sub: language 2 only.
Auto Chapter
Chapter start marks are inserted at fixed intervals in recordings on DVDs in video
mode. You can select intervals of 5, 10 or 15 minutes. If you select None automatic
chapter setting is switched off.
AV2 Recording
The signal type can be selected to record the video in signal of a device connected
to the AV2 DECODER.
Auto The video in signal is adapted automatically to the received
video signal.
CVBS Only for recording a CVBS input signal.
RGB Only for recording an RGB input signal.
Timeshift
The recorder can be set so that it is always in timeshift mode in the on state. Current TV programs are then recorded automatically (page 49).
OFF Manual timeshift function.
ON Automatic timeshift function.
- 32
Page 33
OK
Start
Disc Format
Finalize
Disc Label
Disc Protect
PBC
Prev.
Select
VR Mode Video Mode
Select a mode.
Disc Format
OK Cancel
All data on the disc will be deleted.
Proceed?
Disc Format
Initial Installation
Disc Menu
Disc Format
A new disc is initialised by the recorder (on request) when inserted.
DVD-R The recorder initializes the disc in “video mode”.
DVD-RW The recorder initializes the disc in “video mode”.
DVD+R The recorder initializes the disc in “video mode”.
DVD+RW The recorder initializes the disc in “video mode”.
➠ A DVD+RW or DVD-RW disc can also be initialised later by menu:
Call menu.
5 6 Select symbol Disc.
4 Call second level.
5 6 Select Disc Format.
4 Call third level.
OK call Start menu.
3 4 Select a desired format for DVD-RW (Video mode or VR
mode).
Confirm with OK.
The following prompt appears:
34 Select OK button.
Confirm with OK.
➠ When you start formatting all recordings on the disc are
deleted.
After pressing OK disc formatting begins. It can take a few
minutes.
33 -
Page 34

OK
Move
Disc Format
Finalize
Disc Label
Disc Protect
PBC
Finalize
Unfinalize
Prec.
Select
OK Cancel
Do you want finalisation?
Finalize
Initial Installation
Finalize
Finalization fixes recordings so that the disc can be played on a regular DVD player
or a computer with a suitable DVD-ROM drive. During finalization of a Video mode
disc a menu is created for disc navigation (Page 64).
➠ Following recording and finalization of DVD-R and DVD+R discs no other
editing or recording can take place. This does not however apply for a
DVD+RW and DVD-RW disc.
Call menu.
5 6 Select symbol Disc.
4 Call second level.
5 6 Select Finalize.
4 Call third level.
5 6 Select Finalize.
Confirm with OK.
Disc Label
Use this option to enter a name for the disc. The name is displayed when the disc
is loaded and when you display disc information on the screen.
➠ The disc name can be up to 32 characters long.
➠ For discs formatted on other recorders you will only see a limited character set.
Call menu.
5 6 Select symbol Disc.
4 Call second level.
5 6 Select Disc Label.
4 Call third level.
Confirm with OK.
Change name (see page 58).
Disc Protect
Set Disc Protect to ON to avoid accidental recording, editing or deleting of the
disc. To release the disc again, select OFF.
PBC - Play-Back Control
VCD, SVCD
If a VCD (or SVCD) possesses the property of Play-Back Control (PBC) and the PBC
menu is set to ON, the disc is played via the menu on the disc. Otherwise the VCD
can be played like an audio CD but without a track list.
➠ The time needed for finalisation depends on the type of disc, how much is
recorded on the disc and the number of titles on the disc. Finalisation of a
prerecorded disc can take up to 30 minutes.
➠ When inserting a finalised DVD-RW, the finalisation can be cancelled by
selecting Unfinalize in the Finalize menu. Then the disc can be edited and
rewritten.
➠ The Disc Protect option must be set to Off to finalise.
- 34
34 Select OK button.
Confirm with OK to finalise the disc.
Page 35

Operating convenience
CH
04
RTL
24/05/2007 13:30
DVD-Video
RTL Aktuell
18:45-19:05
News
01 ARD
02 ZDF
03 RTL
04 SAT1
05 PRO7
06 BBC
07 CNN
SelectFavourites
DIGITAL TV
OK
◄ ►
TV mode
If you are currently watching a TV channel supplied by the integrated receiver of
the recorder (recorder in Stop mode), you can show (and hide) information about
the TV station with .
Displays the disc format, free memory space and a progress display of the elapsed
playing time.
Indicates the channel number, the station name and the
audio signal for the current program.
Detailed information on the current program.
(only DVB-T).
Shows the program title,
the running time, etc.
See symbols below.
Selecting a station
Station list
There are three different station lists with which you can select stations conveniently.
ANALOG TV: List of all analogue TV stations.
DIGITAL TV: List of all digital TV stations.
RADIO: List of all radio stations (DVB-T, if available).
Open station list (without previous onscreen displays).
You can choose from three different station lists.
Select the desired station list with 34.
Select the station with 56.
Shows the current date and time.
➠ After ten seconds without a button being pressed the screen menu switches
off automatically.
This symbol indicates that subtitles are available to the current
This symbol indicates that the present program is broadcast in
This symbol indicates that detailed information about the selected
program are available (see page 36).
program.
wide screen format.
P+/P- scroll in the pages of the station list.
OK the selected station is called.
Buttons of the remote control
P+/P- Station up/down.
Enter program with the numeric buttons.
OK and then press the blue button to open the Favourites list
menu (page 25).
()
35 -
Page 36

Operating convenience
OK
Tagesschau
Heute
RTL Aktuell
Sat 1 News
Newstime
K1 Nachrichten
News
Heute
Tagesschau
Mittagsmagazin
Drehscheibe
Punkt 12
Blitz
Galileo
K1 Magazin
Wissenshunger
nano
01 ARD
02 ZDF
03 RTL
04 SAT1
05 PRO7
06 Kabel
07 VOX
08 3Sat
Switch to
Detail
│NowStations │Next
12:00 12 Oct
EPG (Electronic Programme Guide)
8 Days
OK
Title
Move 0-9 Input
Enter
DVD-Video
1/10
0:12:34
1.STEREO
OFF
1/1
NORMAL
4/14
EPG program guide
The EPG program guide contains the programs and times for DVB-T programs.
Here you will find all the programs with the program times and a short description
of the content quickly and easily.
Displaying the program preview
Switch on program guide.
Select station/programs with 3456.
P+/P- scroll in the pages of the EPG.
OK switch to the selected station. The program titles for the
selected station are displayed after a short time.
Press the red button to record the selected program. An entry
appears in the timer list (page 52).
()
Press the green button to select another date up to one week
into the future with 34 and confirm with OK.
Press the yellow button to change between the Now/Soon and
8 days views.
Press the blue button to call detailed information about the
selected program.
Exit the menu and return to the selected station.
Disc playback
You can display a variety of information about the inserted disc on the screen.
Twice to select the Title menu.
5 6 Select the desired function.
Title Current title (or track number)/total number of titles (page 38).
Chapter Current chapter number/total number of chapters (page 38).
Time Elapsed playing time (page 39).
Audio Selected sound formats, movie language and audio channels
(page 40).
Subtitle Selected subtitle (page 41).
Angle Selected camera position / total number of camera positions
(page 40).
Sound (3D-surround) selected sound mode (page 40).
Exit menu.
- 36
Page 37

HDMI mode
HDMI (DVI) connection
The HDMI connection (High Definiton Multimedia Interface) allows digital picture
and sound transmission via a connecting cable, e.g. to Loewe Flat TV sets. The
digital picture and sound data are transmitted without data compression and therefore lose none of their quality. In the equipment connected, no analogue/digital
conversion is necessary, which might also have lead to losses in quality.
DVI signals can be also be reproduced by the HDMI connection using a DVI/HDMI
adapter cable. This is possible because HDMI is based on DVI and is downwardly
compatible. That means that the digital video signals are transmitted via HDMI
- no audio signals are transmitted, though. In addition, both use the same copy
protection method HDCP (High Definition Content Protection).
Switch off the TV set/monitor with HDMI connection and
recorder.
Connect recorder to TV set/monitor via HDMI connection as
described on page 16.
Switch on the TV set/monitor.
Switch on the recorder after 30 seconds.
Log in the HDMI connection in the connection wizard of the TV
set (see user guide TV set).
➠ DVI: If a DVI-HDMI adapter cable is used for transmission,
connect the analog or digital audio outputs on the recorder
with the corresponding inputs of the TV set as described on
pages 16 and 19.
Leave the existing SCART connection as it is to record from the TV.
HDMI operation
Switch the TV set over to the HDMI AV input (takes place automatically in connection with a Loewe Flat-TV set, see page 16).
Press the RES button on the recorder repeatedly to set the desired
picture resolution (e.g. 576i, 576p, 720p, 1080i).
➠ You can only set resolutions which your TV set/monitor is
capable of. For optimum picture quality, select the resolution
1080i on the recorder.
Open the disc drawer.
Insert the selected disc in the drawer with the side to be played
facing down.
Close the drawer.
Call main menu.
34 Select FILM.
56 Select HDD, HDD DivX or Disc.
Confirm selection with OK.
A menu appears on the screen.
5 634Select title on DVD.
Depending on the medium, playing starts automatically or is
started with the Play button or you have to make entries in the
menu.
➠ The other sockets (S-Video and Component Video) have no function during
the 720p or 1080i mode.
➠ If your TV set is unable to process a sampling frequency of 96kHz, set the
sampling rate to 48 kHz in the Setup menu under “Sound” (page 29).
If you have selected this option, the recorder will automatically convert all 96kHz
signals to 48kHz-signals.
➠ This recorder performs no internal (2-channel) decoding of DTS soundtracks.
In order to enjoy DTS multi-channel surround sound, this recorder must be
connected by one of the digital audio outputs to a DTS-compatible receiver.
➠ If the “Dolby Digital” or “MPEG” option has not been set to “PCM” in the
Sound menu (page 29), no sound is output through the TV set.
➠ The HDMI connection to the recorder is operated as a signal output. Please
proceed as described on page 52 if you want to record from an external
signal source with the recorder.
37 -
Page 38

DVD-Video
4/14
Video mode
Playing back a DVD or video CD
Preparation
Switch the television on and set the video source to be the input that the recorder
has been connected to or activate the “Control voltage“ option for the television‘s
AV input.
➠ This is unnecessary in Loewe Flat TV sets.
If you have connected the recorder to an audio system, switch on the audio system
and, as the source, set the input that the DVD recorder has been connected to.
Open the disc drawer.
Insert the selected disc in the drawer with the side to be played
facing down.
Close the drawer. READING shows on the display while disc
recognition is in progress.
Play
After detection of the disc it starts playing automatically or a disc menu is displayed.
Call main menu.
34 Select FILM.
56 Select HDD, HDD DivX or Disc.
Confirm selection with OK.
A menu (e.g. title list) appears on the screen.
5 634Select title on DVD.
Start / continue playing.
Select title on (S)VCD (with activated PBC, see page 34).
The menu setting and the exact operating instructions for the
disc may differ from disc to disc. Follow the instructions on the
individual menu pages.
Pause: Pause playing.
Stop: Finish playing.
You will find further information on page 40.
➠ If the Lock System is active and the DVD disc‘s security rating is higher than
that of the DVD Rating, the four-digit password will need to be entered (see
DVD Rating on page 30).
➠ DVD‘s have a country code. The recorder will not play a disc that has a
country code which differs from the country code stored in the unit. This
player has country code 2.
➠ You can also switch off (OFF) PBC for (S)VCD (see page 34) in the main menu.
General functions
➠ Unless otherwise indicated, the remote control (page 3) is able to control the
functions described. The recorder‘s own controls can also be used to control
certain functions (page 6).
Select TITLE HDD DVD-ALL DivX
Twice to select the Title menu.
5 6 Select symbol.
34 Select title number.
OK start playing.
Select CHAPTER / TRACK
HDD DVD-ALL VCD
If a title has several chapters/tracks, you can select another
chapter/track as follows:
P+ or P- during playing to select the next chapter/next track or
return to the beginning of the current chapter/track.
P- twice briefly to return to the previous chapter/track.
Search HDD DVD-ALL VCD DivX CD
Select the search direction and speed:
Press several times for faster search in reverse.
Press several times for faster search forwards.
Speed and direction are shown as arrows.
End search mode and continue playing.
Skip
34 Jump back/forward 5 minutes during playing (HDD).
Jump forward 15 seconds during playing (HDD, DVD±R,
DVD±RW).
- 38
Page 39

DVD-Video
1/10
0:12:34
4/14
HDD
1/6
Video mode
Freeze frame and picture for picture play-back
HDD DVD-ALL VCD DivX
Pause: Pause playing.
34 Scroll picture by picture.
Continue playing.
➠ The picture by picture scroll back is not supported by Video-
CDs and in DivX. You can page forward through images by
pressing PAUSE on the remote control.
Slow Motion
HDD DVD-ALL VCD
Pause: Pause playing.
Switch on slow motion mode during pause.
Select the slow motion direction and speed:
1/16, 1/8, 1/4, 1/2 (reverse).
1/16, 1/8, 1/4, 1/2 (forwards).
1/8, 1/4, 1/2 (forwards / VCD).
Slow motion speed and direction are displayed.
End slow motion mode and continue playing.
➠ On Video-CD the slow motion play-back in reverse is not
supported.
Repeat HDD DVD-ALL VCD CD MP3
DVD-Discs
Select type of repetition.
A-B Repeats the position marked with OK.
Chapter Repeats the current chapter.
Title Repeats the current title.
All Repeats all titles on the disc (VR mode; only DVD-RW disc).
Off No repeat.
Video-CDs / DivX
Select type of repetition.
Track Repeats the current track.
All Repeats all tracks on the disc or in the folder (DivX).
Off No repeat.
➠ On a Video-CD with PBC you have to set PBC to OFF in “Disc” menu of the main
menu to use the repeat function. You will find further information on page 34.
Time (Play from ...) HDD DVD-ALL DivX
The “Time” function enables you to select where a disc starts playing.
Press twice.
The elapsed playing time of the current disc is displayed in the
“Time” box.
5 6 Select symbol.
Enter time in format h:mm:ss.
OK start playing from set time.
Zoom HDD DVD-ALL VCD
With the Zoom function you can enlarge the video picture during playback and
navigate in the enlarged picture.
Select Zoom function during play/freeze frame.
Zoom stages: x1, x2, x4, x1 (normal size).
3 4 5 6 Select picture section.
Close Zoom window.
➠ The Zoom function may not work on certain DVDs.
Markers HDD DVD-ALL VCD
You can start playing from a saved marker. A maximum of six markers may be
saved.
Set Marker
Press the blue button briefly to set a mark at a selected point.
The marker symbol is displayed on the screen for a short time.
Repeat this step to enter a maximum six markers on one disc.
Call Marker
Press the blue button long to select Marker Search menu.
5 634 Select marked scene.
OK Start playing from marked scene.
39 -
Page 40

OK
ENDMENU
Select
CloseDeleteMove
Marker Search
DVD-Video
1/10
0:12:34
1.STEREO
OFF
1/1
4/14
DVD-Video
1/10
0:12:34
1.STEREO
4/14
DVD-Video
1/10
0:12:34
1.STEREO
OFF
1/1
NORMAL
4/14
Video mode
Camera positions DVD-V
If the DVD contains scenes taken at different camera positions, it is possible to
change to another camera position during play-back.
Select twice during play-back.
5 6 Select symbol.
3 4 Select the desired camera angle. The number of the
current camera position is displayed.
Delete Marker
Press the blue button long to select Marker Search menu.
5 634 Select marked scene.
Delete Marker.
34 Select yes option.
Confirm with OK.
Exit the Marker Search menu.
➠ The markers are only saved until the disc is changed (DVD-ALL VCD).
Disc menu DVD-V VCD
DVDs and Video CDs usually contain their own menus.
Select Disc menu.
5 634 Select the desired settings.
Confirm with OK.
Exit Disc menu DVD.
Exit Disc menu HDD.
➠ A camera symbol will appear on the screen during scenes
that were recorded using different camera positions.
Digital sound formats, movie language and audio
channels
You can select the digital sound format in connection with the movie language
here.
Select twice during play-back.
5 6 Select symbol.
3 4 Select other movie language or sound format (DVD-V
DivX).
3 4 Select other audio channel (STEREO, LEFT or RIGHT) (VCD
Video VR).
➠ Some discs have got Dolby Digital and DTS sound tracks. If
DTS is selected, there is no analogue audio output. To listen
to the DTS sound track, connect the recorder via one of the
digital outputs to a DTS amplifier (page 19).
3D-Surround DVD-ALL VCD DivX
This device can create a 3D surround effect which simulates a multi-channel audio
reproduction with two conventional stereo speakers.
Select twice during play-back.
5 6 Select symbol.
- 40
3 4 Select 3D SUR. for surround sound.
3 4 NORMAL to end surround sound.
Page 41

DVD-Video
1/10
0:12:34
1.STEREO
OFF
4/14
Video mode
Subtitles DVD-ALL DivX
Select twice during play-back.
5 6 Select symbol.
3 4 Select the desired subtitle language.
Playing memory media with mixed contents
If the memory media contain files of different playing formats such as MP3, JPG
and DivX, you can switch between the three play modes MOVIE, PHOTO and
MUSIC with the button in the main menu (page 23):
➠ For operation of the MOVIE mode, see chapter “DivX mode” on page 42 (not
for USB memory media).
➠ For operation of the MUSIC mode, see chapter “Audio mode” on page 43.
➠ For operation of the PHOTO mode, see chapter “Photo mode” on page 46.
Storing the last disc settings
DVD-V Video VR
The recorder saves the user settings for the last disc that you have watched. The
settings are saved until you remove the disc from the recorder.
If you insert a disc that has already been played back, playback will continue from
the last stopping point.
PIP (Picture In Picture)
HDD DVD-ALL
This function enables you to watch TV stations or videos from other connected AV
sources whilst playing the video.
Start play-back.
Switch on small picture.
Select station for small picture in TV mode.
Select signal source for the small picture in the order Tuner, AV1,
AV2, AV3, Tuner.
End play-back and PIP. Transfer small picture to large picture.
3 4 Select desired small picture position.
Yellow button – Select Zoom function for the small picture.
Three different sizes are available.
Switch off small picture.
41 -
Page 42

OK
ENDINFO
MARKER
Select
Movie 2 Item(s)
HDD Clip1.avi
Clipl2.avi
New Album
CloseInfo Mark
Movie List
DivX mode
You can play DivX files saved on the harddisc or disc media with this recorder. Movies
can only be saved on USB memory media.
➠ Before playing DivX files, please read the notes “About DivX Video files” on
this page.
Playing DivX files
Open the disc drawer.
Insert the selected disc in the drawer with the side to be played
facing down.
Close the drawer. The disc is read.
Call main menu.
34 Select MOVIE.
56Call HDD DivX or DISC.
Confirm selection with OK. The Movie List menu appears on
the screen.
5 6 Select title or folder.
OK show menu options for file.
5 6 Select option.
Confirm with OK.
New Album Create new folder.
Play Starts playing the selected file.
Copy Copy files to folder or data medium (page 44).
Move Move files to folder or data medium (page 44).
Open Open folder and show contents.
Delete Delete selected title/folder.
Rename Change file / folder name.
Start play-back.
P+ or P- during play-back to select the next title or return to the
beginning of the current title.
P- twice briefly to return to the previous title.
Finish playing.
Show detailed information.
Exit DivX menu.
See page 38 onwards for other operating func tions.
DivX subtitles
For subtitles to be displayed correctly press MENU – LANGUAGE – DivX Subtitles
and select the desired subtitle language.
Alternatively, press the red button for 2 seconds during the DivX
playback and then select the desired character set with 34.
The subtitles function can be switched on and off like on DVD-Video (page 41).
About DivX Video les
This recorder is compatible with the following DivX formats:
The maximum picture resolution of the DivX file is less than or equal 720 x
•
576 (H x V) pixels.
The filename of the DivX file has a maximum of 47 characters.
•
Characters in DivX filenames which cannot be displayed are shown as “_”.
•
The unit can not correctly play image refresh rates of > 30 images per sec-
•
ond.
If the sound and picture are out of sync, either the sound or the picture is
•
played.
This recorder does not support the “GMC” and “QPEL” DivX/Xvid function.
•
Valid DivX file extensions for videos are: “.avi”, “.divx”.
•
Valid DivX file extensions for subtitles are: “.smi”, “.srt”, “.sub” (only Micro
•
DVD, Subviewer 1-2 formats), “.txt” (only Micro DVD, T1-4 formats). Other
subtitles cannot be displayed.
Valid DivX Codec formats: “DivX3.xx”, “DivX4. xx”, “DivX5.xx”, “XVID”,
•
“3IVX”.
Valid DivX Audio formats: “Dolby Digital” (AC3), “PCM”, “MP2”, “MP3”, “DTS
•
(only at DIGITAL OUT)”, “WMA”.
MP3 sampling rates: 8 - 48 kHz.
•
WMA sampling rates: 32 - 48 kHz.
•
MP3 bit rates: 32 - 320 kbps.
•
WMA bit rates: 32 - 192 kbps.
•
- 42
Page 43

OK
END
MARKER TEXT
Select
Track List Duration
Audio CD
55:02:45
TRACK 1
TRACK 2
TRACK 3
TRACK 4
TRACK 5
0:04:12
0:03:45
0:02:15
0:03:22
0.04:15
CloseProg.-ListMark
Music List
OK
END
MARKER TEXT
Select
MP3
TITLE1.mp3
CD
Play
Random
Copy
Program add
TITLE.mp3
TITLE2.mp3
TITLE3.mp3
TITLE4.mp3
CloseProg. ListMark
Music List
Audio mode
Playing titles on Audio CD or MP3/WMA media
Audio CDs can be played with the recorder. Recordings in MP3/WMA format can
also be played from HDD, memory card, CD-ROM, CD-R or CD-RW discs (read
the instructions for MP3/WMA recordings on page 44 before playing MP3/WMA
recordings).
Open the disc drawer.
Insert the selected disc in the drawer with the side to be played
facing down.
Close the drawer. The disc is read.
Call main menu.
34 Select MUSIC.
56Call HDD DivX, DISC or USB.
Confirm selection with OK. The Music List menu appears on
the screen.
AUDIO CD menu
Change between program and original list.
Display detailed information (only MP3/WMA).
Finish playing.
Options in the music menus
5 6 Select title or folder.
OK display menu options.
5 6 Select option.
Confirm with OK.
New album Create new folder.
Play Starts playing the selected tracks/files.
Random Random play-back order of the tracks/files.
Program add Inserts track/file in the program list (page 45).
Copy Copy files to folder or data medium (page 44).
Move Move files to folder or data medium (page 44).
Open Open folder and show contents.
Delete Deletes selected title/folder.
Rename Change file/folder name.
Pause
Pause playing.
Continue playing.
MP3/WMA menu
5 6 Select title.
Start Play.
The elapsed playing time of the current track/current file is
displayed on the left.
Playing stops automatically at the end of the disc/list.
Play another title
P+ or P- during play-back to select the next title or return to the
beginning of the current title.
P- twice briefly to return to the previous title.
Enter the track number of the desired title directly with an AudioCD.
Search CD
Switch on seek mode during play-back.
Select the search direction and speed:
x2, x4, x8 (reverse).
x2, x4, x8 (forwards).
Search speed and direction are displayed.
End search mode and continue playing.
43 -
Page 44

Copy
HDD
USB
Copy
Cancel
Select the Media
New Album
Audio mode
Random play
5 6 Select title or folder.
OK display menu options.
5 6 Select Random.
Confirm with OK. The random play-back starts and the symbol
is displayed: .
Skip the current title with P+.
Hints for MP3/WMA recordings
Sampling rates: MP3: 8 - 48 kHz; WMA: 24 - 48 kHz.
•
MP3 bit rates: 32 - 320 kbps.
•
WMA bit rates: 32 - 192kbps.
•
An MP3 file consists of audio data compressed with the MPEG1 Audio Layer-3
•
file coding.
A WMA file (Windows Media Audio) consists of data which have been com-
•
pressed with the Windows Media Codec.
The filenames must have the extension “.mp3” or “.wma”.
•
This unit cannot play back any DRM-protected contents.
•
Compatibility of MP3 discs
The physical format of the CD-R must conform to ISO 9660 and JOLIET.
•
The physical format of the DVD+R/RW must correspond to ISO 9660 (UDF
•
Bridge-Format).
The total number of files in a folder on the disc may not exceed 1999.
•
➠ Please note that permission is required for downloading MP3/WMA files and
music from the Internet. The required permission must be obtained from the
respective copyright owners or their representatives.
Copy/move files/folders
Files and folders can be copied or moved to other data media depending on the
medium.
➠ Switch off the memory card’s write protection if necessary.
➠ Check whether the memory medium has enough free capacity.
5 6 Select file or folder.
Confirm with OK. Display menu options.
5 6 Select Edit.
4 Call second level.
5 6 Select Copy / Move.
Confirm with OK.
The Copy or Move menu appears.
5 6 Select the folder.
or create a new folder with New Album.
4 5 6 Select Copy / Move.
Confirm with OK.
The selected files / folders are copied to the memory medium
into the selected folder.
Cancel returns to the start menu.
- 44
Page 45
OK
END
MARKER TEXT
Select
Music
TITLE1.mp3
HDD
New Album
TITLE1.mp3
TITLE2.mp3
TITLE3.mp3
TITLE4.mp3
CloseProg.-ListMark
Music List 3 Item(s)
OK
END
MARKER TEXT
Select
Music Program list
TITLE1.mp3
HDD
New Album
TITLE1.mp3
TITLE2.mp3
TITLE3.mp3
TITLE4.mp3
TITLE1.mp3
TITLE2.mp3
TITLE3.mp3
CloseProg.-ListMark
Music List
Audio mode
Program list
With the program list you can put together your favorite titles on a memory medium
in any order for your individual program. This list may contain 99 titles (Audio
CD) or 256 titles (MP3/WMA). Program lists can be saved permanently, renamed,
deleted and loaded as often as you like.
5 6 Select title or folder.
Mark title or folder. A symbol (✓) appears in front of the title/
folder. Repeated pressing marks other titles/folders.
➠ If a folder is selected, all the files in it are added to the program list.
OK display menu options.
5 6 Select Program add to add title to program list.
Confirm with OK.
34 Change to program list.
Options in the menu Program List
5 6 Select title or folder.
OK display menu options.
New album Create new folder.
Play Starts playing the titles in the programmed order.
Random Random play-back order of the titles.
Delete Deletes selected title/folder.
Move Move order of the selected title in the program list.
Program add Inserts track/file in the program list.
Repeat programmed tracks/files
Select type of repetition during play-back.
TRACK Repeats the current title.
FOLDER (MP3/WMA) repeats all files in the currents folder.
Delete title from the program list
5 6 Select title.
Mark title. A symbol (✓) appears in front of the title.
OK display menu options.
5 6 Select Delete.
Confirm with OK.
Change track/file order in the program list
5 6 Select title to be moved.
Mark title. A symbol (✓) appears in front of the title.
OK display menu options.
5 6Select Move. A blue bar appears in the program list.
5 6 Move bar to desired position.
OK perform movement.
5 6 Select first title of the program.
or OK start playing in the programmed order.
Change between program and original list.
45 -
Page 46
OK
END
MARKER
Select
JPG\ 1/15
HDD
Picture1.jpg
New Album
CloseMark
Photo List
Slide Show
Simultaneous Music play
All
CancelStart
Pictures
Normal
Speed
Slide Show
Select All
Deselect All
Start
Cancel
Select music
MARKER
Mark
TITLE1.mp3
TITLE2.mp3
TITLE3.mp3
TITLE4.mp3
TITLE5.mp3
Photo mode
Show photos
The recorder can display JPEG files under the following conditions. The maximum
size of a JPEG file may not exceed 4 MB. The total number of files and folders is
1999. The file extension must be “.jpg”. The progressive and loss-free compression
of JPEG files is not supported.
Call main menu.
34 Select PHOTO.
56 Select HDD / Disc / USB.
Confirm selection with OK.
The Photo List menu appears on the screen.
5 634 Select desired photo.
OK display options.
5 6 Select Full Screen.
Confirm with OK. The photo is displayed.
➠ If the thumbnail is displayed in black, this JPEG file cannot
be displayed.
OK hide / show menu bar.
Go to previous / next photo with P- / P+.
5 6 Rotate photo 90° to left / right.
Exit photo display, return to Photo List menu.
Options in the “Photo List” menu
New Album Create new folder.
Open Open folder and show contents.
Full Screen Show photo.
Delete Delete file(s)/folder.
Slide Show Automatically running photo sequence.
Rename Change file/folder name.
Move Move files to folder or data medium (page 44).
Copy Copy files to folder or data medium (page 44).
- 46
Slide Show
5 6 Select Slide Show option in the Photo List menu.
Confirm with OK. The Slide Show menu appears.
5 634 Select options and confirm with OK.
Pictures Display Selected files or
All files.
Speed Speed of the slide show: Slow, Normal or Fast.
Simultaneous Music Background music selectable from HDD.
You can put together the slide show and simultaneous music individually by
selecting individual files with the MARKER button.
5 634 Select Start button.
OK start slide show.
Stop slide show.
Continue slide show.
End slide show, return to menu Photo List.
Page 47

USB mode
About the system
You can play MP3/WMA audio files or show pictures in JPEG format which are
stored on a USB stick or a memory card in a USB card reader. You can operate
the USB card reader with the remote control of the Loewe recorder.
The memory medium must be formatted in FAT 16 or 32 format. Memory cards
with other formats cannot be read.
➠ Keep memory media out of reach of children. See a doctor immediately in
case of swallowing.
➠ The reading time of the connected memory medium depends on its perform-
ance capacity, the number of files, the file size or resolution.
➠ The front flap of the recorder cannot be closed while a memory medium is
plugged into the USB socket.
➠ This device is compatible with Flash-USB memory media which support USB 1.1.
➠ Certain USB memory media may not be supported by this device.
➠ Never remove the USB memory medium during access (e.g. playback). This
can lead to malfunctioning of the device.
Plugging in the USB memory medium
Open the front ap.
Plug the USB memory medium into the USB socket. Make sure the
USB plug is the right way round.
Video mode
See “Video mode” on page 38 for operation.
Audio mode
See “Audio mode” on page 43 for operation.
Photo mode
See “Photo mode” on page 46 for operation.
47 -
Page 48

Remote control Assist – USB operation
Loewe TV: Sound off/on
LED indicator for current operating mode
Switch over to operate TV set
(page 20) ....................... Switch over to operate Recorder
(pahe 45) ...................................................... Program list
(page 23) ..................................................“Set-up” menu
Loewe TV volume
Switch on/off - on stand by ...............................(page 20)
Loewe TV: Radio Digitall; long: Auro Radio
Switch over to operate DVD-Player
*
*
*
Loewe TV: Sound menu
*
*
*
“Home” menu ...................................................(page 23)
Show detailed information ................................(page 42)
MENU: Close menu
elect previous / next file
MENU: confirm the menu selection
(page 39) ..............................................................Repeat
PLAY: Reverse search
- 48
Pause
MENU: select / adjust
*
*
*
Highlight selection .......................................... (pages 39)
Playback
PLAY: Search forward
Stop
* no function in this operating mode
Page 49

10:26
SYNCPLAY I
11:26
1
2 3 4
5
10:26 11:26
CLIPREC
10:26 11:26
PLAY
Recording
Recordings on the HDD
Recordings on the internal hard disc (HDD) of the recorder are similar to recording
in the VR mode on DVD-RW discs. Ten genres can be assigned to the recordings
for easier management (see “Title Name”, page 58).
➠ The maximum number of titles on the HDD is 255.
Delayed TV viewing – Timeshift mode
You can interrupt a TV program at any time and continue watching it later with
a timeshift.
Set the recorder to the desired signal source as described under
“Manual Record” (page 50).
➠ The timeshift operation only starts when the TV option is set
to TV HDD in the main menu (page 23).
➠ You can switch timeshift mode on or off permanently in the
Record menu (page 32).
Start recording with TIMESHIFT (the T/S HDD display lights up
in the display window of the DVD recorder).
1 Status display for play mode.
2 Timeshift start time.
3 Already elapsed Timeshift time.
4 Current Timeshift time.
5 Timeshift start time plus one hour.
Interrupt recording. Press to continue.
Switch Timeshift display on / off.
➠ The display for Timeshift disappears after 10 seconds. A symbol appears for
this in the bottom left of the screen:
The display can be called again with .
Markers in Timeshift
A marker can be set in Timeshift mode.
Press the blue button briefly to set a mark at a selected point.
Press the blue button long to select the marked scene.
Exit display.
Clip recording
A program can be saved permanently on the HDD during the Timeshift display.
Search for the starting point with single frame, search and
slow motion (page 38).
Press at the starting point of the clip to be recorded.
The progress of the recording is shown red in the progress
display.
Search for the end point with single frame, seek and slow
motion.
Press at the end point of the clip to be recorded.
Playing continues. Repeat the procedure for other clips if
necessary.
➠ The display for Clip recording disappears after 10 seconds. A symbol appears
for this in the bottom left of the screen:
➠ Only the sequences selected by clip recording are saved permanently on the HDD.
➠ Clip recordings are not possible for sequences shorter than five seconds.
Jump to start or end during Timeshift
The display appears.
3 Start playing from Timeshift starting point.
4 Start playing from Timeshift end point.
34 Jump back/forward 5 minutes during playing.
Jump forward 15 seconds during playing.
Exit Timeshift
End recording (only in manual timeshift mode).
A confirmation message is displayed.
34 Select yes.
Confirm with OK. The current TV program is displayed.
49 -
Page 50

20M Rec
80H 19M Free
00:08:21
HDD
Recording
Simultaneous record and display
Playing another medium during recording
Play and record take place independently of each other for DVDs and the integrated
HDD. For example, you can record on a DVD or the HDD and at the same time
play a movie, photos or music from the respective other memory medium (except
Timeshift, DivX).
Start recording.
Call main menu.
34 Select MOVIE, PHOTO, MUSIC.
56 Select desired memory medium.
Confirm selection with OK.
Start play-back.
The recording is continued during play-back from the other data
medium.
Finish playing.
Open main menu and select memory medium for recording
under TV.
End recording.
➠ Some functions (e.g. simultaneous play and recording when
dubbing) are not possible.
Time Slip
HDD
Time Slip enables delayed playing of the title while it is being recorded.
Start recording.
Start play-back.
Playing starts whilst recording continues.
34 You can navigate during play-back with single frame, seek
and slow motion.
Finish playing ...
and show current recording position.
➠ Playing can start at the earliest 15 seconds after starting the
recording.
Manual Record
Proceed as described in the following points in order to carry out video recordings
from integrated tuners.
Switch on the recorder. Insert a rewritable disc for DVD recordings. A new disc is initialised by the recorder (on request) when
inserted (page 33).
If required, select Rec mode Set (page 32)
Call main menu.
34 Select TV.
56Call TV HDD or TV DVD.
Confirm selection with OK. A status information to the selected
memory medium is displayed briefly.
Switch the recorder input to the signal source you wish to record
from with the number buttons, the P+ / P- buttons or the 0 AV
button. The station number, name and current sound status are
displayed on the screen.
Then select the sound channel (“TV Audio” page 32).
Start recording. (REC lights up in the display window of the
recorder). The recording starts immediately and continues until
the disc is full or you interrupt the recording.
During recording. Show remaining recording time. By pressing
the button again the maximum recording time is limited to a
fixed period of time. Every additional press of a button extends
the recording time by 10 – 30 minutes to a maximum 4 hours.
Interrupt recording. Press again to continue.
Show status of recording.
End recording.
➠ If the recorder is disconnected from the mains during recording (or in the
event of a power failure), the entire recording will be lost.
- 50
Page 51

OK
END
Enter
CloseTimer Record List
REC-MENU
Timer Record SQ 80H 9M Free
Media PR Date
HDD 31
S23 K1 Duration : 105 M
StartTime EndTime Repeat
VPS/
PDC
8/12 Fr 20:15 22:00 Once Off
OK
END
Enter Delete
Close0-9 Input
MENU
ShowView
Number
Recording
Timer Recording
This recorder can be programmed to record up to 16 programs within one month.
For programmed recordings the timer must be informed which signal sources
(TV stations or from AV devices) are to be recorded and the respective start and
stop time.
Switch on the recorder. Insert a rewritable disc for DVD recordings.
Call the Timer Record List menu.
5 6 Select the NEW option and confirm with OK.
The Timer-Record menu appears.
Media Select the memory medium for the recording.
CH/PR Select the stations or an external input.
Date Select the data up to one month in advance.
Start time Defines the start time for the recording.
End time Defines the end of the recording.
Repeat Select repetition (once, daily (Mo-Fr), weekly).
VPS/PDC (only analogue TV) The VPS/PDC system adapts the recording
time automatically to changes in the program start time for
recordings via the integrated tuner. Set the VPS/PDC time
and the date of the program you want to record. You will find
these in your TV guide or in the teletext.
Enter the necessary information for your timer recording(s).
3 4 Move the cursor to the previous / next column.
5 6 Edit the setting at the current cursor position.
OK saves timer data.
Exit Timer Record menu without saving.
Call Timer Record List menu.
➠ The recorder must be in standby mode for timer recording to start automatically.
➠ Please note that not every station operates with VPS/PDC.
➠ The starting time for the recording must be at least 3 minutes into the future.
The recorder switches on about 2 minutes before the programmed time and
runs up to about 2 minutes after the programmed time.
➠ The current time and the current date must be set in the recorder (page 27).
➠ Select the audio channel for two-language TV recordings in the “TV Rec Audio”
menu (page 32).
Timer recordings with the ShowView® system
This set makes programming timer recordings (analogue TV only) child’s play. Many
TV program guides publish the ShowView number for the TV programs. So when
you want to make a timer recording of a programme, you only need to key in the
appropriate ShowView code number. You can specify the recording quality to the
recorder optionally and determine whether it is a single or a repeated recording.
You can save a maximum 16 timer programs on the recorder.
Select ShowView menu with the green button.
Enter the ShowView number.
Delete input errors.
Confirm with OK. The Timer Record menu appears.
Check and, if necessary, correct the settings as described under
“Timer Recording” (this page).
➠ The ShowView function is only possible for recordings made with the inte-
grated analogue receiver (tuner) of the recorder. This function is not possible
when recording from an external source (e.g. from a connected SAT receiver).
Switch recorder to standby.
The timer symbol appears in the TV display (page 7).
51 -
Page 52

OK
END
MENU
Edit
CH/PR Date StartTime Duration Check
RTL 8/12 Wed 20:15 105min
Mode
SQ Rec. OK
New
CloseDelete
Timer Record List : VPS/PDC On
Timer Record
REC-MENU
Recording
Timer Record List
Checking the timer programming
Call the Timer Record List menu.
Editing a timer programming
5 6 Select timer recording.
OK edit selected programming (page 51).
Delete selected programming.
or New opens “Timer Record” menu (page 51).
Recording conditions
With the programmed timer the recorder does not record under the following
conditions:
No disc or a non-rewritable disc inserted. The recording is then made on the HDD.
•
The power supply is interrupted or the recorder is not ready.
•
There are already 99 (255 HDD) recorded titles on the disc.
•
The starting time for the recording is less than three minutes into the future.
•
Record from external sources
You can record from an external source ( e.g. SAT-TV set, SAT receiver, camcorder
or video recorder).
The device you want to record from must be connected to the
recorder properly. You will find further information on page 16.
Insert a rewritable disc for DVD recordings.
Switch on the recorder and set the TV HDD or TV DVD option in
the main menu (page 23).
Select source.
AV1 AV1 to the rear of the housing.
AV2 AV2 DECODER to the rear of the housing.
AV3 AUDIO L/R IN to the front of the housing.
DV DV IN to the front of the housing.
PR-nn Integrated tuner on station nn.
Set the recording quality (page 32).
For further operation see “Manual Record” on page 50 or “Timer
Recording“ on page 51.
➠ If you operate this recorder with a Loewe Flat-TV set, the recording wizard of
the TV set controls the recording via Digital Link Plus. This has the advantages of easier operation, especially when recording digital stations. You will
find further information in the TV user guide under “Operation of additional
equipment – Timer recordings”.
➠ If your source is copy-protected by Copy-Guard, you cannot use this recorder
to record from it. Read the copyright notes on page 14.
You cannot program the timer under the following circumstances:
A recording is already in progress.
•
16 timer recordings have already been programmed.
•
Multiple overlapping timer programs:
The earlier recording takes priority.
•
When the earlier recording ends, the later one will start.
•
➠ If the disc is damaged, it is possible that the recording will not be done
properly. Even if the “Rec. OK” message appears in the “Check“ field, this is
not necessarily true in this case.
- 52
Page 53

Recording
Digital Video
General “DV“ information
With DV (Digital Video, also known as i.LINK), you can use a DV cable as the audio,
video, data and control signals input / output to connect a camcorder that has DV to
this recorder. The i.LINK interface complies with the IEEE 1394-1995 standard.
“i.LINK” and the “i.LINK” logo are trademarks.
This recorder is only compatible with “DV 25“ format camcorders. Digital satel-
•
lite tuners and digital VHS video recorders are not compatible.
You cannot connect more than one DV cam-corder at a time to this recorder.
•
You cannot control this recorder with external devices that are connected via
•
the DV IN socket (incl. two Recorders).
The camcorder connected via the DV IN socket cannot necessarily, in every
•
case, be controlled.
Digital camcorders can usually record audio as 16 bit/48 kHz stereo or twin
•
stereo tracks with 12 bit/32 kHz. This recorder can only record one stereo audio
track. Set “DV Rec Audio“ as required or Audio 1 or Audio 2 (page 32).
The sampling rate of the digital sound input to the DV IN socket must be either
•
32 or 48 kHz (not 44.1 kHz).
Recording may suffer from interference if the camcorder stops playing back, if a
•
part of the tape that has not been recorded on is played back, if the electricity
supply to the camcorder is cut off, or if the DV cable comes out.
Troubleshooting
If you are not receiving images and/or sound via the DV IN socket, check the
following:
The DV cable must be properly connected.
•
Switch off the camcorder that is connected, and switch it back on.
•
Tune the audio input in to the recorder.
•
Recording from a digital camcorder
You can record from a camcorder that is connected to the DV IN socket in the
recorder‘s front panel. You can use the recorder‘s remote to control a cam-corder
and the recorder. Before recording, make sure that the audio input has been set
up for the DV IN socket (page 32).
The digital camcorder must be connected to the DV IN socket at
the front of the housing. Further information can be found on
page 20.
You can choose from between Audio 1 (original audio) and Audio
2 (overdubbed audio).
The DV input is set using the “DV Rec Audio“ submenu of the
main menu (page 32).
Select DV input.
“DV” is displayed in the display window of the recorder and on
the screen.
Search the position on the camcorder tape from which you want
to record.
For optimum results, interrupt play-back of the camcorder at the
point from which you want to record. Depending on the
camcorder you can operate the functions STOP, PLAY and PAUSE
with this recorder.
Start recording.
The recording is stopped automatically when the recorder detects
no signal.
Interrupt recording. Press again to continue.
End recording.
➠ You cannot use the recorder to control the camcorder while recording is in
progress.
➠ In Video mode, the last frame of the recording is shown on the screen for a
short time after recording has ended.
➠ For timer recordings to work properly on this recorder, the digital camcorder
should be switched on and operational.
53 -
Page 54

OK
END
MARKER
INFO
Select
SQ 1Std 25Min
HDD
Free
Play
Search >
Delete
Rename
Edit >
Sort >
Dubbing
CloseMarkInfo
TITLE 2
22.11. 0:33:12
TITEL 1
21.11. 0:25:30
TITLE 3
23.11. 0:45:00
TITLE 5
24.11. 0:05:00
TITLE 4
24.11. 0:12:55
TITLE 6
28.11. 0:08:42
Title List 1/9
1
2
3
4
5 6
Edit recordings
Menu Title List and Chapter List
Under the Title List menu, video contents on unfinalised DVDs in VR mode and
video contents on the internal HDD can be edited. The available edit functions
are dependent on whether video on a DVD in VR mode or on the HDD or whether
original contents or playlists are edited.
DVD-RW discs in VR-mode can be edited in two ways. Original contents of the disc
can be edited directly or a playlist can be created and edited. The playlist does not
change the contents of the disc but controls its play-back.
The editing of recordings on the HDD is the same as editing of original contents
of a DVD-RW in the VR mode. Similar commands for deleting and naming titles as
well as a fine setting of the chapter contents within the titles are available.
➠ If the Title List menu of the HDD is displayed during recording, some titles
may have a marker. These titles have been recorded with a different input
setting to the current recorder setting. These titles cannot be played during
the recording.
Pause playing.
Select Title List menu.
5634 Select title.
Change between Original and Playlist menu when editing in DVD
VR mode.
The available options are displayed at the left. The titles (or chapters) on the DVD or HDD are displayed on the right of the screen.
The thumbnails can be edited. (See “Change title thumbnail” on
page 47).
Information about the selected title in the Title List menu.
Close menu.
Different menu options are displayed depending on the memory medium.
1.
Combine Connects two titles or chapters as one (page 59).
Delete Deletes the title or the chapter (page 57).
Delete part Deletes part of the title (page 57).
Divide Divides a title into two (page 60).
Dubbing Copies the title to another data medium (page 63).
Full Play Starts playing the selected title including hidden chapters.
Hide Hides (shows) the selected title or the chapter (page 61).
Move Moves a chapter in the Chapter List / Playlist menu to another
position (page 61).
Play Starts playing the selected title or chapter. Hidden titles and
chapters on the DVD+R/RW are not played.
Playlist Add Adds the title or chapter to a new playlist (page 55).
Protect Prevents accidental recording, editing or deleting of a title
(page 61).
Title Name / Edits the title name; assignment to genre (page 58).
Rename
Search Chapter Display Chapter List of title (page 58).
Search Time Time at which title starts playing (page 58).
Sort Sorts the title list according to date, title or genre (page 59).
Title Displays the title list of the chapter.
- 54
Displays the recording quality, free memory space and a progress display of
2.
the elapsed playing time.
Name of the current memory medium.
3.
Currently selected title.
4.
Thumbnail.
5.
Shows the title name, the recording date and the length of the recording.
6.
Page 55

OK
ENDTEXTINFO
Seelct
DVD-RW
SQ 1Std 25Min
Free
Play
Search >
Delete
Protect
Edit >
Playlist Add >
Dubbing
ClosePlaylistInfo
TITLE 2
22.11. 0:33:12
TITEL 1
21.11. 0:25:30
TITLE 3
23.11. 0:45:00
TITLE 5
24.11. 0:05:00
TITLE 4
24.11. 0:12:55
TITLE 6
28.11. 0:08:42
Title List - Original 1/9
Edit recordings
Edit Original and Playlist
Title, Chapter and Parts
Titles of the original content of the disc contain one or more chapters. When inserting a title in the playlist, all the chapters within this title also appear. That means
that chapters in the playlist behave exactly the same as chapters on a DVD-Video
disc. Parts are sequences of the original or playlist titles. Parts can be added to or
deleted from the Original and Playlist menu. When adding a chapter or title to the
Playlist, a new title is created consisting of a sequence (= chapter) of an original
title. When deleting, part of the title of the Original or Playlist menu is deleted.
➠ If you use the Delete, Edit and Move functions, the start and end frames may
not correspond exactly with the start and end points. A short pause may be
made between edits during play-back of the playlist. This is not a malfunction.
Original and Playlist
-RW VR
The terms Original and Playlist are used in this user guide for the actual contents
and the edited contents.
Original The contents of the actual recordings on the disc.
Playlist On DVDs a “Playlist” of the contents to be played and the
play times is created for editing. The recorder plays the disc
according to the playlist.
Add chapter markers
HDD -RW VR +RW +R
Chapters can be created by inserting chapter markers at the desired positions
within a title.
C-SET During recording or playing at the position at which a
new chapter is to be inserted.
A chapter marker symbol appears on the screen.
➠ Chapter markers are inserted automatically at regular inter-
vals. You can change these intervals in the “Recording” menu
(see “Auto Chapter” on page 32).
Create new Playlist
-RW VR
Use this function to add an original title or a chapter to the playlist. The whole title
is added to the playlist (you can delete parts you will not need later; see “Delete
title/chapter from Original/Playlist” on page 57).
The title appears in the playlist together with the chapter markers of the original.
When adding other chapter markers to the original later, however, these are not
copied automatically to the titles of the playlist. You can add a maximum 999
chapters to a disc. To add only one chapter of a title, read “Add title/chapter to
Playlist” on page 56.
Select Title List/Chapter List Original menu.
5634 Select title/chapter.
Confirm with OK.
The available options are displayed at the left.
56 Select Playlist Add.
Select playlist or add new one.
Confirm with OK.
55 -
Page 56

OK
ENDTEXTINFO
Select
SQ 1Std 25Min
DVD-RW
Free
Play
Search >
Delete
Protect
Edit >
Playlist Add >
Dubbing
ClosePlaylistInfo
TITLE 2
22.11. 0:33:12
TITLE 1
21.11. 0:25:30
TITLE 3
23.11. 0:45:00
TITLE 5
24.11. 0:05:00
TITLE 4
24.11. 0:12:55
TITLE 6
28.11. 0:08:42
Title List - Original
1/9
New Playlist
Select Playlist
OK
ENDTEXTINFO
InfoSelect
Play
Search >
Delete
Title Name
Delete Part
CloseOriginal
TITLE 1
21/11 0:25:30
Titlelist - Playlist
1/1
SQ 1Std 25Min
DVD-RW
Free
OK
ENDTEXTINFO
Select
SQ 1Std 25Min
DVD-RW
Free
Play
Search >
Delete
Protect
Edit >
Playlist Add >
Dubbing
ClosePlaylistInfo
TITLE 2
22.11. 0:33:12
TITLE 1
21.11. 0:25:30
TITLE 3
23.11. 0:45:00
TITLE 5
24.11. 0:05:00
TITLE 4
24.11. 0:12:55
TITLE 6
28.11. 0:08:42
Title List - Original
1/9
OK
ENDTEXTINFO
Select
SQ 1Std 25Min
DVD-RW
Free
Play
Search >
Delete
Protect
Edit >
Playlist Add >
Dubbing
ClosePlaylistInfo
TITLE 2
22.11. 0:33:12
TITLE 1
21.11. 0:25:30
TITLE 3
23.11. 0:45:00
TITLE 5
24.11. 0:05:00
TITLE 4
24.11. 0:12:55
TITLE 6
28.11. 0:08:42
Title List - Original
1/9
New Playlist
NAME1
Select Playlist
OK
ENDTEXT
Select
CloseOriginal
TITLE 2
21.11. 0:25:30
Chapter List - Playlist 2/2
Play
Title
Delete
Combine
Move
Edit recordings
56 Select New Playlist.
Confirm with OK.
The new title appears in the updated Playlist. All chapters of the
title are added to the Playlist.
Add title/chapter to the Playlist
-RW VR
You can add an original title or a chapter to a Playlist title even if it is already
registered.
5634 Select a title/chapter in the Title List Original or
Chapter List Original menu which is to be inserted in the Playlist.
Confirm with OK.
The available options are displayed at the left.
- 56
56 Select Playlist Add.
Confirm with OK.
5634 Select Title List Playlist in which a title or chapter is
to be inserted.
Confirm with OK.
The added chapters are displayed in the menu (Search - Chap-
ter) Chapter List - Playlist.
End editing of the Playlist.
Page 57

OK
END
MARKER
INFO
Select
SQ 1Std 25Min
HDD
Free
Play
Search >
Delete
Rename
Edit >
Sort >
Dubbing
CloseMarkInfo
TITLE 2
22.11. 0:33:12
TITEL 1
21.11. 0:25:30
TITLE 3
23.11. 0:45:00
TITLE 5
24.11. 0:05:00
TITLE 4
24.11. 0:12:55
TITLE 6
28.11. 0:08:42
Title List 1/9
OK
END
Select
Delete Part
Start Point
End Point
Next Part
Cancel
Done
CloseMove Point
II 0:00:33
TITLE 1
24.11. 0:12:55
Edit
Edit recordings
Delete title/chapter from Original/Playlist
When you delete a title or a chapter from the playlist, you only remove the title/
chapter from the playlist.
When you delete a title or chapter from the original list, title/chapter are deleted
from the disc and the time remaining for recording is prolonged again. Titles or
chapters deleted from the original are also deleted from the playlist.
➠ You cannot delete chapters with a playing time of less than 5 seconds.
563 4 Select a title/chapter in the menu Title List -
Original or Chapter List - Original which is to be deleted from
the playlist.
Mark title or folder. A symbol (✓) appears at the title.
Confirm with OK.
The available options are displayed at the left.
56 Select Delete.
Example: Title List (HDD):
Confirm with OK. A delete prompt is displayed.
56 Select yes.
Confirm with OK. The chapter or title is deleted.
OK displays the updated menu.
End editing.
➠ For DVD+R/DVD+RW recordings the deleted title is renamed after “Deleted
Title”.
➠ In case of fast deleting of more than two titles in succession, the titles are
combined as one.
➠ When deleting a title or chapter, the remaining recording time is increased
on the DVD+RW only by the size of the title which was deleted at the end.
Delete part
HDD -RW VR
You can delete a part which you no longer want in the title.
5634 Select title in the Title List menu.
Confirm with OK.
The available options are displayed at the left.
564 Select Edit – Delete Part.
Confirm with OK.
The Edit menu (Delete Part) is displayed.
The Start point symbol is marked.
34 Start play-back and search the start point with single frame,
search and slow motion.
OK at the start point of the clip to be deleted.
The End point symbol is marked.
34 Search the end point with single frame, search and slow
motion.
Confirm with OK.
➠ Other parts can be deleted in recordings on the HDD. Select
Next Part in the menu, press OK and repeat the steps
described above.
56 End editing with Done.
Confirm with OK. A delete prompt is displayed.
34 Select yes.
Confirm with OK. The selected part is deleted from the title.
34 Select Cancel to reject the editing.
57 -
Page 58

OK
ENDINFO
Enter
HDD
SQ 80H 09M
Free
Play
Search >
Delete
Rename
Edit >
Sort >
Dubbing
CloseInfo
Titel 2
22.11. 0:33:12
Titel 1
21.11. 0:25:30
Titel 3
23.11. 0:45:00
Titel 5
24.11. 0:05:00
Titel 4
24.11. 0:12:55
Titel 6
28.11. 0:08:42
Title List 1/16
Alphabet Capital
Space Delete OK Cancel
ABC|
1 2 3 4 5 6 7 8 9 0
A B C D E F G H I J
K L M N O P Q R S T
U V W X Y Z Æ Ç Đ Ø
' ´ ^ ~ " ° Þ ß µ .
ClearAV In
ShowMovie
SportsAnimat.
DramaNews
EduDocu
Genre
OK
END
Play
Time
CloseMove Point
12:0611:52 13:07
TITLE 1
24.11. 0:12:55
Search
Search with ◄ ►and Select
Edit recordings
Title Name
You can assign names to the titles of Original or Playlist. The names may have a
maximum 32 characters. A genre can be added to the name (HDD).
5634 Select title to be renamed in the Title List menu.
Confirm with OK. The available options are displayed at the
left.
56 Select Title Name/Rename.
Confirm with OK.
The Keyboard menu is displayed.
Explanations of the options:
Alphabet Capital Switches the keyboard to capitals.
Alphabet Small Switches the keyboard to small letters.
Symbol Switches the keyboard to special characters.
ABC...123 Inserts the selected character at the cursor position
(shaded grey for special characters).
OK Save setting and exit.
Cancel Exit setting without saving.
Space Inserts a space at the cursor.
Delete Deletes characters to the left of the cursor.
3456 Moves the marker in the selection.
Inserts a space at the cursor.
Deletes the characters to the right of the cursor.
Deletes the character to the left of the cursor.
P+ / P- Moves the cursor to the left or right.
Genre Assigns the title to a genre (HDD).
, Switches the keyboard back and forth among
- 58
capitals, small letters and synbols.
Select the OK button and save with OK.
➠ On DVD-R-, DVD+R- or DVD+RW discs, the entered name is
only displayed after finalisation.
Select title start point
HDD -RW VR -RW Video +RW +R -R
You can select the start point of the title.
5634 Select title in the Title List menu.
Confirm with OK.
The available options are displayed at the left.
56 Select Search - Time.
Confirm with OK.
The Search menu is displayed on the screen.
Example: Title List (HDD):
34 Select the desired start point.
The time changes in one minute steps.
34 Keep pressed to increase the time in steps of 5 minutes.
OK to start at the desired point.
Select chapter
HDD -RW VR -RW Video +RW +R -R
You can select any chapter from a title.
5634Select title in the Title List menu.
Confirm with OK.
The available options are displayed at the left.
56 Select Search - Chapter.
Confirm with OK.
The Chapter List menu is displayed.
5634 Select desired chapter.
OK to start at the selected point.
Page 59

OK
END
MARKER
INFO
Select
HDD
SQ 80H 09M
Free
Play
Search >
Delete
Rename
Edit >
Sort >
Dubbing
CloseMarkInfo
TITLE 2
22.11. 0:33:12
TITLE 1
21.11. 0:25:30
TITLE 3
23.11. 0:45:00
TITLE 5
24.11. 0:05:00
TITLE 4
24.11. 0:12:55
TITLE 6
28.11. 0:08:42
Title List 1/16
Date
Title
Genre
OK
END
MARKER
INFO
Select
HDD
SQ 80H 09M
Free
Play
Search >
Delete
Rename
Edit >
Sort >
Dubbing
CloseMarkInfo
TITLE 2
22.11. 0:33:12
TITLE 1
21.11. 0:25:30
TITLE 3
23.11. 0:45:00
TITLE 5
24.11. 0:05:00
TITLE 4
24.11. 0:12:55
TITLE 6
28.11. 0:08:42
Title List 1/16
Combine
Divide
Delete Part
Edit recordings
Sorting
HDD
With this function the title list can be sorted by date, title or genre for quicker
retrieval of titles.
5634 Select title in the Title List menu of the HDD.
Confirm with OK.
The available options are displayed at the left.
56 Select Sort.
Confirm with OK.
The options for sorting are displayed.
56 Select Date, Title or Genre.
OK Display menu with selected sorting.
Combine titles
HDD
With this function two adjacent original titles on the HDD can be united.
➠ This function is not available if only one title is saved on the HDD.
➠ No titles can be combined of there are more than 60 titles on the HDD.
5634 Select first title of the two titles to be joined in the
Title List menu.
Confirm with OK.
The available options are displayed at the left.
56 Select Edit - Combine.
Confirm with OK.
5634 Select second title of the two titles to be joined.
Confirm with OK.
A confirmation message is displayed.
56 Select yes.
Confirm with OK. The updated Title List menu is displayed.
59 -
Page 60
OK
END
MARKER
INFO
Select
HDD
SQ 80H 09M
Free
Play
Search >
Delete
Rename
Edit >
Sort >
Dubbing
CloseMarkInfo
TITLE 2
22.11. 0:33:12
TITLE 1
21.11. 0:25:30
TITLE 3
23.11. 0:45:00
TITLE 5
24.11. 0:05:00
TITLE 4
24.11. 0:12:55
TITLE 6
28.11. 0:08:42
Title List 1/16
Combine
Divide
Delete Part
OK
END
Select
Divide
Divide
Cancel
Done
CloseMove Point
II 0:00:33
TITLE 1
24.11. 0:12:55
#1 00:00:00
Edit
OK
END
Select
Close
TITLE 2
21.11. 0:25:30 SQ ARD
Chapter List
2/2
Play
Title
Combine
Edit recordings
Divide title
HDD +RW
With this function you can divide a title into two new titles.
5634 Select title to be divided in the Title List menu.
Confirm with OK.
The available options are displayed at the left.
56 Select Edit - Divide.
Example: Title List (HDD):
Confirm with OK.
The menu Edit - Divide is displayed and the Divide option is
marked.
34 Seek the start point for dividing the title with single frame,
seek and slow motion.
- 60
56 Select Divide.
Confirm with OK.
56 Select Done.
Confirm with OK. The title is divided into two new titles. This
process may last up to 4 minutes.
➠ Division points must be at least three seconds apart.
Combine chapters
HDD -RW VR +RW +R
With this function two adjacent playlist or original chapters can be united.
➠ This function is not available if the title only contains one chapter.
5634 The second of the two chapters to be united should
be selected in the (Title List - Search - Chapter) Chapter List
menu.
Confirm with OK.
The available options are displayed at the left.
56 Select Combine. The combination indicator is shown
between the two chapters which you can join.
Confirm with OK.
DVD additional functions
In the Title list DVD you can open certain disc functions directly.
5634 Select Disc.
Confirm with OK.
56Select the desired option.
Confirm with OK.
Disc Format The inserted disc is initialised for recordings in this recorder
(page 33).
Finalize The inserted disc is finalized (page 34).
Unfinalize The finalization is undone.
Disc Label Edits the title name; assignment to genre (page 58).
Protect Prevents accidental recording, editing or deleting of a title
(page 34).
Page 61

OK
ENDTEXT
Select
CloseOriginal
TITLE 2
21.11. 0:25:30
Chapter List - Playlist 2/2
Play
Title
Delete
Combine
Move
OK
ENDINFO
Select
DVD+RW
SQ 25Min
Free
Play
Full Play
Search >
Delete
Protect
Edit >
Dubbing
CloseInfo
TITLE 2
22.11. 0:33:12
TITLE 1
21.11. 0:25:30
TITLE 3
23.11. 0:45:00
TITLE 5
24.11. 0:05:00
TITLE 4
24.11. 0:12:55
TITLE 6
28.11. 0:08:42
Title List 1/15
Title Name
Divide
Hide
OK
ENDINFO
Select
DVD+RW
SQ 25Min
Free
Play
Full Play
Search >
Delete
Protect
Edit >
Dubbing
CloseInfo
TITLE 2
22.11. 0:33:12
TITLE 1
21.11. 0:25:30
TITLE 3
23.11. 0:45:00
TITLE 5
24.11. 0:05:00
TITLE 4
24.11. 0:12:55
TITLE 6
28.11. 0:08:42
Title List 1/15
Edit recordings
Move Playlists Chapters
-RW VR
With this function the play-back order of the chapters within Playlists can be
edited.
➠ This function is not available if only one chapter is available.
56 34 Select chapter in the Chapter List - Playlist
menu.
Confirm with OK.
The available options are displayed at the left.
56 Select Move.
Confirm with OK.
5634 Select position of chapter.
Confirm with OK. The updated menu is displayed.
Hide title/chapter
+RW +R
Playing of selected chapters or titles can be skipped by the disc.
5634 Select the chapters to be hidden in the Title List or
Chapter List menu.
Confirm with OK.
The available options are displayed at the left.
56 Select Edit - Hide.
Confirm with OK. The thumbnail of the chapter or title is
hidden.
➠ When selecting, a hidden chapter or title can be shown in
the Title List or Chapter List menu by selecting the Edit Display option in the menu. Then the chapter or title is
displayed.
Example: Title List (DVD+RW):
Protect title
-RW VR +RW +R
This function prevents accidental overwriting, editing or deleting of a title.
Select Title List menu.
5634 Select the title to be protected.
Confirm with OK.
The available options are displayed at the left.
56 Select Protect.
Confirm with OK. The lock marker appears in the title thumbnail.
➠ If you select a title which is already protected in the Title List
menu, this can be enabled by selecting Unprotected in the
options of the Title List menu. Then the title can be edited
and deleted.
61 -
Page 62

Dubbing
Before dubbing
With the dubbing function of this recorder you can
create backup copies of important recordings on the HDD on a DVD.
•
Create a DVD copy of a recording on the HDD for playing on other players.
•
Copy films recorded on this recorder from DVD to hard disc.
•
Copy edited movies from the HDD to a DVD.
•
➠ Purchased video DVDs or disks that have been recorded on other recorders
cannot be copied onto the hard disk.
➠ Titles which are shorter than 5 seconds cannot be copied from HDD to DVD.
Restrictions when dubbing
Some movies have a single copy protection: These movies cannot be copied to
HDD or DVD.
Single copy protection movies are recognizable by display of the disc information
with INFO during play-back.
Signals in NTSC format from the analog or the DV inputs canot be recorded
•
correctly with this recorder.
Video signals in SECAM format (from the integrated TV tuner or analog inputs)
•
are recorded in PAL format.
Please also see the hints for recording on page 14.
•
PLEASE NOTE THAT NOT EVERY HIGH DEFINITION DEVICE IS FULLY COMPATIBLE
WITH THIS PRODUCT AND THAT ARTEFACTS MAY OCCUR WHEN DISPLAYING THE
PICTURE. IF 625 PROGRESSIVE SCAN PICTURE DISPLAY IS FAULTY, WE RECOMMEND
SETTING THE CONNECTION TO THE “STANDARD DEFINITION” OUTPUT. PLEASE
CONTACT OUR CUSTOMER SERVICE IF YOU HAVE ANY QUESTIONS ABOUT THE
COMPATIBILITY OF THE TV WITH THIS RECORDER (page 70).
High-Speed dubbing (maximum 12x)
Copying DVDs to the harddisc is a completely digital process and therefore takes
place with losing picture and sound quality. The dubbing process can take place
at high speed. When dubbing from HDD to DVD, the dubbing speed depends on
the recording quality and the DVD disc used.
Minimum duration for high-speed dubbing
The following table contains the respective minimum duration for dubbing a twohour movie recorded in SQ mode from HDD to DVD.
Disc type Disc speed Dubbing time (recording speed)
DVD-R / DVD+R 16x 6.5 min. (12x)
DVD-R / DVD+R
/ DVD+RW
DVD-RW 6x 12 min. (6x)
DVD-R / DVD+R
DVD-RW / DVD+RW
DVD+R / DVD+RW 2.4x 21 min. (2.4x)
DVD-R / DVD-RW 2x 25 min. (2x)
➠ The specified times are approximate values.
➠ The actual dubbing speeds may vary with different disc recordings.
➠ Even 4x-/6x-/8x-/16x¬compatible discs may not be dubbed at maximum speed.
➠ High-speed dubbing is not always possible with discs initialized on another device.
8x 8 min. (8x)
4x 13 min. (4x)
- 62
Page 63
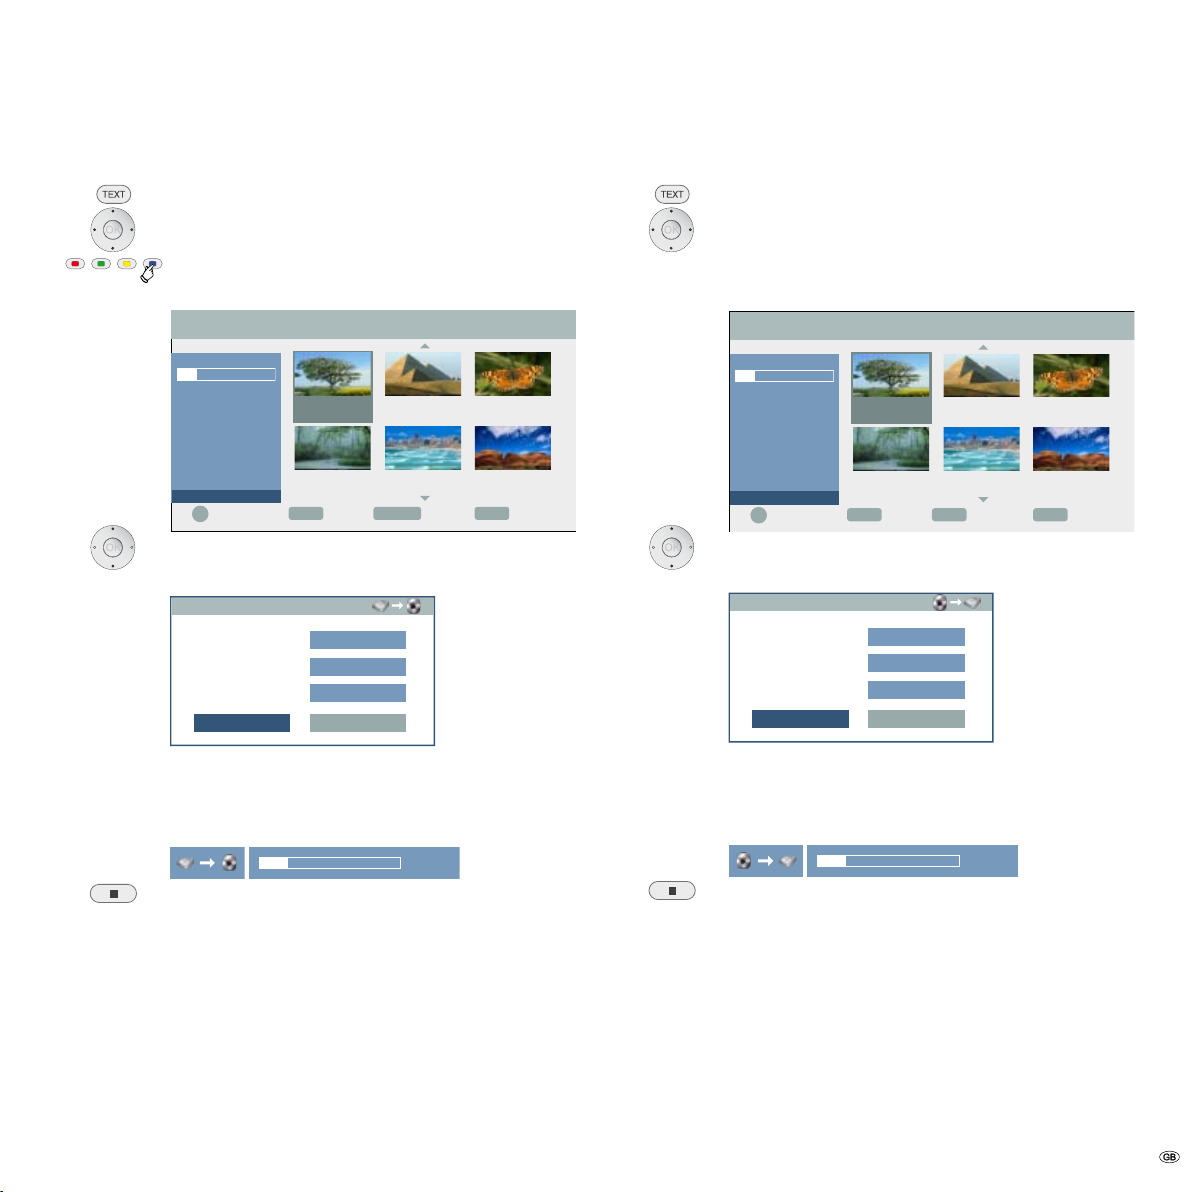
OK
ENDINFO
MARKER
Select
HDD
SQ 80H 09M
Free
Play
Search >
Delete
Rename
Edit >
Sort >
Dubbing
CloseInfo Mark
TITLE 2
22.11. 0:33:12
TITLE 1
21.11. 0:25:30
TITLE 3
23.11. 0:45:00
TITLE 5
24.11. 0:05:00
TITLE 4
24.11. 0:12:55
TITLE 6
28.11. 0:08:42
Title List 1/16
Start Cancel
Dubbing
00:45:00Title Length
120 minFree Space
HQRec Mode
20%
OK
ENDINFO TEXT
Select
DVD-RW
SQ 25M
Free
Play
Search >
Delete
Protect
Edit >
Playlist Add >
Dubbing
CloseInfo Playlist
TITLE 2
22.11. 0:33:12
TITLE 1
21.11. 0:25:30
TITLE 3
23.11. 0:45:00
TITLE 5
24.11. 0:05:00
TITLE 4
24.11. 0:12:55
TITLE 6
28.11. 0:08:42
Title List - Original 1/15
Start Cancel
Dubbing
01:45:00Title Length
2473 minFree Space
HQRec Mode
20%
Dubbing
Dub from HDD to DVD
Select menu Tile List (HDD).
5634 Select title.
Mark title.
Confirm with OK.
56 Select Dubbing.
Confirm with OK. The Dubbing menu appears.
Dub from DVD to HDD
Select menu Tile List – Original (DVD).
5634 Select title.
Confirm with OK.
The available options are displayed at the bottom left.
56 Select Dubbing.
Confirm with OK. The Dubbing menu appears.
5634 Select Rec Mode (HQ, SQ, LQ, EQ, Fast, AUTO).
6 Select Start button.
OK start dubbing.
Cancel dubbing.
➠ The recording time in Fast mode may vary depending on the
amount of source data.
➠ When aborting the dubbing in Fast mode the recording is
halted and all the data recorded up to this point are lost.
➠ The Fast mode is not possible if there is not enough memory
space remaining on the disc.
➠ The Fast mode is not possible for edited titles on the HDD
and clip recordings.
5634 Select Rec Mode (HQ, SQ, LQ, EQ, Fast , AUTO).
6 Select Start button.
OK start dubbing.
Cancel dubbing.
➠ Dubbing may not always be possible depending on the
conditions of the recording device or the disc itself.
➠ When aborting the dubbing in Fast mode the recording is
halted and all the data recorded up to this point are lost.
➠ The recording time in the Fast mode may be up to 19 min-
utes.
➠ The Fast mode is not available for edited titles on DVD-RW
in the VR recording mode.
63 -
Page 64

OK
ENDINFO
Select
DVD+RW
SQ 25M
Free
CloseRECInfo
TITLE 2
22.11. 0:33:12
TITLE 1
21.11. 0:25:30
TITLE 3
23.11. 0:45:00
TITLE 5
24.11. 0:05:00
TITLE 4
24.11. 0:12:55
TITLE 6
28.11. 0:08:42
Title List 1/12
Disc >
TITLE 2
22.11. 0:33:12
<< 1/1 >>
TITLE 1
21.11. 0:25:30
TITLE 3
23.11. 0:45:00
TITLE 5
24.11. 0:05:00
TITLE 4
24.11. 0:12:55
TITLE 6
28.11. 0:08:42
DVD+RW
Dubbing
Overwrite recordings
+RW
Proceed as follows to overwrite a recorded title with a new video recording:
➠ This function is not possible for DVD+R because the recordings are always
made at the end of the disc here.
Switch the recorder input to the signal source you wish to record
from with the number buttons, the P+ / P- buttons or the 0 AV
button.
Select Title List menu.
5634 Select title to be overwritten.
Start overwriting.
The overwriting begins at the start point of the selected title.
End recording. The new title is created and the updated menu
is displayed.
➠ This function is not possible for protected titles (page 61).
➠ If the overwriting title is longer than the recorded title, the
following title is overwritten . However, if the following title
is protected, the recording stops a the start point of this
title.
➠ If the length of the selected title is shorter than 10 seconds,
the following title is overwritten. However, if this title is protected, recording stops.
Title List menus on other devices
+RW +R
The Title List menu can be displayed on DVD players on which DVD+RW or DVD+R
discs can be played.
Insert a written DVD+R or DVD+RW disc.
Select the Title menu (see user guide of the respective unit).
Playing on other devices
Finalised discs, finalised DVD+R or DVD+RW discs recorded in video mode can be
played on most DVD players. Some players can play fialised/unfinalised DVD-RW
discs recorded in VR mode. Look in the player user guide to find out which disc
formats it supports. In the finalisation the recordings are “fixed” so that the disc
can be played on normal DVD players or computers with a DVD-ROM drive.
In the finalisation of a disc in video mode, a menu is created for controlling the
disc. Access is obtained with the MENU or TITLE buttons. For finalisation of a
disc, please read “Finalisation” on page 34.
➠ Unfinalised DVD+RW discs can be played on normal DVD players.
➠ Edited contents of a DVD+RW disc can only be played on normal DVD players
after finalisation.
➠ Edited contents of a DVD+R disc (hidden files, combined chapters, added
chapter markers etc.) cannot be played on normal DVD players.
- 64
Page 65

Troubleshooting
Problem Possible cause Remedy
No function. The mains cable is not plugged in. Fix the mains cable firmly into a socket.
No image. The television is not switched to re-
ceive signals from the Recorder.
The SCART/HDMI cable is not properly connected. Connect the SCART/HDMI cable properly.
The television that is connected is switched off. Switch the television on.
No sound. The connected audio equipment is
not switched to DVD playback.
The audio cables are not properly connected. Connect the audio cable properly.
The connected audio equipment is switched off. Switch on the audio equipment that is connected.
The audio connection cable is faulty. Change it.
Inferior picture quality. The disc is dirty. Clean the disc.
Playback not possible. There is no disc. Insert a disc. (Check that the disc display
A non-playable disc has been inserted. Insert a playable disc. (Check the disc type, the colour system
The disc has not been inserted with the playable
side downwards.
The disc has not been properly placed in the guide. Position the disc properly into the guide in the disc drawer.
The disc is dirty. Clean the disc.
A security rating has been set. Cancel the security rating or change the protection.
Select the right video input mode on the television, so that
the image from the Recorder appears on the television
screen.
Set the audio receiver so that you can hear the sound playing
on your Recorder.
comes on in the display window.)
and the region code.)
Insert the disc with the playable side downwards.
There is interference with images from an
external source.
A channel is skipped when using P+ / P- . The stations are locked. Switch the Lock option to Off (page 30).
The image or sound on the transmission channel
is weak or absent.
The camcorder image is not displaying. The camcorder is switched off. Switch on the camcorder and make sure your are using it
The camcorder image is not appearing on the
television screen when using the A/V input or
DV IN to the Recorder.
A disc that was recorded to from this Recorder
cannot be played on a different DVD player.
The video signal from the external component is
copy-protected.
Loose antenna or cable. Tighten the connections or change the cable.
The Recorder AV selection is wrong. Select the input channel (AV1, AV2, DV etc.) with DVD-AV.
The disc was recorded in video mode. Finalising the disc (page 34).
You cannot get a connection from this recorder. Connect the
component directly into the television.
properly.
65 -
Page 66

Troubleshooting
Problem Possible cause Remedy
A disc that was recorded to from this Recorder
cannot be played on a different DVD player.
Playback not possible or unsuccessful. There is insufficient space on the disc. Use a different disc.
Timer recording not possible. The time has not been set correctly on the recorder. Set the correct time. See “Setting the time automatically“ or
Stereo-audio recording and/or playback
unavailable.
The remote control is not working properly. The remote control’s batteries have run out. Replace the old batteries with new ones.
Interference is visible at the top and
bottom edges of the screen.
The recorder is not working normally. The unit is in an undefined state. Reset the recorder (page 20).
Some players do not play discs with finalisation in
video mode.
The disc was recorded in VR mode. The other player must be RW-compatible.
The ability of CD-R / RWs (MP3/WMA, JPEG,
(X)VCD, (X)SVCD) and DVD+R / RWs and DVD-R
/ RWs is influenced by the recording equipment,
recording methods and data media. Therefore,
there may be problems occasionally when playing
on conventional DVD players.
The source that you want to record is copy-protected. You cannot record the source.
Copy-protected broadcasts cannot be recorded on a
video mode disc.
The timer was wrongly programmed. Re-program the timer. See “Timer recording“ on page 51.
The time between programming the timer and the
start of recording is too short.
After programming, the timer recording symbol is no
longer displayed.
The television is not stereo-compatible or the
broadcast transmission is not in stereo format.
The Recorder’s A/V Out sockets are not connected
to the TV’s A/V In sockets.
The Recorder’s audio/video Out has not been
selected for the television.
The DVD recorder’s TV audio channel must be set
to Mono.
Unfavourable resolution setting in HDMI mode. Set the resolution to 1080i with the RES button (page 37).
No solution.
No solution.
Use a disc formatted in the VR mode for once copiable
material.
“Setting the time manually“ on page 27.
The recording‘s start time must be at least 3 minutes into the
future.
Re-program the timer.
No solution.
Make the A/V connections.
Select the AUX or A/V source as the TV input.
Set the TV’s audio channel to stereo.
- 66
Page 67

Technical Specifications
General
ViewVision DR+ DVB-T Item No. 67502A/D/T00
ViewVision DR+ DR+ DVB-T Secam Item No. 67505A/D/T00
Power supply AC 200-240V, 50/60 Hz
Power consumption During operation: 30 W
In standby mode: <1 W
(with energy save function)
Dimensions (approx.) 430 x 60 x 280 mm (W x H x D)
Weight (approx.) 4,6 kg
Operating temperature 5 °C to 35 °C
Humidity 5 % to 90 %
TV system ViewVision DR+ DVB-T PAL B/G, I, Secam DK
ViewVision DR+ DVB-T PAL B/G, Secam L
Recording format PAL
Recording
Recording format DVD Video-Recording, DVD-VIDEO
Rewritable memory media Harddisc (HDD) 250 GB,
DVD-RW, DVD-R,
DVD+RW, DVD+R
Video recording format
Sampling frequency 27MHz
Compression format MPEG 2
Audio recording format
Sampling frequency 48kHz
Compression format Dolby Digital
Playback
Frequency response DVD (PCM 48 kHz): 8 Hz to 22kHz,
CD: 8 Hz to 20 kHz
DVD (PCM 96 kHz): 8 Hz to 44 kHz
Signal-to-noise ratio > 100 dB (AUDIO OUT connection)
Harmonic distortion < 0,008% (AUDIO OUT connection)
Dynamic range > 95 dB (AUDIO OUT connection)
Outputs
HDMI OUT Type A, 19 Pin, LVDS digital, V1.2a
S-VIDEO OUT (Y) 1,0 V (p-p), 75 ohms , negative Sync.,
(C) 0,3 V (p-p) 75 ohms, Mini DIN 4-pin x 1
COMPONENT VIDEO OUT (Y) 1,0 V (p-p), 75 ohms, negative Sync.,
RCA socket x 1 (Pb)/(Pr) 0,7 V (p-p),
75 ohms, RCA socket x 3
Audio output (digital audio) 0,5 V (p-p), 75 ohms, RCA socket x 1
Audio output (optical audio) Optical connector x 1 (TOS-Link)
Audio output (analogue audio) 2,0 Vrms (1 kHz, 0 dB), 600 ohms,
RCA socket (L, R) x 1 / SCART
Masthead
The Loewe Opta GmbH is a share company of German law with its Head Office
in Kronach.
Industriestraße 11, 96317 Kronach
Telephone: + 49 (0)9261 / 99-0
Fax: + 49 (0)9261 / 99-500
E-mail: ccc@loewe.de
Trade Register: Municipal Court Coburg, No. HRB 42243
VAT ID-No.: DE 193216550
WEEE registration no.: DE 41359413
Issue 04.08 3rd edition
© Loewe Opta GmbH, Kronach
All rights reserved including translation.
Design and technical specifi cations are subject to change without notice.
Inputs
AERIAL IN Aerial input, 75 ohms
Digital aerial supply 5 V/0,1 A (double insulated, switchable).
VIDEO IN 1.0 Vp-p 75 ohms, negative sync. ,
RCA socket x 2 / SCART x 2
AUDIO IN 0 dBm > 47 kOhm, RCA socket
(L, R) x 2 / SCART x 2
DV IN 4 Pins (i.LINK/IEEE 1394-Standard/DV-25)
USB V 1.1
67 -
Page 68

Language Code List
Enter the appropriate code when fi rst setting up “Disc Audio“, “Disc Subtitles“ and/or “Disc Menu“. (Further information can be found under “Disc Languages“ on
page 28.)
Code Language
6565 Afar
6566 Abkhaz
6570 Afrikaans
6577 Amharic
6582 Arabic
6583 Assamese
6588 Aymara
6590 Azerbaijani
6665 Bashkir
6669 Byelorussian
6671 Bulgarian
6672 Bihari
6678 Bengali; Bangla
6679 Tibetan
6682 Breton
6765 Catalan
6779 Corsican
6783 Czech
6789 Welsh
6865 Danish
6869 German
6890 Bhutanese
6976 Greek
6978 English
6979 Esperanto
6983 Spanish
6984 Estonian
6985 Basque
7065 Persian
7073 Finnish
7074 Fijian
7079 Faroese
7082 French
7089 Frisian
7165 Irish
7168 Scottish
Gaelic
7176 Galician
7178 Guarani
7185 Gujarati
7265 Hausa
7273 Hindi
7282 Croatian
7285 Hungarian
7289 Armenian
7365 Interlingua
7378 Indonesian
7383 Icelandic
7384 Italian
Code Language
7387 Hebrew
7465 Japanese
7473 Yiddish
7487 Javanese
7565 Georgian
7575 Kazakh
7576 Greenlandic
7577 Cambodian
7578 Canadian
7579 Korean
7583 Kashmiri
7585 Kurdish
7589 Kirgiz
7665 Latin
7678 Lingala
7679 Laotian
7684 Lituanian
7686 Latvian
7771 Malagasy
7773 Maori
7775 Macedonian
7776 Malayalam
7778 Mongolian
7779 Moldovian
7782 Marathi
7783 Malay
7784 Maltese
7789 Burmese
7865 Nauruan
7869 Nepalese
7876 Dutch
7879 Norwegian
7982 Oriya
8065 Punjabi
8076 Polish
8083 Pashto
8084 Portuguese
8185 Quechua
8277 Romansh
8279 Romanian
8285 Russian
8365 Sanskrit
8368 Sindhi
8372 Serbocroat
8373 Singhalese
8375 Slovak
8376 Slovene
8377 Samoan
8378 Shona
Code Language
8379 Somali
8381 Albanian
8382 Serbian
8385 Sudanese
8386 Swedish
8387 Swahili
8465 Tamil
8469 Telugu
8471 Tadzhik
8472 Thai
8473 Tigrinya
8475 Turkmen
8476 Tagalog
8479 Tongan
8482 Turkish
8484 Tatar
8487 Twi
8575 Ukranian
8582 Urdu
8590 Uzbek
8673 Vietnamese
8679 Volapuk
8779 Wolof
8872 Xhosa
8979 Yoruba
9072 Chinese
9085 Zulu
- 68
Page 69

List of country codes
Key in the corresponding code when first setting the “Area code“ (page 31).
Code Country code
AD Andorra
AE United Arab Emirates
AF Afghanistan
AG Antigua and Barbuda
AI Anguilla
AL Albania
AM Armenia
AN Dutch Antilles
AO Angola
AQ Antarctic
AR Argentina
AS American Samoa
AT Austria
AU Australia
AW Aruba
AZ Azerbaizhan
BA Bosnia-Herzegovina
BB Barbados
BD Bangladesh
BE Belgium
BF Burkina Faso
BG Bulgaria
BH Bahrain
BI Burundi
BJ Benin
BM Bermuda
BN Brunei Darussalam
BO Bolivia
BR Brazil
BS Bahamas
BT Bhutan
BV Bouvet Island
BW Botswana
BY Byelorussia
BZ Belize
CA Canada
CC Cocos (Keeling) Islands
CF Central African Republic
CG Congo
CH Switzerland
CI Ivory Coast
CK Cook Islands
CL Chile
CM Cameroon
CN China
CO Columbia
CR Costa Rica
CS Former Czechoslovakia
CU Cuba
Code Country code
CV Cape Verde
CX Christmas Islands
CY Cyprus
CZ Czech Republic
DE Germany
DJ Djibouti
DK Denmark
DM Dominica
DO Dominican Republic
DZ Algeria
EC Ecuador
EE Estonia
EG Egypt
EH West Sahara
ER Eritrea
ES Spain
ET Ethiopia
FI Finland
FJ Fiji
FK Falkland Islands
FM Micronesia
FO Faroe Islands
FR France
FX France (European
Territory)
GA Gabon
GB Great Britain
GD Grenada
GE Georgia
GF French Guyana
GH Ghana
GI Gibraltar
GL Greenland
GM Gambia
GN Guinea
GP Guadeloupe (French)
GQ Equatorial Guinea
GR Greece
GS S. Georgia & S. Sandwich Islands
GT Guatemala
GU Guam (USA)
GW Guinea Bissau
GY Guyana
HK Hong Kong
HM Heard and McDonald
Islands
HN Honduras
HR Croatia
HT Haiti
Code Country code
HU Hungary
ID Indonesia
IE Ireland
IL Israel
IN India
IO British Territory
in the Indian Ocean
IQ Iraq
IR Iran
IS Iceland
IT Italy
JM Jamaica
JO Jordan
JP Japan
KE Kenya
KG Kirghizia
KH Cambodia
KI Kiribati
KM Comoros
KN Saint Kitts and Nevis Anguilla
KP North Korea
KR South Korea
KW Kuwait
KY Cayman Islands
KZ Kazakhstan
LA Laos
LB Lebanon
LC Saint Lucia
LI Liechtenstein
LK Sri Lanka
LR Liberia
LS Lesotho
LT Lithuania
LU Luxembourg
LV Latvia
LY Libya
MA Morocco
MC Monacco
MD Moldova
MG Madagascar
MH Marshall Islands
MK Macedonia
ML Mali
MM Myanmar
MN Mongolia
MO Macao
MP Northern Mariana Islands
MQ Martinique (French)
MR Mauretania
Code Country code
MS Montserrat
MT Malta
MU Mauritius
MV Maldives
MW Malawi
MX Mexico
MY Malaysia
MZ Mozambique
NA Namibia
NC New Caledonia (French)
NE Niger
NF Norfolk Island
NG Nigeria
NI Nicaragua
NL Netherlands
NO Norway
NP Nepal
NR Nauru
NU Niue
NZ New Zealand
OM Oman
PA Panama
PE Peru
PF Polynesia (French)
PG Papua New Guinea
PH Philippines
PK Pakistan
PL Poland
PM Saint Pierre and Miquelon
PN Pitcairn Island
PR Puerto Rico
PT Portugal
PW Palau
PY Paraguay
QA Qatar
RE Reunion (French)
RO Rumania
RU Russian Federation
RW Rwanda
SA Saudi Arabia
69 -
Page 70

Service
Loewe Austria GmbH
Parkring 12
1010 Wien, Österreich
Tel +43 - 1 22 88 633 - 0
Fax +43 - 1 22 88 633 - 90
Email loewe@loewe.co.at
International Dynamics
Australasia Pty Ltd.
129 Palmer Street
Richmond 3121, Victoria,
Australia
Tel +61 - 3 - 94 29 08 22
Fax +61 - 3 - 94 29 08 33
Email mail@international
dynamics.com.au
Loewe Opta Benelux NV/SA
Uilenbaan 84
2160 Antwerpen, België
Tel +32 - 3 - 2 70 99 30
Fax +32 - 3 - 2 71 01 08
Email ccc@loewe.be
Darlington Service
Kn. Klementina Street, bl. 193
1618 Sofia, Bulgaria
Tel +359 - 2 955 63 99
Fax +359 - 2 955 63 99
Email sac@audio-bg.com
Telion AG
Rütistrasse 26
8952 Schlieren, Schweiz
Tel +41 - 44 732 15 11
Fax +41 - 44 732 15 02
Email lgelpke@telion.ch
HADJIKYRIAKOS & SONS LTD.
121 Prodromos Str., P.O Box
21587
1511 Nicosia, Cyprus
Tel +357 - 22 87 21 11
Fax +357 - 22 66 33 91
Email savvas@hadjikyriakos.
com.cy
K+B PROGRES A.S.
U Expertu 91
25069 Klicany u Prahy, Česko
Tel +420 2 72 12 21 11 (222)
Fax +420 2 72 12 22 39
Email loewe@kbexpert.cz
Loewe Opta GmbH,
Customer Care Center
Industriestraße 11
96317 Kronach, Deutschland
Tel +49 1801–22256393
Fax +49 9261–99500
Email ccc@loewe.de
Kjaerulff 1 A/S
C.F. Tietgens Boulevard 19
5220 Odense SØ, Denmark
Tel +45 - 66 13 54 80
Fax +45 - 66 13 54 10
Email mail@kjaerulff1.com
Gaplasa S.A.
Conde de Torroja, 25
28022 Madrid, España
Tel +34 - 917 48 29 60
Fax +34 - 913 29 16 75
Email loewe@maygap.com
TEDRA TRADING OY
Kuusemetsa 3
Saue 76506, Estonia
Tel +372 - 50 14 817
Fax +372 - 67 09 611
Email raivo@futurehifi.com
Loewe Opta France S.A.
13 rue du Dépôt,
Parc del l‘Europe, BP 10010
67014 Strasbourg Cédex, France
Tel +33 - 3- 88 79 72 50
Fax +33 - 3- 88 79 72 59
Email loewe.france@wanadoo.fr
Kjaerulff 1 OY
Uudenmaantie 100
20760 Piispanristi, Finland
Tel +358 - 20 751 3800
Fax +358 - 20 751 3801
Email jari@kjaerulff1.com
Loewe UK Limited
Century Court, Riverside Way
Riverside Business Park, Irvine,
Ayrshire
KA11 5DD, UK
Tel +44 - 1294 315 000
Fax +44 - 1294 315 001
Email enquiries@loewe-uk.com
ISSAGOGIKI EMBORIKI ELLADOS
S.A.
321 Mesogion Av.
152 31 Chalandri-Athens, Hellas
Tel +30 - 210 672 12 00
Fax +30 - 210 674 02 04
Email christina@bose-onkyo.gr
Basys Magyarorszagi KFT
Tó park u.9.
2045 Törökbálint, Magyar
Tel +36 - 2341 56 37 (121)
Fax +36 - 23 41 51 82
Email basys@mail.basys.hu
Plug&Play
Bednjanska 8, 10000 Zagreb
Hrvatska (Kroatia)
Tel +385 1 4929 683
Fax +385 1 4929 682
Email loewe@loewe.hr
Loewe Italiana SRL
Largo del Perlar, 12
37135 Verona (VR), Italia
Tel +39 - 045 82 51 611
Fax +39 - 045 82 51 622
Email Stefano.Borgognoni@
loewe.it
PL Trading (pz 2004) Ltd.
27, Aliat Hanoar St.
Givataiim 53401, Israel
Tel +972 - 3 - 57 27 155
Fax +972 - 3 - 57 27 150
Email zeev@loewe.co.il
Origo Ltd
Unit 23 Magna Drive
Magna Business Park, City West
Dublin 24, Republic of Ireland
Tel +353-1-4666700
Fax +353-1-4666706
Email service@origo.ie
SAS
Hamad Al Haqueel Street,
Rawdah, Jeddah
Kingdom of Saudi Arabia
Tel +966 (2) 665 4616 ext: 666
Fax +966 (2) 660 7864
Email hrant@sas-syseng.com
A Cappella
Ausros Vartu 5, Pasazo skg.
01129 Vilnius, Lithuania
Tel +370 - 52 12 22 96
Fax +370 - 52 62 66 81
Email: aretas@acappella.lt
DONEO CO. LTD
34/36 Danny Cremona Street
Hamrun, HMR02, Malta
Tel +356 - 21 - 22 53 81
Fax +356 - 21 - 23 07 35
Email info@doneo.com.mt
SOMARA S.A.
377, Rue Mustapha El Maani
20000 Casablanca, Morocco
Tel +212 - 22 22 03 08
Fax +212 - 22 26 00 06
Email somara@somara.ma
CableCom AS
Ostre Kullerod 5
3241 Sandefjord, Norge
Tel +47 - 33 48 33 48
Fax +47 - 33 44 60 44
Email odd@cablecom.no
International Dynamics (NZ) Pty
Ltd
PO Box 109 317, Newmarket
Auckland, New Zealand
Tel +64 9 379 0179
Fax +64 9 379 0279
Email: enquiries@international
dynamics.co.nz
Mayro Magnetics Portugal, Lda.
Rua Professor Henrique de Barros
Edifício Sagres, 2º. C
2685-338 Prior Velho, Portugal
Tel +351 - 21 942 78 30
Fax +351 - 21 942 78 30
Email geral.loewe@mayro.pt
DSV TRADING SA
Plac Kaszubski 8
81-350 Gdynia, Polska
Tel +48 - 58 - 6 61 28 00
Fax +48 - 58 - 6 61 44 70
Email market@dsv.com.pl
Avitech Co. SRL
1/II Pipera Tunari St.
007190 Voluntari, Ilfov, Romania
Tel +40 - 21 200 64 64
Fax +40 - 21 200 64 65
Email andrei.silisteanu@avitech.ro
Service Center Loewe
ul. Verkhnaya Maslovka, d. 29
125083 Moscow, Россия
Tel +7 - 495 612 50 43
Fax +7 - 495 612 47 10
Email service@atc.ru
Kjaerulff 1 AB
Ridbanegatan 4, Box 9076
200 39 Malmø, Sverige
Tel +46 - 4 06 79 74 00
Fax +46 - 4 06 79 74 01
Email Sweden@kjaerulff1.com
BaSys Czech & Slovak s.r.o.
Stará Vajnorská 17/A
831 04 Bratislava, Slovakia
Tel + 421 2 49 10 66 18
Fax + 421 2 49 10 66 33
Email: loewe@basys.sk
ENKAY ELEKTRONIK SAN. Ve Tic.
Ltd. Sti.
Alemdag Cad: Site Yolu No.: 10
81230 Ümraniye/ Istanbul, Türkiye
Tel +90 - 216 634 44 44
Fax +90 - 216 634 39 88
Email mhatipog@enkaygroup.com
Dubai Audio Center
P.O. Box 32836, Sheik Zayed Road
Dubai, UAE
Tel +971 - 4 343 14 41
Fax +971 - 4 343 77 48
Email dacdubai@emirates.net.ae
THE SOUNDLAB (PTY) LTD
P.O. Box 31952, Kyalami 1684
Republic of South Africa
Tel +27 - 1 14 66 47 00
Fax +27 - 1 14 66 42 85
Email loewe@mad.co.za
© by Loewe Opta 071218
70
Page 71

Glossary
A
AV socket: Audio and video signal.
AV sources: Audio/video source.
AVS: Audio/video front sockets on the TV set (cinch and Mini-DIN).
C
Cinch cable: Cable for transmitting sound or picture.
Component Signal: Video signal which is transmitted by three separate cinch
connections. It is made up of the brightness signal “Y” and the colour difference
signals “Pb” and “Pr”. YPbPr is the original analogue version of the digital YcbCr
in which the video data stored on the DVD are colour coded.
D
Digital Link: System for controlling recorders (for Loewe video recorders and DVD
recorders) via the Euro AV sockets of the Loewe TV set when installed in a concealed
place. Control of the recorder for timer recordings.
Digital Link Plus: System for controlling recorders according to protocol 50. Station
and timer data are transmitted to the recorder via the Euro AV socket for analog
stations. The time recording is made exclusively by the recorder. Different names
at different manufacturers.
DTS: Digital multi-channel sound.
Dolby Digital: Digital multi-channel sound.
Dolby Pro Logic: Analog multi-channel sound.
Dolby Surround: is an analog multi-channel sound system which accommodates
four audio channels in two sound tracks using a matrix coding.
DVD: abbreviation for Digital Video Disc and later Digital Versatile Disc.
DVD-Preceiver: combi-device of DVD player and radio.
DVI: Digital Visual Interface is an interface for transmitting digital video and graphic
data (without sound).
E
Euro AV socket: Interface for connecting video recorders to a TV set. This socket
is also known as a Scart socket.
F
Finalising: Finishing the disc for playing on other players.
H
HDCP: Copy protection standard.
HDD: (hard disc) Integrated hard disc.
HDMI: High Definition Multimedia Interface is a newly developed interface for full
digital transmission of audio and video data.
I
Initialising: Preparing the disc for recording video signals.
L
LCD: Liquid Crystal Display.
L-Link: Interface for detection and control of Loewe audio components.
M
MPEG: Digital compression method for video.
Modulator: Transmitter in the recorder to receive signals via the TV tuner.
Mono: single channel sound.
N
NICAM: Sound standard NICAM is used in Belgium, Denmark, England, France,
Sweden and Spain.
NTSC: American color standard.
P
PAL: European colour standard.
PCM: Puls Code Modulation for digital sound.
PIP: Picture in Picture, a function which shows two pictures on one screen.
Progressive Scan: Technique for setting up images with real full images for
flicker-free display.
Picture In Picture: see PIP.
R
RGB: colour signals red, green, blue.
S
Switching voltage: Video devices transmit this voltage to switch the TV to play.
SECAM: French colour TV standard.
SetTop-Box: (STB) Accessory connected to the TV set which enables additional
functions.
Signal strength: strength of the reception signal.
Signal quality: quality of the incoming signal.
Stereo: dual channel sound.
T
Terrestrial: In data transmission, a radio transmission which does not use a satellite
as an intermediate station is called terrestrial.
Tuner: receiver
U
USB: Universal Serial Bus. Serial bus system for connecting external devices (USB
card reader, USB stick).
V
VPS: The Video Program System (VPS) is a signal which some (but not all) stations
transmit in the scanning gap of the TV signal. The signal serves for video or DVD
recorders to react to differences in the starting time, postponements and overrunning of the planned transmission time when recording programs.
Y
Ycc/Ypp: colour standard in Set-Top-Boxes.
71 -
 Loading...