

Page 1

Connect ID
TV
Connect ID 55
Connect ID 46
Connect ID 40
35907000
Quick guide
Page 2

Connect ID 40-55 - 2 -
Quick guide
Table of contents
Welcome! .......................................................................................3
Scope of delivery .......................................................................................... 3
About this quick guide ................................................................................. 3
Imprint ............................................................................................................ 3
For your safety ..............................................................................4
Technical information (Connect ID DR+) .................................................. 5
Basic functions .............................................................................6
english
Remote control ............................................................................. 7
Functions of the operating controls ..........................................8
Preparing the TV set ....................................................................8
Preparing the remote control unit .............................................................. 8
Switching the TV set ON/OFF ....................................................................9
General information on the operation .......................................9
Info display ....................................................................................................12
Operation without remote control.............................................................12
Video ............................................................................................25
Video playback ............................................................................................26
Additional functions for DR+ archive playback ...................................27
Audio/Radio ...............................................................................28
Audio playback ...........................................................................................29
Radio mode (DVB radio) ...........................................................................30
Radio mode (Internet radio) ......................................................................31
Photo ...........................................................................................32
Photo display ...............................................................................................33
Web ............................................................................................. 34
Web ...............................................................................................................34
MediaNet ..................................................................................................... 34
Browser ........................................................................................................ 35
Extras.......................................................................................... 36
Extras ...........................................................................................................36
Timer ............................................................................................................36
Conditional Access module (CA module) ...............................................37
Home view / Home - Favourites ............................................... 13
Home view ....................................................................................................13
Home - Favourites .......................................................................................13
TV ................................................................................................. 14
Setting the volume ......................................................................................14
Select station ...............................................................................................14
Status display ...............................................................................................16
Function list ..................................................................................................17
AV selection ..................................................................................................17
Electronic Programme Guide – EPG.........................................................18
(1
Picture in Picture (PIP)
............................................................................19
Teletext .........................................................................................................20
HbbTV / MediaText .....................................................................................21
Digital Recorder ......................................................................................... 22
TV viewing with time shift ....................................................................... 22
Archive recording .....................................................................................22
DR+ archive .............................................................................................. 23
Media+ ....................................................................................... 24
General information on media reproduction ..........................................24
Accessing your media ................................................................................ 24
Connections rear side of the device ........................................38
Connect ID 40-55 DR+ .............................................................................38
Function of the connections (Connect ID DR+) .....................................39
Connect ID 40-55 .......................................................................................40
Function of the connections (Connect ID) ...............................................41
Technical data ........................................................................... 42
Connect ID 40-55 DR+ .............................................................................42
Connect ID 40-55 ....................................................................................... 43
Environment .............................................................................. 44
Legal information ......................................................................44
Miscellaneous ............................................................................ 45
Integrated features ..................................................................................... 45
Conformity / Manufacturer’s declaration ............................................... 45
Software / User guides .............................................................................. 45
Index ........................................................................................... 46
Service .........................................................................................47
(1
only for TV sets with DR+.
Page 3

Connect ID 40-55 - 3 -
Quick guide
Welcome!
Thank you,
for choosing a Loewe TV set!
Loewe stands for the highest standards of technology, design and user
friendliness. This applies equally for TV, video and accessories.
In addition to sleek design and a varied combination of colour and
mounting choices, your Loewe TV set offers a host of technological
options.
Loewe Image
Image+ and state-of-the-art full HD LCD displays with LED backlit TV
technology guarantee the best image quality and high contrast values
and all this at lowest possible energy consumption.
Loewe Digital
The integrated Triple Tuner for DVB-T/C/S allows you to receive standard
as well as high-definition content and thanks to CI Plus interface even
pay TV.
Loewe Sound
Audio competence on the highest level - this is for what Loewe is unique:
an integrated multichannel decoder provides 5.1. Home Entertainment
of outstanding quality without any external devices.
Loewe DR
Due to Loewe DR+, recording of TV transmissions on the integrated
hard disk by simply pressing a key or halting the current transmission
are no problem. Additionally, DR+ Streaming enables the retrieval of
films on further Loewe devices.
Loewe Assist
The intuitive Loewe user interface Assist Media offers a simple access
to all device functions; by means of the HOME key on the remote control you can access all your favourite content as well as all multimedia
functions of your TV set.
+
+
(1
+
(1
+
+
About this quick guide
This quick guide gives you only a short overview of the most important
functions of your TV set.
You can download detailed user guides in your language in elec-
tronic form in the latest version via the support portal of the Loewe
Homepage (see section Miscellaneous – Software / User guides).
In the detailed user guide, you will find i.a. a detailed description of the
menu items of the system settings, the complete functionality of the
digital recorder and the connection and installation of external devices.
The operating instructions for your TV set are updated at irregular
intervals. We recommend checking them now and then, especially
after a software update.
For best results regarding safety and the longevity of the set, we
recommend you read the chapter For your safety before switching
it on for the first time.
Paragraphs which begin with the symbol
tions, tips or conditions for the following settings.
Terms which you will find in the menus or printed on the remote control
or TV set are written in bold type.
The necessary control elements are shown in the descriptions to the
left of the text containing the instructions for action.
In addition to the remote control, a PC keyboard can be connected to
one of the USB ports on your TV and then used to control your TV set.
In the user guide, this symbol indicates places in which
the use of a keyboard is particularly advantageous.
Depending on the connected accessory equipment the menus in the
TV set can differ from those described here.
All the station names, programme contents, the illustrated photos,
titles, albums and album covers in this quick guide are examples.
indicate important instruc-
english
Loewe Media
The Loewe Multimedia functions offer you a multitude of options: via
MediaHome you have access to your photos, videos and music in your
home network or on the USB stick.
Loewe MediaNet and MediaText help you to access numerous worldwide web-applications and contents from HbbTV services.
Loewe Connectivity
Network your TV set by means of numerous interconnection options.
Be it HDMI, USB, CI Plus or LAN/WLAN, discover the world of the
Loewe networking possibilities.
+
+
Scope of delivery
• LCD TV set
• Mains cable
• Antenna cable
• Table Stand Dynamic (Connect ID 40 / 46)
• Wall mount WM62 (Connect ID 55)
• Remote control Assist with two batteries
• Quick guide
General information on the operation of the
TV set
For further information on the user interface and the general operation
of your TV set see chapter General information on the operation.
Interactive data services
In some countries the stations also broadcast interactive data services
with their programmes, leading to the functions of individual keys not
being available or only so to a limited extent. You can find out more
about this in section HbbTV / MediaText.
Imprint
Loewe Opta GmbH
Industriestraße 11
D-96317 Kronach
www.loewe.de
All rights including translation, technical modifications and errors
reserved.
Printed in Germany
Editorial date 07/13-2.0 TB/FP
© Loewe Opta GmbH, Kronach
ID: 2.1.14
(1
only for TV sets with DR+.
Page 4

Connect ID 40-55 - 4 -
Quick guide
For your safety
For your safety, and to avoid unnecessary damage to your unit,
please read and follow the safety instructions below:
Intended use and ambient conditions
This TV set is intended exclusively for receiving and playing visual and
audio signals. It must not be used in rooms with a high level of humi-
dity (e.g. bathroom, sauna) or a high dust concentration. The
manufacturer‘s warranty is only valid for use in the specified permissible environment.
If the unit is used outdoors, make sure that it is protected from moisture
english
(rain, dripping water and splashing water or dew). High humidity and
dust concentrations lead to leakage currents in the device. This can
result in a shock hazard when touching it or even fire.
If you have moved the unit out of
the cold into a warm environment,
leave it switched off for about an
hour to avoid the formation of
condensation.
Do not place objects containing
liquids on top of the unit. Protect
the appliance against dripping and
splashing water.
Candles or naked flames must be
kept away from the TV set at all
times to prevent it from catching
fire.
Never place the TV set in a location where it is exposed to vibrations.
This may lead to damage.
Transporting
Move the device in vertical position only. Get hold of the device on
the upper and lower edges of the housing.
If the set has to be put down during packing/unpacking, place the TV
set with its entire front surface lying flat on soft material. Use a blanket
or the fleece from the packing material as an underlay.
The LCD screen is made of glass or plastic and can break if not handled
properly.
Always wear rubber gloves to carry the TV set if the LCD screen is
damaged and liquid crystal might be leaking out. In the case of skin
contact immediately rinse thoroughly with water.
Air circulation and high temperatures
The vent slots on the rear panel of the set must always be kept
unobstructed. Please do not place newspapers or cloths on/over the
TV set.
Make sure that there is at
least 10 cm free space on the
sides and above the set for
air circulation, if the set is
placed in a cabinet or on a
shelf.
Like any electronic device,
your TV set requires air for
cooling. Obstruction of the
air circulation can cause fires.
Prevent metal items, needles, paper clips, liquids, wax, or similar
items, from getting into the interior of the device through the vent
slots in the rear panel. Such objects can cause short circuits in the
set, which could possibly cause a fire.
If something should get into the interior of the set then immedi-
ately unplug the mains plug of the device and contact the field service
for more information.
Set-up
The set is suitable for mounting in many different ways. Note the assembly instructions regarding the different possible mounting options.
Before setting up the device, please check that the final location is
suitable to bear the load of the device in terms of surface (sensitivity
to pressure) and stability (statics).
This is particularly the case for the high-gloss painted surfaces and
surfaces that are made from real wood/real wood veneer.
Place the TV set with the table or floor stand only on a level, sturdy,
horizontal base. Particularly make sure that the set does not protrude
to the front when placed in or on pieces of furniture.
Place the TV set in a normal position for use. The TV set may only be
used in an upright horizontal position. It may not be tilted by more
than 10 degrees. The TV set must never be operated in portrait position, lying flat or hanging overhead from the ceiling.
10 cm
10 cm
10 cm
±10°
D
Power supply
Incorrect voltages can damage the unit. This device may only be con-
nected to a power supply with the voltage and frequency indicated on the
type plate using the supplied mains cable. The mains plug of the TV set
must be easily accessible so that the device can be disconnected from
the mains at any time. When unplugging the unit from the mains, pull at
the connector body and not at the cable. The cables in the mains plug
could otherwise be damaged and could cause a short-circuit when
plugged in again.
Lay the mains cable so that it cannot be damaged. Do not step on
the mains cable. The mains cable may not be kinked or laid over sharp
edges nor be exposed to chemicals; the latter also applies to the unit
as a whole. A mains cable with damaged insulation can cause electric
shocks and poses a fire risk.
Set up the device where it is not exposed to direct insolation and
where it is not exposed to additional heating by radiators.
About the LCD screen
The TV set with LCD screen you have purchased satisfies the most
rigorous quality requirements and has been inspected with respect
to pixel errors. Despite of thorough care when manufacturing the
display, it cannot be 100% guaranteed that no subpixel defects will
occur due to technical reasons. Please understand that these types
of effects, as long as they are within the limits specified in the standard,
cannot be considered as a device defect in terms of the guarantee.
Avoid displaying still images for long periods of time. It is possible that
a copy of the image may remain visible.
Page 5

Connect ID 40-55 - 5 -
Quick guide
For your safety
TV sets with 3D function
Read the following safety instructions before using the 3D function
of your TV set.
Please use the Loewe 3D TV sets only with the Loewe 3D glasses which
can be purchased as an accessory from your Loewe dealer.
People with a visual disorder may not be able to perceive 3D effects
or may only be able to perceive them to a limited extent. People who
are sensitive to flickering images (e.g. those with epilepsy) should only
use the 3D function after having consulted their doctor.
It might take some time for you to get used to the 3D glasses and
before you can perceive the 3D effects properly.
Stop using the 3D function immediately if you experience any feelings
of nausea, dizziness or malaise when viewing 3D content.
Supervise children whilst they are viewing 3D content, as they can be
particularly sensitive to it.
Allow more time for a break after having watched 3D movies, so that
you are able to relax. Failure to do so could result in headaches, fatigue,
dizziness or malaise.
Position yourself comfortably in front of the 3D TV set and ensure that
you are seated firmly. By doing this, you will avoid any injuries that may
occur due to reacting to extreme 3D content.
Switch off any artificial light sources (e.g., energy saving lamp) between
the TV set and the 3D glasses. These could impair the infrared reception or the TV picture may flicker as a result.
Supervision
Do not let children operate the TV set unsupervised and do not let
them loiter and play close to the set. The set could tip over, be pushed
off or pulled down from the stand surface and injure someone.
Do not allow the switched-on TV set to run unattended.
Volume
Loud music can lead to ear damage. Avoid extreme volume especially over long periods and when using headphones.
Thunder storms
Pull out the mains plug and all connected antenna cables from the
TV set in a thunderstorm. Overvoltage caused by lightning strokes
can damage the set via the antenna system, as well as via the mains.
The mains plug and all connected antenna cables should also be pulled
out during long periods of absence.
Cleaning and care
Switch off the TV set with the main switch prior to cleaning.
Clean the TV set, the screen, and the remote control unit with a soft,
moist, clean and colour-neutral cloth only, without any aggressive
or scouring cleaning agents.
The speaker panel of your TV set is covered with textile. Vacuum the
surface regularly using a soft brush set.
In case of dirt or stains:
Moisten a soft, colour-neutral cloth with detergent or normal stain
remover and gently rub away the stain. You can also treat the mark/
stain directly with normal dry stain remover spray (vacuum up powder).
Do not moisten the covering fabric directly with detergent or stain
remover (risk of encrustation). Do not use any solvents to clean the
fabric.
Follow the manufacturer’s instructions when using stain removers.
There is an increased risk of encrustation when cleaning speaker
panels with nicotine deposits.
Repairs and accessories
Never remove the back of the TV set yourself. Have your TV set repaired or serviced by authorised television technicians only.
Only use original accessories such as Loewe stands, if possible.
Technical information (Connect ID DR+)
Switching off the TV set with the mains switch during operation or an
inadvertent disruption to the power supply (e.g., power failure) can
cause damage to the hard disk file system and hence loss of the recorded broadcasts. Always return the TV set to Standby mode before
switching it off with the main switch. Never ever disconnect the USB
storage device from the TV set during a copy process.
However, if unexpected problems occur when operating the hard disk,
formatting the hard disk may rectify this. You can find the corresponding menu items under System settings ט Control ט more ... ט
Hard disks.
Loewe are not liable for the loss of data on the integrated hard disk
of your TV set. To avoid data loss, we recommend copying important
recordings to an external storage medium.
english
Automatic shutdown
If the TV is not operated for 4 hours (adjustment of volume, programme change, etc.) the TV will automatically switch to stand-by
mode to save energy. A prompt to terminate this shutdown process
appears one minute before expiry of the 4 hours.
The automatic shutdown is generally active for the TV mode as soon
as the energy efficiency mode Home Mode is enabled for at least one
of the signal input groups. This also applies if another energy efficiency
mode is selected during initial installation, but one of the signal input
groups is subsequently set to Home Mode.
Automatic shutdown does not occur when using the radio without
screen display (screen off).
Page 6

Connect ID 40-55 - 6 -
Quick guide
Basic functions
On/Off of the TV set
General navigation
english
Select station
Switching the TV set ON / switching it OFF in Standby
mode (Mains switch must be switched ON)
With the TV set being switched on:
Press key long: TV set and all CEC-enabled devices
connected to the HDMI ports will be switched off to
standby (system standby).
Navigation on the user interface, select
objects
OK short: Call station list. Or:
OK long: Call expanded station list.
Mark station,
OK switch over to station.
Or:
P+/P– Next/previous channel
Key functions
TV operation
Call radio mode (standard assignment)
(1
Call Home view,
Select the operating mode or the function
short, during screen fade-in function:
Info display,
Info text appropriate to the content that can assist you
further, should you have any questions about your TV
set;
short, without on-screen display: call status display.
with status display opened and repeatedly pressing
the key call / close the detailed information on the
broadcast
long: Show key explanation window
short: Open the DR+ archive
long: Call timer list
Add current object to Home favourites
Or:
Select station with numerical keys
Sound
V+/V– Increase/reduce volume
Sound on/off
Function of the coloured keys during TV operation
Red key: Start HbbTV or value-added network
service
Yellow key: Last selected station
Blue key: Call function list
(selection of language/sound,
subtitles or channel/video track)
Function of the coloured keys in audio mode
Green key: Switch screen ON/OFF
Yellow key: Last selected station in DVB radio
mode
Call MediaNet
EPG (Electronic Programme Guide) On/Off
(2
PIP (picture in picture) on/off
Turn Teletext/MediaText on/off
short: Call function list for the active operating mode
long: Call System settings
short: step / level back
long: close all displays
(1
The assignment of these keys can be changed. The description refers to the standard setting.
(2
only for TV sets with DR+.
Page 7

Connect ID 40-55 - 7 -
Quick guide
Remote control
1
2
3
4
5
6
7
8
9
10
11
in the menu: confirm/call up
12
13
14
15
16
17
18
19
20
21
22
23
24
press long: close all displays
25
In menu: context-relevant Info on/ off
26
27
28
29
in the menu: enter numbers or letters
30
31
32
33
System standby
10
11
12
13
14
15
16
1
33
2
3
4
5
32
31
30
6
29
28
27
7
8
9
26
25
24
23
22
21
20
19
18
17
Sound mute/on
LED display for currently operated device
Switching to TV mode
Reassign remote control to SetTop-Box (PACE DS440N)
DR+ archive on/off
Define active object as favourite
Electronic Programme Guide on/off
Teletext/MediaText
Call function list
V+/V- increase/reduce volume
Call station list / expanded station list
Green coloured key: screen on/off
Red coloured key: call preferred value-added network service
Jump / Wind
One Touch Recording
Start / interrupt timeshift television
Finish timeshift
Jump / wind
Start / continue timeshift television
Blue coloured key: call station function list with subfunctions
Yellow coloured key: switching to previously received station
In menu / in lists: selecting/setting
P+/P– select stations up/down
Press briefly: back to previous window (step back)
Status display on/off
PIP (picture in picture) on/off
Open/close Home view
AV selection
Select station directly
Call MediaNet
Reassign remote control to BluTech Vision 3D
Switch to radio mode
Switch ON/OFF to standby mode
(2
on/off
(1
(1
(1
english
(
2
The key assignment displayed here is valid for the main level of the TV set. The key assignment may vary in certain operating modes (see the corresponding chapter in this quick guide).
(1
The assignment of these keys can be changed. The description refers to the standard setting.
(2
Depending on the corresponding settings.
Page 8

Connect ID 40-55 - 8 -
Quick guide
Operating controls on the TV set / Preparing the TV set
Functions of the operating controls
english
6
Key M:
TV set in standby mode: switch TV set on in TV mode
TV set switched on: call direct control on TV set
in direct control on TV set: up
7
Key R:
TV set in standby mode: switch TV set on in radio mode
TV set switched on: toggle TV mode and radio mode
Direct control on TV set: down
8
Key +:
increase volume
Direct control on TV set: to the right
9
Key – :
reduce volume
Direct control on TV set: to the left
6
5
-
9
M
4
+
8
1
2
3
R
7
1
Mains switch:
The mains switch is located on the bottom of the set.
Always return the TV set to Standby mode before switching it off
with the main switch.
The TV set will be completely separated from mains only when
you unplug the mains cable.
2
On/Off key:
Switching on in standby mode
Switching off to the standby mode
3
IR receiver:
Infrared receiver for receiving the remote control commands.
Preparing the remote control unit
Inserting or replacing batteries
Press on the embossed arrow whilst pushing the battery cover down.
Only use leak-proof micro-cells of the LR 03 (AAA) Alkali-Manganese
type. Do not use different types of batteries and old and new batteries together.
The batteries used must not be exposed to excessive heat such as
sunlight, fire or similar!
Pay attention to the correct polarity of + and – when inserting the
batteries.
If the batteries are too weak after longer use, the TV set prompts you
to change the batteries. Dispose of used batteries in an environmentally friendly way (see chapter Environment / Legal information).
Push the cover back on from below after having inserted the batteries.
AAA LR03
AAA LR03
4
Display:
white: Standby
white, intermittent: TV set starts
green: TV set switched on
red: timer recording active
blue: TV set in standby, background operation
active (EPG data updating, software
update or DR+ streaming server func-
(1
)
tion
5
Infrared transmitter:
When showing 3D content, the 3D glasses Loewe Active
Glasses 3D are controlled via the infrared sensor.
(1
only for TV sets with DR+.
Adjusting the remote control unit for operating the TV set
Press the TV key.
Page 9

Connect ID 40-55 - 9 -
Quick guide
Switching TV set on/off / General information on the operation
Switching the TV set ON/OFF
Switching TV set to the standby mode
Press the mains switch at the bottom of the set.
The indicator in the control panel on the front side lights up white. The
set is now in standby mode.
Switching the TV set on/off via the local operating panel
To switch the TV set into Operating mode or switch it off to Standby
mode, press the button on top of the TV set for about 2 seconds.
Display
After switching on the TV set, it takes a few seconds for further ope-
rating commands to be processed. Your TV set is ready to operate
as soon as the status indicator in the control panel lights up in green.
Switching the TV set on by means of the Remote control
Press the on/off key.
Or:
Press the TV key.
The previously watched station will be called.
Or:
Press numerical keys 1-9.
The corresponding station will be called.
General information on the operation
Some keys of the remote control for operating the TV set you will use
more often than others. The most important keys for navigation will
be explained in general. The numbers in the text refer to the figure
showing the remote control in chapter Remote control.
22
The arrow keys
TV set and for selecting menu items. They are arranged in the middle
of the remote control in a circle around the OK key
quick guide they will be represented as follows:
The OK key
menu item and for opening the station list. In this quick guide, an
instruction for this key looks like the following:
Using the numerical keys of your remote control
gramme channels and teletext pages directly. With key 0 you open
the AV options. In this user guide, entering numbers with numerical
keys is shown as follows:
The numerical keys are also used to enter text (see section Entry of
characters by remote control).
The Home view is the central overview page for all of your TV set‘s
operating modes. You reach Home view with the HOME key
help you to navigate in the menus and lists of the
11
. Later in this
Select the desired item.
11
is used to confirm a selection, for calling the highlighted
OKconfirm.
you enter pro-
29
Entering programme channel directly.
27
.
english
After switching on the TV set, it takes a few seconds for further ope-
rating commands to be processed. Your TV set is ready to operate
as soon as the status indicator in the control panel lights up in green.
Switching the set off with the remote control (Standby)
Press the on/off key.
Before switching off the set with the mains switch,
we recommend you to switch it to standby mode.
Switching TV set and connected additional devices off
(System Standby)
Press the On/Off key longer:
TV set and all CEC-enabled devices connected to the
HDMI ports will be switched off to standby (System
Standby).
HOME: Calling the Home view.
24
Pressing the BACK key
Pressing the BACK key longer closes all opened fade-ins. An example
for the BACK key in this quick guide:
BACK: Stop text entry and exit entry box.
Prolonged pressure on the INFO key
gives you information on the currently most important key functions.
If the function for a key is not available, this will be indicated by an
inserted symbol
briefly brings you one level up in the wizard.
25
shows a key guide window that
on the right above.
continued on the next page ט
Page 10

Connect ID 40-55 - 10 -
Quick guide
General information on the operation
Structure of the Menu screen
Basically, the structure of the different menu screens is similar, regardless of whether it is e.g. a wizard, rendering media content or a setup
menu. The structure is explained by means of three different screens.
The functions of these menu screens are explained more detailed in
the respective chapters.
Screen structure: Wizard
english
INITIAL INSTALLATION - Menu language
Which menu language do you want to use for operation?
Deutsch (de) Ελληνικά (el) Svenska (sv) Čeština (cs)
English (en) Polski (pl) Dansk (da)
Français (fr) Magyar (hu) Português (pt)
Italiano (it) Suomi (fi) Русский (ru)
Español (es) Slovenščina (sl) Norsk (no)
Nederlands (nl) Slovenčina (sk) Türkçe (tr)
Proceed with
Back with Cancel with
(A) Title bar with name of the wizard and the current operating step.
(B) Selected items, whose number can be different according to the
operating step.
(C) Bottom line showing the available operating controls. If required,
instructions and information are inserted.
Screen structure: Rendering of media content (example: Audio
player)
Snow Patrol / Eyes Open
A
Screen structure: Setup (example: picture)
A
Picture
CB D
3D
Picture adjustment
Contrast
Brightness
Colour intensity
Image+
Active
Picture format
more ...
If your desired display format has not been automatically
selected then you can choose it in the 3D settings menu. You
may display the 3D image in 2D or vice versa.
(A) Selected function in the Home overview (here: system settings)
(B) Home Menu System settings, with selected menu item Picture.
(C) Menu items Picture focusing on 3D
(D) Help text for the selected menu item Picture > 3D
Navigation: Selection of elements (example: On-screen displays)
Highlighting and thus selecting the symbols/elements or menu items
on the screen can be effected by the arrow keys on the remote control.
So you can see all the time where you are. As soon as there is a bar
above a symbol or text, this is a selected element.
On-screen displays
......
On-screen
displays
Back
B
Display time
Volume display
Automatic info
B
Permanent clock display
Automatic HDMI hint
< 7s >
< 7s >
yes no
yes no
on
off on
off on
off on
yes no
yes no
Back
C
A
C
Chasing Cars Shut Your EyesHands Open
00:00
02:56
D
04:27
E
(A) Title bar with selected album / subdirectory.
(B) Menu item Back to exit the menu or to go back to the previous
menu item.
(C) Selection of album or title
(D) Time bar
(E) Bottom line with the different symbols for controlling the playback
function.
With this you activate/deactivate the info text overlay for the menu item just selected.
(A) Selectable elements / menu items.
(B) The text in the line where the marker is currently located is white.
(C) Move the selection marking by means of the arrow keys
to the menu item to be set.
In most cases, the marked menu item will be automatically
adopted. The font colour of the previously active item will change
to grey, that of the newly selected item to white.
In a few menus, to confirm a selected menu item is required by
pressing OK.
continued on the next page ט
Page 11

Connect ID 40-55 - 11 -
Quick guide
General information on the operation
Navigation: Wizards
DVB-S settings (ASTRA1 19,2°E)
Please specify whether you want to search for scrambled stations too.
Note: Scrambled stations can only be received with an integrated CA module and additional
card.
Scrambled stations
Search method
Symbol rate
Accept Logical Channel Number
Back with Proceed with
If the menu item(s) (marked white) is/are already
correctly preset:
Go to next step.
Otherwise:
Mark the menu items to be changed. The
OK confirm the selection.
Go to next step.
yes
no
Network search
22000
no
Frequency search
yes
update will be adopted automatically. The
fount colour of the previously active item will
change to grey. If not,
Entering characters with on-screen keyboard
For certain functions, entering letters or characters is required, e.g., for
Web addresses (URLs) in the browser or for renaming archive entries.
An on-screen keyboard appears for entering text.
Enter/change internet address
CancelAdopt
http://www.loewe.de
Q
W
E
A
S
D
Y
X
C
1
2
3
Delete Cancel AdoptSpace
R
T
Z
U
I
O
P
F
G
H
J
K
L
I
V
B
N
M
.-/
abc
4
5
6
7
8
9
0
Back
highlight character / on-screen button,
OK Accept character.
For the selection of special characters select field
.-/ several times briefly in rapid succession.
To conclude the entry:
Mark Adopt,
confirm with OK.
english
Entry of characters by remote control
Alternatively to the on-screen keyboard you can also enter the desired
characters by means of the remote control (as with the keypad of a
mobile phone).
Mark text entry field.
Under the first letter of the name you will see a line
indicating the current input position.
Input position one character to the right (also for
blanks).
Input position one character to the left.
Enter the letters one after another. When using the
remote control, press the numerical keys just as on
a mobile phone keypad (0-9) until the desired symbol
is displayed.
Key Characters (uppercase - lowercase)
1
2
3
4
5
6
7
8
9
0
[space] 1
A B C 2 Ä Æ Ã Å Ā À Á Ć Ç Č - a b c 2 ä æ ã å ā â à á ć ç č
D E F 3 Ė Ë Ē Ę Ê È É - d e f 3 ė ë ē ę ê è é
G H I 4 Ï Ī Į Î Ì Í - g h i 4 ï ī į î î ì í
J K L 5 - j k l 5
M N O 6 Ö O E Õ Ō Ô Ò Ó Ø - m n o 6 ń ñ ö o e õ ō ô ò ó ø
P Q R S 7 - p q r s 7
T U V 8 Ü Ū Û Ù Ú - t u v 8 ü ū û ù ú
W X Y Z 9 - w x y z 9
. 0 - / _ : + , ; ? ! = & # % ~ @ $ * ’ ( ) ” § \ { } [ ] < > ´ ` ^ |
To conclude the entry:
Mark Accept,
confirm with OK.
Page 12

Connect ID 40-55 - 12 -
Quick guide
Info display / Operation without remote control
Info display
The info display provides an info text appropriate to the on-screen
display that can assist you further with the operation of your TV set.
An on-screen display is faded in.
The factory setting is that the info display is shown
automatically for each menu item. In this case you can
temporarily hide the info texts with the INFO key.
english
Permanently display or hide the automatic info display
Once you have become familiar with how to operate the TV set, you
can switch off the automatic info display.
The automatic info display can be hidden permanently via a menu setting. Then it can be displayed
temporarily by pressing the INFO key.
...
Energy efficiency
The priority here is low energy consumption in home use. In this
Home Mode
case, the TV switches off automatically for the sake of saving
energy, after it has been out of operation for four hours.
Premium
Mode
Shop Mode
Operation without remote control
Changing Volume
+ / – Increase/reduce volume.
Switching radio on or off or switching to radio
R Radio on or switch between TV and Radio.
Calling direct control on TV set
M Call direct control on TV set.
Operating
mode
Station selection
AV selection
3D
Contrast
Picture format
Service
HOME: Calling the Home view.
Mark System settings,
OK call system settings.
Mark Control,
go to next column.
Mark more ... ,
move to next column.
Mark On-screen displays,
call On-screen displays.
Select Automatic menu info,
select off / on.
On-screen
displays
On-screen displays
Display time
Volume display
Automatic menu info
Key explanation
Permanent clock display
Automatic HDMI hint
Tilbage
<>7 s
yes no
off on
off on
off on
yes no
...
If you select "on" here, the informational text belonging to each selected menu item will always appear
simultaneously.
Back
OK Accept settings.
R Scroll down.
M Scroll up.
– Scroll left.
+ Scroll right, adopt settings, confirm.
Close all displays
Press M longer.
Explanations of the settings:
Operating
Switch between TV and radio operation.
mode
Stations
Call Station selection.
selection
AV selection Select AV interface.
3D Calling 3D settings.
Contrast Set contrast.
The power consumption of the TV set depends
directly on the value set here.
Picture
Selecting the picture format.
format
Service
The Service menu item is provided for service
purposes by dealers only.
Page 13

Connect ID 40-55 - 13 -
Quick guide
Home view / Home - Favourites
Home view
The Home view is the central overview page for all of your TV set‘s
operating modes.
The list of options on the left of Home view gives you access to TV,
Video, Audio/Radio, Photo and Web.
By means of Extras and System settings you have access to more
functions and you can configure your TV set.
On the right side of the screen you find all your favourites (bookmarks)
created in the different operating modes.
The number of selectable items varies depending on the TV equipment, network connection, available media/media servers and connected gadgets.
Call Home view
HOME: Calling the Home view.
TV
Video
Audio/Radio
Photo
Web
Extras
System settings
Select menu item / favourite,
OK call.
Loewe
ProSieben
TVMovie.de
KeinOhrHasen
Coldplay/Viva
ZDF
DasErste HD
Antenne
die ärzte/auch
Aupeo
Franken
Picasa
Activated operating mode
The respective activated operating mode will be indicated in the list
of options by a small playback symbol in the lower right-hand corner
of the Home symbol.
Examples:
TV mode activated.
Audio player (Audio mode) activated.
In the opened Home view, pressing again on the Home key brings you
back to the respective active operating mode.
Home - Favourites
You will find your favourites on the right of the individual operating
modes.
You can create favourites in the operating modes of the TV set. In this
way you get a collection of your favourite music titles, your preferred
stations and often visited Internet sites on a single overview page.
After an initial installation, TV stations, online links and radio stations
will already be automatically created as favourites independent of the
installation site of the TV set and of existing Internet links.
Creating favourites
In the operating modes of the TV set you can define the current object (station, music title, photo, etc.) as favourite by means of your
remote control. The favourite will be added to Home view and placed
at the end.
english
Description of the individual sections/functions:
TV: Here you call the TV mode of your TV set.
See chapter TV for further information.
Video: The item Video gives you access to videos from
local (USB, home network) and online sources.
See chapter Video for further information.
Audio/Radio: With item Audio/Radio you find music files
from your local server(s) and USB storage media as well
as from DVB and Internet radio.
See chapter Audio/Radio for further information.
Photo: Via menu item Photo you can view photos from
your local media on your TV screen.
See chapter Photo for further information.
Web: Here you have access to multimedia content in the
Internet (MediaNet) as well as a high-quality web browser.
See chapter Web for further information.
Extras: Extras contains additional functions and settings
(e.g., Timer list, CA module).
See chapter Extras for further information.
System settings: In menu item System settings you find
the configuration menu of the TV set e.g., with settings for
picture, sound, connections or sound components. For the
description of the system settings, refer to the detailed user
guide (see section Software / User guides).
Create favourite.
If there are more favourites than can be shown on one
page, this will be indicated by rectangular symbols in
the upper right corner of Home view. Example:
Three pages with favourites exist. The first page of
them is indicated.
Editing favourites
You can edit the existing favourites in Home view. Change the sequence of your favourites as you wish or delete favourites you do not
need any more.
HOME: Calling the Home view.
Mark the favourite to be changed.
MENU: change favourite.
Move favourite or delete it (see below).
Moving favourites
move favourite to new position.
BACK: finish procedure.
Deleting favourites
TEXT: Delete selected favourite.
BACK: Finish procedure.
Page 14
Connect ID 40-55 - 14 -
20
30
20
30
Quick guide
TV
Volume / Station
TV
In TV mode that can be selected via the Home overview, you can use
the basic TV functions of your TV set. In TV mode you will have numerous functionalities at your disposal as, for instance, PIP, EPG and, if
offered by the station, HbbTV (hybrid broadcast broadband television).
By means of the function list you may call additional options and settings all around TV operation.
Setting the volume
english
Switching sound off/on
Sound off.
Sound on: Press key again or increase the volume
using V+.
Setting the volume
V+/V– Volume up/down.
The volume control bar will be displayed in the upper
right corner.
The volume control bar can be deactivated in the
menu System settings ט Control טmore ... ט
On-screen displays.
Select station
Select station with P+ / P–
P+/P– Station up/down.
The number and the name of the station along with
the title of the programme and that of the next
programme will be briefly shown. Also, the status
display with time and programme-dependent symbols
appears.
The symbols of the status display are described in
section Status display.
Selecting a station out of the station list
In normal TV mode, without other displays:
OK Call station list.
:15 - 23:
ASTRA LCN
9 ZDF HD
20:15 - 21:45
Toskana
10 BR Nord HD
21:15 - 21:45
11 SAT.1
20:14 - 22:19
12 RTL Television
21:15 - 22:15
Dr. House
13 n-tv
21:10 - 22:00
14 ProSieben
Mark stations.
OK The marked station will be called.
Length of the station list
There is a possibility to influence the amount of stations by using different station lists.
In normal TV mode, without other displays:
OK Call station list,
call overview of station lists.
:15 - 23:
ASTRA LCN
9 ZDF HD
20:15 - 21:45
Analogue
Toskana
10 BR Nord HD
DVB-C
21:15 - 21:45
DVB-T
11 SAT.1
20:14 - 22:19
Personal list 1
12 RTL Television
AV
21:15 - 22:15
Dr. House
13 n-tv
Manage list
21:10 - 22:00
14 ProSieben
Select station using the numerical keys
1-digit stations
Press the numerical key a little bit longer: The chan-
long
nel will change immediately.
Or:
Press the numerical key briefly, the station changes
after 2 seconds (changes immediately if up to 9
stations are stored).
2-digit and 3-digit stations
Press first (and second) numerical key briefly.
short short long
Keep the last numerical key depressed a little bit
longer: The channel will change immediately.
Or:
Press all the numerical keys briefly, the channel
changes two seconds after the last number has been
entered (with up to 99 or 999 saved channels it will
change immediately).
4-digit stations
all short
Press all four numerical keys briefly, the station
changes immediately.
If you select an unoccupied station position, the next
available station is selected.
Mark the desired list.
The station list will be changed according to the
selection. The list will be adopted automatically.
Move to the newly selected list.
Explanations of the station lists:
The number and the names of the possible station lists depend on
the available signal sources (antennas, TV reception networks, etc.).
ASTRA LCN
Analogue
Only stations from the selected source / reception
network are indicated in the station list.
DVB-C
DVB-T
AV
Exclusively AV inputs are shown in the station list.
Personal list
Only stations of the selected personal list are indicated
in the station list. The name of the list may be changed.
Manage list
Call up the station list editing menu (System set-
tings ט Stations ט Station lists TV).
continued on the next page ט
Page 15

Connect ID 40-55 - 15 -
ASTRA LCN
20
30
Quick guide
TV
Stations
Selecting stations by means of the expanded station list
In normal TV mode, without other displays:
OK Call station list,
call function list.
Mark expanded station list,
call expanded station list.
Expanded station list
13 ZDF.kultur HD
14 ZDFinfokanal HD
15 SAT.1 HD
16 RTL HD
17 ProSieben HD
18 VOX HD
19 kabel eins HD
20 SUPER RTL HD
21 N24 HD
22 TELE5 HD
23 SPORT1 HD
24 NICK/CC HD
2 ZDF HD
21:00-21:45
Toskana
A..Z < All stations >< ASTRA LCN >Search
1 Das Erste HD
2 ZDF HD
3 BR Nord HD
4 SAT.1
5 RTL
6 n-tv
7 ProSieben
8 3sat HD
9 ARTE HD
10 EinsPlus
11 Eurosport
12 ZDF Neo HD
Mark stations.
Scrolling in the station list is possible.
OK The marked station will be called.
Or:
For numerical sorting: Enter the channel number. The
marker will jump to the selected station. The marked
station is shown as a thumbnail picture.
OK The marked station will be called.
For alphabetical sorting: Enter the first letter. The first
station for the specified letters is marked.
Mark the station.
OK The marked station will be called.
Selecting stations by personal lists
You can save your preferred stations in up to six personal lists (e.g.,
for several users). Each personal list can contain up to 99 stations.
Personal list existing.
In normal TV mode, without other displays.
OK Call station list.
Back
Open overview of station lists.
:15 - 23:
Personal list 1
9 ZDF HD
20:15 - 21:45
AV
Toskana
10 BR Nord HD
Manage list
21:15 - 21:45
11 SAT.1
20:14 - 22:19
12 RTL Television
21:15 - 22:15
Dr. House
13 n-tv
21:10 - 22:00
14 ProSieben
Mark the desired personal list,
The station list will be changed according to the
selection. The list will be adopted automatically.
Move to the newly selected list.
Mark the station.
OK The marked station will be called. Or:
Select station directly with numerical keys.
Explanation of the icons following the station names:
DVB-T station (digital terrestrial via antenna)
english
Filter and sort options of the expanded station list
Using the on-screen buttons on the bottom line of the expanded station
list you can filter and sort the station list by various options.
0..9
Numerical sorting of the station list.
A..Z
Alphabetical sorting of the station list.
Searching
This allows you to do targeted searches for stations.
The station name is to be entered via the on-screen
keyboard. The entry is described under General
information on the operation.
Station lists Select the station list, the stations of which are to be
displayed in the extended station list (e.g., Personal
station list, ASTRA LCN, DVB-C).
All stations Here you can specify if all stations, only HD
stations, locked stations, scrambled stations,
unscrambled stations, CI+ protected stations,
newly found stations or stations no more to be
found from the selected sources shall be indicated.
DVB-C station (digital via cable)
DVB-S station (digital via satellite)
Scrambled station
CI Plus coded station
Locked station (Parental lock)
Page 16

Connect ID 40-55 - 16 -
Quick guide
TV
Status display
Status display
english
In normal TV mode, without other displays.
INFO: Show status display.
10 ZDF HD
21:00 - 21:45
Toskana
21:45 - 23:15
Menschen, Tiere
13:33 21.01.2013
Digital 2
In the left upper corner you will see in the marked field
the number and name of the station, the transmission
time and (if available) the title of the current programme.
The bar (if available) indicates the progress of the
current programme. If information about the current
programme is available, this can be called by pressing
the INFO key again.
In another adjacent field to the right, the programme
info of the following programme is displayed additionally for DVB stations.
The field in the upper right corner contains the time,
the date and, depending on the DVB station and
according to availability, various additional information
which is represented by symbols (see column on the
right).
The status display is shown automatically every time
you change channels.
The status display is hidden automatically at the end
of the display time.
If you want to hide the status display manually before
the display time ends, you can do this with the BACK
key.
Explanations of the symbols in the status display (continued):
Transmitted audio signal:
Mono
Dual
channel
1+1
Stereo
6WHUHR$$&
ܐ
۲
'LJLWDO
۲
'LJLWDO
۲'LJLWDO$$&
dts
MPEG
۲
PLII
۲
965HI
۲
96:LGH
Mono audio transmission analogue
Dual channel sound transmission (Sound1/Sound2)
analogue
Dual channel sound transmission (Sound1/Sound2)
digital
Stereo sound transmission analogue
Stereo sound transmission (HEAAC)
Stereo sound transmission digital (PCM)
Dolby digital sound transmission (DD)
Dolby digital sound transmission (DD+)
Dolby digital AAC+ sound transmission (HEAAC)
dts sound transmission
MPEG sound transmission
Dolby Pro Logic II sound transmission
Dolby Virtual Speaker Reference display
Dolby Virtual Speaker Wide
Transmitted audio channels:
܂
܆
܉
܈
܋
܍
܅
ۿ
DD / dts 1.0 / mono
DD / dts / MPEG 2.0
DD / dts 3.0
DD / dts 4.0
DD / dts 5.0
DD / dts 2.1
DD / dts 3.1
DD / dts 4.1
DD / dts 5.1
Explanations of the symbols in the status display:
General symbols:
Language/sound selection available
Subtitles available
Channel selection for multi-channel providers
3D programme
HDTV programme
HbbTV mode available from this station
Selected listening mode:
܃
܃
܃
܃
܃
܃6RXQG
projector
܃([WHUQDO
speakers
Playback of centre sound or mono (left/right)
Playback of front sound (L/R stereo)
Playback of front and centre sound
Playback of front and surround sound
Playback of front, surround and centre sound
Playback of sound via sound projector
Playback of sound via speakers connected to an
external amplifier
If the number of speakers appears in brackets, the
sound of missing speakers is transmitted by the
existing speakers (virtually). The Dolby Virtual
Speaker (VS mode) developed by Dolby is activated
for the virtual sound reproduction.
Page 17

Connect ID 40-55 - 17 -
Quick guide
TV
Function list / AV selection
Function list
The function list contains settings and additional options. Die individual
List items will be briefly explained as follows:
The function list can be opened directly in TV mode or via the station
list. Depending on this, some list items may possibly not be available.
In TV mode:
MENU: Call function list.
9 ZDF HD
20:15 - 21:45
Toskana
Subtitles
Recording
Sound mode
Or:
OK Call station list,
call function list.
Mark function,
OK call.
Explanations of the symbols in the function list:
Open Expanded station list.
Call EPG (Electronic Programme Guide) wizard.
Menu item is only displayed as long as the EPG wizard has
not yet been executed.
Here you can display your "Electronic Programme Guide".
Explanations of the symbols in the function list (continued):
Switch screen off
The menu item is only shown when DVB radio or an AV
source is active.
Add current station as Favourite to Home view.
Changes the Sorting between numerically and alphabetically.
Call Change station list.
Delete stations, shift stations, restore deleted stations.
AV selection
Selecting the AV source via the AV selection
In normal TV mode, without other displays.
Open up the station list with the preset AV.
Move to the AV list.
AV selectionAV selection Select with Select with
HDMI1HDMI1
HDMI2HDMI2
HDMI3HDMI3
HDMI4HDMI4
PC INPC IN
AVS
AV
VIDEO
english
OK
Call up Language / sound. The available sound formats
and their designations depend on the programme being
broadcast.
Menu item will only be indicated when several languages/
sound tracks are available.
Call up Subtitles selection.
Menu item will only be indicated when subtitles are
available.
Open recording dialogue to programme a Recording.
Set Sound mode (number of speakers).
Call up Sound settings.
Call up and adjust Headphone volume.
Menu item will only be indicated when a headphone is
connected to the TV set.
Call up Picture settings.
Activate PIP.
Move picture vertically up/down.
Select desired connection,
OK switch over.
If the selected AV source provides a signal (picture), it
should be visible now.
When selecting VIDEO, you switch to cable analogue,
channel E36. The TV set shows the signal of a provider via antenna.
Selecting the AV source via the station list
In normal TV mode, without other displays.
OK call station list.
Call overview of station lists.
Mark AV list.
The AV list will be displayed.
Move to the AV list.
Mark desired AV source,
OK switch to AV source.
Page 18

Connect ID 40-55 - 18 -
Quick guide
TV
Electronic Programme Guide
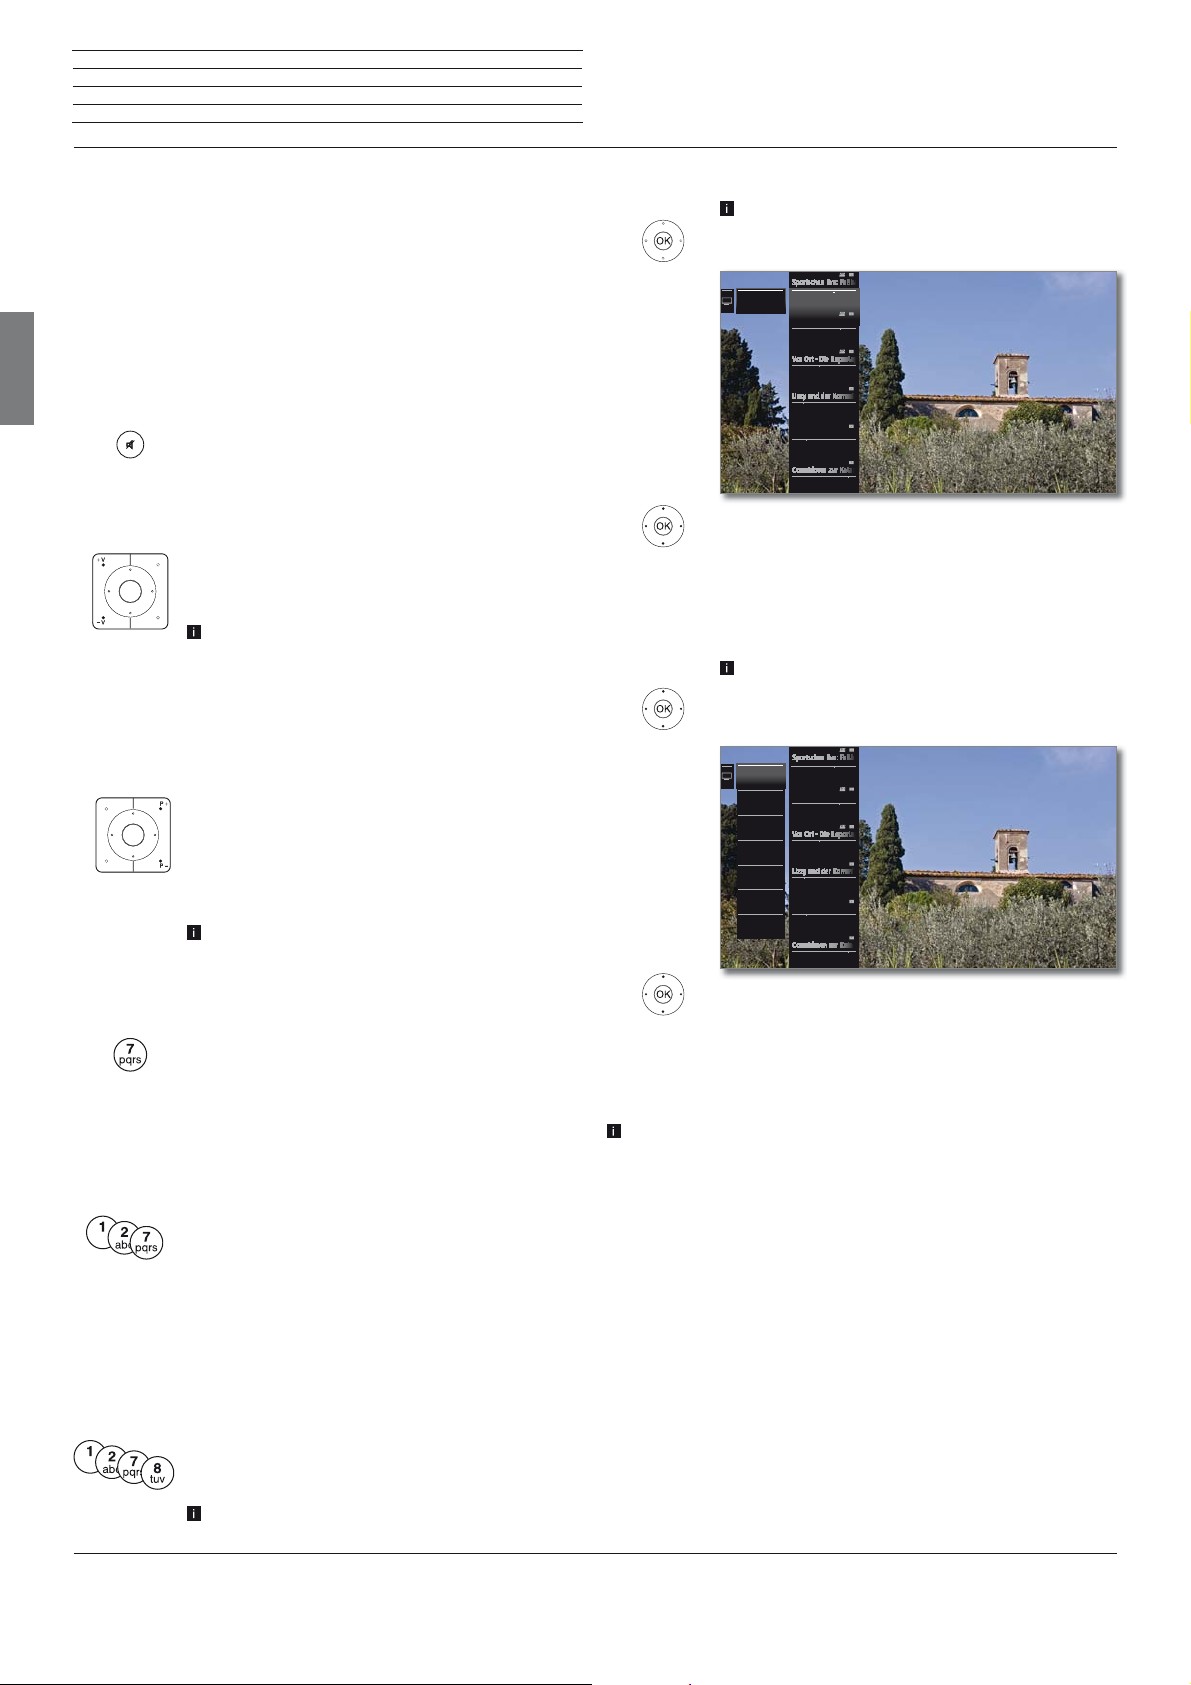
Electronic Programme Guide – EPG
EPG stands for Electronic Programme Guide and provides you with
on-screen programme details. With the system, as with a printed programme guide, you can learn about the current programme. In addition
programmes can be sorted according to certain topics, memorised, and
also recordings can be programmed.
If a personal list has been selected, only the programmes of stations
from the personal list are displayed in the programme list.
Starting and ending EPG
english
EPG: Switch EPG on / off.
17:46 18:00 19:00 20:00
Brisant
Unter uns
taff
Navy CIS
X-Diaries
SOKO Wismar
Verbotene Liebe
mieten, kaufen, wohnen
Die Simpsons
Köln 50667
Private Practice Grey‘s Anatomy Top Dog ModelEmergency Room
Die Simpsons Galileo
10 ZDF HD
11 ARD HD
13 VOX
14 Sat. 1
15 ProSieben
16 kabel eins
17 SPORT1
18 RTL2
19 SIXX
EPG is only available for DVB stations.
The first time you start EPG, a wizard will start that
guides you through the necessary pre-settings.
Depending on the number of stations selected for EPG,
it may take some time until the programme information
is displayed.
EPG Operation
In the left column there is a list of stations of your currently active station list (personal list, whole station list). With the on-screen buttons
in the header of the EPG you can select the day of the programme
preview and filter the programmes as to their genre.
Küstenwache
Alles was zählt
push - das SAT.1 Magazin
Berlin - Tag & Nacht
Adapting the EPG Overview
The options to be selected are in the header,
if not, press MENU key.
Select day or genre.
OK Confirm selection.
19:25 - 20:15
Küstenwache
News
Today
17:46 18:00 19:00 20:00
17:30 - 18:00
Unter uns
17:15 - 18:00
Brisant
16:55 - 17:55
ta
18:00 - 18:50
SOKO Wismar
18:00 - 18:50
Verbotene Liebe
17:58 - 18:29
Die Simpsons
18:29 - 18:58
Die Simpsons
19:05 - 19:40
Alles was zählt
19:15 - 19:59
push - das SAT.1 Magazin
18:58 - 20:14
Galileo
19:00 - 20:0018:00 - 19:0017:00 - 18:00
10
ZDF HD
11
RTL Television
12
Das Erste HD12Das Erste HD
13
All genresToday
SAT.1 Bayern
14
ProSieben14ProSieben
15
Example If you look for the next newscast, select today’s date
and News under genre. Newscasts will be highlighted.
PIP: Switch in EPG view between standard and
compact view.
Calling up additional information about the programmes
INFO: Call up detailed information.
Detailed info
5 ProSieben
View Timer list
5 ProSieben
16:30-16:58
How I Met Your Mother
Eine Halloween-Party auf dem Dach seines Wohnhauses steht bevor, und auch dieses Jahr lässt
sich Ted das Ereignis nicht entgehen. Doch eigentlich hofft er, ein Mädchen, das er vor vier Jahren
dort getroffen hat, endlich wiederzusehen. Barney findet die Idee völlig dämlich und versucht,
seinen Freund zu einer Party bei Victoria‘s Secret zu überreden. Ted gibt die Hoffnung nicht auf,
doch dann taucht spät abends eine ganz andere Frau auf dem Dach auf und gesellt sich zu ihm ...
Back
INFO: briefly: Call up detailed information (see
right-hand column).
press longer: Show key explanation.
Scrolling in the station list.
Scrolling through the programmes.
Or:
P+/P– Scrolling in the station list page by page.
RECORD key:
Schedule the recording of the marked
programme for a time.
MENU: Go to header.
Mark selection of date or genre.
OK Accept changes.
MENU: Move from date to genre or from genre to
station list.
If there is more information on the selected programme,
it will be indicated here. You find further information
on the indicated programme in the bottom line:
View Watch selected TV programme.
The menu item is only available when the selected
programme is on the air.
Memorise Memorise the programme for later watching / liste-
ning. For further information see column on the right.
This menu item is only available when the selected
programme has not started yet.
Depending on the presetting the TV set will switch
on by itself when it is in standby.
Delete
memo
Timer list
(Recording)
For programmes being memorised you can also
delete the memo.
Call up timer list.
Schedule the recording of the selected programme
for a time.
Schedule the recording of the selected programme for
(Favourite)
a time. Additionally, an entry to the Home favourites
will be added.
continued on the next page ט
Page 19

Connect ID 40-55 - 19 -
Quick guide
TV
Electronic Programme Guide / PIP
Explanation of the symbols in the programme information:
۳
ܦ
۲
۴
۵
The symbols may also appear in combinations.
Memorising a programme via the EPG
A programme that has not started yet can be memorised. For
memorised programmes, the TV set will ask at the beginning of a
programme if it should change the channel accordingly or switch on
from the stand-by mode if this is activated in the System settings
under Control טmore ... ט EPG.
Programme in 16:9 picture format
Programme with high picture definition (HDTV)
Programme with Dolby-Digital sound
Transmission of subtitles for hearing-impaired persons
Programme with youth protection.
Mark the desired programme.
OK Call up detailed information.
Mark Memorise,
OK Memorise programme.
Picture in Picture (PIP) (1
The concurrent display of two different images is referred to as Picture
in Picture.
Starting and ending PIP mode
The size of the PIP display can be set in the System settings under
Control ט PIP settings.
Picture change and station selection are restricted during recording.
PIP Mode is not accessible as long as an HbbTV application is active.
The simultaneous display of two channels via analogue cable TV
is not possible.
PIP: Show/hide PIP display.
english
In the EPG, a memorise symbol is placed behind the title of the pro-
gramme
You can also start memorising programmes via the timer list (see
section Extras – Timer).
Meaning of the colours in the EPG
The coloured labels indicate the genre of the respective programme.
When filtering with genre selection in the header, the programmes of
the selected genre will be highlighted.
.
Movies
News
Show
Sport
Child
Music
Arts
Social
Education
Hobby
Series
Selecting the station of the PIP picture
The frame is green, if not, press green key.
Select the station as usual.
Select the station for the main picture
The frame is white,
if not, press green key.
Select the station as usual.
Coloured key functions
The frame is green, if not, press green key.
Yellow key: Swaps contents of TV picture and PIP
picture.
Blue key: Start/stop PIP scan in the PIP picture.
(1
only for TV sets with DR+.
Page 20

Connect ID 40-55 - 20 -
Quick guide
TV
Teletext
Teletext
Your TV set supports the two operating systems TOP text and FLOF.
Up to 1,000 / 2,000 pages
Starting and ending Teletext
TEXT: Call teletext.
The function of the TEXT key can be set under
System settings ט Control טmore ...טHbbTVט
english
Function of the TEXT key. The factory default is
Standard teletext first.
Das Erste
(1
are stored so that you have quick access.
100 100 ARDtext Do 12.07.12 14:12:42
ARD Text
Syrien: Botschafter läuft über .. 107
EuGH hebt Saatgut-Verbot auf .... 121
Bundeswehr:Feldpostaffäre beendet 112
Neun Tote bei Lawinenunglück ..... 142
Live: Ticker, 11.Etappe der Tour. 666
Galatasaray will Hamit Altintop.. 211
NBA: Kaman spielt mit Nowitzki... 220
14:00 Tagesschau
14:10 ARD-Mittagsmagazin ..... 312
15:00 Tagesschau
Tagesschau.... 101 Kultur........ 400
Wirtschaft.... 170 Wissen........ 500
Sport..... 200/600 Ratgeber...... 530
Programm...... 300 Inhalt (A-Z).. 790
– +
TEXT: Switching between Standard Teletext and
MediaText.
Pressing the BACK key ends Teletext.
Key functions for Standard Teletext operation
0 AV: Stop self changing pages.
9: Zoom in the page (press several times).
: Add active Teletext page to Home favourites.
Wirtschaft Nachrichten
Additional page selection possibilities
First possibility:
INFO: Call overview page 100.
Second possibility:
Directly enter the page number.
Third possibility:
The page includes 3-digit page numbers.
Mark desired page number.
Back
Das Erste
100 100 ARDtext Do 12.07.12 14:12:42
ARD Text
Syrien: Botschafter läuft über .. 107
EuGH hebt Saatgut-Verbot auf .... 121
Bundeswehr:Feldpostaffäre beendet 112
Neun Tote bei Lawinenunglück ..... 142
Live: Ticker, 11.Etappe der Tour. 666
Galatasaray will Hamit Altintop.. 211
NBA: Kaman spielt mit Nowitzki... 220
14:00 Tagesschau
14:10 ARD-Mittagsmagazin ..... 312
15:00 Tagesschau
Tagesschau.... 101 Kultur........ 400
Wirtschaft.... 170 Wissen........ 500
Sport..... 200/600 Ratgeber...... 530
Programm...... 300 Inhalt (A-Z).. 790
– +
OK Call page.
Fourth possibility:
The page consists of several sub-pages, indicated by
the symbol
Go to bottom line.
Mark
OK select previous / next sub-page.
The number of the current sub-page is shown
between the arrows.
Back
Wirtschaft Nachrichten
and the arrows in the bottom line.
or ,
Page selection with the coloured keys
Red key: One page back or back to previous page
(depending on Teletext provider).
Green key: Advance one page.
Yellow key: To next topic.
Blue key: To next range of topics.
The coloured bars (with TOP text) or the coloured writing (with FLOF text) in the last to bottom line show you
which colour button you need to use to select which
topic areas and topics.
Explanation of the symbols in the Teletext bottom line
Symbol
(icon)
Remote
control key
Description
– For Teletext pages with sub-pages:
Show previous sub-page.
– For Teletext pages with sub-pages:
Show next sub-page.
– Hide TV picture (Teletext as full screen).
– Insert TV picture (Split screen Teletext/
TV Picture).
– Activate Newsflash mode.
– Show hidden information on the Teletext
page.
– Hide information on the Teletext
page again.
Add current Teletext page to the favourites in Home view.
Call function list with Teletext settings.
(1
Depending on the type of TV set (see chapter Technical data).
Page 21

Connect ID 40-55 - 21 -
Quick guide
TV
HbbTV / MediaText
HbbTV / MediaText
(1
HbbTV
comprehensive multimedia contents, e.g., media centres or additional
information on the current programme as far as they are provided by
the station.
MediaText helps you to use the next generation of teletext/videotext
for HbbTV.
MediaText/HbbTV text can either be started directly or through an
HbbTV application.
Opening an HbbTV application
If an HbbTV application is available for the chosen channel after
changing channels, this will be loaded during the automatic start
process and a red key symbol will appear. When starting manually,
the application will be loaded not until you press the red key. The start
behaviour can be set under System settings ט Control ט more...ט
HbbTVטFunction of the TEXT key.
(Hybrid broadcast broadband television) offers the user
The TV must be connected to the Internet to use HbbTV/MediaText.
A connection speed of at least 6,000 kbit/s (DSL 6000 or equivalent) is recommended for smooth playback of videos.
HbbTV is offered by the selected channel.
Connection to the Internet established.
HbbTV mode is set to on.
Red key: Load / display HbbTV application.
Opening HbbTV text directly
Depending on the programme provider, the direct
Call of MediaText may not be possible. MediaText
must then be opened by means of the HbbTV application.
MediaText/HbbTV text is offered by the selected
channel.
Connection to the Internet established.
TEXT: Call up “standard” Teletext (see chapter Tele-
text).
By pressing the TEXT key a second time the MediaText/HbbTV Text will be called up.
The function of the TEXT key can be set.
Navigation within the HbbTV Text and how the coloured
keys are assigned can vary depending on the provider.
english
The appearance, key assignment and available
functions of the HbbTV applications are dependent on
the provider.
Under certain circumstances, the recording and
bookmarking functions of the applications may not be
supported.
Loewe do not guarantee the accessibility, functionality
or content of HbbTV applications.
Hide / Close HbbTV application
BACK: Hide / Close HbbTV application.
Depending on the set start behaviour, the HbbTV
application will be hidden (automatically) or closed
(manually). In the start behaviour Automatic, you
need to press the BACK key a second time for closure.
You will see a screen message after closing.
Terminating the HbbTV Text
Pressing the BACK key ends HbbTV text.
(1
Depending on the settings selected.
Page 22

Connect ID 40-55 - 22 -
Quick guide
TV
Digital Recorder
Digital Recorder
Using the Digital Recorder of your Loewe TV set you can record programmes onto the integrated hard disc (for TV sets with DR+), or
onto an external hard disc connected via USB (USB recording only
for TV sets without DR+).
TV viewing with time shift
The TV broadcast that you watch is automatically recorded in the
background
english
continue watching it later with a time shift. The maximum time shift
is three hours.
Recording of analogue stations is not possible.
Time-shifted operation is perhaps not possible or only to a limited
extent for programmes of stations working with CI Plus encryption.
Interrupt watching (start time-shift television)
(1
. You can stop the TV programme at any time and
Press PAUSE key.
2 ZDF 20:15 - 21:45 Rundreise Gardasee
Time shift
07:03 min
20:10 20:40 21:10
Back
20:47 21.01.2013
Digital 2
Archive recording
Movies that you wish to watch at a later date can be recorded in the
Digital Recorder Archive (DR+ archive).
If EPG or teletext data is available, the Digital Recorder stores the title
and additional information on each programme in the archive.
If additional languages are being transmitted for a DVB broadcast,
these will also be recorded. DVB subtitles or Teletext subtitles can
also be recorded. Language selection and subtitles are displayed as
in TV mode.
(1
You can watch another programme
programme from the archive while recording a TV programme into
the archive. You can also play back the programme that you are just
recording or any other programme
During the archive recording, the bar showing the recording progress
is red.
Recording of analogue stations is not possible.
Recordings of CI Plus encrypted programmes are perhaps not
possible or only to a limited extent.
One Touch Recording
With One Touch Recording, the recording starts immediately on
pressing a key.
Press RECORD key longer: Start One Touch Recording.
Select recording time,
OK confirm.
or playback a recorded TV
(1
with time delay.
The TV image becomes a freeze frame and the DR+
status display appears.
At the top you will see the number and name of the
station provided that EPG or Teletext data is available,
and in addition to that the start and end of the current
programme and the title of the programme.
In the lower part of the screen you find the starting time
of the background recording left of the time bar. On
the right hand side of the bar you can see the time at
which the time shift recorder will be full (automatically
extends by 30 minutes, up to a max. 3 hours). The time
above the bar at the PAUSE key shows the current time.
Continue (time-shift viewing)
Press PLAY key.
You can now continue watching the TV programme
at the time when you had pressed the PAU SE key.
The Playback symbol appears instead of the Pause
symbol .
For further options of time shift watching see section
Video playback.
Returning to live picture (end time-shift television)
Press STOP key.
You see the station’s live picture again.
Switching to a different station
If you switch to another channel, the time-delayed recording (time
shift) is restarted. The hitherto existing time-delayed recording is deleted (time-shift buffer is emptied). When switching between encrypted
and unencrypted contents of the same station the timeshift buffer is
also cleared. When doing this, the timeshift television is interrupted
and you see the live picture of the broadcast. As a precaution, start
archive recording of interesting broadcasts when watching stations
with changing coding.
Time shift viewing during archive recording
PAUSE key: Switch to freeze picture.
The recording is continued in the background.
Display during time-shift viewing and archive recording:
2 ZDF 20:15 - 21:45 Rundreise Gardasee
20:15 21:04 21:50Time shift
05:00 min
Back
21:09 21.01.2013
Digital 2
PLAY key: Continue playback.
You will now see the time-shift archive recording.
For further options of time shift watching see section Video playback.
STOP key: End time shift and return to the live picture
of the current archive recording.
continued on the next page ט
(1
only for TV sets with DR+.
Page 23

Connect ID 40-55 - 23 -
Quick guide
TV
Digital Recorder
Watching other stations during archive recording (1
After you have started the recording, you can switch to another station.
The second channel can be watched in time-shift TV whilst a re-
cording is taking place (Time shift during archive recording).
Viewing another programme from the archive during archive
recording
After you have started the recording, you can also watch a programme
you have already recorded.
Call DR+ archive (see also right-hand column).
Mark the recorded broadcast,
OK watch programme.
The recording process is continued in the background.
Switching off the TV set during recording
You can switch off the TV to standby whilst recording. The recording
is continued in the standby mode.
Never switch the TV set off at the mains and do not pull the plug
of the TV set out of the socket. Otherwise the recording will be lost!
Stop recording early
You can end a current archive recording prematurely.
Press STOP key.
A message appears in the right upper corner of the
screen.
Stop recording?Stop recording?
yesyes nono
DR+ archive
With the DR+ archive you have access to all the recorded programmes
and and you can start their playback.
Open the DR+ archive
Open the DR+ archive.
Select desired archive,
OK Display archive entries.
...... Unsere Tierwelt
Integrated
......
hard disk
Selecting the recorded programme
Mark the recorded programme.
Call function list.
View Start or continue replaying the selected archive entry.
See section Video playback for further information.
Detailed info Show detailed information on the marked archive
entry.
Sort Sort archive entries in alphabetical (ascending A-Z)
or (descending Z-A) order or according to recording
date (newest entries first).
20:15 - 22:00
21.09.12 ZDF HD
Unsere Tierwelt
english
OK Stop recording.
The recording process is ended. The portion of the TV
broadcast recorded up to this point is saved on the
hard disk and can be played back via the DR+ archive.
You can also end a running recording by deleting the
corresponding Timer entry in the Timer overview.
Rename
Edit title of archive entry.
Delete Delete archive entry from hard disk and recover
disk space.
Copy Copying an archive entry to an external hard disk.
Favourite Add archive entry to Home favourites.
See chapter Home view for further information.
Delete
protection
Parental
Activate or deactivate protection against automatic
deletion by the Delete Manager.
Protect recorded broadcast by a four digit PIN against
lock
unauthorised playback.
This menu item appears only when a PIN has
already been defined.
Repeat Playing archive entry repeatedly (in a loop) during
future playbacks.
Settings opens the video settings.
(1
only for TV sets with DR+.
Page 24

Connect ID 40-55 - 24 -
Quick guide
TV
Media+
General information on media reproduction
Home view gives you access to photos, videos and music from your
personal storage media, e.g., from storage media connected via USB
and from media servers in your home network to which your TV set
is connected.
By pressing the Web key you get access to an Internet browser and
multimedia data from the Internet.
Please follow also the information below for the MediaNet Internet
functions which can be called under Web.
english
Connecting the TV set to your network
To receive media via media servers in your home network or via the
Internet, you have to integrate your TV set in your home network. You
can connect your TV set both with a wired connection (Ethernet,
PowerLine) or via a wireless radio connection (WLAN or WI-FI).
For wireless connections, the TV set has an internal WLAN antenna.
Your Loewe TV set supports the UPnP AV standard for data playback
in the home network.
Help for configuration problems
Loewe cannot provide any support for PC hardware and software or
network components owing to the diverse configuration options with
home networks.
Please contact the administrator of your home network and/or specialist dealer for support when setting up and for maintenance of network
connections, storage media, media server software and network devices
such as routers.
Accessing your media
HOME: Call Home view.
TV
Video
Audio/Radio
Photo
Web
Extras
System settings
Mark desired function,
OK call function.
Web: see section Web.
Playing music and videos, displaying photos
The windows for playing music and videos and for displaying photos
are comparable for all cases irrespective of the media source. The
relevant players are therefore grouped together.
Exit media
Loewe
ProSieben
TVMovie.de
KeinOhrHasen
Coldplay/Viva
ZDF
DasErste HD
Antenne
die ärzte/auch
Aupeo
Franken
Picasa
Video: see section Video.
Audio/Radio: see section Audio/Radio.
Photo: see section Photo.
MediaNet
If you wish to use MediaNet we recommend registering your TV set
on our homepage
http://support.loewe.tv (International),
http://support.loewe.tv/uk ( United Kingdom and Republic of
Ireland),
http://support.loewe.tv/au (Australia) or
http://support.loewe.tv/nz (New Zealand).
(using the Register free-of-charge option).
Simply follow the steps in the registration process.
The MAC address (Media Access Control) of your TV set is required
for the registration. You can find this in the TV set under Extras ט
Special functions טIntegrated features ט MAC address (TV).
HOME: Call Home view and select another function
(see above).
Or:
Press TV or AUDIO key for switching to TV or radio
(1
mode
.
(1
The assignment of the AUDIO key can be changed. The description refers to the standard setting.
Page 25

Connect ID 40-55 - 25 -
Quick guide
Video
Video
The item Video gives you access to videos from local (USB, home
network) and online sources. The individual subitems are described
in detail in the following.
High definition movie material (HD movies) from format 720p
upwards (resolution 1280 x 720 or higher) should be played back
via a wired connection. If there is a wireless connection, then
technical limitations (e.g., fault liability, bandwidth limitations) can
cause disruptions in the playback right up to a complete breakdown
of the playback.
Calling video selection
HOME: Calling the Home view.
Mark Video,
OK call list of video sources.
Mark function,
OK call.
DR+ archive
TwonkyMedia
WMP11
MediaNet
Programmes that you have recorded onto the integrated hard disk using the Digital Recorder are collected in the DR+ archive. Via the DR+ archive you
can replay, edit or delete your recorded programmes.
For further information see section DR+ archive.
Examples for media servers in your home network.
The exact designation depends on the media server
used.
USB
USB storage media connected to the USB of your TV
set. The exact designation depends on the relevant
storage medium.
Call MediaNet טBrowse טVideo.
Timer
Call up the timer list (see section Extras – Timer list).
Please also observe the notes regarding USB sticks in
section Software / User guides!
The media sources shown here depend on the
devices available/used.
Video function list
MENU: Call function list.
......
......
Video_2.avi
0.68 GB
Video_3.avi
1.03 GB
Video_4.avi
0.04 GB
Video_5.avi
0.29 GB
Video_6.avi
0.19 GB
Video_7.avi
0.74 GB
Sorting
Favourite
Settings
The availability of the following items depends on the currently
marked object (data source, directory, file).
Unmount
Unmount USB data storage medium before removing it in order to prevent data loss.
Sort Sort media files in the opened directory in alphabeti-
cal (ascending A-Z or descending Z-A) order, file size
or date (newest entries first).
Favourite Add marked media file to the Favourites in Home
view.
Settings
opens the media settings.
Select video
Mark desired directory,
OK open directory.
Repeat procedure if necessary.
Mark desired video,
OK Start or continue playback of the selected
video.
english
continued on the next page ט
Page 26

Connect ID 40-55 - 26 -
Quick guide
Video
Video playback
The description of the following functions applies to the playback of
videos from the DR+ archive as well as for videos from USB storage
media or from media servers in the home network.
For playback of DR+ archive entries you have additional playback
and editing capabilities. The explanation of these functions you find
in the section Additional functions for DR+ archive playback.
DR+ archive : ZDFinfo HD 17:05 - 17:50 Flora und Fauna
english
00:00
hh:mm
Video status display
The video status display provides you with further options for the
current playback.
Show status display.
BACK: Hide the status display again.
38:42
45:00
11:27
21.01.2013
Digital 2
Back
Symbol
(icon)
hh:mm
Remote
Description
control key
Only for playback from DR+ archive:
Skip to next bookmark.
only for playback from DR+ archive:
Skip to previous bookmark.
–
only in time-shift mode:
Start DR+ Follow me recording.
–
only for playback from DR+ archive:
Call interval functions.
–
only for playback from DR+ archive:
Call dialogue for deleting bookmarks.
–
For playback from DR+ archive:
Activate / deactivate again the repetition of the currently played archive entry.
– Skip to desired position in the playback.
Add currently played video to the favourites in Home view.
Call detailed info on the current playback.
Call function list with video settings.
Description of the symbols in the status display for video playback
Symbol
(icon)
Remote
control key
–
Description
For playback of videos from USB
storage media or from the home
network:
Switch repetition (loop playback) of all
titles of the current directory ON/OFF.
–
For playback of videos from USB
storage media or from the home
network:
Switch ON/OFF repetition (loop playback) of the current title.
– Change picture format of the video
playback.
long
Only for playback from DR+ archive:
Set bookmark manually.
In case of time-shifted viewing the timeshifted recording will be converted into
an archive recording.
long
only for playback from DR+ archive:
Delete bookmark manually.
The function is only available when a
manually set bookmark is within five
seconds around the current playback
position.
continued on the next page ט
Page 27

Connect ID 40-55 - 27 -
Quick guide
Video
Pause playback (freeze picture)
PAUSE key: Switch to freeze picture.
PLAY key: Continue playback.
Jump
By briefly pressing the or keys you can skip forwards and back-
wards in the movie. The jump distance can be set in the System set-
tings under Control ט more ... טDR+ט Jump distance.
Skip forwards.
Skip backwards.
Skipping with Smart Jump
The Smart Jump function ensures that the jump width is halved each
time the jump direction is changed or doubled after three jumps in
the same direction (max. 8 minutes). This way you can quickly find a
certain spot of the recording.
The settings for Smart Jump you find in the System settings under
Control ט more ... טDR+טSmart Jump.
For example, you are searching for the beginning of a broadcast that
has already started:
Press repeatedly quickly to jump back.
If you have jumped past the beginning of the programme, jump in the opposite direction:
Press . This jump in the opposite direction is only
carried out for half the jump distance. Jump
forward using .
Additional functions for DR+ archive playback
There are additional editing and playback functions for playback of
recorded programmes from the DR+ archive. These are explained
as follows:
Setting bookmarks
To retrieve interesting scenes in a movie later, you can manually set the
bookmarks. In addition, there are also automatically set bookmarks
every time a broadcast is changed. You can jump to each of the bookmarks in succession by pressing a key.
In case of a running time-shift recording (time-shift television), this
will be converted into an archive recording when a bookmark is set.
PLAY key (press a little bit longer): Set bookmark.
You will see a message on the screen. The drive indicator is then faded
in and you will see the set bookmark above the bar for the playback.
DR+ archive : ZDFinfo HD 17:05 - 17:50 Flora und Fauna
00:00
hh:mm
38:42
45:00
Automatically set bookmarks are white. Manually
set bookmarks are blue.
Back
english
If you have jumped past the start of the programme:
Jump back again. In the process, the jump
distance is cut in half again.
By halving the jump distance when changing direction again you can
find your way to a specific position.
Winding
To search for desired scenes in movies you can fast forward and rewind
at three different speeds. Sound is not audible during winding.
In case of time-shift viewing, playback is automatically activated
when the end of the recording is reached.
In case of Fast forward of archive entries, playback will finish at the
end of the recording. The DR+ archive is displayed again.
Press or a little bit longer.
With each brief pressing of or the speed will increase until you switch back to the first speed.
Available speeds: 2x, 5x, 10x.
PLAY key: Continue playback.
In the case of Internet videos, please wait until these
are buffered in the memory. This can take a few
seconds, depending on the bit rate of the film and
Internet speed.
Jump to bookmarks
Mark next bookmark
OK jump to next bookmark.
Mark previous bookmark
OK jump to next bookmark.
Deleting individual bookmarks
Jump to the manually set bookmark to be deleted.
DR+ archive : ZDFinfo HD 17:05 - 17:50 Flora und Fauna
00:00
Press PLAY key for a little bit longer: Delete bookmark.
,
,
Back
23:51 45:00
hh:mm
Page 28

Connect ID 40-55 - 28 -
Quick guide
Audio/Radio
Audio/Radio
With item Audio/Radio you find music files from your local server(s)
and USB storage media and you access DVB and Internet radio. The
individual subitems are described in detail in the following.
Calling Audio selection
HOME: Call the Home view.
english
DVB radio
Internet radio
MediaCenter
TwonkyMedia
WMP11
Mark Audio/Radio,
OK call list of audio sources.
Mark function,
OK call.
The TV set can receive digital radio stations via DVB.
For further information see section Radio mode (DVB
radio).
The TV set can receive digital radio stations via the
Internet.
For further information on Internet radio see Radio
mode (Internet radio).
A Loewe media centre connected to your home
network.
Examples for media servers in your home network.
The exact designation depends on the media server
used.
Audio/Radio function list
MENU: Call function list.
......
auch
01 Ist das noch Punkrock?
02 Bettmagnet
03 Sohn der Leere
04 TCR
05 Das darfst du
06 Tamagotchi
07 M&F
08 Freundschaft ist Kunst
09 Angekumpelt
10 Waldspaziergang mit Folgen
11 Fiasko
12 Miststück
13 Das finde ich gut
14 Cpt. Metal
15 Die Hard
16 zeiDverschwÄndung
03:00
03:07
03:42
03:44
03:20
03:06
04:16
03:22
02:34
03:27
02:44
03:39
02:27
04:36
02:20
02:59
Sorting
Favourite
Settings
The availability of the following items depends on the currently
marked object (data source, directory, file).
Unmount
Unmount USB data storage medium before removing it in order to prevent data loss.
Sorting Sort media files in the opened directory in alphabeti-
cal (ascending A-Z or descending Z-A) order, file size
or date (newest entries first).
Favourite Add marked media file to the Favourites in Home
view.
Settings
opens the media settings.
USB
MediaNet
USB storage media connected to the USB of your TV
set. The exact designation depends on the relevant
storage medium.
Call MediaNet טBrowse טMusic.
Please also observe the notes regarding USB sticks in
section Software / User guides!
The media sources shown here depend on the
devices available/used.
Select music title
Mark desired directory,
OK open directory.
Repeat procedure if necessary.
Mark desired music title,
OK Start or continue playback of the selected
music title.
Page 29

Connect ID 40-55 - 29 -
Quick guide
Audio/Radio
Audio playback
Description of the symbols in the status display for audio playback
Snow Patrol / Eyes Open
Chasing Cars Shut Your EyesHands Open
Symbol
(icon)
Remote
control key
–
–
–
00:00
Description
Only for playback of music titles via
USB / Home network:
Switch repetition (loop playback) of all
titles of the current directory ON/OFF.
Only for playback of music titles via
USB / Home network:
Switch ON/OFF repetition (loop playback) of the current title.
Only for playback of music titles via
USB / Home network:
Switch shuffle playback for the titles of
the current directory ON/OFF.
Switch off the TV screen.
Add the current station / music title to
the favourites in Home view.
In case of DVB radio:
Show EPG detailed info on the current
broadcast.
Only for playback of music titles via
USB / Home network:
Call detailed info on the played music
titles.
Call function list with audio settings.
02:56
04:27
Pause playback
PAUSE key: Halt current playback.
Back
PLAY key: Continue playback.
Winding
You can fast forward music titles at four different speeds. Sound is not
audible during winding.
Press a little bit longer.
With each brief pressing of the speed will increase
until you switch back to the first speed.
Available speeds: 2x, 4x, 8x, 16x.
PLAY key: Continue playback.
Select another title / play current title from start
BACK: Call music selection.
Select music title as described in section Audio/
Radio–Select music title.
Or:
Press P+ briefly:
Play next title of current album / directory.
Press P– briefly:
Play current title from start.
Press P– briefly again:
Play previous title of the current album / directory.
Or:
Go to line with music titles,
scroll in music titles.
Snow Patrol / Eyes Open
Chasing Cars Shut Your EyesHands Open
00:00
02:56
english
Back
04:27
OK start playback of the marked title.
Ending playback
STOP key: End playback and return to music selec-
tion.
Page 30

Connect ID 40-55 - 30 -
Quick guide
Audio/Radio
Radio mode (DVB radio)
The TV set can receive digital radio stations via DVB.
In addition you can play the sound from an external device through
the TV set via the audio/AV inputs of the TV set.
The AUDIO key has been preset to radio mode in the factory.
Switching Radio mode on
AUDIO key on the remote control
english
Or
Press R on the ring cursor on the TV set.
Or:
HOME: Calling the Home view.
Select Audio/Radio,
OK call.
Select DVB radio,
OK call.
You see the radio station list.
2 Antenne Bayern
3 Bayern 3
4 Bayern 1
5 Radio Eins
6 hr1
7 hr2
Select station,
OK call.
Station switching
The radio mode is switched on and a radio station
has been selected (see above).
P+/P– or press the numerical keys on the remote
control.
Or:
OK call station list.
Select station,
OK call.
Setting the volume
V+/V– Volume up/down.
Other sound settings are the same as for the volume
setting in TV mode (see chapter TV – Setting the
volume).
Switching the screen on/off
Green key: Switch screen OFF.
Switching off the screen reduces the power
consumption of the TV set.
Switch on the screen with the remote control:
Press green key.
Switch on the screen on the TV set:
Press R on the ring cursor on the TV set.
DVB radio function list
MENU: Call function list.
Or:
OK Call station list,
call function list.
Mark function,
OK call.
See chapter TV – Function list for further informa-
tion.
2 Antenne Bayern
Nachrichten
Exit radio mode
Press AUDIO key or
TV key on the remote control (TV mode is called).
Or:
HOME: Calling the Home view.
Select another operating mode,
OK call.
Page 31

Connect ID 40-55 - 31 -
Quick guide
Audio/Radio
Radio mode (Internet radio)
The TV set can receive digital radio stations via the Internet.
In addition you can play the sound from an external device through
the TV set via the audio/AV inputs of the TV set.
The names of the directories and stations in the Internet radio mode
are given by the provider vTuner. Changing the order of stations or
renaming them is not possible here.
Internet radio is only accessible if a connection to the Internet has
been established.
Switching Radio mode on
HOME: Calling the Home view.
Select Audio/Radio,
OK call.
Select Internet radio,
OK call.
You see the radio station list.
Internet radio
Mark desired directory,
OK open directory.
Repeat procedure if necessary.
BuzzBuzz
by Genreby Genre
by Locationby Location
FavoritesFavorites
Local GermanyLocal Germany
New StationsNew Stations
Popular StationsPopular Stations
Recommended StationsRecommended Stations
Station switching
BACK: call station list.
Select stations as described above.
Or:
P+/P– Scroll through the current Internet radio direc-
tory to look for stations.
Setting the volume
V+/V– Volume up/down.
Other sound settings are the same as for the volume
setting in TV mode (see chapter TV – Setting the
volume).
Switching the screen on/off
Green key: Switch screen OFF.
Or:
VTuner -> Antenne Bayern Classic Rock Live
Antenne Bayern Classic Rock Live
english
Back
Select station,
OK call.
For further information on the control of the Internet
radio see section Audio playback.
Mark Screen off
,
OK Switch screen off.
Switching off the screen reduces the power
consumption of the TV set.
Switch on the screen with the remote control:
Press green key.
Switch on the screen on the TV set:
Press R on the ring cursor on the TV set.
Page 32

Connect ID 40-55 - 32 -
Quick guide
Photo
Photo
Via menu item Photo you can view photos from your local media and
from online sources on your TV screen. The individual subitems are
described in detail in the following.
Calling Photo selection
HOME: Calling the Home view.
english
TwonkyMedia
WMP11
MediaNet
Mark Photo,
OK call list of photo sources.
Mark function,
OK call.
Examples for media servers in your home network.
The exact designation depends on the media server
used.
USB
USB storage media connected to the USB of your TV
set. The exact designation depends on the relevant
storage medium.
Call MediaNet טBrowse טPhoto.
Please also observe the notes regarding USB sticks in
section Software / User guides!
The media sources shown here depend on the
devices available/used.
Photo function list
MENU: Call function list.
...... Here you can run the images as a
Slide show
Sorting
Favourite
Settings
slideshow in the selected folder.
The availability of the following items depends on the currently
marked object (data source, directory, file).
Unmount
Unmount USB data storage medium before removing it in order to prevent data loss.
Slide show Start slide show of the photos in the currently se-
lected directory.
See section Photo display for further information.
Sort Sort media files in the opened directory in alphabeti-
cal (ascending A-Z or descending Z-A) order, file size
or date (newest entries first).
Favourite Add marked media file to the Favourites in Home
view.
Settings
Select photo
opens the media settings.
Mark desired directory,
OK open directory.
Repeat procedure if necessary.
Mark desired photo,
OK View photo zoomed to full screen.
Page 33

Connect ID 40-55 - 33 -
Quick guide
Photo
Photo display
Description of the symbols in the status display for photos
USB1 -> CRW_7266b
Symbol
(icon)
Remote
Description
control key
short
short
Show previous photo.
Show next photo.
– Rotate photo by 90 degrees to the left.
Full-screen mode
Back
Rotating the photo
A photo is marked.
OK View photo in full-screen mode.
USB1 -> CRW_7266b
Display previous / next photo.
Fade in photo status.
Mark
or .
OK Rotate photo by 90 degrees to the left / right.
USB1 -> CRW_7266b
Back
english
Back
– Rotate photo by 90 degrees to the right.
Start slide show.
Pause current slide show.
Call detailed info on the displayed photo.
Add currently displayed photo to the
favourites in Home view.
Call function list with photo settings.
Slide show
PLAY key: Start slide show.
USB1 -> CRW_7268
PAUSE key: Pause slide show.
Back
PLAY key: Continue paused slide show.
Photo in full-screen mode / exit slide show
STOP key: Full-screen mode / end slide show and
return to photo selection.
Page 34

Connect ID 40-55 - 34 -
Quick guide
Web
Web
Here you have access to multimedia content in the Internet (MediaNet)
as well as a high-quality web browser.
Calling the Web selection
HOME: Calling the Home view.
Mark We b,
OK call Web.
english
Thus you open the Web-APP Portal.
MediaNet
Browser
MediaNet
Browser
Mark function,
OK call.
Under the menu item MediaNet you will find a
continually expanding platform for interactive TV
applications from the Internet.
All applications are optimised for use on the TV.
Call Web browser of the TV set.
For further information see section Browser.
MediaNet
Call MediaNet
WEB: Call MediaNet.
or
HOME: Call Home view.
Select Web,
OK call.
Mark MediaNet,
call.
Home
Browse
Settings
Imprint
T
he upper portion of the MediaNet home screen
MediaNet - Home
New
Recommendations
contains new online content.
The lower portion of the MediaNet home screen
contains Recommendations given by Loewe.
The given content may change from time to time
without prior notice.
Select Home,
OK go to the right to choose the online content.
Mark the desired online content,
OK Display/play content.
The navigation within the various applications
depends on the provider.
Functions in the MediaNet home screen
Home
Browse
Moves to the right to choose the online content.
Under Browse you can list and call the online content
by subjects.
Settings In the Settings for MediaNet you can select coun-
tries, for example, to take advantage of various
services.
Imprint Providing the legally required information on the
parties responsible for the content.
Exit MediaNet
HOME: Call Home view and select another function.
Page 35

Connect ID 40-55 - 35 -
Quick guide
Web
Browser
You can access Internet sites directly using the integrated Opera
browser. The web browser can also be used without an Internet
connection. Thus you can access local devices which provide a web
interface (e.g., router, home control, home network server).
Calling the Web browser
HOME: Calling the Home view.
Select We b,
OK call.
Select Browser,
OK call.
Start page will be opened.
INFO: display browser status.
Entering a URL (Internet address)
Browser status is displayed.
Mark the URL (Internet address) of the
indicated Internet site,
OK Open address entry box.
Enter/change internet address
http://www.loewe.de
Q
W
E
D
A
S
C
Y
X
3
1
2
Delete Cancel AdoptSpace
CancelAdopt
Select required character,
OK Accept character.
Delete character to the left of the cursor.
Å
.-/
Enter special characters (select repeatedly for more
characters).
abc
Switch between upper/lower case.
Space
Enter blank space.
Back
R
T
Z
U
I
O
F
G
H
V
B
N
4
5
6
P
J
K
L
I
M
.-/
abc
7
8
9
0
english
Explanation of the symbols in the browser status
Define current site as homepage.
Update the displayed Internet site.
100% Change zoom factor of the displayed site / browser.
Add displayed Web site to Home view (in the Favourites
area).
Navigation on Web sites
P+/P– Scroll page vertically.
/ Scroll page horizontally.
Select link or text input field,
OK open link or confirm text input.
For the entry of text, press a numerical key (0-9)
repeatedly as with a mobile phone until the desired
character appears. The available letters are printed on
the individual numerical keys.
BACK: Stop text entry and exit entry box.
Delete Delete all characters.
Cancel
Cancel input. The entry box will be closed and the
previous Internet site will be displayed again.
Accept
Accept address and open new Internet site.
The characters may also be entered by the USB
keyboard or the numerical keys of the remote control
(see left column).
Exit Browser
Web site is displayed. Browser status is hidden
HOME: Call Home view and select another function.
Page 36

Connect ID 40-55 - 36 -
Quick guide
Extras
Extras
Extras contains additional functions and settings (e.g., Timer list, CA
module settings).
Call Extras
HOME: Calling the Home view.
Mark Extras,
OK call Extras.
english
Timer
Software
DR+
Streaming
Energy efficiency
CA module
Viaccess
CA module
AlphaCrypt
Special functions
Explanation of the subitems of Extras
Timer
Under the menu item Timer you find the timer list
as well as the timer services such as alarm clock or
time-triggered switch-off of the TV set.
Software Carry out software update.
DR+
Switch off the TV set to be in an advanced standby
Streaming
mode (server function). The access to your TV entries remains activated for a preset time.
This allows you to open a list which contains all the programmed
timertasks.
Timer
Timer list
All programmed recordings, earmarked programmes and copy jobs
are listed in the timer list.
You can also programme new recordings, earmark other programmes and copy pre-recorded programmes from the DR+ archive to an
external USB hard disk by means of the timer list.
When you have programmed timer recordings, the TV set must only
be switched off to the standby mode. Never switch the TV set off
at the mains and do not pull out the plug of the TV set out of the
socket. Otherwise no timer recordings can be made.
Call up the timer list
Press long: Call timer list.
Back
>All entries
Add new
Delete
Timer
Timer list Timer Services
24.09. 10:32 - 11:00 ProSieben How I Met Your Mother
Mon
24.09. 12:15 - 12:44 ProSieben Malcolm mittendrin
24.09. 20:15 - 21:15 RTL Television Wer wird Millionär?
Mon
25.09. 20:00 - 20:15 Das Erste HD Tagesschau
Add new
Delete
Create new timer instruction (recording, copy,
memo).
Delete one or several timer instructions.
Energy
efficiency
CA module
[name]
Special
functions
Here you can determine how energy efficient your
TV set shall be.
Make settings for your CA modules.
This menu item appears only it at least one CA
module is plugged in.
The exact designation of the menu item and availa-
ble subitems depends on your CA module(s).
Here, you find the equipment overview of your TV
set and repeat the initial installation. Moreover, you
reset the various settings to the factory settings here.
Explanation of the symbols in the timer list:
Recording
Recording in progress
Memorised programme
Repeated recording (daily, weekly or Mon-Fri)
Serial recording
Timer Services
This menu offers you convenient alarm services. Programmed alarms
are also active when the TV set has been switched off to standby.
If the TV set is switched on from the standby mode by alarm, a screen
message appears. If this is not confirmed within 5 minutes with the
OK key, the TV set switches automatically off again for safety reasons.
The TV set can also be switched off automatically at certain times. A
screen warning appears one minute before automatic switch off. The
automatic switch off can be interrupted by pressing any key.
You can find further information on timer services in the detailed
instruction manual.
Page 37

Connect ID 40-55 - 37 -
Quick guide
Extras
CA module
Conditional Access module (CA module)
In order to receive coded digital stations, a Conditional Access module (CA module) and a Smart Card must be inserted in the CI slot of
your TV set.
The CA module and the Smart Card are not part of the set of equipment supplied with the TV set. They are usually available from your
dealer. Loewe does not provide any guarantee for the functioning of
the CA module.
The TV set must first recognise and set up the CA module during initial
operation. Therefore, it can take up to a minute until decoding starts
during initial operation.
Inserting the Smart Card into the CA module
Push the Smart Card into the CA module as far as it will go. The side
of the card with the golden chip on it should be pointing towards the
thicker side of the insertion slot (see illustration). Note the direction
of the arrow printed on the Smart Card.
CA module
Contact side
Inserting the CA module into the TV set’s CI slot
Switch off TV set using the mains switch.
Remove the cover from the rear of the set.
Smart Card
Searching for encrypted stations
HOME: Calling the Home view.
Select System settings,
OK call System settings.
Mark Stations,
go to next column.
Automatic scan TV+Radio,
go to next column.
Select Change search settings,
OK wizard guides you through the search settings.
Under scrambled stations you have to select yes.
Next select Start search/update,
OK start updating the station list.
Calling CA module information
This menu is only available when a CA module is
plugged in.
HOME: Calling the Home view.
Mark Extras,
OK call Extras.
Select desired CA module.
The indicated name depends on the inserted
CA module.
go to next column.
Select CA module,
OK call information.
The content of this menu depends on the provider of
the CA module.
english
Insert the CA module carefully into one of the two CI slots, ensuring
that the contact side goes in first. Do not use force. Make sure the
module is not twisted in the process. Push the CA module in as far as
it will go.
Finally, close the side cover.
Removing the CA module
Switch off TV set using the mains switch.
Remove the cover from the rear of the set.
Pull the CA module out of the CI slot.
Close the side cover.
Page 38

Connect ID 40-55 - 38 -
9
10
Quick guide
Connections rear side of the device
Connect ID 40-55 DR+
english
1 2
3
4
5
6
7
8
11
12 13
14
15
16
17
18
19
20
21
22
23
24
29
1
SPDIF OUT - Digital audio output
2
SPDIF IN - Digital audio input
3
CENTER IN - Centre audio input (analogue)
4
DIGITAL AUDIO LINK - Surround audio outputs (digital)
5
AUDIO OUT - Audio output (analogue) L/R
6
AV - Mini AV socket
7
AUDIO IN - Audio input (analogue)
8
PC IN - VGA/XGA input
9
HDMI 1 - HDMI input 1 (with HDMI ARC support)
10
HDMI 2 - HDMI input 2
11
HDMI 3 - HDMI input 3
12
LAN - Network connection
13
USB - USB connection
14
ANT TV - Antenna/cable analogue/digital
(1
The adaptor set is available as an accessory from your dealer.
(2
Optionally available as an upgrade kit
(1
K
28
15
ANT SAT - Satellite antenna (sat tuner 1)
16
ANT SAT 2 - Satellite antenna (sat tuner 2)
17
CI-COMMON INTERFACE - Common Interface (CI slot)
18
CI-COMMON INTERFACE - Common Interface (CI slot)
19
HDMI 4 - HDMI input 4
20
USB - USB connection
21
USB - USB connection
22
- Headphone connection
AVS - S-Video connection (AVS)
23
24
AUDIO IN R - Audio input right (AVS)
25
AUDIO IN L - Audio input left (AVS)
26
RS-232C - Serial interface (2
27
IR LINK - Infrared transmitter connection
28
Socket for Kensington lock
29
AC IN - Mains connection
(2
25
26
27
Page 39

Connect ID 40-55 - 39 -
Quick guide
Connections rear side of the device
Connect ID 40-55 DR+
Function of the connections (Connect ID DR+)
The following table shows the name, type and function of the ports.
Designation Type Function / Signal
Mains socket 220-240 V ~ 50 / 60 Hz Supply voltage
RJ12 Data I/O: Serial interface (1
Jack 3.5 mm Connection for IR transmitter (1
Cinch (black) Audio IN: max. 2Vrms: Centre audio input (analogue)
english
HDMI4
Video IN:
Mini AV
Audio IN:
IEC socket 75 Ohm / 5 V / 80 mA:
Antenna analogue / Cable analogue / DVB-T / DVB-C
Y/C (S-VHS/Hi 8)
CVBS (VHS/8 mm)
RGB
L/R
DVB-T2
F socket (2x) 75 Ohm / 13/18 V / 500 mA: ANT-SAT DVB-S/S2
Cinch (orange) SPDIF IN: Digital audio input
Cinch (orange) SPDIF OUT: Digital audio output
RJ-45 Audio OUT: Multi-sound (digital)
Jack 3.5 mm Audio IN: Audio input (analogue)
D-SUB 15-pole Video IN:
PC/STB video signal
Component (YPbPr)
Jack 3.5 mm Audio OUT: Audio output (analogue)
Digital Video/Audio IN
(HDMI1, HDMI2, HDMI3,
HDMI type A (4x)
HDMI4):
Digital video and audio
Digital Audio OUT
(HDMI1 via HDMI ARC):
RJ-45 Ethernet / Fast Ethernet: Network interface
USB type A (3x) USB 2.0 (max. 500 mA): Multimedia files/software update
Mini DIN Video IN:
Y/C (S-VHS/Hi 8)
CVBS (VHS/8 mm)
Cinch (white/red) Audio IN: L (white) / R (red)
Jack 3.5 mm Headphones 32–200 Ohm
(1
(1
Optionally available as an upgrade kit
CI Slot (2x) Common Interface: Slot for CA module
Page 40

Connect ID 40-55 - 40 -
9
10
Quick guide
Connections rear side of the device
Connect ID 40-55
english
1 2
4 5 3
6
8
7
11
12
13
14
K
18
1
USB - USB connection
2
RS-232C - Serial interface
3
PC IN - Mini AV socket (1
4
HDMI 1 - HDMI input 1 (with HDMI ARC support)
5
HDMI 2 - HDMI input 2
6
HDMI 3 - HDMI input 3
7
ANT TV - Antenna/cable analogue/digital
8
ANT SAT - Satellite antenna (sat tuner)
9
SPDIF OUT - Digital audio output
(1
The adaptor set is available as an accessory from your dealer.
(2
Only use a LAN cable without a cap over the locking mechanism (see image A). LAN cables with caps may cause problems when the cable is being disconnected.
10
11
12
13
14
15
16
17
18
17
LAN - Network connection (2
CI-COMMON INTERFACE - Common Interface (CI slot)
- Headphone connection / Audio output (analogue) L/R
HDMI 4 - HDMI input 4
AVS - Mini AV socket (1
USB - USB connection
USB - USB connection
Socket for Kensington lock
AC IN - Mains connection
A
15
16
Page 41

Connect ID 40-55 - 41 -
Quick guide
Connections rear side of the device
Connect ID 40-55
Function of the connections (Connect ID)
The following table shows the name, type and function of the ports.
Designation Type Function / Signal
Mains socket 220-240 V ~ 50 / 60 Hz Supply voltage
RJ12 Data I/O: serial interface
Video IN:
Mini AV
Audio IN:
IEC socket 75 Ohm / 5 V / 80 mA:
F socket 75 Ohm / 13/18 V / 400 mA: ANT-SAT DVB-S/S2
Cinch (orange) SPDIF OUT: Digital audio output
Digital Video/Audio IN
HDMI4
HDMI type A (4x)
RJ-45 Ethernet / Fast Ethernet: Network interface
(HDMI1, HDMI2, HDMI3,
HDMI4):
Digital Audio OUT
(HDMI1 via HDMI ARC):
with S-Video adaptor:
with VGA adaptor:
Antenna (analogue) / Cable (analogue) /
CVBS (VHS/8 mm)
PC/STB video signal
Component (YPbPr)
DVB-T/T2 / DVB-C
Digital video and audio
Y/C (S-VHS/Hi 8)
english
L/R
USB type A (3x) USB 2.0 (max. 500 mA): Multimedia files/software update
Mini AV
Jack 3.5 mm
Video IN:
Audio IN:
Audio OUT:
with S-video adaptor: Y/C (S-VHS/Hi 8)
CVBS (VHS/8 mm)
RGB
L/R
Headphones 32–200 Ohm
Audio output (analogue) L/R
CI Slot Common Interface: Slot for CA module
Page 42

Connect ID 40-55 - 42 -
Quick guide
Technical data
Connect ID 40-55 DR+
Technical data
Type Connect ID 55 DR
+
Connect ID 46 DR
+
Connect ID 40 DR
Part number 52465x44 52464x44 52463x44
Device dimensions without mounting option
(W x H x D)
125.8 x 78.4 x 8.8 cm
106.4 x 67.4 x 7.8 cm
93.1 x 59.8 x 7.8 cm
Device dimensions with mounting option
english
(W x H x D)
Weight without mounting option (approximate)
Weight with mounting option (approximate)
125.8 x 78.4 x 12.7 cm
30.4 kg
31.4 kg
106.4 x 68.2 x 24.1 cm
19.8 kg
20.1 kg
93.1 x 60.8 x 24.1 cm
16.4 kg
16.7 kg
Display technology Full HD LCD with edge LED backlight technology
Screen diagonal / Picture format 140 cm / 16:9 117 cm / 16:9 102 cm / 16:9
Resolution / Motion Response 1920 x 1080 px / 200 Hz
Contrast (static / dynamic) 7,000 : 1 / 7,000,000 : 1 6,000 : 1 / 6,000,000 : 1
Viewing angle (horizontal / vertical) 178° / 178°
Power consumption On-Mode max.
(Audio output 1/8 of the maximum value)
Power consumption On-Mode (Home)
Power consumption in Standby Mode
Power consumption when set is switched off
108 W
82 W
< 0,5 W
0 W
91 W
82 W
< 0,5 W
0 W
82 W
63 W
< 0,5 W
0 W
Ambient temperature 5°C – 35°C
+
Relative humidity (non-condensing) 20 – 80%
Air pressure 800 – 1114 hPa (0 – 2000 m above sea level)
Chassis designation: SL 221
Power supply: 220 V – 240 V/50–60 Hz
Tuner: terr./cable:
Satellite:
Range: terr./cable:
Satellite:
4 levels: 13/18V/22kHz / 16 levels: DiSEqC 1.0 / single-cable system: EN 50494
VHF/Hyperband/UHF
Terr./cable: 45 MHz up to 860 MHz
Satellite: 950 MHz up to 2150 MHz
Station storage locations incl. AV and radio: 6000
TV standards: analogue:
digital:
B/G, I, L, D/K, M, N
DVB-T, DVB-C, DVB-S/S2
DVB-T2
(1
Colour standards: SECAM, PAL, NTSC, NTSC-V, PAL-V (60 Hz)
Sound standards: analogue:
BG, DK, MN:
BG, I, DK:
L, L1:
digital:
Mono, Stereo, Dual channel, PCM, Dolby Digital, Dolby Digital Plus,
Mono, Stereo, Dual channel
FM-A2
FM-Nicam
AM-Nicam
Dolby Virtual Speaker, DTS, Dolby Digital Pulse
Audio output power (music/sine): 2 x 40 W / 2 x 20 W
Teletext: TOP
FLOF
HiText (Level 2.5)
Page memory: 2000
(1
Optionally available as an upgrade kit
Page 43

Connect ID 40-55 - 43 -
Quick guide
Technical data
Connect ID 40-55
Technical data
Type Connect ID 55 Connect ID 46 Connect ID 40
Part number 52465x85 52464x85 52463x85
Device dimensions without mounting option
(W x H x D)
Device dimensions with mounting option
(W x H x D)
Weight without mounting option (approximate)
Weight with mounting option (approximate)
Display technology Full HD LCD with edge LED backlight technology
Screen diagonal / Picture format 140 cm / 16:9 117 cm / 16:9 102 cm / 16:9
Resolution / Motion Response 1920 x 1080 px / 200 Hz
Contrast (static / dynamic) 7,000 : 1 / 7,000,000 : 1 6,000 : 1 / 6,000,000 : 1
Viewing angle (horizontal / vertical) 178° / 178°
125.8 x 78.4 x 8.8 cm
125.8 x 78.4 x 12.7 cm
30.1 kg
31.1 kg
106.4 x 67.4 x 7.8 cm
106.4 x 68.2 x 24.1 cm
19.5 kg
19.8 kg
93.1 x 59.8 x 7.8 cm
93.1 x 60.8 x 24.1 cm
16.1 kg
16.4 kg
english
Power consumption On-Mode max.
(Audio output 1/8 of the maximum value)
Power consumption in Standby Mode
Power consumption when set is switched off
103 W
< 0,5 W
0 W
86 W
< 0,5 W
0 W
77 W
< 0,5 W
0 W
Ambient temperature 5°C – 35°C
Relative humidity (non-condensing) 20 – 80%
Air pressure 800 – 1114 hPa (0 – 2000 m above sea level)
Chassis designation: SL 212
Power supply: 220 V – 240 V/50–60 Hz
Tuner: terr./cable:
Satellite:
Range: terr./cable:
Satellite:
4 levels: 13/18V/22kHz / 16 levels: DiSEqC 1.0 / single-cable system: EN 50494
VHF/Hyperband/UHF
Terr./cable: 45 MHz up to 860 MHz
Satellite: 950 MHz up to 2150 MHz
Station storage locations incl. AV and radio: 6000
TV standards: analogue:
digital:
B/G, I, L, D/K, M, N
DVB-T/T2, DVB-C, DVB-S/S2
Colour standards: SECAM, PAL, NTSC, NTSC-V, PAL-V (60 Hz)
Sound standards: analogue:
BG, DK, MN:
BG, I, DK:
L, L1:
digital:
Mono, Stereo, Dual channel
FM-A2
FM-Nicam
AM-Nicam
Mono, Stereo, Dual channel, PCM,
Dolby Digital, Dolby Digital Plus, Dolby Digital Pulse
Audio output power (music/sine): 2 x 40 W / 2 x 20 W
Teletext: TOP
FLOF
Page memory: 1000
Page 44

Connect ID 40-55 - 44 -
Quick guide
Environment
Legal information
Environmental protection
Power consumption
Your TV set is equipped with an eco-standby power supply. In the
standby mode, the power consumption drops to low power (see
chapter Technical data). If you want to save even more energy then
switch the device off with the mains switch. Please also note that
the EPG data (Electronic Programme Guide) is lost under certain
circumstances and possibly programmed timer recordings cannot
be carried out by the TV set.
english
The TV set will be completely separated from mains only when you
unplug the mains cable.
The power consumed by the TV set during operation depends on the
energy efficiency preset in the initial installation or on the setting in
the system settings.
If you activate the automatic dimming, your TV picture will adapt to
the ambient brightness. This reduces the power consumption of the
TV set.
If the TV set is not operated for 4 hours (adjustment of volume, programme change, etc.) the TV set will automatically switch to stand-by
mode to save energy. A prompt to terminate this shutdown process
appears one minute before expiry of the 4 hours. The automatic
shutdown is only active in the energy efficiency mode Home Mode.
Cardboard box and packaging
You have made a decision to purchase a high-quality technical product
with a long service life. For disposal of the packaging, we have paid a
fee to a commissioned recycler to pick up the packaging from the
dealer in accordance with national legislation.
The device
The EU directive 2002/96/EG regulates the proper
way to recycle, handle and utilise used electronic devices. Old electronic appliances must therefore be
disposed of separately. Never dispose of this device
in normal domestic waste!
You can hand in your old unit free of charge at identified
collection points or to your dealer if you buy a similar new unit. Other
details about re-acceptance (also for non-EU countries) are available
from your local municipal administration.
Batteries
The batteries supplied as initial equipment do not con-
tain any pollutants such as cadmium, lead, or mercury.
In accordance with the Battery Directive, used batter-
ies should no longer be disposed of in the domestic
waste. Dispose of your batteries at no charge in the
collection containers which are set up for this pur-
pose in retail stores.
Licences
Manufactured under licence from Dolby Laboratories. “Dolby”, “Pro
Logic” and the double-D symbol are trademarks of Dolby Laboratories.
This set contains a software which is partly based on the work of the
Independent JPEG Group.
HDMI, the HDMI logo and High-Definition Multimedia Interface are
trademarks or registered trademarks of HDMI licensing LLC in the
United States and other countries.
®
This product includes software developed by the OpenSSL Project for
use in the OpenSSL Toolkit (http://www.openssl.org/).
This software is provided by the OpenSSL project “as is“ and any
expressed or implied warranties, including, but not limited to,
the implied warranties of merchantability and fitness for a particular purpose are disclaimed. In no event shall the OpenSSL
project or its contributors be liable for any direct, indirect, incidental, special, exemplary, or consequential damages (including,
but not limited to, procurement of substitute goods or services; loss
of use, data, or profits; or business interruption) however caused
and on any theory of liability, whether in contract, strict liability, or
tort (including negligence or otherwise) arising in any way out of the
use of this software, even if advised of the possibility of such damage.
This product includes cryptographic software written by Eric Young
(eay@cryptsoft.com).
This product includes software written by Tim Hudson (tjh@cryptsoft.
com).
This product contains software which was developed by third parties
and / or software which is subject to GNU General Public License (GPL)
and/or GNU Lesser General Public License (LGPL). You can pass on
and modify them in accordance with Version 2 of the GNU General
Public License or optionally every later version which is published by
the Free Software Foundation.
The publication of this programme by Loewe is carried out WITHOUT
ANY GUARANTEE OR SUPPORT, particularly without an implicit
guarantee concerning MARKET MATURITY or the USABILITY FOR A
SPECIFIC PURPOSE. Details can be found in the GNU General Public
License. You can obtain the software via the Loewe customer service
department.
The GNU General Public License can be downloaded from:
http://www.gnu.org/licenses/.
Page 45

Connect ID 40-55 - 45 -
Quick guide
Miscellaneous
Integrated features
See the rating plate on the rear of the set for the precise product
designation.
The precise features, part and series numbers as well as the device
software release are listed in the Integrated features item under
Extras ט Special functions.
Integrated features
Integrated
Manufacturer LOEWE
features
Serial number 834
Article number 52401B43
Chassis SL220
Software 1.11.7.0
PIP
Nicam
DD/DTS
Digital Recording (DR)
Channel 1 A/T/T2/C/S/S2
Channel 2 A/T/T2/C/S/S2
CI Plus
Wi-Fi module
MAC address (TV) 00:09:82:18:03:34
MAC address (Wi-Fi) 20:10:7a:75:2a:ae
Back
Conformity / Manufacturer’s declaration
The set is CE marked and complies with EU directives. The complete
declaration of conformity is included in the detailed operating manual, which you can download from our homepage (see right-hand column).
This equipment is in compliance with the essential requirements and
other relevant provisions of Directive 1999/5/EG. It may be operated
in all countries in the EU and also in Iceland, Norway and Switzer-
land. In France and Italy it may only be used indoors.
Software / User guides
You can download new software and comprehensive user guides for
your TV set from our homepage, if these are available.
Visit our homepage under:
http://support.loewe.tv (International),
http://support.loewe.tv/uk ( United Kingdom and Republic of
Ireland),
http://support.loewe.tv/au (Australia) or
http://support.loewe.tv/nz (New Zealand).
Please select your TV set (current product line) in the Choose a
Product part of the User guides section. You can then download
the corresponding user guide in the form of a PDF file. You can find
user guides for previous product lines in the product selection under
Archive.
The detailed operating instructions will give you more information on
the following subjects and more:
• Installing / Connecting the TV set
• System settings
• Installation / Connecting devices
To download other content (e.g. software updates, MediaUpdate), go
to the support homepage and select Register free-of-charge. Simply
follow the steps in the registration process.
After successful registration on the support homepage, you also need
to register your product (have the article number and serial number
ready – both can be found under Integrated features (see left-hand
column), and on the rating plate on the rear of the set).
You will then receive an overview of available content for your TV
set, including software and user guides for the registered TV set in
electronic form.
english
USB stick - requirements
USB sticks tested by Loewe and compatible in type and format can
be ordered from the Loewe dealer using the article no. 90456.990.
If you would like to use your own USB stick, please follow these tips/
conditions:
• Formatting in FAT32.
• Just one partition.
• Do not use encrypted USB sticks.
• Do not use USB sticks that simulate a CD ROM drive.
• The stick must not contain hidden files.
• For some types of device, the construction of the USB stick is significant.
Maximum dimensions in mm: 70x20x10.
• If in doubt, the USB stick should be formatted as “FAT32” without
“extended attributes”.
✄
safe place.
The key number invalidates an
identification number and thus the
parental lock. Please keep it in a
Page 46

Connect ID 40-55 - 46 -
Quick guide
Index
A
Alarm ............................................................................................... 36
ARC ............................................................................................38, 40
Archive recording ............................................................................ 22
Audio playback ................................................................................ 29
Audio/Radio ...............................................................................13, 28
Audio Return Channel ..............................................................38, 40
Automatic shutdown .........................................................................5
AV selection ...................................................................................... 17
B
english
Batteries .............................................................................................8
Browser ............................................................................................ 35
C
CA module ........................................................................................37
CI slot ................................................................................................37
Cleaning and care ..............................................................................5
Coloured keys .............................................................................. 6, 20
Conformity / Manufacturer’s declaration ..................................... 45
D
Digital Recorder .............................................................................. 22
Display ................................................................................................9
DR+ archive ..................................................................................... 23
E
Encrypted stations ...........................................................................37
Energy efficiency ............................................................................. 36
Environment .................................................................................... 44
EPG ...................................................................................................18
Extras ..........................................................................................13, 36
F
Favourites .........................................................................................13
FLOF .................................................................................................20
Function list ...................................................................................... 17
G
General information on the operation ..............................................9
H
HbbTV ...............................................................................................21
HbbTV text .......................................................................................21
HDMI ARC ..................................................................................38, 40
Headphone volume ......................................................................... 17
Home view ........................................................................................ 13
I
Info display ........................................................................................12
Integrated features .......................................................................... 45
Internal WLAN antenna ...................................................................24
J
Jump .................................................................................................27
Jump to bookmarks ........................................................................27
L
Length of the station list .................................................................. 14
M
Mains switch ...................................................................................8, 9
Media ................................................................................................24
MediaNet ......................................................................................... 34
Call ................................................................................................ 34
Exit ................................................................................................ 34
Mobile phone keypad ........................................................................11
N
Network connections
Wired .............................................................................................24
Wireless .........................................................................................24
Numerical keys .............................................................................9, 14
O
One Touch Recording ..................................................................... 22
On/Off button .....................................................................................8
P
Page selection .................................................................................20
Personal list ......................................................................................15
Photo ...........................................................................................13, 32
Exit ................................................................................................ 33
Full-screen mode ......................................................................... 33
Rotate photo ................................................................................ 33
Rotate picture .............................................................................. 33
Slide show .................................................................................... 33
PIP ..................................................................................................... 19
R
Radio mode ................................................................................30, 31
Remote control .............................................................................. 7, 8
S
Safety ..............................................................................................4, 5
Scope of delivery ................................................................................3
Selecting a station out of the station list ........................................ 14
Select station ...................................................................................14
using the numerical keys .............................................................14
via personal lists ........................................................................... 15
with P+/P- ....................................................................................14
Service ..............................................................................................47
Setting the volume ...........................................................................14
Smart Card .......................................................................................37
Smart Jump .....................................................................................27
Software ........................................................................................... 45
Standby mode ....................................................................................9
Status display ...................................................................................16
Stop recording early ....................................................................... 23
Switching off the TV set during recording ..................................... 23
Switch off ............................................................................................9
Switch on ............................................................................................9
Switch to live picture ....................................................................... 22
System settings ...............................................................................13
T
Teletext ............................................................................................ 20
Timer ................................................................................................ 36
Timer list .......................................................................................... 36
Time-shift television ....................................................................... 22
TOP ..................................................................................................20
TV ................................................................................................ 13, 14
TV key .................................................................................................8
U
UPnP .................................................................................................24
User guides ..................................................................................... 45
V
Video ........................................................................................... 13, 25
Video playback ................................................................................ 26
Viewing another programme from the archive during
archive recording ........................................................................... 23
W
Watching other stations during archive recording ....................... 23
Web ............................................................................................. 13, 34
Page 47

Connect ID 40-55 - 47 -
Quick guide
Service
Loewe Austria GmbH
Parkring 12
1010 Wien, Österreich
Tel +43 - 810 0810 24
Fax +43 - 1 22 88 633 - 90
E-mail: loewe@loewe.co.at
Audio Products Group Pty Ltd
67 O’Riordan St
Alexandria NSW 2015, Australia
Tel +61 - 1300 130 492
Fax +61 - 02 9578 0140
E-mail: help@audioproducts.com.au
Loewe Opta Benelux NV/SA
Uilenbaan 84
2160 Wommelgem, België
Tel +32 - 3 - 2 70 99 30
Fax +32 - 3 - 2 71 01 08
E-mail: ccc@loewe.be
Darlington Service
193 Kn. Klementina St.
1612 Sofia, Bulgaria
Tel +359 - 2 9556399
E-mail: darlington@psp-bg.com
Telion AG
Rütistrasse 26
8952 Schlieren, Schweiz
Tel +41 - 44 732 15 11
Fax +41 - 44 732 15 02
E-mail: infoKD@telion.ch
Hadjikyriakos & Sons Ltd.
121 Prodromos Str., P.O Box 21587
1511 Nicosia, Cyprus
Tel +357 - 22 87 21 11
Fax +357 - 22 66 33 91
E-mail: savvas@hadjikyriakos.com.cy
BaSys CS s.r.o.
Sodomkova 1478/8
10200 Praha 10 - Hostivar,
Česká republika
Tel +420 234 706 700
Fax +420 234 706 701
E-mail: office@basys.cz
Loewe Opta GmbH,
Customer Care Center
Industriestraße 11
96317 Kronach, Deutschland
Tel +49 9261 99-500
Fax +49 9261 99-515
E-mail: ccc@loewe.de
EET Europarts
Nordisk Loewe distributør
Bregnerødvej 133 D
3460 Birkerød, Denmark
Tel +45 - 82 19 19
Fax +45 - 82 16 09
E-mail: info@eeteuroparts.dk
Gaplasa S.A.
Conde de Torroja, 25
28022 Madrid, España
Tel +34 - 917 48 29 60
Fax +34 - 913 29 16 75
E-mail: loewe@maygap.com
Loewe France SAS
Rue du Dépôt,
13 Parc de l l‘Europe, BP 10010
67014 Strasbourg Cédex, France
Tel +33 - 3- 88 79 72 50
Fax +33 - 3- 88 79 72 59
E-mail: loewe.france@loewe-fr.com
Karevox Oy
Museokatu 36
00100 Helsinki, Finland
Tel +358 - 9 44 56 33
E-mail: kare@haloradio.fi
Loewe UK Limited
1st Floor, 237A Kensington High St
London
W8 6SA, UK
Tel +44 - (0) 207 368 1100
Fax +44 - (0) 207 368 1101
E-mail: enquiries@loewe-uk.com
Issagogiki Emboriki Ellados
321 Mesogion Av.
152 31 Chalandri-Athens, Hellas
Tel +30 - 210 672 12 00
Fax +30 - 210 674 02 04
E-mail: christina_argyropoulou@
Tó park u.9.
2045 Törökbálint, Magyar
Tel +36 - 2341 56 37 (121)
Fax +36 - 23 41 51 82
E-mail: ertekesites@basys.hu
King‘s Tower 28/F, 111 King Lam Street
Kowloon, Hong Kong
Tel +852 - 27 77 89 88
Fax +852 - 23 10 08 08
E-mail: service@loewe-cn.com
Bednjanska 8, 10000 Zagreb
Hrvatska (Kroatia)
Tel +385 1 4929 683
Fax +385 1 4929 682
E-mail: info@loewe.hr
Via Monte Baldo, 14/P – 14/N
37069 Dossobuono di Villafranca di
Tel +39 - 045 82 51 690
Fax +39 - 045 82 51 622
E-mail: info@loewe.it
Clear electronic entertainment Ltd
13 Noah Mozes St.
Agish Ravad Building
Tel Aviv 67442, Israel
Tel +972 - 3 - 6091100
Fax +972 - 3 - 6092200
E-mail: info@loewe.co.il
Block D, Plot No. 7 Shanti Kunj
Vasant Kunj
New Delhi - 110070, India
Tel +91 11 47 65 55 00
Fax +91 11 47 67 67 15
E-Mail: admin@navshiv.com
S.A.
isembel.gr
Basys Magyarorszagi KFT
Galerien Und PartnerPlus
Plug&Play Ltd.
Loewe Italiana S.r.L.
Verona
Navshiv Retail Pvt. Ltd.
MiMoRa HOLDING CO.
N0 1001, Afra Tower
Parsa St. Fereshteh
Tehran, Iran
Tel + 98 921 344 0521
E-Mail: s.zarandooz@gmail.com
Salem Agencies & Services Co.
Hamad Al Haqueel Street, Rawdah,
Jeddah 21413
Kingdom of Saudi Arabia
Tel +966 (2) 665 4616
Fax +966 (2) 660 7864
E-mail: hkurkjian@aol.com
Kpartners, SIA
A.Čaka iela 80
Rīga, LV-1011, Latvia
Tel +3 71 - 67 29 29 59
Fax +3 71 - 67 31 05 68
E-mail: olga@dom332.lv
A Cappella Ltd.
Ausros Vartu 5, Pasazo skg.
01129 Vilnius, Lithuania
Tel +370 - 52 12 22 96
Fax +370 - 52 62 66 81
E-mail: info@loewe.lt
Doneo Co. Ltd
34/36 Danny Cremona Street
Hamrun, HMR1514, Malta
Tel +356 - 21 - 22 53 81
Fax +356 - 21 - 23 07 35
E-mail: service@doneo.com.mt
Somara S.A.
377, Rue Mustapha El Maani
20000 Casablanca, Morocco
Tel +212 - 22 22 03 08
Fax +212 - 22 26 00 06
E-mail: somara@somara.ma
Premium Consumer Electronics as
Østre Kullerød 5
3241 Sandefjord, Norge
Tel +47 - 33 29 30 40
Fax +47 - 33 44 60 44
E-mail: loewe@loewe.no
Audio Products Group Pty Ltd
67 O’Riordan St
Alexandria NSW 2015, Australia
Tel 0800 174 781
Fax +61 - 02 9578 0140
E-mail: help@audioproducts.com.au
Mayro Magnetics Portugal, Lda.
Rua Professor Henrique de Barros
Edifício Sagres, 2º. C
2685-338 Prior Velho, Portugal
Tel +351 - 21 942 78 30
Fax +351 - 21 940 00 78
E-mail: geral.loewe@mayro.pt
3LOGIC Sp.z o.o.
ul. Zakopiańska 153
30-435 Kraków
Tel +48 - 12 640 20 00
Fax +48 - 12 640 20 01
www.3logic.pl
Service Center Loewe
Aptekarsky per.4 podjezd 5A
105005 Moscow, Russia
Tel +7 - 499 940 42 32 ( ext. 454 )
Fax +7 - 495 730 78 01
E-mail: service@loewe-cis.ru
EET Europarts AB
Nordisk Loewe distributör
Box 4124
SE-131 04, Nacka, Sverige
Tel +46 - 8 507 510 00
E-mail: Kundservice@eeteuroparts.se
Atlas Sound & Vision Pte Ltd
10 Winstedt Road #01-18
Singapore 227977
Tel +65 - 6334 9320
Fax +65 - 6339 1615
E-mail: service@atlas-sv.com
BaSys SK, s.r.o.
Stará Vajnorská 37/C
83104 Bratislava, Slovakia
Tel + 421 2 49 10 66 18
Fax + 421 2 49 10 66 33
E-mail: loewe@basys.sk
SERVISPLUS GENEL MERKEZ
ÖRNEK MAH. ATES SOK. NO:1
34704 ATASEHIR, ISTANBUL, TÜRKIYE
Tel +90 - 216 315 39 00
Fax +90 - 216 315 49 50
E-mail: info@servisplus.com.tr
Dubai Audio Center
P.O. Box 32836, Sheikh Zayed Road
Dubai, UAE
Tel +971 - 4 343 14 41
Fax +971 - 4 343 77 48
E-mail: service@dubaiaudio.com
english
© by Loewe Opta 02.04.13
Page 48

Connect ID 40-55 - 48 -
Quick guide
english
 Loading...