

Page 1

TV
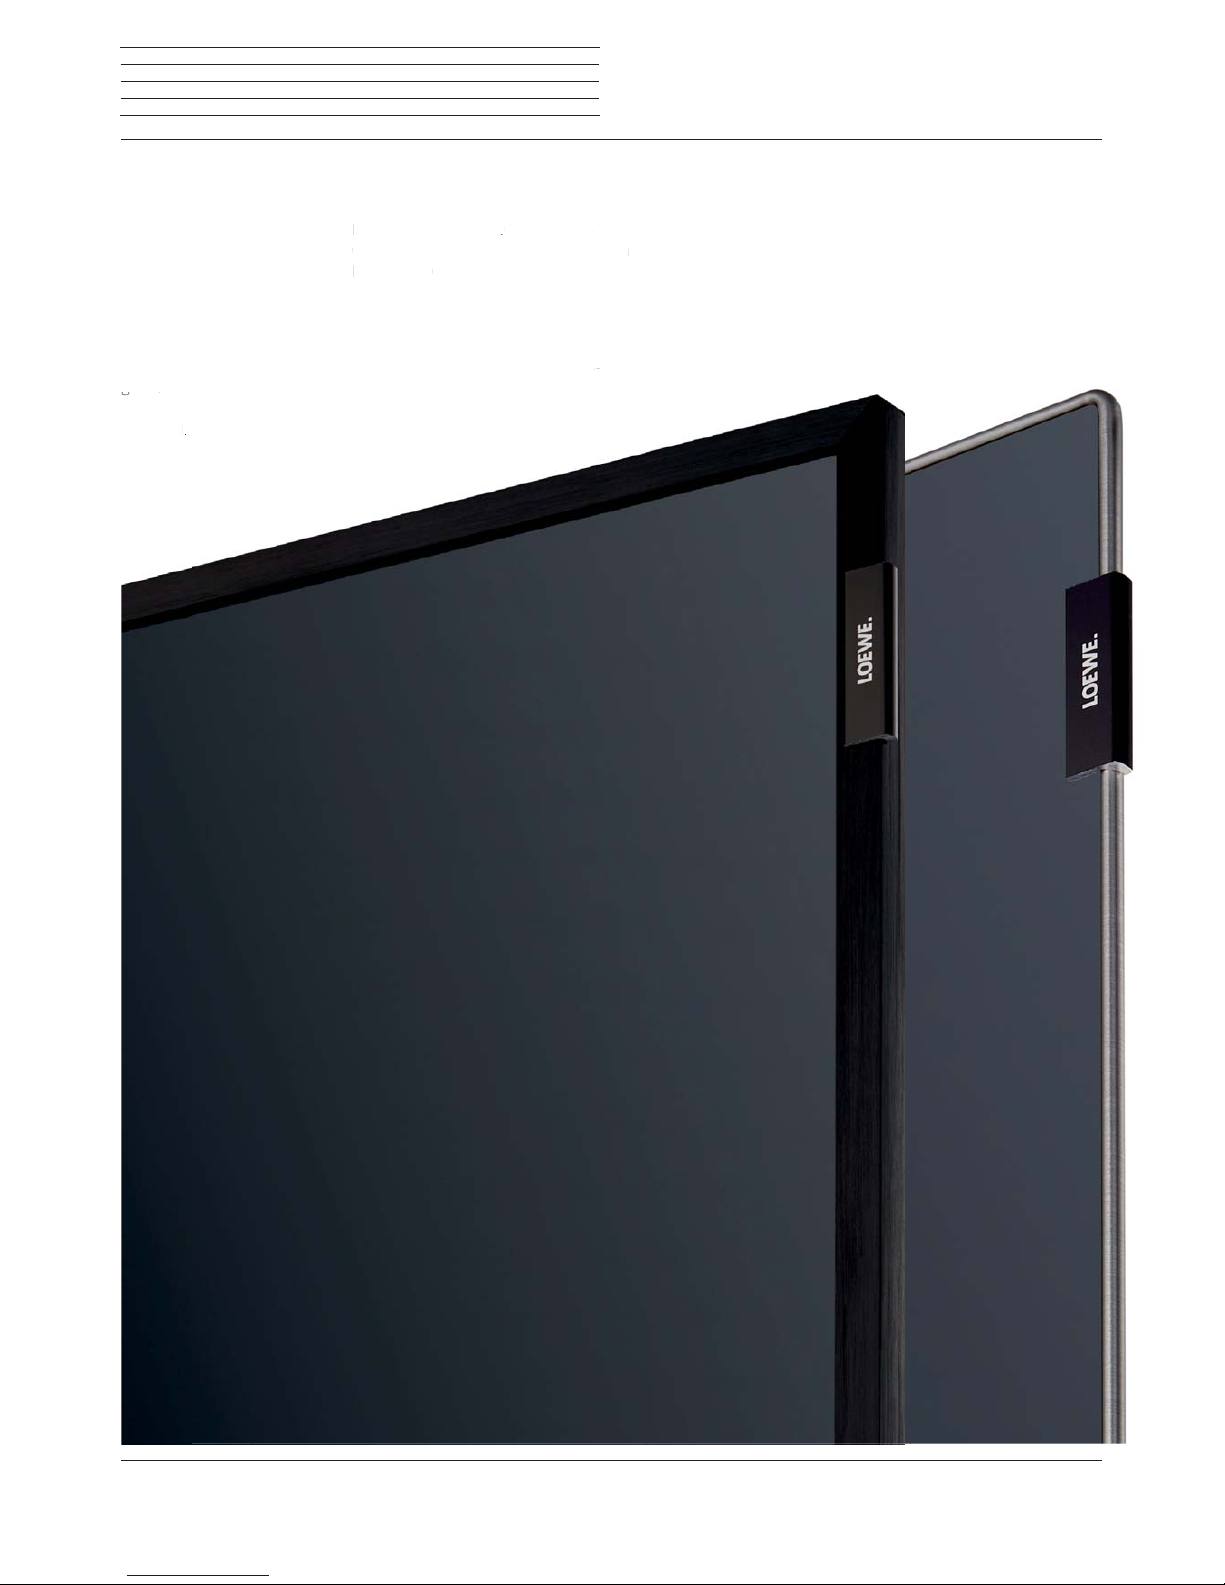
Loewe bild
bild 9
bild 7
bild 5
bild 4
bild 3
bild 2
bild 1
User handbook
36960023
Page 2
Loewe bild
User handbook
2
Imprint
Loewe Technologies GmbH
Industriestraße 11
D-96317 Kronach
www.loewe.tv
Editorial date 11/18-4.0 PS, TB, SB
© Loewe Technologies GmbH, Kronach
ID: 5.0.23.0
The screen graphics used are only exemplary. Depending on the device
type, the available hardware/software components may be different.
The information in this document is subject to change without notice
and does not constitute any obligation on the part of Loewe Technolo-
gies GmbH.
All rights including translation, technical modifications and errors
reserved
.
Imprint
hnologies GmbH
traße
11
ronac
h
.tv
itorial date 1118-4 PS, TB,
SB
Loewe Technologies GmbH, Krona
:
.0.23.
0
graphics used are only exemplary. Depending on the device
vailable hardware/software components may be different.
ation in this document is subject to change without notice
ot constitute any obligation on the part of Loewe Technolo
G
ll rights
reserve
d
including translation, technical modifications and errors
Page 3

Loewe bild
User handbook
3
Table of contents
Imprint ...........................................................................................2
Welcome ........................................................................................5
About this user handbook ........................................................................... 5
Safety/Warning ............................................................................6
Technical information ..................................................................8
Remote control button mapping ..............................................10
Operating controls on the TV set ..............................................11
Function of the connections ..................................................... 12
Preparing the TV set .................................................................. 13
Installing the TV set .....................................................................................13
Set covers .....................................................................................................13
Cable fixing ...................................................................................................13
Connecting the TV set ................................................................................14
Switching the TV set ON/OFF ...................................................................16
General information on menu operation ..................................17
On-screen displays .................................................................... 20
Explanation of keys .....................................................................................20
Explanation of symbols .............................................................................20
Automatic menu info .................................................................................20
Permanent clock display ...........................................................................20
Initial installation ....................................................................... 21
Initial installation wizard ..............................................................................21
TV set as a monitor ....................................................................................33
Home view .................................................................................. 34
Home view - EPG search .......................................................................... 34
Home view - Favourites ............................................................................. 35
TV ................................................................................................ 36
Setting the volume .....................................................................................36
Select channel.............................................................................................36
Status display/Info key ..............................................................................38
Menu options ..............................................................................................39
Electronic Programme Guide – EPG........................................................40
Freeview Play ...............................................................................................44
Teletext .........................................................................................................46
HbbTV / MediaText ....................................................................................48
Picture in Picture (PIP) ...............................................................................49
Rotating the TV set .....................................................................................50
Vogels Motion Mount ..................................................................................51
Recordings ..................................................................................53
Digital Recorder .......................................................................................... 53
TV viewing with time shift .......................................................................53
Archive recording ..................................................................................... 54
Multi recording ......................................................................................... 55
DR+ archive ..............................................................................................56
DR+ Streaming .........................................................................................61
Follow me function ...................................................................................61
Multiroom ....................................................................................................62
Timer ............................................................................................................63
Sources ...................................................................................... 66
Video ............................................................................................................68
Video playback ............................................................................................68
Additional functions for DR+ archive playback .......................................71
Audio ............................................................................................................ 74
Audio playback ........................................................................................... 74
Photo ............................................................................................................ 76
Photo playback ........................................................................................... 76
Apps .............................................................................................78
App Gallery ..................................................................................................78
Browser ........................................................................................................80
DVB radio ......................................................................................................81
Internet radio ............................................................................................... 82
Screen Mirroring ......................................................................................... 83
System settings ........................................................................ 84
Picture ..........................................................................................................85
Sound ...........................................................................................................89
Surround modus .....................................................................................90
Mimi Defined
TM
.........................................................................................91
Channels ......................................................................................................94
Automatic scan TV+Radio .....................................................................95
Manual Scan TV / Radio .........................................................................96
Channel lists TV / Radio .........................................................................98
Compose / edit Personal list ..................................................................99
Update channel list automatically .......................................................100
Transfer all channel lists ........................................................................100
Control ........................................................................................................101
Language ................................................................................................ 102
EPG .......................................................................................................... 102
Parental lock ...........................................................................................103
Energy efficiency .................................................................................... 104
Quick start mode ................................................................................... 104
Software update..................................................................................... 105
On-screen displays .................................................................................110
Time and date .........................................................................................110
DVB settings .............................................................................................111
PIP ..............................................................................................................111
DR+ ..........................................................................................................112
Standard Teletext ....................................................................................113
HbbTV ...................................................................................................... 114
Asterisk key function .............................................................................. 114
Rotate TV ................................................................................................. 115
Display kinematics .................................................................................. 116
Hard disks ................................................................................................ 117
Export log file ........................................................................................... 118
Multimedia/Network ................................................................................119
Network settings .................................................................................... 120
Multimedia settings ............................................................................... 123
Home Automation ................................................................................. 123
Renderer ................................................................................................. 123
Mobile Recording ................................................................................... 124
Bluetooth ................................................................................................ 125
Amazon Alexa login ............................................................................... 127
m
int.............................................
lc
ome
..........................
..
bout this user handboo
k
......
..
afety/Warning..............................
Technical information....................
emote control button mappin
g
erating controls on the TV set.
Function of the connections.........
reparing the TV set ......................
nstalling the TV set
t cove
rs
able fixin
g
Connecting the TV se
t
witching the TV set ON/OFF
General information on menu o
pe
n-screen displays.........................
Explanation of k
s
Explanation of symbols........................
tomati
c menu
nf
ermanent clock displa
y
nitial installati
on
nitial installation wizar
d
set as a monito
r
ome vie
w
Home view - EPG search
ome view - Favourites
.....................................................
etting the volum
e
..................
..
Select channel
Status display/Info ke
y
..............
enu optio
ns
Electronic Programme Guide – EP
G
reeview Pla
y
tex
t
HbbTV / MediaTe x
..............................
Picture in Picture(PI
P)
otating the TV se
t
o
ge
ls M
otion Moun
t
ecording
s
..........................
igital Recorde
r
V viewing with time shift
rchive recordin
g
..................
..
Multi recordin
g
DR+ archiv
e
Streamin
g
owmfution
tir
oom
Page 4

Loewe bild
User handbook
4
Table of contents
Connections .............................................................................................. 128
Sound components .............................................................................. 129
Antenna DVB .......................................................................................... 134
AV connection settings .........................................................................134
Digital Link ............................................................................................... 135
HDMI ........................................................................................................ 135
Extras .........................................................................................................136
DR+ Streaming ......................................................................................136
Integrated features ................................................................................ 137
Reset to factory settings ....................................................................... 137
Dealer mode ........................................................................................... 138
Legal matters.......................................................................................... 138
Conditional Access module (CA module) .......................................... 139
External devices ....................................................................... 141
Devices to the HDMI connections ........................................................... 141
Digital Link HD ........................................................................................... 142
Devices on AV ............................................................................................ 143
Connecting the speaker system (AUDIO OUT) ................................... 145
Connecting the speaker system (DAL) ................................................. 145
Connecting active loudspeakers ............................................................ 146
Connecting the HiFi/AV amplifier ........................................................... 146
Audio playback from external devices ....................................................147
IR-Link .........................................................................................................147
Serial interface RS-232C (RJ12) ..............................................................147
Setting the remote control ......................................................................148
Teaching the remote control ..................................................149
Loewe app ..................................................................................151
Technical data ..........................................................................155
bild 9 ................................................................................................. 155
Connections rear side of the device (bild 9.65/bild 9.55) .................. 155
Technical data (bild 9.65/bild 9.55) ....................................................... 156
Equipment features (bild 9.65/bild 9.55).............................................. 157
bild 7 .................................................................................................158
Connections rear side of the device (bild 7.77/bild 7.65/bild 7.55) .... 158
Technical data (bild 7.77/bild 7.65/bild 7.55).........................................159
Equipment features (bild 7.77/bild 7.65/bild 7.55) ............................... 160
bild 5 oled ........................................................................................ 161
Connections rear side of the device (bild 5.65 oled/bild 5.55 oled) ..161
Technical data (bild 5.65 oled/bild 5.55 oled) ...................................... 162
Equipment features (bild 5.65 oled/bild 5.55 oled) ............................. 163
bild 5 .................................................................................................164
Connections rear side of the device (bild 5.55/bild 5.48/bild 5.40) . 164
Connections rear side of the device (bild 5.32 dr+/bild 5.32) ........... 165
Technical data (bild 5.55/bild 5.48/bild 5.40/bild 5.32) ..................... 166
Equipment features (bild 5.55/bild 5.48/bild 5.40/bild 5.32) ........... 167
bild 4 .................................................................................................168
Connections rear side of the device (bild 4.55) ................................... 168
Technical data (bild 4.55) ........................................................................169
Equipment features (bild 4.55) ............................................................... 170
System settings (continuation) .............................................128 bild 3 (2017) .....................................................................................171
Connections rear side of the device (bild 3.65 oled/bild 3.55 oled) .. 171
Connections rear side of the device (bild 3.49/bild 3.43) ...................172
Technical data (bild 3.65 oled/bild 3.55 oled/bild 3.49/bild 3.43) .....173
Equipment features (bild 3.65 oled/bild 3.55 oled) .............................174
Equipment features (bild 3.49/bild 3.43) ...............................................175
bild 3 ................................................................................................. 176
Connections rear side of the device (bild 3.55/bild 3.48/bild 3.40) ..176
Technical data (bild 3.55/bild 3.48/bild 3.40/bild 3.40 FHD) .............177
Equipment features (bild 3.55 dal/bild 3.48 dal/bild 3.40 dal) ..........178
Equipment features (bild 3.55/bild 3.48/bild 3.40/bild 3.40 FHD) .. 179
bild 3 .................................................................................................180
Position and function of the connections (bild 2.55 oled) ..................180
Position and function of the connections (
bild 2.49 / bild 2.43
) ...........181
Technical data (bild 2.55 oled/bild 2.49/bild 2.43) ............................. 182
Equipment features (bild 2.55 oled/bild 2.49/bild 2.43) ....................183
bild 1 ..................................................................................................184
Connections rear side of the device (bild 1.65/55) .............................. 184
Connections rear side of the device (bild 1.40/32) .............................. 185
Technical data (bild 1.65/bild 1.55/bild 1.40/bild 1.32) .......................186
Equipment features (bild 1.65/bild 1.55/bild 1.40/bild 1.32).............. 187
bild (across sets) ............................................................................188
Signals via HDMI/AV (PC IN) .................................................................. 188
Signal input groups ...................................................................................191
Accessories ...............................................................................192
Upgrade kits / conversion kits / cables ................................................ 192
Mounting options (bild 9.65/bild 9.55) ................................................. 193
Mounting options (bild 7.77/bild 7.65/bild 7.55) ................................... 194
Mounting options (bild 5.65 oled/bild 5.55 oled) ................................ 195
Mounting options (bild 5.55/bild 5.48/bild 5.40/bild 5.32) ...............196
Mounting options (bild 4.55) .................................................................. 197
Mounting options (bild 3.65 oled/bild 3.55 oled/bild 3.49/bild 3.43) ....
198
Mounting options (bild 3.55/bild 3.48/bild 3.40) ................................ 199
Mounting options (bild 2.55 oled/bild 2.49/bild 2.43)....................... 200
Mounting options (bild 1.65/bild 1.55/bild 1.40/bild 1.32) .................201
VESA standard ......................................................................................... 202
Environmental ......................................................................... 203
Disposal .................................................................................... 203
Licences ................................................................................... 203
Troubleshooting ...................................................................... 205
CA module error codes ........................................................................... 212
Glossary .................................................................................... 213
EC Declaration of Conformity................................................. 217
Index ..........................................................................................218
Service ...................................................................................... 222
Code page ................................................................................ 223
Page 5

Loewe bild
User handbook
5
Welcome
Thank you,
for choosing a Loewe product and having placed your trust in us.
With Loewe you have not simply decided on a modern and technically
innovative TV set, but for timeless design, sharp picture quality, brilliant
sound for movies and music as well as intuitive operation with the
Loewe remote control unit, smart phone or tablet. In short, Loewe is
perfect for home entertainment.
We look forward to welcome you as our customer and hope that you
enjoy your Premium Home Entertainment made by Loewe.
Many features, one result:
perfect Home Entertainment.
Just more entertainment.
The Loewe os user interface is intuitive and graphically
optimised. This is how you quickly find your desired content
– from TV set to online.
See chapter: Home view.
Perfectly networked.
Thanks to its numerous connections, your Loewe TV
becomes your entertainment centre. Connect it to the
Internet, DVD/Blu-ray player, external speakers, etc.
Hard disk for your TV archive.
Record the TV programme or pause it and continue watching
it at a later date.
Depending on the set type, on an externally connected USB
hard drive or the hard drive installed in the TV set
(1
.
With DR+ (Digital Recording), all this is no problem for your
Loewe TV set.
See chapter: Digital Recorder.
Your contact person.
We are happy to help you with any questions regarding your
TV set and other Loewe products.
In the user handbook refer to Service.
Customer
Care
Center
About this user handbook
For best results regarding safety and the longevity of the set, we
recommend you read the chapter Safety/Warning before switching
the TV set on for the first time.
This user handbook can be used for all current Loewe bild TV sets. The
equipment and function scope varies according to set type.
The Technical data chapter is structured according to set lines and
gives you information about the features of your TV set.
For differences in the functional descriptions, refer to the features in
the Technical data chapter.
The chapter glossary gives explanations of certain terms used in the
TV set and the user handbook.
Paragraphs which begin with the symbol
indicate important
instructions, tips or conditions for the following settings.
Terms which you will find in the menus or printed on the remote control
or TV set are written in bold type.
The necessary control elements are shown in the descriptions to the
left of the text containing the instructions for action.
Depending on the connected accessory equipment the menus in the
TV set can differ from those described here. The screen graphic displayed is only an example. Depending on the device type, the available
hardware/software components may be different.
All the channel names, programme contents, the illustrated photos,
titles, albums and album covers in this user handbook are examples.
In addition to the remote control, a PC keyboard can be connected to
one of the USB ports on your TV and then used to control your TV set.
In the user handbook, this symbol indicates places in
which the use of a keyboard is particularly advantageous.
With the Loewe app, you can also comfortably enter addresses or
search terms. Simply mark the input field for this, the Loewe app
displays automatically a keyboard symbol. Open Loewe app keyboard,
enter and confirm.
The user handbook is updated at irregular intervals. We recommend an
occasional examination on the Support Portal of the Loewe homepage.
General information on the operation of the
TV set
For further information on the user interface and the general operation
of your TV set see chapter General information on the operation.
Important information
Loewe does not accept any liability for the nature and content of
receivable Internet services. This also applies to the Loewe MediaNet
portal. With its devices, Loewe provides the technical platform that
fundamentally enables such material to be received. Loewe cannot
make any guarantees regarding changes in scope and content,
particularly with regard to the future and after going to press. The
receivable online services are not included in the delivery and can vary
depending on the product and country.
(1
Availability varies by device type (see chapter Technical data - equipment features for your TV set).
Page 6

Loewe bild
User handbook
6
Safety/Warning
Safety/Warning
For your safety, and to avoid unnecessary damage to your unit, please
read and follow the safety instructions below.
Key
This symbol indicates risks caused by high voltages.
This symbol indicates dangers caused by the development
of fire.
This symbol should alert the user to other, more specific risks.
This symbol indicates dangers caused by sharp edges.
Do not remove set rear panel
Warning: When opening or removing the rear panel, there is the dan-
ger of electric shock and the risk of serious injury from high voltages.
Never open the rear panel yourself. Leave repairs and servicing work
on your TV set to qualified, authorised television technicians.
Please contact your dealer or our customer service.
Intended use and environmental conditions
This TV set is intended exclusively for the reception and
playback of picture and sound signals.
The TV set is designed for dry rooms (living rooms and office
spaces). It must not be operated in spaces with high humidity
(for example, near or in a bath or sauna).
We point out that our TV sets can react sensitively to dust and
soot particles in the ambient air.
Excessive amounts of these can lead to damage to the set, up
to loss of function.
Ensure a clean environment, so that your set will not be
damaged.
High humidity and dust concentrations lead to power leaks in
the set. This can lead to danger of injury and damage to the set
by electric tensions or a fire.
If the set is used outdoors, make sure therefore that it is
protected against moisture (rain, dripping or splashing water
or condensation).
If you’ve brought the set from the cold into a warm environment,
leave it off for around an hour due to the formation of
condensation.
Do not place objects filled with liquid on the
set. Protect the set from dripping and
splashing water.
Candles and other open flames must be
kept away from the set at all times, to prevent the spread of fire.
Transport
Improper handling during transportation can lead to damage
to the display and risks of injury.
The screen consists of glass or plastic and can break if handled
improperly.
Only transport the set in a vertical position.
No pressure should be applied to the glass or the plastic during
transport.
For TV sets with OLED screen:
Only handle the TV set at the display corners. The correct
handling is shown in operating instructions 1, which are
enclosed with the TV set.
Do not place it on the lower edge so as to reduce the danger of
damage and contamination.
For TV sets with Loewe Eye:
Make sure that the Loewe Eye is not damaged when
transporting / handling the TV set.
The TV sets with OLED screen of the set product lines bild 3,
bild 4 and bild 5 have a different packaging concept from bild
7 and bild 9.
With these sets you can, as a protective box is located in front
of the display, after unpacking the device, also place this on this
protective box, also on the front side.
The TV sets of the device product lines bild 9 and bild 7 must
not be placed on the front side (display surface).
For TV sets with LCD screen:
Grasp the set by the edges of the housing at the bottom and at
the top.
Do not place it on the lower edge so as to reduce the danger of
damage and contamination.
For TV sets with Loewe Eye:
Make sure that the Loewe Eye is not damaged when
transporting / handling the TV set.
If the set needs to be stored during packing / unpacking, place
the TV set with the entire surface of the front side on a soft
underlay. Use as an underlay, for example a blanket or fleece
from the packaging material.
In the event of damage to the LCD screen and any leaking liquid
crystal, be sure to use rubber gloves to remove the set.
In case of skin contact with the fluid, clean immediately with
plenty of water.
Mains cable/power supply
Incorrect voltages can damage the set.
This set may only be connected to a mains power supply with
the voltage and frequency indicated on the rating plate using
the existing
(1
/ enclosed mains cable.
The mains power plug of the TV set must be easily accessible
so that the set can be disconnected from the mains at any time.
When pulling the mains power plug out, do not pull the cable
but the plug housing. The cables in the mains power plug could
be damaged and cause a short circuit when plugged in again.
A mains power cable with a damaged insulation can lead to
electric shock and presents a fire hazard. Never use a damaged
mains cable.
Lay the mains cables so that they cannot be damaged. Do not
tread on the mains cable.
The mains cable must not be kinked or laid over sharp edges.
(1
Availability varies by device type (see chapter Technical data - equipment features for your TV set).
WARNUNG
STROMSCHLAGGEFAHR –
NICHT ÖFFNEN
Page 7

Loewe bild
User handbook
7
Safety/Warning
Air circulation and high temperatures
Like any electronic device, your TV set requires air for cooling.
If air circulation is impeded, it may result in a fire.
The ventilation slots on the rear panel of
the set must therefore remain free.
Please do not cover the set.
Wall mounting: Leave at least 10 cm of
space all around the set at the side,
above and below.
Table / stand foot: Leave at least 10 cm
clear space around the set at the side
and at the top.
Foreign bodies
Foreign bodies inside of the set can lead to short circuits and
fires.
Danger of injury and damage exists
Therefore avoid metal parts, needles, paper clips, liquids, wax
or similar passing through the ventilation slits of the rear
panel into the interior of the set.
Should something get into the interior of the appliance, immediately pull out the mains power plug of the set and inform
the customer service department for checking.
Installation
Opting for an incorrect or wrongly mounted installation can
lead to danger of accidents Rolling or falling sets can cause
injuries or damage.
Loewe TV sets are specified for Loewe accessories. We strongly
recommend the use of original Loewe installation options.
Do not use any installation options that are not approved for
your TV set!
Note the instructions regarding the mounting for the different
possible installation options! A corresponding documentation
is included with every Loewe product.
Check before the installation of the set, whether the final location with regard to the surface (pressure sensitivity) and stability (static) is designed for the load from the set! This applies in
particular to high-gloss lacquered surfaces and surfaces made
of real wood, real wood veneer and plastic surfaces.
Only place the TV set on a levelled, stable, horizontal base with
table or stand foot! The set should especially not protrude at
the front when installing in or on furniture.
Not placing the television set on cloth or other materials that
may be located between television set and supporting furniture.
Educating children about dangers of climbing on furniture to
reach the television set or its controls.
The usual usage position of the TV set should be followed. The
TV set can only be operated horizontally upright
A
. The
inclination can amount to a maximum of 10 degrees for wall
mounting
B
. The TV set must never be operated in portrait
orientation,
C
, horizontal D or overhead on the ceiling E .
Position the set so that it is not exposed to direct sunlight and
additional heating from radiators!
Do not place the TV in a location where vibrations can arise!
This can lead to damage.
In the case of installation options for third-party manufacturers
with a motor drive, it is to be ensured that the adjustment of the
TV set does not occur manually. It is generally not advisable to
use the installation options of other manufacturers with locking
devices in certain positions.
When using accessories from third-party manufacturers, it is
to be ensured that the TV set is easily adjusted for the respective installation option.
When adjusting the TV set, ensure that
the pressure applied to the set frame
is not too great. Especially in large
format displays, there is the danger
of damaging the display.
For TV sets with OLED:
OLED technology allows for a design with an extremely thin dis-
play. When you have mounted your TV set on a non-motorized
installation option, avoid over excessive force when rotating
the TV set.
For TV sets with VESA mounting points:
The mounting of a TV set on a On a holder according to the
VESA standard requires mandatory use of the VESA adapter
bolts. Otherwise, damage to the TV may result.
The Vesa adapter bolts must be attached to the TV set with a
torque of circa 4 Nm. You can obtain these from your Loewe
dealer (you can find further information in chapter Miscellane-
ous, section VESA standard).
Make sure that after unpacking and setting up the TV set the
packaging material (TV box, Styrofoam shells and protective
fleece) does not fall carelessly into the hands of children.
Please also note the disposal instructions for packaging and
carton (see chapter Environment / Legal information, section Disposal).
±10°
D
A B
C
E
D
Page 8

Loewe bild
User handbook
8
Supervision
Do not let unsupervised children handle the TV set nor let them
play immediately around the TV set!
The set could be knocked over, moved or pulled down from the
stand surface and injure people.
Do not leave the TV set when switched on unattended!
Volume
Loud music can lead to hearing damage. Avoid extreme sound
volume, especially over extended periods of time and when
using headphones!
Thunderstorms
During thunderstorms, pull out the mains power plug and all
connected antenna cables from the TV set!
If you have connected a network cable to the LAN port, remove
this as well!
Over-voltages due to lightning strike can damage the set both
via the antenna system and via the mains power supply.
Even in the case of prolonged absence, the mains power plug
and all connected antenna cables should be disconnected from
the TV set.
Cleaning and care/chemicals
Before cleaning, switch the TV set off using the mains power
switch!
Damages caused by chemicals can lead to adverse effects and
development of fire.
Never expose the set or accessories to aggressive (for example,
corrosive) chemicals such as alkalis or acids!
Only clean the TV set, the front screen and the remote control
with a damp, soft, clean and colour neutral cloth, without any
aggressive or scouring cleaning agents!
For TV sets with textile-covered speaker panel:
Hoover the surface regularly with a soft brush attachment!
On stains or dirt, moisten a soft, colour neutral cloth with detergent solution or commercially available stain remove and
rub the stain gently away! You can also treat the stain directly
with a commercial dry stain remover spray (hoover up the
dust).
Do not moisten the covering fabric directly with detergent solution or stain remover (risk of stain circle formation)! Do not use
solvents to clean the fabric!
Note the usage instructions of the manufacturer when using
stain remover!
When cleaning loudspeaker panels which have been exposed
to nicotine, there is an increased risk of stain circle formation.
TV sets with 3D function
(1
Read the following safety instructions before using the 3D
function of your TV set.
Please use the Loewe 3D TV sets only with the Loewe 3D
glasses which can be purchased as an accessory from your
Loewe dealer.
People with a visual disorder may not be able to perceive 3D
effects or may only be able to perceive them to a limited extent.
People who are sensitive to flickering images (e.g. those with
epilepsy) should only use the 3D function after having consulted
their doctor.
It might take some time for you to get used to the 3D glasses
and before you can perceive the 3D effects properly.
Stop using the 3D function immediately if you experience
any feelings of nausea, dizziness or malaise when viewing 3D
content.
Supervise children whilst they are viewing 3D content, as they
can be particularly sensitive to it.
Allow more time for a break after having watched 3D movies,
so that you are able to relax. Failure to do so could result in
headaches, fatigue, dizziness or malaise.
Position yourself comfortably in front of the 3D TV set and ensure that you are seated firmly. By doing this, you will avoid any
injuries that may occur due to reacting to extreme 3D content.
Technical information
Instructions on the built-in / connected hard drive
Switching off the TV set with the mains switch during operation or
an inadvertent disruption to the power supply (e.g., power failure)
can cause damage to the hard disk file system and hence loss of the
recorded broadcasts.
Never ever disconnect the USB storage device from the TV set during
a copy process. Before switching off the set with the mains switch, we
recommend you to switch it to standby mode.
If, contrary to expectation, you are still experiencing problems with the
operation of the hard drive, you can first carry out a test. In addition,
a formatting of the hard disk can be remedy. In the process, however,
all content on the hard disk is deleted. You can find the corresponding
menu items under System settings ט Control ט more...ט Hard
disks.
Loewe are not liable for the loss of data on the integrated hard disk
(1
of your TV set. To avoid data loss, we recommend copying important
recordings to an external storage medium.
Safety/Warning
(1
Availability varies by device type (see chapter Technical data - equipment features for your TV set).
Page 9

Loewe bild
User handbook
9
Notes on the LCD / OLED screen
The TV set with LCD screen or OLED screen purchased by you meets
the highest quality standards and has been checked for pixel errors.
Despite of thorough care when manufacturing the display, it cannot
be 100% guaranteed that no subpixel defects will occur due to technical reasons.
Please understand that these types of effects, as long as they are
within the limits specified in the standard, cannot be considered as a
device defect in terms of the guarantee.
For TV sets with LCD:
Avoid displaying static images over a longer period. Image persistence
errors may arise.
For TV sets with OLED:
Organic Light Emitting Diodes are an image technology based on
self-luminous pixels that offer clear benefits in terms of image quality
and performance.
Under certain conditions, persistent, one-sided loads on the OLED
material can result in persistence image faults which are irreversible.
Residual image issues can arise by using static image content over a
longer period, such as static images, subtitles or ticker displays, looping dia-shows or video sequences, static displays serving as presentation monitors or with video games, black bars in some screen formats.
These residual image issues are not defects within the meaning of
the warranty.
To minimise such issues, Loewe has developed a special algorithm
for detecting image content.
If static images are displayed for too long, the TV set automatically
switches to a screen-friendly contrast mode. After a new user operation, the device immediately returns to its normal state. In addition,
menu insertions are gradually reduced or displayed transparently
after one minute.
Under normal viewing conditions, such residual image issues do not
arise.
Notes on Kinematics
The Loewe TV sets types bild 9 and bild 7 are equipped with a kinematics that moves the TV set upwards or downwards when switching it on
and off, whereby the speaker cover is visible or is hidden.
Please make sure that there is no externally applied force opposing the
movement. You have the option to fix the position of the kinematics
from the menu, or disable the function.
You can find further information in the chapter System settings,
section Control – Display kinematics.
Software update
It is possible to update the software on your Loewe TV set.
In the software update (package update) all the software releases in
the TV set are scanned and updated as required.
You can find further information in the chapter System settings,
section Control – Software update.
Safety/Warning
Information about OLED calibration
Only for set types with OLED display
(1
.
To maintain the high quality of picture display permanently, your Loewe
TV set calibrates itself automatically at regular intervals. In this way,
excess TFT capacitors are discharged and so-called image sticking
effects / „ghost images“ are eliminated.
When switching off the TV set from the remote control, where necessary, the calibration process is started and lasts for a maximum of
thirty minutes.
During this period, the power supply to the TV set must not be interrupted.
After the calibration is complete, the TV set switches to Standby mode.
Calibration does not take place during normal TV operation and so will
not have any negative impact on usage of the TV set.
If calibration is terminated by switching the set back on prematurely,
the TV-set will attempt to perform a recalibration again the next time
the TV is switched off.
You still have the possibility to start a refresh procedure manually by
means of the user menu of your Loewe TV set.
Call OLED calibration
HOME: Call Home view.
Select System settings,
OK call System settings.
Select Picture,
go to next column.
Select more ...,
call other settings.
Select OLED calibration,
OKCall.
A calibration of the OLEDs is required every 1500 hours. This also starts
automatically when the TV set is switched off using the remote control.
Calibration lasts one hour maximum. If calibration was not finished
properly, an on-screen image will indicate this.
After the calibration is complete, the TV set switches to Standby mode.
(1
Availability varies by device type (see chapter Technical data - equipment features for your TV set).
Page 10

Loewe bild
User handbook
10
Remote control
(1
The assignment of these keys can be changed. The description refers to the standard setting. The factory setting of the keys can vary depending on the firmware version of the
remote control.
(2
Depending on the settings HbbTV mode on/off, start behaviour of HbbTV channel (System Settings
ט
Control
ט
more ... ט HbbTV)
.
(3
Depending on the set type, on an externally connected USB hard drive or the hard drive installed in the TV set (see chapter Technical data - equipment features for your TV set)
Remote control button mapping
Depending on the selected operating mode (TV/Video/Audio/Photo/Apps) and function (e.g. DR+, EPG, PIP, Teletext, HbbTV, etc.), the key assignment
may differ from the assignment described here (see the corresponding chapter).
1
2
3
4
5
6
7
8
9
10
11
12
13
14
15
16
31
18
19
20
21
22
23
24
25
26
27
28
29
30
32
17
1
Sound mute/on.
2
LED display for currently operated device.
3
Call the TV mode.
4
Reassign remote control to Set-Top-Box
(1
(presetting: Apple TV).
5
Pressing briefly
: Open the DR+ archive.
P
ressing longer
: Call timer.
6
Pressing briefly
: Add current object to Home favourites.
P
ressing longer
: Open App Gallery. (standard assignment)
(1
7
EPG (Electronic Programme Guide) on/off.
8
Teletext/MediaText
(2
on/off.
9
Pressing briefly
: Call menu options for the active operating mode.
P
ressing longer
: Call System settings.
10
V+/V- increase/reduce volume.
11
Pressing briefly: Call channel list.
Pressing longer
: Call
expanded channel list.
In the menu: confirm/call up.
12
Green coloured key: screen on/off in Audio/Radio mode.
13
Red coloured key: call preferred value-added network service, if available
(
2
.
14
Pressing briefly: skip backwards.
Pressing longer: winding backwards.
15
Pressing briefly: direct recording (with determination of recording duration)
(
3
.
Pressing longer: One Touch Recording
(
3
.
16
Pause / Start/pause the timeshift television
(
3
.
17
Stop / End timeshift (return to live image)
(
3
.
18
Pressing briefly: skip forwards.
Pressing longer: winding forwards.
19
Play / Start/continue timeshift television
(
3
.
20
Blue coloured key: call channel menu options
(selection of language/sound, subtitles or channel/video track).
21
Pressing briefly: Yellow coloured key: call history.
Pressing longer: Yellow coloured key: call last channel.
22
Navigation on the user interface, select objects.
In the menu / lists: select/set.
23
P+/P– next/previous channel.
24
Pressing briefly: step / level back.
Pressing long: close all displays.
25
Press briefly during an on-screen display: info display. Info text appropriate to the content
that can assist you further, should you have any questions about your TV set.
Press briefly, without on-screen display: access status display. With status display open
and repeatedly pressing the key call the detailed information on the broadcast.
Press longer: show Explanation of keys.
26
PIP (picture in picture) on/off.
27
Call up the Home view.
28
Select channels with numeric buttons directly.
In the menu: enter numbers or letters
29
Call Sources.
30
Reassign remote control to video device
(1
(presetting: BluTech Vision 3D).
31
Call radio mode (standard assignment) (1.
32
Switches the TV set on (mains switch must be turned on) or switches to standby mode.
Press briefly while TV set is switched on: TV set and all CEC-enabled devices connected to
the HDMI ports will be switched off to standby (System Standby).
Page 11

Loewe bild
User handbook
11
3
Display:
white: TV set in standby.
Depending on the ambient brightness, the
white LED display is dimmed and lights
up with a different degree of brightness
(OPC)
(1
.
If the TV set is in quick start mode, the
white LED display is not dimmable and
starts with full brightness.
white, intermittent:
TV set starts.
green: TV set switched on.
red: timer recording active.
blue:
TV set in standby and background operation active (EPG
data updating, software update or streaming server
function
(1
, OLED calibration
(1
).
4
IR receiver:
Infrared receiver for receiving the remote control commands.
5
Key M / joystick direction M:
TV set in standby mode: switch on TV set with the last selected
mode (TV/Radio).
TV set switched on: call direct control on TV set.
Direct control on TV set: up .
6
Key R / joystick direction R:
TV set in standby mode: switch on TV set with the last selected
mode (TV/Radio).
TV set switched on: toggle TV mode and radio mode.
Direct control on TV set: down .
7
Key V+ /joystick direction +:
TV set in standby mode: switch on TV set with the last selected
mode (TV/Radio).
TV set switched on: Increase volume.
Direct control on TV set: to the right .
8
Key V– /joystick direction – :
TV set in standby mode: switch on TV set with the last selected
mode (TV/Radio).
TV set switched on: Reduce volume.
Direct control on TV set: to the left .
9
Key P +:
TV set switched on: Programmme + (next channel).
10
Key P –:
TV set switched on: Programme – (previous channel).
11
On/Off button / Press joystick:
Switching on in standby mode
Switching off to the standby mode
Operating controls on the TV set
Operating controls on the TV set
(1
1
Mains switch:
Always return the TV set to Standby mode before switching it off
with the main switch.
The position of the mains supply switch for your TV set can be
found in the chapter Technical data.
2
Infrared transmitter:
When showing 3D content
(1
, the 3D glasses Loewe Active
Glasses 3D are controlled via the infrared sensor.
(1
Availability and position varies according to device type (see chapter Technical data - equipment features for your TV set).
M
R
V+
V-
P+
P-
M
_
R
+
5
6
7
8
9
10
11
5
6
11
7
8
4
1
2
3
3
4
Page 12
Loewe bild
User handbook
12
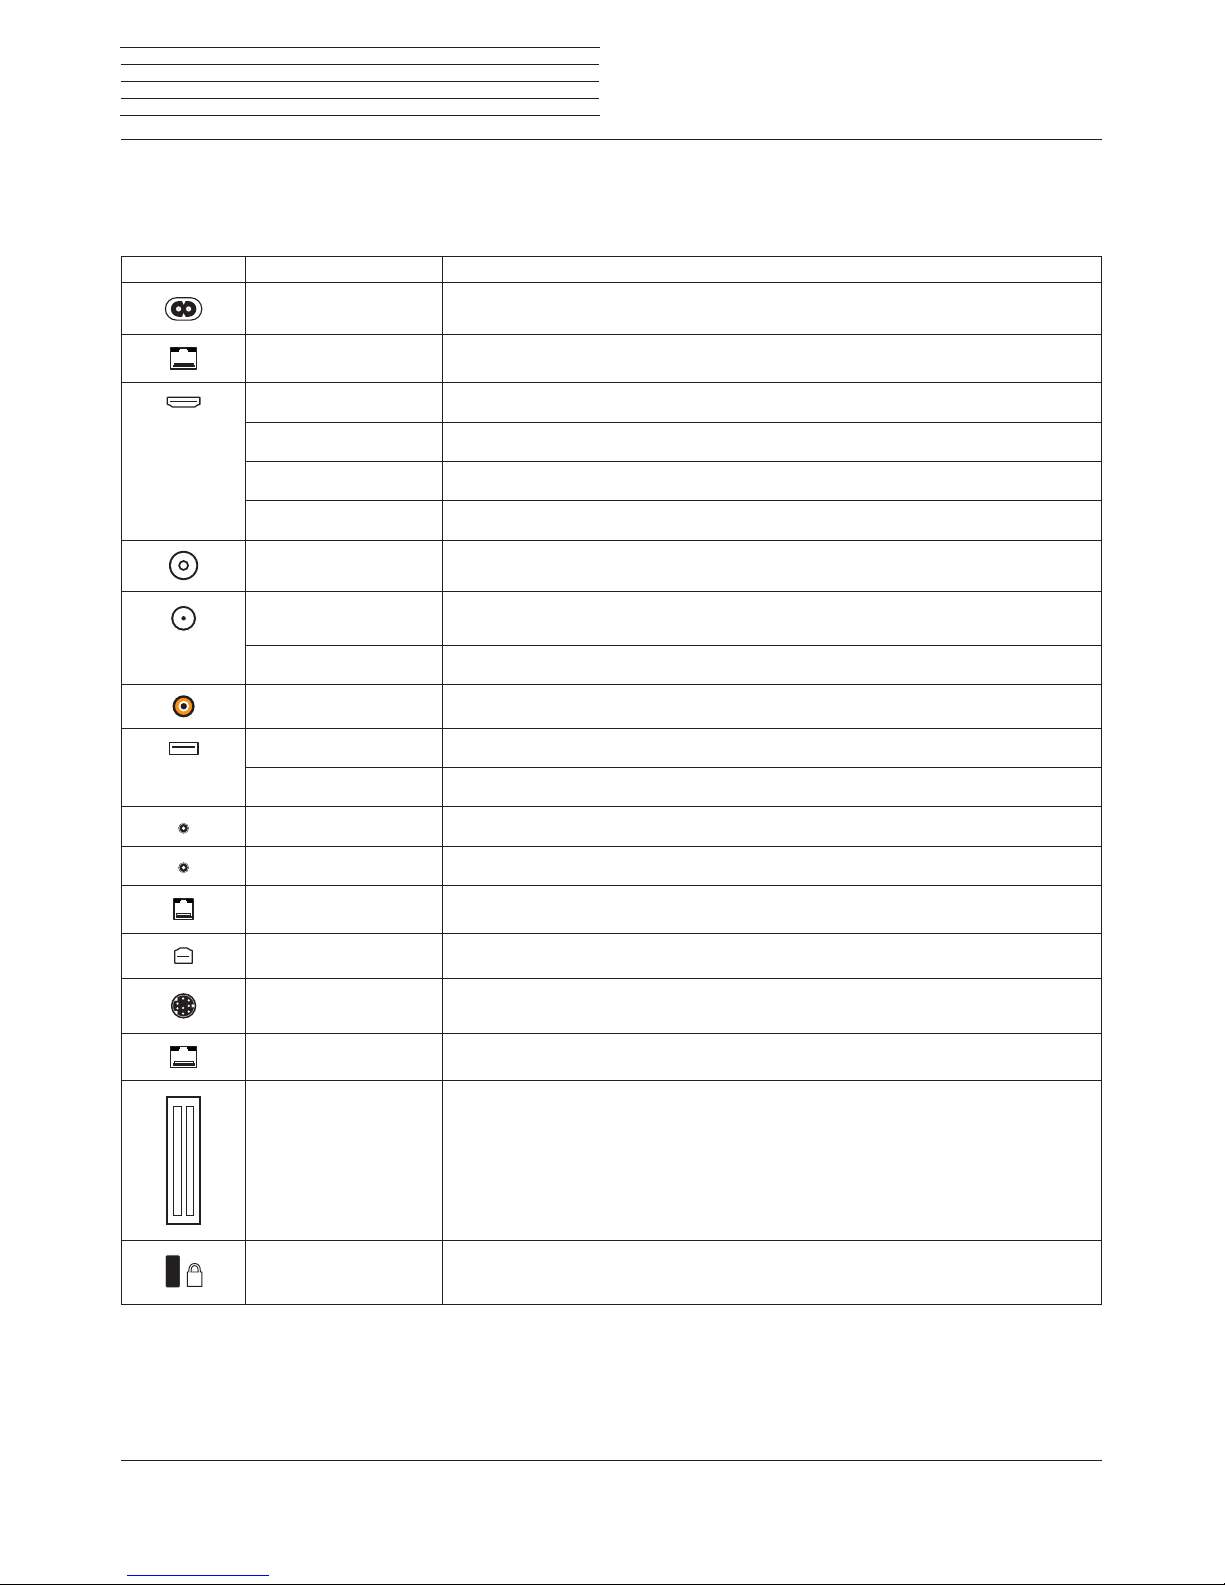
Function of the connections
Function of the connections
The position, availability and number of connections on your TV set vary depending on the set type.
Detailed information on the position and function of the connections for your TV set type can be found in the chapter Technical data.
Connection: Labelling: Function:
AC IN
Mains connection
LAN
Network connection
HDMI 1 ARC
HDMI input 1 (with Audio Return Channel)
HDMI 2
HDMI input 2
HDMI 3
HDMI input 3
HDMI 4
HDMI input 4
ANT TV
Antenna/cable analogue / DVB-T/T2 / DVB-C
ANT SAT 1
Satellite antenna (Sat tuner 1) DVB-S/S2
ANT SAT 2
Satellite antenna (Sat tuner 2) DVB-S/S2
SPDIF OUT
Audio output (digital)
USB 3.0
USB connection
USB
USB connection
HEADPHONE
Headphone connection
AUDIO OUT
Audio output (analogue) L/R
RS-232C
Serial interface
AV
Micro AV socket
MOTOR UNIT
Rotating stand control
DIGITAL AUDIO LINK
Surround audio outputs (digital)
COMMON INTERFACE
CI slot
K
Slot for Kensington lock
Page 13
Loewe bild
User handbook
13
Installing the TV set
Mounting options / Installation notes
Your Loewe dealer can also assist you in finding other mounting
options. Look for the corresponding directions in the installation
instruction.
Choose a place for installing your TV set where no bright light or
sunlight shines directly onto the screen. This could cause reflections
which impair the picture.
3 times the screen diagonal can be taken as a guide value for the
viewing distance (e.g., for a 55-inch set approx. 4.2 m for SD signal).
The viewing distance can be reduced with an HD/UHD signal.
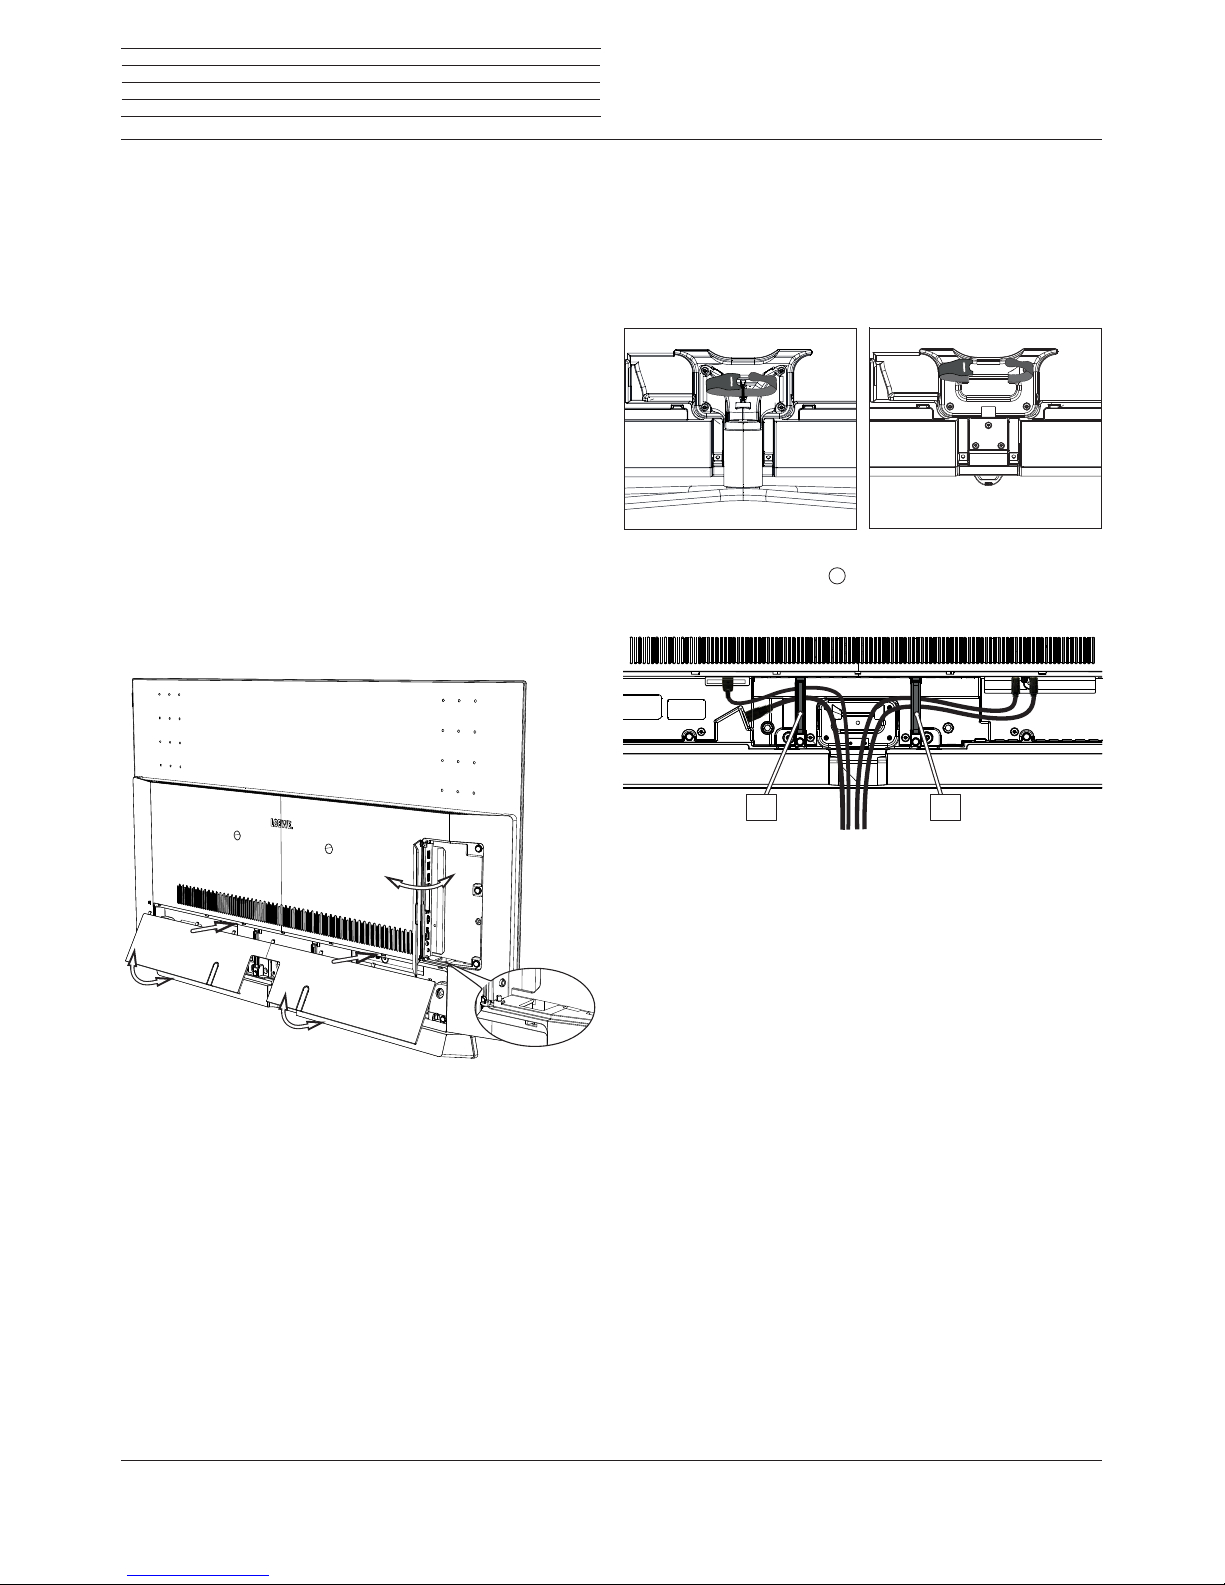
Set covers
Covers for rear and side connections
(1
In order to remove the rear side cable covers pull them simply from
the device.
To fit the cover, insert the lugs at the top edge of the cover into the
corresponding cut-outs in the rear panel and push up the cover until
it snaps in.
The side cover of the TV set can also be completely removed. For this,
open it as far as it will go and gently pull on the open cover.
The cover detaches from the holder and gives free access to the connection area. To insert the cover, simply push it back onto the holders.
A cable bushing connects the lateral and posterior terminal region. In
this way you can pass the cables of the lateral connections through
and lay them out together with the rear connecting cables.
Preparing the TV set
Cable fixing
Using the Velcro cable tie supplied, you can fix the rear cables.
When the TV set is mounted on the Table Stand, the connection cables
are fixed to the Table Stand (see figure).
When using a wall bracket (Wall Mount is available as an accessory
from your specialist dealer), the connection cables are fixed to the
two recesses on the rear of the set (see figure).
If the set type
(1
is equipped A with a removable cable holder, you
can additionally fix the rear connection cables to the rear wall of the
housing.
Table Stand
Wall Mount
A A
(1
Availability different according to set type.
Page 14

Loewe bild
User handbook
14
Connecting the TV set
Connecting to the mains supply
Remove the cover for the connections.
Connect the TV set to a 220-240V mains socket:
With built in mains cable: Connect the mains supply plug of the mains
supply cable attached to the TV to a power outlet.
With external mains cable: First plug the smaller plug (small set plug)
of the mains supply cable into the mains supply connector (AC IN)
of the TV set and then connect the larger plug (Euro plug) to a mains
supply socket.
Connecting antennas
(1
Cable (analogue)/DVB-C/DVB-T antenna:
Plug the cable of antenna, cable TV system or room antenna into the
ANT TV socket.
If you want to use analogue cables/DVB-C connection and a DVB-T
antenna together, use an external antenna switch (available from
your dealer).
Satellite antenna DVB-S:
Depending on the used satellite system, connect a connecting cable
from the multi-switch or directly from the LNC to the ANT SAT1 and
ANT SAT2 sockets of the TV set respectively.
When connecting the TV set to a single cable community antenna,
connect the ANT SAT1 and ANT SAT2 sockets directly to the
appropriate SAT antenna socket.
AC IN
ANTTVANT
SAT1
ANT
SAT2
R TV
Cable
analogue /
DVB-C
DVB-T DVB-S
When connecting the TV set to a DiSEqC single cable community
antenna (in accordance with EN 50494), connect the ANT SAT1
socket directly to the appropriate SAT antenna socket.
For a DiSEqC single-cable shared system, you only need in principal
only one antenna cable. The further sub-division of the signal to
the two reception pathways is transferred by the satellite tuner of
the TV set.
If you want to use two transmission channels of the DiSEqC single-
cable shared system (for example, for different channels main
picture / PIP picture), both channels are received on a SAT antenna
cable.
In the antenna configuration one antenna cable must be provided.
It is possible to reuse an existing SAT cabling with two connection
cables on a DiSEqC single-cable shared system. However, the
system components used (sockets, distributors, etc.) must be
designed for DiSEqC operation.
If you want to use two channels of the DiSEqC single-cable shared
system (for example, for a different channels main picture / PIP
picture), then one channel will be received per SAT antenna cable.
In the antenna configuration, two antenna cables and the number
of used channels thus also must be set to “two“ .
Ask your dealer in this regard.
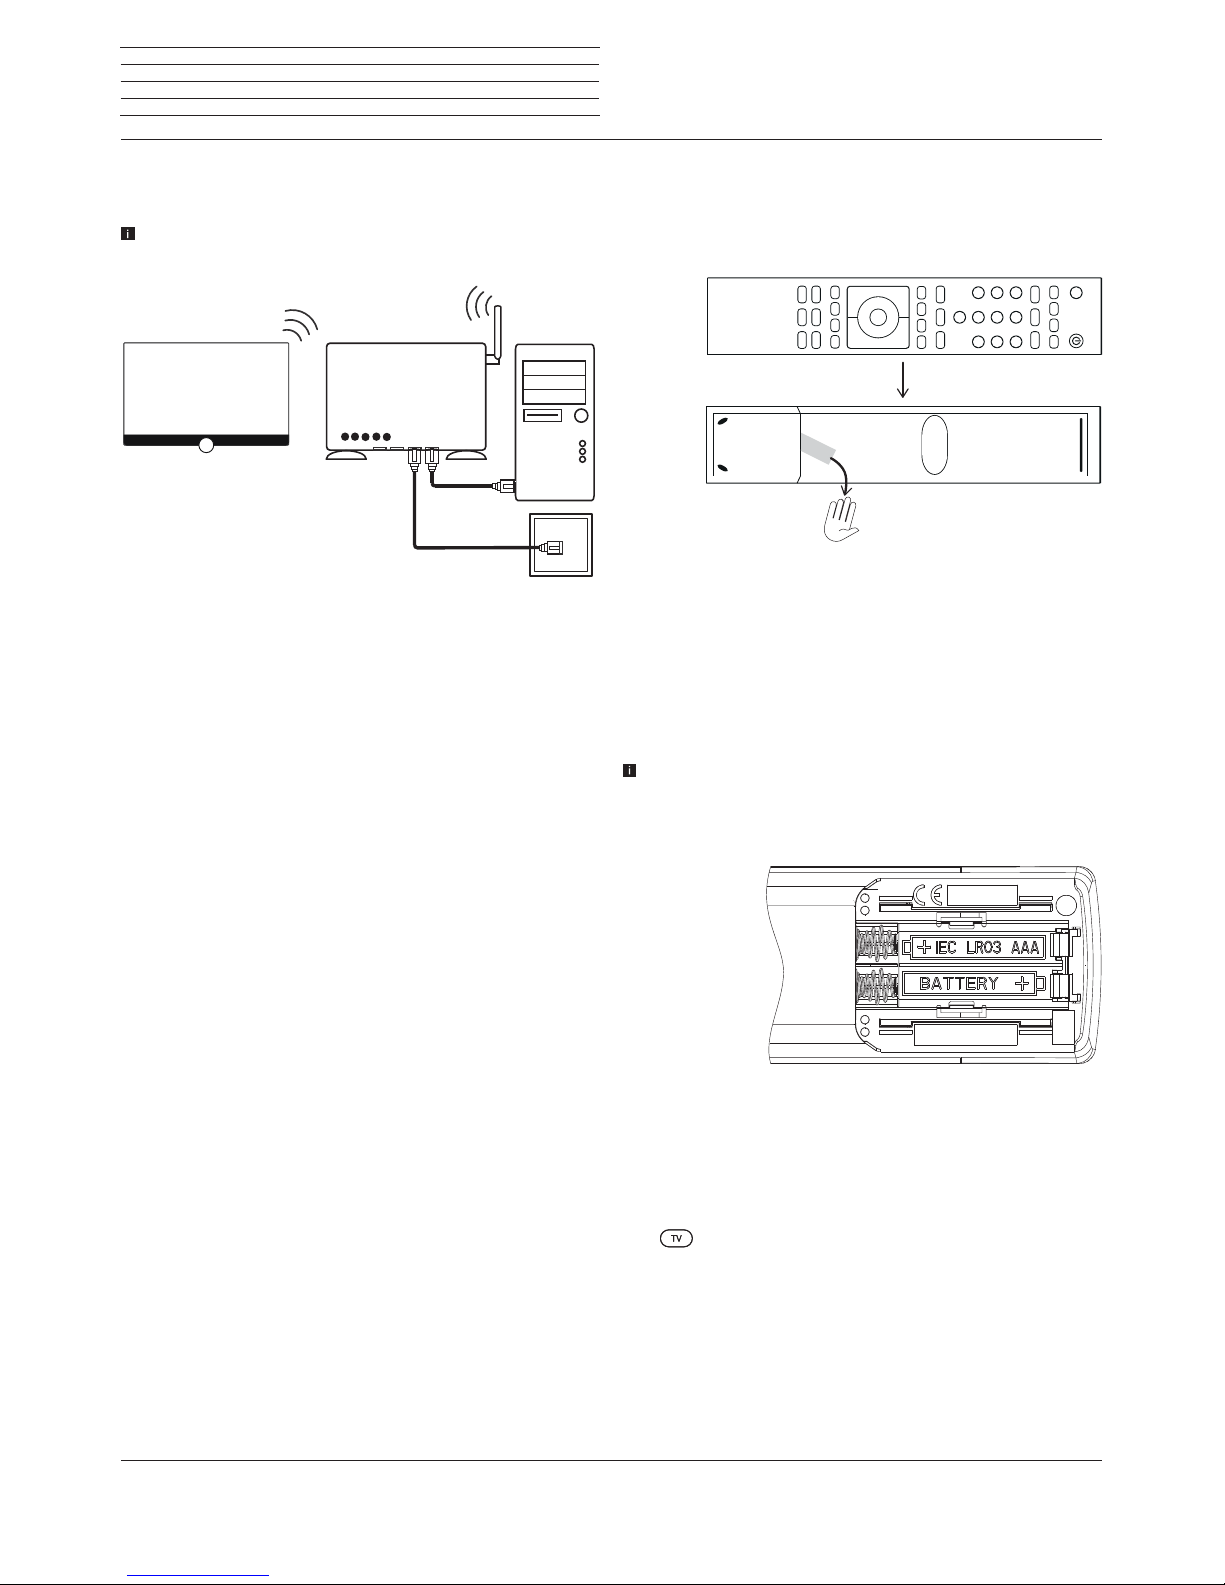
Connecting the TV set to the Home network
You may link your TV set to the home network by a wired connection
(Ethernet, Powerline adapters separately available) or by a wireless
radio connection (WLAN). For wireless connections, the TV set has
an internal WLAN antenna.
In order to play back data from your home network your Loewe TV
supports the UPnP AV standard.
You call the network wizard to configure the network adaptor (System
settingsטMultimedia/NetworkטNetwork settingsטNet-
working).
Under no circumstances may the TV set be wired and at the same
time connected by a wireless connection to the same network, e.g.
router. This may cause severe operational faults!
Example for a wired connection
Connect the LAN socket of your TV set to the LAN switch/router of
your home network with a network cable (available from your dealer).
DSL
LAN
LAN switch/router
TV set
PC
Preparing the TV set
(1
Availability varies by device type (see chapter Technical data - equipment features for your TV set).
Page 15
Loewe bild
User handbook
15
Preparing the TV set
Example for a wireless connection
You can connect the TV set to your home network by a wireless radio
connection via the WLAN antenna inside the set.
Shadow effects of various materials, such as reinforced concrete,
metal surfaces, etc., attenuate the WIFI signal sometimes
significantly or completely.
Help for configuration problems
Loewe cannot provide any support for PC hardware and software or
network components owing to the diverse configuration options with
home networks.
Please contact the administrator of your home network and/or specialist
dealer for support when setting up and for maintenance of network
connections, storage media, media server software and network devices
such as routers.
DSL
WLAN router
TV set
PC
Preparing the remote control unit
Removing the battery protection
The remote control is supplied with batteries. To make them ready for
use, remove the plastic flag out as shown below.
Inserting or replacing batteries
Press on the embossed arrow whilst pushing the battery cover down.
Only use leak-proof micro-cells of the LR 03 (AAA) Alkali-Manganese
type. Do not use different types of batteries and old and new batteries
together.
Make sure that the batteries do not get into the hands of children.
The batteries used must not be exposed to excessive heat such as
sunlight, fire or similar!
The position of the batteries is indicated in the battery compartment
(in opposite directions). Pay attention to the correct polarity of +
and – when inserting the batteries.
Do not be guided by the battery
contacts (springs), but by the illustration at the bottom of the battery
compartment.
If the batteries are too weak after longer use, the TV set prompts you to
change the batteries. Dispose of used batteries in an environmentally
friendly way (see chapter Environment/Legal information).
Push the cover back on from below after having inserted the batteries.
Adjusting the remote control unit for operating the TV set
Press the TV key.
Page 16

Loewe bild
User handbook
16
Switching the TV set ON/OFF
Switching the TV set ON/OFF
Switching TV set to the standby mode
Put the mains supply switch into Pos I .
The LED display lights up white for a short time. The set now finds
itself in the standby mode.
Meaning of the LED colours:
white: TV set in standby.
Depending on the ambient brightness, the
white LED display is dimmed and lights
up with a different degree of brightness
(OPC)
(1
.
If the TV set is in quick start mode, the
white LED display is not dimmable and
starts with full brightness.
white, intermittent:
TV set starts.
green: TV set switched on.
red: timer recording active.
blue:
TV set in standby and background operation active (EPG data updating, software
update or streaming server function
(1
,
OLED Calibration
(1
).
After switching on the TV set, it takes a few seconds for further oper-
ating commands to be processed (Exception: Quick start mode, see
chapter System settings, section Control – Quick start mode).
Your TV set is ready for operation once the LED display lights green.
Switching the TV set on by means of the remote control
Press the on/off key.
Or:
Press the TV key.
The previously watched channel will be called.
Or:
Press numerical keys 1-9.
The corresponding channel will be called.
After switching on the TV set, it takes a few seconds for further oper-
ating commands to be processed (Exception: Quick start mode, see
chapter System settings, section Control – Quick start mode).
Your TV set is ready for operation once the LED display lights green.
Switching the set off with the remote control (Standby)
Press the on/off key.
Switch TV set and all CEC-capable devices connected
to the HDMI interfaces OFF to Standby mode.
Before switching off the set with the mains switch,
we recommend you to switch it to standby mode.
Quick start mode
If you choose to activate the quick start mode, you will see the TV
screen immediately after each switching on of the TV set and without
any waiting time. You can specify the times at which your device will
be in the Quick Start Mode (see chapter System settings, section
Control – Quick start mode).
In this case, please note the higher power consumption (see chapter
Technical data) and thus a higher annual energy consumption.
Default setting for the Quick Start Mode: off
.
(1
Availability varies by device type (see chapter Technical data - equipment features for your TV set).
Page 17

Loewe bild
User handbook
17
General information on menu operation
The most important keys for navigation will be explained in general.
The numbers in the text refer to the figure showing the remote control
in chapter Remote control.
The arrow keys
22
help you to navigate in the menus and lists of the
TV set and for selecting menu items. They are arranged in the middle
of the remote control in a circle around the OK key
11
. Later in this
user handbook they will be represented as follows:
Select the desired item.
The OK key
11
is used to confirm a selection, for calling the highlighted
menu item and for opening the channel list. In this user handbook, an
instruction for this key looks like the following:
OKconfirm.
Using the numerical keys of your remote control
29
you enter
programme channels and teletext pages directly. With key
you
open the source menu. In this user handbook, entering numbers with
numerical keys is shown as follows:
Entering programme channel directly.
The numerical keys are also used to enter text (see chapter General
information on menu operation,section Entry of characters by
remote control).
The Home view is the central overview page for all of your TV set‘s
operating modes. You reach Home view with the HOME key
27
.
HOME: Call Home view.
A short key stroke on the BACK
24
key takes you back one level in a
menu. A longer pressing of the BACK key closes all opened windows.
An example for the BACK key in this user manual:
BACK: Stop text entry and exit entry box.
With the keys
18
and
14
, you can jump back and forth in the
various wizards (for example, initial start up, etc.).
Call up next step.
Call up previous step.
Pressing longer on the INFO key
25
displays an explanation of the
most important key functions of the current operating mode (e.g. TV
mode, teletext, PIP, etc.).
Structure of the Menu screen
Basically, the structure of the different menu screens is similar,
depending on the fact if a wizard, rendering media content or a setup
menu are concerned. The structure is explained by means of three
different illustrations.
Screen structure: Wizard
(A) Title bar with name of the wizard and the current operating step.
(B) Selected items, whose number can be different according to the
operating step.
(C) Bottom line showing the available operating controls.
Screen structure: Rendering of media content (example:
Audio player)
(A) Cover display (if available).
(B) Time line.
(C) Album selection or track selection.
A
C
B
C
B
A
General information on menu operation
Page 18

Loewe bild
User handbook
18
General information on menu operation
Screen structure: Setup (example: picture)
(A) Selected function in the Home overview (here: system settings)
(B) Home Menu System settings, with selected menu item Picture.
(C) Menu items Picture focusing on Contrast.
(D) Help text for the selected menu item Picture > Contrast.
Navigation: Selection of elements (example: On-screen displays)
Highlighting and thus selecting the symbols/elements or menu items
on the screen can be effected by the arrow keys on the remote control.
So you can see all the time where you are. As soon as there is a bar
above a symbol or text, this is a selected element.
(A) Selectable elements / menu items.
(B) The writing of the line in which the relevant selectable menu item
can be found is white.
(C) Move the selection marking by means of the arrow keys
to the menu item to be set.
The position of the marking is to see by a grey rectangle.
The newly selected menu item must be confirmed by selecting
OK. The previously active item’s text colour will change to grey;
the newly selected item will change to white.
A CB
A
B
C
Navigation: Wizards
If the menu item(s) (marked white) is/are already
correctly preset:
Go to next step.
Otherwise:
Mark menu point which should be changed.
OK confirm.
The font colour of the prior active point changes
to grey.
Go to next step.
Navigation: Element selection in lists using initials
Using the numerical keys of the remote control you can jump into list,
e.g., Internet radio channel lists.
If the list is sorted in alphabetical order, you jump to the entered letter.
For example, when pressing the key 7 three times you jump to the first
list element starting with letter R.
In case of numerical sorting, you can directly select the channels
with the numerical keys.
Page 19

Loewe bild
User handbook
19
General information on menu operation
Entering characters with on-screen keyboard
For certain functions, entering letters or characters is required. An
on-screen keyboard appears for entering text.
Select character/on-screen button,
OK Adopt character.
If a small symbol is displayed next to a letter,
further long letters can be selected by pressing
the OK button (2 seconds).
For the selection of special characters use the .-/
field.
To conclude the entry:
Select Adopt,
OK confirm the selection.
With the Loewe app, you can also comfortably enter
addresses or search terms. Simply mark the input
field for this, the Loewe app displays automatically
a keyboard symbol. Open Loewe app keyboard,
enter and confirm.
Entry of characters by remote control
Alternatively to the on-screen keyboard you can also enter the desired
characters by means of the remote control (as with the keypad of a
mobile phone).
Select text entry field.
Under the 1st letter of the name you will see a line
indicating the current input position.
Input position one character to the right (also for
blanks).
Input position one character to the left.
Input the letters one after another. When using the
remote control, press the numerical keys just as on
a mobile phone keypad (0-9) until the desired symbol
is displayed. The available letters are printed on the
individual numeric buttons.
You find the exact key assignment in the character
table in the right column.
To conclude the entry:
Select Adopt,
OK confirm the selection.
Table of characters for entering text by means of the remote
control
Key Characters (uppercase - lowercase)
1
[space] 1
2
A B C 2 Ä Æ Ã Å Ā À Á Ć Ç Č - a b c 2 ä æ ã å ā â à á ć ç č
3
D E F 3 Ė Ë Ē Ę Ê È É - d e f 3 ė ë ē ę ê è é
4
G H I 4 Ï Ī Į Î Ì Í - g h i 4 ï ī į î î ì í
5
J K L 5 - j k l 5
6
M N O 6 Ö O E Õ Ō Ô Ò Ó Ø - m n o 6 ń ñ ö o e õ ō ô ò ó ø
7
P Q R S 7 ß - p q r s 7 ß
8
T U V 8 Ü Ū Û Ù Ú - t u v 8 ü ū û ù ú
9
W X Y Z 9 - w x y z 9
0
. 0 - / _ : + , ; ? ! = & # % ~ @ $ * ’ ( ) ” § \ { } [ ] < > ´ ` ^ |
Menu options
The menu options, where available will open when clicked on. The list
of the menu options contains Settings and Additional Options.
Depending on when the menu options is selected (e.g. channel is displayed, channel list activated, DVB Radio is used, etc.), the selectable
menu items of the menu options may vary.
The menu items of the menu options are described in the respective
chapters.
An example of a menu options of the used channel list:
OK call channel list,
MENU: call menu options.
Select menu option,
OK confirm the selection.
Page 20

Loewe bild
User handbook
20
On-screen displays
Explanation of keys
An explanation of the main operating keys that can be used at the
moment, can be displayed.
The availability of the key explanation is dependent on the currently
active operating situation.
INFO press longer: show Explanation of keys.
INFO or BACK: hide Explanation of keys.
Explanation of symbols
A text box will temporarily be displayed for screen pages with remote
control symbols in the footnotes (for instance, teletext) as soon as
the symbol is selected
.
Automatic menu info
The automatic menu info provides an info text for the selected menu
item appropriate to the on-screen display that can assist you further
with the operation of your TV set.
An on-screen display is displayed.
The factory setting is that the info display is shown
automatically for each menu item. In this case you can
temporarily hide the info texts with the INFO key.
Permanent clock display
The clock display can be permanently shown. It is always visible as
long as no other display is made.
You can switch the permanent clock display on or off in Home view
under System SettingsטControlטmore ...ט On-screen displays.
Page 21

Loewe bild
User handbook
21
Initial installation wizard
Initial installation after switching on for the first time
The Initial installation wizard starts automatically with an initial
installation. It may be called repeatedly again (see chapter System
settings,section Extras – Repeat initial installation).
If a parental lock is activated, the access code must be entered
before repeating initial installation (see chapter System settings,
section Control – Parental lock).
For information on navigation within the wizard refer to chapter
General information on menu operation.
First installation wizard routine
The selected settings affect the routine of the Initial installation wizard.
Select desired Menu language.
OK Confirm selection.
Selecting the language of the user guidance is the
wizard’s first step. Then you simply follow the
instructions on your TV screen.
Proceed to next step.
A licence agreement will be displayed.
Select Confirm.
OK Confirm the licence agreement and proceed to
the next step.
Select Energy efficiency.
OK Confirm selection.
Determine how energy efficient your TV set shall
be. The value for the contrast (and thus the
brightness of the background lighting) is adapted
and the automatic dimmer activated or
deactivated depending on the presetting.
The automatic shutdown is active in the mode
Home Mode and Premium mode.
Menu
language
Energy
efficiency
Home mode:
The emphasis for home use is on low energy
consumption. The automatic dimmer is activated.
Premium mode:
This mode optimises the settings to a brighter
environment at a higher energy consumption. The
automatic dimmer is activated.
The use of this energy efficiency setting must be
confirmed afterwards once again.
Shop mode:
The picture settings are aligned to operation in
the presentation room. The automatic dimmer is
deactivated. If the ambient brightness diminishes, the
energy consumption is not reduced.
The use of this energy efficiency setting must be
confirmed afterwards once again.
Not all image and sound settings will be stored in
the shop mode. These settings will be reset to the
factory default settings after re-starting.
The presetting can be changed later in the System
settings under Control ט Energy efficiency.
Proceed to next step.
Select Location of TV set (national defaults
are adopted).
OK Confirm selection.
For certain locations (e.g., Australia), there is finally
a selection screen where you can indicate in which
state/territory the device is being operated.
Proceed to next step.
Select the Operating mode.
OK Confirm selection.
Use the TV set as a TV set:
Continued with Connect antennas cable(s) (see
next page).
Use the TV set just as a monitor:
see chapter Initial installation, section TV set as a
monitor.
Energy
efficiency
(continued)
Location of
TV set
Operating
mode
Initial installation
Page 22

Loewe bild
User handbook
22
Initial installation
Select option.
OK Confirm selection.
With the selection, specify whether you want to
configure the available network adaptor now.
Configure now: Make settings for network
adaptor and proxy server (see chapter System
settings,section Multimedia / Network –
Network settings).
Do not configure or configure later: Skip
network adaptor configuration.
Proceed to next step.
Select antenna cable.
OK Connect/disconnect antenna cable.
Select the antenna cables that are connected to
your TV.
Ahead of each selected antenna, the symbol
appears.
Cable analog: analogue channels via cable
Terrestrial (DVB-T/T2): digital channels via antenna
Cable (DVB-C): digital channels via cable
Satellite (DVB-S/cable 1): digital channels via satellite
Satellite (DVB-S/cable 2): digital channels via satellite
IPTV: Streaming via network (In-
ternet)
SAT>IP:
digital channel via local network
With the connection sockets ANT SAT 1 / ANT
SAT2
(1
, when the TV set is switched on, it is automatically detected whether an antenna cable is connected. The symbol appears in the menu dialogue
behind the respective antenna cable
.
IPTV / SAT>IP can only be selected if a network-
connection has been configured in a previous step.
Proceed to next step.
Network
configuration
Connect
antennas
cable(s)
The rest of the initial installation wizard routine
depends on the selected antennas (Cable analogue,
DVB-T/T2, DVB-C, DVB-S/S2, IPTV, SAT>IP (ASTRA))
in step Connect antennas cable(s).
The different antennas/types of reception are
described in the following sections of initial installation.
Setting options for reception via Cable analog:
If you have not selected Cable analog in step Connect antenna
cable(s) in the initial installation, proceed to the next section Setting
options for reception via SAT>IP
.
The selection of a Colour standard is only required
when the Location of TV set Other country was
selected. Otherwise, the country-specific default
settings will be preset when selecting the Location
of TV set. This step will be skipped then
Select appropriate colour standard.
OK Confirm selection.
Proceed to next step.
TV/col.
standard
(1
The ANT SAT 2 connection is only available for set types with dual-channel (see chapter Technical data - equipment features for your TV set).
Page 23

Loewe bild
User handbook
23
Initial installation
Setting options for reception via SAT>IP:
If you have not selected SAT>IP in step Connect antenna cable(s)
in the initial installation, proceed to the next section Setting options
for IPTV reception
.
Select server,
OK Select / deselect the server.
State from which servers you wish to receive your
channels.
Before each selected server, the symbol
appears.
The server converts the antenna television signals
from the reception system into IP signals and
provides them in an existing local IP network.
Proceed to next step.
Server
selection
Setting options for reception via
IPTV
:
If you have not selected IPTV in step Connect antenna cable(s) in
the initial installation, proceed to the next section Setting options
for DVB-T reception.
If more than one receive network is available via IPTV,
you can select the network from which you want to
receive your channels.
Select network,
OK Confirm selection.
Proceed to next step.
Network
selection
(IPTV)
Page 24

Loewe bild
User handbook
24
Initial installation
Setting options for DVB-T reception:
If you have not selected Terrestrial (DVB-T) in step Connect
antenna cable(s) in the initial installation, proceed to the next section
Setting options for DVB-C reception.
If several networks are available via DVB-T, you can
decide which network you want to receive your
channels from.
Select network,
OK Confirm selection.
Proceed to next step.
Select and adapt settings for DVB-T reception.
OK Confirm selection.
Scrambled
channels
You can state whether coded channels are to be
searched for in the search/update.
Select yes to save all found scrambled channels.
However, these channels can only be received in
connection with a CA module and the appropriate
Smart Card.
The handling of the CA module is described in the
chapter System settings, section Extras – CA
module.
Accept
Logical
Channel
Number
In various countries, digital channels (DVB-T) are
transmitted with a preset channel number per channel, known as Logical Channel Numbers (LCN).
If you select yes here, these default channel slots
will be used and the channels of the preferred signal
source will be sorted as per LCN. The channels in
the channel list can no longer be shifted.
Network
selection
Settings
Supply
voltage
DVB-T
antenna
Select supply voltage no (0V) / yes (5V).
If you use a DVB-T antenna that requires a supply
voltage (active antenna) and which is not already
supplied via a power adaptor, then select yes (5V)
for the antenna’s power supply.
How to align your DVB-T antenna is described in
chapter System settings, section Connections
– Antenna DVB.
Proceed to next step.
Page 25

Loewe bild
User handbook
25
Initial installation
Setting options for DVB-C reception:
If you have not selected Cable (DVB-C) in step Connect antenna
cable(s) in the initial installation, proceed to the next section Setting
options for DVB-S reception.
If several networks are available via DVB-C, you can
decide which network you want to receive your
channels from.
The normal DVB-C settings are derived from the
selection of the location or network and do not need
to be changed.
Exactly which of the following settings are present is
dependent on which network is selected.
Select network.
OK Confirm selection.
Proceed to next step.
Select and adapt settings for DVB-C
reception.
OK Confirm selection.
Scrambled
channels
You can state whether coded channels are to be
searched for in the search/update.
Select yes to save all found scrambled channels.
However, these channels can only be received in
connection with a CA module and the appropriate
Smart Card.
The handling of the CA module is described in the
chapter System settings, section Extras – CA
module.
Search
method
If you select Frequency search here, a search is
performed for all receivable channels.
With Network search, only the channels which
the networks supply are searched - either for
all receivable networks or only for the particular
network specified under Network ID.
Start
frequency
The DVB channels are only searched for in the
frequency range above the start frequency.
Network
selection
Settings
Network ID
If you select none here, DVB signals of all current
transmitter networks are searched automatically
(recommended for most cable networks).
If, on the other hand, you specify a certain network ID
(necessary in the cable networks of some countries),
only DVB signals of this broadcasting network are
searched for automatically.
Your cable provider has the information you need.
Accept
Logical
Channel
Number
In various countries, digital channels (DVB-C) are
transmitted with a preset channel number per channel, known as Logical Channel Numbers (LCN).
If you select yes here, these default channel slots
will be used and the channels of the preferred signal
source will be sorted as per LCN. The channels in
the channel list can no longer be shifted.
Proceed to next step.
Page 26

Loewe bild
User handbook
26
Initial installation
Setting options for DVB-S reception:
If you have not selected Satellite (DVB-S/cable x) in step Connect
antenna cable(s) in the initial installation, proceed to the next section
Setting options for all types of reception.
If several networks are available via DVB-S, you can
decide which network you want to receive your
channels from.
Select network.
OK Confirm selection.
Proceed to next step.
Select Only one antenna cable or Two antenna
cables.
OK Confirm selection.
Select here whether you have one or two satellite
antenna cables available. If two satellite antenna
cables are available, please connect them to the
ANT SAT1 and ANT SAT2 sockets of the TV set.
If only one is available, please connect it to the
ANT SAT1 socket.
Proceed to next step.
Network
selection
Number of
satellite
antenna
cables
Selecting the satellite system.
OK Confirm selection.
Specify how you receive which satellite(s) (single
satellite or type of satellite system). Ask your
dealer in this regard.
The normal DVB-S settings are derived from the
selection of the location and do not need to be
changed in most cases.
Single
satellite
Reception of a single satellite via a connected LNC
(LNB).
2 satellites
on 22 kHz
switchbox
Reception of two different satellites with two LNCs
(LNBs) which are connected to the TV set by a 22
kHz switchbox.
2 satellites
on toneburst
switch
Reception of two different satellites with two LNCs
(LNBs) which are connected to the TV set by a
toneburst switch.
Max. 4
satellites
on DiSEqC
multiswitch
The TV set controls a DiSEqC multiswitch to which
up to four LNCs (LNBs) for different satellites are
connected.
DiSEqC
one cable
communal
system
Select setting if the TV set is connected to a DiSEqC
single-cable system (according to EN 50494). Several
Sat receivers can be connected to one Sat cable.
other
communal
installation
Select setting if the TV set is connected to a
single-cable system (without DiSEqC). Several
Sat receivers can be connected to one Sat cable.
Contrary to a DiSEqC one cable communal system
there are restrictions in the range of certain reception
frequencies in "common" single-cable community
systems.
Proceed to next step.
The rest of the initial installation wizard routine
depends on the selected satellite system in step Select
satellite installation.
The different satellite systems are described in the
following sections of initial installation.
Select
satellite
installation
Page 27

Loewe bild
User handbook
27
Initial installation
Setting options for the satellite system (single satellite):
Select satellite,
OK Confirm selection.
Proceed to next step.
Select Dual band (low/high) or Single band.
OK Confirm selection.
Here you specify if you use a Dual Band (Universal)
LNB or a Single LNB.
Proceed to next step.
Set LNB frequencies.
OK Adopt settings.
The setting of the LNB frequency is only called
when you have used the setting Single band
in step Dual / single band.
Normally, you do not need to change the values
for high and low band, unless the LNC (LNB) of
your satellite system uses a different oscillator
frequency (important for the frequency display).
Proceed to next step.
Proceed to section Setting options for DVB-S
reception (continued).
Select
single satellite
Dual/single
band
LNC
frequencies
Setting options for the satellite system (2 satellites on 22
kHz switchbox / 2 satellites on toneburst switch):
Mark Satellite 1 / Satellite 2,
select satellite.
OK Adopt settings.
Proceed to next step.
Proceed to section Setting options for DVB-S
reception (continued).
Satellite
selection
Page 28
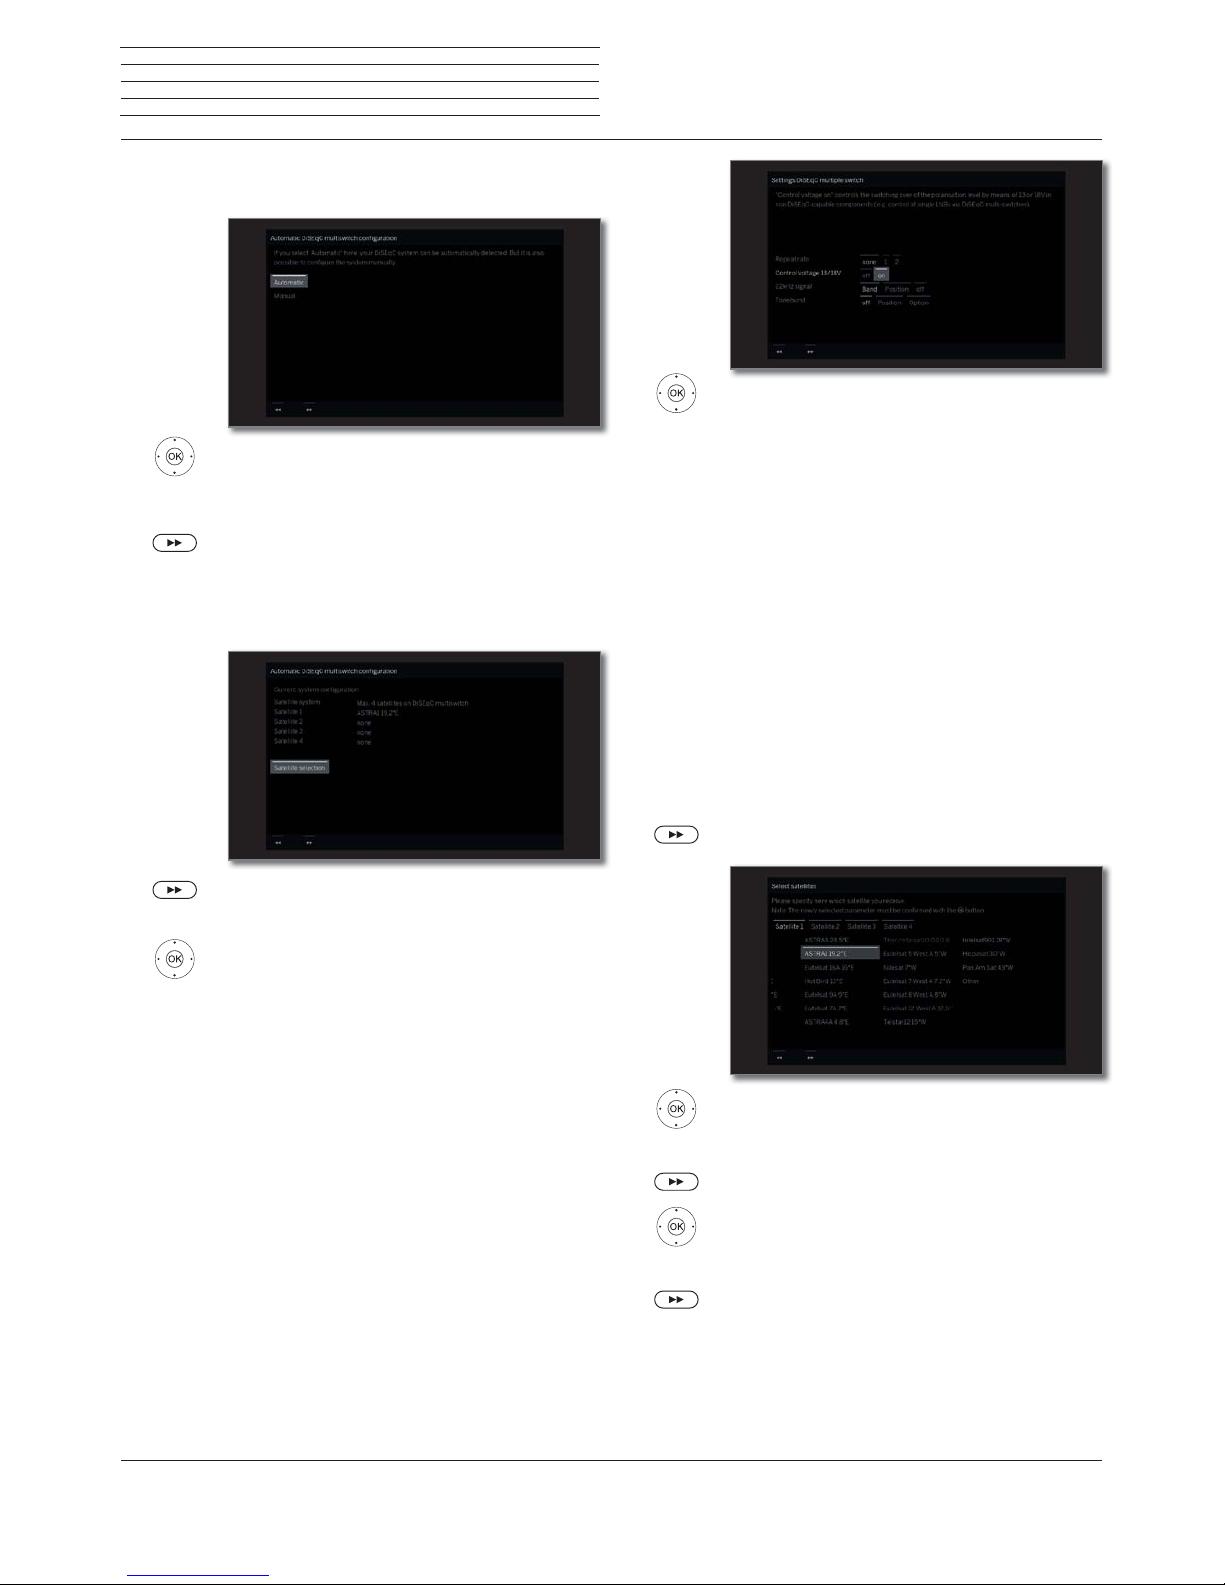
Loewe bild
User handbook
28
Initial installation
Setting options for the satellite system
(max. 4 satellites on DiSEqC multiswitch):
Select Automatic or Manual depending on
whether your DiSEqC system should be configured automatically or manually.
OK Accept settings.
Proceed to next step.
For manual configuration, continue in the next column.
Search for available satellites occurs via automatic
configuration.
Proceed to next step.
Or:
Select Satellite selection to select the
satellites used from the list.
Proceed to section Setting options for all types of
reception.
Automatic
DiSEqC
multiswitch
configuration
Automatic
DiSEqC
multiswitch
configuration
Select and adapt settings for the DiSEqC
multiswitch.
OK Adopt settings.
Repeat rate
The refresh rate determines how often a DiSEqC
command is output. A refresh is only necessary with
cascaded systems.
Control
voltage
The control voltage controls the switching of the
polarisation level (horizontal/vertical) in non-DiSEqC
capable components (e.g., control of single LNBs via
DiSEqC multiswitch).
22kHz signal
The 22 kHz signal controls the switching between
high and low band in the Band setting. The Position
setting controls the selection of the satellites in nonDiSEqC capable components.
Toneburst
The Toneburst controls the selection of the satellites
in non-DiSEqC but Toneburst capable components
with the Position and Option settings.
Proceed to next step.
Mark Satellite 1 ... Satellite 4,
Select satellite.
OK Adopt settings.
Proceed to next step.
Set LNB frequencies.
Normally, you do not need to change the values.
OK Adopt settings.
Proceed to next step.
Proceed to section Setting options for DVB-S
reception (continued).
Settings
DiSEqC
multiple
switch
Satellite
selection
Page 29

Loewe bild
User handbook
29
Initial installation
Setting options for the satellite system
(DiSEqC one cable communal system):
Select One channel or Two channels.
OK Confirm selection.
Here you specify if you use one or two transmission
channels in your one cable communal system.
In case of two channels - as far as they are
available in your system - different channels can
be simultaneously viewed on the main picture and
on PIP.
You get more information on your system from
your dealer.
Proceed to next step.
Select DiSEqC single cable communal
installation.
OK Confirm selection.
Proceed to next step.
Select satellites from list,
OK Confirm selection.
Proceed to next step.
Number of
system
channel used
DiSEqC
one cable
communal
installation
Satellite
selection
.
Set LNB frequencies.
Normally, you do not need to change the
values unless the LNC (LNB) of your satellite
system uses a different oscillator frequency
(important for the frequency display).
OK Adopt settings.
Proceed to next step.
Select and adjust settings for the DiSEqC
single cable communal installation.
OK Adopt settings.
The manual registration must be made for both ANT
SAT jacks when either two DVB-S antenna cables or
two system channels are used.
Transmission
channel
Select the desired transmission channel.
Transmission
frequency
Select the corresponding transmission frequency.
PIN protection
If your system is designed for it, it is possible to
protect your used transmission data from use by
other subscribers with a PIN.
DiSEqC
envelope
mode
Should your DiSEqC system occasionally show
problems during channel switching, you can switch
on the DiSEqC envelope mode to test whether the
switching problems then will no longer occur.
Define/
change PIN
Here you can determine and change the PIN for
PIN protection. Only possible, when yes has been
selected for PIN protection.
Proceed to next step.
Proceed to section Setting options for DVB-S
reception (continued).
LNB
frequencies
Manual
registration
(for socket
ANT SAT)
Page 30

Loewe bild
User handbook
30
Initial installation
Setting options for the satellite system (other communal
installation):
Select satellite.
OK Confirm selection.
Proceed to next step.
Select and adapt settings.
OK Confirm selection.
LNC
frequency
Normally, you do not need to change the values for
high and low band, unless the LNC (LNB) of your
satellite system uses a different oscillator frequency
(important for the frequency display).
Supply
voltage
If your set is connected to a single-cable system
without external voltage supply, you can connect
the antenna supply (13V or 18V / max. 500mA).
Proceed to next step.
Proceed to section Setting options for all types of
reception.
Select
single satellite
LNB
frequencies,
Supply
voltage
Page 31
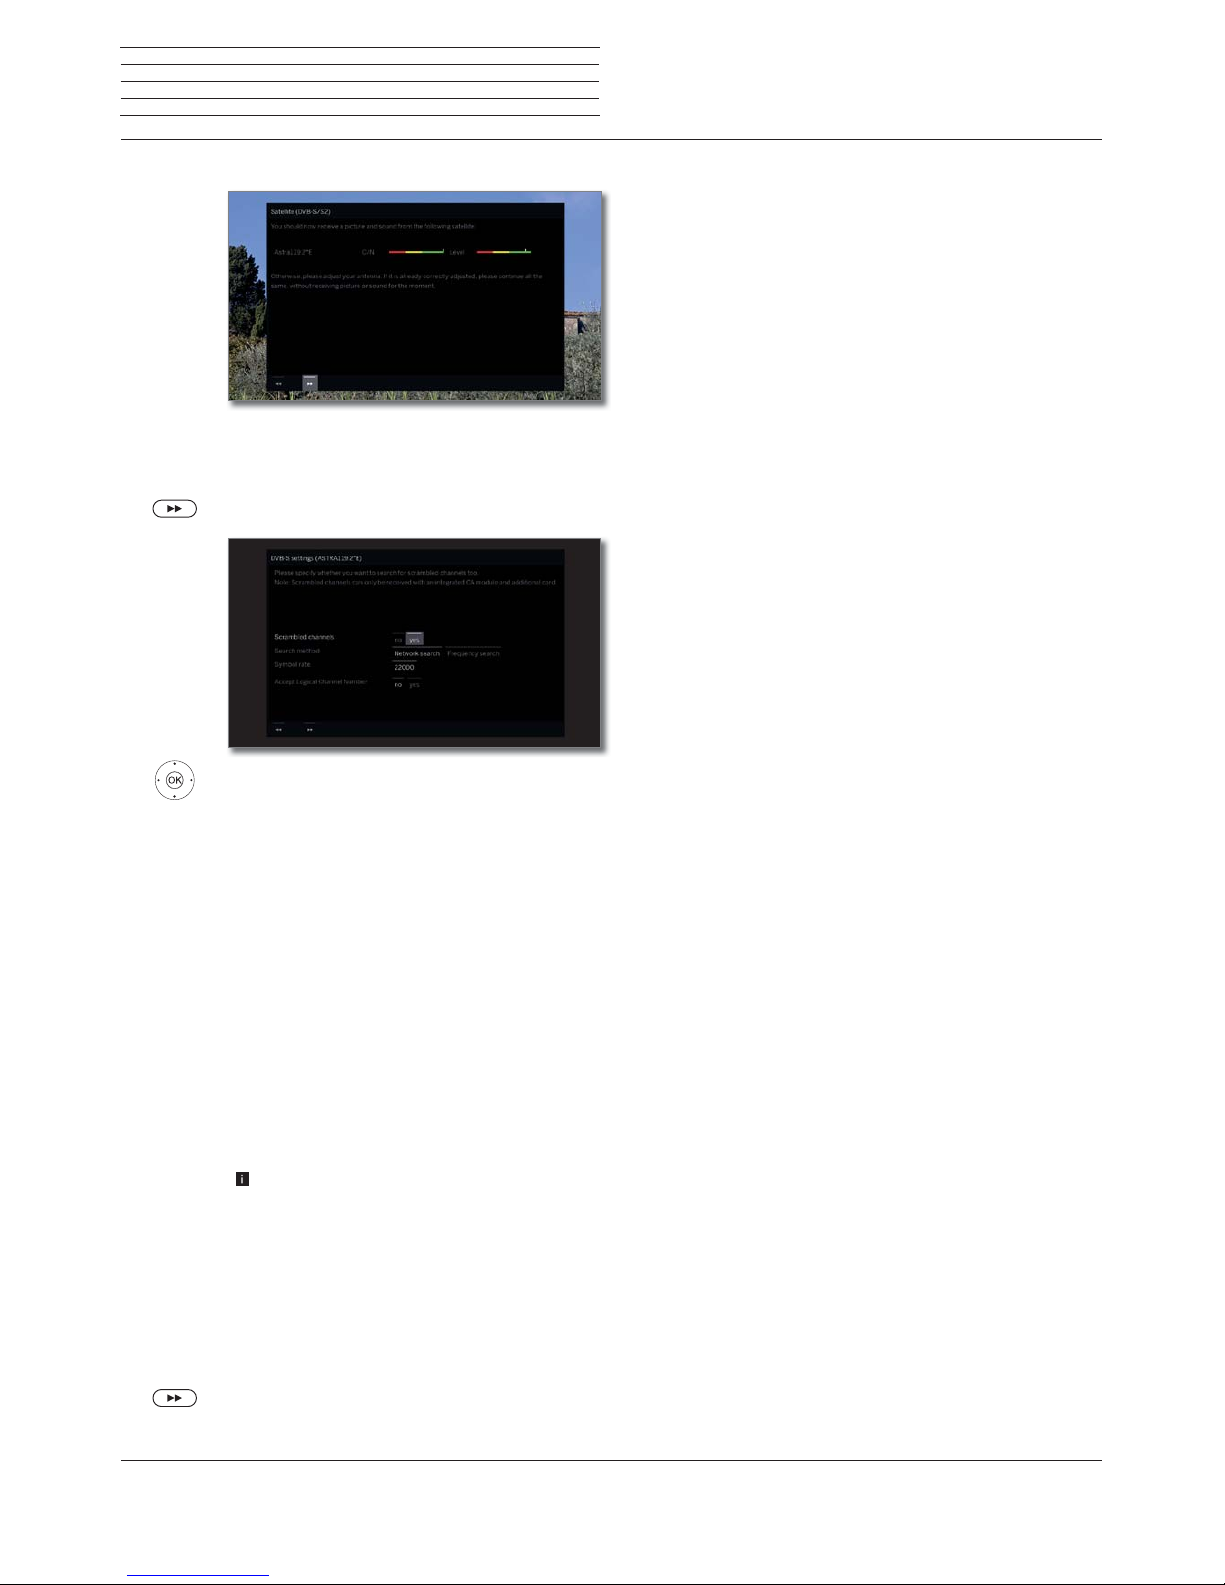
Loewe bild
User handbook
31
Initial installation
Setting options for DVB-S reception (continued):
After you have made the previous settings, you should
receive picture and sound of the selected satellites
(only possible for Astra1 and HOTBIRD).
Proceed to next step.
Select and adapt settings.
OK Confirm selection.
If several satellites are received, the following settings
must be made for every satellite. The type of settings
available may differ depending on the selected satellite
or network.
Scrambled
channels
You can state whether coded channels are to be
searched for in the search/update.
Select yes to save all found scrambled channels.
However, these channels can only be received in
connection with a CA module and the appropriate
Smart Card.
Handling of the CA module is described in chapter
System settings, section Extras – CA module.
Search
method
If you select Frequency search here, a search is
performed for all receivable channels. With Network
search, from all receivable networks all the channels
are searched which are supplied by these networks.
Depending on the selected network, this step
might possibly be skipped.
Accept
Logical
Channel
Number
In various countries, digital channels (DVB-S) are
transmitted with a preset channel number per channel, known as Logical Channel Numbers (LCN).
If you select yes here, these default channel slots
will be used and the channels of the preferred signal
source will be sorted as per LCN. The channels in
the channel list can no longer be shifted.
Proceed to next step.
Proceed to section Setting options for all types of
reception.
Test reception
Settings
Page 32

Loewe bild
User handbook
32
Initial installation
Setting options for all types of reception:
You will see a list of the selected settings. You can go
back step by step with the key to make any changes
to the settings.
OK Start automatic search.
Now, the TV set searches for TV and radio channels.
It searches successively for channels from the selected
signal sources. The progress of search is shown by a
progress bar.
In case of a repeated initial installation routine (via
Home view under System settings
p
Extras) all
stored channels will be first deleted here.
The number of TV and radio channels found is displayed.
Proceed to next step.
Check
search
settings
Info
station search
.
Select Age-related lock.
OK Confirm selection.
You can specify an age limit for your TV set here.
DVB broadcasts which have an appropriate age
identification are locked and can only be watched
after entering the access code.
In some countries, the yes/no option does not
exist for some channels, and a compulsory age
check must be entered.
Proceed to next step.
The data capture for time and date is set to automatic
ex factory.
If time and date are automatically obtained via the
receive path, no entry is necessary.
For more information, see the chapter System
settings, section Control – Time and Date.
Proceed to next step.
Age-related
lock
Time and
date
Page 33
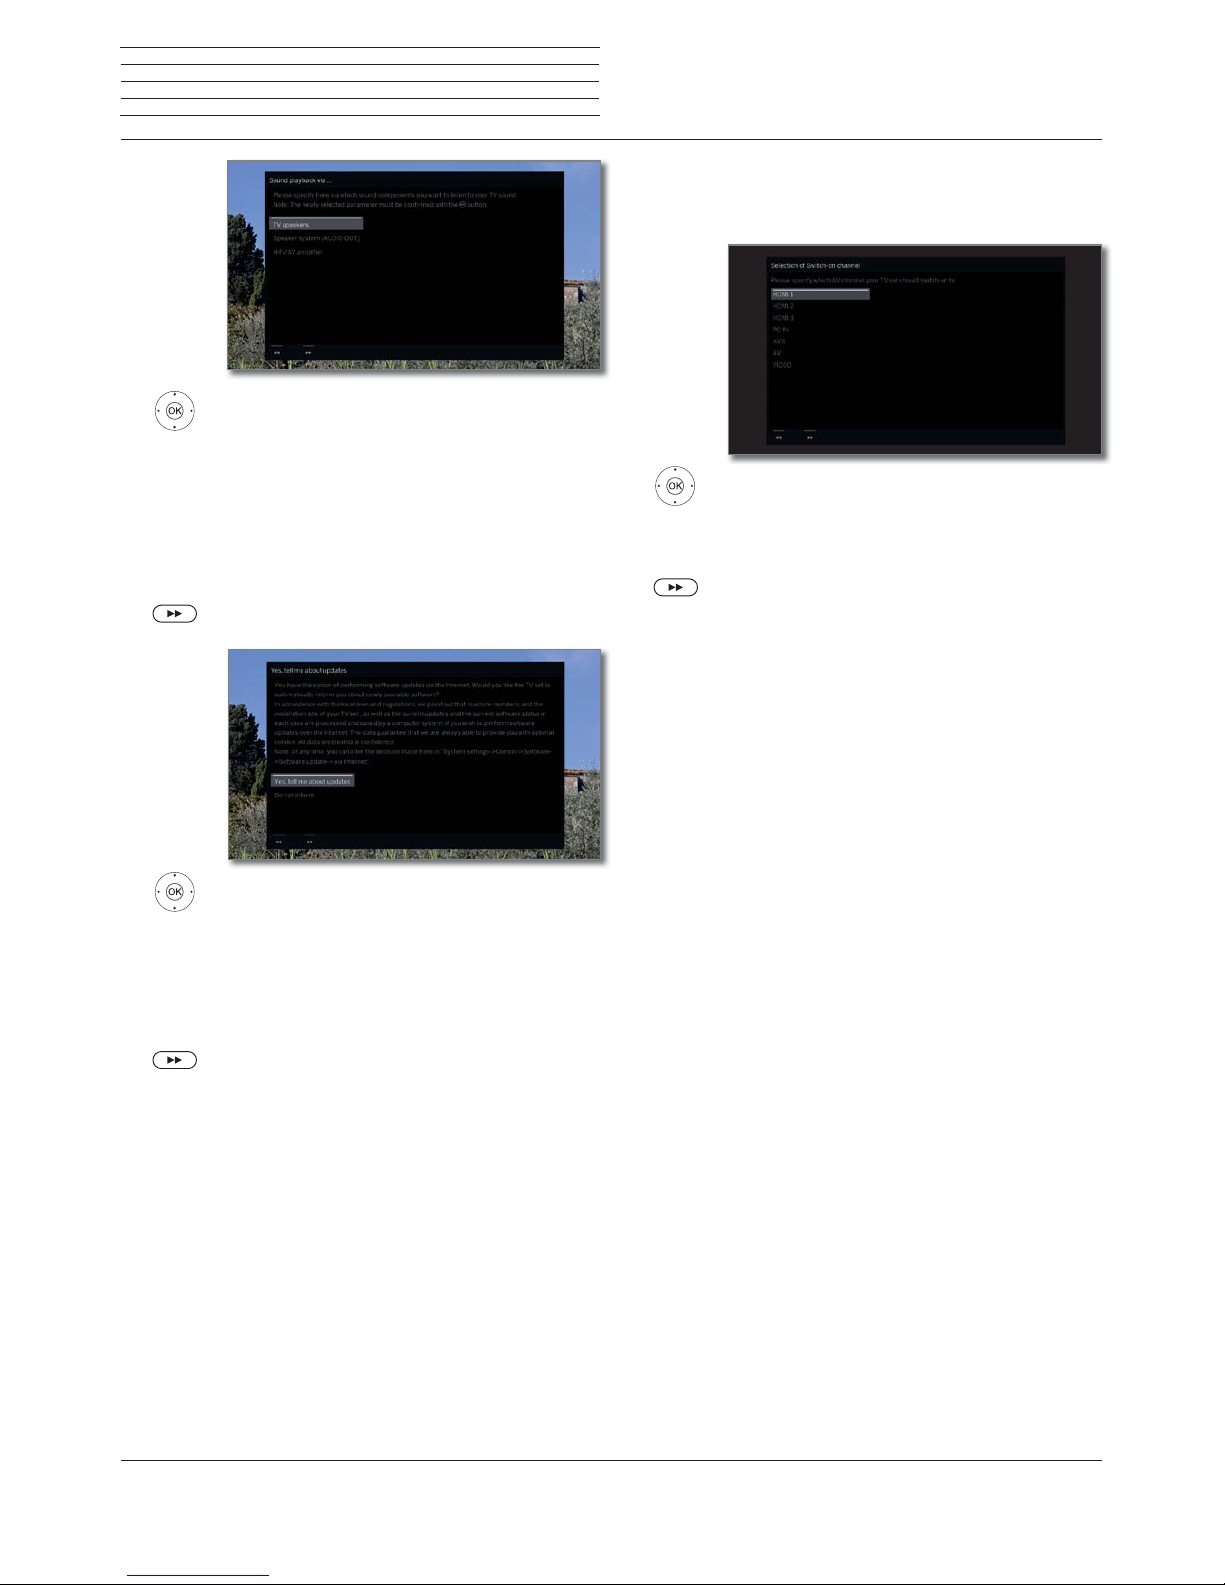
Loewe bild
User handbook
33
Select sound components.
OK Confirm selection.
This selection indicates which sound components
you want to use to hear your TV sound. Depending
on the selection, the sound component wizard
starts with which you can make further settings.
The sound component wizard is described in
chapter System settings, section Connections –
Sound components and can also be started at
any time beyond the initial installation.
Proceed to next step.
Select option.
OK Confirm selection.
When selecting Information on new software
updates, your TV set checks at definite intervals
whether a newer software than the one installed in the
TV set is available in the Internet. A screen message
appears when a new software update is found.
Exit wizard.
The initial installation wizard is complete.
Sound
playback
via ...
Inform about
new software
TV set as a monitor
You can also use your TV set just as a monitor, i.e. if you only use it with
a PC. The tuner in the TV set cannot be used in this mode.
Select AV connection.
OK Confirm selection.
The selected AV connection is shown when
switching the TV on.
Proceed to next step.
Initial setup continues with the Time and date setup.
Initial installation
Page 34

Loewe bild
User handbook
34
Home view
The Home view is the central overview page of your TV set.
Via the selection list on the left, you can select the menu items: Home,
TV, Recordings, Sources, and Apps . Via System settings
you
have access to more functions and you can configure your TV set.
The right section of the display shows, depending on the selected
menu item, the current channel list, favourites (also see right column)
and the available sources and/or apps.
Depending on the device configuration, network connection, media/
media servers available and the connected devices, the number of
selectable items may vary.
Call Home view
HOME: Calling the Home view.
Select menu item / Favourite,
OK call.
Description of the individual menu items:
Home Under the item Home all favourites of the different
sections are summarized.
TV Via the Menuitem TV you can change the TV mode
in the event that another operating mode (e.g. radio,
etc.) is selected. In the right half of the screen, you
can access the channel of the currently selected
channel list.
See chapter TV for further information.
Recordings
Via the menu item Recordings you have access to
DR+ archive (local/DR+ streaming where available)
videos and connected USB storage media. The timer
(timer overview and timer services) is likewise accessible via the menu item Recordings.
See chapter Recordings for further information.
Sources Via the item Sources in the Home view, you can
change to sources in order to play back something
from them. You can access devices that are locally
connected to the TV set (e.g. to AV, HDMI, USB) as
well as devices available via the home network.
See chapter Sources for further information.
Apps Via the menu item Apps you can find multimedia
content on the Internet (App Gallery), Internet and
DVB radio and a full-featured browser.
See chapter Apps for further information.
System
settings
In menu item System settings you find the con-
figuration menu of the TV set e.g., with settings for
picture, sound, connections or sound components.
In the right half of the screen, you can access the
most important points.
See chapter System settings for further informa-
tion.
Home view - EPG search
You can use the magnifying glass icon at the top of the Home view
or the Search function in the menu options to search the EPG for
keywords (according to whether TV or Radio EPG mode is selected).
For more information, please refer to the chapter TV, section Elec-
tronic Program Guide - EPG search.
The EPG search function is only available after once-off pairing
of the TV set with the Loewe app. Next, confirm the activation in
the screen dialogue.
Home view
Page 35

Loewe bild
User handbook
35
Home view
Home view - Favourites
Under the menu items Home and Apps you will find your Favourites
on the right-hand side.
By selecting the individual menu items, your Favourites will be filtered
accordingly. When selecting Home the Favourites of both menu items
will be displayed together.
After an initial installation, some favourites will already be
automatically created depending on the installation site of the TV
set and of existing Internet links (e.g. TV channels, online links).
Creating favourites
In the operating modes of the TV set you can define the current
object (e.g. channel, music title, teletext page, website, photo, etc.)
as favourite.
Create favourite.
The active object is added as a favourite and placed at
the bottom of the Home view under the menu items
Home or Apps.
In the instance that there are more favourites than
can fit onto one screen page, they will be displayed
via a scroll list.
P+/P– Scrolling through the individual pages.
Editing favourites
You can edit the existing favourites in Home view. Change the
sequence of your favourites as you wish or delete favourites you do
not need any more.
Moving favourites
HOME: Calling the Home view.
Select the favourite to be changed.
MENU: call menu options.
Select Move.
OK call.
Move favourite to new position.
BACK: Finish procedure.
Delete Favourites (individual)
HOME: Calling the Home view.
Select the favourite to be changed.
MENU: call menu options.
Select Delete.
OK call.
Delete Favourites (multiple selection)
Edit Favourites menu options is retrieved.
Select Multi select.
OK call.
Select favourite
OK highlight (highlighted item changes to blue),
where applicable apply to other favourites.
MENU: call menu options.
Select Delete.
OK call.
Page 36

Loewe bild
User handbook
36
TV
Via the menu item TV, which is selectable via the Home view, one
channel can be selected from the current channel list. By selecting a
channel you will arrive in the TV mode.
In the TV mode there are a number of functions, such as Teletext, PIP,
EPG available to you. Via the individual menu options you can select
additional options and settings surrounding the TV operation.
Setting the volume
Switching sound off/on
Sound off.
Sound on: Press key again or increase the volume
using V+.
Setting the volume
V+/V– Volume up/down.
The volume indicator will be displayed in the center of
the screen.
The volume control bar can be deactivated in the
menu System settings ט Control ט more ... ט
On-screen displays.
Select channel
Select channel with P+ / P–
When using Instant Channel Zapping, you can very quickly switch to other
channels. The instant channel zapping
(1
technology uses the second tuner
in the background in order to pre-select the next channels. Due to this
pre-selection, you can now switch to this channel within a very short time.
While using the digital recorder DR+
(1
(timeshift operation, archive
recording, multi recording) or in PIP mode, Instant Channel Zapping
is not available. Switching is done at „normal“ speed.
For encrypted channels Instant Channel Zapping is only possible to
a limited extent.
P+/P– Channel up/down.
The number and the name of the channel along with the
title of the programme and that of the next programme
will be briefly shown. Also, the status display with time/
date and programme-dependent symbols appears.
The symbols of the status display are described in
chapter TV, section Status display.
Select channel using the numerical keys
If you select an unoccupied channel position, the next available
channel is selected.
1-digit channels
Press the numerical key a little bit longer: The channel
will change immediately or press the numerical key
briefly, the channel changes after 2 seconds (changes
immediately if up to 9 channels are stored).
2-digit and 3-digit channels
Press first (and second) numerical key briefly. Keep the
last numerical key depressed a little bit longer: The
channel will change immediately or: press all the numer-
ical keys briefly, the channel changes two seconds after
the last number has been entered (with up to 99 or 999
saved channels it will change immediately).
4-digit channels
Press all four numerical keys briefly, the channel
changes immediately.
long
short short long
all short
Selecting a channel out of the channel list
In normal TV mode, without other displays:
OK Call channel list.
Mark channels.
OK The marked channel will be called.
Changing the channel list
In normal TV mode, without other displays:
OK Call channel list,
MENU: Call menu options.
Mark channel list selection.
OK Call.
Mark desired channel list.
OK Call.
The channel list is amended according to selection.
BACK: a long press: Close overlay.
Explanations of the channel lists:
The number and the names of the possible channel lists depend
on the available signal sources (antennas, TV reception networks,
etc.).
ASTRA LCN
Analogue
DVB-C
DVB-T
Only channels from the selected source / reception
network are indicated in the channel list.
Personal list
Only channels of the selected personal list are indicated
in the channel list. The name of the list may be changed.
AV list
Exclusively AV inputs are shown in the channel list.
Manage list
Call up the channel list editing menu (System
settings ט Channels ט Channel lists TV).
TV
Volume / channels
(1
Availability varies by device type (see chapter Technical data - equipment features for your TV set).
Page 37

Loewe bild
User handbook
37
TV
Channel
Selecting channels by means of the expanded channel list
In normal TV mode, without other displays:
OK Press long to call expanded channel list,.
Mark channels.
OK The marked channel will be called.
Or:
For numerical sorting: Enter the channel number. The
marker will jump to the selected channel.
OK The marked channel will be called.
For alphabetical sorting: Enter the first letter. The first
channel for the specified letters is marked.
Mark the channel.
OK The marked channel will be called.
Filter and sort options of the expanded channel list
Using the on-screen buttons on the bottom line of the expanded
channel list you can filter and sort the channel list by various options.
MENU: Switching between list and bottom line.
0..9
Numerical sorting of the channel list.
A..Z
Alphabetical sorting of the channel list.
Searching
This allows you to do targeted searches for channels.
The channel name is to be entered via the on-screen
keyboard. The entry is described in chapter General
information on the operation.
Channel list Select the list, the channels of which are to be dis-
played in the extended channel list (e.g., Analogue,
DVB-C, DVB-T, ASTRA LCN, Personal channel list,
AV list).
All channels Here you can filter the content of the channel list
according to various criteria. Shall All Channels,
only HD channels, channels that are Locked or
Scrambled or Unscrambled, CI+ Protected
channels be indicated.
Selecting channels by personal lists
You can save your preferred channels in personal lists (e.g., for several
users). Each personal list can contain up to 99 channels.
Personal list available (creating a new personal list
via Manage list ט New personal list).
In normal TV mode, without other displays.
OK Call channel list.
MENU: Call menu options.
Mark channel list selection.
OK Call.
Mark the desired personal list,
OK Call.
The channel list is amended according to selection.
BACK: a long press: Close overlay.
OK Call personal list.
Mark channels.
OK The marked channel will be called.
Explanation of the icons following the channel names:
Locked channel.
HDTV channel.
DVB-T channel (digital terrestrial via antenna).
DVB-C channel (digital via cable).
DVB-S channel (digital via satellite).
Scrambled channel.
History
Recently selected channels are saved in History.
In normal TV mode, without other displays:
Yellow button: call History.
Select entry,
OK call.
The last channel can also be accessed directly:
Yellow button press longer: Call last channel.
Page 38

Loewe bild
User handbook
38
TV
Status display/Info key
Status display/Info key
In normal TV mode, without other displays.
INFO: Show status display.
Below you see the number and the name of the channel and (if available) the title of the current programme.
The bar (if available) indicates the progress of the
current programme. If information about the current
programme is available, this can be called by pressing
the INFO key again.
The field at the top shows various additional pieces of
information, if available, which are represented by
symbols.
A window with button descriptions is displayed in the
bottom right corner. The automatic display of the
Explanation of keys with status display can be switched
off via System settings טControl ט more ... ט
On-screen displays טKey explanation.
By pressing the INFO key longer the Explanation of
keys can be displayed regardless of the status display
(see also chapter On-screen displays, section
Explanation of keys).
The status display is shown automatically every time
you change channels.
The status display is hidden automatically at the end
of the display time.
If you want to hide the status display manually before
the display time ends, you can do this with the BACK
key.
Explanations of the symbols in the status display:
General symbols:
Language/sound selection available.
Subtitles available.
Channel selection for multi-channel providers.
HbbTV mode available from this channel.
TTX Teletext available on this channel.
Mimi DefinedTM: Individual sound personalisation
enabled.
General symbols (continued):
DVB-T channel (digital terrestrial via antenna).
DVB-C channel (digital via cable).
DVB-S channel (digital via satellite).
Coded station.
3D programme
(1
.
HDTV programme.
UHD programme
(1
.
HLG HLG programme
(1
.
HDR 10 HDR 10 programme
(1
.
Dolby Vision programme
(1
.
Transmitted audio signal:
Mono
Mono audio transmission analogue.
Dual
channel
Dual channel sound transmission (Sound1/
Sound2) analogue.
1+1
Dual channel sound transmission (Sound1/
Sound2) digital.
ܐ
Stereo sound transmission digital (PCM).
Dolby Audio® transmission.
MPEG
MPEG sound transmission.
Selected listening mode
(1
:
܃
Playback of centre sound or mono (left/right).
܃
Playback of front sound (L/R stereo).
܃
Playback of front and centre sound.
܃
Playback of front and surround sound.
܃
Playback of front, surround and centre sound.
܃6RXQG
SURMHFWRU
Playback of sound via sound projector.
܃([WHUQDO
VSHDNHUV
Playback of sound via speakers connected to an
external amplifier.
If the number of speakers appears in brackets, the sound of miss-
ing speakers is transmitted by the existing speakers (virtually). The
Dolby Virtual speaker (VS mode) developed by Dolby is activated
for the virtual sound reproduction in sound mode (4) and (5). Here
you can choose between Dolby Virtual and Cinema Surround
(2
. In
sound mode (3), proprietory settings of Loewe are used for the
virtual reproduction.
(1
Availability varies by device type (see chapter Technical data - equipment features for your TV set).
(2
Only for set types Loewe bild 9, Loewe bild 7, Loewe bild 5 oled, Loewe bild 4.
Page 39

Loewe bild
User handbook
39
TV
Menu options
Menu options
The menu options contain various selection and setting options.
Depending on the set type and equipment of the TV set (motorized
rotary foot, built-in hard drive or connected USB hard drive, Feature
Drive, etc.) and application (TV mode, EPG, Teletext, apps, Media
player, etc.), various menu options can be called up.
In the following, the individual menu options for the current channel
and for the selected channel list are briefly explained in TV mode.
Menu options for the current channel:
MENU: Call menu options.
Select menu option,
OK call.
Menu items in the menu options for the current channel:
Channel list
selection
Exchanging the channel lists.
Recordings
Here you can call up a recording dialogue.
Detailed info
Calling additional information on the current programme.
Search Search for any keyword in the EPG to find a program.
Favourite
Storing the current channel as a favourite.
Multiroom
playback
This function allows you to synchronise the playback on multiple Loewe TV devices that support
this function.
Language /
sound
Selecting other languages and audio formats (if
available).
Subtitles
Display programme subtitles (if available).
Picture
Make frequently used picture settings.
Sound
Adjusting all available audio settings.
Headphone
volume
Here you can regardless of the volume of the device
speakers, adjust the headphone volume.
Screen off
Here you can switch off the screen. You can turn
the screen on again with the arrow button on the
remote control.
Store
channel
Here you can save the current channel to a list that
is selected in the following step.
Expanded
channel list
Here, you can open the entire channel list in full screen
mode. You can filter it according to various criteria.
More
settings
You can apply all the settings on your TV set here.
Menu options for the selected channel list:
OK Call channel list,
MENU: Call menu options.
Select menu option,
OK call.
Menu items in the menu option for the current channel list:
Channel list
selection
Exchanging the channel lists.
Recordings
Here you can call up a recording dialogue.
Detailed info
Calling additional information on the current programme.
Search Search for any keyword in the EPG to find a program.
Favourite
Storing the current channel as a favourite.
Multiroom
playback
This function allows you to synchronise the playback on multiple Loewe TV devices that support
this function.
Language /
sound
Selecting other languages and audio formats (if
available).
Subtitles
Display programme subtitles (if available).
Picture
Make frequently used picture settings.
Sound
Adjusting all available audio settings.
Headphone
volume
Here you can regardless of the volume of the device
speakers, adjust the headphone volume.
Screen off
Here you can switch off the screen. You can turn
the screen on again with the arrow button on the
remote control.
Edit
channel list
Here you can change your current channel list (for
example, add channel, reorder channel, delete
channel).
Store
channel
Here you can save the current channel to a list that
is selected in the following step.
Expanded
channel list
Here, you can open the entire channel list in full screen
mode. You can filter it according to various criteria.
Sorting Here you can sort your current channel list
alphabetically or numerically.
More
settings
You can apply all the settings on your TV set here.
Page 40

Loewe bild
User handbook
40
TV
Electronic Programme Guide
Electronic Programme Guide – EPG
EPG stands for Electronic Programme Guide and provides you with
on-screen programme details. With the system, as with a printed
programme guide, you can learn about the current programme. In
addition programmes can be memorised and also recordings can be
programmed.
Starting and ending EPG
EPG: Switch EPG on / off.
EPG is only available for DVB channels.
Depending on the number of channels selected for
EPG, it may take some time until the programme
information is displayed.
In the left column is a list of the channel of the selected
source / channel list (for example DVB-S, DVB-C,
personal list etc.).
The right side shows the program overview. The
programs currently running are highlighted by lighter
fields. A white line marks the current time in the running
program.
The white box marks the selected program whose
program information is displayed at the top.
In the upper left corner, the live image of the currently
selected channel is displayed. When using Premium
EPG, the window for the live image will be displayed
on the right side.
EPG Operation
P+/P– Scrolling in the channel list page by page.
Scrolling in the channel list.
Scrolling through the programmes.
OK short: (highlighted TV programme is running):
EPG will be closed and the programme is
selected.
short:
(highlighted programme not yet started):
Detailed information on the selected
programme will be called.
long: Change preview image to the channel of the
highlighted programme.
short: Scroll a screen width forward / backward.
long: Scroll 24 hours forward / backward.
INFO: short: Call detailed information on the selected
programme (see next page).
long: show Explanation of keys.
REC: Schedule the recording of the highlighted
programme.
EPG menu options
EPG called
MENU: Call menu options.
Select menu option
OK call.
Menu items in the EPG menu options:
Channel list
selection
Select channel list to be displayed in the EPG.
Recording Programme recording of the selected programme.
Detailed info
Bring up detailed information on the selected
programme.
View View selected TV programme (for programmes
currently running).
Memorise Make a note of selected TV programme (for
programmes that have not yet begun).
Date Jump to a desired date.
Entry of
channel/time
Jump directly to a time or channel.
Change view Change EPG view between standard and concise.
Adapting the EPG view
EPG called.
PIP: Change EPG view between standard and concise.
EPG view Standard:
EPG view Concise:
Page 41

Loewe bild
User handbook
41
TV
Electronic Programme Guide
Calling additional information about the programmes
EPG called.
INFO: Call up detailed information.
If there is more information on the selected programme,
it will be indicated here.
You will find further options for the displayed channel
in the menu options menu.
Change to menu options.
or:
MENU: change between detailed information and
menu options.
Select menu option.
OK call.
or:
BACK: Leave detailed information and go back to EPG.
Menu items in the EPG menu options:
Recording Schedule the recording of the selected broadcast
for a time.
View/
Memorise
Selected TV broadcast:
View for live broadcasts.
Memorise for broadcasts that have not yet started.
Previous
event
Information on the previous broadcast
Next Event
Information on the next broadcast
Timer Call up the timer list so as to programme further
recordings.
Change channel for live image
EPG called.
Mark a currently running broadcast in the channel
list.
OK press long: switch to the selected program.
In the top left window, the current programme of
the selected channel is displayed now.
When using Premium EPG (see next page), the
window for the live image will be displayed on the
right side.
When leaving EPG the channel is displayed in the
preview thumbnail in the full picture.
Jumping to time or channel
The marking must be in the channel list.
Press the numerical key (0 through 9). The window
Select Time/Channel is shown.
Select time or channel,
Enter numbers.
When entering a time, you always jump to the next
occurrence of the entered time (24-hour window).
If the time is already passed today, the time entered
will appear on the following day.
OK Activate jump.
Switching to the current broadcast
EPG called.
Mark current broadcast.
OK press briefly: switch to current broadcast.
The electronic programme guide will be closed.
Page 42
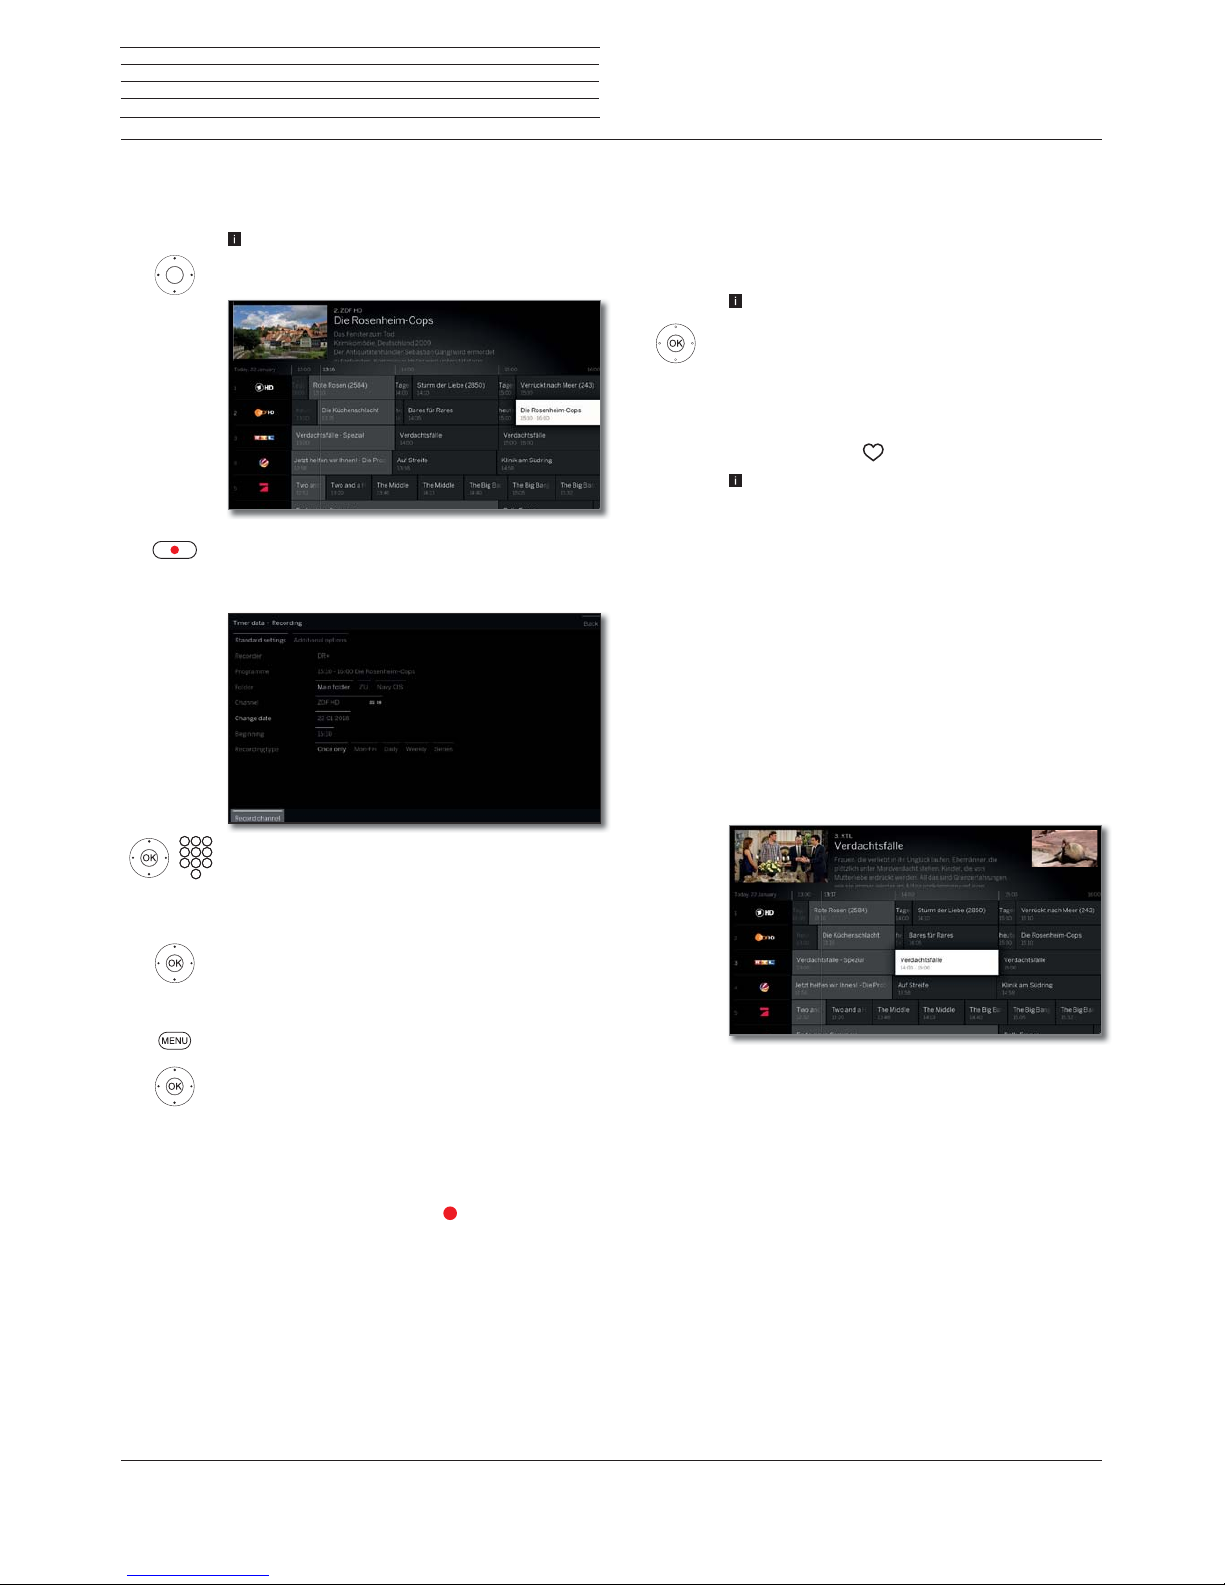
Loewe bild
User handbook
42
TV
Electronic Programme Guide
Recording a programme via EPG
You can programme timer recordings of TV programmes conveniently
using the EPG.
EPG called.
Select the desired broadcast.
RECORD key: Programme timer recording for the TV
programme.
Timer data dialogue is opened.
Check the timer data and update it if necessary (e.g.
directory, start, end, recording type).
See chapter Recordings,section Timer for explana-
tions of the setting options in the Timer data menu.
Select Record channel,
OK adopt.
Or:
MENU: Call menu options
Select Recording,
OK adopt.
When a program is currently running, a recording is
started immediately.
For programs that have not yet started, a timer recording is entered in the timer list.
In the EPG a recording symbol
is placed behind the
title of the programme.
Memorising a programme via the EPG
A programme that has not started yet can be memorised. For memorised programmes, the TV set will ask at the beginning of a programme
if it should change the channel accordingly or switch on from the
stand-by mode if this is activated in the menu System settings
p
Control
p
EPG p TV on when memorised.
EPG called.
Mark the desired programme.
OK Call up detailed information.
Mark Memorise,
OK Memorise programme.
In the EPG, a memorise symbol is placed behind the title
of the programme
.
After a software update, it is likely that Memos of
programmes are deleted. After a software update,
please check your timer list
(see chapter Recordings,
section Timer).
Activate Premium EPG Services
In conjunction with the Loewe app, you have the option of accessing
an additional service that provides you with a preview image of the
relevant program from the Gracenote database.
A prerequisite for this is a current version of the Loewe app on a smart
device that is in the same network as your TV set. The TV must also
be connected to the internet.
When pairing app and TV, your set will announce the availability of
Premium EPG Services. Confirm the activation in the screen dialogue.
At the next call of the EPG function, the new preview images are available, depending on the respective channel.
The additional function can be deactivated at any time. Under System
settings ט Control ט EPG טExpanded info select for this no.
Configuring EPG
You can find the EPG settings in the chapter System settings,section
Control – EPG).
Page 43

Loewe bild
User handbook
43
EPG search
The EPG search function is only available after once-off pairing
of the TV set with the Loewe app. Next, confirm the activation in
the screen dialogue.
HOME: Calling the Home view.
Select magnifying glass icon.
OK Call up search.
Select the desired character,
OK apply the character.
Search suggestions are made from the second
character and adjusted for each additional
character entered. If wanted, these can be
selected directly.
The characters can also be entered from a USB
keyboard or the numeric buttons on the remote
control.
ABC/abc
Switch between upper and lower case.
=/#
Switch to special characters.
Switch the on-screen keyboard to English, German
or Russian.
Space
Enter space.
Å
Delete characters to the left of the cursor.
Clear
Delete all characters.
Enter
Accept search term and start search.
Cancel entry. If search suggestions are already
displayed, the input window is closed and you jump
to previous search suggestions. If there are no search
suggestions, you are immediately returned to the
Home view.
Switch between on-screen keyboard (below) and
the displayed search terms (above).
Once the search term has been confirmed via the field
in the keypad or selected in the list, the search results
are displayed.
Highlight desired program,
OK call up info text.
Switch to menu options.
For explanations, refer to the chapter EPG, section Call-
ing additional information about the programmes.
Or:
Select the desired program,
MENU: Call up menu options.
Select menu options.
OK call up menu options.
Menu options in the EPG search:
Channel list
selection
Here you can select the list of channels to be included
in the search.
Only channels that are marked in the channel selection for recording EPG data are included in the
selected list (see chapter System settings, section
Control – EPG).
Search
mode
Here you can specify in which part of the EPG information you want to search. The choices are Title
& Info, Only title and Only info. The number of
search results will vary depending on the search
mode you selected. If the search mode is changed,
this change remains in place until the next time the
TV is switched on.
The default setting after switching on the TV set
is Title & Info.
Recording The selected program is bookmarked for recording.
An entry is created in the Timer list. The program is
marked with the symbol
.
Memorise The selected program is bookmarked for viewing.
An entry is created in the Timer list. The program is
marked with the symbol
.
Timer If there are any entries in the Timer list, these are
displayed, otherwise the Timer services appear.
TV
Electronic Programme Guide
Page 44

Loewe bild
User handbook
44
Freeview Play
The Freeview Play service gives you access to programs that have already
been broadcast. In conjunction with the electronic program guide – the
EPG – you can immediately access the additional content from the relevant channel’s media library.
You need to accept the Terms of Use the first time you use this service.
If you have accidentally rejected the Terms of Use and still want to make
use of this service, you can also accept them later.
There is an active connection to the Internet.
When you use the respective player for the first time, you must log in
to receive an activation code. Registering with the service providers is
free of charge for you.
If your TV set has been reset to factory settings, you will need to
re-activate the player.
HOME: Calling the Home view.
Select Freeview Play.
OK Call up the Terms of Use.
Select Adopt,
OK confirm selection.
This changes the Home view. You now you have access to the media
libraries of several TV channels. The tile Freeview Explore now appears
(see next page/column).
Program archive:
In the program archive, you can watch programs again that have
already been broadcast.
The programs are stored for seven days.
EPG called up.
The Terms of Use must be accepted.
The Detail Info displays “OD Available” or “OD”.
Select channel.
MENU: Call up menu options.
Select Backwards EPG,
OK confirm.
Or:
MENU: Call up menu options.
Select date,
OK confirm.
Select date in the past,
OK confirm.
Or:
Use the navigation key to move the selection
window to the left until the program archive
appearst.
TV
Freeview Play
Page 45

Loewe bild
User handbook
45
Notes on the program archive:
The channel currently selected is displayed in the channel list on the
right. This is marked with a white border.
The channel can only be changed when you are in this list.
If the border is greyed out, you are in the channel selection on the left.
If you want to change the channel, you must move the selection
window back to the channel list. The selected channel is again marked
with a white border.
Use the INFO button to open detailed information about the selected
program.
Press the OK/PLAY button to start playback of the program in the
Program Archive. The program starts after a short delay.
Freeview Explore:
The Freeview Explore function combines all the media libraries of the
active channels. For example, you can use Freeview Explore to search
for sports events, movies or documentaries that have already been
broadcast.
The Terms of Use must be accepted.
There is an active connection to the Internet.
HOME: Call up Home view.
Select Freeview Explore,
OK call up Freeview Explore.
TV
Freeview Play
Page 46

Loewe bild
User handbook
46
TV
Teletext
Teletext
Your TV set supports the two operating systems TOP text and FLOF.
Up to 2000 pages are stored in order to get quick access.
Starting and ending Teletext
TEXT: Call teletext.
The function of the TEXT key can be set under
System settings ט Control טmore ...טHbbTVט
Function of the TEXT key.
The factory default is Standard teletext first (see
also chapter System settings, section Control –
HbbTV).
TEXT: Switching between Standard Teletext and
MediaText.
If no MediaText is available Teletext off.
Otherwise:
Pressing the BACK key ends Teletext.
Key functions for Standard Teletext operation
INFO press longer: Show Explanation of keys.
IINFO or BACK: Hide Explanation of keys.
0-9: Directly enter the page number.
0: Stop self changing pages.
9: Zoom in the page (press several times).
Page selection with the coloured keys
Red key: One page back or back to previous page
(depending on Teletext provider).
Green key: Advance one page.
Yellow key: To next topic.
Blue key: To next range of topics.
The coloured bars (with TOP text) or the coloured
writing (with FLOF text) in the last to bottom line show
you which colour button you need to use to select which
topic areas and topics.
Page selection with P+/P–
P+ call next Teletext page.
P– call previous Teletext page.
Additional page selection possibilities
First possibility:
INFO: Call overview page 100.
Second possibility:
Directly enter the page number.
Third possibility:
The page includes 3-digit page numbers.
Mark desired page number.
OK Call page.
Fourth possibility:
The page consists of several sub-pages, indicated by
the symbol
and the arrows in the bottom line.
Go to bottom line.
Mark
or ,
OK select previous / next sub-page.
The number of the current sub-page is shown
between the arrows.
Explanation of the symbols in the Teletext bottom line
Symbol
(icon)
Remote
control key
Description
– For Teletext pages with sub-pages:
Show previous sub-page.
– For Teletext pages with sub-pages:
Show next sub-page.
Hide TV picture (Teletext as full screen).
Insert TV picture (Split screen Teletext/
TV Picture).
– Activate Newsflash mode.
– Show hidden information on the Teletext
page.
– Hide information on the Teletext
page again.
Add current Teletext page to the favourites
in Home view.
Call menu options with Teletext settings.
Page 47

Loewe bild
User handbook
47
TV
Teletext
Newsflash
Some text pages, e.g., live tickers, will be permanently updated. In
order to keep track of changes and also to be able to watch the TV
programme at the same time you may hide the Teletext temporarily
and can still remain informed on updates of the page.
Mark
Newsflash,
OK confirm.
The future behaviour of the News function depends
on the type of the Teletext page:
In case of Full screen Teletext pages the Teletext will
be hidden. In the bottom right corner, there will be a
symbol for the activated news function.
A screen message appears when the contents of the
page has changed.
Show updated page,
Select yes or no.
OK Confirm selection.
In case of Teletext pages which cover only a part of the
Teletext page, e.g., News tickers, the respective part
will be faded in and permanently updated.
End News function
OK show Teletext again.
Or:
BACK: exit Teletext.
The Teletext page has
been updated. Would
you like to see it now?
yes no
Page 48

Loewe bild
User handbook
48
(1
Depending on the settings selected.
TV
HbbTV / MediaText
HbbTV / MediaText
HbbTV
(1
(Hybrid broadcast broadband television) offers the user
comprehensive multimedia contents, e.g., media centres or additional
information on the current programme as far as they are provided by
the channel (Value-added service).
MediaText helps you to use the next generation of teletext/videotext
for HbbTV.
MediaText/HbbTV text can either be started directly or through an
HbbTV application.
Dependent on the selected TV channel, buttons on your remote
control can be locked via MediaText / HbbTV text.
The TV must be connected to the Internet to use HbbTV/MediaText.
A connection speed of at least 6,000 kbit/s (DSL 6000 or
equivalent) is recommended for smooth playback of videos.
Opening an HbbTV application
If an HbbTV application is available for the chosen channel after
changing channels, this will be loaded during the automatic start
process and a red key symbol will appear. When starting manually,
the application will be loaded not until you press the red key. The start
behaviour can be set under System settings ט Control ט more...ט
HbbTVטStart behaviour of HbbTV stations.
HbbTV is offered by the selected channel.
Connection to the Internet established.
HbbTV mode is set to on.
Red key: Load / display HbbTV application.
The appearance, key assignment and available
functions of the HbbTV applications are dependent on
the provider.
Under certain circumstances, the recording and
bookmarking functions of the applications may not be
supported.
Loewe do not guarantee the accessibility, functionality
or content of HbbTV applications.
Hide / Close HbbTV application
Red key: Fade out HbbTV application.
Press BACK for a long time: Close HbbTV application.
Opening HbbTV text directly
Depending on the programme provider, the direct
Call of MediaText may not be possible. MediaText
must then be opened by means of the HbbTV
application.
MediaText/HbbTV text is offered by the selected
channel.
Connection to the Internet established.
TEXT: Call up “standard” Teletext (see chapter TV,
section Teletext).
By pressing the TEXT key a second time the Media-
Text/HbbTV Text will be called up.
The function of the TEXT key can be set.
Navigation within the HbbTV Text and how the coloured
keys are assigned can vary depending on the provider.
Terminating the HbbTV Text
Press BACK for a long time: End HbbTV text.
HbbTV services for DVB radio
Various DVB radio channels also offer HbbTV text/media text. The
functionality is the same as in TV mode.
Page 49

Loewe bild
User handbook
49
TV
PIP
Picture in Picture (PIP)
The concurrent display of two different images is referred to as Picture
in Picture.
Restrictions with PIP operation:
In PIP mode, it is generally not possible to use analogue channels
and analogue sources (AV, PC IN etc.) for main/PIP picture.
Picture change and channel selection are restricted during record-
ing.
The PIP mode cannot be operated via the colour buttons while an
HbbTV application is active.
The iPIP menu item is not available for non-dual-channel devices
(4
or when selecting an AV interface (HDMI, etc.).
The selection and combination options for the main display/PIP
display depends on the version of your set or on the number of
available tuners for the TV set and the image signal (SDTV / HDTV
/ UHD-TV) the set receives.
Simultaneous display of...
z (yes)/– (no)
a digitally broadcast channel (DVB-T/C/S) and
picture from a digital AV source (e.g. HDMI1)
z
a digitally broadcast channel DVB-T/C/S and a
channel over analogue cable television
–
a digitally broadcast channel over DVB-T/C and
a satellite broadcaster (DVB-S)
z
(1
/ –
(2
two channels over analogue cable television
–
two digitally broadcast channels (DVB-T/C/S)
z
(1
/ –
(2
a free-to-air and an encrypted digitally broadcast channel (DVB-T/C/S)
A CA module with corresponding smartcard
is required for decryption.
z
(1
/ –
(2
two encrypted channels
Two CA modules with corresponding smart-
cards are required for decryption.
z
(1
/ –
(2
an SDTV channel and an HDTV channel (DVBT/C / S )
z
(1
/ –
(2
two HDTV channels (DVB-T/C/S)
z
(1
/ –
(2
a channel in the HEVC / H.265 standard and
any other channel.
–
two channels in the HEVC / H.265 standard.
–
(3
PIP functionality Standard PIP/iPIP:
Standard PIP:
Within the scope of the display options, the channels for PIP and TV
display can be selected and interchanged at will.
A green frame around the PIP display indicates that the channel selection affects the PIP display. A white frame means that the operation
refers to the main display. If the frame is blue, Play channel is active
in the PIP display.
iPIP:
When the iPIP mode starts up, the channel shown in the TV display is
moved into the PIP display. You can now select any other channel for
the TV display. When exiting iPIP mode, the PIP display becomes the
TV display again and the PIP window is closed.
An orange frame around the PIP display indicates iPIP functionality.
Start and end iPIP mode
PIP: Move the current TV display to the PIP display.
You can choose other channels for the TV display
and still keep an eye on the PIP display. This allows
you to temporarily move advertising or parts of
programs to the PIP display.
PIP: Move the PIP display back to the TV display (PIP
off).
Start and end standard PIP mode
PIP: Show/hide PIP display.
Selecting the channel of the PIP picture
If the frame colour of the PIP picture is not green,
press the green key.
Select the channel as usual. (see also chapter TV,
section Select channel or chapter Sources).
(1
On set types with Dual Channel (see chapter Technical data - equipment features for your TV set).
(2
On set types without Dual Channel (see chapter Technical data - equipment features for your TV set).
(3
For set types with Chassis SL4xx, two DVB-T2 HD channels are possible in the HEVC / H.265 standard with full HD resolution.
(4
Availability varies by device type (see chapter Technical data - equipment features for your TV set).
Page 50

Loewe bild
User handbook
50
Rotating the TV set
(1
If you have a Loewe motorised rotary foot attached, you have the
option of automatically turning your TV set via remote control.
To connect a motorized rotary foot, you need the Motor unit con-
nection. This is found at the rear of your TV set.
Menu item Rotate TV will only be displayed when a motorised
stand is connected to the TV set.
The range of rotation and the switch-off position you can set under
System Settings ט Control ט more ... ט Rotate TV. For more
information, see chapter System Settings, section Control –
Rotate TV.
Rotating the TV set with Loewe motorised rotary foot
The TV set may be positioned within the set range of
rotation.
In normal TV mode, without other displays:
Rotate TV set to the desired position.
Or:
MENU: Call menu options.
Select Rotate TV,
OK call.
Rotate TV set to the desired position.
BACK: exit Rotate TV.
Rotating the TV set
TV
PIP / Rotating the TV set
(1
Availability varies by device type (see chapter Technical data - equipment features for your TV set).
Select the channel for the main picture
If the frame colour of the PIP picture is not white,
press the green key.
Select the channel as usual. (see also chapter TV,
section Select channel or chapter Sources).
Coloured key functions
If the frame colour of the PIP picture is not green,
press the green key.
Yellow key: Swaps contents of TV picture and PIP
picture.
Blue key: Start/stop PIP scan in the PIP picture.
Change PIP position
PIP image is displayed.
Move PIP image to one of the screen corners.
PIP Settings
PIP image is displayed.
MENU: Call up menu options.
Select PIP,
OK call.
The size, position and mode of the PIP display can
also be changed in System settings under Control ט
more ... טPIP (see also the chapter System settings,
section Control – PIP).
Page 51

Loewe bild
User handbook
51
Vogels Motion Mount
The motorised, adjustable Vogel‘s MotionMount wall mount system
makes it possible for you to change the position of your TV by remote
control, including changing the distance between the TV and the wall.
Not only can MotionMount be controlled via Vogel‘s own MotionMount
app, it can also conveniently be operated via the TV menu using the
Loewe assist remote control.
The wall bracket and the TV set communicate via Bluetooth.
Please check the instructions included with Vogel’s MotionMount
to determine if the weight of your TV is suitable for the wall mount
system. Mount the MotionMount as described in the original Vogel‘s
manual.
Loewe does not guarantee the availability and functioning of Vogel‘s
MotionMount. For support with the motorised wall mount system,
please contact Vogel‘s directly.
Mounting a Loewe TV set with VESA attachment points
(1
to Vogel‘s
MotionMount requires the use of Loewe Vesa adapter bolts.
If Loewe Vesa adapter bolts are not used, the TV set may be dam-
aged.
Your dealer will supply you with the appropriate Vesa adapter bolts
for your TV set. The item numbers are listed in the chapter Acces-
sories.
To control Vogel‘s motorised adjustable MotionMount wall mount
system directly via your TV set, your TV
(1
must have Bluetooth
functionality.
Connecting Vogel‘s MotionMount system to the TV
Vogel‘s MotionMount is correctly mounted and
ready for use.
HOME: Calling the Home view.
Select System settings,
OK call System settings.
Select Multimedia / Network,
go to next column.
Select Bluetooth,
OKcall.
The system automatically starts searching for Bluetooth devices in the vicinity for 2 min.
If Vogel‘s MotionMount is available, it will be displayed
in the list.
Mark Vogel‘s MotionMount,
OK select.
The TV set and Vogel‘s MotionMount are now
paired. No new pairing is required after switching
the TV on/off. It occurs automatically when the
turning functionality is called up.
TV
Vogels Motion Mount
Adjusting Vogel‘s MotionMount manually
In normal TV operation, without further displays:
MENU: Call up menu options.
Select Rotate TV,
OK access. Or:
Call up the Rotate TV menu directly.
The following message appears: Connection is being
established to wall mount. Please allow some
seconds ….
Once the connection is established, the Turn TV menu
appears.
Reduce/increase the distance between the wall/TV.
Turn the TV set left/right or swivel it.
While turning, the wall bracket may automatically
increase the distance between the TV set and the
wall to provide enough room to rotate the TV.
The TV can be rotated through the entire turning
range when the wall bracket is at maximum
distance from the wall.
If the wall mount is manually adjusted, this position
can also be saved via the position menu.
REC: Call up the position menu (see next page).
BACK: Exit Rotate TV.
(1
Availability varies by device type (see chapter Technical data - equipment features for your TV set).
Page 52

Loewe bild
User handbook
52
Moving Vogel‘s MotionMount to a defined position
Call up the Position menu.
Select Position,
OK call.
The Vogel‘s MotionMount moves to the saved
position.
Managing Vogel‘s MotionMount positions
Call up the Position menu.
The position Wall is fixed and cannot be changed
(renaming, deleting not possible).
Select Manage presets,
OK call.
Select Position,
OKcall. A check mark appears before the position.
Select menu option,
OK call.
Menu options in the Positions preferences:
save If you previously selected New position as the
selected position and use the menu option Save,
a new position with the current position of the wall
mount will be inserted in the list.
rename You can rename the previously selected position
here.
delete You can delete the previously selected position
here.
Switching the TV on/off
When the TV is switched off, the Vogel‘s MotionMount moves from
any position to the wall position – i.e. in the centre, at the closest
position to the wall.
When the TV is switched on, the Vogel‘s MotionMount returns from
the wall position to the last position it was in before it was switched off.
TV
Vogels Motion Mount
Page 53
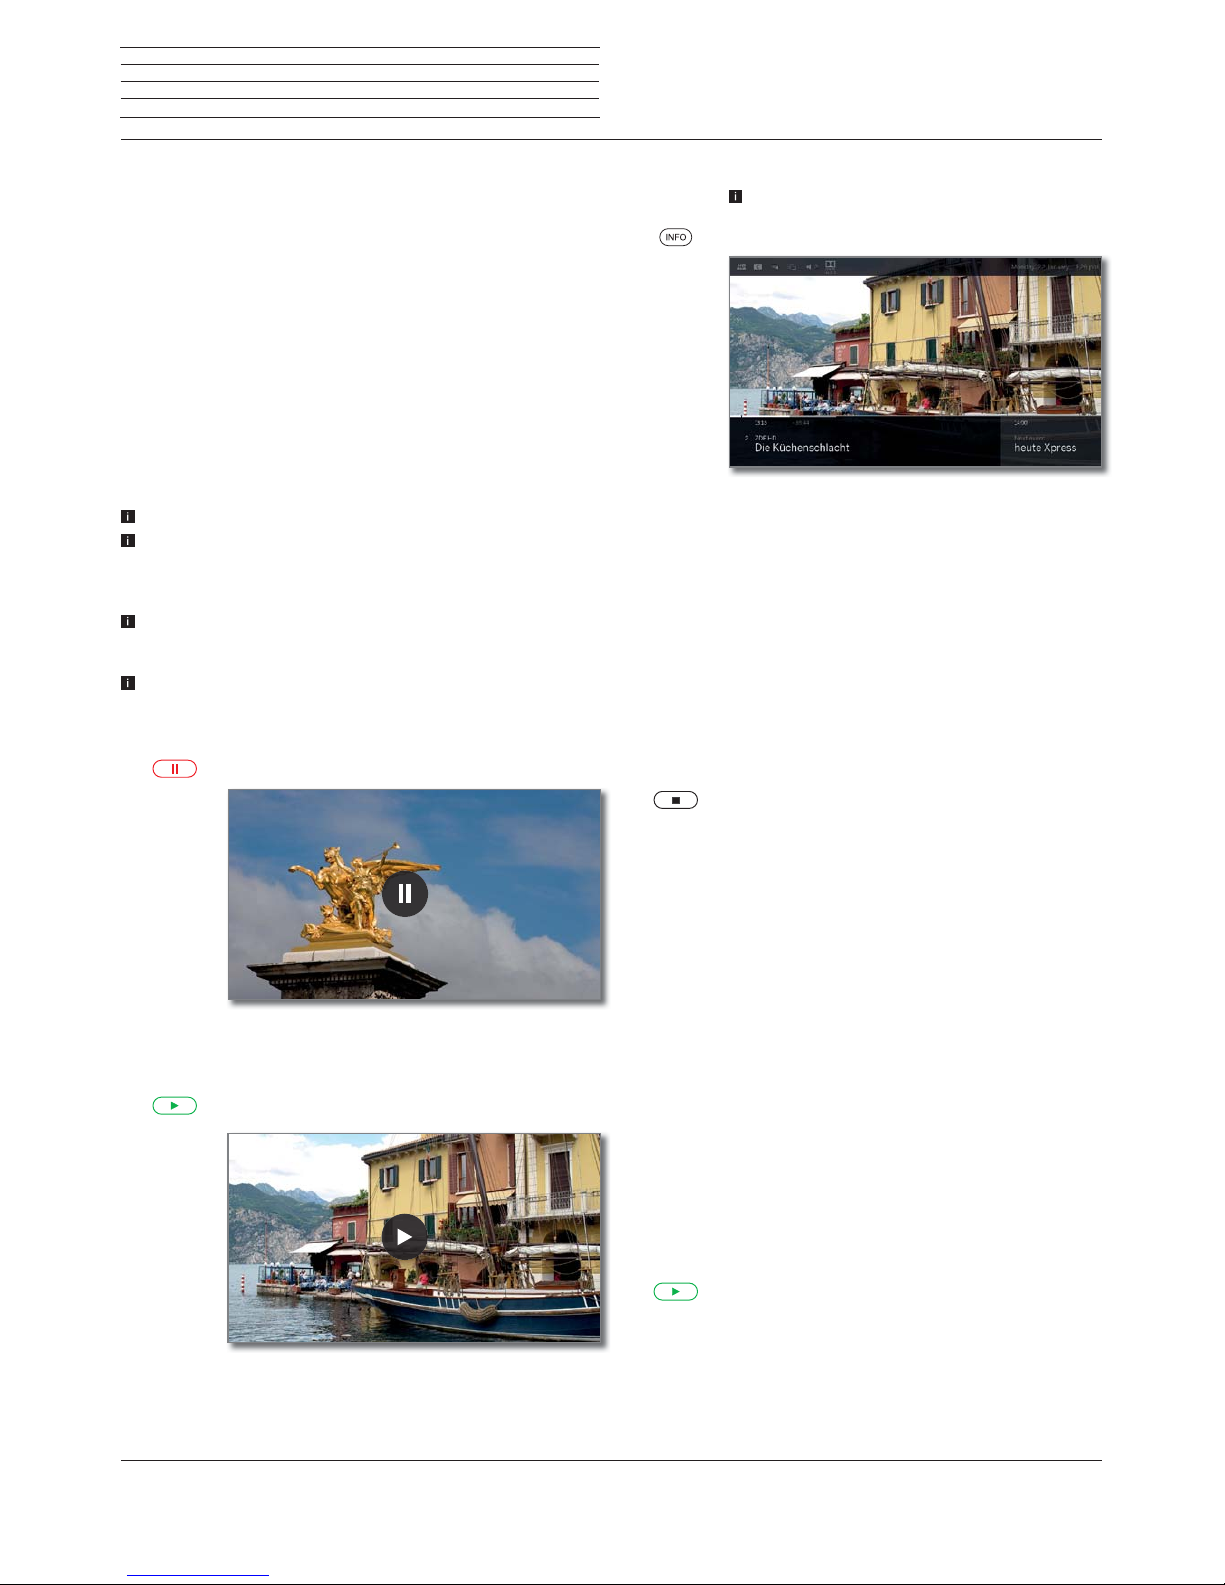
Loewe bild
User handbook
53
Recordings
Digital Recorder
TV viewing with time shift
A TV program or DVB radio program that you watch or listen to is
recorded in the background in the time shift buffer.
You can stop recording the program at any time and play it later with a
time delay (time shift operation). The maximum Time offset amounts
to three hours.
On time shift operation, the program is not stored in the long term.
If you change the channel (switch over program), the current recording
is discarded, the time shift buffer being emptied.
If you want to save programs for a longer period use the archive recording (see next page).
The recording in the time shift buffer is automatically started on TV
sets with integrated hard drive
(1
.
For TV sets without an integrated hard drive, the recording on the
externally connected USB hard drive only starts when the pause key
is pressed.
Recording of analogue channels is not possible.
Time-shifted operation is perhaps not possible or only to a limited
extent for programmes of channels working with CI Plus encryption
(see also chapter Sytem settings, section Extras – Common
Interface).
A seen and already finished program in the time shift buffer can be
transferred to the DR+ archive, provided no channel change has
taken place in the meantime.
The operation of time shift operation in DVB radio programs is
identical to the time shift operation in TV operation.
Interrupt watching (start timeshift television)
Press PAUSE key.
The pause icon is briefly displayed and TV picture
becomes a still picture. Time shift operation is started.
Continue (time shift viewing)
Press PLAY key.
The playback symbol will be shown briefly, now you will
see the TV program delayed in time from the moment
you had pressed the PAUSE key.
Time shift status display
In time shift operation, without further displays.
INFO: ShowTime shift status display.
In the lower area, you will see the number and name of
the channel, the beginning, the end and the title of the
current program as well as the title of the next program.
The grey progress bar indicates how far the time shift
buffer is filled with the content of the current program.
The white bar shows the current position in the time
shift buffer or how far the program has already been
viewed.
The time in the bar indicates the remaining time of the
current program.
For further options of time-shift watching see chapter
Sources, section Video playback.
Returning to live picture (end timeshift television)
Press STOP key.
You see the channel’s live picture again.
Switch to a different channel
If you switch to another station, the display appears on the TV set: End
timeshift and switch over. If you confirm this, the current recording
is discarded (time shift buffer is emptied).
The recording in the time shift buffer is automatically restarted on TV
sets with integrated hard drive
(1
after a change of channels.
For TV sets without an integrated hard drive, recording on the externally connected USB hard drive only starts after pressing the Pause
key after a channel change.
When switching between encrypted and unencrypted contents of the
same channel the timeshift buffer is also cleared.
When doing this, the timeshift television is interrupted and you see
the live picture of the broadcast.
As a precaution, start archive recording of interesting broadcasts when
watching channels with changing coding.
Setting bookmarks
You can manually set bookmarks during time-shift TV watching. For
this, the time shift recording is converted into an archive recording.
Press Play button longer: Delete bookmark.
(1
Availability varies by device type (see chapter Technical data - equipment features for your TV set).
Page 54

Loewe bild
User handbook
54
Recordings
Digital Recorder
Archive recording
Programs that you want to save permanently or view at a later time,
place in the digital recorderarchive (DR+ Archive).
On TV sets with integrated
(1
hard drive, this is done on the internal
hard drive, on TV sets without an integrated hard drive on an externally
connected USB hard drive.
A recording can be made manually (instant recording / direct
recording) or as timer recording. The timer data can again be entered
manually or more comfortably, for example, via EPG.
If EPG or teletext data is available, the Digital Recorder stores the title
and additional information on each programme in the archive.
If additional languages are being transmitted for a DVB broadcast,
these will also be recorded. DVB subtitles can also be recorded.
You can watch another programme or playback a recorded TV
programme from the archive while recording a TV programme into
the archive. But you can also play back the programme that you are
just recording with time-shift.
With multi recording
(1
two programmes can be recorded simultaneously
(see chapter Recordings, secion Digital Recorder – Multi
recording).
During the archive recording, the bar showing the recording progress
is red.
Recording of analogue channels is not possible.
Recordings of CI Plus encrypted programmes (e.g. RTL HD, Sat 1
HD, Pro 7 HD, etc.) are perhaps not possible or only to a limited
extent.
I
n order to use the full DR + functionality, two antenna cables, ANT-
SAT 1 and ANT-SAT 2 must be
(1
connected or 2 channels must be
configured for a DiSEqC single-cable system.
Instant recording (One touch recording) / Direct recording
If the broadcast was watched right from its start, it will be saved from
the the beginning in the DR+ archive. Otherwise, recording begins
at the point from which viewing of the broadcast began.
One Touch Recording: The recording is started immediately with a
single keystroke.
Press REC key longer: The current programme is
recorded immediately.
Direct recording: The timer data is called up. If required, it can be
adapted and the recording subsequently started.
Press REC key briefly.
If desired, adjust timer data (e.g. directory, start, end,
recording type).
Select Record channel,
OK adopt.
Watching other channels during archive recording
After you have started the recording, you can switch to another
channel.
The second channel can be watched in time-shift TV whilst a
recording is taking place (Time shift during archive recording).
On TV sets without Dual Channel
(1
switching to another channel
is only possible if the second channel is located on the same transponder as the program you are recording.
Viewing another programme from the archive during archive
recording
After you have started the recording, you can also watch a programme
you have already recorded.
Open the DR+ archive.
Mark the recorded programme,
OK view programme.
The recording process is continued in the background.
Time shift viewing during archive recording
Whilst an archive recording is taking place you can play back the
programme that is being recorded or watch a programme on another
channel using time delay.
PAUSE key: Switch to freeze picture.
The recording is continued in the background.
PLAY key: Continue playback.
You will now see the time-shift archive recording.
INFO: Show Time shift status display.
For further options of time-shift watching see chapter
Sources, section Video playback.
STOP key: End time shift and return to the live picture
of the current archive recording.
Subsequent archive recording
You can also save an already viewed and finished broadcast in the
archive provided there has been no change of channel in between.
Skip or wind back to the desired broadcast and start the recording.
Setting bookmarks during archive recording
During a running archive recording you can create bookmarks (by pressing the PLAY key a little longer). You will see a message on the screen.
Bookmarks also serve as starting and end points of intervals.
Function of the coloured buttoned when archiving
Yellow key: Jump to the previous bookmark.
Blue key: Jump to the next bookmark.
(1
Availability varies by device type (see chapter Technical data - equipment features for your TV set).
Page 55

Loewe bild
User handbook
55
Recordings
Digital Recorder
Subtitles
Subtitles (DVB subtitles) of a program can also be saved during
recording.
The recording of subtitles in DR+ continuous mode must be
activated in the settings.
It is not possible to record teletext or HbbTV subtitles.
Calling up the subtitles during a later playback is similar to calling
subtitles in TV mode.
Timer-controlled recording
Comfortably select your favourite programme for recording from the
EPG. The timer overview has room for 50 entries.
You will find further information on timer-recording in chapter
Recordings, section Timer.
Switching off the TV set during recording
You can switch off the TV to standby whilst recording. The recording
is continued in the standby mode.
Never switch the TV set off at the mains and do not pull the plug
of the TV set out of the socket. Otherwise the recording will be lost!
Stop recording early
You can end a current archive recording prematurely.
Press STOP key.
A message appears in the right upper corner of the
screen.
OK Stop recording.
The recording process is ended. The portion of the TV
broadcast recorded up to this point is saved on the
hard disk and can be played back via the DR+ archive.
If two archive recordings are active (multi record-
ing
(1
), the recording stops that started first.
You can also end a running recording by deleting the
corresponding Timer entry in the Timer overview
(see chapter Recordings, section Timer).
Multi recording
(1
The Multi Recording function makes it possible to record two programmes at the same time and still watch a third one as well.
Generally speaking: each recording, each selected channel requires
one transponder stream. With dual channel devices, two separate
streams are available.
An ideal scenario is to record from two channels sharing one transponder, so that any third programme can be watched.
While simultaneously recording from two programmes that are on two
different transponders, only those channels are selectable for the third
programme, which are transmitted by one of the two transponders.
All channels that are on other transponders appear in the channel list
in dark grey and cannot be selected.
In order to use the full range of functions of multi-recording, two
antenna cables must be connected when using DVB-S or 2 chan-
nels must be configured for a DiSEqC single-cable system.
Recording of analogue channels is not possible.
Recordings of CI Plus encrypted programmes (e.g. RTL HD, Sat 1
HD, Pro 7 HD, etc.) are perhaps not possible or only to a limited ex-
tent. In order to use the full range of functions of the multi-recording,
two CA modules must be used.
The examples shown in the following table for channel combina-
tions are valid only for DVB-S. For DVB-T or DVB-C, other combina-
tions may apply.
The channel / recording combination that can be used, depends
on the respective channel group / transponder group. You get
the assignment from your network provider or the respective
broadcasting channels.
Examples of DVB-S recording combinations:
Broadcasting channel
combinations:
Possible:
Info
Recording Sat 1
Recording Pro 7
Watching any of the channels
Yes Transponder 1: Sat 1, Pro 7
Transponder 2: vacant for selecting any channel
Recording Sat 1
Recording RTL
Watching any of the channels
No Transponder 1: Sat 1
Transponder 2: RTL
You can not choose any chan-
nel, only one channel on one of
the transponders used e.g. Vox,
Pro7, RTL2.
Recording ARD HD
Recording ZDF HD
Watching arte HD
Yes Transponder 1: ARD, arte HD
Transponder 2: ZDF HD
Recording RTL
Recording RTL II
Watching ARD HD
Yes Transponder 1: RTL, RTL2
Transponder 2: ARD HD
Recording RTL
Watching ARD HD
Watching ZDF HD
No Transponder 1: RTL
Transponder 2: ARD HD
ZDF HD is on a different tran-
sponder, and therefore can not
be displayed.
Multi recording
(1
Availability varies by device type (see chapter Technical data - equipment features for your TV set).
Page 56

Loewe bild
User handbook
56
Recordings
Digital Recorder
DR+ archive
Via the DR+ archive, you can call up your recorded TV / radio programs
and start playback. In the DR+ archive you can create your own directories and sort your records accordingly.
Open the DR+ archive
Open DR+ archive.
If a DR+ archive is present on a connected storage
medium or the integrated fixed drive, this is displayed.
Select the desired DR+ archive if several available,
OK Display archive entries.
The archive’s name and/or storage medium, as
well as the free remaining capacity of the storage
medium are indicated in the title list.
The current marked archive entry is indicated by
a white selection frame.
Existing folders are identified by a folder
symbol.
PIP: Change DR+ Archive view between standard and
concise.
The progress bar under the title image (standard
view) or the complete archive entry (concise view)
shows how far the archive entry has already been
viewed.
Playing from the DR+ archive
Select the required archive entry (programme
or directory).
If directory selected:
OK Open directory,
Select the desired broadcast in the directory,
OK Start or continue playback of the selected
programme.
See chapter Sources, section Video playback
for further information.
During playback:
P+ call next programme.
P– call previous programme.
Directories are skipped in this case.
DR+ archive menu options
The menu options of the DR+ archive contains the individual function
for its archive entries.
The menu items available in the menu options depend on the
selected entry from archive (programme or directory).
An archive entry has been selected.
MENU: Call menu options.
Select desired menu option,
OK Confirm selection.
Page 57
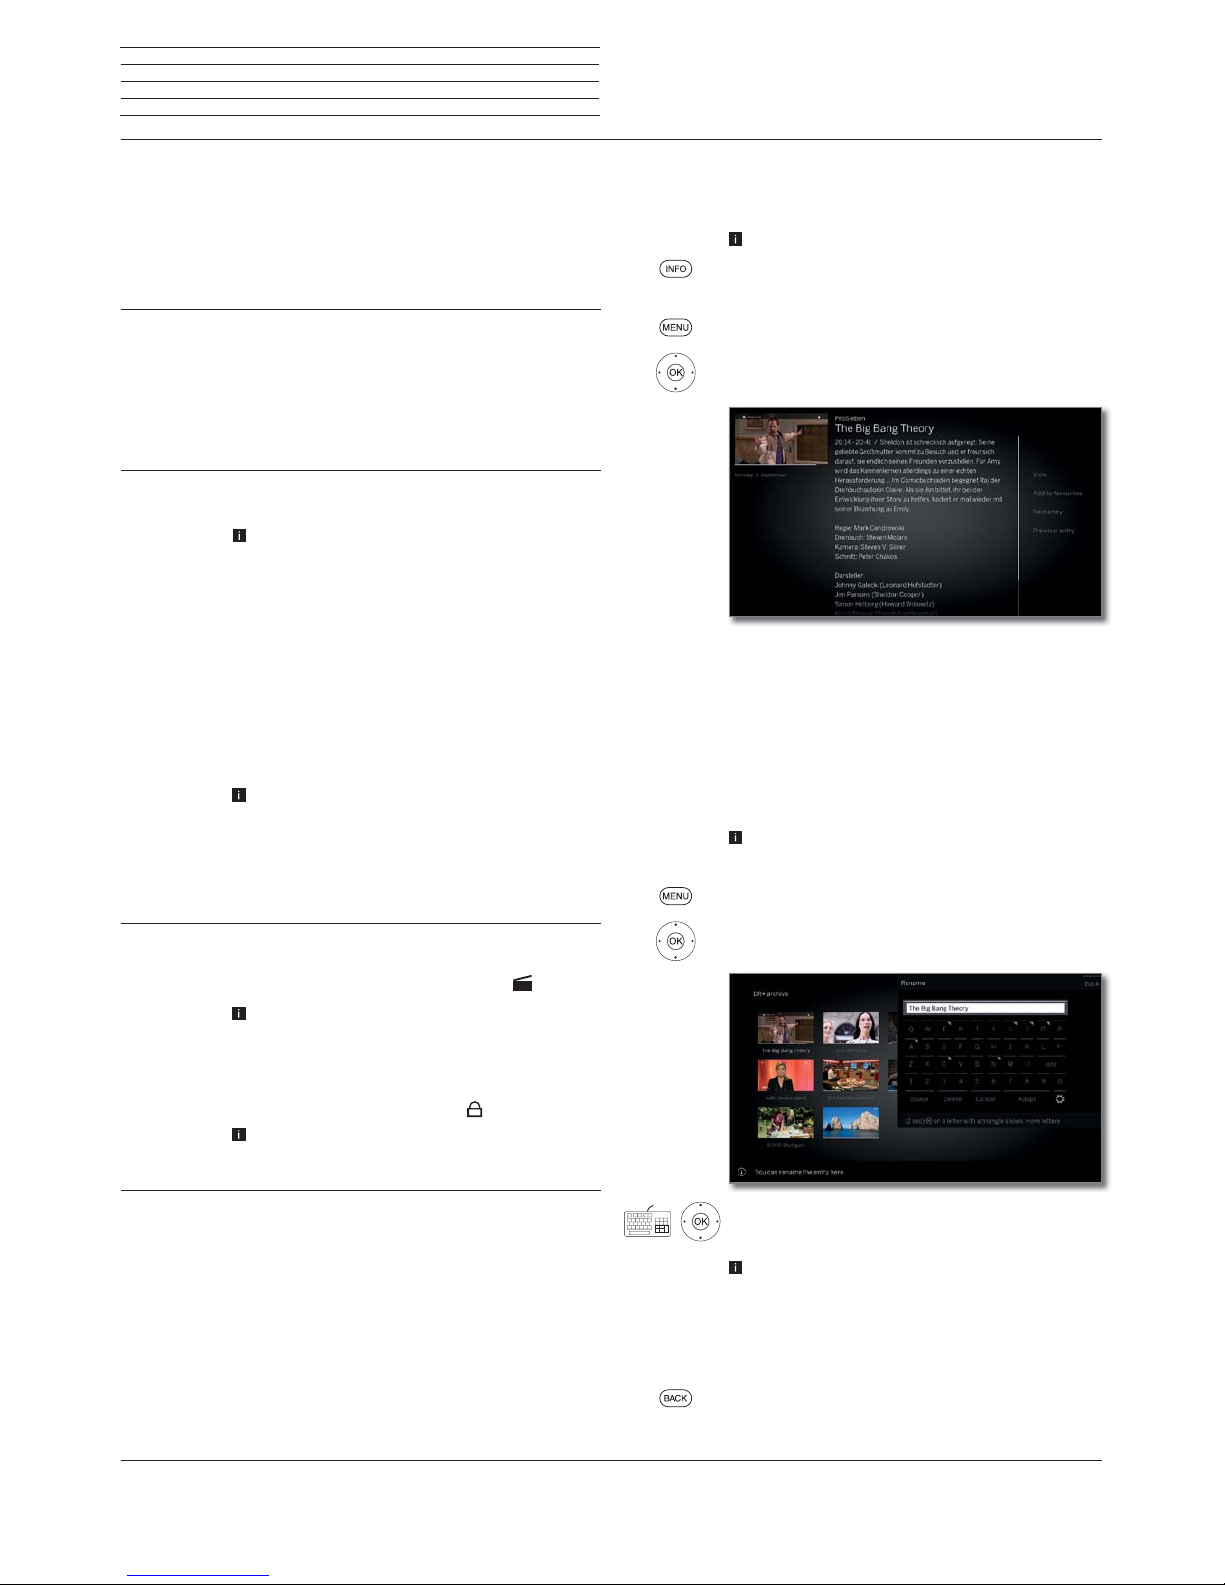
Loewe bild
User handbook
57
Recordings
Digital Recorder
Explanations of the DR + Archive menu options:
Detailed info Show detailed information on the marked archive
entry (see next column).
Favourite Add archive entry to Home favourites.
See chapter Home view for further information.
Multiroom
playback
This function allows you to synchronise the playback
on multiple Loewe TV devices that support this
function.
Rename
Changing title of the record or of directory.
Delete Delete archive entry from hard disk and recover disk
space.
Filter Select the desired filter (audio or video) and thus
hide the other files.
The filter is automatically reset after leaving the
archives.
Multi select Marking multiple archive entries is possible (see
next page).
Move
internal
Here, you can move recordings in the DR+ archive to
a directory and create new directories (see chapter
Recordings, section Digital Recorder – Moving
of archive entries).
Copy/move
external
Copy/move archive entries to an externally connected
USB storage device or to the hard disk of compatible
Loewe TV sets in the home network.
If no target medium is available, the menu item is
shown in dark grey.
Export
With Exporting, you can move the archive entries
to externally connected USB storage media. Then
you can easily view the archive entries with another
playback device.
Delete
protection
Activate or deactivate protection against automatic
deletion by the Delete Manager.
Symbol for activated delete protection:
The menu item only appears if your TV set has an
internal hard drive.
(1
Parental
lock
Protect recorded broadcast by a four digit PIN against
unauthorised playback.
Symbol for the set parental lock:
This menu item appears only when a PIN has
already been defined (see chapter System
settings, sectionControl – Parental lock).
Sorting Sort archive entries according to certain criteria,
ascending A-Z or descending Z-A) or according to
recording date (newest entries first).
Change view Change DR+ Archive view between standard and
concise.
Displaying detailed information on the recording
If detailed information exists on the recorded broadcast from the EPG,
you can deplay it.
The desired entry in the DR+ archive is marked.
INFO: Display detailed information for programme.
Or:
MENU: Call menu options.
Mark Detailed info,
OK Display detailed information on the broadcast.
On the right next to the preview thumbnail you will see,
if present, the channel name, the title of the program,
the recording time as well as a short synopsis.
Under the preview thumbnail you will see the progress
bar which indicates how much of the programme has
already been viewed.
Changing the title of an archive recording or folder
Desired entry (programme or folder) is highlighted
in the DR+ archive.
MENU: Call menu options.
Mark Rename,
OK Call.
Select characters,
OK Move character to input line.
For further information on character input see chapter
General information on menu operation.
End input with Adopt. This saves the change
permanently.
Or:
BACK: Cancel renaming.
(1
Availability varies by device type (see chapter Technical data - equipment features for your TV set).
Page 58

Loewe bild
User handbook
58
Recordings
Digital Recorder
Deleting recordings from the archive
The desired entry in the DR+ archive is marked.
STOP key: Call delete dialogue.
OK Confirm deletion.
The DR+ archive will be displayed again.
Or:
MENU: Call menu options.
Mark Delete,
OK call.
OK Confirm deletion.
The DR+ archive will be displayed again.
It may take some time to delete recordings from
external hard disks, depending on the length of the
programme and recording quality.
To delete a folder, all archive entries in the folder
need to be deleted.
Multi select
Multiple selection allows to mark several archive entries and then
perform a desired action via the menu options (e.g. export, delete).
The DR+ archive is opened, multiple selection was
called in the DR+ archive menu options.
Select archive entry,
OK
Confirm selection (archive entry becomes blue).
Repeat as often as desired.
MENU: Call menu options.
Select desired function (e.g. delete),
OK
Confirm selection
.
The marked archive entries will be deleted.
Moving of archive entries (folder management)
In the DR+ archive, you can create new directories when using the
function move.
Into these directories you can move existing archive entries or do a
new recording directly there.
For this purpose you simply choose the desired directory in the recording control (timer data).
You can determine the name of the new directory yourself. The DR+
archive root directory has the fixed designation main directory.
It is not possible to nest several directories into one another.
With multiple selection it is possible to move several archive entries
simultaneously to a folder.
Moving an archive entry to a new folder
The desired entry in the DR+ archive is marked.
MENU: Call menu options.
Mark Move internal,
OK call.
Select New folder,
OK call.
The on-screen keyboard will be displayed to enter the
folder names.
Select character,
OK Move character to input line.
For further information on character input see
chapter General information on menu operation.
If the name of the folder is completely entered,
complete with Adopt.
The new folder is created in the DR+ archive and the
selected archive entry is moved into the folder.
Moving an archive entry into an existing folder
Archive entry to be moved to a folder is highlighted
in the DR+ archive.
MENU: Call menu options.
Mark Move internal,
OK call.
Select Tar g et (folder name) if several are
available,
OK adopt.
Mark Execute,
OK adopt.
The selected archive entry is moved to the
selected folder.
(1
Availability varies by device type (see chapter Technical data - equipment features for your TV set).
Page 59

Loewe bild
User handbook
59
Recordings
Digital Recorder
Copy/move external of archive entries
You can copy/move archive entries to an externally connected USB
storage device or to the hard disk of compatible Loewe TV sets in the
home network.
If no target medium is available, the menu item is
shown in dark grey.
Copying/moving recordings, which originate from a
CI Plus encrypted channel, is perhaps not possible
or only to a limited extent.
The desired entry in the DR+ archive is marked.
MENU: Call menu options.
Mark Copy/move external,
OK call.
Select Target if several are available,
OK adopt.
Select Copy or Move.
OK Start the procedure.
After a successful moving, the recording is automati-
cally deleted from the source.
Copying to an external hard disk takes place in the
background and at a significantly higher speed. You
see a screen message, when copying has finished.
The status of copying assignments in progress/
pending can be seen in the timer list.
The TV set must not be switched off with the mains
switch during the copying process!
Export archive entries
With the export function, you can move the archive entries to externally
connected USB storage media. Then you can easily view and save the
archive entries with a computer.
If no target medium is available, the menu item is
shown in dark grey.
Exporting recordings, which originate from a CI Plus
encrypted channel, is perhaps not possible or only
to a limited extent.
The desired entry in the DR+ archive is marked.
MENU: Call menu options.
Mark Export,
OK call.
Select Target if several are available,
OK adopt.
Select Export.
OK Start the procedure.
Copying to an external hard disk takes place in the
background and at a significantly higher speed. You
see a screen message, when copying has finished.
The status of copying assignments in progress/
pending can be seen in the timer list.
The TV set must not be switched off with the mains
switch during the copying process!
HD archive entries (H264) are exported as „.mkv“
files.
Export archive entries (MPEG2) are exported as
“.mpg” files.
Export radio archive entries are exported as “.mpg”
files. The TV screen remains dark when playing back
the mpg file.
For UHD archive entries, the export is restricted
depending on the transport stream of the program
or in some cases not possible.
Page 60

Loewe bild
User handbook
60
Recordings
Digital Recorder
Setting/cancelling delete protection
The menu item only appears if your TV set has an internal hard
drive.
(1
You can provide films with a delete protection to prevent an automatic
deletion by the delete manager.
The desired entry in the DR+ archive is marked.
MENU: Call menu options.
Mark Delete protection,
OK Call.
Mark yes / no,
OK Adoptsettings.
Delete manager
The menu item only appears if your TV set has an internal hard
drive.
(1
The Delete Manager always makes sure there is enough memory
space on the hard disk for new recordings.
If the capacity on the hard disk is nearly fully exhausted, the oldest
recording(s) are automatically deleted in order to create space on
the hard disc.
Recordings which have been protected with a delete protection are
not deleted by the Delete Manager. However, you can still delete these
recordings manually.
To avoid data loss, we recommend copying important recordings to
an external USB hard disk (see Export of archive entries).
Loewe are not liable for data loss from the Digital Recorder’s hard
disk.
Locking/unlocking a movie (Parental lock)
You can lock movies that your children are not permitted to view, for
instance. Playback is then only possible after entering a PIN.
In order to activate the Parental lock, a code num-
ber (PIN) must have been defined beforehand
(see chapter System settings, section Control
– Parentol lock).
The desired entry in the DR+ archive is marked.
MENU: Call menu options.
Mark Parental lock,
OK Call.
Select yes / no,
OKAdopt.
The titles of locked films in the DR+ archive will be
replaced by asterisks * when a parental lock is active
and thus cannot be read anymore. The detailed
information for the recording cannot be called up.
The cover of the recording will be replaced by a
picture of a lock. In addition, the entry will be labelled
with the symbol
.
Viewing a locked movie
The desired locked entry in the DR+ archive is
marked.
When the access code of the parental lock has not
been entered yet:
OK call entry of PIN.
Enter your PIN.
After the access code has been entered, the lock
of the archive entries will be temporarily released.
OK View film.
(1
Availability varies by device type (see chapter Technical data - equipment features for your TV set).
Page 61
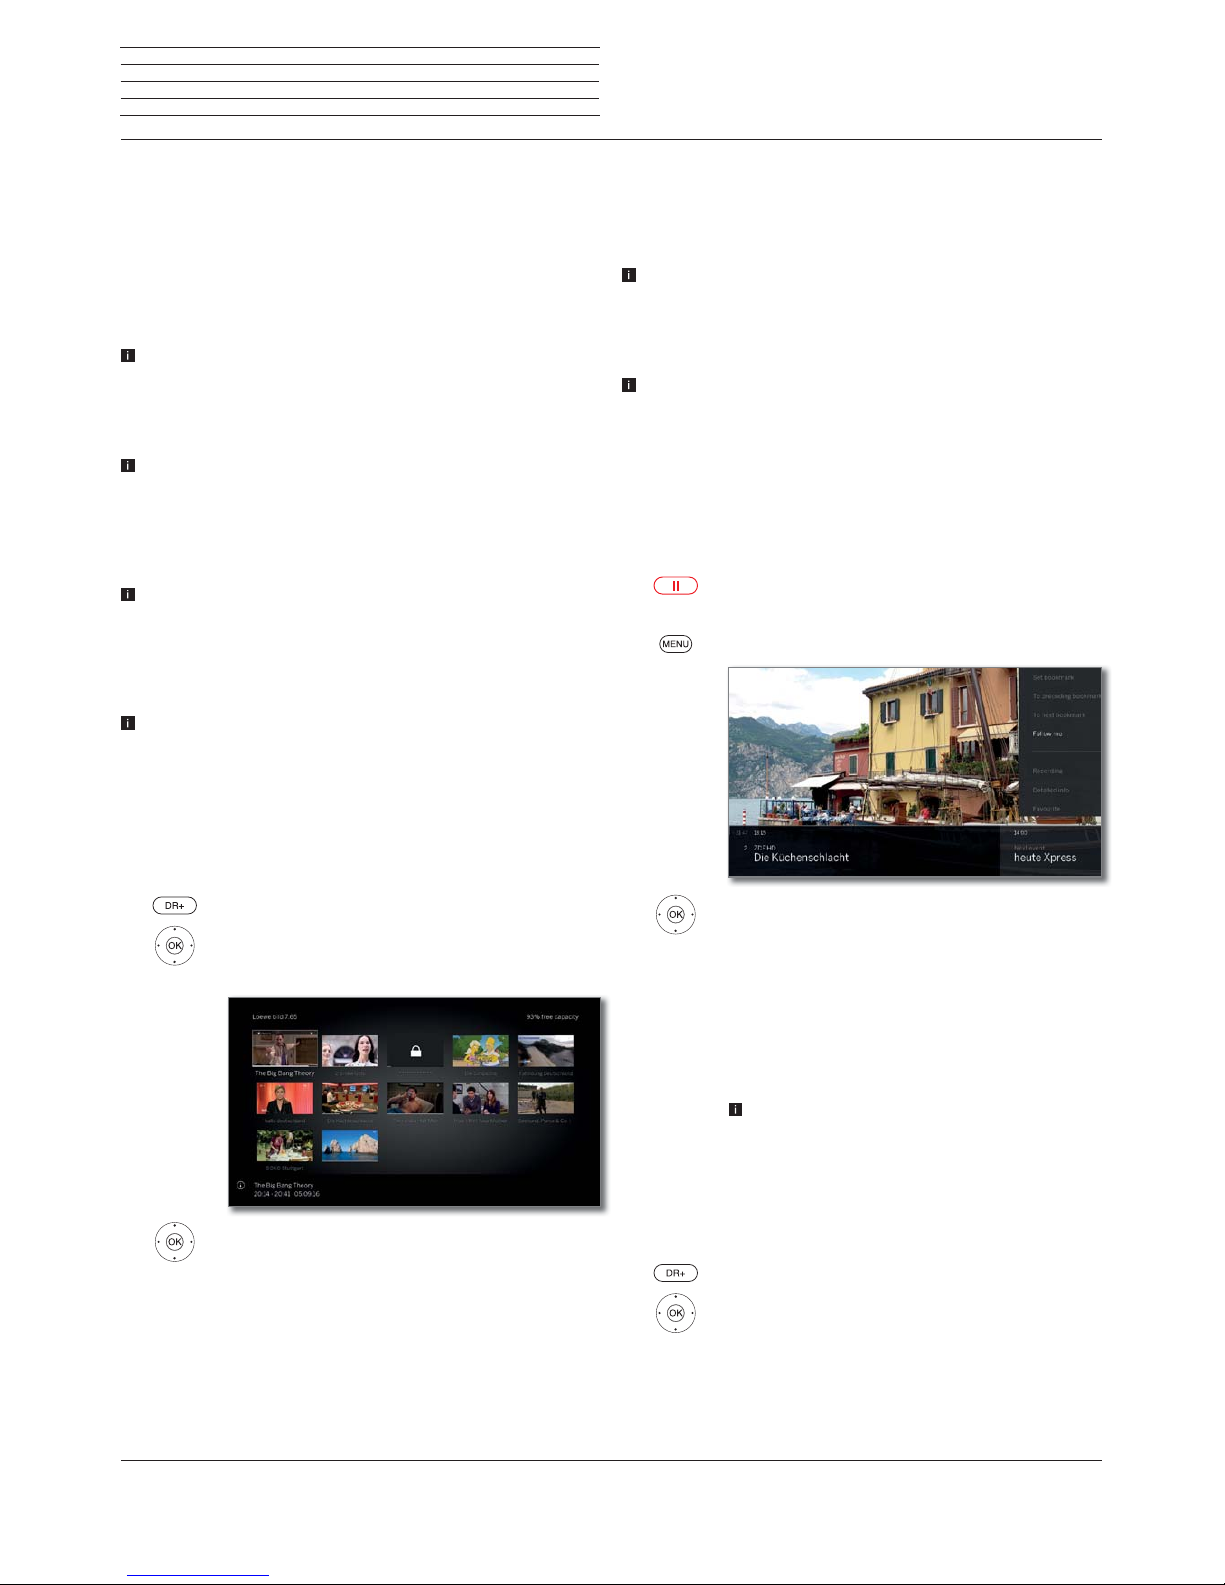
Loewe bild
User handbook
61
Recordings
Digital Recorder
DR+ Streaming
Using the DR+ streaming function, you can view films via your home
network from the DR archives of other Loewe TVs that have been set
up for this function, as long as these units make their DR archives
accessible.
Also, you can make the DR archive of your TV set available to any other
TV sets and UPnP clients equipped with this feature. They will then be
able to access the archive via your home network.
To use DR+ streaming, at least two Loewe TV sets are required, of
these, at least one TV set with integrated hard disk (with Chassis
SL1xx, SL2xx, SL3xx, SL4xx as DR+ Streaming Server).
The TV sets also need to be connected via a network (wireless
connection via Wi-Fi or cable connection via Ethernet, PowerLine).
Archive entries can only be provided or released in the network by
TV sets with integrated hard disks (DR+)
In case of these TV sets which are used as DR+ Streaming Servers,
the DR+ archive must be made available for other TV sets:
System settings ט Control ט more ... ט DR+ ט DR+ Streaming
ט Share DR+ archive with other devices ט yes.
Archive entries released in the network can be replayed by all TV
sets with chassis SL1xx, SL2xx, SL3xx, SL4xx and Chassis MB180.
In case of these TV sets used as DR+ Streaming Clients, access to
other DR+ archives must be enabled:
System Settings ט Control ט more ... ט DR+ ט DR+ Streaming
ט Also use other archives ט yes.
Functions requiring write access to a device that enables the
recording to be viewed are not available when viewing a DR+ archive
entry over the network.
Such functions are, for example, child protection, delete protection,
renaming, deleting entry or bookmark, setting bookmark, deleting
or hiding parts of the recording.
Playback of DR+ archive entry via the network
Open the DR+ archive.
Select desired archive of the corresponding
device,
OK Display archive entries.
Select the required archive entry,
OK Play archive entry.
See chapter Sources, section Video playback
for further information.
Follow me function
The Follow me function enables you to interrupt a current programme
in a TV set (main device) with integrated hard disk and to continue viewing it with a TV (secondary device) set from the point of interruption.
To use Follow me function, at least two Loewe TV sets are required,
of these, at least one TV set with integrated hard disk (with Chassis
SL1xx, SL2xx, SL3xx, SL4xx).
The TV sets also need to be connected via a network (wireless
connection via WLAN or cable connection via Ethernet, PowerLine).
On the main TV set, the function must be enabled:
System settings ט Control ט more ... ט DR+ ט DR+ Streaming
ט Share DR+ archive with other devices ט yes.
On the target TV set (secondary device), the function must be
enabled:
System Settings ט Control ט more ... ט DR+ ט DR+ Streaming
ט Also use other archives ט yes.
Start Follow me function on main device
Press PAUSE key.
The TV image becomes a freeze frame.
MENU: Call menu options.
Activate Follow me,
OKAdopt.
You will see a message on the screen.
The archive recording starts in approximately 20
seconds without an entry. The TV set switches itself
off after starting the recording. The broadcast is
adopted into the DR archive.
The recording TV set will make the broadcast available
to the network from now.
You can indicate the beginning of a Follow me
recording at the target TV sets in your network by
a screen display.
Continue viewing the programme at the second device
Call on the TV set, where you want to view the broadcast, the DR+
archive of the recording TV set.
Open the DR+ archive.
Select archive of the recording TV set (main
device),
Display archive entries.
Select Follow me recording,
OK View recording.
Page 62
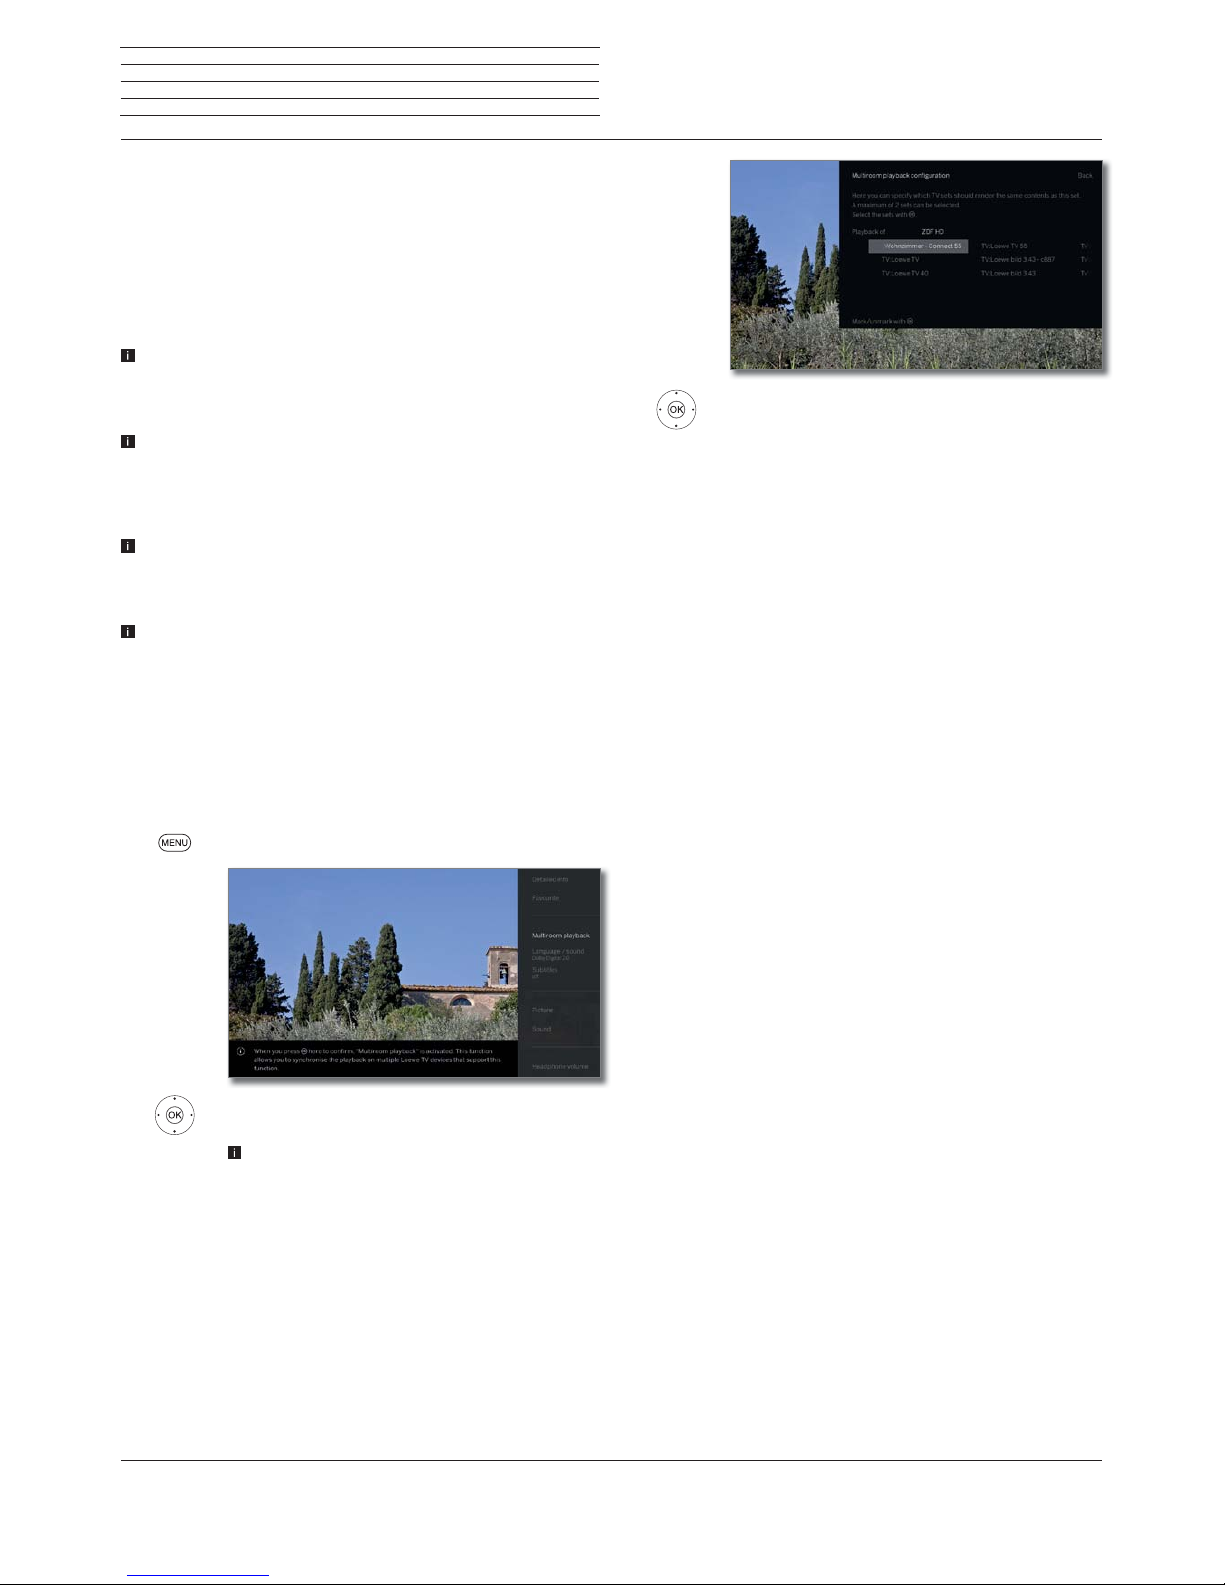
Loewe bild
User handbook
62
Multiroom
(1
Using the Multiroom function, you can transmit content over the network from a TV (Master TV) simultaneously to up to two other Loewe
TV sets, which are in different rooms.
The content may be live TV, DR + recordings, DVB radio, internet radio
or music files.
With the wake on WLAN/LAN function the master TV set can switch
on the selected TV sets before the playback starts.
To use Multiroom TV, at least two devices with SL3xx/SL4xx chassis
must exist. For the device type Reference, the multiroom function
is available ex factory; all other types of devices must be equipped
with the feature upgrade stick SL3xx/SL4xx.
All TV sets must be connected to the home network. It is recom-
mended to use a wired connection (LAN). In case of a wireless
connection (WiFi), technical limitations (e.g. liability to interferences,
bandwidth limitations) can cause disruptions in the playback right
up to a complete breakdown of the playback.
To switch on the devices with the wake on WLAN/LAN function,
the function must be enabled. Adjustable in the System settings
under Multimedia / Network טNetwork settings טWake on
LAN/WiFi.
In order to provide DR+ recordings via the Multiroom function in the
network, your TV set must possess an internal hard drive.
Multiroom playback
Choose your desired content, for example, a TV or DVB radio program
or a DR+ recording from the internal DR+ archive.
The TV set on which the content is selected, is for this time the Master
TV.
Example for Multiroom playback from the current TV programme:
MENU: Call menu options.
Select Multiroom playback ,
OK call.
With Multiroom TV Streaming, only channels that
transmit unencrypted TV content can be used.
Multiroom
Select set(s) on which the content is to be
displayed (maximum 2 sets or 4 sets in
Multiroom audio playback).
OK confirm selection. Behind the selected devices, a
check mark ۪ is set.
Select Confirm,
OK confirm selection.
The current TV programme is simultaneously
replayed on the selected
(2
devices.
The Multiroom playback of a DR+ recording from
the internal DR+ archive or a running DVB radio
program follows the same pattern as described
above using Multiroom TV streaming as an example.
In multiroom streaming, there are limitations in
the playback controls, for example (pause and
winding are not available).
Ending the Multiroom playback
If you select a different content on an individual Multiroom TV, the
Multiroom playback on this TV set is terminated
Adapting the TV set names
The default name of your TV set in the network is Loewe bild X.XX
(X: device name ex factory, XX is the screen size).
The device name can be set in the System Settings under
Multimedia / Network ט Network settings ט Host name
.
Multiroom Bluetooth Music Player
For the functionality of the Multiroom Bluetooth Music Player, please
refer to the corresponding section (see chapter System settings,
section Multimedia/Network – Bluetooth).
Recordings
Multiroom
(1
Availability varies by device type (see chapter Technical data - equipment features for your TV set).
(2
Time delay of 100ms.
Page 63
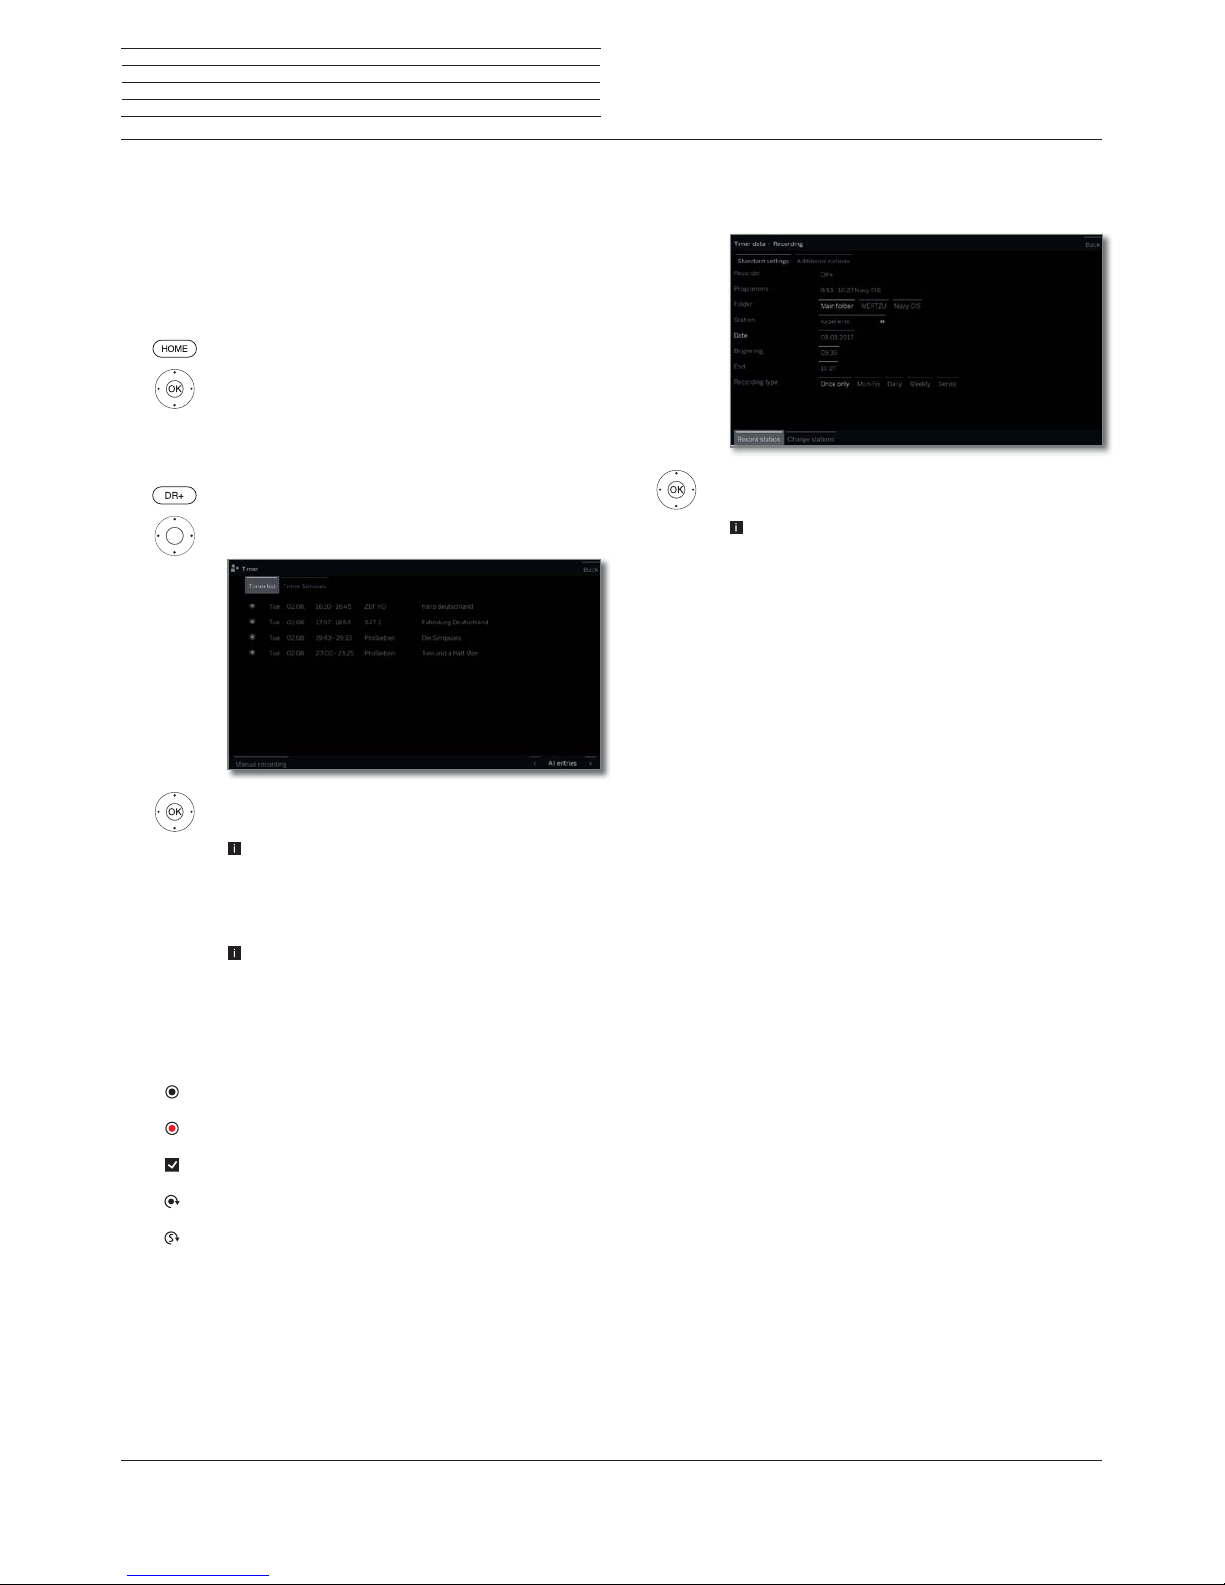
Loewe bild
User handbook
63
Timer
In the timer menu you will find the Timer List and the Timer Services.
All programmed recordings, earmarked programmes and copy jobs
are listed in the timer list.
The timer services menu offers you convenient alarm services see
chapter Recordings, section Timer – Timer Services).
Calling the timer menu
HOME: Calling the Home view.
Select Recordings,
select Timer,
OK call.
Or:
press longer: call the timer menu.
Select Timer list.
Select Manual recording,
OK Timer data are retrieved (see right column).
When you have programmed timer recordings, the
TV set can only be switched off to the standby mode.
Never switch the TV set off at the mains and do
not pull out the plug of the TV set out of the socket.
Otherwise no timer recordings can be made.
When a software update occurs it may happen
that timer entries and memorised programmes
are deleted. After such a software update, check
your timer list.
Explanation of the symbols in the timer list:
Recording
Recording in progress
Marked programme
Repeated recording (daily, weekly or Mon-Fri)
Serial recording
Entering the Timer data
The setting options for the timer data differ depending on the way (EPG
or manual recording) the recording has been programmed.
Update timer data, if required, or press
OK for confirmation.
Please also read the instructions in chapter System
settings, section Extras – CA module concerning
the recording of encoded programmes.
Explanations of the setting options in the menu Timer data –
Standard settings
Folder
If available, select the directory into which the
recording will be directly saved.
The DR+ archive root directory has the fixed
designation Main folder.
Default setting: Main folder.
Channel
Channel for which the recording is carried out.
Date
Day of recording.
Beginning
Starting time of the recording.
End
End time of the recording.
Recording
type
Programmes can be recorded in different ways:
Once only: The programme will be recorded at the
specified time.
Mon-Fri: The programme will always be recorded
from Monday to Friday at the specified time.
Daily: The programme will be recorded every day at
the specified time.
Weekly: The programme will be recorded every week
at the specified time.
Serial
(1
: A programme running regularly, but with different start times, can be conveniently programmed.
In this case, the TV set is checking ervery day at the
specified time, whether the programme is available
in the EPG data. If so, the program is recorded, if not,
the next review will be made the following day.
Recordings
Timer
(1
Only available if EPG data exists.
Page 64

Loewe bild
User handbook
64
Explanations of the setting options in the menu Timer data –
Additional options
Lock
recording
Only allow later playback of this recording after
entering the PIN number (Parental lock).
If a PIN still has not been entered under System
settings ט Control ט Parental lock, the
Parental lock will at first be activated. See
chapter System settings, section Control –
Parental lock for further information.
Delete
protection
Safeguard the recording from being deleted automatically by using the delete manager.
Auto time
control
(1
Your TV set can use the automatic time control
(Accurate Recording) for recording a programme.
The automatic time control takes control of the
corresponding monitoring of the start and end time
for DVB channels. The recording is started at the
beginning of the broadcast and switched off at the
end, even if the start and/or end time have been
changed by the programme provider.
The automatic time control is not supported by
all channels.
If yes is selected and automatic time control is
not supported by the recorded channel then no
recording is made.
If the programme information (Event-ID) should
not be available any more for the recording of a
programmed broadcast. e.g., due to a programme
change or because the Event-ID has been changed
by the channel, the programme cannot be recorded. The broadcasters alone are responsible for
the transfer of this data for using automatic time
control. The availability of the appropriate data
cannot be guaranteed by Loewe.
Recording
subtitles
Select whether broadcast subtitles are to be recorded too.
In case of a direct recording the presetting is
taken from System settingsט Control טmore
... טDR+טRecording subtitles.
Favourite
When selecting yes the recording will be added to
the Home favourites.
Record conflict
Despite the possibility of multi recording, it can happen when
programming a new recording that there will be an overlapping with
already stored timer recordings. In this case, the recording conflict
dialogue will open.
Here you can determine which of the recordings you want to be
executed, and you must eventually specify which of the programmes
shall be fully recorded and which are cut.
Select recording,
OK change status.
The symbol before the recording shows you what
happens to the recording.
If the status for each recording is ok:
Mark store recordings,
OK call.
The timer data of the recordings will be adjusted
accordingly.
Explanation of the symbols in the conflict manager:
TV programme is completely recorded.
Recording is cut off (at the beginning and/or end). Pay
attention to the start and end time of the recording.
The recording is deleted.
Delete/change programmed timer instruction
Use this function in the timer list if you want to delete recordings
already programmed, to end a running timer recording or to change
a timer instruction.
The Timer list is displayed.
Mark desired timer instruction,
The text of a currently active timer instruction is
red. If you delete this timer instruction, the recording is stopped.
OK Change marked timer instruction.
The timer instruction will be displayed.
Or:
STOP: Delete marked timer instruction.
OKConfirm delete.
Timer instruction will be deleted.
Recordings
Timer
(1
only available if EPG data exists.
Page 65

Loewe bild
User handbook
65
Recordings
Timer
Timer Services
This menu offers you convenient alarm services. Programmed alarms
are also active when the TV set has been switched off to standby.
If the TV set is switched on from the standby mode by alarm, a screen
message appears. If this is not confirmed within 5 minutes with the
OK key, the TV set switches automatically off again for safety reasons.
The TV set can also be switched off automatically at certain times. A
screen warning appears one minute before automatic switch off. The
automatic switch off can be interrupted by pressing any key.
Call Timer Services
HOME: Calling the Home view.
Select Recordings,
select Timer,
OK call.
Or:
press longer: call the timer menu.
Select Timer Services.
Select the desired setting,
OK change.
OK adopt.
Explanations of the setting options:
Sleep timer
After expiration of the indicated time, the device
automatically turns into Standby mode.
Switch off
once
The set switches to the standby mode automatically
at the specified time.
If a time is specified which has already passed on
the same day, the set switches off at this time the
next day.
Switch off
daily
The set switches to the standby mode automatically
every day at the specified time.
One time
alarm
The set alerts you once today at the specified time.
If a time was specified which has already passed on
the same day, the alarm is saved for the next day.
Wake up
Mon-Fri
The set regularly alerts you from Monday to Friday
at the set time.
Wake up Sat
Wake up Sun
The TV set alerts on Saturdays or Sundays regularly
at the specified time.
Wake up with
Indicate whether the TV set should enter the TV or
radio mode from stand-by during an alarm. The
channel, which was last active, is activated.
Wake up
signal
volume
Enter the volume at which the alarm sounding
should take place.
Page 66
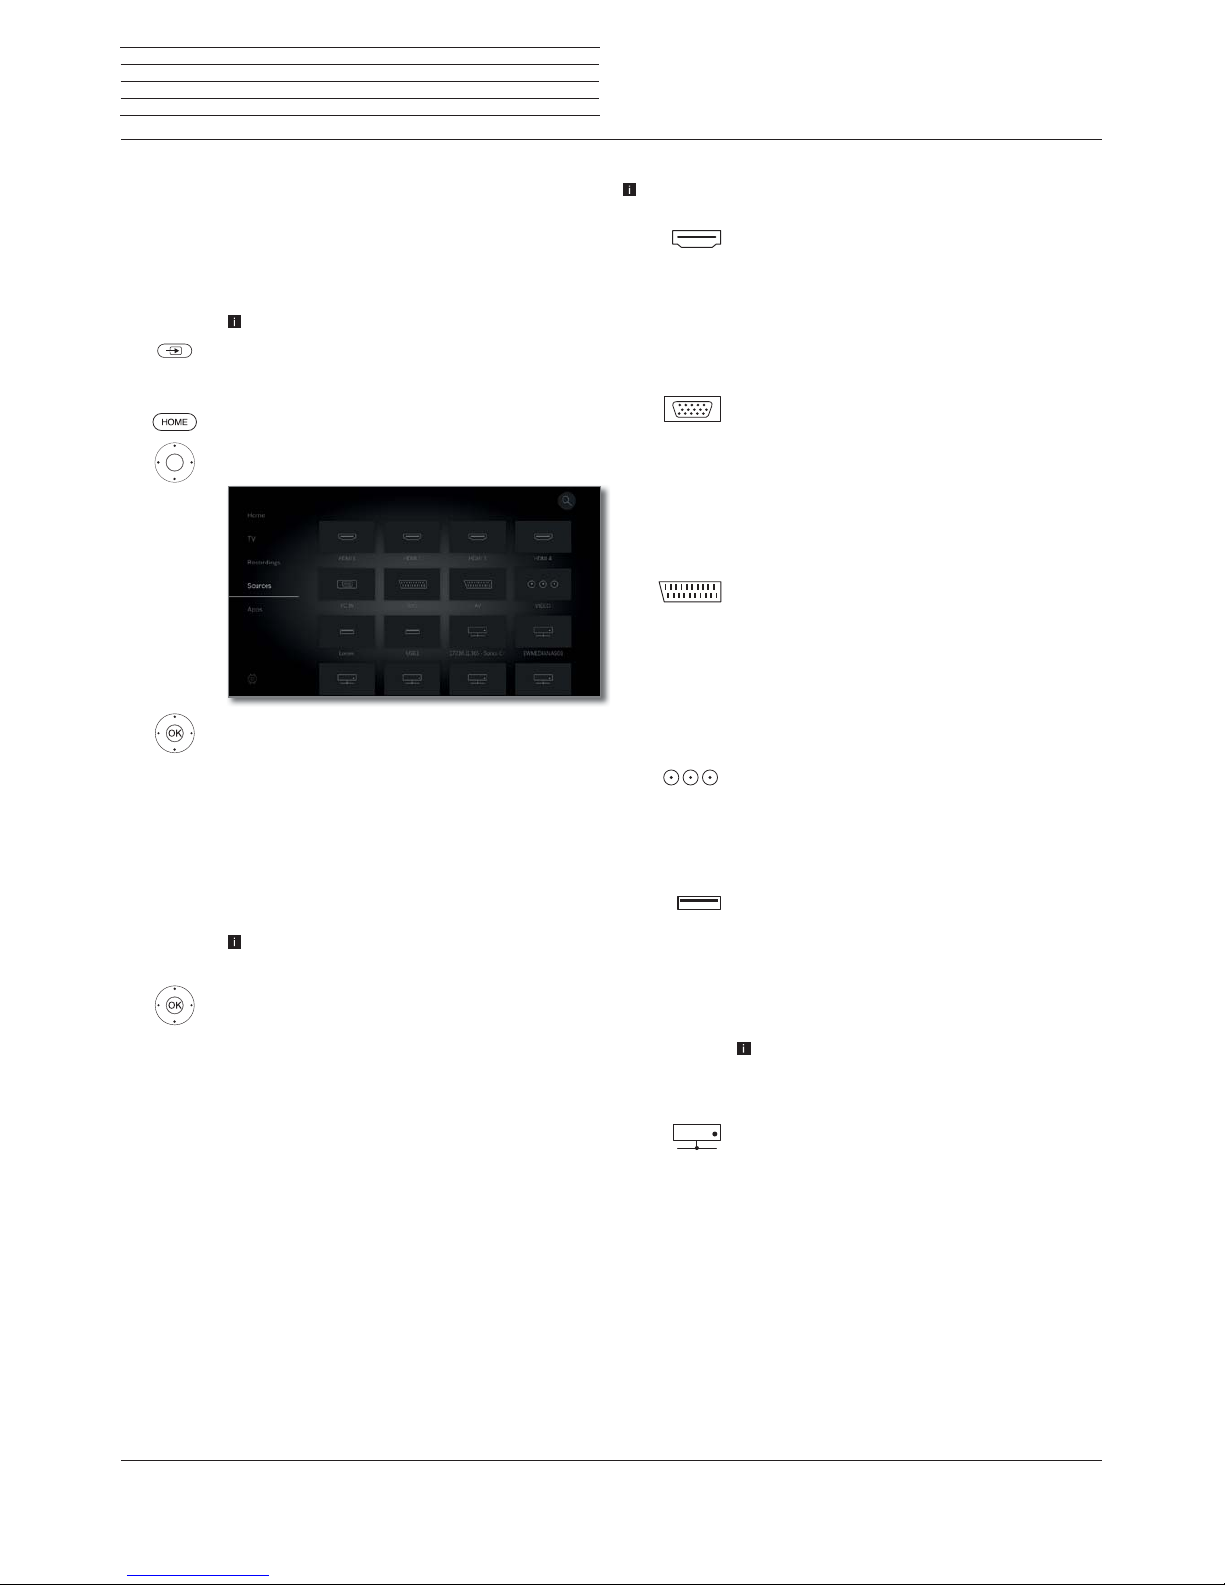
Loewe bild
User handbook
66
Sources
Sources
You will receive access to all devices connected to the TV set locally
via the Sources point in the Home view (e.g. to AV, HDMI, USB), as
well as all available devices on the home network in order to playback
multimedia content on the TV set.
Selecting the content source
In normal TV mode, without other displays.
Open Sources.
Or:
HOME: Calling the Home view.
Call Sources
Select source,
OK call.
If you have selected, for example, an HDMI connection,
it will change over to the respective connection. The
TV set is ready to present the content of the source.
Where the selected source delivers a signal, this should
now be visible.
When selecting a connected USB hard disk or a media
server, you must select another playable file in the file
structure.
The structure and the presentation of the files/fold-
ers are dependent on the selected source.
If applicable, select the desired folder,
OK then open the folder.
If required, repeat.
Select the desired file,
OK start playback of the selected file.
Possible sources
The media sources displayed depend on your devices.
HDMI
Source on HDMI connection of the TV set.
Depending on the content being played back from
the external source, see chapter Sources, section
Video-, Audio- and Photo playback.
For the connection and the configuration of external
devices, see the section External devices, section
Devices to the HDMI connections.
PC IN
Source on the AV connection (with VGA adapter)
of the TV set.
Depending on the content being played back from
the external source, see chapter Sources, section
Video-, Audio- and Photo playback.
For the connection and the configuration of external
devices, see the section External devices, section
Devices on AV.
AVS
AV
Source on the AV connection (with scart adapter)
of the TV set.
Depending on the content being played back from
the external source, see chapter Sources, section
Video-, Audio- and Photo playback.
For the connection and the configuration of external
devices, see the section External devices, section
Devices on AV.
VIDEO
Source on the ANT TV connection of the TV set.
When selecting VIDEO, you switch to the signal
source Cable analogue, channel E36. The TV set
can display the signal from an external source via
the antenna input TV ANT.
USB
Source (e.g. USB hard disk, USB stick) to an USB
connection of the TV set.
The exact description is dependent on the respective
storage medium.
Depending on the content being played back from
the external source, see chapter Sources, section
Video-, Audio- and Photo playback.
Please also refer to the chapter System settings,
section Control - Software update for the USB
sticks!
Network
Source (e.g. media server, NAS), which is available
via the Home network.
Depending on the content being played back from
the external source, see chapter Sources, section
Video-, Audio- and Photo playback.
The exact description is dependent on the respective
storage medium.
Page 67

Loewe bild
User handbook
67
Sources
Explanation of the source menu options
A source has been selected.
The menu items available in the menu options depend on the
currently marked object (data source, directory, file).
MENU: Call menu options.
Select desired menu option,
OK Confirm selection.
Favourite Add marked media file to the Favourites in Home
view.
Sorting Sort media files in the opened directory in alphabetical
(ascending A-Z or descending Z-A) order, file size or
date (newest entries first).
Filter Select the desired filter (Audio-Titles, Audio-Artists,
Audio-Album, Photo or Video) and thus hide the
other files.
The filter is automatically reset after leaving the
archives.
Log off The current selected USB source can be safely
logged off from the TV set via this menu option before
disconnecting it.
Exchange thumbnail of the HDMI input
A separate thumbnail can be defined for each HDMI input in the source
selection. A selection of different thumbnails (for instance, Blu-Ray
players, game consoles and set top boxes) are available.
HOME: Calling the Home view.
Call Sources,
Select HDMI entry.
MENU: Call menu options.
Select Change thumbnail,
OK call.
Select desired thumbnail,
OK Confirm selection.
Page 68

Loewe bild
User handbook
68
Sources
Video
Video playback
The description of the following functions applies to the playback of
videos from the DR+ archive as well as for videos from USB storage
media or from media servers in the home network.
For playback of DR+ archive entries you have additional playback
and editing capabilities. The explanation of these functions you
find in chapter Sources, section Additional functions for DR+
archive playback.
Video menu options
The menu options provide you with further options for the current
playback.
A video is being played back. Selection of the video via the menu
item Sources (see chapter Sources) or, where available, the DR+
Archive via the menu item Recordings (see chapter Recordings,
section Digital Recorder).
MENU: Call up menu options.
BACK: Hide menu options again.
Explanation of the menu options for video playback
The number of available items in the menu options depends on the
video and video source selected (DR + Archive, USB and Home
Network).
Remote
operation key
Menu option
Call up menu options with video settings
Call up detailed information on current playback.
Key INFO: Display detailed information if status
display appears, otherwise call status display.
Call up lists view (select video)
long
Set bookmark.
Only with DR + archive playback.
JumpTo previous bookmark .
Only with DR + archive playback.
JumpTo next bookmark .
Only with DR + archive playback.
long
Delete bookmark
←/→
.
Only with DR + archive playback. The function
is only available if a bookmark set manually
is within five seconds of the current playback
position (only valid for deleting with the remote
control key).
Remote
operation key
Menu option
– Go to. Use this menu item to jump to a specific
point in time during playback.
– Start Follow me recording.
With the Follow me function, you can interrupt
a program in progress and resume playback on
another Loewe TV set at the point of interruption.
Only during time-shifted playback (time shift
operation).
– Hide. Use this menu item to hide parts in archived
recordings.
Nur bei DR+ Archiv-Wiedergabe.
Nur im Pause-Modus anwählbar.
– Delete to start. Use this menu item to delete the
section of an archived recording from the current
position to the start of the recording.
Only with DR + archive playback.
Only selectable in pause mode.
– Delete to end. Use this menu item to delete the
section of an archived recording from the current
position to the end of the recording.
Only with DR + archive playback.
Only selectable in pause mode.
– Take over as track image. Apply current standard
image as track image in the DR + archive.
Only with DR + archive playback.
Only selectable in pause mode.
– Activate / again deactivate Repeat of the currently
played directory or archive entry.
Only with DR + archive playback.
Favourite. Add the currently played video to favourites in Home view.
– The Multi-room playback item starts the syn-
chronous playback of the currently playing video
on several Loewe TV sets that support this function.
– Language/sound. You can select other film lan-
guages and other sound formats here.
– The Sub-title menu point is shown, if the recording
contains subtitles.
Only with DR + archive playback.
Subtitles are recorded (see chapter Recordings,
section Timer – Entering the timer data).
–
Image. The Image menu item contains the most
important settings for adjusting the video playback.
Further information see chapter System settings,
section Picture.
–
Sound. The menu item sound contains the most
important settings for adjusting the sound reproduction.
Further information see chapter System settings,
section Sound.
Page 69

Loewe bild
User handbook
69
Sources
Video
Remote
operation key
Menu option
–
The Headphone volume is adjustable independently of the set volume of the set loudspeakers.
–
With Image off , you can switch off the screen of
your TV set. The navigation keys further activate the
screen. V+/V- does not activate the screen.
Only with DR + archive playback.
–
With Further settings ,access the system settings
of your TV set.
Further information, see chapter System set-
tings.
Explanation of keys
INFO (press longer): show Explanation of keys.
INFO or BACK: hide Explanation of keys
Pause playback (freeze picture)
PAUSE key: Switch to freeze picture.
PLAY key: Continue playback.
Jump
By briefly pressing the or keys you can skip forwards and back-
wards in the movie.
The jump distance can be set in the System settings under Control
ט more ... טDR+ ט Jump distance (see also chapter System set-
tings, section Control – DR+).
Skip forwards.
Skip backwards.
Skipping with Smart jump
The Smart jump function ensures that the jump width is halved each
time the jump direction is changed or doubled after three jumps in
the same direction (max. 8 minutes). This way you can quickly find a
certain spot of the recording.
The settings for Smart Jump you find in the System settings under
Control ט more ... טDR+ ט Smart Jump (see also chapter System
settings, section Control – DR+).
You are looking for a particular scene in a running
programme:
Depending on your needs, press the key (backwards) or (forwards) briefly several times, to roughly
jump to the area of the programme you are looking for.
If you skipped the desired scene of the programme,
jump in the opposite direction. This jump is executed
in halfs of the jump distance.
If you skipped the desired scene of the programme
again, jump again in the opposite direction. In the
process, the jump distance is cut in half again.
By halving the jump distance again when changing
direction you can gradually approach the desired
location.
Jumping by entering a time
You canenter a time to jump to any position in the video.
MENU: Call up the menu options.
Select Go to...,
OK Call.
Use the number keys to enter the time.
OK to jump.
Page 70
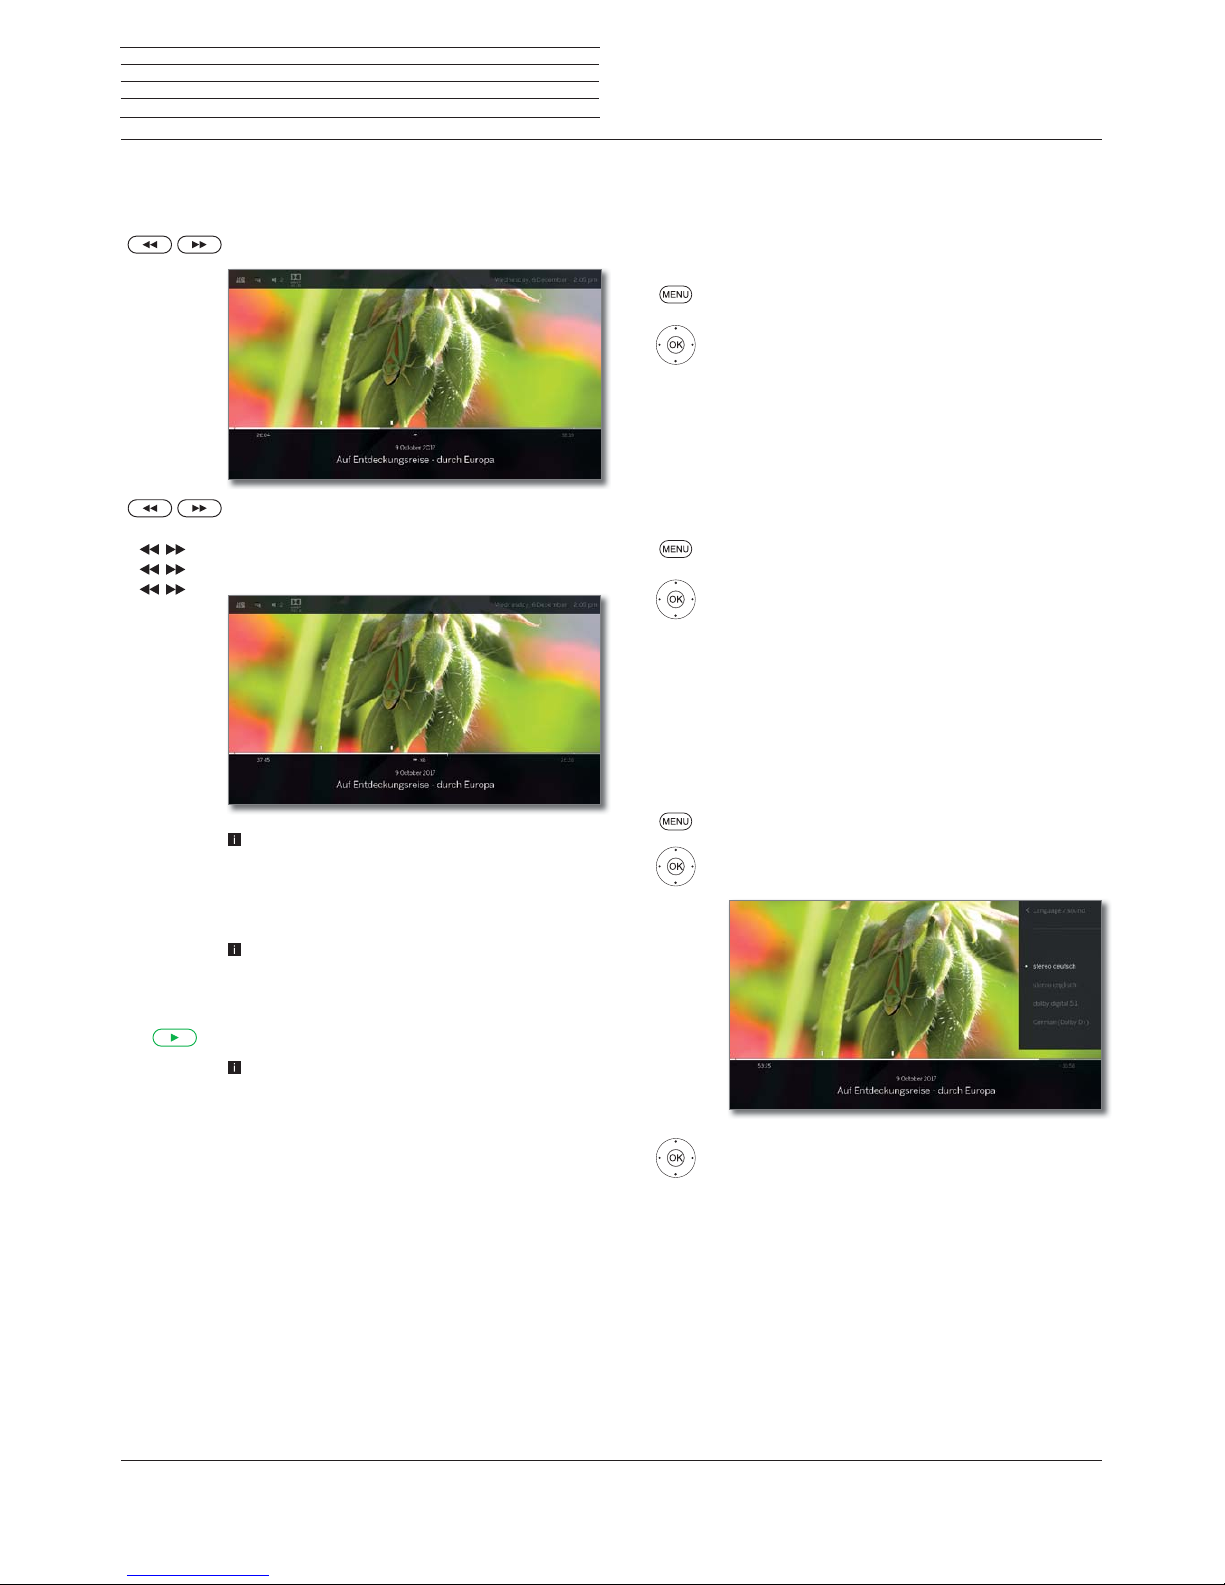
Loewe bild
User handbook
70
Sources
Video
Wind
To search for desired scenes in movies you can fast forward and rewind
at three different speeds. Sound is not audible during winding.
or press a little bit longer.
By each brief pressing of or the speed will increase
until you switch back to the first speed.
The different winding speeds are represented by the
symbols shown below.
In case of time-shift viewing, playback is automatically
activated when the end of the recording is reached.
You are then about 10 seconds behind the live
picture or when rewinding at the beginning of the
time shift recording.
In case of Fast forward of archive entries, playback
will finish at the end of the recording. The DR+
archive is displayed again.
PLAY key: Continue playback.
In the case of Internet videos, please wait until these
are buffered in the memory. This can take a few
seconds, depending on the bit rate of the film and
Internet speed.
x4
x8
Repeat
Videos can be repeated, i.e., replayed in an endless loop.
Repeated playback of DR+ archive entries
MENU: Call up menu options.
Mark Repeat,
OK confirm.
Mark Title,
OK confirm.
The current archive entry will be replayed repeatedly.
The repetition setting remains active for this archive
entry even when the playback is finished.
To deactivate playback again:
MENU: Call up menu options.
Mark Repeat,
OK confirm.
Mark off,
OK confirm.
Select language/sound
Videos, especially those recorded from TV broadcasts, can contain
several sound tracks.
Select sound track/language:
MENU: Call up menu options.
Mark Language/sound,
OK call Language/Sound selection.
mark desired sound or desired language,
OK select sound track.
Page 71

Loewe bild
User handbook
71
Sources
Video
Changing the picture format
Function is not available for all videos.
MENU: Call up menu options.
Mark Change Picture format,
OK set picture format.
You can choose between small or full image settings.
Small image setting shows the video close to the
original resolution. The video status bar is permanently
shown below the image.
The full image setting enlarges the image to fit the
entire screen. The status bar can be set to visible or
hidden.
Additional functions for DR+ archive playback
When playing back recorded channels from the internal DR+ archive
on an of the DR+ archive of an attached USB hard drive, there are
additional editing and playback functions.
Setting bookmarks
To retrieve interesting scenes in a movie later, you can manually set the
bookmarks. In addition, there are also automatically set bookmarks
for the start/end of a programme.
In programmes sent in Dolby Digital 5.1 format, the commercials are
detected and automatically bookmarked at the beginning and end of
the advertising block.
In case of a running time-shift recording (timeshift television), this will
be converted into an archive recording when a blank is set.
PLAY key (press longer): Set bookmark.
You will see a screen message at the top right edge
of the TV set.
The bookmarks set automatically appear as black
or white marking in the time line. The bookmarks set
manually appears as white marking via the time line.
Jumping to Bookmarks
MENU: Call up menu options.
Mark To next bookmark,
OK Jump to next bookmark.
Mark To preceding bookmark,
OK Jump to next bookmark.
Or:
Blue key: Skip to next bookmark.
Yellow key: Skip to previous bookmark.
Page 72

Loewe bild
User handbook
72
Sources
Video
Deleting individual bookmarks
Jump to the manually set bookmark to be deleted.
Press PLAY key for a little bit longer: Delete bookmark.
Deleting the Bookmark during playback
You can delete your manually set bookmarks during the playback of
the DR+ Archive entry.
The bookmarks set automatically appear as black or white marking
in the time line. The bookmarks set manually appears as white
marking via the time line.
MENU: Call up menu options.
Mark Delete bookmark
←
,
OK the manually set bookmark left from the current
position is deleted.
Or:
MENU: Call up menu options.
Mark Delete bookmark
→
,
OK the manually set bookmark left from the current
position is deleted.
Interval functions
Intervals between manually or automatically set bookmarks (intervals)
can be hidden for future playback. This can be useful for example To
hide advertising blocks in an archive entry.
The interval functions can also be used to delete unwanted passages
at the beginning or end of your recorded broadcasts.
Hiding the interval
An archive entry is played back.
Control the required interval by jumping or spooling.
PAUSE: Pause playback.
MENU: Call up the menu options.
Select Hide,
OK to hide the current interval.
This interval will be skipped when the archive entry is
played back in future.
Displaying a hidden interval
If a hidden interval is skipped when playing a DR+ archive entry, a
message appears on screen.
In the
System settings ט Control ט more ...ט
DR+ טNotify hidden sections make sure a yes
is set
.
In the screen prompt, choose yes,
OK to confirm.
The hidden interval will be shown again in future playback.
Deleting intervals
You can delete intervals by deleting the bookmark at the beginning
or end of the interval.
Page 73
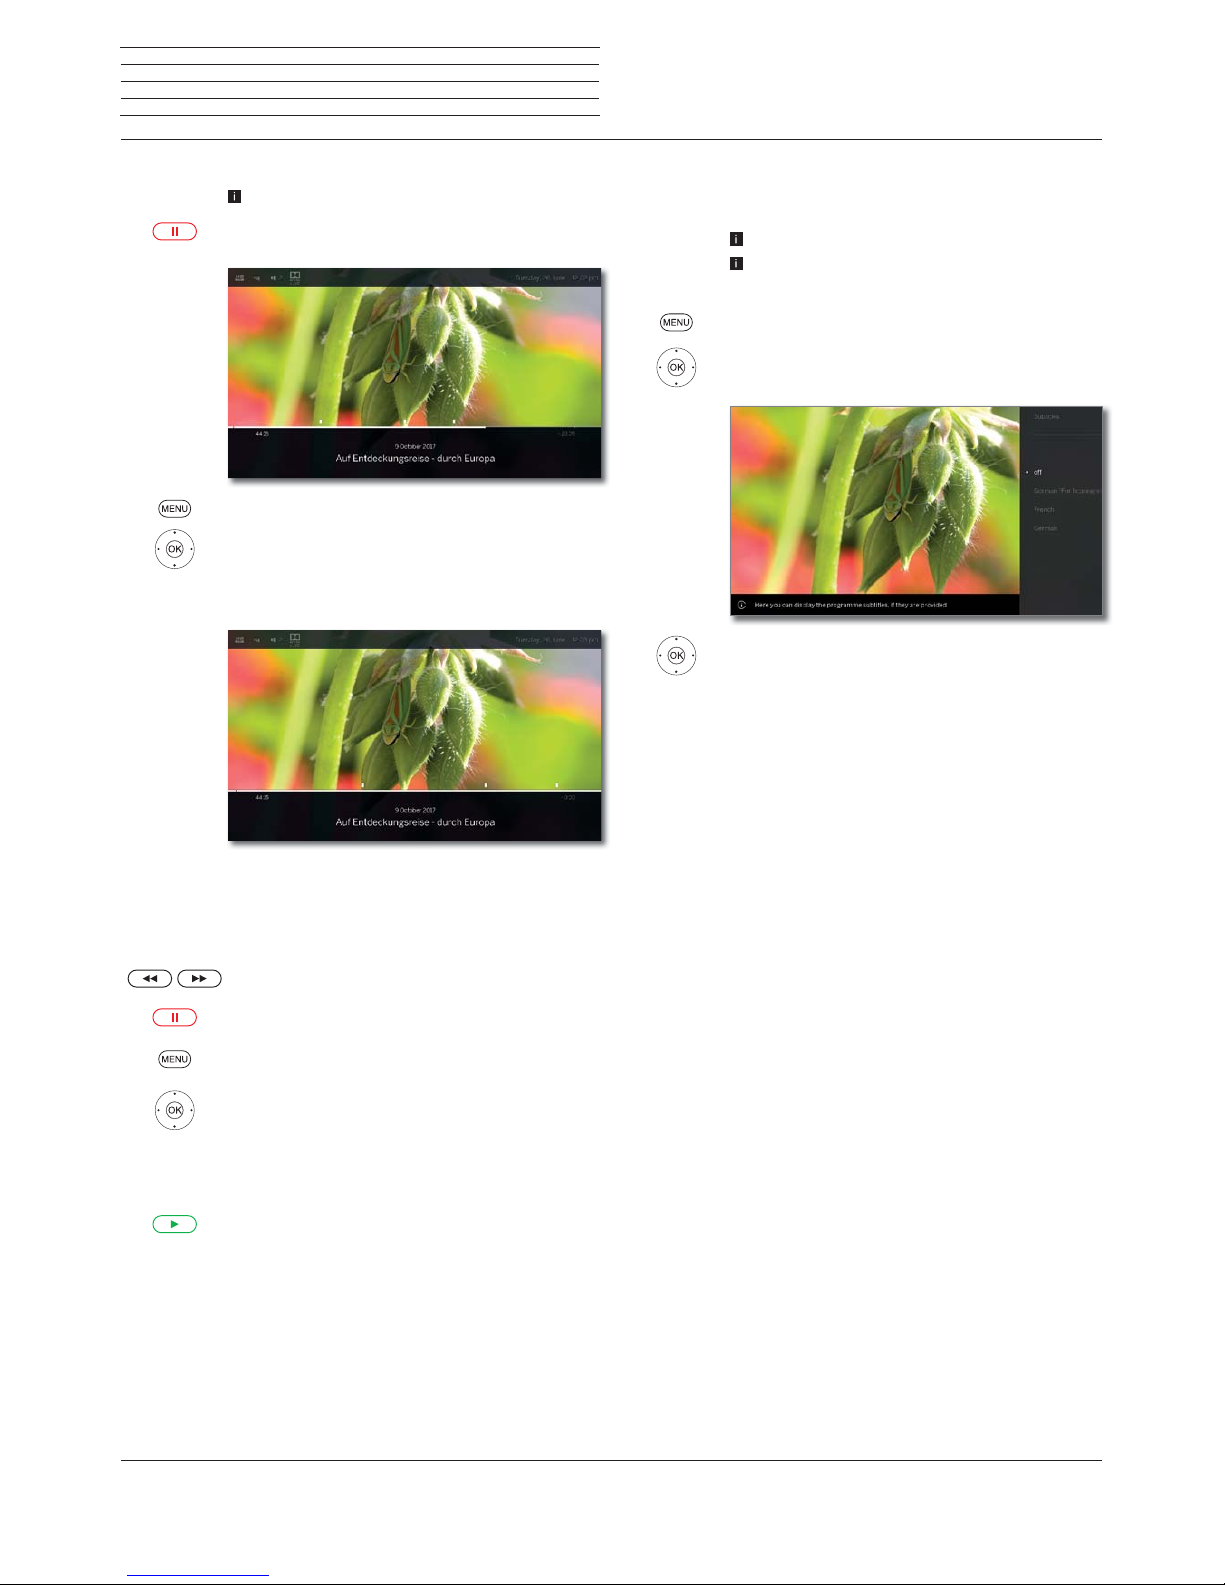
Loewe bild
User handbook
73
Deleting part of a recording
Playback an archive entry.
Press the PAUSE button from which point you want
to delete the recording to the end or the beginning.
MENU: Call up the menu options.
Select Delete to start or Delete to end,
OK Confirm with.
Select Ye s
OK Delete part of a recording.
Determine cover picture
The covers for the display of the entry in the DR+ archive can be freely
determined by you during an archive replay:
Jump / wind to the desired position in the recording.
PAUSE key: Switch to freeze picture.
MENU: Call up menu options.
Mark Adopt as cover picture,
OK confirm.
You will see a message on the screen. The image will
be displayed next to the broadcast in the DR archive
in future.
PLAY key: Resume play.
Subtitles
When recording a programme, any existing subtitles can be recorded
as well and displayed when playing back.
An archive entry is replayed.
Subtitles were recorded too (see chapter TV, section
Recordings – Entering the Timer data).
MENU: Call up menu options.
Mark Subtitles,
OK call up available subtitles.
Mark the desired subtitles,
OK show/hide subtitles.
Sources
Video
Page 74

Loewe bild
User handbook
74
Sources
Audio
Audio playback
Explanation of the menu options for audio playback
An audio file is being played back. Selection of the audio file via the
menu item Sources (see chapter Sources).
MENU: Call up menu options.
BACK: Hide menu options again.
Remote
operation key
Menu option
Call up menu options for audio playback.
Call up file view (select music title / channel).
Display EPG detailed information on current
program.
Only for DVB radio.
Call up detailed information on played back
music title.
Only when playing tracks via USB / home
network.
Favourite. Add currently played channel / music
track to favourites in the Home view.
Screen off. Switch off screen of the TV set
– Switch on/off Shuffle replay of the tracks of the
current folder.
Only when playing tracks via USB / home
network.
– Switch on/off Repeat, (endless reply) all tracks of
the current folder / directory or the current track.
Only when playing tracks via USB / home
network.
– The Multiroom playback item starts the
synchronous playback of the currently playing
video on several Loewe TV sets that support this
function.
–
Sound. The menu item sound contains the most
important settings for adjusting the sound reproduction.
Further information see chapter System set-
tings, section Sound.
Remote
operation key
Menu option
–
The Headphone volume is adjustable independently of the set volume of the set loudspeakers.
–
With Other settings ,access the system settings
of your TV set.
Further information, see chapter System set-
tings.
Explanation of keys
INFO (press longer): show Explanation of keys.
INFO or BACK: hide Explanation of keys.
Pause playback
PAUSE key: Stop current playback.
PLAY key: Continue playback.
Wind
You can fast forward music titles at four different speeds. Sound is not
audible during winding.
Press a little bit longer.
With each brief pressing of the speed will increase
until you switch back to the first speed.
Available speeds: 2x, 4x, 8x, 16x.
PLAY key: Continue playback.
Page 75

Loewe bild
User handbook
75
Sources
Audio
Select another title / play current title from start
BACK: Call music selection.
Select Music Titles as described in the chapter Sources.
Or:
Press P+ or briefly:
Play next title of current album / directory.
Press P– or briefly:
Play current title from start.
Press P– or briefly again:
Play previous title of the current album / directory.
Or:
Scroll in music titles.
Playback of the selected track starts automatically
after approx. 2 seconds.
Repeat
Music titles can be repeated, i.e., replayed in an endless loop.
MENU: Call up menu options.
Mark Repeat,
OK Call up repeat.
Mark Title,
OK Turn on repeat of the single music track.
The repeat setting remains until it will be deactivated
or another music title is replayed.
Or:
Mark All ,
OK Turn on repeat of all music tracks in the current
folder/directory.
The repeat setting remains until it will be deactivated
or another directory in the overview is selected.
Repeat Title and repeat All cannot be activated at
the same time.
The setting one of the two functions deactivates the
other.
Repeat and Shuffle (see right column) cannot be
activated at the same time. Activating a repeat
operation deactivates shuffle.
Shuffle playback
The music titles of your current medium are replayed in random order.
MENU: Call up menu options.
Mark Shuffle playback,
OK Switch shuffle playback of the titles in current
album / directory ON/OFF.
Repeat and Shuffle (see left column) cannot be
activated at the same time. Activating the shuffle
playback deactivates repeat.
Switching the screen ON/OFF
Green key: Switch screen OFF.
Or.
MENU: Call up menu options:
Mark Screen off,
OK Switch screen off.
Switching off the screen reduces the power
consumption of the TV set.
Switch on the screen with the remote control:
Press green key.
Ending playback
STOP key: End playback and return to music selec-
tion.
Page 76

Loewe bild
User handbook
76
Sources
Photo
Photo playback
Explanation of menu options when displaying photos
A photo is being displayed. Selection of the photo via the menu item
Sources (see chapter Sources).
MENU: Call up menu options.
BACK: Hide menu options again.
Remote
operation key
Menu option
Call up menu options for photo playback.
Call up file view (select photograph).
short
Display previous photograph.
short
Display next photograph.
Favourite. Add the currently displayed
photograph to favourites in Home view.
Start slide show.
Pause slide show which is running.
–
Rotate photo by 90 degrees to the left. (Rotate
left)
–
Rotate photo by 90 degrees to the right. (Rotate
right)
– With the Photo menu item, you can make fre-
quently used picture settings.
–
Picture. The menu item image contains the
most important settings for adjusting the image
reproduction.
Further information see chapter System set-
tings, in section Picture.
–
Pause background music.
The menu item only appears when playing
music tracks in the background.
Remote
operation key
Menu option
–
Sound. The menu item sound contains the
most important settings for adjusting the sound
reproduction.
Further information see System settings chapter, section on Sound.
–
The Headphone volume is adjustable independently of the set volume of the set loudspeakers.
Use Detailed info to display the file size, the
recording date and the file name of the image.
–
With Other settings, access the system settings
of your TV set.
Further information, see chapter System set-
tings.
Explanation of keys
INFO (press longer): show Explanation of keys.
INFO or BACK: hide Explanation of keys.
Full-screen mode
A photo is highlighted in the selection (Folder view).
OK View photo in full-screen mode.
Show previous / next photo.
Rotating the photo
MENU: Call up menu options.
MarkRotate left or Rotate right.
OK Rotate photo by 90 degrees to the left/right.
Page 77

Loewe bild
User handbook
77
Slide show
MENU: Call up menu options.
Mark Start slideshow,
OK start slide show.
Or:
PLAY key: Start slide show.
PAUSE key: Pause slide show.
PLAY key: Continue paused slide show.
Photo in full-screen mode / exit slide show
STOP key: Full-screen mode / end slide show and
return to photo selection.
Sources
Photo
Page 78
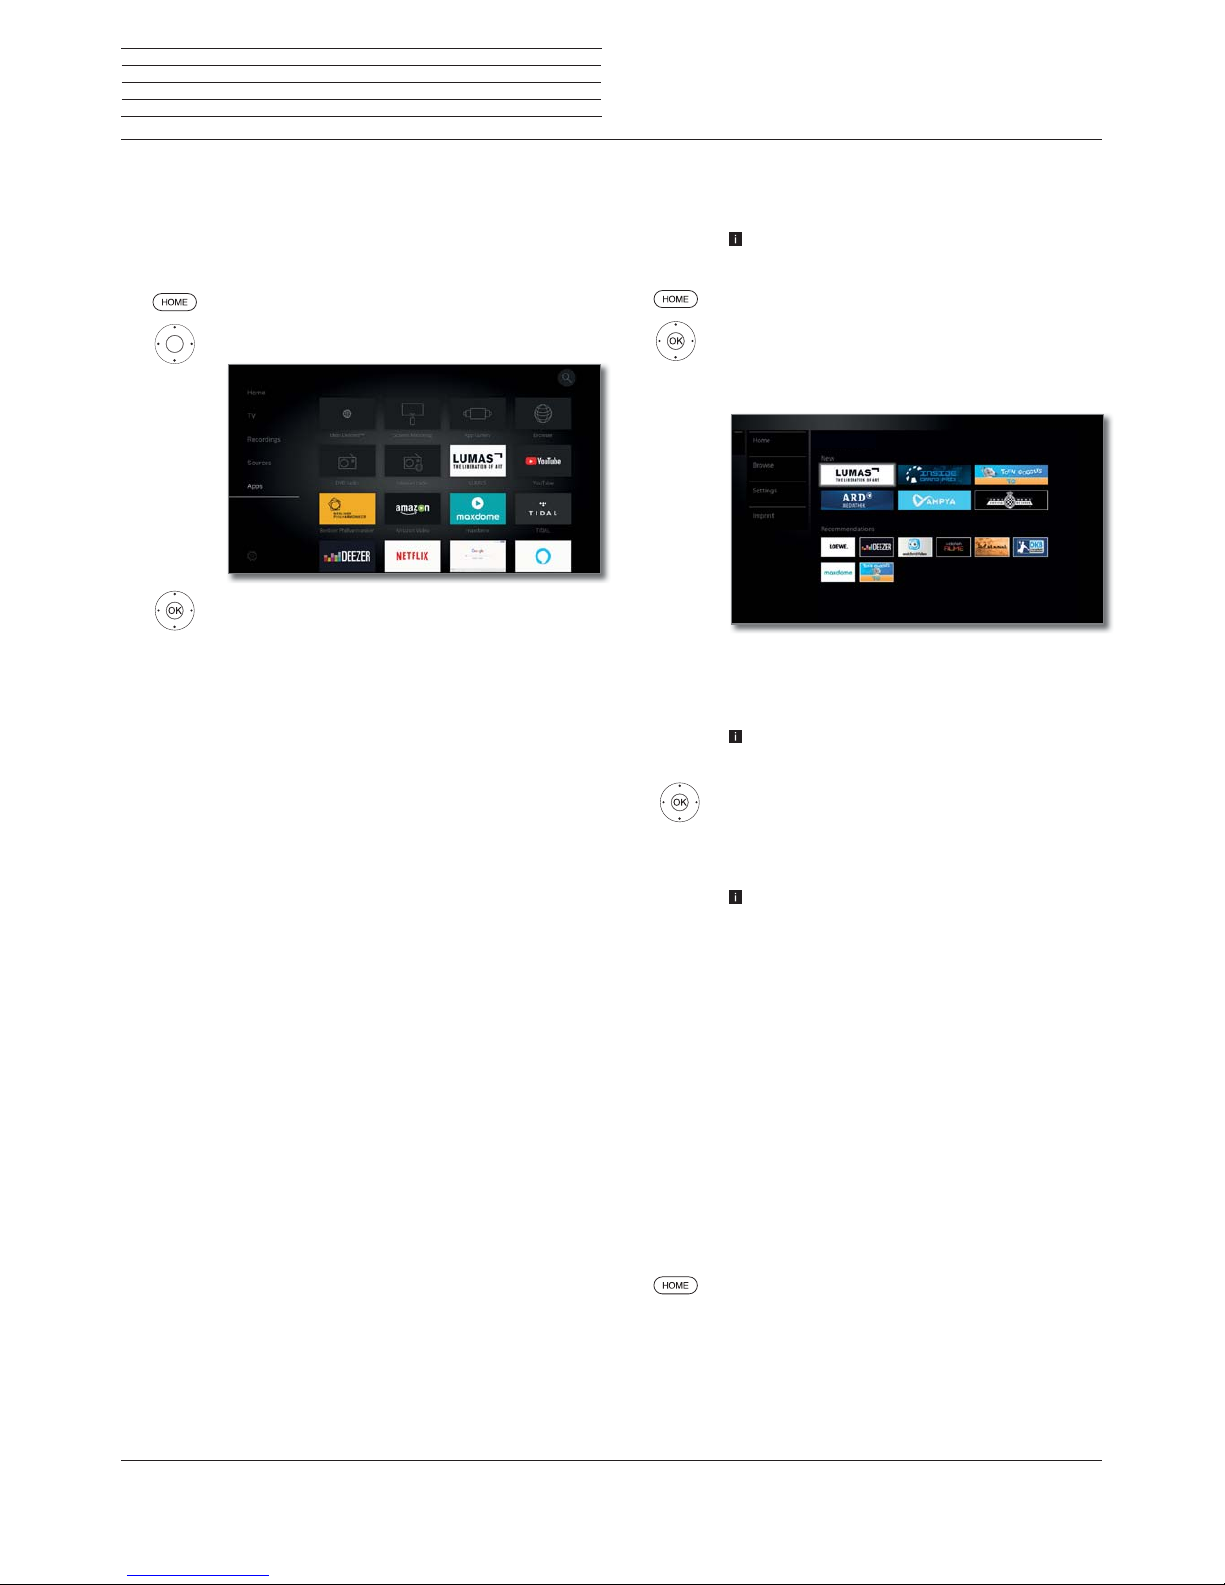
Loewe bild
User handbook
78
Apps
Here you have access to multimedia content on the Internet (App
Gallery), a full-fledged web browser and other apps.
Calling the Web selection
HOME: Calling the Home view.
Select Apps.
Select favourite (if any) or source,
OK call.
Possible Web sources
App Gallery
Under the menu item App Gallery you will find a
continually expanding platform for interactive TV
applications from the Internet (see next column).
All applications are optimised for use on the TV.
Browser
Call Web browser of the TV set.
For further information see chapter Apps, section
Browser.
DVB radio
The TV set can receive digital radio channels via DVB.
For more information, see chapter Apps, section
DVB radio.
Internet radio
The TV can receive digital radio channels over
Internet.
For more information, see chapter Apps, section
Internet radio.
Screen
mirroring
Here you can mirror the content of your Android
mobile device (Smartphone, tablet) on the TV set.
Further information, see chapter Apps, section
Screen mirroring.
Mimi
Defined
TM
You can see a quick introduction on setting up this
feature under the
Mimi DefinedTM tile
(1
.
For further information, please refer to the chapter
System settings, section Sound - Mimi Defined
TM
.
Apps
Numerous apps for video, audio or images portals
such as YouTube, Amazon Video, Netflix, Tidal, Deezer,
or Lumas etc.
App Gallery
Call App Gallery
To use the full functionality of App Gallery, the TV
set must be connected to the Internet.
HOME: Call Home view.
Select Apps.
Select App Gallery,
OK call.
T
he upper portion of the App Gallery home screen
contains new online content.
The lower portion of the App Gallery home screen
contains Recommendations given by Loewe.
The given content may change from time to time
without prior notice.
Select Home,
OK go to the right to choose the online content.
Mark the desired online content,
OK Display/play content.
The navigation within the various applications
depends on the provider.
Functions in the App Gallery home screen
Home
Displays the App Gallery home screen with a choice of
new online content and recommendations.
Browse
Under Browse you can list and call the online content
by subjects.
Settings In the Settings for App Gallery you can select
countries, for example, to take advantage of various
services.
Imprint Providing the legally required information on the
parties responsible for the content.
Exit App Gallery
HOME: Call Home view and select another function.
App Galerie - Home
Apps
App Gallery
(1
Mimi DefinedTM can be activated later on compatible device types with chassis generation SL4xx using an activation code. This can be purchased from specialist dealers
or in the Loewe online shop. Further information can be obtained from your specialist dealer or in the Loewe online shop.
Page 79
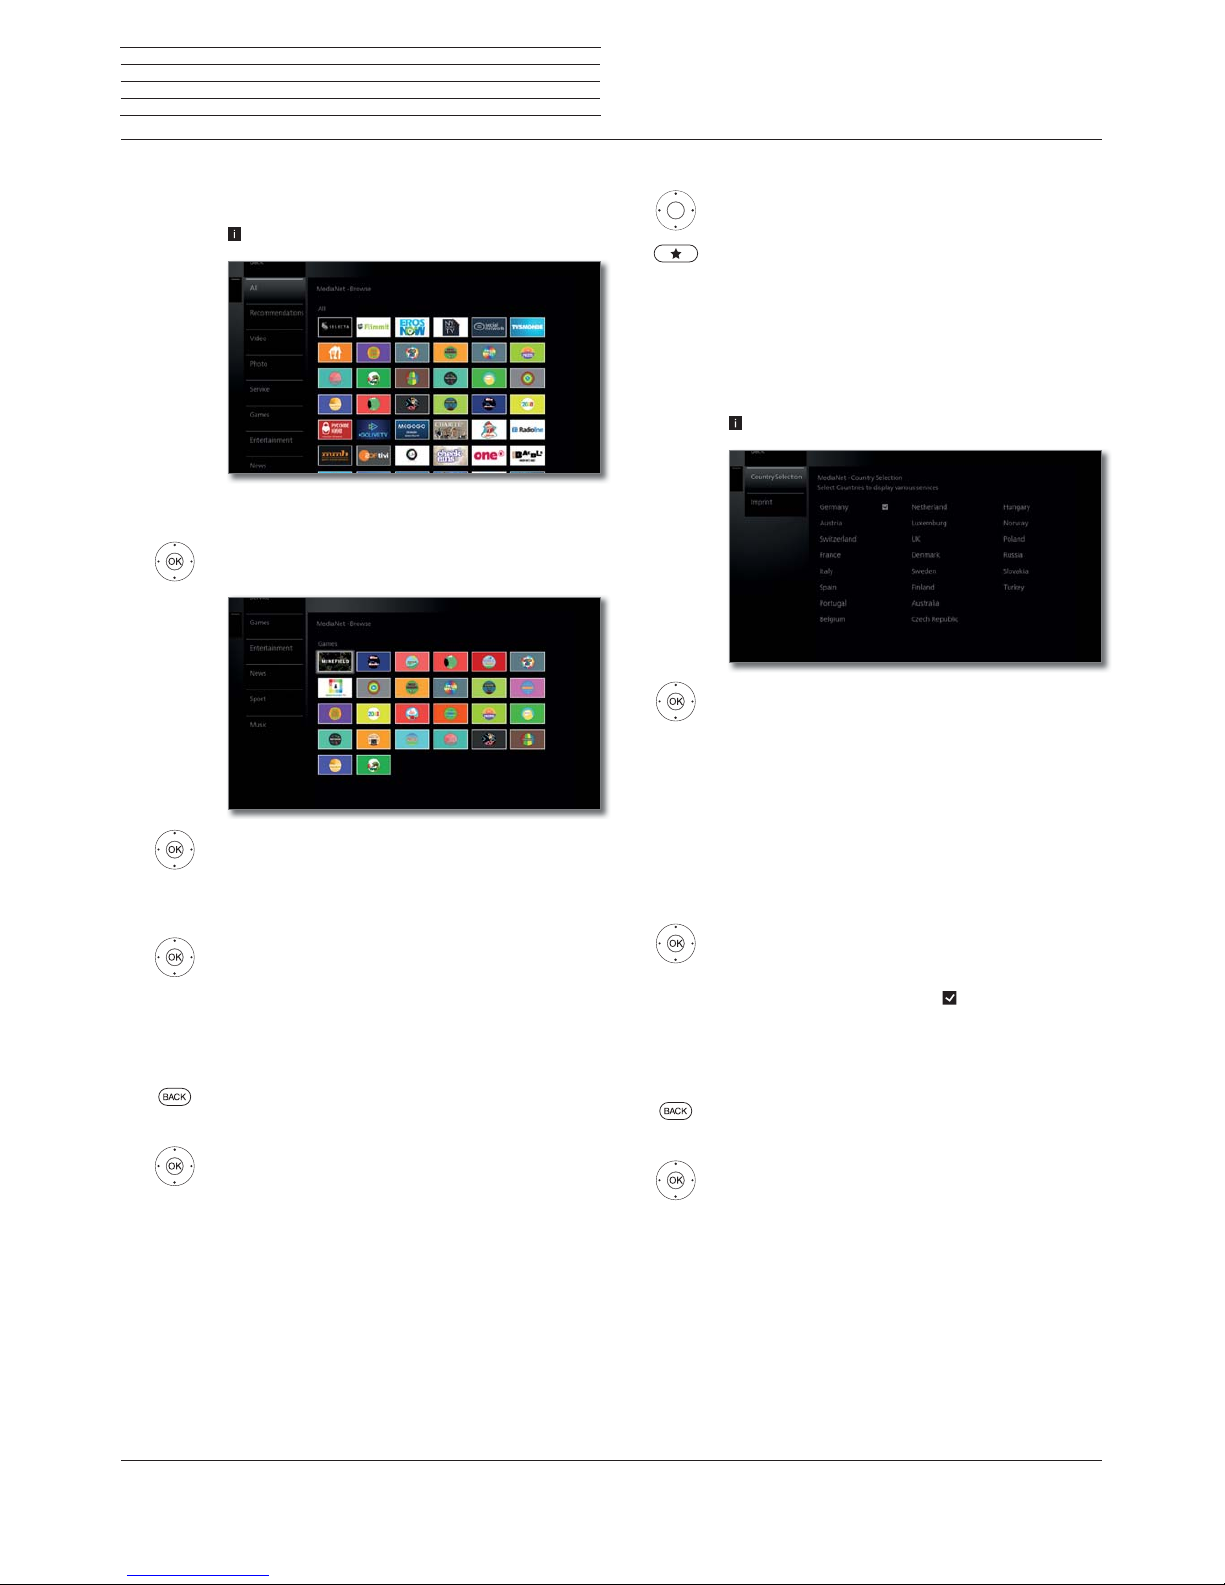
Loewe bild
User handbook
79
Apps
App Gallery
App Gallery – Browse
Under the item Browse, you browse the full range of applications by
topic.
App Gallery-Browse is called.
Filtering applications
Select the genre / topic,
OK call applications of the genre.
Select desired application,
OK open application
Change filter
Go to column with genres / topics.
Select another genre / topic,
OK call applications of the selected genre.
Exit Browse
BACK: Return to the App Gallery home screen.
Or:
Go to column with genres / topics.
Select Back,
OK return to the App Gallery home screen.
Define application as favourite
Mark the desired application.
Add the marked application to the Home favourites.
The favourite is added to view Home of web favourites
and queued at the end.
App Gallery – Settings
Here, you can find setting options for App Gallery.
App Gallery settings are called.
Select the desired setting,
OK call.
Country
Selection
Select countries from which you want to get
information on services (see below).
Imprint
Providing the legally required information on the
parties responsible for the content.
Country Selection
Mark country,
OK select / deselect country.
Various services (applications, etc.) from countries
that are marked with a tick
are offered in App
Gallery.
Exit Settings
BACK: Return to the App Gallery home screen.
Or:
Go to column with settings.
Select Back,
OK return to the App Gallery home screen.
Page 80

Loewe bild
User handbook
80
Apps
Browser
Browser
You can access Internet sites directly using the integrated Opera
browser. The web browser can also be used without an Internet
connection. Thus you can access local devices which provide a web
interface (e.g., router, home control, home network server).
Calling the Web browser
HOME: Calling the Home view.
Select Apps,
Select Browser,
OK call.
Start page will be opened.
INFO: display browser status.
Explanation of the symbols in the browser status
Update the displayed Internet site. (Reload site)
Select as start page.
100% Change zoom factor of the displayed site / browser.
Add displayed Web site as favourite to Home screen.
Navigation on Web sites
P+/P– Scroll page vertically.
/ Scroll page horizontally.
Select link or text entry field with mouse
cursor faded in,
OK o. TEXT open link or confirm text input.
For the entry of text, press a numerical key (0-9)
repeatedly as with a mobile phone until the desired
character appears. The available letters are printed on
the individual numerical keys.
Yellow key: Delete character.
BACK: Stop text entry and exit entry box.
Entering a URL (Internet address)
Browser status is displayed.
Mark the URL (Internet address) of the
indicated Internet site,
OK Open address entry box.
Select required character,
OK Accept character.
If a small symbol is displayed next to a letter, with
a long press on the OK button (2 seconds),
further letters can be selected.
Å
Delete character to the left of the cursor.
-/#
The selection switches to special characters.
ABC/abc
Switch between upper/lower case.
Switch key assignment of the on-screen keyboard
between English, German or Russian.
Space
Enter blank space.
Clear Delete all characters.
Cancel input. The entry box will be closed and the
previous Internet site will be displayed again.
Enter
Accept address and open new Internet site.
The characters may also be entered by the USB
keyboard or the numerical keys of the remote control
(see left column).
Use of an external mouse
It is possible to connect an external USB mouse to a free USB interface
of the TV set.
This allows you to move the mouse pointer comfortably over the TV
screen.
Loewe does not warrant the functionality of any USB input devices
on the market.
Exit Browser
Web site is displayed. Browser status is hidden
HOME: Call Home view and select another function.
Page 81

Loewe bild
User handbook
81
Apps
DVB radio
DVB radio
The TV set can receive digital radio channels via DVB.
The AUDIO key has been preset to radio mode in the factory.
Switching Radio mode on
AUDIO key on the remote control.
Or:
HOME: Calling the Home view.
Select Apps.
Select DVB radio,
OK call.
For the first use of DVB-Radio the first channel in the
radio channel list is called, otherwise the channel last
used.
If the HbbTV mode is active
(see Chapter System
settings, Control - HbbTV)
,section, certain radio
stations display a station logo instead of the symbol
shown above.
Channel switching
The radio mode is switched on and a radio channel
has been selected (see above).
P+/P– Channel up/down.
The number and the channel name are displayed
briefly. Also, the status display with time/date and
programme-dependent symbols appears.
Or:
Enter the channel directly using the numerical keys.
Or:
OK call channel list.
Select channel,
OK call.
2 ANTENNE BAYERN
Explanation of keys
INFO (press longer): show Explanation of keys.
INFO or BACK: hide Explanation of keys.
DVB radio menu options
MENU: Call menu options.
Or:
OK Call channel list,
call menu options.
Select menu option,
OK call.
See chapter TV, section Menu options for further
information.
HbbTV services for DVB radio
Various DVB radio channels also offer HbbTV text/media text. The
functionality is the same as in TV mode. (see chapter TV, section
HbbTV / MediaText).
Switching the screen on/off
Green key: Switch screen OFF.
Switching off the screen reduces the power
consumption of the TV set.
Switch on the screen with the remote control:
Press green key.
Archive recording in the DVB radio operation
In DVB radio mode, just like in TV mode, it is possible to record DVB
radio channels on a built-in hard drive or connected USB hard drive.
The procedure for recording a DVB radio channel is identical to recording a TV channel (see chapter Recordings, section Digital Recorder
– Archive recording).
Time shift in the DVB radio operation
The operation of time shift operation in DVB radio programs is identical to the time shift operation in TV mode (see chapter Recordings,
section Digital Recorder – TV viewing with time shift).
Exit radio mode
TV key: TV mode is called.
Or:
HOME: Calling the Home view.
Select another operating mode,
OK call.
Page 82

Loewe bild
User handbook
82
Apps
Internet radio
Internet radio
The TV set can receive digital radio channels via the Internet.
The names of the directories and channels in the Internet radio mode
are given by the provider vTuner. Changing the order of channels or
renaming them is not possible here.
Internet radio is only accessible if a connection to the Internet has
been established.
Switching Radio mode on
HOME: Calling the Home view.
Select Apps.
Select Internet radio,
OK call.
You see the radio channel list.
Mark desired directory,
OK open directory. Repeat procedure if necessary.
Select channel,
OK call.
For further information on the control of the In-
ternet radio see chapter Sources, section Audio
playback.
Channel switching
BACK: call channel list.
Select channels as described above. Or:
P+/P– Scroll through the current Internet radio
directory to look for channels. Or:
Keys 2-9: Input the first letter. The channel list will jump
to the first channel of the corresponding letter.
Explanation of keys
INFO (press longer): show Explanation of keys.
INFO or BACK: hide Explanation of keys.
Internet radio menu options
MENU: Call menu options.
Select menu option,
OK call.
See chapter TV, section Menu options for further
information.
Search for artists
By means of the search for artists, you can quickly and easily see all
radio channels that just play music by this artist. The result list is sorted
for now and most played.
Internet radio channel list is opened.
Select Artist Search,
OK call.
Select New search,
OK on-screen keyboard is opened.
Enter name of the band or singer using the
keyboard (see also chapter General
information on the operation, section
Entering characters with on-screen
keyboard),
OK adopt, search is started.
Select channel,
OK call.
Channel search
You can search an Internet radio channel directly by name using the
menu item Channel search. The procedure is similar to the Artist
Search described above.
Switching the screen on/off
Green key: Switch screen OFF.
Switching off the screen reduces the power
consumption of the TV set.
Switch on the screen with the remote control:
Press green key.
Exit radio mode
TV key: TV mode is called.
Or:
HOME: Calling the Home view.
Select another operating mode,
OK call.
Page 83

Loewe bild
User handbook
83
Screen Mirroring
With screen mirroring, you can mirror the content of your Android
mobile device (Smartphone, tablet) on the TV set.
The Android mobile device must support screen mirroring. Depen-
ding on the manufacturer, the designation for this feature may vary.
The Loewe TV and Android mobile devices must be on the same
network.
Call Screen Mirroring
HOME: Calling the Home view.
Select Apps,
Select Screen Mirroring,
OK call.
The TV set waits for the connection with the mobile
device.
Open the settings on your mobile device.
Search in the settings for the Screen mirroring func-
tion and select this. Depending on the manufacturer,
the designation for this feature may vary.
The mobile device searches for available devices and
lists them.
Select the found TV set on the mobile device.
TV and mobile device are connected.
The display content of the mobile device is mirrored
on the TV set.
Apps
Screen Mirroring
Page 84

Loewe bild
User handbook
84
System settings
System settings
Under the menu item System settings in the Home menu you
find all settings and adaptabilities of your TV set.
Availability varies according to device type (see chapter Technical
data - equipment features for your TV set).
Calling System settings
HOME: Call Home view.
Select System settings ,
You can find the selection of the most used functions
on the right side.
Select settings,
OK call.
Or:
Press MENU key longer: call System settings.
Explanations of the setting options:
Picture
Here you do the settings referring to the
representation of the picture signal on your TV set.
Menu items Picture:
Picture adjustment, Contrast, Brightness, Colour
intensity, Image+ Active, Picture format, Automatic
aspect ratio.
Menu items Picture טmore ...:
3D
(1
, Colour temperature, Sharpness, Move picture
up/down, Auto dimming, Film quality improvement
(DMM), Digital Noise Control (DNC), Skin tone,
Gamma brightness correction, OLED calibration
(2
,
Deblocking filter.
For more information refer to chapter System
settings, section Picture.
Sound
Under this menu item you find the settings for sound
playback.
Menu items Sound:
Mimi Defined
TM (9
,Sound via (3, Sound mode (4, Sound
adjustment, Loudness, Surround mode
(8
, Sound
picture synchronisation, Volume adjustment.
Menu items Sound טmore ...:
Auto volume, AV output signal, Maximum volume,
Maximum switch on volume, Balance, Auto speech
detection, Dynamic SPDIF sync.
The available menu items may vary and depend
on the connected audio component.
For more information refer to chapter System
settings, section Sound.
Channels
Move and delete TV and radio channels. In addition
to that you can automatically and manually update
the complete channel list. Your channels can also
be arranged and optionally sorted in personal lists.
Menu items Channels:
Automatic scan TV+Radio, Manuell scan (incl.
antenna status), Channel lists TV, Channel lists
Radio, Update channel list automatically, Transfer
all channel lists.
For more information refer to chapter System
settings, section Channels.
Control
In this menu you find settings for additional functions
of your TV set like EPG, picture in picture (PIP), digital
recorder (DR+) as well as interfunctional settings
like time and date, parental lock or software update.
Menu items Control:
Language, Parental lock, EPG, Energy efficiency,
Quick start mode, Software update.
Menu items Control טmore ...:
On-screen displays, Time and date, DVB settings,
PIP, DR+, Standard Teletext, HbbTV, Rotate TV
(5
,
Display kinematics
(6
, Hard disks, Export log file,
Asterisk key function.
For more information refer to chapter System
settings, section Control.
Multimedia /
Network
By means of the Multimedia / Network menu you
configure your network adaptor and network access.
By means of the menu item renderer you can allow
external devices to access your TV set (renderer) via
app to render (play back) contents there.
Menu items Multimedia / Network:
Network settings, Multimedia settings, Home Au-
tomation, Renderer, Mobile Recording, Bluetooth
(1
,
TIDAL login, Streaming server standby
(7,
Amazon
Alexa Login.
For more information refer to chapter System
settings, section Multimedia / Network.
Connections
Use this menu to configure the TV set for operation
with external devices.
The sound component wizard leads you comfortably
through the configuration of your used audio
equipment such as speaker systems or HiFi/AV
amplifiers.
For more information, refer to the instruction
manuals of the equipment used.
Menu items Connections:
Sound components, Antenna DVB, AV connecting
settings, Digital Link, HDMI.
For more information refer to chapter System
settings, section Connections.
Extras Under this menu item you can display the features
of your TV set, repeat the initial startup or reset the
device to the factory settings.
Menu items Extras:
Integrated features, Repeat initial installation, Reset
to factory settings, Dealer Mode, Legal matters.
For more information refer to chapter System
settings, section Extras.
(1
Availability varies by device type (see chapter Technical data - equipment features
chapter for your TV set).
(2
Only for set types with OLED technology.
(3
The menu item Sound via appears only if Speaker System or HiFi / AV Amplifier is
selected in the sound component wizard.
(4
Only for set types with built-in DAL connection.
(5
Menu item only appears if a motorized rotary foot is connected to the TV set.
(6
Only for set types Loewe bild 9 and Loewe bild 7.
(7
Only for set types with built-in hard drives.
(8
Only for set types Loewe bild 9, Loewe bild 7, Loewe bild 5 oled and Loewe bild 4.
(9
Mimi DefinedTM can be activated later on compatible device types with chassis generation
SL4xx using an activation code.
Page 85

Loewe bild
User handbook
85
System settings
Picture
Picture
Here you do the settings referring to the representation of the picture
signal on your TV set.
Calling picture settings
HOME: Call Home view.
Mark System settings,
OK call System settings.
Mark Picture,
go to next column.
Select desired picture function,
proceed to next column.
Explanations of the picture settings:
Picture
adjustment
You can switch between several fixed picture
adjustment modes and the personal picture values
that you have set here.
See chapter System settings, section Picture –
Picture adjustment for further information.
Contrast
The contrast setting depends on the brightness of
the room. The brighter the surroundings the higher
the contrast should be set.
The power consumption of the TV set depends
directly on the value set here.
Brightness
Set the brightness so that the black areas of the
picture only just appear black.
Colour
intensity
Set the colour intensity to suit your personal taste.
The colours should appear natural.
You can pinpoint this by the colour of peoples‘ faces
for example.
Image
+
Active
Image+ Active is a special picture improvement
developed by LOEWE which provides a detailed and
contrasting, sharper, natural and true colored picture
which is rich in detail and contrast.
Picture
format
Select the format so that the screen is used to the
fullest possible extent without affecting the natural
proportions.
See chapter System settings, section Picture –
Selecting the picture format for further information.
Menu item is only available if
Automatic aspect
ratio
–
off
is selected
.
Automatic
aspect ratio
When automatic aspect ratio is switched on, the TV
set recognizes the aspect ratio for Cinemascope or
wide-screen movies and adjusts itself accordingly.
more ...
call with OK.
3D
(1
Do the settings for your TV set‘s 3D display (see
next page).
Colour
temperature
Here, you can give the TV picture a warmer or colder
hue according to your personal taste.
Sharpness
Here you can adjust picture sharpness to obtain the
best definition.
Move picture
up/down
In various picture formats, font or graphic insertions
are not or only partially visible at the bottom or at
the top.
You can move the picture up or down with the up/
down menu control keys to make the displays visible.
Menu item only available in the picture formats
panorama or zoom.
Auto
dimming
Two automatic dimming functions are available here
which enable you to adapt the TV picture to the room
brightness, improve the visual contrast and reduce
the power consumption of your TV.
Depending on video (VBD+)
(1
:
The display lighting is reduced depending on the
current video content and the video signal is simultaneously amplified in order to get an improved
contrast of your TV picture (Video compensated
Backlight Dimming – VBD).
Depending on the environment (OPC)
(1
:
The contrast of your TV picture is automatically
reduced vs. decreasing room brightness (Optical
Power Control – OPC).
Due to a reduction in the luminance in 3D mode
for technical reasons, this function is deactivated
when showing 3D content.
Film quality
improvement
(DMM)
DMM reduces jolt in rapid picture object movements
and rolling text displays. This applies especially for
movies.
Digital Noise
Control (DNC)
With active DNC (Digital Noise Control) you can
eliminate or reduce picture noise.
Skin tone Adjust the skin tone so that the most natural facial
skin colour is achieved.
Gamma
brightness
correction
If image seems over- or underexposed, you can
adjust it here accordingly.
OLED
calibration
(1
Herewith you start an OLED calibration to ensure an
consistently high picture quality.
OLED
protection
(2
The displayed image content is continuously analysed
by an algorithm which partly fades out static areas of
the image (e.g. broadcaster logo, etc).
This is done to
prevent any potential issues.
Deblocking
filter
To minimise the visible interference to the picture
caused by modern compression methods for images
and image sequences (formation of small blocks),
a so-called deblocking filter can be activated which
counteracts this interference.
PC IN
display
For some PC image formats, horizontal as well as
vertical position and the phase position of the image
can be corrected.
For more information, see chapter System set-
tings, section Picture – Selecting the picture
format.
Menu item only available if there is a valid PC signal
via the VGA adapter at the AV connection.
(1
Availability varies by device type (see chapter Technical data - equipment features for your TV set).
(2
Only for set types with OLED technology.
Page 86

Loewe bild
User handbook
86
System settings
Picture
3D function
(1
You can use the 3D functionality of your TV set to display 3D material
transmitted by a channel or from an external player that is connected.
To make full use of 3D functionality, you need Loewe 3D glasses (see
chapter Accessories). Please read the operating instructions included
with the 3D glasses.
3D mode
(1
For 3D content that is being played back from an external HDMI
player, the 3D display format is normally recognised correctly when
the factory setting 3D mode טAutomatic is selected. You may need
to set the 3D mode manually to view 3D content from broadcasters.
Owing to a reduction in the luminance in 3D mode for technical
reasons,
Auto-dimming - Room
and
Auto-Dimming- Video
(VBD+)
are deactivated when 3D contents is displayed.
If the TV set is operated with the remote control during a 3D
playback, flicker effects can occur in the 3D glasses when doing this.
Calling 3D mode
(1
HOME: Call Home view.
Mark System settings,
OK call System settings.
Mark Picture,
go to next column.
Mark more...,
go to next column.
Mark 3D,
go to next column.
Select 3D mode.
Explanations concerning the 3D mode
(1
Automatic
If the TV is set to this setting (factory setting), then
the TV set automatically switches over to the correct
3D mode, if this is possible and supported by the
broadcaster.
Only change the setting if the 3D content is not
displayed correctly.
side by side
To display 3D content in side by side format. When
viewing 3D content with this setting, two almost
identical images are displayed next to each other
and put together correctly by the TV set.
The 3D mode is Automatic reset the next time you
switch on the TV set.
top/bottom
To display 3D content in top/bottom format. When
viewing 3D content with this option, two almost
identical images are displayed one above the other
and put together correctly by the TV set.
The 3D mode is Automatic reset the next time you
switch on the TV set.
Picture format / 3D mode
(1
If 3D contents are recognised by the TV device, the picture format
cannot be subsequently changed. The picture format when in 3D
operation is always 16:9 PC.
Instruction / Symbol
(1
If 3D content is detected by the TV set, a corresponding message
appears. The instruction text will disappear after the display time
has elapsed.
In the status display, 3D content is indicated by an icon.
The following images will
be displayed in 3D mode.
For this part, put the 3D
glasses on and then
switch them on. Viewing
3D images for extended
periods of time can tire
out the eyes and/or cause
feelings of dizziness.
(1
Availability varies by device type (see chapter Technical data - equipment features for your TV set).
Page 87

Loewe bild
User handbook
87
System settings
Picture
Picture adjustment
By the selection of one of the pre-set picture adjustment variants, the
image settings for the immediately active signal input groups are set
to predefined values.
You can use Personal Mode to specify individual settings for contrast,
colour intensity, colour temperature, sharpness and digital noise
suppression. Here you can enter your own specifications for each
signal input group.
You find a listing of the various signal input groups in chapter Technical
Data, section Signal input groups.
Calling picture adjustment
HOME: Call Home view.
Mark System settings,
OK call System settings.
Mark Picture,
go to next column.
Mark Picture adjustment,
go to next column.
Select mode,
OK adopt selected mode.
On the selection of one of the three pre-set picture
adjustment variants, it is also necessary to specify
whether the mode should be set for the current
signal source, for example Only for HD Digital or
for the entire TV.
Explanations for the picture adjustment variants:
If a change is made in the selected mode in image adjustment (e.g.
Contrast, Brightness, Definition, etc.) when carrying out the image
adjustment you are always in Personal mode. The selected energy
efficiency mode is unaffected.
Home Mode
The emphasis for the picture settings is here on low
energy consumption for home use. In this case, the
TV set switches automatically off after 4 hours of
unattended time.
In this mode, the TV set switches off automatically
for the sake of saving energy, after it has been out of
operation for 4 hours.
Premium
Mode
The picture settings in Premium Mode are optimised
for a brighter environment at the cost of higher
energy consumption.
In this mode, the TV set switches off automatically
for the sake of saving energy, after it has been out of
operation for 4 hours.
Shop Mode
The picture settings in Shop Mode are adjusted to
operation in the presentation room.
The automatic dimming is deactivated.
Any changes made (e.g to contrast, etc.) are reset to
the defaults after 30 minutes.
Cinema
Mode
The cinema mode is optimised for video and photo
playback.
Personal
Mode
Here, you can recall your last personal picture
settings.
In this mode, the TV set switches off automatically
for the sake of saving energy, after it has been out of
operation for 4 hours.
Depending on set type
(1
different HDR-Standards (Dolby Vision, HDR
10, HLG) are supported. There are further picture adjustment variants
depending on the image material presented
.
Dolby Vision-Content:
DOLBY
VISION
Bright
Picture settings for a brighter environment defined
by DOLBY.
DOLBY
VISION
Dark
Picture settings for a dark environment (home theatre) defined by DOLBY.
Premium HDR
Picture settings defined by DOLBY, which, however,
use additionally Loewe algorithms for motion
compensation or the automatic adjustment to the
ambient light.
HDR10 Content:
HDR10
Bright
The picture settings are optimized for playback in a
brighter environment.
HDR10 Dark
The picture settings are optimized for playback in a
dark environment (home theatre).
The picture settings in the premium mode are optimized for a brighter environment with higher energy
consumption.
HDR10
Premium
Image settings that use additional algorithms for
motion compensation or automatic adjustment to
the ambient light.
HLG-Content:
HDR10
Bright
The picture settings are optimized for playback in a
brighter environment.
HDR10 Dark
The picture settings are optimized for playback in a
dark environment (home theatre).
The picture settings in the premium mode are optimized for a brighter environment with higher energy
consumption.
HDR10
Premium
Image settings that use additional algorithms for
motion compensation or automatic adjustment to
the ambient light.
(1
HDR compatibility different according to device type (see chapter Technical data - equipment features for your TV set).
Page 88
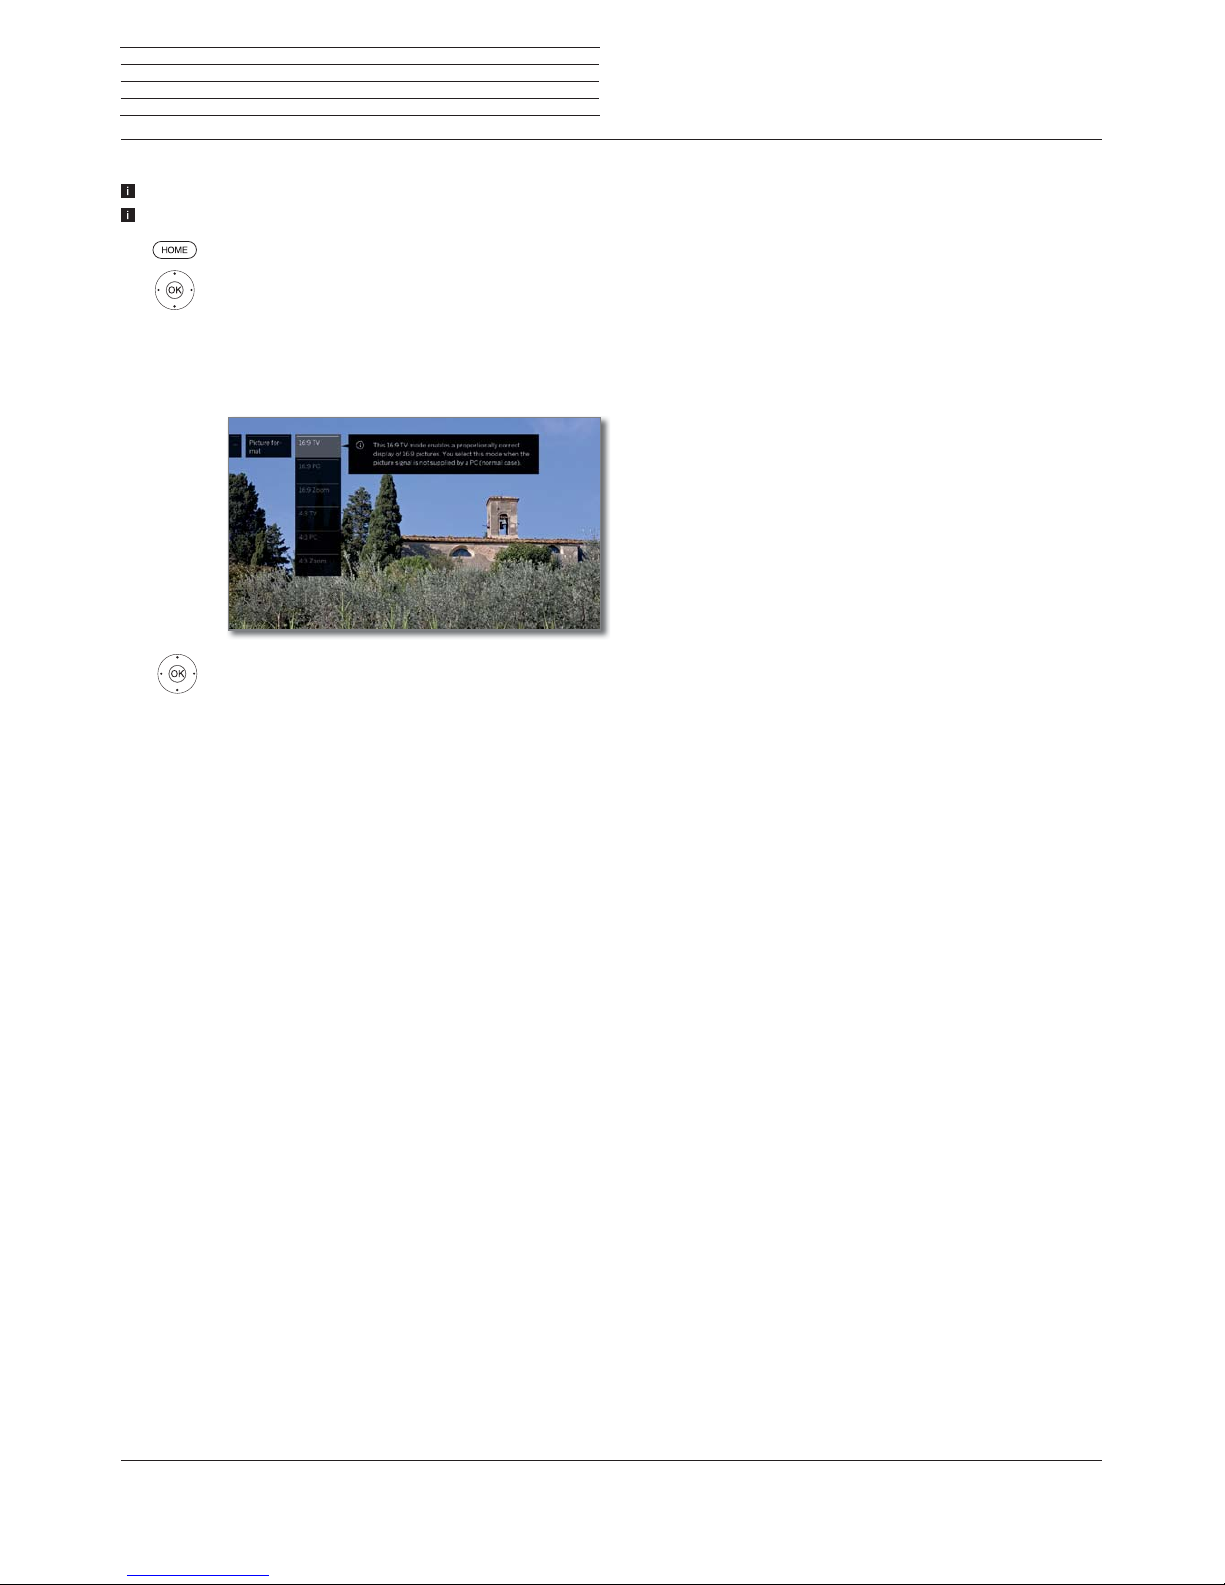
Loewe bild
User handbook
88
System settings
Picture
Selecting the picture format
The setting options depend on the transmitted picture content.
Menu item is only available if Automatic aspect ratio – off is selected.
HOME: Call Home view.
Mark System settings,
OK call System settings.
Mark Picture,
go to next column.
Mark Picture format,
go to next column.
Select format,
OK adopt selected format.
Explanations of the picture formats for HD signals:
4:3 TV
16:9 TV
Proportionally correct display of 4:3 or 16:9
broadcasts. You select this mode when the signal is
not supplied by a PC (normal case). A small part of
the picture is truncated. This may be necessary to
hide possible interference at the edge of the picture,
which arises from the signal supplied.
4:3 PC
16:9 PC
Proportionally correct display of 4:3 or 16:9
broadcasts without loss of information.
You select this mode when the signal is supplied
by a PC.
4:3 Zoom
16:9 Zoom
Proportionally correct display. Maximum picture
magnification. Displayed text may get lost.
Explanations of the picture formats for SD signals:
16:9 Proportionally correct display of 16:9 broadcasts.
4:3 Proportionally correct display of 4:3 broadcasts.
Panorama 1 Proportionally correct display of 4:3 broadcasts on
the 16:9 screen. Channel logo and subtitles remain
visible.
Panorama 2 Format filling display (factory default) of 4:3 broad-
casts on the 16:9 screen. Channel logo and subtitles
remain visible.
Zoom Proportionally correct display. Maximum picture
magnification. Displayed text may get lost.
PALplus Is a 4:3-compatible 16:9 picture broadcast supplied
by the channel which is detected automatically.
Page 89

Loewe bild
User handbook
89
System settings
Sound
Sound
Calling the sound settings
The selectable menu items depend on the selected channel and
the connected sound components.
HOME: Call Home view.
Mark System settings,
OK call System settings.
Mark Sound,
go to next column.
Select sound function,
proceed to next column.
Explanations of the sound settings:
Mimi
Defined
TM
WithMimi DefinedTM you can adapt the sound of your
Loewe TV set
(3
to your listening profile.
For further information, please refer to the chapter
System settings, section Sound – Mimi Defined
TM
)
Sound
mode
(1
Depending on the supplied audio signal of your TV
programme or audio source (DVD, Blu-ray, etc.)
you can select the speakers you want to listen here.
The subwoofer is always active if connected
(exception: listening mode is set to ܃).
If more audio channels are supplied than the
connected speakers are able to reproduce, the
missing speakers can be added virtually (this case
is represented respectively by brackets).
In the „optimal“ position, always the best quality
sound is output with the ideal number of speakers
for the currently played audio signal.
Optimum
܃
܃
܃
܃
܃
HiFi/AV
amplifier
The momentarily reproduced audio signal is output
with the ideal number of speakers.
Play centre sound or mono (left/right).
Play front sound (L/R stereo).
Play front and centre sound.
Play front and surround sound.
Play front, surround and centre sound.
Play via an external HiFi amplifier. Selection is only
possible if an amplifier has been selected in the
sound components wizard.
Explanations of the sound settings (continued):
Dolby PLII
mode
(1
Here you can select/adapt preset sound
characteristics (movie, music, matrix) in case of
Dolby Pro Logic II coded broadcasts.
The movie mode is „movie focused“, that is, the
centre sound is dominant, as we are used to it in
a movie.
In music mode, you can set 3 parameters:
Width: center sound is mixed with left/right.
Change in dimension: rear and centre are mixed
with left/right.
Panorama: distance between the speakers is
increased artificially.
In matrix mode, the front speakers are „mirrored“
to the rear speakers. Front left is mixed with left rear,
right front with right rear and the centre sound is
distributed to all channels.
The menu item appears when a multi-channel
system (speaker system) is connected and
loudspeakers are simulated (e.g. DVB signal with
2.0 sound, listening mode to 5).
Sound via
Playback over the TV speakers or an external hi-fi
amplifier.
The menu item Sound over appears only if a
different system has been selected in the sound
component wizard (see c
hapter System settings,
section Connections – Sound components
).
Sound
adjustment
Here, you can adapt preset sound characteristics
of the respective broadcast. Selectable are, e.g.,
Speech, Classical, Pop, Custom music and Film
soundtracks. For personal music and film sound you
can do the settings for pitch and bass sound (high
and low frequencies).
Loudness
Proper boost of bass and treble tones at low volume.
Surround-
Modus
(2
Here you can choose between different surround
sound simulations (see next page).
Sound
picture
synchronisa-
tion
If the sound and picture are not precisely in sync,
you may correct this here. Move the mark on the
bar downwards, slowing down the sound compared
with the picture. Move the mark upwards, speeding
it up compared with the picture. Time adjustment
of the sound occurs in steps of 10 ms in each case.
only available for DVB channels.
Volume
adjustment
The volume can differ according to the individual
channels. If the sound is too loud or too quiet in relation to other channels, adjust the volume.
more ...
call with OK (see next page).
(1
Only for set types with built-in DAL connection.
(2
Only for set types Loewe bild 9, Loewe bild 7, Loewe bild 5 oled and Loewe bild 4.
(3
Mimi DefinedTM can be activated later on compatible device types with chassis generation SL4xx using an activation code. This can be purchased from specialist dealers
or in the Loewe online shop. Further information can be obtained from your specialist dealer or in the Loewe online shop.
Page 90

Loewe bild
User handbook
90
System settings
Sound
Explanations of the sound settings (continued):
more ...
Loudspeaker/
Headphone
sound
Selection options for Mono/ Stereo or Sound 1 or
Sound 2 for bilingual programmes, separately for
the loudspeakers and the headphones.
The menu item appears only for analogue channels.
Auto volume
The volume may vary when receiving channels with
different standards, when switching from channel to
channel or during commercials.
You can reduce these differences in volume by
selecting auto volume on. For music and live broadcasts you get a better sound spectrum with auto
volume off.
Maximum
volume
You can limit the volume adjustment of the loudspeakers. This prevents selecting a volume which
is too loud.
Maximum
switch on
volume
Set the sound level to be heard after switching on the
TV set with the mains switch or after a power failure.
When switching on the TV set in standby mode, the
volume last used is retained unless it was above this
switch-on level. Otherwise it is limited by this.
Balance
Set stereo balance so that the volume impression is
identical on the left and right.
Dynamic
SPDIF sync
Audio synchronization with external devices is
achieved by dynamically adjusting the SPDIF frequency.
Some AVRs (Audio/video receivers) do not tolerate
any adjustment of the frequency of +/- 1000ppm
and show sound drop-outs or no sound at all.
Only in this case, please select here off.
Surround modus
(1
In the Surround mode menu point, two special virtualiser modes are
found that offer the possibility to simulate virtual surround sound via
the built-in TV loudspeakers.
Selecting the Surround mode
The choice is available for sound component - TV speakers. All other
audio components do not support this mode.
Adjustable in the System settings under Connections טSound
components.
The selection of surround modes is available when sound mode
܃or܃ is used.
Adjustable in the System settings under Sound טSound mode
or in the current TV programme via the menu options (see chapter
TV, section Menu options).
HOME: Call Home view.
Select System settings,
OK call System settings.
Select Sound,
go to next column.
Select Surround Mode,
OKcall.
Select the desired mode.
Explanation of the setting options:
Cinema
Surround
For the Cinema Surround mode an advanced
Virtualizer technology is used that is developed by
Loewe. This one improves speech intelligibility while
simultaneously widening the 3D sound.
Default setting ex factory.
Dolby Virtual
Dolby Virtual simulates the hearing impression of
a 5.1 surround sound system via the built-in TV
speakers.
(1
Only for set types Loewe bild 9, Loewe bild 7, Loewe bild 5 oled and Loewe bild 4.
Page 91

Loewe bild
User handbook
91
Mimi DefinedTM
Every user’s perception of sound is individual and changes in certain
frequency ranges with age.
With Mimi Defined
TM
you can adjust the sound of your Loewe TV set
to your personal, age-specific hearing in three simple steps.
First, you create a personal profile or choose a setting for a whole
group of listeners. Depending on the age or age group, an algorithm
then determines the ideal frequency response curve for the best
listening experience.
Mimi Defined
TM
is the result of state-of-the-art hearing research and
has been developed and validated in cooperation with Charité - Universitätsmedizin Berlin, the largest university hospital in Europe.
Mimi DefinedTM is currently only available for TV sets with chassis
generation SL4xx and software from version V5.x.
Mimi Defined
TM
can be activated retroactively with compatible de-
vice types with chassis generation SL4xx using an activation code.
This can be purchased through the specialised trade or in the Loewe
online shop. Further information can be obtained from your specialist dealer or in the Loewe online shop.
The activation code is entered under the menu item Activate pack-
age (see chapter System settings, section Extras – Integrated
features).
According to your settings, Mimi DefinedTM also increases speech
intelligibility at sound setting 5.1. This may result in surround effects
not always sounding as originally intended.
Personalised sound settings may affect the effectiveness of Mimi
Defined
TM
. You may need to reset your personal sound settings.
With input signals via HDMI, only Dolby signals are processed.
Calling up Mimi Defined
TM
In normal TV operation, without further displays:
MENU: Call up Menu options.
Select Sound,
OK call.
Select Mimi Defined
TM
,
OK call.
Select the desired menu option,
OKcall.
Notes on the settings options:
Profile
If audio profiles have been created, you can select
them here and switch between the individual or
group profiles that have been created.
Mimi
Defined
TM
To enjoy the Mimi DefinedTM listening experience,
enable the feature by selecting the option on.
Intensity
The intensity with which Mimi DefinedTM optimises
the sound of the TV can be changed according to
personal preference.
New person
Here you can create a new hearing profile for one
person.
Further information, see column on the right
New group
Here you can create a new hearing profile for a group.
Turning on Mimi Defined
TM
Menu options for Mimi DefinedTM are opened:
Select Mimi Defined
TM
,
OK call.
Select on,
OK call.
(1
Availability varies by device type (see chapter Technical data - equipment features for your TV set).
System settings
Sound
Page 92

Loewe bild
User handbook
92
Creating a profile for Mimi Defined
TM
Menu options for Mimi DefinedTM are opened:
Select
New person
,
OKcall.
Select
Profile
,
OKcall.
,
Select the desired character,
OK apply the character.
After entering the name of the profile:
Select Enter,
OK adopt.
Select
Year of birth
,
OK call.
Select the desired number,
OK adopt.
After entering the year of birth:
Select Enter,
OK adopt, profile is created.
Alternatively, you can create a group profile for multiple
users of the same age group by selecting New group.
Again, a name can be assigned. For the age, select the
decade of birth that applies to the members of the
group.
Selecting a profile for Mimi Defined
TM
Menu options for Mimi DefinedTM are opened:
Select
Profile
,
OKcall.
Select the desired Mimi Defined
TM
profile,
OK adopt.
Deleting a profile for Mimi Defined
TM
Menu options for Mimi DefinedTM are opened:
Select
Profile
,
OK call.
Select the Mimi Defined
TM
profile to be deleted.
STOP: Delete profile.
Select
yes
,
OKconfirm.
Setting the intensity for Mimi Defined
TM
Menu options for Mimi DefinedTM are opened:
Select
Intensity
,
OKcall.
Set the desired Mimi Defined
TM
intensity.
The intensity with which Mimi Defined
TM
optimises
the sound of the TV set can be changed according
to personal preference.
You can set the intensity on a scale of 0 to 100
percent. The change is immediately noticeable.
The intensity setting affects all listening profiles
that have been created.
Switching Mimi Defined
TM
on/off with the star key
You can assign the Mimi Defined
TM
function to the star key. This makes
it possible to turn Mimi Defined
TM
on or off quickly.
For instructions on how to reassign the star key, please refer to the
chapter System settings, section Control - Asterisk key function.
Asterisk key reserved for Mimi DefinedTM.
press and hold: Call up Mimi Defined
TM.
menu.
Select
on or off
,
OKconfirm.
System settings
Sound
Page 93
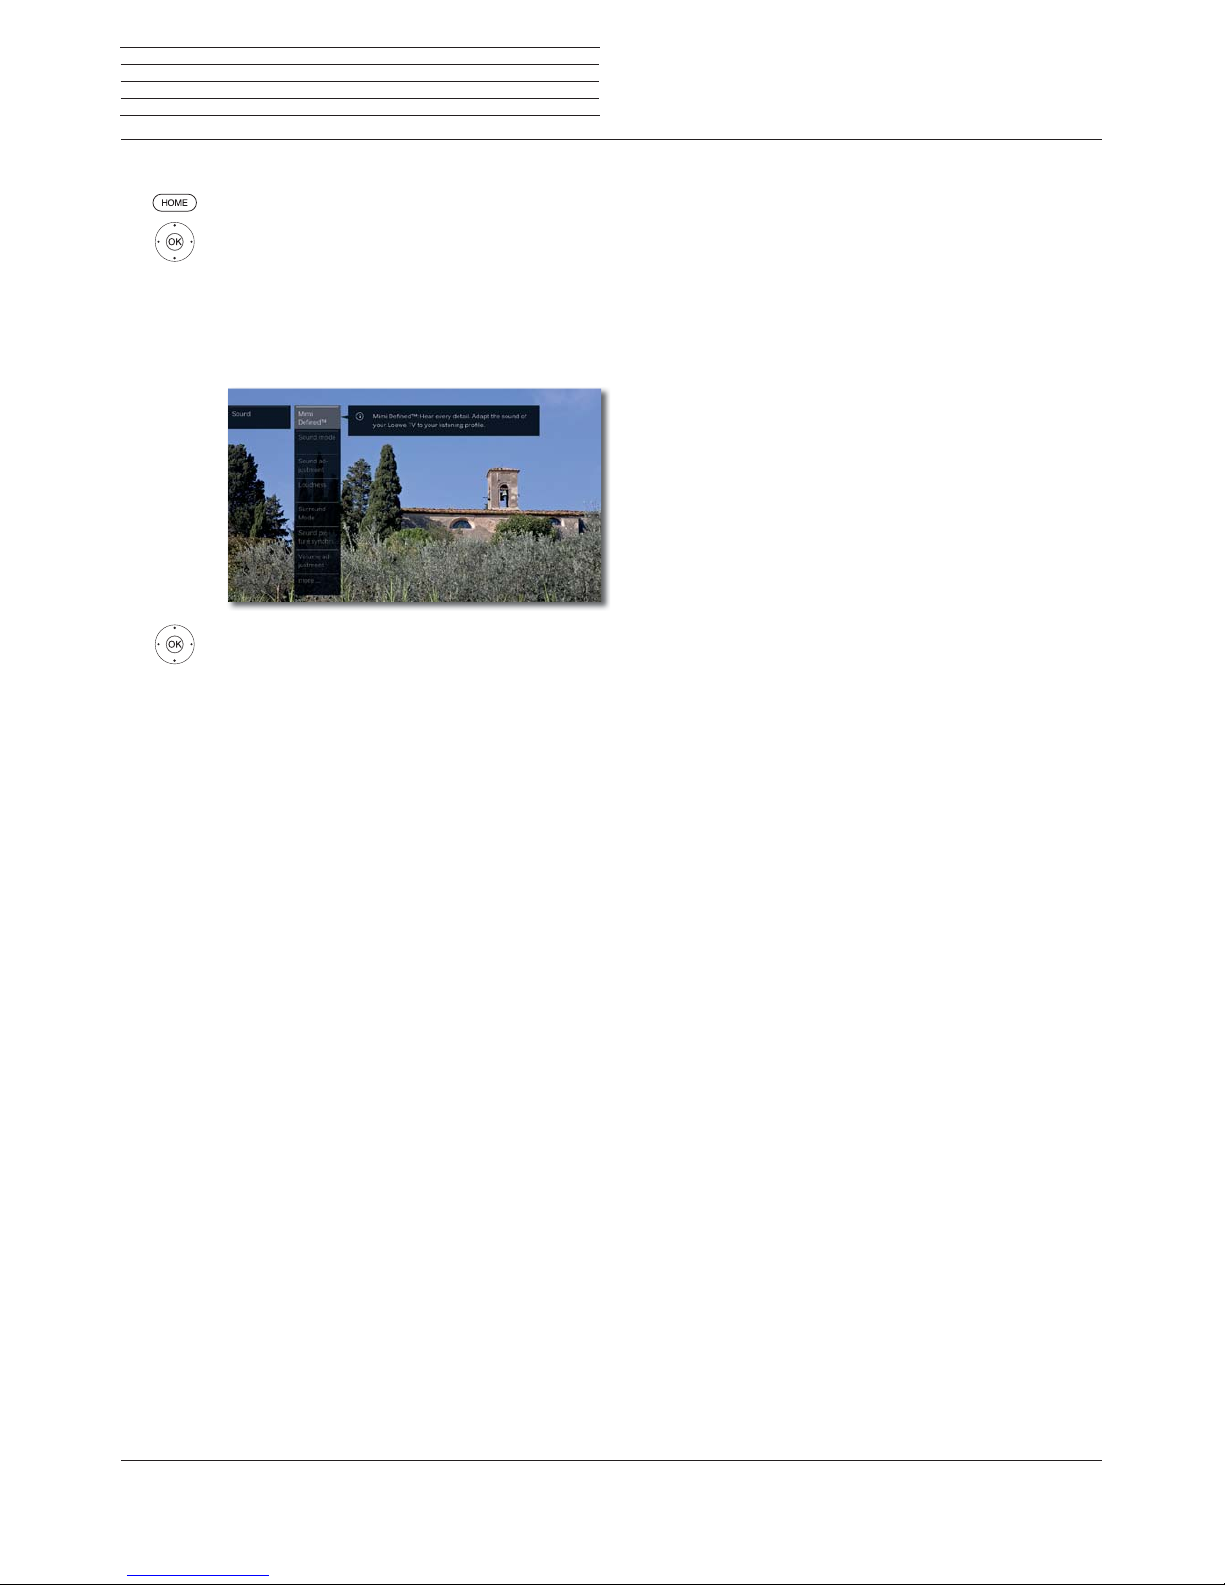
Loewe bild
User handbook
93
Calling up Mimi DefinedTM via System settings
HOME: Call Home view.
Select System settings,
OK call up System settings.
Select Sound,
go to next column.
Select Mimi Defined
TM
,
OK call.
Select the desired menu option,
OKcall.
System settings
Sound
Page 94

Loewe bild
User handbook
94
System settings
Channels
Channels
Under the item Channels you find all settings concerned with channel search for TV and DVB radio as well as functions for creating and
editing the various channel lists.
Channel management is not possible as long as a programmed
timer recording is active.
If at least one channel is locked, the access code must be entered
prior to automatic search
.
The procedure for radio channels or Channel lists Radio is similar to
that for TV channels or Channel lists TV. Therefore, this procedure
is described only for TV channels.
Call Channels menu
HOME: Call Home view.
Mark System settings,
OK call System settings.
Mark Channels,
go to next column.
Select desired function,
proceed to next column.
Explanations of setting possibilities in the Channels menu:
Automatic
scan
TV+Radio
Here you start the wizard that searches and stores
all TV and DVB radio channels (see chapter System
settings, section Channels – Automatic scan
TV+Radio).
Manual scan
(incl.
antenna
status)
Here, you can enter all the settings available for a
TV channel (see chapter System settings, section
Channels – Manual Scan TV / Radio).
Channel lists
TV
Channel lists
Radio
Here you can move and delete TV channels/ DVB
radio channels in all lists.
You can put together your most frequently watched
programmes in one or more lists of personal
favourites (see chapter System settings, section
Channels – Channel lists TV / Radio).
Update
channel list
automatically
If the channel list is not up to date, it will be updated
automatically, provided the parameter Allow is
selected (see chapter System settings, section
Channels – Update channel list automatically).
Transfer all
channel
lists
Here you can export or import all channel lists of
this TV set
(
see chapter System settings, section
Channels – Transfer all channel lists
)
.
Page 95
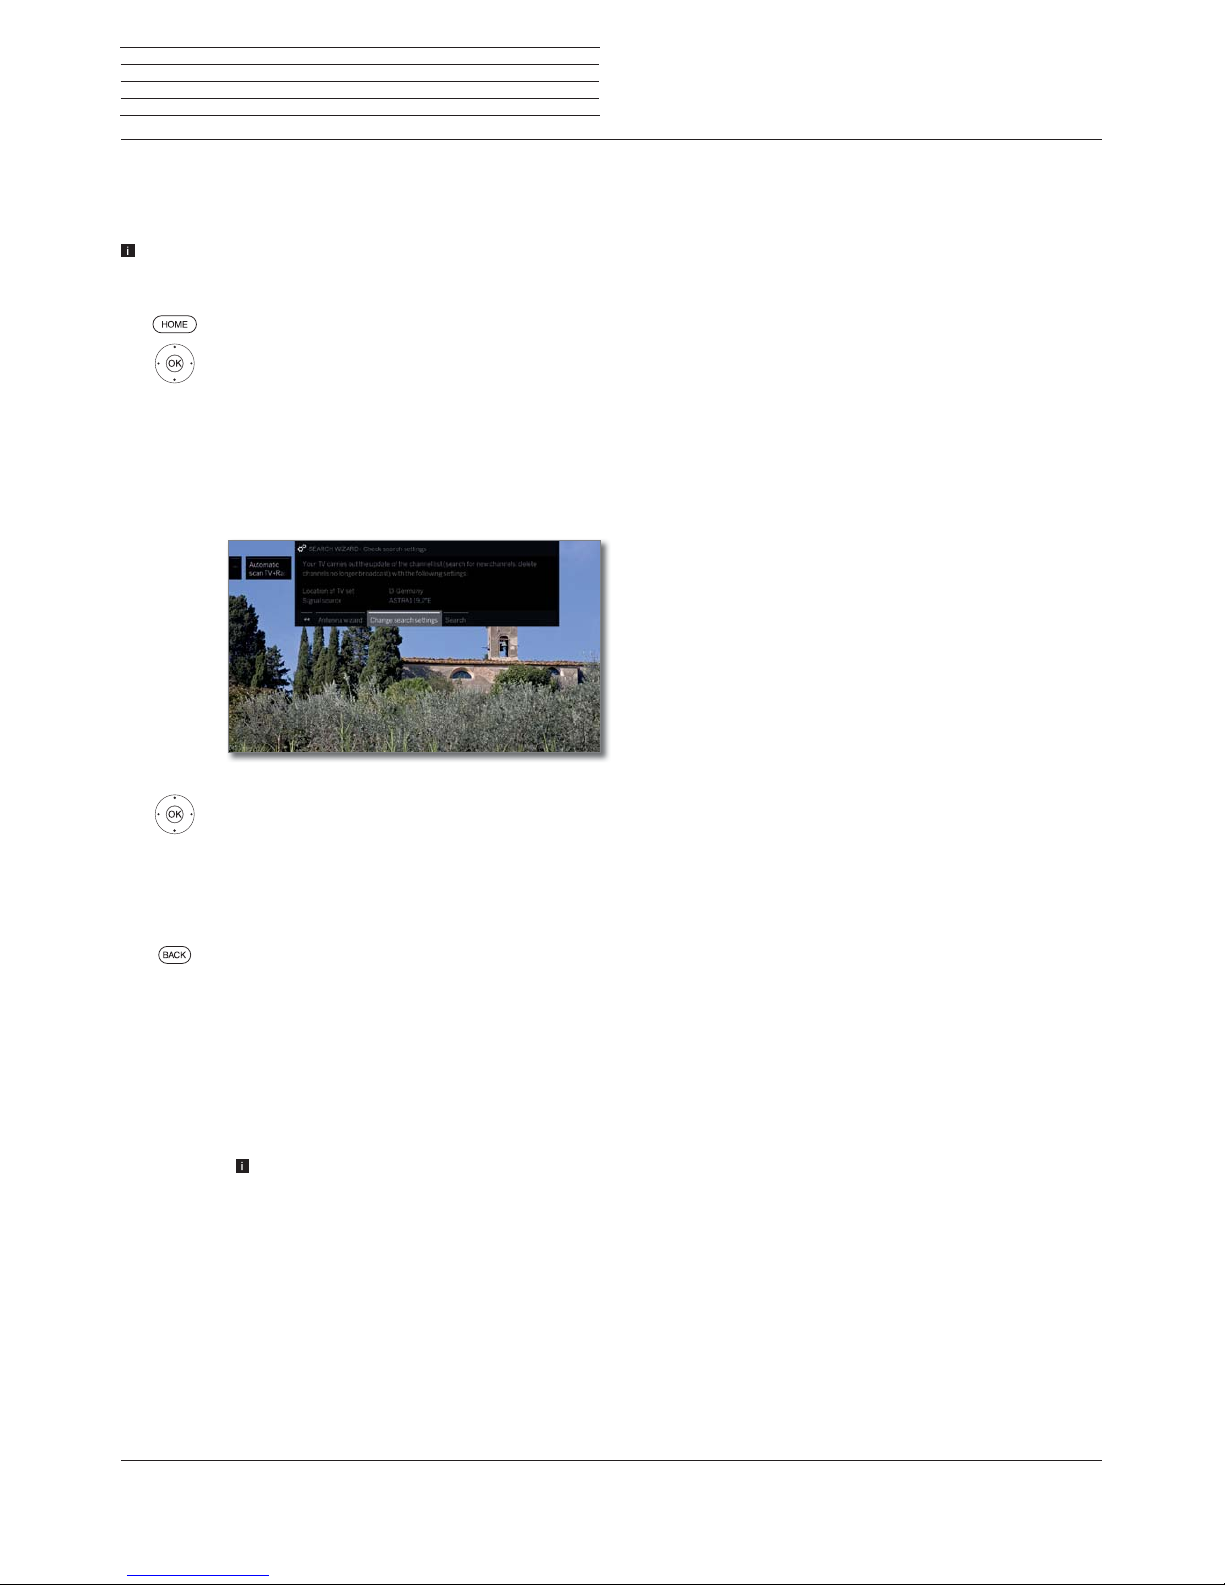
Loewe bild
User handbook
95
Automatic scan TV+Radio
For automatic scan TV+Radio, a search wizard will be started that
searches for new channels which are not yet stored.
You have to repeat the initial installation and automatically search for
new channels if you want to delete all the existing channels and
automatically search for new ones.
HOME: Call Home view.
Mark System settings,
OK call System settings.
Mark Channels,
go to next column.
Mark Automatic scan TV+Radio,
go to next column.
In the upper info text the current search settings will
now be displayed:
If you want to change these search settings:
Select Change search settings,
OKwizard guides you through the search settings
(see column on the right).
If you agree with these settings:
Select Start search/update,
OKstart scan.
BACK: Cancel current search/update.
Explanations of some search settings:
Signal source
Select here cable analogue, terrestrial (DVB-T /
T2), cable (DVB-C), satellite (DVB-S / S2) or IPTV
depending on the signal source you wish to use to
search for new channels.
Use the Antenna wizard to call the configuration of
the DVB-T and DVB-S antennas.
Calling up the DVB antenna configuration causes
the Change search settings dialogue to be quit.
You must call up the dialogue again after finishing
the configuration.
Cable
(analogue)
TV/colour
standard
With the selection of TV set location the conventional
TV standard/colour standard is the default.
It should only be changed if channels with other
standards are to be searched.
Explanations of some search settings (continued):
DVB-T/C/S
IPTV
Network
selection
If several networks are available, you can decide
which network you want to receive your channels
from.
DVB-T/C/S
IPTV
Settings
With the selection of set location the conventional
settings will be preset. Only change these defaults
if you are familiar with other parameters.
Scrambled channels:
(DVB-T/C/S)
You can state whether scrambled channels are to be
searched for in the search/update. If you select yes,
coded channels will also be searched for. However,
these channels can only be received in connection
with a CA module and the appropriate Smart Card.
Ask your dealer which Smart Card you need to
receive certain channels.
Search method: (DVB-T)
If you want to run the channel search independently
of the channel grid, select Frequency search for the
search method.
Search method: (DVB-C)
If you select Frequency search here, a search is
performed for all receivable channels. With Network
search, only the channels which the networks supply are searched - either for all receivable networks
or only for the particular network specified under
Network ID.
Network ID: (DVB-C)
If you select none here, DVB signals of all current
broadcasting networks are scanned automatically
(recommended for most cable networks).
If, on the other hand, you specify a certain network ID
(necessary in the cable networks of some countries),
only DVB signals of this broadcasting network are
searched for automatically. Your cable provider has
the information you need.
Search method: (DVB-S)
If you select Frequency search here, a search is
performed for all receivable channels. With Network
search, from all receivable networks all the channels
are searched which are supplied by these networks.
Accept Logical Channel Number: (DVB-T/C/S)
In various countries, digital channels (DVB-T/C/S)
are transmitted with a preset channel number per
channel, known as Logical Channel Numbers (LCN).
If you select yes here, these default channel slots
will be used and the channels of the preferred signal
source will be sorted as per LCN. The channels in
the channel list can no longer be shifted.
System settings
Channels
Page 96

Loewe bild
User handbook
96
System settings
Channels
Search for/update channels – handling of new and no longer
found channels
After the automatic search/update has been concluded, the number
of newly found TV and radio channels is shown.
Call list of new TV channels found.
Select channel.
OK Mark / unmark channel.
Stores the marked TV channels.
Afterwards, a list of the channels which are saved but
which are temporarily not broadcasting or no longer
exist is displayed, if available.
The number of the memory location used is displayed
in front of the channel. Please select the channels you
really want to delete.
Select channel.
OK Mark / unmark channel.
Proceed. The marked TV channels will be deleted.
Subsequently the process of Newly found chan-
nels/Channels no longer found shall be carried
out in the same way for the radio channels.
Back: Close search assistant.
Manual Scan TV / Radio
Here, you can enter all the settings available for a channel. However,
this requires detailed knowledge.
The manual search of radio channels is similar to that of TV channels.
Therefore, the manual search for radio channel is not dealt with
separately.
Calling manual search
HOME: Call Home view.
Mark System settings,
OK call System settings.
Mark Channels,
go to next column.
Mark Manual Scan (incl. antenna status),
OKcall Manual Scan.
Select the menu item Signal source to decide in which
area you want to search for channels.
Depending on the selected source, various setting
possibilities will be available.
On the next page, the settings for analogue cable and
DVB-T/C/S sources are described separately.
Status bar for manual search
Status bars are displayed for manual search, which
show the reception quality of the individual channels
during the channel scan. The markers in all bars should
preferably be in the green area.
C/N: (Carrier/Noise) The bar shows the signal-tonoise ratio. The value indicated in dB should be
preferably high.
Level: The bar shows the receiving level of the channel.
The value displayed in dBμV should be preferably high.
BER: (Bit Error Rate) The bar shows the bit error rate
of the channel. The value for BER should be as low as
possible.
Page 97

Loewe bild
User handbook
97
System settings
Channels
Manual search for cable analogue (analogue cable reception):
Manual search is called.
Cable analogue has been selected as signal source.
Mark and adjust settings,
OK confirm as the case may be.
Mark Search,
OK start search.
If a channel has been found:
Mark Store/Overwrite,
OK store channel.
Explanations on the search settings for cable analogue:
Signal source Selection of range in which you want to search for the
channel.
TV standard
If necessary, ask your dealer which standard to
select for specific channels or AV equipment.
Colour
standard
If necessary, ask your dealer which standard to
select for specific channels or AV equipment.
Channel
Direct input of channel.
Frequency
Direct input of channel frequency.
Range for entry: 044.75 MHz - 859.25 MHz.
Name
Here, the name of the found channel is displayed.
You can change the name of the channel.
Manual DVB-T/C/S search:
Manual search is called.
Mark and adjust settings,
OK confirm as the case may be.
Mark Search,
OK start search.
When a DVB transponder has been found:
Mark the channel,
OK Channel will be ticked with
. If necessary,
repeat for several channels.
Channels that already exist in the channel overview
will be displayed with their channel number on the
left.
Mark Store/Overwrite,
OK Channels marked with
will be stored.
Explanations of some search settings:
Signal
source
(DVB-T/C/S)
Selection of range in which you want to search for the
channel.
Channel
(DVB-T)
Direct input of channel.
Satellite
(DVB-S)
Here you can select the satellite where the channels
are to be searched for.
Band
(DVB-S)
Here you can select the frequency band in which
shall be searched.
Setting ranges: horiz/low 10694 - 11906 MHz
horiz/high 11544 - 12756 MHz
vert/low 10694 - 11906 MHz
vert/high 11544 - 12756 MHz
Frequency
(DVB-T/C/S)
DVB-T/C: Direct input of channel frequency.
DVB-S: Direct input of LNC frequency
Symbol rate
(DVB-S)
Here you can specify the symbol rate
Range: 1000-45000
Page 98
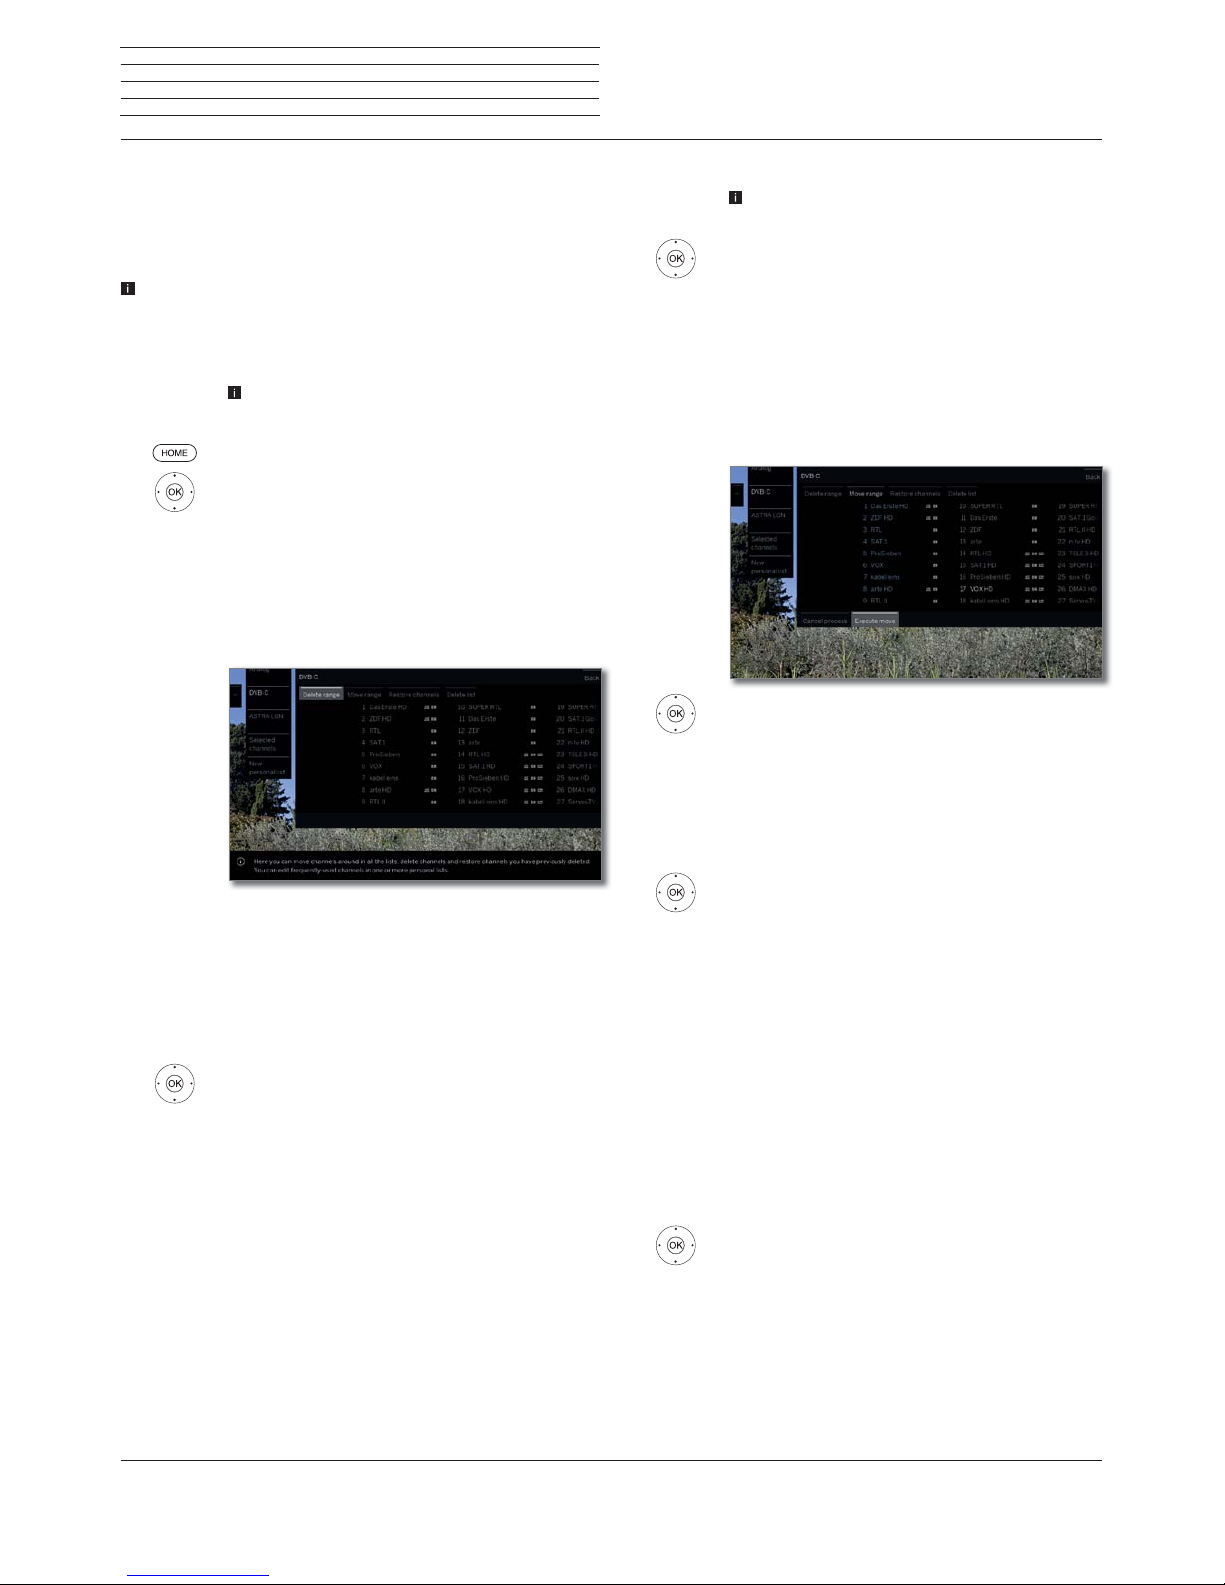
Loewe bild
User handbook
98
System settings
Channels
Channel lists TV / Radio
Under the menu item Channel lists TV or Channel lists Radio you
can edit (delete block, move block, restore deleted channels, delete
list) various lists, e.g., DVB-T, ASTRA LCN, DVB-C, etc. You can also
create and edit new Personal lists.
The function of Channel lists Radio is similar to that of Channel
lists TV. Therefore, editing of Channel lists Radio will not be dealt
with separately.
Change channel list
If at least one channel is locked, the access code
must be entered before changing channels
.
HOME: Call Home view.
Mark System settings,
OK call system settings.
Mark Channels,
go to next column.
Select Channel lists TV,
go to next column.
Mark desired channel list,
call list.
Here, you can delete and move channel blocks as well
as restore deleted channels.
The following section describes how to proceed if you
wish to Delete block, Move block,Restore channels
and Delete list.
Delete block
Select Delete Block,
move to list.
Select beginning of block,
OK mark beginning of block.
Select end of block,
OK mark end of block (selected channels are coloured
blue).
Select Execute delete,
OK block will be deleted.
Or:
select Cancel procedure,
OK cancel delete.
Move block / Change order
Channels with LCN cannot be reordered. In this case,
the function Move block is hidden.
Select Move block,
move to list.
Select beginning of block,
OK mark beginning of block.
Select end of block,
OK mark end of block (selected channels are coloured
blue).
Select insert position,
OK Confirm insert position.
Select Execute move,
OK block will be moved.
Or:
select Cancel procedure,
OK cancel move.
Restore channels
Select Restore channels,
move to list.
Select beginning of block,
OK mark beginning of block.
Select end of block,
OK mark end of block (selected channels are coloured
blue).
Select Restore channels,
OK channels will be added again to the channel list.
Or:
select Cancel procedure,
OK cancel restore.
Delete list
Select Delete list,
OK confirm delete list.
OK Confirm delete.
Page 99

Loewe bild
User handbook
99
System settings
Channels
Compose / edit Personal list
Each personal list can contain up to 99 channels. You can compose the
personal lists to suit your convenience (e.g., topic lists). Other persons
using this TV set can create their own personal lists.
Creating and updating personal channel lists is not possible as long
as a programmed timer recording is active.
Create / edit New personal list
HOME: Call Home view.
Mark System settings,
OK call System settings.
Mark Channels,
go to next column.
Mark Channel lists TV,
go to next column.
Mark New personal list,
OKNew personal list x will be created.
x stands for the number of the personal list.
The number depends on how many list were
already created.
Mark the channel in the channel list which is to be
added to the personal list.
OK adds the channel to the personal list.
The new channel will be added at the end of the
personal list. Proceed in the same way with additional channels.
Call up additional options.
ASTRA LCN
DVB-T
DVB-C
Examples of channel lists. Select the channel list from
which you add channels to the personal list. In the
personal list you can store channels from different
sources.
Sorting The sorting procedure for the source channel list
may be changed between numerical and alphabetical.
BACK: Store and close channel list.
Adding channels to Personal list
The Personal list must be opened to add new chan-
nels to it.
Select Add/remove Channels in the menu
options.
How to add channels is described in the left column.
Deleting channels from the Personal list
The Personal list must be opened to delete channels
in it.
Select Add/remove Channels in the menu
options,
OKactivate.
go to personal list.
Mark the channel to be deleted in the personal
list,
OK activate. Function of the coloured keys in standard
PIP functionality.
BACK: Store and close channel list.
Move / reorder channels in the Personal list
The personal list must be opened to move channels
in it.
Select Move channels in the menu options,
OKactivate.
Select channel to be moved in the Personal list,
OK mark (channel will be coloured blue).
Select insert position (insert position will be
marked with a blue line),
OK Execute move. Proceed in the same way with
additional channels.
BACK: Store and close channel list.
Renaming the Personal list
The Personal list to be renamed must be opened.
Select Rename list in the menu options,
OKactivate.
Enter new name.
Select Adopt.
OK New name for the personal list will be adopted.
Delete Personal list
The Personal list to be deleted must be opened.
Deleting of the list is irrevocable.
Select Delete list in the menu options,
OKactivate.
Page 100

Loewe bild
User handbook
100
System settings
Channels
Update channel list automatically
Some programme providers offer an automatic update of the channel lists (Dynamic Channel Management). You may Allow or Block
an automatic channel list update. If automatic updating is allowed,
a screen message about an available update appears whenever the
list is changed.
Allow/block updates
HOME: Call Home view.
Mark System settings,
OK call System settings.
Mark Channels,
go to next column.
Mark Update channel list automatically,
go to next column.
Select Allow or Block,
OK adopt.
If the channel list is not up to date, it will be
updated automatically, provided the option Allow
is selected.
Updating the channel list
A message appears whenever the TV is switched on if the network
provider changes their channel list.
In Update channel list automatically, Allow must
be selected.
Select the desired procedure.
Because your network provider has changed its station list, it has to be adapted
on your TV set as well. Please specify when you wish to do this.
At once
After switch off to standby
Later
Update station list
Proceed with
At once
The channel list will be immediately updated. Normally
this occurs in the background without interfering
further with the TV‘s operation. In exceptional cases,
it is however possible that during this process an
automatic channel change may be necessary.
After switch
off to
standby
The channel list will be updated the next time the TV
set is switched off into standby mode.
Later
Updating the channel list will be postponed to a later
date. When the TV set is switched on and off, the
update message will appear again.
OK Confirm selection.
Transfer all channel lists
You can export all channel lists of your TV set to a USB storage device
or import channel lists.
Calling Transfer all channel lists
HOME: Call Home view.
Mark System settings,
OK call System settings.
Mark Channels,
go to next column.
Mark Transfer all channel lists,
OK call.
Select a target if several USB storage media
are available.
Mark Export or Import,
OK confirm selection.
When you import channel lists, all channel lists are
overwritten in this device.
Before you remove the USB storage again, you need
to safely disconnect it with ‚Unmount‘ from the TV
set to prevent data loss.
 Loading...