

Page 1
DBManager
Installation and Setup
DB Manager
Liquid ControLs Group
An IDEX Fluid & Metering Business
Operation: EM200-21
Page 2

TABLE OF CONTENTS
INTRODUCTION
Software License Agreement .............................3
DBManager Overview .........................................4
LC Fueling Systems Overview ............................5
LC Fueling Systems Components ......................5
LC Fueling Systems Data Flow ..........................6
INSTALLATION & SETUP
DBManager Installation & Setup Overview .......10
Software Installation ...........................................11
DBManager Setup ..............................................12
Register File Server Nodes ...................................... 14
Register Application ................................................. 14
Set Master File List .................................................. 15
Set Node List............................................................ 16
LCP Setup ..........................................................17
Ofce User Setup ...............................................19
Be Prepared
• Before using this product, read and understand the instructions.
• Save these instructions for future reference.
• All work must be performed by qualied personnel trained in the proper application, installation, and
maintenance of equipment and/or systems in accordance with all applicable codes and ordinances.
• Failure to follow the instructions set forth in this publication could result in property damage, personal injury,
or death from re and/or explosion, or other hazards that may be associated with this type of equipment.
Be Prepared
Publication Updates and Translations
The most current English versions of all Liquid Controls publications are available on our web site, www.lcmeter.
com. It is the responsibility of the local distributor to provide the most current version of LC manuals, instructions, and
specication sheets in the required language of the country, or the language of the end user to which the products are
shipping. If there are questions about the language of any LC manuals, instructions, or specication sheets, please
contact your local distributor.
2
Page 3

SOFTWARE LICENSE AGREEMENT - INTRODUCTION
Read this license carefully. You agree that by using the itemized software package, you have
agreed to the software license terms and conditions. This agreement constitutes complete and
entire agreement between you and Liquid Controls with respect to this product.
1. Liquid Controls hereby grants to Licensee a nonexclusive
license to use DBManager (hereinafter referred to as
“Licensed Software”)
2. Under the License granted herein, Licensee may use the
eldized machine readable (executable code) copy of the
Software, including any subsequent updates which may
be provided. Licensee shall not, without Liquid Controls’
prior written consent, (a) rent, lease, lend, sublease or
otherwise transfer the materials hereunder; (b) remove
or obscure proprietary or copyright notices which may
be set forth on the Licensed Software; or (c) alter,
decompile, or disassemble the program.
3. One (1) copy of the Licensed Software, including any
software distributed on disks may be made for backup
purposes only. No other copies may be made or used
without the written consent of Liquid Controls.
4. Title. No title to ownership of any Licensed Software is
transferred to the Licensee.
5. Upgrades. License upgrades may become available for
the Licensed Software. Any cost associated with such
upgrades will solely be determined by Liquid Controls.
6. Warranty. Liquid Controls makes and licensee receives
no warranty express or implied and there are expressly
excluded all warranties of merchantability and tness for
a particular purpose.
7. Limitation of Liability. Licensee shall have the sole
responsibility for adequate protection and backup of
its data in connection with the Licensed Software. In
no event shall Liquid Controls be liable for (a) special,
indirect or consequential damages; (b) any damages
whatsoever resulting from loss of use, data, or prots,
product, inaccurate input or work delays, or any direct
property damage arising out of or in connection with this
agreement or the use or performance of the Licensed
Software.
8. Termination. Liquid Controls may terminate this software
license granted hereunder and require return of the
Licensed Software if Licensee fails to comply with these
license terms and conditions.
9. Licensee acknowledges that it has read this agreement,
understands it, and agrees to be bound by its terms, and
further agrees that this is the complete and exclusive
statement of the agreement between Liquid Controls
and Licensee, which supersedes and merges all prior
proposals, understandings, and all other agreements, oral
or written, between the parties relating to this agreement.
This agreement may not be modied or altered except by
written instrument duly executed by both parties.
10. This Agreement and performance hereunder shall be
construed and interpreted under the laws of the State of
Illinois.
11. If any provision of this agreement is invalid under any
applicable statute or rule of law, it is to that extent to be
deemed omitted.
12. Licensee may not assign or sublicense, without the prior
written consent of Liquid Controls, its rights, duties, or
obligations under this Agreement to any person or entity
in whole or in part.
13. The waiver or failure of Liquid Controls to exercise in any
respect any right provided herein shall not be deemed a
waiver of any further right hereunder.
3
Page 4
INTRODUCTION - DBMANAGER OVERVIEW
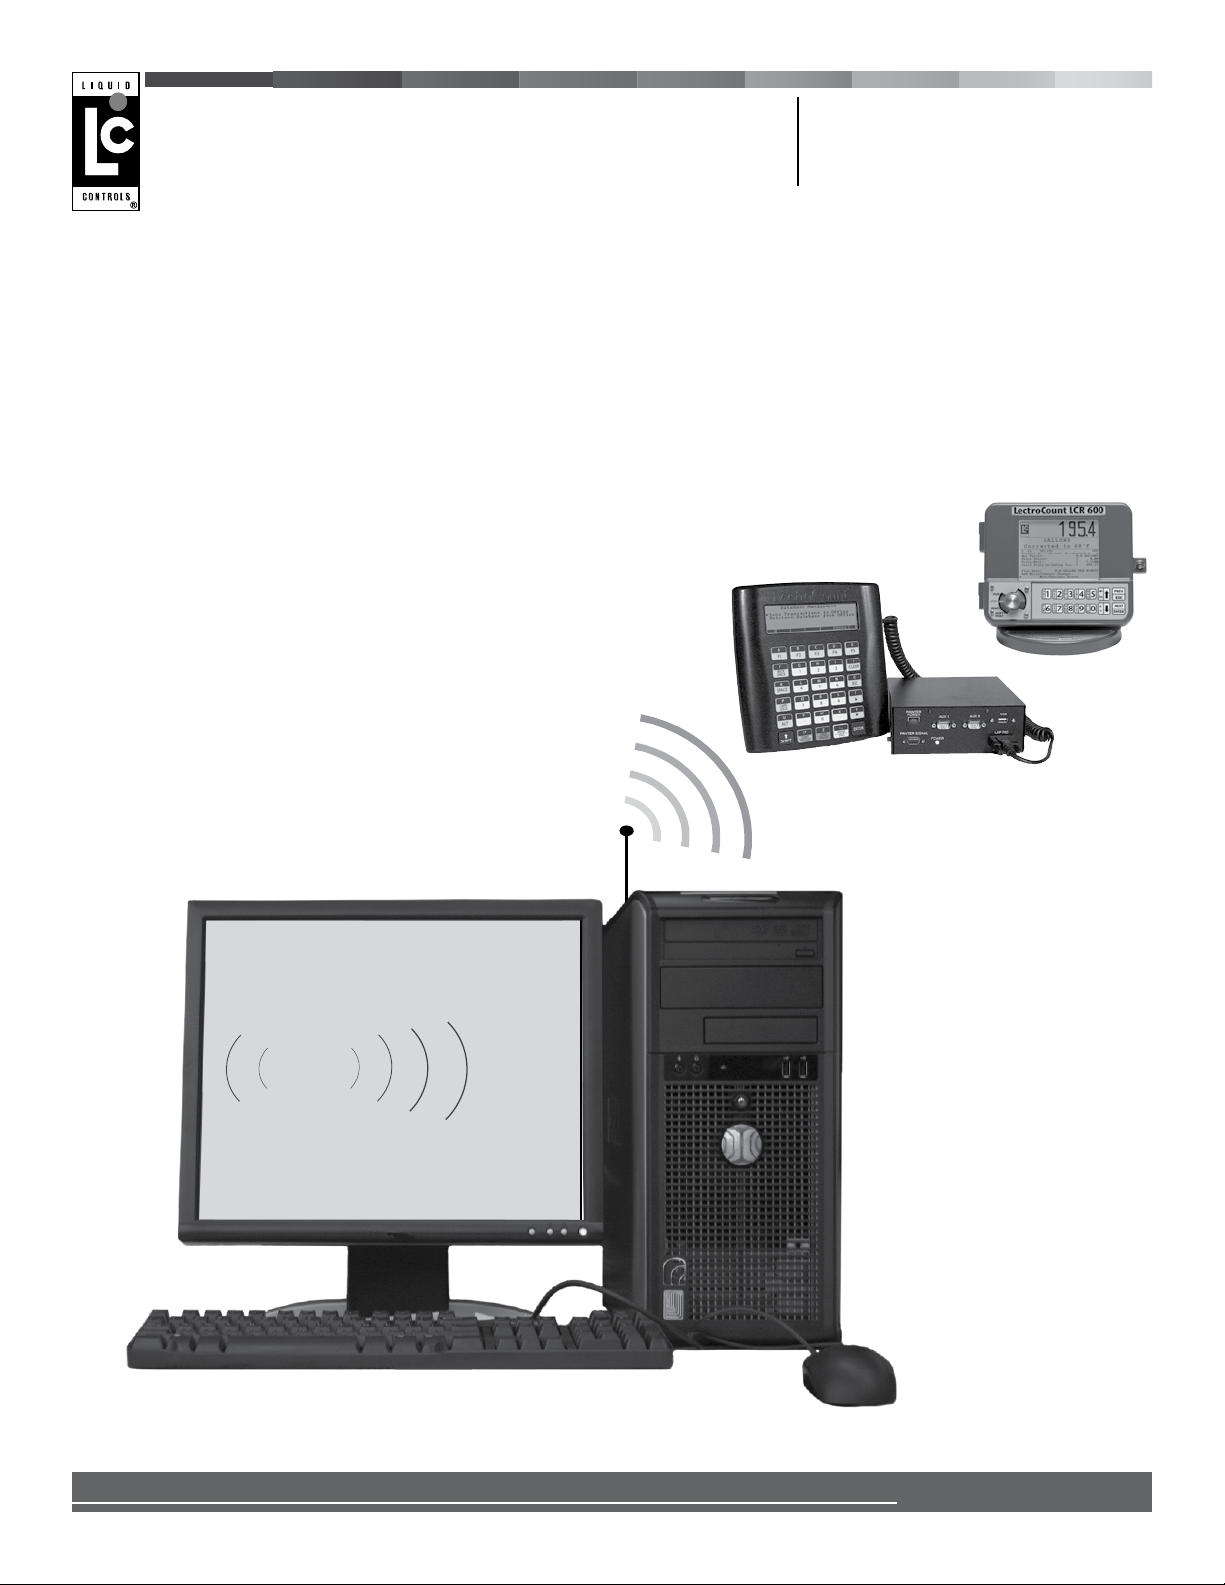
DBManager Overview
DBManager is a software package that supports Liquid Controls’ (LC) Fueling Systems including DMS Delivery,
FlightConnect, and EZConnect. The software package includes three programs: LCP Setup (LCPSetup.exe),
DBManager (DBManager.exe), and Ofce User (OfceUser.exe).
LCPSETUP
LCP Setup congures the ofce computer for wireless communications.
• Wireless communication conguration of ofce computers.
• Communication test between ofce computers and the DMS and LCR 600 units.
DBMANAGER
DBManager serves as a le server/database manager, managing the master database of the fueling system on the
ofce computer (multiple fueling systems if required) and maintaining the databases of the units (DMS and/or LCR
600) in the network. It determines what database records have been added, edited, or deleted and ensures that the
databases on each unit (DMS and/or LCR 600) in the network match the master database. DBManager can be set
to automatically update the databases in the network or updates can be made manually. DBManager also provides
a window on the PC where users can verify the data transmissions into and out of the server, and it is capable of
retaining a log le to troubleshoot any wireless transmission issues that may occur.
• Database management for all DMS and LCR 600 in-cab units in a fueling system
• Database update scheduling
OFFICEUSER
Ofce User is a security application that congures user access to the fueling system ofce software including DMS
Delivery Ofce, FlightConnect Ofce, and EZConnect Ofce.
• User, password, and access (to ofce application software databases) setup.
LCP Setup
Ofce UserDBManager (Setup)
4
Page 5
LC FUELING SYSTEMS - INTRODUCTION
LC Fueling Systems Overview
LC Fueling Systems (Delivery, EZConnect, FlightConnect) are automated data acquisition and management systems
designed for specic fueling applications. They acquire metrological and transaction data on fueling vehicles and
transmit the data to the ofce computers.
Main functions of an LC Fueling System include:
• Delivery and transaction data acquisition
• Database management
• Communication conguration and management
• Delivery and transaction data transfer
Deliver y
FlightConnect
CONNECT
Liquid Controls Positive Displacement Flowmeter Meter
DMS and LectroCount LCR-II
LectroCount LCR 600
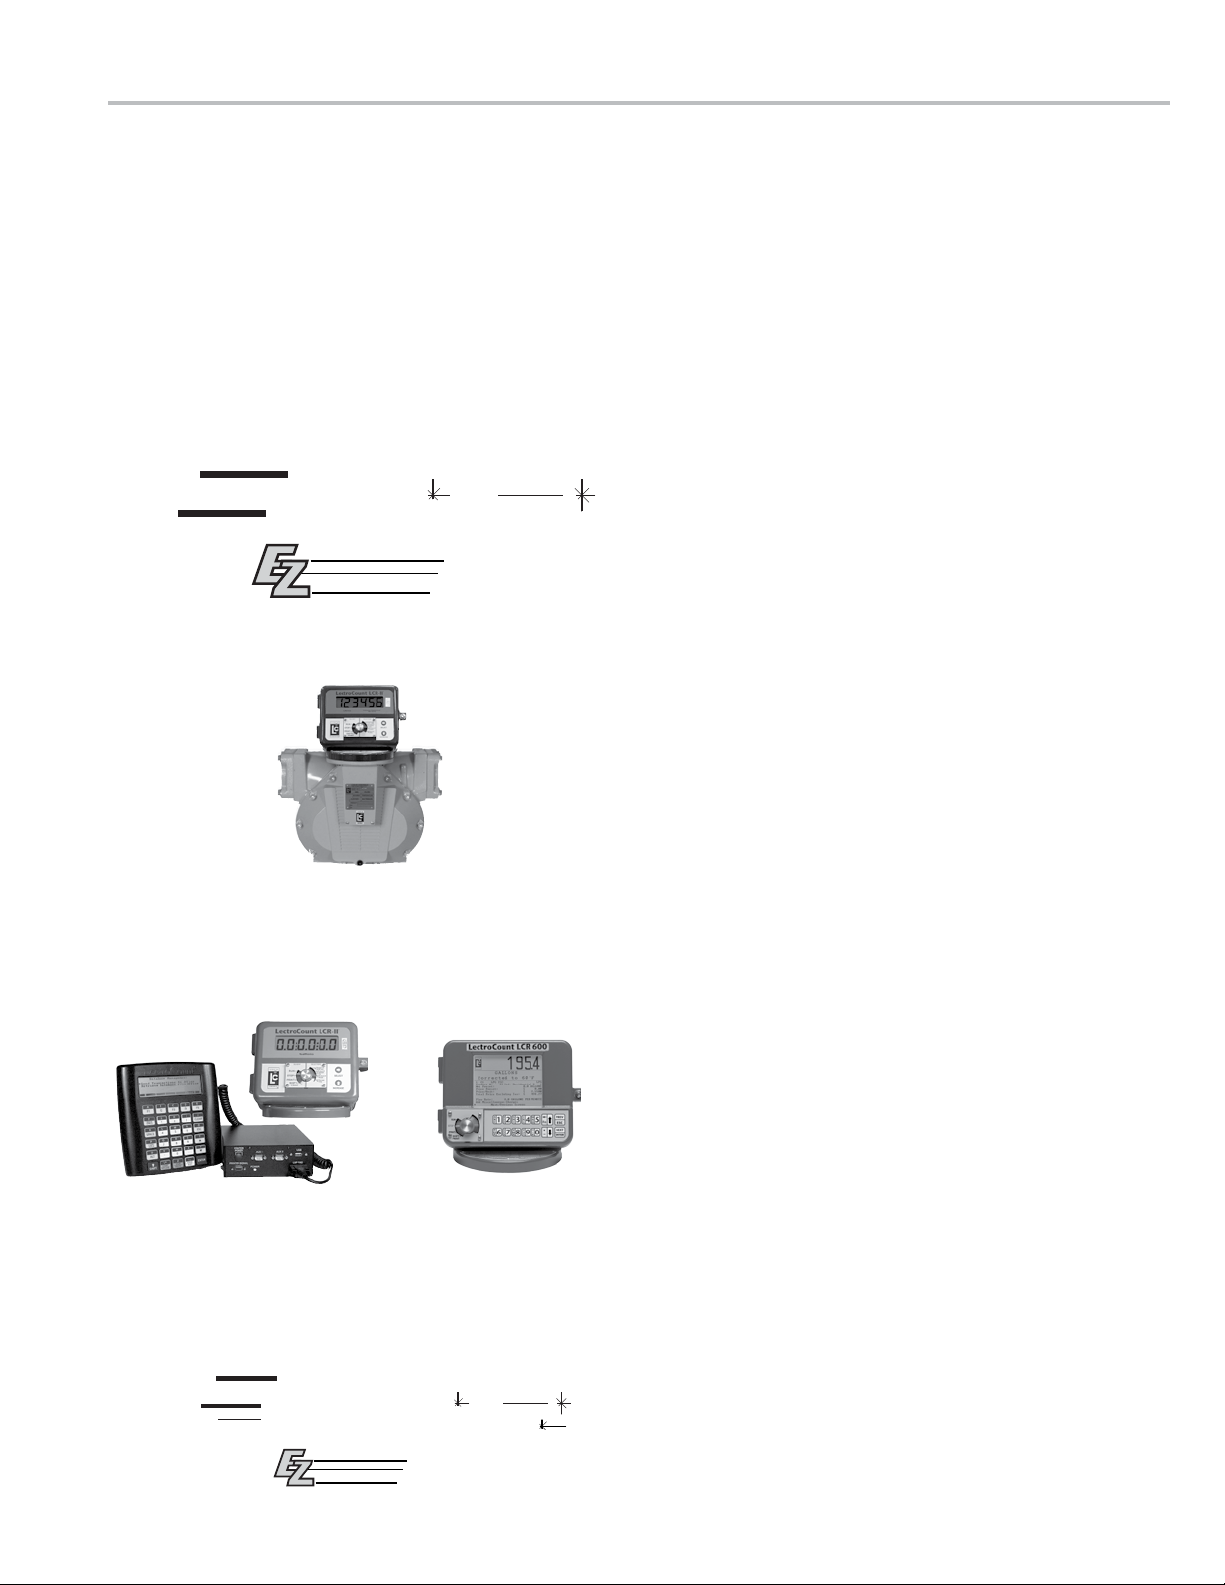
LC Fueling System Components
METERING SYSTEM
Typically mounted to the back or side of a delivery
vehicle, the metering system accurately measures,
stops and starts the ow, and preserves the purity of
the metered product. A Liquid Controls metering system
can include the meter, LCR electronic register, strainer,
ETVC (temperature compensation) probe, air eliminator,
and control valve.
LC FUELING SOFTWARE
Delivery, EZConnect, FlightConnect Fueling System
software can run on a DMS in-cab computer, in
conjunction with a LectroCount LCR-II electronic register.
The DMS is an in-cab computer with a heavy-duty lap
pad interface. The LCR-II compiles metrological data
during custody transfers and is Weights & Measures
approved. FlightConnect Fueling System software can
also run on a LectroCount LCR 600 electronic register.
The LCR 600 also compiles metrological data during
custody transfers and is Weights & Measures approved.
DATA TRANSFER
LC fueling systems can transfer data via a serial output
to a device such as a Wi adaptor, RF transceiver, or
cell modem. Cell modems enable long distance wireless
data transmissions between LCR 600s and DMSs in
the eld and computers in the ofce. Cell modems and
service contracts must be purchased separately from a
cellular service provider. RF transceivers are designed
for short, line-of-sight wireless transmissions of data.
Serial Wi adaptors can be adapted to an existing Wi
network within the customer framework. Wi range
is typically very limited, but can be used if the Fueling
System uploads and downloads data from a location that
is Wi -enabled on the users network. Liquid Controls
does not provide Wi adaptors, however your distributor
or IT Professional should be able to recommend one. A
USB Flash Memory Device can also be used to transfer
data between the DMS and computers in the ofce.
Delivery
OFFICE
CONNECT
OFFICE
FlightConnect
Office
LC OFFICE SOFTWARE
Delivery Ofce, EZConnect Ofce, and FlightConnect
Ofce all contain a suite of programs for managing LC
fueling system databases and transferring fueling data
les into third-party software.
5
Page 6
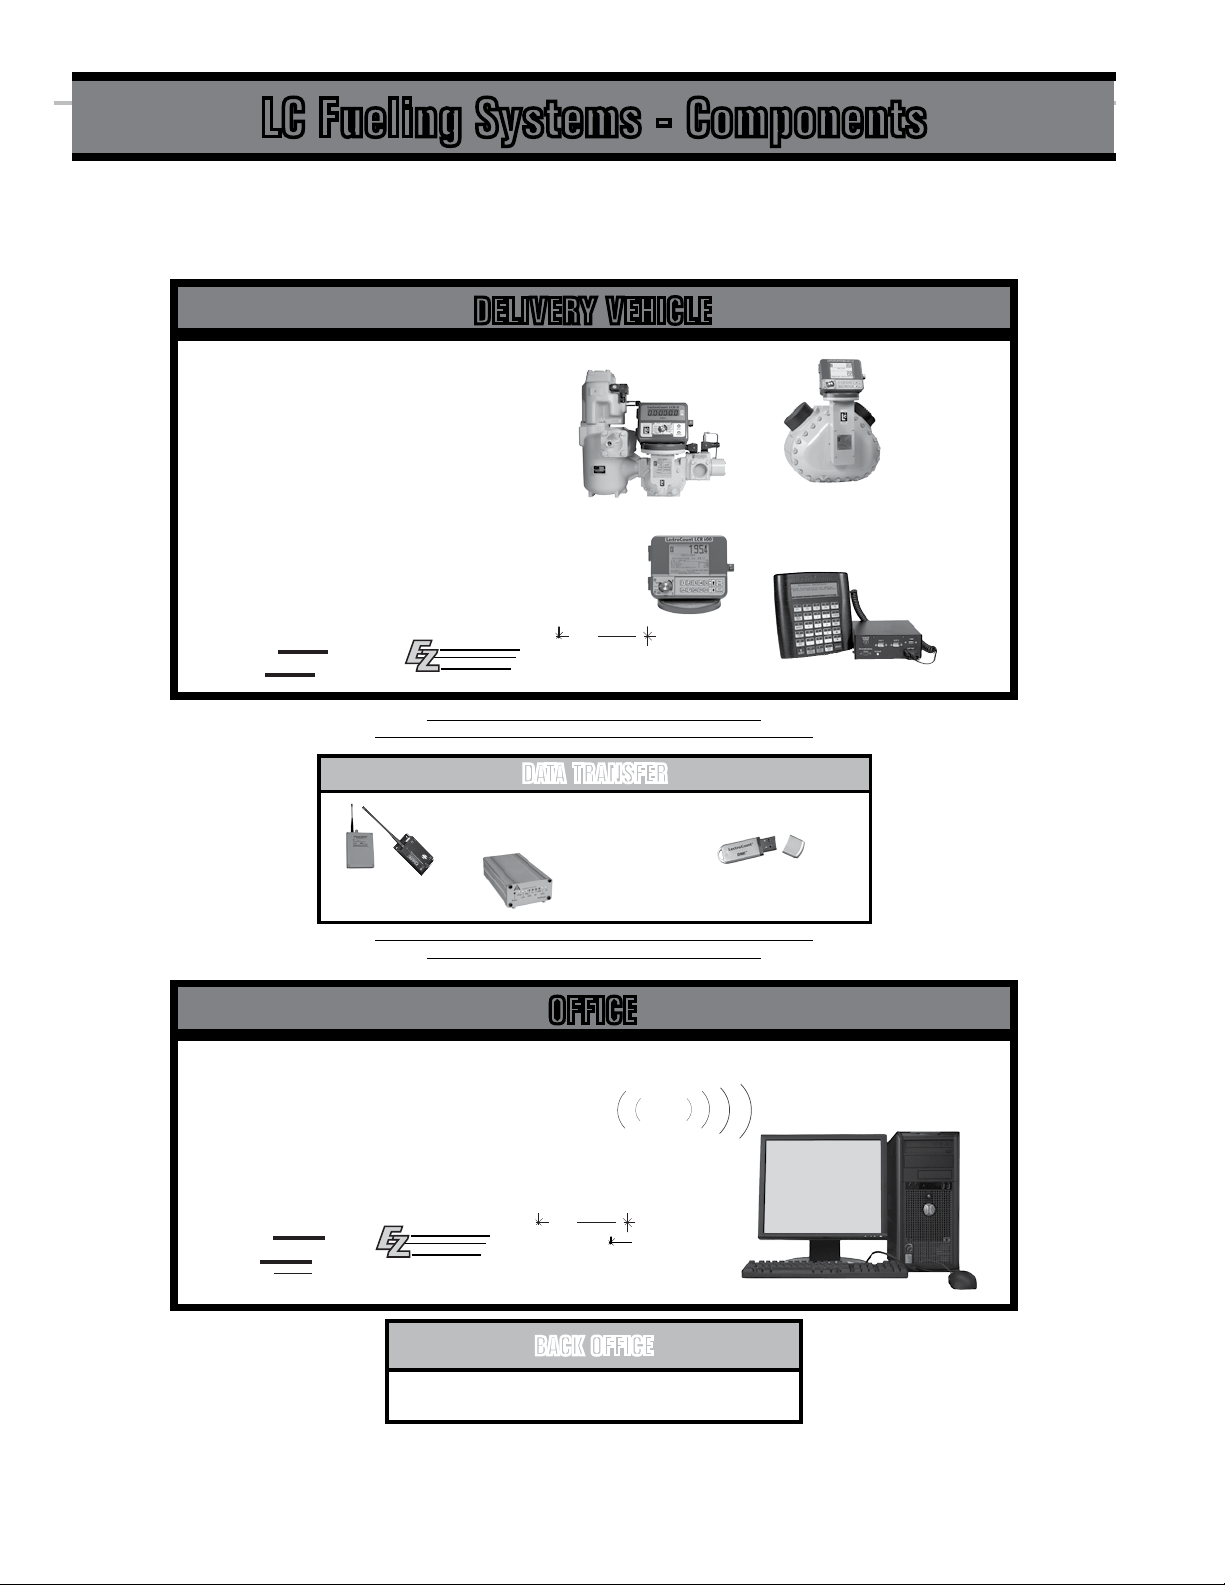
LC Fueling Systems - Components
DELIVERY VEHICLE
Metering System
• Metering
• Electronic Temperature Compensation
• Valve Control/Air & Vapor Elimination
• Electronic Registration
• Ticket Printing
Vehicle Application Software
• Data Acquisition
• Data Management
• Electronic Registration LCR 600 FlightConnect
• Ticket Printing specialized by application software
• Delivery Stop & Start
Delivery
CONNECT
FlightConnect
DATA TRANSFER
Wireless
RF, Cellular, & Wi
Manual
USB Memory Drive
OFFICE
DBManager
• Data Transfer DMS & LCR 600 to office application software
• Database Management
Office Application Software
• Data Transfer office application software to back office accounting software
• Database Management
FlightConnect
Office
Delivery
OFFICE
CONNECT
OFFICE
BACK OFFICE
DB Manager
Back office ERP or other accounting software
6
Page 7

LC Fueling Systems - Data Flow
CONNECT
READ
DMS/LCR 600 Database Files
LC FUELING SOFTWARE
DBMANAGER
Transaction
& Database
Files
LC OFFICE
SOFTWARE
Delivery
FlightConnect
Read
CONNECT
Transaction
Files
[DELREAD.DAT (Delivery)]
FlightConnect
Compxxx.trn
Compxxx.trn
Compxxx.trn
READ
with Ofce Read
CompTran.xml
or CompTran.csv
Delivery
DB Manager
.500 - Delivery les
.501 - FlightConnect les
.502 - EZConnect les
Database
Files
Editxxx.trn
with Begin Validation
FlightConnect
CONNECT
with Ofce Edit
Xxxx.50X
Database
Files
EDIT
Edit
ACode.50X
AType.50X
Customer.50X
Dispatch.50X
FuelLoc.50X
FuelType.50X
LoadLoc.50X
SysDefs.50X
TType.50X
Fueler.slf
Truck.slf
and others
updated .50X & .slf files
Master Database Files
ACode.50X
AType.50X
Customer.50X
Dispatch.50X
FuelLoc.50X
FuelType.50X
LoadLoc.50X
SysDefs.50X
TType.50X
Fueler.slf
Truck.slf
and others
BACK OFFICE SOFTWARE
Transaction
Files
CompTran.xml
or CompTran.csv
[DELREAD.DAT (Delivery)]
third-party accounting software or
spreadsheet application
Database Files
Updated in Back Office Software
ACode.txt
AType.txt
Customer.txt
Dispatch.txt
FuelLoc.txt
FuelType.txt
LoadLoc.txt
SysDefs.txt
TType.txt
Fueler.txt
Truck.txt
and others
7
Page 8

CONNECT
READ
INTRODUCTION - TRANSACTION DATA FLOW
Transaction Data Flow
DMS & LCR 600 FUELING SOFTWARE (DATA CAPTURE)
After each delivery, the LC fueling software compiles the metrological,
transaction, customer, driver, and product data into transaction
les (.trn). The transaction les are then sent to the ofce PC either
wirelessly (Wi , RF or cellular), or they are downloaded to a USB
memory device (DMS only).
DB MANAGER (DATA TRANSFER)
If the transaction les are sent wirelessly (Wi , RF, or cellular) using
the Send Transactions to Ofce command, DBManager receives
the transaction les (.trn) and noties the Ofce Read program that
the les have been received. Transmissions can be setup to be sent
automatically to the ofce.
OFFICE READ (FILE CONVERSION)
The ofce read software (Delivery Read, FlightConnect Read, or
EZConnect Read) converts the transaction les (.trn) received from
the fueling software into a .csv (text) or .xml le format (Delivery Read
typically converts .trn les into text les with a .dat extension). These
formats can be used for import into most third-party software programs
and spreadsheet applications.
Delivery
FlightConnect
LC FUELING
SOFTWARE
Compxxx.trn
DB Manager
DBMANAGER
BACK OFFICE SOFTWARE
Back ofce software refers to any third-party software used for daily
bookkeeping. After the ofce read software converts transaction les into
a .csv (text) or .xml le format, the third-party software can import les
into its database.
USB Memory Stick Data Transmission (DMS only)
The DMS can transmit les via a USB memory device. If the transaction les
are sent via USB memory device, when a shift is nished, the fuelers download
the transaction les created during their shift using the Send Transactions to
Ofce command and return the USB device to the ofce. DBManager is not
required for USB data transfers. If the les are transferred via a USB memory
device, they must be copied from the USB device and pasted into the C:/DMS
folder. From there, Read.exe can convert them into text or XML les.
Compxxx.trn
LC READ
SOFTWARE
Delivery
FlightConnect
CONNECT
CompTran.xml
or CompTran.csv
third-party
accounting software
or spreadsheet
application
BACK OFFICE SOFTWARE
Read
READ
8
Page 9

DATABASE DATA FLOW - INTRODUCTION
Database Data Flow
DBMANAGER (DATABASE MANAGER)
DBManager serves as a le server/database manager, identifying changes to the master
database of the fueling system (multiple fueling systems if required) and maintaining the
database of the units (DMS and/or LCR 600) in the network. It determines which master
database records have been added, edited, or deleted and adjusts the databases on
each unit (DMS and/or LCR 600) in the network to match the master database.
OFFICE EDIT
The ofce edit software (FlightConnect Edit or EZConnect Edit) provides an interface where users can add, delete
and edit records in the fueling system master database. It also allows the user to easily import and export les into
and out of the database. The ofce edit software also allows users to validate or reject any records added or edited by
the units in the network for the master database.
OFFICE READ
When the ofce read software (FlightConnect Read, or EZConnect Read) receives a transaction le, it converts any
records added or edited by the fueler into separate edit le (Editxxx.trn). Ofce read sends the edit le to the ofce
edit software where it must be validated for the master database or rejected
DMS FUELING SOFTWARE
DMS FlightConnect and EZConnect fueling software allow fuelers to edit or add
records, such as new customers and other parameters, while they are in the eld.
These new records are included in the transaction le and sent to the ofce where
the ofce read software separates them from the transaction data and send them the
ofce edit software for validation or rejection.
not support database data ow
The DMS Delivery
Fueling System does not
support database data ow
from the DMS to the ofce.
LCR 600 FlightConnect does
from the DMS to the ofce.
LC FUELING
SOFTWARE
DBMANAGER
LC READ
SOFTWARE
FlightConnect
Compxxx.trn
Compxxx.trn
Compxxx.trn
FlightConnect
Read
CONNECT
READ
CONNECT
DB Manager
.500 - Delivery les
.501 - FlightConnect les
.502 - EZConnect les
Editxxx.trn
with Begin Validation
FlightConnect
CONNECT
Edit
EDIT
with Ofce Edit
Xxxx.50X
DMS/LCR 600 Database Files
ACode.50X
AType.50X
Customer.50X
Dispatch.50X
FuelLoc.50X
FuelType.50X
updated .50X & .slf files
LoadLoc.50X
SysDefs.50X
TType.50X
Fueler.slf
Truck.slf
and others
Master Database Files
ACode.50X
AType.50X
Customer.50X
Dispatch.50X
FuelLoc.50X
FuelType.50X
LoadLoc.50X
SysDefs.50X
TType.50X
Fueler.slf
Truck.slf
and others
LC EDIT
SOFTWARE
9
Page 10

INSTALLATION & SETUP - OVERVIEW
DBManager Installation Overview
PREREQUISITES
Prior to installation of any LC fueling system ofce software, ensure that all of the fuel delivery systems hardware
components are installed. To complete DBManager setup and Ofce User setup, the ofce fueling software (Delivery
Ofce, EZConnect Ofce, FlightConnect Ofce) must be installed.
DBManager Installation Prerequisites:
1. Setup all LectroCount electronic registers (including calibration), DMS computers, and printers.
2. Install wireless devices for data transmission according to original manufacturers instructions. Not necessary if using USB memory
sticks for data transmission.
3. Install the ofce fueling software (Delivery Ofce, EZConnect Ofce, FlightConnect Ofce).
1. SOFTWARE INSTALLATION
Install the DBManager software suite using the DBManager CD-ROM. Software installation will
automatically load the application les (.exe) into a folder (default folder is C:\DMS) and place
three shortcuts onto your desktop window: DBManager, Ofce User Setup, and LCP Setup.
2. DATABASE MANAGEMENT SETUP
After communication between the ofce PC and the DMSs is conrmed, you will need to setup
DBManager on your ofce PC. DBManager setup is comprised of four steps: Register File Server Nodes, Register
Applications, Set Master File List, and Set Node List.
DBManager CD-ROM
3. LCP SETUP (WIRELESS COMMUNICATION SETUP)
To initiate wireless communication, the ofce PC, the DMSs and LCR 600s in the network, and the wireless
communication devices must be set to the proper communication settings. LCP Setup is a conguration utility for
conguring the communication settings for your ofce PC.
To congure the communication settings of a DMS, the LCP File Server software on the DMS provides settings for
wireless communication. Communication settings for the LCR 600 are located in System Setup, Screen 2. For more
information about the DMS and LCR 600 communication settings, refer to the setup and operation manuals.
Wireless Communication Devices
When installing a radio or modem for a LC fueling system, please refer
to the manual or documentation provided by the original manufacturer
of the device and ensure it is installed and congured properly.
4. OFFICE USER SETUP
Ofce User is a security access application that allows access to LC fueling system databases (through the ofce edit
software). To setup Ofce User, users and passwords must be created and assigned to the database (or databases)
they will have access to. Ofce User can be disabled, allowing unrestricted access to the LC fueling system
databases.
10
Page 11

SOFTWARE - INSTALLATION
Software Installation
To install DBManager software, insert the DBManager
CD-ROM into your ofce PC (or click on the the setup.
exe le supplied by Liquid Controls). Installation should
begin automatically. Follow the DBManager installation
wizard directions until installation is complete. If the
installation does not begin automatically, use your
browser to locate the setup.exe application le on the
CD-ROM and click on it to begin the installation.
If automatic launch does not begin, perform the
following:
1. From the Taskbar, click Windows© Start menu then click
Run.
2. From the Run window, click Browse.
3. From the Browse window, select the CD-ROM drive,
select the setup.exe le then click Open.
4. From the Run window, click OK.
DBManager Ofce installation wizard.
1. From the Welcome window, click Next.
2. From the Software License Agreement window, if you
agree to the license terms, click I accept the terms in
the license agreement.
3. From the Choose Destination Location window,
perform one of the following options:
3a. Click Browse to select a custom destination location.
3b. Click Next to select the default destination location
C:\DMS.
4. From the Ready to Install the Program window, click
Install to begin installation.
5. From the InstallShield Wizard Completed window, click
Finish.
DBManager les loaded into the destination folder:
• DBManager.exe
• LCPSetup.exe
• OfceUser.exe
• DBMCongurator.exe
• LCLCP32.dll
• LCLCPF32.dll
• HSSLF32.dll
• dotNetFX40 Client setup.exe
• vcrdits_x86.exe (Microsoft© Visual C++ Redistributable Package)
Shortcuts loaded onto desktop:
LCP Setup DBManager
11
Page 12

SETUP - DBMANAGER
DBManager
DBManager is a le server/database manager, managing the master database of the fueling system on the ofce
computer (multiple fueling systems if required) and maintaining the databases of the units (DMS and/or LCR 600)
in the network. It determines what database records have been added, edited, or deleted and ensures that the
databases on each unit (DMS and/or LCR 600) in the network match the master database. DBManager can be set
to automatically update the databases in the network or updates can be made manually. DBManager also provides a
window where users can verify data transmissions coming into and out of the server, and it is capable of retaining a
log le to troubleshoot any wireless transmission issues that my occur.
DBMANAGER WINDOW
The DBManager window displays a description and time
of the data transmissions coming into and out of the
server. During day-to-day operation, DBManager will
run, without prompting, in the background collecting les
from and sending modied records out to the DMS and
LCR 600 units in the network.
Keep DBManager Open
Data transmissions cannot move through the LC fueling
network when DBManager is closed.
The Check Files button at the bottom left of the
window opens the Check Files window, which contains
commands for manually “checking” the database les.
When DBManager “checks” les it checks for additions,
edits, and deletions in the master database. The
databases on the DMS and LCR 600 units are then
synchronized with the master database during the next
data transmission.
The Setup button opens the Setup Database Manager
window
CHECK FILES
Check les set as “Manual Check”:
Checks master database les set as “Manual Check” (in Master
File List) and updates network databases.
Check all les:
Checks all master database les and updates network databases.
Check les for selected nodes only:
Checks all master database les and updates a specic unit
database.
DBManager Window
Check Files
12
Page 13

DBMANAGER - SETUP
DBManager Setup
Setting up the DBManager is comprised of determining what les need to be sent between the computer and DMS
and LCR 600 units in the network, where those les should be sent, and when they should be sent.
All settings required for setup are accessed through the DBManager Setup window. After setup is complete, the Setup
DBManager window will only be opened on rare occasions such as: adding a node for a new DMS or LCR 600 in the
network, registering a new application’s master database, or changing your “check le” schedule.
There are four main steps required to setup the DBManager:
1. Register File Server Nodes
Identify the DMS and LCR 600 units in the fueling system network.
2. Register Application
Locate and identify master database les on the computer and the database les on the DMS and LCR 600 units in the network.
3. Set Master File List
Select the database les for transmission and schedule the checks of the “live les” to nd modied les.
4. Set Node List
Select which DMS and LCR 600 units (identied by node numbers) will receive each le.
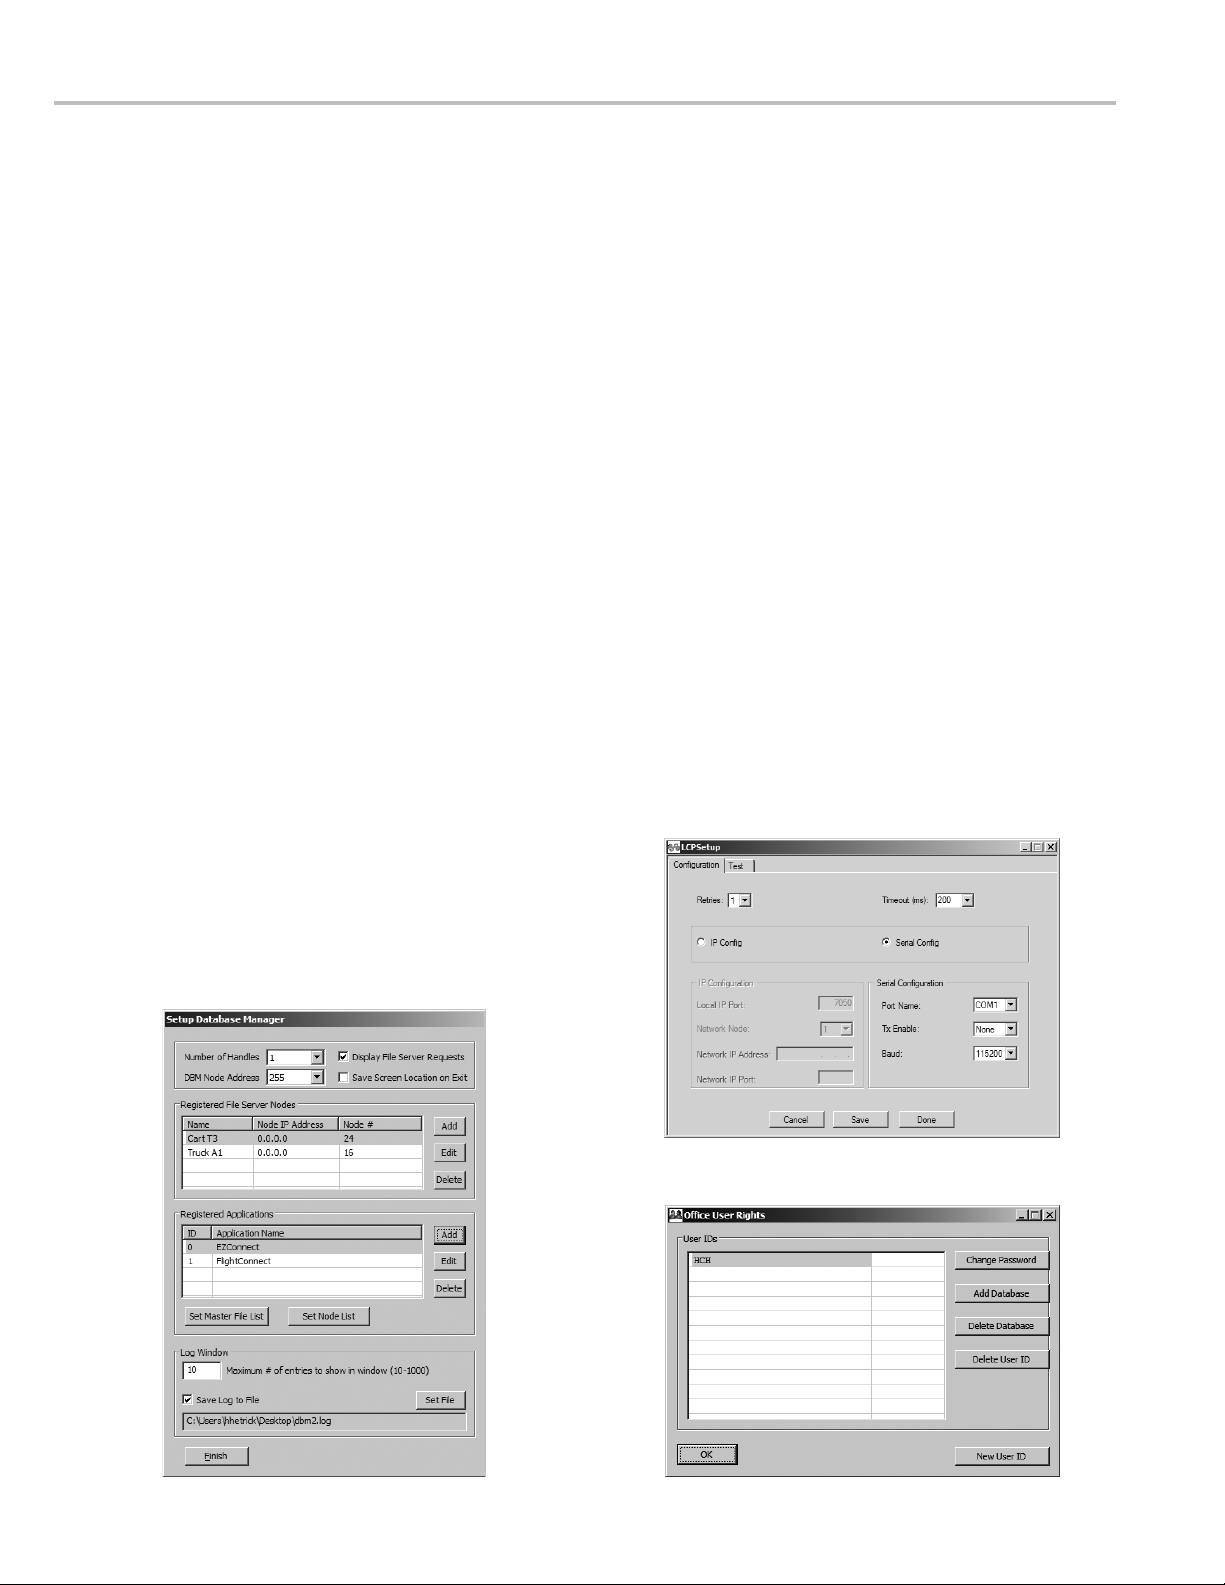
DBMANAGER SETUP WINDOW
All DBManager setup is conducted from the Setup
Database Manager window.
Number of Handles
This value must match the Number of File Handles: in the Setup
LCP File Server (1/3) window of each DMS unit in the network.
The default vale is 1.
DBM Node Address
The node address assigned to DBManager on the server. This
node address is used by the DMS and LCR 600 to connect with
DBManager on the server.
Setup Database Manager
Value must match the Ofce Node Address: in
System Utilities (2/3) of each DMS unit in the
network and the DBM Node Address: in System Setup
2 of each LCR 600 in the network.
Display File Server Requests
If checked, the DBManager window will display the description and
time of the each transmission coming into and out of the server.
Save Screen Location on Exit
Saves the location of the DBManager window when the window
is closed and reopens the window in the same location. If
unchecked, the DBManager window will open in the middle of your
primary display screen.
Maximum # of entries shown in window (10-1000) (Log
Window)
The number of data transmissions available in the DBManager
window.
Save Log to File (Log Window)
Creates a log le of all DBManager data transmissions while the
box is checked. This is useful for troubleshooting network issues.
If unchecked, data transmissions are not recorded. If a log is not
needed, leave box unchecked to avoid an enormous log le.
Set File (Log Window)
Opens a window to set a le path location and save the log le.
13
Page 14

SETUP - DBMANAGER
REGISTER FILE SERVER NODES
Registering the les server nodes in the network entails
identifying the node of each DMS and LCR 600 in the
fueling system and entering them into DBManager.
To register the DMS and LCR 600 units in
DBManager:
1. Click the DBManager icon.
2. From the Database Manager window, click Setup.
3. From the Setup Database Manager window, under
Registered Filed Server Nodes, click Add.
4. In the Register New Node window, type a name for the
DMS or LCR 600 in the Node Name: eld. (ex: Truck 1)
5. If setting up a cellular network, enter the IP address of the
modem connected to the unit in the Node IP Address:
eld. If using serial communication, this eld should be set to 0.0.0.0.
6. In the Node Number: eld, enter the node of the unit .
Value must match the LCP Node Address: in the Setup
LCP File Server (2/3) window of each DMS unit in the
network and the Unit ID: in the General Setup 1 screen
on each LCR 600 in the network.
Register New Node
Registered Nodes
7. Repeat steps 3-6 until each DMS and LCR 600 in the
fueling network is registered.
REGISTER APPLICATION
Registering applications on DBManager entails mapping
the le path to the master database on the computer
and the databases on the DMS and LCR 600 units in the
network.
To register the application in DB Manager:
1. From the Setup Database Manager window, under
Registered Applications, click Add.
2. From the Add Application window, enter a name for the
application network in the Application Name: eld.
3. From the Add Application window, click the small folder
icon to the right of the Path of Master Files on Ofce
PC eld and, in the Browse for Master Files Folder
window navigate to the folder where the master database
les are saved. The le path can also be entered into the eld
manually.
4. From the Add Application window, enter the le path of
the databases on the DMS and LCR 600 units. See note
below.
After a node is registered, DBManager will
create a database folder for the device (node) in
C:\DMS, named by the name of the device.
Add Application
14
File paths are set in the Ofce Path: eld in the
System Utilities (2/3) window on the DMS and the
Ofce Path: eld in FlightConnect Setup on the LCR
600. The DMS le path should be C:\DMS. The LCR
600 le path should be A:\.
Browse for Master Files Folder
Page 15

DBMANAGER - SETUP
SET MASTER FILE LIST
Setting the Master File List entails selecting which set of
master database les will be checked for additions and
edits and scheduling the frequency of the checks.
To set the Master File List in DBManager:
1. From the Setup Database Manager window, under
Registered Applications, click Set Master File List.
2. From the Master File List window, click Add.
3. From the Add File window, highlight the les to be
checked for modications and sent (if modications are
found) to the other databases in the network. These les will
have le extension .500, .501 .502, or .slf. Click OK.
Checking the Copy added les to the nodes box will
update the database les of the selected nodes (DMS
and LCR 600 units) in the network according to the
master database les. Only select this option if the DMS
and LCR 600 units already have these les loaded.
Add File
Master File List
4. In the Master File List window, highlight a le (or les)
for scheduling. From the Set Checking Frequency
for Selected drop-down box, select Weekly, Periodic,
Manual Check, or Never.
Selecting Weekly will open the Weekly
Check window. Selecting Periodically opens the
Periodically Check window. Manual Check and Never
will not schedule any automatic checks.
5. If Weekly or Periodically is selected, the Weekly Check
or Periodically Check window appears, ll out the elds
in the window to your preference. Click OK.
6. If Manual is selected, les must be checked using the
Check Files option from the Database Manager window.
Weekly Check
Periodically Check
15
Page 16

SETUP - DBMANAGER
SET NODE LIST
Setting the node list designates which nodes (DMS
and LCR 600) will receive database updates from the
selected master database.
To set a Node List in DBManager:
1. From the Setup Database Manager window, under
Registered Applications, highlight a Registered
Application from the list and click Set Node List.
A Set Node List button is also available in the Master
File List window. Nodes set in the Master File List
window will be assigned to the application selected
when the Master File List window was opened.
2 From the Node List window, click Add.
3. From the Add Node window, Highlight the nodes that will
receive database updates from the selected application’s
database and click OK.
These steps must be performed in precise order to
properly register a node.
Node LIst
Load Master Files to Selected Nodes
Checking the Load Master Files to Selected Nodes box will update the
database les of the selected nodes (DMS and LCR 600 units) with
the master database les. Typically, this option is reserved for DMS
units that already have the database loaded and are being added
into DBManager.
Do not select this option if these les are already loaded the
DMS and LCR 600 units..
If master les are loaded onto selected nodes that already have
les loaded, go into C:\DMS\node name\master database name and
delete the les.
Add Node
16
Page 17

LCP SETUP - SETUP
LCP Setup
LCP Setup sets up the communication link at your PC or server in the ofce, conguring the ofce computer
for wireless communication. LCP Setup contains settings for IP congurations (Wi and cellular) and serial
congurations (radio and direct serial cable). For successful data transmission, the settings in LCP Setup must be
congured to match the communication settings of the DMSs, LCR 600s, and wireless transmission devices in the LC
fueling network. LCP Setup includes a Test tab, where connection between the computer and a specic DMS or LCR
600 (or another computer) can be tested.
LCP SETUP CONFIGURATION
Retries:
After an initial failed attempt, the number of attempts the computer
will try to make a connection with the wireless communication network
before timing out. (1 is the default value)
Timeout (ms):
The amount of time the computer will wait for a response once a signal
is sent to a wireless network, before timing out. (2000 is the default
value).
IP Cong:
Clicking the button activates IP Conguration settings.
Serial Cong:
Clicking the button activates Serial Conguration settings.
Local IP Port:
A port where TCP/IP communication can be heard. To get around
existing rewalls, your ofce PC will need to be congured so that TCP
data is accepted at this port number.
LCP Setup - Conguration
Value must match value in the cell modem’s internal setting
(see cell modem manual for setting its IP port). Liquid Controls
recommends 7050 for the value. It is not a common IP Port number
used by other programs such as ftp and email applications.
Network Node:
The LCP network node number of the device the computer is communicating with. 1-255 range
Network IP Address:
The IP address of the device the computer is communicating with, using TCP/IP protocol
Network IP Port:
The IP port number of the device the computer is communicating with, using TCP/IP protocol
Port Name:
The computer’s serial communication port the data communication device is connected to.
TX Enable:
The setting for the serial signal transmit and receive handshake technique to the data communication device. None is the default setting.
None • !RTS • RTS • !DTR • DTR • !RTS!DTR • RTSDTR
Baud:
The communication speed. This value should match the wireless device. 57600 is the standard communication speed, but check your
wireless device specications to ensure the proper selection.
115200 • 57600 • 19200 • 9600 • 4800 • 2400
Cancel
Closes the window without saving.
Save
Saves settings that appear in the window.
Done
Saves settings that appear in the window and closes the window.
17
Page 18

SETUP - LCP SETUP
LCP SETUP TEST
Node:
The unique node address for the DMS or LCR 600 which will
be tested for communication. This is the node address used by
DBManager (Liquid Controls’ database management software
for the ofce computer) to identify the units in the fueling system
network. This eld value must be unique among units in the
network and have a matching Node # in the Registered Files
Server Nodes of the DBManager.
IP Cong:
Clicking the button activates IP Conguration settings.
Serial Cong:
Clicking the button activates Serial Conguration settings.
Target IP Address:
The IP address of the device the computer is communicating with,
using TCP/IP protocol
Target IP Port:
The IP port number of the device the computer is communicating
with, using TCP/IP protocol
Test
Sends signal to test communication with a specic DMS or LCR
600 unit—set to the Node: setting—in the network.
LCP Setup - Test
When testing communication with a DMS,
ensure the LCP File Server is running.
DBManager must be closed when testing
communication with LCP Setup.
Done
Saves settings that appear in the window and closes the window.
LCP Setup - Test Success
18
Page 19

OFFICE USER - SETUP
Ofce User Setup
Ofce User Rights is an optional application used to dene users and passwords, and database access via ofce edit
software (EZConnect Edit and FlightConnect Edit). To hide and restrict access, there is no desktop shortcut for Ofce
User. The Ofce User application is located in the folder where the DBManager software suite was installed (typically
C:\ DMS).
DBManager must be set up before
beginning Ofce User setup.
To set up ofce user rights:
1. Navigate to the folder where the DBManager software
suite is installed, and click the OfceUser.exe le.
2. From the Ofce User window, click New User ID.
3. From the Create a New User ID window type in an
ID into the User ID text box, type a password in the
Password text box, and click OK.
4. From the Add Database Privileges window, perform one
of the following, and click Add
4a. Click Select All to allow user access to all the listed
databases.
Access to individual databases can only be
assigned to users once multiple databases
have been established.
4b. Click on individual databases to allow user access to
selected databases.
5. Click Add.
6. To exit the Ofce User window, click OK.
EDITING EXISTING USERS
Ofce User provides commands to edit existing users:
Change Password, Add Database, Delete Database,
and Delete User ID.
Change Password
Create New User
Add Database Privileges
Add Database Privileges Delete Database Privileges
Delete User ID
DISABLING OFFICE USER
Ofce User can be disabled. If it is disabled, access to the ofce edit software is unrestricted
To disable Ofce User:
1. Navigate to folder where the DBManager software suite is installed (typically C:\DMS)
2. Delete the User.slf le.
19
Page 20

Liquid conTroLS
105 Albrecht Drive
Lake Bluff, IL 60044
(847) 295-1050
SAmpi
Via Amerigo Vespucci 1
55011 Altopascio (Lucca), Italy
+39 0583 24751
ideX FLuid And meTering pvT. LTd.
Survey No. 256, Alindra
Savli GIDC, Manjusar
Dist. Vadodara 391 770
Gujarat, India
+91 2667 662001
Liquid conTroLS SponSLer
105 Albrecht Drive
Lake Bluff, IL 60044
(847) 295-1050
TopTech SySTemS
1124 Florida Central Parkway
Longwood, FL 32750
(407) 332-1774
Nateus Business Park
Nieuwe Weg 1-Haven 1053
B-2070 Zwijndrecht (Antwerp), Belguim
+32 (0)3 250 60 60
FAure hermAn
Route de Bonnetable
B.P. 20154
72406 La Ferté-Bernard Cedex, France
+33 (0)2 43 60 28 60
4702 North Sam Houston Parkway West, Suite 100
Houston, TX 77086
(713) 623-0808
corken
3805 Northwest 36th St.
Oklahoma City, OK 73112
(405) 946-5576
105 Albrecht Drive
Lake Bluff, IL 60044-2242
1.800.458.5262 • 847.295.1050
Fax: 847.295.1057
www.lcmeter.com
© 2014 Liquid Controls
Pub. No. 500387
(1/2014)
 Loading...