

Page 1

LINN
IKEMI
&
GENKI
CD PLAYER OWNERS MANUAL
Page 2

Year 2000 Compliance
Linn has used all reasonable endeavours to ensure
that the software in the products manufactured by it
is capable of normal operation before, during and after
1 January 2000 and in respect of past, present and
future dates without replacement, alteration or upgrade
(“Year 2000 Compliant”). Linn, however, gives no express
warranties, representations or undertakings and to the
maximum extent permitted hereby excludes any terms,
warranties, representations or undertakings implied by law
to that effect. Linn cannot give any warranties,
representations or undertakings that non Linn software is
or will be Year 2000 Compliant or that Linn’s software
will be Year 2000 Compliant if used in conjunction with non
Linn products, systems or software. The Purchaser,
Installer, Retailer or Distributor will be solely responsible
for ensuring that Linn’s software will be Year 2000
Compliant when used in conjunction with such non
Linn software, systems or products and for any failure if
it is not Year 2000 Compliant in such circumstances.
Except to the extent implied by law and which by law
cannot be excluded, Linn shall not be liable to any party
for any costs, claims, losses (including indirect and
consequential losses) or liabilities arising from the failure of
Linn’s software to be Year 2000 Compliant if used in conjunction with non Linn products, systems or software.
Page 3
i
Important safety information
Explanation of symbols used in this manual and on the product:
This symbol is intended to alert the user to the presence of
uninsulated dangerous voltages within the enclosure of sufficient
magnitude to cause electric shock.
This symbol is intended to alert the user to the presence of
important maintenance and servicing information in the instruction
and service manuals.
CAUTION
TO REDUCE THE RISK OF ELECTRIC SHOCK DO NOT REMOVE THE
COVER.
NO USER SERVICEABLE PARTS INSIDE.
REFER SERVICING TO QUALIFIED SERVICE PERSONNEL.
WARNING: SHOCK HAZARD. DO NOT OPEN.
AVIS: RISQUE DE CHOC ELECTRIQUE. NE PAS OUVRIR.
CAUTION: REPLACE FUSE WITH SAME TYPE AND RATING.
ATTENTION: UTILISER UN FUSIBLE DE RECHANGE DE MÊME TYPE.
DISCONNECT SUPPLY CORD BEFORE CHANGING FUSE.
ATTENTION: DEBRANCHER AVANT DE REMPLACER LE FUSIBLE.
WARNING
TO REDUCE THE RISK OF FIRE OR ELECTRIC SHOCK DO NOT EXPOSE
THIS APPLIANCE TO RAIN OR MOISTURE.
MAINS PLUGS
This appliance is supplied with a non-rewireable mains plug for the
intended country.
Replacement mains leads can be obtained from your Linn retailer.
Should you need to change the plug please dispose of it carefully.
A plug with bared conductors is dangerous if engaged in a live socket.
The Brown wire must be connected to the Live (Line) supply pin.
The Blue wire must be connected to the Neutral supply pin.
The Green/Yellow wire must be connected to the Earth (Ground) supply
pin.
Please contact your retailer or a competent electrician if you are in any
doubt.
Page 4

ii
GENERAL SAFETY INSTRUCTIONS
1. Read instructions. Read the safety and operating instructions before operating the
appliance.
2. Retain instructions. Retain the safety and operating instructions for future reference.
3. Heed warnings. Observe all warnings on the appliance and in the operating
instructions.
4. Follow instructions. Follow all operating and use instructions.
5. Water and moisture. Do not use the appliance near water, for example near a bathtub,
washbowl, kitchen sink, laundry tub, in a wet basement, or near a swimming pool and
the like.
6. Carts and stands. Use only with a cart or stand that is recommended by the
manufacturer.
6a. An appliance and cart combination should be used with care. Quick stops, excessive
force, and uneven surfaces may cause the appliance and cart combination to overturn.
7. Wall or ceiling mounting. Mount to a wall or ceiling only as recommended by the
manufacturer.
8. Ventilation. Site the appliance so that its location or position does not interfere with its
proper ventilation. For example, the appliance should not be situated on a bed, sofa,
rug, or similar surface that may block the ventilation openings, or placed in a built-in
installation such as a bookcase or cabinet that may impede the flow of air through the
ventilation openings.
9. Heat. Site the appliance away from heat sources such as radiators, heaters, stoves, or
other appliances (including amplifiers) that produce heat.
10. Power sources. Connect the appliance to a power supply only of the type described in
the operating instructions or marked on the appliance.
11. Grounding or polarisation. Do not defeat the safety purpose of the polarised or
grounding type plug. A polarised plug has two blades with one wider than the other. A
grounding type plug has two blades and a third grounding prong. The wide blade or
the third prong are provided for your safety. When the provided plug does not fit into
your outlet, consult an electrician for replacement of the obsolete outlet.
12. Power cord protection. Route power cords so that they are not likely to be walked on
or pinched by items placed upon or against them, paying particular attention to cords
at plugs, power sockets, and at the point where they exit from the appliance.
13. Protective attachment plug. As a safety feature the product is equipped with an
attachment plug containing overload protection. See the instruction manual about
resetting or replacing the plug. Should the plug need replacing ensure that a
replacement is used which has the same overload protection as the original.
14. Cleaning. The product should be cleaned only as recommended by the manufacturer.
15. Power lines. An outdoor antenna should be located away from power lines.
16. Outdoor antenna grounding. If an outdoor antenna is connected to the tuner/receiver
ensure that the antenna system is grounded to provide some protection against
voltage surges and static build up.
In the USA see article 810 of the National Electrical Code ANSI/NFPA 70 concerning
installation requirements.
17. Unplug this apparatus during lightning storms or when unused for long periods of
time.
18. Objects and liquid entry. Take care not to let objects or liquids fall into the product.
19. Damage requiring service. The product should be serviced by qualified personnel if:
a) The power cord or plug has been damaged.
b) Objects or liquid have fallen into the product.
c) The product has been exposed to rain.
d) The product does not appear to operate normally or exhibits a marked change in
operation.
e) The product has been dropped or the enclosure damaged.
20. Servicing. Don’t attempt to service the product beyond that described in the operating
instructions. All other servicing should be referred to qualified service personnel.
Page 5

iii
UK USERS PLEASE READ THIS IMPORTANT SAFETY INFORMATION
Fuse replacement
This appliance is fitted with a non-rewireable 13 Amp mains plug. The plug
contains a 5 Amp fuse. If the fuse has blown it can be replaced as follows:
a) Pull out the red fuse cover/carrier.
b) Remove and dispose of the blown fuse.
c) Fit a new 5 Amp BS1362 approved fuse into the carrier and push the
carrier back into the plug.
Always ensure the fuse cover is fitted. If the fuse cover is missing do not use
the plug. Contact your Linn retailer to obtain a replacement fuse cover.
Fuses are for fire protection and do not protect against electric shock.
Mains plug replacement
Should your mains plug need replacing and you are competent to do this
proceed as follows. If you are in doubt contact your Linn retailer or a
competent electrician.
a) Disconnect the plug from the mains supply.
b) Cut off the plug and dispose of it safely. A plug with bared conductors is
dangerous if engaged in a live socket.
c) Only fit a 13 Amp BS1363A approved plug with a 5 Amp fuse.
d) The cable wire colours or a letter will be marked at the connection points
of most quality plugs.
Attach the wires securely to their respective points. The Brown wire must
go to the Live pin, the Blue wire must go to the Neutral pin, and the
Green/Yellow wire must go to the Earth pin.
e) Before replacing the plug top ensure that the cable restraint is holding
the outer sheath of the cable firmly and that the wires are correctly
connected.
WARNING
THIS APPLIANCE MUST BE EARTHED.
Replacing the fuse
Should the mains fuse blow replace it only with an equivalent part. The fuse
holder is located just below the mains inlet socket. To replace the fuse
disconnect the product from the mains supply. Using a flat blade
screwdriver remove and replace the fuse. If the fuse blows a second time
there is a fault in the product. Contact your local retailer.
Fuse ratings. See specifications section.
Mains voltage operating range. See specifications section.
Warning!! The power supply may be destroyed if a unit
designed for 115V is connected to 230V.
Page 6

iv
CE Declaration of Conformity
Linn Products Ltd declare that this product is in conformance with the Low
Voltage Directive 73/23/EEC and Electromagnetic Compatibility 89/336/
EEC as amended by 92/31/EEC and 93/68/EEC.
The conformity of the designated product with the provisions of Directive
number 73/23/EEC (LVD) is proved by full compliance with the following
standards:
Standard number Date of issue Test type
EN60065 1993 General requirements
Marking
Ionizing
Heating under normal conditions
Shock hazards under normal
operating conditions
Insulation requirements
Fault conditions
Mechanical strength
Parts connected to the mains supply
Components
Terminal devices
External flexible cords
Electrical connections and
mechanical fixings
The conformity of the designated product with the provisions of Directive
number 89/336/EEC (EMC) is proved by full compliance with the following
standards:
Standard number Date of issue Test type
EN55013 1994 Conducted emissions
EN55013 1994 Absorbed emissions
EN60555-2 1987 Harmonics
EN60555-3 1987 Voltage fluctuations
EN55020 1994 Immunity
FCC notice
NOTE: This equipment has been tested and found to comply with the
limits for a Class B digital device, pursuant to Part 15 of the FCC Rules.
These limits are designed to provide reasonable protection against harmful
interference in a residential installation. This equipment generates, uses
and can radiate radio frequency energy and, if not installed and used in
accordance with the instructions, may cause harmful interference to radio
communications. However, there is no guarantee that interference will not
occur in a particular installation.
If this equipment does cause harmful interference to radio or television
reception, which can be determined by turning the equipment off and on,
the user is encouraged to try to correct the interference by one or more of
the following measures:
– Reorient or relocate the receiving antenna.
– Increase the separation between the equipment and receiver.
– Connect the equipment into an outlet on a circuit different from that to
which the receiver is connected.
– Consult the dealer or an experienced radio/TV technician for help.
Page 7

v
Contents
Introduction ........................................ 1
About the IKEMI and GENKI ........................................ 2
Setting up the IKEMI and GENKI ........................................ 7
Unpacking ........................................ 7
Positioning ........................................ 9
Connecting ........................................ 10
Using the IKEMI and GENKI ........................................ 12
Using the front panel ........................................ 12
Using the handset ........................................ 14
Switching on and off ........................................ 15
Display information ........................................ 16
Playing a disc ........................................ 17
Skip and search ........................................ 18
Direct track number selection ........................................ 19
Repeat play ........................................ 20
Programming ........................................ 21
GENKI variable output ........................................ 23
Advanced CD functions ........................................ 24
User options ........................................ 26
Maintenance ........................................ 27
Technical Support ........................................ 28
Technical information ........................................ 29
Specifications ........................................ 29
Page 8
vi
Copyright and acknowledgements
Copyright © Linn Products Limited.
Linn Products Limited, Floors Road, Waterfoot, Glasgow, G76 0EP,
Scotland, United Kingdom.
All rights reserved. No part of this publication may be reproduced,
stored in a retrieval system, or transmitted, in any form or by any
means, electronic, mechanical, photocopying, recording, or
otherwise, without the prior written consent of the publisher.
Printed in the United Kingdom.
IKEMI and GENKI are trademarks of Linn Products Limited.
,HDCD
®
, High Definition Compatible Digital® and Pacific
Microsonics™ are either registered trademarks or trademarks of
Pacific Microsonics, Inc. in the United States and/or other
countries. HDCD system manufactured under license from Pacific
Microsonics, Inc. This product is covered by one or more of the
following: In the USA: 5,479,168, 5,638,074, 5,640,161, 5,808,574,
5,838,274, 5,854,600, 5,864,311, 5,872,531, and in Australia:
669114. Other patents pending.
TOSLINK is a trademark of Toshiba Corporation.
The information in this manual is furnished for informational use
only, is subject to change without notice, and should not be
construed as a commitment by Linn Products Limited. Linn
Products Limited assumes no responsibility or liability for any errors
or inaccuracies that may appear in this manual.
®
Page 9
1
Introduction
Thank you for buying this product.
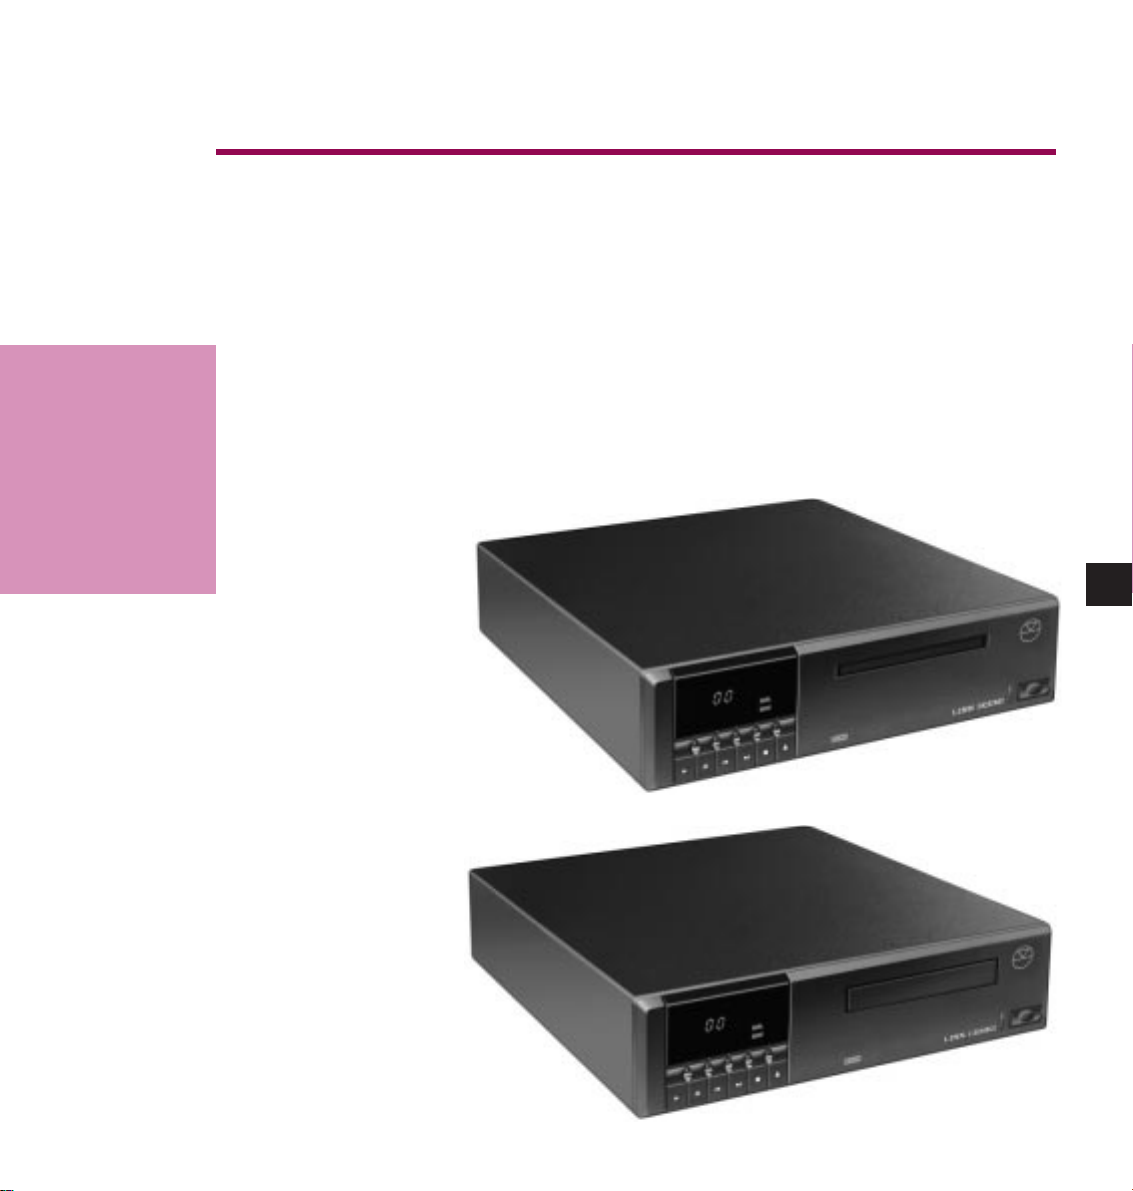
The Ikemi and Genki are the latest Linn CD players. Both products
are covered in this manual as they share many common attributes.
If you just want to play music now, skip to the section on ‘Using the
Ikemi and Genki’. If you would like to learn more about the Ikemi
and Genki, read on.
IKEMI & GENKI
Page 10

2
The Linn CD players.
We have a range of four CD players:
The Classik integrated CD player, pre and power-amplifier is our
starting point. This is a self contained, independent product
capable of giving a powerful and truly musical performance from a
compact and versatile package.
The Genki is a true high performance CD player for those who
want to build a great music playing system one component at a
time. Its audio quality justifies using it with the best control and
playback systems, and its built in variable output allows a complete
CD playing system to be built with only a power amplifier and
loudspeakers.
The Ikemi exceeds the audio performance of our previous best CD
player and external D/A convertor, but all in one compact box.
With its range of outputs, both balanced and single ended, its
beautifully engineered mechanism and unique audio design it
combines the latest technology with years of digital audio
experience.
The CD12 is our ‘flagship’ CD player. A case machined from two
solid aluminium plates contains the Linn ‘CD Engine’, the highest
digital audio technology and countless hours of intense
engineering work. With no expense spared in its design and
manufacture it represents the best we can do.
Page 11

3
Details, similarities, differences.
The most obvious external difference between the Ikemi and Genki
is the CD loading slot. The slim aluminium drawer of the Ikemi is
the only visible part of the CD mechanism. Inside is a precision
machined and very ingenious CD loading mechanism. Its
‘mechatronic’ design is built up from a rigid circuit board which
contains the CD servo and decoding circuitry, the mechanism
control circuitry and software, and the motors, pulleys, belts and
optical sensors which monitor the disc loading process.
The mechanism is not only a pleasure to use but also provides
considerable vibration and environmental protection for the laser
system, increasing its immunity to external disturbances.
The digital audio signals from this ‘CD engine’ are connected
through very short links to the ‘audio module’ which contains our
‘2D’ digital signal processing algorithm, the D/A convertors, the
master clock, filters, output circuitry and power supply regulators.
This uses (as do all our products) high density surface mount
circuitry to keep the signal paths short and direct, giving a very
electrically quiet product with high immunity to external electrical
disturbances. The Ikemi has both single ended and balanced audio
outputs, making it easy to connect to any high performance control
amplifier. The balanced output, unlike many others, uses a very low
noise circuit topology allowing maximum signal transfer from the
Ikemi.
The Genki uses a simple, reliable and robust CD mechanism, which
though lacking the refinement of the Ikemi mechanism has exactly
Page 12

4
the same laser, CD servo and decoding circuitry, D/A convertor and
power supply. All the digital and analogue audio circuitry is
contained on one high density surface mount circuit board. The
ultra low noise power supplies, low jitter master clock and high
resolution D/A convertor are all focussed on providing high musical
performance through both the fixed and variable outputs. If you
already have a good control amplifier and are therefore using the
Genki fixed output, you may wish to consider using the Genki
variable output to feed a power amplifier in another room, making
it easy to enjoy great sound around your house. For even more
flexibility, see the section on Knekt.
The intelligence of the Ikemi and Genki is contained in a fast
microprocessor on the control module, behind the front panel. The
operating software is held in ‘flash’ memory which is loaded, when
the product is built, through the optional RS232 interface module.
The RS232 interface module provides complete electrical isolation
between the Ikemi and an external control system and allows, for
example, a home automation system to provide the user interface
to the audio system, with no compromise to the audio
performance.
Power for both products is supplied through the latest generation
of our ‘Brilliant’ switch mode power supply. Our understanding and
use of this ‘silent power’ technology has enabled us to improve the
performance of all our source and control products over the last
few years, and with the imminent launch of our latest power
amplifier, has just taken our system performance higher still. The
same power supply technology is used to power the Genki, Ikemi,
CD12 and our best control amplifiers.
Page 13

5
HDCD®.
Both the Ikemi and Genki are equipped with an HDCD
®
decoder.
HDCD® is a digital signal processing system developed by Pacific
Microsonics of California which conceals control codes into a very
small fraction of the recorded CD digital audio stream. An HDCD
®
decoder recognises these control codes and uses them to process
the digital audio to increase its dynamic range and resolution, while
leaving the original digital stream compatible with conventional CD
players. The HDCD
®
process has been used successfully on many
CDs, but possibly more importantly, the digital filters in the HDCD
®
decoder, through which all signals pass, are much better than most
existing digital filters, so every CD benefits.
Digital outputs.
The Ikemi and Genki both have low jitter SPDIF digital audio
outputs on BNC sockets. The Ikemi also has an optical output
(Toslink) and an AES/EBU professional balanced low noise digital
output. Though rarely used on domestic equipment this digital
audio connection format combines the high speed and low jitter of
an electrical interface with almost as low electrical noise as an
optical connection.
We provided these digital outputs for connection to external
processors, digital recorders and for potential future external
DACs. However, as the digital and analogue audio circuitry used in
the Ikemi and Genki are so good, and with the advantage of being
in the same box as the source of the digital stream, there are
currently very few external DACs which will give an improvement in
sound quality!
Page 14

6
Sync Link™.
The Sync Link is a simple system which we have used since we
made our first CD player (the Karik) and separate DAC (the
Numerik) in 1991, to minimise the jitter introduced by the SPDIF
interface commonly used to connect digital audio components. In a
sync link equipped CD transport and DAC, the DAC instead of
having to recover its clock signal from the incoming SPDIF stream
contains its own free running low noise master clock, connected
directly to the D/A chips. A low frequency (almost DC) signal is fed
back to the CD transport to adjust its speed, making it supply
digital audio data at the rate the master clock in the DAC requires.
The DAC therefore becomes the master, and the CD transport the
slave.
There are other systems which try to achieve this goal, but they
invariably involve sending a high speed (and high noise) clock
signal from the DAC to the CD transport. The Linn sync link is
unique in its silent effectiveness.
However, as mentioned above, the performance of the Ikemi and
Genki is so good that the Ikemi on its own out-performs our
current standalone DAC, the Numerik, even with the sync link.
Knekt.
Knekt is the versatile, flexible and powerful Linn multiroom audio
system. Both the Ikemi and Genki are fully Knekt compatible
making it easy to enjoy their performance all round your home. See
your local installer or our website for more information.
Page 15

7
Setting up the
IKEMI and GENKI
This chapter explains how to unpack your CD player, and how to
set it up with your other hi-fi components.
Unpacking
The IKEMI and GENKI are supplied with complete with the
following accessories:
• A remote control handset
• A mains lead
• Mains fuses
• This manual
• Audio interconnect cables
We recommend you retain the packaging in case you need to
transport the CD player at a later date.
WARNING: Do not connect the mains supply until you have
verified that the CD player is set to the correct voltage for your
mains supply.
The IKEMI and GENKI are factory-set for a 230 volts mains supply
and must not be connected to a mains supply before being
adjusted for your local voltage, and fitted with the appropriate
fuses. To set the voltage, using a flat blade screwdriver, turn the
voltage selector on the mains inlet module to display the correct
setting for your country:
• 230V for countries with 230V or 240V supplies.
• 115V for countries with 100V or 115V supplies.
Page 16

8
Replacing the fuses
Before replacing the fuse identify the correct fuse for your local
voltage:
• 100V: T800mA
• 115V: T800mA
• 230V: T800mA
The fuse compartment is on the mains inlet module to the left of
the voltage selector.
Disconnect the mains supply by removing the IEC mains cable from
the mains inlet module. Using a flat blade screwdriver remove and
replace the fuse. If the fuse blows a second time there is a fault in
the product. Contact your local retailer.
Earthing.
This product must be earthed, Use the three wire moulded mains
lead supplied. Never use an unearthed plug or adaptor.
Page 17

9
Positioning the IKEMI and GENKI
You can position your CD player almost anywhere you find
convenient, but the following considerations may be useful.
The CD player can be placed on top of other products, provided
you allow plenty of air circulation around components that
generate heat, such as power amplifiers.
Locating the IKEMI and GENKI for use with the handset
The Linn infra-red remote control system is exceptionally sensitive,
and you should be able to operate your CD player with the
handset from almost anywhere in a room. For best results the
infra-red sensor on the front panel should be kept out of direct
sunlight, and it should not be obscured.
Note that certain types of halogen lamps, and low-energy or
fluorescent bulbs, can also interfere with use of the handset if they
are near to the CD player.
Page 18
10
Connecting the IKEMI and GENKI
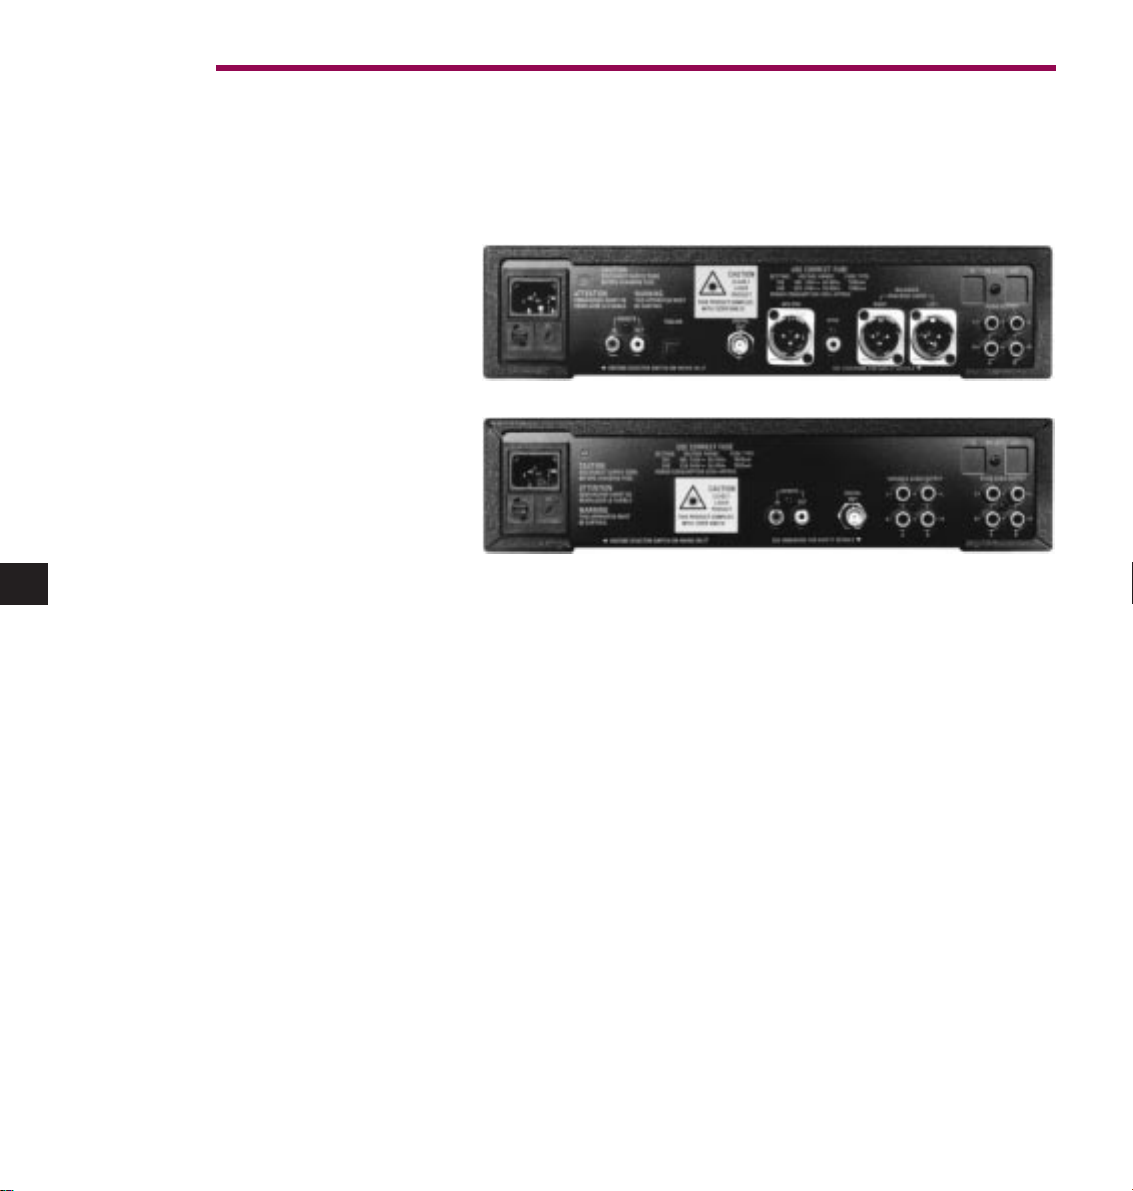
The following diagram shows the rear panel connections of the
Ikemi and Genki.
Switch OFF.
Always switch off all equipment before changing any connections
as surges may cause serious equipment damage.
IKEMI.
Analogue outputs.
The Ikemi has two identical pairs of single ended (RCA phono
socket) outputs. Use one to connect to your main control amplifier,
and one for connection to other components, for example a
multiroom distribution system.
If your control amplifier has balanced inputs you may prefer to use
the Ikemi balanced outputs, particularly if there is more than a few
metres between the Ikemi and the control amplifier.
Page 19
11
Use the digital outputs for connecting to digital recorders,
processors etc. The digital outputs can all be switched off if they
are not required. See ‘Using the Ikemi and Genki’.
The Sync Link™ connector is only of use with a Linn DAC, such as
the Numerik.
The remote in/out connectors are for use in a Linn Knekt system. If
you have the optional RS232 interface see the accompanying
information for it’s use.
GENKI.
The Genki has two identical pairs of fixed level outputs and two
identical pairs of variable level outputs. Use one pair of the fixed
level outputs if you already have a high quality control amplifier.
The other fixed output can be used to connect to other
components, for example a multiroom distribution system.
If you do not have a control amplifier you can connect one pair of
the variable level outputs directly to your power amplifier. The
other pair can feed a power amplifier in another room, or even use
both pairs with two matched power amplifiers to bi-amp your
speakers!
The SPDIF digital output is for connecting to digital recorders,
processors etc. The digital output can be switched off if not
required. See ‘Using the Ikemi and Genki’.
Mains supply.
Connect the mains lead to a suitable earthed power outlet.
Page 20

12
Using the IKEMI & GENKI
This chapter explains how to use the IKEMI and GENKI.
Using the front panel
We designed the IKEMI and GENKI to be easy to use. The front
panel display gives clear information about what you are doing
and, although there are many sophisticated features, all the most
commonly used ones require only one or two key presses.
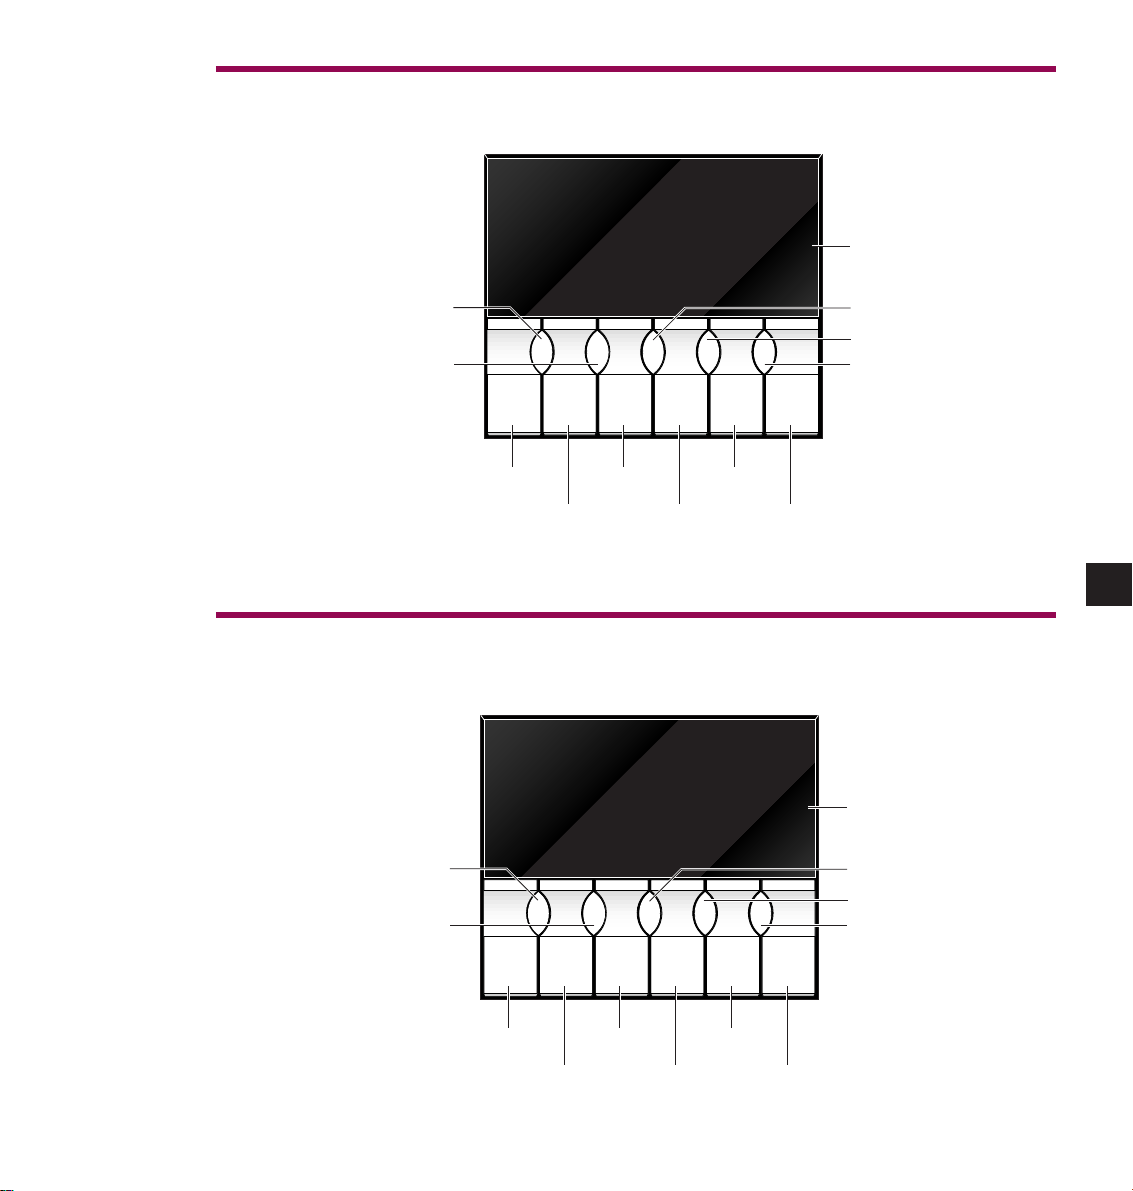
The illustrations on the following pages explain the function of
each of the front panel keys, and the meaning of the different parts
of the display.
Page 21
13
IKEMI display and controls
GENKI display and controls
CD.CA
TRACK
INDEX
RANDOM PLAY
REPEAT PLAY
TOTAL
REMAIN
TRACK
HDCD
TIME
RND
>
= [ ] * å
8888
RPT
DIS
¯
>
=
DIGITAL
REPEATVOLUMEBALANCE
˘
DISPLAY
DISPLAY MODE
SEARCH BACKWARD
SEARCH FORWARD
PLAY
PAUSE
CD.CA
TRACK
INDEX
VOLUME DOWN
VOLUME UP
>
PLAY
TOTAL
REMAIN
MUTE
TRACK
HDCD
TIME
VOL
– +
= [ ] * å
PAUSE
SKIP
BACK
SKIP
FORWARD
8888
VOL
M
SKIP
BACK
SKIP
FORWARD
BAL
L
STOP
>
=
DIGITAL
REPEATVOLUMEBALANCE
STOP
OPEN/CLOSE
BAL
R
OPEN/CLOSE
DISPLAY
MUTE
BALANCE LEFT
BALANCE RIGHT
Page 22
14
Using the handset
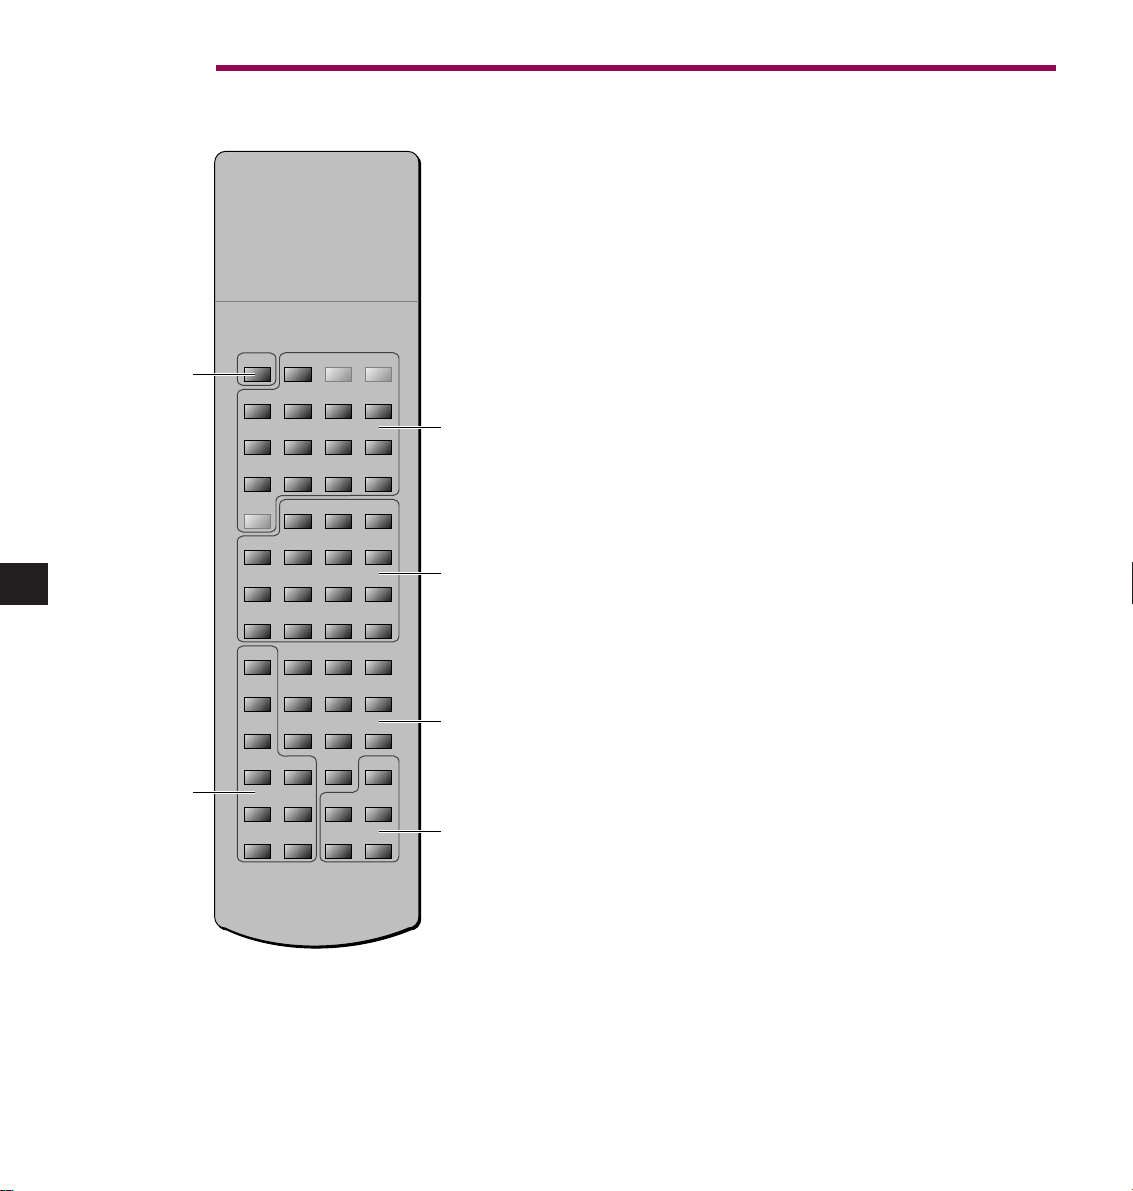
The IKEMI and GENKI are supplied with a remote
control handset which provides access to all of the
functions available from the front panel. In
addition it provides several more advanced
features, including selecting tracks by number and
programming a selection of tracks.
The keys are arranged into logical groups, for
ease of use, and the illustration opposite shows
the function of each group of keys.
Note that the number keys operate the CD or
tuner, depending on which one was last controlled
by the handset. If the number keys appear not to
work press one of the CD control keys.
LINN
CLASSIK CD/CA HANDSET
STANDBY
TUNER
KEYS
REPEAT
DISPLAY
TUNER
O
INTRO
”
SKIP
¯
SEARCH
<
INDEX
!
’
˘
0TUNESCAN
+- VOLMUTE
RL BALCDLISTEN
+- TREBAUXTUN
+- BASSTP1TP2
OPENSHUFFLERANDOMRECORD
PLAY
PAUSE
>
STOP
321BAND
654SIGNAL
987MONO
O
TIMERALARM+-
+- TIMESTOREPRESET
PREAMPLIFIER
KEYS
CD PLAYER
KEYS
CD PLAYER PRE-AMP
NUMBER KEYS
CLOCK, TIMER,
CLOCK
AND ALARM KEYS
Page 23
15
Switching on and off
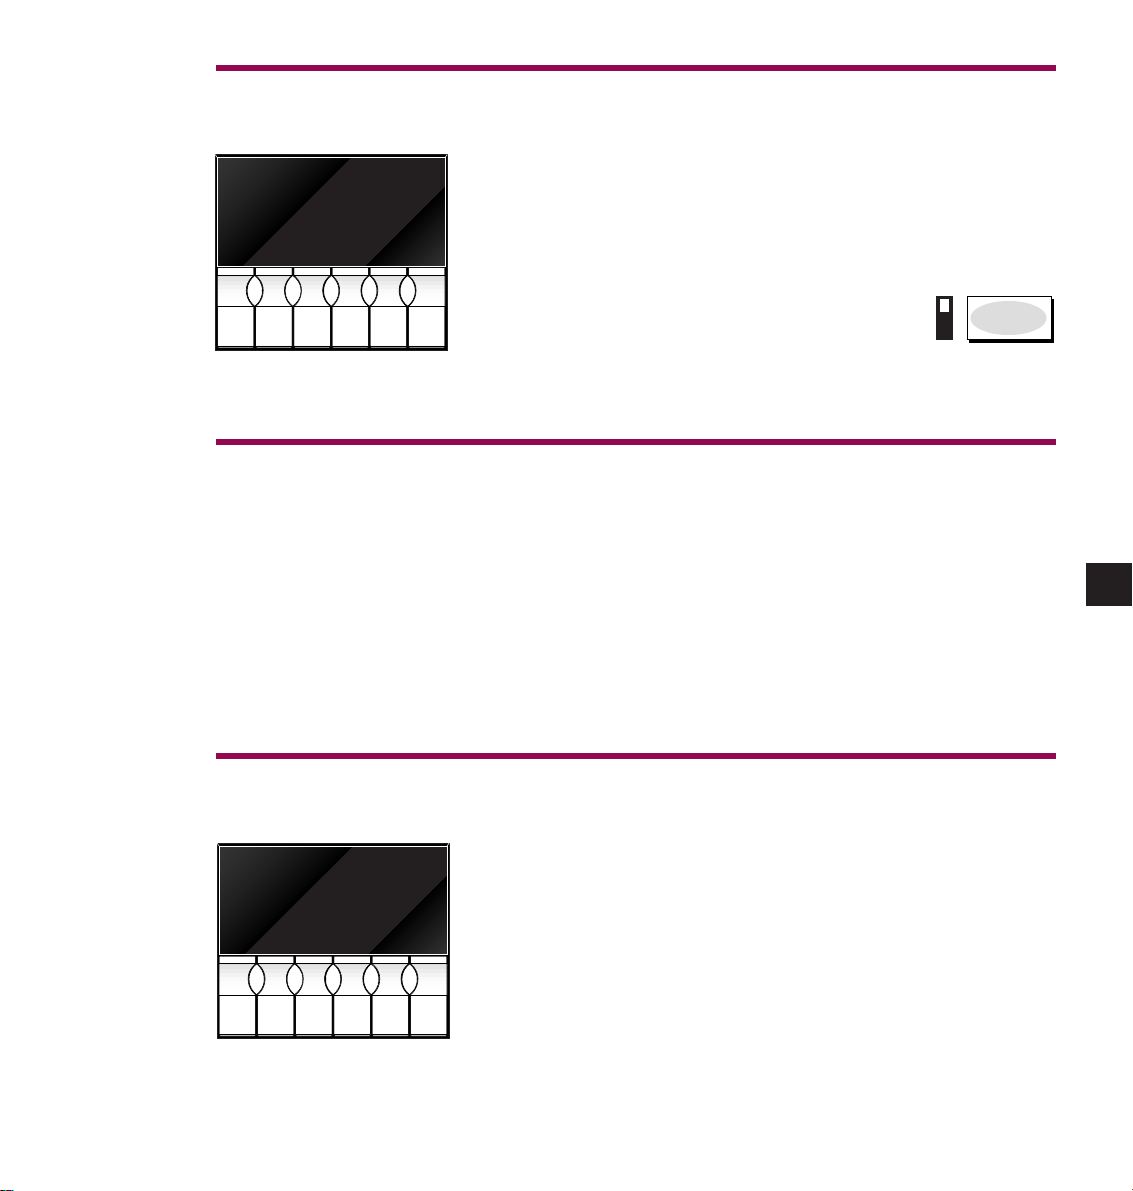
Press the power button on the front panel. The adjacent indicator
will light whenever power is applied.
The power up state can be changed in
User Options.
IKEMI and GENKI operation
The next few pages show how to operate the IKEMI and GENKI.
The illustrations show the IKEMI front panel. A small insert shows
the appropriate remote control handset button to operate both the
IKEMI and GENKI. The features unique to the GENKI are covered
after "programming".
HDCD
®
Both the IKEMI and the GENKI are HDCD® compatible. When a
disc with HDCD
®
encoding is played the HDCD® legend will light.
RECORD
POWER
CD.CA
TRACK
INDEX
00
TRACK
RPT
RND
>
DIS
= [ ] * å
DIGITAL
˘
¯
CD.CA
TRACK
INDEX
>
8281
TRACK
HDCD
RPT
RND
= [ ] * å
>
DIGITAL
DIS
˘
¯
Page 24
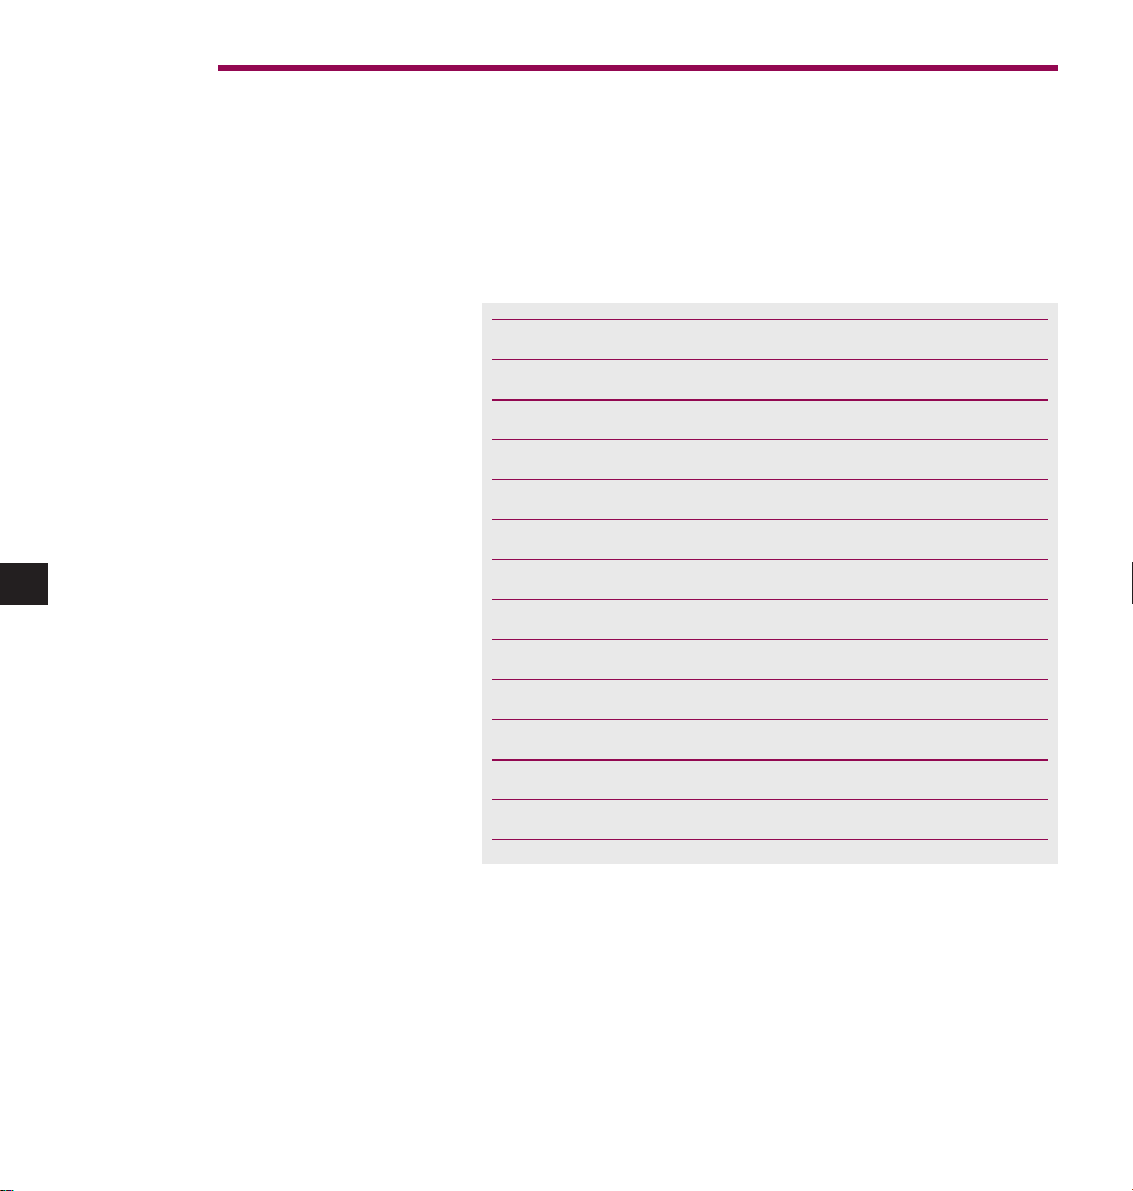
16
Display information
The display on the IKEMI and GENKI can show the following
information by pressing the DISPLAY handset button or the DIS
front panel button on the IKEMI, when a disc is playing. Only the
GENKI has volume and balance displays.
Display Description Example
TRACK+INDEX Track and index number.
No disc present. 00
Disc is playing. 3 1
Disc is stopped. 16
TRACK TIME Time from the start of 0.38
the current track.
REMAIN TRACK TIME Time remaining for the 1.25
current track.
TOTAL TIME Time from the start of the disc. 25.14
TOTAL REMAIN TIME Time remaining for the disc. 12.54
VOLUME GENKI output level. 23
BALANCE GENKI left/right level. ==
Page 25
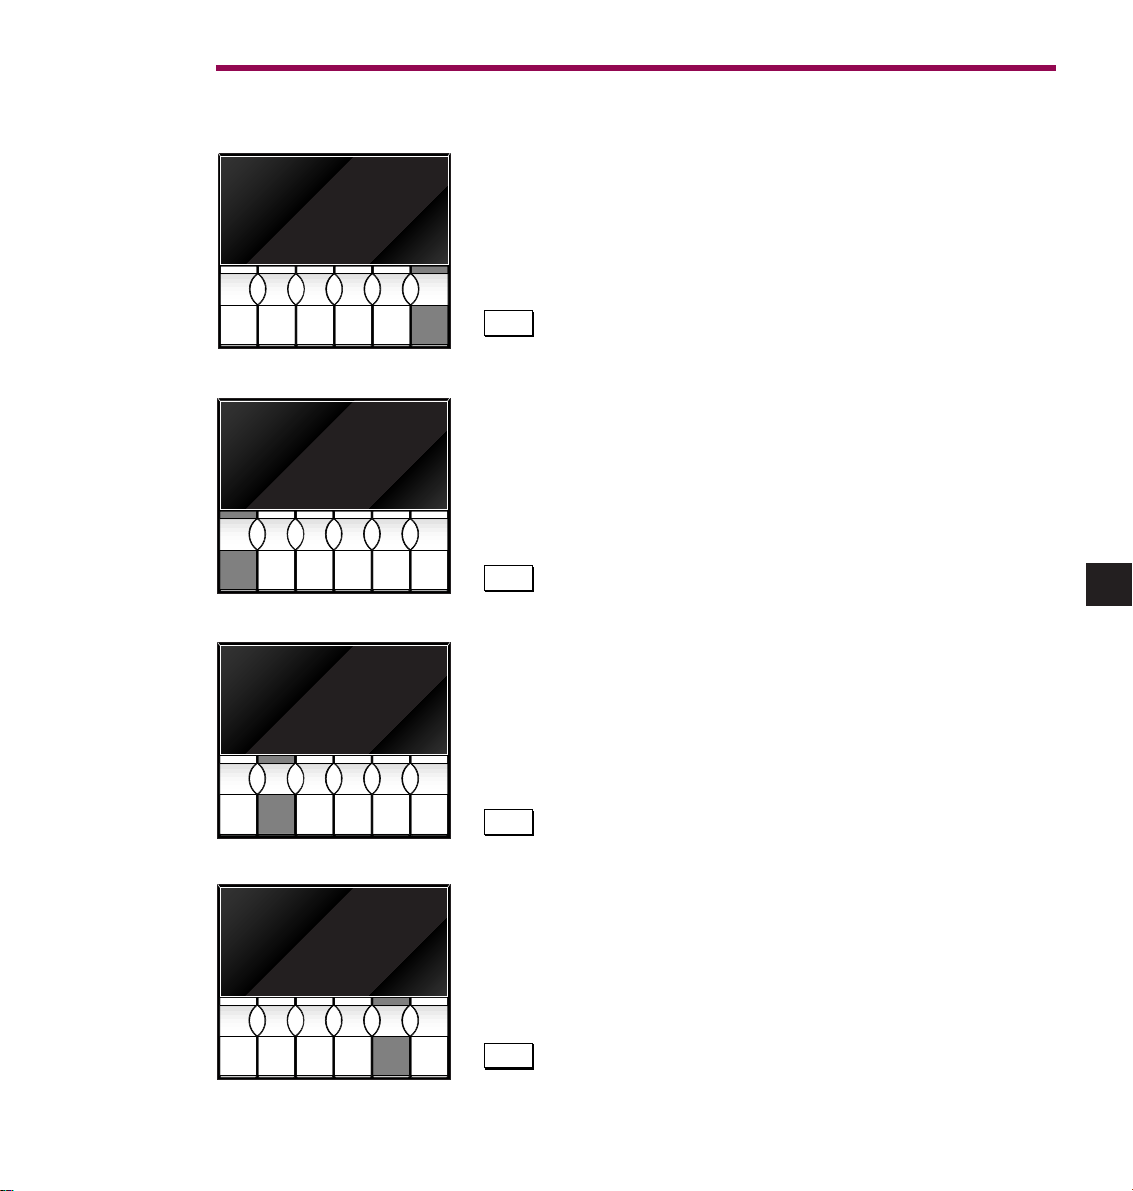
17
Playing a disc
Open the drawer
You can close the drawer by gently nudging it or by pressing OPEN
again.
Press PLAY
To change the display see the previous page.
Press PAUSE
To continue playing press PAUSE again, or PLAY.
Press STOP
When stopped the display shows the number of tracks on the disc.
OPEN
PLAY
PAUSE
STOP
CD.CA
TRACK
INDEX
CD.CA
TRACK
INDEX
CD.CA
TRACK
INDEX
00
TRACK
RPT
RND
>
TRACK
RND
>
TRACK
DIS
= [ ] * å
1 1
RPT
DIS
= [ ] * å
1 1
DIGITAL
˘
¯
RECORD
>
DIGITAL
˘
¯
RECORD
=
DIGITAL
CD.CA
TRACK
INDEX
RPT
RND
>
TRACK
RND
>
DIS
= [ ] * å
16
RPT
DIS
= [ ] * å
˘
¯
RECORD
DIGITAL
˘
¯
RECORD
Page 26
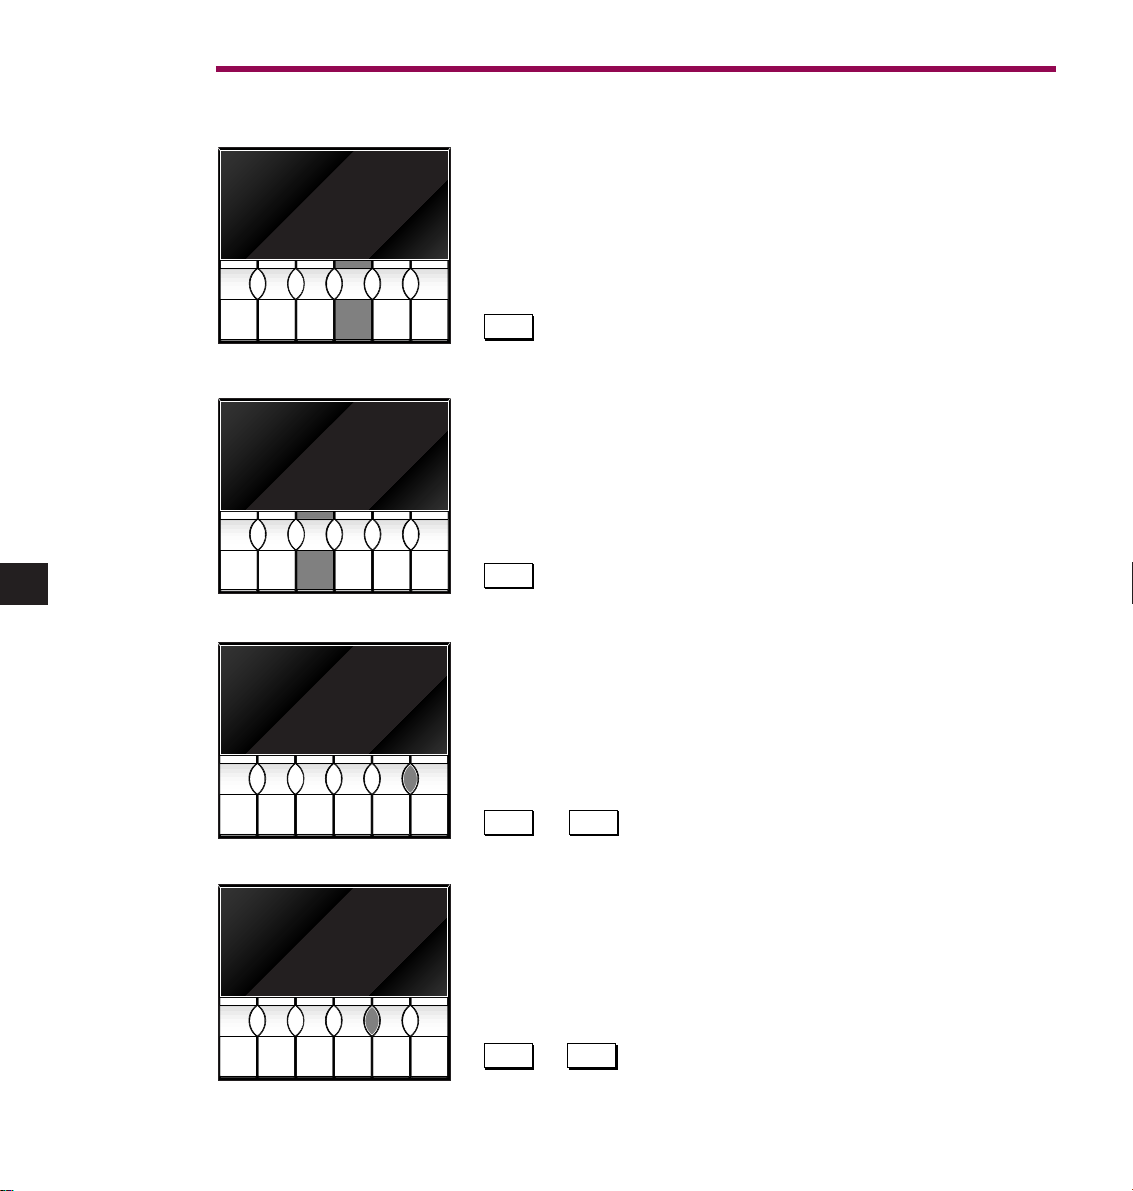
18
Skip and Search
Press SKIP forward.
Skip to the start of the next track.
Press SKIP backward.
First press skips to the start of the current track.
Further presses skip back through the disc.
Press SEARCH forward.
Press DIS (DISPLAY) to show the disc time.
Press SEARCH backward.
Press DIS (DISPLAY) to show the disc time.
>]
SKIP
[<
SKIP
SEARCH
˘
DISPLAY
SEARCH
¯
DISPLAY
CD.CA
TRACK
INDEX
CD.CA
TRACK
INDEX
CD.CA
TRACK
INDEX
TOTAL
REMAIN
8601
MUTE
TRACK
HDCD
TIME
RPT
RND
>
REMAIN
MUTE
TRACK
HDCD
RND
>
TOTAL
REMAIN
MUTE
TRACK
HDCD
DIS
= [ ] * å
TOTAL
8501
TIME
RPT
DIS
= [ ] * å
22.36
TIME
>
=
DIGITAL
REPEATVOLUMEBALANCE
˘
¯
RECORD
>
=
DIGITAL
REPEATVOLUMEBALANCE
˘
¯
RECORD
>
=
DIGITAL
REPEATVOLUMEBALANCE
CD.CA
TRACK
INDEX
RPT
RND
>
TOTAL
REMAIN
MUTE
TRACK
HDCD
RND
>
DIS
= [ ] * å
22.24
TIME
RPT
DIS
= [ ] * å
˘
¯
RECORD
RECORD
>
=
DIGITAL
REPEATVOLUMEBALANCE
˘
¯
RECORD
RECORD
Page 27
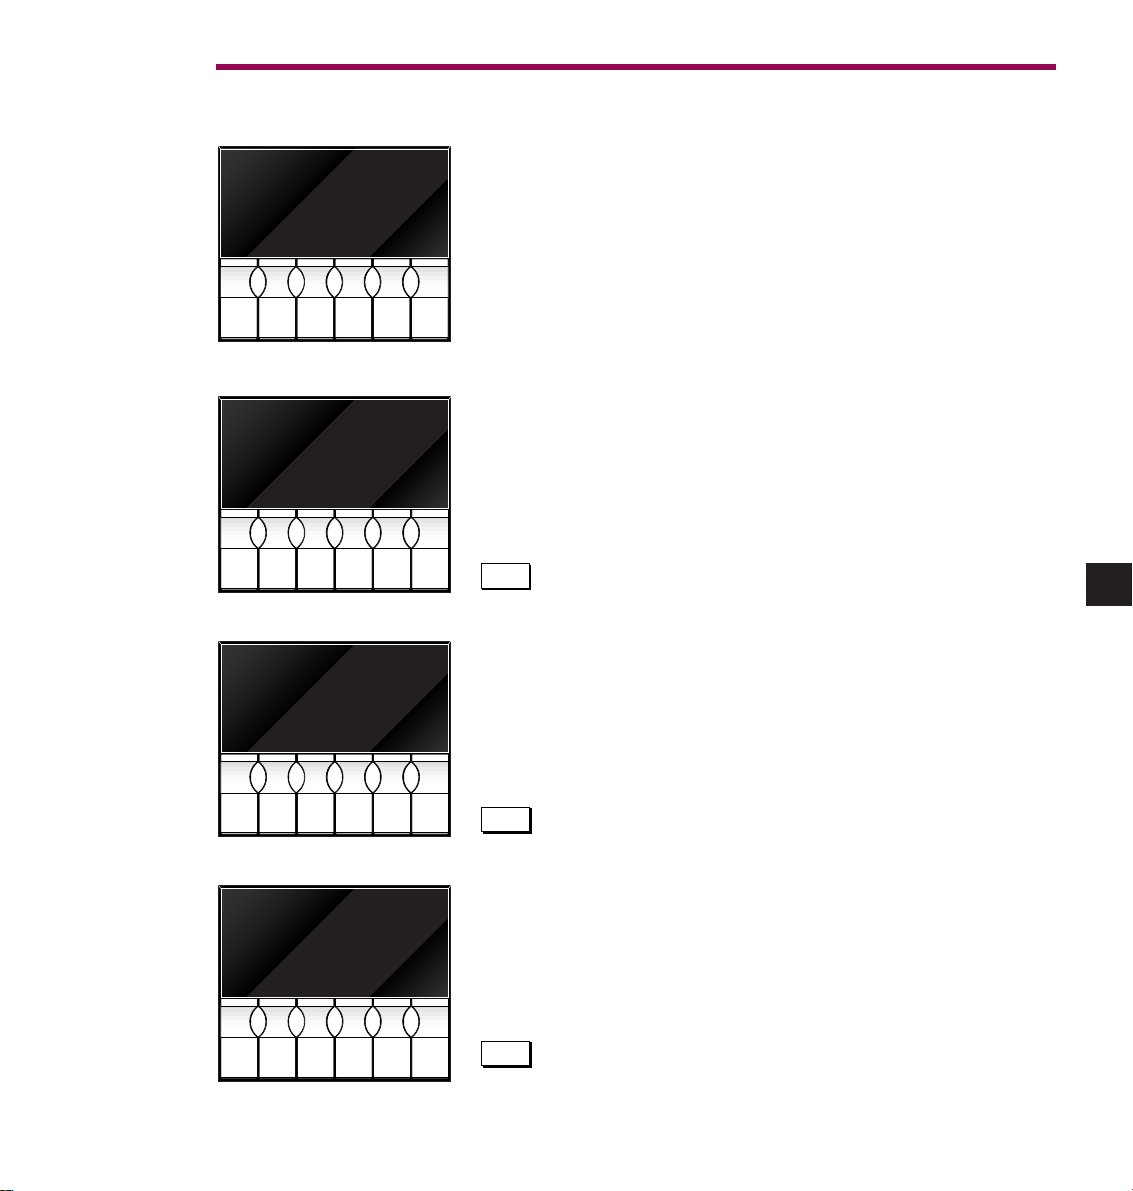
19
Direct track number selection
The CD player can be playing, stopped or open.
Press the number of the required track on the handset. The
selected track will play immediately.
Note: If the track is not selected press any CD control button on
the handset to tie the numbers to the CD player.
To select a two digit track number press the first digit and hold for
two seconds.
1
Press the second digit. The selected track will play immediately.
4
1
3
CD.CA
TRACK
INDEX
CD.CA
TRACK
INDEX
CD.CA
TRACK
INDEX
1 1
TRACK
RPT
RND
>
RND
>
DIS
= [ ] * å
4 1
TRACK
RPT
DIS
= [ ] * å
1- 1
TRACK
>
DIGITAL
˘
¯
>
DIGITAL
˘
¯
RECORD
>
DIGITAL
CD.CA
TRACK
INDEX
RPT
RND
>
TRACK
RND
>
DIS
= [ ] * å
13 1
RPT
DIS
= [ ] * å
˘
¯
RECORD
>
DIGITAL
˘
¯
RECORD
Page 28
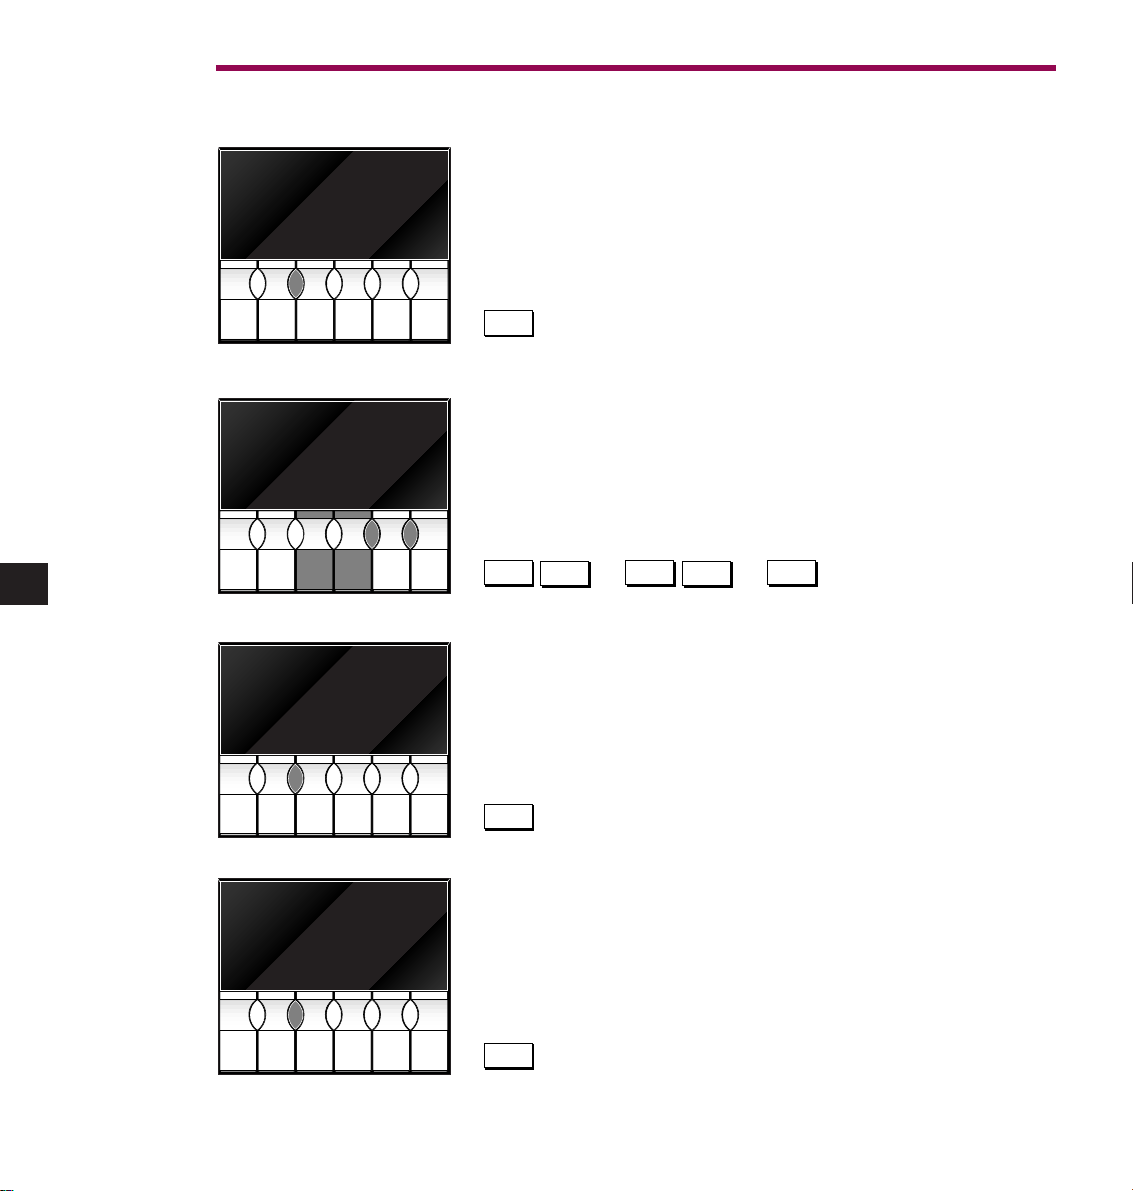
20
Repeat Play
Press REPEAT once.
This will repeat the entire disc or choose the
start point for a section repeat.
Using SKIP or SEARCH or the handset select the
end of the section to repeat.
Press REPEAT a second time to store the end of section repeat.
Press Repeat a third time to cancel all repeats.
REPEAT
REPEAT
[<
>]
SKIP
RECORD
RECORD
SEARCH
¯
˘
0...9
REPEAT
CD.CA
TRACK
INDEX
CD.CA
TRACK
INDEX
CD.CA
TRACK
INDEX
8381
TRACK
HDCD
RPT
RND
>
TRACK
HDCD
RND
>
TRACK
HDCD
DIS
= [ ] * å
8481
RPT
DIS
= [ ] * å
8581
>
DIGITAL
REPEATVOLUME
˘
¯
RECORD
>
DIGITAL
REPEATVOLUME
˘
¯
RECORD
RECORD
RECORD
>
DIGITAL
REPEATVOLUME
CD.CA
TRACK
INDEX
RPT
RND
>
TRACK
HDCD
RND
>
DIS
= [ ] * å
8581
RPT
DIS
= [ ] * å
˘
¯
RECORD
>
DIGITAL
REPEATVOLUME
˘
¯
RECORD
Page 29
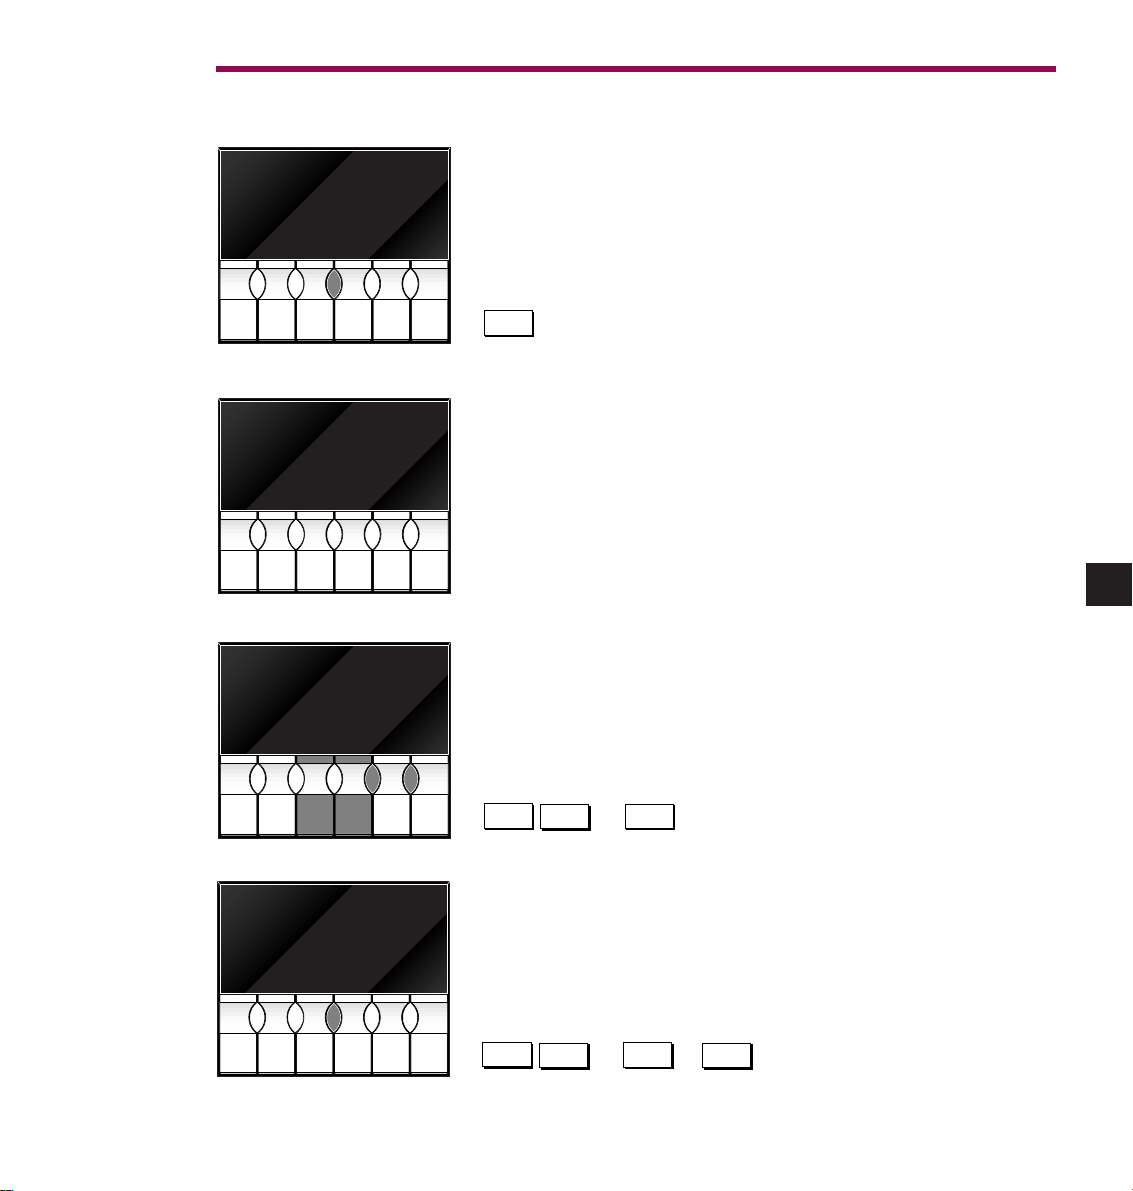
21
Programming a selection of tracks (programme mode A)
Load a disc and press OPEN. Wait until the display shows the disc
time then the number of tracks. Press and hold DIS (DISPLAY) for
one second. Holding for longer will enter programme mode B.
To start again press OPEN.
Ready to programme.
Using SKIP or the handset select the first track to play.
Press DIS (DISPLAY) to save this programme step. Using SKIP or
the handset repeat for all chosen tracks then press PLAY.
Open the drawer to clear the programme.
DISPLAY
[<
>]
SKIP
RECORD
0...9
DISPLAY
[<
>]
SKIP
RECORD
0...9
CD.CA
TRACK
INDEX
CD.CA
TRACK
INDEX
CD.CA
TRACK
INDEX
TOTAL
P--A
TRACK
RPT
RND
>
TRACK
RND
>
TRACK
DIS
= [ ] * å
TOTAL
P-00
RPT
DIS
= [ ] * å
TOTAL
P2-A
>
=
DIGITAL
˘
¯
RECORD
>
=
DIGITAL
˘
¯
>
=
DIGITAL
CD.CA
TRACK
INDEX
RPT
RND
>
TOTAL
TRACK
RND
>
DIS
= [ ] * å
P-01
RPT
DIS
= [ ] * å
˘
¯
RECORD
RECORD
>
=
DIGITAL
˘
¯
RECORD
RECORD
RECORD
Page 30
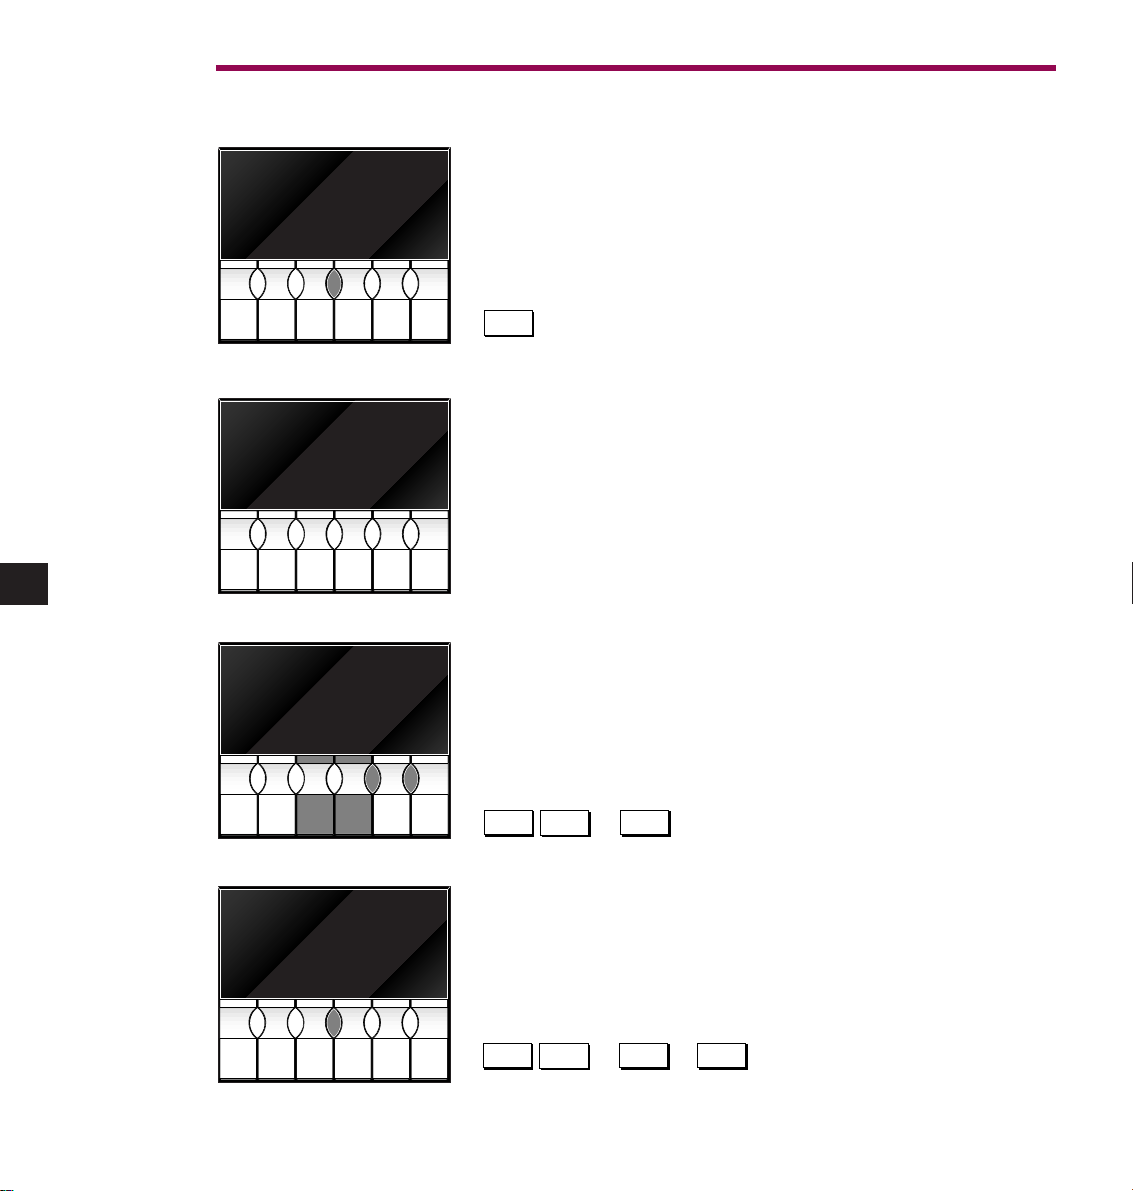
22
Programming excluding of tracks (programme mode B)
Load a disc and press OPEN. Wait until the display shows the disc
time then the number of tracks. Press and hold DIS (DISPLAY) for
two seconds. To start again press OPEN.
Ready to programme.
Using SKIP or the handset select the first track to exclude.
Press DIS (DISPLAY) to save this programme step. Using SKIP or
the handset repeat for all chosen tracks then press PLAY.
Open the drawer to clear the programme.
DISPLAY
[<
>]
SKIP
RECORD
0...9
DISPLAY
[<
>]
SKIP
0...9
CD.CA
TRACK
INDEX
CD.CA
TRACK
INDEX
CD.CA
TRACK
INDEX
TOTAL
P--b
TRACK
RPT
RND
>
TRACK
RND
>
TRACK
DIS
= [ ] * å
TOTAL
P-00
RPT
DIS
= [ ] * å
TOTAL
P2-A
>
=
DIGITAL
˘
¯
RECORD
>
=
DIGITAL
˘
¯
>
=
DIGITAL
CD.CA
TRACK
INDEX
RPT
RND
>
TOTAL
TRACK
RND
>
DIS
= [ ] * å
P-01
RPT
DIS
= [ ] * å
˘
¯
RECORD
RECORD
>
=
DIGITAL
˘
¯
RECORD
RECORD
RECORD
RECORD
Page 31
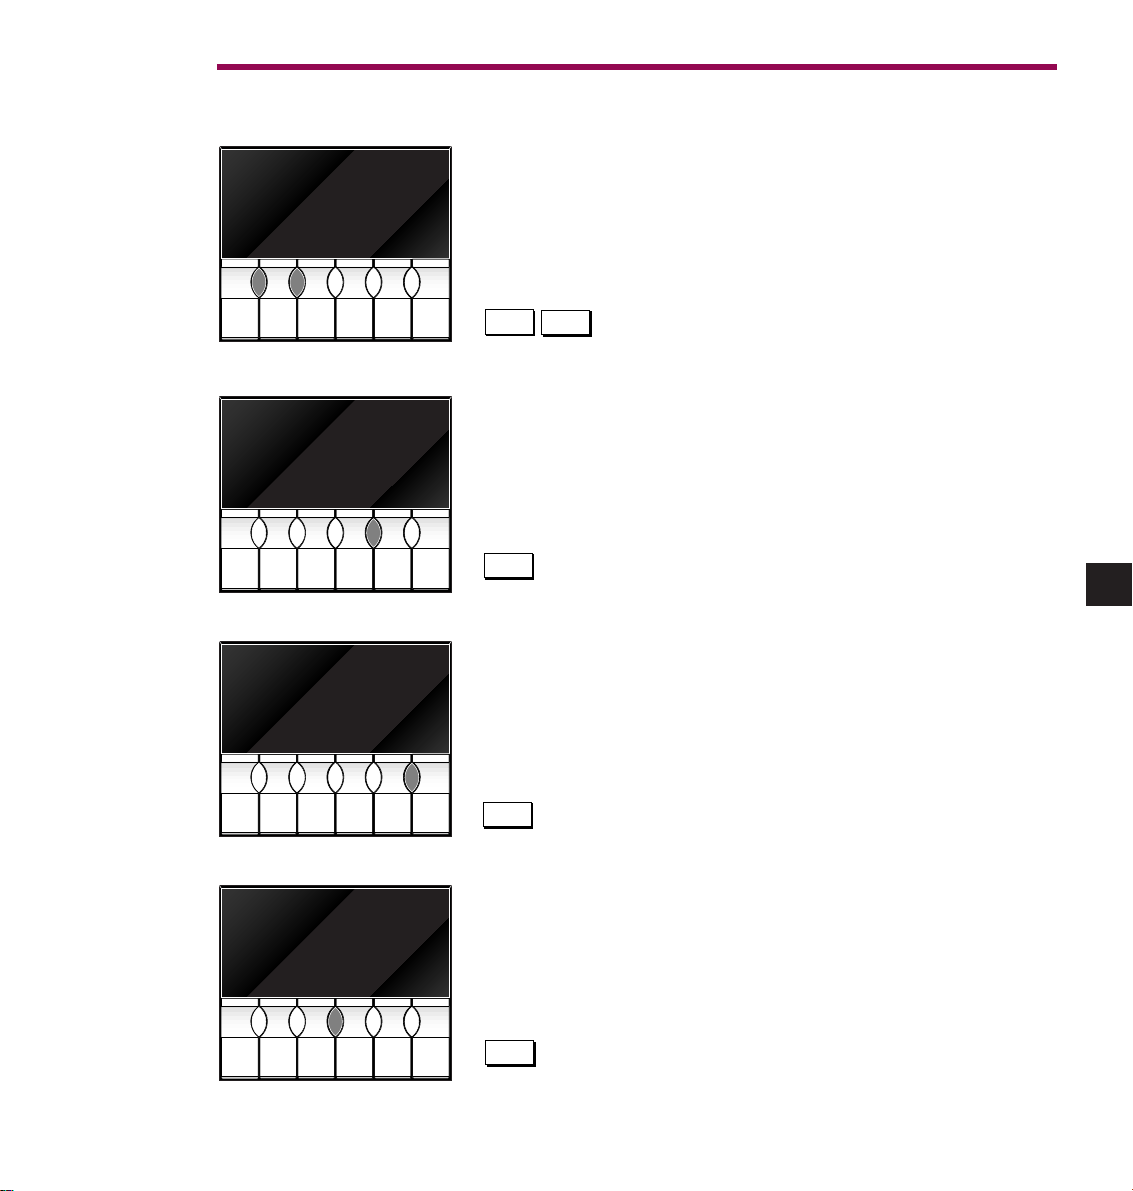
23
GENKI variable output
Increase and decrease volume.
Move the balance to the left.
Move the balance to the right.
Mute the variable output.
+
VOLUME
–
BALANCE
L
BALANCE
R
MUTE
CD.CA
TRACK
INDEX
CD.CA
TRACK
INDEX
CD.CA
TRACK
INDEX
TOTAL
REMAIN
8358
MUTE
TRACK
HDCD
TIME
VOL
>
VOL
– +
M
= [ ] * å
2~-_
BALANCE
VOL
>
VOL
– +
M
= [ ] * å
_-~3
BALANCE
DIGITAL
REPEATVOLUMEBALANCE
BAL
BAL
L
R
RECORD
RECORD
BAL
BAL
L
R
RECORD
CD.CA
TRACK
INDEX
VOL
>
>
MUTE
VOL
– +
TRACK
VOL
– +
M
= [ ] * å
8281
VOL
M
= [ ] * å
BAL
BAL
L
R
RECORD
>
DIGITAL
BAL
BAL
L
R
RECORD
Page 32
24
Advanced CD functions
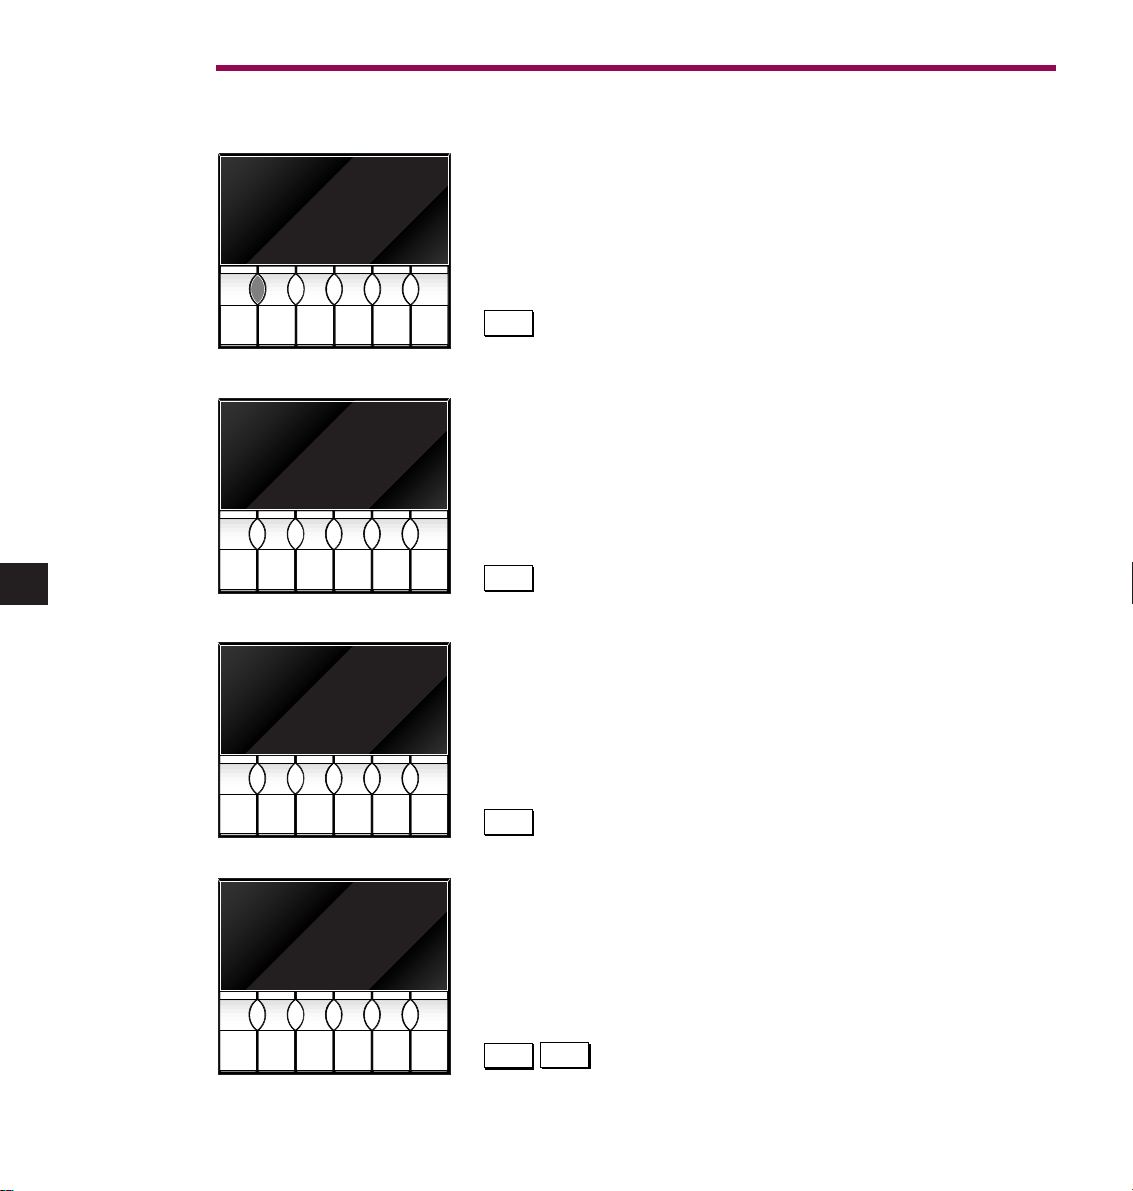
Random play mode. This will play and repeat all the tracks on the
disc in random order.
The random play mode can start from open, stopped or playing.
The play list takes several seconds to create, please wait.
Shuffle play mode. This will play all the tracks on the disc once, in
random order.
The shuffle play mode can start from open, stopped or playing.
The play list takes several seconds to create, please wait.
Intro play mode. This will play the first ten seconds of each track on
the disc in sequence. Press PLAY to listen to the selected track.
Index points. Some classical discs have index points, for example to
make it easier to find the start of a movement.
RANDOM
SHUFFLE
INTRO
< >
INDEX
CD.CA
TRACK
INDEX
CD.CA
TRACK
INDEX
CD.CA
TRACK
INDEX
13 1
TRACK
RPT
RND
>
TRACK
RND
>
TRACK
DIS
= [ ] * å
13 1
RPT
DIS
= [ ] * å
13 1
>
DIGITAL
˘
¯
RECORD
>
DIGITAL
˘
¯
RECORD
>
DIGITAL
CD.CA
TRACK
INDEX
RPT
RND
>
TRACK
RND
>
DIS
= [ ] * å
5 3
RPT
DIS
= [ ] * å
˘
¯
RECORD
>
DIGITAL
˘
¯
RECORD
RECORD
Page 33
25
Advanced CD functions, continued
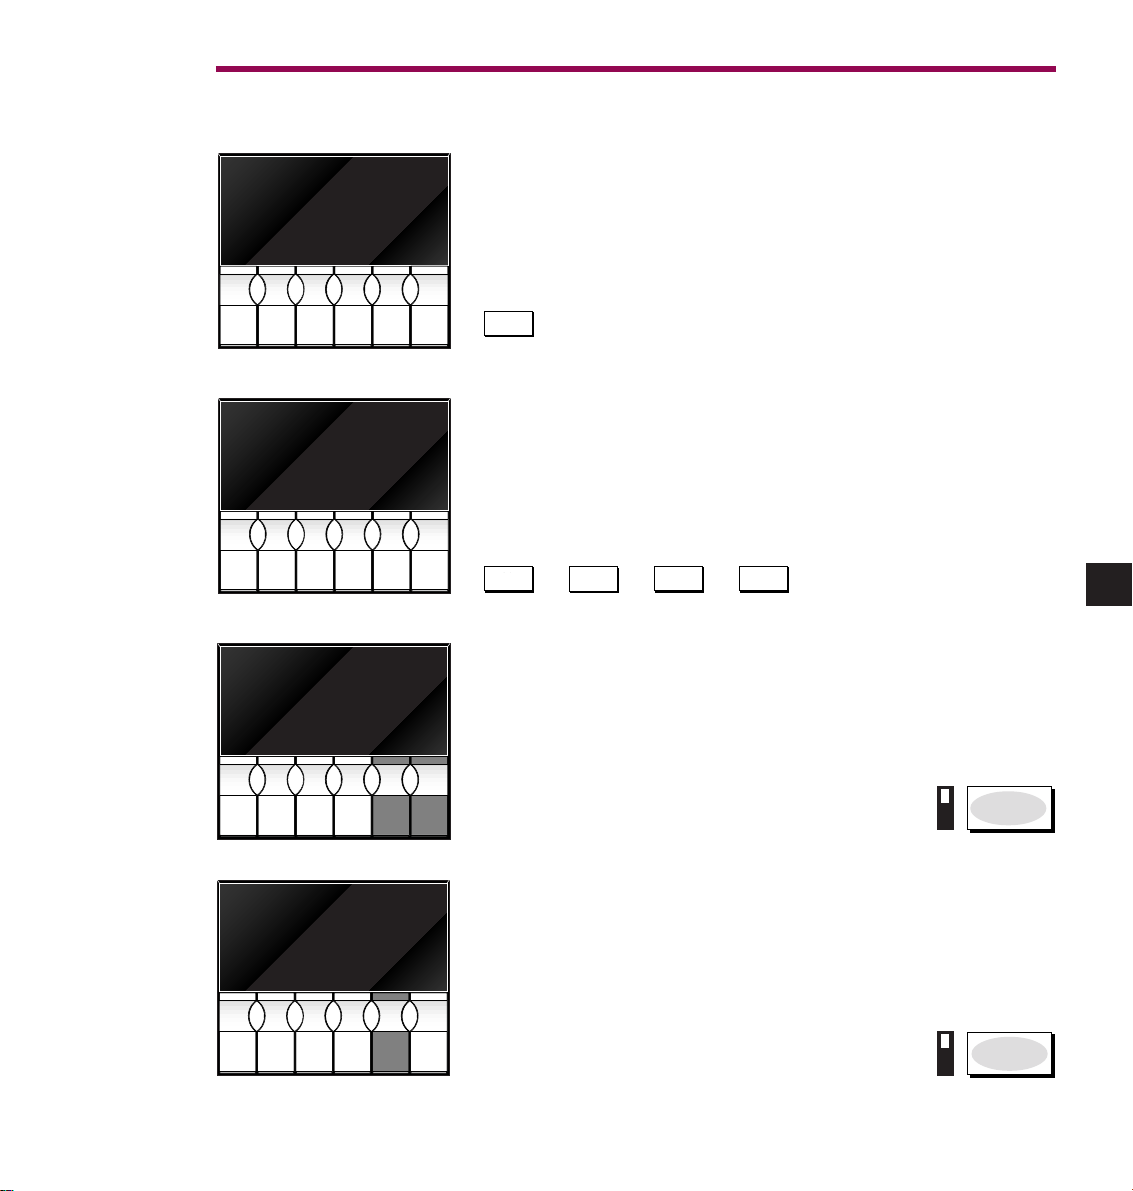
Digital output. Press and hold 0 on the handset to switch on and
off the digital outputs. Use this, for example, if you have a digital
audio accessory with automatic input selection.
The PLAY button. If your handset does not have RANDOM,
SHUFFLE and INTRO buttons press and hold the PLAY button.
User Options. To customise the operation of the IKEMI and GENKI
go to the User Options mode. Switch the power on while holding
the OPEN button for twelve seconds. OPEN selects the Option,
STOP changes its value. See the following table for the options.
To exit press and hold OPEN for five seconds.
Factory default settings (initialise). Switch the power on while
holding the STOP button, for ten seconds.
0
PLAY
1
2
3
INTRO SHUFFLE RANDOM
RECORD
RECORD
POWER
POWER
CD.CA
TRACK
INDEX
CD.CA
TRACK
INDEX
CD.CA
TRACK
INDEX
4 1
TRACK
RPT
RND
>
DIS
= [ ] * å
>
˘
¯
cd8?
RPT
RND
> = [ ] * å
DIS
˘
¯
U1i0
RPT
RND
> = [ ] * å
DIS
˘
¯
RECORD
RECORD
RECORD
RECORD
RECORD
CD.CA
TRACK
INDEX
init
RPT
RND
> = [ ] * å
DIS
˘
¯
Page 34
26
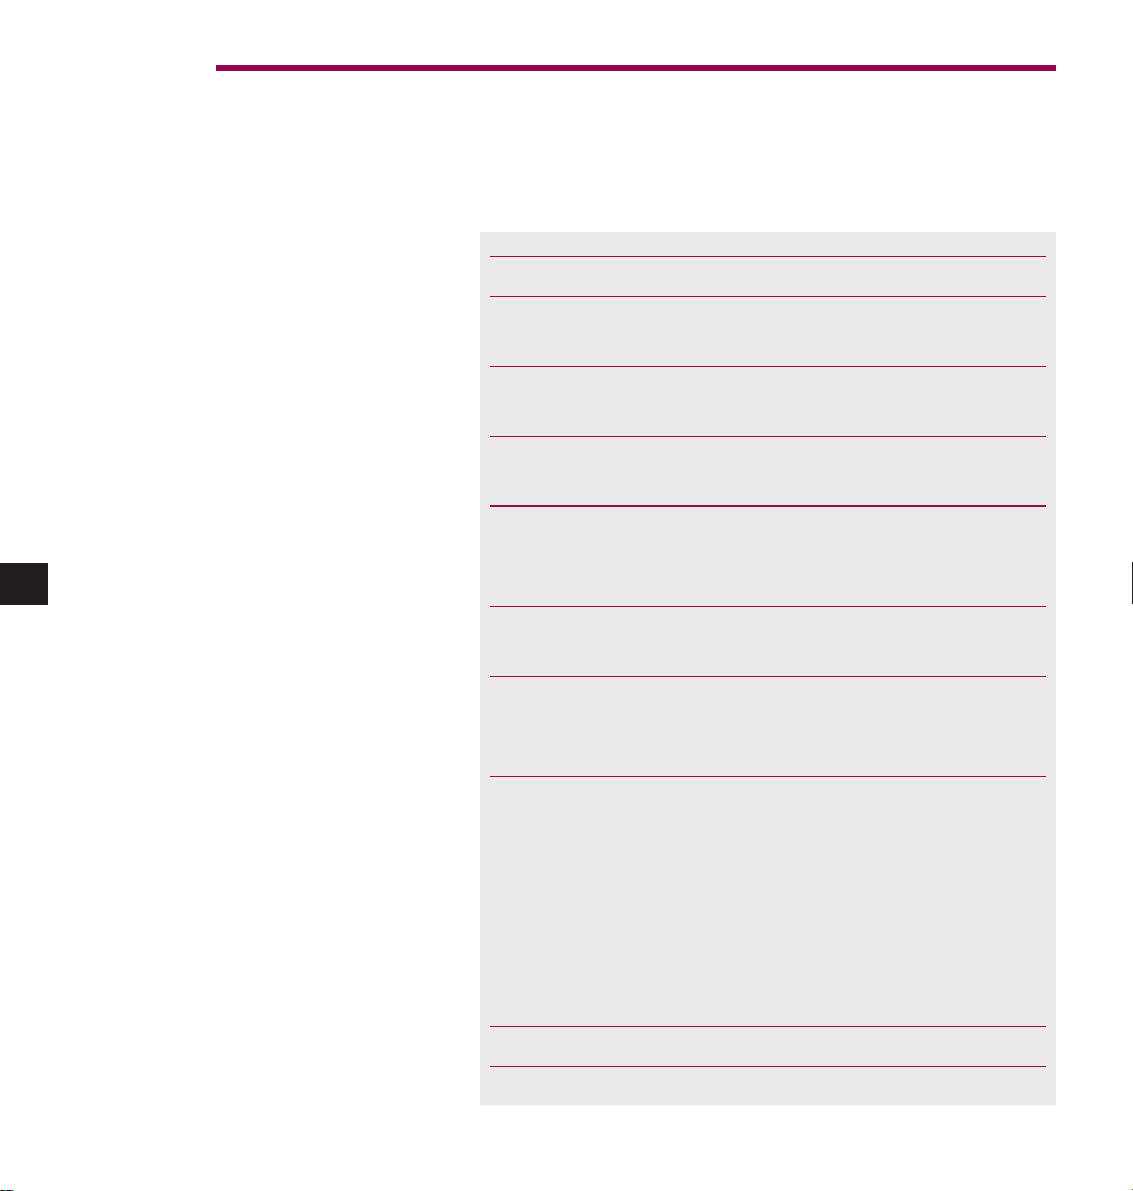
The IKEMI & GENKI include a number of user options to allow you
to change the way they operate to suit your personal preferences.
Option Description Values
U1 Display Sleep mode 0 = Disabled
1 = Sleep display
U2 Remote control receiver 0 = Disabled
1 = Enabled
U3 CD power up 0 = CD stop on power up
1 = CD start on power up
U4 CD status at power down 0 = do not retain status
(stopped, paused, playing, 1 = retain status
track number)
U5* Default volume on power up 0 = Volume 25
1 = Volume 50
U6* Volume on power up is last 0 = Use volume from U5
selected volume 1 = Power up at last
volume
U7* Change the pre-amp address 0 = Pre-amp 3 on Linn
for the volume and balance AV5101 handset
commands (address 15)
1 = Kairn address
(address 16)
2 = Knekt function 1/
function 2 keys
on Linn handset.
* GENKI only
Values in bold are factory defaults.
User Options
Page 35

27
Maintenance
CD handling
Hold the compact disc by the edge so you don’t touch the playing
surface. Don’t attach paper or tape to either side of the disc. Never
attempt to play a cracked or badly warped disc; it may damage the
CD player laser.
Cleaning.
To remove fingerprints or other marks lightly wipe the disc with a
soft cloth from the centre of the disc outwards. Dampen the cloth
for more persistent marks then dry with a soft cloth.
Storage.
Don’t leave discs in the player. If they’re not being played put them
back in their cases.
Servicing
Like all our products the Ikemi and Genki are designed for a long
life. Any servicing should only be carried out by an authorised
retailer.
Cleaning.
Dust and finger marks can be removed using a soft damp cloth.
Switch the unit off before cleaning. Avoid the use of domestic
cleaning products.
Page 36

28
Technical support
For technical support, product queries and information please
contact either your local retailer or:
Linn Products Ltd
Floors Road
Waterfoot
Glasgow G76 0EP
Scotland
Phone: +(44) (0)141 307 7777
fax: +(44) (0)141 644 4262
UK helpline: 0500 888909
email: [email protected]
website: http://www.linn.co.uk
Linn Incorporated
4540 Southside Boulevard
Suite 402
Jacksonville
Florida 32216
phone: +(1) 904 645 5242
fax: +(1) 904 645 7275
email: [email protected]
Linn GmbH
Albert Einstein Ring no.19
D22761
Hamburg
phone: +(49) 40 890 6600
fax: +(49) 40 890 66029
email: [email protected]
Page 37
29
Technical information
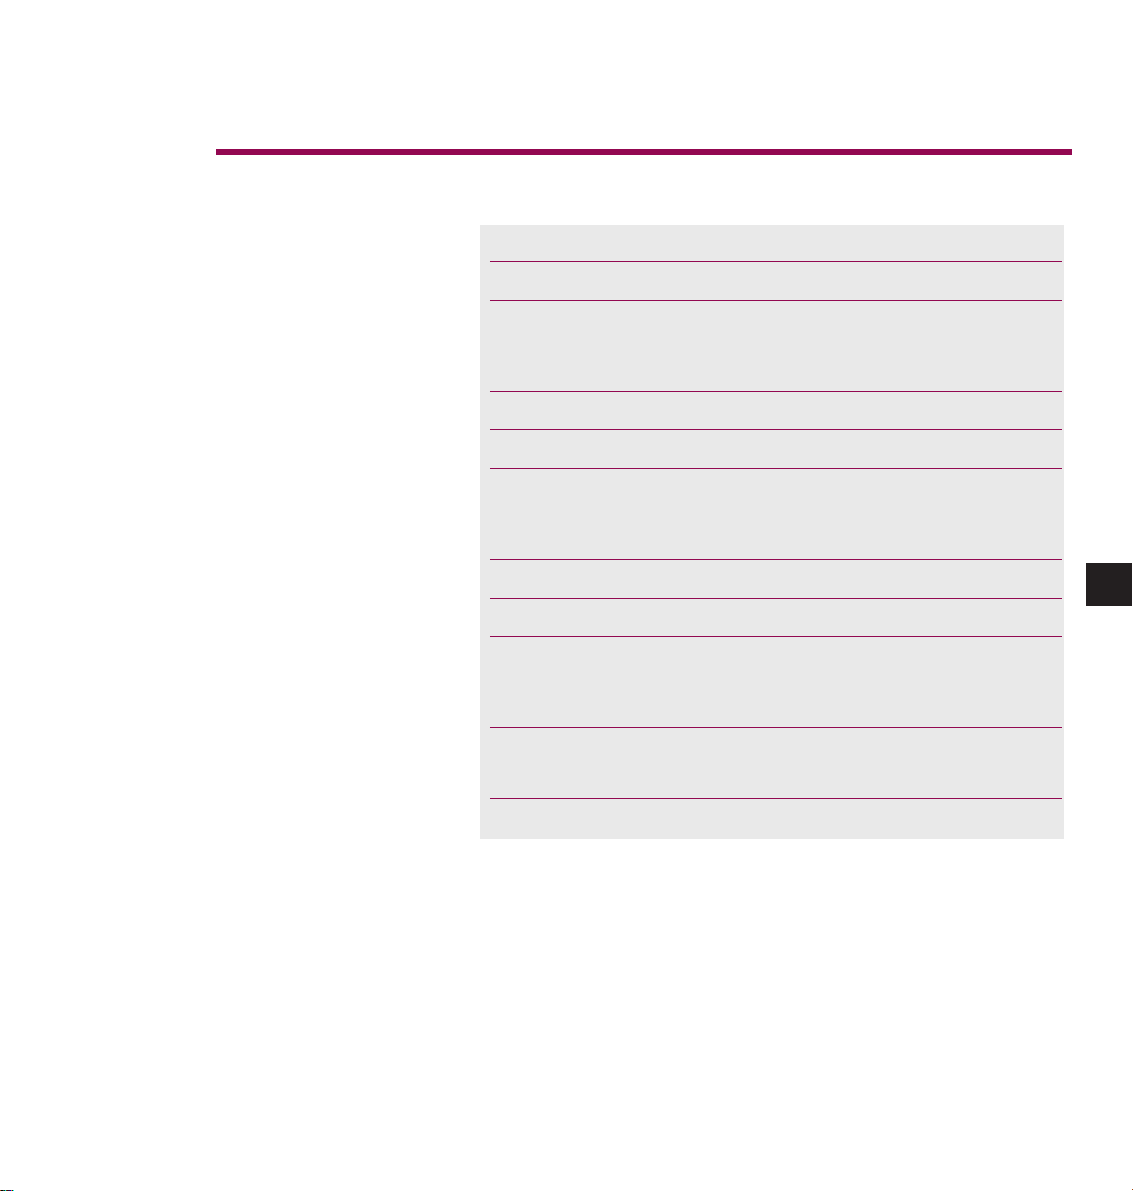
IKEMI Specifications
Signal Connector Level Impedance Notes
Single ended analogue RCA phono 2V rms 300 Ohms
Balanced analogue XLR male 4V rms 600 Ohms pin1 gnd
pin 2 hot
pin 3 cold
SPDIF electrical BNC 0.5V pp 75 Ohms
SPDIF optical TOSLINK
AES/EBU electrical XLR male 1V pp 110 OHMS pin 1 gnd
pin 2 hot
pin 3 cold
Sync Link input RCA phono 0-10 Vdc 10k Ohms Linn use only
Knekt remote in/out RCA phono 4mA na Knekt use only
Mains input IEC 90 - 130Vac
180 - 260Vac manual switch
20 Watts max
Dimensions: 80mm H x 320mm W x 325mm D
(3.15 x 12.6 x 12.8 inches)
Weight: 4.1kg (9 lb)
Page 38
30
GENKI Specifications
Signal Connector Level Impedance Notes
Analogue, fixed level RCA phono 2V rms 300 Ohms
Analogue, variable RCA phono
2V rms max
300 Ohms 72dB range
SPDIF electrical BNC 0.5V pp 75 Ohms
Knekt remote in/out RCA phono 4mA na Knekt use only
Mains input IEC 90 - 130Vac
180 - 260Vac manual switch
20 Watts max
Dimensions: 80mm H x 320mm W x 325mm D
(3.15 x 12.6 x 12.8 inches)
Weight: 3.3kg (7.26 lb)
RS232 option (both IKEMI and GENKI)
RS232 IN RJ45 RS232 na pin 1 boot
pin 2 transmit
pin 3 receive
pin 4 nc
pin 5 common
pin 6 boot
RS232 OUT RJ45 RS232 na pin 1 nc
pin 2 common
pin 3 nc
pin 4 transmit
pin 5 receive
pin 6 nc
Page 39

PACK 169
 Loading...