

Page 1
Instant Wireless™Series
Wireless PrintServer
Use this Guide to install:
Model No.:WPS11
User Guide
Page 2

COPYRIGHT & TRADEMARKS
Copyright © 2001 Linksys, All Rights Reserved. Microsoft, Windows, and the Windows
logo are registered trademarks of Microsoft Corporation. All other trademarks and brand
names are the property of their respective proprietors.
LIMITED WARRANTY
Linksys guarantees that every Instant Wireless® Wireless PrintServer is free from physical defects in material and workmanship for one year from the date of purchase, when
used within the limits set forth in the Specification section of this User Guide. If the product proves defective during this warranty period, call Linksys Customer Support in order
to obtain a Return Authorization number. BE SURE TO HAVE YOUR PROOF OF PURCHASE ON HAND WHEN CALLING. RETURN REQUESTS CANNOT BE PROCESSED
WITHOUT PROOF OF PURCHASE. When returning a product, mark the Return
Authorization number clearly on the outside of the package and include a copy of your
original proof of purchase.
IN NO EVENT SHALL LINKSYS’ LIABILITY EXCEED THE PRICE PAID FOR THE PRODUCT FROM DIRECT, INDIRECT, SPECIAL, INCIDENTAL, OR CONSEQUENTIAL DAMAGES RESULTING FROM THE USE OF THE PRODUCT, ITS ACCOMPANYING SOFTWARE, OR ITS DOCUMENTATION. Linksys makes no warranty or representation,
expressed, implied, or statutory , with r espect to its pr oducts or the contents or use of this
documentation and all accompanying software, and specifically disclaims its quality,
performance, merchantability, or fitness for any particular purpose. Linksys reserves the
right to revise or update its products, software, or documentation without obligation to
notify any individual or entity. Please direct all inquiries to:
Linksys P.O. Box 18558, Irvine, CA 92623
FCC STATEMENT
The Wireless PrintServer has been tested and complies with the specifications for a
Class B digital device, pursuant to Part 15 of the FCC Rules. These rules are designed
to provide reasonable protection against harmful interference in a residential installation.
This equipment generates, uses, and can radiate radio frequency energy and, if not
installed and used according to the instructions, may cause harmful interference to radio
communications. However , there is no guarantee that interference will not occur in a particular installation. If this equipment does cause harmful interference to radio or television
reception, which is found by turning the equipment off and on, the user is encouraged to
try to correct the interference by one or more of the following measures:
• Reorient or relocate the receiving antenna
• Increase the separation between the equipment or device
• Connect the equipment to an outlet other than the receiver’s
• Consult a dealer or an experienced radio/TV technician for assistance
UG_WPS11 011130B KL
Page 3

Table of Contents
Introduction 1
The Instant Wireless™ Wireless PrintServer 1
Features 1
Package Contents 2
Getting to Know the Wireless PrintServer 3
The Wireless PrintServer’s LEDs 3
The Wireless PrintServer’s Ports 4
Hardware Installation 5
Overview 5
Finding the Wireless PrintServer’s Default Name 5
Finding the Wireless PrintServer’s Node Address 5
Connecting the Wireless PrintServer to Your Network 5
Windows Driver Setup 7
Overview 7
The Autorun Bi-Admin Management Utility Installation 8
Bi-Admin: PrintSer ver Management 14
Installing the Bi-Admin Management Utility 14
Starting the Bi-Admin Management Utility 14
Using Bi-Admin 16
Setting the PrintServer’s IP Address 17
Changing the Device Name 18
Enabling and Disabling Protocols 18
Attaching Bi-Admin to a Remote Wireless PrintServer 19
Resetting the Wireless PrintServer 19
Restoring Factory Default 19
Configuring the Wireless PrintServer
Using the Web-based Utility 21
Accessing the Web-based Utility 21
The Server Page 22
The Printer Page 22
The TCP/IP Page 23
The Wireless Page 24
The Status Page 25
Advanced Properties 26
The AppleT alk Page 26
The Internet Printing Page 27
The Logical Printers Page 28
The NetBEUI Page 29
The SNMP Page 30
Internet Printing Protocol (IPP) 32
Windows 95/98/Millennium/NT 4.0/2000/XP IPP Client Setup 32
DHCP Support for the Wireless PrintServer 38
Troubleshooting 39
Hardware Issues 39
General Printing Issues 39
Appendix 40
About Bi-directional Printing 40
About the Wireless PrintServer’s Software 41
Glossary 42
Specifications 49
Environmental 50
Warranty Information 51
Contact Information 52
Instant Wireless™ Series
Wireless PrintServer
Page 4

• One Instant Wireless™ Wireless PrintServer
• One Antenna (Not Shown)
• One Setup Utility CD
• One Power Adapter
• One User Guide on Setup Utility CD (Not Shown)
• One Registration Card (Not Shown)
2
Instant Wireless™ Series
Wireless PrintServer
Introduction
Congratulations on your purchase of the Instant Wireless™ Wireless
PrintServer, the fastest and easiest way to network your printers. Now you can
share your printing resources without tying up your workstation performance
with pending print jobs.
The Instant Wireless™ Wireless PrintServer comes with an easy-to-use software management suite that runs seamlessly with virtually all Windows operating systems. Fully compatible with standard laser, bubble jet, ink jet, and dot
matrix printers, the Instant Wireless™ Wireless PrintServer also supports your
bi-directional printers. Direct Memory Access (DMA) technology, a 2MB
buffer, and automatic collision control all result in the Instant Wireless™
Wireless PrintServer handling print jobs up to 50% faster than regular
printservers- even complex graphics and layout jobs.
• Interoperable with IEEE 802.11b (DSSS) 2.4GHz-Compliant Equipment
• Long Operating Range: Up to 91m (Indoors) and 457m (Outdoors)
• Configurable Through Your Networked PC's Web Browser
• Runs with Virtually All Laser, Ink Jet, Bubble Jet, Color
and Dot Matrix Printers
• Supports Multiple Print Jobs Simultaneously
• Integrates Through Both Ethernet and Wireless Connections
• Works with Vir tually All Major Operating Systems
• Stand-Alone Unit Means No Dedicated PrintServer PC Is Needed
• Easy-to-Use Built-In Remote Management Utility
• 2MB RAM Buffer for Faster Graphics Performance
• 1MB Flash Memory for Future Upgrades
• Free Technical Support—24 Hours a Day, 7 Days a Week for North
America Only
• 1-Year Limited Warranty
1
The Instant Wireless™ Wireless PrintServer
Features
Package Contents
Page 5
4
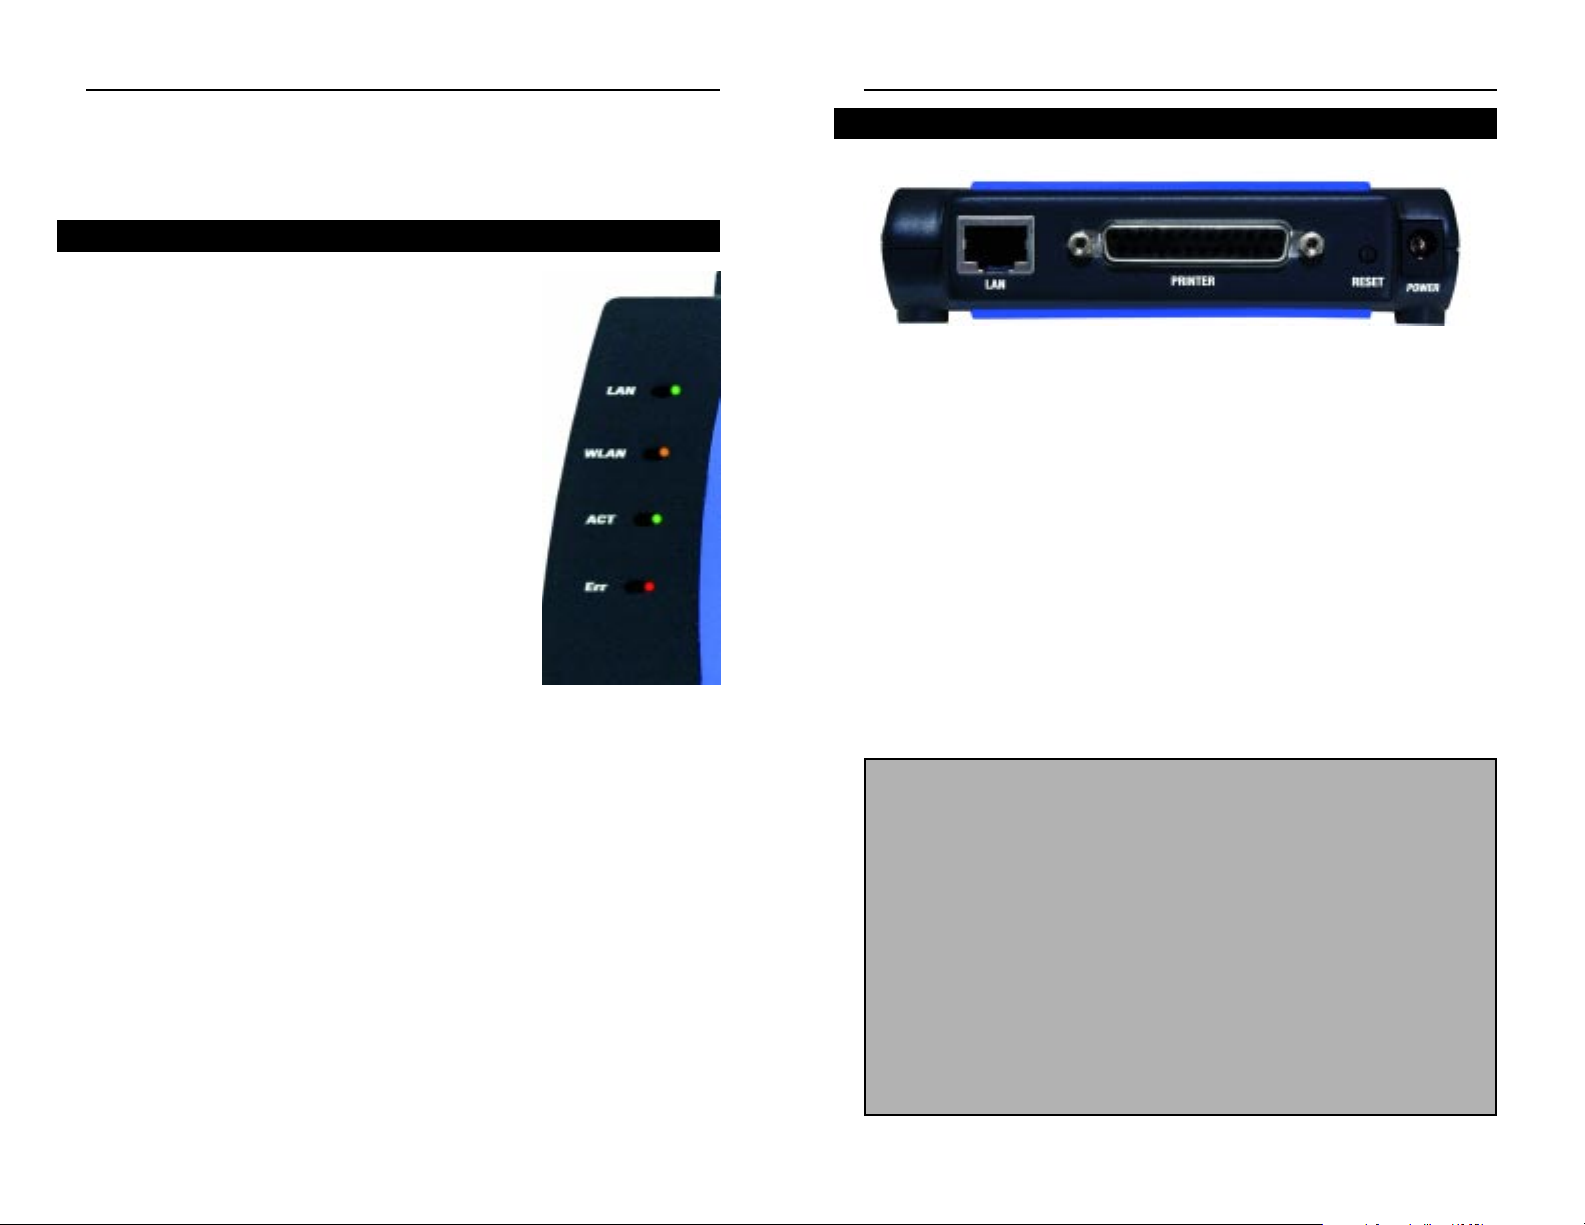
LAN This port connects to your wired network using a
standard Category 5 network cable.
Printer This Parallel (LPT) Port connects to your printer.
Reset Button Briefly pressing the Reset Button will refresh the
Wireless PrintServer’s connections, potentially clearing any jammed links.
Power This port connects the power adapter.
Antenna (not shown) This port, located on the side of the Wireless
PrintServer, is where you will connect the included
antenna by screwing it on securely.
Getting to Know the Wireless
PrintServer
LAN Green. The LAN LED serves two purposes.
If the LED is continuously illuminated, the
Wireless PrintServer is successfully connected to a device through the LAN port. If
the LED is flickering, the Wireless
PrintServer is actively sending or receiving
data to the wired network.
WLAN Amber. The WLAN LED is exactly like the
LAN LED, e xcept that it will show Wireless
Activity. It will stay continuously lit if there
is a wireless connection, and it will flicker
when the Wireless PrintServer is actively
sending or receiving data to the wireless
network.
ACT Green. The ACT LED will remain continu-
ously lit when a printer is correctly connected to the W ireless PrintServer. The LED will flicker when print jobs
are being transmitted to the printer, over both the wired and wireless
networks.
Err Red. The Error LED lights up when there is a problem printing to the
indicated printer. If this LED lights up, try resetting the Wireless
PrintServer by pressing the Reset button on the back of the Wireless
PrintServer.
3
The Wireless PrintServer’s LEDs
Instant Wireless™ Series
Wireless PrintServer
The Wireless PrintServer’s Ports
To reset the factory default settings:
1. Turn the Print Ser ver OFF.
2. Press and hold the diagnostic button. While pressing the button, switch the
Print Server ON.
3. If you continue pressing the button for 10 seconds, a diagnostic page will
be printed, showing the new (default) settings.
To generate a Diagnostic print out
1. Ensure that both the Print Server and the printer attached to port 1 are ON.
2. Press the diagnostic button, and hold it in for 2 seconds.
3. The test page, containing the current settings, will be printed.
PostScript printers are unable to print this page. If you have a PostScript printer on Port 1, the test page will not be printed.
Page 6

6
Connecting the Wireless PrintServer to Your Network
1. After powering on the Wireless PrintServer, plug one end of a UTP
Category 5 (or better) cable into the Wireless PrintServer’s LAN Port.
2. Connect the other end of the cable into a network ed hub or switch. The distance between the Wireless PrintServer and the second device should not
exceed 328 feet (100 meters).
3. The LAN LED will become active. If the LAN LED does not light up, see
the Troubleshooting section for more information.
Connecting a Printer to the Wireless PrintServer
1. Connect your printer to the Wireless PrintServer’s Printer (LPT) port with
your printer cable. Some printers, especially bi-directional models, may
require special shielded cabling. Consult your printer’s user guide for
cabling specifications.
2. Power on your printer.
The Wireless PrintSer ver’s hardware installation is now complete, and you are
now ready to install the Wireless PrintServer’s software.
Only use the power adapter packaged with the
Wireless PrintServer. Using a different power
adapter could damage the Wireless PrintServer.
Instant Wireless™ Series
Hardware Installation
Before starting the physical installation, be sure to find the Wireless
PrintServer’s Default Name and Node Address first. The information may be
hard to access after the W ireless PrintServer is completely installed in y our network and surrounded by wires and computers.
On the bottom of the W ireless PrintServer , there is a white bar code stick er with
an SC number printed on it (example: SCA71107). This number is the
PrintServer’s Default Name, which you’ll use in the Wireless PrintServer driver installation. Since it is written in hexadecimal form, the SC number may
include letters as well as numbers. Write it in the box below for future reference.
To find the Wireless PrintServer’s node address, add 00C002 before the
PrintServer’s Default Name. The resulting combined number is the
PrintServer’s Node Address. Write it in the box below for future reference.
(example: 00C002A71107).
The Wireless PrintSer ver does not
have an ON/OFF power switch. Whenever
its power adapter is plugged into a power supply, the Wireless PrintServer is
powered on. The Wireless PrintServer can be powered on before, during, or
after your network.
Connecting the Power
1. Plug the power adapter cord into the Wireless PrintServer’s Power port.
2. Plug the power adapter into the wall.
PrintServer Default Name: ___________________________________
PrintServer Node Address: 00C002_____________________________
Overview
Finding the Wireless PrintServer’s Default Name
Finding the Wireless PrintServer’s Node Address
Connecting the Wireless PrintServer to Your Network
Wireless PrintServer
5
Page 7
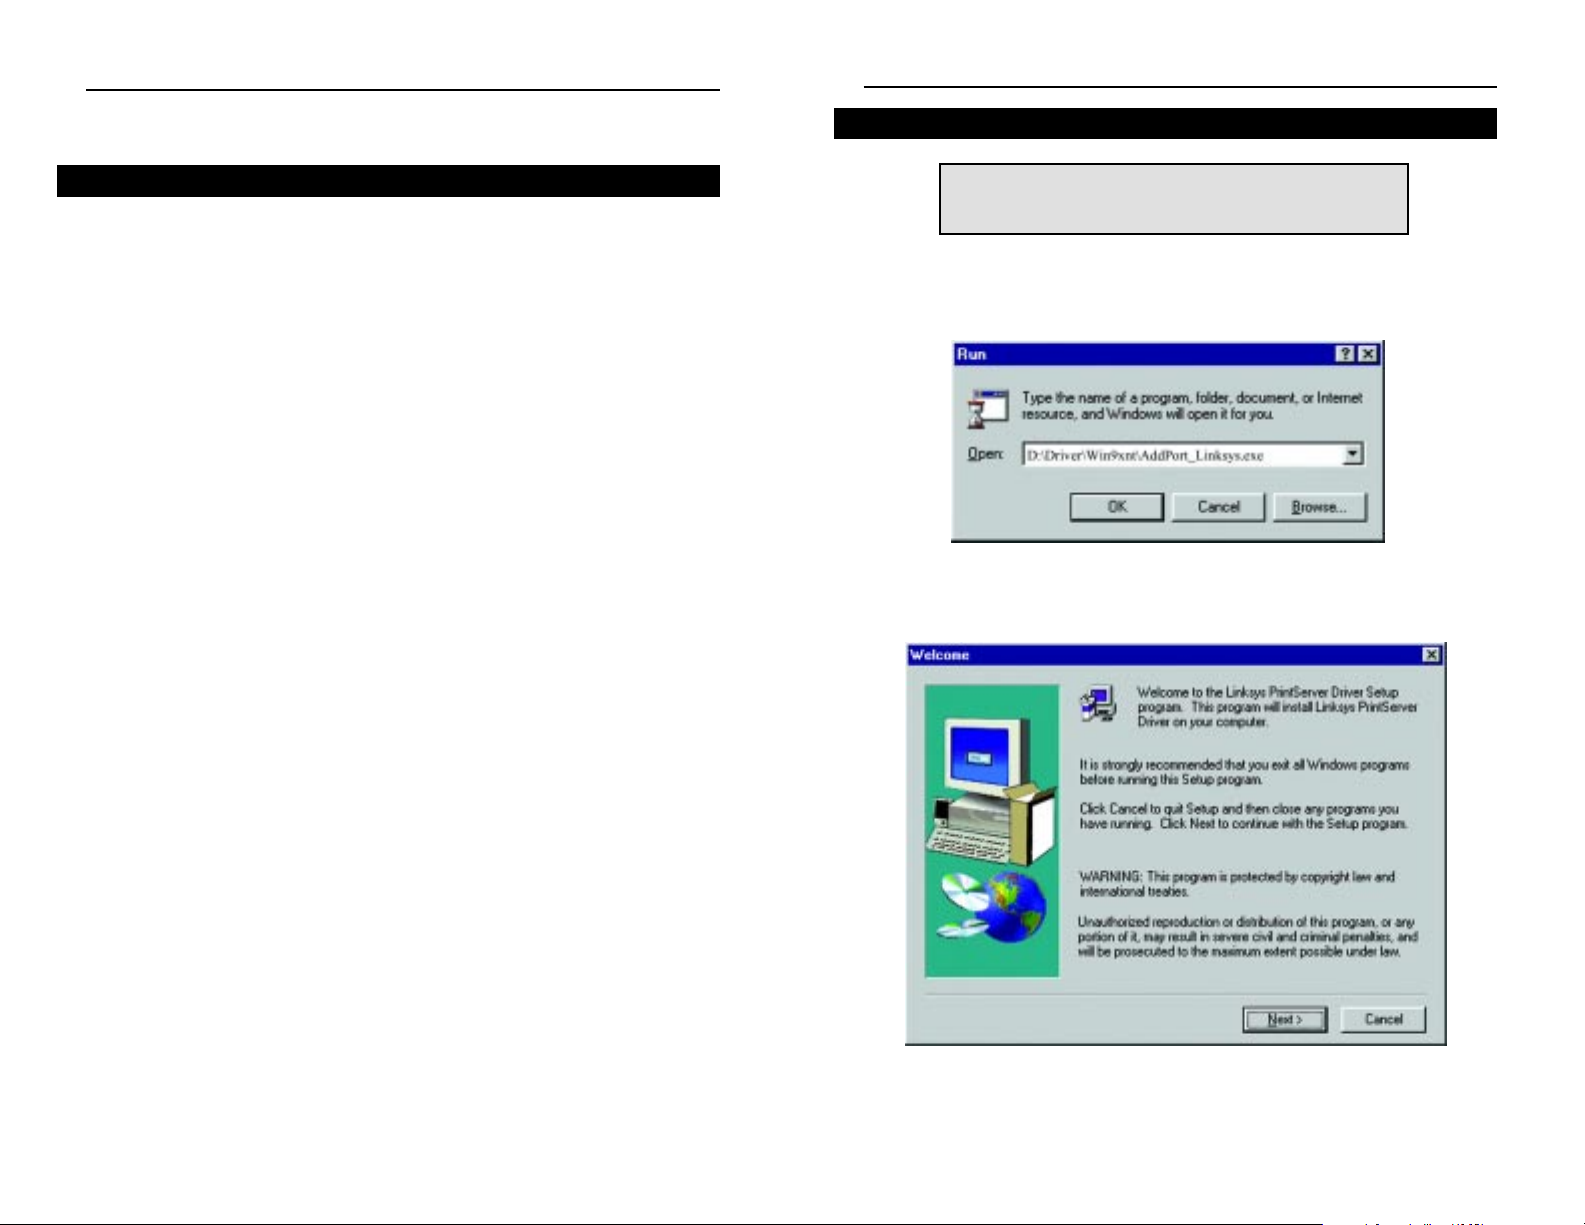
1. To begin driver installation, click the Start button, select Run, and type
D:\Driver\Win9xnt\AddPort_Linksys.exe (where D is the letter of your
CD-ROM drive) in the Open field that appears. Click the OK button.
2. The Install Wizard window appears. Read the text that appears and click
the Next button.
The Autorun Bi-Admin Management Utility Installation
7
NNoottee
: To set up DHCP on the Wireless PrintServer, install
BBii--
AAddmmiinn
first, and then install
DDHHCCPP
. Once these are done, pro-
ceed to install the Printer Driver.
Windows Driver Setup
This section installs the Wireless PrintSer ver’s software on your Windows 95,
98, Millennium, NT, 2000 or XP computers to give them Wireless PrintServer
printing abilities. The Wireless PrintServer is fully compatible with Windows
95, 98, Millennium, NT 4.0, 2000 and XP environments.
At this point, you must have:
• the Wireless PrintServer hardware installed on your network. If not, see the
Hardware Installation section.
• TCP/IP installed on each of your computers.
• an IP address assigned to each of the computers on your network. If not, see
the section on DHCP Support for the Wireless PrintServer.
This setup should be completed on the network administrator’s computer
before all other users’computers on the network. The Wireless PrintServer’s IP
address will be assigned in this first installation on the network administrator’s
computer only, which takes three extra steps.
It is assumed that your CD-ROM drive’s letter name is designated as D. If y our
CD drive is named another letter, replace all instances of D with the appropriate letter.
If you need to install the Wireless PrintServer’s driver on computers without a
CD-ROM drive, you can create a setup disk by using a computer with a CDROM drive to copy the contents of D:\Driver\Win9xNT onto a floppy disk.
Overview
Instant Wireless™ Series
8
Wireless PrintServer
Page 8
10
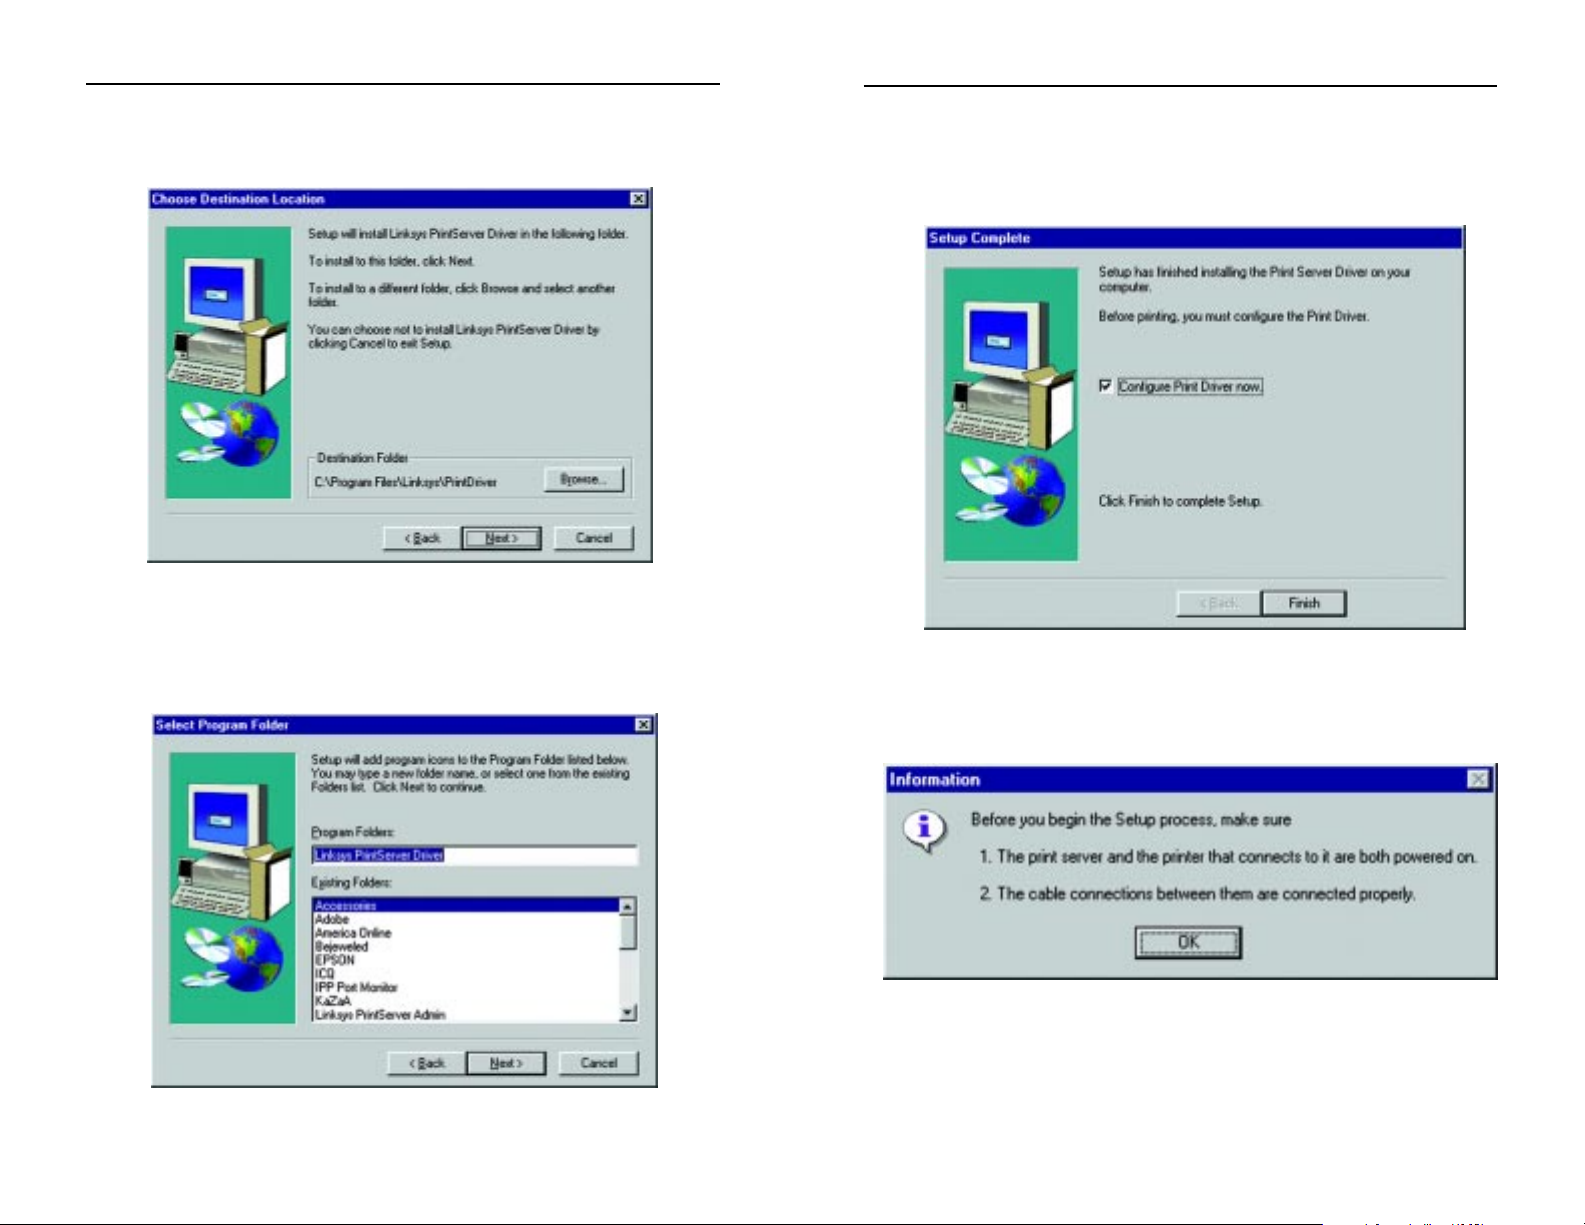
5. Driver installation is now completed but the Print Driver still needs to be
configured. The Wireless-Ready PrintServer will not function properly
until the Print Driver is configured. Check the box beside Configure Print
Driver Now and click the Finish button to continue.
6. Before setting up and configuring the Print Port, follow the directions on
the screen below and click the OK button to continue.
3. Click Next to accept the default Destination Directory, shown below (recommended). If you choose to utilize another directory, click the Browse button
and choose the appropriate directory. Then, click the Next button.
4. The following screen will assign a Program Folder from the Windows
T askbar. The default Program Folder is the “Linksys PrintServer Driver”. If
you would like to use another name for the Program Folder, type it in the
Program Folders field or select one from the Existing Folders field. Click
the Next button to continue.
Instant Wireless™ Series
9
Wireless PrintServer
Page 9
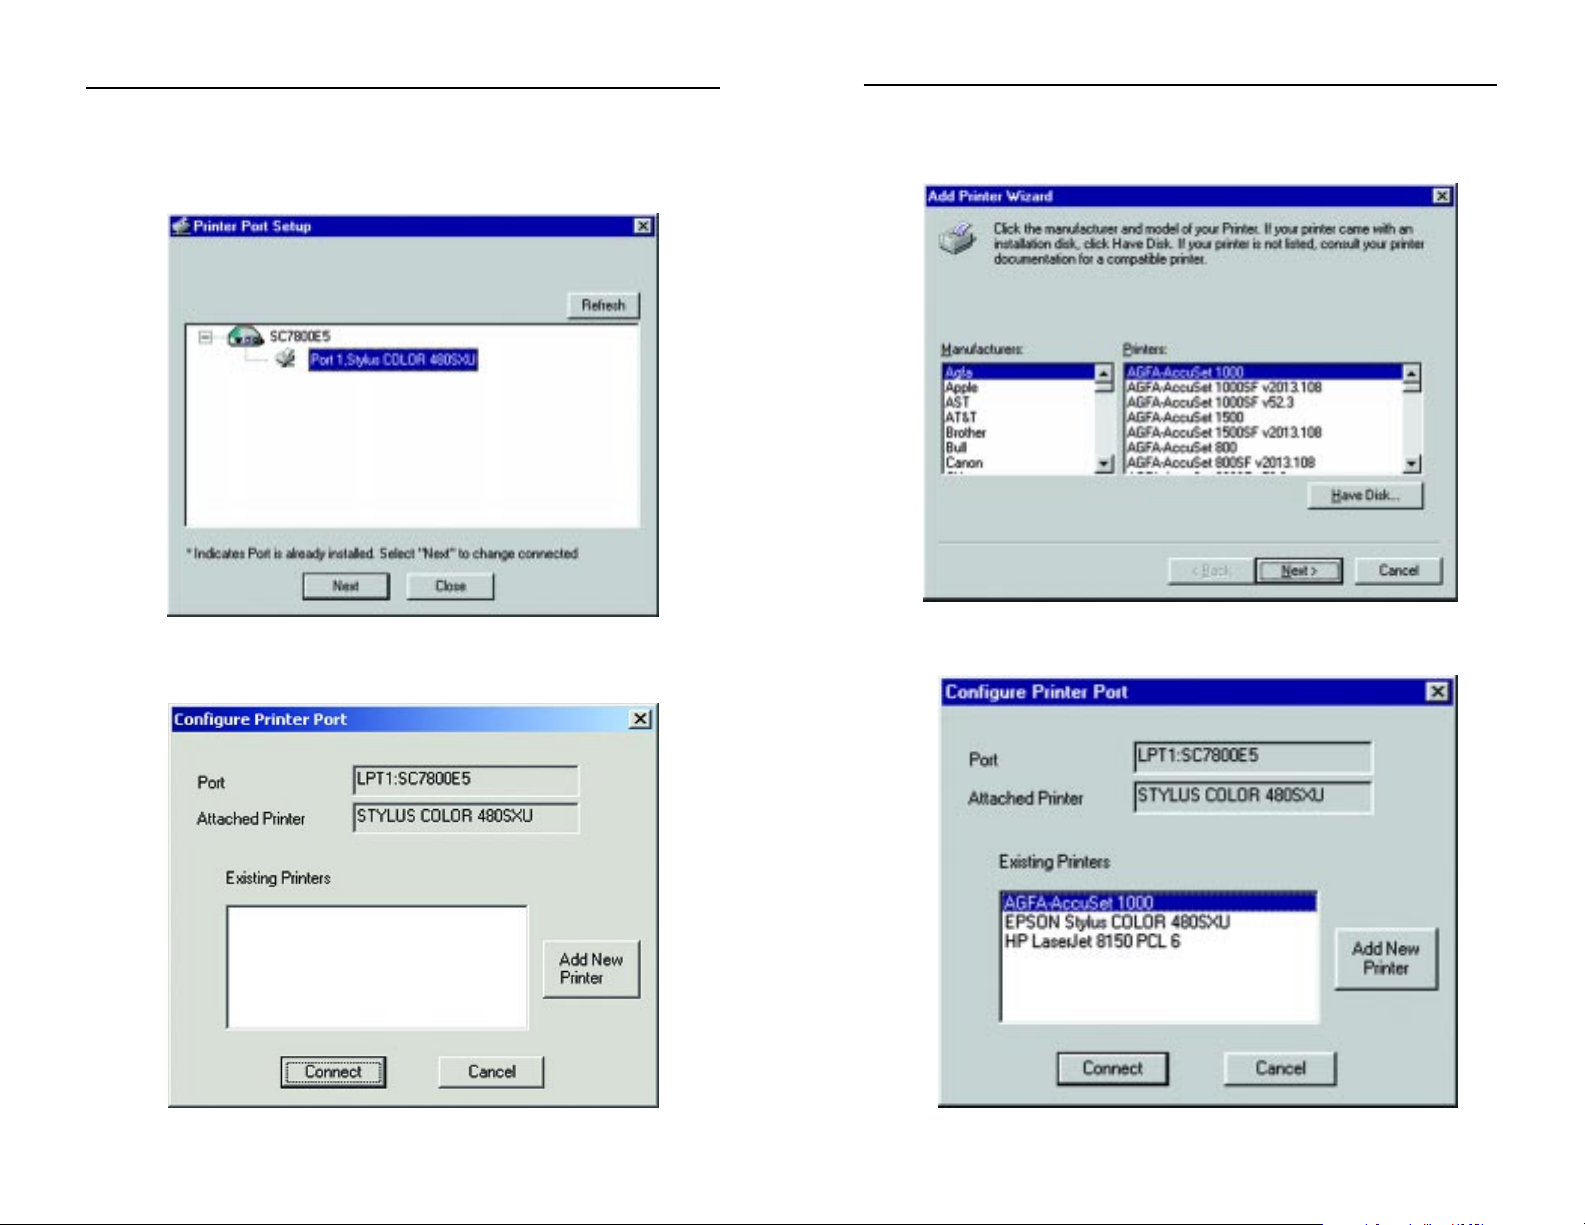
1211
9. The Add New Printer Wizard will come up at this point. Follow the stan-
dard procedure for adding printers under Windows. If you have any questions on adding printers, please refer to your Windows documentation.
10. After your printer(s) have been added, you will return to the Conf igure
Printer Port screen. Click the Connect button to connect the printer(s).
7. The Print Port Setup screen will display the Wireless-Ready PrintServer and
all of the printers which with it communicates. Here, you have the option
of installing the printer by highlighting its description and clicking the Next
button. You can also close this screen by clicking the Close button.
8. This will display the Conf igure Printer Port screen. Any installed printers
will be displayed in the Existing Printers field. You can install a printer by
clicking the Add New Printer button.
Instant Wireless™ Series
Wireless PrintServer
Page 10

1413
Bi-Admin: PrintServer Management
Overview
The Wireless PrintSer ver is managed by a utility program called Bi-Admin on
the Wireless PrintSer ver’s Setup CD. Fully compatible with Windows 95, 98,
Millennium, NT, 2000, and XP, Bi-Admin allows you to change the Wireless
PrintServer’s inter nal settings, check on the unit’s status, and perform basic
diagnostic tests. Note that the Bi-Admin program must only be installed on the
network administrator’s computer.
Bi-Admin is a Windows-based program. So if you are using the Wireless
PrintServer in a NetWare DOS-only environment, you must use a program
other than Bi-Admin to manage the Wireless PrintSer ver.
The Bi-Admin Management Utility should have been installed when the Setup
CD was first inserted. If, however, you need to install it again, simply follow
these directions.
1. Insert the Wireless PrintServer’s Setup CD into your CD-ROM drive.
2. When the autorun screen appears, click the Install tab.
3. Click the Next button on the following screen. When asked for a destination folder, either click the Next button to choose the default location or
click the Browse button to select a new location
4. The Bi-Admin Management Utility will now be installed.
1. To start the Bi-Admin program, click on Start, Programs, Linksys, and
then PrintServer Bi-Admin. If the Bi-Admin icon has been created, you
can just double-click on it instead. You can drag the shortcut icon onto your
Desktop for easy access to the Bi-Admin program.
Installing the Bi-Admin Management Utility
Starting the Bi-Admin Management Utility
Wireless PrintServer
11. The Printer Port Setup screen will appear again, displaying the printers
which are now communicating with the Wireless-Ready PrintServer. Click
the Next button to any any more printers or Close to complete the installation and configuration procedure.
Instant Wireless™ Series
Page 11

1615
Obtaining Device Information:
The Device Information Icon
To access information about the Wireless PrintServer,
either click on it in the Device List window (on the right
side of the Bi-Admin window) or highlight the Wireless
PrintServer and click on the Device Information icon, shown above. You can
also highlight the Wireless PrintServer and then click on Status to select
Device Information. The Bi-Admin pro gram displays the W ireless PrintServer’s
information in a read-only window, and gives you the following information:
Hardware ID: 0620103428
Firmware Version: 6010
Protocol ID: 003F
Default Name: SCA71107
Server Name: SCA71107
NetWare Info:
Master File Server:
NDS Tree Name:
NDS Tree Context:
Print Server Mode Status:
Remote Printer Mode Status: N/A
AppleTalk Info:
Printer Type:
SCA71107:LaserWriter
TCP/IP Info:
IP Address: 192.168.1.78
Gateway Address: 192.168.1.254
Subnet Mask: 255.255.255.0
Email Server IP Address: 0.0.0.0
Printing Account Name: N/A
Redirect Account Name: N/A
SMB Info:
Domain Name: WORKGROUP
You can save this information to a text file by clicking Save to Text in the
Device Information window and giving Bi-Admin the location to which the
file should be saved.
Using Bi-Admin
Wireless PrintServer
2. When the Bi-Admin program appears, it will automatically scan the net-
work for available Wireless PrintServer hardware. Any hardware found on
the network will appear in the Default Name, Device Name, and Printer
Port categories on the right hand side of window. Default Name is the SC
number located on the back or bottom of the Wireless PrintServer unit, and
cannot be changed.
3. When any change or operation is ex ecuted, you will be prompted for a pass-
word. Enter the password, making sure to use the same case (i.e. upper or
lower) that you used when creating the password.
“Device name” is a nickname that you can give the Wireless PrintServer to
make it more user-friendly for users on the network. It can be changed with BiAdmin by clicking on Configuration, then System.
“Printer Port” displays the model of the Wireless Printserver that you are using.
Bi-Admin Help Files
The Help files for the Bi-Admin program can be accessed by clicking on Help
in the Menu bar. These help files offer extensive advice and details about all of
the Wireless PrintSer ver’s functions and capabilities.
NNoottee::
Sometimes the Wireless PrintServer's
EErrrroorr
or
AACCTT
LED may light
up or flicker as it accepts your configuration changes, which is normal.
Instant Wireless™ Series
Page 12

1817
The Wireless PrintServer comes with a default device name printed on the bottom of the unit, and always starting with the pref ix SC (example: SC489392).
The SC name is the name of the W ireless PrintServer any time users on the network query it . To make the Wireless PrintServer more user-friendly, you can
give it a uniquedevice name to help identify its location. (example: Marketing).
To change the Wireless PrintServer’s device name, click once on the Device
Name of the Wireless PrintServer you want to affect, then click on
Configuration, and then System. The System Configuration window will
appear. To include the Wireless PrintServer in a group (for administrative use),
use the Group Name option, which appears as a drop-down menu.
Enter a new device name for the W ireless PrintServer in the Device Name field.
When you finish, click on Save. The new setting will be stored in the Wireless
PrintServer unit. To verify the change, click on the Refresh icon in the BiAdmin menu bar. Bi-Admin will search the network for available PrintServers
and report back with their device names.
If you are not using multiple protocols on your network, you may want to disable one or more of the Wireless PrintServer's internal protocols; this may help
reduce unwanted network traff ic.
T o disab le one of the Wireless PrintServer's protocols, click once on the Device
Name of the Wireless PrintServer you want to change, then click
Configuration, followed by System. The System Configuration window will
appear. Each protocol is listed, along with Enable and Disable buttons. Enable
or disable the protocols you want, then click on Save to save the changes.
CCaauuttiioonn!!
Always leave at least one protocol enabled on the
Wireless PrintServer. Disabling all protocols could leave
you without a way to communicate with the unit..
Unless you require TCP/IP to be disabled, leave it alone.
Changing the Device Name
Enabling and Disabling Protocols
Wireless PrintServer
Refreshing the Device List:
The Refresh Icon
To force Bi-Admin to refresh its list of PrintServers on the
network, click Refresh, and Bi-Admin will scan the net-
work for available PrintServers to update the Default
Names, Device Names, and Printer Port charts.
Checking the Status of a Printer Port:
Printer Status Icons
The numbered Printer Port icons let you to check the name, status, and printing details of each printer attached to the W ireless PrintServer . A password may
be required to access this information. You may be able to configure some
printers’ settings within the Printer Status window.
The W ireless PrintServer onl y sho ws as many parallel port icons as it has ports.
For example, with this model, only two parallel port icons will show. Because
Wireless PrintServers do not support serial printing, the serial port icon will
always remain gray and inaccessible.
The Wireless PrintSer ver's IP address can be easily changed at any time. Click
once on the Device Name of the Wireless PrintServer whose address you want
to change, then click on Init Device and Set IP Address, which will bring up
the Set IP Address window.
If the Default Name f ield is empty, enter the Wireless PrintServer’s SC number, which you copied from the Wireless PrintServer’s bar code sticker. Enter
the new IP Address, Gateway Address (optional), and Subnet Mask for the
Wireless PrintServer, then click Set. The new settings will be written to the
Wireless PrintServer unit.
Also, if you have a DHCP ser ver, you can enable DHCP and leave all the IP,
Gateway, and Subnet values on zero. See the section on DHCP Support for
the Wireless PrintServer for more information.
Setting the Wireless PrintServer’s IP Address
Instant Wireless™ Series
Page 13

Logical Port Configuration:
Logical Port Configuration Icon
To set or change the Wireless PrintServer’s logical port settings, highlight the Wireless PrintServer to be changed and
click on the Logical Port icon (shown here). The Logical
Port Configuration window will appear. Make any
changes to the settings, and click on Save to Device when
you are finished.
Upgrading the Firmware:
The Firmware Upgrade Icon
To make sure that the Wireless PrintServer is running its
most current version of firmware, upgrade the device’s
ROM chip regularly. To do so, you must be able to access
the Wireless PrintSer ver device from your computer. Click
on the Upgrade Firmwareicon and follow the instructions
on the screen.
Exiting Bi-Admin:
The Application Exit Icon
To exit the Bi-Admin program, just click on the Exit icon.
Configuring Wireless:
The Wireless Icon
To configure the wireless settings, just click on the
Wireless icon.
2019
Wireless PrintServer
The Bi-Admin program can locate Wireless PrintServers on networks other
than your own, given your network is running TCP/IP across a WAN or other
network-to-network link via a router. To attach Bi-Admin to a remote Wireless
PrintServer located on a remote network, click on Init Device, then Attach.
The Add Cross Segment PrintServer window will appear. Enter the IP
address of the remote unit, then click Set. The remote Wireless PrintServer will
appear in the list of available PrintServers, allowing you to configure it.
If the Wireless PrintSer ver seems locked up for any reason, you can reset it
from the Bi-Admin program. To reset a Wireless PrintServer, click once on the
Device Name of the Wireless PrintServer you want to reset, followed by Init
Device, then Reset Device. You can also reset it by pressing the Reset button
on the back of the unit, or by unplugging its power cord.
If you have made ir reversible changes in configuration that have rendered the
Wireless PrintServer unusable, or if y ou simply want to start over from scratch,
you can set the Wireless PrintServer back to the default mode so that the device
will operate just as it did when you purchased it. Click on Init Device, then
Restore Factory Default.
CCaauuttiioonn!!
Restoring Factory Default will
eerraassee AALLLL
of the work that
you have done on this unit since purchasing it.
Attaching Bi-Admin to a Remote Wireless PrintServer
Resetting the Wireless PrintServer
Restoring Factory Default
Instant Wireless™ Series
Page 14

When the Configure Server screen appears, enter the Wireless PrintServer
name (in the example shown here SCA71107). Then enter your password (if
you created one) into the Passw ord dropdo wn bo x and type it again in the Verify
Password to confirm it. Check all boxes that apply to your network next to the
Enable area under Protocols. Generally, AppleTalk is only for Macintosh networks. If you are unsure, however, you may check all boxes. This option,
while giving you the greatest chance of connection, increases network traff ic.
Once you’ve made all your choices, click the Save button.
Click the Printers tab to open the Printer Status screen. On this screen, you
will be able to see the status of any printers connected to the Wireless
PrintServer. You can also test the printers by clicking the Print T est Page but-
ton corresponding to the printer you want to test.
The Server Page
The Printer Page
22
Wireless PrintServer
21
Configuring the Wireless PrintServer
Using the Web-based Utility
You can use the Wireless PrintServer’s built-in Web-based Utility to conf igure
the Wireless PrintSer ver. In order to open the Utility, follow the instructions
below.
Open your web browser and type http:// followed by the Wireless
PrintServer’s IP address in the browser’s Address box. Use the Bi-Admin software to find the IP address. Press Enter.
The Passw ord Screen will appear ne xt. Leave the User Name field blank. The
Passw or d f ield will be blank as well. If you want to password protect the
Wireless PrintServer, enter a password now. If you don’t want to be required
to enter this password every time you log on, check the box next to Save this
password in your password list. This will automaticall y log you in when you
return to this page. (Note: If you change your password, the automatic login
will not work until you save the new password over the old one.) If you decide
to enter a password, do so and click the OK button. Otherwise, just click the
OK button.
Accessing the Web-based Utility
Instant Wireless™ Series
Page 15

Click the Wireless tab to allow you to view information about the Wireless
PrintServer. No values can be changed on this screen. This screen is for information only. Clicking the Refresh button causes the Wireless PrintServer to
retrieve this information again.
The Wireless Page
24
Wireless PrintServer
Click the TCP/IP tab to view or change the TCP/IP values of the Wireless
PrintServer. If you are using DHCP to assign IP addresses, select DHCP
Client. If you need to assign the Wireless PrintServer a Fixed IP Address
(also known as Static IP Address), select this option and enter the appropriate
values under Device IP Address, Router IP Address, and Subnet Mask. To
find your router’s IP address, consult your router’s documentation. The Device
IP Address and Subnet Mask are the same as those of any PC connected to the
network. If you change the Wireless PrintServer’s IP address, make sure you
that you reconnect to the Wireless PrintServer using that new IP address.
Otherwise, you will not be communicating with the Wireless PrintServer.
Under the Connection settings, you can set how long you want the Wireless
PrintServer to delay between attempting connections to the network. You can
also specify the number of times that the Wireless PrintSer ver will attempt to
make a connection. Enter your chosen values in the boxes provided.
If you want to reset the settings for this screen, you can click the Retrieve
Defaults button to return to the factory default settings.
If you make any mistakes prior to saving, you can simply hit the Cancel button, which will exit the screen without making any changes.
Once you are certain of any changes you have made, click the Save button to
implement the changes.
The TCP/IP Page
Instant Wireless™ Series
23
Page 16
Advanced Properties
The Adv anced Properties section of the Web-based Utility is for users who have
a thorough understanding of networks and network settings. Changing these
settings can cause interruption of network communication and make the
Wireless PrintServer cease to function properly. To access the Advanced
Properties, click the Advanced tab in the Web-based Utility.
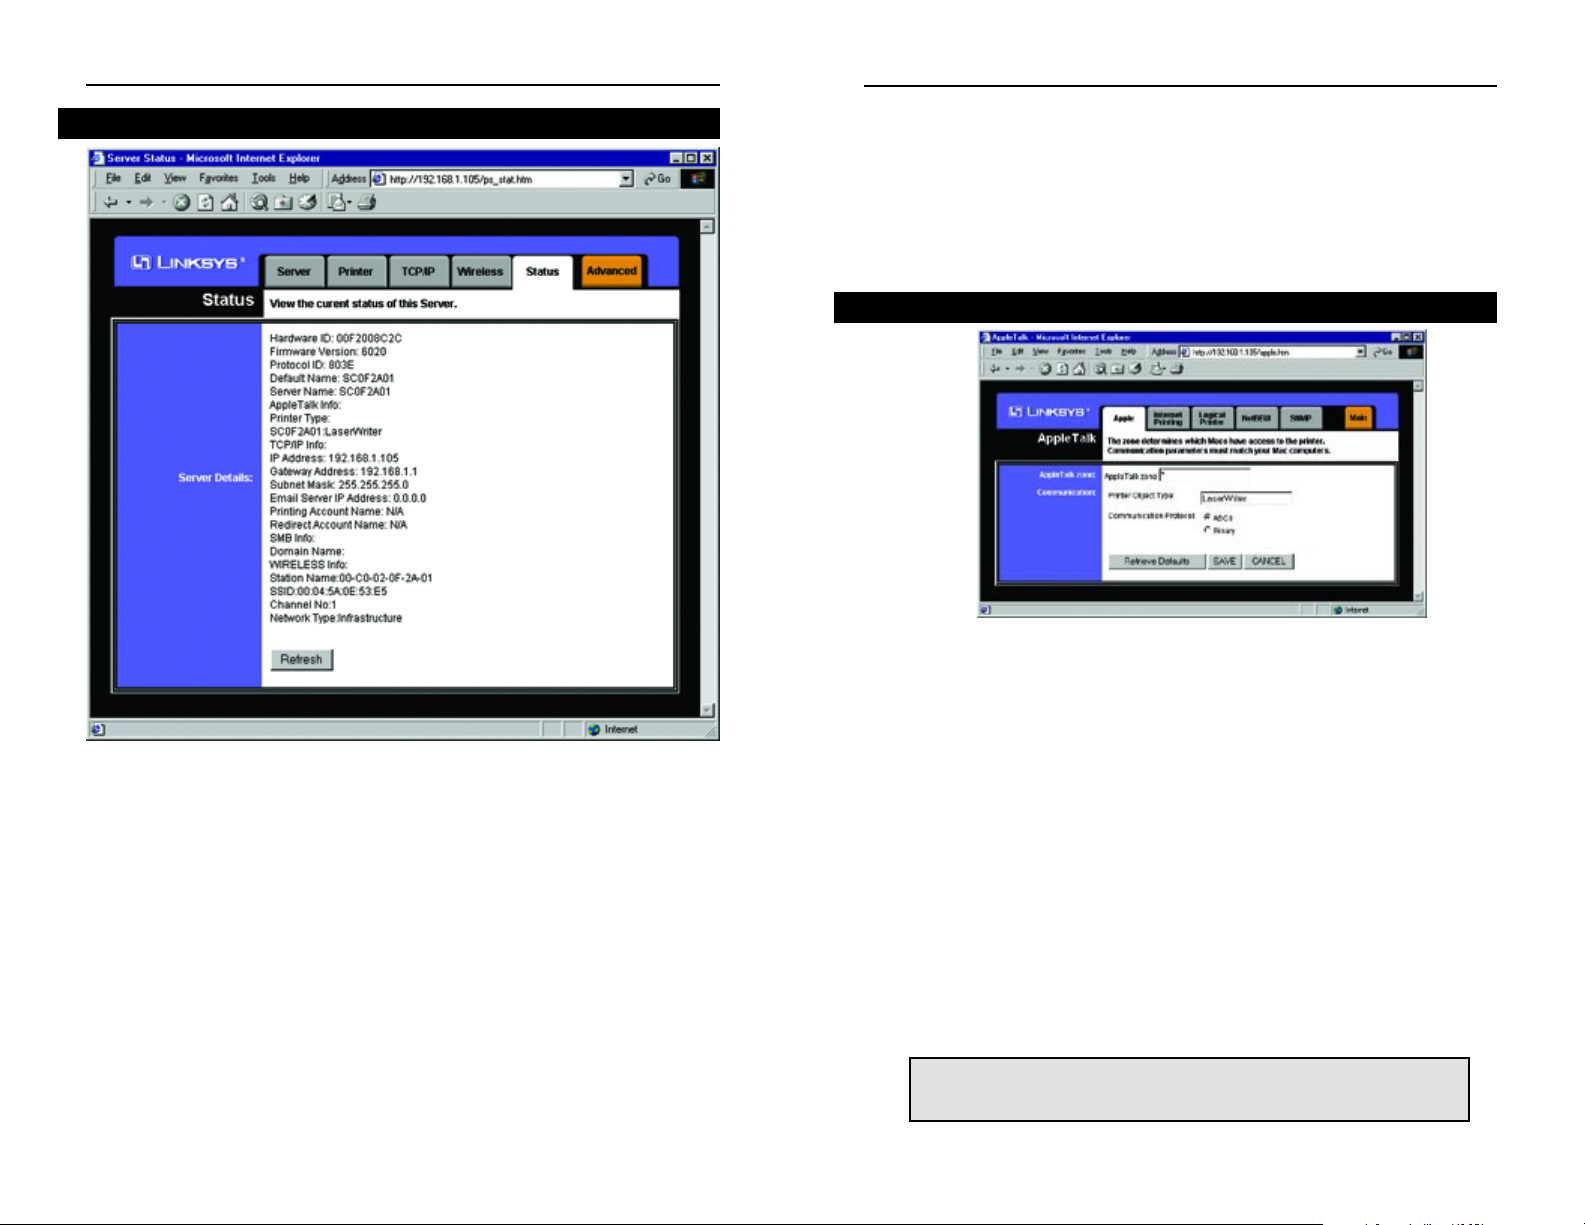
AppleTalk is a network communications protocol which allows computers to
talk to each other using Ethernet. Typically only Macintoshes use AppleTalk,
although other platforms can be made to use it with extra software.
AppleTalk Zones (if available) can be seen in the Chooser, the AppleTalk
Control Panel, and the Network Browser. Once you have determined the
AppleTalk Zone that you want the Wireless PrintServer to be associated with,
enter its name in the box next to AppleTalk zone.
The Printer Object type can be obtained from the manufacturer of the printer.
For each printer connected to the Wireless PrintServer, you will choose the
Communications Protocol that allows the devices on the network to communicate. Choose either ASCII or Binary for each printer, according to the recommendation of the printer’s manuf acturer.
If you make any mistakes prior to saving, you can simply hit the Cancel button, which will exit the screen without making any changes. Once y ou are certain of any changes you have made, click the Save button to implement the
changes.
The AppleTalk Page
NNoottee::
Linksys does not support its products in an Apple networking environment. If you encounter trouble, consult your printer documentation for possible help with settings.
26
Wireless PrintServer
25
Click the Status tab to allow you to view information about the Wireless
PrintServer. No values can be changed on this screen. This screen is for information only. Clicking the Refresh button causes the Wireless PrintServer to
retrieve this information again.
The Status Page
Instant Wireless™ Series
Page 17

Click the Logical Printers tab to view or change the logical printer settings of
the Wireless PrintSer ver.
For each Logical Printer, the following fields are available:
Logical Printer(Port) - Select the Logical Printer Port you wish to configure.
(L1 to L8). Click the Get Data button to update the display with the current
data for the selected logical printer.
Port - Select the Printer Port which the Logical printer will use.
Pre-string - The printer control string (in hex) to be sent to the printer before
each print job. This string cannot exceed 30 characters.
Post String - The printer control string (in hex) to be sent to the printer after
each print job. This string cannot exceed 30 characters.
Convert LF to CR+LF - If checked, LF (line feed) characters are changed to
CR+LF (carriage return + line feed).
If you make any mistakes, you can simply hit the Cancel button, which will
exit the screen without making any changes. Once you are certain of any
changes you have made, click the Save button to implement the changes.
The Logical Printers Page
28
Wireless PrintServer
27
Click the Internet
Printing tab to view or
change the Internet
Printing values of the
Wireless PrintServer.
Internet Printing allows
you to automatically
print any e-mails that
are sent to a specific email account on your
network. This is especially useful for printing information when
you are not connected
to the network. You can
print from anywhere
that you can access email.
The Mail Server IP Address is where you will enter the address of your mail
server. (This value must be a fixed IP address.) The Account Name and
Account Password must be entered next. Enter the password again to Verify
Password. Then, enter the time interval for the Wireless PrintServer to check
for e-mail to be printed, in hours and minutes in the Check Mail every: box.
You may even specify an e-mail address where mails that cannot be printed are
routed, which is useful for both graphic-intensive e-mails and for troubleshooting purposes. Enter this e-mail address in the Redirect unprintable Mail to:
box.
Under the Printer settings, enter the Printer Model in the box provided. You
can find this in the Device Manager. Then choose the Printer Port from the
drop down box.
Then, choose from the Options by placing a check mark next to your preferences. You can Print every E-Mail, choose to Print Banner Pages (default),
or Mail response when printed.
If you make any mistakes prior to saving, you can simply hit the Cancel button, which will exit the screen without making any changes. Once y ou are certain of any changes you have made, click the Save button to implement the
changes.
The Internet Printing Page
NNoottee::
Linksys does not provide any technical support for problems with IPP.
Instant Wireless™ Series
Page 18
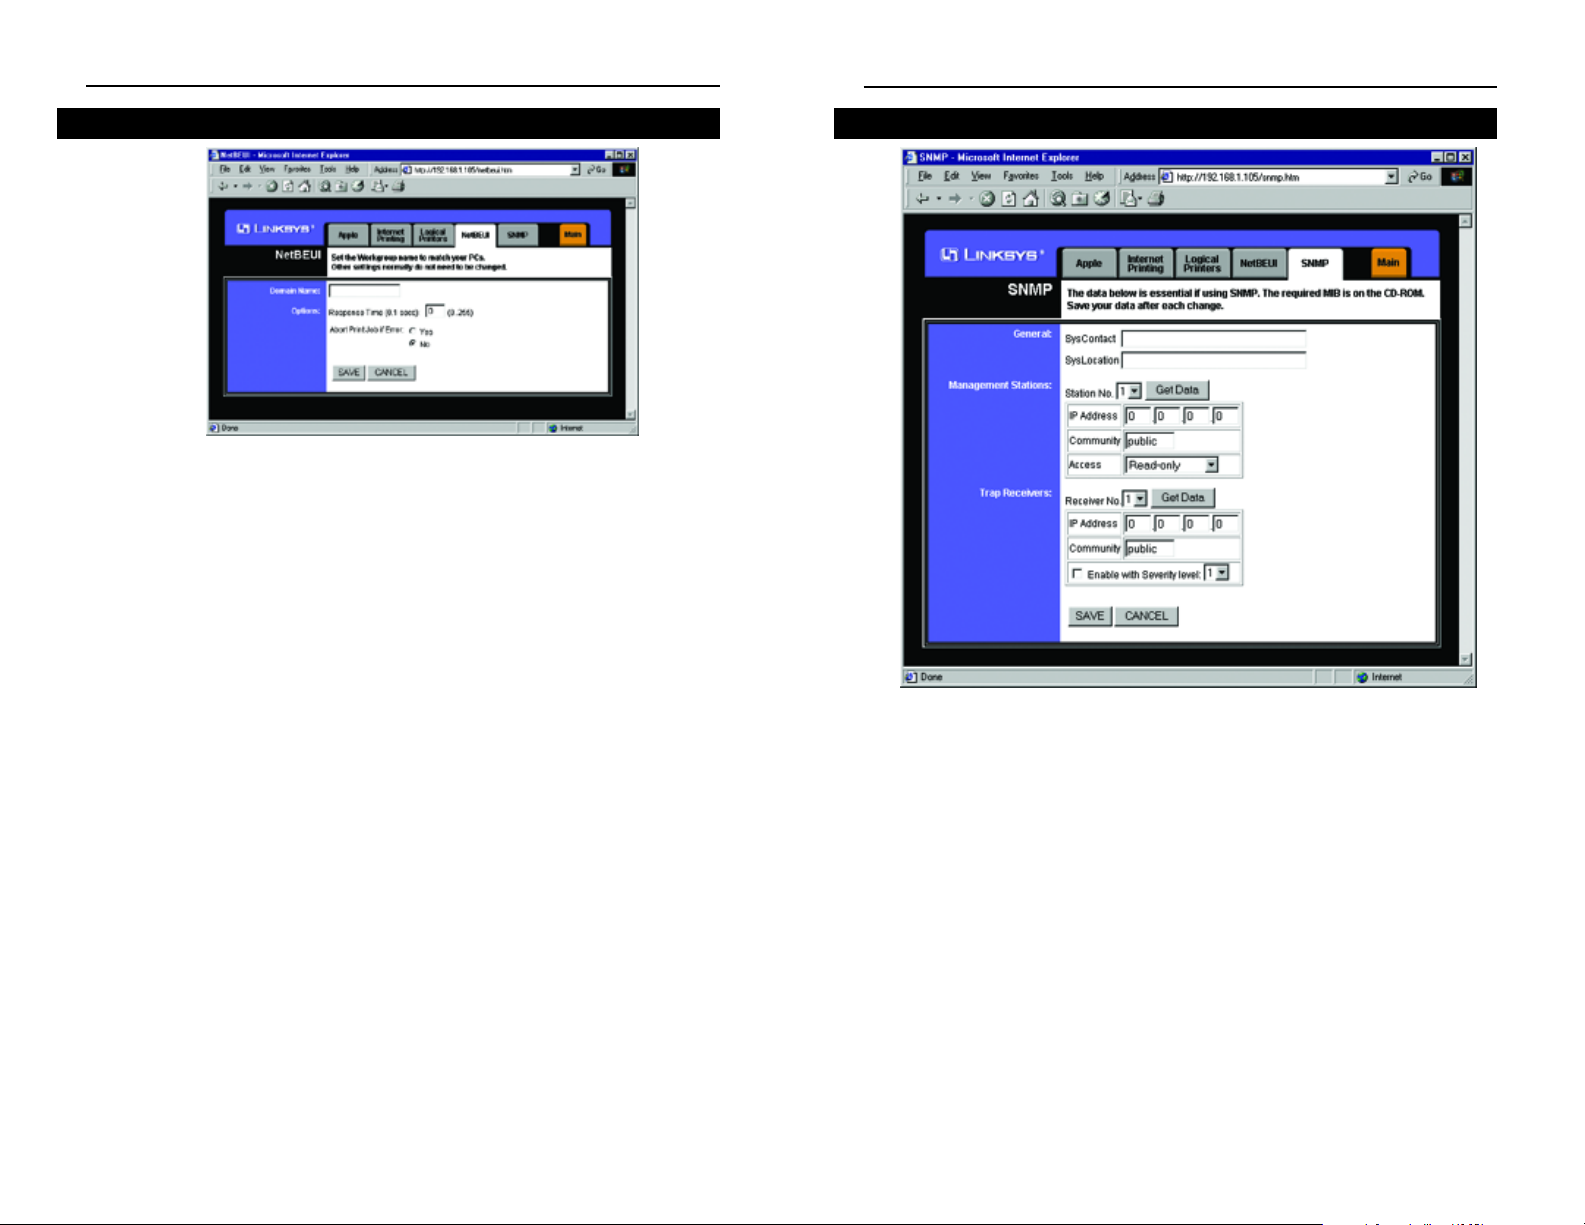
Click the SNMP tab to view or change the SNMP settings of the Wireless
PrintServer.
The Wireless PrintServer supports SNMP (Simple Network Management
Protocol). This allows network supervisors to monitor and control the
Wireless PrintServer using network management platforms such as HP
OpenView, IBM SystemView, etc.
The appropriate MIB file must be impor ted into your SNMP management
program using the Import-Compile command. Check your management
program for details on this procedure. The MIB file is provided in the Mib
folder on the CD-ROM. The name of the f ile is Mib2p.mib.
General
SysContact Text Field - Name of the contact person.
SysLocation Text Field - Location of the contact person.
The SNMP Page
30
Wireless PrintServer
29
Click the NetBEUI tab to view or change the NetBEUI connection settings
of the Wireless PrintSer ver.
Enter the name of the domain that you want the Wireless PrintServer associated with in the Domain Name box. If you are unsure of the Domain
Name, you can find it out by looking on any computer already on the network. In Windows 95, 98 and NT, right click Network Neighborhood and
select Properties. Under the Identification tab, there will be listed that com-
puter’s name, and the Domain to which it is connected. For Windows
Millennium and 2000, right click My Network Places. Then right click
Local Area Connection and choose Properties. Then right click TCP/IP
and choose Properties. The Domain name will appear. If you want the
Wireless PrintServer to be connected to that same Domain, enter that
Domain name here. If no Domain name exists there, you will use the
Workgroup name from that window.
Under Options, you can also specify the Response Time that you prefer for
the Wireless PrintSer ver. This is the amount of time (measured in seconds)
that the Wireless PrintServer will wait for a response from the network
before “timing out”.
You also have the option to Abort Print Job if Error. Selecting Yes here
will terminate the printing if there is an error of any kind. If you select No,
print jobs that have errors will be sent to the printer, but may not print properly.
If you make any mistakes prior to saving, you can simply hit the Cancel button, which will exit the screen without making any changes. Once you are
certain of any changes you have made, click the Save button to implement
the changes.
The NetBEUI Page
Instant Wireless™ Series
Page 19

Internet Printing Protocol (IPP)
IPP (Internet Printing Protocol) is a new standards-based system to allow
remote printing from a PC to any accessible printer. Normally, the printer will
be attached to a computer or other device which functions as an IPP Server . For
client PCs, it is necessary to install a compatible IPP Client program. The
Client must also know the IP Address or URL or the IPP Server.
The Wireless PrintServer contains the necessary firmware to act as an IPP
Server. No additional configuration is necessary. However, the following
requirements must be met:
· The Wireless PrintServer must have a valid IP Address. For printing via
the Internet, the Wireless PrintServer's IP Address must be external (allocated by your ISP), rather than an IP Address on your local LAN.
· Any Router, Gateway or Firewall linking your LAN to the Internet must
NOT block the IPP protocol.
· You must advise clients of the correct URL or IP Address of the IPP
Server. To use a URL rather than an IP Address, you need to register the
domain name for the URL.
· Unless clients are using Windows 2000, you must provide your clients
with the supplied IPP Client software . If it is not con venient to pr o vide the
CD-ROM, supply the IPP CLIENT.EXE f ile, located in the IPP folder.
Installing from the CD-ROM
1. Insert the CD-ROM in your drive. If the program does not start automatical-
ly, click the Start button, choose Run and type d:\setup.exe in the dropdown box (where D is the letter of your CD-ROM drive).
2. Follow the prompts until you reach the Select Installation screen, and select
IPP Client.
3. At the next screen, select the Install IPP Client option.
4. Click Next, and step though the remaining screens to complete the installa-
tion.
32
Wireless PrintServer
Windows 95/98/Millennium/NT 4.0/2000/XP IPP Client Setup
31
Management Stations
No. Select the Management station (1..4), and click the Get Data button to
update the display for the selected item.
IP Address Enter the IP Address of the management station, which has the
SNMP program installed.
Community This is a text field. Enter the name of the community, normally "public" or "private".
Access Select the desired level of access.
Trap Receivers
No. Select the Trap Receiver number (1..4), and click the Get Data button
to update the display for the selected item.
IP Address Enter the IP Address of the Trap Receiver, which will be sent
the Trap message.
Community This is a text field. Enter the name of the community, normally "public" or "private".
Enable Check to enable; select the se v erity le v el. Note:Currently, all traps
are level one.
If you make any mistakes, you can simply hit the Cancel button, which will
exit the screen without making any changes. Once you are certain of any
changes you have made, click the Save button to implement the changes.
Instant Wireless™ Series
Page 20

5. Click Sav eto create the IPP port on your system. You will see a message con-
fir ming that the por t has been created, then the following dialog:
6. Either select an existing printer to use the new port, and click OK.
OR
Click the Add New Printer button to create a new printer to use the IPP
port. This will start the Add Printer wizard. Follow the prompts to complete
the process. Ensure that the new printer uses the IPP port.
Installation is now complete.
· To create additional IPP Ports, repeat the entire procedure.
· The Proxy Server and other options are set individually for each IPP Port.
Changing the IPP Port Settings
After the IPP port is created, you can reach the Configure IPP Port screen by:
1. Open the Printers folder (Start - Settings - Printers)
2. Right-click the IPP Printer and select Properties.
34
Wireless PrintServer
33
Installing using IPP CLIENT.EXE
1. Run this program to unzip the included files.
2. The IPP Setup program will then r un.
3. Follow the prompts to complete the installation.
IPP Client Configuration for Windows 95/98/Millennium/NT 4.0
1. Run the Add IPP Port program entry created by the installation. A screen
like the following will be displayed.
2. If Internet access from your location is via a Proxy Server, check Access IPP
Server via Proxy Server, and enter details of y our Pro xy Server. (This will be
the same as your Browser configuration.)
3. Enter the IP Address or URL of the IPP Server.
4. Click Select Device Port to view the available ports on the IPP Server and
select the appropriate port. A connection to the IPP Server will be established at this time.
Instant Wireless™ Series
Page 21
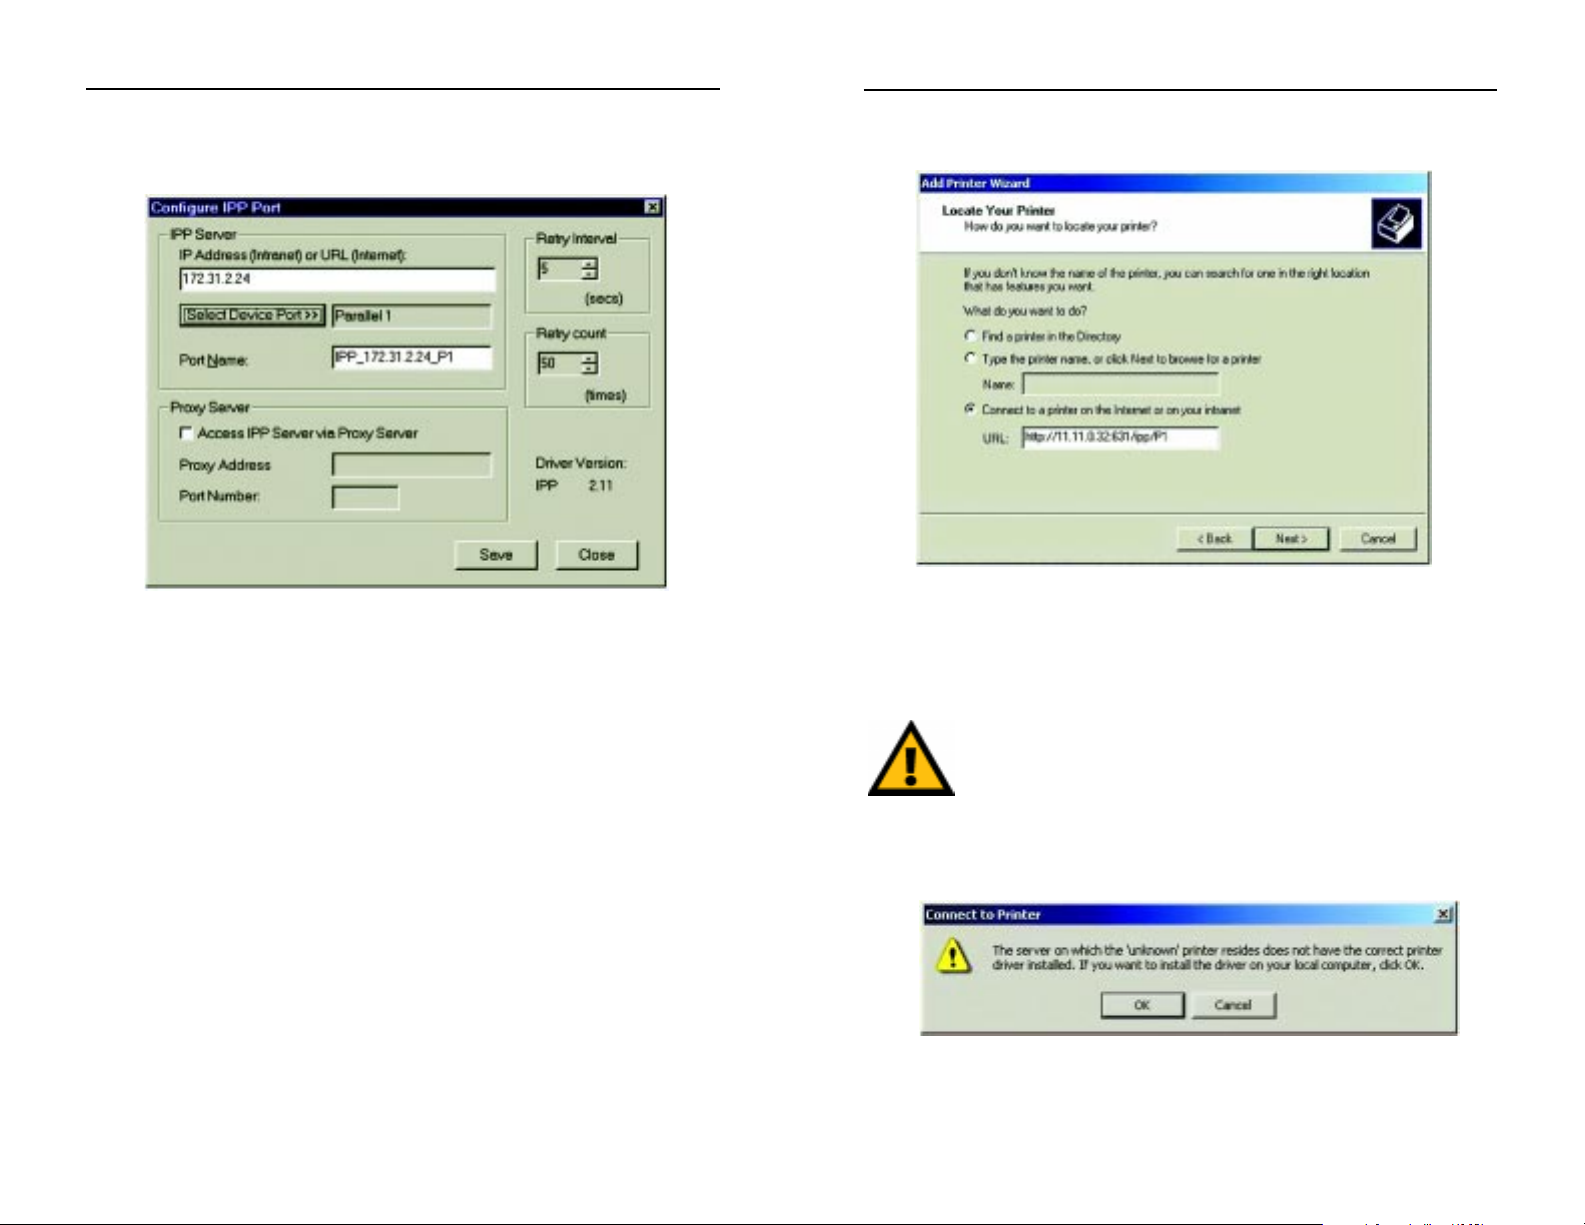
2. Select Network Printerand click Nextto see the Locate your Printer screen,
as shown below.
3. Select Connect to a printer on the Internet or on your intranet, and enter the
URL of the IPP Server as follows, where ip_address represents the IP
Address of the IPP Server, and 631 is the port number.
Parallel Port 1 ip_address:631/ipp/P1
These entries are case sensitiv e.They must be entered as shown,
with "ipp" in lower case, and P1 in UPPER case.
4. If the connection can be established, and the printer on that port is on-line,
the following dialog will be displayed.
5. Click OK and select the printer manufacturer and model to match the printer connected to the port on the IPP Server.
36
Wireless PrintServer
35
3. Click the Port Settings button (Details or Port tab, depending on your ver-
sion of Windows). The Configure IPP Port screen (shown below) will
appear.
There are two settings - Retry Interval and Retry Count - which can be
adjusted if you have problems connecting to the IPP Server.
· Retry Interval sets the time interval (in seconds) between connection
attempts. Increase this number if you have a poor connection, or the
remote server is very busy.
· Retry Count sets how many connection attempts will be made. Increase
this number if you have a poor connection, or the remote ser ver is very
busy.
IPP Client Setup for Windows 2000 and XP
Windo ws 2000 and XP ha v e their o wn IPP Client, and there is no need to install
the supplied IPP Client Software. To use this IPP Client with the Wireless
PrintServer, follow this procedure:
1. Start the Add Printer wizard.
Instant Wireless™ Series
Page 22

38
DHCP Support for the Wireless
PrintServer
To use DHCP, which assigns non-static IP addresses, you must have a DHCP
server and DHCP management software. Otherwise, the Wireless PrintServer's
IP address will remain unknown, and connecting to it will impossible. In this
case, ignore DHCP and configure the Wireless PrintServer for a static IP
address as described in previous sections.
To enable DHCP, you must run the Bi-Admin program. When Bi-Admin loads,
it scans the network for PrintServers and displays a list of PrintServers.
Highlight the W ireless PrintServer to be set up, enter the Wireless PrintServer’s
password if one has been assigned, and click OK.
After entering the program and selecting the Wireless PrintServer to be configured, click on Configuration in the menu and choose TCP/IP from the
drop-down field. The TCP/IP Configuration window will appear. Select
Enable to enable DHCP, then click Save to Device. You can exit the Bi-Admin
program. To install the Wireless PrintServer driver , see the section on Windows
Driver Setup.
NNoottee::
For help with the Internet Mail Printing Configuration features, see
the guide in D:\Not_supp\Manual directory on the Wireless PrintServer’ s
Setup CD. Linksys does not provide technical support for this option.
Wireless PrintServer
6. Click Next and complete the Wizard.
The IPP printer is now ready for use.
Using IPP Printers
The IPP Printer can be selected and used like any other Windows printer. If the
IPP Server is not on your network, your Internet connection needs to be active.
If you wish to check the availability of the remote IPP Server, you can use the
Query IPP Printer program installed with Add IPP Port.
An IPP Server may be unavailable for any of the following reasons:
· It is powered off.
· A printer problem has caused the IPP Server to cease responding, and a
restart (reboot) is required.
· The Server's IP Address has changed.
· The Internet connection for the IPP Server is down.
· Network congestion causes the connection attempt to time out.
If using the supplied IPP Client software, there are two settings -Retry Interval
and Retry Count - which can be adjusted if you have problems connecting to
the IPP Server.
See the previous section Changing the IPP Port Settings for details.
37
Instant Wireless™ Series
Page 23

Appendix
Normal printing only sends print signals from a PC to a printer. Bi-directional printing, also called bitronic printing, refers to a printer's ability to do just
the opposite- talk back to a PC to notify it of a print job status, paper jams, etc.
This two-way communication technology can be found in HP, IBM, Panasonic,
and other laser or color printers where close contact between the PC and printer is key. In color printing, for example, the printer "informs" the PC of its constant status in order to mix color inks correctly for optimal quality output.
Bi-directional communication, communication from a printer to a PC, is normally handled by a combination of the printer hardware and special software
on your computer. Bi-directional printers generally have highly advanced parallel interfaces. These printers often require special parallel ports in order to
take full advantage of their features.
Using a bi-directional printer on a network poses unique challenges. Unlike a
direct PC-to-printer connection in which a bi-directional printer can easily send
its signals back to the host PC through the computer’s parallel port (which is
normally located only a few feet away from the printer), a networked printer
faces the problem of having to route messages bound for a particular PC
through a large array of hubs, switches, file servers, and computers.
Unfortunately, most printers are not equipped to handle the complexities of
printer-to-PC communication across a network. That does not mean that they
can’t be used on a network, however.
Linksys designed the Wireless PrintSer vers to function with both regular as
well as bi-directional printers. Standard print servers cannot work with bidirectional printers, but the Wireless PrintSer ver features a custom design to
support both parallel as well as bi-directional parallel interfaces. However, the
Wireless PrintServer cannot pass messages from the printer back to the printing PC -- this limitation is simply an industry standard, and not one of the
Wireless PrintServer itself.
However, the Wireless PrintServer can check any printer’s online and printing
status on the network with the Bi-Admin management utility software packaged with the Wireless PrintSer ver. The status-checking feature built into the
management software does not require a bi-directional printer to function. If
your printer came with special bi-directional software allowing you to monitor
40
About Bi-directional Printing
Instant Wireless™ Series
Troubleshooting
If the Wireless PrintSer ver is not working cor rectly, follow the advice in this
chapter. If you have trouble printing, see the Hardware section first, and then
go to the Printing section. If this Troubleshooting section does not resolve your
problem, please see the Contact Information page to contact Technical Support.
1. All the LEDs on the front of the Wireless PrintServer are off.
• Check the power supply and the power connection.
2. The Wireless PrintServer's Status LED stays lit continuously.
• Reset the Wireless PrintServer by unplugging the po w er suppl y and plugging
it back in or pressing the Reset button on the back of the W ireless PrintServer.
3. I am using DHCP, and the Wireless PrintSer ver gets an IP Address conflict
involving the Wireless PrintServer.
• If the Wireless PrintServer is left on when the DHCP Server is turned off, the
Wireless PrintServer will retain its IP Address without informing the DHCP
server. Reset the W ireless PrintServer so it will obtain a new IP Address. This
problem also arises if you assigned a static IP Address within the range used
by the DHCP server. If so, use another address NOT within the range used
by the DHCP server.
4. The LED on the side of the Wireless PrintServer is not lighting up.
• Check your cabling and make sure that the Link LED on your hub or switch
is lit up. Change the dip switchsettings on the Wireless PrintServer.
1. A printer connected to the Wireless PrintServer cannot print or prints garbage.
• Check the following:
1. Cable connection between the Wireless PrintSer ver and printer.
2. The printer driver in the application program or Windows matches the
printer.
3. Cabling distance is too long if it exceeds 15 feet.
2. The Configuration button on the Printer Status screen in Bi-Admin is grayed out,
even though my printer is bi-directional.
• The button is unavailable until the printer has finished its print jobs and sits
idle.
Hardware Issues
General Printing Issues
39
Wireless PrintServer
Page 24

printer status, do not use it with the Wireless PrintSer ver - the software is most
likely not network-capable. For best results, turn off the printer’s bi-directional
function either by (1) removing any bi-directional printing software from your
network computers, and/or (2) turning off the printer’s bi-directional print feature inside of the printer’s on-board menus (if it has menus). Your printer’s user
guide should be able to provide specific instructions for doing this.
The Wireless PrintServer is fully compatible with Windows 95, 98,
Millennium, NT, and 2000.
When used with Windows 95, 98, Millennium, 2000 and NT, the Wireless
PrintServer uses the TCP/IP protocol for network communication. Each computer on your network that needs Wireless PrintServer access will need to have
the TCP/IP protocol installed. TCP/IP installation f iles are included on your
original Windows 95, 98, Millennium, NT, or 2000 CD-ROM.
Please be aware that although Linksys provides instructions for the setup of the
TCP/IP protocol, these instructions are provided for reference only. Linksys
will not provide technical support for the configuration and troubleshooting of
the TCP/IP protocol. For full instructions on using TCP/IP, consult your operating system’s user guide.
41
Glossary
10BaseT - An Ethernet standard that uses twisted wire pairs.
100BaseTX - IEEE physical layer specification for 100 Mbps over tw o pairs of
Category 5 UTP or STP wire.
AppleTalk - An Apple Computer networking system that support Apple's proprietary local talk.
Boot - To cause the computer to star t executing instructions. Personal computers contain built-in instructions in a ROM chip that are automatically executed
on startup. These instructions search for the operating system, load it and pass
control to it.
Browser - A browser is an application prog ram that provides a way to look at
and interact with all the information on the World Wide Web or PC. The word
"browser" seems to have originated prior to the Web as a generic term for user
interfaces that let you browse text files online.
Buffer - A buffer is a shared or assigned memory area used by hardware
devices or program processes that operate at different speeds or with different
sets of priorities. The buffer allows each device or process to operate without
being held up by the other. In order for a buffer to be effective, the size of the
buffer and the algorithms for moving data into and out of the buffer need to be
considered by the buffer designer. Like a cache, a buffer is a "midpoint holding place" but exists not so much to accelerate the speed of an activity as to
support the coordination of separate activities.
Category 5 - ANSI/EIA (American National Standards Institute/Electronic
Industries Association) Standard 568 is one of several standards that specify
"categories" (the singular is commonly referred to as "CAT") of twisted pair
cabling systems (wires, junctions, and connectors) in terms of the data rates
that they can sustain.
Default Gateway - The routing device used to forward all traff ic that is not
addressed to a station within the local subnet.
Instant Wireless™ Series
Wireless PrintServer
NNoottee::
A Default Gateway is not required. Check with your network administrator.
About the Wireless PrintServer’s Software
42
Page 25

Ethernet - IEEE standard network protocol that specifies how data is placed
on and retrieved from a common transmission medium. Has a transfer rate of
10 Mbps. Forms the underlying transport vehicle used by several upper-level
protocols, including TCP/IP and XNS.
Firewall - A firewall is a set of related programs, located at a network gateway
server, that protects the resources of a netw ork from users from other networks.
(The term also implies the security policy that is used with the programs.) An
enterprise with an intranet that allows its workers access to the wider Internet
installs a firewall to prevent outsiders from accessing its own private data
resources and for controlling what outside resources to which its own users
have access.
Basically, a firewall, working closely with a router, examines each network
packet to determine whether to forward it toward its destination.
Firmware - Programming that is inserted into programmable read-only memory (programmable read-only memory), thus becoming a permanent part of a
computing device.
Full Duplex - The ability of a device or line to transmit data simultaneously in
both directions.
Gateway - A device that interconnects networks with different, incompatible
communications protocols.
Half Duplex - Data transmission that can occur in two directions over a single
line, but only one direction at a time.
Hardware - Hardware is the physical aspect of computers, telecommunications, and other information technology devices. The term arose as a wa y to distinguish the "box" and the electronic circuitry and components of a computer
from the program you put in it to make it do things. The program came to be
known as the software.
Hub - The device that serves as the central location for attaching wires from
workstations. Can be passive, where there is no amplification of the signals; or
active, where the hubs are used like repeaters to provide an extension of the
cable that connects to a workstation.
Instant Wireless™ Series
43
DHCP (Dynamic Host Conf iguration Protocol) - A protocol that lets network
administrators manage centrally and automate the assignment of Internet
Protocol (IP) addresses in an organization's network. Using the Internet's set of
protocol (TCP/IP), each machine that can connect to the Internet needs a
unique IP address. When an organization sets up its computer users with a connection to the Internet, an IP address must be assigned to each machine.
Without DHCP, the IP address must be entered manually at each computer and,
if computers move to another location in another part of the network, a new IP
address must be entered. DHCP lets a network administrator supervise and distribute IP addresses from a central point and automatically sends a new IP
address when a computer is plugged into a different place in the network.
DHCP uses the concept of a "lease" or amount of time that a given IP address
will be valid for a computer. The lease time can vary depending on how long a
user is likely to require the Internet connection at a particular location. It's especially useful in education and other environments where users change frequently. Using very short leases, DHCP can dynamically reconfigure networks
in which there are more computers than there are available IP addresses.
DHCP supports static addresses for computers containing Web servers that
need a permanent IP address.
Domain - A subnetwork comprised of a group of clients and servers under the
control of one security database. Dividing LANs into domains improves performance and security.
Driver - A workstation or server software module that provides an interface
between a netw ork interface card and the upper-la y er protocol softw are running
in the computer; it is installed during the initial installation of a network-compatible client or server operating system.
DSSS (Direct-Sequence Spread-Spectrum) - DSSS generates a redundant bit
pattern for each bit to be transmitted. This bit pattern is called a chip (or chipping code). The longer the chip, the greater the probability that the original data
can be recovered. Even if one or more bits in the chip are damaged during
transmission, statistical techniques embedded in the radio can recover the original data without -the need for retransmission. To an unintended receiver , DSSS
appears as low power wideband noise and is rejected (ignored) by most narrowband receivers.
Wireless PrintServer
44
Page 26

NetBIOS - The native networking protocol in DOS and Windows networks.
Although originally combined with its transport layer protocol (NetBEUI),
NetBIOS today provides a programming interface for applications at the session layer (layer 5). NetBIOS can ride over NetBEUI, its native transport,
which is not routable, or over TCP/IP and IPX/SPX, which are routable protocols.
NetBIOS computers are identified by a unique 15-character name, and
Windows machines (NetBIOS machines) periodically broadcast their names
over the network so that Network Neighborhood can catalog them. For TCP/IP
networks, NetBIOS names are turned into IP addresses via manual configuration in an LMHOSTS file or a WINS server.
There are two NetBIOS modes. The Datagram mode is the fastest mode, but
does not guarantee delivery. It uses a self-contained packet with send and
receive name, usually limited to 512 bytes. If the recipient device is not listening for messages, the datagram is lost. The Session mode establishes a connection until broken. It guarantees delivery of messages up to 64KB long.
Network- A system that transmits an y combination of v oice, video and/or data
between users.
Packet- A unit of data routed between an origin and a destination in a network.
Port - A pathway into and out of the computer or a network device such as a
switch or router. For example, the serial and parallel ports on a personal computer are external sockets for plugging in communications lines, modems and
printers.
PrintServer - A hardware device that enables a printer to be located anywhere
in the network.
RJ-45 (Registered Jack-45) - A connector similar to a telephone connector that
holds up to eight wires, used for connecting Ethernet devices.
Router - Protocol-dependent device that connects subnetworks together.
Routers are useful in breaking down a very large network into smaller subnetworks.
Server - Any computer whose function in a network is to provide user access
to files, printing, communications, and other ser vices.
Instant Wireless™ Series
45
IEEE - The Institute of Electrical and Electronics Engineers. The IEEE
describes itself as "the world's largest technical professional society -- promoting the development and application of electrotechnology and allied sciences
for the benefit of humanity, the advancement of the profession, and the wellbeing of our members."
The IEEE fosters the development of standards that often become national and
international standards. The organization publishes a number of jour nals, has
many local chapters, and several large societies in special areas, such as the
IEEE Computer Society.
IP Address - In the most widely installed level of the Internet Protocol
(Internet Protocol) today, an IP address is a 32-binary digit number that identifies each sender or receiver of information that is sent in packet across the
Internet. When you request an HTML page or send e-mail, the Internet
Protocol part of TCP/IP includes your IP address in the message (actually, in
each of the packets if more than one is required) and sends it to the IP address
that is obtained by looking up the domain name in the Uniform Resource
Locator you requested or in the e-mail address you're sending a note to. At the
other end, the recipient can see the IP address of the Web page requestor or the
e-mail sender and can respond by sending another message using the IP address
it received.
ISP - An ISP (Internet service provider) is a company that provides individuals
and companies access to the Internet and other related services such as W eb site
building and virtual hosting.
LAN - A local area network (LAN) is a group of computers and associated
devices that share a common communications line and typically share the
resources of a single processor or server within a small geographic area (for
example, within an office building).
Mbps (MegaBits Per Second) - One million bits per second; unit of measurement for data transmission.
NetBEUI (NetBIOS Extended User Interface) - The transport layer for
NetBIOS. NetBIOS and NetBEUI were originally part of a single protocol
suite that was later separated. NetBIOS sessions can be transported over
NetBEUI, TCP/IP and SPX/IPX protocols.
Wireless PrintServer
46
Page 27

TCP/IP - Transmission Control Protocol/Internet Protocol (TCP/IP) is the
basic communication language or protocol of the Internet. It can also be used
as a communications protocol in a private network (either an intranet or an
extranet). When you are set up with direct access to the Internet, your computer is provided with a copy of the TCP/IP program just as every other computer
that you may send messages to or get information from also has a copy of
TCP/IP.
Upgrade - To replace existing software or f ir mware with a newer version.
URL (Uniform Resource Locator) - The address that defines the route to a file
on the Web or any other Internet facility. URLs are typed into the browser to
access Web pages, and URLs are embedded within the pages themselves to provide the hypertext links to other pages.
UTP - Unshielded twisted pair is the most common kind of copper telephone
wiring. Twisted pair is the ordinary copper wire that connects home and many
business computers to the telephone company. To reduce crosstalk or electromagnetic induction between pairs of wires, two insulated copper wires are
twisted around each other. Each signal on twisted pair requires both wires.
Since some telephone sets or desktop locations require multiple connections,
twisted pair is sometimes installed in two or more pairs, all within a single
cable.
WAN - A communications network that cov ers a wide geographic area, such as
state or country.
Workgroup - Two or more individuals that share files and databases.
Instant Wireless™ Series
47
Software- Instructions for the computer. A series of instructions that performs
a particular task is called a "program." The tw o major categories of softw are are
"system software" and "application software." System software is made up of
control programs such as the operating system and database management system (DBMS). Application software is any program that processes data for the
user.
A common misconception is that software is data. It is not. Software tells the
hardware how to process the data.
Spread Spectrum - Spread Spectrum technology is a wideband radio frequency technique developed by the military for use in reliable, secure, mission-critical communications systems. It is designed to trade off bandwidth efficiency
for reliability, integrity, and security. In other words, more bandwidth is consumed than in the case of narrowband transmission, but the trade off produces
a signal that is, in effect, louder and thus easier to detect, provided that the
receiver knows the parameters of the spread-spectrum signal being broadcast.
If a receiver is not tuned to the right frequency, a spread-spectrum signal looks
like background noise. There are two main alternatives, Direct Sequence
Spread Spectrum (DSSS) and Frequency Hopping Spread Spectrum (FHSS).
Static IP Address - A permanent IP address that is assigned to a node in an IP
or a TCP/IP network.
STP (Shielded Twisted Pair) - Telephone wire that is wrapped in a metal sheath
to eliminate external interference.
Subnet Mask - The method used for splitting IP networks into a series of subgroups, or subnets. The mask is a binary pattern that is matched up with the IP
address to turn part of the host ID address field into a f ield for subnets.
Switch - 1. A data switch connects computing devices to host computers,
allowing a large number of devices to share a limited number of ports. 2. A
device for making, breaking, or changing the connections in an electrical circuit.
TCP (Transmission Control Protocol) - A method (protocol) used along with
the Internet Protocol (Internet Protocol) to send data in the form of message
units between computers over the Internet. While IP takes care of handling the
actual delivery of the data, TCP takes care of keeping track of the individual
units of data (called packet) that a message is divided into for efficient routing
through the Internet.
Wireless PrintServer
48
Page 28

Environmental
Dimensions: 5.91” x 8.66” x 1.18”(150mm x 220mm x 30mm)
Unit Weight: 5.6 oz. (0.16 kg)
Power: External, 12V DC, 800mA
Certifications: FCC Class B, CE Mark Commercial
Operating Temp: 0ºC to 40ºC (32ºF to 104ºF)
Storage Temp: -20ºC to 70ºC (-4ºF to 158ºF)
Operating Humidity: 10% to 85%, Non-Condensing
Storage Humidity: 5% to 90%, Non-Condensing
Instant Wireless™ Series
49
Specifications
Standards: IEEE 802.3 (10BaseT), IEEE 802.3u (100BaseTX),
IEEE 802.11b (Wireless), IEEE1284
Protocol: CSMA/CD
Ports: One 10/100 RJ-45 Port
One DB-25 Bidirectional Parallel Port
Transfer Speed:
LAN: 10Mbps or 100Mbps (Half Duplex)
20Mbps or 200Mbps (Full Duplex)
Parallel Ports: Up to 1.5Mbps
Wireless: Up to 11Mbps
Memory: 512KB Flash Memory
Button: Reset
Cabling Type: Network: UTP Category 5 or better
Printer: IEEE 1284 Standard Printer Cable
Wireless Range: Indoors:
up to
30M (100 ft.) @ 11 Mbps
up to
50M (165 ft.) @ 5.5 Mbps
up to
70M (230 ft.) @ 2 Mbps
up to
91M (300 ft.) @ 1 Mbps
Outdoors:
up to
152M (500 ft.) @ 11 Mbps
up to
270M (885 ft.) @ 5.5 Mbps
up to
396M (1300 ft.) @ 2 Mbps
up to
457M (1500 ft.) @ 1 Mbps
LEDs: LAN,WLAN,ACT,Err
Wireless PrintServer
50
Page 29

5251
Contact Information
For help with the installation or operation of this product, contact Linksys
Customer Support at one of the phone numbers or Internet addresses below.
Sales Information 800-546-5797 (LINKSYS)
Tech Support 866-242-8558
RMA Issues 949-261-1288
Fax 949-261-8868
Email support@linksys.com
Web http://www.linksys.com
FTP Site ftp.linksys.com
Extended Technical Support
The Wireless PrintServer supports the NetBEUI and Appletalk protocols,
Internet Mail Printing, Unix support, and much more. Howev er, Linksys is neither responsible nor liable for supporting these optional features, and will not
provide phone or online support for these features.
In the Not_supp directory on the Wireless PrintServer’s Setup CD, you'll find
software, drivers and informati ve how-to guides covering the installation of the
unsupported functions. The User Guides provided in the Not_supp directory
(PDF or DOC) have all of the information you need to set up and use these
functions.
Instant Wireless™ Series
Warranty Information
BE SURE TO HAVE YOUR PROOF OF PURCHASE AND A BARCODE
FROM THE PRODUCT'S PACKAGING ON HAND WHEN CALLING.
RETURN REQUESTS CANNOT BE PROCESSED WITHOUT PROOF OF
PURCHASE.
IN NO EVENT SHALL LINKSYS’LIABILITY EXCEED THE PRICE PAID
FOR THE PRODUCT FROM DIRECT, INDIRECT, SPECIAL, INCIDENTAL, OR CONSEQUENTIAL DAMAGES RESULTING FROM THE USE
OF THE PRODUCT, ITS ACCOMPANYING SOFTWARE, OR ITS DOCUMENTATION. LINKSYS DOES NOT OFFER REFUNDS FOR ANY PRODUCT.
LINKSYS OFFERS CROSS SHIPMENTS, A FASTER PROCESS FOR PROCESSING AND RECEIVING YOUR REPLACEMENT. LINKSYS PAYS
FOR UPS GROUND ONLY. ALL CUSTOMERS LOCATED OUTSIDE OF
THE UNITED STATES OF AMERICA AND CANADA SHALL BE HELD
RESPONSIBLE FOR SHIPPING AND HANDLING CHARGES. PLEASE
CALL LINKSYS FOR MORE DETAILS.
Wireless PrintServer
Page 30

© Copyright 2001 Linksys,All Rights Reserved.
http://www.linksys.com
 Loading...