

Page 1
Model No.
Quick Installation
Model No.
Voice
with 2 Ports for Voice-over-IP
Package Contents
• Phone Adapter with 2 Ports for Voice-over-IP
• Power Adapter
• Installation and Troubleshooting Guide on CD-ROM
•Network Cable
• Quick Installation
• Registration Information Card
• Vonage Service Materials
1
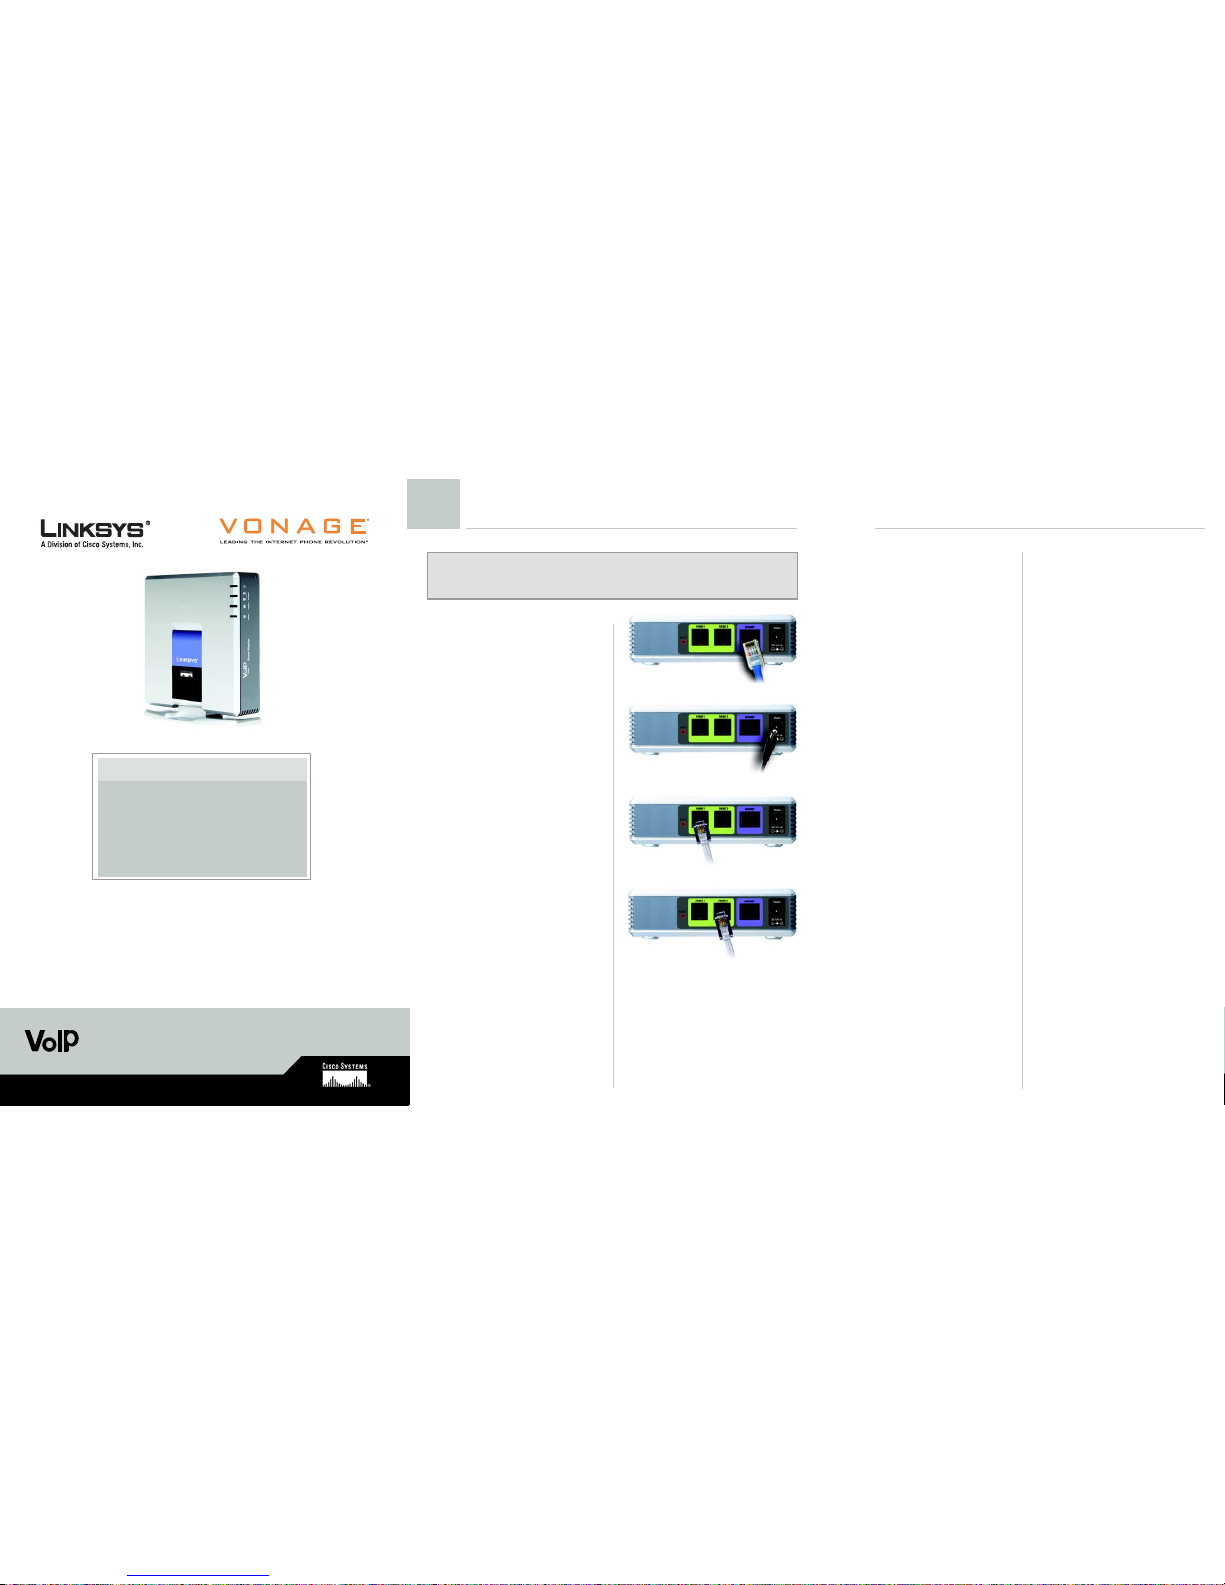
Connect the Phone Adapter
A Connect the included Ethernet
network cable to the Phone
Adapter’s INTERNET port.
B Connect the other end of the
cable to an available Ethernet
port on your network router.
C Connect the included power
adapter to the Phone
Adapter’s POWER port.
Connect the other end of the
power adapter to a standard
electrical outlet.
D Wait until the Phone LED on the
front panel of the Phone
Adapter is solidly lit. Then
connect your telephone or fax
machine to the Phone
Adapter’s PHONE 1 port using a
standard telephone cable.
E If you have a second Vonage
line, connect a second
telephone or fax machine to
the Phone Adapter’s PHONE 2
port.
F Pick up the telephone and
check for a dial tone. If you
don’t hear one, please consult
the troubleshooting section of
this installation guide.
G Once you hear a dial tone, call
800-342-1791 to complete the
installation process.
Follow the instructions you hear,
and then hang up the
telephone.
H To set up your voicemail, pick
up the telephone and press
*123.
When prompted for a
password, press 1234. Follow
the instructions you hear.
Then, you’re all set! Bon Vonage!
Congratulations! You’ve finally freed
yourself from the phone company.
PAP2 Ver. 2
Phone Adapter
A
D
E
This Quick Installation Guide has everything you need to get
your Vonage® Internet Phone Service working with the Linksys
Phone Adapter. Take a look at the equipment, follow the simple
instructions provided here, and in no time at all you’ll be part of
the telephone revolution.
IMPORTANT: First, visit www.vonage.com/activate to activate your Vonage
phone service. After you have activated your service, wait 30 minutes. Then proceed
to Step A.
C
Page 2
A Pick up the telephone and
check for a dial tone. If you
don’t hear one, consult the
troubleshooting section of this
installation guide.
B Dial a phone number. Vonage
supports 7-, 10-, and 11-digit
dialing. Use 7-, 10-, or 11-digit
dialing for calls in the same
area code as your Vonage
phone number. Use 10-, or 11digit dialing for calls outside of
your Vonage area code.
Advanced Users
If you want to configure the Phone
Adapter’s network settings through its
Web-based Utility, follow these
instructions:
A Use a telephone connected to
the PHONE 1 or PHONE 2 port
of the Phone Adapter.
B Press **** (in other words, press
the star key four times).
C You will hear, “Configuration
menu. Please enter option
followed by the # (pound) key
or hang up to exit.”
Press 110.
D Write down the IP address you
hear, and then hang up the
telephone.
E Launch a web browser on a
networked computer.
F In the Address field, enter the IP
address you wrote down. Press
the Enter key.
G On the Login screen, enter
admin in the Username and
Passw ord fields. Click Log In.
You can now configure the Phone
Adapter’s network settings.
For more information about the Webbased Utility, refer to the Installation
and Troubleshooting Guide on the
CD-ROM.
If you don’t hear a dial tone and the
PHONE 1 light is not on, follow the
checklist below until your problem is
solved.
• Make sure your phone is plugged
into the Phone Adapter’s PHONE 1
port.
• Make sure you can access Web
pages from a computer that is
connected to your router. If not,
check to see if your Internet
Service Provider (ISP) is having
connection issues in your area.
• Make sure that the phone
plugged into the Phone Adapter is
not connected to a wall jack (that
traditional phone companies use).
If it’s connected to a wall jack, the
Phone Adapter will not connect to
the Vonage service and you will
not get a dial tone.
• Check your device connections
against the installation instructions.
The order in which you turn on your
devices is very important.
• Many installation issues can be
resolved by resetting all of the
equipment. First, power down your
Computer, Phone Adapter, Router
and DSL or Cable Modem. Then,
turn the devices on in the following
order, DSL or Cable Modem,
Router, Phone Adapter, and
Computer.
If you are transferring your telephone
number, please keep in mind that
most people calling your current
phone number will ring your old line,
however, Vonage customers will ring
your Vonage line.
During the startup process, the Phone
Adapter’s Power light flashes. This
indicates that it is connecting to the
Vonage service. Refer to the list below
for more information on the Phone
Adapter’s lights and status:
• The Power light flashes
continuously: the Phone Adapter is
powering up.
• The Power light flashes two times
every second: the Phone Adapter
is obtaining an IP address.
• The Power light flashes three times
every second: the Phone Adapter
is obtaining its configuration from
Vona ge.
• The Power light flashes four times
every second: the Phone Adapter
is registering with Vonage.
• The Power, Phone, and Internet
lights flash continuously: the Phone
Adapter is downloading/
upgrading firmware; do not turn
it off.
• The Power and Phone lights
remain solid green: the startup
process is complete, and you
may now make and receive calls.
PAP2_V2-QI-60421NC JL
For additional information or troubleshooting
help, refer to the Installation and
Troubleshooting Guide on the CD-ROM. You
can also visit the following websites for more
troubleshooting help:
VONAGE
Troubleshooting
US: http://www.vonage.com/help
Canada: http://www.vonage.ca/help
Website
http://www.vonage.com
LINKSYS
Website
http://www.linksys.com or
http://www.linksys.com/support
Linksys is a registered trademark or trademark of
Cisco Systems, Inc. and/or its affiliates in the U.S.
and certain other countries. Copyright © 2006
Cisco Systems, Inc. All rights reserved.
Troubleshooting
911 SERVICE: Vonage’s 911
offering is different from that offered
by traditional telephone companies;
please visit www.vonage.com/911 to
learn more about it.
2
Make a Phone Call
3
 Loading...