

Page 1
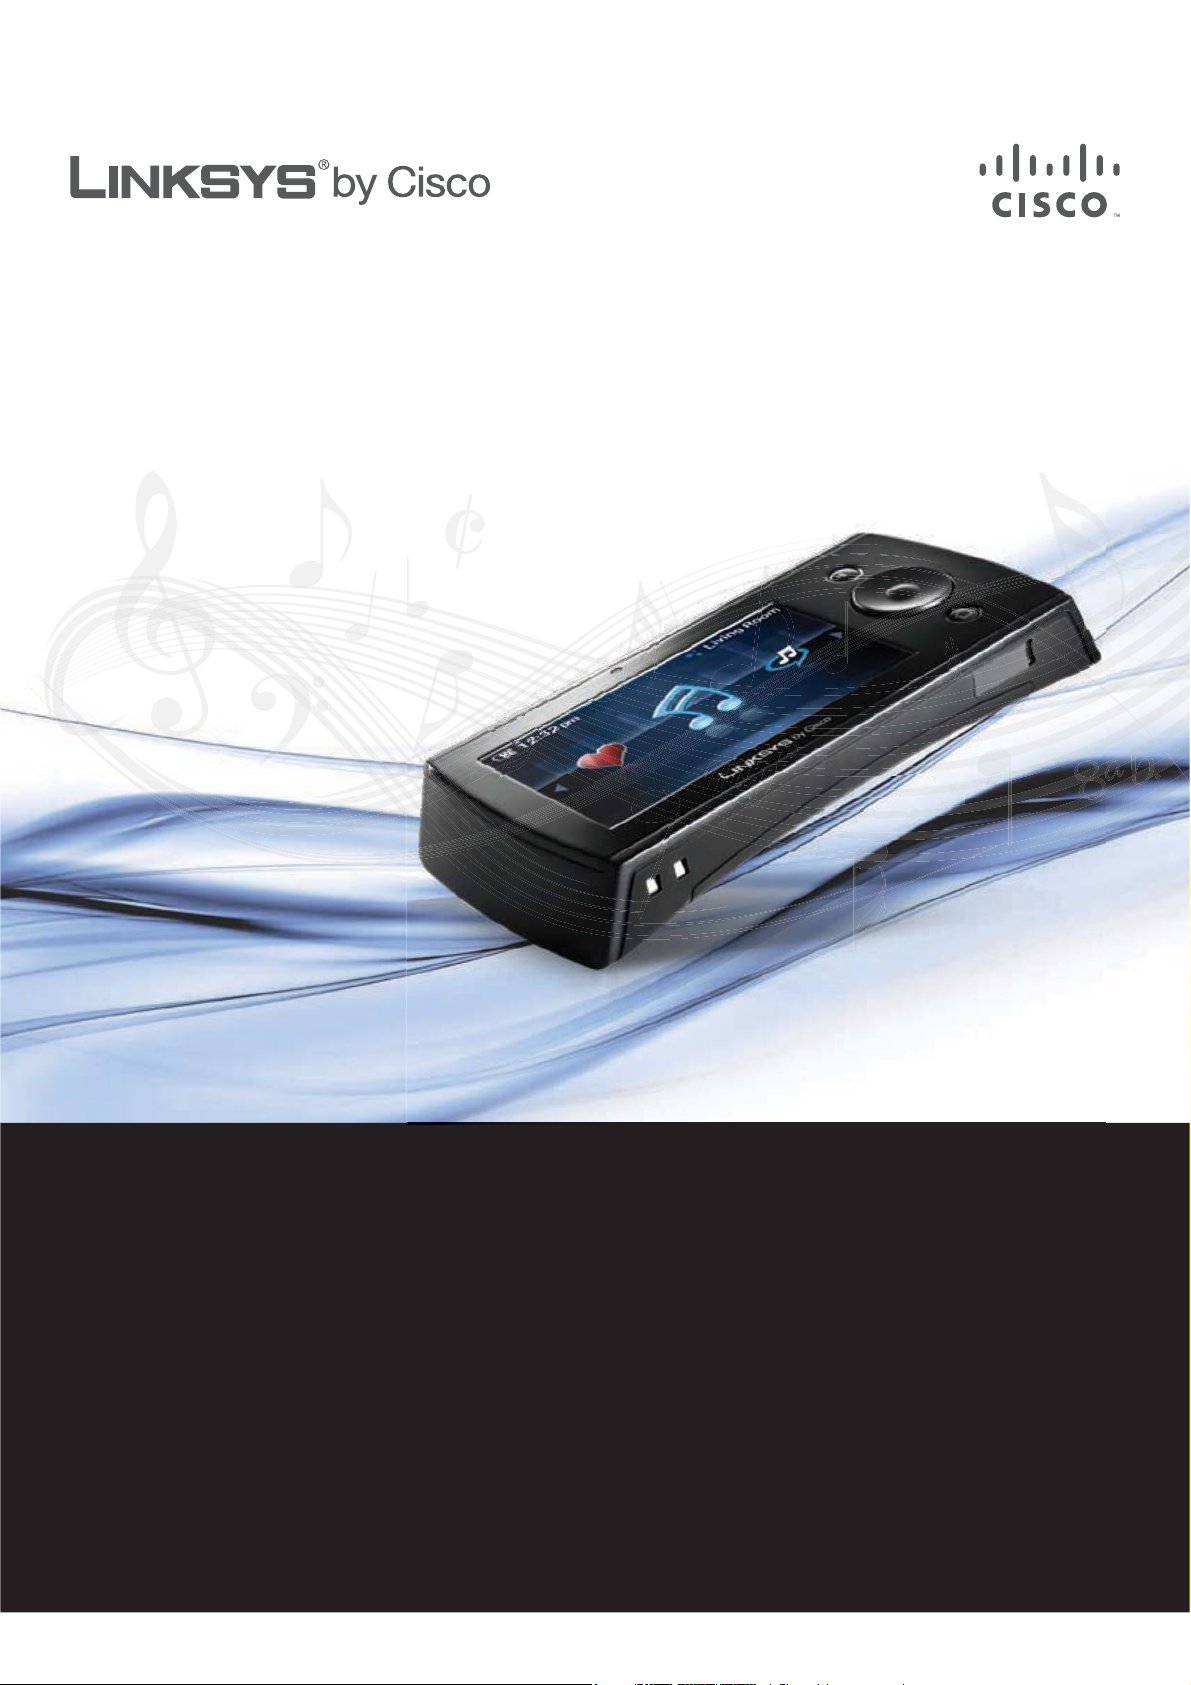
Wireless Home Audio
Controller
Wireless-N Touchscreen Controller
DMRW1000 User Guide
Page 2
Wireless Home Audio
About This Guide
Icon Descriptions
While reading through the User Guide you may see
various icons that call attention to specific items. Below is
a description of these icons:
NOTE: This check mark indicates that there is
a note of interest and is something that you
should pay special attention to while using the
product.
WARNING: This exclamation point indicates
that there is a caution or warning and it is
something that could damage your property or
product.
WEB: This globe icon indicates a noteworthy
website address or e-mail address.
About This Guide
Online Resources
Website addresses in this document are listed without
http:// in front of the address because most current web
browsers do not require it. If you use an older web browser,
you may have to add http:// in front of the web address.
Resource Website
Linksys www.linksys.com
Linksys International www.linksys.com/international
Glossary www.linksys.com/glossary
Network Security www.linksys.com/security
Support www.linksys.com/support
Copyright and Trademarks
Linksys, Cisco and the Cisco Logo are
registered trademarks or trademarks
of Cisco Systems, Inc. and/or its
affiliates in the U.S. and certain other
countries. Copyright © 2008 Cisco
Systems, Inc. All rights reserved.
Other brands and product names are
trademarks or registered trademarks
of their respective holders.
Controller/Wireless-N Touchscreen Remote
i
Page 3
Wireless Home Audio
Important Safety
Instructions
Read these instructions.1.
Keep these instructions.2.
Heed all warnings.3.
Follow all instructions.4.
Do not use this apparatus near water.5.
Clean only with dry cloth.6.
Do not block any ventilation openings. Install in 7.
accordance with the manufacturer’s instructions.
Do not install near any heat sources such as radiators, 8.
heat registers, stoves, or other apparatus (including
amplifiers) that produce heat.
Do not defeat the safety purpose of the polarized 9.
or grounding-type plug. A polarized plug has two
blades with one wider than the other. A grounding
type plug has two blades and a third grounding
prong. The wide blade or the third prong are
provided for your safety. If the provided plug does
not fit into your outlet, consult an electrician for
replacement of the obsolete outlet.
Protect the power cord from being walked on 10.
or pinched particularly at plugs, convenience
receptacles, and the point where they exit from the
apparatus.
Only use attachments/accessories specified by the 11.
manufacturer.
Use only with the cart, stand, 12.
tripod, bracket, or table specified
by the manufacturer, or sold with
the apparatus. When a cart is used,
use caution when moving the cart/
apparatus combination to avoid injury
from tip-over.
Unplug this apparatus during lightning storms or 13.
when unused for long periods of time.
Refer all servicing to qualified service personnel. 14.
Servicing is required when the apparatus has been
damaged in any way, such as power-supply cord or
plug is damaged, liquid has been spilled or objects
have fallen into the apparatus, the apparatus has
been exposed to rain or moisture, does not operate
normally, or has been dropped.
The socket-outlet shall be installed near the 15.
equipment and shall be easily accessible.
Important Safety Instructions
WARNING: To reduce the risk of fire or electric
shock, do not expose this apparatus to rain or
moisture.
Controller/Wireless-N Touchscreen Remote
ii
Page 4

Table of ContentsWireless Home Audio
Table of Contents
About This Guide i
Important Safety Instructions ii
Wireless Home Audio Product Family 1
Unleash Your Music .........................................1
The Wireless Home Audio Product Family ........................... 1
Conductor . . . . . . . . . . . . . . . . . . . . . . . . . . . . . . . . . . . . . . . . . . . . . . . 1
Director.................................................1
Player . . . . . . . . . . . . . . . . . . . . . . . . . . . . . . . . . . . . . . . . . . . . . . . . . . 1
Controller................................................1
Docking Station............................................ 1
Speakers . . . . . . . . . . . . . . . . . . . . . . . . . . . . . . . . . . . . . . . . . . . . . . . . 1
Other Great Linksys Products................................... 1
NMH................................................... 1
WRT310N................................................ 1
WRT610N................................................ 1
Sample Home Conguration ...................................2
Product Overview - Controller 3
Before You Begin ........................................... 3
Features ................................................3
Top Panel................................................ 3
Side Panel ...............................................3
Bottom Panel ............................................. 4
Inserting the Battery......................................... 4
Charging the Battery . . . . . . . . . . . . . . . . . . . . . . . . . . . . . . . . . . . . . . . . 4
User Interface .............................................4
Carousel . . . . . . . . . . . . . . . . . . . . . . . . . . . . . . . . . . . . . . . . . . . . . . . . 4
Touchscreen Buttons . . . . . . . . . . . . . . . . . . . . . . . . . . . . . . . . . . . . . . . . 4
Lists . . . . . . . . . . . . . . . . . . . . . . . . . . . . . . . . . . . . . . . . . . . . . . . . . . . 4
Action Menu.............................................. 4
Common Uses 5
Playing Music From Dierent Sources ............................. 5
iPod and iTunes ............................................5
Generic MP3 Player . . . . . . . . . . . . . . . . . . . . . . . . . . . . . . . . . . . . . . . . . 5
USB Drive................................................5
Computer . . . . . . . . . . . . . . . . . . . . . . . . . . . . . . . . . . . . . . . . . . . . . . . 5
Rhapsody................................................ 5
RadioTime . . . . . . . . . . . . . . . . . . . . . . . . . . . . . . . . . . . . . . . . . . . . . . . 5
Controller/Wireless-N Touchscreen Remote
iii
Page 5

Table of ContentsWireless Home Audio
Stereo System............................................. 5
Finding Music .............................................5
Managing Music Libraries ..................................... 5
Creating Playlists . . . . . . . . . . . . . . . . . . . . . . . . . . . . . . . . . . . . . . . . . . 5
Creating and Using Favorites . . . . . . . . . . . . . . . . . . . . . . . . . . . . . . . . . . . 5
Presets . . . . . . . . . . . . . . . . . . . . . . . . . . . . . . . . . . . . . . . . . . . . . . . . . 5
Using the Queue ........................................... 5
Using Online Services........................................ 5
Playback Controls and Options.................................. 5
Playing to Multiple Rooms . . . . . . . . . . . . . . . . . . . . . . . . . . . . . . . . . . . . . 5
Party Mode............................................... 5
Playback Controls . . . . . . . . . . . . . . . . . . . . . . . . . . . . . . . . . . . . . . . . . . 5
Playback Settings........................................... 5
Controlling Other Devices on the Network . . . . . . . . . . . . . . . . . . . . . . . . . . 5
Volume Control ............................................5
Power On/O and Standby Modes ............................... 5
Using the PC Application...................................... 5
Navigating the User Interface 6
Home Screen ............................................. 6
Rhapsody ............................................... 6
My Library . . . . . . . . . . . . . . . . . . . . . . . . . . . . . . . . . . . . . . . . . . . . . . . 6
Search.................................................. 6
Channels . . . . . . . . . . . . . . . . . . . . . . . . . . . . . . . . . . . . . . . . . . . . . . . . 7
Playlist.................................................. 7
Browsing and Content Playback . . . . . . . . . . . . . . . . . . . . . . . . . . . . . . . . . 7
My Music ................................................ 7
Artists . . . . . . . . . . . . . . . . . . . . . . . . . . . . . . . . . . . . . . . . . . . . . . . . . . 7
Albums . . . . . . . . . . . . . . . . . . . . . . . . . . . . . . . . . . . . . . . . . . . . . . . . . 7
Genres..................................................7
Queue .................................................. 7
Browse Folders . . . . . . . . . . . . . . . . . . . . . . . . . . . . . . . . . . . . . . . . . . . . 7
Devices................................................. 7
Source.................................................. 8
Analog Source In . . . . . . . . . . . . . . . . . . . . . . . . . . . . . . . . . . . . . . . . . . . 8
Finding Content in a Library on the Network . . . . . . . . . . . . . . . . . . . . . . . . . 8
All Libraries .............................................. 8
RadioTime ............................................... 8
Browsing and Playback from RadioTime . . . . . . . . . . . . . . . . . . . . . . . . . . . . 8
Favorites ................................................ 8
Now Playing .............................................. 9
Settings................................................. 9
Controller/Wireless-N Touchscreen Remote
iv
Page 6

Table of ContentsWireless Home Audio
Play To.................................................. 9
Network . . . . . . . . . . . . . . . . . . . . . . . . . . . . . . . . . . . . . . . . . . . . . . . . 9
General . . . . . . . . . . . . . . . . . . . . . . . . . . . . . . . . . . . . . . . . . . . . . . . . .10
Brightness . . . . . . . . . . . . . . . . . . . . . . . . . . . . . . . . . . . . . . . . . . . . . . .11
Audio . . . . . . . . . . . . . . . . . . . . . . . . . . . . . . . . . . . . . . . . . . . . . . . . . .11
About ..................................................11
Rhapsody 12
Signup .................................................12
RadioTime 13
Browsing and Playback from RadioTime ........................... .13
Troubleshooting 14
Specications 15
Warranty Information 16
Limited Warranty.......................................... .16
Exclusions and Limitations .....................................16
Obtaining Warranty Service . . . . . . . . . . . . . . . . . . . . . . . . . . . . . . . . . . . .16
Technical Support . . . . . . . . . . . . . . . . . . . . . . . . . . . . . . . . . . . . . . . . . .17
Regulatory Information 18
FCC Statement ............................................18
FCC Radiation Exposure Statement ...............................18
Safety Notices............................................ .18
Industry Canada Statement ................................... .18
Industry Canada Radiation Exposure Statement: .......................18
Industry Canada Interference Statement ............................18
Avis d’Industrie Canada ......................................19
Avis d’Industrie Canada concernant l’exposition aux radiofréquences :.........19
Wireless Disclaimer .........................................19
Avis de non-responsabilité concernant les appareils sans l ...............19
Declaration of Conformity ....................................20
CE Marking ..............................................21
National Restrictions ........................................21
Denmark . . . . . . . . . . . . . . . . . . . . . . . . . . . . . . . . . . . . . . . . . . . . . . . .21
France..................................................22
Italy . . . . . . . . . . . . . . . . . . . . . . . . . . . . . . . . . . . . . . . . . . . . . . . . . . .22
Latvia . . . . . . . . . . . . . . . . . . . . . . . . . . . . . . . . . . . . . . . . . . . . . . . . . .22
Product Usage Restrictions ....................................22
2,4 GHz Restrictions . . . . . . . . . . . . . . . . . . . . . . . . . . . . . . . . . . . . . . . . .22
Third-Party Software or Firmware . . . . . . . . . . . . . . . . . . . . . . . . . . . . . . . .22
Controller/Wireless-N Touchscreen Remote
v
Page 7

Table of ContentsWireless Home Audio
Technical Documents on www.linksys.com/international................ .22
User Information for Consumer Products Covered by EU Directive 2002/96/EC on
Waste Electric and Electronic Equipment (WEEE) ......................23
Software License Agreement 27
Software in Linksys Products ...................................27
Software Licenses ..........................................27
Schedule 1 - Linksys Software License Agreement ......................27
Schedule 2 . . . . . . . . . . . . . . . . . . . . . . . . . . . . . . . . . . . . . . . . . . . . . . .28
Schedule 3 . . . . . . . . . . . . . . . . . . . . . . . . . . . . . . . . . . . . . . . . . . . . . . .31
OpenSSL License . . . . . . . . . . . . . . . . . . . . . . . . . . . . . . . . . . . . . . . . . . .32
Original SSLeay License.......................................32
Controller/Wireless-N Touchscreen Remote
vi
Page 8
Wireless Home Audio
Wireless Home Audio
Product Family
Unleash Your Music
Te xt
The Wireless Home Audio Product
Family
Insert paragraphs
Wireless Home Audio Product Family
MCC140
Speakers
DMSPK50 Speakers
Wireless Home Audio Product Family
Conductor
Tex t
Director
The Director is a remote hub and playback controller on
the home network, receiving music from sources on the
network, including a Compact Audio System, the Internet
and PCs, as well as from analog sources and docked MP3
players attached directly to the Director. It can be used to
organize music into playlists, serve audio to other devices
on the network and play it back locally. The Director
includes power amplifiers and must be connected to
speakers such as the Linksys DMSPK-50 speakers or a
stereo system.
Player
Tex t
Tex t
Other Great Linksys Products
There are many other great Linksys products that integrate
perfectly with your Wireless Home Audio products.
NMH
WRT310N
WRT610N
Controller
Tex t
Docking Station
Controller/Wireless-N Touchscreen Remote
1
Page 9
Wireless Home Audio
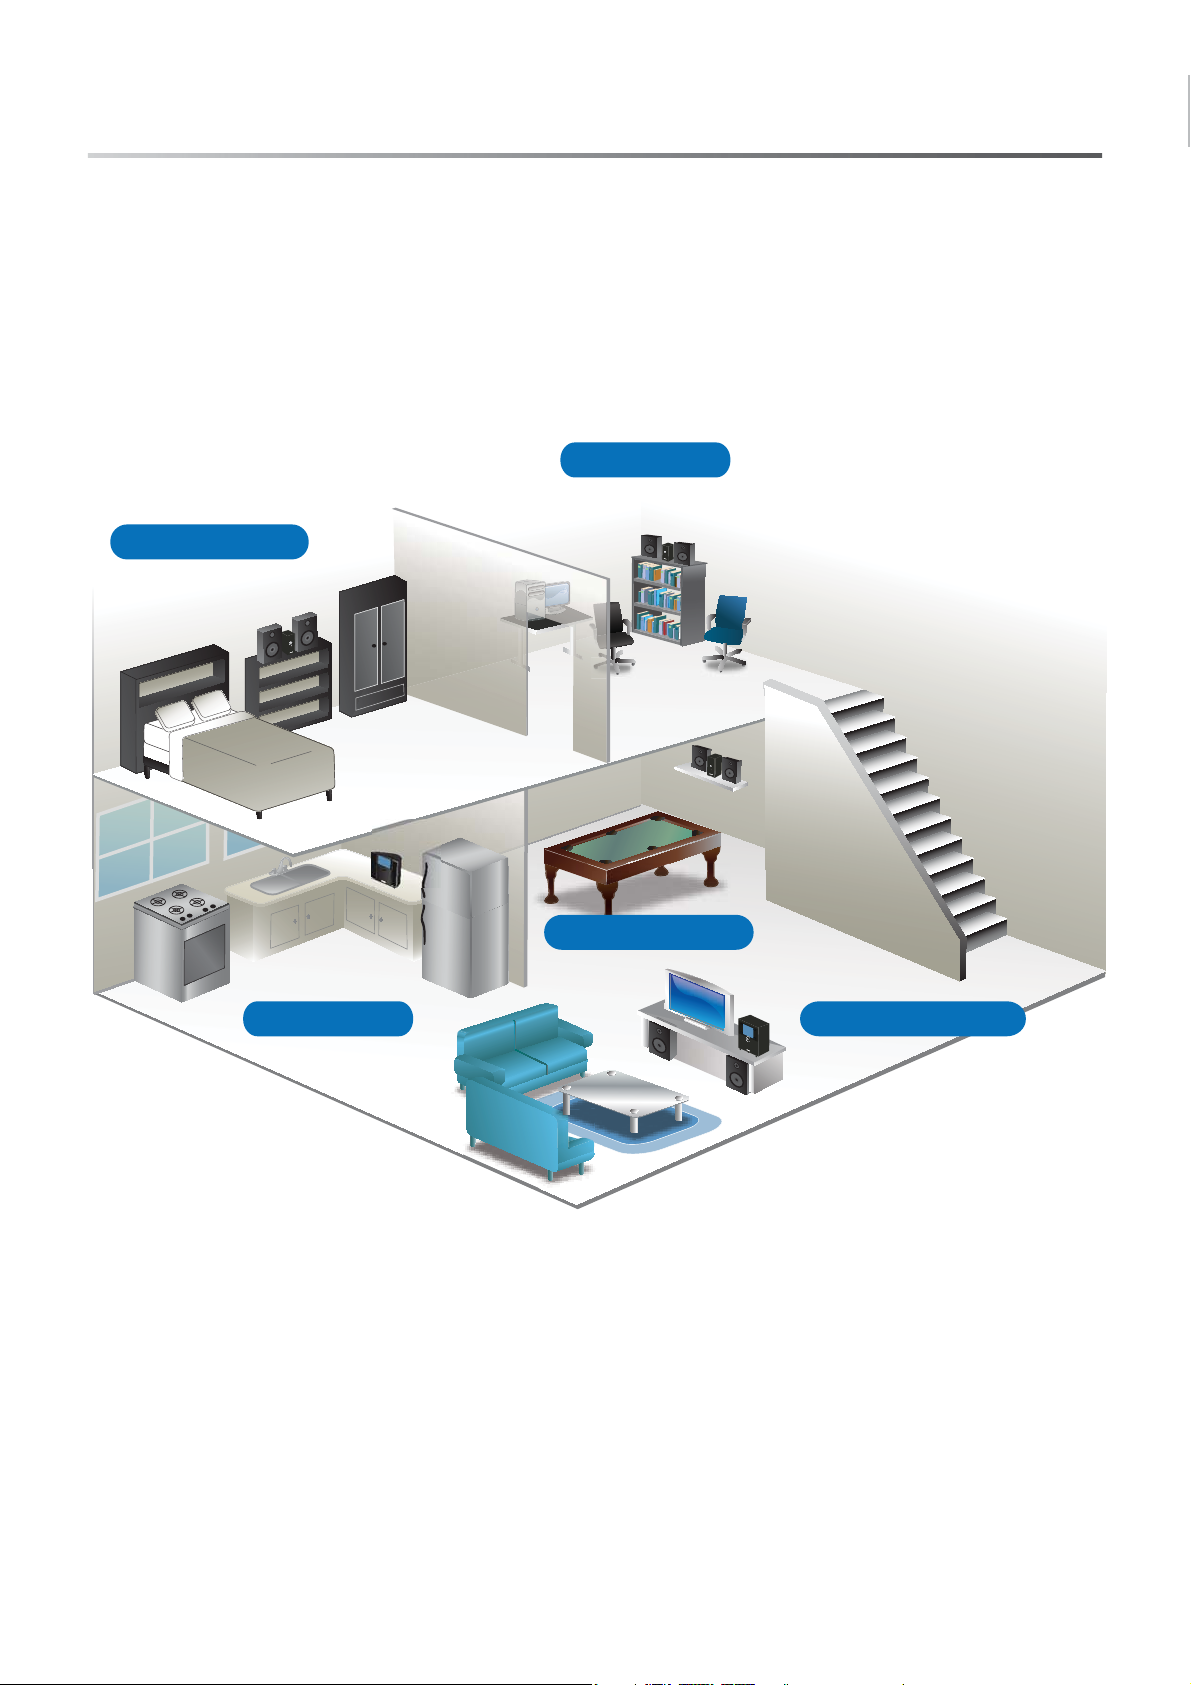
Sample Home Configuration
Click on the image below to launch an interactive Flash
version of a Wireless Home Audio configuration. Place the
cursor over a device to zoom in and obtain details.
Zone 5 - Bedroom
Wireless Home Audio Product Family
Zone 4 - Oce
Zone 3 - Game Room
Zone 1 - Living RoomZone 2 - Kitchen
Controller/Wireless-N Touchscreen Remote
2
Page 10
Wireless Home Audio
Product Overview - Controller
Product Overview Controller
Before You Begin
This User Guide is intended to provide details on the
product hardware, user interface, and use of the product.
For initial installation instructions, please refer to the Quick
Installation Guide included with your product.
Features
802.11 Draft N Wi-Fi based transceiver s
Part of a family of Cisco branded Remote Control s
Devices
5 Way Navigation Button Control
s
4.3 inch color Touchscreen LCD s
Internal Antennas s
Rechargeable Battery s
External AC-DC Power Supply/Battery Chargers
DLNA 1.5 and UpNP compliant and certifieds
Plug and play simplicity when used with other Linksys s
A/V products and routers
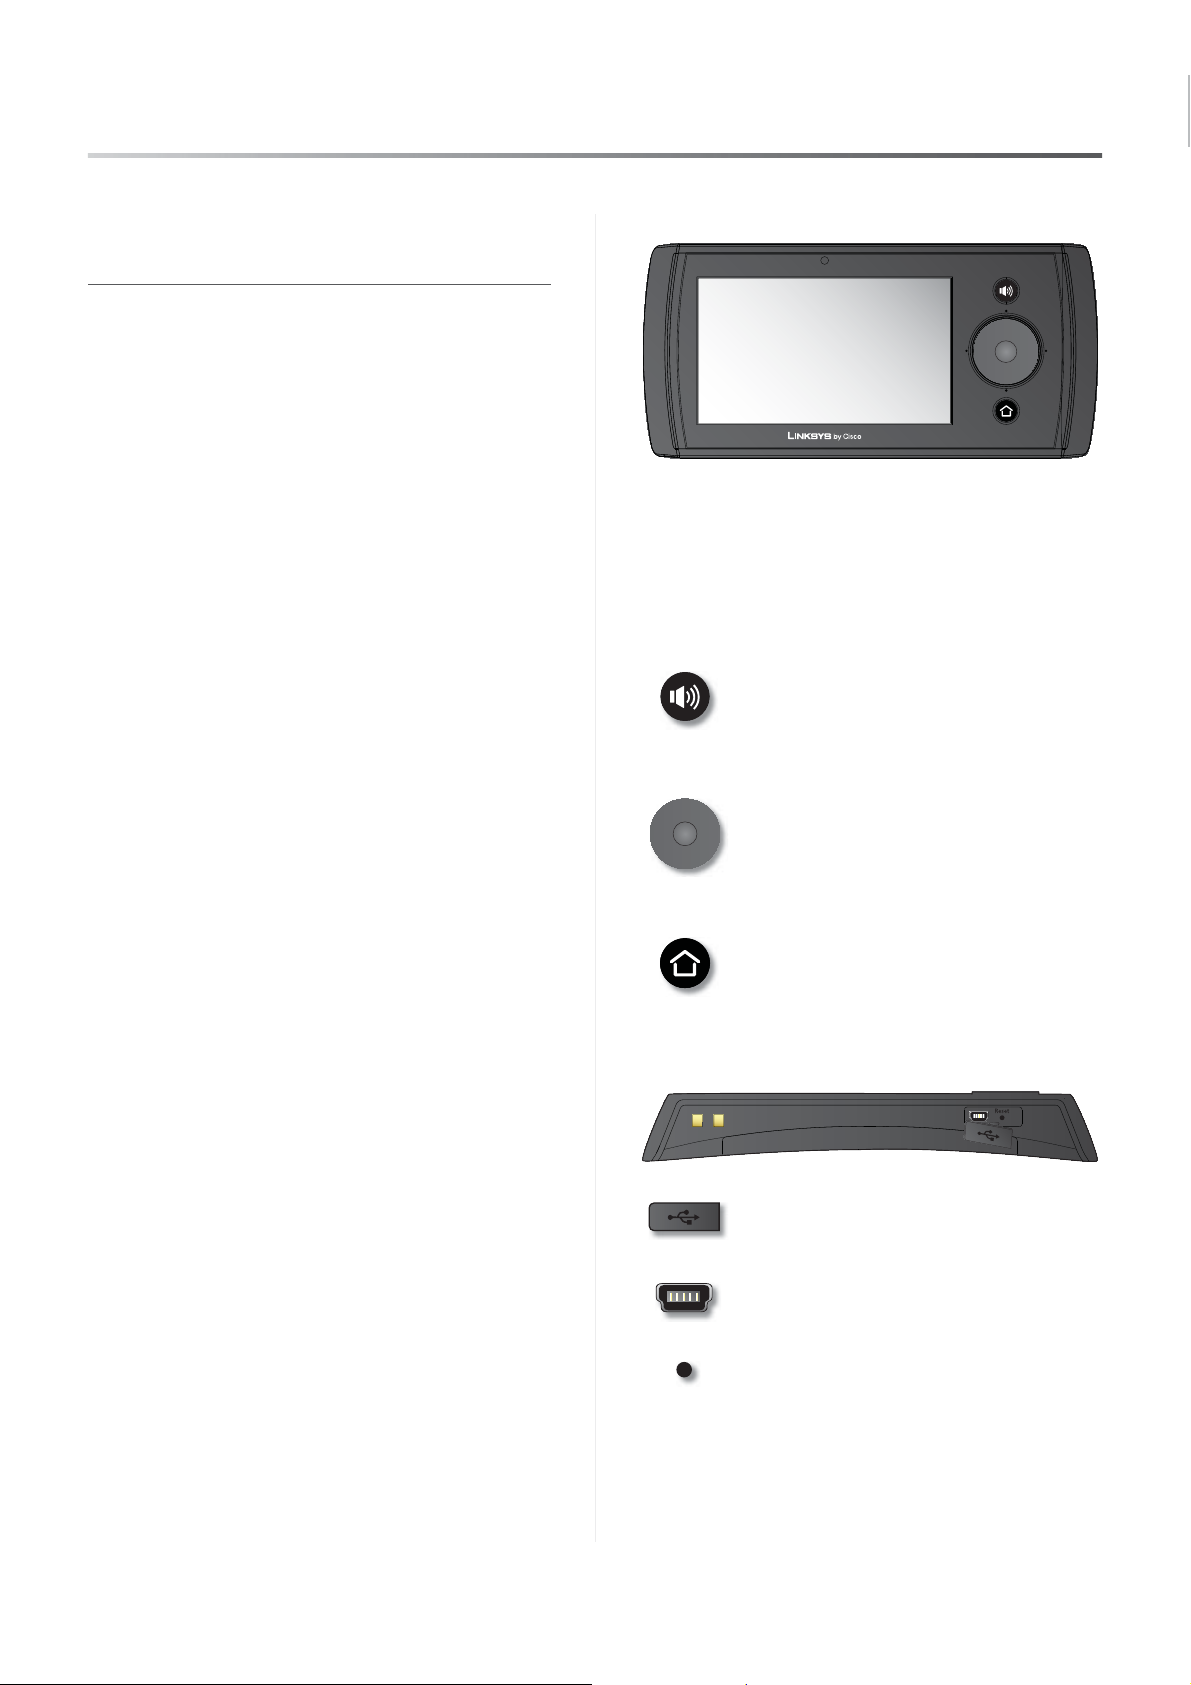
Top Panel
Touchscreen The 4.3" Touchscreen LCD has arrows
on the left and right side of the screen for navigating
through the menu icons. To select an option, click on
the icon. There are other buttons available on the
screen that vary depending upon your location in the
interface.
Volume Button Press the Volume button
and a volume bar will appear on the screen.
Rotate the Navigation wheel clockwise to
increase the volume or counterclockwise to
decrease the volume.
Navigation Wheel/Selector The navigation
wheel is used to scroll through the carousel
of icons and lists, select letters or characters,
and increase or decrease values.
Home Returns to the main menu from
anywhere within the interface.
Side Panel
Mini-USB/Reset Cover The Mini-USB
connector and the Reset button are covered
by this.
Mini-USB Connector The mini-USB
connector is used to connect a power source
to the Controller.
Reset button This button is used to reset
the remote. Use a straightened paper clip or
similar object to press the button.
Controller/Wireless-N Touchscreen Remote
3
Page 11
Wireless Home Audio
Product Overview - Controller
Bottom Panel
Battery Compartment The Battery Compartment opens
by gently pressing down on the two designated areas and
sliding the compartment off.
Inserting the Battery
To install the battery, perform the following steps:
Open the battery comparment.1.
Align the battery so that the notches line up with the 2.
grooves on the Controller. The plus and minus symbol
should align to the connectors on the Controller.
Slide the battery towards the battery connectors until 3.
the battery is connected.
Plus and MinusNotches
Charging the Battery
The Controller includes two charging options. One
connects the Controller to the computer to charge and
the other connects to a standard power outlet.
Battery Status The battery status icon will
indicate the power remaining on the battery.
A message will appear when the battery
power is low.
Battery Charging When the battery is
plugged into a power source and charging,
this icon will be displayed in the upper left
corner of the LCD touchscreen.
User Interface
Carousel
Touchscreen Buttons
Navigation Arrows Scrolls through the
icons in the direction selected.
Back Navigates to the previous screen
within the interface.
Play/Pause If nothing is playing, pressing
the Play/Pause button when music is selected
will start the playback of that music. This
button also toggles between playback and
a paused state. When the button is pressed
when playing music, the song will pause.
When pressed when the song is paused, the
music will play.
Stop Stops the current music selection
(playing or paused music) and restructures
the queue to move the first item played to
the top which is then highlighted. The Stop
button does not clear the queue and brings
the user to the Now Playing screen.
Play To Use this button to select the zones
to play the music to.
NOTE: The battery connectors on the Controller
should line up with the + and - symbols on the
battery.
Controller/Wireless-N Touchscreen Remote
Add to Queue When music is highlighted
(Genre, Playlists, Artist, Album, or Song), the
selected item will be added to the queue on
the Now Playing screen. The queued item
will not begin playing and will be added to
the bottom of the queue even if it is the only
item in the queue.
Lists
Action Menu
4
Page 12

Wireless Home Audio
Common Uses
Common Uses
Playing Music From Different
Sources
Tex t
iPod and iTunes
Tex t
Generic MP3 Player
Tex t
USB Drive
Tex t
Computer
Tex t
Rhapsody
Network
Volume Control
Tex t
Power On/Off and Standby Modes
Using the PC Application
RadioTime
Stereo System
Finding Music
Managing Music Libraries
Creating Playlists
Creating and Using Favorites
Presets
Using the Queue
Using Online Services
Playback Controls and Options
Playing to Multiple Rooms
Party Mode
Playback Controls
Playback Settings
Controlling Other Devices on the
Controller/Wireless-N Touchscreen Remote
5
Page 13
Wireless Home Audio
Navigating the User Interface
Navigating the User
Interface
The front panel of the Wireless Home Audio Director has
4 buttons that can be used for navigation and selection in
the user interface (Refer to , page 1 for details). However,
the easiest way to navigate through the user interface is
using a remote control.
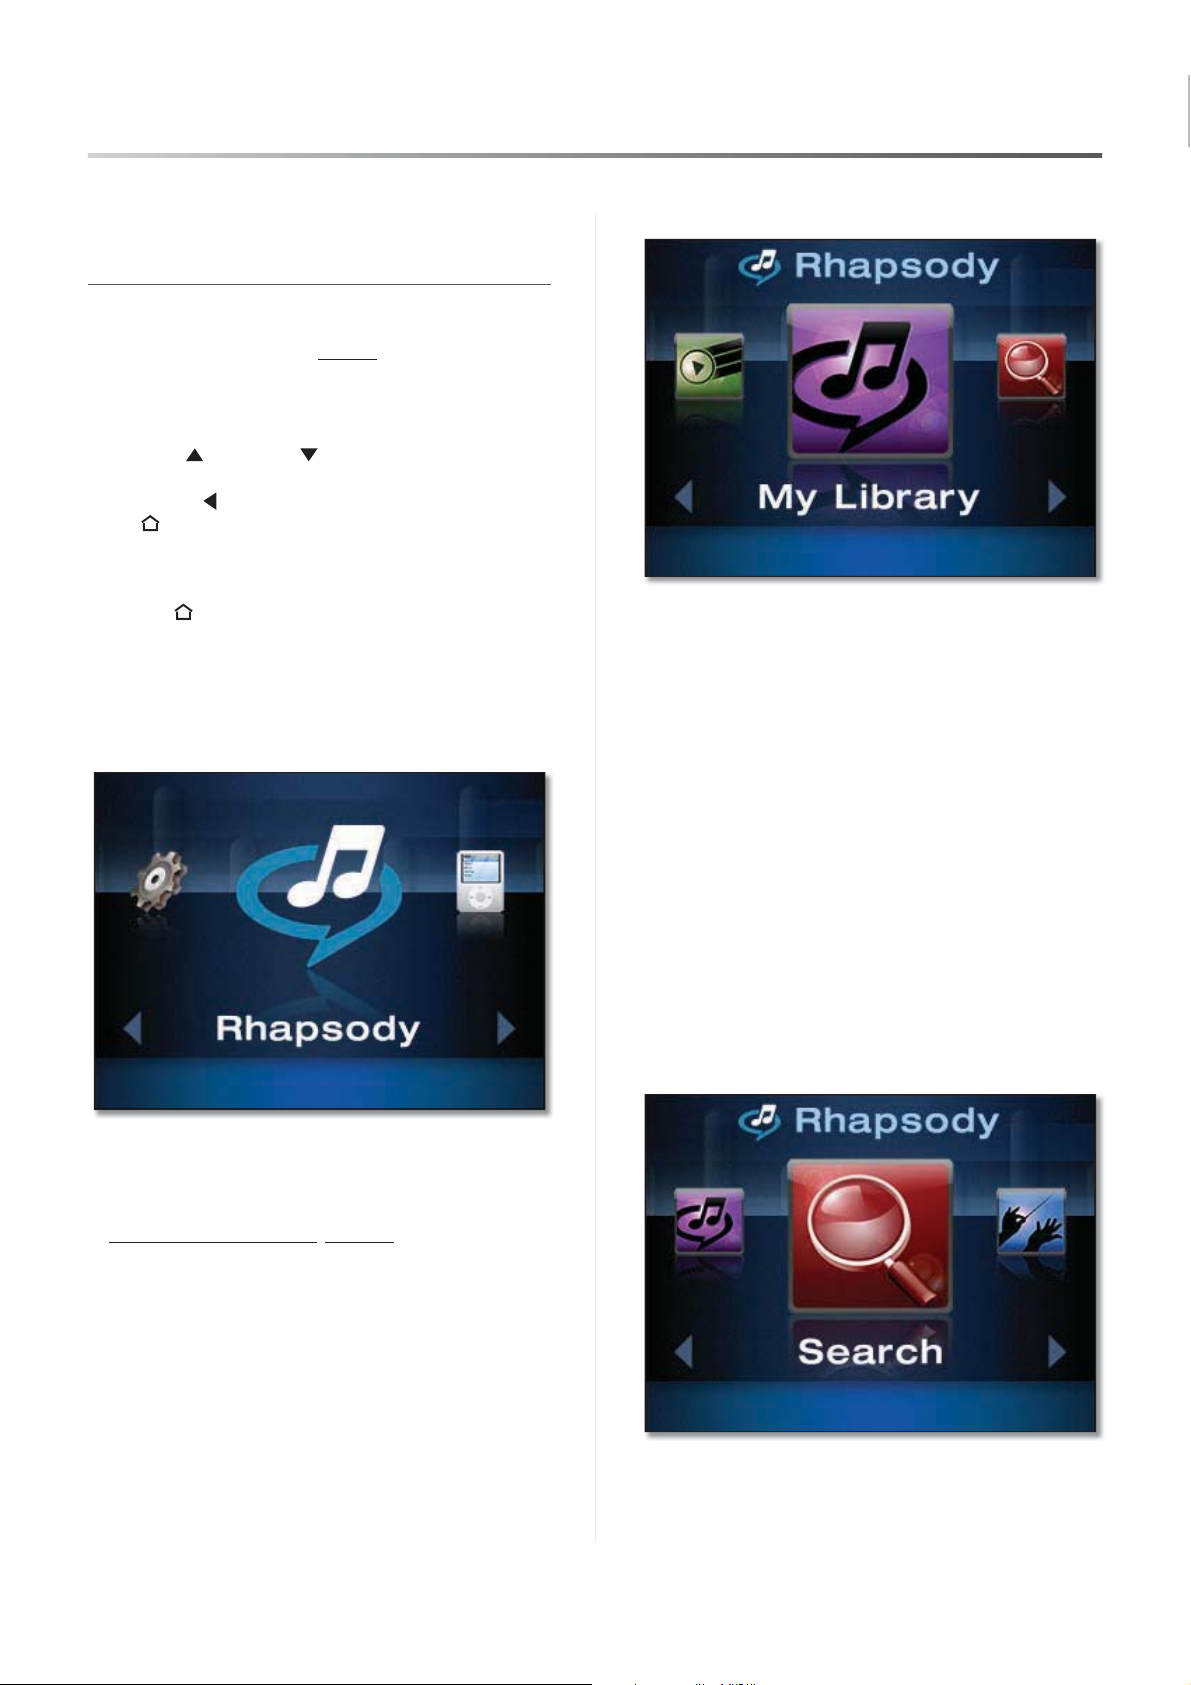
Use the remote control to navigate and select options.
Use the up
options. Press the OK button to select an option or press
the left arrow
Home
Home Screen
The Home button on the remote control will return you
to the initial menu screen that appeared after the system
finshed loading. Press this button to return to the Home
screen from any screen with the interface.
Rhapsody
and down arrows to navigate through
to return to the previous screen. Use the
button to return to the home screen.
My Library
My Library allows you to connect to favorite tracks and
albums that you’ve bookmarked in Rhapsody’s extensive
online music library. To bookmark tracks and albums in
Rhapsody Online, you need to access Rhapsody Online
from your computer and locate a track or album that you
want to add. To add the album or track, click the + (plus
sign) next to it and select Add to My Library.
Artistss Displays an alphabetical list of all of the artists
that have been added to My Library.
Albumss Displays an alphabetical list of album titles
that have been added to My Library.
Trackss An alphabetical list of track titles that have
been added to My Library.
My Playlistss Displays an alphabetical list of playlists
that have been created in Rhapsody Online.
My Channelss
Rhapsody is a digital music service that lets you listen to
their entire catalog for one monthly price. Rhapsody’s
catalag contains millions of songs and thousands of
artists. For information on signing up for Rhapsody, refer
to Signup up for Rhapsody, page 14.
Controller/Wireless-N Touchscreen Remote
Search
Allows you to search by Artist, Album, or Track.
6
Page 14

Wireless Home Audio
Navigating the User Interface
Music Guide Quick selection of new and featured albums
and genres.
New Releasess The most significant recent releases.
Staff Pickss This week’s staff selections.
Just Addeds Albums that have just been added to
Rhapsody.
Exclusivess Music you won’t find anywhere else.
Genress Displays a list of musical genres. Select a genre
to view key tracks by key artists in the genre.
Channels
Featured Playlistss
Browsing and Content Playback
My Music
Once the Media Server software has been installed
and configured on a computer, you can control
playback of music on the computer from within the
Wireless Home Audio Director interface.
Artists
Selecting the Artists option will display an alphabetical list
of artists that are available on the media device.
Albums
This option allows you to sort music by album. Highlighting
the album and clicking the Play
of the tracks on the album. Clicking OK on an album title
will display all the track titles on the album.
Genres
Sort the library of tracks based on the musical genre.
button will play all
All Channelss Allows you to view all available
channels.
Top Channelss Displays a list of the channels that are
accessed the most.
Channels by Genres Displays a list of music channels
categorized by music genre.
My Channelss
Playlist
Queue
Browse Folders
Devices
Top Playlistss
Controller/Wireless-N Touchscreen Remote
7
Page 15

Wireless Home Audio
Navigating the User Interface
Source
Analog Source In
Finding Content in a Library on the
Network
All Libraries
RadioTime
RadioTime provides streaming Internet radio broadcasts.
Local Radio Displays a list of local FM and AM band radio
stations that are accessible via RadioTime.
Browse Talk Bring up a list of various talk radio topics for
selection.
Browse Music Select from a list of music categories. Once
a category of music is selected, a list of choices within that
category appears.
Browse by Location Stations can be located by
geographical location.
Browsing and Playback from RadioTime
Favorites
Controller/Wireless-N Touchscreen Remote
8
Page 16

Wireless Home Audio
Navigating the User Interface
Now Playing
The Now Playing option brings up a screen that displays
information on the current track that is playing. Album
artwork, artist, song title, and time information is
displayed.
Settings
Play To
The Play To option allows you to configure which zones
are playing the music.
Network
Connect to Network
Select the connection method that will be used to connect
the Wireless Home Audio Director to the network.
Wired
Advanced This option is used for IP configuration. A
dynamic or static IP address can be selected here.
Dynamic IPs The dynamic IP option should be selected
if your router or network connection automatically
provides an IP address to devices on the network.
Once this option is selected, the Details screen can be
used to verify that an IP address has been obtained.
Static IPs Selecting Static IP will prompt you to enter
the IP address. To enter the IP address using the
remote control, remove the existing address by using
the left arrow on the Navigation Halo. Numbers can be
entered manually using the keypad or arrow up and
down on the Navigation Halo to scroll through the
number selections. To move to the next digit, use the
right arrow on the Navigation Halo. To enter a dot (.)
or period in the IP address, press the zero (0) button
twice.
Details This option displays the current network
connection settings including the wireless network name,
wireless security type, DHCP status, IP address, subnet
mask, gateway, and DNS information.
Controller/Wireless-N Touchscreen Remote
Wireless
Select Network Use this option to select a wireless
network name (also known as an SSID) from the list of
available networks or enter a wireless network name
manually by selecting Enter Network Name. To enter
the name manually, use the alphanumeric keypad on the
remote control to select the appropriate characters or use
the up and down arrows on the Navigation Halo to scroll
through the list of characters. To enter the next character,
use the right arrow on the Navigation Halo.
9
Page 17

Wireless Home Audio
Navigating the User Interface
NOTE: The wireless network name is
case-sensitive. Capital letters can be found
immediately after the group of lowercase
letters.
Once the wireless network name has been selected, a
screen will appear asking for the wireless security mode
utilized on the network.
Opens If your network doesn’t have wireless security
enabled, the open option should be selected.
NOTE: Linksys recommends using some form
of wireless security on your network to help
safeguard your personal information. Wireless
security is typically configured on your router.
Refer to the documentation included with your
router for details on enabling wireless security.
Shareds If your network uses WEP security, select
this option and enter in WEP key number 1. Enter the
appropriate number of hexadecimal characters (“0” to
“9” and “A” to “F”). For 64-bit encryption, enter exactly
10 hexadecimal characters. For 128-bit encryption,
enter exactly 26 hexadecimal characters.
WPAs Select TKIP or AES and enter the network’s
Passphrase (also called a pre-shared key) of 8-63
characters.
WP2s Select TKIP or AES and enter the network’s
Passphrase (also called a pre-shared key) of 8-63
characters.
Wi-Fi Protected Setup™ Discoverys This option is
used to connect to your router using the Wi-Fi Protected
Setup™
and the Wi-Fi Protected Setup™
router..
Wi-Fi Protected Setup™ Pin Settings Select this
option to enter the Wireless Home Audio Director’s
PIN number on the router.
Advanced This option is used for IP configuration. A
dynamic or static IP address can be selected here.
Dynamic IPs The dynamic IP option should be selected
if your router or network connection automatically
provides an IP address to devices on the network.
Once this option is selected, the Details screen can be
used to verify that an IP address has been obtained.
button on the Wireless Home Audio Director
button on your
Static IPs Selecting Static IP will prompt you to enter
the IP address. To enter the IP address using the
remote control, remove the existing address by using
the left arrow on the Navigation Halo. Numbers can be
entered manually using the keypad or arrow up and
down on the Navigation Halo to scroll through the
number selections. To move to the next digit, use the
right arrow on the Navigation Halo. To enter a dot (.)
or period in the IP address, press the zero (0) button
twice.
Details This option displays the current network
connection settings including the wireless network name,
wireless security type, DHCP status, IP address, subnet
mask, gateway, and DNS information.
Zones and Libraries
Rename Zone
Rediscover
General
Date Time Setup
Set Times Select the month, day, year, and enter the
time using the Navigation Halo.
Set Time Zones Select your local time zone.
Time Formats This allows you to select a 12 hour or
24 hour time format. The 12 hour format is the default
setting.
Date Formats Allows you to specify the order that the
day, month, and year are displayed.
NPS setup
Controller/Wireless-N Touchscreen Remote
This option configures the Now Playing Screen. This feature
can be configure to display the Now Playing Screen after
15, 30, or 60 seconds of playback. Off disables the feature.
10
Page 18

Wireless Home Audio
Navigating the User Interface
OK button
This option configures the screen that will appear when
the OK button is pressed. The options are the following:
Plays
Add to Queues
Play Nexts
Calibrate
Selecting this option will calibrate the touchscreen display.
Click on the plus signs and then OK to calibrate the LCD.
Sleep Timer
This allows you to set the amount of time before the screen
goes into sleep mode.
Hibernate Setting
This feature is used to conserve battery life and you can
set the amount of idle time before the Controller goes into
hibernate mode.
Brightness
Audio
Treble Setup
Bass Setup
About
Use the up and down arrows on the remote control
to adjust the brightness level of the viewing screen.
Controller/Wireless-N Touchscreen Remote
Version Displays the version of the software installed on
the Wireless Home Audio Director.
Automatically check for updates This feature will
automatically check online for updates to the software
installed on the Wireless Home Audio Director.
Check for updates This option can be used to check
manually for an update to the software installed on the
Wireless Home Audio Director.
11
Page 19

Wireless Home Audio
Rhapsody
Signup
Go to 1. www.rhapsody.com/linksys and click the
CLICK HERE TO TRY RHAPSODY button.
Rhapsody
Account Creation Screen
Rhapsody Signup Screen
Select your plan and click 2. Continue.
Plan Selection Screen
Create your account by entering the necessary account 3.
and billing information.
Controller/Wireless-N Touchscreen Remote
12
Page 20

Wireless Home Audio
RadioTime
RadioTime provides streaming Internet radio
Local Radio Displays a list of local FM and AM band radio
stations that are accessible via RadioTime.
Browse Talk Bring up a list of various talk radio topics for
selection.
Browse Music Select from a list of music categories. Once
a category of music is selected, a list of choices within that
category appears.
Browse by Location Stations can be located by
geographical location.
Browsing and Playback from
RadioTime
RadioTime
Controller/Wireless-N Touchscreen Remote
13
Page 21

Wireless Home Audio
Troubleshooting
Troubleshooting
Controller/Wireless-N Touchscreen Remote
14
Page 22

Wireless Home Audio
Specifications
Model DMRW1000
WiFi Standards Draft dual band 802.11n,
802.11g, 802.11b (2.4GHz and
5GHz)
Security features WEP, WPA, WPA2
Security key bits 64, 128, 256
# of Antennas Internal antennas only
Detachable (y/n) N
RF Pwr (EIRP) in dBm Waiting for data from QMI after
testing for approval.
Antenna Gain in dBi Waiting for data from QMI after
testing for approval.
UPnP able/cert UPnP Certied
Ports Mini-USB for battery charging,
contacts for future battery
charger cradle
Buttons Front 5-Way navigation buttons,
Home button, Menu button
Specifications
Display
Display Size 4.3 inch
LCD Type TFT transmissive Touch Screen
Resolution 480 x 272 (RGB)
Color 16.7M
Backlighting White
Power
Power supply 3000 mAH Li-Polymer Battery
Pack with 100-240 VAC input,
5VDC output charger
Environmental
Dimensions 3.39" x 1.02" x 6.88"
86 x 26 x 175 mm
Weight 0.60 lb (0.27 kg)
Power 100-240 VAC input, 5VDC output.
Certication FCC, CE, TUV, PSB, C-Tick
Operating Temp. 41 to 104° F (5 to 40° C)
Storage Temp. -4 to 140° F (-20 to 60° C)
Operating Humidity 10 to 85% Noncondensing
Storage Humidity 5 to 90% Noncondensing
Specications are subject to change without notice.
Controller/Wireless-N Touchscreen Remote
15
Page 23

Wireless Home Audio
Warranty Information
Warranty Information
Limited Warranty
Linksys warrants this Linksys hardware product against
defects in materials and workmanship under normal
use for the Warranty Period, which begins on the date of
purchase by the original end-user purchaser and lasts for
the period specified below:
s
One (1) year for new product
Ninety (90) days for refurbished products
This limited warranty is non-transferable and extends only
to the original end-user purchaser. Your exclusive remedy
and Linksys’ entire liability under this limited warranty
will be for Linksys, at its option, to (a) repair the product
with new or refurbished parts, (b) replace the product
with a reasonably available equivalent new or refurbished
Linksys product, or (c) refund the purchase price of the
product less any rebates. Any repaired or replacement
products will be warranted for the remainder of the
original Warranty Period or thirty (30) days, whichever is
longer. All products and parts that are replaced become
the property of Linksys.
Exclusions and Limitations
This limited warranty does not apply if: (a) the product
assembly seal has been removed or damaged, (b) the
product has been altered or modified, except by Linksys, (c)
the product damage was caused by use with non-Linksys
products, (d) the product has not been installed, operated,
repaired, or maintained in accordance with instructions
supplied by Linksys, (e) the product has been subjected to
abnormal physical or electrical stress, misuse, negligence,
or accident, (f) the serial number on the Product has been
altered, defaced, or removed, or (g) the product is supplied
or licensed for beta, evaluation, testing or demonstration
purposes for which Linksys does not charge a purchase
price or license fee.
ALL SOFTWARE PROVIDED BY LINKSYS WITH THE
PRODUCT, WHETHER FACTORY LOADED ON THE
PRODUCT OR CONTAINED ON MEDIA ACCOMPANYING
THE PRODUCT, IS PROVIDED “AS IS” WITHOUT WARRANTY
OF ANY KIND. Without limiting the foregoing, Linksys does
not warrant that the operation of the product or software
will be uninterrupted or error free. Also, due to the
continual development of new techniques for intruding
upon and attacking networks, Linksys does not warrant
that the product, software or any equipment, system or
network on which the product or software is used will be
free of vulnerability to intrusion or attack. The product
may include or be bundled with third party software or
service offerings. This limited warranty shall not apply to
such third party software or service offerings. This limited
warranty does not guarantee any continued availability
of a third party’s service for which this product’s use or
operation may require.
TO THE EXTENT NOT PROHIBITED BY LAW, ALL IMPLIED
WARRANTIES AND CONDITIONS OF MERCHANTABILITY,
SATISFACTORY QUALITY OR FITNESS FOR A PARTICULAR
PURPOSE ARE LIMITED TO THE DURATION OF THE
WARRANTY PERIOD. ALL OTHER EXPRESS OR IMPLIED
CONDITIONS, REPRESENTATIONS AND WARRANTIES,
INCLUDING, BUT NOT LIMITED TO, ANY IMPLIED
WARRANTY OF NON-INFRINGEMENT, ARE DISCLAIMED.
Some jurisdictions do not allow limitations on how long
an implied warranty lasts, so the above limitation may not
apply to you. This limited warranty gives you specific legal
rights, and you may also have other rights which vary by
jurisdiction.
TO THE EXTENT NOT PROHIBITED BY LAW, IN NO EVENT
WILL LINKSYS BE LIABLE FOR ANY LOST DATA, REVENUE
OR PROFIT, OR FOR SPECIAL, INDIRECT, CONSEQUENTIAL,
INCIDENTAL OR PUNITIVE DAMAGES, REGARDLESS OF THE
THEORY OF LIABILITY (INCLUDING NEGLIGENCE), ARISING
OUT OF OR RELATED TO THE USE OF OR INABILITY TO
USE THE PRODUCT (INCLUDING ANY SOFTWARE), EVEN
IF LINKSYS HAS BEEN ADVISED OF THE POSSIBILITY OF
SUCH DAMAGES. IN NO EVENT WILL LINKSYS’ LIABILITY
EXCEED THE AMOUNT PAID BY YOU FOR THE PRODUCT.
The foregoing limitations will apply even if any warranty
or remedy provided under this limited warranty fails of
its essential purpose. Some jurisdictions do not allow
the exclusion or limitation of incidental or consequential
damages, so the above limitation or exclusion may not
apply to you.
Obtaining Warranty Service
If you have a question about your product or experience a
problem with it, please go to www.linksys.com/support
where you will find a variety of online support tools and
information to assist you with your product. If the product
proves defective during the Warranty Period, contact
Linksys Technical Support for instructions on how to
obtain warranty service. The telephone number for Linksys
Technical Support in your area can be found in the product
User Guide and at www.linksys.com. Have your product
serial number and proof of purchase on hand when calling.
A DATED PROOF OF ORIGINAL PURCHASE IS REQUIRED
TO PROCESS WARRANTY CLAIMS. If you are requested to
return your product, you will be given a Return Materials
Authorization (RMA) number. You are responsible for
properly packaging and shipping your product to Linksys
at your cost and risk. You must include the RMA number
and a copy of your dated proof of original purchase when
returning your product. Products received without a RMA
number and dated proof of original purchase will be
rejected. Do not include any other items with the product
you are returning to Linksys. Defective product covered
by this limited warranty will be repaired or replaced and
returned to you without charge. Customers outside of
Controller/Wireless-N Touchscreen Remote
16
Page 24

Wireless Home Audio
the United States of America and Canada are responsible
for all shipping and handling charges, custom duties,
VAT and other associated taxes and charges. Repairs or
replacements not covered under this limited warranty will
be subject to charge at Linksys’ then-current rates.
Technical Support
This limited warranty is neither a service nor a support
contract. Information about Linksys’ current technical
support offerings and policies (including any fees for
support services) can be found at:
www.linksys.com/support.
This limited warranty is governed by the laws of the
jurisdiction in which the Product was purchased by you.
Please direct all inquiries to: Linksys, P.O. Box 18558, Irvine,
CA 92623.
Warranty Information
Controller/Wireless-N Touchscreen Remote
17
Page 25

Regulatory Information for DMRW1000
Safety Warning Statement(s)
Warning: This exclamation point indicates that there is a caution or warning
of potential risk of bodily injury and/or it is something that could damage your property
or product.
Warning - Risk of Explosion if battery is replaced by an incorrect type. Replace only with
the same or equivalent type. Dispose of used batteries according to the
instructions.
Warning - Do not use this product near water, for example, near bath tube, kitchen sink,
in a wet basement or near a swimming pool.
California Lead Warning Statement
Warning – This product contains lead, know to State of California to cause cancer, and
birth defects, or other productive harm. Wash hands after handling.
FCC RF Exposure Statement
The Wireless-N Touchscreen Controller complies with FCC RF radiation exposure limits set
forth for an uncontrolled environment and meets the FCC RF Exposure Guidelines in Supplement
C of OET65. This device has been tested in typical lap held operations with the back side of the
device contacted directly to the human body. To maintain compliance with FCC RF exposure
compliance requirements, avoid direct contact to the transmitting antenna during transmitting.
This transmitter must not be co-located or operating in conjunction with any other antenna or
transmitter.
Page 26

FCC Part15 class B Statement
This device has been tested and complies with the specifications for a Class B digital device,
pursuant to Part 15 of the FCC Rules. These limits are designed to provide reasonable protection
against harmful interference in a residential installation. This device generates, uses, and can
radiate radio frequency energy and, if not installed and used according to the instructions, may
cause harmful interference to radio communications. However, there is no guarantee that
interference will not occur in a particular installation. If this device does cause harmful
interference to radio or television reception, which is found by turning the equipment off and on,
the user is encouraged to try to correct the interference by one or more of the following measures:
• Reorient or relocate the receiving antenna
• Increase the separation between the equipment or devices
• Connect the equipment to an outlet other than the receiver's
• Consult a dealer or an experienced radio/TV technician for assistance
FCC Caution:
Any changes or modifications not expressly approved by the party responsible for
compliance could void the user's authority to operate this equipment.
For operation within 5.150-5.250 GHz frequency range, it is restricted to indoor
environment.
This device does not operate within the 5.25
-5.35 GHz and 5.47-5.75 GHz bands. In this
case, the DFS and TPC functions are not required.
IC class B Statement (Canada)
This class B digital device complies with Industry Canada ICES-003 and RSS-210 rules.
Operation is subject to the following two conditions:
1. This device may not cause interference and
2. This device must accept any interference, including interference that may cause
undesired operation of the device.
Règlement de la classe B d' Industrie Canada
Cet appareil numérique de la classe B est conforme à la norme NMB-003 et RSS-210 d'industrie.
L'opération est sujette aux deux conditions suivantes :
1. Ceci le dispositif peut ne pas causer l'interférence et
2.
Ceci le dispositif doit accepter n'importe quelle interférence, y compris l'interférence qui
peut causer fonctionnement peu désiré du dispositif.
Page 27

Industry Canada Interference Statement
The device for the band 5150-5250 MHz is only for indoor usage to reduce potential for harmful
interference to co-channel mobile satellite systems;
The maximum antenna gain 5.94dBi permitted (for devices in the band 5725-5850 MHz) to
comply with the e.i.r.p. limits specified for point-to-point and non point-to-point operation as
appropriate, as stated in section A9.2(3).
Warning- In addition, users should also be cautioned to take note that high-power
radars are allocated as primary users (meaning they have priority) of the bands 5250-5350 MHz
and 5650-5850 MHz and these radars could cause interference and/or damage to LE-LAN device.
CE – Marking
CE marking on this product represents the product is in compliance with all directives that are
applicable to it.
EU Declaration of conformity (DOC)
This product complies with the essential requirements of the EMC Directive 2004/108/EC, the
Low Voltage Directive 2006/95/EC and the R&TTE Directive 1999/5/EC. For more detail, Please
see the DoC.
The copy of the DoC shall be stored in one or more places mentioned in the
¥ note.
¥ Note: For all Cisco-Linksys products, the Declaration of Conformity (DoC) is available in one or
more of the following options:
Ɣ A PDF file is included on the product’s CD.
Ɣ A printed copy is included with the product.
Ɣ A PDF file is available on the product’s webpage. Please visit
www.linksys.com/international
model.
and select your country region. Then select your product
Page 28

R&TTE Declaration of Conformity
This device complies with the essential requirements of the R&TTE Directive 1999/5/EC.
Compliance Information for 2.4-GHz and 5-GHz Wireless Products Relevant to the EU and Other
Countries Following the EU Directive1999/5/EC (R&TTE Directive).The following standards were
applied during the assessment of the product against the requirements of the R&TTE Directive:
Ɣ Radio: EN 300 328 (2.4GHz), EN 301 893 (5.0GHz)
Ɣ EMC: EN 301 489-1, EN 301 489-17
Ɣ Safety & Health: EN/IEC 60950 and EN 50371
EN50371᧶D=0.06989m
E-field strength of 61V/m
is the minimum distance between the EUT and human body to meet the
Ȼɴɥɝɚɪɫɤɢ
[Bulgarian]
ýesky
[Czech]:
Dansk
[Danish]:
Deutsch
[German]:
Eesti
[Estonian]:
English: This equipment is in compliance with the essential requirements and other relevant
Español
[Spanish]:
ǼȜȜȘȞȚțȒ
[Greek]:
Français
[French]:
Íslenska
[Icelandic]:
Italiano
[Italian]:
Latviski
[Latvian]:
Lietuviǐ
[Lithuanian]:
Nederlands
[Dutch]:
Malti
[Maltese]:
Magyar
[Hungarian]:
Norsk
[Norwegian]:
Polski
[Polish]:
Português
[Portuguese]:
Română
[Romanian]
Slovensko
[Slovenian]:
Slovensky
[Slovak]:
Suomi Tämä laite täyttää direktiivin 1999/5/EY olennaiset vaatimukset ja on siinä asetettujen
Ɍɨɜɚ ɨɛɨɪɭɞɜɚɧɟ ɨɬɝɨɜɚɪɹ ɧɚ ɫɴɳɟɫɬɜɟɧɢɬɟ ɢɡɢɫɤɜɚɧɢɹ ɢ ɩɪɢɥɨɠɢɦɢ ɤɥɚɭɡɢ ɧɚ
Ⱦɢɪɟɤɬɢɜɚ 1999/5/ȿɋ.
Toto zaĜízení je v souladu se základními požadavky a ostatními odpovídajícími
ustanoveními SmČrnice 1999/5/EC.
Dette udstyr er i overensstemmelse med de væsentlige krav og andre relevante
bestemmelser i Direktiv 1999/5/EF.
Dieses Gerät entspricht den grundlegenden Anforderungen und den weiteren
entsprechenden Vorgaben der Richtlinie 1999/5/EU.
See seade vastab direktiivi 1999/5/EÜ olulistele nõuetele ja teistele asjakohastele
sätetele.
provisions of Directive 1999/5/EC.
Este equipo cumple con los requisitos esenciales asi como con otras disposiciones
de la Directiva 1999/5/CE.
ǹȣIJȩȢ Ƞ İȟȠʌȜȚıȝȩȢ İȓȞĮȚ ıİ ıȣȝȝȩȡijȦıȘ ȝİ IJȚȢ ȠȣıȚȫįİȚȢ ĮʌĮȚIJȒıİȚȢ țĮȚ ȐȜȜİȢ
ıȤİIJȚțȑȢ įȚĮIJȐȟİȚȢ IJȘȢ ȅįȘȖȓĮȢ 1999/5/EC.
Cet appareil est conforme aux exigences essentielles et aux autres dispositions
pertinentes de la Directive 1999/5/EC.
Þetta tæki er samkvæmt grunnkröfum og öðrum viðeigandi ákvæðum Tilskipunar
1999/5/EC.
Questo apparato é conforme ai requisiti essenziali ed agli altri principi sanciti dalla
Direttiva 1999/5/CE.
ŠƯ iekƗrta atbilst DirektƯvas 1999/5/ EK bnjtiskajƗm prasƯbƗm un citiem ar to saistƯtajiem
noteikumiem.
Šis Ƴrenginys tenkina 1999/5/EB Direktyvos esminius reikalavimus ir kitas šios direktyvos
nuostatas.
Dit apparaat voldoet aan de essentiele eisen en andere van toepassing zijnde
bepalingen van de Richtlijn 1999/5/EC.
Dan l-apparat huwa konformi mal-ƫtiƥiet essenzjali u l-provedimenti l-oƫra rilevanti tadDirettiva 1999/5/EC.
Ez a készülék teljesíti az alapvetĘ követelményeket és más 1999/5/EK irányelvben
meghatározott vonatkozó rendelkezéseket.
Dette utstyret er i samsvar med de grunnleggende krav og andre relevante
bestemmelser i EU-direktiv 1999/5/EF.
Urządzenie jest zgodne z ogólnymi wymaganiami oraz szczególnymi warunkami
okreĞlonymi Dyrektywą UE: 1999/5/EC.
Este equipamento está em conformidade com os requisitos essenciais e outras
provisões relevantes da Directiva 1999/5/EC.
Acest echipament este in conformitate cu cerintele esentiale si cu alte prevederi
relevante ale Directivei 1999/5/EC.
Ta naprava je skladna z bistvenimi zahtevami in ostalimi relevantnimi pogoji Direktive
1999/5/EC.
Toto zariadenie je v zhode so základnými požiadavkami a inými príslušnými
nariadeniami direktív: 1999/5/EC.
Page 29

[Finnish]: muiden laitetta koskevien määräysten mukainen.
Svenska
[Swedish]:
Denna utrustning är i överensstämmelse med de väsentliga kraven och andra relevanta
bestämmelser i Direktiv 1999/5/EC.
Alert sign! Follows CE marking
Alert sign must be indicated if a restriction on use applied to the product and it must follow the CE
marking.
NB-Identification number if there is any
Notified body number is indicated if it is involve in the conformity assessment procedure.
XXXX
Please check the CE mark on the product label to find out which notified body was involved
during assessment.
National Restrictions
In the majority of the EU and other European countries, the 2.4 GHz and the 5.0 GHz bands have
been made available for the use of wireless local area networks (LANs). The table labeled
“Overview of Regulatory Requirements for Wireless LANs” provides an overview of the regulatory
requirements applicable for the 2.4 GHz and the 5.0 GHz bands.
The requirements for any country may evolve. Linksys recommends that end-user check with the
local authorities for the latest status of their national regulations for both the 2.4 GHz and the 5.0
GHz.
Frequency Band
(MHz)
2400-2483.5 100 X
5150-5250 200 X
5250-5350* 200 X
5470-5725* 1000 X
Table A. Regulatory Requirements for Wireless LANs
* Dynamic Frequency Selection (DFS) and Transmit Power Control (TCP) are required in the
frequency ranges of 5250-5350 MHz and 5470-5725 MHz.
Max. Power Level
EIRP (mW)
Indoor Only Indoor & Outdoor
Page 30

Dynamic Frequency Selection (DFS) and Transmit Power Control (TPC) are required for
operation in the 5.0 GHz band.
DFS: Dynamic Frequency Selection. This feature is required by the national regulations to avoid
interference with the Radio Location Services (radars) when operating in the 5.250-5.350 GHz &
5.470-5.725 GHz bands.
TPC: Transmit Power Control. For operation in the 5.250-5.350 GHz band & 5.470-5.725 GHz
band, the maximum power level is 3 dB or more below the applicable limit. As such, TPC is not
required.
This device does not operate within the 5.25
-5.35 GHz and 5.47-5.75 GHz bands. In this
case, the DFS and TPC functions are not required.
This product contains a wireless-N, -G, -B, and/or –A transceiver, intended for use in all EU
countries, and all other countries following EU directive 1999/5/EC, without any limitation except
for any country listed in the restriction of use below:
Ce produit contient un sans fil-N, - G, - B, et/ou - A émetteur récepteur, destiné à l'utilisation dans
tous les pays de l'UE, et tous autres pays après l'UE 1999/5/EC directif, sans n'importe quelle
limitation excepté n'importe quel pays énuméré dans la restriction de l'utilisation ci-dessous :
Dieses Produkt enthält ein drahtloses-n, - G, - ein B und/oder - ein Lautsprecherempfänger,
bestimmt für Gebrauch in allen EU-Ländern und in allen weiteren Ländern nach EU
richtungweisendes 1999/5/EC, ohne irgendeine Beschränkung außer jedem möglichem Land,
das nachstehend in der Beschränkung des Gebrauches aufgeführt wird:
Cer produit zahlt contient un sans fil-N, - G, - B, et/ou - ein émetteur récepteur, destiné à
l'utilisation dans tous les de L'UE, und zahlt tous autres après l'UE 1999/5/EC directif, sans,
n'importe quelle Beschränkung excepté n'importe, das quel énuméré dans la restriction de
L'utilisation Ci-dessous zahlt:
Croatia
In Croatia, license is required in the band 5150-5350 MHz.
France
In France, outdoor use limited to 10 mW e.i.r.p. within the band 2454-2483.5 MHz. For detailed
information, the end-user should contact the national spectrum authority in France or visit
http://www.arcep.fr/
Denmark
In Denmark, the band 5150-5350 MHz is also allowed for outdoor usage.
Italy
In Italy, if used outside of own premises, “general authorization” is required within the band 51505350 MHz & 5470-5725 MHz. For detailed information on applying for license, the end-user
should contact the national spectrum authorities in Italy or visit http://www.comunicazioni.it/it/
Page 31

Latvia
In Latvia, outdoor usage of the 2,4 GHz band requires an authorization from the Electronic
Communications Office. For detailed information, please visit http://www.esd.lv
Notes:
1. Although Norway, Switzerland and Liechtenstein are not EU member states, the EU Directive
1999/5/EC has also been implemented in those countries.
2. The regulatory limits for maximum output power are specified in EIRP. The EIRP level of a
device can be calculated by adding the gain of the antenna used (specified in dBi) to the output
power available at the connector (specified in dBm).
Product Usage Restrictions
This product is designed for indoor usage only. Outdoor usage is not recommended, unless
otherwise noted.
Third-Party Software or Firmware
The use of software or firmware not supported/provided by Linksys may result that the equipment
is no longer compliant with the regulatory requirements.
Technical Documents on
www.linksys.com/international
Follow these steps to access technical documents:
1. Enter http://www.linksys.com/international in your web browser.
2. Select the country or region in which you live.
3. Click the Products tab.
4. Select the appropriate product category.
5. Select the product sub-category, if necessary.
6. Select the product.
7. Select the type of documentation you want from the More Information section. The document
will open in PDF format if you have Adobe Acrobat installed on your computer.
¥ NOTE: If you have questions regarding the compliance of this product or you cannot find the
information you need, please contact your local sales office or visit
www.linksys.com/international
¥ NOTE: For all Cisco-Linksys products, the Declaration of Conformity (DoC) is available in one
or more of the following options:
Ɣ A PDF file is included on the product’s CD.
Ɣ A printed copy is included with the product.
Page 32

Ɣ A PDF file is available on the product’s webpage. Please visit
www.linksys.com/international
and select your country region. Then select your product
model.
WEEE Compliance Statements
User Information for Consumer Products Covered by EU Directive 2002/96/EC on Waste
Electric and Electronic Equipment (WEEE)
This document contains important information for users with regards to the proper disposal and
recycling of Linksys products. Consumers are required to comply with this notice for all electronic
products bearing the following symbol:
English - Environmental Information for Customers in the European
Union
European Directive 2002/96/EC requires that the equipment bearing this symbol on the product and/or its
packaging must not be disposed of with unsortedmunicipal waste. The symbol indicates that this product
should be disposed of separately from regular household waste streams. It is your responsibility to dispose
of this and other electric and electronic equipment via designated collection facilities appointed by the
government or local authorities. Correct disposal and recycling will help prevent potential negative
consequences to the environment and human health. For more detailed information about the disposal of
your old equipment, please contact your local authorities, waste disposal service, or the shop where you
purchased the product.
Ȼɴɥɝɚɪɫɤɢ (Bulgarian) - ɂɧɮɨɪɦɚɰɢɹ ɨɬɧɨɫɧɨ ɨɩɚɡɜɚɧɟɬɨ ɧɚ
ɨɤɨɥɧɚɬɚ ɫɪɟɞɚ ɡɚ ɩɨɬɪɟɛɢɬɟɥɢ ɜ ȿɜɪɨɩɟɣɫɤɢɹ ɫɴɸɡ
ȿɜɪɨɩɟɣɫɤɚ ɞɢɪɟɤɬɢɜɚ 2002/96/EC ɢɡɢɫɤɜɚ ɭɪɟɞɢɬɟ, ɧɨɫɟɳɢ ɬɨɡɢ ɫɢɦɜɨɥ ɜɴɪɯɭ ɢɡɞɟɥɢɟɬɨ ɢ/ɢɥɢ
ɨɩɚɤɨɜɤɚɬɚ ɦɭ, ɞɚ ɧɟ ɫɟ ɢɡɯɜɴɪɥɹ ɬ ɫ ɧɟɫɨɪɬɢɪɚɧɢ ɛɢɬɨɜɢ ɨɬɩɚɞɴɰɢ. ɋɢɦɜɨɥɴɬ ɨɛɨɡɧɚɱɚɜɚ, ɱɟ
ɢɡɞɟɥɢɟɬɨ ɬɪɹɛɜɚ ɞɚ ɫɟ ɢɡɯɜɴɪɥɹ ɨɬɞɟɥɧɨ ɨɬ ɫɦɟɬɨɫɴɛɢɪɚɧɟɬɨ ɧɚ ɨɛɢɤɧɨɜɟɧɢɬɟ ɛɢɬɨɜɢ ɨɬɩɚɞɴɰɢ.
ȼɚɲɚ ɟ ɨɬɝɨɜɨɪɧɨɫɬɬɚ ɬɨɡɢ ɢ ɞɪɭɝɢɬɟ ɟɥɟɤɬɪɢɱɟɫɤɢ ɢ ɟɥɟɤɬɪɨɧɧɢ ɭɪɟɞɢ ɞɚ ɫɟ ɢɡɯɜɴɪɥɹɬ ɜ
ɩɪɟɞɜɚɪɢɬɟɥɧɨ ɨɩɪɟɞɟɥɟɧɢ ɨɬ ɞɴɪɠɚɜɧɢɬɟ ɢɥɢ ɨɛɳɢɧɫɤɢ ɨɪɝɚɧɢ ɫɩɟɰɢɚɥɢɡɢɪɚɧɢ ɩɭɧɤɬɨɜɟ ɡɚ
ɫɴɛɢɪɚɧɟ. ɉɪɚɜɢɥɧɨɬɨ ɢɡɯɜɴɪɥɹɧɟ ɢ ɪɟɰɢɤɥɢɪɚɧɟ ɳɟ ɫɩɨɦɨɝɧɚɬ ɞɚ ɫɟ ɩɪɟɞɨɬɜɪɚɬɹɬ ɟɜɟɧɬɭɚɥɧɢ
ɜɪɟɞɧɢ ɡɚ ɨɤɨɥɧɚɬɚ ɫɪɟɞɚ ɢ ɡɞɪɚɜɟɬɨ ɧɚ ɧɚɫɟɥɟɧɢɟɬɨ ɩɨɫɥɟɞɫɬɜɢɹ. Ɂɚ ɩɨ-ɩɨɞɪɨɛɧɚ ɢɧɮɨɪɦɚɰɢɹ
ɨɬɧɨɫɧɨ ɢɡɯɜɴɪɥɹɧɟɬɨ ɧɚ ɜɚɲɢɬɟ ɫɬɚɪɢ ɭɪɟɞɢ ɫɟ ɨɛɴɪɧɟɬɟ ɤɴɦ ɦɟɫɬɧɢɬɟ ɜɥɚɫɬɢ, ɫɥɭɠɛɢɬɟ ɡɚ
ɫɦɟɬɨɫɴɛɢɪɚɧɟ ɢɥɢ ɦɚɝɚɡɢɧɚ,
ɨɬ ɤɨɣɬɨ ɫɬɟ ɡɚɤɭɩɢɥɢ ɭɪɟɞɚ.
Ceština (Czech) - Informace o ochranČ životního prostĜedí pro
zákazníky v zemích Evropské unie
Evropská smČrnice 2002/96/ES zakazuje, aby zaĜízení oznaþené tímto symbolem na produktu anebo na
obalu bylo likvidováno s netĜídČným komunálním odpadem. Tento symbol udává, že daný produkt musí být
Page 33

likvidován oddČlenČ od bČžného komunálního odpadu. Odpovídáte za likvidaci tohoto produktu a dalších
elektrických a elektronických zaĜízení prostĜednictvím urþených sbČrných míst stanovených vládou nebo
místními úĜady. Správná likvidace a recyklace pomáhá pĜedcházet potenciálním negativním dopadĤm na
životní prostĜedí a lidské zdraví. PodrobnČjší informace o likvidaci starého vybavení si laskavČ vyžádejte od
místních úĜadĤ, podniku zabývajícího se likvidací komunálních odpadĤ nebo obchodu, kde jste produkt
zakoupili.
Dansk (Danish) - Miljøinformation for kunder i EU
EU-direktiv 2002/96/EF kræver, at udstyr der bærer dette symbol på produktet og/eller emballagen ikke må
bortskaffes som usorteret kommunalt affald. Symbolet betyder, at dette produkt skal bortskaffes adskilt fra
det almindelige husholdningsaffald. Det er dit ansvar at bortskaffe dette og andet elektrisk og elektronisk
udstyr via bestemte indsamlingssteder udpeget af staten eller de lokale myndigheder. Korrekt bortskaffelse
og genvinding vil hjælpe med til at undgå mulige skader for miljøet og menneskers sundhed. Kontakt
venligst de lokale myndigheder, renovationstjenesten eller den butik, hvor du har købt produktet, angående
mere detaljeret information om bortskaffelse af dit gamle udstyr.
Deutsch (German) - Umweltinformation für Kunden innerhalb der
Europäischen Union
Die Europäische Richtlinie 2002/96/EC verlangt, dass technische Ausrüstung, die direkt am Gerät und/oder
an der Verpackung mit diesem Symbol versehen ist , nicht zusammen mit unsortiertem Gemeindeabfall
entsorgt werden darf. Das Symbol weist darauf hin, dass das Produkt von regulärem Haushaltmüll getrennt
entsorgt werden sollte. Es liegt in Ihrer Verantwortung, dieses Gerät und andere elektrische und
elektronische Geräte über die dafür zuständigen und von der Regierung oder örtlichen Behörden dazu
bestimmten Sammelstellen zu entsorgen. Ordnungsgemäßes Entsorgen und Recyceln trägt dazu bei,
potentielle negative Folgen für Umwelt und die menschliche Gesundheit zu vermeiden. Wenn Sie weitere
Informationen zur Entsorgung Ihrer Altgeräte benötigen, wenden Sie sich bitte an die örtlichen Behörden
oder städtischen Entsorgungsdienste oder an den Händler, bei dem Sie das Produkt erworben haben.
Eesti (Estonian) - Keskkonnaalane informatsioon Euroopa Liidus
asuvatele klientidele
Euroopa Liidu direktiivi 2002/96/EÜ nõuete kohaselt on seadmeid, millel on tootel või pakendil käesolev
sümbol , keelatud kõrvaldada koos sorteerimata olmejäätmetega. See sümbol näitab, et toode tuleks
kõrvaldada eraldi tavalistest olmejäätmevoogudest. Olete kohustatud kõrvaldama käesoleva ja ka muud
elektri- ja elektroonikaseadmed riigi või kohalike ametiasutuste poolt ette nähtud kogumispunktide kaudu.
Seadmete korrektne kõrvaldamine ja ringlussevõtt aitab vältida võimalikke negatiivseid tagajärgi
keskkonnale ning inimeste tervisele. Vanade seadmete kõrvaldamise kohta täpsema informatsiooni
saamiseks võtke palun ühendust kohalike ametiasutustega, jäätmekäitlusfirmaga või kauplusega, kust te
toote ostsite.
Español (Spanish) - Información medioambiental para clientes de la
Unión Europea
La Directiva 2002/96/CE de la UE exige que los equipos que lleven este símbolo en el propio aparato y/o
en su embalaje no deben eliminarse junto con otros residuos urbanos no seleccionados. El símbolo indica
que el producto en cuestión debe separarse de los residuos domésticos convencionales con vistas a su
eliminación. Es responsabilidad suya desechar este y cualesquiera otros aparatos eléctricos y electrónicos
a través de los puntos de recogida que ponen a su disposición el gobierno y las autoridades locales. Al
desechar y reciclar correctamente estos aparatos estará contribuyendo a evitar posibles consecuencias
negativas para el medio ambiente y la salud de las personas. Si desea obtener información más detallada
sobre la eliminación segura de su aparato usado, consulte a las autoridades locales, al servicio de recogida
y eliminación de residuos de su zona o pregunte en la tienda donde adquirió el producto.
ȟȜȜȘȞȚțȐ (Greek) - ȈIJȠȚȤİȓĮ ʌİȡȚȕĮȜȜȠȞIJȚțȒȢ ʌȡȠıIJĮıȓĮȢ ȖȚĮ
ʌİȜȐIJİȢ İȞIJȩȢ IJȘȢ ǼȣȡȦʌĮȧțȒȢ DzȞȦıȘȢ
Ǿ ȀȠȚȞȠIJȚțȒ ȅįȘȖȓĮ 2002/96/EC ĮʌĮȚIJİȓ ȩIJȚ Ƞ İȟȠʌȜȚıȝȩȢ Ƞ ȠʌȠȓȠȢ ijȑȡİȚ ĮȣIJȩ IJȠ ıȪȝȕȠȜȠ ıIJȠ ʌȡȠȧȩȞ țĮȚ/Ȓ
ıIJȘ ıȣıțİȣĮıȓĮ IJȠȣ įİȞ ʌȡȑʌİȚ ȞĮ ĮʌȠȡȡȓʌIJİIJĮȚ ȝĮȗȓ ȝİ IJĮ ȝȚțIJȐ țȠȚȞȠIJȚțȐ ĮʌȠȡȡȓȝȝĮIJĮ. ȉȠ ıȪȝȕȠȜȠ
ȣʌȠįİȚțȞȪİȚ ȩIJȚ ĮȣIJȩ IJȠ ʌȡȠȧȩȞ șĮ ʌȡȑʌİȚ ȞĮ ĮʌȠȡȡȓʌIJİIJĮȚ ȟİȤȦȡȚıIJȐ Įʌȩ IJĮ ıȣȞȒșȘ ȠȚțȚĮțȐ ĮʌȠȡȡȓȝȝĮIJĮ.
ǼȓıIJİ ȣʌİȪșȣȞȠȢ ȖȚĮ IJȘȞ ĮʌȩȡȡȚȥȘ IJȠȣ ʌĮȡȩȞIJȠȢ țĮȚ ȐȜȜȠȣ ȘȜİțIJȡȚțȠȪ țĮȚ ȘȜİțIJȡȠȞȚțȠȪ İȟȠʌȜȚıȝȠȪ ȝȑıȦ
IJȦȞ țĮșȠȡȚıȝȑȞȦȞ İȖțĮIJĮıIJȐıİȦȞ ıȣȖțȑȞIJȡȦıȘȢ ĮʌȠȡȡȚȝȝȐIJȦȞ ȠȚ ȠʌȠȓİȢ ʌĮȡȑȤȠȞIJĮȚ Įʌȩ IJȠ țȡȐIJȠȢ Ȓ IJȚȢ
ĮȡȝȩįȚİȢ IJȠʌȚțȑȢ ĮȡȤȑȢ. Ǿ ıȦıIJȒ ĮʌȩȡȡȚȥȘ țĮȚ ĮȞĮțȪțȜȦıȘ ıȣȝȕȐȜȜİȚ ıIJȘȞ ʌȡȩȜȘȥȘ ʌȚșĮȞȫȞ ĮȡȞȘIJȚțȫȞ
ıȣȞİʌİȚȫȞ ȖȚĮ IJȠ ʌİȡȚȕȐȜȜȠȞ țĮȚ IJȘȞ ȣȖİȓĮ. īȚĮ ʌİȡȚııȩIJİȡİȢ ʌȜȘȡȠijȠȡȓİȢ ıȤİIJȚțȐ ȝİ IJȘȞ ĮʌȩȡȡȚȥȘ IJȠȣ
Page 34

ʌĮȜȚȠȪ ıĮȢ İȟȠʌȜȚıȝȠȪ, ʌĮȡĮțĮȜȫ İʌȚțȠȚȞȦȞȒıIJİ ȝİ IJȚȢ IJȠʌȚțȑȢ ĮȡȤȑȢ, IJȚȢ ȣʌȘȡİıȓİȢ ĮʌȩȡȡȚȥȘȢ Ȓ IJȠ
țĮIJȐıIJȘȝĮ Įʌȩ IJȠ ȠʌȠȓȠ ĮȖȠȡȐıĮIJİ IJȠ ʌȡȠȧȩȞ.
Français (French) - Informations environnementales pour les clients
de l’Union européenne
La directive européenne 2002/96/CE exige que l’équipement sur lequel est apposé ce symbole sur le
produit et/ou son emballage ne soit pas jeté avec les autres ordures ménagères. Ce symbole indique que le
produit doit être éliminé dans un circuit distinct de celui pour les déchets des ménages. Il est de votre
responsabilité de jeter ce matériel ainsi que tout autre matériel électrique ou électronique par les moyens de
collecte indiqués par le gouvernement et les pouvoirs publics des collectivités territoriales. L’élimination et le
recyclage en bonne et due forme ont pour but de lutter contre l’impact néfaste potentiel de ce type de
produits sur l’environnement et la santé publique. Pour plus d’informations sur le mode d’élimination de
votre ancien équipement, veuillez prendre contact avec les pouvoirs publics locaux, le service de traitement
des déchets, ou l’endroit où vous avez acheté le produit.
Italiano (Italian) - Informazioni relative all’ambiente per i clienti
residenti nell’Unione Europea
La direttiva europea 2002/96/EC richiede che le apparecchiature contrassegnate con questo simbolo sul
prodotto e/o sull’imballaggio non siano smaltite insieme ai rifiuti urbani non differenziati. Il simbolo indica che
questo prodotto non deve essere smaltito insieme ai normali rifiuti domestici. È responsabilità del
proprietario smaltire sia questi prodotti sia le altre apparecchiature elettriche ed elettroniche mediante le
specifiche strutture di raccolta indicate dal governo o dagli enti pubblici locali. Il corretto smaltimento ed il
riciclaggio aiuteranno a prevenire conseguenze potenzialmente negative per l’ambiente e per la salute
dell’essere umano. Per ricevere informazioni più dettagliate circa lo smaltimento delle vecchie
apparecchiature in Vostro possesso, Vi invitiamo a contattare gli enti pubblici di competenza, il servizio di
smaltimento rifiuti o il negozio nel quale avete acquistato il prodotto.
Latviešu valoda (Latvian) - EkoloƧiska informƗcija klientiem Eiropas
SavienƯbas jurisdikcijƗ
DirektƯvƗ 2002/96/EK ir prasƯba, ka aprƯkojumu, kam pievienota zƯme uz paša izstrƗdƗjuma vai uz tƗ
iesaiƼojuma, nedrƯkst izmest nešƷirotƗ veidƗ kopƗ ar komunƗlajiem atkritumiem (tiem, ko rada vietƝji
iedzƯvotƗji un uzƼƝmumi). ŠƯ zƯme nozƯmƝ to, ka šƯ ierƯce ir jƗizmet atkritumos tƗ, lai tƗ nenonƗktu kopƗ ar
parastiem mƗjsaimniecƯbas atkritumiem. Jnjsu pienƗkums ir šo un citas elektriskas un elektroniskas ierƯces
izmest atkritumos, izmantojot Ưpašus atkritumu savƗkšanas veidus un lƯdzekƺus, ko nodrošina valsts un
pašvaldƯbu iestƗdes. Ja izmešana atkritumos un pƗrstrƗde tiek veikta pareizi, tad mazinƗs iespƝjamais
kaitƝjums dabai un cilvƝku veselƯ
varat saƼemt vietƝjƗ pašvaldƯbƗ, atkritumu savƗkšanas dienestƗ, kƗ arƯ veikalƗ, kur iegƗdƗjƗties šo
izstrƗdƗjumu.
bai. SƯkƗkas ziƼas par novecojuša aprƯkojuma izmešanu atkritumos jnjs
Lietuvškai (Lithuanian) - Aplinkosaugos informacija, skirta Europos
Sąjungos vartotojams
Europos direktyva 2002/96/EC numato, kad Ƴrangos, kuri ir kurios pakuotơ yra pažymơta šiuo simboliu
(Ƴveskite simbolƳ), negalima šalinti kartu su nernjšiuotomis komunalinơmis atliekomis. Šis simbolis rodo, kad
gaminƳ reikia šalinti atskirai nuo bendro buitiniǐ atliekǐ srauto. Jnjs privalote užtikrinti, kad ši ir kita elektros ar
elektroninơƳranga bnjtǐ šalinama per tam tikras nacionalinơs ar vietinơs valdžios nustatytas atliekǐ rinkimo
sistemas. Tinkamai šalinant ir perdirbant atliekas, bus išvengta galimos žalos aplinkai ir žmoniǐ sveikatai.
Daugiau informacijos apie jnjsǐ senos Ƴrangos šalinimą gali pateikti vietinơs valdžios institucijos, atliekǐ
šalinimo tarnybos arba parduotuvơs, kuriose Ƴsigijote tą gaminƳ.
Malti (Maltese) - Informazzjoni Ambjentali gƫal Klijenti fl-Unjoni
Ewropea
Id-Direttiva Ewropea 2002/96/KE titlob li t-tagƫmir li jkun fih is-simbolu fuq il-prodott u/jew fuq l-ippakkjar ma
jistax jintrema ma’ skart muniƛipali li ma ƥiex isseparat. Is-simbolu jindika li dan il-prodott gƫandu jintrema
separatament minn ma’ l-iskart domestiku regolari. Hija responsabbiltà tiegƫek li tarmi dan ittagƫmir u kull
tagƫmir ieƫor ta’ l-elettriku u elettroniku permezz ta’ faƛilitajiet ta’ ƥbir appuntati apposta mill-gvern jew millawtoritajiet lokali. Ir-rimi b’mod korrett u r-riƛiklaƥƥ jgƫin jipprevjeni konsegwenzi negattivi potenzjali
gƫallambjent u gƫas-saƫƫa tal-bniedem. Gƫal aktar informazzjoni dettaljata dwar irrimi tat-tagƫmir antik
tiegƫek, jekk jogƫƥbok ikkuntattja lill-awtoritajiet lokali tiegƫek, is-servizzi gƫar-rimi ta’ l-iskart, jew il-ƫanut
minn fejn xtrajt il-prodott.
Appendix E
Re
Page 35

Magyar (Hungarian) - Környezetvédelmi információ az európai
uniós vásárlók számára
A 2002/96/EC számú európai uniós irányelv megkívánja, hogy azokat a termékeket, amelyeken, és/vagy
amelyek csomagolásán az alábbi címke megjelenik, tilos a többi szelektálatlan lakossági hulladékkal együtt
kidobni. A címke azt jelöli, hogy az adott termék kidobásakor a szokványos háztartási hulladékelszállítási
rendszerektõl elkülönített eljárást kell alkalmazni. Az Ön felelõssége, hogy ezt, és más elektromos és
elektronikus berendezéseit a kormányzati vagy a helyi hatóságok által kijelölt gyĦjtoredszereken keresztül
számolja fel. A megfelelõ hulladékfeldolgozás segít a környezetre és az emberi egészségre potenciálisan
ártalmas negatív hatások megelõzésében. Ha elavult berendezéseinek felszámolásához további részletes
információra van szüksége, kérjük, lépjen kapcsolatba a helyi hatóságokkal, a hulladékfeldolgozási
szolgálattal, vagy azzal üzlettel, ahol a terméket vásárolta.
Nederlands (Dutch) - Milieu-informatie voor klanten in de Europese
Unie
De Europese Richtlijn 2002/96/EC schrijft voor dat apparatuur die is voorzien van dit symbool op het product
of de verpakking, niet mag worden ingezameld met niet-gescheiden huishoudelijk afval. Dit symbool geeft
aan dat het product apart moet worden ingezameld. U bent zelf verantwoordelijk voor de vernietiging van
deze en andere elektrische en elektronische apparatuur via de daarvoor door de landelijke of plaatselijke
overheid aangewezen inzamelingskanalen. De juiste vernietiging en recycling van deze apparatuur
voorkomt mogelijke negatieve gevolgen voor het milieu en de gezondheid. Voor meer informatie over het
vernietigen van uw oude apparatuur neemt u contact op met de plaatselijke autoriteiten of
afvalverwerkingsdienst, of met de winkel waar u het product hebt aangeschaft.
Norsk (Norwegian) - Miljøinformasjon for kunder i EU
EU-direktiv 2002/96/EF krever at utstyr med følgende symbol avbildet på produktet og/eller pakningen, ikke
må kastes sammen med usortert avfall. Symbolet indikerer at dette produktet skal håndteres atskilt fra
ordinær avfallsinnsamling for husholdningsavfall. Det er ditt ansvar å kvitte deg med dette produktet og
annet elektrisk og elektronisk avfall via egne innsamlingsordninger slik myndighetene eller kommunene
bestemmer. Korrekt avfallshåndtering og gjenvinning vil være med på å forhindre mulige negative
konsekvenser for miljø og helse. For nærmere informasjon om håndtering av det kasserte utstyret ditt, kan
du ta kontakt med kommunen, en innsamlingsstasjon for avfall eller
butikken der du kjøpte produktet.
Appendix E
Polski (Polish) - Informacja dla klientów w Unii Europejskiej o
przepisach dotyczących ochrony Ğrodowiska
Dyrektywa Europejska 2002/96/EC wymaga, aby sprzĊt oznaczony symbolem znajdującym siĊ na produkcie
i/lub jego opakowaniu nie byá wyrzucany razem z innymi niesortowanymi odpadami komunalnymi. Symbol
ten wskazuje, Īe produkt nie powinien byü usuwany razem ze zwykáymi odpadami z gospodarstw
domowych. Na PaĔstwu spoczywa obowiązek wyrzucania tego i innych urządzeĔ elektrycznych oraz
elektronicznych w punktach odbioru wyznaczonych przez wáadze krajowe lub lokalne. Pozbywanie siĊ
sprzĊtu we wáaĞciwy sposób i jego recykling pomogą zapobiec potencjalnie negatywnym konsekwencjom
dla Ğrodowiska i zdrowia ludzkiego. W celu uzyskania szczegóáowych informacji o usuwaniu starego sprzĊtu,
prosimy zwróciü siĊ do lokalnych wáadz, sáuĪb oczyszczania miasta lub sklepu, w którym produkt zostaá
nabyty.
Português (Portuguese) - Informação ambiental para clientes da
União Europeia
A Directiva Europeia 2002/96/CE exige que o equipamento que exibe este símbolo no produto e/ou na sua
embalagem não seja eliminado junto com os resíduos municipais não separados. O símbolo indica que este
produto deve ser eliminado separadamente dos resíduos domésticos regulares. É da sua responsabilidade
eliminar este e qualquer outro equipamento eléctrico e electrónico através das instalações de recolha
designadas pelas autoridades governamentais ou locais. A eliminação e reciclagem correctas ajudarão a
prevenir as consequências negativas para o ambiente e para a saúde humana. Para obter informações
mais detalhadas sobre a forma de eliminar o seu equipamento antigo, contacte as autoridades locais, os
serviços de eliminação de resíduos ou o estabelecimento comercial onde adquiriu o produto.
Română (Romanian) - InformaĠii de mediu pentru clienĠii din
Uniunea Europeană
Directiva europeană 2002/96/CE impune ca echipamentele care prezintă acest simbol pe produs úi/sau pe
ambalajul acestuia să nu fie casate împreună cu gunoiul menajer municipal. Simbolul indică faptul că acest
produs trebuie să fie casat separat de gunoiul menajer obiúnuit. Este responsabilitatea dvs. să casaĠi acest
Page 36

produs úi alte echipamente electrice úi electronice prin intermediul unităĠilor de colectare special desemnate
de guvern sau de autorităĠile locale. Casarea úi reciclarea corecte vor ajuta la prevenirea potenĠialelor
consecinĠe negative asupra sănătăĠii mediului úi a oamenilor. Pentru mai multe informaĠii detaliate
cu privire la casarea acestui echipament vechi, contactaĠi autorităĠile locale, serviciul de salubrizare sau
magazinul de la care aĠi achiziĠionat produsul.
Slovenþina (Slovak) - Informácie o ochrane životného prostredia pre
zákazníkov v Európskej únii
PodĐa európskej smernice 2002/96/ES zariadenie s týmto symbolom na produkte a/alebo jeho balení
nesmie byĢ likvidované spolu s netriedeným komunálnym odpadom. Symbol znamená, že produkt by sa mal
likvidovaĢ oddelene od bežného odpadu z domácností. Je vašou povinnosĢou likvidovaĢ toto i ostatné
elektrické a elektronické zariadenia prostredníctvom špecializovaných zberných zariadení urþených vládou
alebo miestnymi orgánmi. Správna likvidácia a recyklácia pomôže zabrániĢ prípadným negatívnym dopadom
na životné prostredie a zdravie Đudí. Ak máte záujem o podrobnejšie informácie o likvidácii starého
zariadenia, obráĢte sa, prosím, na miestne orgány, organizácie zaoberajúce sa likvidáciou odpadov alebo
obchod, v ktorom ste si product zakúpili.
Slovenþina (Slovene) - Okoljske informacije za stranke v Evropski
uniji
Evropska direktiva 2002/96/EC prepoveduje odlaganje opreme, oznaþene s tem simbolom – na izdelku in/ali
na embalaži – med obiþajne, nerazvršþene odpadke. Ta simbol opozarja, da je treba izdelek odvreþi loþeno
od preostalih gospodinjskih odpadkov. Vaša odgovornost je, da to in preostalo elektriþno in elektronsko
opremo odnesete na posebna zbirališþa, ki jih doloþijo državne ustanove ali lokalna uprava. S pravilnim
odlaganjem in recikliranjem boste prepreþili morebitne škodljive vplive na okolje in zdravje ljudi. ýe želite
izvedeti veþ o odlaganju stare opreme, se obrnite na lokalno upravo, odpad ali trgovino, kjer ste izdelek
kupili.
Suomi (Finnish) - Ympäristöä koskevia tietoja EU-alueen asiakkaille
EU-direktiivi 2002/96/EY edellyttää, että jos laitteistossa on tämä symboli itse tuotteessa ja/tai sen
pakkauksessa, laitteistoa ei saa hävittää lajittelemattoman yhdyskuntajätteen mukana. Symboli merkitsee
sitä, että tämä tuote on hävitettävä erillään tavallisesta kotitalousjätteestä. Sinun vastuullasi on hävittää
tämä elektroniikkatuote ja muut vastaavat elektroniikkatuotteet viemällä tuote tai tuotteet viranomaisten
määräämään keräyspisteeseen. Laitteiston oikea hävittäminen estää mahdolliset kielteiset vaikutukset
ympäristöön ja ihmisten terveyteen. Lisätietoja vanhan laitteiston oikeasta hävitystavasta saa paikallisilta
viranomaisilta, jätteenhävityspalvelusta tai siitä myymälästä, josta ostit tuotteen.
Svenska (Swedish) - Miljöinformation för kunder i Europeiska
unionen
Det europeiska direktivet 2002/96/EC kräver att utrustning med denna symbol på produkten och/eller
förpackningen inte får kastas med osorterat kommunalt avfall. Symbolen visar att denna produkt bör kastas
efter att den avskiljts från vanligt hushållsavfall. Det faller på ditt ansvar att kasta denna och annan elektrisk
och elektronisk utrustning på fastställda insamlingsplatser utsedda av regeringen eller lokala myndigheter.
Korrekt kassering och återvinning skyddar mot eventuella negativa konsekvenser för miljön och personhälsa.
För mer detaljerad information om kassering av din gamla utrustning kontaktar du dina lokala myndigheter,
avfallshanteringen eller butiken där du köpte produkten.
WEB: For additional information, please visit www.linksys.com
Page 37

Wireless Home Audio
Software License Agreement
Software License Agreement
Software in Linksys Products
This product from Cisco-Linksys LLC or from one of its
affiliates Cisco Systems-Linksys (Asia) Pte Ltd. or CiscoLinksys K.K. (“Linksys”) contains software (including
firmware) originating from Linksys and its suppliers
and may also contain software from the open source
community. Any software originating from Linksys and its
suppliers is licensed under the Linksys Software License
Agreement contained at Schedule 1 below. You may also
be prompted to review and accept that Linksys Software
License Agreement upon installation of the software.
Any software from the open source community is licensed
under the specific license terms applicable to that software
made available by Linksys at www.linksys.com/gpl or as
provided for in Schedules 2 and 3 below.
Where such specific license terms entitle you to the source
code of such software, that source code is upon request
available at cost from Linksys for at least three years
from the purchase date of this product and may also be
available for download from www.linksys.com/gpl. For
detailed license terms and additional information on
open source software in Linksys products please look at
the Linksys public web site at: www.linksys.com/gpl/ or
Schedule 2 below as applicable.
BY DOWNLOADING OR INSTALLING THE SOFTWARE,
OR USING THE PRODUCT CONTAINING THE SOFTWARE,
YOU ARE CONSENTING TO BE BOUND BY THE SOFTWARE
LICENSE AGREEMENTS BELOW. IF YOU DO NOT AGREE TO
ALL OF THESE TERMS, THEN YOU MAY NOT DOWNLOAD,
INSTALL OR USE THE SOFTWARE. YOU MAY RETURN
UNUSED SOFTWARE (OR, IF THE SOFTWARE IS SUPPLIED
AS PART OF ANOTHER PRODUCT, THE UNUSED PRODUCT)
FOR A FULL REFUND UP TO 30 DAYS AFTER ORIGINAL
PURCHASE, SUBJECT TO THE RETURN PROCESS AND
POLICIES OF THE PARTY FROM WHICH YOU PURCHASED
SUCH PRODUCT OR SOFTWARE.
Software Licenses
The software Licenses applicable to software from Linksys
are made available at the Linksys public web site at:
www.linksys.com and www.linksys.com/gpl/
respectively. For your convenience of reference, a copy
of the Linksys Software License Agreement and the main
open source code licenses used by Linksys in its products
are contained in the Schedules below.
Schedule 1 - Linksys Software License
Agreement
THIS LICENSE AGREEMENT IS BETWEEN YOU AND
CISCO-LINKSYS LLC OR ONE OF ITS AFFILIATES CISCO
SYSTEMS-LINKSYS (ASIA) PTE LTD. OR CISCO-LINKSYS
K.K. (“LINKSYS”) LICENSING THE SOFTWARE INSTEAD OF
CISCO-LINKSYS LLC. BY DOWNLOADING OR INSTALLING
THE SOFTWARE, OR USING THE PRODUCT CONTAINING
THE SOFTWARE, YOU ARE CONSENTING TO BE BOUND BY
THIS AGREEMENT. IF YOU DO NOT AGREE TO ALL OF THESE
TERMS, THEN YOU MAY NOT DOWNLOAD, INSTALL OR USE
THE SOFTWARE. YOU MAY RETURN UNUSED SOFTWARE
(OR, IF THE SOFTWARE IS SUPPLIED AS PART OF ANOTHER
PRODUCT, THE UNUSED PRODUCT) FOR A FULL REFUND
UP TO 30 DAYS AFTER ORIGINAL PURCHASE, SUBJECT TO
THE RETURN PROCESS AND POLICIES OF THE PARTY FROM
WHICH YOU PURCHASED SUCH PRODUCT OR SOFTWARE.
License. Subject to the terms and conditions of this
Agreement, Linksys grants the original end user purchaser
of the Linksys product containing the Software (“You”)
a nonexclusive license to use the Software solely as
embedded in or (where authorized in the applicable
documentation) for communication with such product.
This license may not be sublicensed, and is not transferable
except to a person or entity to which you transfer
ownership of the complete Linksys product containing
the Software, provided you permanently transfer all rights
under this Agreement and do not retain any full or partial
copies of the Software, and the recipient agrees to the
terms of this Agreement.
“Software” includes, and this Agreement will apply to (a)
the software of Linksys or its suppliers provided in or with
the applicable Linksys product, and (b) any upgrades,
updates, bug fixes or modified versions (“Upgrades”) or
backup copies of the Software supplied to You by Linksys
or an authorized reseller, provided you already hold a
valid license to the original software and have paid any
applicable fee for the Upgrade.
Protection of Information. The Software and
documentation contain trade secrets and/or copyrighted
materials of Linksys or its suppliers. You will not copy
or modify the Software or decompile, decrypt, reverse
engineer or disassemble the Software (except to the
extent expressly permitted by law notwithstanding this
provision), and You will not disclose or make available
such trade secrets or copyrighted material in any form
to any third party. Title to and ownership of the Software
and documentation and any portion thereof, will remain
solely with Linksys or its suppliers.
Collection and Processing of Information. You agree that
Linksys and/or its affiliates may, from time to time, collect
and process information about your Linksys product and/
or the Software and/or your use of either in order (i) to
enable Linksys to offer you Upgrades; (ii) to ensure that
your Linksys product and/or the Software is being used in
accordance with the terms of this Agreement; (iii) to provide
improvements to the way Linksys delivers technology to
you and to other Linksys customers; (iv) to enable Linksys
to comply with the terms of any agreements it has with
Controller/Wireless-N Touchscreen Remote
27
Page 38

Wireless Home Audio
Software License Agreement
any third parties regarding your Linksys product and/or
Software and/or (v) to enable Linksys to comply with all
applicable laws and/or regulations, or the requirements
of any regulatory authority or government agency.
Linksys and/ or its affiliates may collect and process
this information provided that it does not identify you
personally. Your use of your Linksys product and/or the
Software constitutes this consent by you to Linksys and/
or its affiliates’ collection and use of such information and,
for EEA customers, to the transfer of such information to a
location outside the EEA.
Software Upgrades etc. If the Software enables you to
receive Upgrades, you may elect at any time to receive
these Upgrades either automatically or manually. If you
elect to receive Upgrades manually or you otherwise
elect not to receive or be notified of any Upgrades, you
may expose your Linksys product and/or the Software
to serious security threats and/or some features within
your Linksys product and/or Software may become
inaccessible. There may be circumstances where we
apply an Upgrade automatically in order to comply with
changes in legislation, legal or regulatory requirements
or as a result of requirements to comply with the terms
of any agreements Linksys has with any third parties
regarding your Linksys product and/or the Software. You
will always be notified of any Upgrades being delivered
to you. The terms of this license will apply to any such
Upgrade unless the Upgrade in question is accompanied
by a separate license, in which event the terms of that
license will apply.
Open Source Software. The GPL or other open source
code incorporated into the Software and the open source
license for such source code are available for free download
at http://www.linksys.com/gpl. If You would like a copy
of the GPL or other open source code in this Software on a
CD, Linksys will mail to You a CD with such code for $9.99
plus the cost of shipping, upon request.
Term and Termination. You may terminate this License
at any time by destroying all copies of the Software
and documentation. Your rights under this License will
terminate immediately without notice from Linksys if You
fail to comply with any provision of this Agreement.
Limited Warranty. The warranty terms and period
specified in the applicable Linksys Product User Guide
shall also apply to the Software.
Disclaimer of Liabilities. IN NO EVENT WILL LINKSYS OR
ITS SUPPLIERS BE LIABLE FOR ANY LOST DATA, REVENUE
OR PROFIT, OR FOR SPECIAL, INDIRECT, CONSEQUENTIAL,
INCIDENTAL OR PUNITIVE DAMAGES, REGARDLESS OF
CAUSE (INCLUDING NEGLIGENCE), ARISING OUT OF
OR RELATED TO THE USE OF OR INABILITY TO USE THE
SOFTWARE, EVEN IF LINKSYS HAS BEEN ADVISED OF
THE POSSIBILITY OF SUCH DAMAGES. IN NO EVENT WILL
LINKSYS’ LIABILITY EXCEED THE AMOUNT PAID BY YOU
FOR THE PRODUCT. The foregoing limitations will apply
even if any warranty or remedy under this Agreement fails
of its essential purpose. Some jurisdictions do not allow
the exclusion or limitation of incidental or consequential
damages, so the above limitation or exclusion may not
apply to You.
Export. Software, including technical data, may be subject
to U.S. export control laws and regulations and/or export
or import regulations in other countries. You agree to
comply strictly with all such laws and regulations.
U.S. Government Users. The Software and documentation
qualify as “commercial items” as defined at 48 C.F.R. 2.101
and 48 C.F.R. 12.212. All Government users acquire the
Software and documentation with only those rights
herein that apply to non-governmental customers.
General Terms. This Agreement will be governed by and
construed in accordance with the laws of the State of
California, without reference to conflict of laws principles.
The United Nations Convention on Contracts for the
International Sale of Goods will not apply. If any portion
of this Agreement is found to be void or unenforceable,
the remaining provisions will remain in full force and
effect. This Agreement constitutes the entire agreement
between the parties with respect to the Software and
supersedes any conflicting or additional terms contained
in any purchase order or elsewhere.
END OF SCHEDULE 1
Schedule 2
If this Linksys product contains open source software
licensed under Version 2 of the “GNU General Public
License” then the license terms below in this Schedule 2
will apply to that open source software. The license terms
below in this Schedule 2 are from the public web site at
http://www.gnu.org/copyleft/gpl.html
GNU GENERAL PUBLIC LICENSE
Version 2, June 1991
Copyright © 1989, 1991 Free Software Foundation, Inc.
51 Franklin Street, Fifth Floor, Boston, MA 02110-1301,
USA
Everyone is permitted to copy and distribute verbatim
copies of this license document, but changing it is not
allowed.
Preamble
The licenses for most software are designed to take away
your freedom to share and change it. By contrast, the
GNU General Public License is intended to guarantee your
freedom to share and change free software–to make sure
the software is free for all its users. This General Public
License applies to most of the Free Software Foundation’s
software and to any other program whose authors
commit to using it. (Some other Free Software Foundation
Controller/Wireless-N Touchscreen Remote
28
Page 39

Wireless Home Audio
Software License Agreement
software is covered by the GNU Lesser General Public
License instead.) You can apply it to your programs, too.
When we speak of free software, we are referring to
freedom, not price. Our General Public Licenses are
designed to make sure that you have the freedom to
distribute copies of free software (and charge for this
service if you wish), that you receive source code or can
get it if you want it, that you can change the software or
use pieces of it in new free programs; and that you know
you can do these things.
To protect your rights, we need to make restrictions that
forbid anyone to deny you these rights or to ask you to
surrender the rights. These restrictions translate to certain
responsibilities for you if you distribute copies of the
software, or if you modify it.
For example, if you distribute copies of such a program,
whether gratis or for a fee, you must give the recipients
all the rights that you have. You must make sure that they,
too, receive or can get the source code. And you must
show them these terms so they know their rights.
We protect your rights with two steps: (1) copyright the
software, and (2) offer you this license which gives you
legal permission to copy, distribute and/or modify the
software.
Also, for each author’s protection and ours, we want to
make certain that everyone understands that there is no
warranty for this free software. If the software is modified
by someone else and passed on, we want its recipients
to know that what they have is not the original, so that
any problems introduced by others will not reflect on the
original authors’ reputations.
Finally, any free program is threatened constantly by
software patents. We wish to avoid the danger that
redistributors of a free program will individually obtain
patent licenses, in effect making the program proprietary.
To prevent this, we have made it clear that any patent must
be licensed for everyone’s free use or not licensed at all.
The precise terms and conditions for copying, distribution
and modification follow.
TERMS AND CONDITIONS FOR COPYING,
DISTRIBUTION AND MODIFICATION
This License applies to any program or other work 0.
which contains a notice placed by the copyright
holder saying it may be distributed under the terms
of this General Public License. The “Program”, below,
refers to any such program or work, and a “work
based on the Program” means either the Program
or any derivative work under copyright law: that is
to say, a work containing the Program or a portion
of it, either verbatim or with modifications and/
or translated into another language. (Hereinafter,
translation is included without limitation in the term
“modification”.) Each licensee is addressed as “you”.
Activities other than copying, distribution and
modification are not covered by this License; they
are outside its scope. The act of running the Program
is not restricted, and the output from the Program is
covered only if its contents constitute a work based on
the Program (independent of having been made by
running the Program). Whether that is true depends
on what the Program does.
You may copy and distribute verbatim copies of the 1.
Program’s source code as you receive it, in any medium,
provided that you conspicuously and appropriately
publish on each copy an appropriate copyright
notice and disclaimer of warranty; keep intact all the
notices that refer to this License and to the absence
of any warranty; and give any other recipients of the
Program a copy of this License along with the Program.
You may charge a fee for the physical act of transferring
a copy, and you may at your option offer warranty
protection in exchange for a fee.
You may modify your copy or copies of the Program 2.
or any portion of it, thus forming a work based on the
Program, and copy and distribute such modifications
or work under the terms of Section 1 above, provided
that you also meet all of these conditions:
You must cause the modified files to carry a.
prominent notices stating that you changed the
files and the date of any change.
You must cause any work that you distribute or b.
publish, that in whole or in part contains or is
derived from the Program or any part thereof, to be
licensed as a whole at no charge to all third parties
under the terms of this License.
Controller/Wireless-N Touchscreen Remote
29
Page 40

Wireless Home Audio
Software License Agreement
If the modified program normally reads commands c.
interactively when run, you must cause it, when
started running for such interactive use in the most
ordinary way, to print or display an announcement
including an appropriate copyright notice and
a notice that there is no warranty (or else, saying
that you provide a warranty) and that users may
redistribute the program under these conditions,
and telling the user how to view a copy of
this License. (Exception: if the Program itself is
interactive but does not normally print such an
announcement, your work based on the Program
is not required to print an announcement.)
These requirements apply to the modified work as
a whole. If identifiable sections of that work are not
derived from the Program, and can be reasonably
considered independent and separate works in
themselves, then this License, and its terms, do not
apply to those sections when you distribute them as
separate works. But when you distribute the same
sections as part of a whole which is a work based on
the Program, the distribution of the whole must be on
the terms of this License, whose permissions for other
licensees extend to the entire whole, and thus to each
and every part regardless of who wrote it.
Thus, it is not the intent of this section to claim rights
or contest your rights to work written entirely by you;
rather, the intent is to exercise the right to control the
distribution of derivative or collective works based on
the Program.
In addition, mere aggregation of another work not
based on the Program with the Program (or with a
work based on the Program) on a volume of a storage
or distribution medium does not bring the other work
under the scope of this License.
You may copy and distribute the Program (or a 3.
work based on it, under Section 2) in object code or
executable form under the terms of Sections 1 and 2
above provided that you also do one of the following:
Accompany it with the complete corresponding a.
machine-readable source code, which must be
distributed under the terms of Sections 1 and 2
above on a medium customarily used for software
interchange; or,
Accompany it with a written offer, valid for at least b.
three years, to give any third party, for a charge
no more than your cost of physically performing
source distribution, a complete machine-readable
copy of the corresponding source code, to be
distributed under the terms of Sections 1 and 2
above on a medium customarily used for software
interchange; or,
Accompany it with the information you received as c.
to the offer to distribute corresponding source code.
(This alternative is allowed only for noncommercial
distribution and only if you received the program
in object code or executable form with such an
offer, in accord with Subsection b above.)
The source code for a work means the preferred form
of the work for making modifications to it. For an
executable work, complete source code means all
the source code for all modules it contains, plus any
associated interface definition files, plus the scripts
used to control compilation and installation of the
executable. However, as a special exception, the source
code distributed need not include anything that is
normally distributed (in either source or binary form)
with the major components (compiler, kernel, and so
on) of the operating system on which the executable
runs, unless that component itself accompanies the
executable.
If distribution of executable or object code is made
by offering access to copy from a designated place,
then offering equivalent access to copy the source
code from the same place counts as distribution of
the source code, even though third parties are not
compelled to copy the source along with the object
code.
You may not copy, modify, sublicense, or distribute 4.
the Program except as expressly provided under
this License. Any attempt otherwise to copy, modify,
sublicense or distribute the Program is void, and will
automatically terminate your rights under this License.
However, parties who have received copies, or rights,
from you under this License will not have their licenses
terminated so long as such parties remain in full
compliance.
You are not required to accept this License, since you 5.
have not signed it. However, nothing else grants you
permission to modify or distribute the Program or its
derivative works. These actions are prohibited by law if
you do not accept this License. Therefore, by modifying
or distributing the Program (or any work based on the
Program), you indicate your acceptance of this License
to do so, and all its terms and conditions for copying,
distributing or modifying the Program or works based
on it.
Each time you redistribute the Program (or any work 6.
based on the Program), the recipient automatically
receives a license from the original licensor to copy,
distribute or modify the Program subject to these
terms and conditions. You may not impose any further
restrictions on the recipients’ exercise of the rights
granted herein. You are not responsible for enforcing
compliance by third parties to this License.
Controller/Wireless-N Touchscreen Remote
30
Page 41

Wireless Home Audio
Software License Agreement
If, as a consequence of a court judgment or allegation 7.
of patent infringement or for any other reason (not
limited to patent issues), conditions are imposed on
you (whether by court order, agreement or otherwise)
that contradict the conditions of this License, they do
not excuse you from the conditions of this License. If
you cannot distribute so as to satisfy simultaneously
your obligations under this License and any other
pertinent obligations, then as a consequence you
may not distribute the Program at all. For example,
if a patent license would not permit royalty-free
redistribution of the Program by all those who receive
copies directly or indirectly through you, then the only
way you could satisfy both it and this License would be
to refrain entirely from distribution of the Program.
If any portion of this section is held invalid or
unenforceable under any particular circumstance,
the balance of the section is intended to apply and
the section as a whole is intended to apply in other
circumstances.
It is not the purpose of this section to induce you to
infringe any patents or other property right claims or
to contest validity of any such claims; this section has
the sole purpose of protecting the integrity of the free
software distribution system, which is implemented
by public license practices. Many people have
made generous contributions to the wide range of
software distributed through that system in reliance
on consistent application of that system; it is up to
the author/donor to decide if he or she is willing to
distribute software through any other system and a
licensee cannot impose that choice.
This section is intended to make thoroughly clear
what is believed to be a consequence of the rest of this
License.
If the distribution and/or use of the Program is 8.
restricted in certain countries either by patents or by
copyrighted interfaces, the original copyright holder
who places the Program under this License may add an
explicit geographical distribution limitation excluding
those countries, so that distribution is permitted only
in or among countries not thus excluded. In such case,
this License incorporates the limitation as if written in
the body of this License.
The Free Software Foundation may publish revised 9.
and/or new versions of the General Public License
from time to time. Such new versions will be similar in
spirit to the present version, but may differ in detail to
address new problems or concerns.
Each version is given a distinguishing version number.
If the Program specifies a version number of this
License which applies to it and “any later version”, you
have the option of following the terms and conditions
either of that version or of any later version published
by the Free Software Foundation. If the Program does
not specify a version number of this License, you
may choose any version ever published by the Free
Software Foundation.
If you wish to incorporate parts of the Program into 10.
other free programs whose distribution conditions are
different, write to the author to ask for permission. For
software which is copyrighted by the Free Software
Foundation, write to the Free Software Foundation; we
sometimes make exceptions for this. Our decision will
be guided by the two goals of preserving the free status
of all derivatives of our free software and of promoting
the sharing and reuse of software generally.
NO WARRANTY
BECAUSE THE PROGRAM IS LICENSED FREE OF CHARGE, 11.
THERE IS NO WARRANTY FOR THE PROGRAM, TO THE
EXTENT PERMITTED BY APPLICABLE LAW. EXCEPT
WHEN OTHERWISE STATED IN WRITING THE COPYRIGHT
HOLDERS AND/OR OTHER PARTIES PROVIDE THE
PROGRAM “AS IS” WITHOUT WARRANTY OF ANY
KIND, EITHER EXPRESSED OR IMPLIED, INCLUDING,
BUT NOT LIMITED TO, THE IMPLIED WARRANTIES OF
MERCHANTABILITY AND FITNESS FOR A PARTICULAR
PURPOSE. THE ENTIRE RISK AS TO THE QUALITY AND
PERFORMANCE OF THE PROGRAM IS WITH YOU.
SHOULD THE PROGRAM PROVE DEFECTIVE, YOU
ASSUME THE COST OF ALL NECESSARY SERVICING,
REPAIR OR CORRECTION.
IN NO EVENT UNLESS REQUIRED BY APPLICABLE LAW OR 12.
AGREED TO IN WRITING WILL ANY COPYRIGHT HOLDER,
OR ANY OTHER PARTY WHO MAY MODIFY AND/OR
REDISTRIBUTE THE PROGRAM AS PERMITTED ABOVE,
BE LIABLE TO YOU FOR DAMAGES, INCLUDING ANY
GENERAL, SPECIAL, INCIDENTAL OR CONSEQUENTIAL
DAMAGES ARISING OUT OF THE USE OR INABILITY TO
USE THE PROGRAM (INCLUDING BUT NOT LIMITED TO
LOSS OF DATA OR DATA BEING RENDERED INACCURATE
OR LOSSES SUSTAINED BY YOU OR THIRD PARTIES OR
A FAILURE OF THE PROGRAM TO OPERATE WITH ANY
OTHER PROGRAMS), EVEN IF SUCH HOLDER OR OTHER
PARTY HAS BEEN ADVISED OF THE POSSIBILITY OF
SUCH DAMAGES.
END OF TERMS AND CONDITIONS
END OF SCHEDULE 2
Schedule 3
If this Linksys product contains open source software
licensed under the OpenSSL license:
This product includes software developed by the
OpenSSL Project for use in the OpenSSL Toolkit.
(http://www.openssl.org/).
This product includes cryptographic software written by
Eric Young (eay@cryptsoft.com).
Controller/Wireless-N Touchscreen Remote
31
Page 42

Wireless Home Audio
Software License Agreement
This product includes software written by Tim Hudson
(tjh@cryptsoft.com).
In addition, if this Linksys product contains open
source software licensed under the OpenSSL license
then the license terms below in this Schedule 3 will
apply to that open source software. The license terms
below in this Schedule 3 are from the public web site at
http://www.openssl.org/source/license.html.
The OpenSSL toolkit stays under a dual license, i.e. both
the conditions of the OpenSSL License and the original
SSLeay license apply to the toolkit. See below for the
actual license texts. Actually both licenses are BSD-style
Open Source licenses. In case of any license issues related
to OpenSSL please contact openssl-core@openssl.org.
OpenSSL License
Copyright © 1998-2007 The OpenSSL Project. All rights
reserved.
Redistribution and use in source and binary forms, with
or without modification, are permitted provided that the
following conditions are met:
Redistributions of source code must retain the above 1.
copyright notice, this list of conditions and the
following disclaimer.
Redistributions in binary form must reproduce the 2.
above copyright notice, this list of conditions and the
following disclaimer in the documentation and/or
other materials provided with the distribution.
All advertising materials mentioning features or 3.
use of this software must display the following
acknowledgment: “This product includes software
developed by the OpenSSL Project for use in the
OpenSSL Toolkit. (http://www.openssl.org/)”
The names “OpenSSL Toolkit” and “OpenSSL Project” 4.
must not be used to endorse or promote products
derived from this software without prior written
permission. For written permission, please contact
openssl-core@openssl.org.
Products derived from this software may not be called 5.
“OpenSSL” nor may “OpenSSL” appear in their names
without prior written permission of the OpenSSL
Project.
Redistributions of any form whatsoever must retain 6.
the following acknowledgment: “ This product includes
software developed by the OpenSSL Project for use in
the OpenSSL Toolkit (http://www.openssl.org/)”
THIS SOFTWARE IS PROVIDED BY THE OpenSSL PROJECT
``AS IS’’ AND ANY EXPRESSED OR IMPLIED WARRANTIES,
INCLUDING, BUT NOT LIMITED TO, THE IMPLIED
WARRANTIES OF MERCHANTABILITY AND FITNESS FOR
A PARTICULAR PURPOSE ARE DISCLAIMED. IN NO EVENT
SHALL THE OpenSSL PROJECT OR ITS CONTRIBUTORS BE
LIABLE FOR ANY DIRECT, INDIRECT, INCIDENTAL, SPECIAL,
Controller/Wireless-N Touchscreen Remote
EXEMPLARY, OR CONSEQUENTIAL DAMAGES (INCLUDING,
BUT NOT LIMITED TO, PROCUREMENT OF SUBSTITUTE
GOODS OR SERVICES; LOSS OF USE, DATA, OR PROFITS;
OR BUSINESS INTERRUPTION) HOWEVER CAUSED AND
ON ANY THEORY OF LIABILITY, WHETHER IN CONTRACT,
STRICT LIABILITY, OR TORT (INCLUDING NEGLIGENCE OR
OTHERWISE) ARISING IN ANY WAY OUT OF THE USE OF
THIS SOFTWARE, EVEN IF ADVISED OF THE POSSIBILITY OF
SUCH DAMAGE.
This product includes cryptographic software written by
Eric Young (eay@cryptsoft.com). This product includes
software written by Tim Hudson (tjh@cryptsoft.com).
Original SSLeay License
Copyright © 1995-1998 Eric Young (eay@cryptsoft.com)
All rights reserved.
This package is an SSL implementation written by Eric
Young (eay@cryptsoft.com).
The implementation was written so as to conform with
Netscapes SSL.
This library is free for commercial and non-commercial
use as long as the following conditions are adhered to.
The following conditions apply to all code found in this
distribution, be it the RC4, RSA, lhash, DES, etc., code; not
just the SSL code. The SSL documentation included with
this distribution is covered by the same copyright terms
except that the holder is Tim Hudson (tjh@cryptsoft.
com).
Copyright remains Eric Young’s, and as such any Copyright
notices in the code are not to be removed.
If this package is used in a product, Eric Young should be
given attribution as the author of the parts of the library
used. This can be in the form of a textual message at
program startup or in documentation (online or textual)
provided with the package.
Redistribution and use in source and binary forms, with
or without modification, are permitted provided that the
following conditions are met:
Redistributions of source code must retain the 1.
copyright notice, this list of conditions and the
following disclaimer.
Redistributions in binary form must reproduce the 2.
above copyright notice, this list of conditions and the
following disclaimer in the documentation and/or
other materials provided with the distribution.
All advertising materials mentioning features or 3.
use of this software must display the following
acknowledgement:
“This product includes cryptographic software written
by Eric Young (eay@cryptsoft.com)”
32
Page 43

Wireless Home Audio
The word ‘cryptographic’ can be left out if the routines
from the library being used are not cryptographic
related.
If you include any Windows specific code (or a derivative 4.
thereof) from the apps directory (application code)
you must include an acknowledgement: “This product
includes software written by Tim Hudson (tjh@
cryptsoft.com)”
THIS SOFTWARE IS PROVIDED BY ERIC YOUNG ``AS IS’’
AND ANY EXPRESS OR IMPLIED WARRANTIES, INCLUDING,
BUT NOT LIMITED TO, THE IMPLIED WARRANTIES OF
MERCHANTABILITY AND FITNESS FOR A PARTICULAR
PURPOSE ARE DISCLAIMED. IN NO EVENT SHALL THE
AUTHOR OR CONTRIBUTORS BE LIABLE FOR ANY
DIRECT, INDIRECT, INCIDENTAL, SPECIAL, EXEMPLARY,
OR CONSEQUENTIAL DAMAGES (INCLUDING, BUT NOT
LIMITED TO, PROCUREMENT OF SUBSTITUTE GOODS OR
SERVICES; LOSS OF USE, DATA, OR PROFITS; OR BUSINESS
INTERRUPTION) HOWEVER CAUSED AND ON ANY THEORY
OF LIABILITY, WHETHER IN CONTRACT, STRICT LIABILITY,
OR TORT (INCLUDING NEGLIGENCE OR OTHERWISE)
ARISING IN ANY WAY OUT OF THE USE OF THIS SOFTWARE,
EVEN IF ADVISED OF THE POSSIBILITY OF SUCH DAMAGE.
The license and distribution terms for any publicly available
version or derivative of this code cannot be changed. i.e.
this code cannot simply be copied and put under another
distribution license [including the GNU Public License.]
END OF SCHEDULE 3
Software License Agreement
Controller/Wireless-N Touchscreen Remote
8082010NC-RR
33
 Loading...