

Page 1

P
O
WER
D
I
M
MODE
DISP
1
BAN
MA
I
N SP
MULTI-MEDIA INPUT
®
Operation
and Installation
Manual
A
M
F
/
M MULTI-MEDI
A
RE
C
EIVE
R
CT
EJE
M
U
TE
S
TEREO
ALA
R
M
E
N
T
E
R
-
I
P
O
D
-
M
E
N
2
D
EQ
E
A
K
ERS
3
/
LO
U
D
AS
/
P
S
V
OL
U
A
B
ME
C
SEEK
SCAN
SELECT
PU
4
5
R
E
P
E
AT
IN
AUX OFF
T
MAIN OFF
S
H
SLEEP
ALARM
U
6
R
O
R
A
N
D
OM
A
L
L
O
N
S
P
E
A
K
E
R CO
N
T
R
OL
HEAD
PHON
E
O
UTPUT
RESET
U.S. PATENT NO.: D561754
RV5055
AM / FM Stereo
Multi-Media Receiver
Page 2

Introduction
Please take the time to read all of the information in this manual. Familiarity with operation and installation
procedures will help you obtain the best possible performance from your new AM/FM Stereo Multi-Media
Receiver.
WARNING! To prevent fire or electrical shock hazard, do not expose this product to moisture, or remove
cover or bottom screws. No user-serviceable parts inside. Refer servicing to qualified personnel.
Index
Button Locations and Functions 3-4
Remote Control Button Locations and Functions 5
General Operation 6
Sound Controls 7-8
Speaker Selection Switches 8-9
Setting the Clock 9
Sleep Timer Operation 9
Alarm Operation 10
Radio Operations 11-12
Disc Warnings 13
Music Disc Operation 14-15
MP3 Disc Operation 16
Movie Disc Operation 17-19
Setup Menu 19-20
Audio Input 20
Headphone Output 20
IPOD Operations 21-23
USB Input 23-24
Reset Button 24
Installation 25
Speaker Connections 26
Auxiliary Connections 27
Input Connections 29
Warranty
One Year Limited Warranty 29
Extended 5 Year Warranty 30
Warranty Cards 31-32
2
Page 3
Button Locations and Functions
3
1
33
32
31
30
29
MAIN SPEAKER
M
U
LT
2
PO
W
E
R
D
I
M
M
ODE
D
I
SP
1
2
B
AN
D
S
I
-
M
E
DIA
I
N
PU
T
28
3
E
Q
/L
OU
D
AS/P
S
V
O
L
UM
A
B
27
26
E
C
S
EEK
SCAN
25
23
24
4
S
E
L
ECT
MA
P
U
SH
A
LAR
20
22
R
E
IN OFF
SLEEP
M
5 6
J
E
C
T
E
M
UT
E
S
T
ER
EO
A
LAR
M
4
5
18
IN
T
R
O
R
A
AL
L ON
SPEAKER CONTROL
16
6
N
DO
M
H
E
A
D
PH
O
N
E
OU
T
P
U
T
R
E
S
E
T
PE
AT
AUX OFF
7
8
9
10
11
12
13
14
15
171921
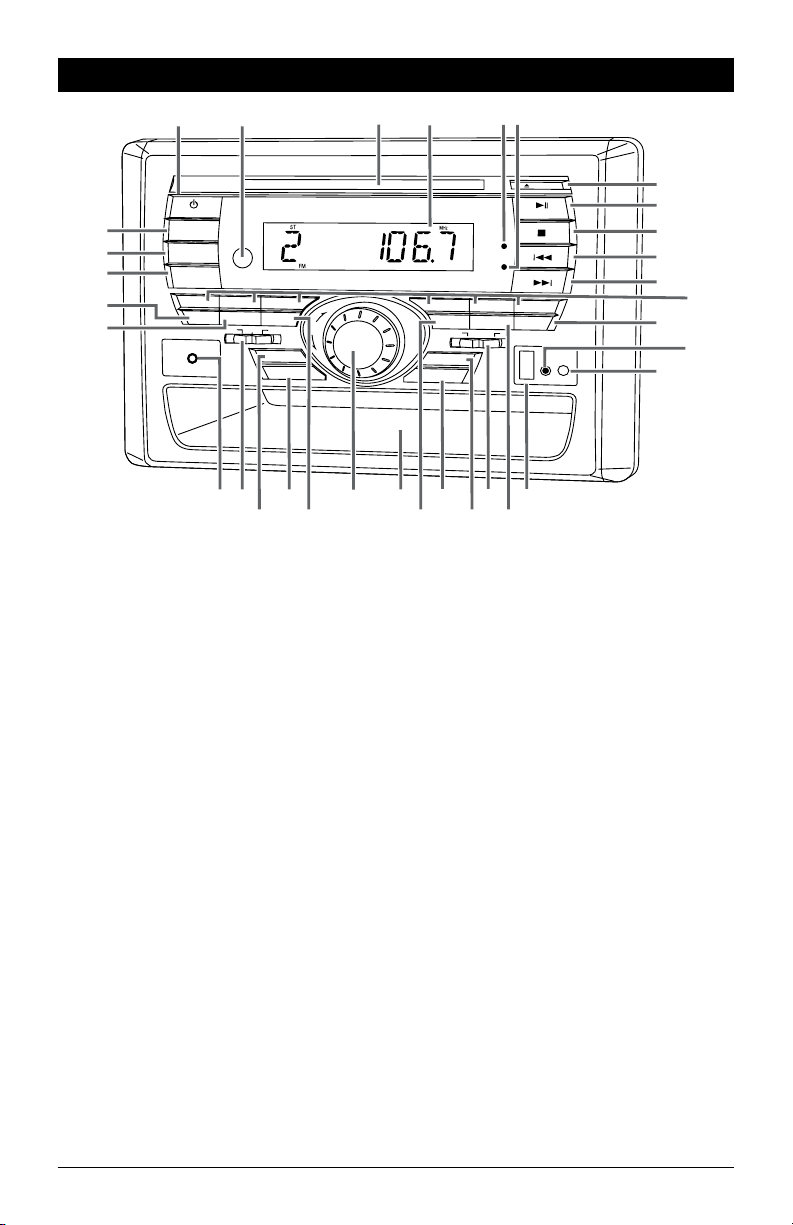
1. Power On/Off: Press to turn the unit on or off.
2. Infrared Eye: Receives the signals from the remote control.
3. Disc Slot: To play a disc, insert the disc into slot with label facing up.
4.
Display Area: This area displays all function information for the radio, clock, disc player and IPOD.
5. FM Stereo Indication LED: FM stereo reception is indicated when the LED is on.
6. Alarm Timer LED: The alarm timer has been activated when the LED is on.
7. Eject Button: Press to eject the disc.
8. Play/Pause (ll) and Mute Button:
Radio and Multi-Media Input Modes: Press to mute volume level. Press again to restore.
Disc Mode: Press to pause disc play, press again to resume play.
IPOD Mode: Press to pause play, press again to resume play.
9. Stop Button
Disc Mode: Press to stop play of movie or audio.
10. Seek- l Button:
Radio Mode: Press to tune the radio to a lower frequency.
Disc Mode: Press this button to search for the beginning of the previous track or chapter.
IPOD Mode: Press this button to search for the beginning of the previous track.
11. Seek+ l Button:
Radio Mode: Press to tune the radio to a higher frequency.
Disc Mode: Press this button to search for the beginning of the next track or chapter.
IPOD Mode: Press this button to search for the beginning of the next track.
12. Radio Station Recall Buttons (1-6): Press and release when recalling preset radio stations. Press
and hold until the preset number appears to memorize a radio station.
13. Random Button:
Disc Mode: Press to play all the tracks on the music disc in random order. Press again to cancel.
3
Page 4

Button Locations and Functions (Continued)
14. Reset Button: Press to reset the unit to it’s default settings.
15. Headphone Socket: Accepts 3.5mm stereo headphone jacks.
16. USB Input: Press the MODE button until “DISC” appears in the display. Then plug in your USB device.
“USB” will then appears in the display.
Note: The RV5055 will control the USB audio device. (See “USB Input” for more details).
17. Music Disc Intro Button: Press to preview each track on the music disc for 6 seconds. Press again to
cancel.
18. Speaker Control Switch: Switches the main speakers off/auxiliary speakers on, main speakers on/
auxiliary speakers off or main/auxiliary speakers on.
19. Sleep Button: Sets the sleep timer. (See “Sleep Timer Operation” for more details).
20. Alarm Button: Sets the alarm. (See “Alarm Operation” for more details).
21. Repeat Button:
Disc Mode: Press to repeat a music disc track or to repeat a movie disc title or chapter. Press again
to cancel.
IPOD Mode: (See IPOD Operations section for more details).
22. Storage Tray.
23. Volume and Select Button: Rotate to increase or decrease the volume level. Press to select the
sound controls: Bass, Treble and Balance.
24. Radio AS/PS Button: Automatic radio station memory storing (AS) and Preset radio station scanning
(PS). (See “AM/FM Operation” for more details).
25. Radio SCAN Button: Press this button and the tuner will scan up, pausing for 5 seconds at each
strong station. Press the button again to cancel the scan function.
26. Radio SEEK Button: Press this button and the tuner will scan up to the next strong station and stop.
27. Main Speakers A, B and C Selector Switch: Selects the different sets of speakers installed.
28. Audio/Video Input Jack: Press the MODE button until “AV IN F” appears in the display then
plug in a device via the 3.5mm audio/video input plug.
Note: The RV5055 does not control the device, it just allows the audio/video to be played
through the system.
29. EQ/LOUD Button (Equalizer and Loudness): Press to select between the preset sound equalization
settings. Press and hold the button to boost high and low tones at low volume levels (loudness).
30. AM/FM Band Selector Button: Press to select the desired radio band: 1 FM, 2 FM, 3 FM,
1 AM and 2 AM.
31. DISP Button (Display): Press to display the clock or frequency in radio mode, track in music disc
mode, chapter and elapse time in movie disc mode or track in IPOD mode. Press and hold to perform
clock setting functions (See “Setting the Clock” for more details).
32. Mode Button: Press to choose between AV IN F (Audio/Video in Front), AV IN R (Audio/Video in
Rear), RADIO (AM or FM Band), DISC (Music, Movie or USB Input) and IPOD (IPOD Input).
33. DIM Button (Display Dimmer): Press to select the desired level of brightness of the display.
4
Page 5
Remote Control Button Locations and Functions
11. AM/FM Band Selector Button: Press to select
the desired radio band: 1FM, 2FM, 3FM, 1AM,
POWER MODE MENU
1
2
3
4
MUTE
RANDOM
5
REPEAT
6
ZOOM SETUP
7
AS/PS
ELAPSE
BAND
ENTER
EQ
8
9
10
11
SLOW
AUDIO
TONE
SUB.TT
12
DISP
13
2
1
15
16
17
18
VOL
19
20
21
+
22
23
24
3
25
14
6
10/0
7
+
10
4
5
8
9
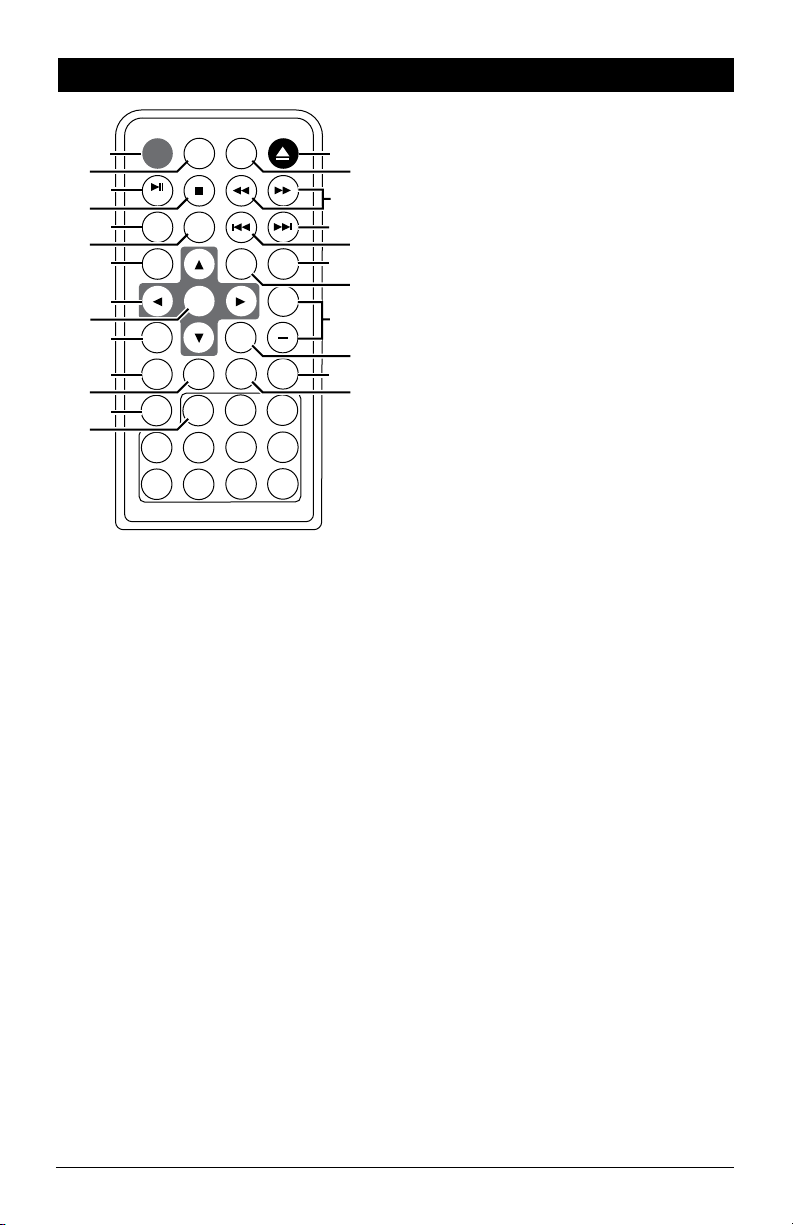
1. Power On/Off Button: Press to turn the unit
on or off.
2.
Mode Button: Press to choose between Audio/
Video In, Front (AV IN F), Audio/Video In, Rear
(AV IN R), AM/FM Radio (RADIO), Music/Movie
Disc or USB Input (DISC) and IPOD Input (IPOD)
3. Play/Pause and Mute Button:
Radio Modes: Press to mute volume level.
Press again to restore.
Disc Mode: Press to pause disc play, press
again to resume play.
4.
Stop Button: Press to stop play of picture or audio.
5.
Random: Press to play all the tracks on the music
disc in random order. Press again to cancel.
6. Repeat: Press to repeat a music track or to
repeat a movie disc title or chapter. Press
again to cancel.
7. Zoom: Press to enlarge the movie disc’s
onscreen image.
8. Navigation: In the movie disc menu mode,
these buttons serve as cursor buttons to select
item left/right, up/down.
9. Enter: Executes the selected item.
10. AS/PS Button: Automatic radio station memory
storing (AS) and Preset radio station scanning
(PS). See “Radio Operation” for more details.
In music and movie modes press to display
running times.
and 2AM.
12. EQ Button (Equalizer): Press to select between
the preset sound equalization settings.
13. DISP Button (Display): Press to display the
frequency in radio mode or track in music disc
mode and chapter and elapse time in movie
disc mode. Press and hold to perform clock
setting functions (See “Setting the Clock” for
more details).
14. Numeric Buttons
15. Eject Button: Press to eject a disc.
16. Menu Button: Press to display the root menu
that is stored on the movie disc.
17. Fast Forward/Fast Reverse Disc Play
Buttons: Press the button to fast forward
disc play or press the button to fast
reverse disc play. Each time the button is
pressed, the speed changes. To resume normal play, press the l (Play) button.
18. Previous Button:
Radio Mode: Press to tune to a lower radio
station frequency.
Disc Mode: Press this button to search for the
beginning of the previous track or chapter.
19. Next Button:
Radio Mode: Press to tune to a higher radio
station frequency.
Disc Mode: Press this button to search for the
beginning of the next track or chapter.
20. Volume/Tone Button: Press to select the different sound controls: Volume, Bass, Treble
and Balance.
21.
Setup Button: Displays the onscreen SETUP menu.
22. Volume Adjustment Buttons: Press to increase
or decrease the volume level. They also adjust
Bass, Treble and Balance when selected.
23. Slow Motion: Press to play the movie disc in slow
motion.
24. Subtitle Button: Press to access movie disc’s
subtitle languages.
25. Audio Button: Press to access movie disc’s
audio setting.
5
Page 6
General Operations
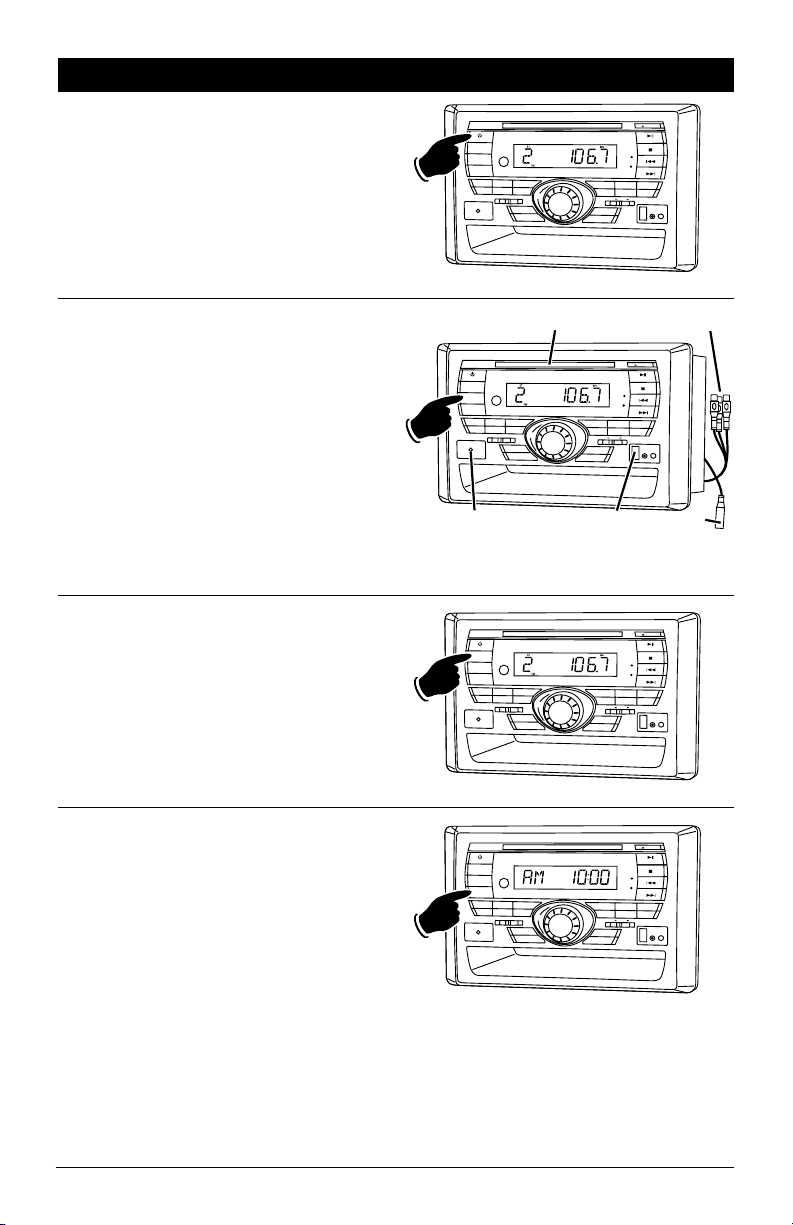
Power On/Off:
Press the POWER button to turn the unit On/Off.
T
C
JE
P
O
W
ER
DIM
M
ODE
DISP
1
2
3
BA
N
D
E
Q
/L
O
U
D
A
S
/
P
S
V
O
L
U
M
E
S
E
A
B
C
M
A
I
N
S
P
E
AK
E
R
S
M
U
LT
I
M
E
D
IA
IN
P
U
T
SEEK
SCA
LE
PUS
N
E
MU
TE
S
T
ERE
O
A
L
ARM
4
5
6
RE
P
E
AT
I
N
T
R
O
RA
N
D
O
M
C
T
M
A
I
N
O
F
F
A
UX
O
A
F
L
L
F
O
N
H
S
P
E
AK
ER
CO
N
T
R
O
L
HE
A
D
P
HONE
OUT
P
U
SL
ALARM
T
EEP
R
ESE
T
Selecting a Play Source:
To select a play source, press the MODE button
until the desired source appears in the display:
AV IN F (Audio/Video Input Front),
AV IN R (Audio/Video Input Rear),
RADIO (AM or FM Band)
DISC (Music, Movie or USB Input), and
IPOD (IPOD Input) (Optional harness
required).
Dimming the Display:
Press the DIM button to select the desired level
of brightness for the display.
Display Selection:
Press the DISP button to display the clock. Press
again to return to previous display.
Press and hold to perform clock setting functions (See “Setting the Clock” for more details).
PO
W
ER
DI
M
MODE
DI
SP
1
BAN
D
MAIN
S
P
E
A
K
ER
S
M
U
L
TI-
MEDI
A
I
N
P
U
T
A
/V
AV IN F
P
O
W
E
R
DIM
M
ODE
DI
SP
1
BA
ND
M
A
I
N S
P
E
A
K
M
UL
T
I
M
E
D
I
A
I
NP
U
T
P
O
W
E
R
D
IM
MOD
E
DISP
1
B
A
ND
M
A
I
N
S
P
E
A
K
M
U
L
T
I-M
E
D
I
A
IN
P
U
T
DISC
ST
ER
EO
ALAR
2
3
E
Q
/
L
OU
D
AS/PS
VO
LU
ME
A
B
C
SEEK
SCAN
M
4
5
R
E
P
EAT
I
N
T
R
O
S
E
L
E
C
T
M
AI
N O
F
F
A
U
X
O
F
F
P
USH
SL
E
EP
ALAR
M
2
3
EQ
/
L
O
U
D
AS
/
P
S
V
O
L
U
ME
A
B
C
E
R
S
S
E
EK
SCAN
2
3
EQ
/
L
O
U
D
AS
/
P
S
V
OL
U
M
E
A
B
C
E
R
S
S
E
E
K
S
C
AN
4
R
E
PEA
T
S
EL
E
C
T
MAIN
O
F
F
AU
P
USH
S
LE
EP
ALAR
M
A
M
4
R
E
PE
A
T
S
E
L
E
C
T
MAIN
O
F
F
A
U
X
PU
S
H
S
L
E
EP
AL
A
R
M
AV IN R
T
E
J
E
C
M
U
TE
6
RA
N
D
O
M
A
LL
O
N
SP
E
AKER
CO
N
TROL
H
E
A
D
P
H
ON
E
O
U
T
P
UT
RESET
IPOD
T
E
C
EJ
M
U
TE
S
T
E
R
EO
A
L
AR
M
5
6
INTR
O
R
A
N
D
O
M
X
ALL
O
F
F
O
N
S
PEA
K
E
R
CON
T
R
OL
H
E
AD
P
H
O
NE
O
U
T
P
U
T
R
E
S
E
T
T
EJ
E
C
M
UT
E
S
TE
R
E
O
A
L
A
R
M
5
6
INT
RO
RAN
D
OM
A
OFF
L
L
O
N
S
PEAK
E
R
CO
N
TRO
L
HE
AD
PH
ONE
O
U
TP
UT
R
E
SE
T
6
Page 7

Sound Controls
Volume:
Increase the volume by rotating the Volume knob
clockwise. Decrease the volume by rotating the
Volume knob counterclockwise.
P
O
W
ER
DIM
MODE
DIS
P
1
2
3
BA
N
D
E
Q
/
LOU
D
A
S
/
PS
VO
LU
M
E
SE
A
B
C
M
A
I
N
SP
E
A
KERS
M
U
L
TI
-M
E
D
I
A
I
N
P
U
T
SE
EK
S
CA
LE
P
U
N
JECT
E
M
U
T
E
S
T
E
RE
O
A
L
A
R
M
4
5
6
R
E
P
E
AT
I
N
TR
O
R
A
N
DO
M
C
T
M
A
I
N
O
F
F
A
U
X
A
L
O
F
L O
F
N
SH
SPE
A
KE
R CON
T
R
O
L
H
E
A
D
P
H
O
NE
OU
T
P
U
S
AL
AR
T
L
E
EP
M
R
ES
ET
Bass, Treble and Balance Control
Select the desired sound mode by pressing the VOLUME/SELECT knob. The modes will be displayed in
the following order: Bass, Treble, Balance and Volume.
Bass:
Select the Bass mode by pressing the VOLUME/
SELECT button. Increase the Bass by rotating the
knob clockwise. Decrease the Bass by rotating
the knob counterclockwise. After 5 seconds control reverts back to volume control.
Treble:
Select the Treble mode by pressing the VOLUME/
SELECT button. Increase the Treble by rotating
the knob clockwise. Decrease the Treble by rotating the knob counterclockwise. After 5 seconds
control reverts back to volume control.
PO
WE
R
D
I
M
MODE
D
I
S
P
1
2
3
B
AN
D
E
Q
/
L
O
U
D
AS
/PS
V
O
LU
M
E
SE
A
B
C
MA
IN S
PE
A
KER
S
M
U
L
T
I-
M
E
D
I
A
INP
U
T
SEEK
SC
AN
P
O
W
ER
D
I
M
M
O
DE
D
I
S
P
1
2
3
BA
ND
E
Q
/
L
O
UD
A
S
/PS
A
B
C
M
A
I
N
S
P
E
AK
ER
S
M
U
L
TI-
M
EDIA IN
P
UT
SE
E
K
S
C
A
L
P
U
V
OLU
M
E
SE
L
P
U
N
JECT
E
M
U
T
E
S
TER
E
O
A
LA
RM
4
5
6
R
E
P
E
A
T
I
N
T
R
O
R
A
N
D
O
M
E
CT
MA
I
N
OF
F
A
UX
ALL ON
O
F
F
SH
SPE
A
K
E
R
C
O
N
T
RO
L
H
EAD
PH
O
N
E
OU
T
PUT
S
L
E
EP
ALARM
RE
S
ET
T
J
E
C
E
M
UTE
S
T
E
R
E
O
A
L
A
R
M
4
5
6
R
E
P
E
AT
IN
T
R
O
R
AND
O
M
E
CT
M
A
IN
O
F
F
A
UX
O
AL
F
F
L
O
N
S
H
SP
E
A
K
E
R
C
ON
T
R
O
L
HE
A
D
PHO
N
E
O
UT
PU
S
A
LA
R
T
L
E
E
P
M
RE
S
ET
Balance:
Select the Balance mode by pressing the
VOLUME/SELECT button. Adjust the Balance by
rotating the knob.
-
L = Equal sound right and left
R
-
R 7 = Right speaker only
L 7 = Left speaker only
After 5 seconds control reverts back to volume
control.
T
C
E
P
O
W
E
R
D
I
M
MO
D
E
DIS
P
1
2
3
B
A
ND
EQ/L
O
U
D
A
S
/
P
S
V
OL
U
M
E
A
B
C
M
A
I
N
S
PE
AK
E
R
S
MU
L
TI
-
M
E
D
I
A
I
N
P
U
T
SEEK
SC
SEL
PU
AN
EJ
M
U
T
E
S
T
E
RE
O
A
L
A
R
M
4
5
6
R
EPEAT
I
N
T
RO
RA
N
D
O
M
E
C
T
M
A
I
N
O
F
F
A
U
X
A
LL
OF
F
O
N
S
H
S
P
E
A
K
ER
C
O
NTR
OL
HE
A
D
P
HO
N
E
OUT
P
U
SLEEP
ALA
RM
T
R
E
S
E
T
7
Page 8

Sound Controls
D
E
Q
/L
O
U
D
A
S
/
P
S
S
E
E
K
P
U
T
(Continued)
Equalizer (EQ):
Press the EQ button to choose between the
preset equalizer settings: Flat, Classic, Rock,
Popular and Jazz as indicated in the display area.
T
E
C
J
P
O
W
E
R
D
IM
M
O
D
E
DI
SP
1
2
3
B
A
N
D
E
Q/
LOU
D
AS/
P
S
VO
LU
ME
A
B
C
MA
I
N
S
P
E
A
K
E
R
S
M
U
L
T
I
ME
DIA
I
NP
U
T
S
EEK
SC
SELECT
PU
S
AN
E
M
U
T
E
S
T
ER
EO
A
L
A
R
M
4
5
6
R
E
PE
A
T
I
N
T
RO
R
A
NDO
M
M
A
I
N
OF
F
A
UX O
A
F
L
F
L
ON
H
S
P
E
A
K
E
R
C
O
N
T
R
O
L
H
E
A
DP
HON
E
O
U
T
P
U
SL
AL
AR
T
EEP
M
R
E
SE
T
Loud:
To boost high and low tones at low volume
levels, press and hold the EQ button until “LOUD
ON” appears in the display. To deselect, press
and hold the EQ button again until “LOUD OFF”
appears in the display.
Mute:
Press the MUTE button to mute the volume level.
If a disc is playing the MUTE button will pause
the disc. Press the MUTE button again to restore
the volume or resume playing the disc.
Speaker Selection Switches
Main Speakers:
Slide the Main Speaker Switch to play audio
through speaker set A, speaker set B or speaker
set C.
T
J
EC
P
OW
ER
DI
M
M
OD
E
D
I
S
P
1
2
3
B
A
N
D
E
Q
/L
O
U
D
A
S
/
PS
VOLU
M
E
SE
L
A
B
C
M
A
I
N
S
P
E
A
K
E
R
S
MU
L
T
I
M
E
D
I
A
INP
U
T
S
E
E
K
S
CAN
E
P
U
S
E
MUTE
ST
E
R
E
O
ALA
R
M
4
5
6
R
E
P
E
AT
I
N
T
R
O
R
A
N
D
O
M
C
T
MA
I
N
O
F
F
A
U
X
A
O
L
F
L
F
O
N
H
SPEA
K
E
R
C
ON
TR
O
L
H
E
A
D
P
H
ON
E
O
UT
PUT
SL
EEP
AL
ARM
RES
ET
Hold
T
C
E
POW
E
R
DI
M
MO
DE
DISP
1
2
3
B
A
N
D
E
Q
/
L
O
U
D
AS/
PS
VO
LU
ME
SE
L
A
B
C
M
A
I
N
S
P
E
AKER
S
MU
L
T
I
ME
D
IA
I
N
P
U
T
SE
E
K
SC
A
N
P
O
W
E
R
D
IM
MO
D
E
D
ISP
1
2
3
B
A
N
D
E
Q
/L
O
U
D
A
S
/
P
S
V
O
L
UM
E
A
B
C
M
A
IN
S
P
E
A
KE
R
S
MU
LTI-M
ED
I
A
I
N
P
U
T
S
EE
K
S
C
A
N
E
P
U
SH
4
R
E
P
E
A
T
S
E
LE
C
T
M
A
I
N
O
F
F
A
P
U
S
H
S
L
E
E
P
A
LA
R
M
JE
M
U
T
E
S
T
E
R
E
O
A
LA
R
M
4
5
6
R
EP
E
AT
I
N
T
R
O
RA
N
D
O
M
C
T
MA
IN
OFF
AUX
A
O
L
F
L
F
O
N
S
P
E
A
K
E
R
C
O
N
TR
O
L
HE
A
D
P
H
O
NE
O
UT
P
U
SL
AL
A
R
S
T
ER
E
O
A
L
A
R
M
5
I
N
T
R
O
U
X
O
F
F
A
T
E
EP
M
RE
S
ET
E
J
E
C
T
M
U
T
E
6
R
A
N
D
O
M
L
L
O
N
S
P
E
A
KE
R
C
O
N
T
R
O
L
H
E
A
DP
H
O
N
E
O
U
TP
U
T
R
ES
E
T
A
B
C
Speakers
Set A
8
Speakers
Sets B
Speakers
Set C
Page 9
Speaker Selection Switches (Continued)
R
E
P
E
A
T
IN
T
R
O
R
A
S
L
E
E
P
Auxiliary Speakers:
Slide the Speaker Control Switch to turn:
• Main speaker off and auxiliary speakers on
(MAIN OFF),
• Main speakers on and auxiliary speakers off
(AUX OFF) or
• Main speakers on and auxiliary speakers on
(ALL ON).
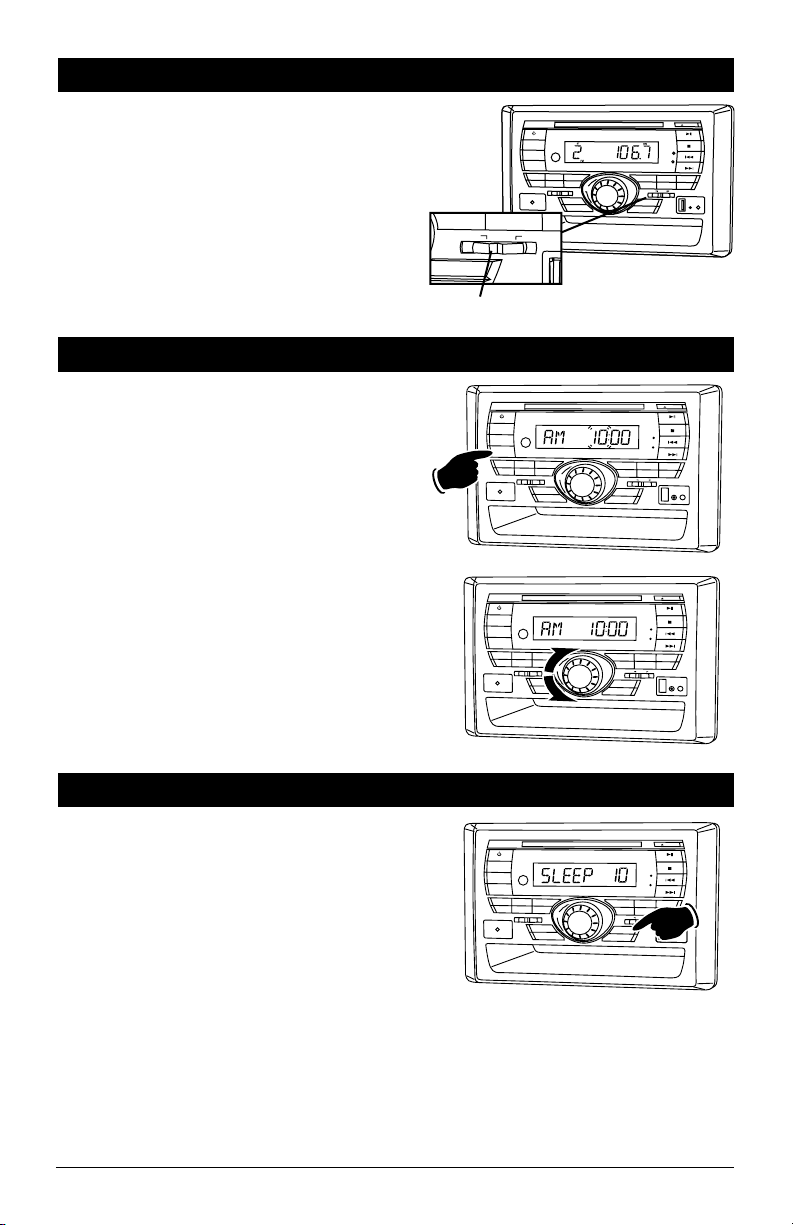
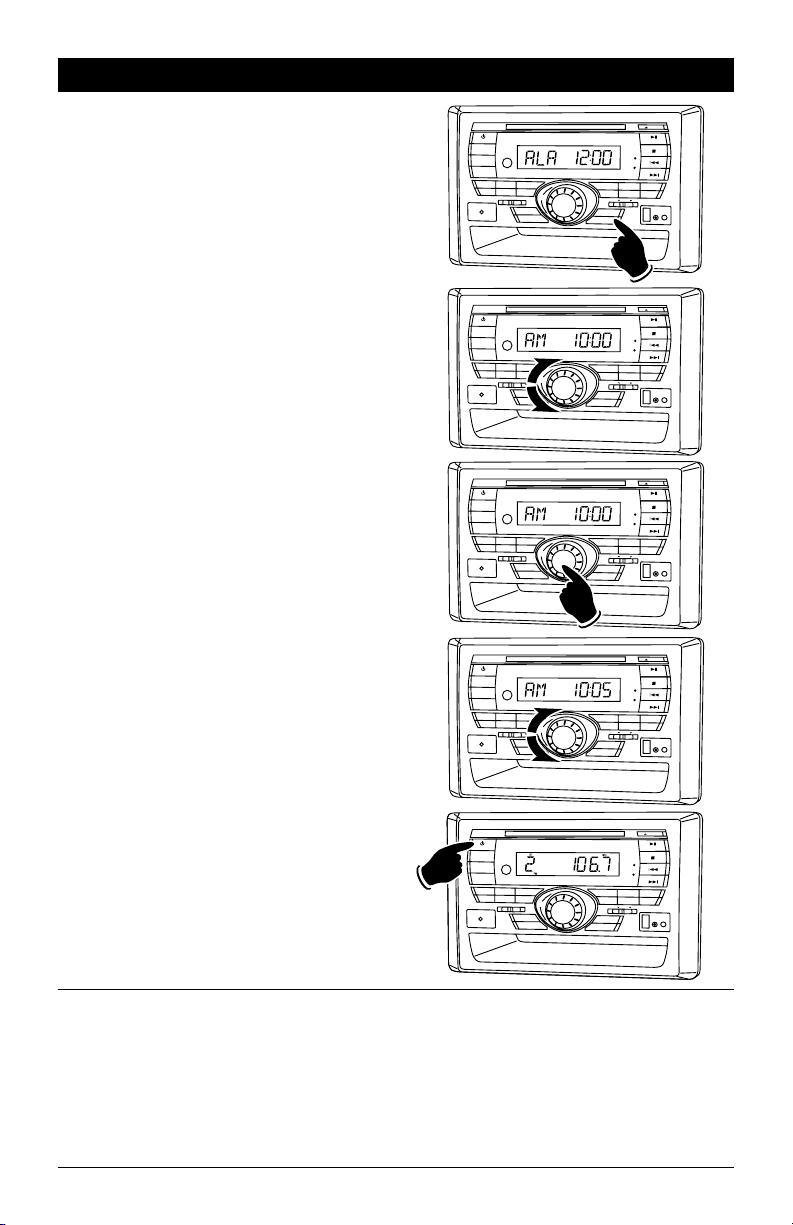
Setting the Clock
1. Press the DISP button until the clock appears in
the display.
2. Press and hold the DISP button until the hour
indicator start flashing.
3. Rotate the VOLUME knob until the correct Hour
appears in the display.
Note: When setting the clock make sure to
select the correct AM or PM indicator.
4. Press the VOLUME knob and the Minute indicators will start flashing.
5.
Rotate the
Minutes appears in the display
6. Press the DISP button and the colon between
the hours and the minutes will start flashing
indicating the clock is set.
VOLUME knob
until the correct
.
M
A
IN
Speaker Control
Hold
C
E
J
T
P
O
W
E
R
D
I
M
M
O
D
E
D
I
S
P
1
2
3
B
A
N
D
E
Q
A
S
/
P
S
VO
L
U
M
E
A
B
C
M
A
I
N
S
P
E
A
K
E
R
S
MUL
TI
M
E
D
IA
IN
P
UT
O
F
F
A
U
X
O
F
F
A
L
L
O
N
S
P
E
A
P
O
W
ER
D
IM
M
ODE
DISP
1
2
3
BA
N
D
EQ
/
LO
U
D
AS/
PS
VO
L
U
ME
A
B
C
MAIN
S
P
E
AKE
R
S
M
U
L
T
I
M
E
D
I
A
IN
P
UT
SE
E
K
S
CAN
P
O
WE
R
DI
M
MODE
D
ISP
1
2
3
B
A
N
D
EQ/L
OU
D
A
S
/PS
V
O
LU
M
E
A
B
C
M
AI
N
S
P
E
A
K
ER
S
MU
L
T
I-
M
E
D
I
A
I
NPUT
SEEK
S
CA
N
S
S
E
E
K
S
CA
N
4
R
EP
E
A
S
E
L
ECT
MA
I
PUS
H
S
L
EEP
AL
AR
M
4
R
E
P
E
AT
S
EL
E
CT
M
A
IN O
PUS
H
SL
E
E
P
AL
A
RM
E
M
U
T
E
S
T
E
R
E
O
A
L
A
R
M
4
5
6
R
E
P
E
A
T
IN
T
R
O
R
A
N
D
O
M
E
L
EC
T
M
A
I
N
O
F
F
A
U
X
O
F
F
A
L
L
O
N
P
U
S
H
SP
E
A
K
E
R
CO
N
T
R
O
L
SL
E
E
P
A
L
A
R
M
R
ES
E
T
T
J
E
C
E
MU
T
E
S
T
E
RE
O
A
L
A
R
M
5
6
T
I
N
T
RO
RA
N
DO
M
N
O
F
F
AUX
A
LL
O
FF
O
N
S
PE
A
K
ER
C
ON
T
R
O
L
HE
A
D
PH
O
N
E
OUT
P
UT
RE
SE
T
T
J
EC
E
M
UTE
S
TER
E
O
ALARM
5
6
I
NTRO
RA
N
DOM
F
F
A
U
X
A
OF
LL
F
ON
S
P
E
A
KE
R
C
O
N
TR
OL
H
E
AD
PH
O
N
E
O
U
T
P
UT
R
E
SE
T
Sleep Timer Operation
Setting the Sleep Timer:
1. Press the SLEEP button until the “SLEEP”
appears in the display.
2. Keep pressing the SLEEP button again until
the desired sleep time appears in the display
(0, 10, 20, 30, 40, 50, 60, 70, 80 minutes).
3. Wait 5 seconds and the display will return to
normal operation.
4.
After the designated sleep timer has expired
the unit will turn off automatically
Cancelling the Sleep Timer:
1. Press the SLEEP button until “SLEEP 0” is
displayed.
2. Wait 5 seconds and the display will return to
normal operation.
T
C
JE
P
OW
E
R
DI
M
MO
DE
D
ISP
1
2
3
B
A
ND
E
Q
/L
OU
D
AS
/
P
S
VO
LU
ME
S
EL
A
B
C
M
A
IN
SPE
A
K
ERS
MU
L
TI
M
E
D
I
A
I
NPUT
SEEK
S
C
A
N
ECT
PU
S
E
M
U
T
E
S
T
ERE
O
AL
A
RM
4
5
6
RE
P
E
A
T
I
N
TR
O
R
AN
D
O
M
MA
I
N
O
FF
A
U
X
O
A
F
L
F
L
ON
O
F
F
H
SPEAK
E
R
C
O
N
TR
OL
SA
TE
LL
I
TE
H
E
AD
P
HO
N
E
S
R
A
D
I
O
I
NP
U
SLE
A
L
AR
M
T
E
P
RE
SE
T
RE
S
E
T
.
9
Page 10
Alarm Operation
Setting the Alarm Timer:
1. Press the ALARM button and the clock will
appear in the display with the Hour number
flashing.
2. Rotate the VOLUME knob until the correct
Hour appears in the display. The alarm LED
will glow indicating the alarm is activated.
Note 1: When setting the alarm clock make
sure to select the correct AM or PM indicator.
Note 2: When setting the alarm DO NOT use
12:00 AM, because that time is used to cancel
the alarm.
3. Press the VOLUME knob and the Minute indicators will start flashing.
4.
Rotate the
Minutes appears in the display
and the colon between the hours and the minutes will start flashing.
VOLUME
knob until the correct
. Wait 5 seconds
T
E
J
E
P
OWE
R
DIM
M
O
D
E
D
I
SP
1
2
3
B
A
ND
E
Q
/
LO
U
D
A
S
/
P
S
V
O
L
U
ME
S
E
A
B
C
M
AI
N
SP
E
A
K
E
R
S
M
U
L
TI-
M
E
D
I
A
INPU
T
SEEK
SCA
P
O
WE
R
D
I
M
M
O
D
E
D
ISP
1
2
3
B
A
N
D
E
Q
/
L
O
U
D
A
S
/
P
S
A
B
C
MA
I
N
S
P
E
A
K
E
R
S
MU
L
T
I
M
E
D
IA
I
N
P
U
T
SE
EK
SCA
P
O
W
E
R
D
I
M
M
O
D
E
DISP
1
2
3
B
A
N
D
E
Q
/
L
O
U
D
A
S
/
PS
A
B
C
MA
I
N
S
P
E
A
K
E
R
S
MU
L
T
I
M
E
D
IA
I
N
P
U
T
SE
EK
SCA
P
O
WE
R
D
I
M
M
O
D
E
D
ISP
1
2
3
B
A
N
D
E
Q
/
L
O
U
D
A
S
/
P
S
A
B
C
M
A
I
N
S
P
E
A
K
E
R
S
MU
L
T
I
M
E
D
IA
I
N
P
U
T
SE
EK
SCA
LEC
P
U
S
H
N
V
O
L
U
M
E
S
E
L
EC
P
U
S
H
N
V
O
L
U
M
E
S
E
L
E
C
P
U
S
H
N
V
O
L
U
M
E
S
E
L
EC
P
U
SH
N
C
MU
T
E
ST
ER
E
O
A
M
AL
A
R
M
4
5
6
REP
E
A
T
I
N
T
R
O
R
A
N
D
O
M
T
M
A
I
N
O
FF
A
U
X
A
O
L
F
L
F
O
N
S
P
E
A
K
E
R
C
O
N
TR
O
L
HEA
D
P
H
ON
E
OUTP
UT
S
L
E
EP
A
L
A
RM
R
E
SET
T
C
EJE
M
U
T
E
S
T
E
RE
O
A
L
A
R
M
4
5
6
R
EP
E
A
T
I
N
T
R
O
RA
N
DO
M
T
MA
I
N
O
FF
A
U
X
O
A
L
F
L
F
O
N
S
P
E
A
KE
R
C
O
N
T
R
O
L
H
E
A
D
P
H
O
N
E
O
U
T
P
U
SL
AL
A
RM
R
T
SL
AL
A
RM
R
T
SLE
AL
A
RM
T
EE
P
RE
S
ET
T
C
EJE
M
U
T
E
S
T
E
RE
O
A
L
A
R
M
4
5
6
EP
E
A
T
I
N
T
R
O
RA
N
DO
M
MA
I
N
O
FF
A
U
X
A
O
L
F
L O
F
N
S
P
E
A
K
E
R
C
O
N
T
R
O
L
H
E
A
D
P
H
O
NE
O
U
T
P
U
T
EE
P
RE
S
ET
T
C
EJE
M
U
T
E
S
T
E
RE
O
A
L
A
R
M
4
5
6
EP
E
A
T
I
N
T
R
O
RA
N
DO
M
MA
I
N
O
FF
A
U
X
A
O
L
F
L
F
O
N
S
P
E
A
KE
R
C
O
N
T
R
O
L
H
E
A
D
P
H
O
N
E
O
U
T
P
U
T
E
P
RE
S
ET
5. Press the POWER button to turn the unit off.
The unit will automatically turn on when the
set alarm time is reached.
Cancelling the Alarm Timer:
Follow the procedures above except set the
alarm time to “AM 12:00”. The alarm LED will
not be glowing indicating the alarm has been
cancelled.
10
T
C
JE
P
O
W
ER
DIM
M
ODE
DISP
1
2
3
BA
N
D
E
Q
/L
O
U
D
A
S
/
P
S
V
O
L
U
M
E
S
E
A
B
C
M
A
I
N
S
P
E
AK
E
R
S
M
U
LT
I
M
E
D
IA
IN
P
U
T
SEEK
SCA
N
LE
PUS
E
MU
TE
S
T
ERE
O
A
L
ARM
4
5
6
RE
P
E
AT
I
N
T
R
O
RA
ND
O
M
C
T
M
A
I
N
O
F
F
A
UX
O
A
F
L
L
F
O
N
H
S
P
E
AK
ER
CO
N
T
R
O
L
HE
A
D
P
HONE
OUT
P
U
SL
ALARM
T
EEP
R
ESE
T
Page 11

Radio Operations
Power On/Off:
Press the POWER button to turn the unit 0n.
Selecting the Play Source:
Press the MODE button until “RADIO” appears in the display. After a brief moment either AM or FM will
appear in the display.
Selecting the AM or FM:
Press the BAND button repeatedly and select
from 1 FM, 2 FM, 3 FM, 1 AM or 2 AM.
PO
W
ER
DIM
MOD
E
D
ISP
1
2
3
B
A
N
D
E
Q
/
LO
U
D
AS
/PS
V
OLU
M
E
SE
L
E
A
B
C
M
A
I
N
SPE
A
KER
S
M
U
LTI
ME
D
I
A IN
PU
T
SE
E
K
SCAN
CT
PUS
H
ECT
EJ
M
U
T
E
S
T
EREO
A
L
A
R
M
4
5
6
R
EPE
A
T
INT
R
O
RA
N
D
O
M
M
A
I
N
OFF
A
UX
A
O
L
F
L
F
O
N
S
P
EAK
ER
C
O
N
T
R
O
L
HE
A
DPH
ONE
OU
TP
SLE
ALAR
UT
EP
M
R
E
S
E
T
Manually Tuning in a Radio Station:
Press the l button to tune in a lower radio
station. Press the l button to tune in a
higher radio station.
Note: The unit will automatically switch from
FM Mono to FM Stereo when the signal strength
increases to a stereo level. If the stereo signal
should become weak, the unit will switch back to
Mono. FM stereo reception is indicated when the
STEREO LED is lit.
Tuning in a Radio Station Using Seek:
Press the SEEK button and the tuner will scan up
to the next strong station and stop seeking, then
start playing.
Tuning in a Radio Station Using Scan:
Press the SCAN button and the tuner will scan
up to the next strong station and pause for 6
seconds, then scan for the next strong station.
To cancel this function press the SCAN button
again.
Lower
T
J
E
C
P
OW
ER
DI
M
MODE
DISP
1
2
3
BAN
D
EQ
/L
O
UD
A
S/
P
S
VO
L
U
M
E
SE
A
B
C
M
AI
N
S
P
EA
K
E
R
S
MU
L
T
I
M
E
D
I
A
IN
P
UT
SE
E
K
SCAN
L
PU
E
MU
T
E
ST
ER
E
O
AL
A
R
M
4
5
6
R
EP
E
A
T
IN
T
R
O
R
A
N
D
O
M
E
C
T
MAIN
O
F
F
AU
X O
A
LL
F
O
F
N
SH
S
P
E
A
K
E
R C
O
NTRO
L
HE
A
DPH
O
N
E
O
U
T
PU
S
LEEP
AL
A
RM
T
R
ESET
Higher
C
T
E
E
P
OW
E
R
DI
M
M
ODE
D
I
S
P
1
2
3
BA
N
D
EQ/L
O
U
D
A
S
/
P
S
VOLU
M
E
S
A
B
C
M
A
I
N
SP
E
AK
ER
S
MU
L
T
I
M
ED
I
A
I
N
P
U
T
SEEK
S
CAN
P
OW
E
R
DI
M
M
ODE
D
I
SP
1
2
3
BA
N
D
EQ/L
O
U
D
A
S
/
P
S
A
B
C
M
A
I
N
SP
E
AK
ER
S
MU
L
TI
M
ED
I
A
I
N
P
U
T
SEEK
S
CAN
ELE
P
US
VOLU
M
E
S
ELE
CT
PU
SH
J
M
U
T
E
S
T
ER
EO
AL
A
R
M
4
5
6
R
E
PE
A
T
I
N
T
R
O
R
AND
O
M
CT
M
A
IN
O
FF
A
U
X
A
O
L
L
F
F
O
N
H
SP
E
AKE
R
C
ONTR
O
L
H
EAD
P
HO
N
E
O
U
TPUT
S
L
EEP
ALA
R
M
RE
S
E
T
C
T
E
E
J
M
U
T
E
S
T
ER
EO
AL
A
R
M
4
5
6
R
E
PE
A
T
I
N
T
R
O
R
AN
D
O
M
M
A
IN
O
FF
A
U
X
A
O
LL
FF
O
N
SP
E
AKE
R
C
ONTR
O
L
H
EAD
P
HO
N
E
O
UTPU
S
ALA
R
T
L
EEP
M
RE
S
E
T
11
Page 12
Radio Operation (Continued)
Memorizing Radio Stations:
1. Press the BAND button to select either the
1 FM, 2 FM, 3 FM, 1 AM or 2 AM radio band.
2. Tune-in the desired radio station.
3. To memorize the station press and hold anyone of the six radio station recall buttons until
the the preset number appears.
Automatically Store Radio Stations:
1. Press the BAND button to select either the FM
or AM radio band.
2. Press and hold the AS/PS button then release.
The tuner will search for the strongest stations and store them into memory. The new
stations will replace stations that were previously stored in the current band.
Note: When the FM band is selected the 18
strongest stations will be stored into 1 FM, 2
FM and 3 FM. When AM band is selected the 12
strongest stations will be stored into 1 AM and
2 AM.
Scanning Stored Radio Stations:
1. Press the BAND button to select either the FM
or AM radio band.
2. Press the AS/PS button then release. The
tuner scans for preset stations stored in
the current band and pauses for 5 seconds
at each station. When a desired station is
reached, press the AS/PS button again to stop
scanning.
Radio Station Recall Buttons
J
EC
PO
W
E
R
DIM
M
ODE
DISP
1
2
3
B
A
N
D
E
Q/LO
U
D
AS
/
PS
VO
L
U
M
E
S
E
A
B
C
M
A
I
N
SPEAKE
R
S
MU
L
T
IM
E
D
I
A INP
UT
SEEK
SC
AN
P
OW
E
R
D
I
M
M
OD
E
DI
S
P
1
2
3
BA
N
D
EQ/L
O
U
D
A
S
/
P
A
B
C
M
A
I
N SP
E
AK
ER
S
MU
L
T
I
M
ED
I
A
I
NP
U
T
SEEK
S
CAN
L
P
US
S
VOLU
M
E
S
ELE
PU
E
MUT
O
D
S
T
E
RE
O
A
L
A
R
M
4
5
6
R
E
PEA
T
I
N
T
R
O
R
A
N
DOM
E
C
T
MAIN O
F
F
A
UX
OFF
A
L
L
H
O
N
SP
E
AK
ER
CO
N
T
S
LE
EP
ALARM
R
ESET
E
E
J
M
U
S
T
ER
EO
AL
A
R
M
4
5
6
R
E
PE
A
T
I
N
T
R
O
R
AN
D
O
M
CT
M
A
IN
O
FF
A
U
X
A
O
L
L
F
F
O
N
S
H
SP
E
AKE
R
C
ONTR
S
L
E
EP
ALA
R
M
RE
Hold
C
E
E
P
OW
E
R
D
I
M
M
ODE
DI
S
P
1
2
3
BA
N
D
EQ/L
O
U
D
A
S
/
P
S
VOLU
M
E
S
ELE
A
B
C
M
A
I
N SP
E
AK
ER
S
MU
L
T
I
M
ED
I
A
I
NP
U
T
SE
EK
S
CAN
CT
PUS
H
J
M
U
T
S
T
ER
EO
AL
A
R
M
4
5
6
R
E
PE
A
T
I
N
T
R
O
R
AN
D
O
M
M
A
IN
O
FF
A
U
X
A
O
L
L
F
F
O
N
SP
E
AKE
R
C
ONTR
S
L
E
EP
ALA
R
M
RE
S
T
E
RO
L
HEA
D
P
H
O
NE
OU
T
P
UT
C
T
T
E
O
L
H
EAD
P
HON
E
O
UTPU
T
S
E
T
T
E
O
L
H
EAD
P
HO
N
E
O
UTPU
T
E
T
12
Page 13
Disc Warnings
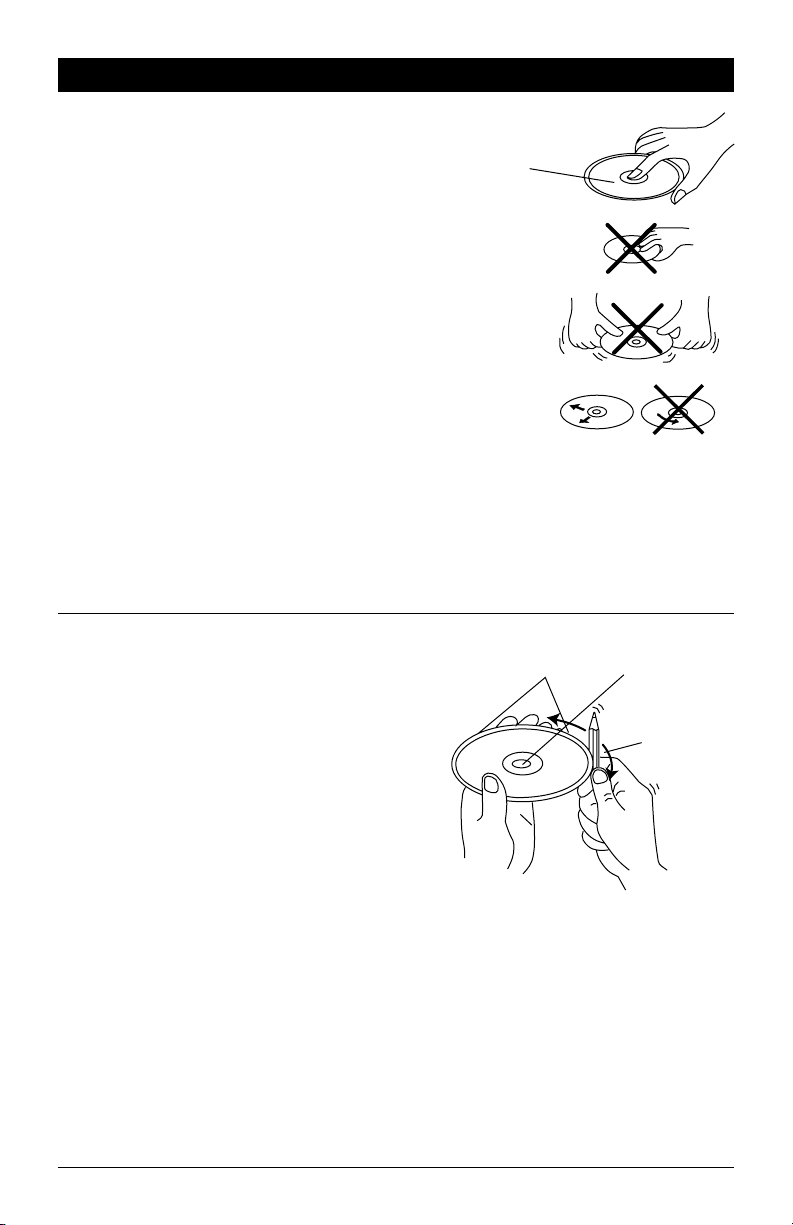
Handling and Cleaning:
• Dirt, dust, scratches and warping disc will cause
non operation.
• Do not place stickers on disc or scratch disc.
• Do not warp discs.
• A disc should always be kept in its case when not
in use to prevent damage.
• Do not place discs in the following places:
1. Direct sunlight.
2. Dirty, dusty and damp areas.
3. Near car heaters.
4. Car seats or dashboard.
Label side up
Do not touch
the underside
of the disc
Do not bend
Disc Cleaning:
Use a dry soft cloth to wipe disc the surface. If
the disc is quite dirty, use a soft cloth slightly
moist with isopropyl (rubbing) alcohol. Never use
solvents such as benzine, thinner or conventional
record cleaners as they may mar the surface of
the disc.
Note:
A disc may become somewhat scratched
(although
not enough to make it unusable) depending on handling and conditions in the usage environment.
Preparing New Discs with Rough Spots:
A new disc may have rough edges on its inside
and outside edges. If a disc with rough edges is
used, the proper setting will not be performed and
the player will not play the disc. Therefore, remove
the rough edges in advance by using a ball point
pen or pencil as shown. To do this, press the side
of the pen or pencil against the inside and outside
edges of the disc.
Wipe the disc from
the center toward
the outside edge
Rough spots on
outside edge
Rough spots on
inside edge
Ball point pen
or pencil
13
Page 14

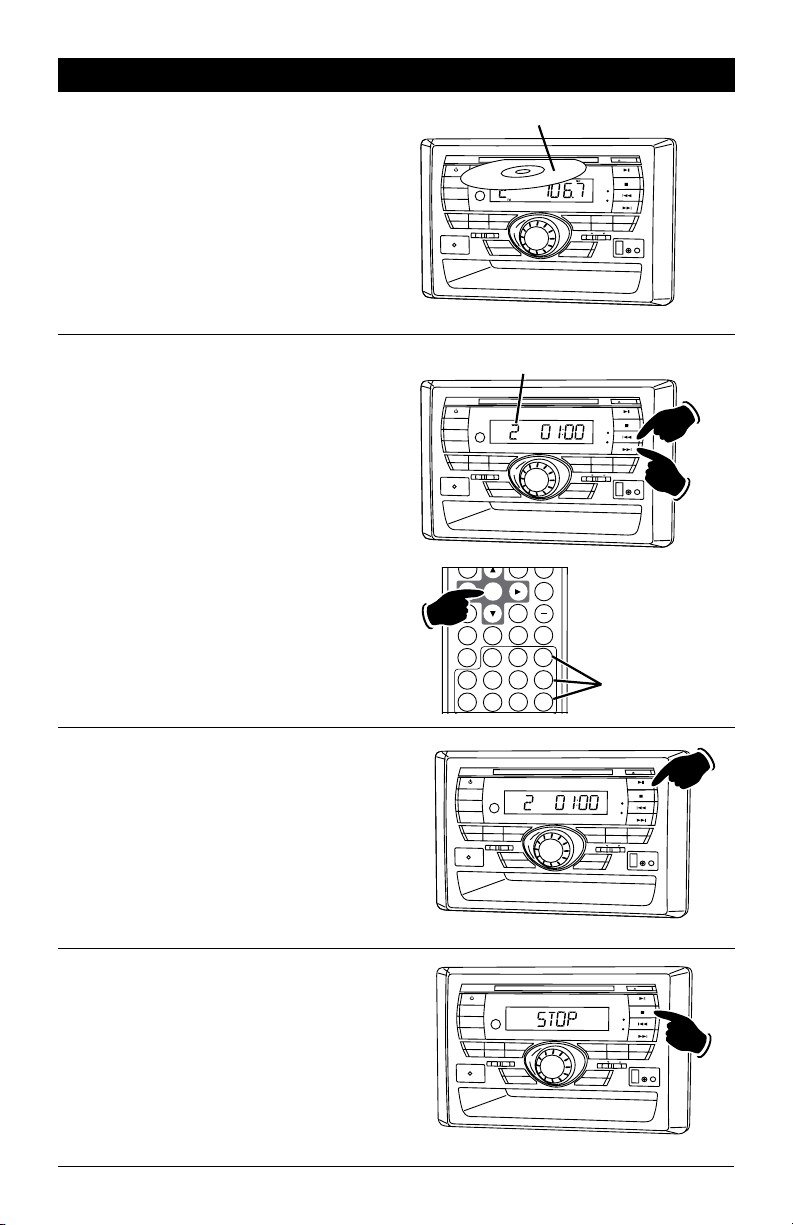
Music Disc Operation
VOL
General Operations:
1. Press the POWER button to turn the unit
On.
2. Gently insert the disc into the slot with
the label side up. The unit will automatically load the disc.
Note: If a disc does not auto-load DO NOT
FORCE into the slot, as you may already
have a disc loaded.
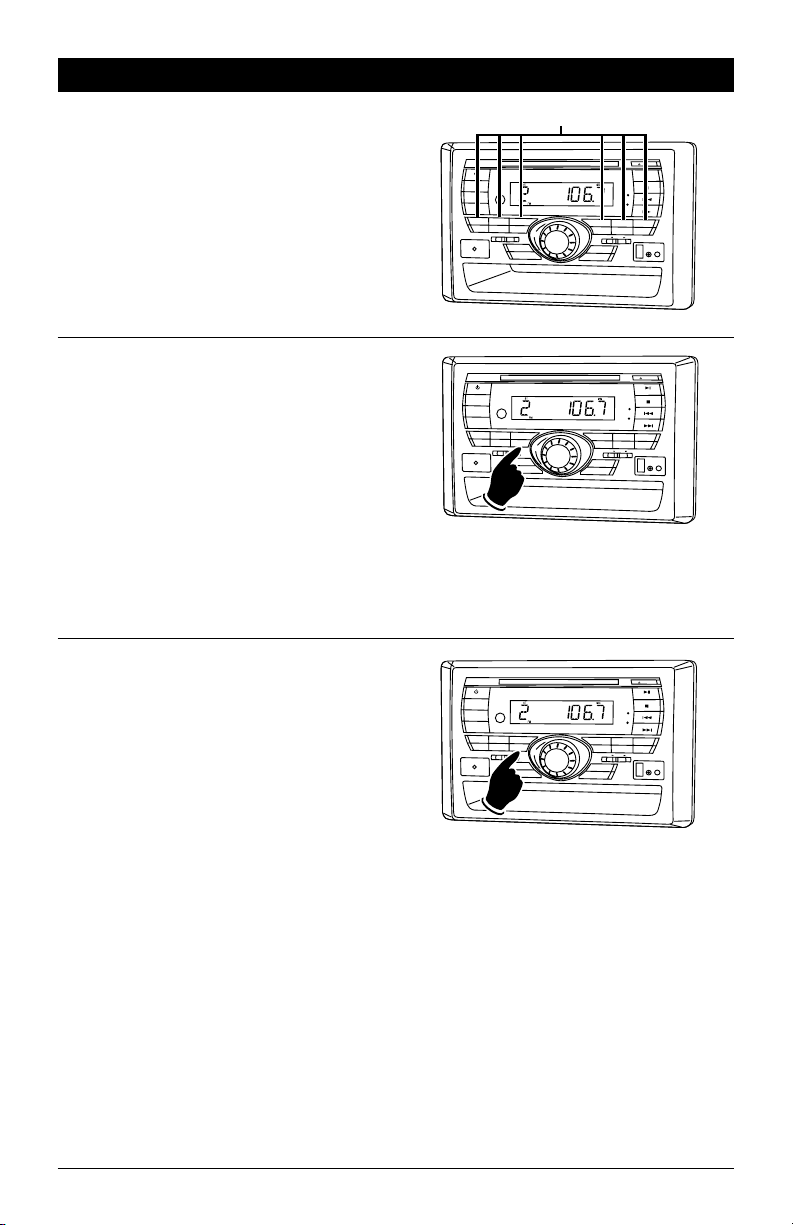
Music Track Selection:
Press the l button to select a lower track.
Press the l button to select a higher track.
The track number will appear in the display.
Tracks can also be selected by using the remote
control. Press the track selection number button
that corresponds to the track you want to play
then press the ENTER button.
For example: If you want to play track 8, press
button 8 then the ENTER button. Track 8 will
start playing and “8” will appear in the display.
If you want to play track 12, press 10+, then press
button 1, followed immediately by button 2, and
finally press the ENTER button. Track 12 will start
playing and “12” will appear in the display.
Label Side Up
P
O
W
ER
DIM
MODE
D
ISP
1
2
B
A
ND
E
Q
/
L
OU
D
A
A C
B
M
A
I
N
S
PE
A
KERS
M
UL
T
I
-ME
D
I
A
I
NPU
T
SEEK
Track Number
P
O
W
E
R
D
I
M
MODE
D
I
S
P
1
2
B
A
N
D
E
Q/
LO
UD
A
A
B
C
MA
I
N S
PE
A
KER
S
MU
L
T
I-ME
D
I
A
I
N
P
U
T
SE
ZOOM SETUP
ENTER
AS/PS
ELAPSE
BAND
EQ
DISP
1
4
5
8
9
J
ECT
E
M
UTE
ST
E
R
E
O
A
LA
R
3
S/
P
S
VOLU
ME
S
C
AN
PLAY
3
S
/PS
VO
LU
M
E
E
K
S
CAN
M
4
5
6
R
E
P
EA
T
IN
T
R
O
R
A
N
D
O
S
E
L
P
U
SELE
PU
M
EC
T
MA
I
N
OFF
A
U
X
A
O
LL
F
F
O
N
S
H
S
P
EA
KER
C
O
N
TR
O
L
H
E
ADPH
O
NE
O
U
T
P
SL
A
L
ARM
C
T
S
H
SLEE
ALARM
UT
E
EP
R
E
SET
Lower
T
J
EC
E
MUT
E
CD
ST
E
R
EO
AL
A
R
M
4
5
6
R
E
PE
A
T
I
NTRO
RA
N
D
O
M
M
AIN O
FF
A
U
X
A
O
L
F
L O
F
N
S
P
E
A
KE
R
CO
N
T
R
O
L
H
E
A
D
PH
O
NE
OUT
P
U
T
P
R
E
S
ET
Higher
TONE
+
SLOW
AUDIO
SUB.TT
+
Track Selection
Numbers
(Buttons 1-10+)
2
3
6
7
10
10/0
Pausing the Disc:
Press the ll button to pause the disc, press it
again to resume play.
Stopping the Disc:
Press the button to stop the disc. To resume
play, press the ll button.
Pressing the button 2 times, then pressing
the ll button will play the disc from the beginning.
14
T
J
EC
P
O
W
E
R
D
IM
M
ODE
D
I
S
P
1
B
A
N
D E
M
A
I
N
S
PEAKE
R
S
M
U
L
T
I
-
M
E
DI
A I
N
P
U
T
PO
W
E
R
DI
M
M
OD
E
DI
S
P
1
B
A
ND
M
AIN S
P
E
A
KE
R
S
M
U
L
T
I
-ME
D
I
A
IN
P
UT
PAUSE
2
3
Q/
L
O
U
D
A
S
/
P
S
V
OLU
ME
S
A
B
C
SE
E
K
SC
AN
2
3
E
Q
/
L
O
U
D
AS
/
P
A
B
C
SEE
K
S
CAN
ELEC
P
U
S
VOLU
ME
SELE
PUSH
E
M
U
T
E
CD
S
TE
R
E
O
ALA
R
M
4
5
6
RE
P
E
AT
INT
R
O
R
A
N
D
OM
T
M
A
I
N
OF
F
AU
X
A
O
L
S
L
FF
H
O
N
SP
E
A
KER
CON
T
R
O
L
HE
AD
P
H
O
N
E
O
U
TP
S
ALA
RM
CT
ALARM
UT
LEEP
RES
E
T
T
J
EC
E
MUT
E
ST
ER
E
O
AL
A
RM
4
5
6
R
E
P
E
A
T
IN
T
R
O
R
A
N
D
OM
M
A
I
N OFF
AU
X O
A
L
L
F
F
O
N
S
PE
AKE
R CO
N
T
RO
L
HE
A
D
PH
ONE
O
U
T
P
U
SL
T
E
EP
R
ESE
T
Page 15

Music Disc Operation (Continued)
Ejecting the Disc:
Press the EJECT button to eject a disc.
Repeating a Music Track or Entire Disc:
Select the desired track to repeat, then press the
REPEAT button once and “REPEAT” appears in
the display. This track will play repeatedly. Press
the REPEAT button one more time and “REPEAT”
will remain in the display. The entire CD will now
be repeated. To cancel this feature press the
REPEAT button again and “REPEAT” disappears
from the display.
Preview Music Tracks:
Press the INTRO button until “INTRO” appears
in the display. Each track on the disc will play
for 6 seconds. To cancel this feature press the
INTRO button until “INTRO” disappears from the
display.
T
J
EC
PO
W
E
R
D
IM
MO
DE
DI
S
P
1
B
A
N
D
M
A
I
N S
P
E
AKE
R
S
M
U
L
TI
M
E
D
I
A
I
NP
U
T
P
O
W
E
R
D
IM
M
O
DE
D
I
S
P
1
BAND
M
A
IN
S
PE
A
KE
RS
MU
L
TI-MEDI
A I
NP
U
T
PO
W
E
R
DI
M
M
OD
E
DI
S
P
1
BA
N
D
M
AIN
S
P
E
A
K
E
R
S
M
U
L
TI-
MED
I
A
I
NP
U
T
PAUSE
2
3
E
Q
/L
O
U
D
AS
/
P
S
V
OL
U
ME
S
E
A
B
C
SE
E
K
SCAN
L
PUS
REPEAT
PLAY
2
3
E
Q
/LO
U
D
AS/
PS
VO
L
U
ME
S
E
A
B
C
SE
EK
SCAN
INTRO
2
3
E
Q
/
L
O
U
D
A
S
/
P
S
A
B
C
SE
E
K
S
CA
LEC
PUS
PLAY
VO
L
U
ME
SEL
PU
N
E
M
U
T
E
CD
S
T
ER
E
O
A
L
A
R
M
4
5
6
R
E
P
E
AT
I
N
T
R
O
R
A
N
DOM
E
C
T
M
A
I
N
O
F
F
A
U
X
OFF
A
L
L
O
N
H
S
P
E
A
KE
R
C
O
N
TR
OL
H
EADPH
ON
E
OUT
P
U
S
AL
ARM
RE
T
H
SL
AL
ARM
R
EC
T
S
H
SL
AL
ARM
T
LE
E
P
RES
E
T
T
J
EC
E
M
U
T
E
CD
ST
E
RE
O
A
L
ARM
4
5
6
P
E
AT
IN
T
RO
R
A
N
DO
M
MAIN
OFF
A
U
X
O
A
L
F
L
F
O
N
S
P
E
A
KE
R C
O
N
TRO
L
HEA
D
P
H
O
NE
O
U
T
P
U
T
E
E
P
RES
E
T
T
JEC
E
M
U
T
E
CD
S
TEREO
A
L
AR
M
4
5
6
E
P
E
AT
I
N
T
RO
R
A
NDOM
M
A
I
N
O
F
F
AUX
A
OFF
LL
O
N
S
P
E
AKE
R
CO
N
TR
O
L
HE
A
D
P
HO
N
E
OUTP
U
T
E
E
P
R
E
SE
T
Random Music Track Play Order:
Press the RANDOM button until “RANDOM”
appears in the display. The tracks on the disc will
play in a random order. To cancel this feature
press the RANDOM button again.
Elapse Times:
Continue to press the AS/PS button during music
disc play to display the following disc information in this order:
Single Remain, Single Elapse, Total Remain and
Total Elapse.
T
J
EC
PO
W
E
R
DIM
M
O
DE
DI
S
P
1
B
A
N
M
AIN
S
P
M
U
L
T
I
M
E
D
I
A
I
PO
W
ER
D
IM
M
OD
E
D
IS
P
1
B
A
N
MAI
N
S
P
M
U
L
T
I
-M
EDI
A
I
NP
RANDOM
PLAY
2
3
D
E
Q
/
L
O
UD
AS
/PS
VO
L
U
ME
SE
A
B
C
E
AKER
S
N
PU
T
SE
E
K
S
C
AN
LE
P
U
PLAY
2
3
D
E
Q
/
L
O
UD
A
S/
P
S
V
O
LU
ME
S
A
B
C
E
AK
E
R
S
UT
S
E
E
K
S
CAN
EL
PU
E
M
UTE
CD
S
TE
RE
O
AL
AR
M
4
5
6
RE
P
EAT
I
N
TR
O
R
A
N
D
O
M
C
T
M
A
IN O
F
F
A
UX
AL
O
FF
L
ON
S
H
S
P
E
A
K
E
R
C
O
N
TROL
HE
A
D
P
H
O
N
E
S
SL
E
EP
ALARM
R
ES
E
T
R
E
S
E
T
T
JEC
E
M
U
TE
CD
S
T
E
R
E
O
AL
AR
M
4
5
6
RE
P
E
AT
I
N
T
R
O
R
A
N
D
O
M
EC
T
M
A
IN
O
F
F
A
U
X
A
OFF
L
L
O
N
S
H
S
P
E
A
K
E
R
CON
T
R
OL
HEAD
PH
O
N
E
OUTPU
S
A
L
AR
T
LEE
P
M
RESET
15
Page 16
MP3 Disc Operation
VOL
General Operations:
1. Press the POWER button to turn the unit on.
2. Gently insert the disc into the slot with the
label side up. The unit will automatically load
the disc.
Note: If a disc does not auto-load DO NOT
FORCE into the slot, as you may already have a
disc loaded.
Disc File Selection:
Press the l button to select a lower file.
Press the l button to select a higher file. The
file number will appear in the display.
File selection can also be selected by using the
remote control. Press the file selection number
button that corresponds to the file you want to
play.
For example: If you want to play file 8, press
button 8.
If you want to play file 28, press button 2, followed immediately by button 8. File 28 will start
playing and “28” will appear in the display.
P
O
W
ER
DIM
MODE
D
ISP
1
2
B
A
ND
E
Q
/
L
A C
M
A
I
N
S
PE
A
KERS
M
UL
T
I
-M
E
D
I
A
I
NPU
T
File Number
PO
W
E
R
DI
M
MOD
E
DI
S
P
1
2
B
A
N
D
E
Q
/L
A
MAIN
S
P
E
AK
ERS
M
UL
TI
-
M
E
DI
A
I
N
P
U
T
ZOOM SETUP
AS/PS
ELAPSE
BAND
DISP
4
8
OU
B
O
U
B
Label Side Up
3
D
A
S/
P
S
VOLU
ME
S
E
L
EC
T
P
U
S
V
O
SLOW
AUDIO
10/0
H
PLAY
L
U
ME
SE
LEC
T
P
US
H
TONE
+
SUB.TT
2
3
6
7
+
10
D
ENTER
SEEK
S
C
AN
3
A
S
/P
S
C
S
EEK
S
C
AN
EQ
1
5
9
J
ECT
E
M
UTE
ST
E
R
E
O
A
LA
R
M
4
5
6
R
E
P
EA
T
IN
T
R
O
R
A
N
D
O
M
MA
I
N
OFF
A
U
X
A
O
LL
F
F
O
N
S
P
EA
KER
C
O
N
TR
O
L
H
E
ADPH
O
U
T
SL
E
EP
A
L
ARM
R
E
SET
EJECT
M
U
T
E
S
T
E
RE
O
MP3
A
L
A
R
M
4
5
6
RE
PE
A
T
IN
T
RO
R
A
N
D
OM
M
A
I
N OF
F
AUX O
AL
F
F
L
O
N
S
P
E
A
K
E
R
CO
N
TROL
H
EAD
PH
OUTP
SL
EEP
AL
ARM
R
E
SE
T
File Selection
Numbers
(Buttons 1-10+)
O
NE
P
UT
O
N
E
UT
Lower
Higher
Pausing the Disc:
Press the ll button to pause the disc, press it
again to resume play.
Ejecting the Disc:
Press the EJECT button to eject the disc.
Stopping the Disc:
Press the button to stop the disc. To resume
play, press the ll button.
Pressing the button 2 times. Then press the
ll button and the disc will start playing from
the beginning.
16
T
J
EC
P
O
W
E
R
D
IM
M
ODE
D
I
S
P
1
B
A
N
D E
M
A
I
N
S
PEAKE
R
S
M
U
L
T
I
M
E
DI
A I
N
P
U
T
PO
W
E
R
DI
M
M
OD
E
DI
S
P
1
B
A
ND
M
AIN S
P
E
A
KE
R
S
M
U
L
T
I
-ME
D
I
A
IN
P
UT
PAUSE
2
3
Q/
L
O
U
D
A
S
/
P
S
V
OLU
ME
S
A
B
C
SE
E
SC
2
E
Q
/
L
O
U
D
AS
A
B
C
SEE
S
ELEC
P
K
AN
3
/
P
S
K
CAN
U
VOLU
ME
SELE
PUSH
E
M
U
T
E
CD
S
TE
R
E
O
ALA
R
M
4
5
6
RE
P
E
AT
INT
R
O
R
A
N
D
OM
T
M
A
I
N
OF
F
AU
X
A
O
L
S
L
FF
H
O
N
SP
E
A
KER
CON
T
R
O
L
HE
AD
P
H
O
N
E
O
U
TP
S
ALA
RM
CT
ALARM
UT
LEEP
RES
E
T
T
J
EC
E
MUT
E
ST
ER
E
O
AL
A
RM
4
5
6
R
E
P
E
A
T
IN
T
R
O
R
A
N
D
OM
M
A
I
N OFF
AU
X O
A
L
L
F
F
O
N
S
PE
AKE
R CO
N
T
RO
L
HE
A
D
PH
ONE
O
U
T
P
U
SL
T
E
EP
R
ESE
T
Page 17
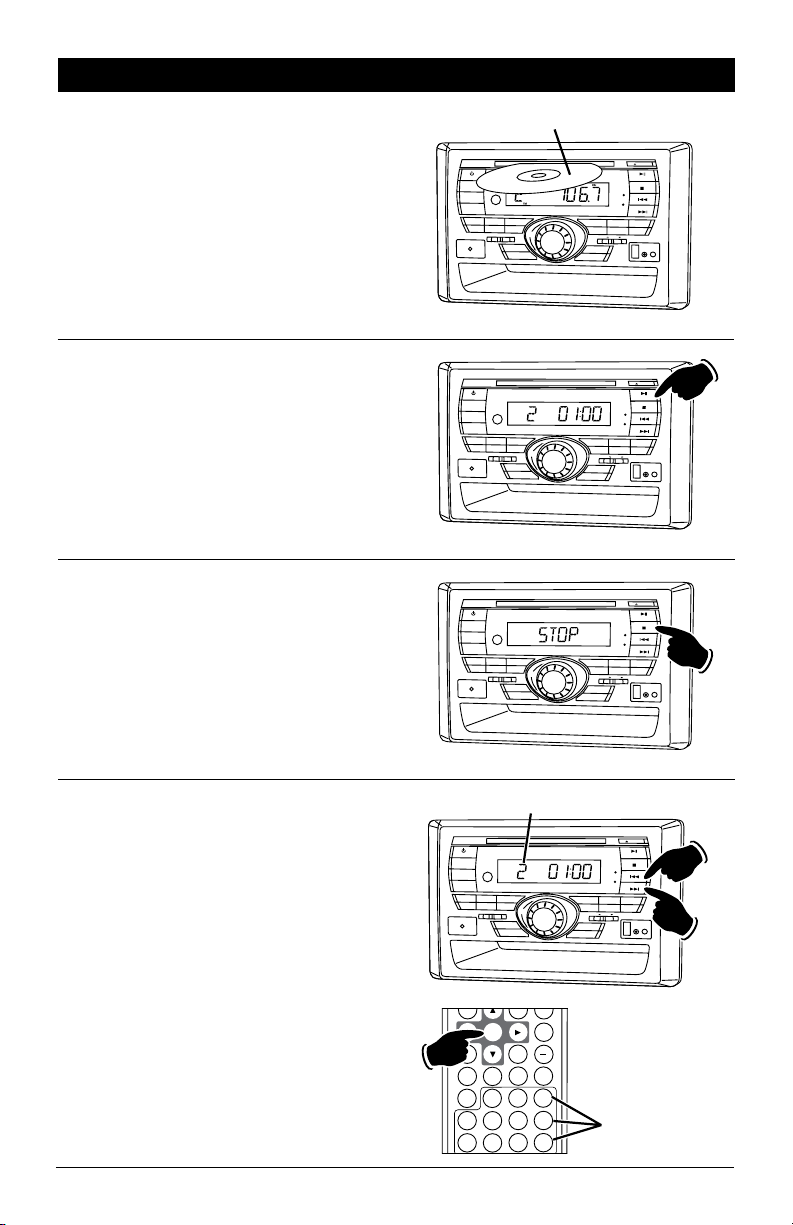
Movie Disc Operation
VOL
General Operations:
1. Press the POWER button to turn the unit On.
2. Gently insert the disc into the slot with the
label side up. The unit will automatically load
the disc.
Note: If a disc does not auto-load DO NOT
FORCE into the slot, as you may already have a
disc loaded.
Pausing a Movie:
Press the ll button to pause the disc, press it
again to resume play.
Stopping a Movie:
Press the button to stop the disc. To resume
play, press the ll button.
Pressing the button 2 times. Then pressing
the ll button and the disc will start playing
from the beginning.
Label Side Up
P
O
W
ER
DIM
MODE
D
ISP
1
2
B
A
ND
E
Q
/
L
OU
D
A C
B
M
A
I
N
S
PE
A
KERS
M
UL
T
I
-ME
D
I
A
I
NPU
T
P
O
W
E
R
D
IM
M
ODE
D
I
S
P
1
2
B
A
N
D E
Q/
L
O
U
D
A
B
M
A
I
N
S
PEAKE
R
S
M
U
L
T
I
M
E
DI
A
I
N
P
U
T
PO
W
E
R
DI
M
M
OD
E
DI
S
P
1
2
B
A
ND
E
Q
/
L
O
U
D
A
B
M
AIN S
P
E
A
KE
R
S
M
U
L
T
I
-ME
D
I
A
IN
P
UT
J
ECT
E
M
UTE
ST
E
R
E
O
A
LA
R
3
A
S/
P
S
VOLU
ME
SEEK
S
C
AN
PAUSE
3
A
S
/
P
S
V
OLU
ME
C
SE
E
K
SC
AN
3
AS
/
P
S
VOLU
ME
C
SEE
K
S
CAN
M
4
5
6
R
E
P
EA
T
IN
T
R
O
R
A
N
D
O
S
E
L
P
U
S
ELEC
P
SELE
PUS
M
EC
T
MA
I
N
OFF
A
U
X
A
O
LL
F
F
O
N
S
H
S
P
EA
KER
C
O
N
TR
O
L
H
E
ADPH
O
NE
O
U
T
P
SL
A
L
ARM
T
U
S
H
ALA
CT
H
SL
ALARM
UT
E
EP
R
E
SET
T
J
EC
E
M
U
T
E
CD
S
TE
R
E
O
ALA
R
M
4
5
6
RE
P
E
AT
INT
R
O
R
A
N
D
OM
M
A
I
N
OF
F
AU
X
A
O
L
L
FF
O
N
SP
E
A
KER
CON
T
R
O
L
HE
AD
P
H
O
N
E
O
U
TP
U
T
S
LEEP
RM
RES
E
T
T
J
EC
E
MUT
E
ST
ER
E
O
AL
A
RM
4
5
6
R
E
P
E
A
T
IN
T
R
O
R
A
N
D
OM
M
A
I
N OFF
AU
X O
A
L
L
F
F
O
N
S
PE
AKE
R CO
N
T
RO
L
H
E
A
D
PH
ONE
O
U
T
P
U
T
EEP
R
ESE
T
Movie Chapter Selection:
Press the l button to select a lower chapter.
Press the l button to select a higher chapter.
The chapter number will appear in the display.
Chapter selection can also be selected by using
the remote control. Press the chapter selection
number button that corresponds to the chapter
you want to play then press the ENTER button.
For example: If you want to play chapter 8, press
button 8, then the ENTER button.
If you want to play chapter 28, press the 10+
button twice followed immediately by button 8.
Chapter 28 will start playing and “28” will appear
in the display.
Chapter Number
P
O
W
ER
DI
M
M
ODE
D
I
S
P
1
BA
N
D
M
A
I
N
S
P
E
AK
M
U
L
T
I
-M
E
D
I
A
I
NPU
T
ZOOM SETUP
AS/PS
ELAPSE
BAND
DISP
4
8
PLAY
2
3
E
Q
/
L
O
U
D
AS
/
P
S
V
O
L
U
M
E
A
B
C
E
R
S
SE
E
K
S
CAN
ENTER
SLOW
AUDIO
SUB.TT
EQ
2
1
6
5
10/0
9
Lower
T
C
J
E
E
M
U
T
E
CD
STE
R
E
O
AL
A
R
M
4
5
6
R
EP
E
AT
I
NT
R
O
R
A
N
DO
S
E
LE
P
U
M
CT
M
AI
N
O
F
F
A
UX O
A
L
L
F
F
O
S
N
H
SP
E
A
KE
R
CO
NTR
OL
H
E
A
DPH
O
NE
O
U
TPU
SLEE
A
L
ARM
T
P
R
E
S
ET
Higher
TONE
+
+
Chapter Selection
Numbers
(Buttons 1-10+)
3
7
10
17
Page 18

Movie Disc Operation (Continued)
Fast Forward / Fast Reverse Disc Play:
Press the l (fast forward) or l
reverse) button during play. Each time the button
is pressed, the speed of fast forward/fast reverse
changes in the following order:
2X, 4X, 8X, 16X, 32X
To resume normal play, press the ll (Play) but-
ton 2 times.
(fast
Slow Motion:
Continue to press the SLOW button to play the
movie disc is slow motion in the following order:
Forward 1/2, 1/4, 1/8, 1/16 then Reverse
1/2, 1/4, 1/8, 1/16
To resume normal play, press the
ll
(Play) button
2 times.
Repeat:
Continue to press the REPEAT button to select a
repeat mode in the following order:
Repeat Chapter, Repeat Title, Repeat All, Normal
Play.
Fast
Rewind
POWE
R
D
I
M
MODE
DI
SP
1
2
B
A
N
D
E
Q
A
MA
I
N
S
P
E
A
K
E
R
S
M
U
L
T
I
-MEDIA
IN
PUT
POWER MODE MENU
MUTE
RANDOM
REPEAT
ZOOM SETUP
ZOOM SETUP
ENTER
AS/PS
ELAPSE
BAND
EQ
REPEAT
PLAY
3
/
L
O
U
D
A
S
/
PS
V
O
L
U
M
E
B
C
SE
EK
SCAN
SLOW
AUDIO
Fast
Forward
VOL
TONE
VOL
TONE
+
SUB.TT
T
J
EC
E
M
U
TE
CD
S
T
E
R
E
O
A
L
A
R
M
E
N
T
E
R
I
P
O
D
M
E
N
U
4
5
6
RE
P
EA
T
I
N
T
R
O
R
A
N
D
O
SE
L
ECT
P
U
S
M
M
A
I
N
O
F
F
A
UX
A
O
L
F
L
F
O
N
H
S
P
E
A
K
ER C
O
N
TRO
L
H
E
A
D
P
H
O
N
E
O
U
T
P
SL
A
L
A
RM
UT
E
E
P
R
E
S
E
T
Elapse Times:
Continue to press the AS.PS/ELAPSE button during
movie disc play to display the following disc information in this order:
Title Elapse, Title Remain, Chapter Elapse,
Chapter Remain and Display Off.
Menu Function:
Press the MENU button during disc play and the
main menu will be displayed. Scroll through the
menu with the NAVIGATION BUTTONS. Select a
feature by pressing the ENTER button.
Audio Language Menu:
Press the AUDIO button during playback to review
the current setting. Most movies have their own
audio setup. Go to the onscreen menu to select
appropriate audio/language setup.
18
Navigation
Buttons
ZOOM SETUP
AS/PS
ELAPSE
BAND
POWER MODE MENU
MUTE
RANDOM
ZOOM SETUP
AS/PS
ELAPSE
ENTER
AS/PS
ELAPSE
BAND
EQ
DISP
1
REPEAT
ENTER
ENTER
EQ
SLOW
AUDIO
VOL
TONE
+
SLOW
AUDIO
SUB.TT
VOL
TONE
+
SLOW
+
SUB.TT
2
3
Page 19

Movie Disc Operation (Continued)
Subtitle Language Menu:
Press the SUB.TT button during playback. Each
time the button is pressed, the subtitle language
changes in sequential order.
• Some discs may only contain one subtitle
language.
• Depending on the disc, the number of subtitle
languages may be different.
ZOOM SETUP
ENTER
AS/PS
ELAPSE
BAND
DISP
SLOW
AUDIO
EQ
1
VOL
TONE
+
SUB.TT
2
3
Zooming the Image:
To enlarge the onscreen image during disc play,
press the ZOOM button. Each time the button is
pressed, the magnification increment changes in
the following order:
2X, 3X, 4X, 1/2, 1/3, 1/4.
Use the navigation buttons to move the image on
the screen.
Setup Menu
System
Setup
Language
Setup
SYSTEM SETUP
TV SYSTEM
AUTO PLAY
TV TYPE
PASSWORD
RATING
DEFAULT
With a disc inserted press the SETUP button on the
remote control to display the Setup Menu:
System Setup:
Use the navigation buttons to scroll between the
menu items. Make a selection by pressing the
ENTER button.
• TV System: NTSC, PAL or AUTO
• Auto Play: On, Off
• TV Type: 4:3 PS, 4:3 LB or 16:9.
• Password: _ _ _ _
• Rating: 1 Kid Safe, 2 G, 3 PG, 4 PG-13, 5
PG-R, 6 R, 7 NC-17 or 8 Adult
• Default: Restore
Audio
Setup
MUTE
RANDOM
REPEAT
SLOW
TONE
VOL
+
Video
Setup
ZOOM SETUP
ENTER
AS/PS
Video
Setup
Language Setup:
Use the navigation buttons to scroll between the
menu items. Make a selection by pressing the
ENTER button.
• OSD Language: English, Spanish
• Audio: Chinese, English, Japan, French,
Spanish, Portuguese, Latin or German
• Subtitle: Chinese, English, Japan, French,
Spanish, Portuguese, German or OFF
• Menu: Chinese, English, Japan, French,
Spanish, Portuguese, German or Latin
19
Page 20

Setup Menu (Continued)
Audio Setup:
Use the navigation buttons to scroll between the
menu items. Make a selection by pressing the
ENTER button.
• Audio: SPDIF/Off, SPDIF/Raw or SPDIF/PCM
Video Setup:
Use the navigation buttons to scroll between the
menu items. Make a selection by pressing the
ENTER button.
• Brightness: 12, 10, 8, 6, 4, 2 or 0
• Contrast: 12, 10, 8, 6, 4, 2 or 0
• Hue: +6, +4, +2, 0, -2, -4, -6
• Saturation: 12, 10, 8, 6, 4, 2 or 0
• Sharpness: 8, 6, 4, 2, 0
Audio/Video Input
Selecting the Audio/Video Play Source:
To select a Audio/Video play source, press the
MODE button until “AV IN F” appears in the
display. Refer to the audio/video device’s owners
manual for proper operation.
Diginal Setup:
Use the navigation buttons to scroll between the
menu items. Make a selection by pressing the
ENTER button.
• Dynamic Range: Full, 6/8, 4/8, 2/8 or Off
• Dual Mono: Stereo, Mono L, Mono R or Mix
Mono
T
J
E
C
P
O
W
E
R
DI
M
M
ODE
D
ISP
1
2
3
BA
N
D
E
Q/L
O
U
D
A
S
/
P
S
V
O
L
U
M
E
S
A
B
C
M
A
I
N
S
PE
AK
E
R
S
MU
L
T
I
-M
E
D
IA
I
N
P
U
T
SE
EK
S
C
E
P
AN
E
MU
T
E
S
T
E
R
E
O
A
L
A
R
M
E
N
T
E
R
IP
O
D
M
E
N
U
4
5
6
R
EP
E
A
T
INT
RO
R
A
N
D
O
L
U
M
E
C
T
MA
I
N
O
F
F
A
U
X
A
L
O
L
F
F
O
N
S
H
SP
E
A
K
E
R
C
O
N
T
R
O
L
H
E
A
D
P
HO
N
E
OU
T
P
U
S
L
A
L
AR
T
E
E
P
M
R
E
S
E
T
M
E
NU
Headphone Output
Plugging in Headphone:
Insert a 3.5mm headphone jack into the
Headphone Output socket. Use the Volume knob
to adjust the audio level.
20
T
C
J
E
P
O
W
E
R
D
I
M
M
OD
E
D
I
SP
1
2
3
B
A
N
D
E
Q/L
O
U
D
A
S
/
P
S
V
O
L
UM
E
SE
A
B
C
M
AI
N
S
P
E
A
K
E
R
S
M
U
L
T
I
-M
EDI
A
INPU
T
S
EE
K
S
CA
LE
PUS
N
E
M
U
T
E
S
T
E
R
E
O
A
L
A
R
M
E
N
T
E
R
I
P
O
D
M
E
N
U
4
5
6
R
E
P
E
AT
I
N
TR
O
RA
N
D
O
M
C
T
M
A
I
N
O
F
F
A
U
X
A
O
L
L
F
F
O
N
H
S
P
E
A
K
E
R
C
O
N
TR
O
L
H
E
A
D
P
H
O
N
E
OUT
P
U
S
ALAR
T
L
EE
P
M
R
E
SE
T
R
ES
E
T
Page 21

IPOD Operation
General Operations:
1. Press the button to turn the unit On.
2. Connect an IPOD to the cable attached to the
RV5055.
3. The unit will automatically switch to the IPOD
mode and start playing.
Note: The IPOD controls will become inoperable,
and the RV5055 now controls the IPOD.
IPOD Mode Button Location and Functions:
P
O
W
ER
D
I
M
MO
D
E
D
ISP
1
2
BAN
D
MA
I
N
SP
E
A
K
E
RS
M
U
L
T
I
-
M
E
D
IA
I
N
P
U
T
1. Preset #6 Button: Same operation as the MENU
button on an IPOD.
2. Track Up/Down Buttons (l, l): Press
these buttons to scroll through the menu items,
which is the same operation as the IPOD’s Click
Wheel.
3
E
Q
/L
O
UD
A
S/PS
V
O
LU
M
A
B
E
C
S
E
EK
S
C
AN
E
CT
P
O
W
E
R
DIM
MO
D
E
DIS
P
1
2
3
B
AN
D E
Q
/
L
OU
D
A
S
/
P
S
VO
L
U
ME
SEL
A
B
B
MA
I
N
S
PE
A
K
E
R
S
M
U
L
TI
M
EDI
A
I
N
P
U
T
S
E
E
K
SC
AN
T
EC
EJ
ECT
P
U
S
MUTE
STER
E
O
ALAR
M
E
N
T
E
R
-
IP
O
D
-
M
E
N
4
RE
P
E
A
T
S
E
L
ECT
M
A
I
N O
F
F
PUS
H
SL
E
EP
A
L
ARM
U
5
6
IN
TRO
R
A
NDOM
AU
X
O
A
L
FF
L O
N
S
PEAK
E
R
C
O
NTR
O
L
H
E
ADPHON
E
O
U
T
P
UT
R
ESET
EJ
M
U
T
E
S
T
ER
E
O
A
L
A
R
M
E
N
T
E
R
I
P
O
D
M
E
N
U
4
5
6
R
E
P
E
A
T
IN
TR
O
R
AN
D
OM
M
A
I
N
O
F
F
A
UX
A
O
L
L
F
F
O
N
H
S
P
EA
K
E
R
C
O
N
TR
O
L
HEA
D
PH
O
N
E
O
UTP
U
S
ALAR
T
LE
E
P
M
RE
S
E
T
3
2
1
4
3. Play/Pause Button ( ll ): Same operation as
the ll button on an IPOD.
4. Preset #5 Button: Same operation as the
Center Select/Enter button on an IPOD.
Browse for a Song:
1. Press the 6 button and “PLAYLIST” will
appear in the display.
2. Press the l
“SONGS” menu.
or l button to select the
CT
J
E
P
OW
E
R
DIM
M
OD
E
D
I
S
P
1
2
3
B
A
N
D
E
Q
/
L
O
U
D
A
S/P
S
V
O
L
U
M
E
SE
L
A
B
B
MA
I
N
S
P
E
A
K
E
RS
MU
L
T
I
ME
D
I
A
I
N
P
U
T
S
EE
K
S
CA
P
O
W
E
R
D
I
M
MODE
D
I
S
P
1
2
3
B
A
N
D
E
Q
/
L
O
U
D
A
S
/
P
S
A
B
B
M
A
I
N
S
P
E
A
K
ER
S
MU
L
TI
M
E
D
IA
IN
P
U
T
SEEK
SCA
E
P
U
S
N
V
O
L
U
M
E
S
EL
P
US
N
E
M
UT
E
S
T
E
R
E
O
A
L
A
R
M
E
N
T
E
R
I
P
O
D
M
E
N
U
4
5
6
R
E
P
E
A
T
I
N
T
R
O
R
A
N
D
O
M
C
T
MA
I
N
O
FF
A
U
X
O
A
F
L
F
L
O
N
H
S
P
E
A
K
E
R
C
O
N
T
R
O
L
H
E
A
D
P
H
O
N
E
O
U
T
P
U
S
L
A
LAR
M
R
E
CT
H
S
ALA
R
T
EEP
R
E
S
E
T
T
J
E
C
E
M
U
T
E
S
TE
RE
O
A
L
A
R
M
E
N
T
E
R
IP
O
D
M
E
N
U
4
5
6
E
PE
A
T
I
NT
R
O
R
A
N
D
O
M
MA
I
N
O
F
F
AU
X
O
A
LL
FF
O
N
S
P
E
A
K
E
R
C
O
N
T
R
O
L
H
E
A
D
P
H
O
NE
O
U
T
P
U
T
LEEP
M
R
E
S
E
T
21
Page 22

IPOD Operation (Continued)
3. Press the 5 button to select the SONGS menu.
4. Press the l
or l button to select the
desired song from the menu. The selected
song will automatically start playing.
Pausing a Track:
Press the ll button to pause the track. Press it
again to resume play.
Repeating a Track:
Select the desired track to repeat, then press
the REPEAT button once and “IPOD RPT” will
appear in the display. This track will play repeatedly. To cancel this function press the REPEAT
button one more time, and “IPOD RPT” will disappear from the display.
T
J
E
C
P
O
W
E
R
D
I
M
MODE
DIS
P
1
2
3
B
A
ND
EQ
/
L
O
U
D
A
S
/
P
S
V
O
L
U
M
E
S
E
A
B
B
M
A
I
N
S
P
E
A
K
E
R
S
M
U
L
T
IM
E
DI
A
I
NP
U
T
SEEK
S
CA
P
O
W
E
R
D
I
M
MO
DE
DI
S
P
1
2
3
B
A
N
D
E
Q/
L
O
U
D
A
S
/
P
S
A
B
B
M
A
I
N
S
P
EA
K
E
R
S
M
U
L
TI-
M
ED
I
A
INPU
T
SEEK
SCA
P
OW
E
R
D
IM
M
ODE
D
I
S
P
1
B
A
N
D E
M
A
I
N
S
P
EA
K
E
M
U
T
L
I
M
ED
I
A
I
N
P
U
T
P
OW
E
R
DI
M
M
O
D
E
DISP
1
B
AND
MA
IN
S
P
E
AK
E
RS
M
U
L
T
I
M
EDI
A
I
NP
UT
P
A
USE
2
3
Q
/
L
O
U
D
A
S
/
P
S
VO
L
U
ME
A
B
B
R
S
SEEK
S
CA
N
R
EP
E
A
T
2
3
E
Q
/
L
OU
D
A
S
/
P
S
V
O
LU
M
E
A
B
B
SE
E
K
SCAN
L
P
U
N
VO
L
U
M
E
S
E
LECT
P
USH
N
4
R
E
P
E
A
T
SE
L
EC
T
M
A
I
N
O
FF
A
P
U
S
H
S
L
EEP
A
L
ARM
STE
A
L
4
R
E
P
E
A
T
I
N
S
E
L
E
C
T
M
A
I
N
O
FF
A
U
X
O
PU
S
H
SL
E
E
P
AL
AR
M
E
M
U
T
E
S
T
E
R
EO
A
L
A
R
M
E
N
T
E
R
IP
O
D
M
E
N
U
4
5
5
6
R
E
P
E
A
T
I
N
T
R
O
R
A
N
DO
E
C
S
H
AL
U
X
RE
A
R
E
5
T
RO
FF
M
T
MA
I
N
OF
F
A
U
X
A
O
LL
F
F
O
N
S
P
E
A
K
E
R
C
O
N
T
R
O
L
H
E
A
D
P
HON
E
O
U
TPU
SLEEP
ALA
RM
RE
SL
ALAR
S
T
E
REO
A
RM
E
N
T
E
R
-
5
IN
T
R
O
A
L
O
L
F
F
O
M
N
T
E
R
I
P
O
A
L
L
O
N
S
T
R
E
S
ET
T
J
E
C
E
M
U
T
E
S
T
E
R
E
O
A
L
A
R
M
E
N
T
E
R
I
P
O
D
M
E
N
U
4
5
6
P
E
A
T
I
N
T
R
O
R
A
N
D
O
M
M
A
I
N
OF
F
A
U
X
OF
A
L
L
F
O
N
S
P
E
A
K
E
R
C
O
N
T
R
O
L
H
E
A
DP
H
O
N
E
O
U
T
P
U
T
E
EP
M
R
E
S
E
T
T
J
EC
E
MU
T
E
IP
O
D
M
E
N
U
6
R
A
N
D
O
M
O
N
S
P
E
A
KER
C
O
NT
ROL
H
R
E
S
E
J
ECT
E
M
U
T
E
D
M
E
N
U
6
R
A
N
D
O
M
P
E
A
K
E
R
C
O
NT
R
O
L
HE
A
D
O
U
T
R
E
S
ET
Pause
EA
D
P
H
O
N
E
O
U
T
P
UT
Indicator
T
Repeat
Track
Indicator
P
H
O
N
E
P
U
T
Random Order Track Play:
Press the RANDOM button until “IPOD SHF”
appears in the display. The tracks on the IPOD
will now play in a random order. To cancel this
feature press the RANDOM button again and
“IPOD SHF” will disappear from the display.
22
T
C
E
P
O
W
E
R
D
IM
MO
D
E
DI
SP
1
2
3
B
A
N
D
E
Q
/
L
O
U
D
A
S
/
P
S
V
O
L
U
M
E
S
E
L
E
A
B
B
M
A
I
N
S
P
E
A
K
E
R
S
M
U
L
T
I
-M
ED
I
A
I
N
P
U
T
SEE
K
S
CAN
C
PU
SH
JE
M
U
T
E
S
T
E
R
E
O
A
L
ARM
E
N
T
E
R
I
P
O
D
M
E
N
U
4
5
6
R
E
P
EA
T
I
N
TR
O
R
A
ND
O
M
T
M
A
I
N
O
FF
A
U
X
A
L
O
L
F
F
ON
S
P
E
A
K
ER
C
O
N
T
R
O
L
HE
A
D
P
H
ONE
O
U
TP
U
S
ALAR
T
LEEP
M
R
E
S
E
T
Page 23

IPOD Operation (Continued)
Preview Tracks:
Press the INTRO button until “IPOD SCN”
appears in the display. Each track on the IPOD
will now play for 10 seconds. To cancel this
feature press the INTRO button until “IPOD SCN”
disappears from the display.
Display Selection:
Press the DISP button to display the following
track information: Elapse Time, Title, Artist,
Album and Track.
Manually Selecting the IPOD Source:
If a different source is playing and you wish to
listen to the IPOD, press the MODE button until
“IPOD” appears in the display. The last song that
was playing on the IPOD will resume.
CT
EJ
P
O
W
E
R
D
IM
M
OD
E
DIS
P
1
2
3
B
A
ND
EQ
/
L
OU
D
A
S
/
PS
V
O
L
U
M
E
S
E
L
A
B
B
M
AI
N
S
P
E
A
K
E
RS
M
U
T
L
I
M
E
D
I
A
I
N
P
U
T
S
EE
K
S
CA
P
O
W
E
R
D
I
M
M
O
DE
DI
S
P
1
2
3
B
A
N
D
EQ
/
L
O
U
D
A
S
/
PS
A
B
B
M
A
I
N
S
P
E
A
K
E
R
S
M
U
L
TI
-
M
E
D
I
A
INP
U
T
SEEK
SCA
P
O
WE
R
D
IM
MODE
D
I
S
P
1
2
3
B
A
N
D
E
Q
/
L
O
U
D
A
S
/
P
S
A
B
B
MA
I
N
S
P
E
A
K
E
R
S
MU
T
L
I-
M
E
D
I
A
I
N
P
U
T
S
E
EK
SCAN
ECT
P
U
S
H
N
V
O
L
U
M
E
SEL
ECT
P
US
H
N
V
OL
U
M
E
S
ELE
C
P
US
H
E
M
U
T
E
S
T
ER
E
O
A
L
A
RM
E
N
T
E
R
I
P
O
D
M
E
N
U
4
5
6
R
EP
E
A
T
I
N
T
RO
RA
N
D
O
M
M
A
I
N
OFF
AU
X
A
L
O
F
L
O
F
N
S
P
E
AK
E
R
C
O
N
T
R
O
L
HE
A
D
P
HON
ES
SL
E
E
P
A
L
A
R
M
R
E
S
E
T
T
J
E
C
E
M
U
T
E
S
T
E
R
E
O
AL
A
R
M
E
N
T
E
R
IP
O
D
M
E
N
U
4
5
6
RE
P
E
AT
I
N
T
R
O
R
A
N
D
O
M
M
A
I
N
O
FF
A
U
X
A
O
L
F
L
F
O
N
S
P
E
A
KE
R
C
O
N
TR
O
L
H
E
A
D
PHO
N
E
O
U
TP
UT
SL
E
EP
ALAR
M
R
E
SE
T
T
J
EC
E
M
UT
E
S
T
ER
E
O
A
L
AR
M
E
N
T
E
R
IP
O
D
M
E
N
U
4
5
6
REP
E
A
T
I
N
T
R
O
RA
N
D
O
M
T
M
A
I
N
O
F
F
A
U
X
A
OF
L
L
O
F
N
S
P
E
A
K
E
R
C
O
N
T
R
O
L
H
E
A
D
P
H
O
NE
OU
T
P
U
S
A
LARM
T
L
EE
P
R
E
S
E
T
USB Input
Selecting USB Audio Play Source:
To select a USB play source, press the MODE
button until “DISC” appears in the display. When
the player is properly connected it will play
automatically. Use the controls on the RV5055 to
select the desired file to play.
J
E
CT
P
O
W
E
R
D
IM
M
O
DE
D
IS
P
1
2
3
B
A
N
D
E
Q
/
L
OU
D
A
S
/
P
S
V
O
L
U
M
E
S
A
B
C
M
A
I
N
S
P
E
A
K
E
R
S
MU
L
T
I-
M
E
D
I
A
IN
PU
T
S
EEK
SCAN
ELE
P
US
E
M
U
T
E
S
T
E
R
E
O
A
LA
R
M
E
N
T
E
R
I
P
O
D
M
E
N
U
4
5
6
R
EP
EA
T
I
N
T
RO
RA
N
D
O
M
C
T
M
A
I
N
O
F
F
AU
X
OF
ALL
F
ON
H
S
P
E
AKER
C
O
N
T
RO
L
H
E
A
D
P
H
O
N
E
O
U
TPUT
SL
E
EP
EP
A
L
ARM
ARM
R
E
S
E
T
23
Page 24

VOL
USB Input (continued)
Disc File Selection:
Press the l button to select a lower file.
Press the l
file number will appear in the display.
File selection can also be selected by using the
remote control. Press the file selection number
button that corresponds to the file you want to
play then press the ENTER button.
For example: If you want to play file 8, press button 8, then the ENTER button.
If you want to play file 28, press 10+, then press
button 2, followed immediately by button 8 and
finally press the ENTER button. File 28 will start
playing and “28” will appear in the display.
button to select a higher file. The
Pausing a MP3 Player:
Press the ll button to “Pause” the player, press
it again to resume play.
Stopping a MP3 Player:
Press the button to “Stop” the player. To
resume play, press the ll button.
Pressing the button 2 times. Then press the
ll button and the disc will start playing from
the beginning.
File Number
P
O
W
E
R
DI
M
MOD
E
D
IS
P
1
2
B
A
ND
EQ
/
L
O
U
D
A
B
MA
I
N
S
P
E
A
K
E
R
S
M
U
L
T
I
MED
I
A
I
N
P
U
T
ZOOM SETUP
ENTER
AS/PS
ELAPSE
BAND
EQ
DISP
1
4
5
8
9
P
O
W
E
R
D
IM
M
OD
E
D
I
S
P
1
2
BA
N
D
EQ
/
L
O
UD
A
MA
I
N
S
P
E
A
K
E
R
S
M
U
L
T
I
M
E
DI
A
I
N
P
U
T
P
OW
E
R
D
I
M
M
OD
E
D
I
S
P
1
2
B
A
ND
EQ/
L
O
U
A
M
A
I
N
S
P
E
A
K
E
R
S
M
U
L
TI
ME
D
I
A
IN
P
U
T
Lower
C
T
J
E
E
M
U
T
E
S
T
E
R
E
O
PLAY
3
A
S
/
P
S
V
O
L
U
M
E
C
S
EE
K
S
C
AN
MP3
A
LA
R
M
E
N
T
E
R
I
P
O
D
M
E
N
U
4
5
6
R
E
P
E
A
T
I
N
TRO
R
AN
D
O
S
E
LE
PU
M
C
T
M
AI
N
O
F
F
A
U
X
OF
A
L
F
L
SH
ON
SP
E
A
K
E
R
C
O
NT
RO
L
HE
A
DP
H
ONE
O
U
TP
U
S
L
AL
ARM
T
EEP
R
E
S
E
T
Higher
TONE
+
SLOW
AUDIO
SUB.TT
+
SE
LE
CT
PU
S
H
ALA
S
E
LE
CT
P
U
SH
AL
File Selection
Numbers
(Buttons 1-10+)
CT
JE
E
M
U
T
E
CD
ST
E
R
E
O
A
L
A
R
M
E
N
T
E
R
IP
O
D
M
E
N
U
4
5
6
R
E
P
E
A
T
I
NTR
O
R
A
N
D
O
M
M
A
IN
O
F
F
A
U
X
A
OFF
L
L
ON
S
P
E
A
K
E
R
C
O
N
T
R
OL
H
E
A
D
P
H
O
N
E
O
U
TP
S
R
SL
AR
UT
LEEP
M
RE
S
E
T
CT
JE
E
M
U
T
E
S
T
E
R
E
O
A
L
AR
M
E
N
T
E
R
IP
O
D
M
E
N
U
4
5
6
R
E
P
E
A
T
I
N
T
RO
R
A
N
DO
M
M
A
I
N
O
F
F
A
U
X
A
O
L
L
F
F
O
N
S
P
EA
K
ER
C
O
NT
R
OL
H
E
A
D
P
H
ON
E
O
U
TP
U
T
EEP
M
R
E
S
E
T
2
3
6
7
10
10/0
PAUSE
3
A
S
/P
S
VO
L
U
M
E
B
C
SE
E
K
SC
AN
3
D
A
S
/
P
S
V
O
L
U
M
E
B
C
SEEK
S
CAN
Reset Button
The LCD display may fail to function normally due to the vehicle’s battery condition, and could require
resetting the radio microprocessor if:
• The vehicle has been “jump started” from a dead battery condition.
• The vehicle battery becomes very low and is quick-charged.
• The vehicle battery is removed and replaced.
Should any of these conditions occur, simply press and release the RESET button on the radio front
panel using the tip of a ball point pen. This will reset the radio microprocessor to the original factory
settings. After pressing the RESET button you should recheck to see if the radio functions normally.
24
Page 25
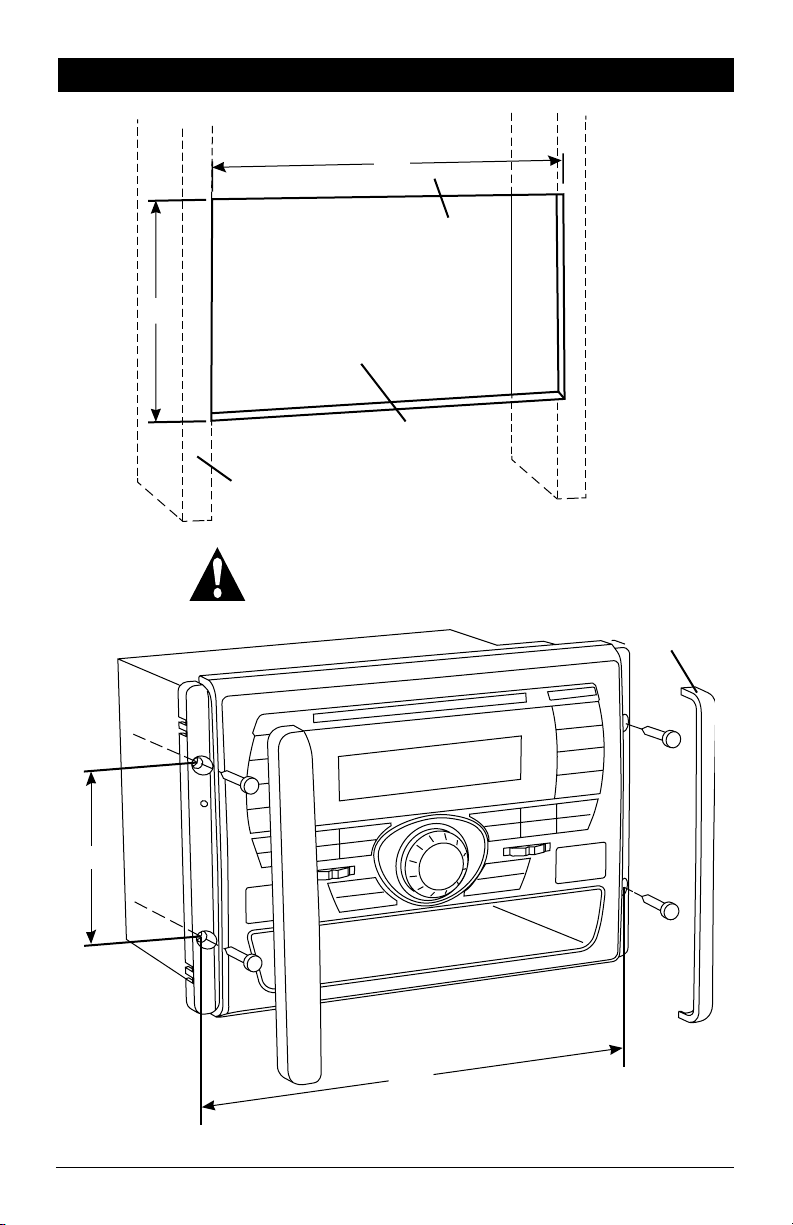
Installation
3
1
6
/
3
9
8
/
”
Wall
Panel
2
”
Chassis Opening
Structural Stud
Caution: Do not install radio without rear cover installed:
No user-serviceable parts inside. Rear cover provides
protection against potential fire hazard.
End Caps
5
8
”
/
3
4
”
/
9
25
Page 26

Speaker Connections
Speaker Left
Speaker A
Left
Auxiliary
_
+
_
Brown/Black Wire
+
Brown Wire
White Wire
9-Pin
Connector
Purple/Black Wire (Common -)
Purple Wire
Gray/Black Wire
Gray Wire
Auxiliary
Speaker Right
_
+
Speaker A
Right
_
+
Speaker C
Left
26
_
Green/Black Wire
Green Wire
+
4-Pin
Connector
Blue/Black Wire
Blue Wire
Speaker C
Right
_
+
Page 27

Auxiliary Connections
This unit for use only with a 12 Volt DC power source with a negative ground.
9-Pin
Connector
2-Channel Audio Output
Video Output
Red Wire (+) to 12 Volt DC Power
Black Wire Ground
White RCA
Red RCA
Yellow RCA
15A
15A
Amplifier
(Optional)
Monitor
(Optional)
27
Page 28
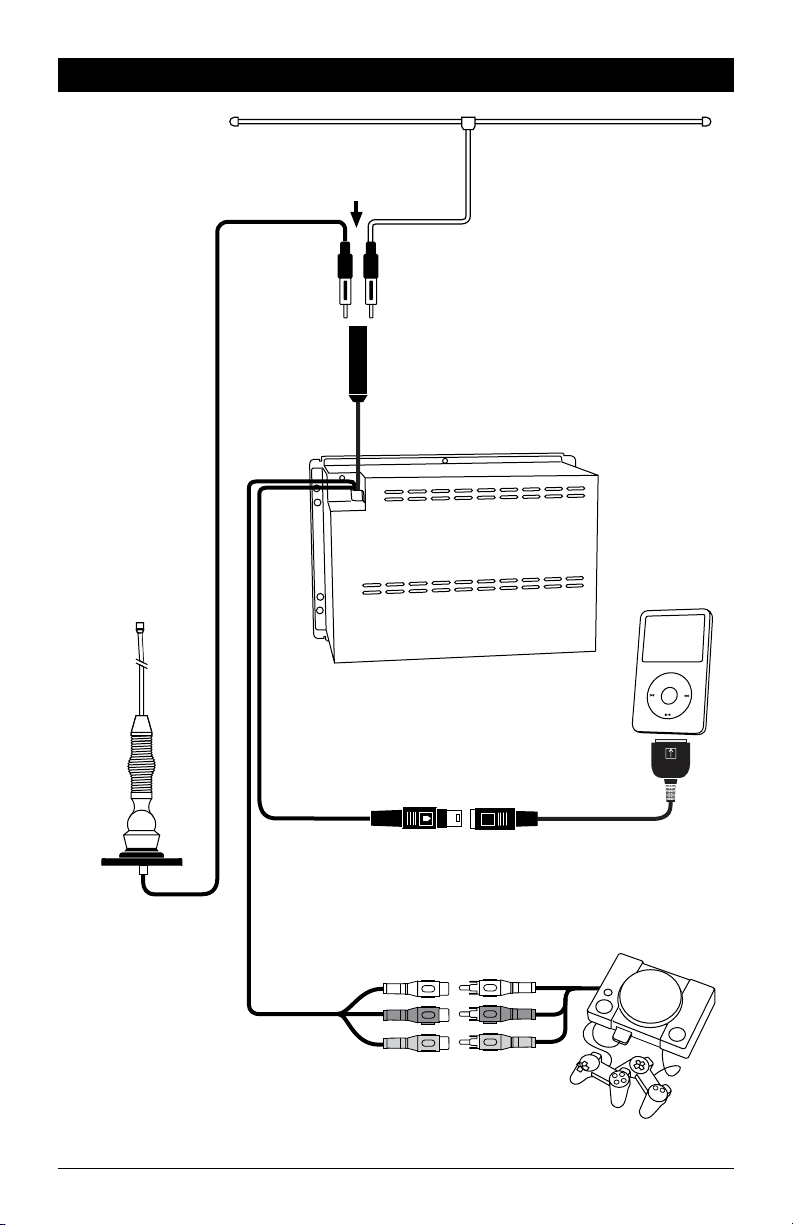
Input Connections
External Automotive
Type Antenna
(Optional)
Plug Either Type of Antenna into
the Female Antenna Receptacle
Model: DP36AXT In-Wall Antenna
(Optional)
IPOD
(Optional)
M
E
N
U
28
Audio/Video
Input (Rear)
iPod Cable
(Optional)
Game Console
(Optional)
RCA Connectors
Page 29

Warranty
ONE (1) YEAR LIMITED WARRANTY
Magnadyne Corporation or its authorized agents will within one year from the date of sale
to you, repair, replace or refund the retail sales price of said product or any part thereof, at
the option of the Magnadyne Corporation or its authorized agents, if said product or part
is found defective in materials or workmanship, when properly connected and operating
on the correct power requirements designated for the specific product. This warranty and
Magnadyne Corporation or its authorized agent’s obligations hereunder do not apply where
the product was; damaged while in the possession of the consumer, subjected to unreasonable or unintended use, not reasonably maintained, utilized in commercial or industrial
operations, or serviced by anyone other than Magnadyne Corporation or its authorized
agents, or where the warning seal on the product is broken or the power and/or plugs
are detached from the unit. Magnadyne Corporation or any of its authorized agents will
not assume any labor costs for the removal and reinstallation of any product found to be
defective, or the cost of transportation to Magnadyne Corporation or its authorized agents.
Such cost are the sole responsibility of the purchaser.
This warranty does not cover the cabinet appearance items or accessories used in connection with this product, or any damage to recording or recording tape, or any damage
to the products resulting from improper installation, alteration, accident, misuse, abuse or
acts of nature.
MAGNADYNE CORPORATION OR ITS AUTHORIZED AGENTS SHALL NOT BE LIABLE TO
ANYONE FOR CONSEQUENTIAL OR INCIDENTAL DAMAGES OR CLAIMS EXCEPT THOSE
ACCORDED BY LAW. NO EXPRESSED WARRANTY OR IMPLIED WARRANTY IS GIVEN
EXCEPT THOSE SET FORTH HEREIN. NO IMPLIED WARRANTY SHALL EXTEND BEYOND
ONE YEAR FROM THE DATE OF SALE.
This warranty extends only to the original purchaser of the product and is not
transferable. Some states do not allow limitations on how long an implied warranty lasts,
and some states do not allow the exclusion or limitation of incidental or consequential
damages, so the above limitations or exclusion may not apply to you. This warranty gives
you specific legal rights, and you may have other rights that vary from state to state.
“NOTE: The manufacturer is not responsible for any radio or TV interference caused by
unauthorized modifications to this equipment. Such modifications could void the User’s
authority to operate the equipment.”
Defective merchandise should be returned to the original point of purchase or
secondly, to Magnadyne Corporation, 1111 W. Victoria Street, Compton CA 90220.
Return Authorization must be obtained before sending, or merchandise may be refused.
29
Page 30

Warranty
EXTENDED FIVE YEAR WARRANTY OPTION
Magnadyne Corporation hereby grants you under the terms stated herein the opportunity
to extend the terms and conditions of your regular Magnadyne Limited Warranty that you
received with your purchase of your Magnadyne product. You may extend the time of
coverage of your Limited Warranty only if (1) you are the original purchaser of the product
and (2) the product remains originally installed in the same vehicle in which it was and you
remain the owner of that vehicle.
In order to exercise your option to extend the Limited Warranty of Magnadyne, you must
do the following:
1. Register your Extended Five Year Warranty with Magnadyne by completing the enclosed
Extended Five Year Warranty Registration Card and returning it, signed by you, along with
your original receipt of purchase and a copy of the registration of the vehicle in which the
Magnadyne product was installed, showing you as the registered owner of that vehicle
and enclosing a check or money order in the sum of $20.00, payable to Magnadyne
Corporation.
2. Transmit the receipt of purchase and the Extended Five Year Warranty Registration Card
to Magnadyne Corporation so that it is received by Magnadyne prior to the end of the
regular term of the Limited Warranty of your Magnadyne product.
In order to obtain service pursuant to this Extended Five Year Warranty, if a covered defect
appears with respect to the product, an R.A. (return authorization) must accompany all
returns. Send the product to Magnadyne, insured, by regular mail, in accordance with the
terms and conditions of the original Limited Warranty. In your correspondence always
include the serial number of your Warranty Registration Card which accompanies this
Extended Five Year Warranty. You must also enclose with the product and your correspondence to Magnadyne, a copy of your then current registration of the vehicle in which the
unit is installed in order to establish your continued ownership of that vehicle.
Upon receipt of the product itemization of the purported defect, a copy of the then current
registration of the vehicle and verification of the timely registration of the Extended Five
Year Warranty, Magnadyne will do that which is required of it pursuant to its obligations
to you.
30
Page 31

®
ONE YEAR LIMITED WARRANTY REGISTRATION CARD
Complete and mail now. Keep a copy for your records. Please print clearly.
LAST NAME
ADDRESS
CITY
DEALER
DATE OF PURCHASE
MAKE OF CAR
MODEL #
®
FIRST NAMEI NITIAL
STATE
SERIAL #
YEAR LICENSE#
ZIP
EXTENDED FIVE YEAR WARRANTY REGISTRATION CARD
Complete and mail now. Enclose $20.00 and a copy of your receipt. Keep a copy for your
records. Please print clearly.
LAST NAME
ADDRESS
CITY
DEALER
DATE OF PURCHASE
MAKE OF CAR
MODEL #
FIRST NAMEI NITIAL
STATE
SERIAL #
YEAR LICENSE#
SIGNATURE
ZIP
Page 32
®
MAGNADYNE CORPORATION
P.O. Box 5365
Carson, CA 90749-5365
®
© Copyright 2011Magnadyne Corporation
MAGNADYNE CORPORATION
P.O. Box 5365
Carson, CA 90749-5365
RV5055-UM
Rev. A 5-13-11
 Loading...