

LINDY 43116 User Manual [ml]

Tested to Comply with
FCC Standards
For Home and Office Use!
lindy.com
USB 3.0 Docking & Clone Station
Premium
User Manual English
Benutzerhandbuch Deutsch
Manuel Utilisateur Français
Manuale Italiano
No. 43116
© LINDY Group - FIFTH EDITION (December 2017)

User Manual English
Introduction
Thank you for purchasing the USB 3.0 Docking & Clone Station Premium. This product
has been designed to provide trouble free, reliable operation. It benefits from both a
LINDY 2 year warranty and free lifetime technical support. To ensure correct use, please
read this manual carefully and retain it for future reference.
The LINDY USB 3.0 HDD Docking & Clone Station can be used as both a dual HDD
SATA docking station and standalone HDD cloning station that creates a bit-by-bit clone
of the source HDD onto a target HDD, twice as fast as other USB 3.0 Cloning Stations.
The USB 3.0 HDD Docking & Clone Station also provides additional features for
Windows computers following the installation of the included software. Please note for
software installation an active internet connection during installation and activation is
necessary. The keys for the software can be entered up to a maximum of 5 times.
A Software Clone function allows you to choose if you use an external or internal hard
drive as the cloning source for the target hard drive. It is also possible to clone from
bigger to smaller hard drives, with software that resizes the partition accordingly.
Note - a completely full, bigger hard drive cannot be copied to a smaller one.
FlashCopy allows cloning to be carried out twice as fast as with standard Clone
Stations, even via a USB 2.0 connection.
DiskErase allows you to completely delete the data on the hard drive safely, securely
and permanently.
Package Contents
1x SATA Docking & Cloning Station
1x Power Supply 100-240VAC / 12V DC 3A
1x Power Cord
1x USB 3.0 cable
1x CD with software
1x This Manual
Features
Computer connection via USB 3.0 SuperSpeed (5 Gbps), backwards compatible
with USB 2.0
Connects 2 SATA HDD/SSDs to a computer using a single connector
SATA 3.0 Gbps standard

User Manual English
Accepts 1.8/2.5/3.5” HDD/SSDs with 22 pin SATA combo interface. For Micro
SATA please use LINDY adapter No. 33502.
Supports auto spin down after being idle for 5 minutes
Compatible with Windows, Mac OS, Linux; Software support only for Windows
computers
Installation
Connect the power supply
For normal docking station operation connect the Docking Station to your
computer with the USB 3.0 cable provided
Insert the HDDs into the docking station and press the power switch ON
Wait until the drivers are loaded by the computers operating system (OS) – you
should then see the drives in the file manager program
Before detaching the HDDs make sure the data transfer processes is complete
and that the activity light is not lit.
Hardware Clone Function
Make sure that no data is stored on the target hard drive – otherwise you will completely
overwrite it during the clone process!
If you want to clone HDDs, do not connect the Docking Station to your
computer
The target HDD must be of equal or larger capacity than the source HDD
Make sure target HDD is empty and not partitioned (i.e. by using, your
operating system disk management utility)
Install the source and target HDDs into the appropriately labelled bay (Source
and Target)
Press the power switch ON
Press the Clone button until the bl ue LED starts to flash, then press the Clone
button again. The Clone process will start and the 25% LED will flash. The per
cent status changes as clone progresses. The 100% LED flashes once the
clone process has ended. Do not switch OFF or unplug the HDDs during the
cloning process!
Software Clone Function
Make sure that no data is stored on the target hard drive – otherwise you will completely
overwrite it during the clone process!
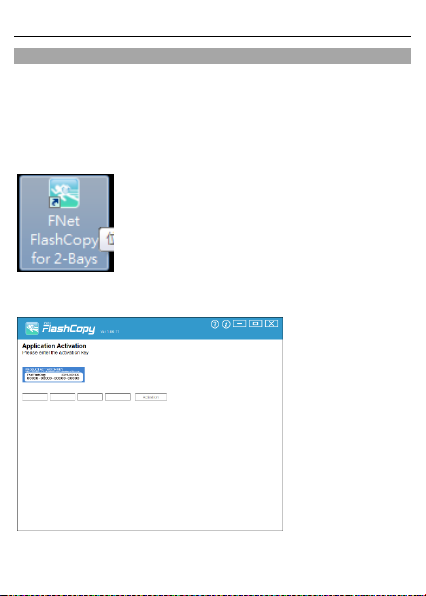
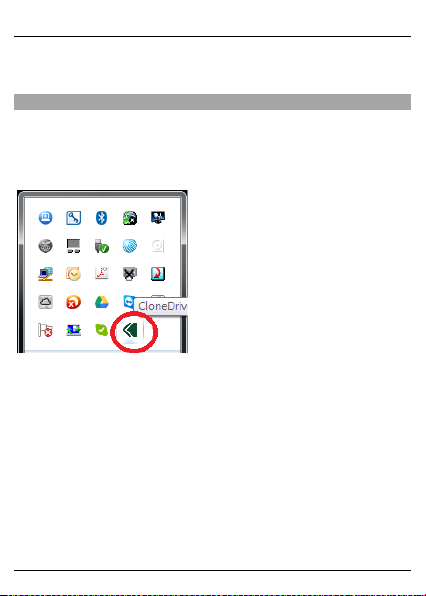
Install the software CloneDrive2 from the included CD. When the installation is
complete, you will find the corresponding icon in the taskbar.
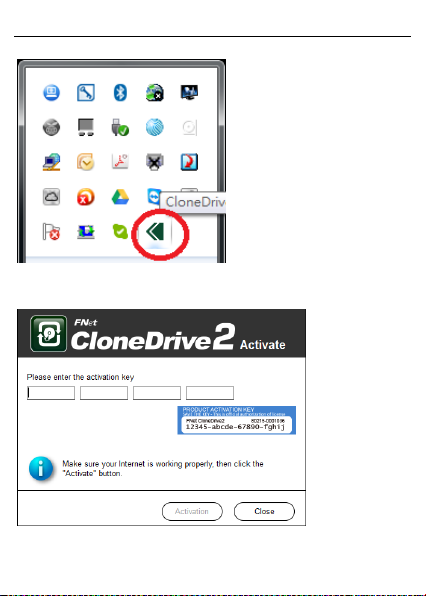
User Manual English
For first time installation, you will have to enter the serial number, which you can find on
a sticker at the bottom of the USB 3.0 HDD Docking & Clone Station.
User Manual English
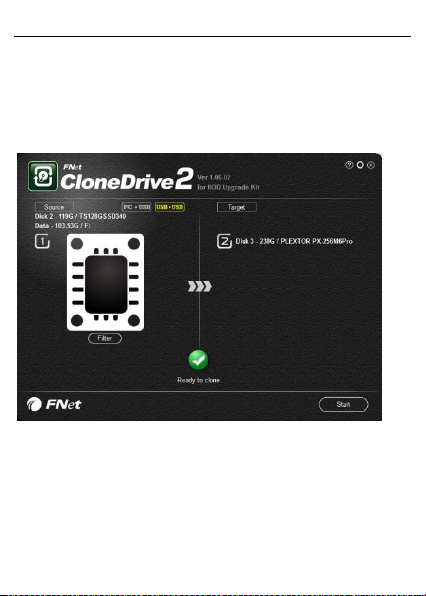
Install the source and target HDDs into the appropriately labelled bay (Source and
Target), connect the USB 3.0 HDD Docking & Clone Station to your computer via USB
3.0 cable and press the power switch on.
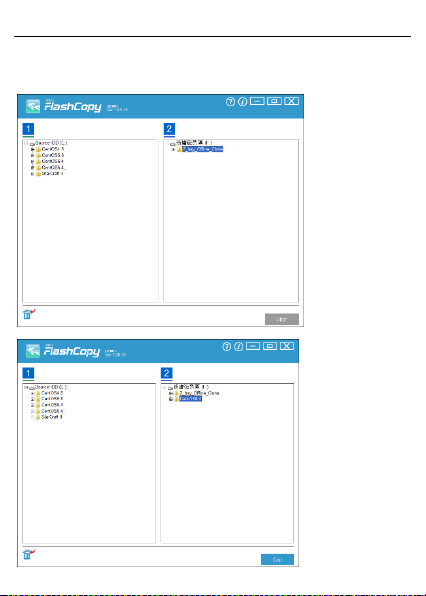
You will then see information on the hard drives of both bays:
User Manual English
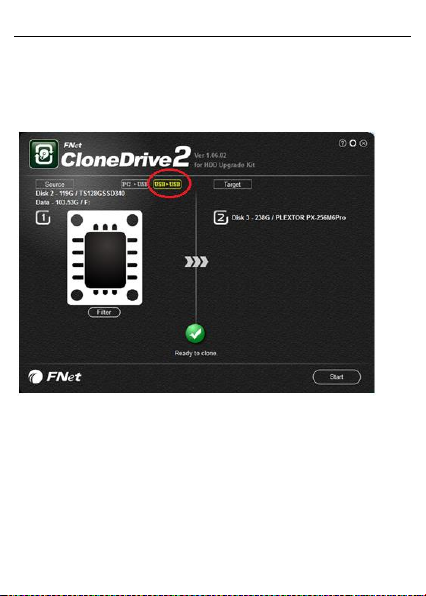
You can choose now to either clone the external disk, which means that the hard disk in
the Source Port will be cloned to the hard drive in the Target Port.
User Manual English
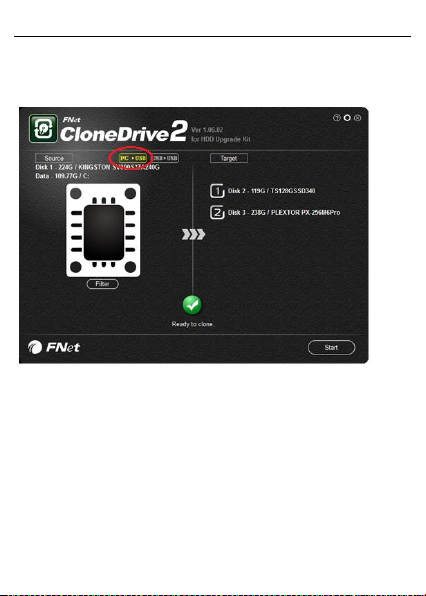
Or you can choose the internal hard disk of the computer as a source. Both hard disks
in the USB 3.0 HDD Docking & Clone Station can then be your target hard disks.
Click either “Start” on the right bottom side for beginning the clone process or push the
Clone button on the USB 3.0 HDD Docking & Clone Station twice.
You can clone from a smaller to a bigger hard drive as well as from a bigger to a smaller
one. If the target hard drive is smaller than the source, the software will resize the
partition. However, a completely full, bigger hard drive cannot be copied to a smaller
one.
User Manual English
Flash Copy Function
FlashCopy allows for cloning twice as fast as standard Clone Stations. Even via a USB
2.0 connection.
Install the source and target HDDs into the appropriately labelled bay (Source and
Target), connect the USB 3.0 HDD Docking & Clone Station to your computer via USB
3.0 cable and press the power switch on. You will then find a FlashCopy icon on the
Desktop or task bar. Start the program with a double click on the icon.
For first time installation, you will have to enter the serial number, which you can find on
a sticker at the bottom of the USB 3.0 HDD Docking & Clone Station.
User Manual English
After starting the program the data on both hard disks will be shown. Select the folder of
the source HDD, which you want to copy, and draw it from the source to the target
HDD.
User Manual English
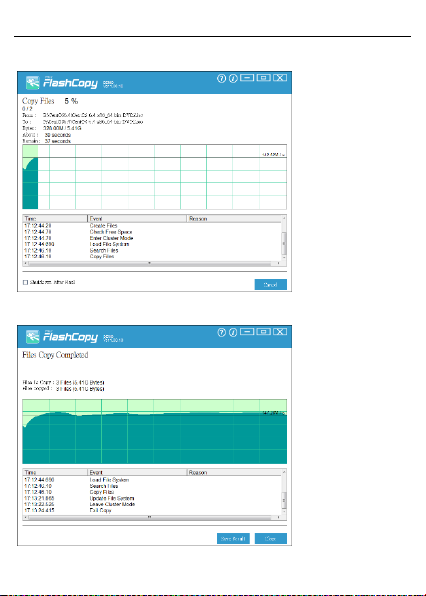
Then click “Start” to activate the FlashCopy function.
The process window will pop up and show detailed information on the copy process.
When copying is completed, you can close the window.

User Manual English
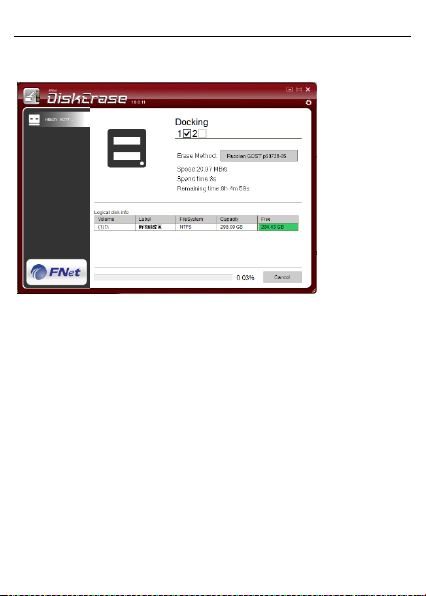
Disk Erase Function
The software DiskErase can delete all data on the hard disk securely and permanently.
DiskErase provides 18 different standard algorithms to wipe out the data on the HDD:
1. One Pass Zeros (1 pass).
2. One Pass Random (1 Pass)
3. US DoD 5220-22.M (3 Pass)
4. US DoD 5220.22-M (ECE) (7 Pass)
5. Canadian OPS-II
6. German VSITR
7. Russian GOST p50739-95
8. US Army AR380-19
9. US Air Force 5020
10. HMG IS5 (Baseline)
11. HMG IS5 (Enhanced)
12. Navso P-5329-26 (RL)
13. Navso P-5329-26 (MFM)
14. NCSC-TG-025
15. NSA 130-2
16. Bruce Schneier
17. Gutmann (35 times)
18. Schneier’s 7 pass (7 times)
Once the data are deleted there is no way to bring them back!
Install the software DiskErase from the included CD. Then install the HDD, which you
want to delete, in the USB 3.0 HDD Docking & Clone Station and connect it with the
computer. Press the power switch of the USB 3.0 HDD Docking & Clone Station on. You
will then find a DiskErase icon on the desktop or in the taskbar. Open the program with
a double click.
User Manual English
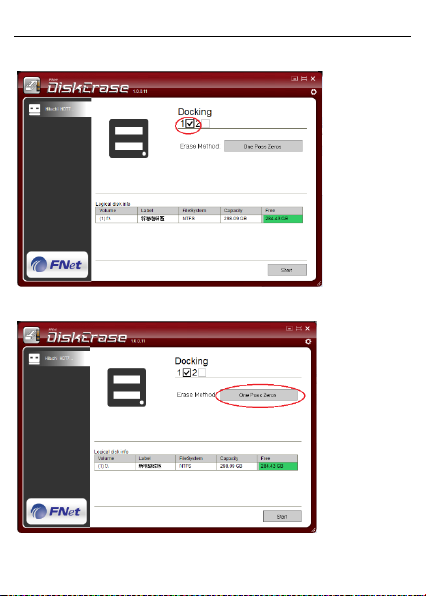
Choose the HDD you want to delete.
Choose the algorithm for wiping out the data.

User Manual English
Click “Start“ to delete the data.
Enter the verification code to be sure; you want to start the data erasure.
User Manual English
The erasing status is shown on the screen.
The erasing speed depends on the algorithm selected and the HDD speed.

Benutzerhandbuch Deutsch
Einführung
Wir freuen uns, dass Ihre Wahl auf ein LINDY-Produkt gefallen ist und danken Ihnen für
Ihr Vertrauen. Sie können sich jederzeit auf unsere Produkte und einen guten Service
verlassen. Diese USB 3.0 Docking & Clone Station Premium unterliegt einer 2-Jahres
LINDY Herstellergarantie und lebenslangem kostenlosen technischen Support. Bitte
lesen Sie diese Anleitung sorgfältig und bewahren Sie sie auf.
Die LINDY USB 3.0 HDD Docking & Clone Station kann sowohl als Dual HDD Docking
Station wie auch als Clone Station zum bitweisen Kopieren (Klonen) von Festplatten
verwendet werden. Bereits beim hardwarebasierten Klonen (ohne Anschluss am
Rechner) ist diese USB 3.0 HDD Docking & Clone Station doppelt bis dreimal so schnell
wie herkömmliche Clone Stations.
Zudem bietet diese USB 3.0 HDD Docking & Clone Station unter Windows
Zusatzfeatures durch Installation der mitgelieferten Software. Für die Installation und
Aktivierung der Software benötigen Sie eine aktive Internetverbindung. Die zugehörige
Seriennummer kann maximal fünfmal eingegeben werden.
Durch die Software Clone Funktion können Sie auswählen, ob Sie eine externe
Festplatte als Quelle zum Klonen verwenden wollen oder die Festplatte des Computers
als Quelle verwenden und auf die Zielfestplatte klonen. Darüber hinaus ist es sogar
möglich, von größeren auf kleinere Festplatten zu klonen. Die Software passt die
Partitionen entsprechend an. Natürlich kann eine voll beschriebene, große Festplatte,
nicht auf eine komplett auf eine kleinere kopiert werden.
Die FlashCopy Funktion ermöglicht doppelt so schnelles Klonen wie auf herkömmlichen
Clone Stations unter USB 2.0.
Mit der Software „DiskErase“ können alle Daten auf den Festplatten zuverlässig
gelöscht werden.
Lieferumfang
1x SATA Docking & Clone Station
1x Netzteil 100-240VAC / 12V DC 3A
1x Stromanschlusskabel
1x USB 3.0 Kabel
1x CD mit Software
1x Diese Anleitung

Benutzerhandbuch Deutsch
Eigenschaften
Interface USB 3.0 SuperSpeed bis 5 GBit/s., abwärts kompatibel mit USB 2.0
Einfacher Anschluss von Festplatten über nur ein Kabel: Festplatte einfach nur
in Docking Station einstecken
SATA 3.0 GBit/s-Standard
Für 2,5/3,5“ HDDs/SSDs mit 22 poligem SATA Kombianschluss
Zum Anschluss von Micro SATA sind von LINDY entsprechende Adapter
verfügbar (Micro SATA Adapter Art.-Nr. 33502, weitere Angaben siehe
Website)
Automatisches Abschalten wenn die Docking und Clone Station 5 Minuten
nicht verwendet wird
Kompatibel mit Windows, Mac OS, Linux; Softwareunterstützung nur durch
Windows
Installation
Schließen Sie das Netzteil an
Zum normalen Betrieb schließen Sie die Docking Station über das USB 3.0
Stecken Sie die Festplatten in die Docking Station und schalten Sie die
Warten Sie bis das Betriebssystem di e Treiber vollständig geladen und di e
Bevor Sie F estplatten entfernen stellen Sie sicher, dass al le Dateitransfers
Hardware Clone Funktion
Achten Sie bitte darauf dass keine Daten auf der Zielfestplatte vorhanden sind – sie
werden beim Clone-Prozess komplett überschrieben!
Zum Klonen soll die Docking Station nicht am Rechner angeschlossen sein
Die Clone Funktion erzeugt 1:1 Kopien einer Festplatte
Die Ziel-Festplatte muss leer, nicht formatiert und nicht partitioniert sein,
Stecken Sie Quell- und Ziel-Festplatte in die mit Source (für Quelle) und
Schalten Sie die Docking Station am Einschalter ein
Drücken Sie den Clone-Schalter bis die blaue LED aufleuchtet, dann drücken
Kabel an
Docking Station ein
Laufwerke angemeldet hat – danach sollten Sie auf die Laufwerke aus Ihrem
Dateimanager zugreifen können
komplett abgeschlossen sind.
verwenden Sie hierzu ggf. die Management Utilities Ihres Betriebssystems.
Außerdem muss die Zielfestplatte mindestens genauso groß oder größer sein
als die Quelle
Target (für Ziel) bezeichneten Ports der Docking Station ein (nicht
verwechseln!)
Sie erneut auf den Clone Schalter und der Clone-Prozess beginnt. Zunächst
Benutzerhandbuch Deutsch
leuchtet die 25% LED auf, Sie können das Fortschreiten des Cloneprozesses
über die LED-Anzeige bis 100% verfolgen. Sobald 100% erreicht sind und die
LEDs nicht mehr aufleuchten ist der Clone-Prozess beendet.
Software Clone Funktion
Achten Sie bitte darauf dass keine Daten auf der Zielfestplatte vorhanden sind – sie
werden beim Clone-Prozess komplett überschrieben!
Installieren Sie dann die Software „CloneDrive2“ v on beiliegender CD. Nach
erfolgreicher Installation finden Sie ein entsprechendes Icon in der Taskleiste.
Bei erstmaliger Installation ist die Eingabe der Seriennummer erforderlich. Diese
befindet sich auf einem Aufkleber am Boden der USB 3.0 HDD Docking und Clone
Station.
 Loading...