

Page 1
No.
43174
USB 3.0 4K DisplayPort Adapter
Installation Guide English
Installationsanleitung Deutsch
Manuel Utilisateur Français
Manuale Italiano
www.LINDY.com
For Home and Office Use
Tested to Comply with
FCC Standards
© LINDY ELECTRONICS LIMITED & LINDY-ELEKTRONIK GMBH –Third Edition (MAY 2015)
Introduction E n g l i s h
Thank you for buying the LINDY USB 3.0 4K DisplayPort Adapter. This
adapter allows you to connect any monitor with a DisplayPort connector
to your PC or notebook. Thanks to SuperSpeed USB 3.0 and DisplayLink Technology, there is no need to add an additional graphics cards to
your computer!
This additional monitor can be used as an additional standard Windows
monitor in mirror mode or extended desktop mode. It also can be configured to be used as a primary monitor.
It can be used to output a high resolution standard Windows desktop as
well as for video playback using Windows Media Player or appropriate
software that supports Video playback on an extended desktop.
Features E n g l i s h
• USB connectivity between PC/notebook to additional display monitor
via DisplayPort connector
• Supports mirror, extended and primary display modes
• SuperSpeed USB 3.0 delivers higher resolution and performance for
video and 3D graphics
• Equipped with USB to DisplayPort audio device to transfer the audio
from PC to a monitor
• Supports 4K resolutions up to 3840 x 2160@30Hz
• Display your PC contents (Internet, music, photo, and video as sup-
ported by your PC) to a monitor with DisplayPort
• Add up to six displays per PC (dependent upon PC specification)
• Power Mode: Bus powered
• Supported Operating System: Windows 7 / 8 / 8.1
• Operation Temperature: 10 ~ 40°C
• Storage Temperature: -20 ~ 70°C
Interlaced modes and reduced blanking modes are not supported.
Installation English
When you connect the USB 3.0 4K DisplayPort Adapter to your computer,
Windows will automatically install the DisplayLink drivers via the internet. If
you use Windows 7 and have no internet connection, then please install
the driver from the included CD.
The performance of the software is dependent upon the processing power
available as well as the operating use (video or desktop), more capable
systems will provide better performance.
Windows users may find most up to date information, DisplayLink manuals
and driver software from
Supported Resolution Table
640x480 720x480 768x576
800x600 832x642 800x480
848x480 1024x600 1024x768
1152x864 1152x870 1280x720
1280x768 1280x800 1280x960
1280x1024 1360x768 1366x768
1368x768 1400x1050 1440x900
1600x900 1600x1200 1680x1050
1920x1080 1920x1200 2048x1080
2048x1152 2048x1280 2048x1536
2560x1440 2560x1600 3840x2160
www.displaylink.com.
Page 2
Windows 7
tion
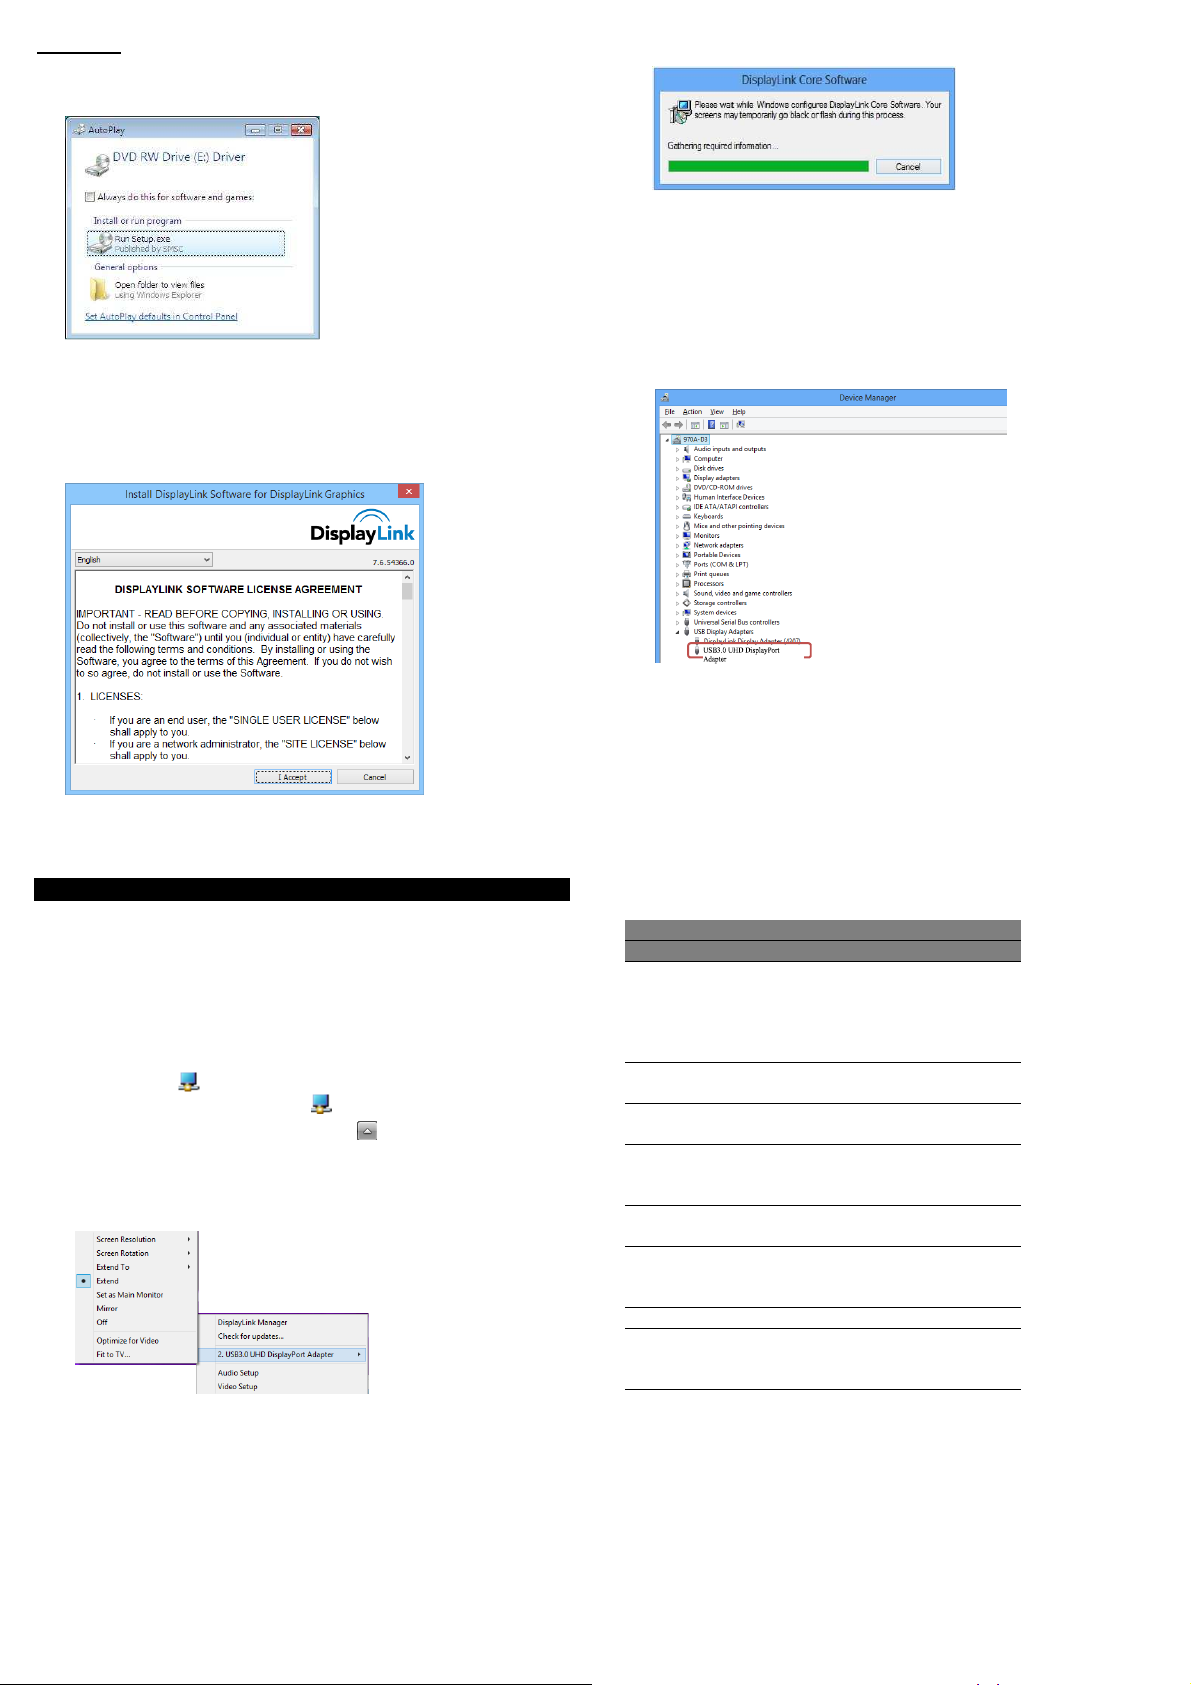
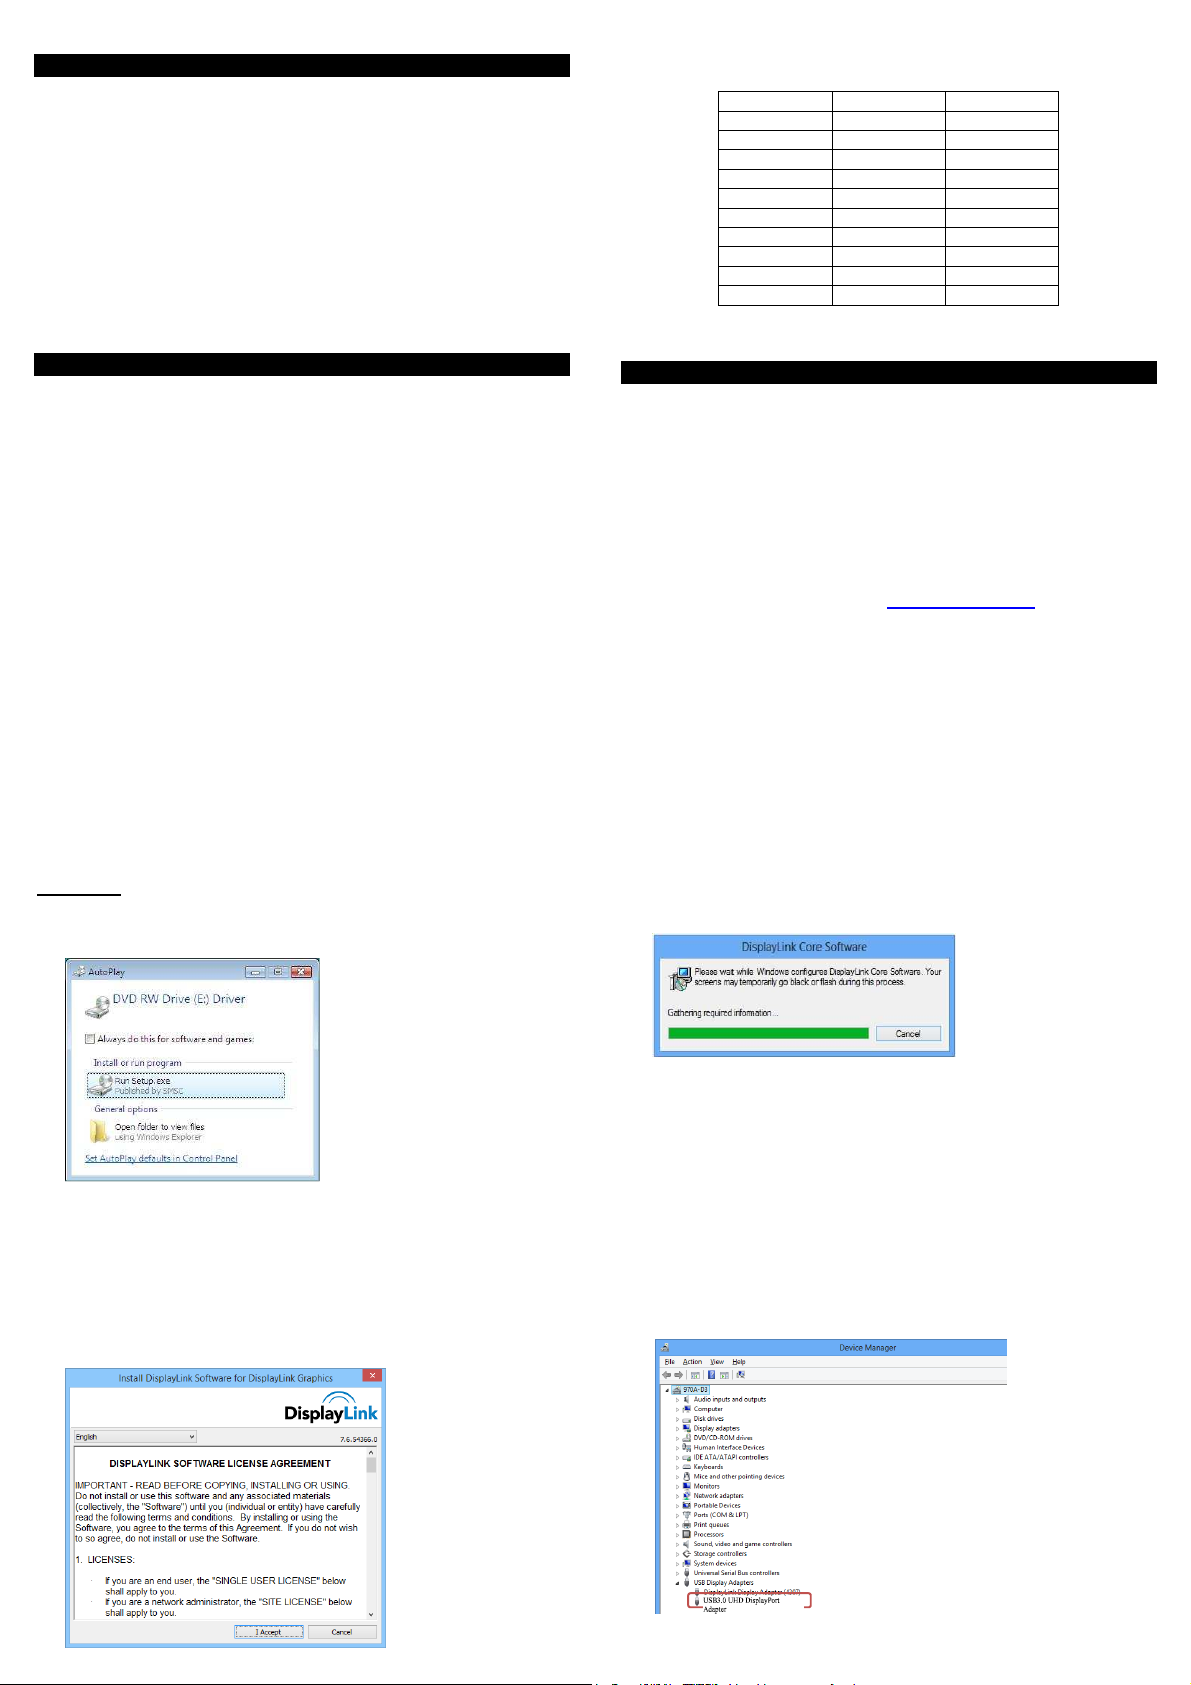
1. Insert the provided CD into your disc drive.
2. Click Run Setup.exe to start the installation.
NOTE:
If the AutoPlay does not appear automatically, locate and double-click
on the Setup.exe file in the driver folder to launch the setup.
Enter the administrator password and then click Yes to start the instal-
lation if a User Account Control dialog box appears.
3. Click I Accept for the next step.
4. Be patient with the installation procedure.
5. When the operating system detects the adapter, the reminder message will appear on the system tray.
Verifying the installation:
To verify the driver of the adapter, follow the step below.
1. Following the path to open the device manager:
Control Panel\ System and Security\ Systems\ Device manager
2. You will find DisplayLink Adapter device listed as below.
NOTE:
If you cannot find the driver in the list, the driver may not be properly
installed. Please delete the item, unplug the adapter and repeat the
installation steps.
Display Configuration English
NOTE: The following screenshots in this section are using Windows 7
operating system. It may not match your operating system but the definitions of buttons, tabs and menus are the same.
Utility settings
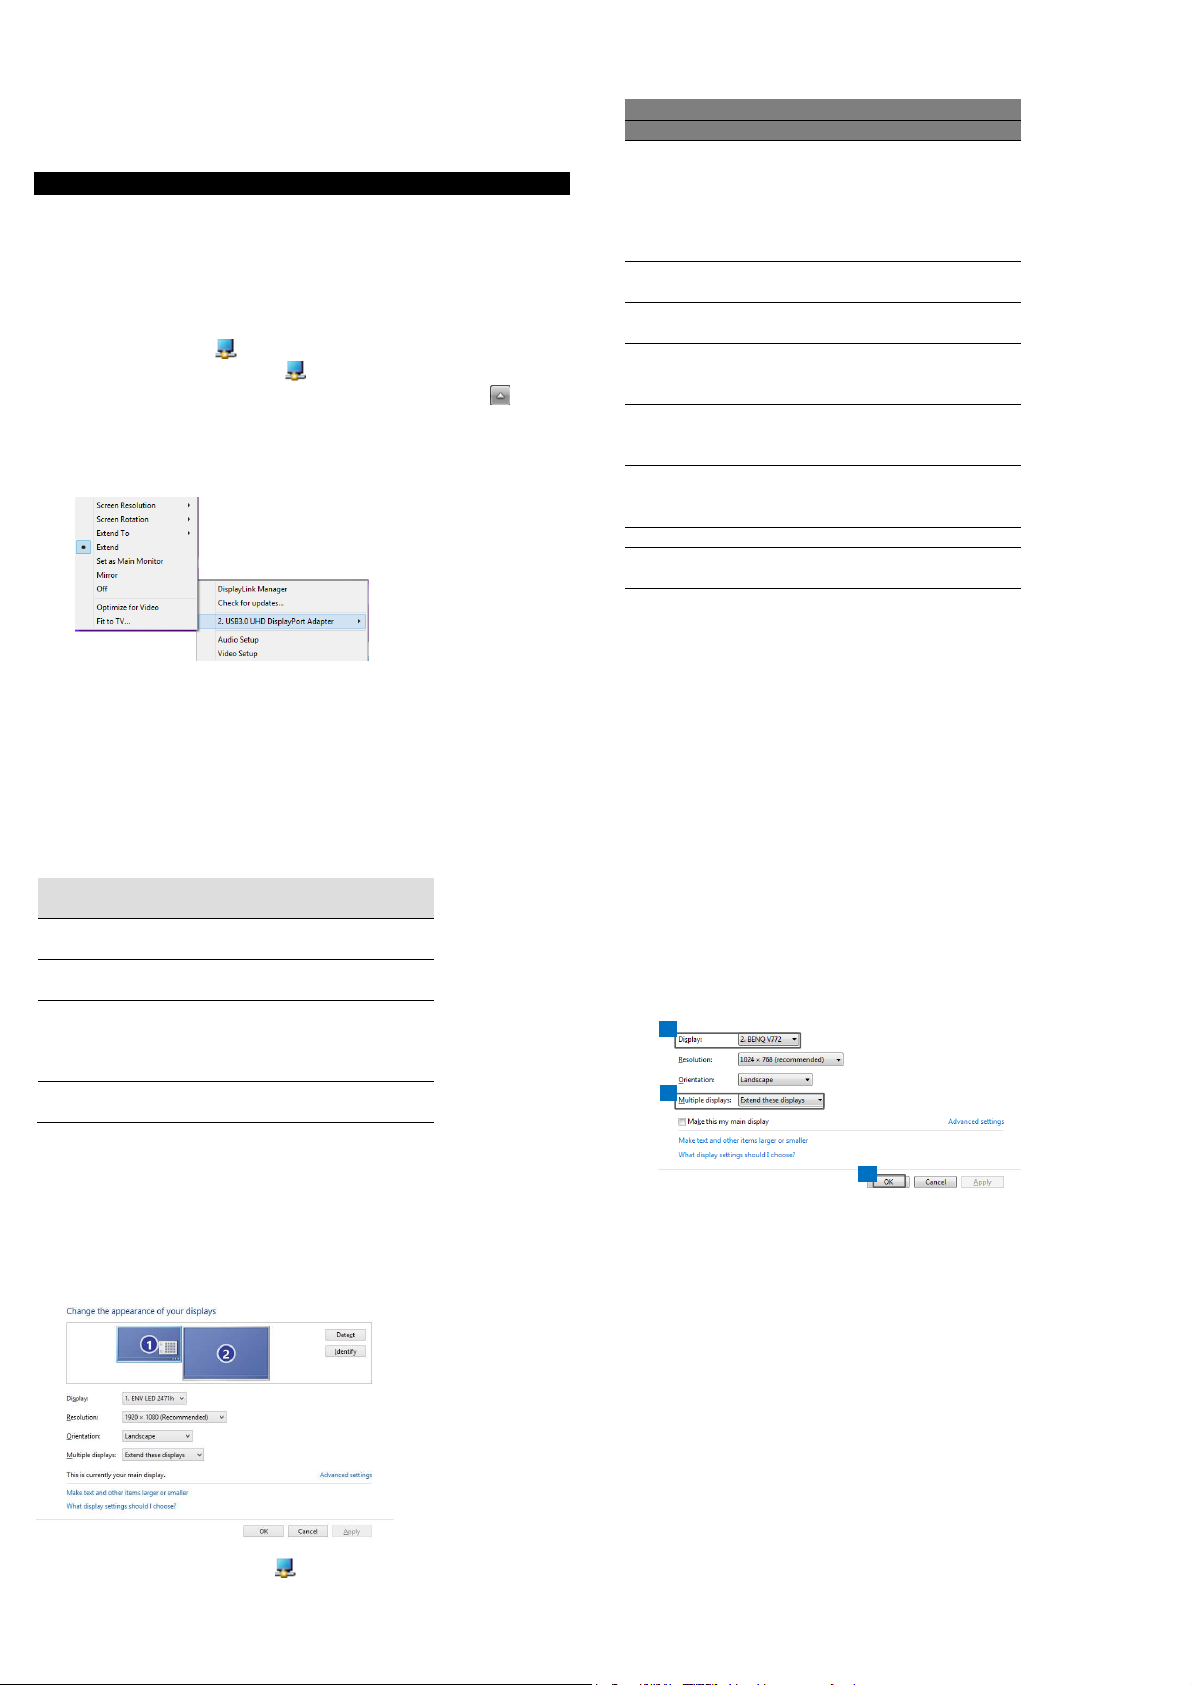
The supplied utility allows configuring the display mode, screen rotation,
screen resolution, and physical arrangement of your monitors.
1. Click utility icon in Windows System Tray.
NOTE: If you cannot find the icon in Windows System Tray, click
arrow icon to bring up icon list to find it
2. Select a preferred option, and then click it using mouse.
Description of the settings:
Options Description
Screen Resolu-
Screen Rotation Rotate the screen according to
Extend Extend the screen according to
Extend to The cursor can extend to desired
Set as Main
Monitor
Mirror Duplicate the primary monitor to
Off Turn off the monitor
Optimize for
video
Fit to TV Adjust the size of Windows
Click to select an available
resolution. Note that this function
is invalid in mirror mode, as the
resolution is defined as the
resolution of the primary monitor
the desired orientation
the desired orientation
screen via left/right/above/below
way moving
Set this screen to the main
screen
the monitor which connects with
the adapter
Optimize the video quality when
playing back. Text may appear
less clear when enabling
Desktop on the TV
NOTE: This function works only
when one add-on monitor is
connected. Besides, this option
will also only work in extended
mode. The add-on monitor will
change to the extended mode if
selecting this option while in
mirror mode.
Page 3
Extend Sub-
updates
resolution page.
2
3
4
menu
Displaylink
manager
Check for
Audio Setup Enable the Windows audio
Video Setup
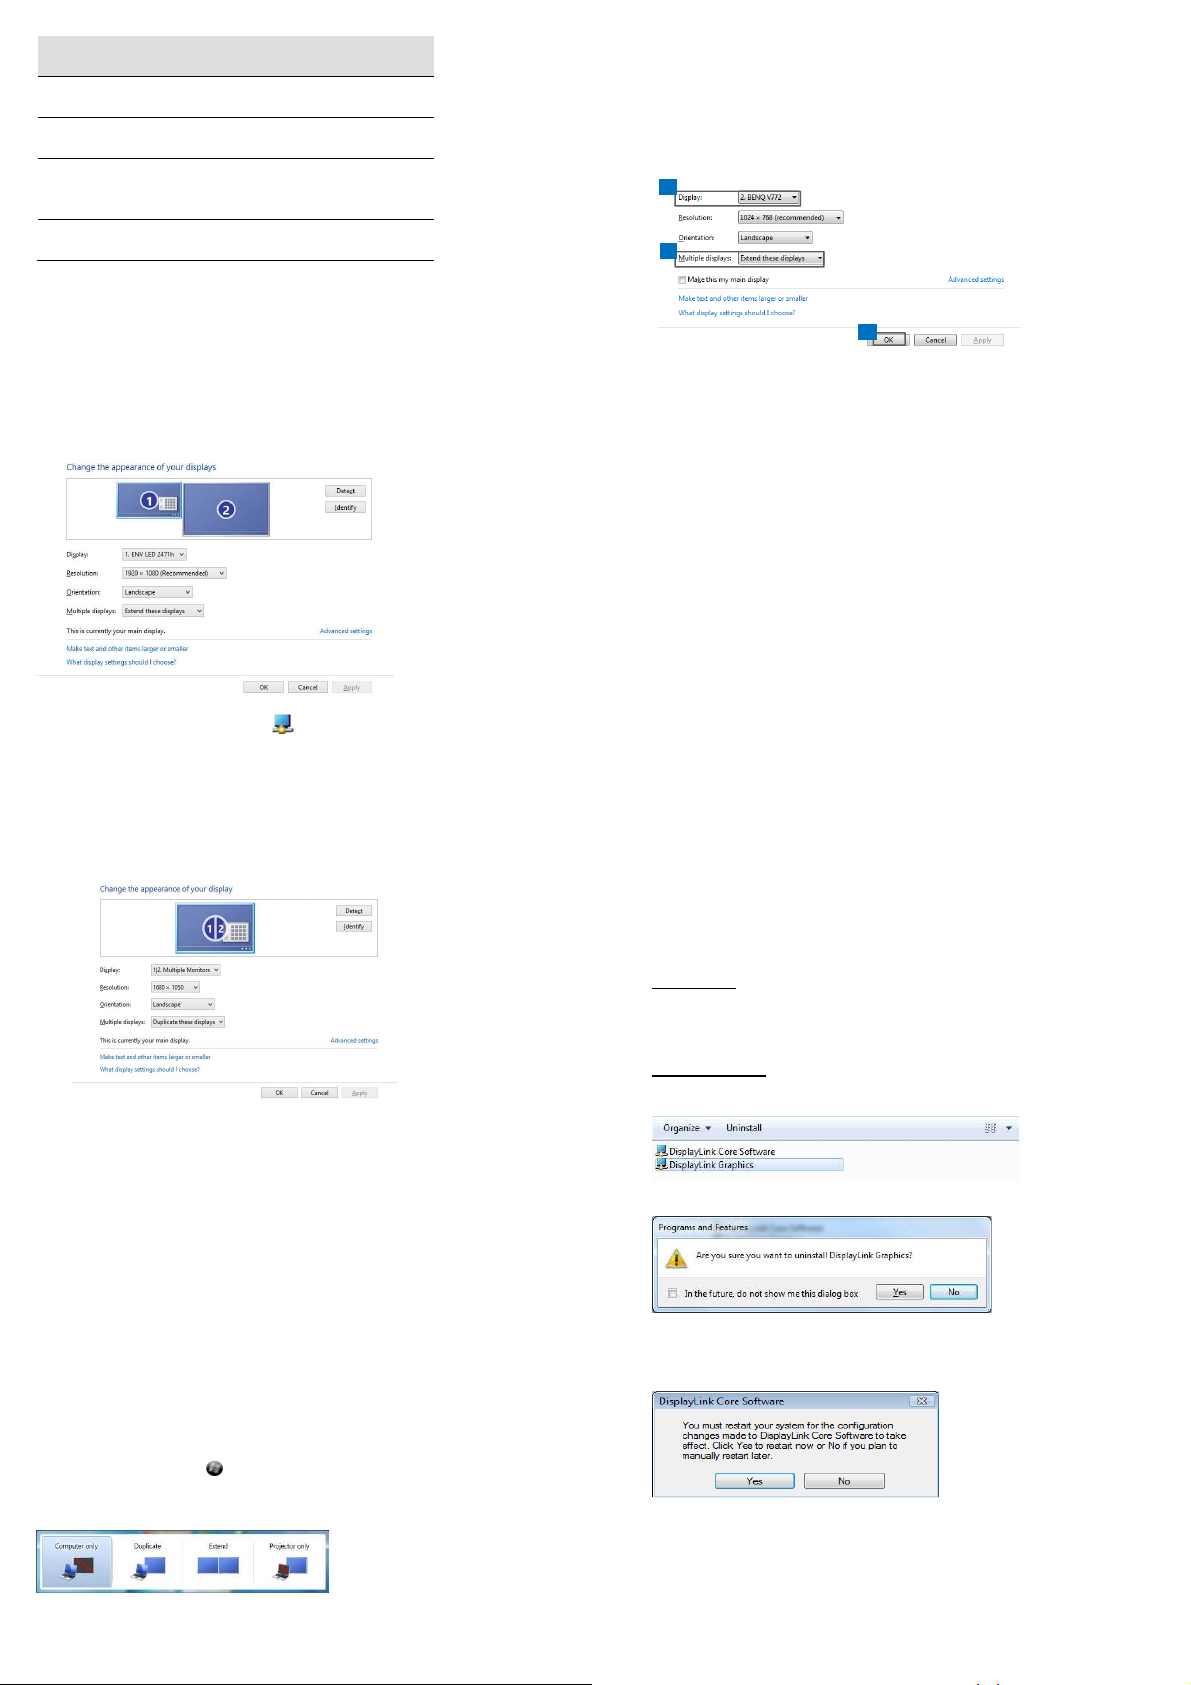
Multi-monitor configuration:
An extra DisplayPort monitor can be directly connected through the adapter. Once the extra monitor is connected, it can be configured
to use either “mirror mode”, “extended mode” or be the primary
display.
Position the mouse anywhere on the Windows Desktop,
Right-click and select Screen Resolution.
Enable the Windows screen
resolution page
Check the latest driver and
download if available
configuration page. This function
works only in specific models.
Enable the Windows screen
Extended mode:
1. Refer to the Multi-monitor configuration section to bring up the
configuration window.
2. In the Display drop-down menu, select the preferred monitor.
3. Select Multiple Displays > Extend these displays.
4. Click OK to confirm and exit.
5. Once the setting is completed, simply drag and drop the application
icons or the opened windows to the add-on monitor. However, some
applications may not support to display on the extended desktop.
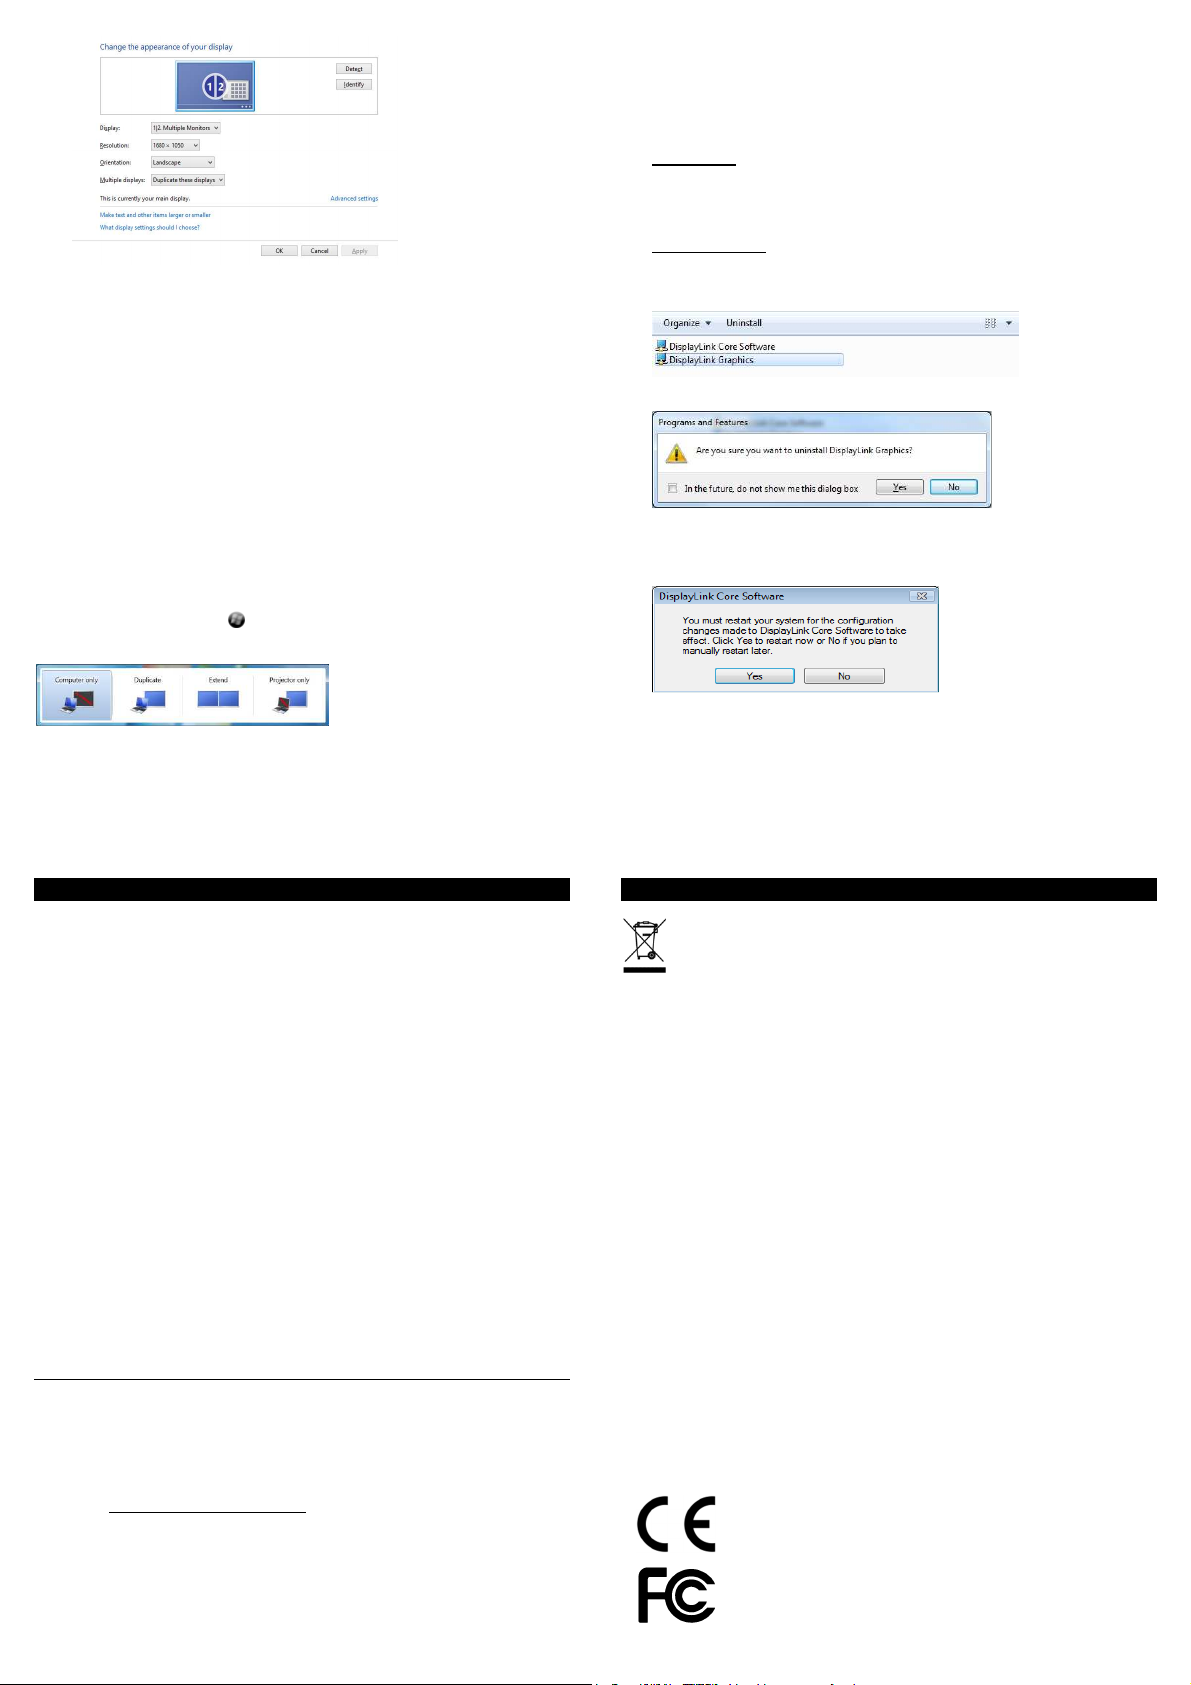
Mirror mode:
1. Refer to the Multi-monitor configuration section to bring up the
configuration window.
2. In the Display drop-down menu, select the preferred monitor.
3. Select Multiple Displays > Duplicate these displays.
Alternatively, click the utility icon in the Windows
System Tray, and then select Video Setup.
4. Click OK
Set the primary monitor:
1. Refer to the Multi-monitor configuration section to bring up the
configuration window.
2. In the Display drop-down menu, select the preferred monitor.
3. Check the box of Make this my main display.
Note: For some computers, you may need to disable the main display
4. Click OK to confirm and exit.
Windows shortcut:
Press Windows button + P to bring up the menu as below, and then
select a desired option.
This function is available for Windows 7 / 8 / 8.1.
to confirm and exit.
by unchecking the box of Extend the desktop onto this moni-
tor or Extend my Windows desktop onto this monitor.
Uninstalling the driver:
1. Follow the instructions to find the driver path, and then right-click on
DisplayLink Graphics
Windows 7
Control Panel > Programs > Programs and Features > Uninstall or
change the program
Windows 8
Settings > Control Panel > Programs > Uninstall a program
/
/
/ /
8.1
to uninstall the driver.
2. Click
Yes
to confirm the uninstallation.
3. Click
Yes
connection now.
to restart your computer. You can also disconnect the video
Page 4
Einleitung D eu tsc h
Vielen Dank für den Kauf des LINDY USB 3.0 4K DisplayPort Adapters.
Er erlaubt Ihnen den Anschluss eines Monitors mit DisplayPort an Ihren
PC. Dank der hohen USB 3.0 Übertragungsrate und mit der DisplayLink
Technologie macht er den Einbau einer zusätzlichen Grafikkarte überflüssig.
Dieser zusätzliche Monitor kann im Windows Modus Gespiegelter Desktop, Erweiterter Desktop und sogar Primärer Desktop konfiguriert werden.
Er kann sowohl als hochauflösender Windows Desktop wie auch für
Videowiedergabe mit dem Windows Media Player oder ähnlicher Software
verwendet werden, die Videowiedergabe und Erweiterten Desktop unterstützt.
Eigenschaften Deu tsc h
• USB-Verbindung zwischen PC/Notebook und zusätzlichem Monitor via
DisplayPort
• Unterstützt höchste Auflösungen bis 3840x2160@30Hz (4K UHD)
• SuperSpeed USB 3.0 für höhere Auflösungen & bessere Performance
• Unterstützt Gespiegelten, Erweiterten und Primären Modus
• USB - DisplayPort Audiounterstützung für die Audioübertragung vom
PC zum Monitor
• Gibt den Inhalt des PC-Bildschirms (Internet, Musik, Fotos und Video)
auf einem Monitor wieder
• Bis zu 6 Adapter / Monitore können an einem Rechner angeschlossen
werden (abhängig von der Spezifikation des PCs)
• USB Bus powered
• Unterstützte Betriebssysteme: Windows 7 / 8 / 8.1
• Betriebstemperatur: 10 ~ 40°C
• Lagertemperatur: -20 ~ 70°C
Unterstützte Auflösungen:
640x480 720x480 768x576
800x600 832x642 800x480
848x480 1024x600 1024x768
Zeilensprungverfahren und Reduced Blanking (Verkürzen der Dunkelzeit)
werden nicht unterstützt.
Installation Deuts ch
Wenn Sie den USB 3.0 4K DisplayPort Adapter an Ihren Computer anschliessen, wird Windows automatisch die neuesten DisplayLink Treiber
über Ihre Internetanbindung installieren. Sollten Sie als Betriebssystem
Windows 7 verwenden und keinen Internetzugang haben, installieren Sie
bitte die Treiber von beiliegender CD.
Für flüssige Videowiedergabe von bewegten Bildern wird dem Rechner
sehr viel Rechenleistung abverlangt; weniger leistungsfähige Prozessoren
können nicht alle Bilder zeigen und zum Ruckeln der Videos führen.
Weitere Informationen und die aktuellsten DisplayLink Treiber finden Sie
auf www.displaylink.com
1152x864 1152x870 1280x720
1280x768 1280x800 1280x960
1280x1024 1360x768 1366x768
1368x768 1400x1050 1440x900
1600x900 1600x1200 1680x1050
1920x1080 1920x1200 2048x1080
2048x1152 2048x1280 2048x1536
2560x1440 2560x1600 3840x2160
Windows 7
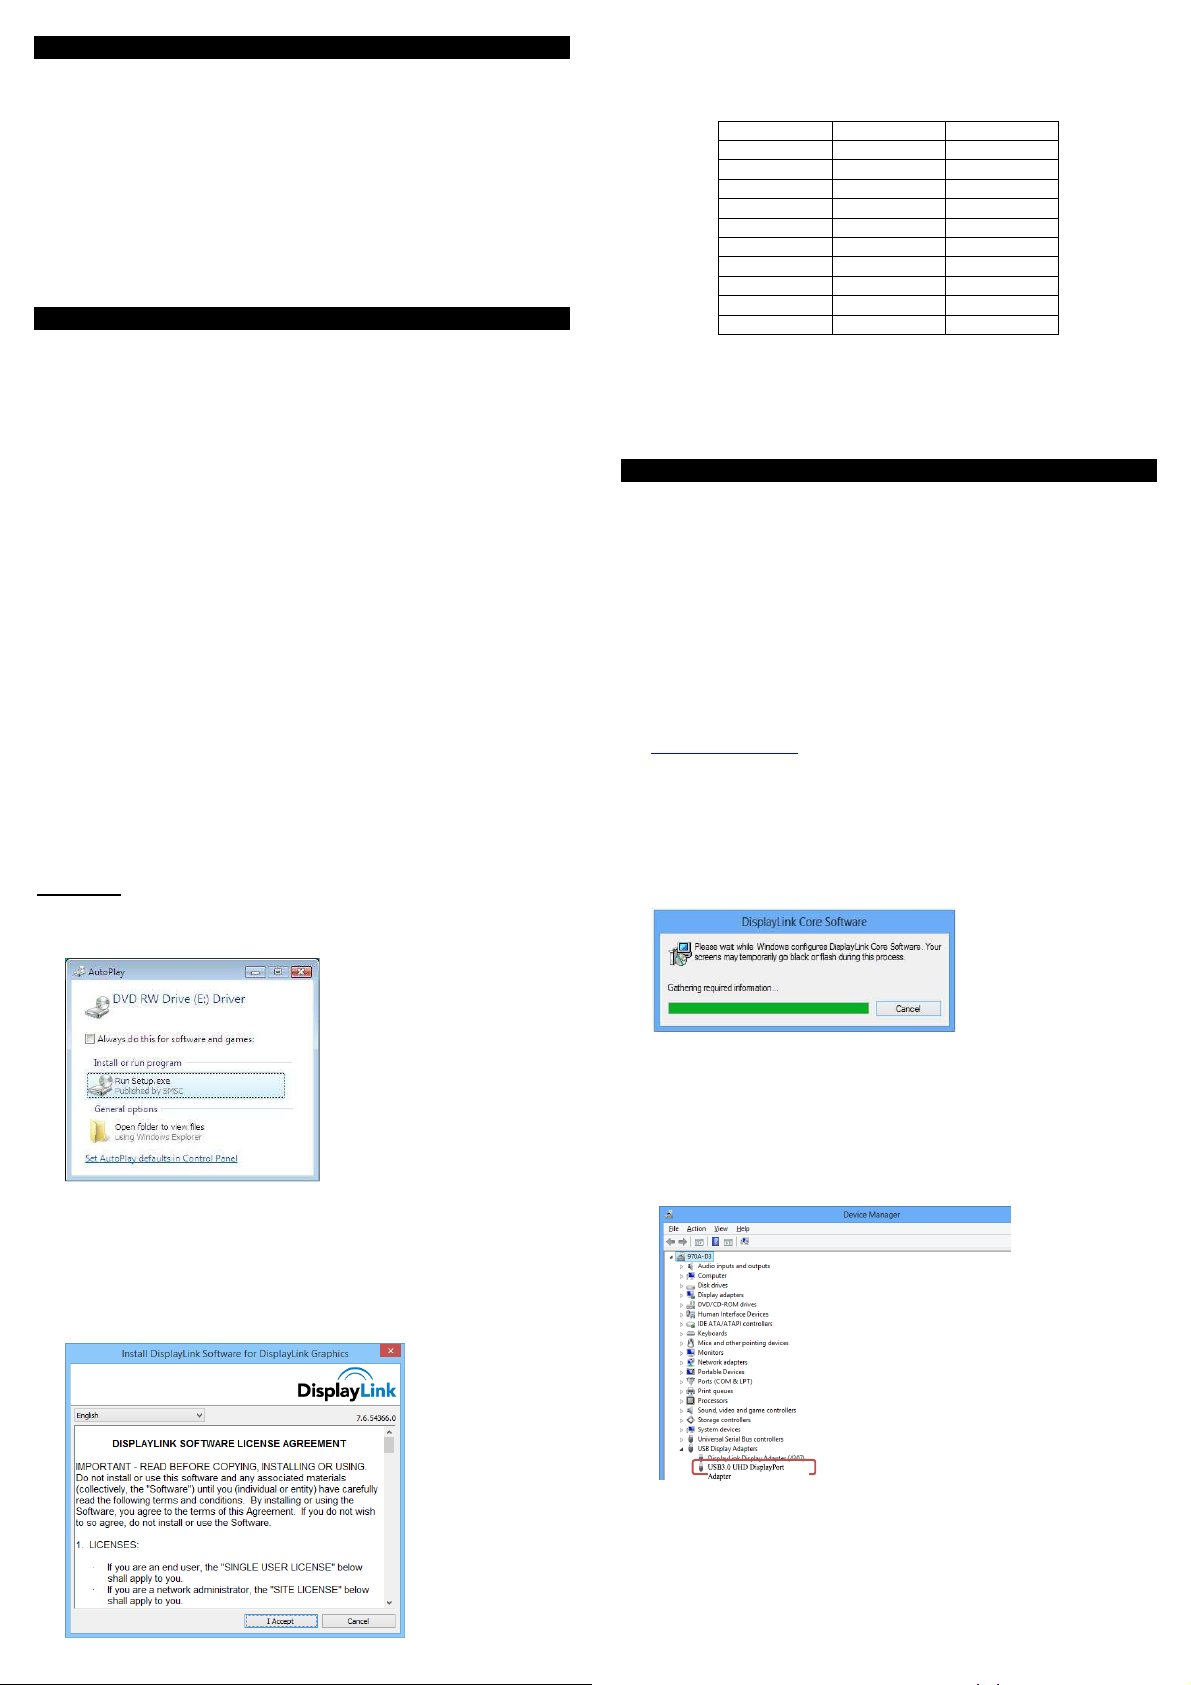
1. Legen Sie die Treiber-CD in Ihr Laufwerk.
2. Starten Sie
Wenn die automatische Wiedergabe nicht startet, klicken Sie auf die
Datei
passwort ein und starten die Installation wenn eine Dialogbox “Benutzerkontensteuerung” erscheint.
3. Klicken Sie auf Akzeptieren zum Fortfahren.
Run Setup.exe
Setup.exe
.
file im Treiberordner. Geben Sie das Administrator-
4. Die Installation kann eine Weile dauern.
5. Wenn das Betriebssystem den Adapter erkennt, erscheint eine Erinnerung in der Systemleiste.
Überprüfen der Installation:
Öffnen Sie den Gerätemanager wie folgt:
Systemsteuerung\ System und Sicherheit\ Systeme\ Gerätemanager
Sie werden den
Wenn Sie den Treiber nicht in der Liste finden, wurde er vermutlich
nicht korrekt installiert.Löschen Sie ggf. die Daten, entfernen den USB
3.0 4K DisplayPort Adapter und wiederholen das Installationsprocede-
re.
DisplayLink Adapter
in der Liste finden.
Page 5
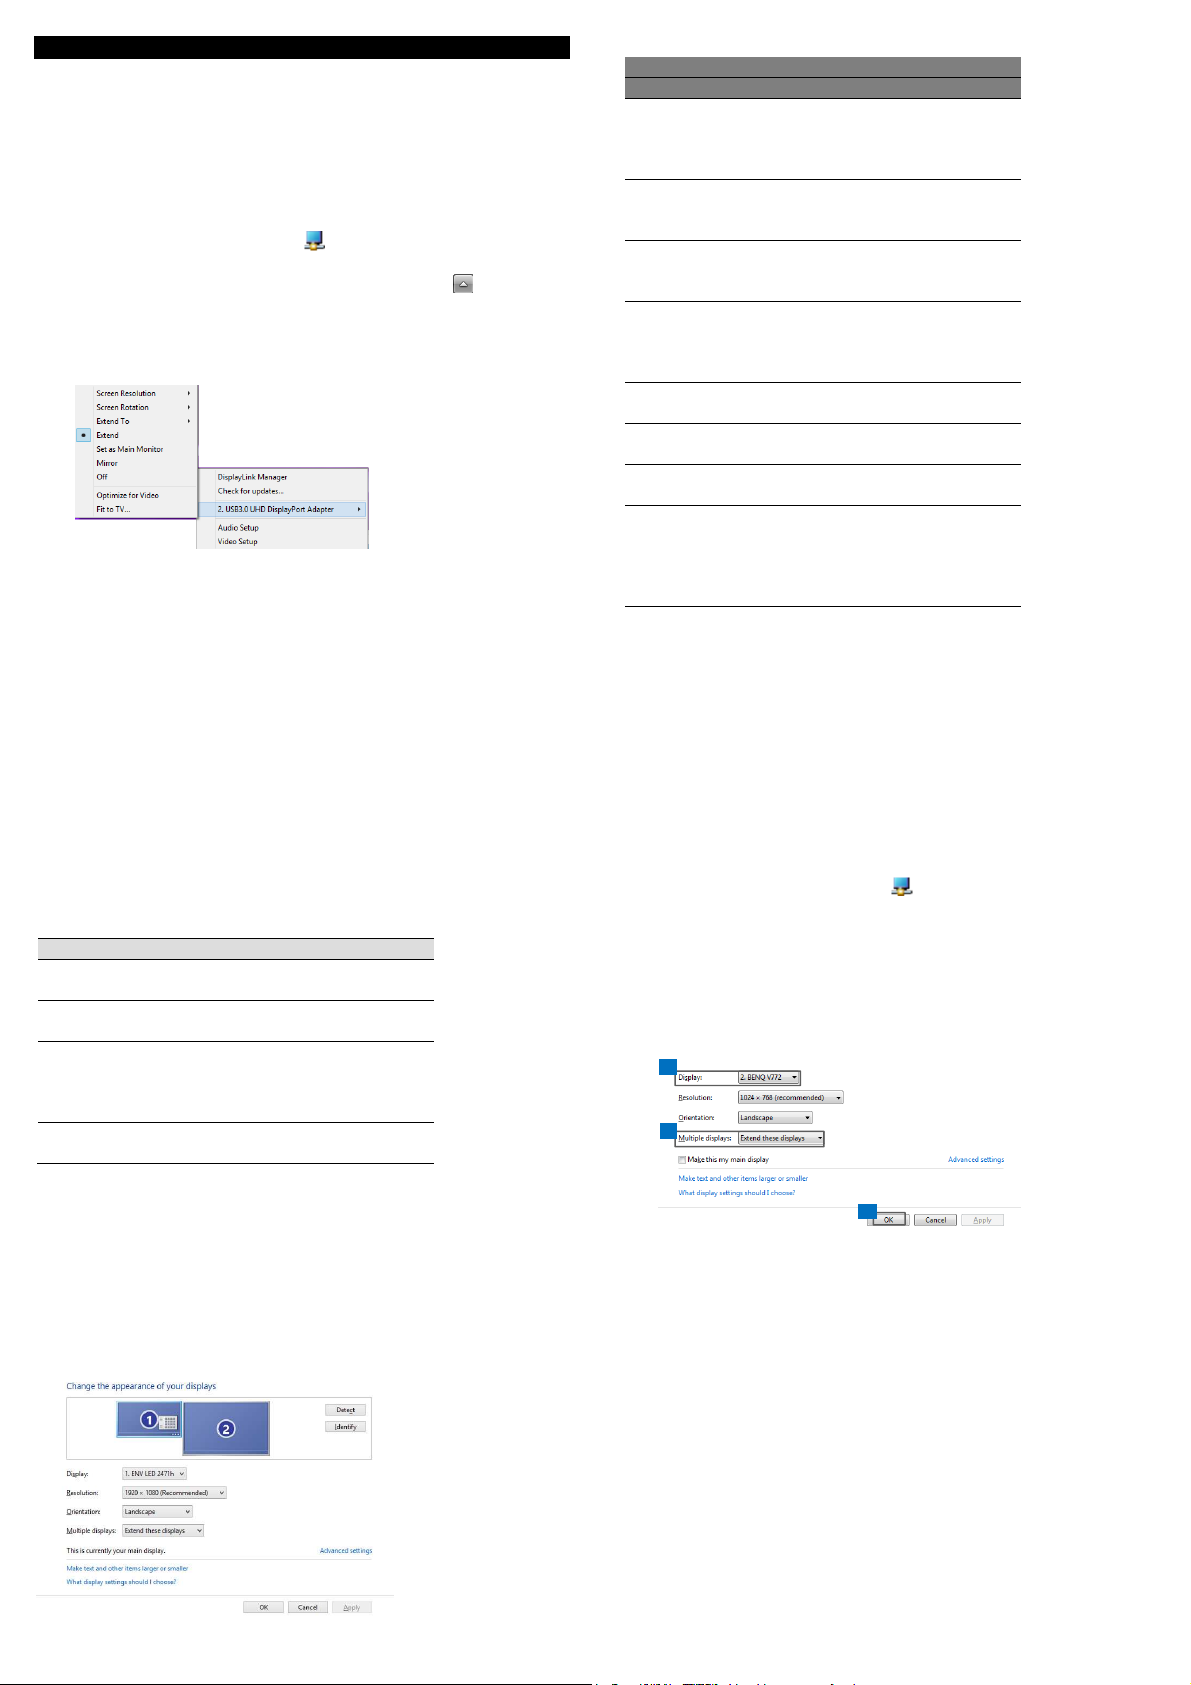
Konfiguration des Displays Deutsch
2
3
4
Die folgenden Screenshots stammen aus dem Windows 7 Betriebssystem.
Sollten Sie ein anderes Betriebssystem verwenden, so sind dennoch die
Definitionen der Tasten, Reiter und Menüs dieselben.
Dienstprogrammeinstellungen:
Hier können Sie Anzeigemodus, Bildschirmrotation, Auflösung und räumliche Anordnung Ihres Monitors einstellen.
1. Klicken Sie auf dieses Icon in der Windows Taskleiste.
Wenn Sie das Icon nicht finden, klicken Sie zur Anzeige aller Icons
auf den kleinen Pfeil rechts unten in der Taskleiste
2.
Wählen Sie die gewünschte Option aus.
Einstellungsmöglichkeiten:
Optionen Beschreibung
Bildschirmauflösung
Wählen Sie eine Auflösung
aus. Im gespiegelten Modus
wird die Auflösung über den
primären Monitor definiert.
Bildschirmrotation Drehen Sie die Bildschirman-
zeige je nach gewünschter
Ausrichtung.
Erweitern Erweitern Sie den Bildschirm
je nach gewünschter Ausrichtung
Erweitern zu Der Cursor kann den Bild-
schirm durch Bewegung nach
links/rechts/oben/unten
erweitern
Einstellen als
Hauptmonitor
Stellen Sie diesen Monitor als
Hauptbildschirm ein
Spiegelung Duplizieren Sie den primären
Monitor diesen
Aus Ausschalten des Monitorsig-
nals
Videoptimierung Verbessern Sie die Vidoquali-
tät beim Abspielen. Bei dieser
Einstellung kann aber der
Text eventuell weniger deut-
lisch erscheinen
Einstellung für den
Fernseher
Passen Sie den Windows
Desktop an den Fernseher an
(funktioniert nur wenn ein
zusätzlicher Monitor ange-
schlossen ist. Diese Funktion
ist nur im erweiterten Modus
verfügbar. Der zusätzliche
Monitor wird in den erweiterten
Modus wechseln, wenn Sie
diese Option im gespiegelten
Modus wählen.
Untermenü
DisplayLink Manager
Suche nach Updates
Aktivieren der Windows
Bildschirmauflösung
Suche nach neuesten Treibern und Download
Audio Setup Aktivieren der Windows
Audioeinstellungen (nur bei
einzelnen Modellen verfügbar)
Video Setup
Aktivieren der
Bildschirmauflösung
Konfiguration mehrerer Monitore:
Ein zusätzlicher DisplayPort Monitor kann durch den Adapter
direkt angeschlossen werden. Der zusätzliche Monitor kann dann als als
gespiegelter, erweiterter oder primärer Monitor konfiguriert werden.
Positionieren Sie die Maus irgendwo auf dem Windows Desktop, klicken
Sie mit der rechten Maustaste und wählen die Bildschirmauflösung aus.
Alternativ klicken Sie auf dieses Icon in der Windows Taskleiste, dann
wählen Sie “Video Setup“ aus.
Erweiterter Modus:
1. Öffnen Sie das Fenster zur Konfiguration mehrerer Monitore.
2. Wählen Sie im Auswahlmenü “Display” den Monitor aus.
3. Wählen Sie unter “mehrere Displays“ „Erweitern“.
4. Klicken Sie auf “ok”.
5. Nun können Sie einfach per “Drag and Drop” die Icons oder die
geöffneten Fenster auf den zusätzlichen Monitor ziehen.Es gibt
aber auch einige Anwendungen, die die Anzeige auf dem erweiterten Monitor nicht unterstützen.
Gespiegelter Modus:
1. Öffnen Sie das Fenster zur Konfiguration mehrerer Monitore
2. Wählen Sie im Auswahlmenü “Display” den Monitor aus.
3. Wählen Sie unter “mehrere Displays“ „Duplizieren/Kopieren“.
Page 6
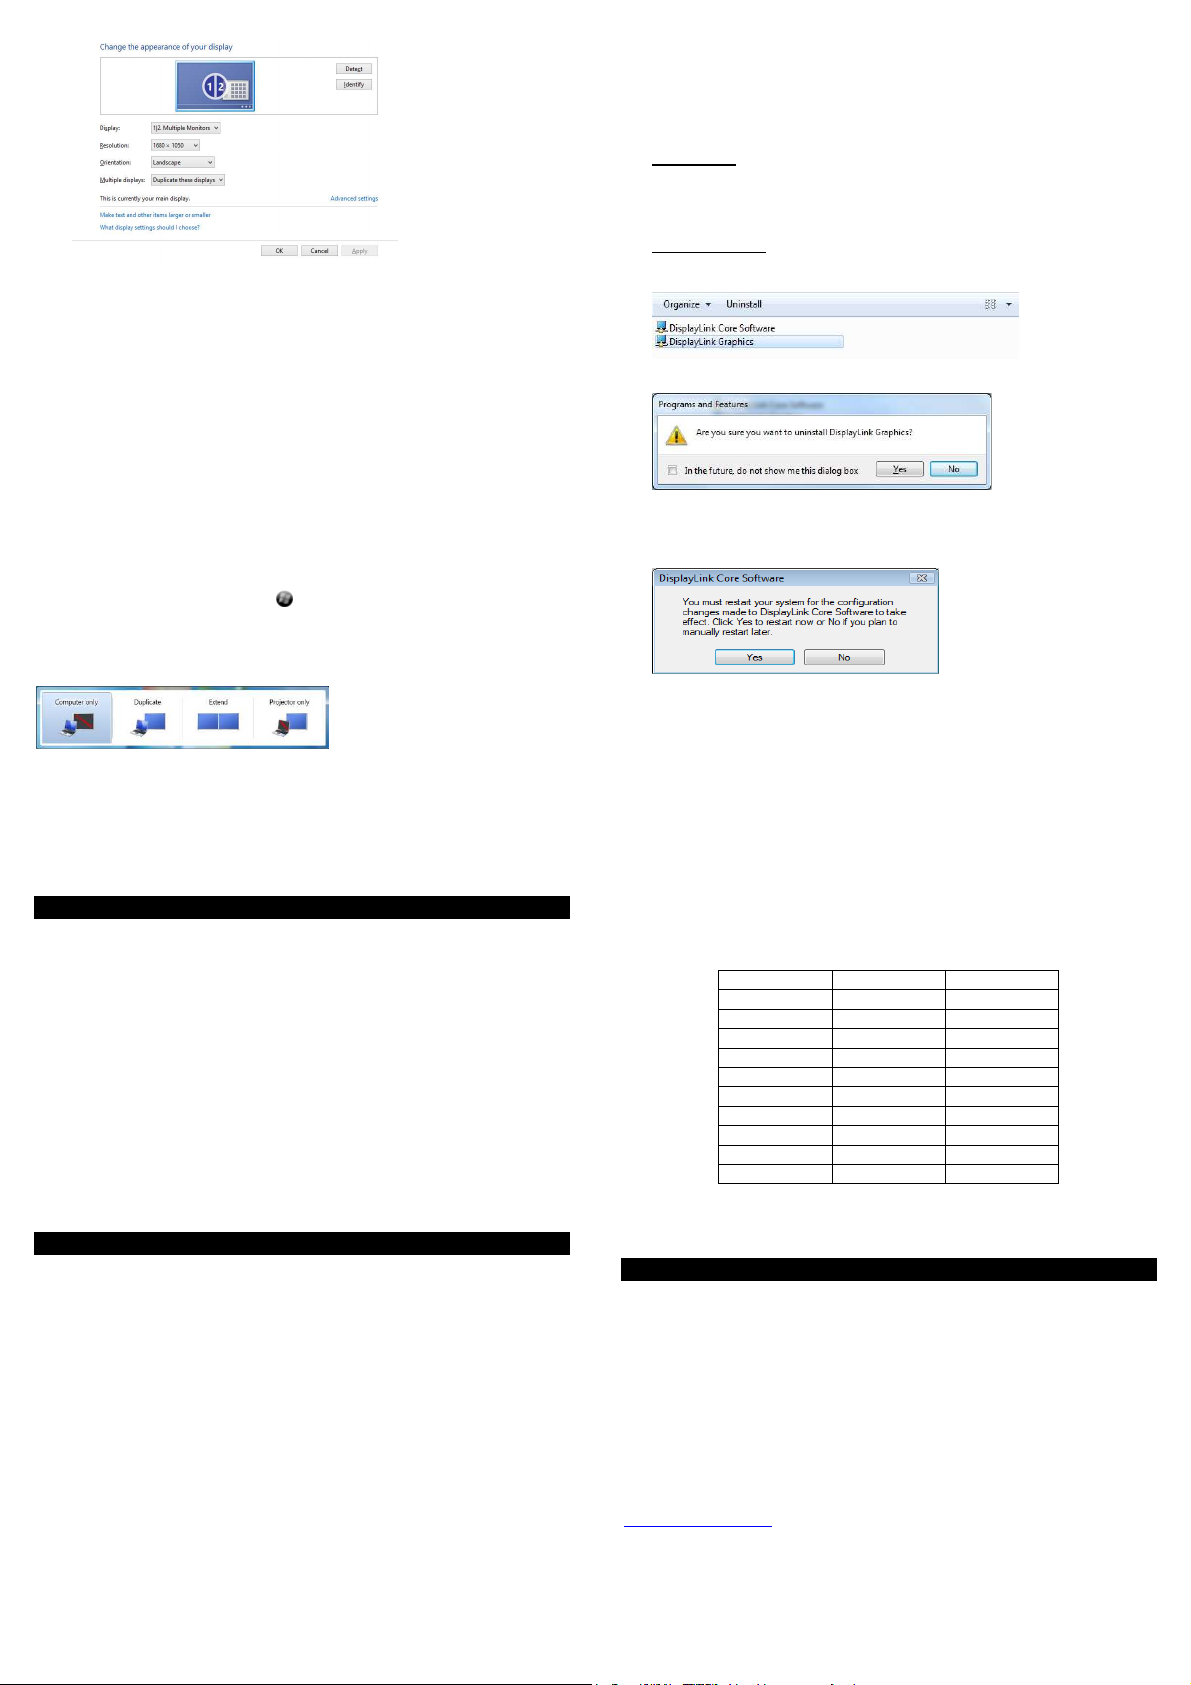
4. Klicken Sie auf “ok”.
Einstellung “primärer Monitor”:
1. Öffnen Sie das Fenster zur Konfiguration mehrerer Monitore
2. Wählen Sie im Auswahlmenü “Display” den Monitor aus.
3. Wählen Sie das Kontrollkästchen “zum primären Monitor machen” aus. Bei einigen Computern kann es sein, dass Sie den
Hauptbildschirm deaktivieren müssen indem Sie das Häkchen
entfernen (neben „Erweitern des Desktop auf diesen Monitor“ oder „ Erweitern meines Windows Desktop auf diesen Monitor“).
4. Klicken Sie auf “ok”.
Windows Verknüpfung:
Betätigen Sie die Windowstaste + P um das Menü unten zu öffnen,
dann wählen Sie die gewünschte Option aus.
Diese Funktion ist verfügbar für
Windows 7 / 8 / 8.1
.
Deinstallation der Treiber:
1. Folgen Sie den Anweisungen unten um den Pfad zum Treiber zu
finden, dann klicken Sie mit der rechten Maustaste auf „DisplayLink
Graphic“ zum Deinstallieren.
Windows 7
Systemsteuerung > Programme > Programme und Funktionen > Deinstallieren
Windows 8
Einstellungen > Systemsteuerung > Programme > Deinstallieren
/
/
/ /
8.1
2. Klicken Sie auf “Ja” zum Bestätigen der Deinstallation.
3. Klicken Sie “ja” zum Neustart des Computers. Sie können nun auch
das Videosignal trennen.
Introduction Français
Merci d’avoir choisi l’Adaptateur USB 3.0 4K DisplayPort LINDY. Cet
adaptateur vous permet de connecter tout écran disposant d’une connectique DisplayPort à votre PC ou notebook. Grâce à l’interface USB
3.0 SuperSpeed et à la technologie DisplayLink, il ne sera pas nécessaire d’ajouter une carte graphique supplémentaire à votre ordinateur !
Cet écran additionnel peut être utilisé en tant que moniteur standard sous
Windows, en mode dupliqué ou bureau étendu. Il peut également être
configuré pour être utilisé comme écran principal.
Il peut être utilisé pour afficher le contenu du bureau Windows standard en
haute résolution ainsi que pour la lecture de vidéo en utilisant Windows
Media Player ou un logiciel approprié qui prend en charge la lecture de
vidéos sur un affichage en bureau étendu.
Caractéristiques Français
• Connectivité USB entre PC/notebook vers un écran d’affichage additionnel via un connecteur DisplayPort
• Prise en charge des modes d’affichage dupliqué, étendu et principal
• USB 3.0 SuperSpeed délivrant performance et haute résolution pour
vidéo et graphisme 3D
• Prise en charge USB vers audio DisplayPort pour le transfert de
l’audio du PC vers l’écran
• Prise en charge des résolutions 4K jusqu’au 3840 x 2160@30Hz
• Affiche le contenu de votre PC (Internet, musique, photo, et vidéo pris
en charge par votre PC) vers un écran DisplayPort
• Ajoutez jusqu’à six écrans par PC (dépendant des spécifications du
PC)
• Alimenté par le bus USB
• Système d’exploitation pris en charge: Windows 7 / 8 / 8.1
• Températures de fonctionnement: 10 ~ 40°C
• Températures de stockage: -20 ~ 70°C
Les modes entrelacés et réduction de blanc ne sont pas pris en charge.
Installation Français
Lors de la connexion de l’adaptateur USB 3.0 4K DisplayPort à votre
ordinateur, Windows installera automatiquement les pilotes DisplayLink via
internet. Si vous utilisez Windows 7 et n’avez pas de connexion internet,
merci d’installer les pilotes du CD inclus dans la livraison.
Les performances du logiciel sont dépendant des capacités de calcul du
processeur ainsi que de l’usage (lecture vidéo ou affichage bureau), des
systèmes ayant plus de capacités fourniront de meilleures performances.
Pour plus d’informations et les derniers pilotes DisplayPort à jour:
www.displaylink.com.
Tableau des résolutions prises en charge
640x480 720x480 768x576
800x600 832x642 800x480
848x480 1024x600 1024x768
1152x864 1152x870 1280x720
1280x768 1280x800 1280x960
1280x1024 1360x768 1366x768
1368x768 1400x1050 1440x900
1600x900 1600x1200 1680x1050
1920x1080 1920x1200 2048x1080
2048x1152 2048x1280 2048x1536
2560x1440 2560x1600 3840x2160
Page 7
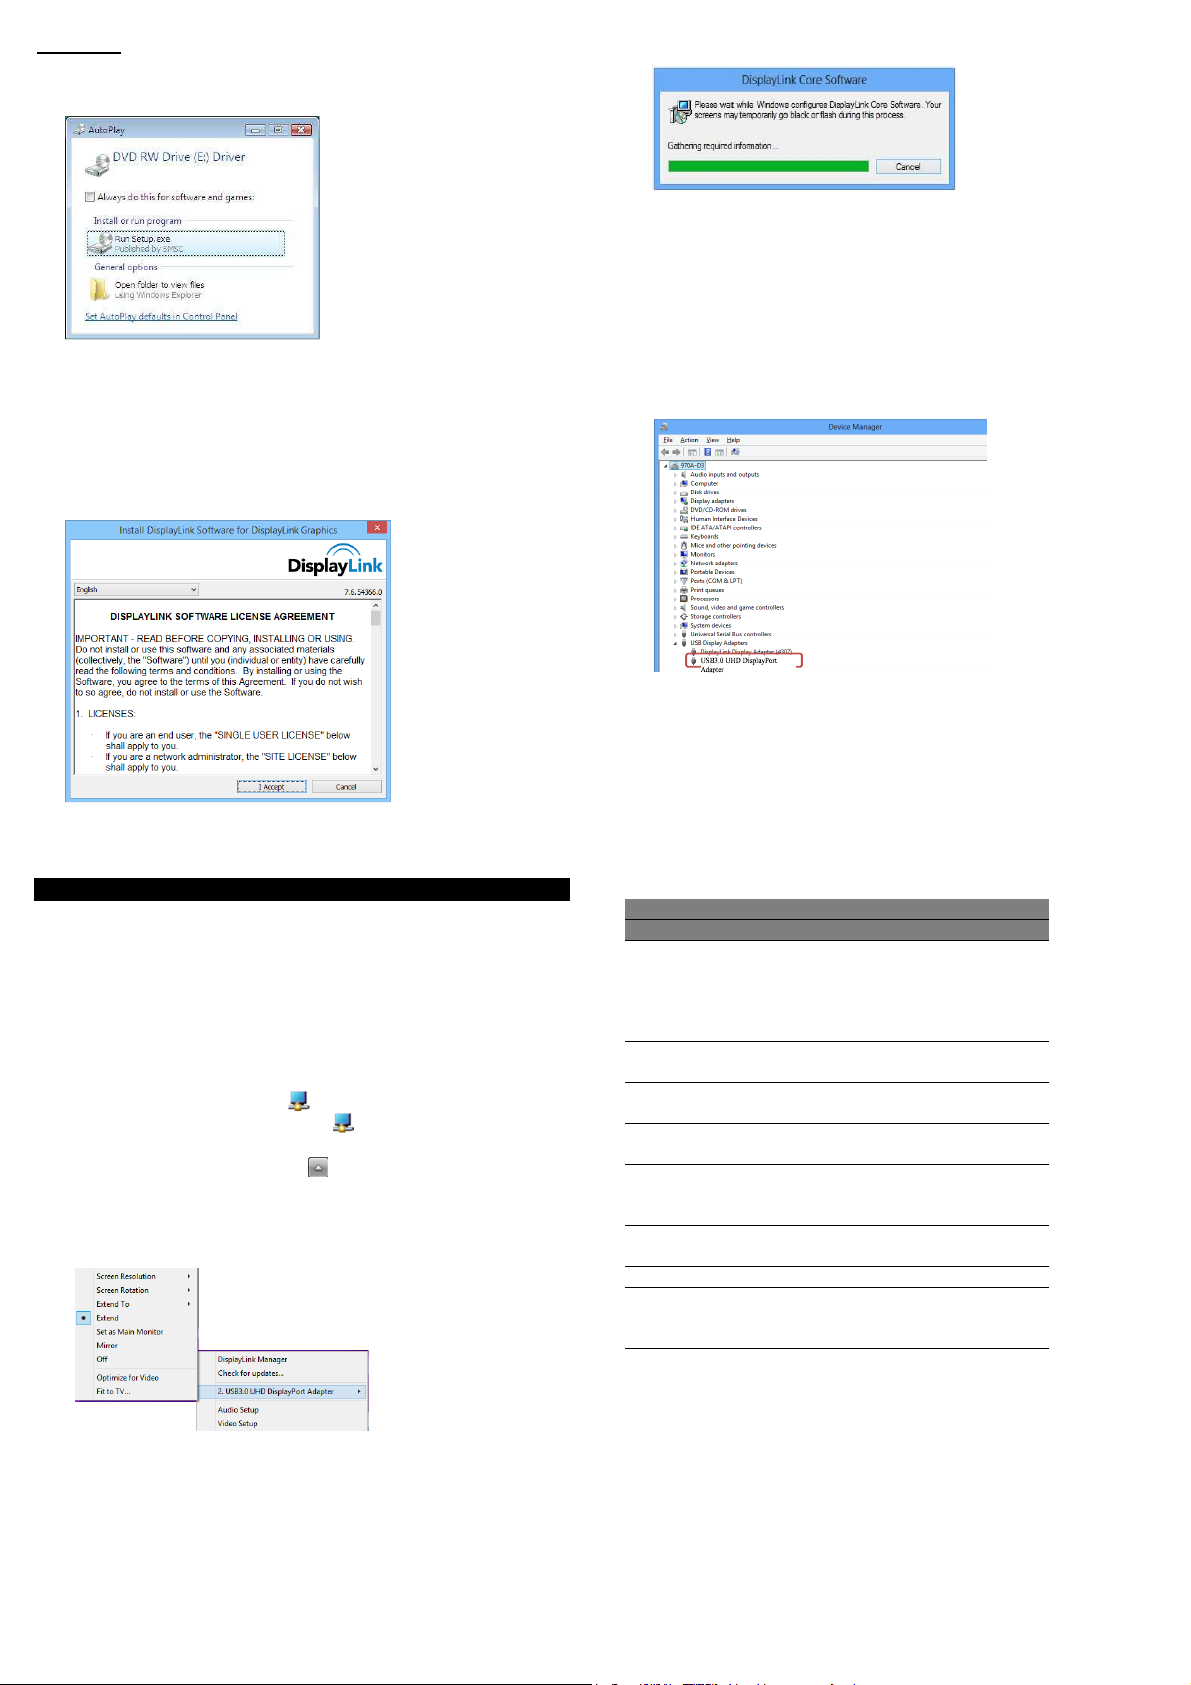
Windows 7
1. Insérez le CD fourni dans le lecteur de disques de votre ordinateur.
2. Cliquez sur
NOTE:
Si
AutoPlay
double-cliquez sur le fichier
pour lancer l’installation.
Entrez le mot de passe administrateur et cliquez ensuite sur
démarrer l’installation si une boîte de dialogue
Utilisateur
3. Cliquez sur
Run Setup.exe
n’apparait pas automatiquement, localisez et
apparait.
J’Accepte
pour démarrer l’installation.
Setup.exe
pour l’étape suivante.
dans le répertoire du disque
Contrôle Compte
Oui
pour
4. Merci de patienter pendant la procédure d’installation.
5. Lorsque le système d’exploitation détecter l’adaptateur, un message
de rappel apparaitra dans la barre d’état système.
Vérification de l’installation:
Pour trouver le pilote de l’adaptateur, suivez le chemin ci-dessous pour
ouvrir le gestionnaire de périphériques :
Panneau de contrôle \ Système et Sécurité \ Système\ Gestionnaire de
périphériques
Vous trouverez
NOTE: Si vous ne trouvez pas le pilote dans la liste, les pilotes pourraient ne pas être installés convenablement. Merci de désinstaller le
logiciel et de déconnecter l’adaptateur, répétez ensuite la procédure
d’installation.
DisplayLink Adapter
listé comme ci-dessous.
Configuration de l’affichage Français
NOTE
: Les captures d’écran suivant sont issues du système d’exploitation
Windows 7. Ces visuels pourraient ne pas être les mêmes que ceux de
votre système d’exploitation, mais les boutons, onglets et menus sont
identiques.
Utilitaire de configuration
L’utilitaire fourni permet de configurer le mode d’affichage, la rotation de
l’écran, la résolution de l’écran et l’agencement de vos moniteurs.
1. Cliquez sur l’icône de l’utilitaire dans la
NOTE:
Windows
trouver l’icône correspondante.
2. Sélectionnez l’option désirée et cliquez dessus à l’aide de la souris.
Barre d’état Windows
si vous ne trouvez pas l’icône dans la
, cliquez sur l’icône flèche pour ouvrir la liste d’icônes et
Barre d’état
.
Description des paramètres:
Options Description
Résolution de
l’écran
Rotation de
l’écran
Etendre Etend l’affichage selon l’orientation
Etendre vers Le curseur peut étendre l’affichage à
Définir comme
Moniteur
Principal
Dupliquer Duplique l’écran principal vers le
Eteindre Eteint le moniteur
Optimise pour la
vidéo
Ajuster au
téléviseur
Cliquez pour sélectionner une résolution disponible. Merci de noter que
cette fonction n’est pas valide en
mode dupliqué, la résolution étant
définie par l’écran principal
Pivote l’écran en fonction de
l’orientation souhaitée
souhaitée
gauche/droite/en haut/en bas
Définir l’écran comme écran principal
moniteur connecté avec l’adaptateur
Optimise la qualité vidéo lors de la
lecture. Le texte peut être moins net
lorsque l’option est active
Ajuste le bureau Windows à l’écran
TV
NOTE:
cette fonction n’est active que
lorsqu’un seul moniteur supplémentaire est ajouté. En outre, cette option
ne fonctionnera qu’en mode étendu.
Le moniteur additionnel basculera en
mode étendu si cette option est sélectionnée lorsqu’il est en mode dupliqué.
Page 8
Sous-Menu
mises à jour
avancée
résolutions d’écran
Windows.
2
3
4
Displaylink
Manager
Vérifier les
Réglage du son Ouvre la fenêtre de configuration son
Configuration
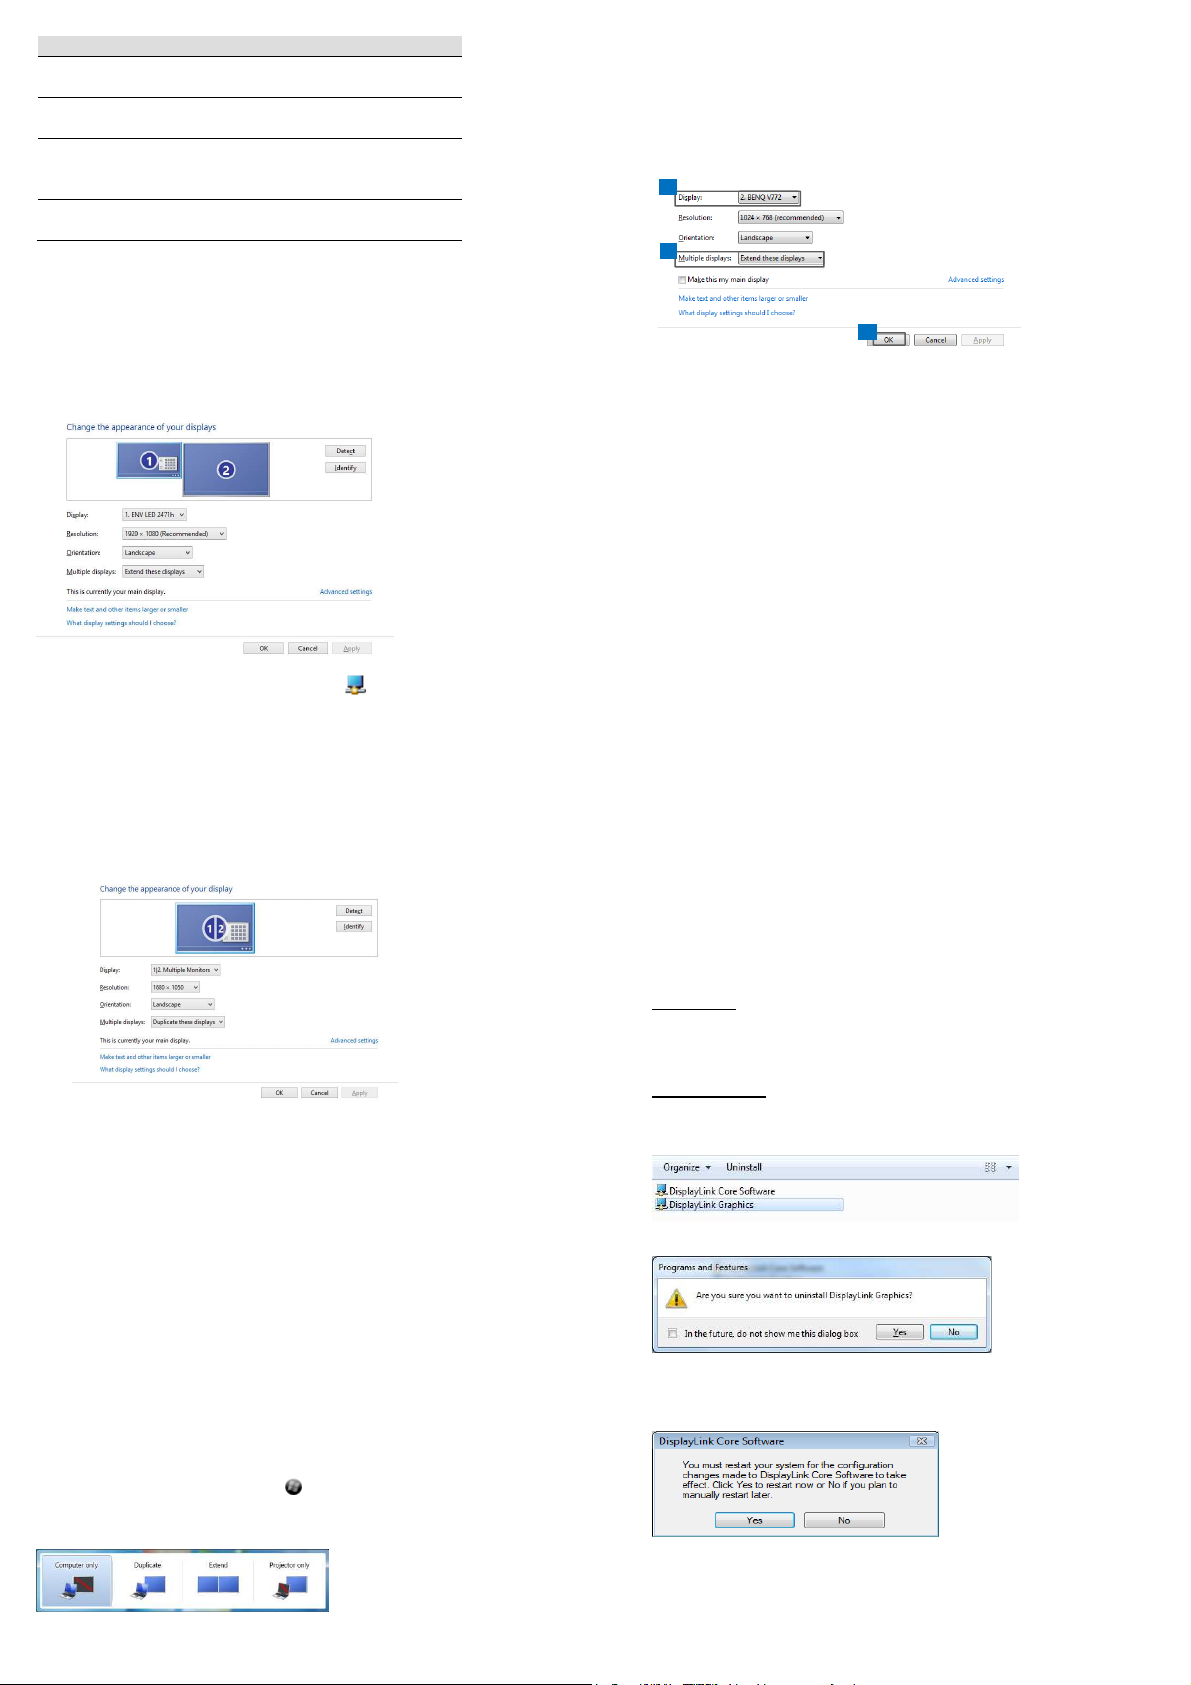
Configuration Multi-écrans:
Un écran DisplayPort supplémentaire peut être relié directement via
l’adaptateur.
Une fois cet écran connecté, il pourra être configuré pour être utilisé soit
en “mode dupliqué”, “mode étendu ” ou en tant qu’écran principal.
Positionnez la souris n’importe où sur le
droite et sélectionnez
Active la page de résolution d’écran
Windows
Vérifie la disponibilité de nouveaux
pilotes et téléchargement
de Windows. Cette fonction ne
fonctionne que sur certains modèles.
Ouvre la fenêtre de configuration des
Bureau Windows
Résolution d’écran
.
, cliquez à
Mode étendu:
1. Reportez-vous à la section
teindre la fenêtre de configuration.
2. Dans le menu déroulant
3. Sélectionnez
4. Cliquez sur OK pour confirmer et sortir.
5. Une fois la configuration terminée, glissez/déposez simplement les
icônes de vos programmes ou la fenêtre active vers l’écran
additionnel. Cependant, certains programmes peuvent ne pas prendre en charge l’affichage en mode bureau étendu.
Mode dupliqué:
1. Reportez-vous à la section
teindre la fenêtre de configuration.
2. Dans le menu déroulant
3. Sélectionnez
Affichages multiples > Etendre ces affichages
Affichages multiples
Configuration Multi-écrans
Affichage
Affichage
, sélectionnez le moniteur voulu.
Configuration Multi-écrans
, sélectionnez le moniteur voulu.
>
Dupliquer ces affichages.
pour at-
.
pour at-
Vous pouvez également, cliquer sur l’icône dans
système Windows
4. Cliquez sur OK pour confirmer et sortir.
Régler l’écran principal:
1. Reportez-vous à la section
teindre la fenêtre de configuration.
2. Dans le menu déroulant
3. Cochez la case
Note: pour certains ordinateurs, vous devrez peut-être désactiver
l’affichage principal en décochant la case
cet affichage
affichage
4. Cliquez sur OK pour confirmer et sortir.
Raccourci Windows:
Appuyez sur les touches Windows + P pour atteindre le menu cidessous, et sélectionnez ensuite l’option désirée.
Cette fonction est disponible sous
, et sélectionnez ensuite
Configuration Multi-écrans
Affichage
Faire de cet affichage votre affichage principal
ou
Etendre mon bureau Windows à cet
.
, sélectionnez le moniteur voulu.
Windows 7 / 8 / 8.1
la barre
Configuration avancée.
pour at-
Etendre le bureau à
.
Désinstallation du pilote:
1. Suivez les instructions pour trouver le chemin du pilote, puis faites un
clic-droit sur
Windows 7
Panneau de configuration > Programmes > Programmes et fonctionnalités > Désinstaller ou modifier un programme
Windows 8
Paramètres > Panneau de configuration > Programmes > Désinstaller
un programme
DisplayLink Graphics
/
/
8.1
/ /
pour désinstaller le pilote.
2. Cliquez sur
.
Oui
pour confirmer la désinstallation.
3. Cliquez sur
présent déconnecter la connexion vidéo.
Oui
pour redémarrer votre ordinateur. Vous pouvez à
Page 9
Introduzione I t a l i a n o
Grazie per aver scelto l’adattatore LINDY USB 3.0 DisplayPort. Questo
prodotto consente di collegare un monitor DisplayPort ad un PC o
notebook. Grazie all’interfaccia USB 3.0 SuperSpeed ed alla
tecnologia DisplayLink non è necessario utilizzare schede grafiche
aggiuntive al computer.
Il monitor collegato può essere utilizzato come monitor addizionale
standard di Windows in modalità mirror o estensione del desktop. Può
anche essere impostato come monitor principale.
Supporta risoluzioni standard di Windows anche per riproduzioni Audio
Video ad alte risoluzioni con Windows Media Player o altri software con le
funzioni Video playback o estensione desktop.
Caratteristiche Ital i a n o
• Connessione via USB a PC/notebook di un monitor addizionale via
DisplayPort
• Supporta le modalità mirror, extended e primary display
• SuperSpeed USB 3.0 offre prestazioni migliori per prestazioni e risolu-
zioni video/grafica 3D
• Dotato di un dispositivo che invia i segnali audio dal Pc al monitor
• Supporta risoluzioni 4K fino a 3840 x 2160@30Hz
• Visualizza il segnale del PC (Internet, musica, foto, video e quanto
supportato dal PC) su un Monitor DisplayPort
• E’ possibile collegare fino a sei monitor per PC (a seconda delle
specifiche del computer)
• Alimentazione: Bus powered
• Sistemi operativi supportati: Windows 7 / 8 / 8.1
• Temperatura di funzionamento: 10 ~ 40°C
• Temperatura di stoccaggio: -20 ~ 70°C
Modalità interlacciate o con adattamento dell'immagine non supportate.
Installazione Italiano
Quando viene collegato l'adattatore USB 3.0 4K DisplayPort al computer,
Windows installerà automaticamente i driver tramite internet. Se si utilizza
Windows 7 e non si ha a disposizione una connessione internet, è necessario installare il driver utilizzando il CD in dotazione.
Le prestazioni del software dipendono dalla potenza di elaborazione
disponibile, i sistemi più potenti forniranno prestazioni migliori.
Utenti Windows possono trovare ulteriori informazioni, manuale
DisplayLink e driver software sul sito www.displaylink.com
Tabella risoluzioni supportate
640x480 720x480 768x576
800x600 832x642 800x480
848x480 1024x600 1024x768
1152x864 1152x870 1280x720
1280x768 1280x800 1280x960
1280x1024 1360x768 1366x768
1368x768 1400x1050 1440x900
1600x900 1600x1200 1680x1050
1920x1080 1920x1200 2048x1080
2048x1152 2048x1280 2048x1536
2560x1440 2560x1600 3840x2160
Windows 7
1. Inserire il CD fornito nella confezione.
2. Fare click su
NOTA:
Se l'
file
Setup.exe
Inserire la password dell'amministratore e fare click su
l'installazione se viene visualizzata la finestra di dialogo
Control
3. Fare click su
AutoPlay
.
Run Setup.exe
non compare automaticamente, fare doppio click sul
nella cartella dei driver.
Accetto
per avviare l'installazione.
per procedere.
Yes
per avviare
User Account
4. Attendere la conclusione della procedura di installazione.
5. Quando il sistema operativo rileva l'adattatore, verrà visualizzato il
messaggio di avviso sulla barra delle applicazioni.
Verifica dell'installazione:
Per verificare il driver, seguire le istruzioni seguenti
1. Seguire il percorso per aprire la gestione delle periferiche Pannello di
controllo \ Sistema e sicurezza \ Sistema \ Gestione dispositivi
2. Sarà visibile il dispositivo
seguito.
DisplayLink Adapter
come indicato di
Page 10
aggiornamenti
V
ideo
monitor di Windows
2
3
4
NOTA:
Se il driver non è visibile nella lista, potrebbe esserci stato un errore
nell'installazione. Si prega di eliminare l'elemento, scollegare l'adattatore e ripetere la procedura di installazione.
Impostazioni Italiano
NOTA
: Le seguenti immagini fanno riferimento al sistema operativo
Windows 7.
Impostazioni Utility
L'utility in dotazione permette di configurare la modalità di visualizzazione,
la rotazione, la risoluzione e la disposizione fisica del monitor.
1. Fare click sull'icona della
NOTA:
dows
2. Selezionare l'opzione preferita e fare click con il mouse.
Barra di sistema di Windows
Se non si trova l'icona della
., fare click sull'icona della freccia per visualizzarla.
Barra di sistema di Win-
.
Descrizione delle impostazioni:
Opzioni Descrizione
Risoluzione del
monitor
Rotazione del
monitor
Estensione Permette di estendere il monitor
Estensione a Il cursore può estendersi sulla
Imposta come
monitor principale
Mirror Consente di duplicare sul monitor
Off Spegne il monitor
Ottimizzazione
video
Adatta alla TV Regola le dimensioni del desktop
Fare click per selezionare una
risoluzione disponibili. Questa
funzione non è valida in modalità
mirror poiché viene impostata
automaticamente dal monitor
principale.
Permette di ruotare il monitor in
base all'orientamento desiderato.
secondo il proprio desiderio
schermata desiderata tramite
destra/sinistra/sopra/sotto.
Imposta il monitor come principale
principale il contenuto del display
collegato.
Ottimizza la qualità video durante
la riproduzione.
di Windows sul televisore
NOTA:
Questa funzione è disponibile solo quando viene collegato un monitor aggiuntivo. Questa
opzione è attivabile solo in modalità estesa.
Estendere i
sottomenu
Gestione
Displaylink
Controlla
Impostazioni
Audio
Impostazioni
Configurazione multi-monitor:
E' possibile collegare un monitor DisplayPort aggiuntivo tramite l'adattatore
Una volta collegato il monitor supplementare, può essere utilizzato in
modalità mirror, estesa oppure impostato come principale.
Posizionare il mouse in qualsiasi punto del
Fare click con il tasto destro del mouse e selezionare
schermo
.
Abilita la pagina di risoluzione
dello schermo di Windows
Controlla, aggiorna e scarica i
driver più recenti.
Abilita la pagina di configurazione
audio di Windows. Questa funzione è disponibile solo nei
modelli specifici.
Abilita la pagina di risoluzione del
Desktop Windows
Risoluzione dello
Modalità estesa:
1. Fare riferimento alla sezione
visualizzare la finestra di configurazione
2. Nel menu a discesa
3. Selezionare
4. Fare OK per confermare ed uscire.
Una volta completata la configurazione, è sufficiente trascinare e rilasciare
le icone delle applicazioni o le finestre aperte per l'add-on monitor. Tuttavia, alcune applicazioni potrebbero non supportare la visualizzare sul
desktop esteso.
Modalità mirror:
1. Fare riferimento alla sezione
visualizzare la finestra di configurazione.
2. Nel menu a discesa
3. Selezionare
Display
Più schermi > Estendi questi schermi
Display
Più schermi > Duplica questi schermi
Configurazione multi-monitor
, selezionare lo schermo preferito.
Configurazione multi-monitor
, selezionare il monitor preferito.
per
.
per
.
In alternativa fare click sull'icona della
e poi selezionare
Impostazioni video.
Barra di sistema di Windows
.,
Page 11
4. Fare OK per confermare ed uscire.
Impostare il monitor principale:
1. Fare riferimento alla sezione
Configurazione multi-monitor
per
visualizzare la finestra di configurazione.
2. Nel menu a discesa
3. Selezionare la casella
Display
, selezionare il monitor preferito
Imposta come monitor principale
.
Note: Su alcuni computer potrebbe essere necessario disattivare il display principale deselezionando la casella
sto monitor.
Estendi desktop su que-
4. Fare OK per confermare ed uscire.
Finestre di scelta rapida:
Premere il tasto Windows + P per visualizzare il menu seguente.
Questa funzione è disponibile su
Windows 7 / 8 / 8.1
.
Disinstallare il driver:
1. Seguire le istruzioni per trovare il percorso del driver, quindi fare click
con il tasto destro del mouse su
DisplayLink Graphics
per procede-
re con la disinstallazione
Windows 7
Pannello di controllo > Programmi > Programmi e funzionalità > Disinstalla o modifica programma
Windows 8
/
/
/ /
8.1
impostazioni > Pannello di controllo > Programmi > Disinstalla un programma
2. Fare click su
Yes
per confermare la disinstallazione.
3. Fare click su
collegamento video.
Yes
per riavviare il computer. E' possibile interrompere il
Certifications
CE Certification
This equipment complies with the requirements relating to Electromagnetic Compatibility Standards EN55022/EN55024 and the further standards cited therein. It must be
used with shielded cables only.
It has been manufactured under the scope of RoHS compliance.
CE Konformitätserklärung
Dieses Produkt entspricht den einschlägigen EMV Richtlinien der EU für ITEquipment und darf nur zusammen mit abgeschirmten Kabeln verwendet werden.
Diese Geräte wurden unter Berücksichtigung der RoHS Vorgaben hergestellt.
Die formelle Konformitätserklärung können wir Ihnen auf Anforderung zur Verfügung
stellen
FCC Certification
This equipment has been tested and found to comply with the limits for a Class B
digital device, pursuant to part 15 of the FCC Rules. These limits are designed to
provide reasonable protection against harmful interference in a residential installation.
You are cautioned that changes or modification not expressly approved by the party
responsible for compliance could void your authority to operate the equipment.
This device complies with part 15 of the FCC Rules.
Operation is subject to the following two conditions:
1. This device may not cause harmful interference, and
2. This device must accept any interference received, including interference that
may cause undesired operation.
LINDY Herstellergarantie – Hinweis für Kunden in Deutschland
LINDY gewährt für dieses Produkt über die gesetzliche Regelung in Deutschland
hinaus eine zweijährige Herstellergarantie ab Kaufdatum. Die detaillierten Bedingungen dieser Garantie finden Sie auf der LINDY Website aufgelistet bei den AGBs.
LINDY-Elektronik GmbH Sadler Forster Way
Markircher Str. 20 Teesside Industrial Estate, Thornaby
68229 Mannheim Stockton-on-Tees, TS17 9JY
Germany United Kingdom
Email: [email protected] [email protected]
T: +49 (0)621 470050 T: +44 (0) 1642 754000
Hersteller / Manufacturers (EU):
LINDY Electronics Ltd.
Recycling Information
WEEE (Waste of Electrical and Electronic Equipment),
Recycling of Electronic Products
In 2006 the European Union introduced regulations (WEEE) for the collection and recycling of all
waste electrical and electronic equipment. The Wheelie bin symbol shown indicates that this
product must not be disposed of with household waste. Instead the product must be recycled in a
manner that is environmentally friendly. For more information on how to dispose of this product,
please contact your local recycling centre or your household waste disposal service. Each individual
EU member state has implemented the WEEE regulations into national law in slightly different
ways. Please follow your national law when you want to dispose of any electrical or electronic
products.
Germany / Deutschland
Die Europäische Union hat mit der WEEE Direktive umfassende Regelungen für die Verschrottung
und das Recycling von Elektro- und Elektronikprodukten geschaffen. Das ElektroG – Elektro- und
Elektronikgerätegesetz verbietet das Entsorgen von entsprechenden, auch alten, Elektro- und
Elektronikgeräten über die Hausmülltonne! Diese Geräte müssen den lokalen Sammelsystemen
bzw. örtlichen Sammelstellen zugeführt werden! Dort werden sie kostenlos entgegen genommen.
Die Kosten für den weiteren Recyclingprozess übernehmen die Gerätehersteller.
France
En 2006, l'union Européenne a introduit la nouvelle réglementation (DEEE) pour le recyclage de
tout équipement électrique et électronique.
Chaque Etat membre de l' Union Européenne a mis en application la nouvelle réglementation
DEEE de manières légèrement différentes. Veuillez suivre le décret d'application correspondant à
l'élimination des déchets électriques ou électroniques de votre pays.
Italy
Nel 2006 l'unione europea ha introdotto regolamentazioni (WEEE) per la raccolta e il riciclo di
apparecchi elettrici ed elettronici. Non è più consentito semplicemente gettare queste apparecchiature, devono essere riciclate. Ogni stato membro dell' EU ha tramutato le direttive WEEE in leggi
statali in varie misure. Fare riferimento alle leggi del proprio Stato quando si dispone di un apparecchio elettrico o elettronico.
Per ulteriori dettagli fare riferimento alla direttiva WEEE sul riciclaggio del proprio Stato.
For Home and Office Use
Tested to Comply with
FCC Standards
LINDY No. 43174
www.lindy.com
 Loading...