


USER MANUAL
INSTRUKCJA OBSŁUGI

CAUTION:
hazardous radiation exposure.
alert the user to the presence of uninsulated "dangerous voltage" within the product's
persons.
The exclamation point within a triangle presence of important operating and
maintenance(servicing)instruction in the literature accompanying the product.
CAUTION
RISK OF ELECTRIC
SHOCK. DO NOT OPEN.
Apparatus shall not be exposed to dripping or splashing and no objects filled with
liquids, such as vases, shall be placed on the apparatus.
WARNING: TO REDUCE RISK OF FIRE OR ELECTRIC SHOCK. DO NOT EXPOSE
THIS APPLIANCE TO RAIN OR MOISTURE
CAUTION: TO REDUCE THE RISK OF
ELECTRIC SHOCK, DO NOT REMOVE
COVER (OR BACK). NO USER
SERVICEABLE PARTS INSIDE. REFER
SERVICING TO QUALIFIED SERVICE
PERSONNEL.
.
This equipment is a Class II or double insulated electrical appliance. It has been designed in such a
way that it does not require a safety connection to electrical earth.
– minimum distances around the apparatus for sufficient ventilation;
– the ventilation should not be impeded by covering the ventilation openings with items,
such as newspapers, table-cloths, curtains, etc.;
– no naked flame sources, such as lighted candles, should be placed on the apparatus;
– attention should be drawn to the environmental aspects of batter y disposal;
Dear Customer,
Hereby, LIN declares that this device is in
compliance with Directive 2014/53/EU. T he full text
of the EU declaration of conformity is available at the
following internet address: www.lin.com.pl/
2
3

Table of Contents
Chapter 1: Introduction
Precauti ons .............. ............... ............... .................. ............... ................ .................. ............... ......5
Product ........................................................................................................................................5
Power and Plug ...........................................................................................................................5
Power Cord and Signal Cable .....................................................................................................5
Use Environment .........................................................................................................................5
Cleaning.......................................................................................................................................5
Hanging the TV Set on the Wall ..................................................................................................5
Important Information...................................................................................................................5
Buttons on the TV ..........................................................................................................................6
Sockets .. ........ ....... ........ ........ ....... ........ ....... ........ ........... ....... ........ ........ ....... ........ ....... ........ ....... .....7
Remote C ontrol Functions ...........................................................................................................8
Chapter 2: Connections and Setup
Switching on ..................................................................................................................................10
Switching off ..................................................................................................................................10
Initial Setup ....................................................................................................................................11
Chapter 3: Using your TV
Performing an automatic channel search ...................................................................................12
Accessing channels .......... ....................... .....................................................................................12
Watching connected devices .......................................................................................................12
Volume .............. ....... ........ ....... ........ ....... ........ ....... ......... ........ ........... ........ ....... ........ ....... ........ ....... .12
Using TV menus ............................................................................................................................12
Selecting menu language .............................................................................................................13
Instant power on ...........................................................................................................................13
Setting up your favourite channels ............................................................................................13
Energy saving ...............................................................................................................................13
SPDIF type .....................................................................................................................................13
Timer ...... ............... ............ ........... ........... ........... ............... ........... ............... ............ ........... ........... ..13
Input settings .................................................................................................................................14
Software update ..................... ................... ................... ............... ................... ................... .............14
Location ..........................................................................................................................................14
T-Link .......... ................... ............... ............... ................. ............... ................... ............... ............... ..14
Reset shop .....................................................................................................................................14
LED Indicator .................................................................................................................................14
Multimedia......................................................................................................................................15
........ ................... ............... ............... ............... ............... ............... ................... ............... ..... 15
Picture
Video ................................................................................................................................................15
Music ...............................................................................................................................................15
Using EPG (Electronic Programme Guide) .................................................................................15
Network connection ......................................................................................................................16
Access Smart TV portal ................................................................................................................17
Share & See....................................................................................................................................18
Wireless Display ............................................................................................................................18
.......... ....... ............ ....... ........ ....... ........ ....... ........ ....... ........ ......16
Chapter 4: Other Information
Problems & Solutions ..................................................................................................................19
Troubleshooting ............................................................................................................................20
Base Installation ............................................................................................................................20
4

Chapter 1 Introduction
Precautions
Product
Cleaning
Power and Plug
-
-
-
-
Power Cord and Signal Cable
Use Environment
Hanging the TV Set on the Wall
Warning: This operation requires two people.
Important Information
5
Introduction
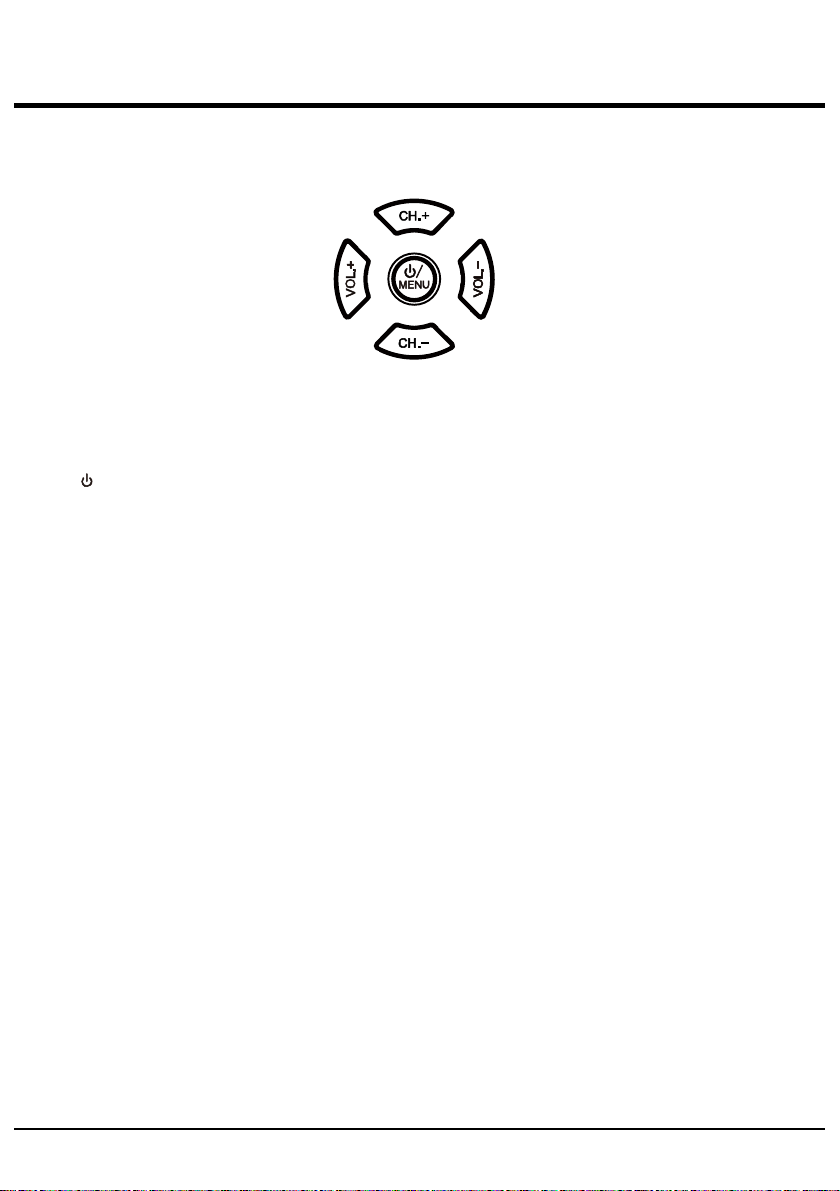
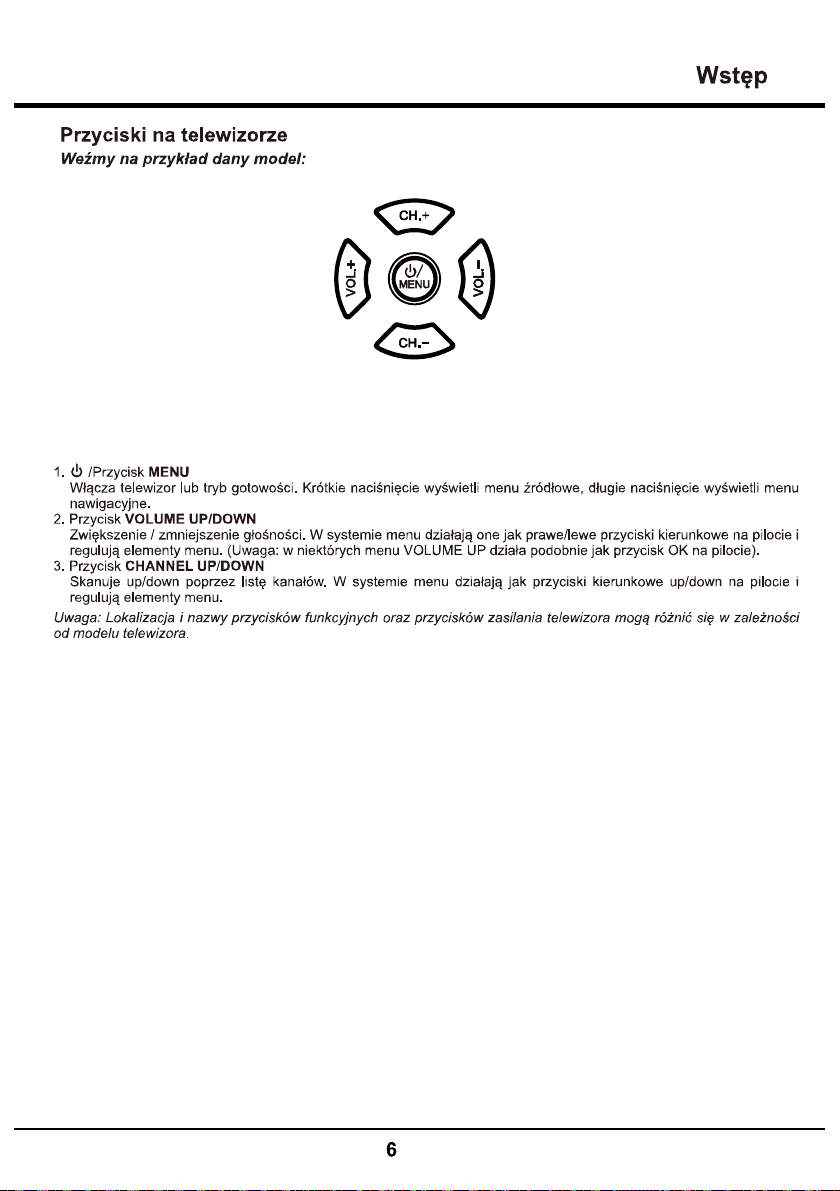
Buttons on the TV
Take a certain model for an example:
/ MENU button1.
Turns the TV on or standby.short press will display the source menu,long press will display the navigation menu.
2
. VOLUME UP/DOWN button
Increases/decreases the volume. In the menu system, they act like the right/left direction buttons on the
remote and adjust menu controls. (Note: In some menus, VOLUME UP also acts like the OK button on the remote.)
3. CHANNEL UP/DOWN button
Scans up/down through the channel list. In the menu system, they act like the up/down direction buttons on the
remote and adjust menu controls.
Note: The location and names of the function buttons and power button on the TV may va ry according to TV model.
6

Introduction
Sockets
Note: The location and names of the sockets on the TV may vary according to TV model,
and not all sockets available on all models.
LAN
LAN
This socket can be used to connect to external modem or network access
equipment.
SPDIF
HDMI 1
or HDMI 2
USB 2.0
MINI AV IN
A
UDIO OUT adapter
SPDIF socket (output)
This socket can be used to connect a compatible digital audio receiver.
HDMI 1/HDMI 2 socket (input)
a device, such as a Blu-ray player, with a HDMI output for best picture
quality. It also provides an uncompressed digital connection that carries
both video and audio data by way of an integrated mini-plug cable.
USB 2.0 socket (input)
This socket can be used to connect a USB device.
(Note: Please don't turn on the unit when USB 3.0 drive is inserted,
as it might cause compatibility problems. )
MINI AV IN socket (input)
AUDIO OUT adapter(output) socket
This AUDIO OUT adapter socket can be used to connect the attached
AUDIO adapter cable with AUDIO L & R OUT socket. The AUDIO OUT
socket can be used to connect you TV to a compatible audio receiver.
NOTE:AUDIO OUT only output the sound of ATV and DTV.
CI
EARPHONE
CI socket
This CI socket can be used to put the CI card in to accept the Scrambled Programs.
Earphone Out socket (output)
Allow you to connect earphones to listen to the sound coming from the TV
Note: Excessive sound pressure from earphones can cause hearing loss.
7

Introduction
Remote Control Functions
Most of your television's functions are available via the menus that appear on the screen. The remote
general settings.
Notes:
- Figures and illustrations in this operation ma nual are provided for reference only and may differ from actual product
appearance.
- The remote control(s) supplied with your set may differ depending on the model. Refer to corresponding remote
control functions below according to your actual remote control(s).
(POWER button) Turns the TV on or standby.
SUBTITLE Press to display the Subtitle Language menu.
SOURCE Brings up the SOURCE menu.
0-9 (Numeric buttons) Enters channel numbers.
Goes to the YouTube homepage.
VOL +/- (VOLUME UP/DOWN) Increases or decreases the TV's volume.
(MUTE button) Turns the volume off or on.
(HOME button) Goes to the smart TV homepage.
CH +/- (CHAN NEL UP/DOWN) Scans up or down through the current
channel list.
To display program information, if available.
ECO To select desired power saving mode.
POWER
1 2 3
7 8 9
SUBTITLE
0
VOL
SOURCE
USB
654
CH
ECO
(SETTING button) Brings up the main menu or press to return to
the previous menu.
Zoom -/+ Press to select the desired screen format.
Note: This function is not available in USB mode.
(Up, down, left and right direction buttons) Highlights different
items in the menu system and adjusts the menu controls.
OK
settings.
(BACK button) In menu mode, goes back to the previous menu
or interface.
EXIT Exits the menu system.
USB
To display the option menu.
8
OK
R G Y B
ZOOM Z OOM+
SLEEP CH LIST
PRE-CH
TEXT GUIDE
EXIT

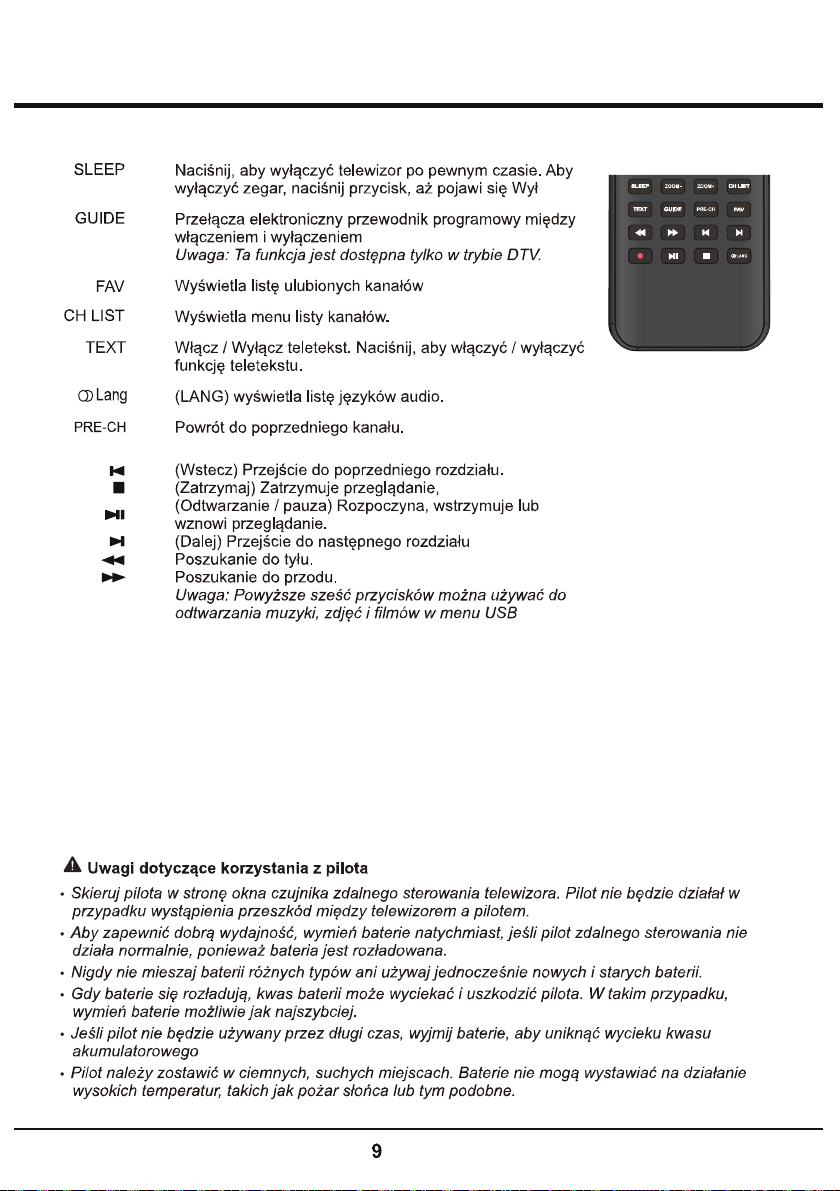
Press to s et t he T V to turn off afte r a given amo un t of
time. To cancel the sleep timer, press until Off appears
SLEEP CH LIST
ZOOM ZOOM+
TEXT GUIDE
PRE-CH
TEXT
PRE-CH
Turn On/Off Teletext. Press to turn on/off the teletext function.
(LANG)display audio language list.
To return to the previous channel.

Chapter2 Connections and Setup
Switching on
Follow the instructions on this page on how to switch on your TV
set and the remote control before going on to following pages
describing how to use the channel set-up procedure.
1. Insert two AAA batteries in the remote control.
Precautions on using batteries:
-
- Make sure you use the correct polarity.
- Do not mix new and used batteries.
- Do not use rechargeable batteries.
- Do not expose batteries to excessive heat such as sunshine,
open them, as this could cause them to leak or explode.
- Remove the batteries from the remote control if you are not
using it for a long period of time.
2. Connect the power cable FIRST to the television, THEN to a
mains socket.
(Note: If the power cable is connected to the television, please
only connect the power cable to the mains socket.)
Your TV set should only be connected to an AC supply. It must
not be connected to a DC supply. If the plug is detached from
the cable, do not, under any circumstances, connect it to a
mains socket, as there is a risk of electric shock.
the power socket of the television might differ depend on the
model.
try to
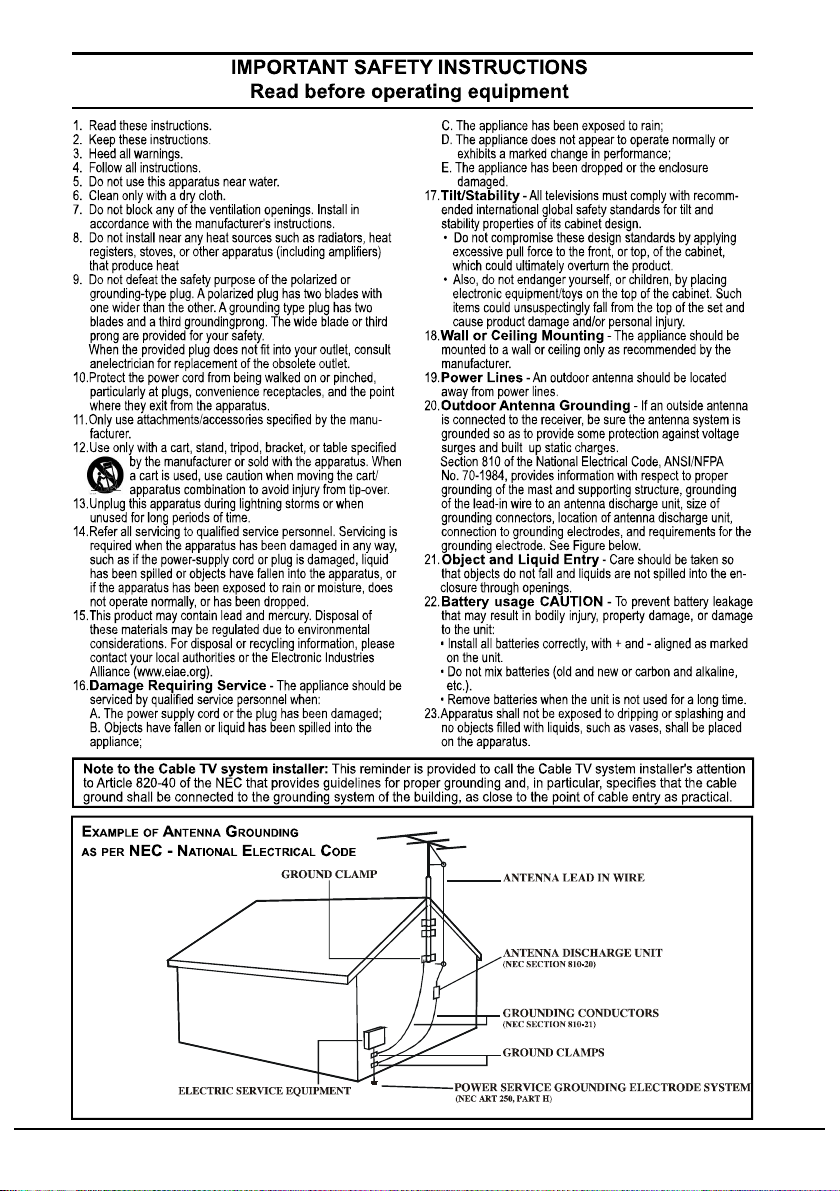
3. Connect an outside aerial to the ANTENNA/CABLE/SATELLITE
IN socket at the back of the TV set.
The aerial socket (75 OHM - VHF / UHF / cable) can be used for
Note: If you want to receive the signal from your cable or cable
box, please connect a coaxial cable to the ANTENNA/CABLE
IN socket at the back of the TV set.
When powered on, the TV will be turned on directly or be in standby
4.
mode.
If the power indicator lights up, the TV set is in standby mode.
Press the
turn on the TV.
button on the remote control or on the TV set to
Switching off
To put the TV set into standby mode, press the
remote control. The TV set remains powered up, but with low energy
consumption.
To switch off the TV set, unplug the mains socket from the
mains outlet.
button on the
10

Connections and Setup
k
Initial Setup
Initial setup involves selecting all the settings
required to be able to search for and store all
the analogue and digital channels you can
receive.
Make sure that the television is switched on and
Note:
If the channel search retrieved only the
analogue channels it could be caused
by poor broadcasting and therefore is
not coverd by manufacturer warranty.
Manufacturers cannot be held responsible
for lack of or poor broadcasting in some
areas.
Setup wizard opens, which guides you through
the initial setup process. (Refer to Figure 1.)
Figure 1
Step 1: Environment setup
1. Press
press OK to enter the next step.
2. Press
press OK to enter the next step.
3. Press
press OK to enter the next step.
to select your language, then
to select your conntry, then
to select your location, then
Step 3: Software setup
1. If the TV set has connected to the networ
successfully, it will search for upgrade files
automatically.
2. Follow the guides on the screen and press
the corresponding buttons on the remote
control to proceed.
Step 4: Channel installation
1. Press
cannels.
2. Follow the guides on the screen and press
the corresponding buttons on the remote
control to proceed.
Note:
To prevent the channel installation process
form being interrupted, wait for the message
indicating that the installation is complete.
You can also skip this step by selecting "I
don't want to install channels".
In this case, to search and store your
channels you may do an automatic channel
search by follwing the instructions in the next
section Performing an automatic channel
search.
Step 5: Clock setup
If the TV set was not connected to the network,
you can use the numeric buttons to enter the
date and time, then select the OK button and
press OK
When the initial setup is completed, the
Congratulations message appears. Press OK
to select Continue to install
Step 2: Network setup
1. Press
connection type(Wired or wireless), then
press OK to enter the next step.
2. Follow the guides on the screen and press
the corresponding buttons on the remote
control to proceed.
Note:
You can also skip this step and step 3
by selecting "I do not have a network
connection", and connect to the internet
later. For details please refer to section
Network Connection.
to select your network
11
Chapter 3 Using your TV
Performing an automatic channel
search
This section describes how to search and stor e
channels automatically. This may be done in
any of the cases below:
- You have selected "I don't want to install
channels" in the initial setup;
- You see "No program info now, Please
- You want to update your channels.
1. In TV mode, press
and select Channel>Channel scan. Press
OK to enter.
2. Press
press OK to enter. Press
Cable, Antenna,Satellite, and press OK
3. Follow a), b) below.
- a) If you have selected Cable.
- b) If you have selected Antenna.
4. The channel search may take a few minutes.
During the process, you can press OK to
stop the search halfway.
5. After the automatic search, channels are
arranged in a prest order. If you wish to
skip channels,
/ to select Tuner mode, then
Press / to select Automatic search,
then press OK to enter.
Press OK to select Digital&Analogue/Digtal/
Analogue.
Press / to select Automatic search,
then press OK to enter.
Press / to select Channel type (Digital
& Analogue, Digital or Analogue).
Channel > Channel Organiser
OK
p
" in TV mode;
in the remote control
/ to select
Accessing channels
Using the numeric buttons: press the
corresponding numeric buttons on the remote
control to access the channels.
Using the CH+/- buttons: press the CH+/buttons on the remote control or the
corresponding buttons on the TV set to scroll
through the channels.
Using the CH LIST buttons: press the TSILHC
buttons on the remote control to display the
channel list and press
select channels.
/ / / and OK to
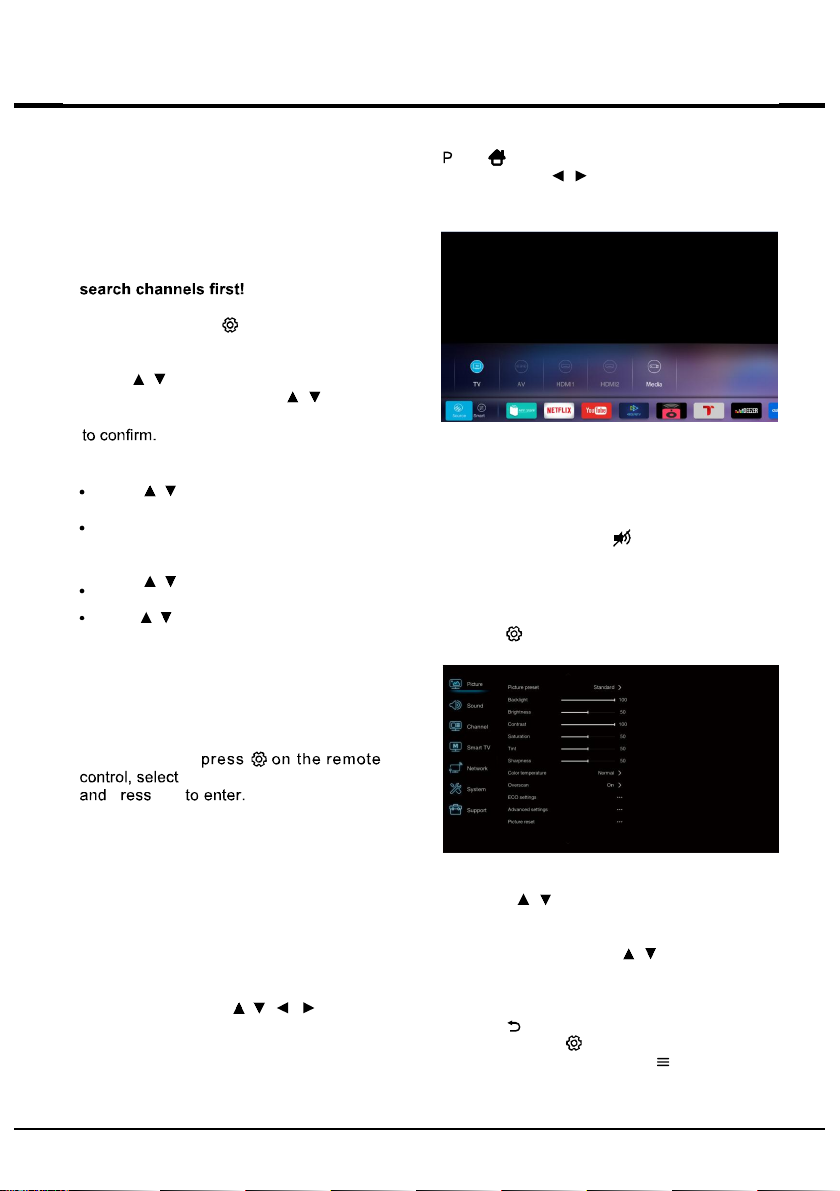
Watching connected devices
ress on the remote control and select the
Sourse .Press
source, and then press OK to confirm
/ to select your desired
Volume
Volume control: press the vol +/- buttons on
the remote control or the corresponding buttons
on the TV set to increase or decrease the
volume.
Sound mute: press the
mute the sound. Press this button again or the
vol + button to restore the sound.
button to temporarily
Using TV menus
1. press
2. Press
3. In submenus, press
4. Press
5. Press EXIT or
on the remote control to display the
Setting menu. (Refer to Fingure 2.)
Fingure 2
then press OK to enter the corresponding
submenu.
options, then press OK to enter the
option list, the adjustment interface, or the
corresponding submenu.
Note: You can also press
control, select Settings (if available) and
press OK to enter the Settings menu.
/ to select the desired item,
/ to select menu
to return to the previous menu.
to close the menu.
on the remote
12

Some options may not be available for
certain signal sources.
Selecting menu language
You can choose your preferred menu
language following the instructions below.
1. press
System > Menu language > Language
and press OK to enter.
2. Press
to display the menus and press OK to
3. Press EXIT or to close the menu.
on the remote control, select
o select your desired language
Instant power on
This function enables you to turn on your TV
quickly.
1. press
System > Instant power on and press OK
to enter.
2. Press
3. Press EXIT or to close the menu.
on the remote control, select
to select On and press OK to
Setting up your favourite channels
You can create a list to your favourite TV
channels.
1. Press CH LIST.
2. Press the red button to enter Select
channel list, press
and press OK to enter.
3. Press
channel list and press the green button to
add the selected channel to your favourite
list.
4. Repeat this procedure to set up other
favourite channels.
5. Press the red button to enter Select
channel list, select Favorites and press
OK to enter.
6. Press
press OK to watch it or press the green
button to remove it from your f avourite list.
7. Press CH LIST or EXIT to exit.
to select a list
to scroll through the
to select a channel,
Using your TV
and press OK to enter. Press to select
is.
Dolby Digital when the programme's
sound format is Dolby Digital.
PCM when the programme's sound
format is MPEG.
- If you select PCM, the SPD IF output format
is PCM, regardless of the programme's
sound format .
- If you select Off, this turns off the audio
output from the audio device connected to
the SPDIF output.
Note: The options you may choose depend
on the programme you are watching. If
the sound is ahead of the picture, you can
select SPDIF delay from the Sound menu,
press OK then press
delay time to synchronize the sound with
the pict ure.
Timer
You can access the time from digital channels
following the instructions below.
1. press
System > Timer > Clock > Auto
synchronization and press OK to enter.
2. Press
3. Press EXIT or to close the menu.
on the remote control, select
to select On and press OK to
to adjust the
13

Input settings
T-Link
OK
OK
OK
4. EXIT
SOURCE OK in the
Note: Not all models have OK button on the
set.
Software update
Note: Don't switch off or unplug the TV
until the upgrade is completed.
> Software update
OK
Support
OK
Enabling or disabling T-Link
T-Link OK
On Off
OK
EXIT
Note:
The CEC functions depend on the devices
connected and it is possible that some devices
may not interoperate correctly when connected
to this TV. The user manual or the manufacturer
of the problematic devices should be consulted
for further information.
Reset shop
OK
network OK
Note: Keep successful network connection
during upgrade.
Location
OK
with demo
EXIT
Home, Shop Shop
OK
OK OK
4. The Initial setup
Initial setup.
LED Indicator
OK
Flashing Normal
Off OK
EXIT
14

Using your TV
Multimedia
Picture
Video
Music
Using EPG (Electronic Programme
Guide)
and press OK to confirm.
15

HDMI 1 port identified with MHL on the TV and the USB
Using your TV
Network connection
The TV does not provide any guarantee, therefore
16
,
Using your TV
Access Smart TV portal
17

Share & See
Using your TV
Wireless Display
(*Not available for some models)
Wireless d isplay allows you to share screen and
sound of your device such as a smartphone
or a tablet to your TV, wirelessly (i.e. without
cables). This makes it possible to view on your
TV, at the same time, what your smartphone
or tablet in showing. For example, you can
launch a video on your smartphone and display
it simultaneously on your TV, or use your tablet
as game controller with content displayed on
the big screen of your TV.
Whenever you want to use wireless display,
To do it follow the steps below:
1. press
2. Find the Wireless display function in your
Different devices may have different names
3. Then click the "connection" function on the
Note:The unit does not guarantee that the
on the remote control, select Smart
TV > Wireless Display and press OK to
enter. You will see details for this function.
device.
for this function.
device. If connected successfully, you will
see on your TV screen what the device is
showing.
use of the Wireless display function will be
smooth or errorfree since not all devices
are compatible with the Wireless display
function.
18

Problems & Solutions
Note: Problems & solutions 1 is for the TV
models which have network functions, so
users of non-connected TV models can
disregard it.

Other Information
Troubleshooting
Most problems you encounter with your TV
can be corrected by consulting the following
troubleshooting list.
No picture, no sound
1. Check if the fuse or circuit breaker is
working.
2. Plug another electrical device into the outlet
to make sure it is working or turned on.
3. Power plug is in a bad contact with the
outlet.
4. Check the signal source.
No color
1. Change the color system.
2. Adjust the saturation.
3. Try another channel. Black-white program
may be received.
Remote control does not work
1. Change the batteries.
2. Batteries are not installed correctly.
No picture, normal sound
1. Adjust the brightness and contrast.
2. Broadcasting failure may happen.
Normal picture, no sound
1. Press button VOL+ to increase volume.
2. Volume is set to mute, press the Mute button
to restore sound.
3. Change the sound system.
4. Broadcasting failure may happen.
Unorderly ripples on the picture
It is usually caused by local interference, such
as cars, daylight lamps and hair driers. Adjust
the antenna to minimize the interference.
Password in Parental Control
• The default password is 1234. You can
change it to a new one.
• The super password is 0423. If you forget
your code, enter the super password to
override any existi ng codes.
Snowy dots and int erference
If the antenna is located in the fringe area of
a television signal where the signal is weak,
the picture may be marred by dots. When the
signal is extremely weak, it may be necessary
to install a special antenna to improve the
reception.
1. Adjust the position and orientation of the
indoor/outdoor antenna.
2. Check the connection of antenna.
3. Fine tune the channel.
4. Try another channel. Broadcasting failure
may happen.
Ignition
Black spots or horizontal streaks appear, or the
by interference from car ignition system,
neon lamps, electric drills, or other electrical
appliance.
Ghost
Ghosts are caused by the television signal
following two paths. One is the direct path, the
other is reflected from tall buildings, hills, or
other objects. Changing the direction or position
of the antenna may improve the reception.
Radio frequency interference
This interference produces moving ripples or
diagonal streaks, and in some case, loss of
contrast in the picture.
Find out and remove the radio interference
source.
* To bring you better visual experience, please
remove all labels from TV front panel and
screen before use.
Base Installation
To fix the double support base on the unit by
screws, the installation is completed.
M4
Recommendation to buy screws : M4X8
122
12
1
20


99-32D170-X56Z1P
Lin Polska Sp. z o.o.
Ul. Arkuszowa 39
01-934 Warszawa
service@lin.com.pl
 Loading...