

LightSpeed Technologies Redcat Access User Manual
User Manual
Classroom Audio System
1POWER 2


TABLE OF CONTENTS
SECTION 1: 4 Important Safety Instructions
Overview 5 System Components and Unpacking
6 Optional Components
7 Front Panel Indicators
7 Top Panel Controls and Connections
8 Side Panel Controls and Connections
8 Rear Panel Features
9 Flexmike Controls and Connections
SECTION 2: 10 Step 1. Determine Set-up Location
Set-up & Use/ 10 1A. To Set-Up on Table Top
Dail Operation
11 1B. To Set-Up Mounted on a Wall
13 Step 2. Connecting the Power Supply
14 Step 3. Audio Integration
15 Step 4. Charging the Flexmike
16 Step 5. Operating the Flexmike
17 Step 6. Output to Assistive Listening Device
(ALD)
18 Step 7. Using the Flexmike as a Wireless
Audio Link
19 Dail Operation Instructions
SECTION 3: 20 Sharemike: Controls and Connections
Optional Accessories 21 Charging
22 Initial Set-Up
23 Media Connector: Controls and Connections
25 Using the Media Connector
26 Audio Integration with Media Connector
SECTION 4: 27 Battery Pack Replacement in a Flexmike
Maintenance & 28 Battery Pack Replacement in a Sharemike
Troubleshooting 29 Troubleshooting Guide
30 Tips to Obtain Optimal Audio Performance
SECTION 5: 31 Warranty Statement
Warranty &
Specifications
32 Safety Warnings and Certifications
37 System Specifications

IMPORTANT SAFETY INSTRUCTIONS
1. Read these instructions.
2. Keep these instructions.
3. Heed all warnings.
4. Follow all instructions.
5. Do not use the apparatus near
water.
6. Clean only with dry cloth.
7. Do not block any ventilation
openings. Install in accordance
with the manufacturer’s
instructions.
8. Do not install near any heat
sources such as radiators,
heat registers, stoves, or other
apparatus (including amplifiers)
that produce heat.
9. Do not defeat the safety purpose
of the polarized or groundingtype plug. A polarized plug
has two blades with one wider
than the other. A groundingtype plug has two blades and
a third grounding prong. The
wide blade or the third prong is
provided for your safety. If the
provided plug does not fit into
your outlet, consult an electrician
for replacement of the obsolete
outlet.
10. Protect the power cord from
being walked on or pinched
particularly at plugs, convenience
receptacles, and the point where
they exit from the apparatus.
11. Only use attachments/
accessories specified by the
manufacturer.
13. Unplug this apparatus during
lightning storms or when unused
for long periods of time.
14. Refer all servicing to qualified
service personnel. Servicing is
required when the apparatus
has been damaged in any way,
such as power-supply cord or
plug is damaged, liquid has been
spilled or objects have fallen into
the apparatus, the apparatus
has been exposed to rain or
moisture, does not operate
normally, or has been dropped.
15. When the mains plug or
appliance coupler is used as the
disconnect device, it shall remain
readily operable.
16. Please keep the unit in a good
ventilation environment.
17. WARNING: To reduce the risk
of fire or electric shock, do not
expose this apparatus to rain or
moisture.
18. Apparatus shall not be exposed
to dripping or splashing and no
objects filled with liquids, such
as vases, shall be placed on the
apparatus.
19. Warning - battery pack shall not
be exposed to excessive heat
such as sunshine, fire or the like.
12. Use only with a cart,
stand, tripod, bracket or
table specified by the
manufacturer, or sold with
the apparatus. When a cart is
used, use caution when moving
the cart/apparatus combination
to avoid injury from tip-over.
5
1. Overview
2. Set Up & Use /
Daily Operation
3. Optional Accessories
4. Maintenance &
Troubleshooting
5. Warranty, Safety
& Specifications
SECTION 1:
OVERVIEW
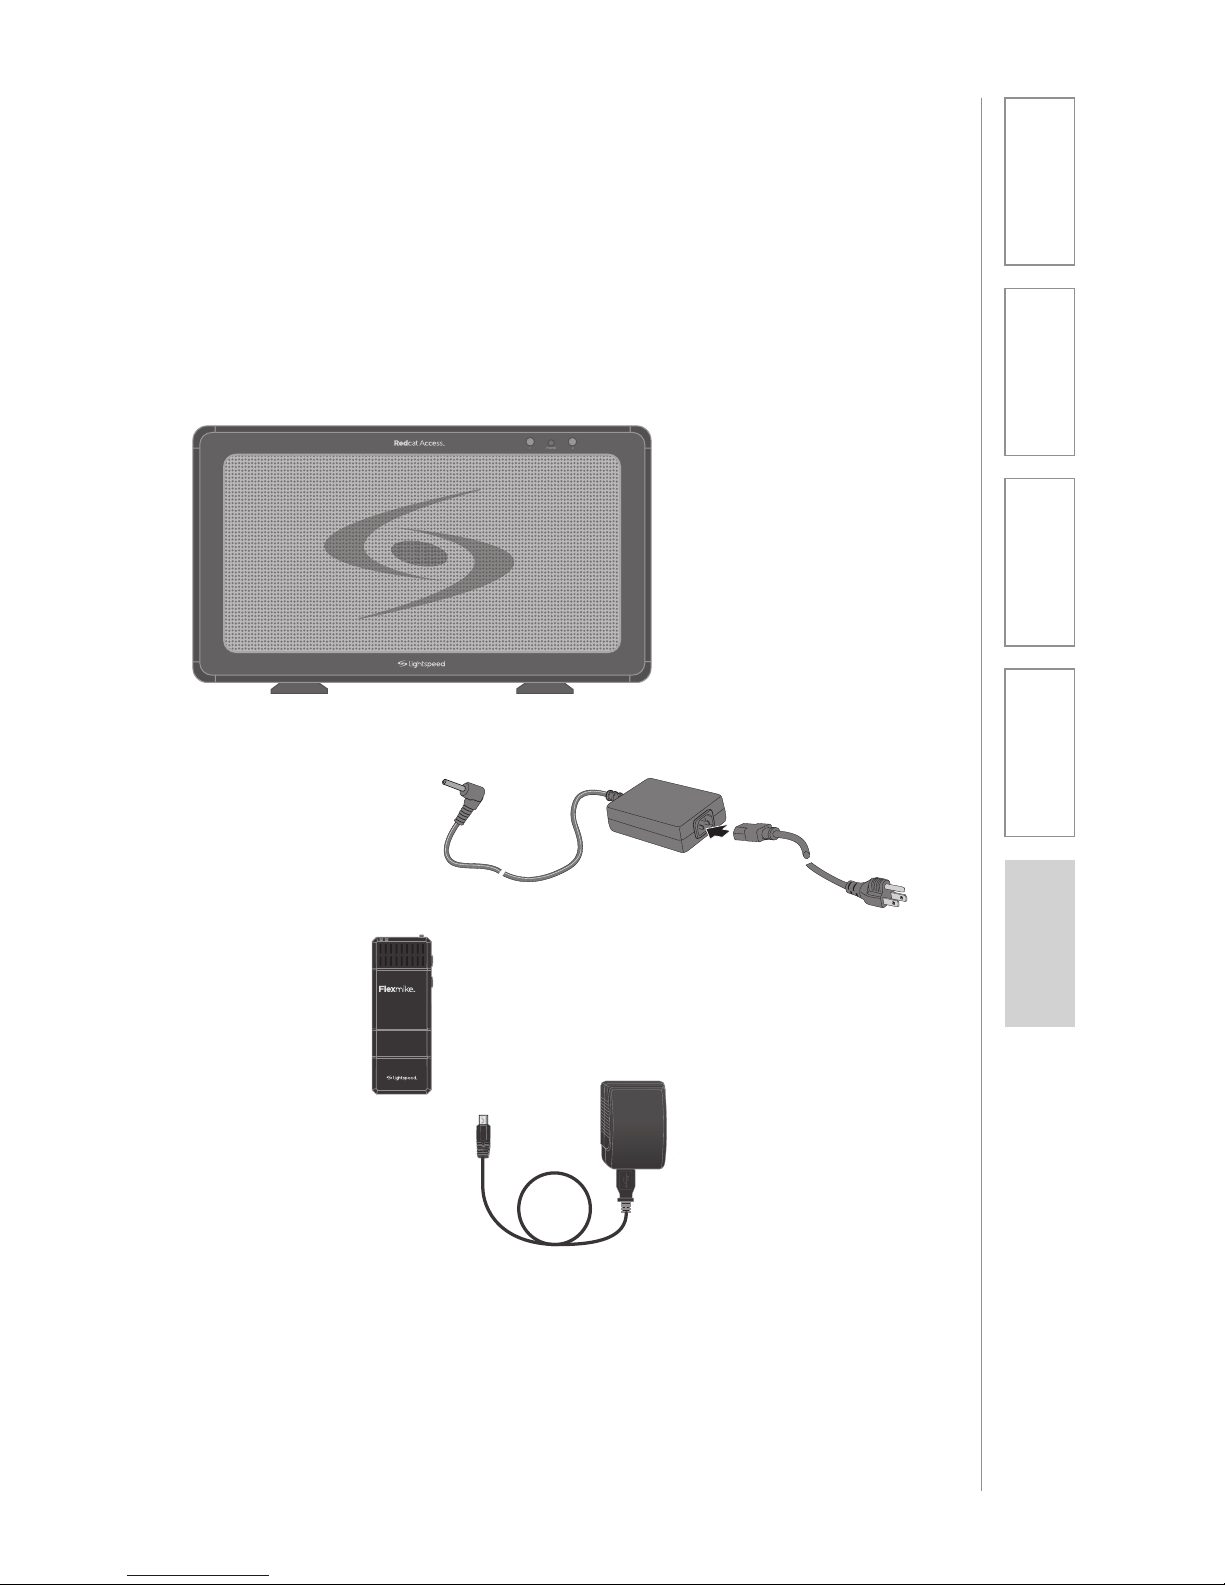
SYSTEM COMPONENTS AND UNPACKING
The standard configuration of the Redcat Access will contain:
Wall Charger &
Charging Cable
Flexmike
Classroom
Microphone
1 2
1POWER 2
Redcat Access Receiver/
Amplifier and Power
Supply
PLEASE NOTE: The Redcat Access, Microphone(s), and Media
Connector are registered together at the factory and are labeled
as such with ID numbers. Please keep all components together as
a system. Moving them from one system or room to another will
result in the need to re-register them to function.

6
1. Overview
2. Set Up & Use /
Daily Operation
3. Optional Accessories
4. Maintenance &
Troubleshooting
5. Warranty, Safety
& Specifications
Standard Accessories
RCA Redcat Access all-in-one system
16V-2.0-NA 16V/2.0A power supply for Redcat Access, U.S. and
Canada
16V-2.0-_ 16V/2.0A power supply for Redcat Access, specify
country
FM Flexmike classroom microphone with battery pack
andlanyard
NH2.4V AA NiMH rechargeable battery pack for Flexmike,
one per Flexmike
FL Flexmike lavaliere cord
USB2-NA Transmitter wall charger, power supply, U.S. and
Canada
AD-USB3DC International transmitter charging adaptor
USB-MCB USB Type A-Micro B charging cable for Flexmike
Optional Accessories
FCAD-4 Flexcat for small group instruction*
SM Handheld microphone with battery pack
BA-NH2APK AA NiMH rechargeable battery pack for Sharemike,
one per Sharemike
USBDC-5 Charging cable for Sharemike
MCA Media Connector with Access
USB2-NA Transmitter wall charger, power supply, U.S. and
Canada
USB-MCB USB Type A-Micro B power cable for Media
Connector
AD-USB3DC International transmitter charging adaptor
5V-1.0-_ 5V charging power supply
4
4
3
3
*For further information on Flexcat for small group instruction, please visit www.lightspeed-tek.com
7
1. Overview
2. Set Up & Use /
Daily Operation
3. Optional Accessories
4. Maintenance &
Troubleshooting
5. Warranty, Safety
& Specifications
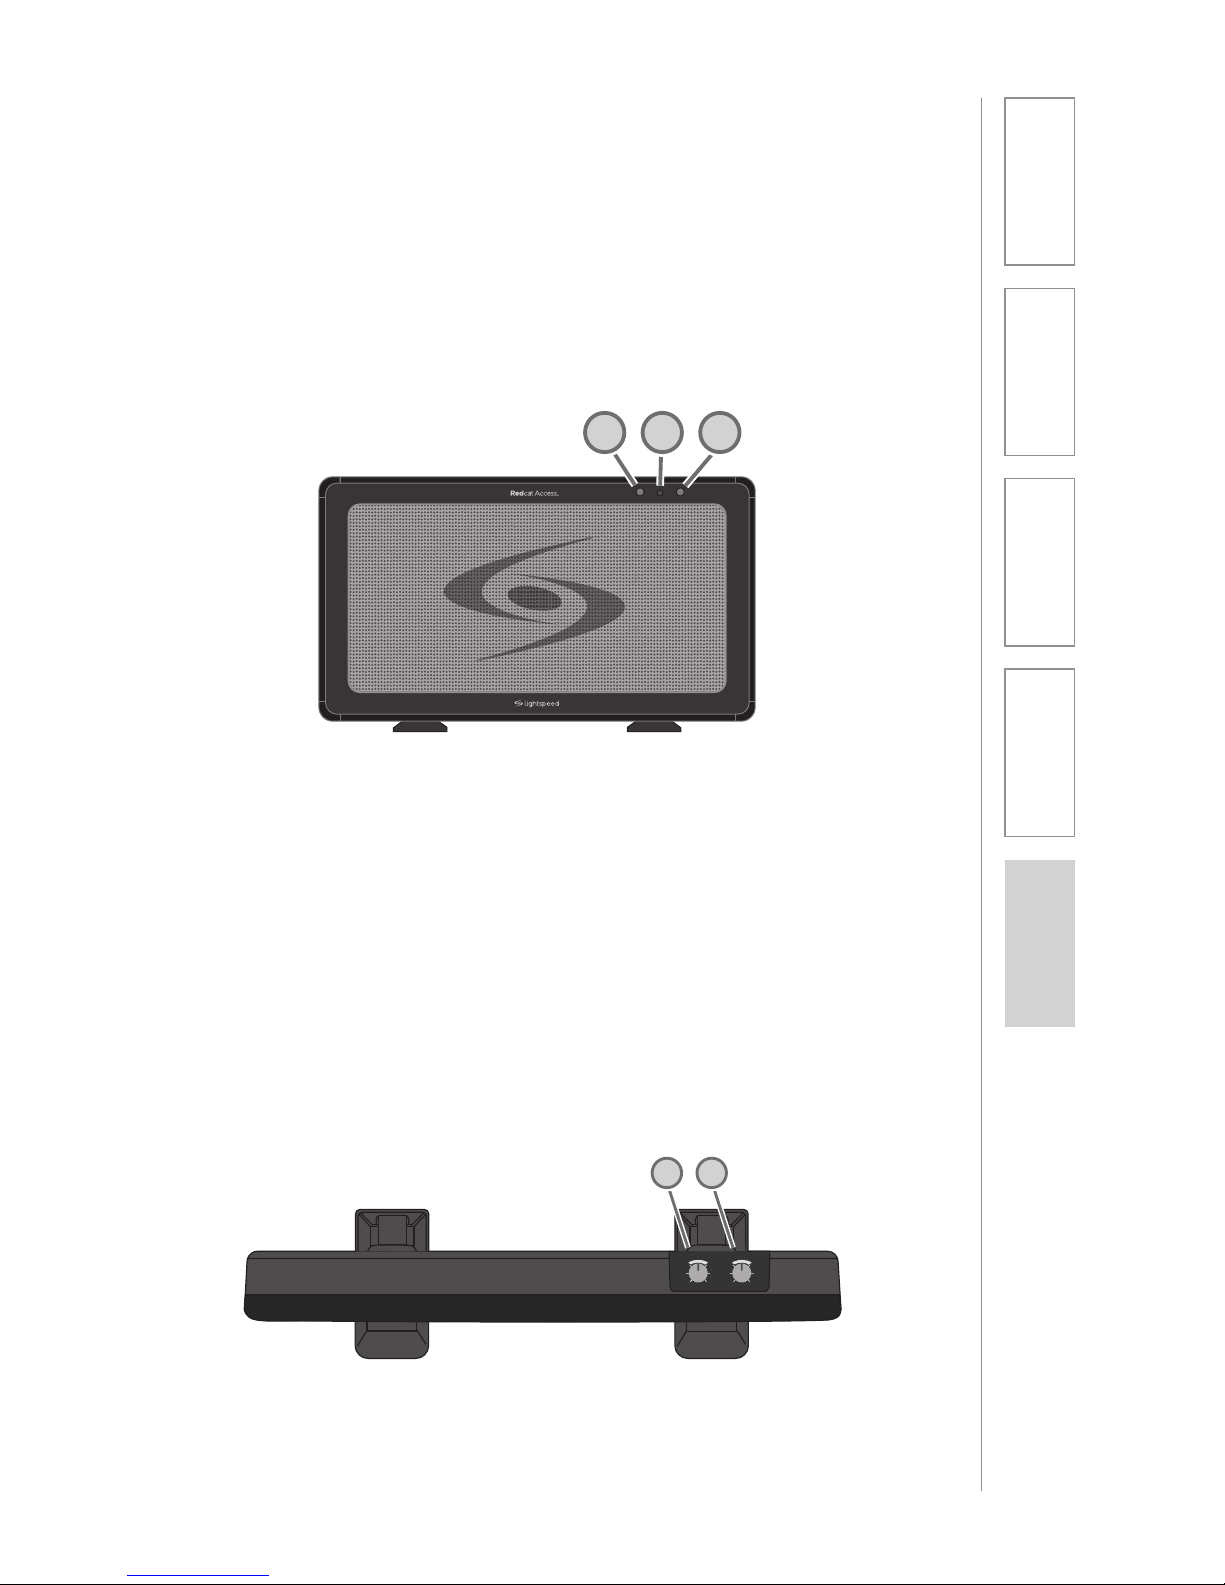
TOP PANEL CONTROLS
FRONT PANEL INDICATORS
1POWER 2
1
22
1. MIC VOLUME: Controls the volume level of the
microphones.
2. TONE CONTROL: Adjusts the audio tone, adding
more bass or treble for a more rich or crisp sound.
MICROPHONE
VOLUME
MINMAX BASSTREBLE
TONE
1
2
1. POWER ON INDICATOR: The power light will glow blue
when power is applied.
2. MIC 1 & MIC 2: Mic link and registration indicators
a. Flashing amber indicates registration is in process.
b. Solid green indicates a link has been established.
8
1. Overview
2. Set Up & Use /
Daily Operation
3. Optional Accessories
4. Maintenance &
Troubleshooting
5. Warranty, Safety
& Specifications
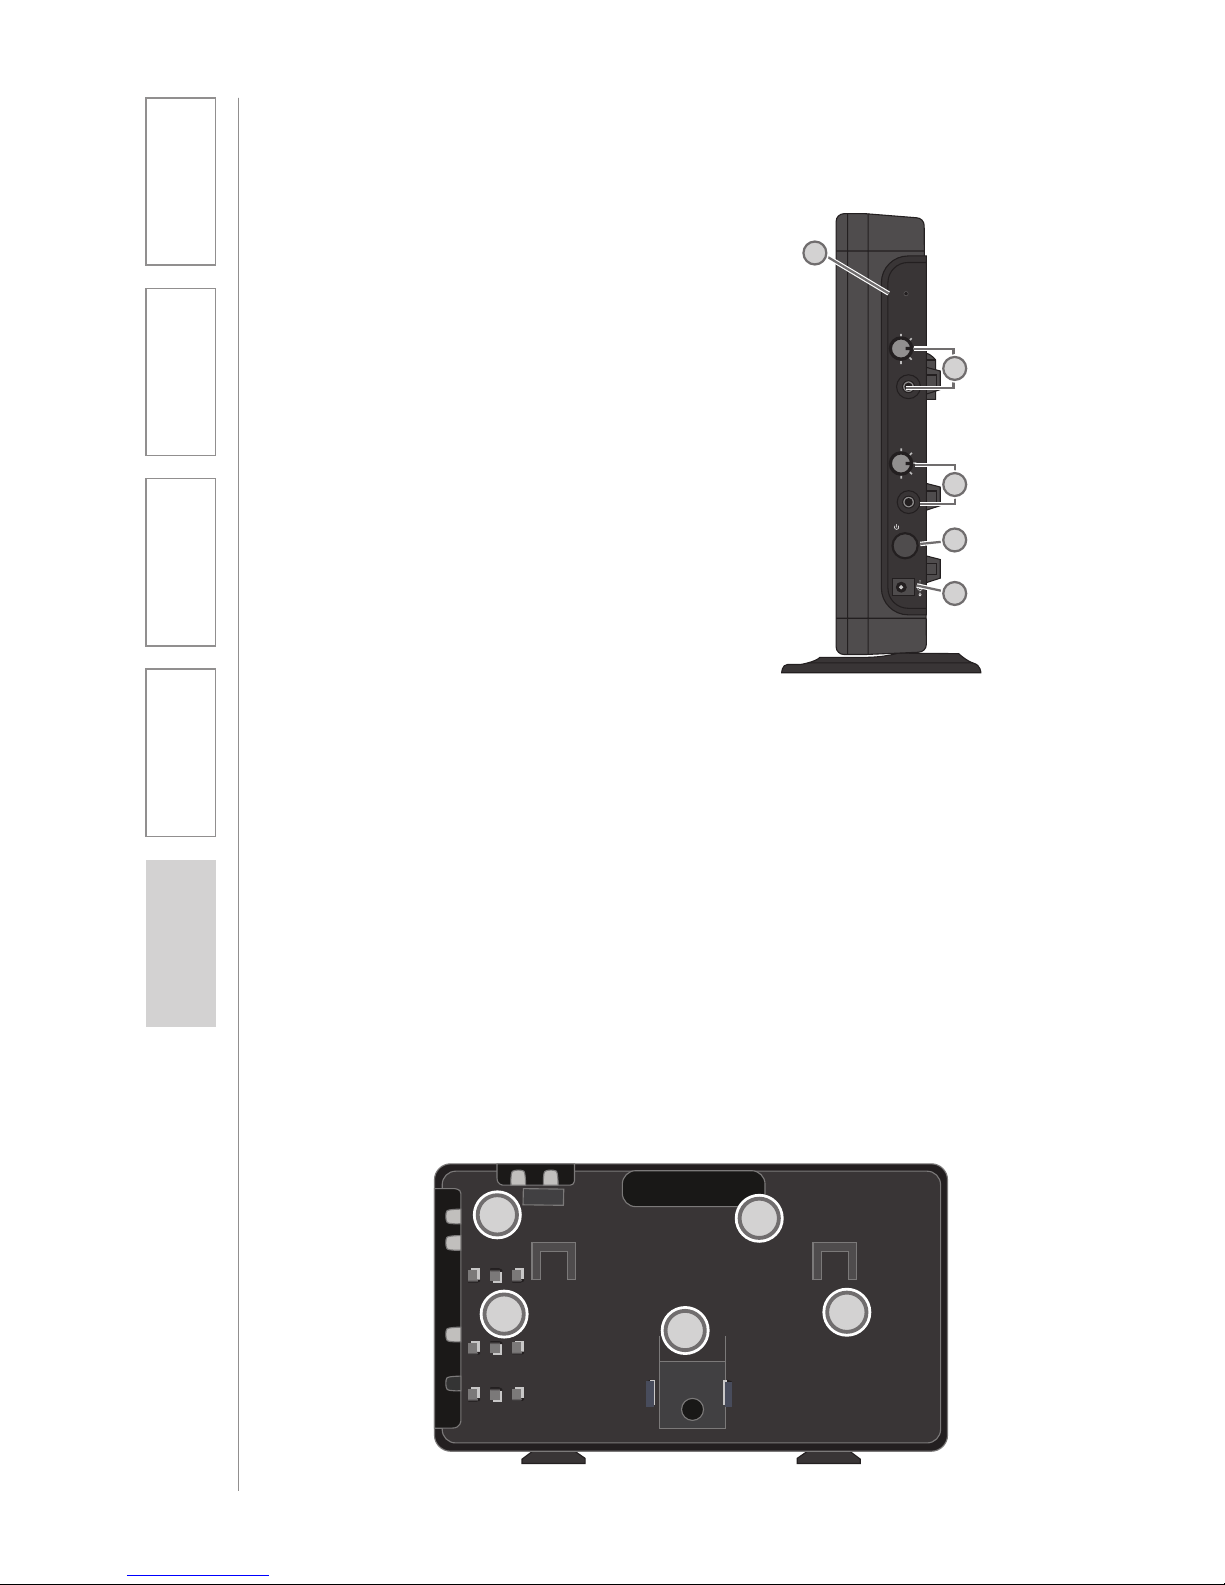
SIDE PANEL CONTROLS AND
CONNECTIONS
1. REGISTRATION: Press this button
if there is a new component, such
as a microphone, to be registered.
2. AUDIO INPUT JACK & VOLUME
CONTROL: 3.5mm stereo connector
for connecting classroom audio
sources to the Redcat Access.
Controls the volume level of the
audio input from the connected
audio source.
3. AUDIO OUTPUT JACK & VOLUME
CONTROL: 3.5mm stereo connector
for connecting to an assisted
listening device (ALD) or to a
computer for recording. Controls
the volume level of the audio
output.
4. POWER BUTTON: This button is
used to turn the Redcat Access on
or off. The front panel blue light
will glow when power is on.
5. DC INPUT JACK: Plug the power
supply (16V/2.0A) into this jack.
REGISTER
AUDIO IN
MIN
MAX
AUDIO
(ALD) OUT
MIN
MAX
ON/OFF
DC INPUT
16V/2.0A
2
1
4
5
3
REAR PANEL FEATURES
1. CARRYING INSET: Cutaway grip for moving or carrying
the Redcat Access.
2. CABLE MANAGEMENT AND STRAIN RELIEF
3. WALL MOUNTING SLOTS
4. SECURITY BRACKET SLOT
5. SYSTEM ID LABEL
Testing Purposes Only
1
2
3
4
5

9
1. Overview
2. Set Up & Use /
Daily Operation
3. Optional Accessories
4. Maintenance &
Troubleshooting
5. Warranty, Safety
& Specifications
FLEXMIKE CONTROLS AND CONNECTIONS
1. POWER/MUTE SWITCH: press and hold to power on, press to
mute, press and hold to power off.
2. MIC 1 STATUS: lighted to indicate microphone is registered as
MIC 1
• Blue: solid = normal operation; Blue: flashing = linking in
process
• Red: solid = muted; Red: flashing = muted while linking in
process
3. MIC 2 STATUS: when using a second microphone, this LED is
lighted to indicate microphone is registered as MIC 2 (same
behavior as MIC 1 status light above)
4. EARBUD CONNECTION*: connect the earbud for monitoring
(*for use with Flexcat Pods only)
5. CHARGING/LOW BATTERY INDICATOR: lights red when
charging, green when fully charged. When in operation, turns red
to indicate low battery.
6. MICROPHONE VOLUME UP/DOWN
7. AUDIO INPUT: connect audio source to send to Redcat Access
8. LANYARD INTERFACE: insert the lanyard into this hook to wear
the Flexmike.
9. BATTERY DOOR: remove the battery door to replace the
rechargeable battery pack
10. REGISTRATION: (inside battery compartment - not shown) only
used when adding or replacing Flexmike.
11. SYSTEM ID LABEL
1
10
9
8
7
6
5
4
3
2
11
10
1. Overview
2. Set Up & Use /
Daily Operation
3. Optional Accessories
4. Maintenance &
Troubleshooting
5. Warranty, Safety
& Specifications
The Redcat Access is shipped with feet to stand on a cabinet or tabletop.
Alternatively, the feet can be used as wall mount brackets.
Advantages of either include:
SECTION 2:
SET-UP & USE
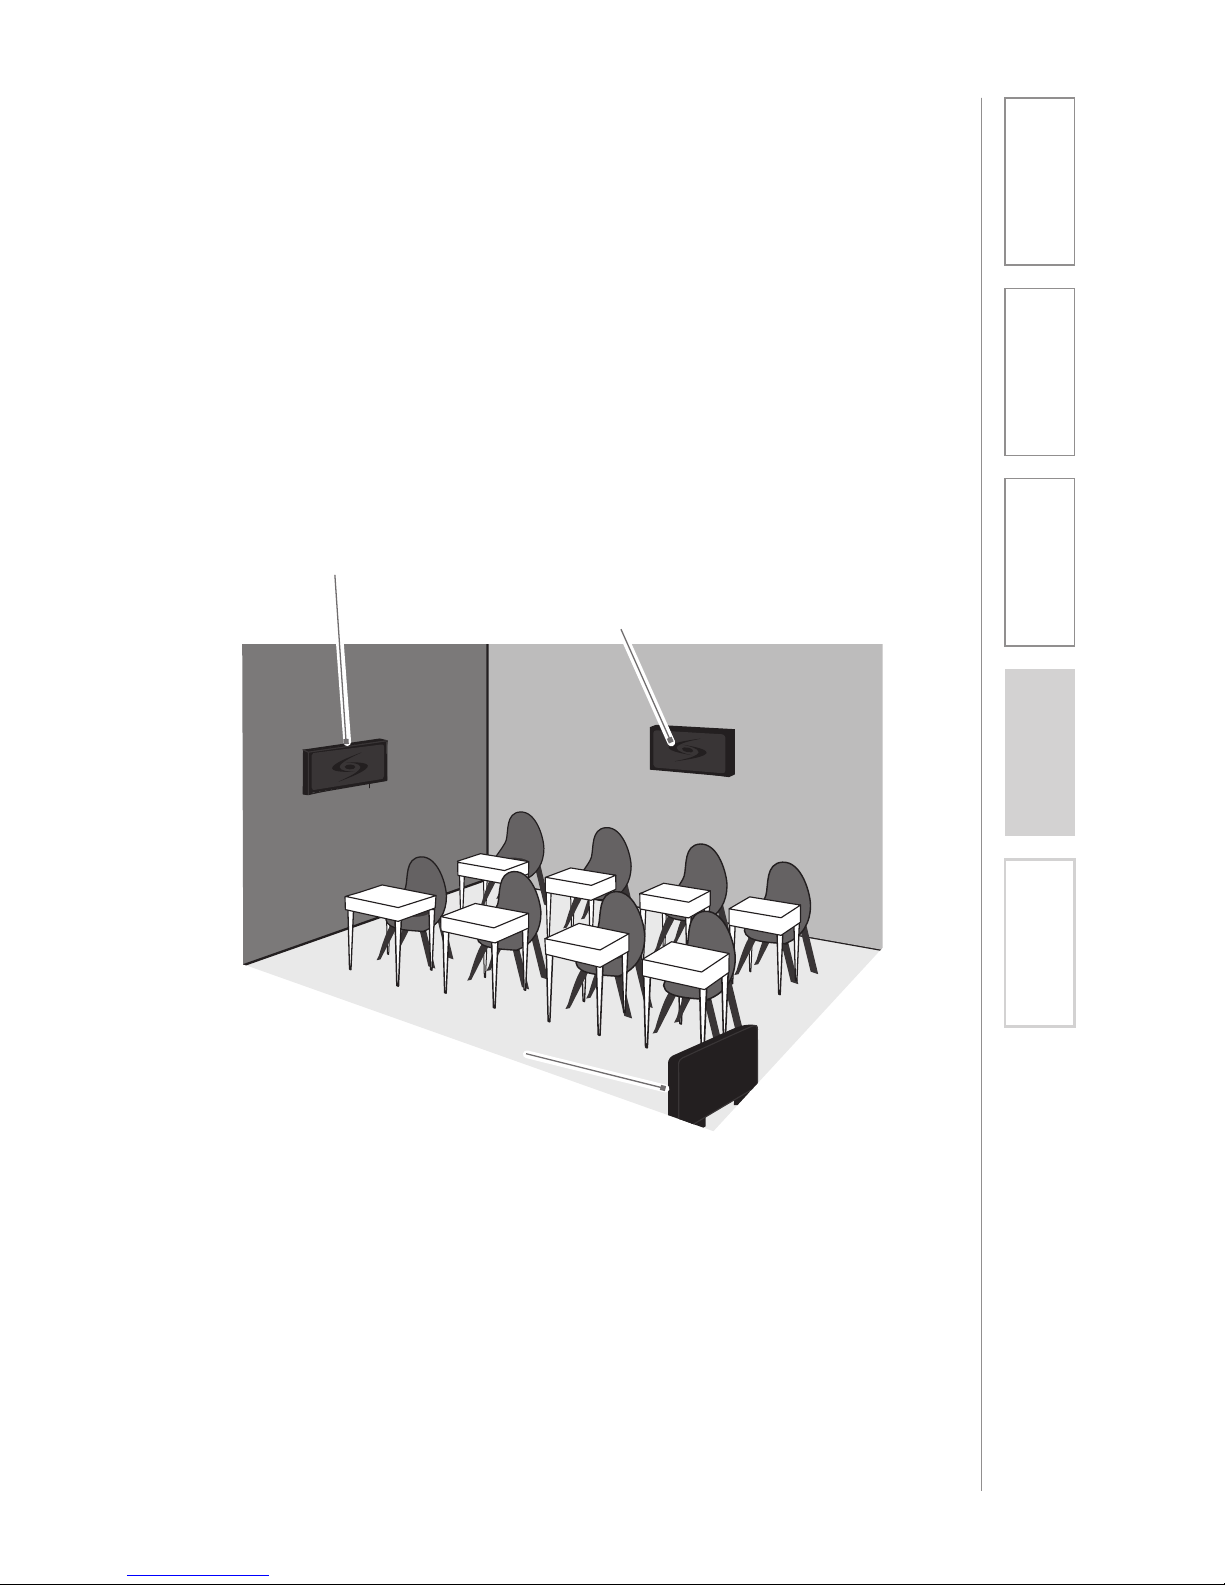
1. DETERMINE SET-UP LOCATION
1A. TO SET-UP ON TABLE-TOP
Tabletop (recommended):
• Virtually no setup time
• Greater flexibility to move to
different locations
First, consider that the Redcat Access
should be placed within 7 feet of
an electrical outlet and on a surface
about 3-6 feet off the ground.
Next, find a location as far away as
possible from the teacher who will
be using the mic. The best place is
against the wall opposite where the
teacher will be speaking. If this is
not possible, other good locations
are along either wall next to the
teacher or in a corner. Avoid placing
the Redcat Access next to where the
teacher instructs. Putting the Redcat
Access in close proximity to the
teacher’s mic can result in feedback.
Wall-mount:
• More permanent setup
• Greater security
Avoid!
Good placement Best placement
11
1. Overview
2. Set Up & Use /
Daily Operation
3. Optional Accessories
4. Maintenance &
Troubleshooting
5. Warranty, Safety
& Specifications
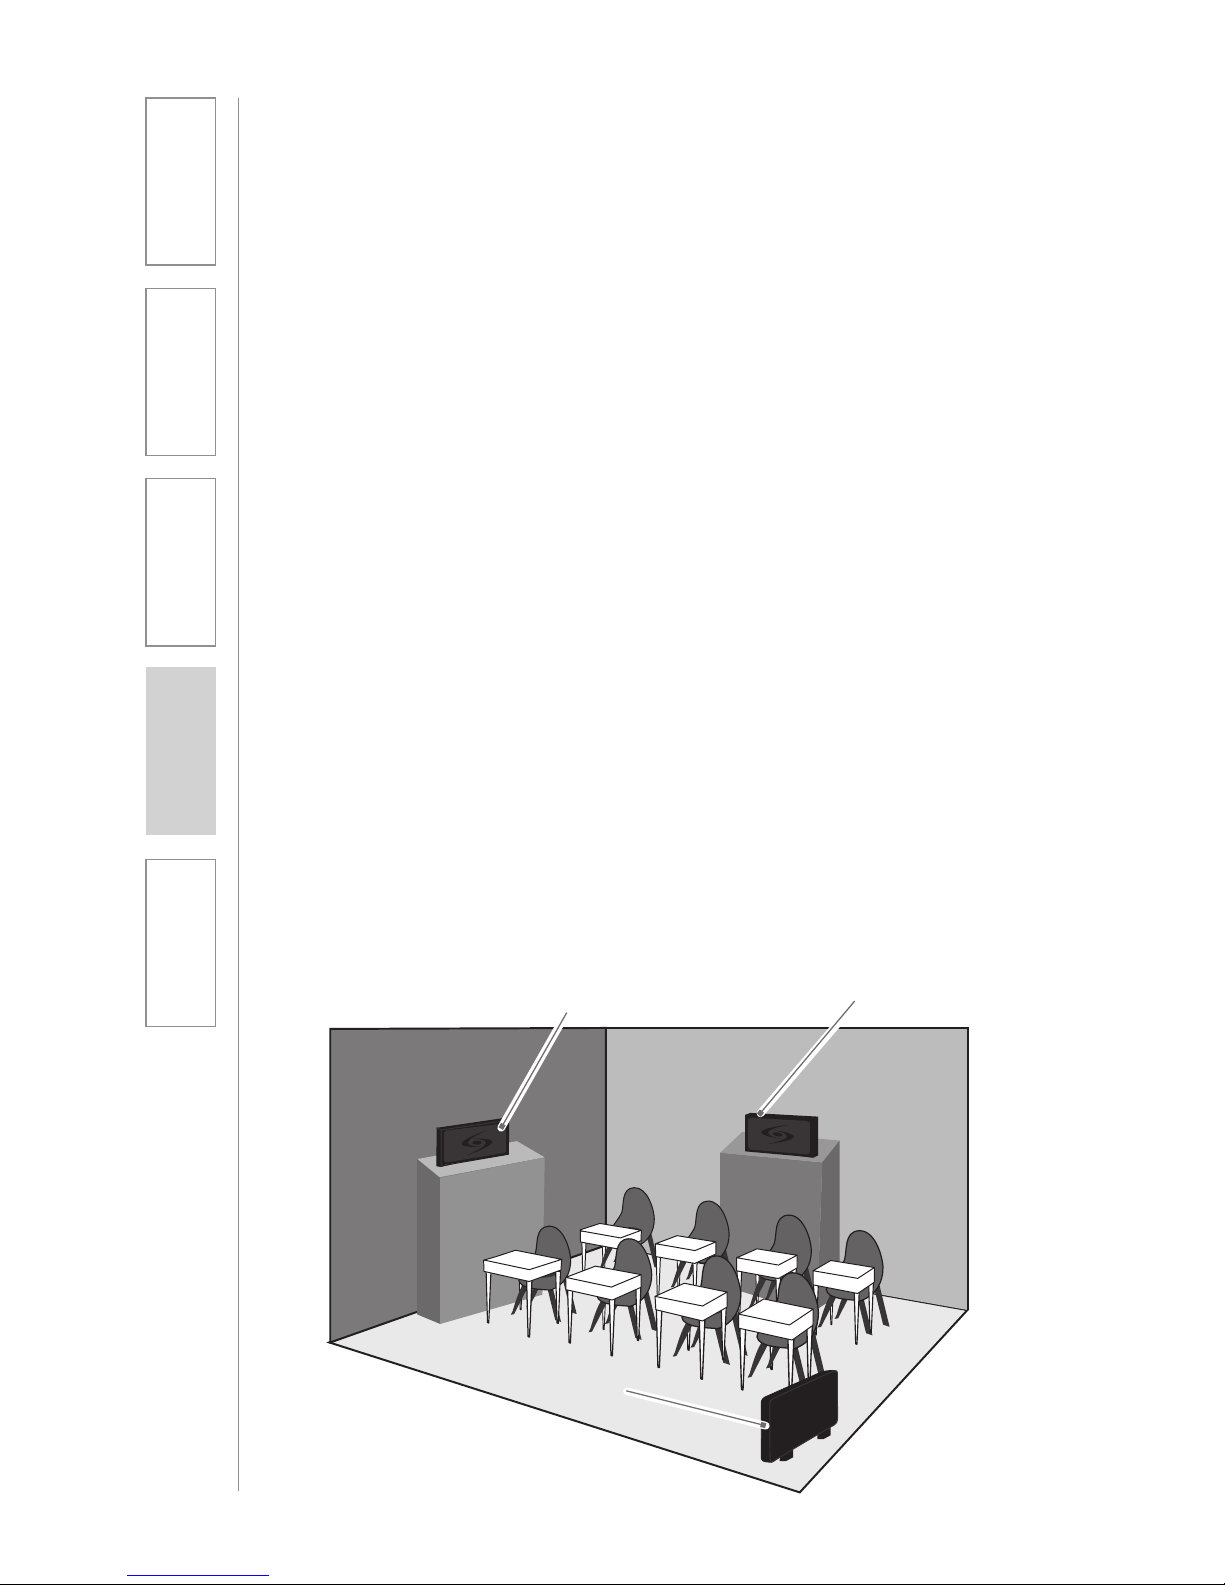
1B. TO SET-UP MOUNTED ON A WALL
First, consider that the Redcat Access
should be placed within 7 feet of an
electrical outlet and about 6-8 feet off
the ground.
Next, find a location as far away as
possible from the teacher who will
be using the mic. The best place is
centered on the long wall opposite
the teacher. If this is not possible,
other good locations are on the wall
next to the teacher. Avoid placing the
Redcat Access on any wall close to
where the teacher usually stands to
instruct the class. Having the teacher’s
mic too close to the Redcat Access
can result in feedback.
Good placement
Best placement
Avoid!
12
1. Overview
2. Set Up & Use /
Daily Operation
3. Optional Accessories
4. Maintenance &
Troubleshooting
5. Warranty, Safety
& Specifications
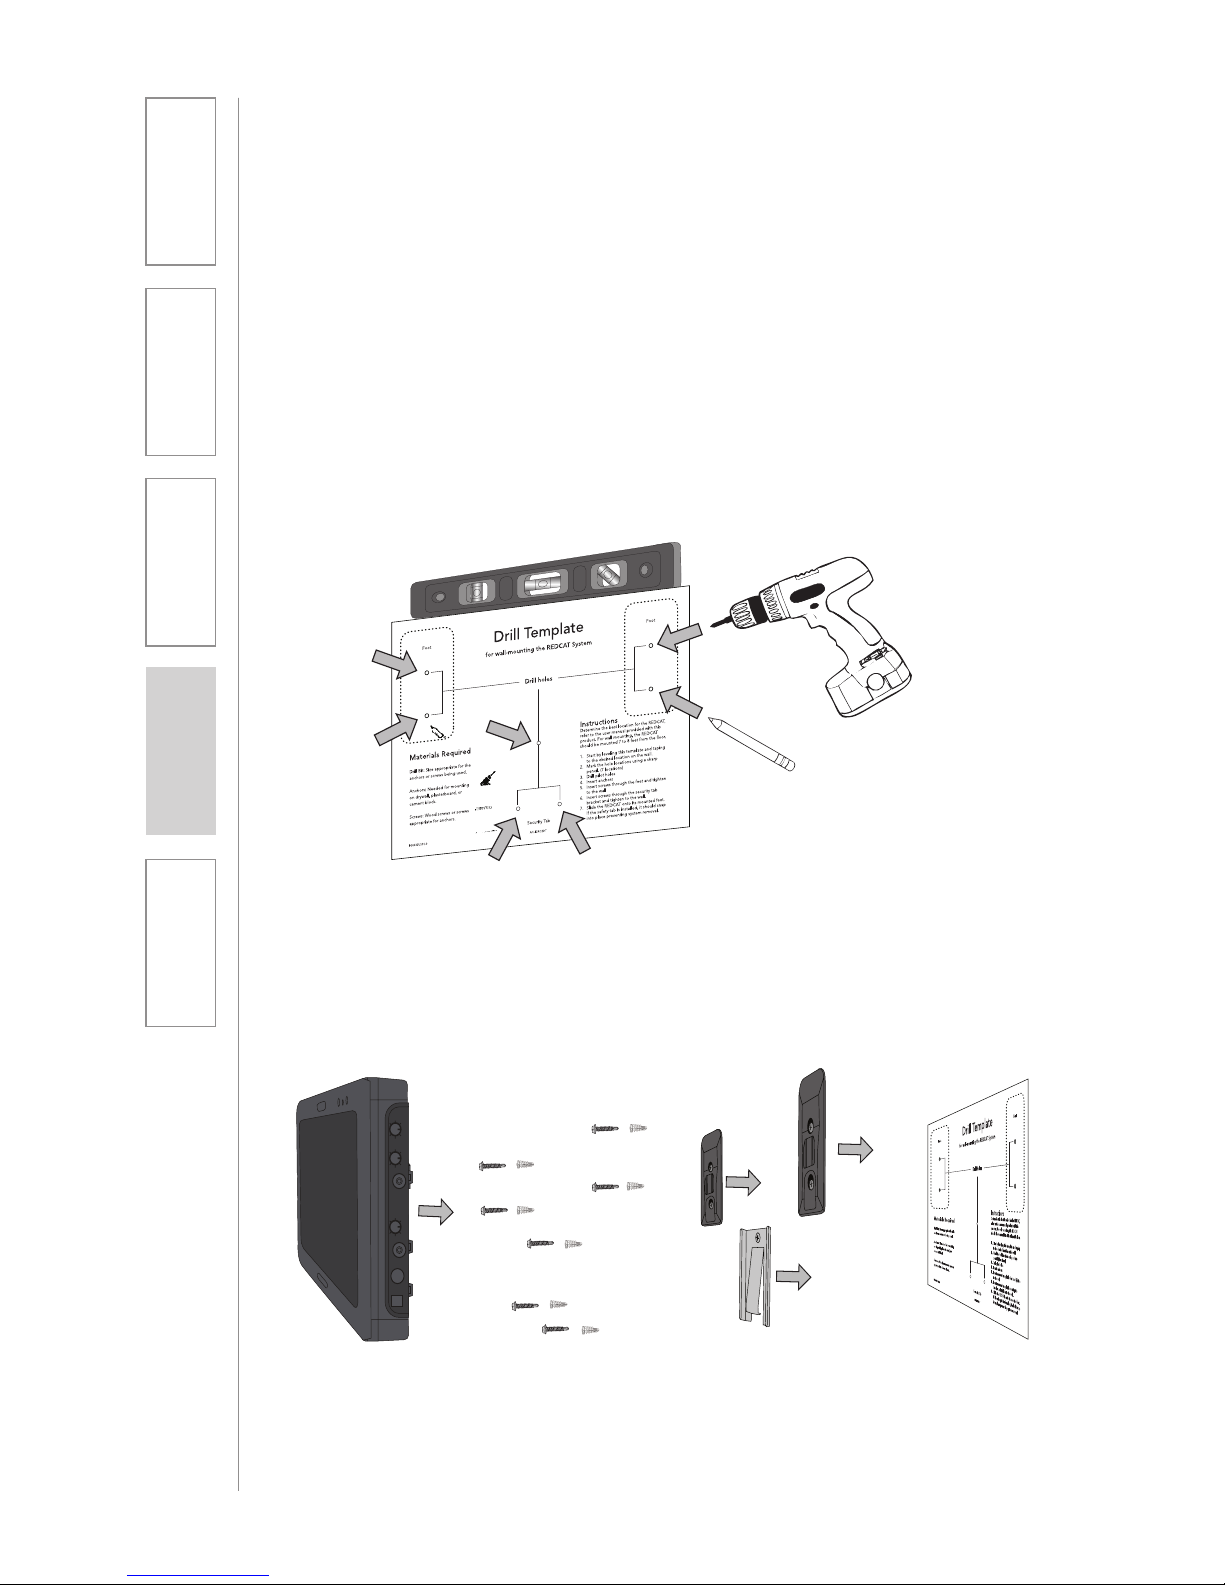
1B. TO SET-UP MOUNTED ON A WALL CONT’D
1. Level template and tape to wall
2. Mark position of drill holes on wall
3. Drill pilot holes
4. Insert anchors
5. Remove feet from Redcat Access and place over anchors
6. Insert and secure screws through the Redcat Access feet into the
anchors
7. If using optional security bracket, mount on wall using the
provided screws and anchors
8. Slide the Redcat Access onto the wall mounted feet
Drill Template
for wall-mounting the REDCAT System
Drill holes
Foot Foot
OR
 Loading...