

LightSpeed Technologies Personal FM System LES 370 Series User Manual
LES 370 Series
Personal FM System
User Manual
Greetings
Congratulations on your purchase of the LES 370 Personal
FM System! Please take a moment to review this manual as it will
help you operate this easy-to-use product, and maximize your investment by caring for and maintaining each component.
Particular attention should be paid to the section discussing batteries
and battery charging to maximize battery life and system operation.
Also note that a troubleshooting guide is available near the end of this
booklet to assist you.
Did You Get Everything?
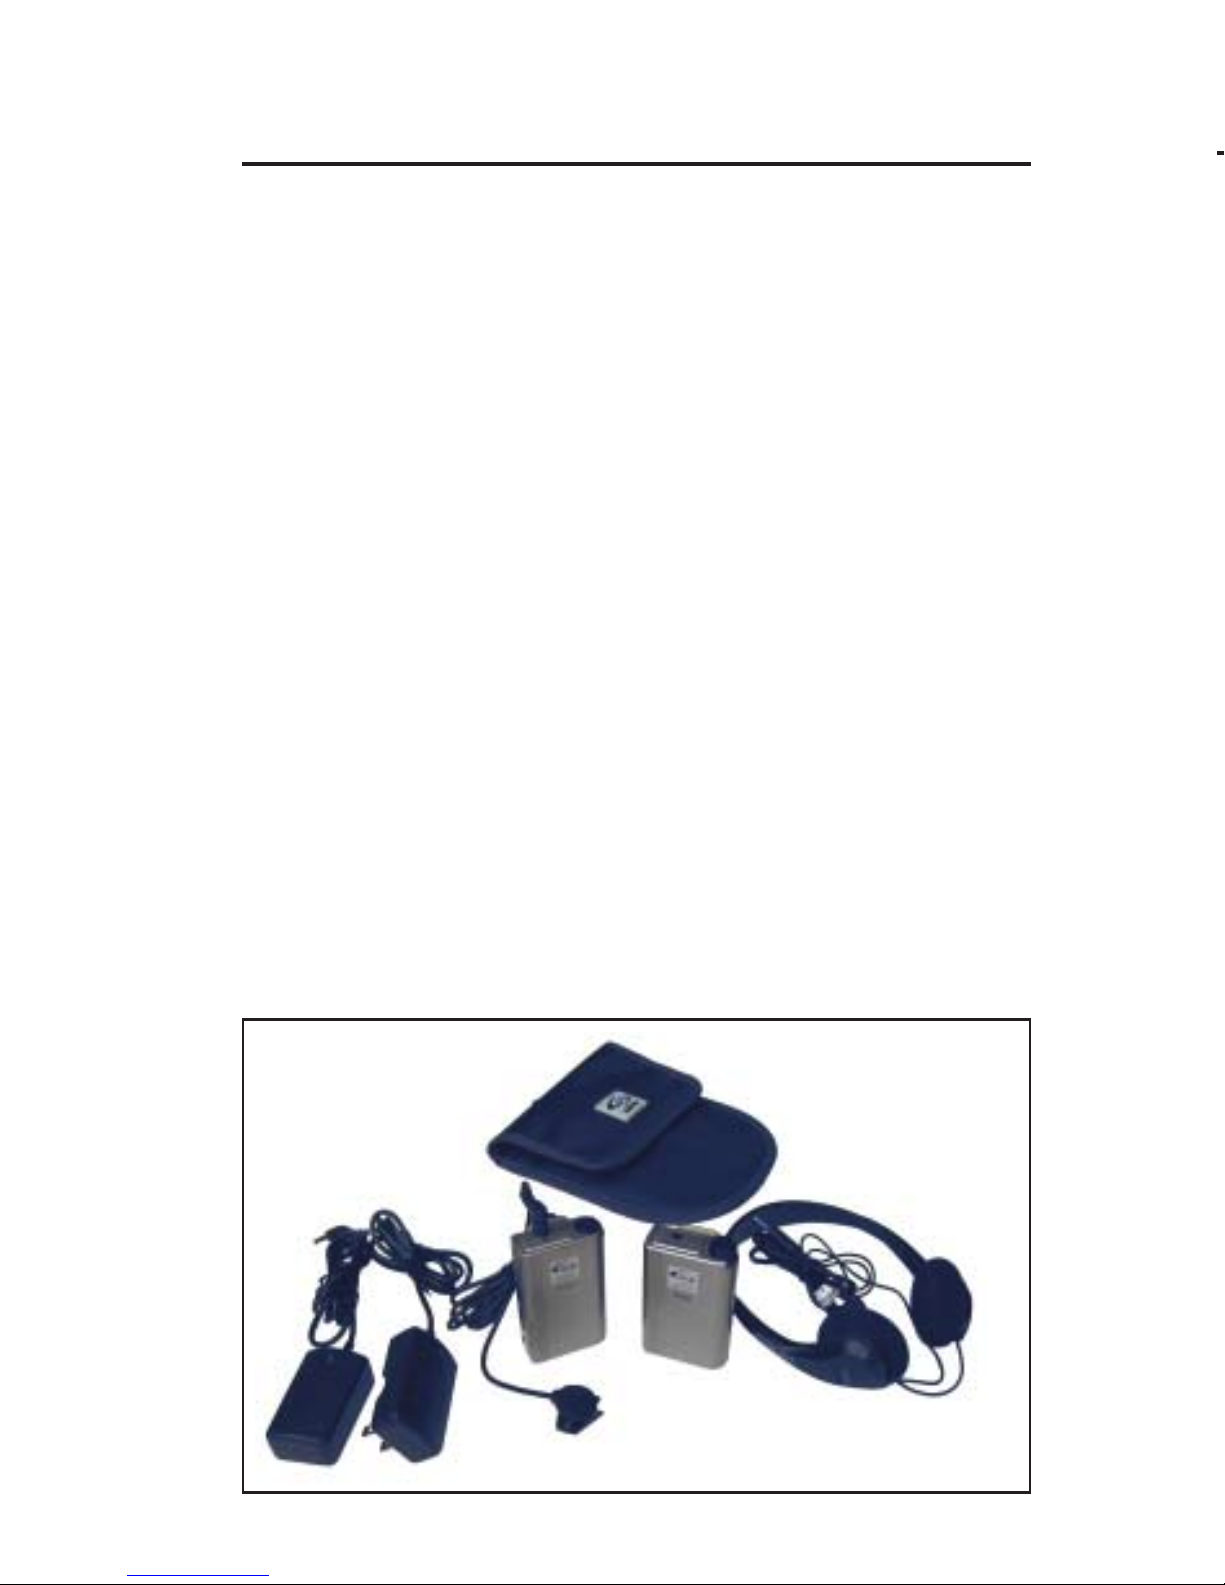
Standard shipping items include:
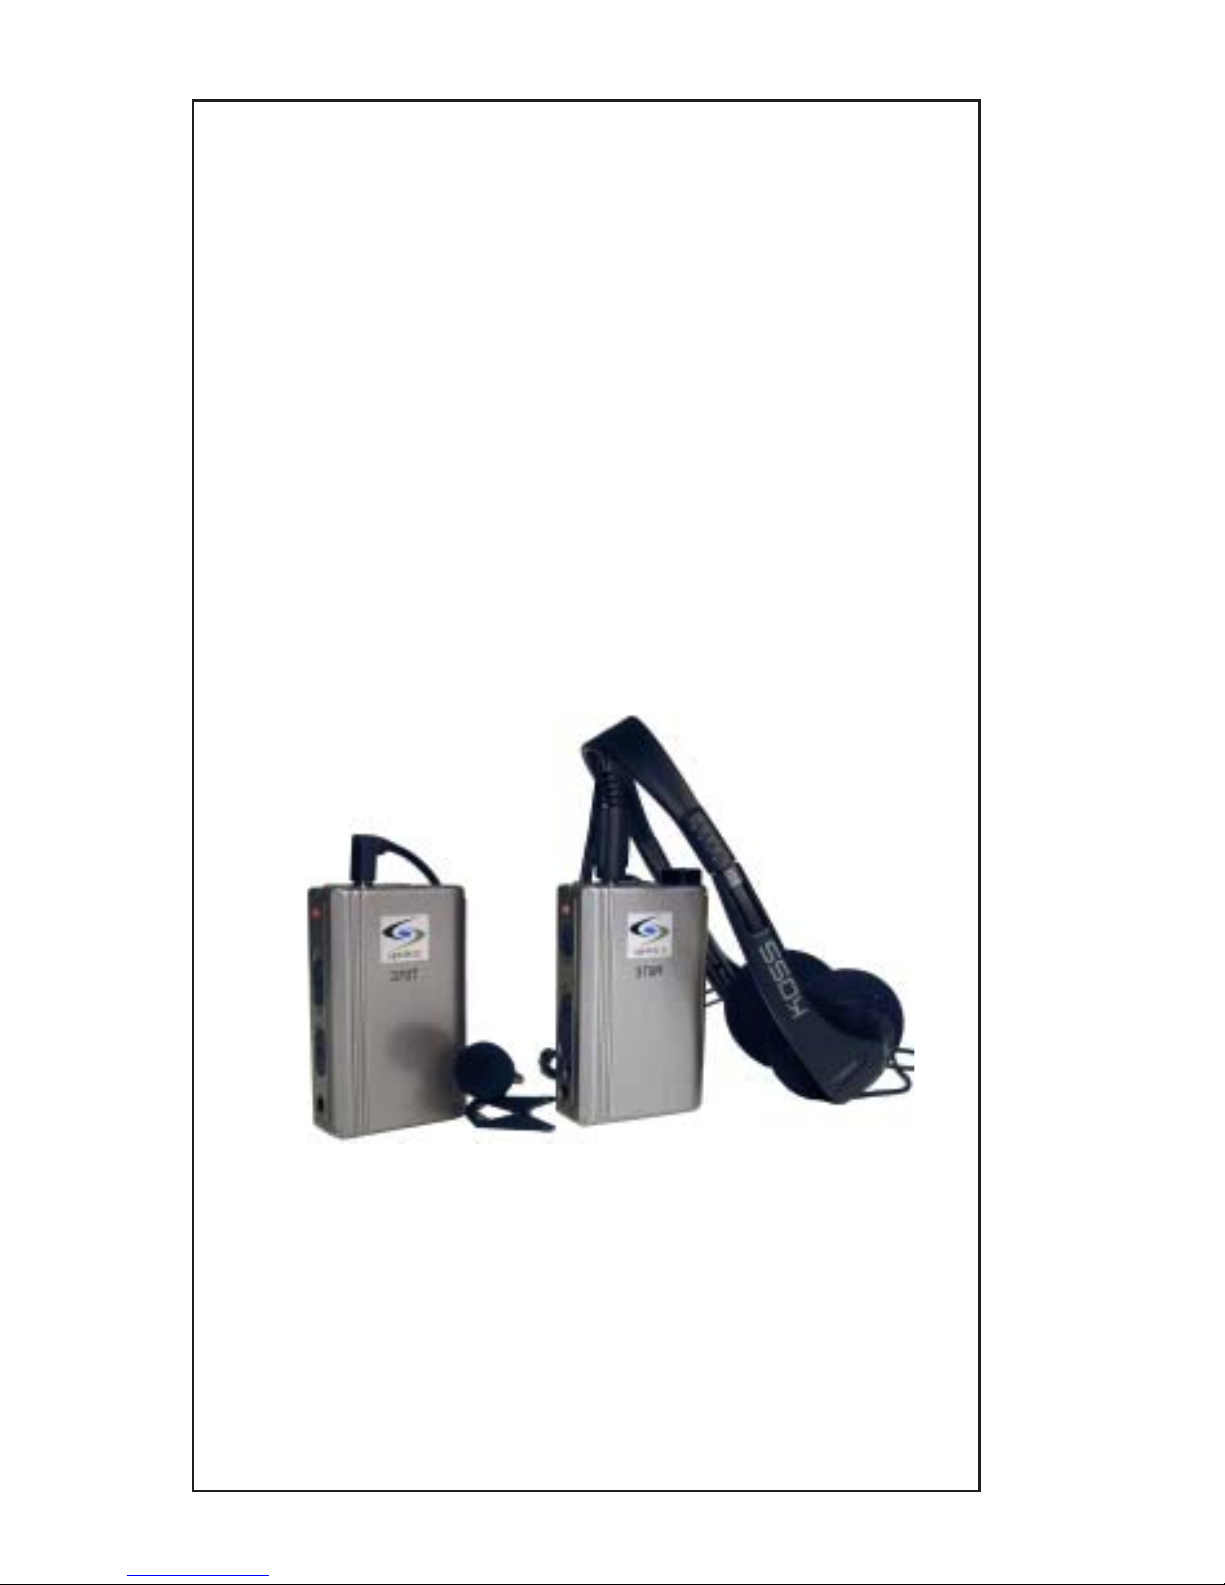
• 370T Transmitter
• 370R Receiver
• Lapel Microphone
• Headphones
• 2 NiMH Rechargeable
Batteries (installed)
• 2 Battery Chargers
• Carry Case
Examine each component carefully to ensure that it arrived safely and
was not damaged in shipping.
LightSPEED Personal FM Systems enhance instructor voice
information presented to students, whether children or adults, with
learning or sensory difficulties.
A teacher or coach wearing the 370T Transmitter with a lapel,
optional lavaliere or optional headset microphone can communicate
privately to a student wearing the 370R Receiver and headphones from
anywhere in the classroom, gym, cafeteria, playground, or on the sports
field. The instructor’s voice is amplified and delivered
directly to the ears of the student.
Since the LightSPEED LES 370 is a wireless system, both the teacher
and student can move freely and still communicate with crystal clarity
at distances up to 300 feet.
Working within the 216-217 MHz assistive listening band, the LES
370 has two frequencies built in. Utilizing two quartz crystals, the
LES 370 can operate on one of two frequencies by changing channels
with a slide switch. (A frequency is a special segment of the “airwaves”
designated by the Federal Communications Commission so that the
Transmitter can “talk” to the Receiver.)
The LES 370 operating frequencies correspond with the frequencies
that Phonak uses in their MicroLink™ systems. If properly matched,
the LES 370 may be used with matching Phonak system frequencies.

Overview
LightSPEED Personal FM Systems enhance instructor voice
information presented to students, whether children or adults, with
learning or sensory difficulties.
A teacher or coach wearing the 370T Transmitter with a lapel,
optional lavaliere or optional headset microphone can communicate
privately to a student wearing the 370R Receiver and headphones from
anywhere in the classroom, gym, cafeteria, playground, or on the sports
field. The instructor’s voice is amplified and delivered
directly to the ears of the student.
Since the LightSPEED LES 370 is a wireless system, both the teacher
and student can move freely and still communicate with crystal clarity
at distances up to 300 feet.
Working within the 216-217 MHz assistive listening band, the LES
370 has two frequencies built in. Utilizing two quartz crystals, the
LES 370 can operate on one of two frequencies by changing channels
with a slide switch. (A frequency is a special segment of the “airwaves”
designated by the Federal Communications Commission so that the
Transmitter can “talk” to the Receiver.)
The LES 370 operating frequencies correspond with the frequencies
that Phonak uses in their MicroLink™ systems. If properly matched,
the LES 370 may be used with matching Phonak system frequencies.

Controls/Functions
LES 370R Receiver
1. LISTENER VOLUME KNOB: Increase or decrease headphone sound
by turning this knob. Level is increased by turning the knob clockwise.
2. EARPHONE JACK: Plug your headphones or earphones into this
jack to transmit the sound received from the transmitter to the
listener’s ear. This jack accepts a 3.5 mm (1/8 inch) mini-plug;
any standard stereo headphones may be used.
3. POWER LIGHT: When power is switched to the ON position,
this red LED indicator will light.
4. POWER SWITCH: Slide switch to the left to turn power ON; slide
switch to the right to turn power OFF.
5. CHANNEL SELECTOR: This slide switch is used to change the
operating channel on the Receiver . The Transmitter must be set to
the same channel (A or B) to send a signal to this Receiver.
6. AUDIO OUT : This is used to connect the 370 Receiver to a computer rather than listener headphones. This jack accepts a 2.5 mm
mini-plug. The level is adjustable from 0 to 10 millivolts with the
Audio Out Adjust (see below).
7. AUDIO OUT ADJUST: This functions similar to a volume control for the Audio Out feature. Output level is increased by turning
this control clockwise using a small screwdriver.
8. DC 3V CHARGING JACK: This jack is used to recharge the
battery while installed in the Receiver using one of the Battery
Chargers included in your system.
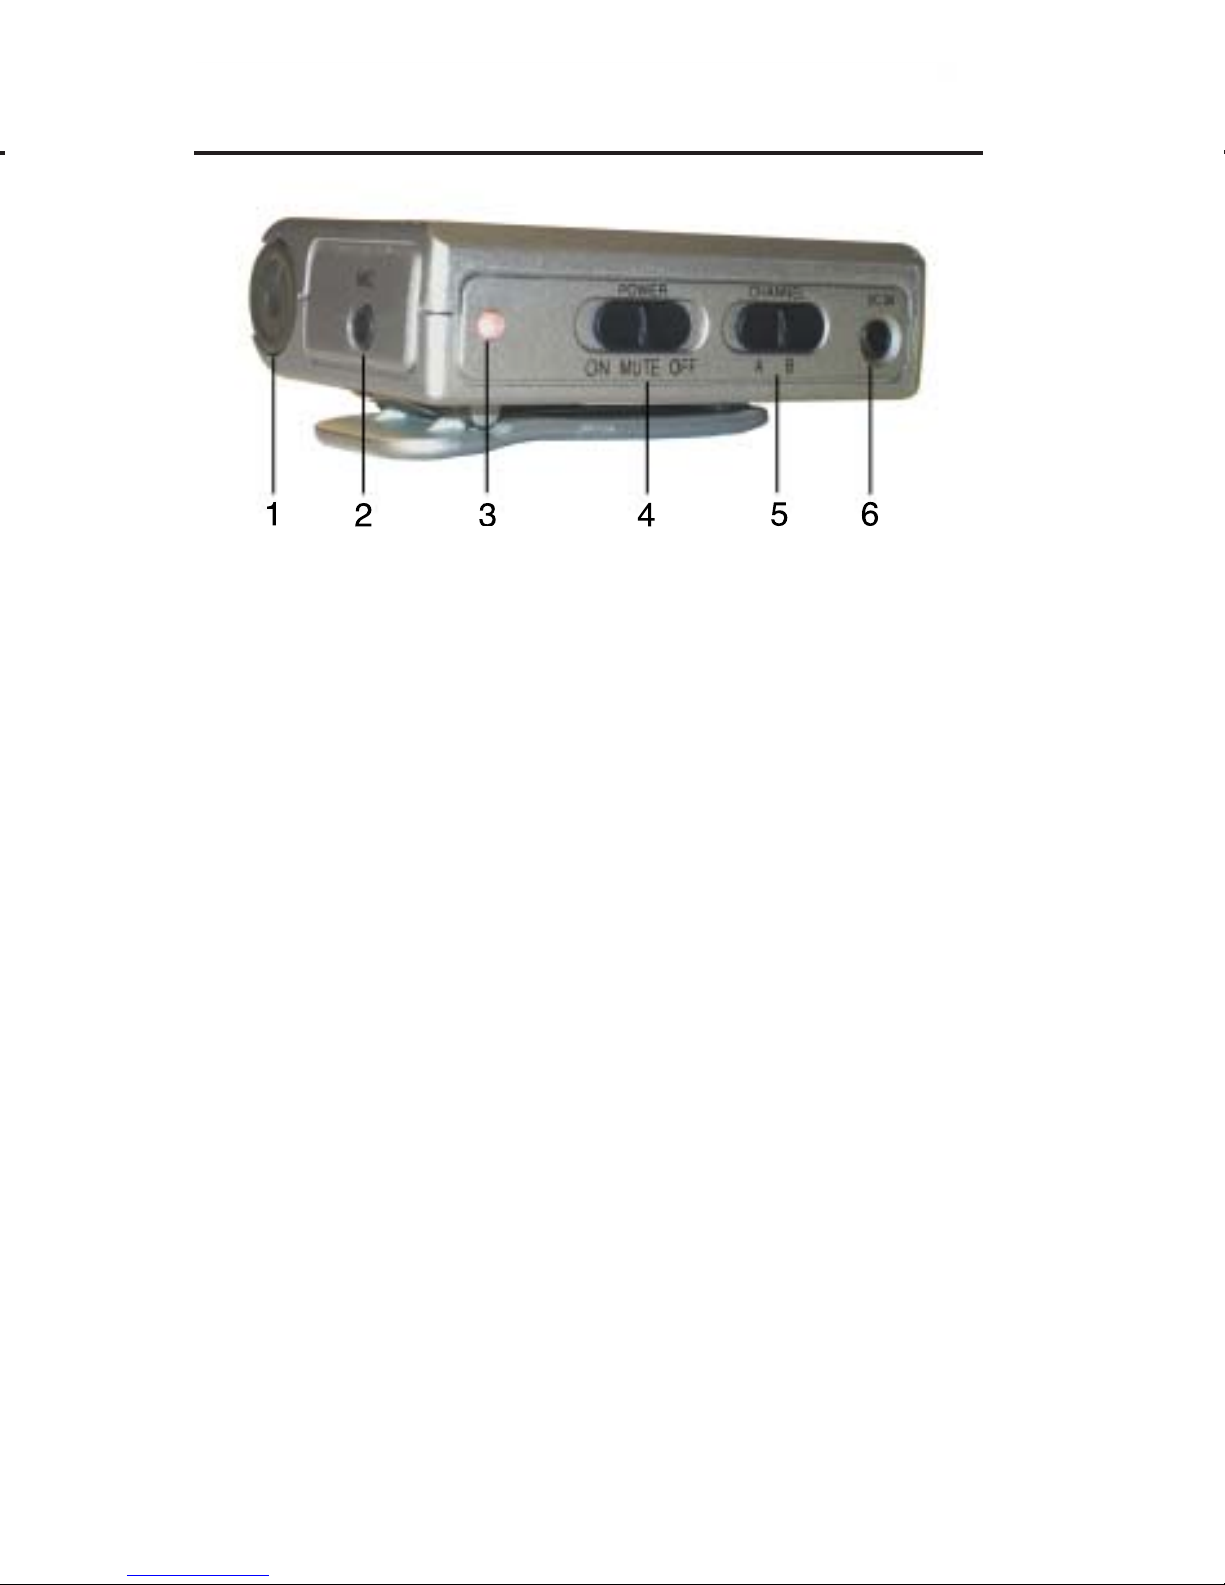
LES 370T Transmitter
1. TEACHER VOLUME KNOB: Turning this knob increases or
decreases output volume. Turn clockwise to increase volume of
the teacher’s voice signal.
2. MIC JACK: Insert your microphone plug securely into this jack.
This jack accepts a 3.5 mm mini-plug if you are connecting
another audio input signal.
3. POWER LIGHT: When power is switched ON, the red LED will
light.
4. POWER/MUTE SWITCH: This switch has three positions, ON,
MUTE and OFF. Slide switch all the way left to turn power ON;
slide switch all the way right to turn power OFF . The center MUTE
position turns the microphone off without turning the Transmitter
power off.
5. CHANNEL SELECT OR SWITCH: This switch is used to change
between channel A and B. Remember, the Receiver must be set
on the same channel (A or B).
6. DC 3V CHARGING JACK: Use this jack and one of the enclosed
Battery Chargers to recharge the battery while it is installed in the
Transmitter.
Controls/Functions
 Loading...