

Lightspeed DQ-WXGA User Manual
DepthQ®-WXGA
HIGH DEFINITION 3D VIDEO PROJECTOR
A product of Lightspeed Design, Inc. co-developed with InFocus® Corp.

DepthQ®-WXGA
HIGH DEFINITION 3D VIDEO PROJECTOR
Declaration of Conformity
Manufactured for Lightspeed Design, Inc. by:
InFocus Corporation, 27500 SW Parkway Ave, Wilsonville, Oregon 97070 USA
European Oce: Louis Armstrongweg 110, 1311 RL Almere, The Netherlands
We declare under our sole responsibility that this projector conforms to the following
directives and norms:
EMC Directive 2004/108/EC
EMC: EN 55022
EN 55024
EN 61000-3-2
EN 61000-3-3
Low Voltage Directive 2006/95/EC
Safety: IEC 60950-1: 1st Edition
Trademarks
DepthQ is a registered trademark of Lightspeed Design, Inc. InFocus, In Focus, and
INFOCUS (stylized) are either registered trademarks or trademarks of InFocus Corporation
in the United States and other countries. DLP® and the DLP logo are registered trademarks
of Texas Instruments and BrilliantColor™ is a trademark of Texas Instruments. Adobe and
Acrobat are trademarks or registered trademarks of Adobe Systems Incorporated. Apple,
Macintosh, and PowerBook are trademarks or registered trademarks of Apple Computer,
Inc. IBM is a trademark or registered trademark of International Business Machines, Inc.
Microsoft, PowerPoint, and Windows are trademarks or registered trademarks of
Microsoft Corporation. NVIDIA is a registered trademark of NVIDIA Corporation.
DESIGN
FCC Warning
Note: This equipment has been tested and found to comply with the limits for a Class B
digital device, pursuant to part 15 of the FCC Rules. These limits are designed to provide
reasonable protection against harmful interference in a residential installation. This
equipment generates, uses and can radiate radio frequency energy and, if not installed and
used in accordance with the instructions, may cause harmful interference to radio
communications. However, there is no guarantee that interference will not occur in a
particular installation. If this equipment does cause harmful interference to radio or
television reception, which can be determined by turning the equipment o and on, the
user is encouraged to try to correct the interference by one or more of the following measures:
--Reorient or relocate the receiving antenna.
--Increase the separation between the equipment and receiver.
--Connect the equipment into an outlet on a circuit dierent from that to which the
receiver is connected.
--Consult the dealer or an experienced radio/TV technician for help.
Changes or modications not expressly approved by InFocus Corporation may void
authority to operate the equipment.
Canada
This Class B digital apparatus complies with Canadian ICES-003.
Cet appareil numérique de la classe B est conforme à la norme NMB-003 du Canada.
Agency Approvals
UL and c-UL (US/Canada), FCC-A (US/Canada), CE (CE member
countries), GOST (Russia), TUV GS (Germany), CCC (China), IRAM
(Argentina), NOM (Mexico), C-Tick (Australia), MIC & eK (South
Korea), PSB (Singapore).
Input ratings: 100-240Vac, 3.0A, 50-60Hz
Lightspeed Design and InFocus reserve the right to alter product oerings
and specications at any time without notice.
1
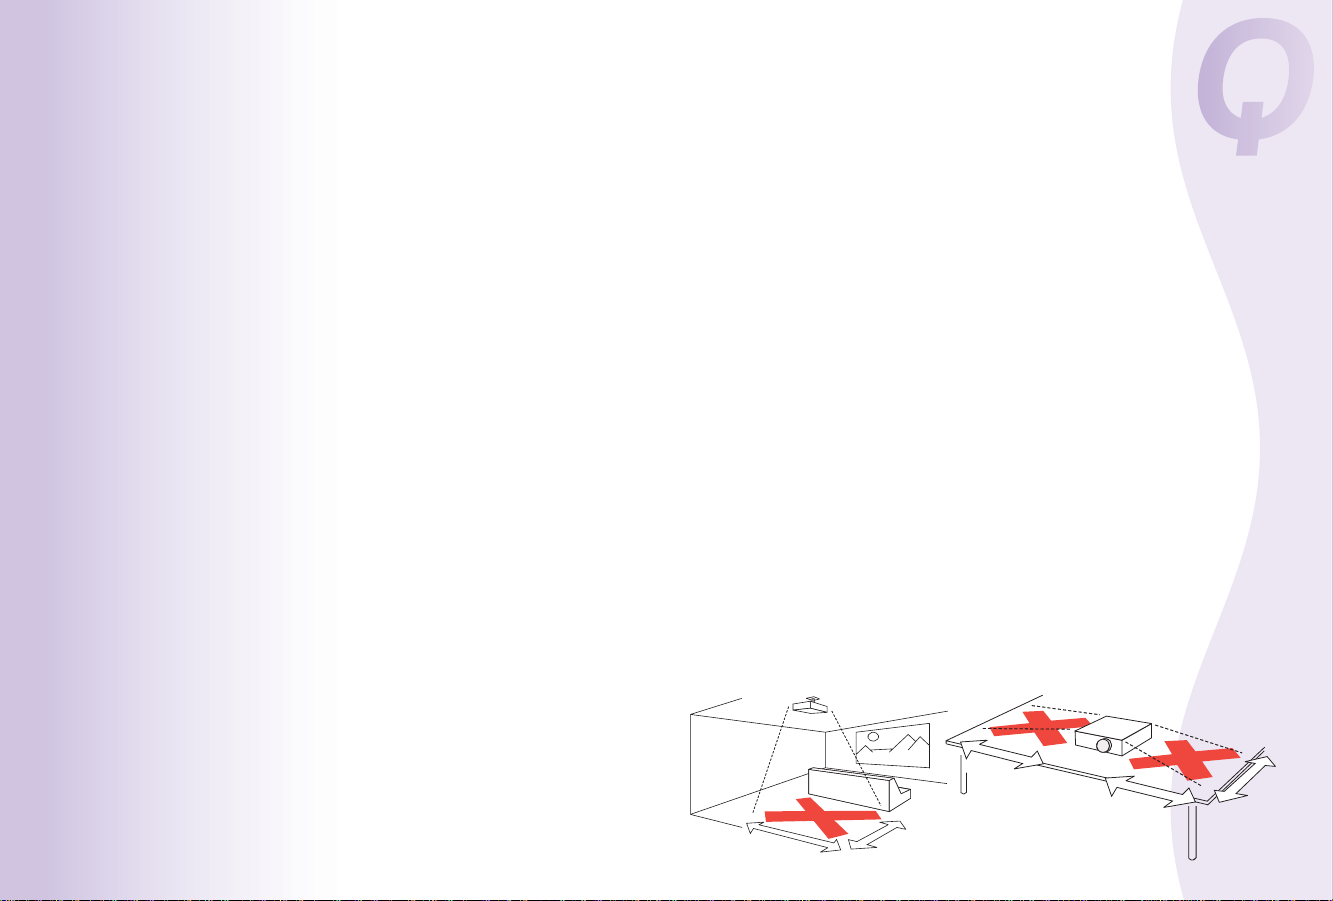
Table of Contents
Introduction
Positioning the Projector
Projector and Device Connector Guide
Connecting a Computer Source
Required Computer Connections
Optional Computer Connections
Displaying an Image
Adjusting the Image
Connecting a Video Device
Composite Video Connection
S-video Connection
Component Video Connection
VESA Connection
Shutting Down the Projector
Troubleshooting Your Setup
Using the Remote Control
Using the Audio
Optimizing Computer Images
Presentation Features
Optimizing Video Images
Customizing the Projector
Using the Menus
Basic Picture Menu
Advanced Picture Menu
Setup Menu
Status and Service Menu
Maintenance
Cleaning the Lens
Using the Security Lock
Stereoscopic 3D Concerns
Follow these instructions to help ensure image quality and lamp life over
the life of the projector. Failure to follow these instructions may aect the
warranty. For complete details of the warranty, see the Warranty booklet.
3
5
6
9
9
9
10
12
13
14
14
14
14
15
15
24
25
26Using the Keypad Buttons
27
27
28
28
29
30
31
32
34
35
35
35
36Replacing the Projection Lamp
38
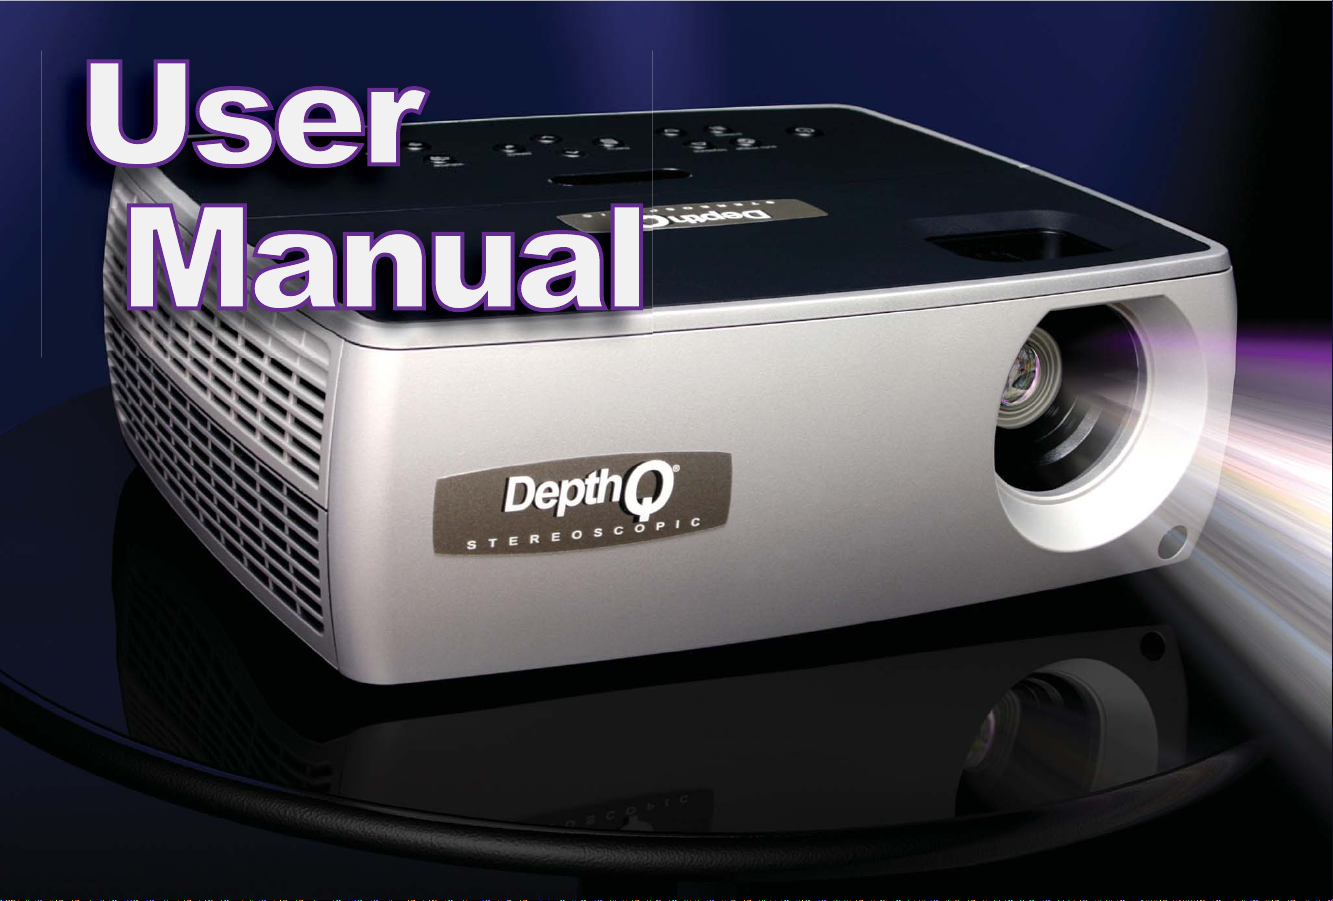
Important Operating Considerations for Safety
Place the projector in a horizontal position no greater than
•
15 degrees o axis.
Locate the projector in a well-ventilated area without any
•
obstructions to intake or exhaust vents. Do not place the
projector on any soft covering that may block the vents.
Locate the projector at least 4' (1.2m) away from any heating
•
or cooling vents.
Use only Lightspeed Design and InFocus-approved ceiling mounts.
•
War ni ng: To prevent eye injury if the projector is ceiling mounted,
wear protective eyewear before opening lamp door. A warning sticker
is included with the user documentation. Place this sticker on the lamp
door if the projector is mounted on the ceiling.
Only genuine InFocus lamps are tested for use in this projector. InFocus
•
is not liable for the performance, safety or certication of any other lamps.
The use of other lamps violates the projector warranty and voids all
certication marks on this projector.
Use only the power cord provided. A surge-protected power strip is
•
recommended.
Refer to this guide for proper startup and shutdown procedures.
•
Hg – Lamp contains mercury. Manage in accordance with local
•
disposal laws. See www.lamprecycle.org
In the unlikely event of a lamp rupture, particles may exit through the
•
projector side vents. When the projector is turned on, keep people,
food, and drinks out of the "keep out" area under and around the
projector, as indicated by the "X" areas below.
3
’
/1m
3
’
/1m
8
’
2
/2.4m
1.5 m
/
’
5
’
2
/0.6m
Introduction
Your new DepthQ® HD 3D projector is simple to connect, easy to use, and
straightforward to maintain. It is a versatile projector that is exible enough
for both professional work as well as home entertainment.
The DepthQ® -WXGA has 1280x720 native resolution and is compatible with
a wide variety of computers and video devices, both in 3D and 2D.
Product Specications
To read the latest specications on your projector, be sure to visit our
website at www.depthq.com/specications.html, as specications
are subject to change.
Accessories
The standard accessories that came with your projector are listed in the
included Quick Start guide. Optional accessories can be found both on our
website at www.depthq.com/accessories.html as well as at the InFocus
store at http://store.infocus.com/stores or from your dealer.
Reliability
DepthQ® HD 3D Projectors are dust-free systems. There aren’t any fan lters
or lamp screens to change, which makes for 24x7 certied operation,
providing around the clock, maintenance free projection.
zoom (rear ring)
focus (front ring)
elevator foot release
keypad
remote control
receiver (IR)
connector
3
panel
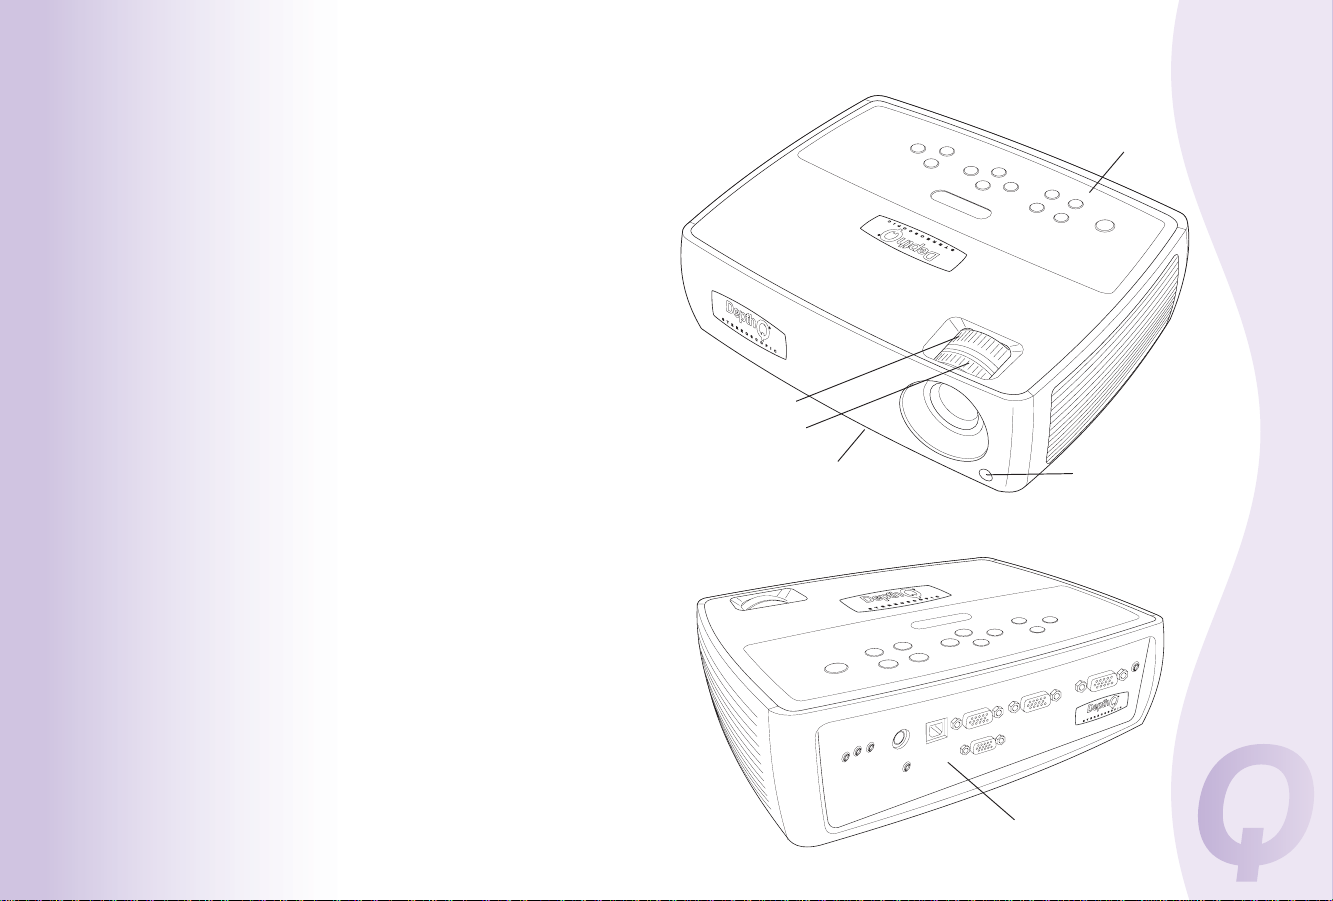
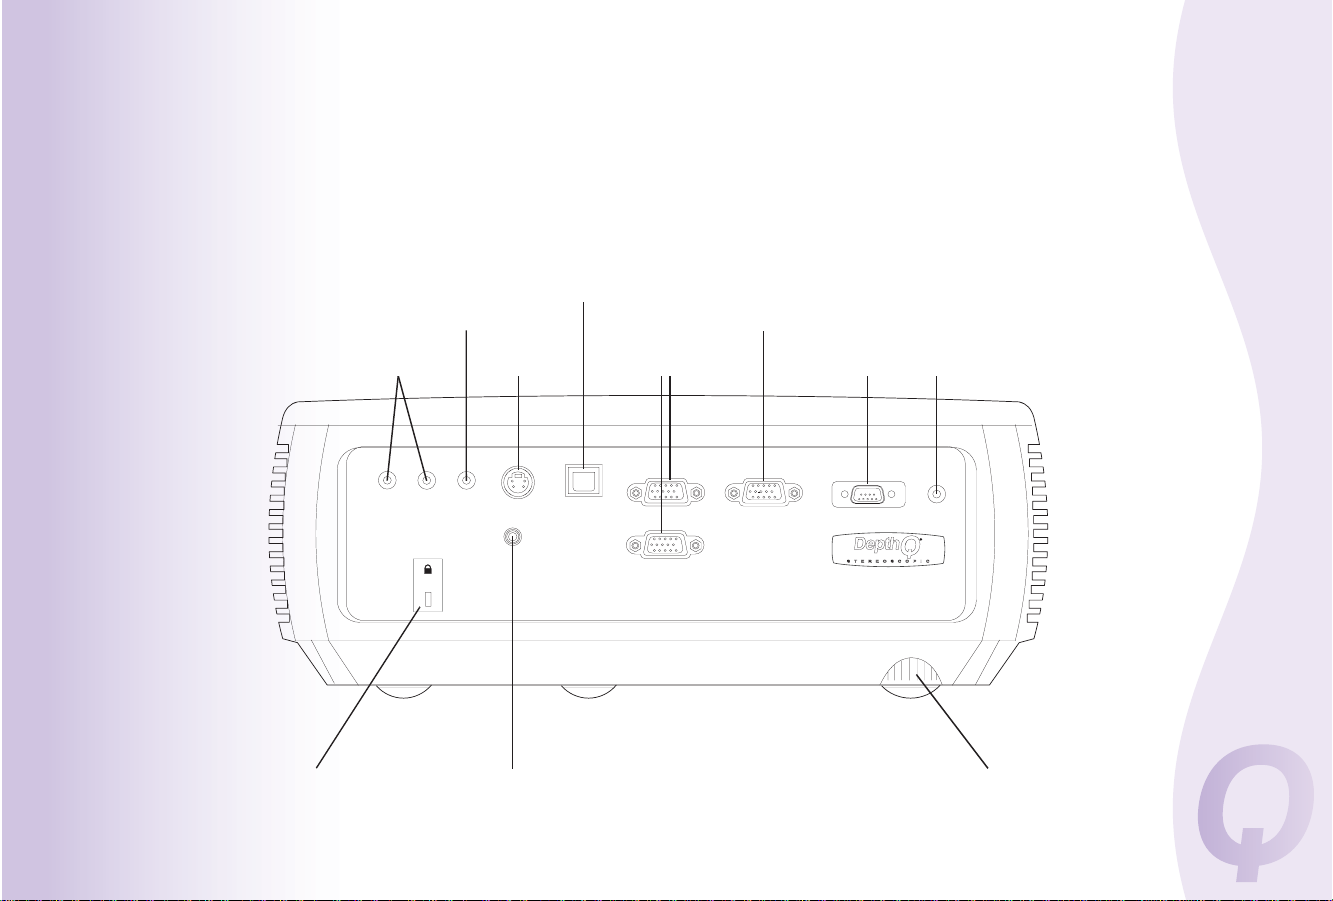
Connector Panel
The projector provides both computer (3D or 2D) and video (2D)
connection options, including:
VESA VGA computer (2)
•
Note that these are two separate inputs that you may switch between. They are not separate
left and right inputs. Either input can be 3D or 2D, but the two do not combine to create the
stereoscopic eect, nor can you display signals from both inputs at the same time.
S-video
•
Composite video
•
Separate audio inputs for video and computer
•
The projector also provides the following connectors:
Monitor out, to provide an image on your desktop computer as well
•
as on the projection screen
Audio out, to provide sound for external speakers
•
USB, to provide mouse control (used with an optional remote control only)
•
A 5 volt DC output (see below)
•
It also has an RS-232 connector for serial control. The Command Line
•
Interface (CLI) specications and commands are on our website:
www.depthq.com/support.html.
Kensington security lock and PIN code feature will keep the projector
•
in the proper location and under authorized use.
5 volt DC output
The 3.5mm mini-jack triggers provide a constant 5 volt, 2 amp DC output while the projector is on. It is designed to provide power for an InFocus
LiteShow II wireless device, which allows wireless 2D projection. More information can be found on the InFocus website at www.infocus.com.
audio in
security lock
audio
out
USB
S-video
composite video
computer
monitor
out
RS-232
5 volt output
adjustable foot
4
Positioning the Projector
To determine where to position the projector, consider the size and shape of
your screen, the location of your power outlets, and the distance between
the projector and the rest of your equipment.
Here are some general guidelines:
Position the projector on a at surface at a right angle to the screen. The
•
projector must be at least 2.5 feet (46.2 cm) from the projection screen.
Position the projector within 10 feet (3m) of your power source and
•
within 6 feet (1.8m) of your video device (unless you purchase extension cables). To ensure adequate cable access, do not place the projector
within 6 inches (.15m) of a wall or other object.
If you are installing the projector on the ceiling, refer to the installation
•
guide that comes with the Ceiling Mount Kit for more information. To
turn the image upside down, see “Ceiling” on page 33. We recommend
using the ceiling mounts described at www.depthq.com/accessories.html.
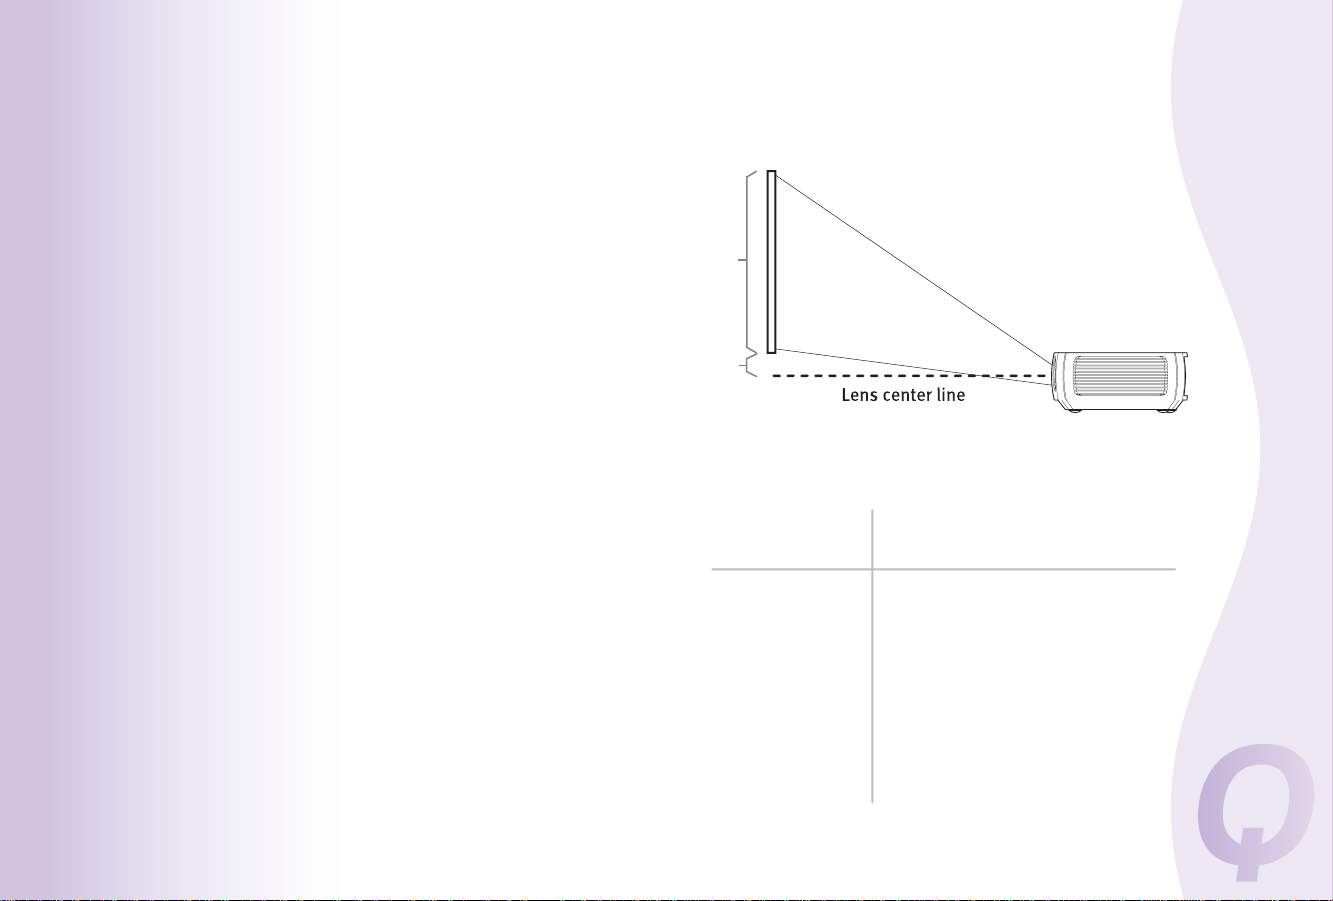
Position the projector the desired distance from the screen. The distance
•
from the lens of the projector to the screen, the zoom setting, and the
video format (as well as the focus to a small extent) determine the size
of the projected image. The native aspect ratio of the projector is 16:9.
The image exits the projector at a given angle. This vertical image oset is
•
115%. This means that if you have an image 10’ high, the bottom of the
image will be 1.15’ above the center of the lens.
Calculating Distance to Screen
You can calculate the approximate minimum and maximum throw distance
for any horizontal or 16:9 diagonal screen size using the following equations:
Minimum Throw Distance = Horizontal Screen Size * 1.49
Maximum Throw Distance = Horizontal Screen Size * 1.83
Minimum Throw Distance = Diagonal Screen Size * 1.30
Maximum Throw Distance = Diagonal Screen Size * 1.59
H
.15H
16:9 Diagonal
Screen Size*
100” / 2.5m
140” / 3.6m
160” / 4.1m
180” / 4.6m
5
Projector Location
As distance increases, the
image gets larger and
moves upwards.
Table 1
Range of distance to the screen for a given screen size
Distance to Screen*
Minimum Maximum
40” / 1m
60” / 1.5m
80” / 2m
120” / 3m
4’4” / 1.3m
6’6“ / 2m
8’8” / 2.6m
10’10“ / 3.3m
13’ / 4m
15’2” / 4.6m
17’4” / 5.3m
19’6” / 6m
5’4” / 1.6m
8’ / 2.4m
10’7“ / 3.2m
13’3” / 4m
15’11“ / 4.9m
18’7” / 5.7m
21’3” / 6.5m
23’11” / 7.3m
*approximate values
Projector and Device Connector Guide
The following illustration and table should help you nd the connectors
to use and obtain the best resolution possible from your input devices,
such as computers, standard VCRs, DVD players (progressive and interlaced),
HDTV sources (1080i and 720p HDTV formats), TV and satellite tuners,
camcorders, video games (progressive and interlaced), and laser disc players.
audio in
security lock
audio
out
S-video
composite video
USB
computer
6
monitor
out
RS-232
5 volt output
adjustable foot

Video Device
HD 3D via Computer
(Stereoscopically-enabled
applications and video games)
Video
Compatibility
1280x720
1024x768
800x600
120 Hz
Progressive
Page-Flip
If Your Device
Connector Is
VGA
Attach to Adapter
or Labeled
Connector on
Projector
Computer 2
CommentsFor Setup Instructions, see
VESA connection on page 14 Computer 1 or
For progressive
120 Hz sources only.
Standard 2D Broadcast TV
(not HDTV) via: cable, digital
cable, satellite TV, DVD, or
VCR
Standard 2D Video Camera
Standard 2D Video Game
NTSC, PAL, and
SECAM formats
NTSC, PAL, and
SECAM formats
NTSC, PAL, and
SECAM formats
Composite video
or S-video
Composite video
or S-video
Composite video
or S-video
Video 2
or Video 1
Video 2
or Video 1
Video 2
or Video 1
7
Composite video connection on
page 14.
S-video connection on page 14
Composite video connection on
page 14.
S-video connection on page 14
Composite video connection on
page 14.
S-video connection on page 14
Not for progressive
(i.e. HDTV) sources.
See page 8.
Not for progressive
(i.e. HDTV) sources.
See page 8.
Not for progressive
(i.e. HDTV) sources.
See page 8.

Video Device
Video
Compatibility
If Your Device
Connector Is
Attach to Adapter
or Labeled
Connector on
Projector
CommentsFor Setup Instructions, see
2D HDTV
(High Denition TV)
2D Progressive DVD
2D Progressive Video Game
High Refresh
2D Progressive Video Game
via Computer
1080i, 720P
Component 480i
1080i, 720P
Component 480P
and 480i
1080i, 720P
Component 480P
and 480i
1280x720P
120 Hz Refresh
VGA
Component video
VGA
Component video
VGA
Component video
VGA
Computer 1 or
Computer 2
Computer 1 or
Computer 2
via optional VESA to
Component adapter
Computer 1 or
Computer 2
Computer 1 or
Computer 2
via optional VESA to
Component adapter
Computer 1 or
Computer 2
Computer 1 or
Computer 2
via optional VESA to
Component adapter
Computer 1 or
Computer 2
VESA connection on page 14
Component video connection on
page 14
VESA connection on page 14
Component video connection on
page 14
VESA connection on page 14
Component video connection on
page 14
VESA connection on page 14
Standard
60 Hz Refresh
Standard
60 Hz Refresh
Standard
60 Hz Refresh
Set Desktop to
120 Hz Refresh
8
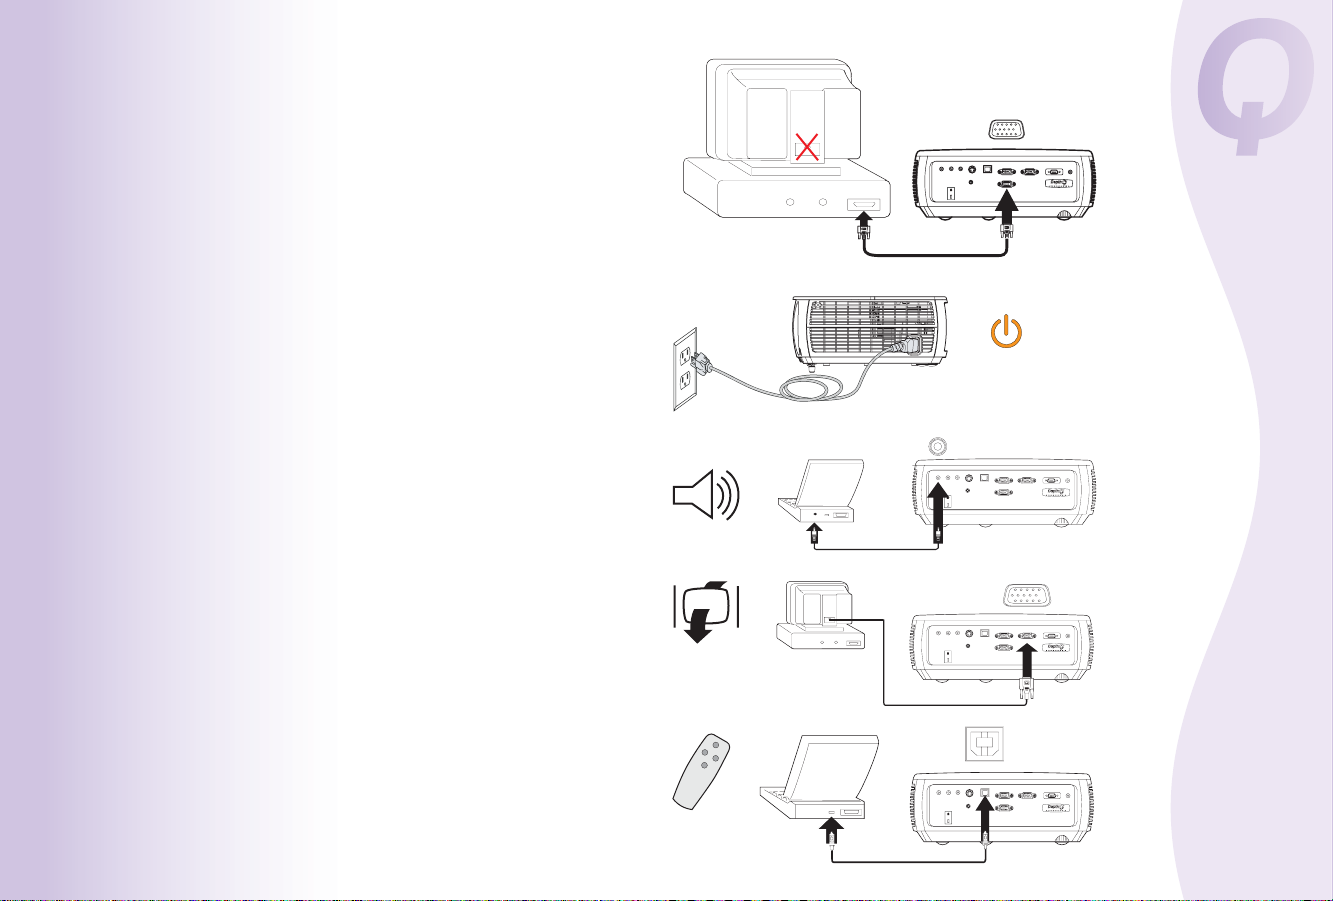
Connecting a Computer Source
Required Computer Connections
Connect one end of the provided VGA computer cable to the Computer 1 or
Computer 2 connector on the projector and the other to the VESA connector
on your computer’s graphics card. If you are using a desktop computer
(currently your only option for viewing stereo 3D on the DepthQ projector),
you will need to disconnect the monitor cable from the computer’s video port
rst (you can connect this monitor cable to the Monitor Out connector on
the projector, see below).
Connect the black power cord to the Pow er connector on the side of the projector and to your electrical outlet. The Power light on the Status Indicator
Panel (page15) turns amber.
NOTE: Always use the power cord that shipped with the projector.
Optional Computer Connections
To get sound from the projector, connect an audio cable (optional cable, not
included) to your computer and to the Audio In Computer connector on
the projector. You may also need an adapter.
If you are using a desktop computer and want to see the image on your
computer screen as well as on the projection screen, connect the computer’s
monitor cable to the Monitor Out connector on the projector.
NOTE: The projector must be plugged in for this feature to work.
connect computer cable
connect power cord
connect audio cable
connect monitor cable
To advance slides in a 2D PowerPoint presentation using an optional remote
control, plug the USB cable into the USB mouse connector on your computer
and the USB connector on the projector.
9
connect USB cable

Infra-Red Emitter
(not included)
DIN or USB cable
(not included)
(USB-connected emitters
may not require external power.)
Displaying an Image
For 3D, Connect your Infra-Red (IR) emitter (not included) to your computer.
•
A) If your graphics card has an onboard DIN3 connector (FX3700, FX4600,
etc.) connect your IR emitter directly to the onboard DIN3 connector.
B) If your graphics card does not have an onboard DIN3 connector (FX1500)
you will need to use a stereoscopic breakout cable (VGA to VGA + DIN3)
(see www.depthq.com/accessories.html).
C) Some IR emitters may connect to a USB port instead of using a DIN3.
Infra-Red Emitter
(not included)
DIN or USB cable
(not included)
Press the Pow er button on the DepthQ® projector.
•
The Power light on the Status Indicator Panel (page 15) blinks green and the
fans start to run. When the lamp comes on, the start up screen displays and
the Power light is steady green. It can take a minute for the image to achieve
full brightness.
? No start up screen ? Get help on page 16.
For 3D, supply power to your IR emitter and aim. (USB-connected emitters
•
may not require external power.)
Either aim your emitter at your screen (for front-projection), through the
screen (for rear-projection), or point it directly towards the viewer from
below or above the screen. Use whichever method works best.
Turn on your computer (for 3D or 2D) or video device (for 2D).
•
For 3D, ensure the computer desktop is set to either 1280x720, 1024x768 or
•
800x600 at a refresh rate of 120 Hz.
press Power button
turn on computer
or video device
10
Folding glasses typically turn on when the ear-pieces are opened.
Others may have a pressure-sensitive switch or a physical button.
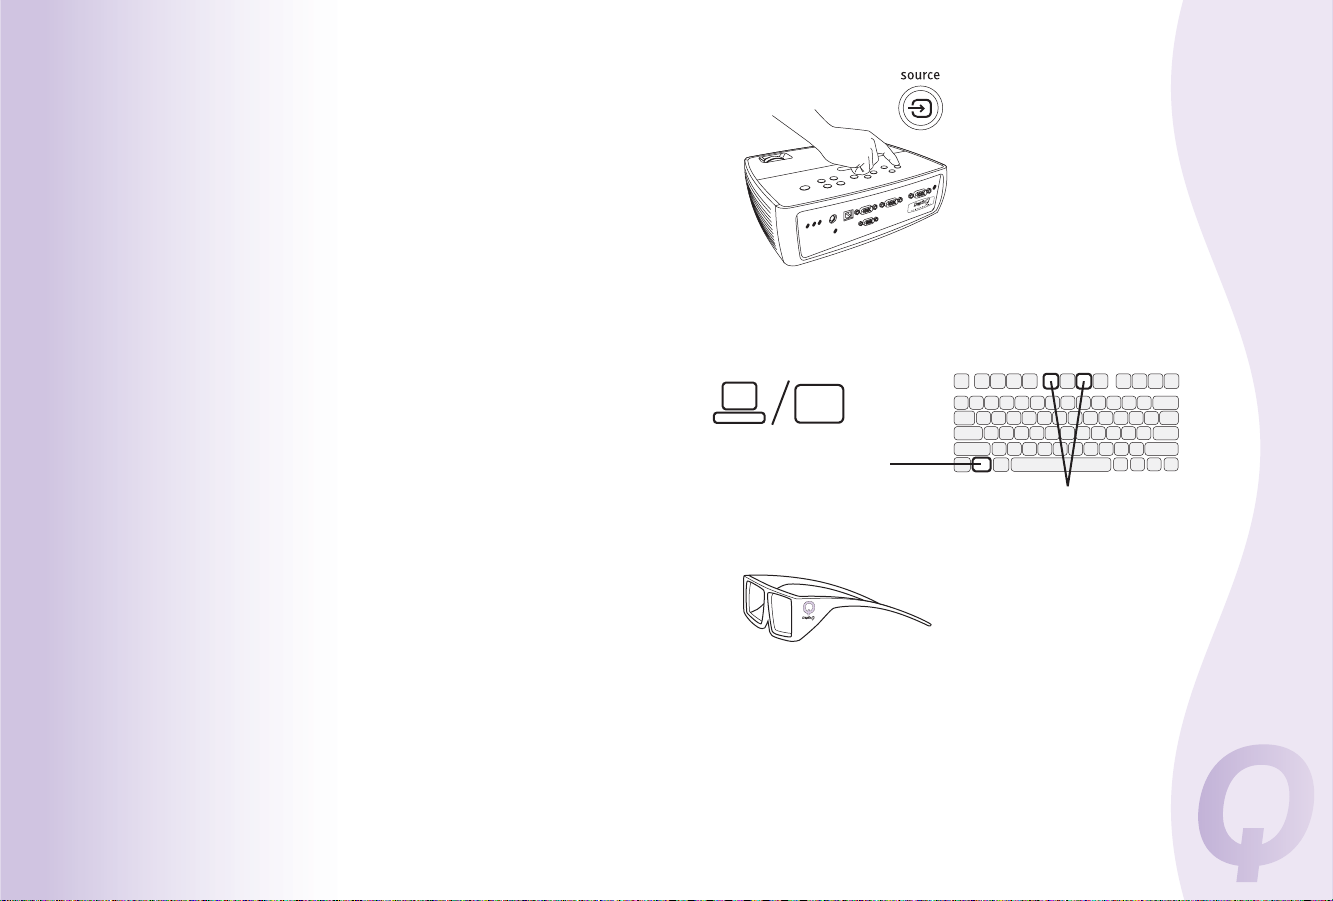
The image should appear on the projection screen. If it doesn’t, press
•
the Source button on the projector’s keypad or remote. You may have to
press it more than once.
Important: If there is still no video, restart your computer
(ensure it’s connected to the projector and the projector is turned on).
If using a laptop (for 2D display), make sure its external video port is active.
(Note - there is currently no 3D solution for using laptops with the DepthQ®)
Many laptops do not automatically turn on their external video port when a
projector is connected. Usually a key combination like FN + F8 or CRT/LCD
key turns the external display on and o. Locate a function key labeled
CRT/LCD or a function key with a monitor symbol. Press FN and the labeled
function key simultaneously. Refer to your laptop’s documentation to learn
your laptop’s key combination.
? No laptop image ? Try pressing the Auto Image button on the key-
pad. Get help on page 17.
For 3D, turn on your active eyewear liquid crystal (LC) shutter glasses.
•
Folding glasses typically turn on when the ear-pieces are opened.
Others may have a pressure-sensitive switch or a physical button.
activate laptop’s external port
FN key
monitor key
or LCD/CRT key
11
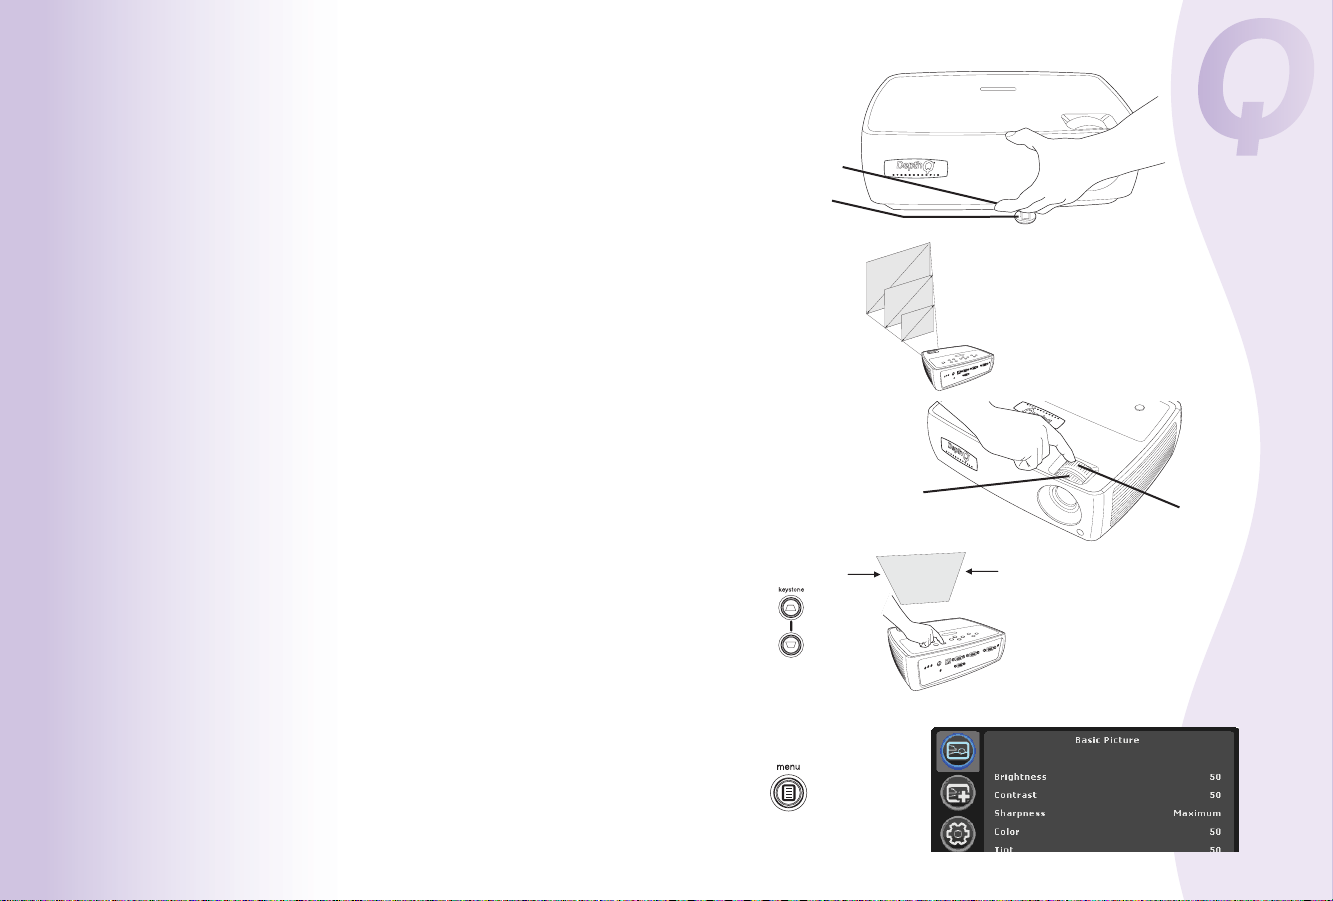
Adjusting the Image
If necessary, adjust the height of the projector by pressing the elevator foot
•
release button to extend the foot.
If necessary, rotate the leveling foot located at the rear of the projector.
•
Avoid placing your hands near the hot exhaust vent at the side of the projector.
adjust height
release button
elevator foot
Position the projector the desired distance from the screen at a 90 degree
•
angle to the screen.
See page 5 for a table listing a sampling of diagonal screen sizes and the
minimum and maximum distances required to ll that screen size.
For even greater detail visit our FAQ page at wwwdepthq.com/faq.html.
Adjust the zoom or focus.
•
The front ring is for focus; the rear ring is for zoom.
If the image is not square, rst make sure that the projector is as perpendicular
•
to the screen as possible.
If the left or right edge of the image is taller or shorter than the other, you can
turn the projector to the left or to the right a few degrees to square the image.
If the image is still wider or narrower on the top or bottom edge of the screen,
press the top Keystone button to reduce the upper part of the image, or press
the bottom Key sto ne button to reduce the lower part. See page 30.
Adjust the Contrast or Brightness in the Basic Picture menu. See page 30 for
•
help with these menu adjustments.
For Aspect Ratio, keep in mind that DVD players must be congured for
16:9 in order to view the highest quality image. For more information
regarding Aspect Ratio, see page 13.
12
adjust distance
adjust zoom or focus
focus
(front ring)
adjust keystone
adjust Basic Picture menu
zoom
(rear ring)
 Loading...