

Page 1
1
2
3
4
5
6
7
8
9
*
0
#
The Chamberlain Group
Elmhurst, IL 60126-1196
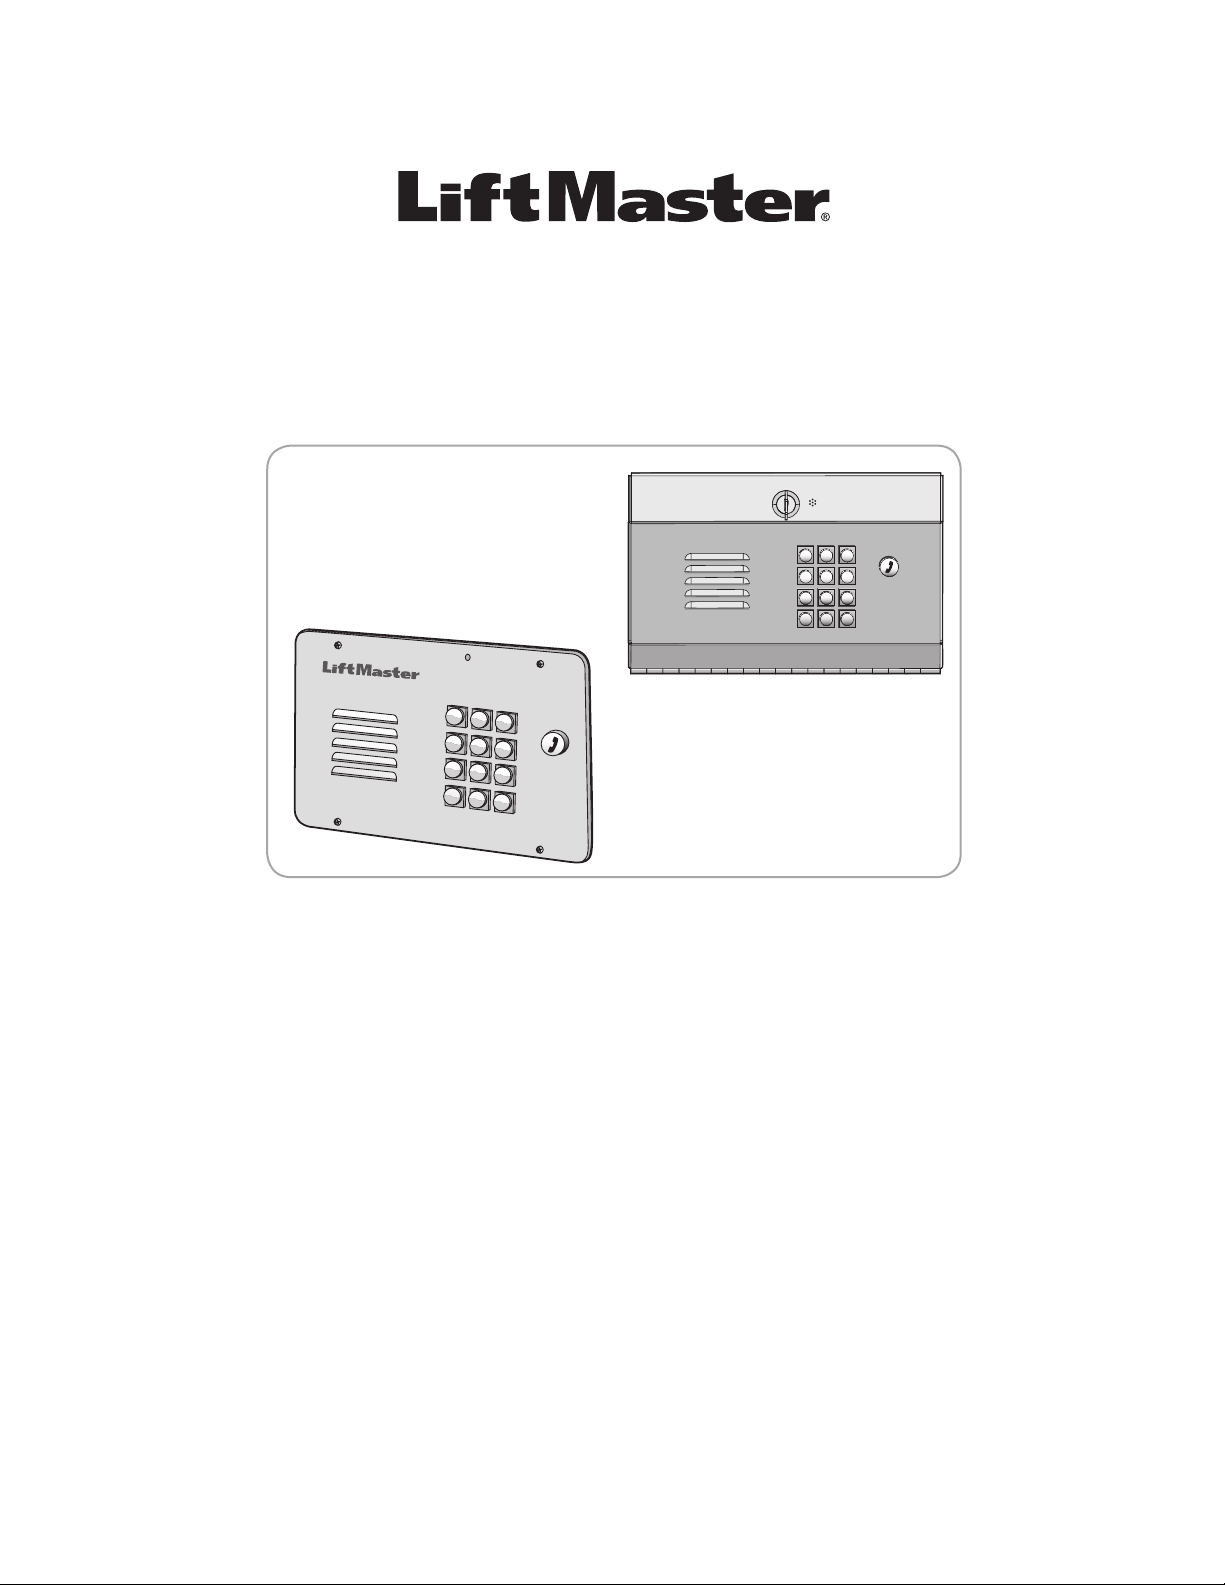
TAC2C & TAC2D
TAC1 RETROFIT KIT FOR CROWN JEWEL & DOORKING 1812® SYSTEMS
123
456
9
7 8
0
#
*
845 Larch Ave.
www.liftmaster.com
Programming Guide
Page 2
PROGRAMMING » KEYPAD
?
?
?
1
3
? ? ? ?
3
?
4
?
?
5
?
?
4
?
?
3
?
1
NOTE: Use the STAR Key “*” to cancel any input.
PROGRAMMING INSTRUCTION SYNTAX KEYSTROKES
General Programming Master Code + Command 1234 + 1 (12,123)
Code Programming Master Code + Command + Code 1234 + 1 (12) + 1234
Relay Programming Master Code + Command + Setting 1234 + 123 + 1234
Level Adjustment Master Code + Command + Setting 1234 + 12 + 1-3
NOTE: Keypad commands are to be entered in a single string to result in success (indicated by double high success tone). Stop and go
keystrokes will result in negative tones (low single and triple fail tones).
CHANGE THE MASTER CODE
1. Enter the Master Code: ? ? ?
2. Enter the Program Code: 0 9 The unit will beep.
3. Enter: # # #
4. Enter the new Master Code: ? ? ?
The unit will beep.
Write down the Master Code and store in a secure location.
ENABLE TELCO MODE
Telco Mode is using the main telephone line for the unit’s
communications to the house or complex.
1. Enter the Master Code: ? ? ?
2. Enter the Program Code: 0
ENABLE INTERCOM (NO TELCO) MODE
1. Enter the Master Code: ? ? ?
2. Enter the Program Code: 0 3
MICROPHONE SENSITIVITY
Allows the resident to hear the visitor at the unit,
1 = Low, 2 = Medium and 3 = High. Default level is 2.
ENABLE PARALLEL RELAY OUTPUT (DEFAULT)
1. Enter the Master Code: ? ? ?
2. Enter the Program Code: 0 2
ENABLE INDEPENDENT RELAY OUTPUT CONTROL
1. Enter the Master Code: ? ? ?
2. Enter the Program Code: 0 2
ADJUST RELAY OUTPUT TIME (RELAY 1)
The amount of time (in seconds) the relay remains active.
Default level is 0.5 seconds.
1. Enter the Master Code: ? ? ?
2. Enter the Program Code: 0 2
3. Enter the Output Time (in seconds): ? ? ?
Example:
0000 = 0.5 Seconds (Minimum)
0010 = 10 Seconds
8000 = 8000 Seconds (Maximum)
1. Enter the Master Code: ? ? ?
2. Enter the Program Code: 0 7
3. Enter the Volume Level:
or 2 or
ADJUST RELAY OUTPUT TIME (RELAY 2)
The amount of time (in seconds) the relay remains active.
Default level is 0.5 seconds.
SPEAKER VOLUME
Allows the visitor to hear the resident at the unit,
1 = Low, 2 = Medium and 3 = High. Default level is 2.
1. Enter the Master Code:
2. Enter the Program Code: 0 6
1. Enter the Master Code: ? ? ?
2. Enter the Program Code: 0 2
3. Enter the Output Time (in seconds): ? ? ?
Example:
0000 = 0.5 Seconds (Minimum)
0010 = 10 Seconds
3. Enter the Volume Level: 1 or 2 or
8000 = 8000 Seconds (Maximum)
2
Page 3
PROGRAMMING » KEYPAD
?
?
?
?
2
?
?
?
4
?
6
?
1
CODE SETUP
The unit’s Master Code is for owner/administrator level commands. The User Codes allow users
to activate and latch relays 1 and 2.
NOTE: The User Code cannot be the same as the Master Code.
ENTER A USER CODE NUMBERS
1. Enter the Master Code: ? ? ? ? The unit
will beep.
2. Enter the Program Code: 9 The unit will beep.
3. Enter New User Code:
4. Enter the Relay for the Code to control: 1 or 2 or no
button is pressed.
NOTE: If no button is pressed in step 4, both relays will
activate simultaneously.
CODE OPERATION
MASTER CODE OPERATIONS
TRIGGER RELAY 1 (ONLY)
Enter the Master Code: ? ? ?
NOTE: Requires Relay 2 be in Independent Mode.
ENABLE VACATION (LOCK DOWN) MODE
Locks the unit from all User Code activity.
DELETE USER CODE NUMBERS
1. Enter the Master Code: ? ? ? ? The unit will
beep.
2. Enter the Program Code: 7 The unit will beep.
3. Enter User Code to be deleted:
ENTER A TEMPORARY (1 SHOT) USER CODE NUMBER
The unit holds 1 temporary User Code.
1. Enter the Master Code: ? ? ?
2. Enter the Program Code: 5 1 The unit will beep.
3. Enter the Temporary User Code:
1. Enter the Master Code: ? ? ?
2. Enter the Program Code: 5 2
DISABLE VACATION (LOCK DOWN) MODE
1. Enter the Master Code: ? ? ?
2. Enter the Program Code: 5 3
TRIGGER RELAY 1
1. Enter the Master Code: ? ? ?
2. Enter the Program Code:
TRIGGER RELAY 2
1. Enter the Master Code: ? ? ?
2. Enter the Program Code:
USER CODE OPERATIONS
TRIGGER PROGRAMMED RELAY FOR USER CODE
4. Enter the Relay for the Code to control: 1 or 2 or no
button is pressed.
NOTE: If no button is pressed in step 4, both relays will
activate simultaneously. Expires in 24 hours or after
fi rst use.
ENGAGE PARTY MODE (RELAY 1)
Party Mode will latch relay.
1. Enter the Master Code: ? ? ?
2. Enter the Program Code: 5
To disengage party mode: Enter a valid code into the keypad
or enter “*9” into the local telephone.
ENGAGE PARTY MODE (RELAY 2)
Party Mode will latch relay.
1. Enter the Master Code: ? ? ?
2. Enter the Program Code: 5
To disengage party mode: Enter a valid code into the keypad
or enter “*5” into the local telephone.
Enter the User Code: ? ? ?
The Relay will activate.
NOTE: Relay 2 must be in Independent Control Mode to
engage Party Mode on relay 2. See page 2.
3
Page 4

PROGRAMMING » TELEPHONE
7
3
0
5
#
3
6
4
5
8
1
2
6
#
9
9
5
5
4
1
0
TELEPHONE PROGRAMMING
ENABLE INTERCOM MODE
Enter the command tone: 0
ENABLE TELCO MODE
Enter the command tone: 0
ENABLE STANDARD (LONG) RING TONE
Enter the command tone: 1
ENABLE ALTERNATE (DUAL) RING TONE (DEFAULT)
Enter the command tone: 1
CALL FORWARDING
ENTER CALL FORWARDING TELEPHONE NUMBER
Enter the command tone:
#
VERIFY CALL FORWARDING NUMBER (VIA CALLER ID)
Up to a 14 Digit Telco Number
ADJUST “PICK UP” RING COUNT
1. Enter the command tone: 1
2. Enter the ring count: 2 through
ENABLE ALTERNATE DTMF PROGRAMMING
This feature changes the fi rst programming digit from
to
Enter the command tone: 1
DISABLE ALTERNATE DTMF PROGRAMMING
Enter the command tone: # 1
ERASE THE CALL FORWARDING NUMBER
Enter the command tone: #
NOTE: This command will also disable the call
forwarding mode.
ENABLE CALL FORWARDING
Enter the command tone: 0
Hang up the phone - Wait for the ring.
TELEPHONE COMMANDS
FROM LOCAL TELEPHONE
TRIGGER RELAY 1
Enter the command tone:
TRIGGER RELAY 2
Enter the command tone:
ENABLE PARTY MODE (RELAY 1)
Enter the command tone: 0
To disengage party mode: Enter “*9” into the local telephone.
ENABLE “DO NOT DISTURB” MODE
Enter the command tone: 1
Enter the command tone: 0
DISABLE CALL FORWARDING
Enter the command tone: 0
FROM FORWARDED TELEPHONE
ACCEPT CALL FROM UNIT ON REMOTE TELEPHONE
Enter the command tone:
Extend talk time: “Talk” or press 0
TRIGGER RELAY 1
Enter the command tone:
TRIGGER RELAY 2
Enter the command tone:
CALL WAITING
Press “Flash” once to answer guest, Once again to return to
outside call on telco line, if
9 or 5 is not
DISABLE “DO NOT DISTURB” MODE
pressed. If 9 (relay 1) or 5 (relay 2) is
Enter the command tone: 1 2
pressed, the TAC2 will automatically return to the telco line.
4
Page 5

PROGRAMMING » QUICK REFERENCE
KEYPAD PROGRAMMING
PROGRAMMING NUMBER DESCRIPTION OF TASK FACTORY SETTING PROGRAMMING PROCEDURE
1 Trigger Relay One Master Code (4 digits) + 1
2 Trigger Relay Two Master Code (4 digits) + 2
7 Delete User Code
9 Enter User Code
03 Enable Intercom (No-Telco) Mode Master Code (4 digits) + 03
04 Enable Telco Mode Enabled Master Code (4 digits) + 04
06 Speaker Volume Level 2
07 Microphone Sensitivity Level 2
09 Change the Master Code
51 Create Temporary (1 Shot) Code
52
53
54 Engage Party Mode (Relay 1) Disabled Master Code (4 digits) + 54
56 Engage Party Mode (Relay 2) Disabled Master Code (4 digits) + 56
021 Enable Parallel Relay Output Enabled Master Code (4 digits) + 021
023
024 Adjust Relay Output Time (Relay 1) .5 Seconds
Enable Vacation (Lock Down)
Mode
Disable Vacation (Lock Down)
Mode
Enable Independent Relay Output
Control
Disabled Master Code (4 digits) + 52
Disabled Master Code (4 digits) + 023
Master Code (4 digits) + 7 + User Code that is to be deleted
(4 digits)
Master Code (4 digits) + 9 + New User Code
(4 digits) + Relay Associated with the User Code (1 or 2)
Master Code (4 digits) + 06 + Volume Level
(1 = Low, 2 = Medium or 3 = High)
Master Code (4 digits) + 07 + Volume Level
(1 = Low, 2 = Medium or 3 = High)
Master Code (4 digits) + 09 + ### + New Master Code
(4 digits)
Master Code (4 digits) + 51 + New Temporary (1 Shot) Code
(4 digits) + Relay Associated with the User Code (1 or 2)
(Expires after 24 hours)
Master Code (4 digits) + 53
Master Code (4 digits) + 024 + Relay Output Time (0000-8000
Seconds) NOTE: Relay output time is ALWAYS 4 digits.
025 Adjust Relay Output Time (Relay 2) .5 Seconds
Master Code (4 digits) + 025 + Relay Output Time (0000-8000
Seconds) NOTE: Relay output time is ALWAYS 4 digits.
DIRECT COMMANDS FROM THE UNIT KEYPAD
KEYSTROKES ACTION
User Code + 1 Triggers Relay 1
User Code + 2 Triggers Relay 2
AUDIO FEEDBACK FROM THE UNIT:
1 Low Tone Beep = Failure
2 Two High Tone Beeps = Valid sequence
3 Low Tone Beep = Error or invalid sequence
NOTE: Use the STAR Key “*” to cancel any input.
NOTE: Keypad commands are to be entered in a single string to result in success (indicated by double high tone).
Stop and go keystrokes will result in negative tones (low single and triple fail tones).
5
Page 6

PROGRAMMING » QUICK REFERENCE
TELEPHONE PROGRAMMING
PROGRAMMING NUMBER DESCRIPTION OF TASK FACTORY SETTING PROGRAMMING PROCEDURE
**01 Enable Call Forwarding Disabled **01
**02 Disable Call Forwarding **02
**03 Enable Intercom Mode Disabled **03
**06 Verify Call Forwarding Number (Via Caller ID) Disabled **06
**07 Enable Telco Mode Disabled **07
**#8 Erase Call Forwarding Number **#8
**10 Adjust Ring Count **10 + Ring Count (2-5)
**13 Enable Alternate DTMF Programming Disabled **13
**14 Enable Standard (Long) Ring Tone **14
**15 Enable Alternate (Dual) Ring Tone Enabled **15
#*16 Disable Alternate DTMF Programming **16
*# Call Forwarding Number # Enter Call Forwarding Telephone Number
*# + Telephone Number
(Up to 14 digits) + #
MASTER CODE NUMBER
Write down the Master Code and store in secure location.
6
Page 7

PROGRAMMING » RESIDENT INSTRUCTIONS FOR TAC MODELS
DIRECT COMMANDS FROM THE LOCAL TELEPHONE
Direct commands allow you to control the unit from the resident telephone. To use direct commands lift the handset, wait for dial tone
and enter the direct command.
PROGRAMMING NUMBER DESCRIPTION OF TASK FACTORY SETTING PROGRAMMING PROCEDURE
*5 Triggers Relay 2 *5
*9 Triggers Relay 1 *9
**04 Enable Party (Latched) Mode Relay 1 **04
**05 Disable Party (Latched) Mode Relay 1
**11 Enable “Do Not Disturb” Mode Disabled **11
**12 Disable “Do Not Disturb” Mode **12
ANSWERING A CALL FROM A VISITOR
To answer a call lift the handset. To control the gate press “*9” or “*5”.
ANSWERING CALLS FROM A REMOTE TELEPHONE
When a call is answered from a remote telephone a beep will be heard for 10 seconds. To accept the call press “0”. Hang up to
disconnect. To control the gate press “*9” or “*5”.
PROGRAMMING NUMBER DESCRIPTION OF TASK FACTORY SETTING PROGRAMMING PROCEDURE
0 Accepts Call From The Unit (Also Extends Talk Time) 0
*5 Triggers Relay 2 *5
*9 Triggers Relay 1 *9
NOTE: Use the STAR Key “*” to cancel any input.
NOTE: Keypad commands are to be entered in a single string to result in success (indicated by double high success tone).
Stop and go keystrokes will result in negative tones (low single and triple fail tones).
7
Page 8

LIMITED WARRANTY
The Chamberlain Group, Inc. (“Seller”) warrants to the fi rst purchaser of this product, for the structure in which this product is originally installed, that it is free from defect
in materials and/or workmanship for a period of one year from the date of purchase.
The proper operation of this product is dependent on your compliance with the instructions regarding installation, operation, maintenance and testing. Failure to comply
strictly with those instructions will void this limited warranty in its entirety.
If, during the limited warranty period, this product appears to contain a defect covered by this limited warranty, call 1-800-528-2806 before dismantling this product. Then
send this product, pre-paid and insured, to our service center for warranty replacement. Products returned to Seller for warranty replacement, which upon receipt by Seller
are confi rmed to be defective and covered by this limited warranty, will be replaced (at Seller’s sole option) at no cost to you and returned pre-paid. Defective parts will be
replaced with new or factory-rebuilt parts at Seller’s sole option.
THIS LIMITED WARRANTY IS IN LIEU OF ANY OTHER WARRANTIES, EXPRESS OR IMPLIED, INCLUDING ANY IMPLIED WARRANTY OF MERCHANTABILITY OR
FITNESS FOR A PARTICULAR PURPOSE OR OTHERWISE, AND OF ANY OTHER OBLIGATIONS OR LIABILITY ON SELLER'S PART. THIS LIMITED WARRANTY DOES
NOT COVER NON-DEFECT DAMAGE, DAMAGE CAUSED BY IMPROPER INSTALLATION, OPERATION OR CARE (INCLUDING, BUT NOT LIMITED TO ABUSE, MISUSE,
FAILURE TO PROVIDE REASONABLE AND NECESSARY MAINTENANCE, UNAUTHORIZED REPAIRS OR ANY ALTERATIONS TO THIS PRODUCT), LABOR CHARGES FOR
REINSTALLING A REPAIRED OR REPLACED UNIT, PROBLEMS RELATED TO INTERFERENCE, OR REPLACEMENT OF BATTERIES.
UNDER NO CIRCUMSTANCES SHALL SELLER BE LIABLE FOR CONSEQUENTIAL, INCIDENTAL OR SPECIAL DAMAGES ARISING IN CONNECTION WITH USE, OR
INABILITY TO USE, THIS PRODUCT. IN NO EVENT SHALL SELLER’S LIABILITY FOR BREACH OF WARRANTY, BREACH OF CONTRACT, NEGLIGENCE OR STRICT
LIABILITY EXCEED THE COST OF THE PRODUCT COVERED HEREBY. NO PERSON IS AUTHORIZED TO ASSUME FOR US ANY OTHER LIABILITY IN CONNECTION WITH
THE SALE OF THIS PRODUCT.
Some states do not allow the exclusion or limitation of consequential, incidental or special damages, so the above limitation or exclusion may not apply to you. This limited
warranty gives you specifi c legal rights, and you may also have other rights which vary from state to state.
FOR TECHNICAL SUPPORT DIAL OUR TOLL FREE NUMBER:
1-800-528-2806
www.liftmaster.com
NOTICE: To comply with FCC and or Industry Canada rules (IC), adjustment or modifications
of this receiver and/or transmitter are prohibited, except for changing the code setting or
replacing the battery. THERE ARE NO OTHER USER SERVICEABLE PARTS.
Tested to Comply with FCC Standards FOR HOME OR OFFICE USE. Operation is subject
to the following two conditions: (1) this device may not cause harmful interference, and
(2) this device must accept any interference received, including interference that may cause
undesired operation.
This document is protected by copyright and may not be copied or adapted without the prior written consent of The Chamberlain Group.
This documentation contains information proprietary to The Chamberlain Group and such information may not be distributed without the
prior written consent of The Chamberlain Group. The software and fi rmware included in the Chamberlain product as they relate to this
documentation are also protected by copyright and contain information proprietary to The Chamberlain Group.
Doorking 1812 is a trademark of Doorking, Inc.
© 2011, The Chamberlain Group
01-35948C All Rights Reserved
 Loading...