


RELEASE DEVICE
CONTROLS
MADE IN THE U.S.A.
RELEASE DEVICE MODEL C+ INSTALLATION MANUAL
UL LISTED CANADIAN LISTED CSFM: 7300-1418:100
GENERAL DESCRIPTION: S/N:_________________________
The LM90-C+ Release Device/Control Panel is a UL Listed, Canadian Listed (C-UL) and California State Fire Marshal Listed (CSFM)
normally energized Fail-Safe device with state of the art electronic control circuitry. This device is designed for use with motorized doors
incorporating a reversing feature safety edge to create an automated door closing system. “DO NOT” install this unit without a safety edge.
The LM90-C+ Release device control is in an inactive state and does not interfere with normal operation of the motorized door in its supervisory
(non-alarm) condition. In an alarm condition, the LM90-C+, turns on optional emergency warning appliances, and after the factory set delay, the
operator will be signalled to close. When an obstruction is encountered, the door will reverse to the open position and repeat the attempt to close
two more times. On the third attempt the motor will turn off and the door will rest on the obstruction. Emergency signalling devices will remain
active. If the obstruction is removed, the door will close after a 3 second delay. If the Open button is depressed while the door is resting on the
obstruction, the door will fully open, reset the cycle counter, and fully close, if the obstruction is removed. If the alarm condition is cleared while
the door is resting on the obstruction, the door will fully open and stop. Emergency signalling appliances will turn off and the system will reset. If
no obstruction is encountered during downward travel, the door will close and the warning devices will turn off. The door system remains active
for emergency egress using the Open push button station. Power must be available to the operator in all conditions for the system to operate. In
absence of power to the operator, standard logic incorporated into the battery supported release device, will initiate a mechanical release to close
the door.
The Release Device features include time delay on alarm, remote test, motor voltage sensing, form-C output, lower limit detection, timer,
battery support for release device logic, smoke detectors, multilingual voice (option), standard annunciators and trouble diagnostic capabilities (do not support motor). Check model label on unit to be installed to verify operating voltage.
CAUTION: Review all installation instructions, procedures, referenced publications, cautions and warnings contained within this manual prior to
installing and/or servicing this product. As with all releasing device systems, maximum fire protection is provided when installed in accordance
with factory specifications and used with fuse link systems. “DO NOT” install this unit without a fuse link system.
TEST WEEKLY TO ASSURE PROPER OPERATION OF RELEASE DEVICE/CONTROL PANEL
Installation and testing to factory specifications shall be performed by factory authorized personnel for proper operation in
accordance with all of the latest National Fire Protection Association (NFPA), Underwriters Laboratories (UL), National Electrical
Code (NEC), local, state, county, district and/or other applicable building and fire standards, guidelines, regulations and codes
including, but not limited to, all appendices and amendments and the requirements of the local authority having jurisdiction (AHJ).
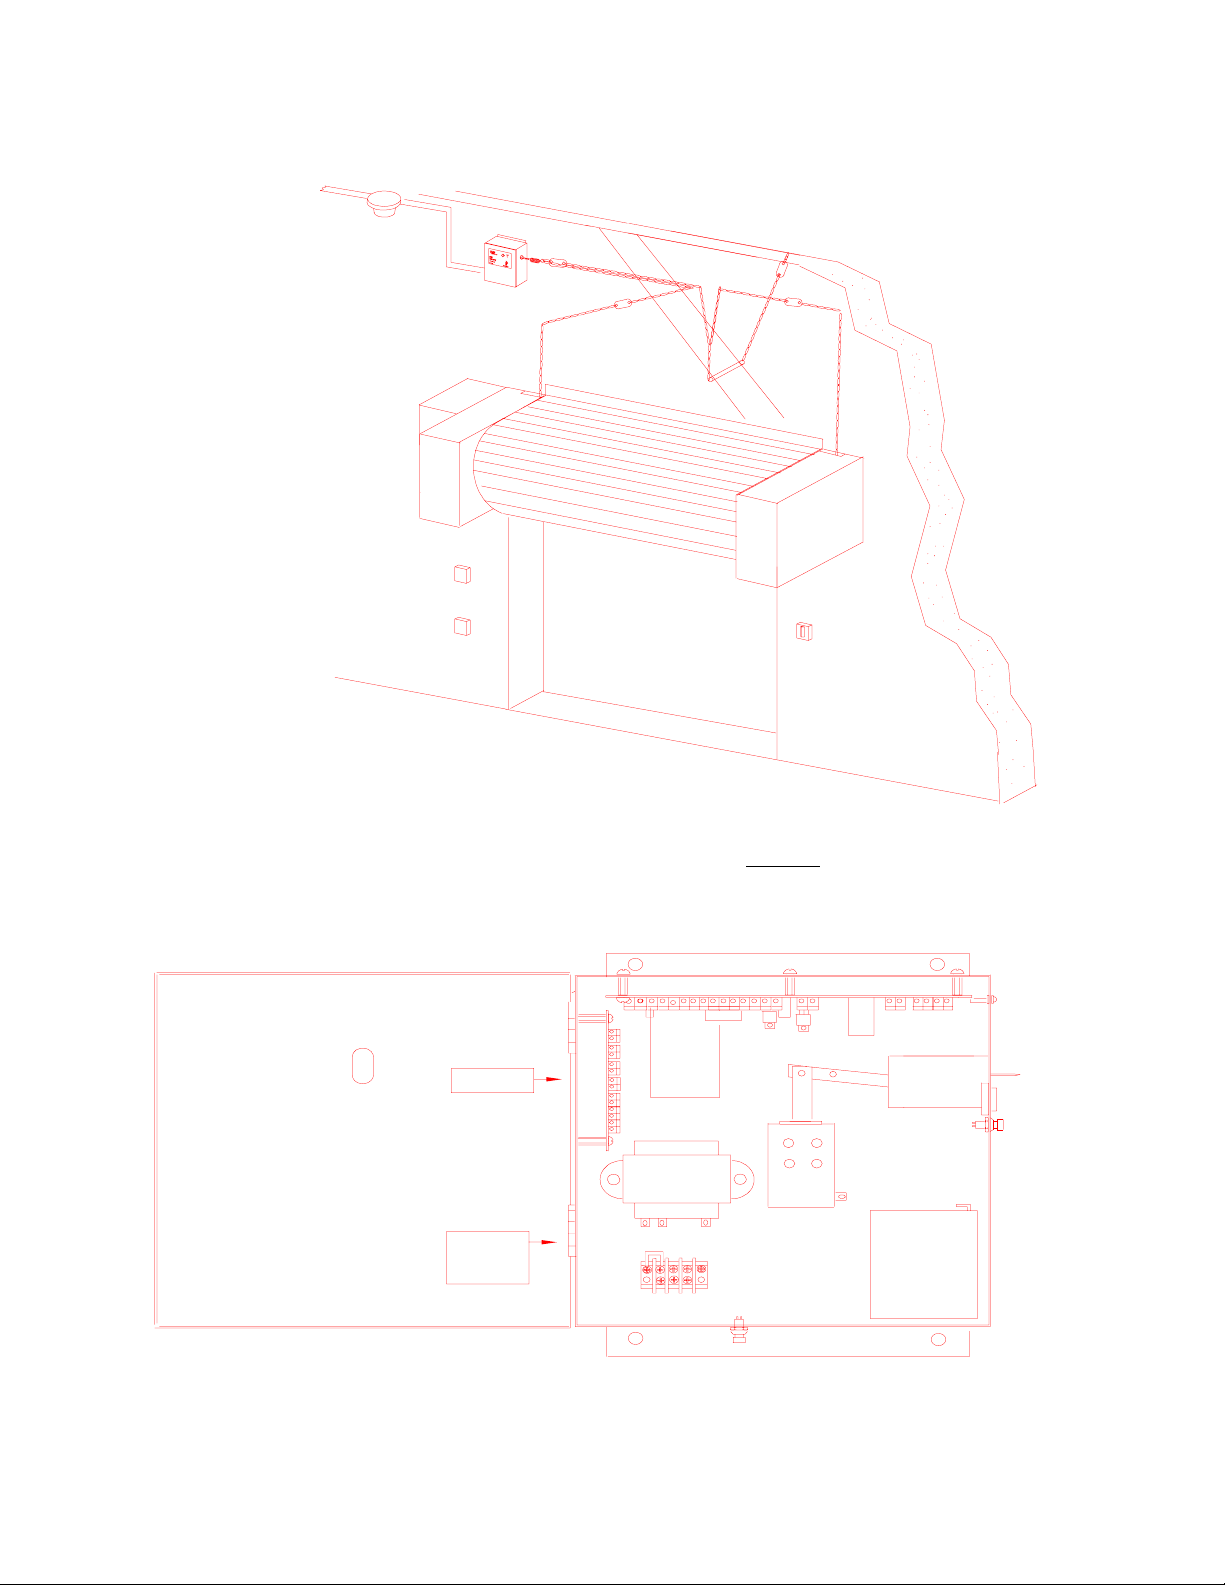
* TYPICAL INSTALLATION FIGURE 1
SMOKE DETECTOR OR
ALARM PANEL
LM90-C+
RELEASE DEVICE
EYEBOLTS OR PULLEYS AS
REQ'D
MOTOR
REMOTE TEST PLATE
FUSIBLE LINK
FUSIBLE LINK
TURNBUCKLE
ANNUNCIATOR
* Actual configuration may differ. See door manufacturers recommendations and NFPA 80 for use of this device and fusible
links with specific door. See NFPA 72 for proper placement of smoke detectors. DO NOT install this unit without fusible links.
INSIDE VIEW FIGURE 1A
CONTROL BOARD
DIAGNOSTIC LEDs
END LINK
TROUBLE SOUNDER
AUX. POWER RESET
C+ MODULE
CLASS 2 WIRING
UPPER ENTRY
CLASS 1 WIRING
LOWER ENTRY
* TRANSFORMER FOUND IN 120VAC
MODELS ONLY
TB1
*TRANSFORMER
TB5
TEST SWITCH
TB2
TB3
BATTERY
TB4
2

INSTALLATION INSTRUCTIONS - To be performed by factory authorized personnel only.
The following installation procedures must be followed to assure performance of equipment to factory standards.
Section A. MOUNTING PROCEDURE (Figure 1)
Typical installation configuration is for illustration only and may not accurately depict door manufacturer’s recommendations.
See door manufacturer’s recommendations for use of this product with specific door being utilized. All hardware required shall
be supplied by the door installer or manufacturer. Use only hardware approved or recognized by the appropriate testing
agencies in conjunction with the installation of this product.
Section B. SMOKE DETECTORS.
When installing smoke detectors with this unit refer to NFPA 72 and NFPA 80, for instructions concerning proper placement
and detection coverage. See Electrical Connections page 2A for wiring information. End of Line Devices shall be installed for
supervision of electrical power to smoke detector. “DO NOT” interface this unit to smoke detectors if electrical supervision is
not provided by means of an End-of-Line Device used in conjunction with the Model C+.
Section C. ELECTRICAL CONNECTIONS
Installation of all wiring and connections, including Class 1 and Class 2 circuits, shall be performed in accordance with, but not
limited to, the latest NFPA, UL and NEC standards and codes. In addition, all installations subject to Canadian standards shall
be performed in accordance with the Canadian Electrical Code, Part I, with respect to wiring material type, wiring gauge related
to power capacity requirements and circuit length and wiring methods. This unit is designed to be used on motorized doors
incorporating a reversing feature safety edge.
DO NOT use this unit on a motorized door if a safety edge has not been installed.
SEE Figure 2 & 2A depicted herein- Verify wiring configuration with that recommended by door manufacturer for use of this
product with specific door operator and accessories being utilized. All wiring beginning at step 4 is low voltage. 18 gauge wire
is recommended.
1. Turn off power supply sources for Model C+ as well as motor before beginning.
2. Verify voltage rating of release device to power source being utilized. Model voltage is indicated on side of unit.
3. Connect power source inputs to TB5, screws 1 & 2. On 24VDC units observe proper polarity by placing positive (+) wire
to screw 1. TB5 screw 3 shall be utilized for earth ground where applicable. (DO NOT connect battery)
4. Normally closed initiating devices - remove jumper from TB1 screw 2 & 3. Connect wiring from N/C initiating device loop
to TB1 screws 2 & 3. Auxiliary power (+12VDC) for smoke detectors may be obtained from TB2. Observe proper
polarity, TB2-2 (+), TB2-1 (-). 4 detector maximum.
Note: TB1 initiating device loops are supervised and cannot be directly series or paralleled between multiple release devices or shared
with other alarm equipment. For proper wiring configurations from multiple smoke detectors or signalling for simultaneous closure
on multiple doors call tech support. Incorrect wiring between units may cause damage to the release control circuit and void warranty.
5. Connect motor control sensing voltage (24V AC or DC) from motor controller transformer secondary to TB3 screws
1 (+) & 2 (-). This connection must be made or the unit will perform a mechanical release in all alarm conditions.
Auxiliary Limit Switch - Figure 2A Detail B (Dry contact auxiliary switch required)
* 6. Aux. Open limit switch. Connect wiring from N/O electrical loop (switch closed in open limit) to C+ Module TB2-1&2.
Connection to an auxiliary open limit switch is required for 3 cycle obstruction count feature. Set aux. limit to toggle
before operator limit when door is traveling toward open position. Improper adjustment will result in continuous cycling
of door.
* Note: Electrical loop must be provided as dry contacts and may not be used in conjunction with the simultaneous
switching of a motor control or any other voltage through the same contacts. Connections of this type will result in
immediate damage to the release device.
7. Operator Closed Limit: (Figure 2A, Closed limit switch Detail A). Remove wire from 24 volt side of operator Close limit
switch. This must be the side of the switch which retains 24 volts when switch opens in down limit position. Splice to
wire from C+ module TB3-1 using wire nut or other suitable connector. Connect return wire from C+ module TB3-2 to
down limit switch.
3

8. *Safety edge common.: (Figure 2A Detail C) Connect Safety Edge control voltage common (normally open side) to wire
from C+ Module TB4-2. This connection replaces the direct connection of the safety edge to the operator control
voltage common. The 24 volt side connection of the safety edge remains unchanged from the factory wiring.
9. Motor control relay (Delay relay) - Connect wiring from TB1-14 & 17 across motor control down switch (For use with
N/O down switch). This relay output latches to initiate a door closure through the operator after a ten second delay.
10. Remote test station. - Connect keyed remote test switch to TB1- 4&5 of Model C+ control board. Series connect the
supervisory resistor (51k ohm @1/4 watt) provided to verify integrity of wiring.
11. Annunciator - (option) connect annunciator to TB1-6 (-) & 7 (+).
Note: Battery should “not” be connected until testing of unit is being performed.
*Safety edge- This unit shall not be installed without a reversing feature safety edge.
TESTING OF RELEASE DEVICE/CONTROL PANEL SHALL BE PERFORMED AND WITNESSED FOR NORMAL OPERATION AFTER INSTALLATION. REFER TO TEST PROCEDURES CONTAINED HEREIN, AS WELL AS ANY OTHER TESTING PROGRAMS RECOMMENDED BY DOOR MANUFACTURER.
RELEASE DEVICE MODEL C PLUS RELEASE DEVICE/CONTROL PANEL
POWER REQUIREMENTS & MECHANICAL SPECIFICATIONS
VOLTAGE RATING
LM90-C+ - 24DC ........ 24VDC +10% / -15%
LM90-C+ - 24AC ........ 24VAC +10% / -15%
LM90-C+ - 120AC ....... 120VAC +10% / -15%
Current with optional accessories shall not exceed alarm current ratings.
NOTE: Initial power up inrush current shall not exceed 3 times rated current on any model.
MOTOR CONTROL SENSE - ALL MODELS
Input Voltage: 24V AC or DC typical +15% / -10%
Input Current: Not to exceed .004A
CURRENT REQUIREMENTS (1)
SUPERVISORY (non-alarm) .120A / ALARM .500A MAX
SUPERVISORY (non-alarm) .120A / ALARM .500A MAX
SUPERVISORY (non-alarm) .120A / ALARM .500A MAX
INITIATING/DOOR DETECTION LOOPS
CAUTION: All initiating devices shall be dry contact type only
Maximum loop resistance: 100 Ohms
Maximum current: Not to exceed .002A
Maximum voltage: 15VDC
FORM C OUTPUT (MAX. CONTACT RATING)
2A/30VDC 60 Watt DC Resistive Load Only
FUSES
All fuses 1A @ 250V, 2AG Fast Acting Type
MECHANICAL SPECIFICATIONS
LOAD RATING (all models) PHYSICAL DIMENSIONS (all models) WEIGHT (includes battery)
Support and Release : 40 LB. MAX. 9.125" x 9.125" x 4.750" (H x W x D)
4
LM90-C
LM90-C
LM90-C+ - 24VDC approx. 12 lbs.
+
- 120VAC approx. 13 lbs.
+
- 24VAC approx. 12 lbs.

LM90-C+ ELECTRICAL CONNECTIONS FIGURE 2
(SEE FIGURE 2A FOR ADDITIONAL WIRING REQUIREMENTS)
End of Line Relay
(2)
As per U.L. 864
(+)
(4)
(1)
(2)
(4)
AUX.UP LIMIT N/O
AUX.UP LIMIT N/C
OR
24V
AC/DC
BLACK
RED
TB1- TB1 THROUGH TB4 PC MOUNT
1
2
3
CIRCUIT BOARD
4
5
(-)
6
(+)
7
8
9
10
11
12
13
14
15
16
17
18
(1)
Trouble relay
non-delayed
2A @ 30VDC
Delayed relay
2A @ 30VDC
(1)
TB2- AUX. POWER
(-)
1
(+)
2
TB3 - MOTOR SENSE
1
(+)
2
(1)
TB4 - REMOTE TEST
1
2
3
4
Do Not loop wires under
terminals. Break wire run to
provide system supervision.
TB5 - CHASSIS MOUNT
(6)
POWER SUPPLY INPUT
BATTERY
GRD
12VDC
4AH
(-)
(+)
123
RED
BLACK
(-)
(+)
(-)
Smoke detector
(5)
(7)
12VDC Annunciator (Option)
AUX.UP LIMIT COMMON
(8)
OR
Use TB1-1 for
common
AUX.DOWN LIMIT N/O
AUX. DOWN LIMIT N/C
FROM MOTOR
(+)
(-)
YELLOW
Test Plate Option
Note: All circuitry connected to/from circuit board terminal blocks TB1 through TB4 is low voltage/low current (see electrical specs page 2).
18 gauge energy limited control cable is recommended for all connections between operator and circuit board.
(1)
DOTTED LINES INDICATE FACTORY INSTALLED JUMPERS: REMOVE WHEN CONNECTING TO N/C
DEVICE. DO NOT REMOVE JUMPER IF LOOP IS UNUSED.
(2) SUPERVISORY DEVICE MUST BE INSTALLED
(3) ALL FUSES 1A @ 250V, 2AG FAST ACTING
(4) MAXIMUM LOOP RESISTANCE 100 OHMS
(5) SEE NFPA 80 AND NFPA 72 FOR PROPER PLACEMENT OF DETECTOR
(6) CLASS 1 WIRING (120VAC Models) MUST ENTER PROPER OPENING. SEE FIGURE 1A
(7) IF UNIT CONTAINS FACTORY INSTALLED VOICE MODULE OPTION REFER TO LM21-VAS INSTALLATION
MANUAL. DO NOT CONNECT A SPEAKER TO TB1-6&7. DAMAGE MAY RESULT TO UNIT.
(8) AUX. UP LIMIT SWITCH MUST BE SET TO TOGGLE OPEN (N/C) OR CLOSED (N/O) BEFORE THE UP LIMIT
SWITCH OF THE OPERATOR WHEN THE DOOR IS TRAVELING TOWARD IT'S OPEN POSITION. IF THE
SWITCH IS IMPROPERLY SET THE DOOR WILL CONTINUE TO CYCLE AND WILL NOT PERFORM THE
THREE CYCLE FUNCTION.
Installation of all wiring must be performed in accordance with, but not limited to, the latest NFPA, U.L. and NEC standards and
codes, as well as the requirements of the final authority having jurisdiction. In addition, all installations subject to the Canadian
standards, shall be performed in accordance with the Canadian Electrical Code, Part I, with respect to wiring type, wiring gauge
related to power capacity requirements and circuit length and wiring methods
.
5

FIGURE 2A : SYSTEM WIRING- See Section C, Electrical Connections herein for wiring details
of illustration below.
Electrical Supervision:
Do not loop wires
under terminals. Break
wire run to provide
proper supervision.
See Detail B
See Detail C
DOOR OPERATOR
L1
L1
24V
{
L2
C
Secondary
Auxiliary Open Limit
See Detail A
24V
{
L2
Close
Button
Operator Close Limit
SAFETY EDGE
End of line relay
Smoke detector
24V
Secondary
C
POWER SOURCE
TB5
3 2 1
TB1
TB1
F1
1 2
1 2
TB3
TB4
TB2
C+ MODULE
TB2
1 2 3 4 5 61 21 2
W2
F2
TB3
TB4
TB5 - RELAY OUTPUTS
Detail A
24 VOLT CONTROL
Coil or other operator
connection
24 VOLT CONTROL
Coil or other operator
connection
Detail C
SAFETY EDGE
Operator Close Limit Switch
N/C
*
N/O
99
9
99
*
N/C
N/O
24 VOLT CONTROL
CPC MODULE:
C
TB3-1
C+
99
9
99
99
9
99
TB3-2
C
Module
TB1- ALARM (POWER) INPUT
TB2- AUX. OPEN LIMIT
TB3- CLOSE LIMIT INTERFACE
C
N/O
Auxiliary Open Limit
TB4-2 - C+ MODULE
99
9
99
TB4-SAFETY EDGE INTERFACE
TB5-RELAY OUTPUT
N/C
TB2-1
99
9
99
TB2-2
99
9
99
Detail B
C+ Module
}
SAFETY EDGE
6

Section D - TEST PROCEDURES: To be performed by factory authorized personnel only
Testing shall be performed and witnessed for proper operation.
Testing of the Model-C+ Release Device does not affect normal operation of alarm system. Testing of the Release Device is
independent of and shall in no way be interpreted as an alternative method of testing the central fire alarm system or any
other components comprising the system. Testing of individual components shall be tested in accordance with installation
instructions provided by the manufacturers of the system components.
CAUTION: CLEAR DOOR OPENING AND PROHIBIT TRAFFIC THROUGH OPENING DURING TESTING!
Power up sequence:
generated. This is a normal condition.
Turn on power to Model C+ and operator. The red LED will light on the Model C+ indicating primary power is present. The
Trouble sounder on the Model C+ will begin to sound. Connect battery observing proper polarity. The trouble sounder will be
silenced and the green battery LED will illuminate indicating the battery is connected and charging. Depress OPEN push
button station, fully raising door (Door must be fully raised, with limit switches set properly to begin testing).
Before testing of system, verify normal operation of close, open, stop and safety edge features of operator.
Test procedures.
A) Turn keyed remote test station to TEST position (if using chassis mount test button it must remain depressed for testing).
Annunciator will turn on and after factory delay of approximately ten seconds the door will begin to close through the motor.
The Model C+ reset indicator should illuminate at this time. When the door reaches full closure the motor will be turned off
along with the annunciators. Return TEST station to OFF position. Depress OPEN push button raising door to it's fully open
position.
B) Place chair or other suitable, easily removable obstruction in path of door closure. Turn keyed remote test station to TEST
position (if using chassis mount test button it must remain depressed for testing). The cycle counter reset indicator on the C+
Module should illuminate at this time. Annunciator will turn on and after factory delay of approximately ten seconds the door
will begin to close through the motor. When the door encounters the obstruction, the reversing edge will reverse the door to
it's fully open position. The reset indicator will turn off. The door will immediately make a second attempt at closure, contact
obstruction and reverse to it's fully open position turning on the Stop Enable indicator. When contact is made with the
obstruction on the third cycle the motor will be turned off immediately and the door will rest on the obstruction. The Stop
Enable and Obstruction Stop indicators will both be illuminated. Remove the obstruction. After approximately a three second
delay to clear the opening the door will be close through the operator. Return TEST station to OFF position. Depress OPEN
push button and raise to fully open position.
Door should be in closed position at power up. If door is in open position, door closure will be
C) Repeat step B until door stops on obstruction. Return TEST station to OFF position. Door will return to it's fully open
position. This feature simulates an automatic reset of the door should the alarm condition be cleared or reset before the
obstruction is removed.
D) Repeat step B until door stops on obstruction. With system still in TEST, push OPEN button station. The door will fully
open allowing for removal of obstruction. With the alarm condition still present (TEST switch activated) the Model C+ counter
will be reset and the door will close immediately. Obstruction cycling will repeat if the obstruction has not been removed.
Return TEST station to OFF position and depress OPEN push button station returning door to it's normal condition.
E) Power Loss Test. Turn off power to operator and Model C+. The internal battery of the Release Device will support the
release device and control logic. Turn TEST switch to Test position. After 10 second alarm delay a mechanical closure will be
performed. This verifies release capability in absence of power to operator. Return TEST switch to OFF position. Reset door
and restore all power.
REMINDER: Testing of the Model-C+ Release Device does not affect normal operation of alarm system. Testing of the
Release Device is independent of and shall in no way be interpreted as an alternative method of testing the central fire alarm
system or any other components comprising the system. Testing of individual components shall be tested in accordance with
installation instructions provided by the manufacturers of the system components.
7

MAINTENANCE REQUIREMENTS
The release devices have been designed to require a minimum amount of system maintenance when installed and used in accordance with
factory specifications. The unit has been designed and tested for use in indoor locations. Regular testing of the unit is recommended. Test
intervals shall ultimately be subject to criteria established by the Final Authority Having Jurisdiction (AHJ).
Serviceable fuses are provided on the Model C+ & Model-C for the following:
See Figures 3 & 3A for fuse locations.
RELEASE DEVICE Model C+ Fuses - Figure 3 Fuses - Figure 3A
F1 1A @ 250V, 2AG Fast Acting, Input Power F1 1 A @ 250V, 2AG Fast Acting, Input Power
F2 1A @ 250V, 2AG Fast Acting, Logic/Aux. Power F2 1 A @ 250V, 2AG Fast Acting, Aux. Signal
F3 1A @ 250V, 2AG Fast Acting, Battery
F4 1A @ 250V, 2AG Fast Acting, Motor Sense
Replacement fuses shall be of equivalent rating and type may be ordered directly from the factory through the technical support number
provided below.
Should servicing of fuses be required, personnel authorized to perform such maintenance shall ensure that; a) all traffic is prohibited through
door opening, b) door is mechanically released and fully closed, c) all power is disconnected from unit including motor sense voltage on
motorized doors.
After servicing equipment as required, unit shall be tested and witnessed for proper operation as described in Section D, TEST
PROCEDURE contained herein.
FIGURE 3 - LM90-C+ CONTROL BOARD
TB1
TB2
TB3
TB4
VR6
VR2
FIGURE 3A
LM90-C+ MODULE
INDICATORS:
CR1 - Green, Alarm
Release Device enabled
CR2 - Yellow,
Stop on obstruction enabled
CR3 - Red,
Obstruction Stop
F3
VR1
F2
CR3
CR2
CR1
F1
TB1
TB2
VR4
TB3
TB4
F4
F1
F2
TB5
8

Warranty Service Procedure
Contact technical support at the number provided below for assistance in determining possible product failure. Installer
shall provide the following information when contacting technical support:
1) Unit Serial Number, found in the following locations
a) Individual unit shipping box
b) Cover of installation manual
c) On unit
2) Name of Distributor who supplied product
3) Name of End User and/or installation company if different from Distributor
4) Detailed description of product non conformity
To receive a Return Goods Authorization (RGA) and shipping address for a Product believed to be defective, all of the above
information shall be required. Products returned without a valid RGA shall be refused receipt. If provided, reference
troubleshooting guide that accompanies product prior to requesting an RGA.
Contact Information
Technical Support: 1- 888-528-7870
RGA (631)467-2501, Request Customer Service
01-30614A
2003, The Chamberlain Group, Inc.
;
All rights Reserved
 Loading...