

Page 1

USER'S GUIDE
USER'S GUIDE
USER'S GUIDEUSER'S GUIDE
Doc 6001001
Doc 6001001
Doc 6001001Doc 6001001
Rev B
Rev B
Rev BRev B
FOR THE
FOR THE
FOR THEFOR THE
EVENT RECORD MONITORING
EVENT RECORD MONITORING
EVENT RECORD MONITORINGEVENT RECORD MONITORING
AND ANALYSIS SOFTWARE
AND ANALYSIS SOFTWARE
AND ANALYSIS SOFTWAREAND ANALYSIS SOFTWARE
Page 2

Page 3

TABLE OF CONTENTS
1 - EVENT RECORD MONITORING AND ANALYSIS (ERMA) SOFTWARE BASICS............ 1
WHAT IS ERMA?.............................................................................................................................1
WHAT DO YOU NEED TO USE ERMA?..........................................................................................1
INSTALLING ERMA .........................................................................................................................2
INSTALLING FROM CD...................................................................................................................2
ACTIVATING THE ERMA PROGRAM..............................................................................................3
EXITING THE ERMA PROGRAM.....................................................................................................3
TIPS FOR USING ERMA..................................................................................................................3
2 - SETTING UP ERMA.............................................................................................................5
WHAT IS THE PURPOSE OF SETTING UP ERMA?.......................................................................5
SETTING UP A SYSTEM IDENTITY ................................................................................................5
EDITING A SYSTEM'S IDENTITY....................................................................................................8
3 - RETRIEVING TRANSACTIONS WITH THE USE OF ERMA...............................................9
WHAT IS "RETRIEVING TRANSACTIONS"? ..................................................................................9
RETRIEVING TRANSACTIONS FROM YOUR SYSTEM.................................................................9
UNRETRIEVABLE TRANSACTIONS.............................................................................................13
4 - ANALYZING TRANSACTIONS WITH THE USE OF ERMA.............................................. 14
WHAT IS "ANALYZING TRANSACTIONS"?..................................................................................14
FILTERING, SORTING, AND PRINTING TRANSACTIONS...........................................................14
5 - MONITORING TRANSACTIONS WITH THE USE OF ERMA........................................... 20
WHAT IS "MONITORING TRANSACTIONS"?...............................................................................20
MONITORING TRANSACTIONS ON YOUR SYSTEM...................................................................20
6 - ERROR MESSAGES AND THEIR MEANINGS................................................................. 25
7 - GLOSSARY........................................................................................................................27
8 - INDEX................................................................................................................................. 29
Copyright 2000
ALL RIGHTS RESERVED
Sentex Systems
Chatsworth, CA
Visit us at www.sentexsystems.com
THIS DOCUMENT IS PROTECTED BY COPYRIGHT, AND MAY NOT BE COPIED OR ADAPTED WITHOUT THE
PRIOR WRITTEN CONSENT OF SENTEX SYSTEMS. THIS DOCUMENT CONTAINS INFORMATION PROPRIETARY
TO SENTEX SYSTEMS AND SUCH INFORMATION MAY NOT BE DISTRIBUTED WITHOUT THE PRIOR WRITTEN
CONSENT OF SENTEX SYSTEMS.
MS-DOS is a registered trademark of Microsoft Corporation
Rev B Doc 6001001
Page 4

Page 5

1 - EVENT RECORD MONITORING AND ANALYSIS (ERMA)
SOFTWARE BASICS
WHAT IS ERMA?
Event Record Monitoring and Analysis software (referred to as ERMA for the remainder of this
document) is a transaction analysis software which is to be used with your stand-alone or Multi-Link Sent ex
Infinity system. A "transaction analysis sof t ware" is a com put er program which allows you to view, record, and
analyze actions that have taken place on your Infinity system.
If you have little or no experience working with the transactions in your Infinity system, ERMA is the
software for you. ERMA consists of the following features:
•
Installs onto your personal computer’s hard disk dr ive in a simple and easy manner.
•
Stores up to 99,999 transactions at a single time on your computer's hard disk drive.
•
Allows your computer to "capture" transactions in real t ime ( as they occur on your system) or upon
demand of the user for easy monit or ing and viewing.
•
Allows easy “filtering” of the t r ansactions by code, name, date and time, action, and source.
•
Allows you to print a list of the transactions to your computer's printer.
This user's guide is based on the assumption that you have some basic computer knowledge. If this is
not true, it would be beneficial for you to read the manuals which came with your computer before moving
ahead with this document.
For the sake of simplicity in the r em ainder of this document, a stand-alone Infinity system will be
referred to as an Infinity system, an Infinity Multi-Link chain will be referred t o as a Multi-Link system, and an
individual Infinity Multi-Link unit within a chain will be referred to as a unit.
WHAT DO YOU NEED TO USE ERMA?
To use ERMA, you will need:
•
One of the following Sentex Systems:
1) A Multi-Link system with version 3.16 firmware or higher in each unit of the system
(firmware revisions that begin with a "4" or a "5" may not be used).
2) An Infinity system with version 6.0 firmware or higher.
•
An IBM PC-compatible computer with at least one serial port.
•
A Hercules (monochrome), EGA (monochr om e or color ), or VGA (monochrome or color) display.
• One high density floppy disk drive and one hard disk drive.
• At least 3.3MB of space on your computer’s hard disk drive for each I nfinity system.
•
640K of RAM, of which at least 550K must be available for ERMA to use during operation.
•
MS-DOS version 3.3 or higher previously installed on your computer' s hard disk drive.
•
Sentex's MLP and/or SPS software previously installed on your computer's hard disk drive and
set up with a system identity.
• In the CONFIG.SYS file, FILES should = “30” or more (for example, “FILES = 99”).
Rev B Doc 6001001 Page 1 of 29
Page 6

INSTALLING ERMA
You must make sure that ERMA has access to the SPS program. SPS should already be installed on
the hard disk of your computer. To confirm that one of t hese pr ograms are installed on the hard disk, at t he
DOS command line type either cd\sps and the “ RETURN” or “ENTER” key (from this point on, the “RETURN”
or “ENTER” key will be referr ed to as the “ENTER” key). If you have SPS already installed, the DOS
command line will be show the hard drive you are in followed by the program name (for example, “C:\SPS>“).
INSTALLING FROM CD
Installing Erma In Windows 95 Or 98
Remember: You must install ERMA-DOS into the same directory as SPS-DO S.
1. Insert the CD into your CD drive.
2. Click on the Start Menu.
3. Click on Settings.
4. Select Control Panel.
5. Click Add/Remove Program.
6. Click Install. Follow the prompts until I nstall asks for the application name.
7. Click Browse.
8. Open the ERMADOS folder.
9. Select SETUP.EXE.
10. Follow the prompts.
Installing Erma In Windows 3.1 Or 3.11
Remember: You must install ERMA-DOS into the same directory as SPS-DO S.
1. From the Program manager, Run <drive>:\ERMADOS\SETUP.EXE.
<drive> is the letter of your CD drive
Example: D:\ERMADOS\SETUP.EXE
2. Follow the prompts.
Page 2 of 29 Doc 6001001 Rev B
Page 7
ACTIVATING THE ERMA PROGRAM
To start the ERMA program, m ake sure you are in the directory where ERMA was installed. When you
installed ERMA onto your hard disk drive, the default sett ing of the installation would have placed ERMA in
“C:\SPS” (or “C:\MLP” if you are using ERMA with MLP). If you changed the default setting during the
installation, make sure you are in the direct or y where you installed ERMA (please refer to the manuals which
came with your computer for instructions on how to change the work ing directory). Once you are in the proper
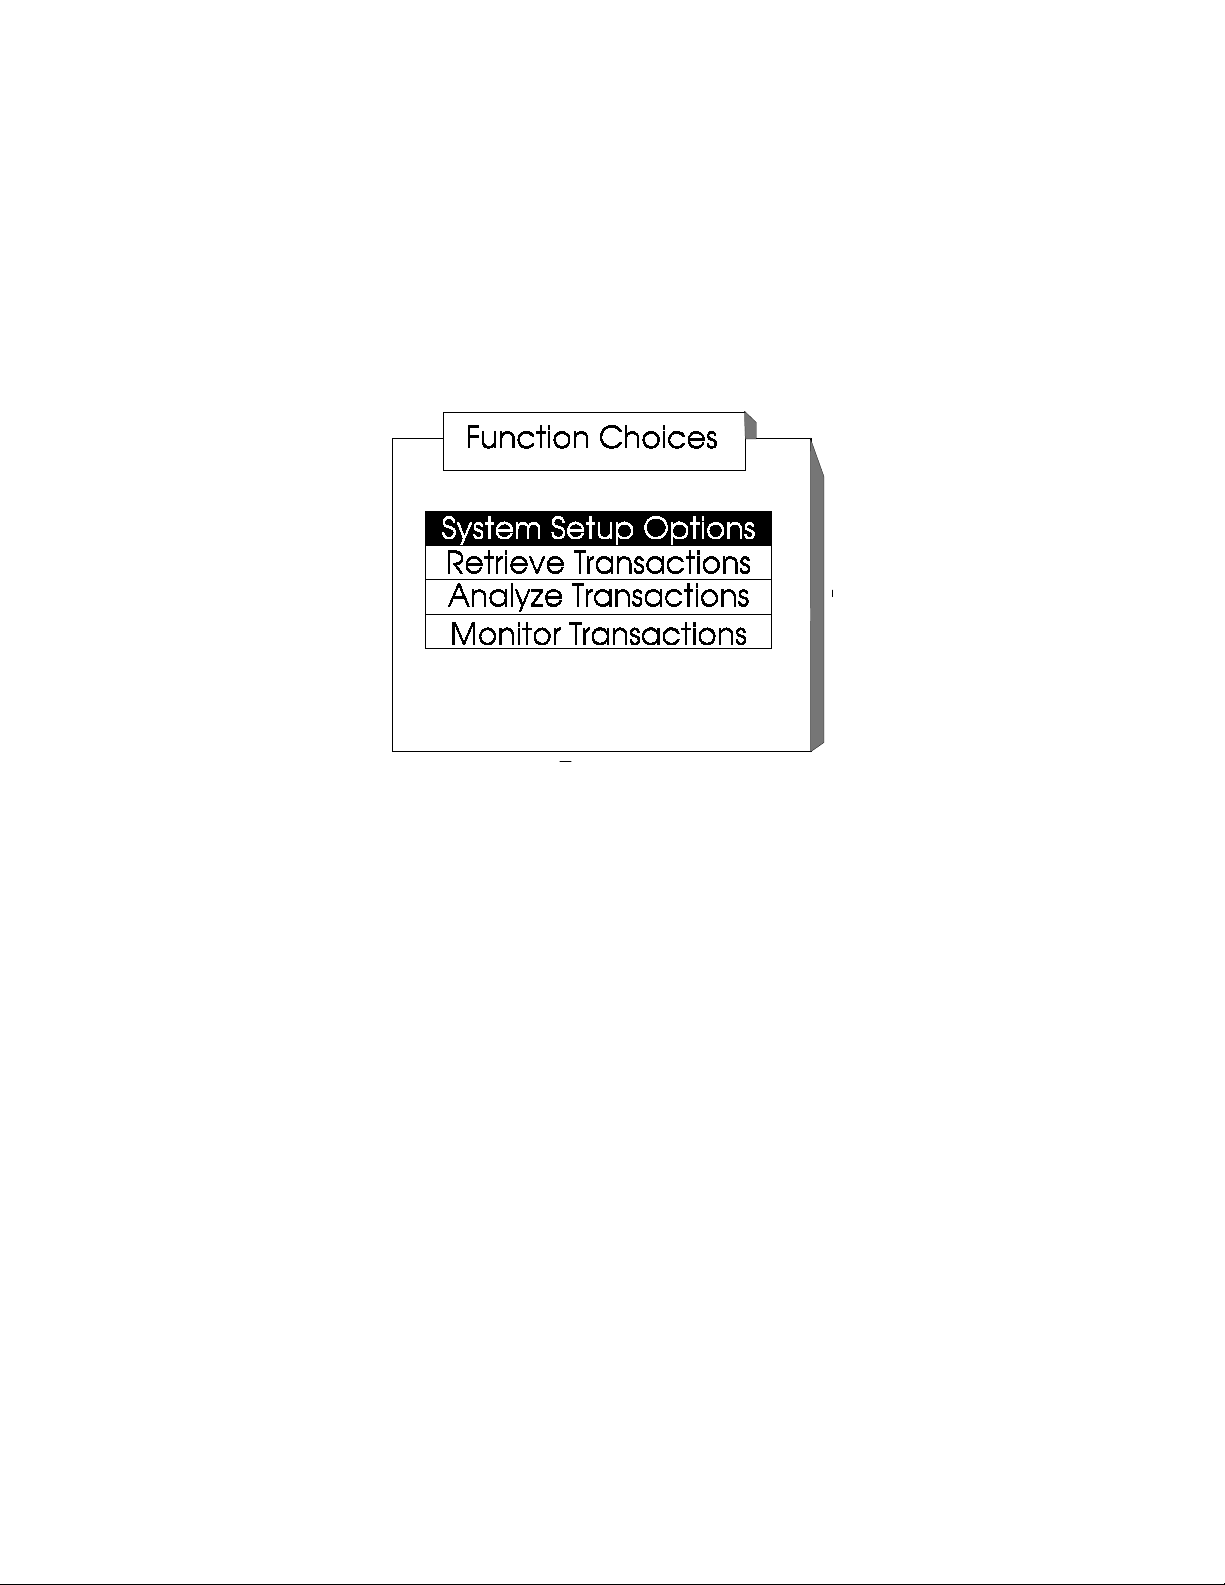
directory, type in erma and the press "ENTER" key. You will then see a brief title page with the copyright
notice. Press any key on your keyboard and ERMA will display the "FUNCTION CHOICES" menu (s ee figure
1 below).
Figure 1 - Function Choices Menu
EXITING THE ERMA PROGRAM
To exit ERMA, press the "ESC" key until you have returned to the DOS prompt. ERMA will
automatically save all of the data that you have previously entered onto your hard disk dr ive.
IMPORTANT NOTE: Always exit out of the ERMA program before turning off your
computer. Otherwise, the data you have entered may not be saved.
TIPS FOR USING ERMA
In the sections that follow, detailed procedur es ar e given for each required entry. In addition to t hese
specific procedures, there are a num ber of general hints and rules which will help ensure that your use of the
ERMA program is done in a correct and eff icient m anner . These hints are discussed below:
1. To move the high lighted bar within a menu (i.e., The FUNCTI O N CHO ICES menu - see figure
1 above), use the arrow keys on your computer's keyboard.
2. To enter a m enu ar ea ( i. e . , The RETRIEVE TRANSACTIONS area of the FUNCTION
CHOICES menu - see figure 1 above), move the highlighted bar over that area and press the
"ENTER" key.
Rev B Doc 6001001 Page 3 of 29
Page 8

3. When you are in a menu area which allows you to filter the system's transactions (i.e. t he
RETRIEVE TRANSACTIONS area), use t he arrow keys to move the cursor within a filtering
area (i.e. the "Code" area). To m ove the cur sor between filtering areas (i.e. f rom the "Code"
area to the "Name" area), use the "TAB" key.
4. If you need help while you are in a menu area, press the <F1> key.
5. If you wish to exit an area, press the "ESC" key and ERMA will return you to the previous
menu.
6. If you wish to exit the ERMA program, pr ess the "ESC" key until you have returned to the DOS
prompt.
Page 4 of 29 Doc 6001001 Rev B
Page 9
2 - SETTING UP ERMA
WHAT IS THE PURPOSE OF SETTING UP ERMA?
Before you begin using the ERMA program, you may wish to change the default settings in ERMA’s
System Setup Options. If you do not chang e t hese set tings, the information displayed by ERMA may not be
very informative. The inform at ion you enter about your system in the setup area will be stored by ERMA and
will allow you to identify and access transactions from your system with ease. In most applications, you will
only need to setup ERMA during the initial use of the prog ram.
SETTING UP A SYSTEM IDENTITY
The first step to set t ing up a system's identity is to access the area titled "SYSTEM SETUP OPT IONS"
from the "FUNCTI O N CHO ICES" menu (see figure 1 on page 3) . Move the highlighted bar, with the use of the
arrow keys, until the box titled "SYSTEM SETUP OPTIONS" is highlighted and press the " ENTER" key. Once
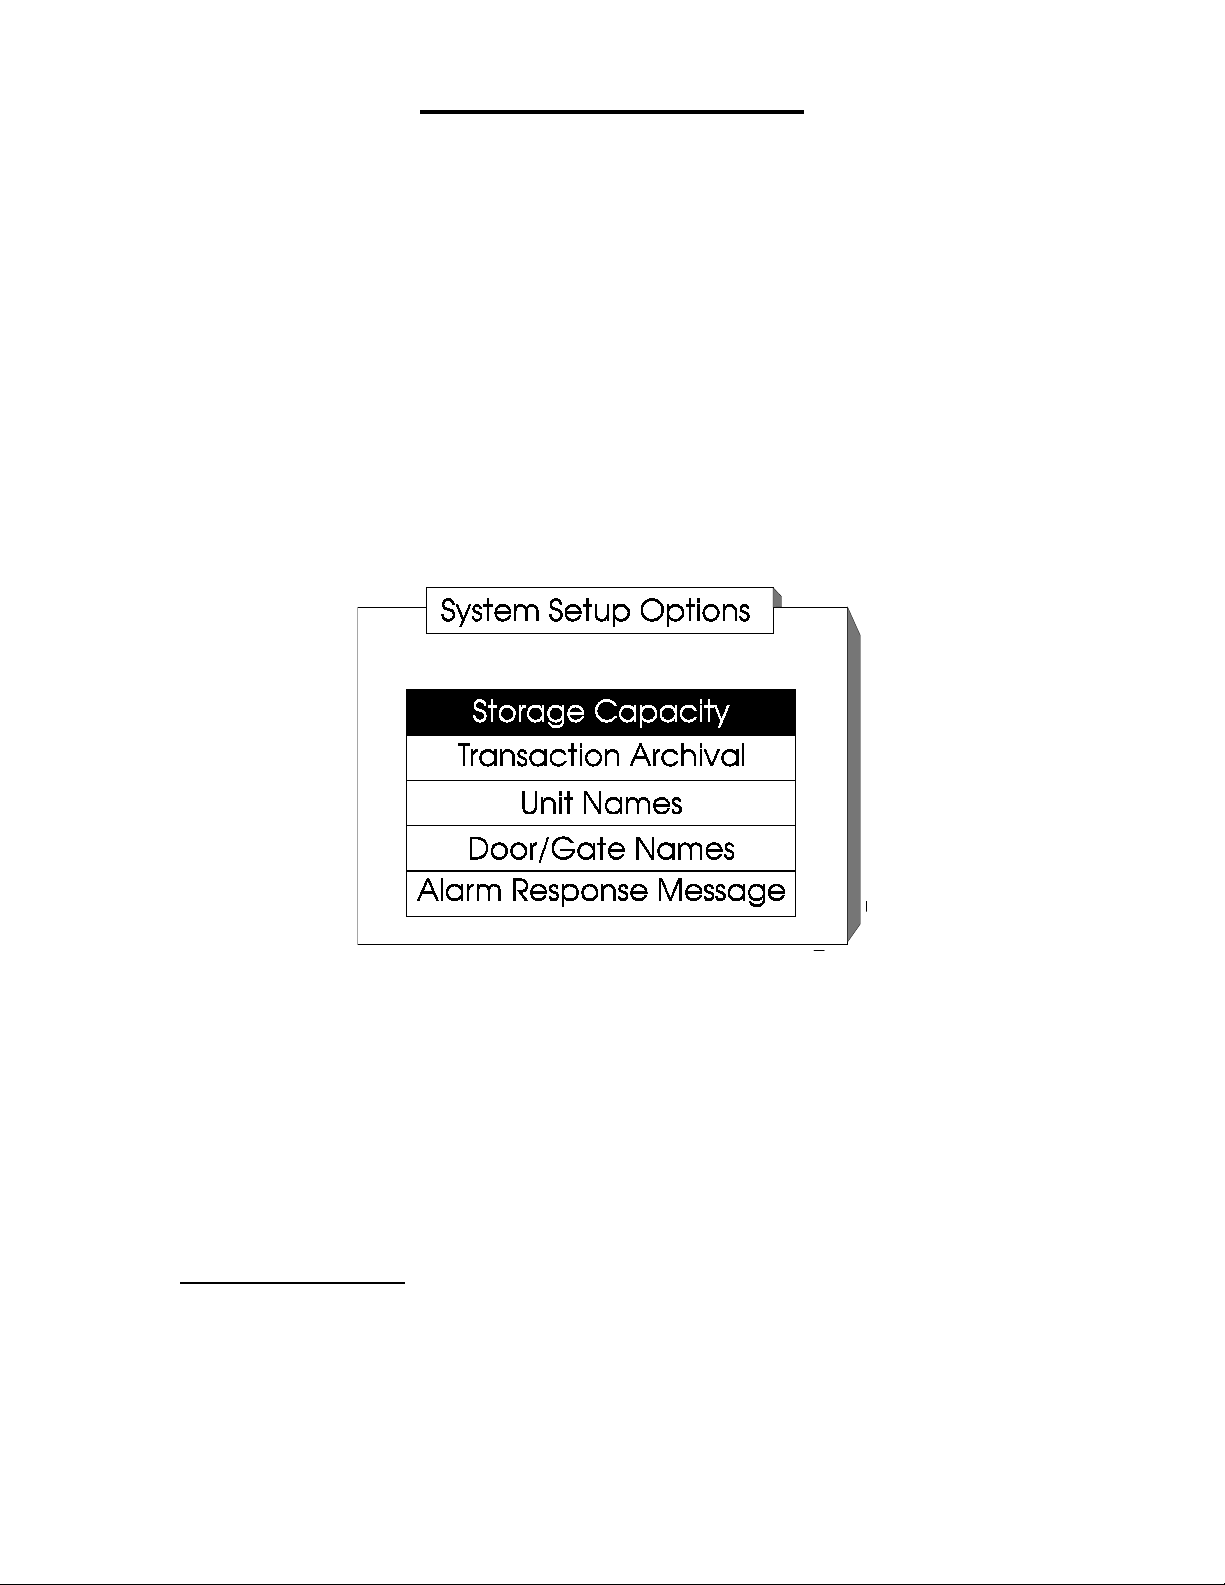
you press the "ENTER" key, the "SYSTEM SETUP OPTIONS" menu will be displayed (see figure 2) .
Figure 2 - The System Setup Options Menu
There are five sections to the "SYSTEM SETUP OPTIONS" menu. Each of these five sections need to
be programmed before beginning the ERMA program. To access a setup area in this m enu, move the
highlighted bar, with the use of t he ar row keys, until the desired section is highlighted and press t he " ENTER"
key. If you wish to exit any section and return to the "SYSTEM SETUP OPTIONS" menu without saving any of
the changes that you have made, press the "ESC" k ey.
An explanation of the purpose/function and an example of a typical entry for each of the five sections
are as follows:
1. STORAGE CAPACITY: This section allows you to set the number of t ransactions that will be
stored by ERMA. You can program the system to store f r om 10 to 99,999 transactions at a single
time. If you have a small number of transactions that will occur between each use of ERMA, you
may want to program the storage capacity for a smaller number, such as between 100 to 500
transactions. This is for t he r eason t hat on some computers, large numbers of transactions will
take a long period of tim e t o retrieve from your system. If you have a large number of transactions
that could occur between each use of ERMA, you may want to program the storag e capacit y for a
larger number, such as 99,000 transact ions.
Rev B Doc 6001001 Page 5 of 29
Page 10
The transaction storage capacity runs in a circ ular m otion. For example, if you set the storage
capacity for 500 transactions, the tr ansact ion r ecor ding will not stop at transaction number 500.
The input that would be considered transaction number 501 will delete and replace tr ansaction
number 1. The factory setting for this section is 99999.
2. TRANSACTION ARCHIVAL
software. When this section is activated in future sof tware revisions, it will tell your computer to
notify you when a certain percentage of the st or age capacity has been filled. It will also ask you at
that time if you would like to retr ieve the t r ansactions currently in ERMA's storage and to save them
on a floppy disk. In current ERMA revisions, you are able to manually retrieve the transactions and
save them onto a floppy disk, but the computer does not signal you when the storage capacity is
reaching its limit or when it is a good time t o save these t r ansact ions ont o a floppy disk.
3. UNIT NAMES
chain. It is helpful to name each unit so that it will be easy to identify where each transaction has
taken place. For example, if you name t he unit controlling the entrances for Building #2 "UNIT 2",
you will be able to easily retrieve or identify every transaction that has occurred at that unit. You
would simply look for or retrieve the tr ansact ions which are labeled as "UNI T 2". Also, when you
name each of the units, it makes it easier for you to filter and sort the transactions according to unit
name.
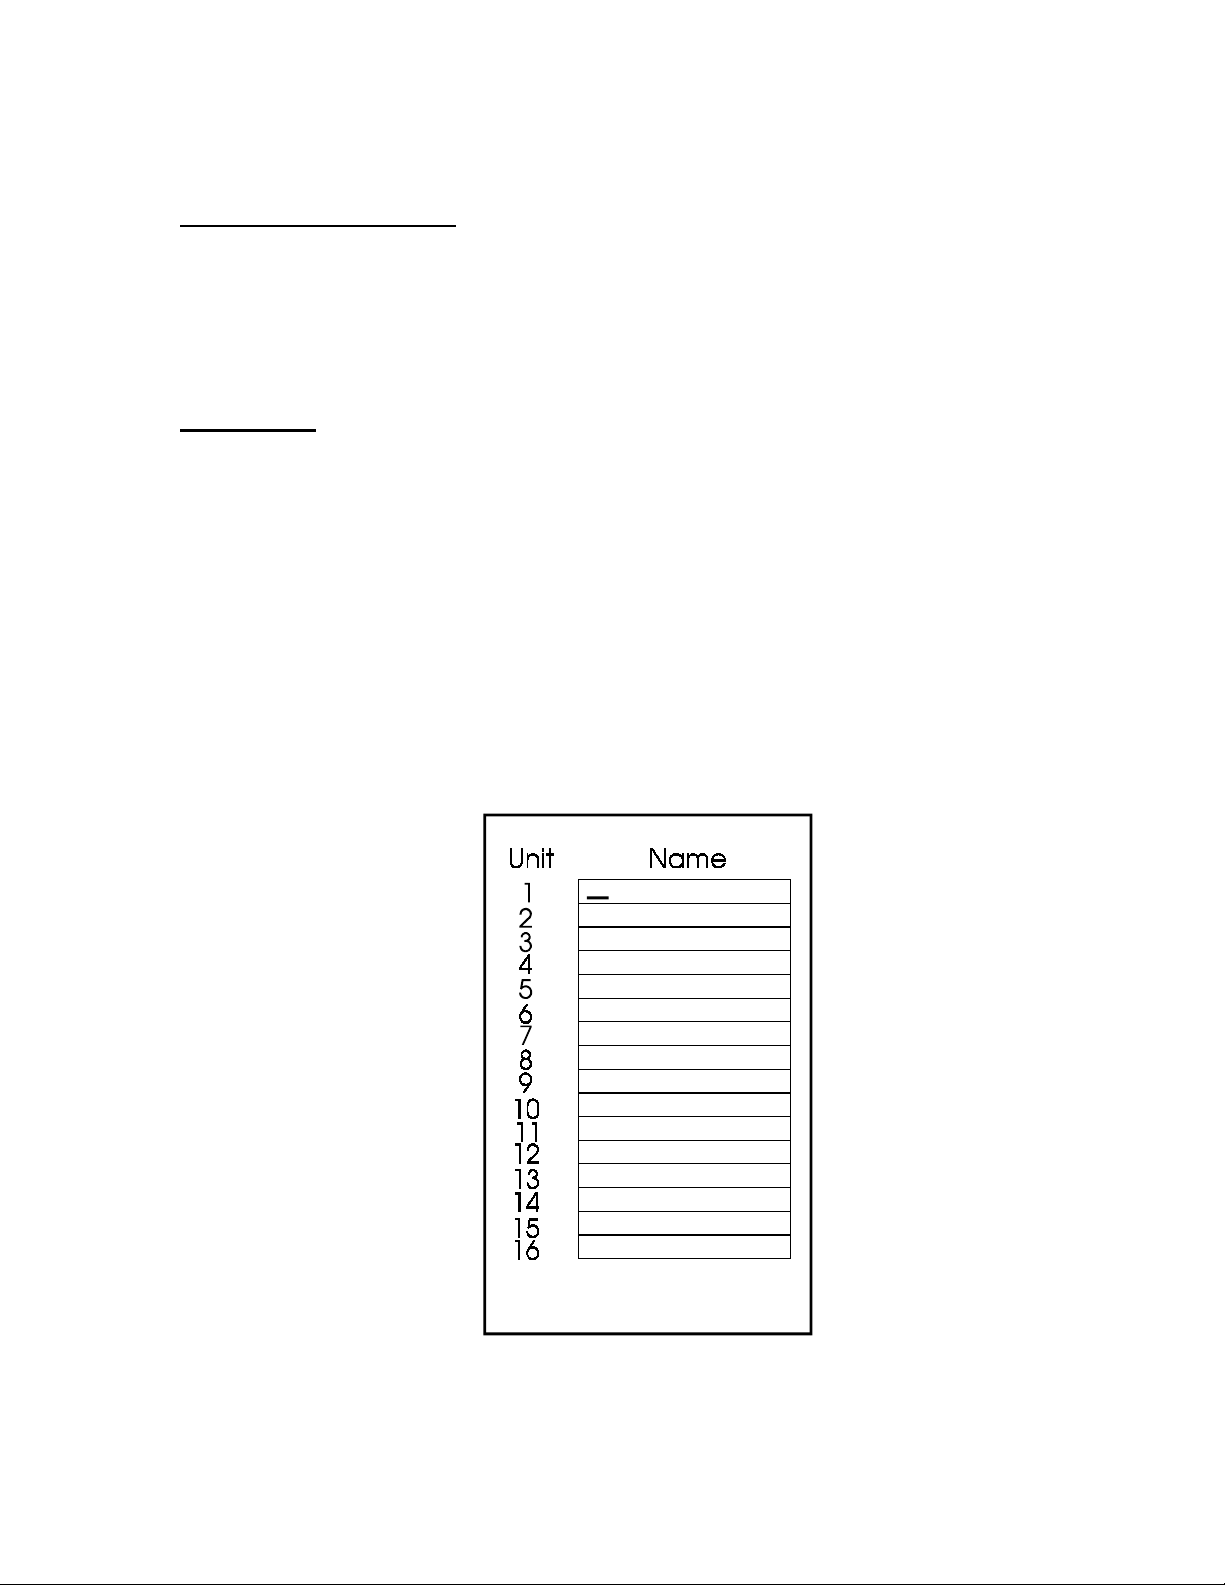
When you are naming a unit , you will have one line of 18 characters to use for each unit name (see
figure 3). Once you have entered the unit nam e, pr ess the down arrow key to advance to the next
unit. W hen you have entered names for all of the units in your system, press the " ENTER" key and
ERMA will save and store these names. If you have made a mistake entering a name, use t he
arrow keys to move the cursor to the mistak e and pr ess t he " DELETE" key (shown as "DEL" on
some keyboards) until the mistake has been erased. There are no default settings for this section.
If you have a stand-alone Infinity system, you will only need to give a name to unit 1.
: This section allows you to name each of the units within your Infinity or Multi-Link
: This section is not available in current versions of t he ERMA
Figure 3 - Unit Names Programming Screen
Page 6 of 29 Doc 6001001 Rev B
Page 11
4. DOOR/GATE NAMES: Each of the units in your Infinity or Multi-Link system can control up to four
door/gates. This section of the system setup allows you to name each of these doors/gates. I t is
helpful to name each door/gate so that transactions which have occurred at that door/gate can be
easily identified and retrieved. For example, if you name the front door in Building #2 "DOO R 1" ,
you will be able to easily identify every transaction that has occurred at that door. You would simply
look for the transact ions labeled as “ UNI T 2 - DOOR 1”.
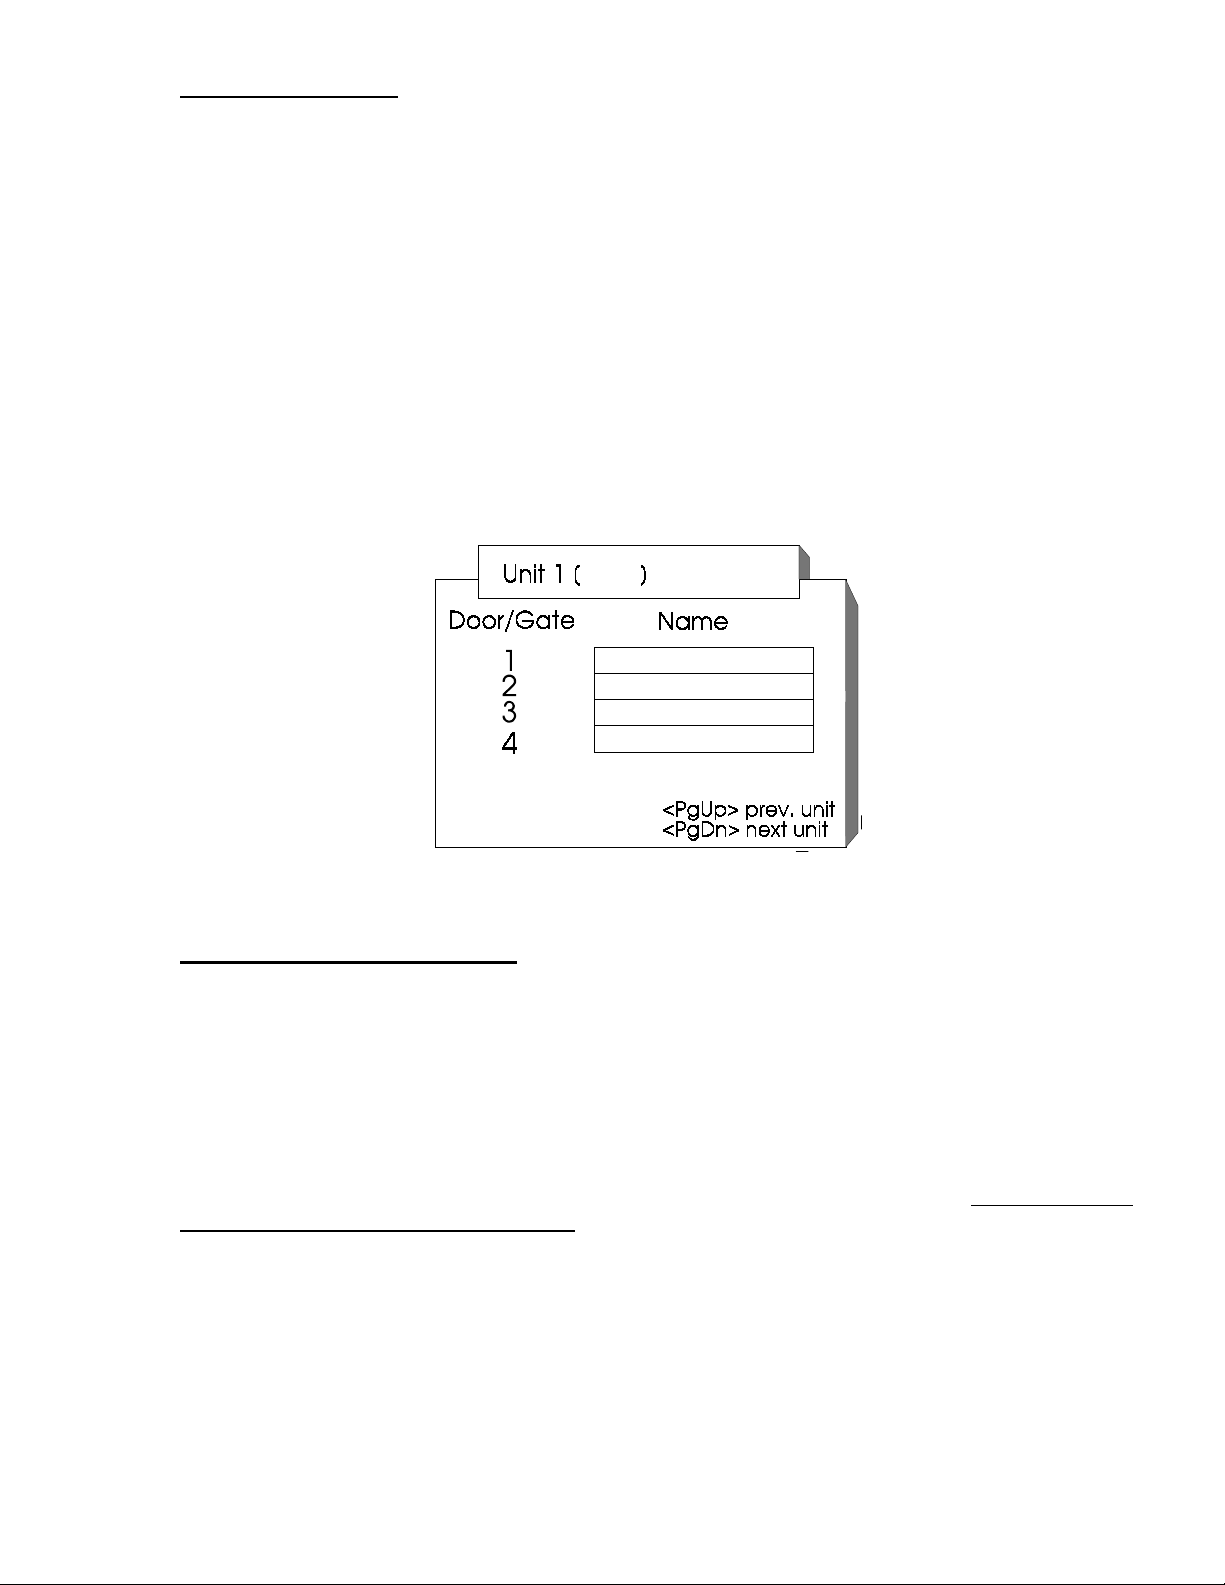
When you are naming a door / gate, you will have one line of 18 characters for each door/g at e name
(see figure 4). Once you have entered a name, press the down arrow key to advance to the next
door/gate. When you have completed your entries for each of door/gates in that unit, press the
"PgDn" key to move on to the next unit. If you wish to return to the unit prior to the unit you are
currently working on, press the "PgUp" key. Once you have finished naming all of the doors/gates
for the Multi-Link chain, press t he " ENTER" key. ERMA will save and store these entries and return
you to the "SYSTEM SETUP OPTIONS" m enu. If you have made a mistake while entering a
name, use the arrow keys to move the cursor to t he m ist ake and simply press the "DELETE" key
(shown as "DEL" on some keyboards) until the mistake has been completely erased. If you have
an Infinity system, you will only need to name the doors/gates for Unit 1. There are no default
settings for this section.
Figure 4 - Door\Gate Names Section Screen
5. ALARM RESPONSE MESSAGES: This section of the ERMA setup allows you to program the
alarm response messages. The alarm r esponse m essage is the warning message that will be
displayed on your computer's screen when an alarm condition has been activated. In this section,
you have the ability to program a different alarm response message for each door in every unit.
To program an alarm response message, make sure that the cursor is locat ed in t he message box
for the door and unit you wish to program (see figure 5). There are 2 lines of 64 characters each
for every alarm response message. When you are programming a message and you reach the
end of the first line, ERMA automat ically wraps your text to the beginning of the second line. I f you
wish to advance to the second line without having to reach to the end of the f irs t line, simply press
the "SPACE BAR" until the cursor is located at the beginning of the second line. Do not press t he
"ENTER" key to advance to the next line. If you press the "ENTER" key, the entries that you have
made up to this point will be saved and you will be returned to the "SYSTEM SETUP OPTI ONS"
menu. Once you have completed your message for that door , pr ess the "TAB" key to move the
cursor forward to the next door's message box. If you wish to move the cursor back to the previous
door's message box, press the "SHIFT " and t he " TAB" keys at the same time. Once you have
completed the messages for all of the doors in a unit, press the “PgDn” key to advance to the next
unit. If you wish to return to the unit prior to the unit you are currently in, press the “PgUp” key.
Once you have completed programming this entire section, press the "ENTER" key and you will be
returned to the "SYSTEM SETUP OPTIONS" menu.
Rev B Doc 6001001 Page 7 of 29
Page 12
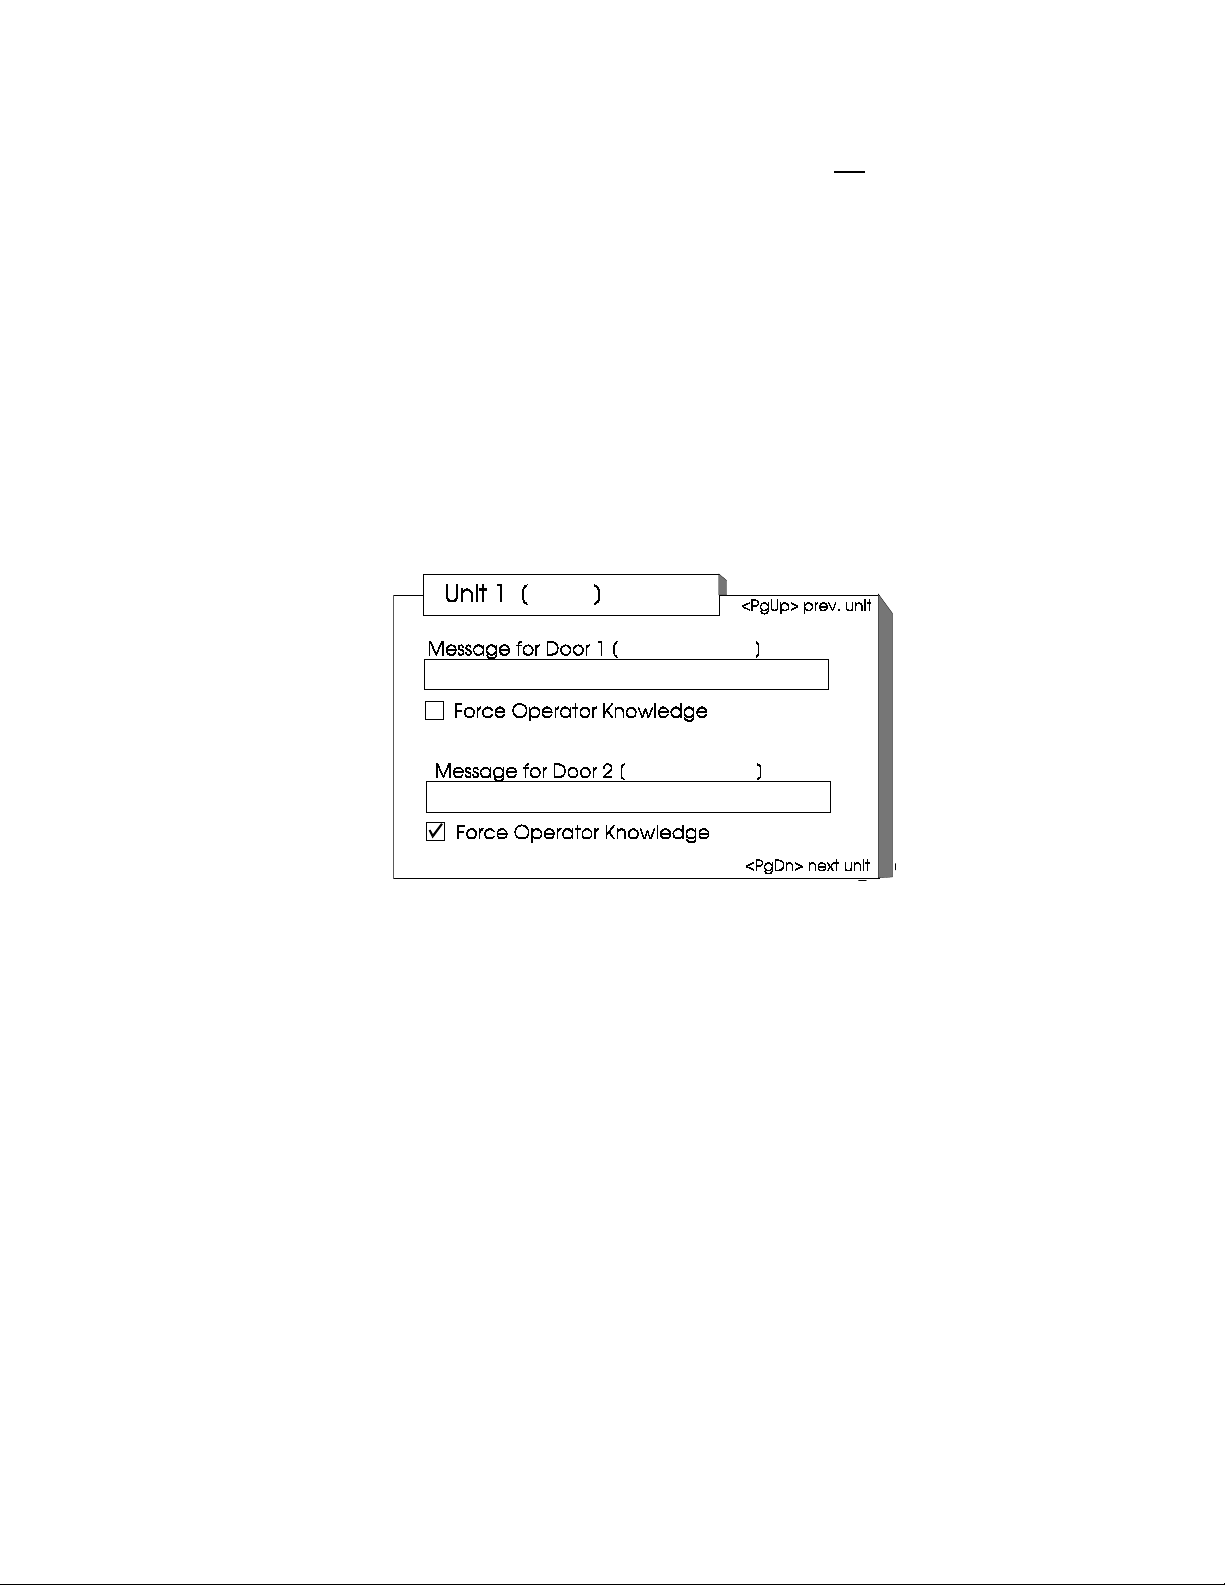
This section of the setup also allows you to choose whether or not you wish to have the "FORCE
OPERATOR KNOWLEDGE" feature act ivated. "FORCE OPERATOR KNOWLEDGE" is a feature
that requires you (or whoever is operating ERMA) to press any key on your computer' s keypad to
acknowledge that you have received an alarm message. If you do not
have the "FORCE
OPERATOR KNOWLEDGE" feature activated, t he alarm response message will appear on your
computer screen for f ive seconds, emit t ing a tone every second it is on your computer's screen.
Once the fifth tone has been emitted by your computer, the alarm message will disappear f r om
your screen. This message will not be repeated. You also have the ability to act ivate t he " FORCE
OPERATOR KNOWLEDGE" feature f or some doors, and deactivate it for other s. For example, if
you wish to have the "FORCE OPERATOR KNOWLEDGE" feature activated for door 2 in unit 1,
but you do not wish to have the feature activated for door 1 of the same unit, simply check the
"FORCE OPERATOR KNOWLEDGE" box under door 2 and leave the box under door 1 empty
(see figure 5).
To activate the "FORCE OPERATO R ACKNO WLEDGE" f eat ure for a specific door, press the
"TAB" key until the cursor is in the "FORCE OPERATOR ACKNOWLEDGE" box for that door .
Press the "SPACE BAR" to activate this feat ur e. If the feature is activated, there should be a check
mark located in the box. If you wish to deactivate the "FORCE OPERATOR ACKNOWLEDGE"
feature, press the "SPACE BAR" again, and the check mark in the box should be cleared.
`
Figure 5 - Alarm Response Messages Screen
EDITING A SYSTEM'S IDENTITY
At some point after you have completed the initial system set up, you may need to modify the system's
identity. Examples of why you would need to change the system's identity are as follows:
• You need to expand or condense the number of transactions in the storage capacity.
•
You need to add, delete, or change a unit ' s nam e.
•
You need to add, delete, or change a door/gate name.
•
You need to change the alarm response message for a door or unit.
•
You need to chang e t he For ce Operator Acknowledge status of a door or unit.
To edit a system's setup fr om the "FUNCTION CHOICES" menu, m ove the highlighted bar with the use
of the arrow keys until the "SYSTEM SETUP OPTIONS" box is highlighted and press the " ENTER" key.
Changes are made to each of the five sections in the same manner as the initial system setup. Please refer to
the section above titled "Setting Up A System Identity" for instructions on changing each of the system's setup
information.
Page 8 of 29 Doc 6001001 Rev B
Page 13

3 - RETRIEVING TRANSACTIONS WITH THE USE OF ERMA
WHAT IS "RETRIEVING TRANSACTIONS"?
Before you are able to view and analyze your system's transactions, you will first need to "retrieve"
them from your Inf init y or Multi-Link system. When you "retr ieve" tr ansactions from your Infinity/Multi-Link
system, you are telling ERMA to copy the transaction record from your system' s m em or y and then st or e that
copy onto your computer's hard disk drive. Once this copy is stored on your com put er 's hard disk drive, you
will be able to view and analyze these transactions with the use of ERMA.
When you are retr ieving t ransactions from your system's memory, you have the ability to filter the
transactions according to five categ o r ies; Code, Nam e, Date and Time, Action, and Source. For example, if
you only wanted to retrieve the transactions that occurred at Unit 1 Door 1 and " lose" the transactions that
occurred at all of the other unit s and doors, you would check the box labeled as "Unit 1 Door 1" in the Source
box (see figure 6 on the following page). Once the retrieval process has been completed, only the
transactions that occurred at Unit 1 Door 1 will be saved and displayed on your computer.
PLEASE NOTE: Since you will lose all transactions that you do not retrieve, it is highly recommended
that you retrieve all
transactions according to the same five previously mentioned categories in the analyzing section of ERMA.
RETRIEVING TRANSACTIONS FROM YOUR SYSTEM
IMPORTANT NOTE: In previous versions of ERMA, when retrieving a currently invalid transaction
from an Infinity System, ERMA would not acknowledge the curr ent transaction. After many attem pt s,
the Infinity System would terminate. All tr ansactions up to and including the invalid transaction, would
be unretrievable. An empty space in the transaction database would occur. The lat est version of
ERMA acknowledges two invalid transactions only. On the third transaction, ERMA will generate an
“unretrievable” transaction.
The first step in retr ieving t r ansact ions from your system's memory is to access the area labeled
"RETRIEVE TRANSACTIO NS" from the "FUNCTION CHO I CES" menu (see figure 1 on page 3). Move the
highlighted bar, with the use of the arrow keys, until the "RETRIEVE TRANSACTIONS" box is highlighted and
press the "ENTER" key. Once you press t he "ENTER" key, the "RETRIEVE TRANSACTIONS" screen will be
displayed (see figure 6 on the following page). There are five areas in this screen. These areas allow you to
filter the transactions which will be retrieved from your system. The purposes/functions for each of the five
areas are discussed on the following pages.
IMPORTANT NOTE: Since you will lose all transactions that you do not retrieve, it is highly
recommended that you retrieve all
filter the transactions that you have retrieved according to the same five categories in the analyzing
section of ERMA.
While you are in the " RET RIEVE TRANSACTIONS" screen, you may perfo r m the following actions:
• To move the cursor within a single area (i.e. t he " CO DE" ar ea), use the arrow keys.
of the transactions fr om your system's memory. You will be able to filter these
of the transactions fr om your system's memory. You will be able to
•
To move the cursor from one ar ea to another (i.e. from the " CO DE" ar ea to the "NAME" area),
press the "TAB" key.
•
To mark a box within an area (i.e. the "Granted" box in the "ACTION" area), place the cur sor
within that box and press the "SPACE BAR".
•
To unmark a box within a certain area, place the cursor within that box and press t he " SPACE
BAR" again.
Rev B Doc 6001001 Page 9 of 29
Page 14

• If you want to exit the "RETRIEVE TRANSACTIONS" area and you do not want your entries to
be saved, press the "ESC" key and you will be returned to the "FUNCT ION CHOICES" menu.
•
Once you have completed all of your entries, press the "ENTER" key and ERMA will save the
entries that you have made and will begin the transaction retrieval process.
Figure 6 - Transaction Retrieval Filter Screen
1. CODE
entry code, or card code (depending on your system’s config uration). To retrieve transactions for a
group of codes, enter the first code of the series in the "Begin" box and the last code of the series
in the "End" box. For example, if you only wanted to retrieve the transactions t hat have occurr ed
for codes between 00400 and 00560 and lose the remainder of t he transactions, you would enter
00400 in the "Begin" box and 00560 in the "End" box (see fig ur e 7 below). I f you only want to
retrieve the transactions that have occurred f or a single code, enter that code in both the "Begin"
box and the "End" box (see figure 8 below).
: The "Code" area allows you to retrieve transactions according t o either the directory code,
Figure 7 - Filtering A Series Of Codes Figure 8 - Filtering A Single
Code
2. NAME
with directory codes, entry codes, or card codes. To f ilt er transactions alphabetically according to
name, enter the first nam e alphabetically in the "Begin" box and the last name alphabetically in the
"End" box. For example, if you only wanted to retrieve the transactions that have occurred for the
names alphabetically between "ADAMS" and "JONES" and lose the transactions for all ot her
names, you would enter "ADAMS" in the "Begin" box and "JONES" in the "End" box (see figure 9
on the following page). If you wish to retrieve only the transactions that have occurred for a single
name and lose the remainder of the t r ansact ions, ent er that name in both the "Begin" box and the
"End" box (see figure 10 on the following page).
Page 10 of 29 Doc 6001001 Rev B
: The "Name" area allows you to retrieve transactions according t o the name associated
Page 15

PLEASE NOTE: If you wish to retrieve transactions according to the name associated with entry
codes or card codes, your system must have the "full contr ol codes with names" option previously
installed and programmed. Contact your inst alling dealer for informat ion r egarding the
configuration of your system.
Figure 9 - Alphabetically Filtering Figure 10 - Filtering A Single Name
A Series of Names
3. DATE AND TIME
date and time that the transaction has occurr ed. To filter the transactions according to the date
and time, enter the beginning date and time in the "Begin" area and the ending date and time in the
"End" area. When you make your first entry for the hour in the "Begin" area, ERMA will display a
default setting f or this area. To change this setting, sim ply type over the default setting. The hour,
minutes, month, day, and year must all be entered as two digit s. To change the time of day setting
from A.M. to P.M., move the cursor t o the "A" position of A.M. and press the "P" key. T he setting
should then read as P.M. To change the time of day setting from P.M. to A.M., move the cursor t o
the "P" position of P.M. and press the "A" key. The setting should then read as A.M. For example,
if you wanted to retrieve the transactions that occurr ed between January 1, 1991 at 12:00 P.M. and
February 1, 1991 at 3:00 A.M., you would enter "12:00 P 01/01/91" for the "Begin" area and "03:00
A 02/01/91" for the "End" area (see figure 11 below).
: The "Date and Time" area allows you to retrieve transactions accor ding to the
Figure 11 - Filtering Transactions By Date and Time
4. ACTION
taken by your Infinity/Multi-Link system. T o filter the transactions according to t he act ion t aken by
your system, mark the box found next to each action listed. You m ay choose more than one action
in this area. For example, if you only want to retrieve the tr ansact ions which are invalid codes,
invalid cards, or have been granted access, you would place an "X" in the boxes labeled "Invalid
Code", "Invalid Card", and "Granted" (see figure 12 on page 13). T o m a r k an action box, place the
cursor in the box with the use of the arrow keys. Next, press t he “SPACE BAR” once to mark the
box. To unmark an action box, press the “SPACE BAR” again. A list and explanation of each
action the system may take is defined in Table 1.
Rev B Doc 6001001 Page 11 of 29
: The "Action" area allows you to retrieve messages according t o t he action that was
Page 16

TYPE OF ACTION DESCRIPTION
Granted Access to the building/complex was granted by either a tenant
pressing a "9" or "5" on their telephone keypad or a valid card/entry
code input.
Invalid Card An invalid card was presented to the card reader and access to the
building/complex was denied.
Invalid Code An invalid entry code was entered on the system's keypad and
access to the building/complex was denied.
Invalid Time Zone A card/entry code was presented to the system during a time it was
not valid and access to the building/complex was denied.
Wrong Door A card/entry code was used at a door where it was not valid and
access to the building/complex was denied.
Passback Violation A card/entry code was used at a door/gate where it was denied
access because it violated the Anti-Passback feature.
Struck Out An invalid entry code was presented to a device the programmed
amount of times and it activated the strikes-and-out feature,
therefore denying all inputs from that device for a 3 minute period.
Hung Up A visitor placed a call to a tenant and either the tenant denied
access to the visitor and disconnected the call by pressing the "S"
key on their telephone keypad or the tenant exceeded the amount
of time allowed for the call and the system disconnected the call.
Exit Request A tenant/visitor placed a request to leave the building/complex
through the use of an exit request device.
Auto Unlock The system automatically unlocked a specified door/gate due to the
pre-programmed Auto Lock/Unlock schedule being activated.
Auto Lock The system automatically locked a specified door/gate due to the
pre-programmed Auto Lock/Unlock schedule being deactivated.
Door Ajar The specified door/gate has been held open for more than 1
minute.
Door Forced The specified door/gate was forced open.
Latch Strike Someone has entered the system’s programming mode and told
the system to activate the relay for an unspecified amount of time.
Cycle Strike Someone has entered the system’s programming mode and told
the system to activate the relay for a specified period of time.
System Reset The system has reset due to a manual reset (through the use of
programming step "52"), power surge, or power failure.
Table 1- An Explanation of Each Type of Action
(Found in the Action Box on the Transaction Retrieval Screen)
Page 12 of 29 Doc 6001001 Rev B
Page 17

Figure 12 - Filtering Transactions By Action
5. SOURCE: The "source" area allows you to retrieve tr ansact ions accor ding to where the
transaction has taken place. The "s our ce" ar ea will list the available sources accor ding to the unit
and door name which were given during the initial system setup. To filter the transactions
according to the source, simple mark the box found next to the source you wish to choose. You
may make more than one selection in this area. To mark a source box, place the cursor in the box
with the use of the arrow keys. Next, press the “SPACE BAR” once t o m ark the box. To unmark a
source box, press the “SPACE BAR” again. For example, if you wished to retrieve the transactions
that have occurred in Unit 1 - Door 1, Unit 2 - Door 1, and Unit 3 - Door 1, simply mark the
appropriate boxes (see figure 13 below).
Figure 13 - Filtering Transactions By Source
UNRETRIEVABLE TRANSACTIONS
If ERMA fails to recognize an Infinity System transaction, it will generate an “unretr ievable transaction”,
acknowledging that this particular t ransaction could not be retrieved.
Rev B Doc 6001001 Page 13 of 29
Page 18

4 - ANALYZING TRANSACTIONS WITH THE USE OF ERMA
WHAT IS "ANALYZING TRANSACTIONS"?
Once you have your Infinity or Multi-Link system's transactions stored on your computer's hard disk,
you are able to analyze them. When you analyze your system's transactions, you are able t o filter, sort and
print the retrieved transactions according t o specific criteria and then view and analyze these transactions for
your own purposes.
FILTERING, SORTING, AND PRINTING TRANSACTIONS
The first step in analyzing your system's transact ions is t o access t he ar ea labeled " ANALYZE
TRANSACTIONS" from the "FUNCTION CHOICES" m enu ( s ee figure 1 on page 3). Move the highlight ed
bar, with the use of the arrow keys, unt il t he "ANALYZE TRANSACTIONS" box is highlighted and press t he
"ENTER" key. The "EVENT ANALYSIS" screen will be shown and will display a listing of the transactions
retrieved (see figure 14 below). Also, in the upper right-hand corner, you will see the words "Sort", "Filt er",
and "Print". These are the dif ferent areas which you can program in this screen. To access these areas,
simply press the first letter of the area you wish to access. For example, if you wanted to access the “Filter”
area, you would press the “F” key. The purpose/f unct ions for each of these areas are discussed in detail on
the following pages:
Figure 14 - The Analyze Transactions Screen
1. Filter
Page 14 of 29 Doc 6001001 Rev B
: The "filter" ar ea allows you to choose what type of t r ansact ions you would like to have
shown on the screen for your analysis according to five different categories; Code, Name, Date and
Time, Action, and Source. For example, if you wanted to analyze the transactions that occurred for
codes between 00400 and 00450, you would filter the retrieved transactions by entering " 00400" in
the "Begin" box of the "CODE" ar ea and " 00450" in the "End" box (see figure 15). The " filter"
screen for analyzing transactions is similar to t he filtering screen in the "RETRIEVE
TRANSACTIONS" area, except you will not lose any of the tr ansactions that you filter out, as you
do in the “RETRIEVE TRANSACTI ONS” area.
Page 19

Figure 15 - Previously Retrieved Transactions That Were Filtered By Code
To access the "filter" ar ea, press the "F" key while you are in the Event Analysis screen. A screen
similar to the "RETRIEVE T RANSACTIONS" screen (see figure 6 on page 10) will be shown.
There are five diff er ent areas to the "filter" screen. The purpose/function for each of these are
discussed on the following pages.
While you are in the "filter" area, you may perform the following actions:
•
move the cursor to the bottom of first area and press the "TAB" key.
cursor within that box and press the "SPACE BAR".
BAR" again.
key and you will be returned to the "EVENT ANALYSIS" screen.
To move the cursor within a single area (i.e. t he " CO DE" ar ea), use the arrow keys.
•
To move the cursor from one ar ea to another (i.e. from the " CO DE" ar ea to the "NAME" area),
•
To mark a box within a certain area (i.e. t he " G ranted" box in the "ACTION" area), place the
•
To unmark a box within a certain area, place the cursor within that box and press t he " SPACE
•
If you want to exit the "Filter" screen and you do not want your entries saved, press the " ESC"
•
Once you have completed all of your entries, press the "ENTER" key and ERMA will save the
entries that you have made and will begin filtering the transactions according to the criteria you
have entered.
Rev B Doc 6001001 Page 15 of 29
Page 20

a. CODE: The "Code" area allows you to analyze the transactions according t o eit her the directory
code, entry code, or card code (depending on your system’s conf iguration). To analyze
transactions that have occurred for a g r oup of codes, enter the first code of the series in the
"Begin" box and the last code of the series in the "End" box. For example, if you only wanted to
analyze the transactions that have occurred for card codes between 00400 and 00560, you would
enter 00400 in the "Begin" box and 00560 in the "End" box (see f igure 16 below). If you only want
to analyze the transactions that have occurred for a sing le code, ent er that code in both the "Begin"
box and the "End" box (see figure 17 below).
Figure 16 - Filtering A Series Of Codes Figure 17 - Filtering A Single Code
b. NAME: The "Name" area allows you to analyze the transactions according to the name associated
with the directory codes, entry codes, or card codes. To filter transactions alphabetically according
to name, enter the fir s t nam e alphabetically in the "Begin" box and the last name alphabetically in
the "End" box. For example, if you only wanted to retrieve the transactions t hat have occurr ed for
the names alphabetically between "ADAMS" and "JONES", you would enter "ADAMS" in the
"Begin" box and "JONES" in the "End" box (see figure 18 below). If you wish to retrieve only the
transactions that have occurred for a single name, enter that name in both the "Begin" box and the
"End" box (see figure 19 below).
PLEASE NOTE: If you wish to analyze the transactions according to the name associated with
entry codes or card codes, your system must have the "full contr ol codes with names" option
previously installed and programmed. Contact your installing dealer for informat ion r egarding the
configuration of your system.
Figure 18 - Alphabetically Filtering Figure 19 - Alphabetically Filtering
A Series of Names A Single Name
c. DATE AND TIME: The "Date and Time" area allows you to analyze transactions according to the
date and time that the transaction occurr ed. To filter the transactions according to the date and
time, enter the beginning date and time in the "Begin" area and the ending date and time in the
"End" area. When you make your first entry for the hour in the "Begin" area, ERMA will display a
default setting f or this entire area. To change this sett ing, simply type over the default setting. T he
hour, minutes, month, day, and year must all be entered as two digits. To change the time of day
setting from A.M. to P. M., m ove the cur sor to the "A" position of A.M. and press the "P" k ey. The
setting should then read as P.M. To change the time of day setting from P.M. to A. M., m ove the
cursor to the "P" position of P. M. and press t he " A" key. The setting should then read as A.M. For
example, if you wanted to analyze the transactions that occurred between January 1, 1991 at 12:00
P.M. and February 1, 1991 at 3:00 A.M., you would enter "12:00 P 01/01/91" for the "Begin" area
and "03:00 A 02/01/91" for t he " End" ar ea ( s ee figure 20 on the following page).
Page 16 of 29 Doc 6001001 Rev B
Page 21

Figure 20 - Filtering Transactions By Date and Time
d. ACTION: The "Action" area allows you to analyze the transactions according to the action that was
taken by your Infinity/Multi-Link system. T o filter the transactions according to t he act ion t aken by
your system, mark the box found next to each action listed. You m ay choose more than one action
in this area. For example, if you only want to retrieve the tr ansact ions which are invalid codes,
invalid cards, or have been granted access, you would place an "X" in the boxes labeled "Invalid
Code", "Invalid Card", and "Grant ed" ( s ee figure 21 below). To mark an action box, place the
cursor in the box with the use of the arrow keys. Next, press t he “SPACE BAR” once to mark the
box. To unmark an action box, press the “SPACE BAR” again. A list and explanation of each
action the system may take is defined in Table 1 on page 12 of this manual.
Figure 21 - Filtering Transactions By Action
Rev B Doc 6001001 Page 17 of 29
Page 22

e. SOURCE: The "source" area allows you to analyze the transactions according t o where the
transaction has taken place. The "s our ce" ar ea will list the available sources accor ding to the unit
and door name which were given during the initial system setup. To filter the transactions
according to the source, simply mark t he box found next to the source you wish to choose. You
may make more than one selection in this area. To mark a source box, place the cursor in the box
with the use of the arrow keys. Next, press the “SPACE BAR” once t o m ark the box. To unmark a
source box, press the “SPACE BAR” again. For example, if you wished to retrieve the transactions
that have occurred in Unit 1 - Door 1, Unit 2 - Door 1, and Unit 3 - Door 1, simply mark the
appropriate boxes (see figure 22 below).
Figure 22 - Filtering Transaction By Source
2. Sort: The "Sort" area allows you to organize the transactions once they have been filtered. When
you filter your retrieved transactions, ERMA displays these transactions on your computer ' s scr een,
but they are not shown in any specific order. The "Sort" area allows you to organize the filtered
transactions according to five dif ferent categories: Date and Time, Source, Code, Name, and
Action. For example, if you previously filtered the t r ansact ions so t hat only the transactions that
occurred for codes between 00400 and 00450 are displayed, they will be shown in the same
disorganized manner that they are retrieved f rom your Infinity/Multi-Link system (see fig ure 15 on
page 15). To organize these tr ansact ions so t hat they will be displayed according to the date and
time that they occurred, you would mark the bubble next to the " Dat e and Time" selection of the
“Sort” menu (see figure 23).
Figure 23 - Filtered Transactions That Have Been Sorted
Page 18 of 29 Doc 6001001 Rev B
Page 23

To enter the "Sort" area, pr ess the "S" key while you are in the Event Analysis screen. A screen
like the one shown in figure 24 below will be shown. While you are in t his ar ea, you may perform
one of the following actions:
•
To move the highlighted bubble between categories, use t he ar r ow keys.
•
To exit out of the "Sort" screen without saving the changes, press the "ESC" key.
•
Once you have highlighted the chosen category, press the " ENT ER" key and ERMA will save
this entry and begin the sorting the pr ocess.
Figure 24 - The Sort Menu from the Analysis Screen
3. PRINT
you to print the transactions shown on the Event Analysis screen. You may print the transact ions
before or after you have filtered and sorted them.
To print the transactions, press t he " P" key while you are in the Event Analysis screen. As soon as
you press the "P" key, ERMA will begin printing the transactions in the or der they are displayed on
your computer's screen. . If you do not have a printer connected to your computer or if there is a
problem with the connection between the computer and the printer, ERMA will display a message
stating, "Printer T im e O ut - Press Any Key to Continue".
: If you have a printer connected to your computer ' s LPT1 port, the "Print" area will allow
Rev B Doc 6001001 Page 19 of 29
Page 24

5 - MONITORING TRANSACTIONS WITH THE USE OF ERMA
WHAT IS "MONITORING TRANSACTIONS"?
Depending upon your needs, you are most likely to be spending a maj or it y of your time in the
"MONITORING TRANSACTI ONS" area of ERMA. W hen you are in t he " MONITORING TRANSACTIONS"
area, you are able to watch the transactions on ERMA as they occur on your Infinity or Multi-Link system ( t his
is called “real-time” monitoring). ERMA will automatically retrieve and store these transactions onto your
computer's hard disk drive as they occur. Also, as you are able t o filter the transactions in the "RETRI EVE
TRANSACTIONS" and "ANALYZE TRANSACTIONS" areas, you have the ability to filter t he t ransactions you
wish to view in the "MONITOR TRANSACTIONS" area.
IMPORTANT NOTE: You will not be able to monitor the transactions of an Infinity system
through the use of the Infinity’s internal modem. In order to monitor an Infinity system’s
transactions, you will have to make contact with the system using either an RS-232 direct
connection or an external modem. For more inf ormation on connect ing to your unit, see Infinity
Installation Instructions with Multi-Link Firmware (Doc. No. 6001016), or theInfinity Installation
Instructions without Multi-Link Firmware (Doc. No. 6001019).
MONITORING TRANSACTIONS ON YOUR SYSTEM
The first step in monitor ing your system' s t r ansactions is to access the area labeled "MONITOR
TRANSACTIONS" from the "FUNCTION CHOICES" m enu ( s ee figure 1 on page 3). Move the highlight ed
bar, with the use of the arrow keys, until the "MONITOR TRANSACTIONS" box is highlighted and press the
"ENTER" key. Once you press the "ENTER" key, a filtering scr een sim ilar to the "RETRIEVE
TRANSACTIONS" screen will be displayed (see figur e 6 on page 10). There are five different categories in
which you can filter the transactions you wish to monitor. The purposes/functions for each of the f ive
categories are discussed in detail on the f ollowing pag es. While you are in the "filtering" area of the
"MONITOR TRANSACTIONS" sect ion, you may perform the following actions:
•
To move the cursor within a single area (i.e. the "CODE" ar ea) , use the arrow keys.
•
To move the cursor from one area t o anot her ( i. e. from the "CODE" area to the " NAME" area),
move the cursor to the bottom of the first area and press the "TAB" key.
•
To mark a box within a certain area (i.e. the "G r anted" box in the "ACTION" area), place the
cursor within that box and press the "SPACE BAR".
•
To unmark a box within a certain area, place the cursor within that box and press t he " SPACE
BAR" again.
•
If you want to exit the "Filter" screen and you do not want your entries saved, press the "ESC"
key and you will be returned to the "FUNCTIO N CHO I CES" menu.
•
Once you have completed all of your entries, press the "ENTER" key and ERMA will save the
entries that you have made and will begin filtering the transactions according to the criteria you
have entered.
IMPORTANT NOTE: If you choose to filter the transactions that you monitor, all of the
transactions that have been "filtered out " will not be saved on your computer's hard disk drive,
therefore being "lost" in the system and cannot be retrieved. Hence, it is highly recommended
that you monitor all
to the same criteria when you are in the "ANALYZE TRANSACTI ONS" screen.
Page 20 of 29 Doc 6001001 Rev B
of your system’s transactions. You can filt er these transactions according
Page 25

1. CODE: The "Code" area allows you to monitor the t r ansactions according to either the directory
code, entry code, or card code (depending on your system’s conf iguration). To analyze the
transactions for a group of codes, enter the first code of the series in the "Begin" box and the last
code of the series in the "End" box. For example, if you only wanted to monitor the transactions
that have occurred for card codes between 00400 and 00560, you would enter 00400 in the "Begin"
box and 00560 in the "End" box (see figure 25 below). If you only wanted to monitor the
transactions that have occurred for a single code, enter that code in both the "Begin" box and the
"End" box (see figure 26 below).
Figure 25 - Filtering A Series of Codes Figure 26 - Filtering A Single Code
2. NAME
with the directory codes, entry codes, or card codes. To filter transactions alphabetically according
to name, enter the fir s t nam e alphabetically in the "Begin" box and the last name alphabetically in
the "End" box. For example, if you only wanted to monitor the transactions that occur for the
names alphabetically between "ADAMS" and "JONES", you would enter "ADAMS" in the "Begin"
box and "JONES" in the "End" box (see figure 27 below). If you wish to monitor only the
transactions that occur for a single name, enter that name in both the "Beg in" box and the " End"
box (see figure 28 below).
PLEASE NOTE: If you wish to analyze the transactions according to the names associated with
entry codes or card codes, your system must have the "full contr ol codes with names" option
previously installed and programmed. Contact your installing dealer for informat ion r egarding the
configuration of your system
: The "Name" area allows you to monitor the transact ions accor ding to the name associated
Figure 27 - Alphabetically Filtering Figure 28 - Alphabetically Filtering
A Series of Names A Single Name
3. DATE AND TIME
date and time that the transaction occurs. To filter the transactions according t o t he date and time,
enter the beginning date and time in the "Begin" area and the ending date and time in the "End"
area. W hen you make your first entry for the hour in t he "Begin" area, ERMA will display a default
setting for this entire area. To change this setting, simply type over the default setting. The hour,
minutes, month, day, and year must all be entered as two digit s. To change the time of day setting
from A.M. to P.M., move the cursor to the "A" position of A.M. and press the "P" k ey.
Rev B Doc 6001001 Page 21 of 29
: The "Date and time" area allows you to monitor tr ansact ions accor ding to the
Page 26

The setting should then read as P.M. To chang e the time of day setting from P. M. to A. M., m ove the
cursor to the "P" position of P. M. and press t he " A" key. The setting should then read as A.M. For
example, if the current date and t ime is Januar y 1, 1991 at 12:00 P.M. and you wish to monitor the
transactions that occur between now and February 1, 1991 at 3:00 A.M., you would enter "12:00 P
01/01/91" for the "Beg in" area and "03:00 A 02/01/91" for the " End" ar ea ( s ee figure 29 below). The
transactions will discontinue monitoring at 3:01 A. M. on Februar y 1, 1991, but you will be able to retrieve
the transactions that occur af ter 3:01 A.M. in the “RETRIEVE TRANSACTI O NS” area of ERMA.
Figure 29 - Filtering Transactions By Date and Time
4. ACTION
by your Infinity/Multi-Link system. To filt er t he t ransactions according to the action taken by your system,
mark the box found next to each action listed. You may choose more than one action in this area. For
example, if you only want to monitor the transactions that ar e invalid codes, invalid cards, and granted
access, you would place an "X" in the boxes labeled "Invalid Code", "Invalid Card", and "Gr ant ed" (see
figure 30 below). To mark an action box, place the cursor in the box with the use of the arrow keys. Next,
press the “SPACE BAR” once to mark the box. To unmark an action box, press the “SPACE BAR” ag ain.
A list and explanation of each action the system may take is defined in Table 1 on page 12 of this manual.
: The "Action" area allows you to monitor the transact ions accor ding to the actions that is taken
Figure 30 - Filtering Transaction By Action
5. SOURCE: The "Source" area allows you to monitor t he t r ansactions according to where the transaction
has taken place. The "Source" area will list the available sources accor ding to the unit and door name
which were given during the initial system setup. To filt er transactions according to the source, simply
mark the box found next to the source you wish to choose. You may make m or e t han one select ion in
this area. To mark a source box, place t he cur sor in the box with the use of the arrow keys. Next, press
the “SPACE BAR” once to mark the box. To unmark a source box, press the “SPACE BAR” again. For
example, if you wished to monitor the transaction that have occurr ed in Unit 1 - Door 1, Unit 2 - Door 1,
and Unit 3 - Door 1, simply mark the appr opriate boxes (see figure 31 below).
Page 22 of 29 Doc 6001001 Rev B
Page 27

Figure 31 - Filtering Transactions By Source
6. VIEWING TRANSACTION RECORDS ON AN INFINITY SYSTEM
1. On an Infinity System, whenever a transaction occurs, the Inf inity sends a recor d of that event
to a transaction buffer where it is st ored. If your Infinity is equipped with a printer, each r ecor d
will printed in a single line format as shown below: If your system is not equipped with a printer,
the transactions can still be viewed on your display by performing programm ing step 23-4.
TIME DATE INPUT SOURCE CODE NAME ACTION REASON
----------------------------------------------------------------------------------------------------------------------------09:12 AM 07/08/96 KEYPAD 1 1164 CODE 1164 GRANTED
09:11AM 07/08/96 PRGM-M1
2. INPUT SOURCE tells you the input source that generat ed the transaction and what
programming transaction was generat ed. The chart below describes the input source and the
programming transact ions. Note that the transaction numbers of 0 t hr ough 2 indicate off-line
changes using TAP, SPS, or MLP, while transaction number s 4, 5, 8, and 9 indicate on-line
changes
SOURCE
K = KEYPAD
H = HANDHELD
M = MODE M
D = DIRECT CONNECT
P = PHONE, DTMF, REMOTE
Rev B Doc 6001001 Page 23 of 29
Page 28

PROGRAMMING TRANSACTION
0 = off-line MEMORY COPY
1 = off-line MEMORY FULL RELOAD
2 = off-line MEMORY PARTIAL RELOAD
4 = on-line MEMORY CHANGE
5 = on-line MEMORY CHANGE AND CLOCK CHANGE
8 = on-line MEMORY RESORT
9 = on-line MEMORY RESORT AND CLOCK CHANGE
NOTE: On-line programming that does not change the system memory (e.g., making a
printout) will not be recorded. Changing the clock will be recorded as an on-line
change.
3. CODE will either be a person's entry code, a person's card code, or the direct or y code of the
person called.
4. ACTION tells you whether access was granted or denied, and if it was denied, why. It will also
print the word Alarm
out" feature to be invoked (see area 06 on page 13 for further discussion of this feature).
if the door has been broken open or if someone causes the "Strikes-and
Page 24 of 29 Doc 6001001 Rev B
Page 29

6 - ERROR MESSAGES AND THEIR MEANINGS
ERROR MESSAGE POSSIBLE MEANINGS
File open failure -- This messag e indicat es that the number of files
portion of your computer’s “CONFIG.SYS” file is
non-existent or is set for less than 30 files. Contact
your computer technician to edit this f ile.
File create failure -- This messag e m ay indicate that ERMA’s files are
being stored in your computer’s root direct or y and
the maximum number of files has been exceeded.
Contact your computer technician to help
troubleshoot the problem.
File close failure -- This messag e indicat e s t hat ERMA is experiencing
problems in closing the file. Terminate the ERMA
program and call your computer technician. Have
your computer technician run a disk integ r it y
program on the storage m edium .
File read failure
File seek failure
-- This error m essage indicates that there is a
corrupted file in the current dir ectory. Exit out of
ERMA and restart the program again. I f you
continue to experience problems, contact your
installing dealer.
File write failure -- This messag e indicat es that there is not enough
space on your computer’s disk. Verify that t here is
enough space on your computer’s disk. If you
continue to experience problems, call your
computer technician.
Invalid range setting.
Entry is out of range.
The begin range must be less than t he end r ange
unless the end range is zero (0)(or blank) .
The Transaction Archival function
is not currently supported
-- This messag e indicat es that an invalid value has
been entered. Refer to the appr opr iate area of this
manual for the value range and change your entr y
accordingly.
-- This message indicat es that this feature is not
available in your version of ERMA.
Unable to allocate new memory -- This message indicates that ERMA needs more
memory than what your computer is able to
provide. Call your computer technician to free up
Block boundary error Header write failure
Block file is not open Incomplete block file header
Block read failure Incorrect lock type
Block write failure Inter nal blkio error
Btree is corrupt Internal btree error
Btree is not open Internal Cbase error
some of your computer’s executable memory.
-- These messages indicat e t hat there are database
errors. To correct this problem, you will need to
delete the ERMA.SYS file and all of the .DAT
database files in the directory you are currently
working in. You will then need to re-install ERMA
onto your computer.
Buffering is off Internal lseq error
Buffering is on Key file creation failure
Cbase is corrupt Lseq is corrupt
Cbase is not open Lseq not open
Rev B Doc 6001001 Page 25 of 29
Page 30

ERROR MESSAGE
POSSIBLE MEANINGS
Database cursor set failure No free list
-- These messages indicat e t hat there are database
Database delete failure No key
Database export failure No record
Database import error Past end of block file
Database insert failure Past end of btree file
Database read failure Past end of Lseq file
Database write failure Printable file er ror
Duplicate key Record boundary error
Fail lock failure Too many open btrees
File creation failure Too many block files open
File open failure Too many open cbases
Too many open lseqs
errors. To correct this problem, you will need to
delete the ERMA.SYS file and all of the .DAT
database files in the directory you are currently
working in. You will then need to re-install ERMA
onto your computer.
Page 26 of 29 Doc 6001001 Rev B
Page 31

Alarm Response Messages
7 - Glossary
A section of the "SYSTEM SETUP OPT I ONS" menu that allows you
to program the messag e t hat will be displayed on your computer's
screen when an alarm condition has been activated.
Analyzing Transactions
Action
All Box
Code
Date and Time
Door/Gate Names
An area of the "FUNCTIO N CHO ICES" menu where you can view the
transactions that you have previously retrieved and filter them by the
filtering and sorting screens. You are also able to print transactions
when you are in this area.
A section of the retrieving transact ions, analyzing transactions, and
monitoring transactions f iltering screens that lists all of t he different
types of actions that the Inf init y or Multi-Link system per forms.
The box located in each area of the retrieving t r ansactions, analyzing
transactions, and monitoring tr ansact ions filtering screens which
allows you to receive all of the transactions taken by your system for
that area.
An area of the filter ing screen which allows you to filter transactions
according to its directory code, entry code, or car d code, depending
on your system’s configuration.
An area of the filter ing screen which allows you to filter transactions
according to the time and date the tr ansact ion has t aken place.
An area in the "SYSTEM SETUP OPTIONS" menu that allows you to
name each of the doors/gates in your system. You can have up to
four doors/gates in each unit.
Event Analysis Screen
Filtering Screens
Force Operator Knowledge
Function Choices Menu
Monitoring Transactions
The screen in the "ANALYZE TRANSACTIO NS" section which allows
you to filter, sort, pr int , or analyze transactions that you have
previously retrieved.
A screen which allows you to sort transactions according to five
different categories: Code, Name, Date and Time, Action, or Sour ce.
This screen can be found in one of thr ee ar eas of ERMA: the
"RETRIEVING TRANSACTI ONS" screen, the "Filter" section of the
"ANALYZING TRANSACTIONS" scr een, or the "MONITORING
TRANSACTIONS" screen.
A feature that req uires you (or whoever is receiving the alarm call
from ERMA) to press any key on your computer's keypad to
acknowledge that you have received an alarm message. This feature
is found in the "Alarm Response Messages" area of the "SYSTEM
SETUP OPTIONS" menu.
The main menu of the ERMA program. There are four sections in
this menu: System Setup Options, Retr ieve Tr ansactions, Analyze
Transactions, and Monitor Transactions.
An area of the "FUNCTIO N CHO ICES" menu where you can monitor
the transactions as they occur on your Infinity or Multi-Link system.
Rev B Doc 6001001 Page 27 of 29
Page 32

Name
An area in the filtering scr een which allows you to filter transactions
according to the name associated with a directory code, entry code,
or card code.
Print
Sort
Source
Storage Capacity
System Setup Options Menu
Transaction Archival
An area in the "ANALYZING TRANSACTI ONS" section which allows
you to print the transactions as they are shown on the "EVENT
ANALYSIS" screen.
An area of the Event Analysis screen in the "ANALYZING
TRANSACTIONS" section which allows you to organize the filtered
transactions according to five categor ies: Dat e and Time, Source,
Code, Name, and Action.
An area in the filtering scr een which allows you to filter transactions
according to where the transaction has taken place.
An area in the "SYSTEM SETUP OPTIONS" menu which allows you
to set the maximum number of tr ansact ions t hat can be st or ed by
ERMA.
An area of the "FUNCTIO N CHO ICES" menu where you enter the
necessary information for ERMA to operate. There are five sections
to this area: Storage Capacit y, Transaction Archival, Unit Names,
Door/Gate Names, and Alarm Response Messages.
An area in the "SYSTEM SETUP OPTIONS" m enu that is not
currently available. When this feature becomes available, it will tell
your computer to notify you when a certain percentage of ERMA’s
storage capacity has been filled.
Unit Names
An area in the "SYSTEM SETUP OPTIONS" menu that allows you to
name each unit in your Infinity or Multi-Link system.
Page 28 of 29 Doc 6001001 Rev B
Page 33

Alarm Response Messages
described.... 7
illustration.....8
Analyzing Transactions
described.... 13
filter.... 13
illustrated....13
print..... 18
sort..... 17
Action Filtering Box
analyzing transactions....16
auto lock....11
auto unlock....11
cycle strike....11
door ajar....11
door forced....11
exit request....11
granted....11
hung up....11
illustrated....11, 16, 21
invalid card....11
invalid code....11
invalid time zone....11
latch strike....121
monitoring transactions....21
passback violation....11
retrieving transactions....9
struck out....12
system reset....12
wrong door....12
Code Filtering Box
analyzing transactions....15
illustrated....10, 15, 20
monitoring transactions....20
retrieving transactions....9
Computer
requirements....2
Date and Time Filtering Box
analyzing transactions....15
illustrated....11, 16, 21
monitoring transactions....21
retrieving transactions....9
Door/Gate Names
described....7
illustrated....7
8 - INDEX
ERMA Software
activating....3
described....2
exiting....4
installing....3
requirements....2
tips for use....4
working copy....3
Event Analysis Screen
illustrated....13, 14, 17
Filtering Screens
action....12, 16, 21
code....10, 15, 20
date and time....11, 16, 21
described....9, 13, 19
illustrated....10
name....10, 15, 20
retrieving transactions....9
source....13, 17, 22
Force Operator Acknowledge
described....8
illustrated.....8
Monitoring Transactions
described....19
filter....19
Name Filtering Box
described....10, 15, 20
illustrated....11, 15, 20
Print Command
described....18
Sort Command
described....17
illustrated....18
Source Filtering Box
described....13, 17, 22
illustrated....13, 17, 22
Storage Capacity
described....5
System Setup Options Menu
alarm response message....7
described....5
door/gate names....7
illustrated....5
storage capacity....5
transaction archival....6
unit names....6
Transaction Archival
described....6
Unit Names
described....6
illustrated....6
Rev B Doc 6001001 Page 29 of 29
Page 34

ERMA Certification Procedure 3/28/00
1. Equipment/Preparation
ο The Multilink system that ERMA will "talk" to should be a 3 unit
chain. Each of the basic functions should be present in at least one
of the units in the chain so that transaction records of all kinds can
be generated for ERMA to use. This should include card readers
with valid and invalid cards, keypads with valid and invalid entry
codes, TIB's for telephone entry, Exit request buttons, door position
sensing for forced door alarms, etc.
ο Generate at least 1 transaction for each of the above mentioned
functions. Include several valid entries (card, entry code,
telephone) with different names.
ο An IBM compatible PC is required for testing ERMA. It should have
2 serial ports: the first should be either connected to an external
modem or is itself an internal modem; the second should be a
simple serial port for direct connection to the Multilink system.
ο The directory in which ERMA is to be run should include MLP and
the file SYSTEMS.DBF generated by MLP.
ο Run MLP and make sure that 2 systems are defined: SYSTEM1
and SYSTEM2. The first should be setup for direct connect
communication at 4800 baud and the 2nd for 300 baud modem
communication.
ο Two telephone lines or a Teltone telephone line simulator are
needed.
2. Banner screen
ο Run ERMA and examine the opening banner screen. Verify that
the word preliminary does not appear on the screen and that the
copyright message is dated for the current year.
ο Initially, the bottom line should read "(please wait)" but should soon
be replaced by the message "Press any key to continue".
ο Press any key.
3. System selection
ο The System Selection screen should show a list of two systems:
SYSTEM1 and SYSTEM2.
Page 1
Page 35

ERMA Certification Procedure 3/28/00
4. Event record functions
ο From the System selection menu, select SYSTEM1 then press the
Enter key.
ο Verify that SYSTEM1 is shown at the upper left corner of the
screen and that 4 function choices are displayed in the center of
the display which are:
1. System Setup Options,
2. Retrieve Transactions,
3. Analyze Transactions,
4. Monitor Transactions.
4.1. System setup options
ο From the Event record functions menu, select System Setup
Options.
ο Verify that 5 option choices are displayed:
1. Storage Capacity,
2. Transaction Archival,
3. Unit Names,
4. Door/Gate Names,
5. Alarm Response Messages.
4.1.1. Storage capacity
ο From the System setup options menu select Storage Capacity.
ο Verify that the default storage capacity of 10 (ten) event records is
displayed.
ο Test the cursor movement keys (left arrow, right arrow, Home, End)
and verify that cursor can occupy 3 positions: on the '1', on the '0'
and to the right of the '0'.
ο Change the value to 0 (zero), press Enter and verify that a
message is displayed saying that the entry is out of range and
providing the correct range of 10 to 99999. Press a key.
ο Change the value to 9 and verify the same error message.
ο Press a key.
ο Change the value to 99999, press Enter and verify that the System
setup options menu is restored.
ο Select Storage Capacity again and change the value to 50 for later
use. Press Enter.
4.1.2. Transaction archival
Page 2
Page 36

ERMA Certification Procedure 3/28/00
ο From the System setup options menu select Transaction Archival.
ο Verify that a message appears saying that this function is not
currently supported.
ο Press Enter.
4.1.3. Unit names
ο From the System setup options menu select Unit Names.
ο Verify that 16 name fields are displayed.
ο Move the cursor and verify that all 16 fields can be reached.
ο Insert a different name (be creative) into each field leaving the last
one blank.
ο Press Enter.
ο Select Unit Names again and verify that the previous entries have
been retained.
ο Press Enter again.
4.1.4. Door/Gate names
ο From the System setup options menu select Door/Gate Names.
ο Verify that 4 name fields are displayed.
ο Use the PgUp and PgDn keys to scroll through all 16 units. Verify
that all 16 can be reached and that the names of the units that
were previously entered are shown in the title bar at the top of the
central door/gate display.
ο Insert a different name into each field for all 16 units leaving one of
the door/gate names (your choice) in each unit blank.
ο Press Enter
4.1.5. Alarm response names
ο From the System setup options menu select Alarm Response
Messages.
ο Verify that the title bar at the top of the central window shows
"Unit_1" followed by the name of the first unit, as previously
defined, enclosed in square brackets.
ο Verify that there are 2 large fields (edit boxes) for entering alarm
response messages and that below each is a checkbox. Above
each edit box should be found "Message for door 1" and "Message
for door 2" respectively. After each of these labels should be found
Page 3
Page 37

ERMA Certification Procedure 3/28/00
the name of the door, as previously defined, enclosed in square
brackets. This will be missing for any door name not defined
(blank).
ο Use the PgUP and PGDn keys to scroll through all 16 units. Verify
that all 16 can be reached and that the names of the units that
were previously entered are shown in the title bar at the top of the
window. Also verify that the names of doors 1 and 2 show correctly
for all units. Again, undefined door names will not show.
ο Enter meaningful response messages into the edit boxes of all
units for both doors except for door 2 of unit 2; leave it blank. While
doing this, test the text editing features by exercising all the cursor
movement functions and performing midtext insertions and
deletions.
ο Press Enter.
4.2. Retrieve transactions
4.2.1. Filter Settings
ο From the Event record functions menu, select Retrieve
Transactions.
ο Verify that there are 5 filter windows labeled:
1. Code,
2. Name,
3. Date & Time,
4. Action,
5. Source.
ο The cursor should be located at the "All" checkbox in the Code
window.
ο Press the Tab key several times and observe that the cursor
circulates between all 5 of the windows. Press Shift-Tab several
times and observe that the cursor circulates in the reverse
direction.
ο Position the cursor in the Code window and press the up and down
arrow keys several time to verify that both the begin and end edit
boxes can be reached.
ο Position the cursor in the Name window and press the up and
down arrow keys several time to verify that both the begin and end
edit boxes can be reached.
Page 4
Page 38

ERMA Certification Procedure 3/28/00
ο Position the cursor in the Date & Time window and press the up
and down arrow keys several time to verify that both the begin and
end date fields can be reached.
ο Position the cursor in the begin field of the Code window and press
the left and right arrow keys several time to verify that all of the
subfields can be reached.
ο Repeat the test for the end fields.
ο Position the cursor in the Action window and press the up and
down arrow keys several times to make sure that all checkboxes
can be reached.
ο Repeat the test for the Source window.
ο From the Source window, press the PgUp and PgDn keys and
verify that the previously defined door/gate names show for all 16
units. The names that were left undefined should appear in the
following form: "(unit 3, door 1)"
ο Position the cursor at the "All" checkbox of the Action window.
Press the space bar once to clear the checkbox. Verify that the
cursor has moved to the next checkbox.
ο Continue pressing the space bar and observe that a new box is
"checked" for each keypress. After "checking" the last check box
observe that the cursor returns to the "All" checkbox.
ο Press the space bar at the "All" checkbox and verify that all the
other checkboxes are cleared..
ο Position the cursor at the "All" checkbox of the Source window.
Press the space bar once to clear the checkbox. Verify that the
cursor has moved to the next checkbox.
ο Continue pressing the space bar until all the checkboxes for the
first 16 doors/gates are checked (enabled). After "checking" the last
check box observe that the cursor returns to the "All" checkbox.
ο Press PgDn then press the down arrow to reach the top door/gate
checkbox. As above, continue pressing the space bar until all the
checkboxes are enabled. Repeat this 2 more times then press the
PgDn key once more to again show the first 16 doors.
Page 5
Page 39

ERMA Certification Procedure 3/28/00
ο Press the space bar at the "All" checkbox and verify, using the
PgDn key, that all 64 checkboxes are cleared.
ο Press the escape (Esc ) key.
4.2.2. Retrieving transactions
ο From the Event record functions menu, select Retrieve
Transactions.
ο Make sure that all the "All" checkboxes are "checked" then press
the Enter key.
ο Verify that ERMA dials the Multilink system, retrieves all the
transactions from each unit and terminates without error.
ο Observe that ERMA displays "Transaction copy complete,
Press any key to continue".
ο Press any key.
ο Press the Enter key to select Retrieve Transactions again.
ο Press Enter to againcopy transaction.
ο Verify after termination that no transactions have been copied.
ο Return to the Event record functions menu.
4.3. Analyze transactions
ο From the Event record functions menu, select Analyze
Transactions.
ο Observe that a screenfull of transactions previously retrieved is
displayed.
4.3.1. Event analysis
ο Press the PgDn, PgUp, down arrow and up arrow keys an verify
that each works. The PgDn and PgUp keys will allow new screens
full of transactions to be displayed from down the list or up the list
respectively. The down and up arrow keys will scroll the screen
down and up the list one line at a time.
ο Press the End key to show the last page (screen) of transactions
then press the down arrow and verify that one blank line is scrolled
up from the bottom.
Page 6
Page 40

ERMA Certification Procedure 3/28/00
ο Press the Home key to show the top page then press the up arrow
and verify that nothing happens.
4.3.2. Sort order
ο Press the "S" (sort) key and observe that a small window appears
in the center of the screen with 5 radio buttons labelled: Date &
Time, Source, Code, Name and Action.
ο Press the up and down arrow keys several time and verify that all
the radio buttons can be reached.
ο Select the Source radio button and press Enter.
ο Verify that the transactions are now displayed in the order shown in
the Source window of the filter screen (press "F").
ο Press the "S" key and select the Code radio button. Press Enter
ο Verify that the records are now displayed in code number order
with blank codes at the top and nonblank codes at the end of the
list.
ο Press the "S" key and select the Name radio button. Press Enter
ο Verify that the records are now displayed in name number order
with blank names at the top and nonblank names at the end of the
list.
ο Press the "S" key and select the Action radio button. Press Enter.
ο Verify that the transactions are now displayed in the order shown in
the Action window of the filter screen (press "F").
ο Restore the sort order to Time & Date.
Page 7
Page 41

ERMA Certification Procedure 3/28/00
4.3.3. Filter settings
ο Press the "F" key to display the filter menu.
ο Clear (uncheck) the "All" checkbox in the Code window.
ο Set the code begin field to a valid code (card entry, entry code or
telephone entry) from the transaction list. Set the end of the code
range to 0 (zero) and press enter.
ο Observe that the Event Analysis screen contains only the records
with the chosen code.
ο Press the "F" key again and enter a range of codes into the begin
and end fields. Put the highest code in the begin field (trust me)
and the lowest in the end field. Press Enter.
ο Observe that a nasty message about the reversed code range is
displayed.
ο Enter the code range correctly. (Be sure that the range includes
more than one code number from the list.) Press enter.
ο Verify that only lines with codes in the specified range are
displayed.
ο Press the "F" key, enable the "All" checkbox in the Code window
and clear the "All" checkbox in the Name window. Test the
reversed range error in the Name window by entering "Z" in the
begin field and "A" in the end field. Press Enter and verify that the
error message appears.
ο Enter a known name from the transaction list into the begin field
and leave the end field blank. Press Enter.
ο Verify that only records with the selected name are displayed.
ο Press the "F" key and enter a begin and end range in the Name
window. Be sure that the range includes more than one name from
the list.
ο Verify that only records having names within the selected range are
displayed.
ο Press the "F" key, enable the "All" checkbox in the Name window
then clear the "All" window in the Date & Time window and verify
that both the begin and end fields show "12:00 Am 01/01/00".
ο Change the begin field to 12:01 Am and verify that a reversed
range error message appears.
Page 8
Page 42

ERMA Certification Procedure 3/28/00
ο Enter a narrow time/date range that includes only a few
transactions in the list. Press Enter.
ο Verify that only the transactions having dates within the range show
on the screen.
ο Press "F" and enable the "All" checkbox in the Time & Date
window.
Note: Make sure that there is at least one transaction in the list for each
action in the Action window. If not then generate those
transactions, retrieve them in the Retrieve Transactions function
and proceed from here.
ο Enable each check box in the Action window (not the "All"
checkbox), one at a time, and verify that the Event Analysis screen
shows only transactions with the selected actions.
ο As with the Action window, enable each check box in the Source
window, one at a time, and verify that the Event Analysis screen
shows only transactions with the selected sources.
4.3.4. Printing
4.4. Monitor transactions
4.4.1. Filter settings
4.4.2. Alarms
Page 9
 Loading...