

Page 1

91X Total Body Trainer
Operation Manual
Total Body Trainer 91X
Mode D´Emploi
Entrenador para todo el cuerpo 91X
Manual De Operación
Page 2

1
LIFE FITNESS ASIA PACIFIC LTD
Room 2610, Miramar Tower
132 Nathan Road
Tsimshatsui, Kowloon
HONG KONG
Telephone: (+852) 2891.6677
FAX: (+852) 2575.6001
LIFE FITNESS ATLANTIC BV
LIFE FITNESS BENELUX
Bijdorpplein 25-31
2992 LB Barendrecht
THE NETHERLANDS
Telephone: (+31) 180.646.666
FAX: (+31) 180.646.699
Telephone: (+32) 87.300.942
FAX: (+32) 87.300.943
LIFE FITNESS DO BRAZIL
Av. Dr. Dib Sauaia Neto 1478
Alphaville, Barueri, SP
06465-140
BRAZIL
Telephone (+55) 11.4193.8282
FAX: (+55) 11.4193.8283
LIFE FITNESS VERTRIEBS GMBH
Dückegasse 7-9/3/36
1220 Vienna
AUSTRIA
Telephone: (+43) 1.61 57 198
FAX: (+43) 1.61 57 198.20
LIFE FITNESS IBERIA
Pol. Ind. Molí dels Frares. c/C, nº 12
08620 Sant Vicenç dels Horts (Barcelona)
SPAIN
Telephone: (+34) 93.672.4660
FAX: (+34) 93.672.4670
LIFE FITNESS EUROPE GMBH
Siemensstrasse 3
85716 Unterschleissheim
GERMANY
Telephone: (+49) 89.31 77 51.0
FAX: (+49) 89.31 77 51.99
LIFE FITNESS ITALIA S.R.L.
Via Vittorio Veneto, 57/A
39042 Bressanone (Bolzano)
ITALY
Telephone: (+39) 0472.835 470
FAX: (+39) 0472.833 150
LIFE FITNESS LATIN AMERICA
and CARIBBEAN
5100 North River Road
Schiller Park, Illinois 60176
U.S.A.
Telephone: (+1) 847.288.3300
FAX:(+1) 847.288.3886
LIFE FITNESS UK LTD
Queen Adelaide
Ely, Cambs CB7 4UB
UNITED KINGDOM
Telephone: (+44) 1353.666017
FAX: (+44) 1353.666018
LIFE FITNESS JAPAN
Nippon Brunswick Bldg., #8F
5-27-7 Sendagaya
Shibuya-Ku, Tokyo
JAPAN 151-0051
Telephone: (+81) 3.3359.4309
FAX: (+81) 3.3359.4307
M051-00K61-A093
04/05
CORPORATE
HEADQUARTERS
5100 North River Road
Schiller Park, Illinois 60176 • U.S.A.
847.288.3300 • FAX: 847.288.3703
800.735.3867 (Toll-free within U.S.A., Canada)
www.lifefitness.com
I
NTERNATIONAL OFFICES
Page 3
Before using this product, it is essential that this
ENTIRE operation manual and ALL installation instructions be read.
This will help in setting up the equipment quickly
and in instructing others on how to use it correctly and safely.
Avant toute utilisation de ce produit, il est indispensable de lire ce manuel d'utilisation
dans son INTÉGRALITÉ, ainsi que TOUTES les instructions d'installations.
Ce manuel explique comment installer l'équipement et comment
l'utiliser correctement et sans danger.
FCC Warning - Possible Radio / Television Interference
NOTE: This equipment has been tested and found to comply with the limits for a Class Adigital
device, pursuant to part 15 of the FCC rules. These limits are designed to provide reasonable
protection against harmful interference when the equipment is operated in a commercial environment. This equipment generates, uses and can radiate radio frequency energy, and if not
installed and used in accordance with the operation manual, may cause harmful interference to
radio communications. Operation of this equipment in a residential area is likely to cause harmful interference in which case the user will be required to correct the interference at his own
expense.
Class S (Studio): Professional and / or commercial use.
CAUTION: Any changes or modifications to this equipment could void the prod-
uct warranty.
MISE EN GARDE: Tout changement et toute modification de ce matériel peut
annuler la garantie du produit.
Any service, other than cleaning or user maintenance, must be performed by an authorized service representative. There are no user serviceable parts.
2
Page 4

TABLE OF CONTENTS
Section Description . . . . . . . . . . . . . . . . . . . . . . . . . . . . . . . . . . . . . . . . . . . . . . . . . . .Page
1. Getting Started . . . . . . . . . . . . . . . . . . . . . . . . . . . . . . . . . . . . . . . . . . . . . . . . . .5
1.1 Important Safety Instructions . . . . . . . . . . . . . . . . . . . . . . . . . . . . . . . . . . . . . . .5
1.2 Setup . . . . . . . . . . . . . . . . . . . . . . . . . . . . . . . . . . . . . . . . . . . . . . . . . . . . . . . . .7
Where to Place the Life Fitness®Cross-trainer // How to Stabilize the Life Fitness
Cross-trainer // Check for Power
2. The Display Console . . . . . . . . . . . . . . . . . . . . . . . . . . . . . . . . . . . . . . . . . . . . .8
2.1 Display Console Overview . . . . . . . . . . . . . . . . . . . . . . . . . . . . . . . . . . . . . . . . .8
2.2 Display Console Descriptions . . . . . . . . . . . . . . . . . . . . . . . . . . . . . . . . . . . . . . .8
2.3 The Accessory Tray / Reading Rack . . . . . . . . . . . . . . . . . . . . . . . . . . . . . . . . . .10
3. Heart Rate Monitoring . . . . . . . . . . . . . . . . . . . . . . . . . . . . . . . . . . . . . . . . . . . .11
3.1 The Lifepulse
TM
Digital Heart Rate Monitoring System . . . . . . . . . . . . . . . . . . . . .11
3.2 The Polar®Telemetry Heart Rate Monitoring Chest Strap . . . . . . . . . . . . . . . . . .12
4. The Workouts . . . . . . . . . . . . . . . . . . . . . . . . . . . . . . . . . . . . . . . . . . . . . . . . . . .13
4.1 Workout Overviews . . . . . . . . . . . . . . . . . . . . . . . . . . . . . . . . . . . . . . . . . . . . . .13
4.2 Using the Workouts . . . . . . . . . . . . . . . . . . . . . . . . . . . . . . . . . . . . . . . . . . . . . .13
To Begin a Workout // Select and Using Quick Start // Selecting a Workout //
Entering Weight // Entering Time // Selecting and Adjusting the Resistance Level
Selecting a Workout Mode // Switching Workouts “On-the-fly” //
Pausing Workouts // Ending Workouts Early //
Life Fitness Cross-trainer Workout Setup Steps (chart)
4.3 Workout Descriptions . . . . . . . . . . . . . . . . . . . . . . . . . . . . . . . . . . . . . . . . . . . . .15
Quick Start // Manual // Random // Hill // Cross-train Aerobics // Cross-train
Reverse
5. Optional Settings . . . . . . . . . . . . . . . . . . . . . . . . . . . . . . . . . . . . . . . . . . . . . . . .18
5.1 Entering and Using the Optional Settings Feature . . . . . . . . . . . . . . . . . . . . . . . .18
6. Service And Technical Data . . . . . . . . . . . . . . . . . . . . . . . . . . . . . . . . . . . . . . . .19
6.1 Preventive Maintenance Tips . . . . . . . . . . . . . . . . . . . . . . . . . . . . . . . . . . . . . . .19
6.2 Preventive Maintenance Schedule . . . . . . . . . . . . . . . . . . . . . . . . . . . . . . . . . . .20
6.3 Troubleshooting the Polar Heart Rate Chest Strap . . . . . . . . . . . . . . . . . . . . . . .20
Heart Rate Reading Is Erratic or Absent Entirely //
Heart Rate Reading Is Erratic or Extremely High
6.4 Troubleshooting the LifepulseSystem Sensors . . . . . . . . . . . . . . . . . . . . . . . . . .21
6.5 How to Obtain Product Service . . . . . . . . . . . . . . . . . . . . . . . . . . . . . . . . . . . . . .21
7. Specifications . . . . . . . . . . . . . . . . . . . . . . . . . . . . . . . . . . . . . . . . . . . . . . . . . . .22
7.1 Life Fitness 91X Cross-trainer Specifications . . . . . . . . . . . . . . . . . . . . . . . . . . .22
© 2005 Life Fitness, a division of Brunswick Corporation. All rights reserved. Life Fitness, Heart Rate Zone
Training, and Lifepulse are registered trademarks of Brunswick Corporation. Heart Rate Zone Training+,
Heart Rate Hill, Heart Rate Interval, and Extreme Heart Rate are trademarks of Brunswick Corporation.
Polar is a registered trademark of Polar Electro, Inc. Cardio Theater is a registered trademark of the Cardio
Theater Holdings. FitLinxx is a registered trademark of the Integrated Fitness Corp. Any use of these trademarks, without the express written consent of Life Fitness or the corresponding companies is forbidden.
3
Page 5
This Operation Manual describes the functions of the following product:
Life Fitness rear drive total body cross-trainer
91X
See "Specifications" page in this manual for product specific features.
Statement of Purpose: The Life Fitness cross-trainer is an exercise machine that combines lowimpact elliptical pedaling with push/pull arm motion to provide an efficient, effective total body
workout.
CAUTION: Life Fitness STRONGLY recommends seeing a physician for a com-
plete medical exam before undertaking an exercise program, particularly if the
user has a family history of high blood pressure or heart disease, or is over the
age of 45, or smokes, has high cholesterol, is obese, or has not exercised regularly in the past year.
If, at any time while exercising, the user experiences faintness, dizziness, pain, or shortness of
breath, he or she must stop immediately.
MISE EN GARDE: Life Fitness conseille VIVEMENT de consulter un médecin pour
subir un examen médical complet avant de commencer tout programme d'exercice, et tout particulièrement si l'utilisateur a des antécédents familiaux d'hypertension ou de troubles cardiaques, ou s'il a plus de 45 ans, s'il fume, s'il a du
cholestérol, s'il est obèse ou n'a pas fait d'exercice régulièrement depuis un an.
Si, pendant l'utilisation de l'appareil, l'utilisateur ressent un malaise, des vertiges, des douleurs
ou des difficultés à respirer, il doit cesser immédiatement.
4
Page 6

1G
ETTING STARTED
1.1 IMPORTANT SAFETY INSTRUCTIONS
SAFETY WARNING: The safety of the product can be maintained only if it is
examined regularly for damage and wear. See Preventative Maintenance section
for details.
• If this Life Fitness product does not function properly after it has been dropped, damaged, or
even partially immersed in water, contact Life Fitness Customer Support Services for assistance.
• Always follow the console instructions for proper operation.
• Close supervision is necessary when used by children, invalids or disabled persons.
• Do not use this product outdoors, near swimming pools or in areas of high humidity.
• Never operate a Life Fitness product with the air openings blocked. Keep air openings free
of lint, hair or any obstructing material.
• Never insert objects into any opening in this product. If an object should drop inside, carefully retrieve it. If the item cannot be reached, contact Life Fitness Customer Support Services.
• Never place liquids of any type directly on the unit, except in the accessory tray water bottle
holder. Containers with lids are recommended.
• Wear shoes with rubber or high-traction soles. Do not use shoes with heels, leather soles,
cleats or spikes. Make sure no stones are embedded in the soles.
• Keep all loose clothing, shoelaces and towels away from moving parts.
• Do not use this product in bare feet.
• Do not tip the unit on its side during operation.
• Keep the area around the Life Fitness product clear of any obstructions, including walls and
furniture. Ensure that there is at least one foot of clearance in front of the Life Fitness crosstrainer.
• Use caution when mounting or dismounting the Life Fitness cross-trainer. Use the stationary
handlebar whenever additional stability is required. While exercising, hold onto the moving
arms.
• Never use the Life Fitness cross-trainer while facing backward.
SAVE THESE INSTRUCTIONS FOR FUTURE REFERENCE.
5
Page 7

1P
OINT DE DÉPART
1.1 CONSIGNES DE SÉCURITÉ IMPORTANTES
CONSIGNE DE SÉCURITÉ : pour un emploi sûr, le produit doit être inspecté
régulièrement afin de s'assurer qu'il n'est pas usé ni endommagé. Consultez la
section de Maintenance préventive pour obtenir de plus amples informations.
• Si l'appareil Life Fitness ne fonctionne pas correctement après avoir subi une chute, des
dommages ou une immersion même partielle dans l'eau, contactez le service d'assistance
clientèle de Life Fitness.
• Pour un fonctionnement correct, suivez toujours les instructions de la console.
• Une surveillance étroite est nécessaire en cas d'utilisation par des enfants, des personnes
invalides ou handicapées.
• N'utilisez pas ce produit à l'extérieur, près d'une piscine ou dans endroits très humides.
• Ne faites jamais fonctionner de produit Life Fitness dont les bouches d'aération seraient bloquées. Maintenez-les exemptes de peluches, de cheveux ou de toute obstruction.
• N'insérez jamais d'objet dans les ouvertures de cet appareil. Si un objet tombe dedans,
coupez l'alimentation électrique, débranchez le cordon de la prise et récupérez-le avec précaution. Si vous ne pouvez pas l'atteindre, consultez le service après-vente de Life Fitness.
• Ne placez jamais de liquides d'aucune sorte directement sur l'appareil, sauf si vous disposez d'un support ou d'un plateau pour accessoires. Il est recommandé d'utiliser des conteneurs munis d'un couvercle.
• Portez des chaussures avec semelles en caoutchouc ou antidérapantes. N'utilisez pas de
chaussures à talons, de semelles en cuir ou à crampons. Assurez-vous qu'aucun caillou ne
s'est incrusté dans les semelles.
• Maintenez les vêtements lâches, les lacets et les serviettes à l'écart des pièces en mouvement.
• N'utilisez pas cet appareil sans chaussures.
• Ne faites pas basculer l'appareil sur le côté tandis qu'il fonctionne.
• Maintenez la zone autour du produit Life Fitness exempte d'obstructions, y compris de murs et
de meubles. Veillez à laisser au moins 30 cm d'espace autour du Life Fitness cross-trainer.
• Procédez avec précaution lors du montage ou du démontage de la machine. Utilisez la
barre fixe pour renforcer votre stabilité. Pendant les exercices, saisissez les bras mobiles.
• N'utilisez jamais cet appareil en vous tournant vers l'arrière.
CONSERVEZ CES INSTRUCTIONS POUR USAGE ULTÉRIEUR.
6
Page 8
1.2 S
ETUP
Read the Operation Manual before setting up the Life Fitness cross-trainer.
WHERE TO PLACE THE LIFE FITNESS®CROSS-TRAINER
Following all safety instructions in Section 1.1, move the Life Fitness cross-trainer to the location
in which it will be used. See Section 7, titled Specifications, for the dimensions of the footprint.
Allow one foot of clearance in front of the Life Fitness cross-trainer to allow for movement of the
pedal levers. It should be easy to mount the Life Fitness cross-trainer from the side.
HOW TO
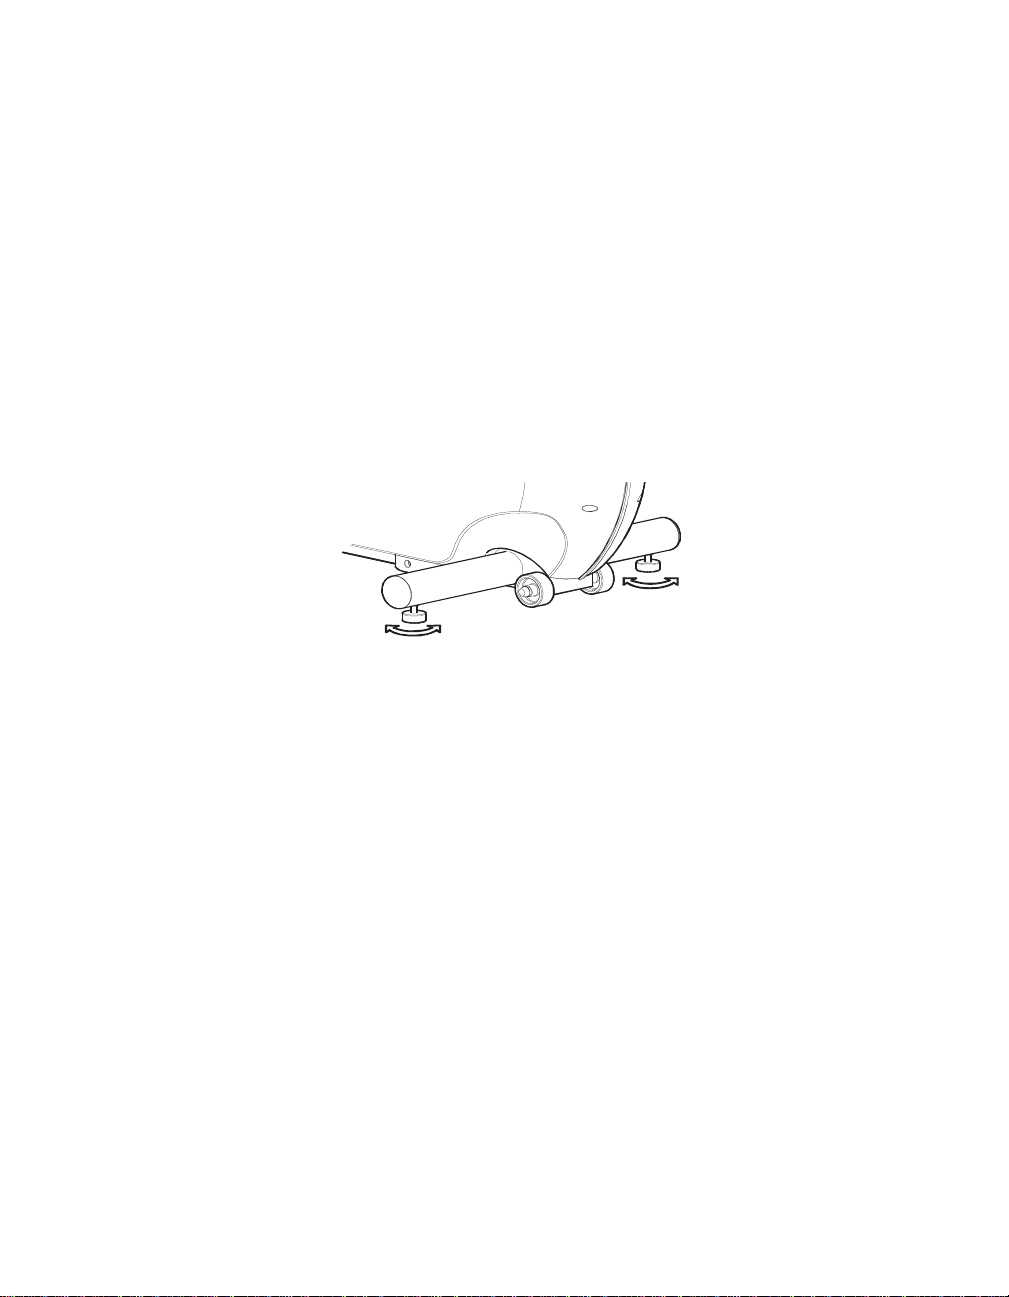
STABILIZE THE LIFE FITNESS CROSS-TRAINER
After placing the Life Fitness cross-trainer in position, check the unit’s stability by attempting to
rock it. Any slight rocking indicates that the unit must be leveled. Check the stabilizing feet to
determine which foot does not rest fully on the floor. Rotate the foot counter-clockwise to lower
it. Recheck the stability and adjust again as needed until the Life Fitness cross-trainer is stable
and no longer rocks. Lock the adjustment into position by tightening the jam nut against
the stabilizer bar with an open end 9/16 inch wrench.
.
CHECK FOR POWER
The console is powered by a rechargeable 6-volt battery. Check the battery by pressing the START
key. The console should light up, and the MESSAGE CENTER should display a prompt to set up a
workout. If this does not occur, mount the Life Fitness cross-trainer and begin pedaling. The console
should then light up, making it possible to program a workout. Pedal for 10 to 20 minutes at 25
RPM or faster during a workout to charge the battery. Afterwards, the pedal action during workouts
keeps the battery charged. If the console still does not light, contact Life Fitness Customer Service.
See section 6.5, titled How to Obtain Product Service, for more information.
7
Page 9
2T
HE DISPLAY CONSOLE
2.1 DISPLAY CONSOLE OVERVIEW
The computerized display console allows the user to tailor a workout to personal fitness abilities
and goals and to monitor progress. With this easy-to-use console, the user can track fitness
improvement from one workout to the next.
2.2 DISPLAY CONSOLE DESCRIPTIONS
This section lists and describes the functions for the keys and display windows on the console. See
Section 4, titled The Workouts, for detailed information on using the console to set up workouts.
A START: Press this key to activate the console for programming a new workout. The activated
console lights up and displays “SELECT WORKOUT OR PRESS QUICK START”. If no key is
pressed for 15 seconds, and the user stops pedaling, the console shuts down again.
NOTE: The Life Fitness cross-trainer’s AutoStart feature also activates the console when the
user steps on the pedals and begins pedaling.
8
Page 10

B ENTER: Press this key after entering each value, such as weight or workout time, when
prompted by console display messages.
C ARROW keys: Use the UP and DOWN ARROW keys to change workout parameters
displayed on the console, such as length of workout, weight, and intensity level.
D QUICK START: Press this key to begin a manual workout immediately, without having to
select a workout program. Once the workout is in progress, use the ARROW KEYS to
change the intensity level.
E CLEAR: When programming a workout, press this key, to clear incorrect data, such as
weight, before pressing the ENTER key. Pressing CLEAR during a workout stops it immediately, at which point the MESSAGE CENTER displays a summary of the workout, including
total time elapsed, total distance traveled, and total calories burned. Pressing CLEAR a second time causes the MESSAGE CENTER to prompt the user for a new
workout setup.
F DISPLAY LOCK: During a workout, the MESSAGE CENTER alternately displays the num-
ber of CALORIES burned and the amount of TIME elapsed. Pressing the DISPLAY LOCK
key when the MESSAGE CENTER displays either statistic forces the MESSAGE CENTER
to display that statistic continuously throughout the workout. Pressing DISPLAY LOCK again
allows the MESSAGE CENTER to resume toggling between both statistics.
G CHANGE WORKOUT: Press this key to switch to another workout while a workout is in
progress.
H COOLDOWN: workouts end automatically in a Cooldown mode, which lowers the intensity
level. Press the COOLDOWN key at any desired point during a workout to go immediately
into Cooldown mode. In this phase of a workout the body begins to remove lactic acid and
other accumulated by-products of exercise, which build up in muscles during a workout and
contribute to muscle soreness. The console automatically adjusts each workout’s Cooldown
level according to the individual user’s performance. Each time the user presses the
COOLDOWN key, the Cooldown duration shortens by one minute.
I WORKOUT PROFILE WINDOW: This window displays shapes, made of columns of lights,
that represent the levels of intensity in a workout-in-progress. The height of the column is
proportional to the level of the intensity.
J MESSAGE CENTER: This window displays step-by-step instructions for setting up a work-
out. During a workout, it displays statistics about the progress of the workout:
• Level: programmed intensity level. Toggles with Heart Rate.
• Heart Rate: the detected heart rate if the user is wearing the chest strap or grasping
sensors. Toggles with Level. If the on-board computer does not detect a heart rate, only
Level is displayed throughout the workout.
• Distance: the total distance traveled in miles (or kilometers if enabled).
• Speed: the pedaling speed or rate in miles per hour (or kilometers per hour if enabled).
• Calories: the number of calories burned since beginning the workout. Toggles with
Time.
• Time: time elapsed since the start of the workout. Toggles with Calories.
9
Page 11
If programmed to do so, the MESSAGE CENTER displays any or all of these three values each
time the intensity level changes during the workout:
• Calories per Hour: the rate of calories burned per hour.
• Watts: effort level in Watts. The Watt is a unit of power output or the expression of the
mechanical rate of work.
• METs: effort level in METs. The MET is an expression of the rate of work for the human
body at rest, or a metabolic equivalent; one MET is approximately equal to the metabolism of a person at rest.
See Chapter 5, titled Internal Settings for information about enabling the MESSAGE CENTER to
display these additional settings.
K AEROBICS MODE: Press this key to activate a workout mode in which the MESSAGE
CENTER displays prompts that vary the workload and emphasize different muscle groups
during the workout. It can be used with any workout.
L REVERSE MODE: Press this key to activate a workout mode that alternates five minutes of
forward motion with two minutes of reverse motion. It can be used with any workout.
M PAUSE: Press this key to pause the current workout. Continue the workout by pressing the
PAUSE key again. For more information, see the topic titled Pausing a Workout in Section
4.2, titled Using the Workouts.
For more information about Aerobics Mode and Reverse Mode, see the topic Using the Two
Workout Modes in Section 4.2, titled, the Using the Workouts.
2.3 T
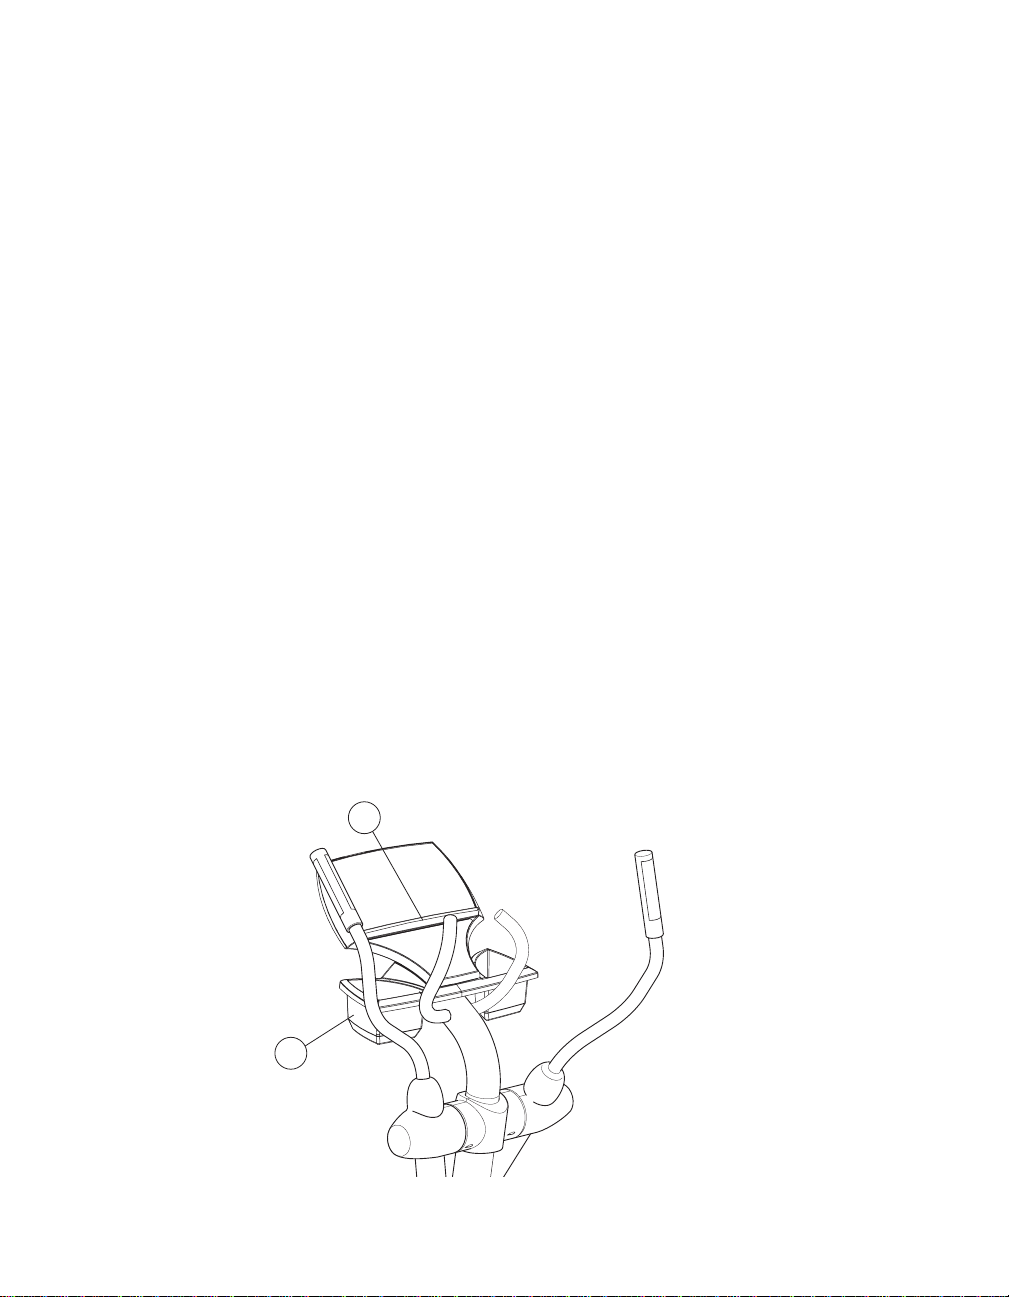
HE ACCESSORY TRAY / READING RACK
The accessory tray (A), which is mounted near the base of the console, provides dual storage
trays with space for items such as water bottles, personal stereos, and cell phones. Additionally,
an integrated reading rack (B) for supporting a book or magazine is located at the base of the
upper panel of the console.
10
B
A
Page 12
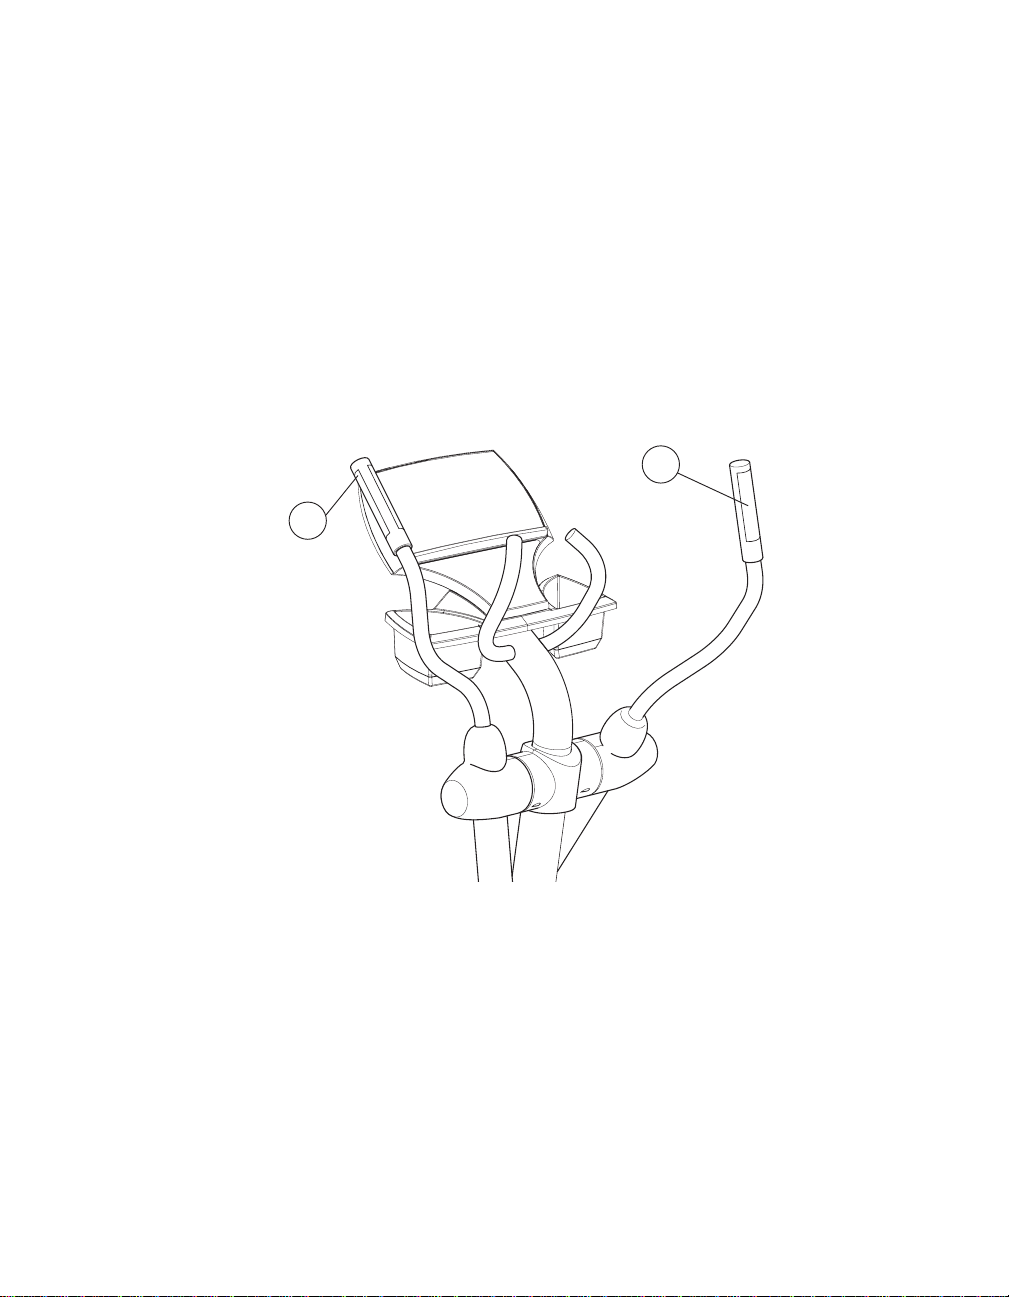
3H
EART RATE MONITORING
3.1 THE LIFEPULSETMDIGITAL HEART RATE MONITORING SYSTEM
The patented Lifepulse system sensors are the built-in heart rate monitoring system on the Life
Fitness cross-trainer. For the most accurate reading possible, during a workout:
• Grasp the sensors (A) firmly.
• Hold each sensors at the vertical midpoint.
• Keep hands steady and in place.
The console displays the heart rate within 10 to 40 seconds after the user grasps the sensors.
11
A
A
Page 13
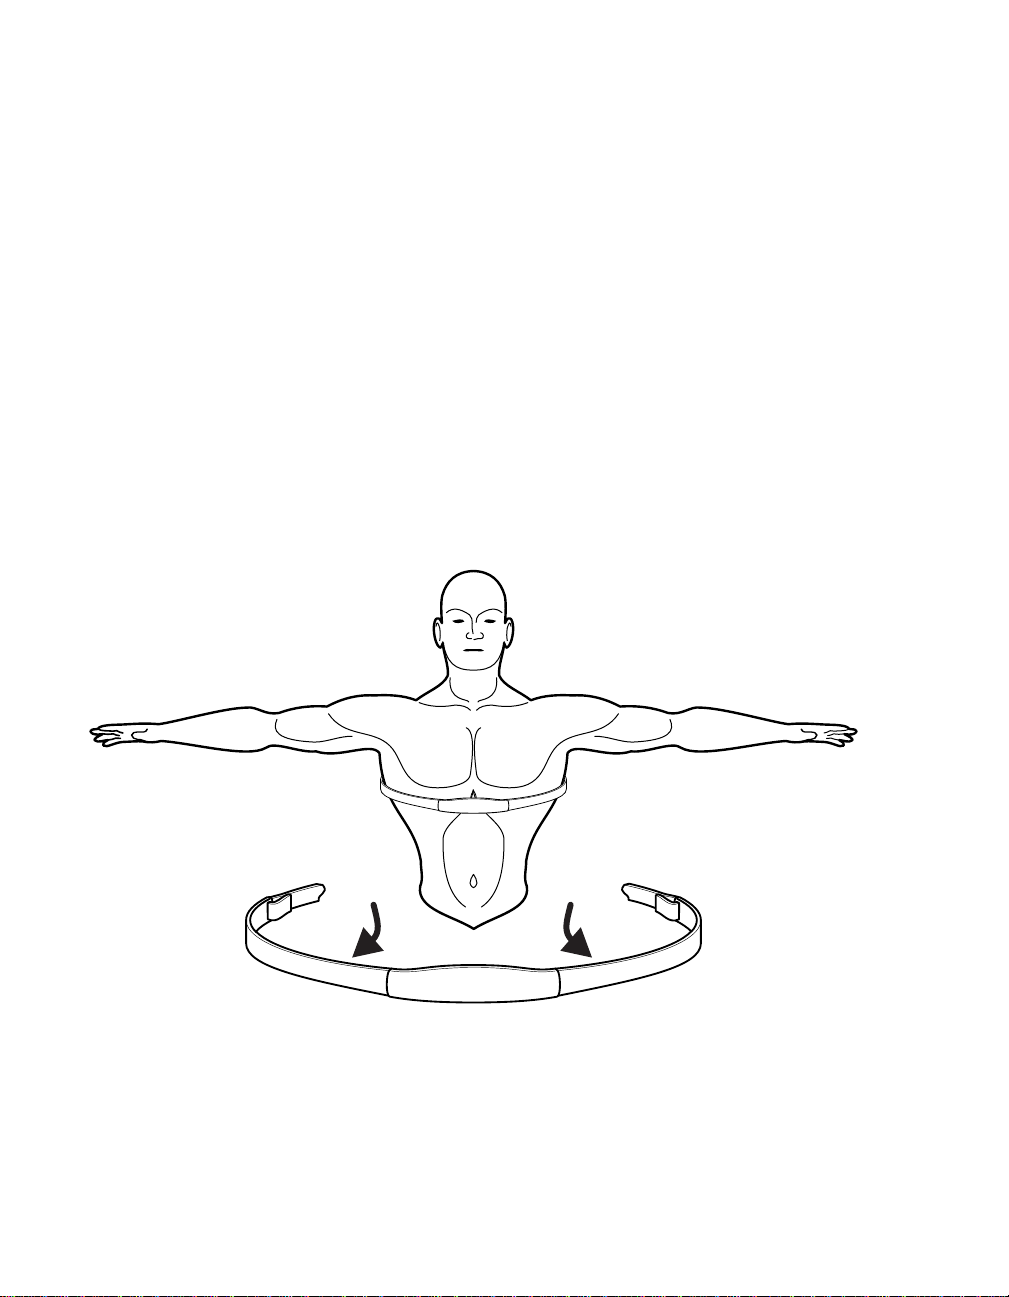
3.2 T
HE POLAR
®
TELEMETRY
HEART RATE MONITORING CHEST STRAP
The Life Fitness cross-trainer is equipped with Polar heart rate monitoring system in which electrodes, pressed against the skin, transfer heart rate signals to the console. These electrodes are
attached to a chest strap that the user wears during the workout. The chest strap is optional. To
order it, call Life Fitness Customer Support Services. See Section 6.5, titled How to Obtain
Product Service.
See the diagram below for correct positioning of the strap. The electrodes (A), which are the two
grooved surfaces on the underside of the strap, must remain wet to transmit accurately the electrical impulses of the heart back to the receiver. Moisten the electrodes. Then, secure the strap
as high under the chest muscles as possible. The strap should be snug, but comfortable enough
to allow for normal breathing.
The transmitter strap delivers an optimal heart rate reading when the electrodes are in direct
contact with skin. However, it also functions properly through a thin layer of wet clothing.
If it becomes necessary to re-moisten the chest strap electrodes, grasp the center of the strap,
pull it away from the chest to expose the two electrodes, and moisten them.
NOTE: If the Lifepulse system sensors are grasped while the chest strap is worn, and if the signals from the sensors are valid, the on-board computer uses the sensor signals for calculating
the heart rate instead of those transmitted with the chest strap.
12
A A
Page 14

4T
HE WORKOUTS
4.1 WORKOUT OVERVIEWS
This section lists the Total Body Trainer’s pre-programmed workouts. For more detailed information,
see Section 4.2, titled Using the Workouts. The following workouts are accessible via the ARROW
keys.
QUICK START is the fastest way to begin exercising and bypasses the steps involved in selecting a specific workout program. After the QUICK START key is pressed, a constant-level workout begins. The intensity level does not change automatically.
MANUAL is a workout in which the intensity level does not change automatically.
RANDOM is an interval training workout of constantly changing intensity levels that occur in no
regular pattern or progression.
CROSS-TRAIN AEROBICS simulates the experience of working with a personal trainer. The
MESSAGE CENTER displays prompts at different times to emphasize pushing, pulling, total
body, lower body, speed changes, and forward/reverse motion. This versatile workout promotes
maximum cross-training benefits.
CROSS-TRAIN REVERSE continuously alternates five minutes of forward motion with two minutes of backward motion to cross-train different muscle groups.
HILL is an interval-training workout combining “hills” and “valleys” of different intensity levels,
which is proven to provide effective, time-efficient cardiovascular results.
4.2 USING THE WORKOUTS
This section provides detailed information on setting up and using workouts. For quick-reference
setup steps, see the chart near the end of the section.
TO BEGIN A WORKOUT
To mount the Total Body Trainer, grasp the handles and carefully step on the pedals. To dismount,
step off the pedals while still holding the handles. Then let go of the handles.
Press START or begin pedaling to activate the console. The MESSAGE CENTER displays,
"SELECT WORKOUT USING ARROW KEYS OR PRESS QUICK START". If it displays a different
message, press the CLEAR key twice in rapid succession.
SELECTING AND USING QUICK START
QUICK START is the fastest way to begin exercising and bypasses the steps of selecting a spe-
cific workout program. At the MESSAGE CENTER prompt to select a workout, press the QUICK
START key. The workout begins at an intensity level that remains the same unless manually
changed. After 12 seconds, the MESSAGE CENTER displays a prompt to enter weight, which
the computer requires to calculate total calories.
13
Page 15

S
ELECTING A WORKOUT
For MANUAL, RANDOM, HILL, CROSS-TRAIN REVERSE and CROSS-TRAIN AEROBICS:
When prompted to select a workout, use the ARROW KEYS to scroll through the workout names
as they appear in the MESSAGE CENTER. When the desired workout appears, press ENTER.
ENTERING WEIGHT
When prompted by the MESSAGE CENTER to enter weight, use the ARROW KEYS to increase
or decrease the displayed weight to the correct value and press ENTER. The default weight is
150 pounds or 68 kilograms. The on-board computer calculates the number and rate of calories
burned using the entered weight as well as the pedaling speed.
ENTERING
TIME
When prompted by the MESSAGE CENTER to enter a time, use the ARROW KEYS to increase
or decrease the displayed time to the desired value and press ENTER.
SELECTING AND
ADJUSTING THE RESISTANCE LEVEL
When prompted by the MESSAGE CENTER, use the ARROW KEYS to increase or decrease the displayed intensity level or target heart rate to the desired value and press ENTER. Adjust the level as
needed or desired during the workout.
• Resistance level: The Total Body Trainer provides a selection of 25 resistance levels. The
resistance is independent of speed. The resistance level appears in the WORKOUT
PROFILE window as rows of lights arranged in columns. Selecting a low intensity level at first
is recommended. As physical conditioning improves, the levels can increase.
SELECTING A WORKOUT MODE
Two workout mode options on the Total Body Trainer feature alternate ways to vary workouts.
• Aerobics Mode: This workout mode simulates the experience of working out with a train-
er. Throughout the workout, the MESSAGE CENTER displays prompts to vary the workload and emphasize different muscle groups, such as upper- and lower-body. This feature
can be used with any workout.
• Reverse Mode: This workout mode continuously alternates five minutes of forward
motion with two minutes of reverse motion, to exercise different leg muscles. This
feature can be used with can be used with any workout.
SWITCHING WORKOUTS “ON-THE-FLY”
It is possible, during a workout, to switch to another workout program. After a switch, the console
retains all the progress information about the workout since its beginning. To change workouts
“on-the-fly,” press CHANGE WORKOUT key and then select a new workout. This feature is available
for all workouts.
PAUSING WORKOUTS
To pause a workout, simply stop pedaling. To continue the workout, resume pedaling. The pause
duration lasts 60 seconds, after which the console automatically shuts down.
ENDING WORKOUTS EARLY
To end a workout before the pre-set duration expires, press CLEAR once. The MESSAGE CENTER
then displays a workout summary, which includes the distance travelled, the total calories burned, and
other statistics. Press CLEAR a second time and the MESSAGE CENTER displays “SELECT WORKOUT USING ARROW KEYS OR PRESS QUICK START” for a new workout.
14
Page 16

4.3 WORKOUT DESCRIPTIONS
QUICK START
QUICK START is the fastest way to begin exercising and bypasses the steps of selecting a specific
workout program. The intensity level for the workout is set automatically and remains the same
unless manually changed. To change the level, press the UP or DOWN ARROW keys to enter a
higher or lower level number. After the workout has been in progress for 12 seconds, the MESSAGE
CENTER displays “ENTER WEIGHT”, which the computer requires to calculate total calories. Using
the ARROW KEYS, increase or decrease the displayed weight to the correct value.
M
ANUAL
The MANUAL program sets an intensity level that does not change automatically. While the
workout is in progress, increase or lower the intensity level as desired using the ARROW keys.
RANDOM
The RANDOM program creates a terrain of hills and valleys that varies with each workout. More
than one million different patterns are possible. Because workout levels are greater in this workout than in the HILL workout, it is recommended that the RANDOM workout be set one or two
levels lower than the workout level which would normally be selected in the HILL workout.
HILL
The Life Fitness-patented HILL workout offers a variety of configurations for interval training.
Intervals are periods of intense aerobic exercise separated by regular periods of lower-intensity
exercise. The WORKOUT PROFILE window represents these high and low intervals as columns of
light, which together have the appearance of hills and valleys. The computerized interval training
workout has been scientifically demonstrated to promote greater cardio-respiratory improvement
than steady-pace training.
15
QUICK START
Press QUICK START
Begin workout
MANUAL
Press ARROW KEYS
repeatedly until
MANUAL appears;
press ENTER
Enter weight
Enter time
Select level
Begin workout
RANDOM
Press ARROW KEYS
repeatedly until
RANDOM appears;
press ENTER
Enter weight
Enter time
Select level
Begin workout
HILL
Press ARROW KEYS
repeatedly until
HILL appears; press
ENTER
Enter weight
Enter time
Select level
Begin workout
CROSS-TRAIN
AEROBICS
Press ARROW KEYS
repeatedly until
CROSS-TRAIN
AEROBICS appears;
press ENTER
Enter weight
Enter time
Select level
Begin workout
CROSS-TRAIN
REVERSE
Press ARROW KEYS
repeatedly until
CROSS-TRAIN
REVERSE appears;
press ENTER
Enter weight
Enter time
Select level
Begin workout
LIFE FITNESS CROSS-TRAINER WORKOUT SETUP STEPS
Page 17
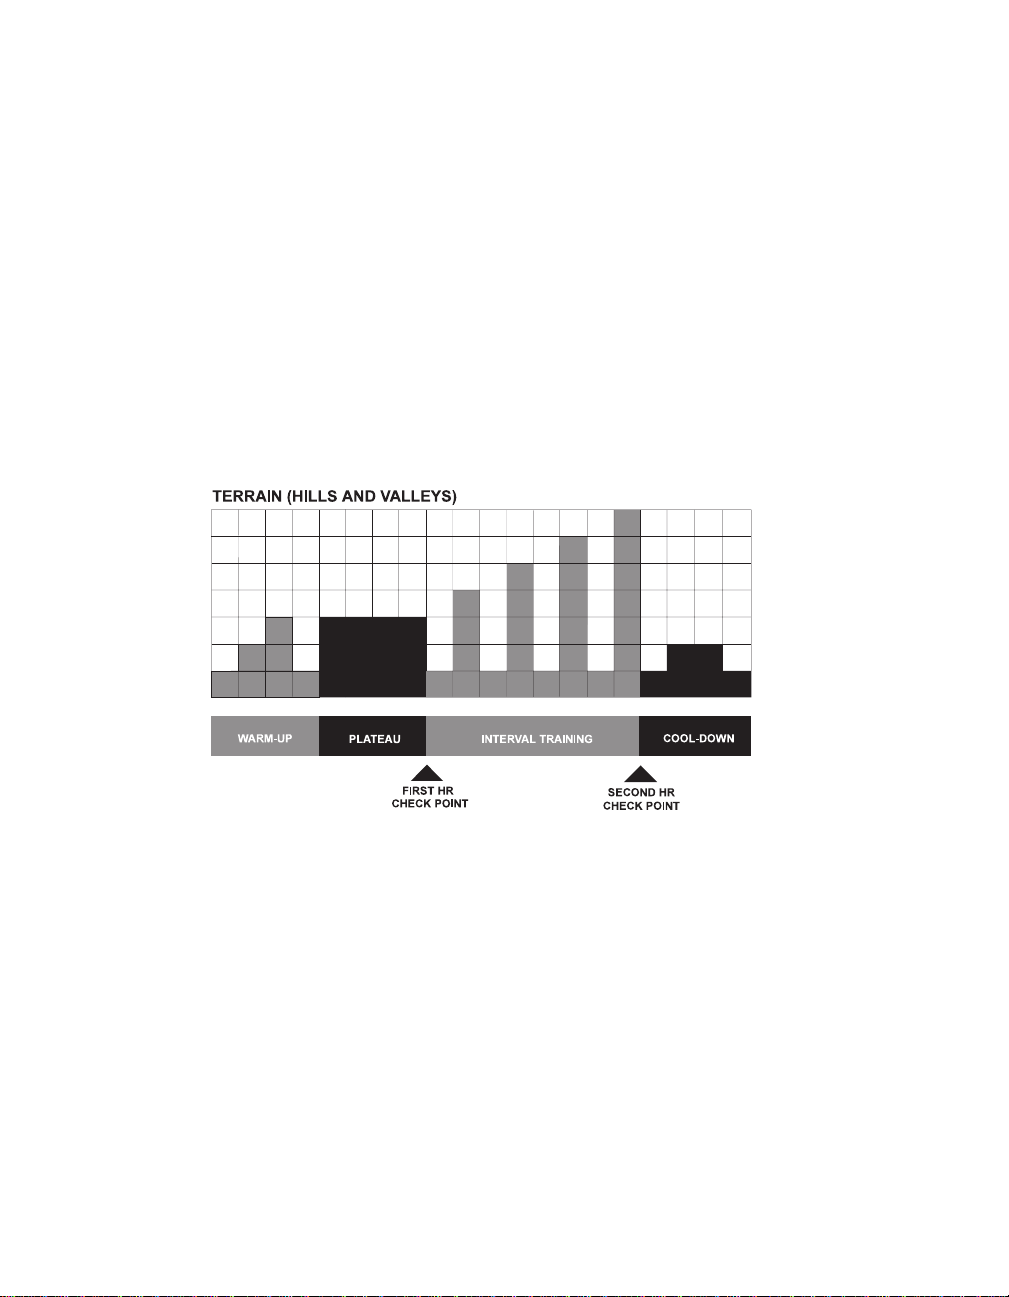
Each HILL workout goes through four phases, each marked by different intensity levels. The
WORKOUT PROFILE window displays the progress of these phases, as seen in the chart following
these descriptions below. As noted in the descriptions, the heart rate should be measured at two
stages in the workout to gauge its effectiveness. To do so, wear the chest strap or grasp the sensors. Note that the MESSAGE CENTER does not display a request for a heart rate measurement
during a HILL workout.
1 Warm-up is a phase of low, gradually rising resistance, which brings the heart rate into the
lower end of the target zone and increases respiration and blood flow to working muscles.
2 Plateau increases the intensity slightly, and keeps it steady, to bring the heart rate to the low
end of the target zone. Check the heart rate at the end of this phase.
3 Interval Training is a series of increasingly steeper hills, alternating with valleys (or periods
of recovery). The heart rate should rise to the high end of the target zone. Check the heart
rate at the end of this phase.
4 Cool-down is a low-intensity phase that allows the body to begin removing lactic acid and
other exercise by-products, which build up in muscles and contribute to soreness.
Each column, as seen in the WORKOUT PROFILE window and the chart above, represents one
interval. The overall duration of the workout determines the length of each interval. Each workout is made up of 20 intervals, so the duration of each interval is equal to the duration of the
entire workout divided by 20.
10 to 19 minutes: The interval durations initially are set at 30 seconds for a 10-minute workout.
For every minute added by the user “on-the-fly,” each interval increases by three seconds.
A 15-minute workout consists of 20 intervals at 45 seconds each.
20 to 99 minutes: All intervals last 60 seconds. If the user adds minutes to the pre-set duration
while the workout is in progress, the program adds hills and valleys that are identical to the first
eight intervals of the Interval Training phase. This pattern repeats until the workout is completed.
16
Page 18

C
ROSS-TRAIN AEROBICS
During this workout, the MESSAGE CENTER displays prompts to emphasize different muscle
groups. To emphasize upper-body muscles, the MESSAGE CENTER displays prompts to focus
on pushing and pulling the moving arms at various times. To emphasize lower-body muscles,
MESSAGE CENTER displays prompts to rest the hands on the stationary handlebar, thus forcing the legs to do all the work. The program also alternates between forward and reverse motion
as well as different speeds.
Ten seconds after prompting the user to change pedaling direction, the workout applies “braking
resistance,” that is, a high resistance level that essentially forces the user to stop pedaling. Once the
user stops pedaling, the workout resumes the normal resistance level. The actual level of breaking
resistance depends on the user’s speed. If the user is pedaling at a rate equal to, or faster than, 6.2
mph (10.0 km/h), the workout applies the maximum level of braking resistance. If the user is pedaling at a speed below 6.2 mph (10.0 km/h), the workout applies 92 percent of the maximum.
CROSS-TRAIN AEROBICS is a constant-resistance workout. However, for a similar experience
with a variable-resistance-level workout, the user can start any workout and then press the
AEROBICS MODE key.
C
ROSS-TRAIN REVERSE
During this workout, the MESSAGE CENTER displays alternating prompts to use pedal forward
(for five minutes) and then backward (for two minutes.) This feature varies the emphasis on different leg muscles.
Ten seconds after prompting the user to change pedaling direction, the workout applies “braking
resistance,” that is, a high resistance level that essentially forces the user to stop pedaling. Once the
user stops pedaling, the workout resumes the normal resistance level. The actual level of breaking
resistance depends on the user’s speed. If the user is pedaling at a rate equal to, or faster than, 6.2
mph (10.0 km/h), the workout applies the maximum level of braking resistance. If the user is pedaling at a speed below 6.2 mph (10.0 km/h), the workout applies 92 percent of the maximum.
CROSS-TRAIN REVERSE is a constant-resistance workout. However, for a similar experience
with a variable-resistance-level workout, the user can start any workout and then press the
REVERSE MODE key.
17
Page 19

5O
PTIONAL SETTINGS
5.1 ENTERING AND USING THE OPTIONAL SETTINGS FEATURE
Fitness club managers and other authorized personnel can use the Optional Settings feature to change
default settings or to enable or disable certain workouts or displays on the Total Body Trainer console.
To enter the Optional Settings, while the unit is on, hold down the UP ARROW key and press CLEAR twice.
The MESSAGE CENTER displays OPTIONAL SETTINGS and then the first configuration option. Scroll forward through the options using the ENTER key or backward using the CLEAR key. For each feature or setting option, the MESSAGE CENTER displays the default setting. To change the default, press the UP or
DOWN ARROW key for the desired value. Press ENTER to select the new value or setting.
To exit Optional Settings, press the CLEAR key repeatedly until the MESSAGE CENTER displays “SELECT
WORKOUT USING ARROW KEYS OR PRESS QUICK START”.
USER LANGUAGE SELECT
If enabled, this option allows users to select the language by which to interact with the unit during a workout.
To use the option, enable User Language Select (see below).
Begin pedalling. The console will display the message “SELECT LANGUAGE USING ARROW KEYS”. The
user can select from a list of available languages using any of the arrow keys. Press enter when the desired
language appears to select that language. Aworkout can now be started using the selected language.
Selecting a language is not necessary to begin a workout. Simply press the Quick Start key to start a workout
or any of the program keys to begin workout programming using the default language.
The user may select from the following languages:
English, French, Spanish, and Portugese
To enable the User Language Select option, enter the Optional Settings (see section 5.1). Scroll forward
through the options using the ENTER key, or backward, using the CLEAR key until LANGUAGE SEL appears.
Once LANGUAGE SEL appears in the Message Center, press any of the UP/DOWN ARROW KEYS to toggle
the mode from OFF to ON.
18
Setting Default Value Description
MAX WORKOUT 60 minutes This is the maximum possible duration for a
DURATION workout. The value can range from 10 to 99.
ENGLISH/METRIC ENGLISH This option determines the units used for entering
UNITS weight and measuring distance.
WATTS DISPLAY DISABLED If this option is enabled, the MESSAGE CENTER
ENABLE/ displays the of Watts equivalent pedaling rate.
DISABLE
METS DISPLAY DISABLED If this option is enabled, the MESSAGE CENTER
ENABLE/ displays the METs equivalent of the pedaling rate.
DISABLE
CAL/HR DISPLAY DISABLED If this option is enabled, the MESSAGE CENTER
ENABLE/ displays the number of calories burned per hour
DISABLE during the workout.
USER LANGUAGE SELECT DISABLED This option, if enabled, gives users the ability to select
a language for use during a workout. See the topic
entitled User Language Select, in this section.
OPTIONAL SETTINGS
Page 20

6S
ERVICE AND
TECHNICAL DATA
6.1 PREVENTIVE MAINTENANCE TIPS
The Total Body Trainer is backed by the engineering excellence of Life Fitness and is one of the
most rugged and trouble-free pieces of exercise equipment on the market today. Commercial
Life Fitness products have proven to be durable in health clubs, colleges, and military facilities
the world over. This same technology, engineering expertise, and reliability have gone into the
Total Body Trainer.
NOTE: The safety of the equipment can be maintained only if the equipment is examined regularly for damage or wear. Keep the equipment out of use until defective parts are repaired or
replaced. Pay special attention to parts that are subject to wear as outlined in the Preventive
Maintenance Schedule.
REMARQUE : pour conserver un matériel sûr, il convient de l'inspecter régulièrement afin de
déceler tout signe d'usure ou d'endommagement. N'utilisez pas l'appareil tant que les pièces
défectueuses n'ont pas été réparées ou remplacées. Portez une attention toute particulière aux
pièces qui s'usent, comme indiqué ci-dessous.
The following preventive maintenance tips will keep your Total Body Trainer operating at peak
performance:
• Locate the Total Body Trainer in a cool, dry place.
• Clean the top surface of the pedals regularly.
• Keep the display console free of fingerprints and salt build-up caused by sweat.
• Use a 100% cotton cloth, lightly moistened with water and mild liquid detergent, to clean the
cross-trainer. Other fabrics, including paper towels, may scratch the surface. Do not use
ammonia, chlorine, or acid-based cleaners.
• Long fingernails may damage or scratch the surface of the console; use the pad of the finger to press the selection buttons on the console.
• Clean the housing and moving arms thoroughly on a regular basis.
NOTE: When cleaning the exterior of the unit, a non-abrasive cleaner and soft cotton
cloth are strongly recommended. At no time should cleaner be applied directly to any
part of the equipment; apply the non-abrasive cleaner on a soft cloth and then wipe the
unit.
19
Page 21
6.2 P
REVENTIVE MAINTENANCE SCHEDULE
Follow the schedule below to ensure proper operation of the product.
ITEM WEEKLY MONTHLY BI-ANNUALLY ANNUALLY
Display Console Clean Inspect
Console Mounting Bolts Inspect
Accessory Tray Clean Inspect
Frame Clean Inspect
Plastic Covers Clean Inspect
6.3 T
ROUBLESHOOTING THE POLAR
®
HEART
RATE CHEST STRAP
20
Malfunction
Heart rate reading is erratic or
absent entirely
Abnormally elevated heart rate
readings
Probable Cause
Belt transmitter electrodes are not
wet enough to pick up accurate
heart rate readings.
Belt transmitter electrodes are not
laying flat against the skin.
Belt transmitter needs cleaning.
Belt transmitter is not within 3 feet
(one meter) of the heart rate
receiver.
Chest strap battery is depleted.
Electromagnetic interference from
television sets and/or antennas.
Electromagnetic interference from
cell phones.
Electromagnetic interference from
computers.
Electromagnetic interference from
cars.
Electromagnetic interference from
high voltage power lines.
Electromagnetic interference from
motor driven exercise equipment.
Electromagnetic interference from
another heart rate transmitter within three feet (one meter).
Corrective Action
Wet the belt transmitter electrodes (see section 3.2).
Ensure the belt transmitter electrodes are laying flat against the
skin (see section 3.2).
Wash the belt transmitter with
mild soap and water.
Make sure the chest strap transmitter is within three feet (one
meter) of the heart rate receiver.
Contact Life Fitness Customer
Support Services* for instructions
on how to have the chest strap
replaced.
Move the cross-trainer a few
inches away from the probable
cause, or move the probable
cause a few inches away from
the cross-trainer, until the heart
rate readings are accurate.
* See Section 6.6 “How to Obtain Product Service” for contact information.
Page 22

6.4 T
ROUBLESHOOTING THE LIFEPULSE SYSTEM SENSORS
If the heart rate reading is erratic or missing, do the following:
• Dry the hands if necessary to prevent slipping.
• Apply hands to all four sensors; two in each hand.
• Grasp the sensors firmly.
• Apply constant pressure around the sensors.
6.5 HOW TO
OBTAIN PRODUCT SERVICE
1. Verify the symptom and review the operating instructions. The problem may be unfamiliarity
with the product and its features and workouts.
2. Locate the serial number plate, which is at the back end of the unit. Document the serial
number, which consists of three letters followed by six numerals.
3. Contact Life Fitness Customer Support Services via the Web at: www.lifefitness.com, or call
the nearest Life Fitness Customer Support Services group:
21
For Product Service within
the United States and Canada:
Telephone: (+1) 847.451.0036
FAX: (+1) 847.288.3702
Toll-free telephone: 800.351.3737
For Product Service Internationally:
Life Fitness Europe GmbH (Germany)
Telephone: (+49) 089.317.751.66
FAX: (+49) 089.317.751.38
Life Fitness (UK) LTD
Telephone: (+44) 1353.665.507
FAX: (+44) 1353.666.719
Life Fitness Atlantic BV (Europe, Middle
East & Africa, except local LF offices)
Life Fitness Benelux
Telephone: +31 180.646.666
FAX: +31 180.646.699
Life Fitness Italia S.R.L.
Telephone: 800.438.836
FAX: (+39) 0457.238.197
Life Fitness Austria Vertriebs GmbH
Telephone: (+43) 1615.7198
FAX: (+43) 1615.7198.20
Life Fitness Asia Pacific Ltd (Asia &
Australia, except local LF offices)
Telephone: (+852) 2891.6677
FAX: (+852) 2575.6001
Life Fitness Latin America
and Caribbean
Telephone: (+1) 847.288.3964
FAX: (+1) 847 288.3886
Life Fitness Brazil
Telephone: (+55) 11.4193.8282
FAX: (+55) 11.4193.8283
Life Fitness Japan
Telephone: (+81) 3.3359.4309
FAX: (+81) 3.3359.4307
Life Fitness Iberia (Spain)
Telephone: (+34) 93.672.4660
FAX: (+34) 93.672.4670
Page 23

7S
PECIFICATIONS
7.1 LIFE FITNESS 91X CROSS-TRAINER SPECIFICATIONS
Designed use: Heavy/Commercial
Maximum user weight: 350 pounds / 160 kilograms
Power requirements: None.
Console:
Type: MESSAGE CENTER with ARROW keys
Displays: Elapsed time, speed, level, calories, heart rate, distance, calories burned per
hour (when enabled), METS (when enabled), and watts (when enabled)
Summaries: Total elapsed time of workout, total calories burned, total distance
Character size: 0.54 inches
Workouts and Goals: Quick Start, Manual, Random, Hill, Cross-train Aerobics, Cross-train Reverse
Modes: Aerobics and Reverse modes during all workouts
Heart rate monitor: Polar telemetry heart rate monitoring system
Lifepulse system sensors
Polar heart rate chest strap: optional
Resistance Levels: 25
Pedal speed range: 2.2 - 12.7 MPH
Drive type: Belt/alternator
Accessory Tray: Standard
Integrated Reading Rack: Standard
Color: Silver with gray accents
PHYSICAL DIMENSIONS:
Length: 83 inches / 211 centimeters
Width: 28 inches / 71 centimeters
Height: 61 inches / 155 centimeters
Weight: 235 pounds / 106.5 kilograms
SHIPPING DIMENSIONS:
Length: 81.3 inches / 206.5 centimeters
Width: 29.6 inches / 75 centimeters
Height: 47 inches / 119.3 centimeters
Weight: 250 pounds / 113.4 kilograms
22
Page 24

Total Body Trainer 91X
Mode D´Emploi
Page 25

1
LIFE FITNESS ASIA PACIFIC LTD
Room 2610, Miramar Tower
132 Nathan Road
Tsimshatsui, Kowloon
HONG KONG
Téléphone : (+852) 2891 6677
Télécopier : (+852) 2575 6001
LIFE FITNESS ATLANTIC BV
LIFE FITNESS BENELUX
Bijdorpplein 25-31
2992 LB Barendrecht
PAYS-BAS
Téléphone : (+31) 180 646 666
Télécopier : (+31) 180 646 699
Téléphone : (+32) 87 300 942
Télécopier : (+32) 87 300 943
LIFE FITNESS DO BRAZIL
Av. Dr. Dib Sauaia Neto 1478
Alphaville, Barueri, SP
06465-140
BRÉSIL
Telephone (+55) 11 4193 8282
Télécopier : (+55) 11 4193 8283
LIFE FITNESS VERTRIEBS GMBH
Dückegasse 7-9/3/36
1220 Vienna
AUTRICHE
Téléphone : (+43) 1 61 57 198
Télécopier : (+43) 1 61 57 198 20
LIFE FITNESS IBERIA
Pol. Ind. Molí dels Frares. c/C, nº 12
08620 Sant Vicenç dels Horts (Barcelona)
ESPAGNE
Téléphone : (+34) 93 672 4660
Télécopier : (+34) 93 672 4670
LIFE FITNESS EUROPE GMBH
Siemensstrasse 3
85716 Unterschleissheim
ALLEMAGNE
Téléphone : (+49) 89 31 77 51 0
Télécopier : (+49) 89 31 77 51 99
LIFE FITNESS ITALIA S.R.L.
Via Vittorio Veneto, 57/A
39042 Bressanone (Balzano)
ITALIE
Téléphone : (+39) 0472.835 470
Télécopier : (+39) 0472 833 150
LIFE FITNESS AMÉRIQUE LATINE
et CARAÏBES
5100 North River Road
Schiller Park, Illinois 60176
ÉTATS-UNIS
Téléphone : (+1) 847 288 3300
Télécopier :(+1) 847 288 3762
LIFE FITNESS UK LTD
Queen Adelaide
Ely, Cambs CB7 4UB
ROYAUME-UNI
Téléphone : (+44) 1 353 666 017
Télécopier : (+44) 1 353 666 018
LIFE FITNESS JAPON
Nippon Brunswick Bldg., #8F
5-27-7 Sendagaya
Shibuya-Ku, Tokyo
JAPON 151-0051
Téléphone : (+81) 3 3359 4309
Télécopier : (+81) 3 3359 4307
M051-00K61-A093
04/05
SIEGE
SOCIAL
5100 North River Road
Schiller Park, Illinois 60176 • U.S.A.
847.288.3300 • FAX: 847 288 3703
800 735 3867 (numéro d'appel gratuit aux États-Unis et au Canada)
www.lifefitness.com
BUREAUX INTERNATIONAUX
Page 26

Avant d'utiliser ce produit, il est impératif de lire ce manuel de l'utilisateur dans son
INTÉGRALITÉ, ainsi que TOUTES les instructions d'installation.
Ceci permet d'installer rapidement le matériel et d'expliquer aux autres
comment l'utiliser correctement et en toute sécurité.
Avertissement de la FCC - Possibilité d'interférences radio/télévision
REMARQUE : ce matériel a été testé et prouvé conforme aux limites des dispositifs numériques
de classe A, en vertu de la section 15 des réglementations de la FCC. Ces limites sont destinées
à fournir une protection raisonnable contre les interférences nuisibles lorsqu'un appareil est utilisé
dans un environnement commercial. Ce matériel produit, utilise et peut faire rayonner de l'énergie
haute fréquence, et risque de provoquer des interférences nuisibles pour les communications
radio s'il n'est pas installé et employé conformément aux instructions du manuel d'utilisation. En
zone résidentielle, le fonctionnement risque de provoquer des interférences gênantes, auquel cas
il incombe à l'utilisateur de remédier au problème à ses propres frais.
Classe S (Studio) : usage commercial et/ou professionnel.
MISE EN GARDE : tout changement et toute modification de ce matériel peut
annuler la garantie du produit.
Toute réparation, à l'exception du nettoyage et de l'entretien à la charge de l'utilisateur, doit être
effectuée par un technicien agréé. Aucune pièce ne peut être réparée par l'utilisateur.
2
Page 27

T
ABLE DES MATIÈRES
Section Description . . . . . . . . . . . . . . . . . . . . . . . . . . . . . . . . . . . . . . . . . . . . . . . . . .Page
1. Point de départ . . . . . . . . . . . . . . . . . . . . . . . . . . . . . . . . . . . . . . . . . . . . . . . . .5
1.1 Consignes de sécurité importantes . . . . . . . . . . . . . . . . . . . . . . . . . . . . . . . . . .5
1.2 Installation . . . . . . . . . . . . . . . . . . . . . . . . . . . . . . . . . . . . . . . . . . . . . . . . . . . . .6
Emplacement du Cross-trainer Life Fitness®// Stabilisation du Cross-trainer Life
Fitness // Vérification de l'alimentation
2. Console d'affichage . . . . . . . . . . . . . . . . . . . . . . . . . . . . . . . . . . . . . . . . . . . . . .7
2.1 Généralités . . . . . . . . . . . . . . . . . . . . . . . . . . . . . . . . . . . . . . . . . . . . . . . . . . . .7
2.2 Description . . . . . . . . . . . . . . . . . . . . . . . . . . . . . . . . . . . . . . . . . . . . . . . . . . . .7
2.3 Plateau d'accessoires / Pupitre de lecture . . . . . . . . . . . . . . . . . . . . . . . . . . . . .9
3. Exercice Heart Rate Zone Training . . . . . . . . . . . . . . . . . . . . . . . . . . . . . . . . . .10
3.1 Système Lifepulse
TM
de contrôle numérique de la fréquence cardiaque . . . . . . .10
3.2 Ceinture thoracique Polar®de contrôle de la fréquence cardiaque par télémesure . . . . . . . .11
4. Exercices . . . . . . . . . . . . . . . . . . . . . . . . . . . . . . . . . . . . . . . . . . . . . . . . . . . . .12
4.1 Généralités . . . . . . . . . . . . . . . . . . . . . . . . . . . . . . . . . . . . . . . . . . . . . . . . . . .12
4.2 Utilisation des exercices . . . . . . . . . . . . . . . . . . . . . . . . . . . . . . . . . . . . . . . . . .12
Lancement d'un exercice // Sélection et utilisation de Départ rapide //
Sélection d'un exercice // Entrée du poids // Entrée de l'heure //
Sélection et réglage du niveau de résistance // Sélection d'un mode d'exercice //
Passage d'un exercice à un autre en cours de route //
Pause pendant un exercice // Interruption des exercices //
Étapes de configuration des exercices avec le cross-trainer Life Fitness
(tableau)
4.3 Description des exercices . . . . . . . . . . . . . . . . . . . . . . . . . . . . . . . . . . . . . . . . .14
Départ rapide // Manuel // Aléatoire // Colline // Cross-training Aérobic // Crosstraining Arrière
5. Paramètres en option . . . . . . . . . . . . . . . . . . . . . . . . . . . . . . . . . . . . . . . . . . . .17
5.1 Accès aux paramètres en option et utilisation . . . . . . . . . . . . . . . . . . . . . . . . . .17
6. Entretien et données techniques . . . . . . . . . . . . . . . . . . . . . . . . . . . . . . . . . . . .19
6.1 Conseils de maintenance préventive . . . . . . . . . . . . . . . . . . . . . . . . . . . . . . . .19
6.2 Calendrier de maintenance préventive . . . . . . . . . . . . . . . . . . . . . . . . . . . . . . .20
6.3 Dépannage de la ceinture thoracique Polar de contrôle de la fréquence cardiaque . .20
Mesure de la fréquence cardiaque erratique ou complètement inexistante //
Mesure de la fréquence cardiaque erratique ou très élevée
6.4 Réparation des produits . . . . . . . . . . . . . . . . . . . . . . . . . . . . . . . . . . . . . . . . . .21
7. Caractéristiques techniques . . . . . . . . . . . . . . . . . . . . . . . . . . . . . . . . . . . . . . .22
7.1 Caractéristiques techniques du Cross-trainer Life Fitness 91X . . . . . . . . . . . . .22
©
2005 Life Fitness, une division de Brunswick Corporation. Tous droits réservés. Life Fitness, Heart Rate Zone Training
et Lifepulse sont des marques déposées de Brunswick Corporation. Polar est une marque déposée de Polar Electro, Inc.
Cardio Theater est une marque déposée de Cardio Theater Holdings. FitLinxx est une marque déposée d'Integrated
Fitness Corp. Toute utilisation de ces marques est interdite sans la permission écrite expresse de Life Fitness ou de la
société correspondante.
3
Page 28

Ce manuel de l'utilisateur décrit le fonctionnement du produit suivant :
Cross-trainer Life Fitness pour exercice total à entraînement arrière
91X
Référez-vous à la section « Caractéristiques techniques » de
ce manuel pour obtenir les caractéristiques spécifiques des produits.
Avis d'utilisation: Ce cross-trainer Life Fitness est un appareil d'exercice qui allie un pédalage
elliptique à faible impact à un mouvement de poussée et de traction des bras visant à fournir un
entraînement bénéficiant de manière efficace à tout le corps.
MISE EN GARDE : Life Fitness conseille VIVEMENT de consulter un médecin pour
subir un examen médical complet avant de commencer tout programme d'exercice,
et tout particulièrement si l'utilisateur a des antécédents familiaux d'hypertension
ou de troubles cardiaques, ou s'il a plus de 45 ans, s'il fume, s'il a du cholestérol,
s'il est obèse ou n'a pas fait d'exercice régulièrement depuis un an.
Si, pendant l'utilisation de l'appareil, l'utilisateur ressent un malaise, des vertiges, des douleurs
ou des difficultés à respirer, il doit s'arrêter immédiatement.
4
Page 29

1P
OINT DE DÉPART
1.1 CONSIGNES DE SÉCURITÉ IMPORTANTES
CONSIGNE DE SÉCURITÉ : pour un emploi sûr, le produit doit être inspecté
régulièrement afin de s'assurer qu'il n'est pas usé ni endommagé. Consultez la
section de Maintenance préventive pour obtenir de plus amples informations.
• Si ce produit Life Fitness ne fonctionne pas correctement après avoir subi une chute, ou
après avoir été endommagé ou partiellement plongé dans l'eau, contactez le service aprèsvente de Life Fitness.
• Pour un fonctionnement correct, suivez toujours les instructions de la console.
• Une surveillance étroite est nécessaire en cas d'utilisation par des enfants, des personnes
invalides ou handicapées.
• N'utilisez pas ce produit à l'extérieur, près d'une piscine ou dans des endroits très humides.
• Ne faites jamais fonctionner de produit Life Fitness dont les bouches d'aération seraient
bloquées. Maintenez-les exemptes de peluches, de cheveux ou de toute obstruction.
• N'insérez jamais d'objet dans les ouvertures de cet appareil. Tout objet accidentellement
tombé à l'intérieur doit être récupéré. Si vous ne pouvez pas l'atteindre, consultez le service
après-vente de Life Fitness.
• Ne placez jamais de liquides d'aucune sorte directement sur l'appareil, sauf dans le support
pour bouteille du plateau d'accessoires. Il est recommandé d'utiliser des gobelets munis
d'un couvercle.
• Portez des chaussures avec semelles en caoutchouc ou antidérapantes. N'utilisez pas de
chaussures à talons, de semelles en cuir ou à crampons. Assurez-vous qu'aucun caillou ne
s'est incrusté dans les semelles.
• Maintenez les vêtements lâches, les lacets et les serviettes à l'écart des pièces en
mouvement.
• N'utilisez pas cet appareil sans chaussures.
• Ne renversez pas l'appareil sur le côté pendant son fonctionnement.
• Maintenez la zone autour de l'appareil libre de toute obstruction, y compris murs et
meubles. Veillez à laisser un dégagement d'au moins 30 cm devant l'appareil.
• Montez et descendez avec précaution du cross-trainer Life Fitness. Utilisez la barre fixe
lorsque vous avez besoin de renforcer votre équilibre. Pendant les exercices, saisissez les
bras mobiles.
• N'utilisez jamais le cross-trainer Life Fitness en vous tournant à l'envers.
CONSERVEZ CES INSTRUCTIONS POUR UN USAGE ULTÉRIEUR.
5
Page 30

1.2 I
NSTALLATION
Lisez le manuel de l'utilisateur avant d'installer le cross-trainer Life Fitness.
EMPLACEMENT DU CROSS-TRAINER LIFE FITNESS
®
Suivez toutes les consignes de sécurité de la section 1.1 pour placer l'appareil à l'endroit où il
doit être utilisé. Référez-vous à la section 7, Caractéristiques techniques, pour connaître les
dimensions au sol. Laissez un dégagement de 30 cm devant l'appareil pour permettre le
mouvement des leviers des pédales. Vous devez pouvoir monter facilement sur le cross-trainer
Life Fitness en l'abordant sur le côté.
STABILISATION DU
CROSS-TRAINER LIFE FITNESS
Après avoir mis l'appareil en place, vérifiez sa stabilité en essayant de le balancer d'un côté à
l'autre. Le moindre mouvement indique qu'il doit être mis de niveau. Examinez les pieds de
stabilisation pour déterminer celui qui ne repose pas complètement au sol. Faites tourner le pied
dans le sens contraire des aiguilles d'une montre pour l'abaisser. Vérifiez à nouveau la stabilité
et procédez aux réglages nécessaires jusqu'à ce que l'appareil soit parfaitement stable. Pour
bloquer le réglage, resserrez le contre-écrou sur la barre de stabilisation au moyen d'une
clé de 14.
.
VÉRIFICATION DE L’ALIMENTATION
La console est alimentée par une batterie rechargeable de 6 volts. Appuyez sur la touche
DÉPART pour vérifier l'état de la batterie. La console doit s'allumer et le CENTRE DES
MESSAGES demander de sélectionner un exercice. Dans le cas contraire, montez sur le crosstrainer Life Fitness et commencez à pédaler. La console doit alors s'allumer et permettre la
programmation d'un exercice. Pédalez pendant 10 à 20 minutes à une vitesse minimum de 25
tr/min pendant un exercice pour charger la batterie. Le mouvement des pédales pendant les
exercices garde ensuite la batterie chargée. Si la console ne s'allume toujours pas, contactez le
service clientèle de Life Fitness. Consultez la section 6.5, Réparation des produits, pour obtenir
de plus amples informations.
6
Page 31

2C
ONSOLE D'AFFICHAGE
2.1 G
ÉNÉRALITÉS
La console d'affichage électronique permet à l'utilisateur d'adapter son entraînement en fonction
de ses besoins et de ses capacités, et d'en suivre le déroulement. Elle représente en outre un
moyen facile de suivre les progrès effectués d'un exercice à l'autre.
2.2 DESCRIPTION
Cette section indique et décrit les fonctions associées aux touches et aux fenêtres d'affichage de la
console. Référez-vous à la section 4, Exercices, pour obtenir de plus amples informations sur la
préparation des exercices au moyen de la console.
A DÉPART. Cette touche permet d'activer la console afin de programmer un nouvel exercice. La
console activée s'allume et affiche « SÉLECTIONNER UN EXERCICE OU APPUYER SUR
DÉPART RAPIDE ». Si aucune touche n'est actionnée dans les 15 secondes et si l'utilisateur
s'arrête de pédaler, la console s'éteint à nouveau.
REMARQUE : la fonction Départ automatique du cross-trainer Life Fitness active également
la console lorsque l'utilisateur appuie sur les pédales et commence à pédaler.
7
Page 32

B ENTER. Appuyez sur cette touche après avoir saisi chaque valeur, telle que le poids ou la durée de
l’exercice, lorsque les messages de la console vous le demandent.
C TOUCHES FLÉCHÉES. Utilisez les FLÈCHES VERS LE BAS et VERS LE HAUT pour changer les
paramètres d’exercices affichés au niveau de la console, tels que la durée de l’exercice, le poids, et le
niveau de difficulté.
D DÉPART RAPIDE. Cette touche permet de lancer immédiatement un exercice manuel sans avoir à
sélectionner tout un programme. Lorsque l’exercice est lancé, vous pouvez utiliser les TOUCHES
FLÉCHÉES pour en modifier la difficulté.
E REMISE À ZÉRO. Lors de la programmation d’un exercice, cette touche permet d’effacer les données
incorrectes, pour le poids par exemple, avant d’avoir appuyé sur la touche ENTER. Elle interrompt
immédiatement le déroulement d’un exercice ; le CENTRE DES MESSAGES affiche alors un résumé
de ce dernier, y compris la durée totale écoulée, la distance totale parcourue et le total des calories
brûlées. Si vous appuyez sur REMISE À ZÉRO une deuxième fois, le CENTRE DES MESSAGES
demande de programmer un nouvel exercice.
F ÉCRAN BLOQUÉ. Pendant un exercice, le CENTRE DES MESSAGES affiche tour à tour le nombre
de calories brûlées et la durée écoulée. L’activation de la touche ÉCRAN BLOQUÉ tandis que l’une de
ces statistiques est affichée, force le CENTRE DES MESSAGES à l’afficher en permanence pendant
tout l’exercice. Appuyez à nouveau sur ÉCRAN BLOQUÉ pour restaurer l’affichage alterné des deux
statistiques.
G MODIFIER EXERCICE. Cette touche permet de passer à un autre exercice pendant que le premier
est en cours.
H RÉCUPÉRATION. Les exercices s’arrêtent automatiquement en mode Récupération qui diminue le
niveau de difficulté. Vous pouvez appuyer sur la touche RÉCUPÉRATION à tout moment de l’exercice
pour passer immédiatement en mode Récupération. Pendant cette phase, l’organisme commence à
éliminer l’acide lactique et d’autres substances dérivées de l’effort qui s’accumulent au niveau des
muscles pendant l’exercice et contribuent aux courbatures. La console règle automatiquement le
niveau de récupération de chaque exercice en fonction des performances de l’utilisateur. À chaque
activation de la touche RÉCUPÉRATION, la durée de récupération est réduite d’une minute.
I FENÊTRE DE TOPOGRAPHIE. Cette fenêtre affiche des colonnes lumineuses qui représentent les
niveaux d’intensité de l’exercice en cours. La hauteur de chaque colonne est proportionnelle à la
difficulté.
J CENTRE DES MESSAGES. Cette fenêtre affiche progressivement les instructions nécessaires à la
sélection d’un exercice. Pendant un exercice, elle affiche les statistiques sur le déroulement de
l’exercice lui-même.
• Niveau : niveau d’intensité programmé. S’affiche en alternance avec Fréquence cardiaque.
• Fréquence cardiaque : La fréquence cardiaque détectée si l'utilisateur porte une ceinture de
télémétrie ou saisit les sondes.. S’affiche en alternance avec Niveau. Si l’ordinateur intégré ne
détecte pas de fréquence cardiaque, seul le niveau est affiché pendant l’exercice.
• Distance : la distance totale parcourue en kilomètres.
• Vitesse : la cadence ou vitesse de pédalage en milles à l’heure (ou en kilomètres à l’heure si
l’option est activée).
• Calories : le nombre de calories brûlées depuis le début de l’exercice. S’affiche en alternance
avec Durée.
• Durée : temps écoulé depuis le début de l’exercice. S’affiche en alternance avec Calories.
Suivant sa programmation, le CENTRE DES MESSAGES affiche toutes ces valeurs ou une partie d’entre
elles à chaque modification de la difficulté ou du niveau d’intensité pendant l’exercice.
8
Page 33

• Calories à l’heure : la quantité de calories brûlées en une heure.
• Watts : le niveau d’effort en Watts. Le Watt est une unité de production de puissance ou
l’expression du taux mécanique du travail.
• METs : le niveau d’effort en METs. Le MET est une expression du taux de travail de l’organisme
humain au repos, ou d’un équivalent métabolique; un MET équivaut approximativement au
métabolisme d’une personne au repos.
Référez-vous au chapitre 5, « Paramètres en option », pour obtenir de plus amples informations sur
l’affichage de ces paramètres supplémentaires au niveau du CENTRE DES MESSAGES.
K MODE AÉROBIC. Appuyez sur cette touche pour lancer un mode dans lequel le CENTRE DES
MESSAGES affiche des invites pour varier l’effort et solliciter divers groupes de muscles pendant
l’exercice. Ce mode peut s’employer avec n’importe quel exercice,.
L MODE ARRIÈRE. Appuyez sur cette touche pour activer un mode qui fait alterner cinq minutes de
mouvement vers l’avant et deux minutes de mouvement vers l’arrière. Ce mode peut s’employer avec
n’importe quel exercice.
M PAUSE. Cette touche permet de faire une pause pendant l’exercice en cours. Pour le relancer, il suffit
d’appuyer à nouveau sur PAUSE. Pour obtenir de plus amples informations, référez-vous à la rubrique
Pause pendant un exercice de la section 4.2, Utilisation des exercices.
Pour en savoir plus sur les modes Aérobic et Arrière, référez-vous à la rubrique « Sélection d’un mode
d’exercice » de la section 4.2, « Utilisation des exercices ».
2.3 PLATEAU D'ACCESSOIRES / PUPITRE DE LECTURE
Le plateau d'accessoires (A) est monté près de la base de la console et constitue une double
surface de rangement avec un espace pour les bidons d'eau, les baladeurs et les téléphones
portables. Un pupitre de lecture intégré (B) destiné à soutenir un livre ou un magazine se trouve
aussi à la base du panneau supérieur de la console.
9
A
B
Page 34

3E
XERCICE HEART RATE ZONE TRAINING
3.1 SYSTÈME LIFEPULSE
TM
DE CONTRÔLE NUMÉRIQUE DE LA FRÉQUENCE
CARDIAQUE
Les capteurs du système Lifepulse breveté constituent le système de contrôle de la fréquence
cardiaque intégré du cross-trainer Life Fitness. Pour obtenir une mesure aussi précise que
possible pendant un exercice :
• saisissez ferment les capteurs (A) ;
• maintenez chaque capteur verticalement au point médian ;
• gardez les mains immobiles et en position.
La console affiche la fréquence cardiaque dans les 10 à 40 secondes suivant le contact avec
les capteurs.
10
A
A
Page 35

3.2 C
EINTURE THORACIQUE POLAR
®
DE CONTRÔLE DE LA FRÉQUENCE
CARDIAQUE PAR TÉLÉMESURE
Le cross-trainer Life Fitness est doté d'une ceinture Polar®, un système de contrôle de la
fréquence cardiaque dans lequel des électrodes placées contre la peau transmettent les
signaux du rythme cardiaque à la console de l'appareil. Ces électrodes sont fixées sur une
ceinture thoracique portée par l'utilisateur pendant les exercices. Cette ceinture est disponible
en option. Pour la commander, contactez le service après-vente de Life Fitness. Référez-vous à
la section 6.5, Réparation des produits.
Référez-vous au schéma ci-dessous pour savoir comment placer la ceinture thoracique. Les
électrodes (A) (les deux surfaces rainurées sous la ceinture) doivent rester humides pour
transmettre avec précision les impulsions électriques du cœur au récepteur. Humidifez les
électrodes. Placez ensuite la ceinture aussi haut que possible sous les muscles thoraciques. Elle
doit être serrée sans pour autant gêner la respiration.
La bande de l'émetteur transmet une lecture optimale de la fréquence cardiaque lorsque les
électrodes sont directement en contact avec la peau. Cependant, elle peut aussi fonctionner
correctement à travers un vêtement fin et humide.
S'il s'avère nécessaire de réhumidifier les électrodes, saisissez le centre de la bande, tirez-le afin de
l'écarter de la cage thoracique et d'exposer les deux électrodes, et réhumidifiez-les dans cette
position.
REMARQUE : Si l'utilisateur saisit les capteurs du système Lifepulse tandis qu'il porte la ceinture
thoracique, et si les signaux des capteurs sont valides, l'ordinateur utilise ces derniers au lieu de
ceux transmis par la ceinture thoracique pour calculer la fréquence cardiaque.
11
A A
Page 36

4E
XERCICES
4.1 GÉNÉRALITÉS
Cette section répertorie les exercices préprogrammés du Total Body Trainer. Pour obtenir de plus amples
informations, référez-vous à la section 4.2, « Utilisation des exercices ». Les exercices suivants sont
accessibles par le biais des TOUCHES FLÉCHÉES.
DÉPART RAPIDE représente la manière la plus rapide de lancer une séance d’exercice car l’utilisateur n’a
pas besoin d’effectuer les sélections d’un programme spécifique. L’activation de DÉPART RAPIDE entraîne
le lancement d’un exercice de difficulté constante. Le niveau d’intensité ne change pas automatiquement.
MANUEL constitue un exercice lors duquel le niveau d’intensité n’est pas modifié automatiquement.
ALÉATOIRE est un exercice d’entraînement fractionné comportant des niveaux de résistance variés dans un
ordre aléatoire et sans progression.
CROSS-TRAINING AÉROBIC simule une séance avec un entraîneur personnel. Le CENTRE DES
MESSAGES affiche des invites à divers moments pour mettre l’accent sur certains types de mouvements
(poussée, traction, corps entier, bas du corps, changements de vitesse, pédalage avant / arrière). Cet
exercice polyvalent permet de profiter au maximum des avantages du cross-training.
CROSS-TRAINING ARRIÈRE alterne continuellement entre cinq minutes de mouvement vers l’avant et deux
minutes de mouvement inverse pour solliciter divers groupes de muscles.
COLLINE est un exercice d’entraînement fractionné composé de « collines » et de « vallées » de
différents niveaux de difficulté qui permettent d’obtenir des résultats cardiovasculaires efficaces en un temps
limité.
4.2 UTILISATION DES EXERCICES
Cette section fournit des informations détaillées sur la programmation et l’utilisation des exercices.
Pour obtenir des informations de programmation en un clin d’œil, référez-vous au tableau à la fin
de cette section.
LANCEMENT D’UN EXERCICE
Pour monter sur le Total Body Trainer, saisissez les poignées et placez avec précaution les pieds sur les
pédales. Pour en descendre, retirez les pieds des pédales tout en maintenant les poignées, puis lâchez ces
dernières.
Appuyez sur DÉPART ou commencez à pédaler pour activer la console. Le CENTRE DES MESSAGES
affiche « SÉLECTIONNER UN EXERCICE AVEC LES TOUCHES FLÉCHÉES OU APPUYER SUR DÉPART
RAPIDE ». Si le message affiché est différent, appuyez rapidement deux fois de suite sur la touche REMISE
À ZÉRO.
SÉLECTION ET UTILISATION DE DÉPART RAPIDE
DÉPART RAPIDE représente la manière la plus rapide de lancer une séance d’exercice car l’utilisateur
n’a pas besoin d’effectuer les sélections d’un programme spécifique. Lorsque le CENTRE DES MESSAGES
vous invite à sélectionner un exercice, appuyez sur la touche DÉPART RAPIDE. L’exercice commence à un
niveau d’intensité qui reste constant tant qu’il n’est pas modifié manuellement. Après 12 secondes, le
CENTRE DES MESSAGES demande d’entrer le poids nécessaire à l’ordinateur pour calculer les calories
brûlées.
12
Page 37

S
ÉLECTION D’UN EXERCICE
Pour MANUEL, ALÉATOIRE, COLLINE, CROSS-TRAINING ARRIÈRE et CROSS-TRAINING AÉROBIC:
lorsque le CENTRE DES MESSAGES demande de sélectionner un exercice, utilisez les TOUCHES
FLÉCHÉES pour faire défiler les noms d’exercices. Lorsque l’exercice voulu apparaît, appuyez sur
ENTER.
ENTRÉE DU POIDS
Lorsque le CENTRE DES MESSAGES demande d’entrer le poids, utilisez les TOUCHES FLÉCHÉES pour
réduire ou augmenter le poids affiché. Une fois la valeur correcte obtenue, appuyez sur ENTER. Le poids
par défaut est de 68 kilogrammes. L’ordinateur intégré se base sur le poids entré et sur la vitesse de
pédalage (en tours par minute) pour calculer la quantité de calories brûlées.
ENTRÉE DE LA DURÉE
Lorsque le CENTRE DES MESSAGES demande d’entrer une durée, utilisez les TOUCHES FLÉCHÉES
pour réduire ou augmenter la durée affichée. Une fois la valeur correcte obtenue, appuyez sur ENTER.
SÉLECTION ET RÉGLAGE DU NIVEAU DE RÉSISTANCE
Lorsque le CENTRE DES MESSAGES vous le demande, utilisez les TOUCHES FLÉCHÉES pour réduire
ou augmenter le niveau d’intensité ou la fréquence cardiaque cible affichés afin d’obtenir la valeur désirée,
puis appuyez sur ENTER. Réglez le niveau selon vos besoins ou vos désirs pendant l’exercice.
• Niveau de résistance – Le Total Body Trainer offre 25 niveaux de résistance. Cette dernière ne
dépend pas de la vitesse. Le niveau de résistance apparaît dans la FENÊTRE DE
TOPOGRAPHIE sous la forme de colonnes lumineuses. Il est conseillé de commencer par
sélectionner un faible niveau d’intensité. Vous pouvez ensuite passer aux niveaux supérieurs à
mesure que votre condition physique s’améliore.
S
ÉLECTION D’
UN MODE D’EXERCICE
Les deux modes d’exercices du Total Body Trainer permettent de varier l’entraînement.
• Le mode Aérobic simule un exercice avec un entraîneur personnel. Pendant l’exercice,
le CENTRE DES MESSAGES demande de varier la difficulté, met l’accent sur divers
groupes de muscles et insiste par exemple sur le bas ou le haut du corps. Il peut s’employer
avec n’importe quel exercice.
• Le mode Arrière alterne continuellement entre cinq minutes de mouvement vers l’avant et deux
minutes de mouvement inverse pour muscler différents muscles des jambes. Il peut s’employer
avec n’importe quel exercice.
PASSAGE D’UN EXERCICE À L’AUTRE EN COURS DE ROUTE
Il est possible de passer à un autre programme pendant un exercice. Après un changement, la console
conserve toutes les informations relatives à l’entraînement depuis le début. Pour changer d’exercice
« en cours de route », appuyez sur la touche MODIF EXERCICE, puis sélectionnez un nouvel exercice.
PAUSE PENDANT UN EXERCICE
Pour effectuer une pause pendant un exercice, il suffit de s’arrêter de pédaler et de recommencer pour le
reprendre. La pause dure 60 secondes avant que la console ne s’éteigne automatiquement.
INTERRUPTION DES EXERCICES
Pour interrompre un exercice avant que la durée programmée ne se soit écoulée, appuyez une fois sur
REMISE À ZÉRO. Le CENTRE DES MESSAGES affiche ensuite un résumé de l’exercice qui comporte la
distance parcourue, les calories brûlées et d’autres statistiques. Si vous appuyez à nouveau sur REMISE
À ZÉRO, le CENTRE DES MESSAGES affiche « SÉLECTIONNER UN EXERCICE AVEC LES TOUCHES
FLÉCHÉES OU APPUYER SUR DÉPART RAPIDE » pour passer à un nouvel exercice.
13
Page 38

4.3 DESCRIPTION DES EXERCICES
DÉPART RAPIDE
DÉPART RAPIDE représente la manière la plus rapide de lancer une séance d’exercice car
l’utilisateur n’a pas besoin d’effectuer les sélections d’un programme spécifique. Le niveau d’intensité
de l’exercice est réglé automatiquement et reste constant tant qu’il n’est pas modifié manuellement.
Pour modifier le niveau, appuyez sur les TOUCHES FLÉCHÉES HAUT et BAS afin d’augmenter ou
de réduire la valeur affichée. Après 12 secondes d’exercice, le CENTRE DES MESSAGES affiche
« ENTRER POIDS », donnée indispensable à l’ordinateur pour calculer les calories brûlées. Utilisez
les TOUCHES FLÉCHÉES pour augmenter ou réduire le poids affiché.
MANUEL
Le programme MANUEL implique un niveau d’effort qui ne change pas automatiquement. Pendant
l’exercice, il suffit d’utiliser les TOUCHES FLÉCHÉES pour augmenter ou diminuer le degré
d’intensité.
A
LÉATOIRE
Le programme ALÉATOIRE crée un enchaînement de vallées et de collines qui varie à chaque
exercice. Plus d’un million de combinaisons différentes sont possibles. Comme les niveaux sont plus
élevés pour cet exercice que pour celui de type COLLINE, il est recommandé de régler l’exercice
ALÉATOIRE un ou deux niveaux au-dessous de la difficulté normalement sélectionnée pour
COLLINE.
COLLINE
Cet exercice breveté de Life Fitness offre diverses possibilités d’entraînement fractionné.
Les intervalles constituent des périodes d’exercice aérobic intenses séparées par des périodes
normales de plus faible intensité. La FENÊTRE DE TOPOGRAPHIE représente les intervalles de
faible et de forte intensité par des colonnes lumineuses qui indiquent des collines et des vallées. Il a
été scientifiquement prouvé que l’entraînement fractionné ou par intervalles produit des progrès
cardiorespiratoires supérieurs à ceux obtenus avec un entraînement régulier.
14
DEPART RAPIDE
Appuyez sur DÉPART
RAPIDE.
Commencez l'exercice.
MANUEL
Appuyez plusieurs fois
sur TOUCHES
FLÉCHÉES jusqu'à
l'apparition de
MANUEL, puis
appuyez sur ENTRER.
Entrez le poids.
Entrez la durée.
Sélectionnez le niveau.
Commencez l’exercice.
ALÉATOIRE
Appuyez plusieurs fois
sur TOUCHES
FLÉCHÉES jusqu'à
l'apparition de
ALÉATOIRE, puis
appuyez sur ENTRER.
Entrez le poids.
Entrez la durée.
Sélectionnez le niveau.
Commencez l’exercice.
COLLINE
Appuyez plusieurs fois
sur TOUCHES
FLÉCHÉES jusqu'à
l'apparition de
COLLINE, puis
appuyez sur ENTRER.
Entrez le poids.
Entrez la durée.
Sélectionnez le niveau.
Commencez l’exercice.
CROSS-TRAINING
AÉROBIC
Appuyez plusieurs fois
sur TOUCHES
FLÉCHÉES jusqu'à
l'apparition de CROSSTRAINING AÉROBIC,
puis appuyez sur
ENTRER.
Entrez le poids.
Entrez la durée.
Sélectionnez le niveau.
Commencez l’exercice.
CROSS-TRAINING
ARRIÈRE
Appuyez plusieurs fois
sur TOUCHES
FLÉCHÉES jusqu'à
l'apparition de CROSSTRAINING ARRIÈRE,
puis appuyez sur
ENTRER.
Entrez le poids.
Entrez la durée.
Sélectionnez le niveau.
Commencez l’exercice.
ÉTAPES DE CONFIGURATION DES EXERCICES AVEC LE CROSS-TRAINER LIFE FITNESS
Page 39

L’exercice COLLINE comporte quatre phases, chacune ayant son propre niveau d’intensité.
La FENÊTRE DE TOPOGRAPHIE affiche la progression de ces phases, comme indiqué dans le
schéma placé sous les descriptions suivantes. Ces dernières indiquent aussi que la fréquence
cardiaque doit être mesurée à deux points de l’exercice afin d’évaluer son efficacité. Vous devez pour
cela porter une ceinture thoracique ou saisissez les sondes. Notez bien que le CENTRE DES
MESSAGES n’affiche pas de demande de la fréquence cardiaque pendant l’exercice COLLINE.
1 Échauffement correspond à une phase de résistance faible à augmentation progressive qui
amène la fréquence cardiaque dans la partie inférieure de la plage cible et augmente la
respiration et le débit sanguin des muscles sollicités.
2 Plateau augmente légèrement l’intensité et la maintient afin de conserver la fréquence cardiaque
dans la partie inférieure de la plage ciblée. Vérifiez la fréquence à la fin de cette phase.
3 Entraînement fractionné correspond à une série de collines de plus en plus pentues, séparées
l’une de l’autre par une vallée (ou une période de récupération). La fréquence cardiaque doit
s’élever à la limite supérieure de la plage prévue. Vérifiez la fréquence à la fin de cette phase.
4 Récupération correspond à une phase de faible intensité qui permet à l’organisme de
commencer à éliminer l’acide lactique et d’autres substances qui s’accumulent dans les muscles
pendant l’exercice et contribuent aux courbatures.
Comme indiqué dans la FENÊTRE DE TOPOGRAPHIE et dans le schéma ci-dessus, chaque
colonne représente un intervalle. La durée totale de l’exercice détermine la longueur de chaque
intervalle. Chaque exercice est composé de 20 intervalles. La durée de chaque intervalle correspond
donc à la durée totale de l’exercice divisée par 20.
De 10 à 19 minutes - La durée des intervalles est normalement de 30 secondes pour un
entraînement de 10 minutes. Pour chaque minute ajoutée par l’utilisateur « en cours de route »,
chaque intervalle augmente de trois secondes. Un exercice de 15 minutes comprendra donc 20
intervalles de 45 secondes chacun.
De 20 à 99 minutes - Tous les intervalles durent 60 secondes. Si, pendant l’exercice, l’utilisateur
ajoute des minutes à la durée prédéterminée, le programme ajoute des collines et des vallées
identiques aux huit premiers intervalles de la phase Entraînement fractionné. Cet enchaînement se
répète jusqu’à la fin de l’exercice.
15
Page 40

C
ROSS-TRAINING AÉROBIC
Pendant cet exercice, le CENTRE DES MESSAGES demande de solliciter divers groupes de
muscles. Pour mettre l’accent sur les muscles du haut du corps, le CENTRE DES MESSAGES
demande de se concentrer sur la poussée et la traction des bras mobiles à divers moments.
Pour solliciter plus particulièrement les muscles du bas du corps, le CENTRE DES MESSAGES
demande de poser les mains sur la barre fixe et de faire tout le travail avec les jambes. Ce
programme alterne également entre le mouvement vers l’avant et vers l’arrière, et propose
différentes vitesses.
Dix secondes après avoir demandé à l’utilisateur de changer de sens de pédalage, l’exercice
applique un freinage, c’est-à-dire un niveau de résistance qui force essentiellement l’utilisateur à
s’arrêter de pédaler. Dès l’arrêt du pédalage, l’exercice repasse au niveau de résistance normal.
Le niveau de résistance de freinage dépend de la vitesse de l’utilisateur. S’il pédale à 10 km/h
ou plus, l’exercice applique le niveau de freinage maximum. S’il pédale au-dessous de 10 km/h,
l’exercice applique 92 pour cent du maximum.
CROSS-TRAINING AÉROBIC représente un exercice à résistance constante. Cependant, pour
obtenir une expérience similaire avec un exercice à résistance variable, l’utilisateur peut lancer
n’importe quel exercice, puis appuyer sur la touche MODE AÉROBIC.
C
ROSS-TRAINING ARRIÈRE
Pendant cet exercice, le CENTRE DES MESSAGES demande tour à tour de pédaler en avant
(pendant cinq minutes) et en arrière (pendant deux minutes). Cette option permet de varier les
muscles sollicités au niveau des jambes.
Dix secondes après avoir demandé à l’utilisateur de changer de sens de pédalage, l’exercice
applique un freinage, c’est-à-dire un niveau de résistance qui force essentiellement l’utilisateur à
s’arrêter de pédaler. Dès l’arrêt du pédalage, l’exercice repasse au niveau de résistance normal.
Le niveau de résistance de freinage dépend de la vitesse de l’utilisateur. S’il pédale à 10 km/h
ou plus, l’exercice applique le niveau de freinage maximum. S’il pédale au-dessous de 10 km/h,
l’exercice applique 92 pour cent du maximum.
CROSS-TRAINING ARRIÈRE représente un exercice à résistance constante. Cependant, pour
obtenir une expérience similaire avec un exercice à résistance variable, l’utilisateur peut lancer
n’importe quel exercice, puis appuyer sur la touche MODE ARRIÈRE.
16
Page 41

5P
ARAMÈTRES EN OPTION
5.1 A
CCÈS AUX PARAMÈTRES EN OPTION ET UTILISATION
Les directeurs de salles de mise en forme et le personnel autorisé peuvent utiliser la fonction
Paramètres en option pour modifier les paramètres par défaut, ou pour activer ou désactiver
certains exercices ou affichages au niveau de la console du Total Body Trainer.
Pour accéder aux Paramètres en option tandis que l’appareil est allumé, maintenez la FLÈCHE
VERS LE HAUT enfoncée et appuyez deux fois sur REMISE À ZÉRO. Le CENTRE DES
MESSAGES affiche PARAMÈTRES EN OPTION, puis la première option de configuration.
Faites défiler les options en avant avec la touche ENTER ou en arrière avec la touche REMISE
À ZÉRO. Pour chaque fonction ou option, le CENTRE DES MESSAGES affiche le paramètre
par défaut. Pour le modifier, appuyez sur la FLÈCHE VERS LE BAS ou VERS LE HAUT jusqu’à
obtention de la valeur recherchée. Appuyez sur ENTER pour sélectionner la nouvelle valeur ou
le nouveau paramètre.
Pour quitter les Paramètres en option, appuyez plusieurs fois sur la touche REMISE À ZÉRO
jusqu’à ce que le CENTRE DES MESSAGES affiche « SÉLECTIONNER UN EXERCICE AVEC
LES TOUCHES FLÉCHÉES OU APPUYER SUR DÉPART RAPIDE ».
17
Paramètre Valeur Description
par défaut
DURÉE MAX. 60 minutes Il s’agit de la durée maximale possible pour un
EXERCICE exercice. Cette valeur peut aller de 10 à 99.
SYSTÈME IMPÉRIAL / IMPÉRIAL Cette option détermine les unités utilisées pour entrer
MÉTRIQUE le poids et mesurer la distance.
AFFICHAGE WATTS DÉSACTIVÉ Si cette option est activée, le CENTRE DES
ACTIVÉ / MESSAGES affiche l’équivalent Watts de la cadence
DÉSACTIVÉ de pédalage.
AFFICHAGE METS DÉSACTIVÉ Si cette option est activée, le CENTRE DES
ACTIVÉ / MESSAGES affiche l’équivalent METS de la cadence
DÉSACTIVÉ de pédalage.
AFFICHAGE CAL/H DÉSACTIVÉ Si cette option est activée, le CENTRE DES
ACTIVÉ / MESSAGES affiche le nombre de calories éliminées
DÉSACTIVÉ par heure d’exercice.
SÉLECTION LANGUE DÉSACTIVÉ Si elle est activée, cette option permet à l'utilisateur de
UTILISATEUR sélectionner une langue à utiliser pendant un exercice.
Référez-vous à la rubrique « Sélection de la langue
utilisateur » de cette section
P
ARAMÈTRES EN OPTION
Page 42

S
ÉLECTION LANGUE UTILISATEUR
Si elle est activée, cette option permet à l'utilisateur de sélectionner la langue d'interaction avec
l'appareil pendant un exercice.
Pour utiliser cette option, activez Sélection langue utilisateur (cf. ci-dessous).
Commencez à pédaler. La console affiche le message « SÉLECTIONNEZ UNE LANGUE AU
MOYEN DES TOUCHES FLÉCHÉES ». L'utilisateur peut utiliser une touche fléchée quelconque
pour opérer une sélection dans la liste de langues disponibles. Lorsque la langue souhaitée
apparaît, appuyez sur ENTRÉE afin de la sélectionner. Un exercice peut désormais démarrer en
utilisant la langue sélectionnée. Il n'est cependant pas nécessaire de choisir une langue pour
lancer un exercice. Il suffit d'appuyer sur la touche Départ rapide pour lancer un exercice, ou sur
n'importe quelle touche de programmation pour commencer à définir un exercice dans la langue
par défaut.
L'utilisateur peut sélectionner une des langues suivantes :
anglais, allemand, français, italien, néerlandais, espagnol, portugais et turc.
Le japonais est disponible si l'appareil est doté d'une console à caractères complexes.
Pour activer l'option Sélection langue utilisateur, accédez à Paramètres en option (cf.
section 5.1). Faites défiler les options en avant avec la touche ENTRÉE ou en arrière avec la
touche REMISE À ZÉRO, jusqu'à l'apparition de SEL LANGUE. Une fois que SEL LANGUE est
affiché dans le centre des messages, appuyez sur l'une des TOUCHES FLÉCHÉES VERS LE
BAS OU VERS LE HAUT pour l'activer.
18
Page 43

6E
NTRETIEN ET DONNÉES TECHNIQUES
6.1 CONSEILS DE MAINTENANCE PRÉVENTIVE
Le Total Body Trainer jouit de l’excellence technique de Life Fitness et est l’un des appareils
d’exercice les plus solides et les plus irréprochables disponibles sur le marché à l’heure
actuelle. Les produits commerciaux Life Fitness ont fait leurs preuves dans les clubs de mise en
forme, les universités et les installations militaires du monde entier. Ce Total Body Trainer est
basé sur la même technologie et sur la même technicité, et il est tout aussi fiable.
REMARQUE – Pour conserver un matériel sûr, il convient de l’inspecter régulièrement afin de
déceler tout signe d’usure ou d’endommagement. N’utilisez pas l’appareil tant que les pièces
défectueuses n’ont pas été réparées ou remplacées. Portez une attention toute particulière aux
pièces qui s’usent, comme indiqué dans le calendrier de maintenance préventive.
Les conseils de maintenance préventive suivants vous permettront de profiter au mieux des
capacités de votre Total Body Trainer.
• Placez le Total Body Trainer dans un endroit sec et frais.
• Nettoyez régulièrement la surface supérieure et les pédales.
• Maintenez la console d’affichage exempte de traces de doigts et d’accumulations de sel
dues à la transpiration.
• Pour nettoyer l’appareil, utilisez un chiffon 100 % coton imprégné d’une solution d’eau et de
détergent liquide doux. D’autres types de tissus, y compris les serviettes en papier,
risqueraient de rayer les surfaces. N’utilisez pas de nettoyants à base d’acide, de chlore ou
d’ammoniaque.
• Les ongles longs risquent d’endommager ou de rayer la surface de la console ; appuyez
sur les touches avec les doigts et non avec les ongles.
• Nettoyez soigneusement et régulièrement le boîtier et les bras mobiles.
REMARQUE – Lorsque vous nettoyez l’extérieur de l’appareil, il est vivement conseillé
d’utiliser un produit non abrasif et un chiffon en coton doux. N’appliquez jamais
denettoyant directement sur l’appareil. Placez-le sur le chiffon en coton, puis essuyez
l’appareil.
19
Page 44

6.2 C
ALENDRIER DE MAINTENANCE PRÉVENTIVE
Suivez le calendrier ci-dessous afin d’assurer un fonctionnement correct de l’appareil.
ÉLÉMENT HEBDOMADAIRE MENSUEL SEMESTRIEL ANNUEL
Console d’affichage Nettoyage Inspection
Boulons de fixation Inspection
de la console
Plateau d’accessoires Nettoyage Inspection
Cadre Nettoyage Inspection
Plaques de protection Nettoyage Inspection
en plastique
6.3 DÉPANNAGE DE LA CEINTURE THORACIQUE POLAR
®
DE CONTRÔLE
DE LA FRÉQUENCE CARDIAQUE
20
Dysfonctionnement
La mesure de la fréquence cardiaque
est irrégulière ou complètement
inexistante.
Mesures de fréquence cardiaque
anormalement élevées
Cause probable
Les électrodes émettrices de la
ceinture ne sont pas assez humides
pour détecter avec précision la
fréquence cardiaque.
Les électrodes émettrices de la
ceinture ne sont pas à plat sur la peau.
L’émetteur de la ceinture a besoin
d’être nettoyé.
L’émetteur de la ceinture se trouve à
plus d’un mètre du récepteur de
fréquence cardiaque.
La batterie de la ceinture thoracique
est épuisée.
Interférences électromagnétiques dues
à des antennes ou des postes de
télévision.
Interférences électromagnétiques dues
à des téléphones portables.
Interférences électromagnétiques dues
à des ordinateurs.
Interférences électromagnétiques dues
à des voitures.
Interférences électromagnétiques dues
à des lignes haute tension.
Interférence électromagnétiques dues
à des appareils d’exercice à moteur.
Interférences électromagnétiques dues
à un autre émetteur de fréquence
cardiaque situé à moins d’un mètre.
Mesure corrective
Humidifiez les électrodes émettrice de
la ceinture (cf. section 3.2).
Assurez-vous que les électrodes
émettrices de la ceinture sont à plat
sur la peau (cf. section 3.2).
Lavez l’émetteur de la ceinture à l’eau
et au savon doux.
Vérifiez si l’émetteur de la ceinture
n’est pas à plus d’un mètre du
récepteur de fréquence cardiaque.
Contactez le service après-vente de
Life Fitness* pour savoir comment
faire remplacer la ceinture thoracique.
Déplacez légèrement l’appareil afin de
l’éloigner de la cause probable, ou
éloignez la cause probable de
l’appareil jusqu’à l’obtention d’une
mesure de fréquence cardiaque
correcte.
Page 45

6.4 R
ÉPARATION DES PRODUITS
1. Vérifiez les symptômes et consultez le mode d’emploi. Le problème peut provenir d’un manque
d’habitude de l’appareil, de ses fonctions et des exercices proposés.
2. Recherchez la plaque signalétique qui se trouve au dos de l’appareil. Relevez le numéro de
série composé de trois lettres suivies de six chiffres.
3. Contactez le service après-vente de Life Fitness sur le Web à l’adresse suivante :
www.lifefitness.com, ou consultez le groupe de service après-vente Life Fitness le plus proche
de chez vous.
21
Pour les réparations effectuées
aux États-Unis et au Canada :
Téléphone : (+1) 847.451.0036
Télécopie : (+1) 847.288.3702
Numéro d’appel gratuit : 800.351.3737
Pour le service après-vente en dehors de
l’Amérique du Nord :
Life Fitness Europe GmbH (Allemagne)
Téléphone : (+49) 089.317.751.66
Télécopie : (+49) 089.317.751.38
Life Fitness (UK) LTD
Téléphone : (+44) 1353.665.507
Télécopie : (+44) 1353.666.719
Life Fitness Atlantic BV (Europe, MoyenOrient et Afrique, sauf bureaux LF locaux)
Life Fitness Benelux
Téléphone : (+31) 180.646.666
Télécopie : (+31) 180.646.699
Life Fitness Italia S.R.L.
Téléphone : 800.438.836
Télécopie : (+39) 0457.238.197
Life Fitness Austria Vertriebs GmbH
Téléphone : (+43) 1615.7198
Télécopie : (+43) 1615.7198.20
Life Fitness Asia Pacific Ltd (Asie et
Australie, sauf bureaux LF locaux)
Téléphone : (+852) 2891.6677
Télécopie : (+852) 2575.6001
Life Fitness Amérique latine
et Caraïbes
Téléphone : (+1) 847.288.3964
Télécopie : (+1) 847.288.3886
Life Fitness Brésil
Téléphone : (+55) 11.4193.8282
Télécopie : (+55) 11.4193.8283
Life Fitness Japon
Téléphone : (+81) 3.3359.4309
Télécopie : (+81) 3.3359.4307
Life Fitness Iberia (Espagne)
Téléphone : (+34) 93.672.4660
Télécopie : (+34) 93.672.4670
Page 46

7C
ARACTÉRISTIQUES TECHNIQUES
7.1 CARACTÉRISTIQUES TECHNIQUES DU CROSS-TRAINER LIFE FITNESS 91X
Utilisation prévue : Intensive/Commerciale
Poids utilisateur max. : 160 kilogrammes
Alimentation requise : Aucune
Console :
Type : CENTRE DES MESSAGES avec TOUCHES FLÉCHÉES
Affichage : Durée écoulée, vitesse, niveau, calories, fréquence cardiaque, distance, calories
brûlées à l'heure (si activé), watts (si activé) et METS (si activé)
Résumés : Durée écoulée totale depuis le début de l'exercice, total des calories brûlées,
distance totale parcourue
Taille des caractères : 14 millimètres
Exercices et objectifs : Départ rapide, Manuel, Aléatoire, Colline, Cross-training Aérobic, Cross-training
Arrière
Modes : Modes Aérobic et Arrière pour tous les exercices
Moniteur de fréquence
cardiaque : Système Polar de contrôle de la fréquence cardiaque par télémesure
Capteurs du système Lifepulse
Ceinture thoracique Polar de contrôle de la fréquence cardiaque : en option
Niveaux de résistance : 25
Plage de vitesse
de pédalage : 3.5 - 20.4 KPH
Type d'entraînement : Courroie / Alternateur
Plateau d'accessoires : Standard
Pupitre de lecture intégré : Standard
Couleur : Argent avec touches de gris
DIMENSIONS HORS TOUT :
Longueur : 211 centimètres
Largeur : 71 centimètres
Hauteur : 155 centimètres
Poids : 106,5 kilogrammes
DIMENSIONS À L'EXPÉDITION :
Longueur : 206,5 centimètres
Largeur : 75 centimètres
Hauteur : 119,3 centimètres
Poids : 113,4 kilogrammes
22
Page 47

Entrenador para todo el cuerpo 91X
Manual De Operación
Page 48

1
LIFE FITNESS ASIA PACIFIC LTD
Room 2610, Miramar Tower
132 Nathan Road
Tsimshatsui, Kowloon
HONG KONG
Teléfono: (+852) 2891.6677
FAX: (+852) 2575.6001
LIFE FITNESS ATLANTIC BV
LIFE FITNESS BENELUX
Bijdorpplein 25-31
2992 LB Barendrecht
PAÍSES BAJOS
Teléfono: (+31) 180.646.666
FAX: (+31) 180.646.699
Teléfono: (+32) 87.300.942
FAX: (+32) 87.300.943
LIFE FITNESS DO BRAZIL
Av. Dr. Dib Sauaia Neto 1478
Alphaville, Barueri, SP
06465-140
BRASIL
Telephone (+55) 11.4193.8282
FAX: (+55) 11.4193.8283
LIFE FITNESS VERTRIEBS GMBH
Dückegasse 7-9/3/36
1220 Vienna
AUSTRIA
Teléfono: (+43) 1.61 57 198
FAX: (+43) 1.61 57 198.20
LIFE FITNESS IBERIA
Pol. Ind. Molí dels Frares. c/C, nº 12
08620 Sant Vicenç dels Horts (Barcelona)
España
Teléfono: (+34) 93.672.4660
FAX: (+34) 93.672.4670
LIFE FITNESS EUROPE GMBH
Siemensstrasse 3
85716 Unterschleissheim
ALEMANIA
Teléfono: (+49) 89.31 77 51.0
FAX: (+49) 89.31 77 51.99
LIFE FITNESS ITALIA S.R.L.
Via Vittorio Veneto, 57/A
39042 Bressanone (Balzano)
ITALIA
Teléfono: (+39) 0472.835 470
FAX: (+39) 0472.833 150
LIFE FITNESS AMÉRICA LATINA
y EL CARIBE
5100 North River Road
Schiller Park, Illinois 60176
EE.UU.
Teléfono: (+1) 847.288.3300
FAX:(+1) 847.288.3762
LIFE FITNESS UK LTD
Queen Adelaide
Ely, Cambs CB7 4UB
REINO UNIDO
Teléfono: (+44) 1.353.666 017
FAX: (+44) 1.353.666 018
LIFE FITNESS JAPAN
Nippon Brunswick Bldg., #8F
5-27-7 Sendagaya
Shibuya-Ku, Tokio
Japón 151-0051
Teléfono: (+81) 3.3359.4309
FAX: (+81) 3.3359.4307
M051-00K61-A093
04/05
OFICINA
MATRIZ CORPORATIVA
5100 North River Road
Schiller Park, Illinois 60176 • EE.UU.
847.288.3300 • FAX: 847.288.3703
800.735.3867 (Gratis dentro de EE.UU. y Canadá)
www.lifefitness.com
OFICINAS INTERNACIONALES
Page 49

Antes de usar este producto, es indispensable leer la TOTALIDAD
de este manual de operación y TODAS las instrucciones de instalación.
Esto ayudará en la configuración rápida del equipo y en
la instrucción a otros sobre el uso correcto y seguro del equipo.
Advertencia de la FCC - Posible interferencia de radio y televisión
NOTA: Este equipo ha sido probado y se ha determinado que satisface los límites para
dispositivos digitales Clase A, según la parte 15 del reglamento de la FCC. Estos límites han sido
diseñados para proporcionar una protección razonable contra las interferencias perjudiciales
cuando el equipo funcione en un entorno comercial. Este equipo genera, usa y puede irradiar
energía de radiofrecuencia, y si no se instala y emplea según lo indicado en el manual de
operación, puede causar interferencias perjudiciales a las comunicaciones de radio. Es posible
que el funcionamiento de este equipo en un área residencial cause interferencias perjudiciales,
en cuyo caso se exigirá al usuario que corrija la interferencia y corra con los gastos.
Clase S (Estudio): Uso profesional y/o comercial.
ATENCIÓN: Cualquier cambio o modificación a este equipo puede anular la
garantía de producto.
Cualquier servicio, distinto de la limpieza o el mantenimiento, debe realizarlo un representante
autorizado de servicio. No hay piezas a las que el usuario pueda realizarles servicio.
2
Page 50

TABLA DE MATERIAS
Sección Descripción . . . . . . . . . . . . . . . . . . . . . . . . . . . . . . . . . . . . . . . . . . . . . . . . .Página
1. Para empezar . . . . . . . . . . . . . . . . . . . . . . . . . . . . . . . . . . . . . . . . . . . . . . . . . .5
1.1 Instrucciones importantes de seguridad . . . . . . . . . . . . . . . . . . . . . . . . . . . . . . .5
1.2 Configuración . . . . . . . . . . . . . . . . . . . . . . . . . . . . . . . . . . . . . . . . . . . . . . . . . .6
Dónde colocar el Cross-trainer Life Fitness®// Cómo estabilizar el Cross-trainer
Life Fitness // Verificación de carga
2. La consola de información . . . . . . . . . . . . . . . . . . . . . . . . . . . . . . . . . . . . . . . . .7
2.1 Generalidades de la consola de información . . . . . . . . . . . . . . . . . . . . . . . . . . .7
2.2 Descripciones de la consola de información . . . . . . . . . . . . . . . . . . . . . . . . . . .7
2.3 La bandeja para accesorios y la repisa de lectura . . . . . . . . . . . . . . . . . . . . . . .9
3. Ejercicio Entrenamiento en zona de ritmo cardiaco . . . . . . . . . . . . . . . . . . . . . .10
3.1 El sistema digital de control del ritmo cardiaco LifePulse
TM
. . . . . . . . . . . . . . . .10
3.2 La banda pectoral de control del ritmo cardiaco con telemetría Polar® . . . . . . . .11
4. Las rutinas . . . . . . . . . . . . . . . . . . . . . . . . . . . . . . . . . . . . . . . . . . . . . . . . . . . .12
4.1 Generalidades de las rutinas . . . . . . . . . . . . . . . . . . . . . . . . . . . . . . . . . . . . . .12
4.2 Cómo usar las rutinas . . . . . . . . . . . . . . . . . . . . . . . . . . . . . . . . . . . . . . . . . . .12
Para empezar una rutina // Selección y uso del Inicio rápido // Selección de una
rutina // Introducción del peso // Introducción del tiempo // Selección y ajuste del
nivel de resistencia // Selección de un modo de rutina // Cambio de rutinas "al
vuelo" // Pausa en las rutinas // Terminar rutinas más pronto // Pasos para
configurar rutinas en el Cross-trainer Life Fitness (cuadro)
4.3 Descripciones de las rutinas . . . . . . . . . . . . . . . . . . . . . . . . . . . . . . . . . . . . . . .14
Inicio rápido // Manual // Aleatoria // Colina // Aeróbicos con entrenamiento
combinado // Entrenamiento combinado inverso
5. Parámetros opcionales . . . . . . . . . . . . . . . . . . . . . . . . . . . . . . . . . . . . . . . . . . .17
5.1 Introducción y uso de la función Parámetros opcionales . . . . . . . . . . . . . . . . . .17
6. Datos técnicos y de servicio . . . . . . . . . . . . . . . . . . . . . . . . . . . . . . . . . . . . . . .19
6.1 Sugerencias de mantenimiento preventivo . . . . . . . . . . . . . . . . . . . . . . . . . . . .19
6.2 Programa de mantenimiento preventivo . . . . . . . . . . . . . . . . . . . . . . . . . . . . . .20
6.3 Diagnóstico y reparación de la banda pectoral del ritmo cardiaco Polar . . . . . .20
La lectura del ritmo cardiaco es errática o no existe en absoluto //
La lectura del ritmo cardiaco es errática o extremadamente alta
6.4 Cómo obtener servicio de producto . . . . . . . . . . . . . . . . . . . . . . . . . . . . . . . . .21
7. Especificaciones . . . . . . . . . . . . . . . . . . . . . . . . . . . . . . . . . . . . . . . . . . . . . . .22
7.1 Especificaciones del Cross-trainer Life Fitness 91X . . . . . . . . . . . . . . . . . . . . .22
© 2005 Life Fitness, una división de Brunswick Corporation. Reservados todos los derechos. Life Fitness, Heart Rate Zone Training y
Lifepulse son marcas registradas de Brunswick Corporation. Polar es una marca registrada de Polar Electro, Inc. Cardio Theater es una
marca registrada de Cardio Theater Holdings. FitLinxx es una marca registrada de Integrated Fitness Corp. Queda prohibido el uso de
cualesquiera de estas marcas, sin el consentimiento expreso escrito de Life Fitness o las empresas correspondientes.
3
Page 51

Este Manual de Operación describe las funciones del siguiente producto:
Cross-trainer Life Fitness con mando trasero para ejercitar todo el cuerpo
91X
Consulte las características específicas del producto en la página
"Especificaciones" de este manual.
Declaración de finalidad: El Cross-trainer Life Fitness es una máquina para hacer ejercicios que
combina el pedaleo elíptico de bajo impacto con el movimiento de empujar / tirar del brazo para
proporcionar una rutina eficiente y efectiva para todo el cuerpo.
ATENCIÓN: Life Fitness recomienda ENFÁTICAMENTE hacerse un examen
médico completo antes de emprender un programa de ejercicios, especialmente
si el usuario tiene un historial familiar de hipertensión o enfermedades del
corazón, si es mayor de 45 años de edad, o si fuma, tiene el colesterol elevado y
es obeso, o no se ha ejercitado de manera regular durante el último año.
Si en cualquier momento durante los ejercicios el usuario sufre desmayo, mareo, dolor o
dificultades para respirar, debe parar de inmediato.
4
Page 52

1P
ARA EMPEZAR
1.1 INSTRUCCIONES IMPORTANTES DE SEGURIDAD
ADVERTENCIA DE SEGURIDAD: La seguridad de este producto puede
mantenerse sólo si se examina regularmente por si hubiera daños y desgaste.
Para más detalles consulte la sección Mantenimiento preventivo.
• Si este producto Life Fitness no funciona bien después de caerse, dañarse o sumergirse
parcialmente en agua, póngase en contacto con el Servicio de Asistencia al Cliente de Life
Fitness para obtener asistencia.
• Siempre siga las instrucciones de la consola para el funcionamiento correcto.
• Es necesaria la supervisión directa cuando lo usen niños y personas inválidas o con
impedimentos físicos.
• No use este producto a la intemperie, cerca de piscinas o en áreas de mucha humedad.
• Nunca haga funcionar un producto Life Fitness con las aberturas de ventilación bloqueadas.
Mantenga las aberturas de ventilación libres de pelusa, cabellos o cualquier material que
pueda causar obstrucción.
• Nunca inserte objetos en ninguna abertura de este producto. Si cayera un objeto dentro de
la unidad, recójalo con cuidado. Si no puede alcanzarlo , contacte al Servicio de Asistencia
al Cliente de Life Fitness.
• Nunca coloque líquidos de ninguna clase directamente sobre la unidad, excepto en el
soporte para botella de agua de la bandeja para accesorios. Se recomienda usar
recipientes con tapas.
• Use zapatos con suela de goma o de alta tracción. No use zapatos con tacones, suela de
cuero, cuñas o púas. Cerciórese de que no hayan piedras incrustadas en la suela.
• Mantenga las ropas sueltas, los cordones de zapatos y las toallas alejados de las partes en
movimiento.
• No use este producto estando descalzo.
• No incline la unidad hacia un lado mientras esté funcionando.
• Mantenga el área alrededor del producto Life Fitness libre de obstrucciones, incluyendo
paredes y muebles. Asegúrese de que haya cuando menos 30 cm de espacio libre delante
del Cross-trainer Life Fitness.
• Tenga cuidado al subirse o bajarse del Cross-trainer Life Fitness. Use el barandal
estacionario cuando necesite mayor estabilidad. Mientras se ejercita, agárrese de los
brazos móviles.
• Nunca use el Cross-trainer Life Fitness mientras esté de espaldas.
GUARDE ESTAS INSTRUCCIONES PARA REFERENCIA FUTURA.
5
Page 53

1.2 C
ONFIGURACIÓN
Lea el Manual de Operación antes de instalar el Cross-trainer Life Fitness.
DÓNDE COLOCAR EL CROSS-TRAINER LIFE FITNESS
®
Siguiendo todas las instrucciones de seguridad de la Sección 1.1, mueva el Cross-trainer Life
Fitness al lugar donde se va a usar. Consulte en la Sección 7, Especificaciones, las medidas
del espacio a ocupar. Mantenga un espacio libre de 30 cm delante del Cross-trainer Life Fitness
para permitir el movimiento de las manivelas de los pedales. Debe ser fácil subir al Crosstrainer Life Fitness desde un costado.
CÓMO ESTABILIZAR EL
CROSS-TRAINER LIFE FITNESS
Después de poner el Cross-trainer Life Fitness en su sitio, compruebe la estabilidad de la unidad
tratando de balancearla. El mínimo balanceo indica que se debe nivelar la unidad. Revise los
pies estabilizadores para determinar el que no se apoya bien en el suelo. Gire el pie en sentido
antihorario para bajarlo. Vuelva a revisar la estabilidad y el ajuste hasta que el Cross-trainer Life
Fitness esté estable y no se balancee. Bloquee el ajuste en su posición apretando la tuerca
inmovilizadora contra la barra estabilizadora con una llave de tuercas de 9/16".
.
V
ERIFICACIÓN DE CARGA
La consola es accionada por una batería recargable de 6 voltios. Verifique la batería presionando la
tecla INICIO. Se debe iluminar la consola, y el CENTRO DE MENSAJES debe presentar un aviso
para configurar una rutina. Si no ocurre esto, súbase al Cross-trainer Life Fitness y comience a
pedalear. Ahora se debe iluminar la consola y debe ser posible programar una rutina. Para cargar
la batería pedalee de 10 a 20 minutos a 25 RPM o más rápido durante una rutina. En adelante, la
acción de pedaleo durante las rutinas mantendrá cargada la batería. Si aún no se enciende la
consola, contacte al Servicio de Asistencia al Cliente de Life Fitness. Para obtener más
información, consulte la sección 6.5, titulada Cómo obtener servicio de producto.
6
Page 54

2L
A CONSOLA DE INFORMACIÓN
2.1 GENERALIDADES DE LA CONSOLA DE INFORMACIÓN
La consola de información computarizada permite que el usuario ajuste la rutina a su capacidad
y metas de condición física, y vigile su evolución. Con esta consola de fácil uso, el usuario
puede vigilar el mejoramiento de su condición física entre una rutina y la próxima.
2.2 DESCRIPCIONES DE LA CONSOLA DE INFORMACIÓN
Esta sección enumera y describe las funciones de las teclas y ventanas de información de la
consola. Para obtener información detallada sobre el uso de la consola para configurar rutinas,
consulte la Sección 4.1, titulada Las rutinas.
A INICIO: Presione esta tecla para activar la consola y programar una nueva rutina. La consola
activada se ilumina y muestra "SELECCIONE RUTINA O PRESIONE INICIO RÁPIDO". Si no
se presiona ninguna tecla durante 15 segundos y el usuario deja de pedalear, la consola se
apaga.
NOTA: La función AutoStart del Cross-trainer Life Fitness también activa la consola cuando
el usuario pisa los pedales y comienza a pedalear.
7
Page 55

B INTRODUCIR: Presione esta tecla después de introducir cada valor, como peso o tiempo de la
rutina, cuando los mensajes de la consola lo indiquen.
C Teclas de FLECHA: Use las teclas de FLECHA ARRIBA y ABAJO para cambiar los parámetros
de la rutina mostrados en la consola, como duración de la rutina, peso, y nivel de intensidad.
D INICIO RÁPIDO: Presione esta tecla para comenzar de inmediato una rutina manual, sin tener
que seleccionar un programa de rutina. Una vez en la rutina, use las TECLAS DE FLECHA para
cambiar el nivel de intensidad.
E BORRAR: Presione esta tecla, cuando programe una rutina, para borrar datos incorrectos tales
como peso, antes de presionar la tecla INTRODUCIR. Cuando se presiona BORRAR durante
una rutina ésta se detiene de inmediato, y en ese momento el CENTRO DE MENSAJES
muestra un resumen de la rutina, incluyendo los totales de tiempo transcurrido, distancia
recorrida y calorías quemadas. Si se presiona BORRAR por segunda vez, el CENTRO DE
MENSAJES le pide al usuario que configure una nueva rutina.
F BLOQUEO DE PANTALLA: Durante una rutina, el CENTRO DE MENSAJES muestra de forma
alternada el número de CALORÍAS quemadas y el TIEMPO transcurrido. Si presiona la tecla
BLOQUEO DE PANTALLAcuando el CENTRO DE MENSAJES está presentando una de las
estadísticas, esto obliga a que esta estadística se muestre continuamente durante toda la rutina.
Si se presiona nuevamente BLOQUEO DE PANTALLAse permite que el CENTRO DE
MENSAJES reanude el cambio entre las dos estadísticas.
G CAMBIAR RUTINA : Presione esta tecla para cambiar a otra rutina mientras está en una.
H ENFRIAMIENTO: Las rutinas finalizan automáticamente en el modo de Enfriamiento, lo que
disminuye el nivel de intensidad. Presione la tecla ENFRIAMIENTO en cualquier momento
durante una rutina para entrar directamente en el modo de Enfriamiento. En esta fase de una
rutina, el cuerpo empieza a eliminar ácido láctico y otros subproductos acumulados del ejercicio,
que se acumulan en los músculos durante la rutina y contribuyen al dolor muscular. La consola
ajusta automáticamente el nivel de Enfriamiento de cada rutina según el rendimiento del usuario.
Cada vez que el usuario presiona la tecla ENFRIAMIENTO, la duración del Enfriamiento
disminuye en un minuto.
I VENTANADE PERFIL DE LA RUTINA: Esta ventana muestra formas, compuestas de columnas
de luces, que representan los niveles de intensidad en una rutina activa. La altura de la columna
es proporcional al nivel de la intensidad.
J CENTRO DE MENSAJES: Esta ventana muestra instrucciones paso a paso para configurar una
rutina. Durante una rutina, presenta estadísticas acerca del progreso de la misma.
• Nivel: nivel de intensidad programado. Alterna con Ritmo cardiaco.
• Ritmo cardiaco: el ritmo cardiaco detectado si el usuario tiene puesta la banda pectoral o
asió los sensores. Alterna con Nivel. Si el ordenador integrado no detecta un ritmo cardiaco,
sólo se mostrará el Nivel durante la rutina.
• Distancia: la distancia total recorrida en kilómetros.
• Velocidad: la velocidad o frecuencia de pedaleo en kilómetros por hora.
• Calorías: número de calorías quemadas desde el inicio de la rutina. Alterna con Tiempo.
• Tiempo: el tiempo transcurrido desde el inicio de la rutina. Alterna con Calorías.
8
Page 56

Si está programado para hacerlo, el CENTRO DE MENSAJES muestra cualquiera de los tres
valores, o todos ellos, cada vez que el nivel de intensidad cambie durante la rutina.
• Calorías por hora: el promedio de calorías quemadas por hora.
• Vatios: el nivel de esfuerzo en vatios. El vatio es una unidad de potencia o la expresión de
ritmo mecánico de trabajo.
• MET: el nivel de esfuerzo en MET. El MET es una expresión del ritmo de trabajo del cuerpo
humano en reposo, o un equivalente metabólico; un MET es aproximadamente igual al
metabolismo de una persona en reposo.
Para obtener información sobre cómo activar el CENTRO DE MENSAJES para que muestre estos
valores adicionales, consulte el Capítulo 5, Parámetros opcionales.
K MODO AERÓBICOS: Presione esta tecla para activar un modo de rutina donde el CENTRO DE
MENSAJES presente avisos que varían la carga de trabajo y enfatizan diferentes grupos de
músculos durante la rutina. Se puede usar con cualquier rutina.
L MODO INVERSO: Presione esta tecla para activar un modo de rutina que alterne cinco minutos
de movimiento de avance con dos minutos de movimiento de retroceso. Se puede usar con
cualquier rutina.
M PAUSA: Presione esta tecla para hacer una pausa en la rutina activa. Continúe la rutina
presionando nuevamente la tecla PAUSA. Para obtener más información, consulte el tema
Pausa en una rutina, en la Sección 4.2, titulada Cómo usar las rutinas.
Para obtener más información sobre el Modo Aeróbicos y el Modo Inverso, consulte el tema Cómo
usar los dos modos de rutina en la Sección 4.2, titulada Cómo usar las rutinas.
2.3 LA BANDEJA PARA ACCESORIOS Y LA REPISA DE LECTURA
La bandeja para accesorios (A), que se encuentra instalada cerca de la base de la consola tiene
bandejas de almacenamiento doble, con espacio para artículos tales como botellas de agua,
equipos de música personales y teléfonos móviles. Además, en la base del panel superior de la
consola hay una repisa de lectura integrada (B) para apoyar un libro o una revista.
9
B
A
Page 57

3E
JERCICIO ENTRENAMIENT O EN ZONA DE RITMO
CARDIACO
3.1 EL SISTEMA DIGITAL DE CONTROL DEL RITMO CARDIACO LIFEPULSE
TM
Los sensores del sistema patentado Lifepulse constituyen el sistema de control del ritmo
cardiaco integrado en el Cross-trainer Life Fitness. Durante una rutina, para obtener la lectura
más precisa posible:
• Sujete firmemente los sensores (A).
• Sujete cada sensor en el punto medio vertical.
• Mantenga las manos estables y en su sitio.
La consola muestra el ritmo cardiaco en un período de 10 a 40 segundos después que el
usuario sujeta los sensores.
10
A
A
Page 58

3.2 L
A BANDA PECTORAL DE CONTROL DEL RITMO CARDIACO CON
TELEMETRÍA
POLAR
®
El Cross-trainer Life Fitness está equipado con un sistema de control del ritmo cardiaco Polar que
usando electrodos, presionados contra la piel, transfiere las señales del ritmo cardiaco a la consola.
Estos electrodos están conectados a una banda pectoral que el usuario lleva puesta durante la
rutina. La banda pectoral es opcional. Para solicitarla, llame a Servicio de Asistencia al Cliente de
Life Fitness. Consulte la Sección 6.5, titulada Cómo obtener servicio de producto.
Véase en el diagrama siguiente la posición correcta de la banda. Los electrodos (A), que son las
dos superficies ranuradas en la parte inferior de la banda pectoral, deben permanecer húmedos
para transmitir fielmente los impulsos eléctricos del corazón al receptor. Humedezca los electrodos.
A continuación, asegure la banda pectoral lo más alto posible debajo de los pectorales. La banda
pectoral debe estar ligeramente apretada, pero lo suficientemente cómoda como para permitir la
respiración normal.
La banda transmisora produce una lectura óptima del ritmo cardiaco cuando los electrodos están
en contacto directo con la piel. Sin embargo, también funciona correctamente a través de una capa
fina de ropa húmeda.
Si es necesario volver a humedecer los electrodos de la banda pectoral, sujete el centro de la
banda, retírela del pecho para dejar al descubierto los dos electrodos y vuélvalos a humedecer.
NOT A: Si se sujetan los sensores del sistema Lifepulse cuando se lleva puesta la banda pectoral,
y si las señales de los sensores son válidas, el ordenador integrado usa las señales de los
sensores para calcular el ritmo cardiaco en lugar de las que transmite la banda pectoral.
11
A A
Page 59

4L
AS RUTINAS
4.1 GENERALIDADES DE LAS RUTINAS
Esta sección enumera las rutinas preprogramadas del Entrenador para todo el cuerpo. Para obtener
información detallada, consulte la Sección 4.2, titulada Cómo usar las rutinas. Las siguientes rutinas
se pueden acceder mediante las teclas de FLECHA.
INICIO RÁPIDO, es la forma más rápida para comenzar a ejercitarse, y omite los pasos para
seleccionar un programa específico de rutina. Después de presionar la tecla INICIO RÁPIDO,
comienza una rutina de nivel constante. El nivel de intensidad no cambia automáticamente.
MANUAL, es una rutina en la que el nivel de intensidad no cambia automáticamente.
ALEATORIA, es una rutina de entrenamiento en intervalos con niveles de intensidad que cambian
constantemente sin seguir un patrón o progresión regular.
AERÓBICOS CROSS-TRAIN, simula la experiencia de trabajar con un entrenador personal. El
CENTRO DE MENSAJES presenta avisos en momentos distintos para enfatizar los movimientos de
empujar, tirar, de todo el cuerpo, de la parte inferior del cuerpo, cambios de velocidad y
avance/retroceso. Esta versátil rutina fomenta beneficios máximos del entrenamiento combinado.
CROSS-TRAIN INVERSO, alterna continuamente cinco minutos de movimiento de avance con dos
minutos de movimiento de retroceso para el ejercicio combinado de grupos de músculos diferentes.
COLINA, es una rutina de entrenamiento en intervalos que combina “colinas” y “valles” con niveles
de intensidad diferentes, que ha demostrado producir resultados cardiovasculares efectivos y
oportunos.
4.2 C
ÓMO USAR LAS RUTINAS
Esta sección ofrece información detallada sobre cómo configurar y usar las rutinas. Véase en el
diagrama cerca del fin de esta sección los pasos de referencia rápida para la configuración.
PARA EMPEZAR UNA RUTINA
Para subirse al Entrenador para todo el cuerpo, sujete los manubrios y pise con cuidado los
pedales. Para desmontar, bájese de los pedales sin dejar de sujetar los manubrios. Después,
suelte los manubrios.
Presione INICIO o comience a pedalear para activar la consola. El CENTRO DE MENSAJES
muestra el mensaje “SELECCIONE RUTINA USANDO TECLAS DE FLECHA O PRESIONE
INICIO RÁPIDO”. Si muestra otro mensaje, presione dos veces sucesivas la tecla BORRAR.
SELECCIÓN Y USO DEL INICIO RÁPIDO
INICIO RÁPIDO es la forma más rápida para comenzar a ejercitarse, y omite los pasos para
seleccionar un programa específico de rutina. Cuando aparezca el aviso del CENTRO DE
MENSAJES para seleccionar una rutina, presione la tecla INICIO RÁPIDO. La rutina comienza
en un nivel de intensidad que permanece igual hasta que se cambie manualmente. Después
de 12 segundos, el CENTRO DE MENSAJES muestra un aviso para introducir el peso, que es
necesario para calcular el total de calorías.
12
Page 60

S
ELECCIÓN DE UNA RUTINA
Para las rutinas MANUAL, ALEATORIA, COLINA, CROSS-TRAIN INVERSO y AERÓBICOS
CROSS-TRAIN: Cuando se le pida que seleccione una rutina, use las TECLAS DE FLECHA
para recorrer los nombres de rutinas que aparecen en el CENTRO DE MENSAJES. Cuando
aparezca la rutina deseada, presione INTRODUCIR.
INTRODUCCIÓN DEL PESO
Cuando el CENTRO DE MENSAJES le pida que introduzca el peso, use las TECLAS DE
FLECHA para aumentar o disminuir el peso mostrado hasta el valor correcto, y presione
INTRODUCIR. El peso predeterminado es de 68 kilogramos. El ordenador integrado calcula el
número y la rapidez de quema de calorías usando el peso introducido y la velocidad de
pedaleo.
INTRODUCCIÓN DEL TIEMPO
Cuando el CENTRO DE MENSAJES le pida que introduzca un tiempo, use las teclas de flecha
para aumentar o disminuir el tiempo mostrado hasta el valor deseado, después presione
INTRODUCIR.
SELECCIÓN Y AJUSTE DEL NIVEL DE RESISTENCIA
Cuando lo pida el CENTRO DE MENSAJES, use las TECLAS DE FLECHA para aumentar o
disminuir el nivel de intensidad o el ritmo cardiaco objetivo mostrados hasta el valor deseado, y
presione INTRODUCIR. Ajuste el nivel según sea necesario, o se desee, durante la rutina.
• Nivel de resistencia: El Entrenador para todo el cuerpo ofrece una selección de 25
niveles de resistencia. La resistencia es independiente de la velocidad. El nivel de
resistencia aparece en la ventana PERFIL DE LA RUTINA como hileras de luces
organizadas en columnas. Se recomienda seleccionar primero un nivel de intensidad
baja. Amedida que mejoren las condiciones físicas, los niveles pueden incrementarse.
S
ELECCIÓN DE UN MODO DE RUTINA
Dos opciones de modos de rutina en el Entrenador para todo el cuerpo presentan formas alternas
para variar las rutinas.
• Modo Aeróbicos: Este modo de rutina simula la experiencia de ejercitarse con un
entrenador. Durante la rutina, el CENTRO DE MENSAJES muestra avisos para variar la
carga de trabajo y enfatizar diferentes grupos de músculos, tales como la parte alta y baja
del cuerpo. Se puede usar esta función con cualquier rutina.
• Modo inverso: Esta rutina alterna continuamente cinco minutos de movimiento de avance
con dos minutos de movimiento de retroceso, para ejercitar diferentes músculos de la
pierna. Se puede usar esta función con cualquier rutina.
CAMBIO DE RUTINAS “AL VUELO”
Durante una rutina es posible cambiar a otro programa de rutina. Después del cambio, la consola
retiene toda la información de la evolución de la rutina desde el principio. Para cambiar las rutinas
“al vuelo”, presione la tecla CAMBIAR RUTINA y seleccione una nueva rutina. Todas las rutinas
disponen de esta función.
13
Page 61

P
AUSA EN LAS RUTINAS
Para hacer una pausa en una rutina, simplemente deje de pedalear. Para continuar la rutina, vuelva
a pedalear. La duración de la pausa es de 60 segundos, después de los cuales la consola
automáticamente se apaga.
T
ERMINAR RUTINAS MÁS PRONTO
Para terminar una rutina antes de que caduque la duración predefinida, presione una vez la tecla
BORRAR. El CENTRO DE MENSAJES muestra un resumen de la rutina, que incluye la distancia
recorrida, las calorías totales quemadas y otras estadísticas. Presione BORRAR una segunda vez, y
el CENTRO DE MENSAJES mostrará “SELECCIONE RUTINA USANDO TECLAS DE FLECHA O
PRESIONE INICIO RÁPIDO” para elegir una rutina nueva.
4.3 DESCRIPCIONES DE LAS RUTINAS
INICIO RÁPIDO
INICIO RÁPIDO es la forma más rápida para comenzar a ejercitarse, y omite los pasos para
seleccionar un programa específico de rutina. El nivel de intensidad de la rutina es definido
automáticamente y permanece igual, a menos que se cambie manualmente. Para cambiar el
nivel, presione las teclas de flecha ASCENDENTE o DESCENDENTE para introducir un
número de nivel más alto o más bajo. Después de 12 segundos en la rutina, el CENTRO DE
MENSAJES muestra “INTRODUZCA PESO”, información que necesita el ordenador para
calcular las calorías totales. Usando las TECLAS DE FLECHA, aumente o disminuya el peso
mostrado hasta el valor correcto.
MANUAL
El programa MANUAL establece un nivel de intensidad que no cambia automáticamente.
Mientras se lleva a cabo la rutina, aumente o disminuya el nivel de intensidad a su gusto,
usando las teclas de FLECHA.
14
INICIO RÁPIDO
Presione INICIO
RÁPIDO
Empiece la rutina
MANUAL
Presione TECLAS DE
FLECHA varias veces
hasta que aparezca
MANUAL; presione
INTRODUCIR.
Introduzca el peso
Introduzca el tiempo
Seleccione el nivel
Empiece la rutina
ALEATORIA
Presione TECLAS DE
FLECHA varias veces
hasta que aparezca
ALEATORIA; presione
INTRODUCIR.
Introduzca el peso
Introduzca el tiempo
Seleccione el nivel
Empiece la rutina
COLINA
Presione TECLAS DE
FLECHA varias veces
hasta que aparezca
COLINA; presione
INTRODUCIR.
Introduzca el peso
Introduzca el tiempo
Seleccione el nivel
Empiece la rutina
AERÓBICOS CROSSTRAIN
Presione TECLAS DE
FLECHA varias veces
hasta que aparezca
AERÓBICOS
CROSS-TRAIN;
presione
INTRODUCIR.
Introduzca el peso
Introduzca el tiempo
Seleccione el nivel
Empiece la rutina
CROSS-TRAIN INVERSO
Presione TECLAS DE
FLECHA varias veces
hasta que aparezca
CROSS-TRAIN
INVERSO; presione
INTRODUCIR.
Introduzca el peso
Introduzca el tiempo
Seleccione el nivel
Empiece la rutina
PASOS DE CONFIGURACIÓN DE RUTINA EN EL
CROSS-TRAINER LIFE FITNESS
Page 62

A
LEATORIA
El programa ALEATORIO crea un terreno de colinas y valles que varía con cada rutina. Es
posible crear más de un millón de modelos diferentes. Debido a que los niveles de la rutina son
más altos en esta rutina que en COLINA, se recomienda fijar la rutina ALEATORIA uno o dos
niveles por debajo del nivel de rutina que normalmente se seleccionaría en la rutina COLINA.
COLINA
La rutina patentada COLINA de Life Fitness ofrece una variedad de configuraciones para el
entrenamiento en intervalos. Los intervalos son períodos de ejercicio aeróbico intenso separados por
períodos regulares de ejercicio de menor intensidad. La ventana PERFIL DE LA RUTINA representa
estos intervalos de alta y baja intensidad como columnas de luces que en conjunto parecen colinas y
valles. Se ha demostrado científicamente que la rutina computarizada de entrenamiento en intervalos
produce una mayor mejora cardiorrespiratoria que el entrenamiento a paso constante.
Cada rutina COLINA pasa por cuatro fases, cada una de ellas marcada por niveles de diferente
intensidad. La ventana PERFIL DE LA RUTINA presenta la evolución de estas fases, tal como se ve
en el diagrama que sigue a estas descripciones, a continuación. Tal como se observa en las
descripciones, se debe medir el ritmo cardiaco en dos etapas de la rutina para calcular su
efectividad. Para ello, póngase la banda pectoral o asga los sensores. Observe que el CENTRO DE
MENSAJES no muestra una solicitud para medir el ritmo cardiaco durante una rutina COLINA.
1 Calentamiento es una fase de baja resistencia, que aumenta gradualmente, y sitúa al ritmo
cardiaco dentro del extremo inferior de la zona objetivo, aumentando la respiración y el flujo
sanguíneo a los músculos ejercitados.
2 Meseta aumenta ligeramente la intensidad, y la mantiene constante, para situar el ritmo cardiaco
en el extremo inferior de la zona objetivo. Verifique el ritmo cardiaco al final de esta fase.
3 Entrenamiento en intervalos es una serie de colinas cada vez más empinadas que alterna con
valles (o períodos de recuperación). El ritmo cardiaco debe subir hasta el extremo superior de la
zona objetivo. Verifique el ritmo cardiaco al final de esta fase.
4 Enfriamiento es una fase de baja intensidad que permite que el cuerpo empiece a eliminar el
ácido láctico y otros subproductos de los ejercicios, que se acumulan en los músculos y
contribuyen al dolor.
15
Page 63

Cada columna, tal como se ve en la ventana PERFIL DE LA RUTINA y en el diagrama anterior,
representa un intervalo. La duración total de la rutina determina la longitud de cada intervalo. Cada
rutina está compuesta de 20 intervalos, o sea que la duración de cada intervalo es igual a la
duración de la rutina completa dividida entre 20.
10 a 19 minutos: Las duraciones de los intervalos se fijan inicialmente en 30 segundos para las
rutinas de 10 minutos. Por cada minuto que el usuario añade “al vuelo”, cada intervalo aumenta tres
segundos. Una rutina de 15 minutos consta de 20 intervalos de 45 segundos cada uno.
20 a 99 minutos: Todos los intervalos duran 60 segundos. Si el usuario añade minutos a la
duración predefinida mientras se desarrolla la rutina, el programa añade colinas y valles
idénticos a los ocho primeros intervalos de la fase de Entrenamiento en intervalos. Esta
secuencia se repite hasta que se completa la rutina.
AERÓBICOS CROSS-TRAIN
Durante esta rutina, el CENTRO DE MENSAJES muestra avisos para enfatizar diferentes
grupos de músculos. Para enfatizar los músculos de la parte superior del cuerpo, el CENTRO
DE MENSAJES muestra avisos para concentrarse en empujar y tirar de los brazos móviles en
varias ocasiones. Para enfatizar los músculos de la parte inferior del cuerpo, el CENTRO DE
MENSAJES muestra avisos para descansar las manos sobre el manillar estacionario, obligando
así a que las piernas hagan todo el trabajo. El programa también alterna entre los movimientos
de avance y retroceso así como en diferentes velocidades.
Diez segundos después de avisar al usuario que cambie la dirección de pedaleo, la rutina
aplica una “resistencia de frenado”, que es un alto nivel de resistencia que esencialmente obliga
al usuario a dejar de pedalear. Cuando el usuario deja de pedalear, la rutina reanuda el nivel de
resistencia normal. El nivel efectivo de resistencia de frenado depende de la velocidad del
usuario. Si el usuario pedalea a una velocidad igual o mayor que 10,0 km/h, la rutina aplica el
nivel máximo de resistencia de frenado. Si el usuario pedalea a una velocidad menor de 10,0
km/h, la rutina aplica el 92 por ciento del máximo.
AERÓBICOS CROSS-TRAIN es una rutina de resistencia constante. Sin embargo, para una
experiencia similar con una rutina de nivel de resistencia variable, el usuario puede empezar
en cualquier rutina y después presionar la tecla MODO AERÓBICOS.
CROSS
-TRAIN INVERSO
Durante esta rutina, el CENTRO DE MENSAJES muestra avisos alternos para pedalear hacia
adelante (durante cinco minutos) y después hacia atrás (por dos minutos). Esta característica
varía el énfasis en diferentes músculos de la pierna.
Diez segundos después de avisar al usuario que cambie la dirección de pedaleo, la rutina
aplica una “resistencia de frenado”, que es un alto nivel de resistencia que esencialmente obliga
al usuario a dejar de pedalear. Cuando el usuario deja de pedalear, la rutina reanuda el nivel de
resistencia normal. El nivel efectivo de resistencia de frenado depende de la velocidad del
usuario. Si el usuario pedalea a una velocidad igual o mayor que 10,0 km/h, la rutina aplica el
nivel máximo de resistencia de frenado. Si el usuario pedalea a una velocidad menor de 10,0
km/h, la rutina aplica el 92 por ciento del máximo.
CROSS-TRAIN INVERSO es una rutina de resistencia constante. Sin embargo, para una
experiencia similar con una rutina de nivel de resistencia variable, el usuario puede empezar en
cualquier rutina y después presionar la tecla MODO INVERSO.
16
Page 64

5P
ARÁMETROS OPCIONALES
5.1 INTRODUCCIÓN Y USO DE LA FUNCIÓN PARÁMETROS OPCIONALES
Los administradores de gimnasios y otro personal autorizado pueden usar la función
Parámetros opcionales para cambiar la configuración predeterminada, o para activar o
desactivar ciertas rutinas o pantallas en la consola del Entrenador para todo el cuerpo.
Para introducir los Parámetros opcionales, mientras la unidad está encendida, mantenga
oprimida la tecla FLECHAARRIBA y presione BORRAR dos veces. El CENTRO DE
MENSAJES muestra los PARÁMETROS OPCIONALES, y después, la primera opción de
configuración. Avance por las opciones usando la tecla INTRODUCIR, o retroceda, usando la
tecla BORRAR. Por cada función u opción de configuración, el CENTRO DE MENSAJES
muestra la configuración predeterminada. Para cambiar el valor predeterminado, presione la
tecla FLECHAARRIBA o ABAJO hasta ver el valor deseado. Presione INTRODUCIR para
seleccionar el nuevo valor o configuración.
Para salir de Parámetros opcionales, presione varias veces la tecla BORRAR hasta que el
CENTRO DE MENSAJES muestre “SELECCIONE RUTINA USANDO TECLAS DE FLECHA O
PRESIONE INICIO RÁPIDO”.
17
Parámetro Valor Descripción
predeterminado
DURACIÓN MÁX 60 minutos Ésta es la duración máxima posible de una rutina.
DE RUTINA El valor puede variar de 10 a 99.
UNIDADES INGLESAS/ INGLESAS Esta opción determina las unidades usadas para
MÉTRICAS: introducir el peso y medir la distancia.
PANTALLA DE VATIOS DESACTIVADA Si esta opción está activada, el CENTRO DE
ACTIV AR/DESACTIVAR MENSAJES muestra la frecuencia de pedaleo
equivalente en vatios.
PANTALLA DE METS DESACTIVADA Si esta opción está activada, el CENTRO DE
ACTIVAR/DESACTIVAR MENSAJES muestra el equivalente en METs de la
frecuencia de pedaleo.
PANTALLA CAL/HR DESACTIVADA Si esta opción está activada, el CENTRO DE
ACTIVAR/ MENSAJES muestra el número de calorías quemadas
DESACTIVAR por hora durante la rutina.
SELECCIÓN DEL IDIOMA DESACTIVADA Cuando esta opción está activada el usuario puede
DEL USUARIO seleccionar un idioma para uso durante la rutina.
Véase Selección del idioma del usuario, en esta
sección.
PARÁMETROS OPCIONALES
Page 65

S
ELECCIÓN DEL IDIOMA DEL USUARIO
Si está activada, esta opción permite que el usuario seleccione el idioma para comunicarse con
la unidad durante una rutina.
Para usar la opción, active Selección del idioma del usuario (ver a continuación).
Comience a pedalear. La consola mostrará el mensaje “SELECCIONE IDIOMAUSANDO
TECLAS DE FLECHA”. El usuario puede seleccionar de una lista de idiomas disponibles
mediante las teclas de flecha. Presione introducir cuando aparezca el idioma deseado para
seleccionarlo. En este momento se puede iniciar una rutina usando el idioma seleccionado. No
es necesario seleccionar un idioma para comenzar una rutina. Simplemente presione la tecla
Inicio rápido para iniciar una rutina o cualquiera de las teclas de programa para comenzar a
programar la rutina usando el idioma predeterminado.
El usuario puede seleccionar entre los siguientes idiomas:
Inglés, alemán, francés, italiano, holandés, español, portugués y turco.
El idioma japonés está disponible si la unidad está equipada con la consola CCD.
Para activar la opción Selección del idioma del usuario, acceda a Parámetros opcionales
(véase la sección 5.1). Avance por las opciones usando la tecla INTRODUCIR, o retroceda,
usando la tecla BORRAR hasta que aparezca SEL IDIOMA. Cuando aparezca SEL IDIOMA en
el Centro de mensajes, presione cualquiera de las teclas de FLECHA
ASCENDENTE/DESCENDENTE para activar o desactivar el modo.
18
Page 66

6D
ATOS TÉCNICOS Y DE SERVICIO
6.1 SUGERENCIAS DE MANTENIMIENTO PREVENTIVO
El Entrenador para todo el cuerpo está respaldado por la excelencia en ingeniería de
Life Fitness y es uno de los equipos para ejercicios más resistentes y libres de problemas
del mercado actual. Los productos comerciales Life Fitness han demostrado ser duraderos en
gimnasios, universidades e instalaciones militares en todo el mundo. Esta misma tecnología,
experiencia en ingeniería y fiabilidad se encuentran en el Entrenador para todo el cuerpo.
NOTA: La seguridad del equipo se puede mantener sólo si se examina regularmente para ver
si hay daños o desgaste. No ponga el equipo en servicio hasta que se repare o reemplacen las
piezas defectuosas. Preste especial atención a las piezas sometidas a desgaste, tal como se
describe en el Programa de mantenimiento preventivo.
Los siguientes consejos de mantenimiento preventivo mantendrán su Entrenador para todo el
cuerpo funcionando a rendimiento máximo:
• Coloque el Entrenador para todo el cuerpo en un lugar fresco y seco.
• Limpie la superficie superior de los pedales con regularidad.
• Mantenga la consola de información libre de huellas digitales y de la acumulación de sal
causada por el sudor.
• Use un paño de puro algodón humedecido con agua y detergente líquido suave para limpiar
el Cross-trainer. Otras telas, incluyendo las toallas de papel, podrían rayar la superficie.
No utilice amoníaco, cloro ni limpiadores a base de ácido.
• Las uñas largas podrían dañar o rayar la superficie de la consola; utilice la yema de los
dedos para presionar los botones de selección en la consola.
• Limpie completamente la cubierta y los brazos móviles con regularidad.
NOTA: Se recomienda usar un limpiador no abrasivo y un paño de algodón suave para
limpiar el exterior de la unidad. En ningún momento se debe aplicar el limpiador
directamente a ninguna parte del equipo; vierta limpiador no abrasivo en un paño
suave y luego limpie la unidad.
19
Page 67

6.2 P
ROGRAMA DE MANTENIMIENTO PREVENTIVO
Siga este programa para asegurar el funcionamiento correcto del sistema.
ELEMENTO SEMANAL MENSUAL SEMESTRAL ANUAL
Consola de información Limpiar Inspeccionar
Tornillos de montaje Inspeccionar
de la consola
Bandeja para accesorios Limpiar Inspeccionar
Armazón Limpiar Inspeccionar
Cubiertas de plástico Limpiar Inspeccionar
6.3 DIAGNÓSTICO Y REPARACIÓN DE LA BANDA PECTORAL
DEL RITMO CARDIACO
POLAR
®
20
Desperfecto
La lectura del ritmo cardiaco es errática
o no existe en absoluto
Las lecturas del ritmo cardiaco son
anormalmente elevadas
Causa probable
Los electrodos del transmisor de la banda
pectoral no están lo suficientemente
húmedos como para captar lecturas
exactas del ritmo cardiaco.
Los electrodos del transmisor de la banda
pectoral no se apoyan bien en la piel.
Hace falta limpiar el transmisor de la
banda pectoral.
El transmisor de la banda pectoral se
encuentra a más de un metro del receptor
del ritmo cardiaco.
Se ha desgastado la pila de la banda
pectoral.
Interferencia electromagnética de los
aparatos de televisión y/o las antenas.
Interferencia electromagnética
de los teléfonos móviles.
Interferencia electromagnética
de los ordenadores.
Interferencia electromagnética
de los autos.
Interferencia electromagnética de las
líneas eléctricas de alta tensión.
Interferencia electromagnética
de los equipos de ejercicios accionados
por motor.
Interferencia electromagnética de otro
transmisor del ritmo cardiaco a menos de
un metro.
Acción correctiva
Humedezca los electrodos del
transmisor de la banda pectoral
(véase la sección 3.2).
Compruebe que los electrodos del
transmisor de la banda pectoral se
apoyen bien contra la piel (véase la
sección 3.2).
Lave el transmisor de la banda pectoral
con jabón suave y agua.
Compruebe que el transmisor de la
banda pectoral se encuentre a una
distancia no mayor de un metro del
receptor del ritmo cardiaco.
Contacte al Servicio de Asistencia al
Cliente de Life Fitness* para recibir
instrucciones sobre cómo reemplazar la
banda pectoral.
Aleje el Cross-Trainer unos cuantos
centímetros de la causa probable, o
aleje la causa probable unos cuantos
centímetros del Cross-Trainer, hasta que
las lecturas del ritmo cardiaco sean
precisas.
Page 68

6.4 C
ÓMO OBTENER SERVICIO DE PRODUCTO
1. Verifique el síntoma y revise las instrucciones de funcionamiento. El problema puede ser la falta
de familiaridad con el producto, sus funciones y rutinas.
2. Busque la placa con el número de serie, que se encuentra en el extremo posterior de la unidad.
Anote el número de serie, que consta de tres letras seguidas de seis dígitos.
3. Contacte al Servicio de Asistencia al Cliente conectándose en la web a: www.lifefitness.com, o
llame al grupo más cercano de Servicio de Asistencia al Cliente de Life Fitness:
21
Para obtener Servicio de producto
dentro de los Estados Unidos y Canadá:
Teléfono: (+1) 847.451.0036
FAX: (+1) 847.288.3702
Teléfono gratuito: 800.351.3737
Para Servicio de producto en otros países:
Life Fitness Europe GmbH (Alemania)
Teléfono: (+49) 089.317.751.66
FAX: (+49) 089.317.751.38
Life Fitness (UK) LTD
Teléfono: (+44) 1353.665.507
FAX: (+44) 1353.666.719
Life Fitness Atlantic BV (Europa, Oriente
Medio y África, excepto las oficinas locales
de Life Fitness)
Life Fitness Benelux
Teléfono: (+31) 180.646.666
FAX: (+31) 180.646.699
Life Fitness Italia S.R.L.
Teléfono: 800.438.836
FAX: (+39) 0457.238.197
Life Fitness Vertriebs GmbH
Teléfono: (+43) 1615.7198
FAX: (+43) 1615.7198.20
Life Fitness Asia Pacific Ltd (Asia y
Australia, excepto las oficinas locales
de Life Fitness)
Teléfono: (+852) 2891.6677
FAX: (+852) 2575.6001
Life Fitness América Latina
y El Caribe
Teléfono: (+1) 847.288.3964
FAX: (+1) 847.288.3886
Life Fitness Brazil
Teléfono: (+55) 11.4193.8282
FAX: (+55) 11.4193.8283
Life Fitness Japan
Teléfono: (+81) 3.3359.4309
FAX: (+81) 3.3359.4307
Life Fitness Iberia (España)
Teléfono: (+34) 93.672.4660
FAX: (+34) 93.672.4670
Page 69

7E
SPECIFICACIONES
7.1 ESPECIFICACIONES DEL CROSS-TRAINER LIFE FITNESS 91X
Uso previsto: Exigente/Comercial
Peso máximo del usuario: 160 kilos
Requisitos del suministro
eléctrico: Ninguno.
Consola:
Tipo: CENTRO DE MENSAJES con teclas de FLECHA
Pantallas: Tiempo transcurrido, velocidad, nivel, calorías, ritmo cardiaco, distancia,
calorías quemadas por hora (cuando está activada), METS (cuando está
activada) y vatios (cuando está activada)
Resúmenes: Tiempo total transcurrido de la rutina, calorías totales quemadas, distancia
total
Tamaño de caracteres: 1,4 centímetros
Rutinas y metas: Inicio rápido, Manual, Aleatoria, Colina, Aeróbicos con entrenamiento
combinado, Entrenamiento combinado Inverso
Modos: Modos Aeróbicos e Inverso durante todas las rutinas
Monitor del ritmo cardiaco: Sistema de control del ritmo cardiaco con telemetría Polar
Sensores del sistema Lifepulse
Banda pectoral del ritmo cardiaco Polar: opcional
Niveles de resistencia: 25
Intervalo de velocidad
de pedaleo: 3.5 - 20.4 RPM
Tipo de transmisión: Correa/alternador
Bandeja para accesorios: Estándar
Repisa de lectura integrada:Estándar
Color:
Plateado con detalles en gris
MEDIDAS FÍSICAS:
Longitud: 211 centímetros
Anchura: 71 centímetros
Altura: 155 centímetros
Peso: 106,5 kilos
MEDIDAS PARA ENVÍO:
Longitud: 206,5 centímetros
Anchura: 75 centímetros
Altura: 119,3 centímetros
Peso: 113,4 kilos
22
Page 70

Life Fitness World Headquarters
5100 North River Road
Schiller Park, IL 60176
M051-00K61-A093
 Loading...