

Page 1
Liesegang dv 610
Bediener-Handbuch
User Manual - Mode d'emploi - Istruzioni per l’uso
Guía del operador - Manual do Usuário
Page 2

User Manual for TFT 6.4“ Data Video Projector 1
Preface 2
1. Scope of Delivery 2
2. Quick Setting Up
2.1 Setting Up t he Proj ector 3
2.2 Projector Term inal Connect ions 3
2.3 Control Pane l Keypad 4
2.4 Mouse Con nection 4
2.5 Image Si ze 4
3. Starting Up t he Proj ector
3.1 First Steps 5
3.2 Standby Mode 5
3.3 Projector Switch Off 6
3.4 Projector Power Down 6
3.5 Using Sys tem Menus 6
3.6 Menu Adj ustments/ Settings 7
4. Remot e Control
4.1 How to Oper ate the R emote C ontrol 10
4.2 Remote Co ntrol Bu tton Funct ions 10
4.3 Replacin g the Bat teries 12
5. Lamp Information
5.1 Metal Halide Projection Lamp 12
5.2 Lamp Life Indicator 12
5.3 Replacing the Lamp 13
6. Maintenance
6.1 Replacing the Air Filter 15
6.2 Cleaning the Projector 16
7. Troubleshooting List 16
Appendix
1. Technical Specif ication 18
2. Projector-to- Screen Dist ance 19
3. Detailed Setup Information
3.1 Setting Repres entation , Resolu tion, Colo urs 19
4. Tips for Data Pr ojectio n 22
5. Service Ho tline 22
Page 3

2 User Manual for TFT 6.4“ Data Video Projector
Preface
The manual describes the Liesegang 6.4“ TFT Data Video Projector. Please read
through this operator manual carefully before starting your projector.
Your projector is easy to use and enables com puter data to be projected in natural
colours at conferences, s eminars or an ywhere where pictur es, graphics and texts are
to be made accessible to a wider audience. This manual aim s to provide the reader
with an introduction to connecting and operating the projector to achieve maximum
success for your present ati on .
The projector can be controlled from either the built- in k eyboar d or the infr ared rem ote
control. All settings are menu-guided and the help texts are available in many
languages. The current parameters are shown on the display.
Functions used frequently, such as brightness or volume controls for video
projections, can be executed directly from the remote control without calling up the
menu system.
Due to its comprehensive r ange of autom atic func tions, the proj ector reli eves the user
of much of the work of adaptation to the computer, s creen card and m ode of display,
most tasks being reduced to a simple key press. For this ver y reason we recomm end
you familiarize yourself with all of the controls of the projector and read throu gh the
section entitled Tips for Data Projection in particular before making your first
presentation.
Faulty settings or i ncorrect connec tion of the proj ectors can lead to impairm ent of the
functions of the disp lay and the connected equipm ent. Only use the original adapter
and connection sets suitable for your computer and monitor.
Should you have any questions or doubts please contact your dealer who will gladly
pass on your request to the manufacturer if necessary.
1. Scope of delivery
The standard equipment includes:
1 TFT-LCD projector with 800x600 pixels resolution
1 dust cover
1 connection cable for VGA/ SVGA analogue, 15 - 15 pin, M/M
1 mouse cable, 9 pin - 9 pin, F/F
1 PS/2 mouse adapter
1 infrared remote control with 2 batteries
1 mains cable,
1 user manual
1 video connection set consisting of:
1 video cable, RCA M/M 75 Ω
1 audio cable, double, RCA mini plug
1 S-VHS cable
1 SCART-RCA adapter
Important note
The projector features its own electronic multi-range power supply with automatic
switching. It must only be operated with 100 V - 130 V or 200
frequency of 50 Hz to 60 Hz. The unit must only be co nnected to a
network with protective conductor. Please check immediately whether the supplied
mains cable is compatible wit h the mains sockets on- site. Pl eas e co ntac t your supplier
if a different power supply cable is required for use abroad.
- 240 V AC with a
properly installed
Page 4
User Manual for TFT 6.4“ Data Video Projector 3
2. Quick Setting Up
2.1 Setting Up the Projector
These instruction are intended to get you going fast. If you have any problems, refer to
Appendix 3.
To avoid damage to the equipment, all power to projector and input
sources must be turned off during cable hook up.
1. Place the projector on a rigid, non-slip surface.
2. Lift cover lock levers and raise top cover into open position.
3. Connect the power cord (Section 2.2).
4. Connect the audio and video input cables to the projector input terminals
(Section 2.2).
5. For mouse emulation, connec t the mouse cable (Section 2.4) . PS/2 applications
and Apple Macintosh computers require an additional adapter or connecting
cable.
6. Power up the projector then the computer and the video sources (Section 3.1).
7. Move the projector nearer or further away from the screen to obtain
the best image size (Appendix 2).
2.2 Projector Terminal Connec tions
Take a moment to look over the input term inals on the bac k of the projector. Term inal
connectors for the computer source are: RGB, Mouse, Audio 1/Audio 2. Terminal
connectors for the video sources are: Video, S-Video, Audio 1/Audio 2.
1. On/Off power switch
2. Power cord terminal
3. RGB computer terminal
4. Mouse terminal
5. Audio 1 – 3.5 mm stereo mini jack
6. Video jack
7. S-VHS jack
8. Audio 2 – 3.5 mm stereo mini jack
Page 5
4 User Manual for TFT 6.4“ Data Video Projector
2.3 Control Panel Keypad
The control panel keypad is located on the back of the projector. It has the
following buttons:
1. Green indicator lamp
2. Red indicator lamp
3. Standby button
4. Menu button
5. Select/Enter button
6. Arrow Keys (up/down, left/right)
2.4 Mouse Connection
The projector has a built-in mouse emulation capability. Use the mouse cable to
connect your computer to the projector. Then c ontrol your com puter mouse func tions
via the remote control.
1. Switch off computer and projector.
2. Remove mouse cable connection from your computer mouse port.
3. Connect the mouse por t of the projector to the mouse port of the computer. For
Microsoft serial mouse application use the mouse cable supplied with this
projector. (For PS/2 applicat ions or Apple Macintosh comput ers an adapter or a
connecting cable is required).
4. First, start up the projector, then start up the computer.
Note: Mouse emulation only works, when all cable connect ions are established and
then the proper start up sequence is followed. See section 3.1.
2.5 Image Size
Adjust the size of the proj ected im age on th e screen b y moving t he proj ector closer to
the screen for a smaller image or further away from the screen for a larger image size.
Details in Appendix 2.
Page 6
User Manual for TFT 6.4“ Data Video Projector 5
3. Starting Up the Projector
3.1 First steps
After all cable connections have been completed, the projector can
be switched on. For best results, please observe the following start up sequence:
1. Press the power switch (1) to ON to apply power to the projector
(I = ON, O = OFF). The red LED (3) will illuminate.
2. Pr ess the Standby button (2). The green LED (3) will illum inate and an im age will
appear and grow brighter on the screen.
3. Check all lateral ventilation slots and clear away any obstructions.
4. Turn the lens (4) to focus the image.
5. Press the foot lock button (5) to release the height adjustment feet.
6. Raise/lower projector body to extend or retract feet (6) to obtain best image
height. Rotate feet (7) for fine adjustment.
7. Power up your computer source and video source(s).
Note: In most cases, the projector will automatically adjust to the graphic mode of
your computer by selecting a pre–programmed setting. See Appendix 3.
3.2 Standby Mode
When the projector is not being used, place it into standby mode.
1. Press the Standby button.
2. The lamp will switch off and the red LED will illuminate the lamp and project an
image on the screen.
Note: In standby mode, the f an motor will continue to run for a few minutes until the
projector cools down.
3. Press the standb y button again to i lluminate the lam p and proj ect an im age on the
screen.
Page 7
6 User Manual for TFT 6.4“ Data Video Projector
3.3 Projector Switch Off
Press the standby button to place the projec tor in the standby m ode. The cooling fan
motor will continue to run.
1. Wait until the cooling f an motor cycles off then press th e main
power switch to OFF.
2. Turn off the power to your input devices.
Note: Switching the power off before the fan has cycled off, will decrease the life of
the projection lamp.
3. To transport the projector, disconnect t he po wer c or d, c omputer cable, mouse c able
and audio/video cables and place into carrying case.
3.4 Projector Power Down
1. Press the Standby button to plac e the projector in the s tandby mode. The c ooling
fan motor will continue to run.
2. Wait until the cooling fan motor cycles off then press the main power switch to Off.
Note: Switching the power off bef ore the fan has cycled off, will decrease the life of
the projection lamp.
3. Turn off the power to your input devices.
4. To transport the projector, disconnect t he po wer c or d, c omputer cable, mouse c able
and audio/video cables and place into carrying case.
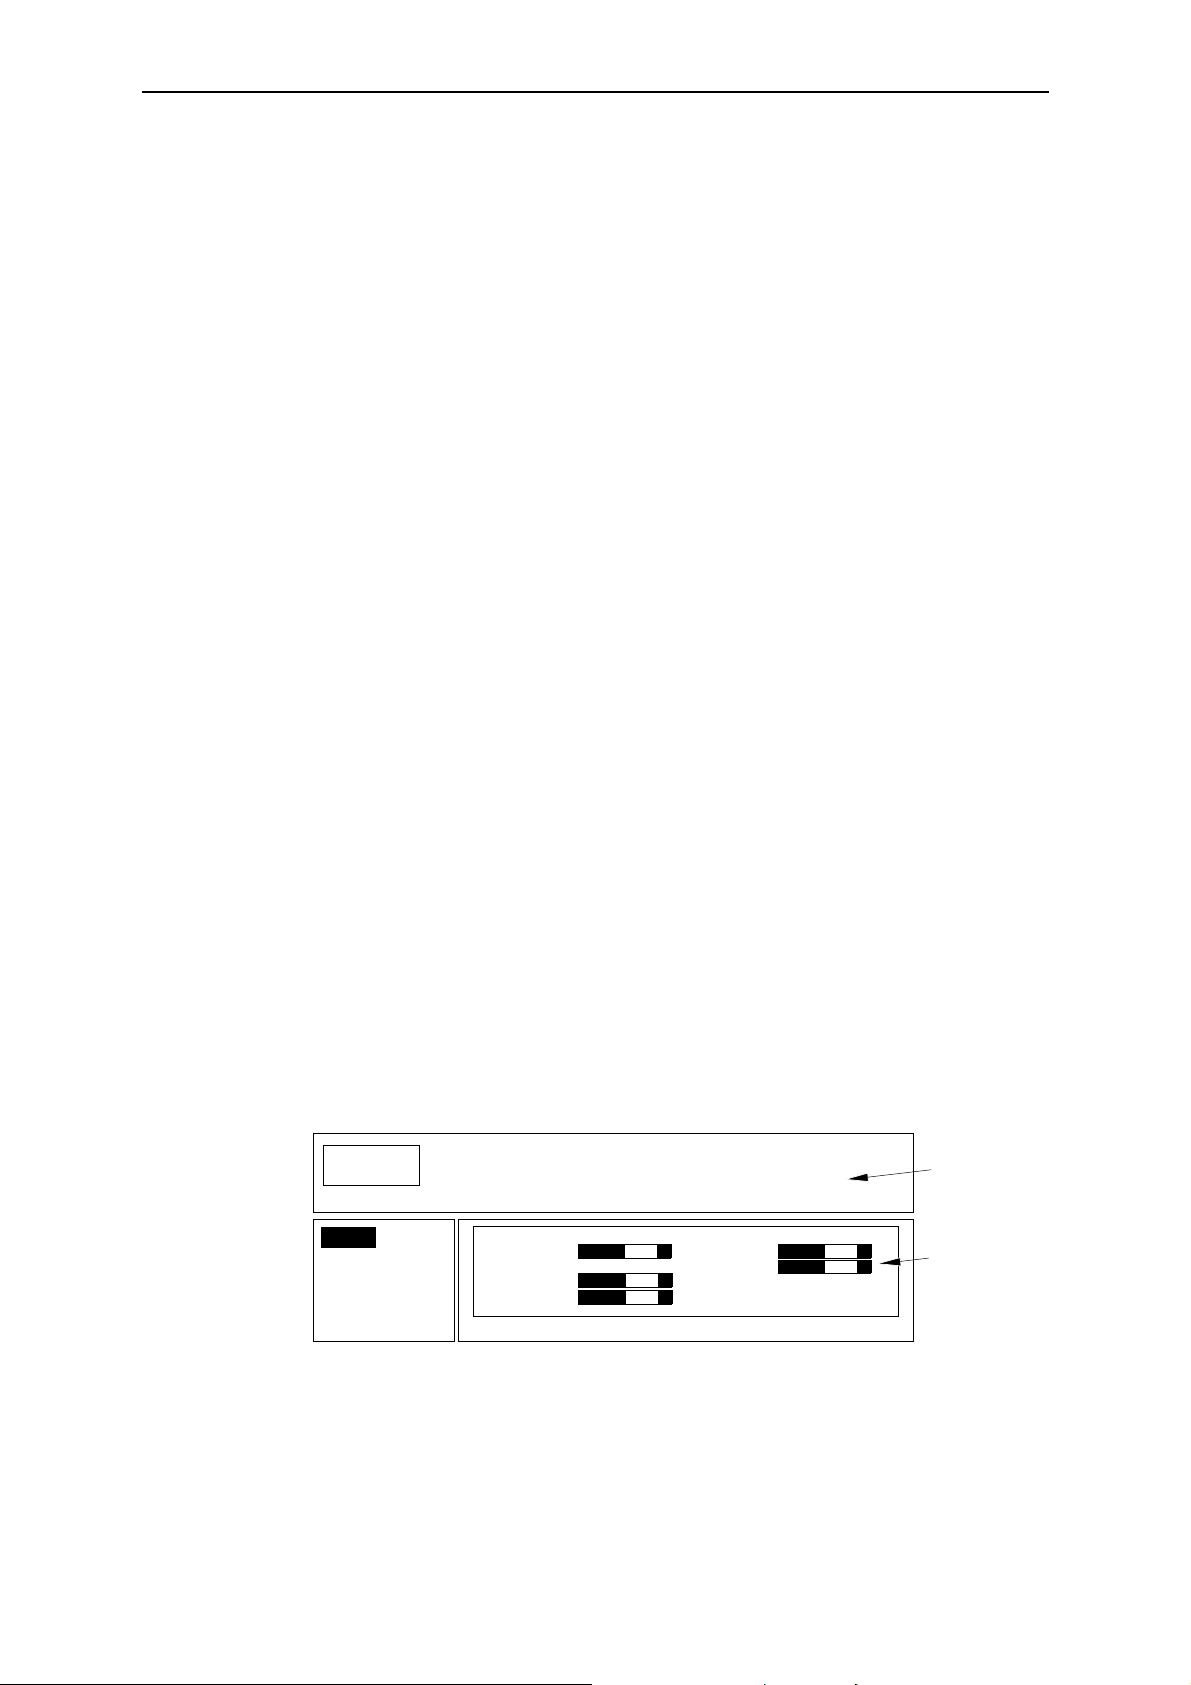
3.5 Using System Menus
You can use the control panel buttons or the remote control to access menus, exit
menus and set menu options. At the top of each menu is a help window which
displays messages that pertain to the menu item that is highlighted.
Press the up/down or left/right ARROW KEYS on the control panel or move the
DISKPAD CONTROL on the remote to navigate through the submenus and select
menu items.
Enter
!"
Menu clear menu
Setup
Option
Audio
Data
for setup sub
VESA 800 x 600 60 Hz
Sync Brightness
Tracking 1056 Contrast
H. off. Inverse off
V. off. Pix. 800 x 600
-+
-+
-+
-+
-+
Help
Window
Setup
Submenu
1. Press the MENU button to display the main menu.
2. Press the up/down ARROW KEYS or m ove the DISKPAD up/down to choose a
sub-menu.
3. Press the SELECT/ENTER button to select the sub–menu.
Page 8
User Manual for TFT 6.4“ Data Video Projector 7
4. Press the up/down ARROW KEYS or move diskpad to select a menu item in the
sub-menu.
5. Press the left/right ARROW KEYS or move the diskpad left/right to change the
value of a menu item.
6. Press the SELECT /ENTER button, if required, to c onfirm the change to the menu
item.
Note: When the background of the displayed item turns red, you must press the
SELECT/ENTER button to confirm the change.
7. Press the MENU button to exit the sub-menu and return to the main menu.
8. In some cases, a message will displa y in the he lp window asking you to conf ir m the
changes made in the sub-menu. Press SELECT/ENTER to confirm.
9. Press the MENU button to exit the main menu disp lay and return to the projec ted
image.
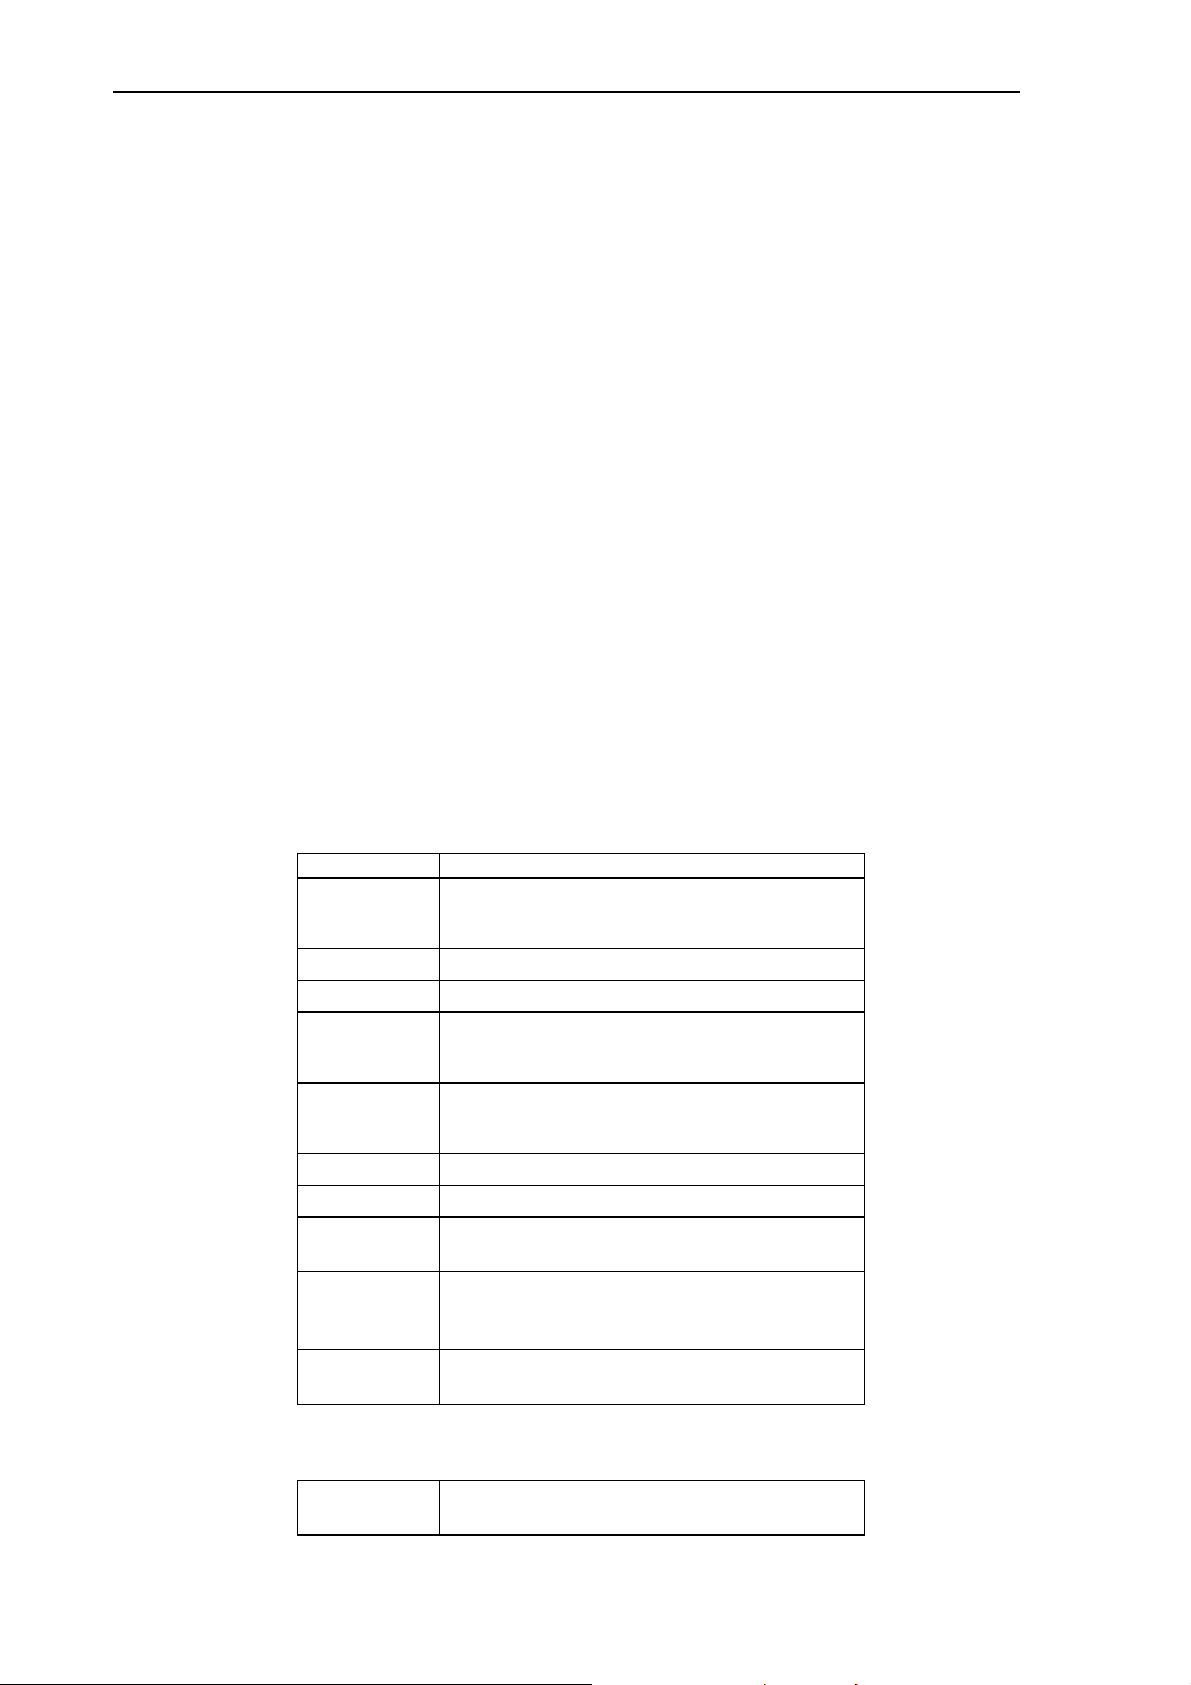
3.6 Menu Adjustments/Settings
Depending on the current video source se lection, the m enu items for either the Video
Menu or the Data Menu will displa y. The tab le belo w lists a ll the m enu item s that can
be adjusted.
An asterisk (*) indicates the it em appears on the Data menu onl y, two asterisks (**)
indicate the item appears on the Video/ S-V HS m enu onl y and no m arking ( ) indic ates
the item is common to both menus.
Submenu Setup*/Image**
Menu Item Explanation of Adjustment/Setting
<Mode>* Selection of graphic mode (e.g. VGA 640 x
480, VESA 800 x 600 72 Hz, etc.). Five
user modes. See appendix 3.
Brightness Image brightness.
Contrast Image contrast.
V. off*
(vertical
offset)
H. off*
(horizontal
offset)
Adjusts the vertical position of the image.
Adjusts the horizontal position of the image.
Colour** Colour saturation.
Inverse* B/W inverse of image.
Sync*
Manual synchronization (phase) or
automatic adjustment using Select/Enter.
Tracking*
Manual screen width (total pixel
number/line) or automatic adjustment using
Select/Enter.
Pixel* Image format: For unscaled image use the
standard resolution.
Submenu Option
Projection Change image direction for back projection
application. (Default=normal)
Page 9

8 User Manual for TFT 6.4“ Data Video Projector
Lamp Mode Change lamp power: standard (=std.) or
eco. (= low) ( Default = eco.)
Remote
Contr.
Auto Mode* Turn automatic mode detection On/Off.
Deinterlacing**
Language Select menu display language.
Help Turn menu help text messages On/Off.
Std.**
SoG*
<Sync
Mode>*
Hue** Colour level for NTSC video.
NTSC** Default setting of NTSC image (full screen
St.byTimer*
Turn remote control feature On/Off.
(Default=On)
(Default=On)
On = Standard video input (VCR).
Off = Motion video input (camera).
(Default = On)
Select video mode (Default = Auto)
Sync-On-Green level. Only for Sync-On-
Green mode.
Change synchronization mode (separate,
composite, SoG).
or centered)
Select standby delay: from 15m, 30m, 45m
and 60m. If the timer is switched off, the
projector switches to the standby mode
immediately when the Standby button is
pressed (lamp off). The Standby mode is
delayed in all other settings. The lamp
remains lit for this time period, the display is
darkened and the projection area is turned
black.
Submenu Function
Freeze
Reset* Restores video modes to factory default
Lamp Lamp life indicator. Green bar - lamp is
Submenu Sound
Volume Volume level.
Treble Treble setting.
Bass Bass setting.
Balance Left/right balance of speakers.
Sound
Stereo
<Audio
assignment>
Freeze an image (D efa ult = off).
settings.
good. Red bar - lamp needs replacement
Speakers On/Off. (Default = On)
Stereo sound On/Off. (Default = On)
Select audio-in channels (Audio-1/Audio-2)
according to data/video selection.
Audio-In 1: Data S-VHS S-VHS
Page 10

User Manual for TFT 6.4“ Data Video Projector 9
Audio-In 2: Video Data Video
Submenu <Video Mode>
Arrow keys
left/right or
diskpad
Select video source: Data, Video or S-VHS
Page 11

10 User Manual for TFT 6.4“ Data Video Projector
4. Remote Control
4.1 How to Operate the Remote Control
The remote control keypad controls basic projector functions. To use the remote
control, aim the remote toward the projection screen and press the desired button.
The remote signal will bounce off of the projection screen and b ack to the sensor on
the front of the projector.
4.2 Remote Control Bu tton Functions
Page 12

User Manual for TFT 6.4“ Data Video Projector 11
Button
FREEZE
MAGNIFY
POINTER
OPTIMIZE
BRIGHT
VIDEO
Description
Press to switch the projector between Standby mode and
operation mode.
Stores (freezes) the projected image. Press FREEZE again to
return the projection of the current image.
Press MAGNIFY to double the image size in horizontal and
vertical direction. The details of the middle of the picture can
be seen. Move the diskpad to displace the magnified area
within the image. Press the MAGNIFY key again to switch
back to normal presentation.
Places a pointing device on the screen. Move pointer by
operating the diskpad.
Optimizes the level setting so that light areas of the image are
projected with optimal intensity.
Brightness adjustment.
Switches to video mode. When in video mode the video
source can be selected (Video or S-Video) by pressing the
key repeatedly.
Mute.
PC
VOL
MENU
MOUSE
VT
DRAG
SELECT
WINDOW
TEXT
CH+
Switches to PC mode.
Volume adjustment.
Start the On Screen Menu System for projector adjustment.
Activates the mouse emulation. The mouse pointer can be
moved using Diskpad. Pressing the button again switches off
the mouse emulation.
Right mouse button, if mouse function is active.
The left mouse button is held down. Under MicrosoftWindows, for example, objects can be selected and moved.
Pressing the drag button again releases the mouse button.
Opens a sub-menu or toggles when the menu system is
active.
Left mouse button, if mouse function is active
No function.
No function.
No function.
TV/AUX
1..2..3..
No function.
No function.
Page 13

12 User Manual for TFT 6.4“ Data Video Projector
PAUSE
DISKPAD
4.3 Replacing the Batteries
1. The remote control uses two AAA batteries. The battery cover is located on the
back of the remote control .
2. Press the locking tab (1) to release the battery compartment door.
3. Lift up on the door (2) to remove it and set it to the side.
4. Remove old batteries.
5. Install new batteries (3) with the correct polarity (+/-).
6. Replace battery compartment door.
Clears screen image (switches to a blank image).
Mouse emulation ON, diskpad controls the movement of the
mouse. Emulation OFF, diskpad centers image on screen.
Pointer ON, controls movement of pointer
3
+
–
–
+
+
+
–
–
5. Lamp Information
5.1 Metal Halide Projection Lamp
The metal halide lam p of the projector has a lim ited life time. If the projected im age
appears dark or a red lamp life indicator bar displays during projector startup, you
must change the lamp.
5.2 Lamp Life Indicator
2
1
8610-06A
The elapsed operat ing time of the lamp can be chec ked in the Function menu. As
long as the bar of the m enu item Lamp is green, the lamp is good. When the bar
changes to red, the lamp has to be changed.
After changing the projection lamp, the lamp life indicator must be reset to zero.
Page 14

User Manual for TFT 6.4“ Data Video Projector 13
To reset the lamp life indicator:
1. Select the menu item Lamp in the Function menu and press SELECT/ENTER.
2. Follow the instructions in the help window
3. Press SELECT/ENTER and the
confirmation.
5.3 Replacing the Lamp
Caution: Always unplug the projector when changing the lamp. There are high
voltage parts inside the cabinet that may cause electric shock.
Caution: Allow the projector to c ool down. Lamp and adjacent m etal parts become
extremely hot and can cause burns to your fingers.
1. Press the Standb y button
wait for the fan motor to cycle off.
2. Turn off the power switch and unplug the projector power cord.
3. Stand the projector upright on the left side with the bottom facing you.
4. Locate the lamp access door (1) on the bottom of the projector.
5. Remove the two screws (2).
6. Push down on the lock tab (3) to release the door.
7. Slide the door open (4) and remove it.
arrow of the projector control panel for
on the projector control p anel or remote contr ol and
4
3
2
1
8610-13A
8. Press the tab (5) to release the lamp assembly
9. Carefully lower the lamp assembly (6) to access the metal halide lamp.
10. The lamp is double ended with sockets on both sides. Carefully pull upward
on both ends of the lamp (7) to remove it.
Page 15

14 User Manual for TFT 6.4“ Data Video Projector
11. Install the new lamp by pushing down on the ends of the lamp (8) with equal
pressure. Take care to correctly align the lamp with the bubble (8a) facing upward.
Important Note: Do not touch lamp glass with fingers. Hold lamp by the metal ends
only.
12. Fold the lamp housing (6) into the closed position until the lock tab (5) secures it.
13. Insert the lamp access door (1) and slide it closed to engage the lock tab (3).
14. Insert the two screws (2).
14. Replace the air filter (included in the lamp kit). See Section 6.1.
Important Note: Always change the air f ilter when the lam p is replaced. When you
order a metal halide lamp, it comes in a kit which includes an air filter.
Page 16

User Manual for TFT 6.4“ Data Video Projector 15
6. Maintenance
6.1 Replacing the Air Filter
It is recommended to c lean the dust filter after ever y 150 hrs of operation. F or best
performance, replace the air filter each time the projection lamp is changed.
1. Unplug the power cord of the projector.
2. Stand the projector upright on the left side with the bottom facing you.
3. Locate the air filter door (1) on the bottom of the projector.
4. Push the lock tab (2) to release the door.
2
1
3
8610-14A
5. The air filter door has a plas tic hook (4) on o ne end. Use th is hook to reac h inside
the projector and hook the corresponding tab on the air filter frame.
6. Remove the air filter (5) by pulling straight outward.
7. Insert the new air filter by sliding it into position.
8. Insert the air filter door and press the lock tab to secure it in place.
6.2 Cleaning the Projector
For best performance, keep your projector free of excess dust and surface dirt.
Page 17

16 User Manual for TFT 6.4“ Data Video Projector
Use a soft cloth to remove dust from the projector housing. Use a soft cleaner to
remove surface dirt and smudges from the projection lens.
Caution: Always unplug the projector when cleaning. Take care that no liquids get
inside the projector. There are high voltag e parts inside the cabin et that may cause
electric shock.
7.
Troubleshooting Lis t
The projector has been designed to be as simple and as trouble-free to use
as possible. If you run into problems when using the projector, consult the
following list.
General measures:
- Check if all cables are correctly connected.
- Check if power cable is safely and properly connected.
- Perform a system reset:
1. Switch OFF the projector completely using the Power switch.
2. Hold down Select/Enter and arrow down key (Approx. 1 min) while
switching ON the unit back.
3. The message „Parameter factory settings restored“ is displayed in
opening screen.
Problem Probable Cause Possible Solution
Projector
cannot be
switched on.
Image is
disturbed or
unstable.
No computer
image
projected.
Message No
sync detected
is shown.
No video
image
projected.
Mouse does
not work.
Lamp house
cover is unlocked
Wrong Sync
setting.
Wrong Tracking
value.
Loose cable.
No power to
computer.
Wrong
synchronization
mode.
Loose cable.
No signal from
video source.
Loose cable.
Wrong
connection.
Insert lamp house cover carefully and lock it.
Set to factory default setting.
Change Sync setting in the Setup menu for
optimum performance.
For vertical interference stripes, change the
Tracking in the Setup menu for optimum
performance.
Check and secure cable connections.
Turn on computer.
Adjust synchronization mode of the projector to
the synchronization mode of the computer via
Option menu.
Check and secure cable connections.
Check video picture on TV.
Check and secure cable connections.
For PS/2 and ADB (Apple) mouse a special
adapter is necessary. Only use adapters from the
original manufacturer.
Image offcenter.
Wrong power up
sequence.
Image position. Center image with the arrow keys of the control
The mouse emulation operates correctly only if
the correct power up sequence has been used.
panel or the diskpad of the remote control.
Page 18

User Manual for TFT 6.4“ Data Video Projector 17
Cannot get
entire image
on the screen.
Washed out
image.
Humming
noise. Slowly
passing
horizontal
bars.
No power
Power shuts
off during
presentation
Wrong Tracking
value.
Compatibility
problem.
Wrong Pixel
setting.
Wrong Contrast
setting.
Wrong
Brightness
setting.
Signal sources
are connected to
different power
sources.
VCR connected
to aerial system
and to projector.
Bad signal.
Power switch off
Projector
overheated
If vertical interference stripes occur, change the
Tracking value in the Setup menu for optimum
performance.
Refer to the documentation of your graphic card.
The projector supports the resolutions that can
be found under Pixel in the Setup menu .
Adjust the Pixel setting in the Setup menu to the
resolution of the video mode output from the
computer graphic card.
Change Contrast setting in the Setup menu. The
bar should be in the middle position.
Lower Brightness setting in the Setup menu. An
automatic adjustment can be performed by
choosing Brightness and pressing Select/Enter.
Locate the source of disturbance. Disconnect the
sources one after another from the projector.
Connect all sources to a common power source.
Remove antenna connection from VCR. If the
disturbance disappears, use a by-pass filter
(isolating transformer) to connect the antenna to
the VCR.
Try different input source.
Turn on power switch to projector.
Remove any objects blocking ventilation and
allow projector to cool down. Power will return
and projector will be in Standb y mode.
Page 19

18 User Manual for TFT 6.4“ Data Video Projector
Appendix
1. Technical Specification
Power supply: 100-130 V /200-240 V ~ , 50-60 Hz
Connections: RGB-Data input : 15 pin HD
Serial interface/m ous e: 9 pin. Sub
(separate user manual available)
Video: Coax (Cinch)
SVHS: S-Video
Audio In (Stereo): 2x mini plug
Only use the factory supplied cable!
Operating temperature: 35°C max. ambient temperature
Storage temperature: 20°C to +60°C
Dimensions and weight: ready to project:
approx. 280 mm width x 178 mm height x 440 mm
depth,approx. 5.9 kg
Infrared remote control: Power supply with 2 batteries
Type IEC LR03 (Size AAA)
Characteristics of the projector:
#
TFT LCD with large scope of contrast of typically 1:200.
#
Resolution 800 x 600 pixels.
#
400 W metal halide lamp with an typical working life of 1,500 hours
#
Approx. 500 Im lumino us flux.
#
Max. pixel dat a rate 80 MHz.
#
The following screen standards can be represented. Screen modes with
smaller/higher resolution than the LC display are scaled to the size of the
display. The scalings are list ed in br ackets:
VGA text 720x400 pixel (800x600)
VGA graphics 640x350 pixel (800x600)
VGA graphics 640x400 pixel (800x600)
VGA graphics 640x480 pixel (800x600)
SVGA graphics 800x600 pixel (800x600)
XGA 1024x768 pixel (800x600)
Macintosh 640x480 pixel (800x600)
Apple Macintosh necessitates a separate connection set.
#
Parameters can b e freely a djusted by the user , for connec ting the pr ojector t o
computers whic h devia te from the pre-pr ogramm ed standar ds.
#
Automatic sett ing of tr acking and s ynchronizati on.
#
Automatic ad aptation of bright ness and c ontrast wi th OPT IMIZE.
#
Current settings are saved and also remain saved after switching off the
projector.
#
Menu-guided parameter settin g with h elp text i n severa l langua ges.
Page 20

User Manual for TFT 6.4“ Data Video Projector 19
#
Freeze funct ion for m omentar ily sa ving the displaye d im age.
#
Digital multi-standard video decoder. Connection for two video sources (one
with S-VHS inpu t). Supported video standar ds:
PAL 625 lines, 50 Hz,
SECAM 625 lines, 50 Hz
NTSC 525 lines, 60 Hz
#
Two integrate d 10 W stereo spe akers.
#
Infrared remote control can be switched off via the options menu when
interferenc e occurs due to ot her inf rared de vices.
#
Interface for Kensington lock. These locks are a safeguard against theft.
They are ava ilable f rom spec ialised dealers .
2. Projector-to-Screen Distance
The following table shows the im age size relative to the dis tance of th e projector fr om
the screen. This distance is measured from the front of the projector lens to the
screen.
DISTANCE TO SCREEN
(cm)
125 cm 126 cm 100 cm 76 cm
150 cm 150 cm 119 cm 90 cm
175 cm 175 cm 139 cm 105 cm
200 cm 205 cm 164 cm 123 cm
225 cm 229 cm 183 cm 137 cm
250 cm 263 cm 210 cm 158 cm
275 cm 290 cm 232 cm 174 cm
300 cm 321 cm 257 cm 193 cm
325 cm 340 cm 272 cm 204 cm
350 cm 375 cm 300 cm 225 cm
375 cm 400 cm 320 cm 240 cm
IMAGE SIZE
(cm)
Diagonal Width Height
3. Detailed Setup Information
3.1 Setting Representation, Resolution, Colours
Most computers do not just support one single screen mode but rather a series of
different modes wh ich differ in type of represe ntation (text or full graphic), resolution
(number of pixels) and number of colours.
Pre-stored standard mode settings for a variety of IBM compatible and Apple
Macintosh computers help th e projector to recog nize the current m ode and adjust for
optimum performance automatically.
Apart from this you can enter and save additional modes with any parameters by
means of the menu system . An upper limit is given by the max imum admissible pixe l
rate (Appendix 1.).
Page 21

20 User Manual for TFT 6.4“ Data Video Projector
Adjust the projector to optimum display quality, as described below, by using the menu
control (see sectio n 3.5). All steps described c an be carried out via the keyboard or
the remote control:
1. Adjust the background as necessary to obtain a display with the highest possible
contrast. For use under Microsoft Windows it is recommended that you close all
applications first, a nd by using the system control, adjust the desk top background to
an even black-and-white raster.
2. Call up the main menu of the projector by pressing the MENU key.
3. Select the Setup menu.
4. Open the Setup menu by press ing the SELECT/ENTER k ey. The current mode is
displayed in the title block of the Setup menu. Change the mode field if desired.
Confirm your selection by press ing the SELECT/ENTER key
5. If desired, selec t an image format with a con ver te d c od in g of pixel and line numbers
to adapt to the current screen mode. Therefore move to the menu item Pixel and
select the image resolution. Use 800x600 for unscaled representation.
6. Select the menu item Brightness and correct the setting so t hat white areas are
projected with optimum intensity. Press the SELECT/ENTER key for automatic
adjustment.
7. Look at a finely structured area with grid lines. This area may have vertical
interference lines superimposed on it.
Select the menu item Tracking (image width) and adjust for minimum interference.
The direction of adjustment is correct when the number of lines decreases. The setting
is optimal when no more interference lines can be seen. An automatic setting of
tracking and synchron ization can b e called up by oper ating the SELECT/ENTER key.
This may not work, if a uniform pattern is displayed on the projector.
8. Synchronize the phase position of the pixel frequency and scanning frequency.
Choose the menu item Sync. Contour flick er can be observed with som e settings as
shown in the following figure:
9. In a range of sever al settings an im age is pr ojected that is free of contour flick er. If
the sync-setting is correct, the image will improve as shown in following figure:
Page 22

User Manual for TFT 6.4“ Data Video Projector 21
10. An automatic setting of the synchronization can be called up by using the
SELECT/ENTER key.
11. Minor interference, where one colour meets another, can be corrected by manually
adjusting the Brightness and Contrast. Normally, the contrast should be set to
approximately the medium value. Lower values cause an increase in background
intensity.
12. To leave the Setup menu, press the MENU key.
13. If parameter settings have been changed, a warning is displayed. Confirm the
changed settings by using the SELECT/ENTER key.
14. Center the projected image, if necess ary, with the cursor keys or the disk pad of
the remote control.
4. Tips for Data Projection
With the projector it is now possible to pres ent graphics , computer im ages, CAD data
and other image contents, which use colour to make up the image, to a large audience
Page 23

22 User Manual for TFT 6.4“ Data Video Projector
without problems and with little effort. It is easy to forget that the impression of the
image which an individua l gets near to the video m onitor is different to that which an
observer gets some meters away from the projection screen.
To conclude with here are some tips on how to give a successful computer data
presentation:
#
Adjust the projector for your computer and save the settings for all screen modes.
#
Try out your presentat ion beforehand in peace and quiet. Look at the projection from
where the audience are seated.
#
Pay attention to good legibility by selecting suitable font sizes and colours.
#
Try the effect of the Inverse representation. Ch ange the setting of brightness both
manually and with t he OPTIMIZE button. Familiarize yourself with the co ntrols in order
to achieve the best possible effect for your presentation.
#
Pay attention to optimal room lighting: sunlight or light from lamps should not fall
directly on the projec tion screen. The room should be lit so that it is comfortable but
not too bright.
#
Use a projection screen with a high degree of reflection.
5. Service Hotline
In case of technical problems please feel free to call Liesegang at +49 211 39 01 444.
For information about Liesegang products and if you have problems with operation of
Liesegang products please do not hesitate to call Liesegang at +49 211 39 01 245.
Fax Hotline +49 211 39 01 226
Trademarks used in this manual: ADB, IBM, Apple, Macintosh, Kensington Lock and Microsoft are
registered trademarks of these manufacturers.
All details are correct at time of going to press, 8/27/98. We reserve the right to make technical changes due
to further development, any delivery changes and accept no liability for errors contai ned. The published data
is only intended for purposes of product description and are not to be understood as assured and legally
binding characteristics.
Page 24

User Manual for TFT 6.4“ Data Video Projector 23
CE
This equipment complies with the re qu ir ements of the EU guide lines 8 9/33 6/ EWG for
electromagnetic compatibility and therefore bears the CE sign. The equipment
satisfies the following standards:
EN 55022 Interference voltage and perturbing radiation
EN 50082-1 Immunity to interference
EN 61000-4-2 Electrostatic discharge
EN 61000-4-3 HF irradiation
EN 61000-4-4 Burst test
Warning!
This is a class A apparatus . T his appar atus can caus e r adio int erf erence in r eside ntial
quarters; in such circumstanc es the user m ay be asked to tak e appropriate s teps and
be responsible for these.
Note
The European standards EN 55022 and EN 50082 diff erentiate bet ween equipm ent of
class B (for use in living areas) and equipment of class A. Residential quarters are
defined as those areas where a rad io or tele vision rec eiver is opera ted withi n a radius
of 10 m. Equipment of class A m ay produce a h igher level of interference voltage but
must itself also be less sensitive to interference caused by other devices than
equipment of class B. This eq uipment fulfills the requir ements of class A. If radio or
television receivers are us ed in the immediate vicinity of this eq uipment then usually
interference is not to be expected as long as these receivers are connected to a
properly installed aeria l s ystem.
 Loading...