

Page 1
AC Power
For Business-Critical Continuity™
Liebert® GXT3-10000T220
User Manual, 10kVA, 50/60 Hz, 120/208/220V
™
Page 2

Page 3

TABLE OF CONTENTS
IMPORTANT SAFETY INSTRUCTIONS . . . . . . . . . . . . . . . . . . . . . . . . . . . . . . . . . . . . . . . . . . . . . . . . 1
1.0 INTRODUCTION AND SYSTEM DESCRIPTION . . . . . . . . . . . . . . . . . . . . . . . . . . . . . . . . . . . . .4
1.1 Device Overview . . . . . . . . . . . . . . . . . . . . . . . . . . . . . . . . . . . . . . . . . . . . . . . . . . . . . . . . . . . . . 5
2.0 UNPACKING THE UPS AND SITE PREPARATION . . . . . . . . . . . . . . . . . . . . . . . . . . . . . . . . . .6
2.1 Inspection . . . . . . . . . . . . . . . . . . . . . . . . . . . . . . . . . . . . . . . . . . . . . . . . . . . . . . . . . . . . . . . . . . 6
2.2 Required Setup Equipment . . . . . . . . . . . . . . . . . . . . . . . . . . . . . . . . . . . . . . . . . . . . . . . . . . . . 6
2.3 Unpacking. . . . . . . . . . . . . . . . . . . . . . . . . . . . . . . . . . . . . . . . . . . . . . . . . . . . . . . . . . . . . . . . . . 6
2.4 Environmental Conditions. . . . . . . . . . . . . . . . . . . . . . . . . . . . . . . . . . . . . . . . . . . . . . . . . . . . . 7
2.5 Access to Area . . . . . . . . . . . . . . . . . . . . . . . . . . . . . . . . . . . . . . . . . . . . . . . . . . . . . . . . . . . . . . . 7
2.6 Floor Loading . . . . . . . . . . . . . . . . . . . . . . . . . . . . . . . . . . . . . . . . . . . . . . . . . . . . . . . . . . . . . . . 7
2.7 Inventory List . . . . . . . . . . . . . . . . . . . . . . . . . . . . . . . . . . . . . . . . . . . . . . . . . . . . . . . . . . . . . . . 7
3.0 INSTALLATION . . . . . . . . . . . . . . . . . . . . . . . . . . . . . . . . . . . . . . . . . . . . . . . . . . . . . . . . . .8
3.1 Electrical preparations. . . . . . . . . . . . . . . . . . . . . . . . . . . . . . . . . . . . . . . . . . . . . . . . . . . . . . . . 8
3.2 Suggested Cable Sizes . . . . . . . . . . . . . . . . . . . . . . . . . . . . . . . . . . . . . . . . . . . . . . . . . . . . . . . . 8
3.3 External Protection and Isolating Devices . . . . . . . . . . . . . . . . . . . . . . . . . . . . . . . . . . . . . . . . 8
3.4 External Electrical Connections . . . . . . . . . . . . . . . . . . . . . . . . . . . . . . . . . . . . . . . . . . . . . . . . 9
3.5 Connecting Utility and Load . . . . . . . . . . . . . . . . . . . . . . . . . . . . . . . . . . . . . . . . . . . . . . . . . . . 9
3.6 Terminal Blocks for UPS . . . . . . . . . . . . . . . . . . . . . . . . . . . . . . . . . . . . . . . . . . . . . . . . . . . . . . 9
3.6.1 Input and Output Connection Requirements . . . . . . . . . . . . . . . . . . . . . . . . . . . . . . . . . . . . . . 10
3.7 Connecting Power Cables. . . . . . . . . . . . . . . . . . . . . . . . . . . . . . . . . . . . . . . . . . . . . . . . . . . . . 11
3.8 External Battery Cabinets. . . . . . . . . . . . . . . . . . . . . . . . . . . . . . . . . . . . . . . . . . . . . . . . . . . . 11
4.0 OPERATION . . . . . . . . . . . . . . . . . . . . . . . . . . . . . . . . . . . . . . . . . . . . . . . . . . . . . . . . . . .12
4.1 Block Diagram . . . . . . . . . . . . . . . . . . . . . . . . . . . . . . . . . . . . . . . . . . . . . . . . . . . . . . . . . . . . . 12
4.2 Control Panel . . . . . . . . . . . . . . . . . . . . . . . . . . . . . . . . . . . . . . . . . . . . . . . . . . . . . . . . . . . . . . 13
4.2.1 Controls and Messages. . . . . . . . . . . . . . . . . . . . . . . . . . . . . . . . . . . . . . . . . . . . . . . . . . . . . . . . 13
4.2.2 Battery Setup Parameters . . . . . . . . . . . . . . . . . . . . . . . . . . . . . . . . . . . . . . . . . . . . . . . . . . . . . 16
4.2.3 Warning Indicators. . . . . . . . . . . . . . . . . . . . . . . . . . . . . . . . . . . . . . . . . . . . . . . . . . . . . . . . . . . 16
4.2.4 Fault Indicators . . . . . . . . . . . . . . . . . . . . . . . . . . . . . . . . . . . . . . . . . . . . . . . . . . . . . . . . . . . . . 17
4.3 Initial UPS Startup Procedure . . . . . . . . . . . . . . . . . . . . . . . . . . . . . . . . . . . . . . . . . . . . . . . . 18
4.4 UPS Shutdown Procedure . . . . . . . . . . . . . . . . . . . . . . . . . . . . . . . . . . . . . . . . . . . . . . . . . . . . 18
4.5 Maintenance Bypass Procedure. . . . . . . . . . . . . . . . . . . . . . . . . . . . . . . . . . . . . . . . . . . . . . . . 18
4.6 Return from Maintenance Bypass. . . . . . . . . . . . . . . . . . . . . . . . . . . . . . . . . . . . . . . . . . . . . . 19
4.7 Maintenance Breaker, Off Position . . . . . . . . . . . . . . . . . . . . . . . . . . . . . . . . . . . . . . . . . . . . . 19
4.8 Self-Tests. . . . . . . . . . . . . . . . . . . . . . . . . . . . . . . . . . . . . . . . . . . . . . . . . . . . . . . . . . . . . . . . . . 19
4.8.1 Lamp Test . . . . . . . . . . . . . . . . . . . . . . . . . . . . . . . . . . . . . . . . . . . . . . . . . . . . . . . . . . . . . . . . . . 19
4.8.2 Battery Test . . . . . . . . . . . . . . . . . . . . . . . . . . . . . . . . . . . . . . . . . . . . . . . . . . . . . . . . . . . . . . . . 19
i
Page 4

5.0 MAINTENANCE . . . . . . . . . . . . . . . . . . . . . . . . . . . . . . . . . . . . . . . . . . . . . . . . . . . . . . . . .20
5.1 Test, Replacement and Disposal of Batteries . . . . . . . . . . . . . . . . . . . . . . . . . . . . . . . . . . . . . 20
5.2 Storage . . . . . . . . . . . . . . . . . . . . . . . . . . . . . . . . . . . . . . . . . . . . . . . . . . . . . . . . . . . . . . . . . . . 20
5.3 Cleaning . . . . . . . . . . . . . . . . . . . . . . . . . . . . . . . . . . . . . . . . . . . . . . . . . . . . . . . . . . . . . . . . . . 20
6.0 COMMUNICATION . . . . . . . . . . . . . . . . . . . . . . . . . . . . . . . . . . . . . . . . . . . . . . . . . . . . . . . 21
6.1 Communication Interface Port . . . . . . . . . . . . . . . . . . . . . . . . . . . . . . . . . . . . . . . . . . . . . . . . 21
6.2 Dry Contact. . . . . . . . . . . . . . . . . . . . . . . . . . . . . . . . . . . . . . . . . . . . . . . . . . . . . . . . . . . . . . . . 21
6.2.1 Any Mode Shutdown . . . . . . . . . . . . . . . . . . . . . . . . . . . . . . . . . . . . . . . . . . . . . . . . . . . . . . . . . 21
6.2.2 Battery Mode Shutdown . . . . . . . . . . . . . . . . . . . . . . . . . . . . . . . . . . . . . . . . . . . . . . . . . . . . . . 22
6.2.3 On Battery . . . . . . . . . . . . . . . . . . . . . . . . . . . . . . . . . . . . . . . . . . . . . . . . . . . . . . . . . . . . . . . . . 22
6.2.4 Low Battery . . . . . . . . . . . . . . . . . . . . . . . . . . . . . . . . . . . . . . . . . . . . . . . . . . . . . . . . . . . . . . . . 22
6.3 Liebert IntelliSlot® Communication Cards. . . . . . . . . . . . . . . . . . . . . . . . . . . . . . . . . . . . . . . 22
6.3.1 Liebert® MultiLink®. . . . . . . . . . . . . . . . . . . . . . . . . . . . . . . . . . . . . . . . . . . . . . . . . . . . . . . . . . 23
6.4 Remote Emergency Power Off . . . . . . . . . . . . . . . . . . . . . . . . . . . . . . . . . . . . . . . . . . . . . . . . . 23
7.0 TROUBLESHOOTING . . . . . . . . . . . . . . . . . . . . . . . . . . . . . . . . . . . . . . . . . . . . . . . . . . . . .24
8.0 SPECIFICATIONS. . . . . . . . . . . . . . . . . . . . . . . . . . . . . . . . . . . . . . . . . . . . . . . . . . . . . . . .25
9.0 PRODUCT WARRANTY REGISTRATION . . . . . . . . . . . . . . . . . . . . . . . . . . . . . . . . . . . . . . . .27
FIGURES
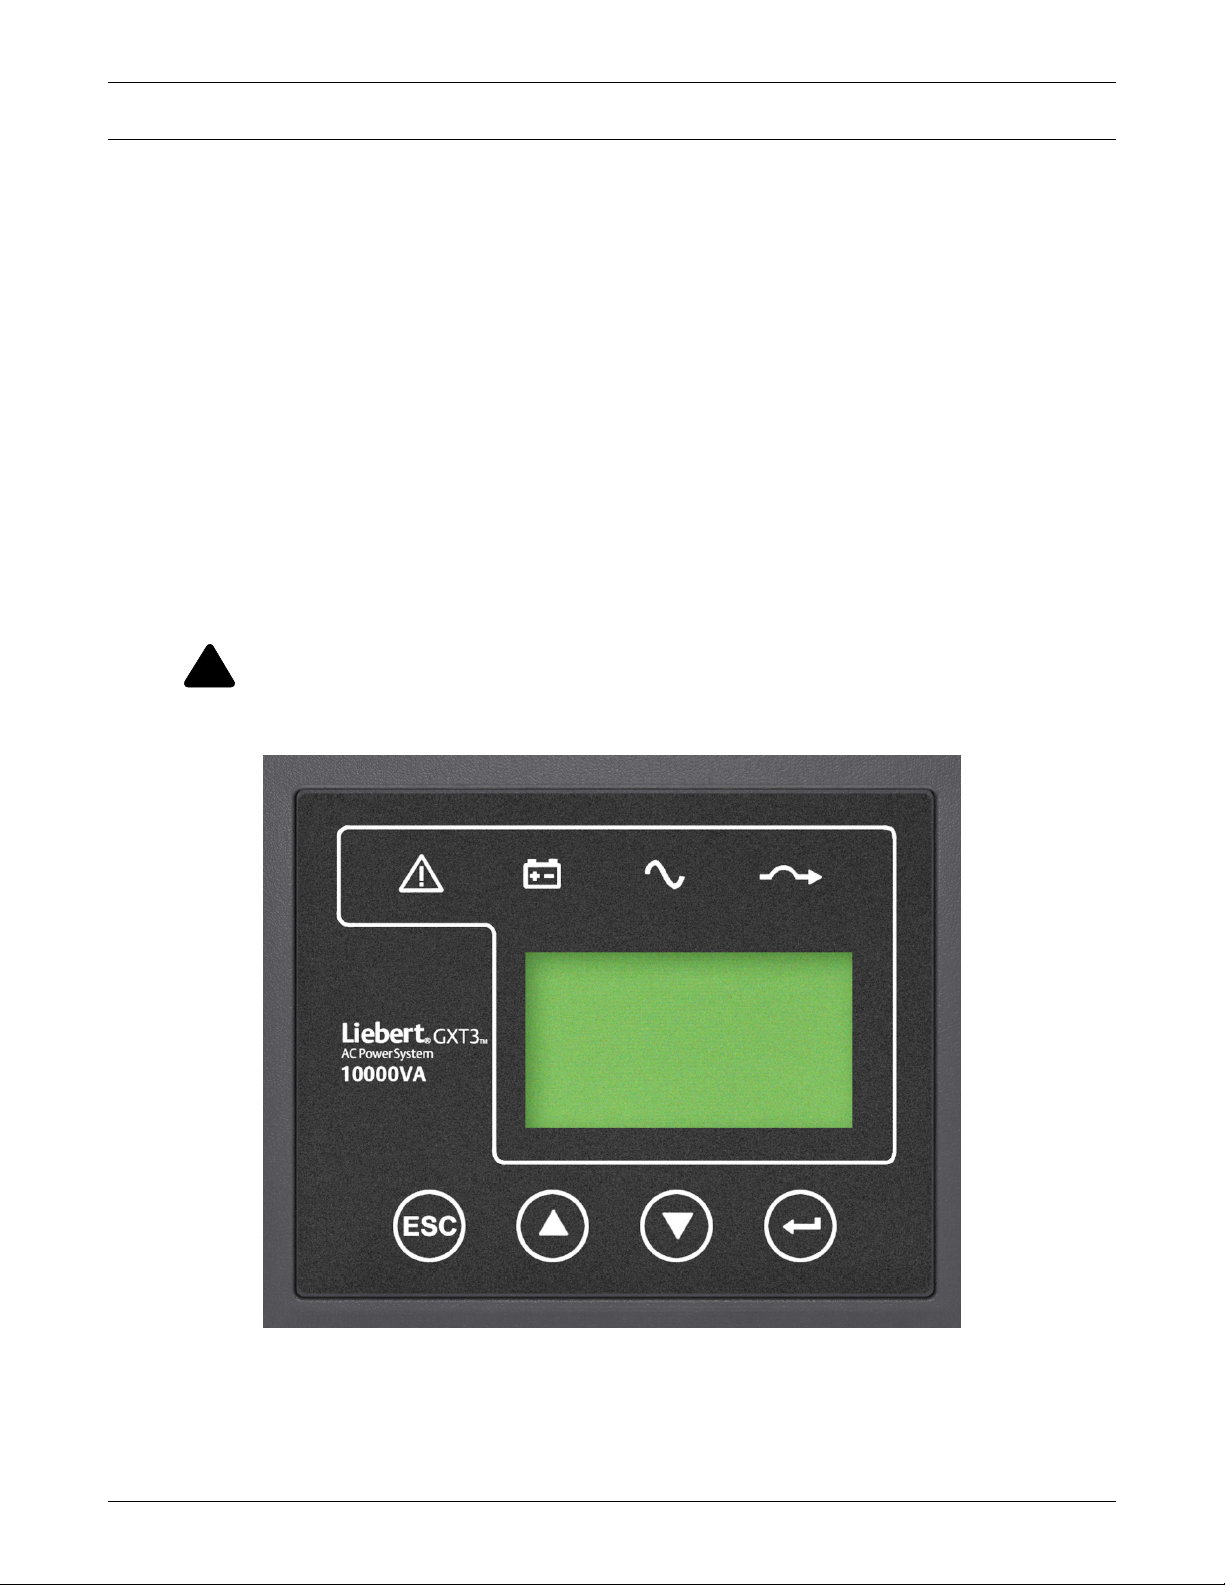
Figure 1 Liebert GXT3-10000T220 control panel . . . . . . . . . . . . . . . . . . . . . . . . . . . . . . . . . . . . . . . . . . . . . . 4
Figure 2 Liebert
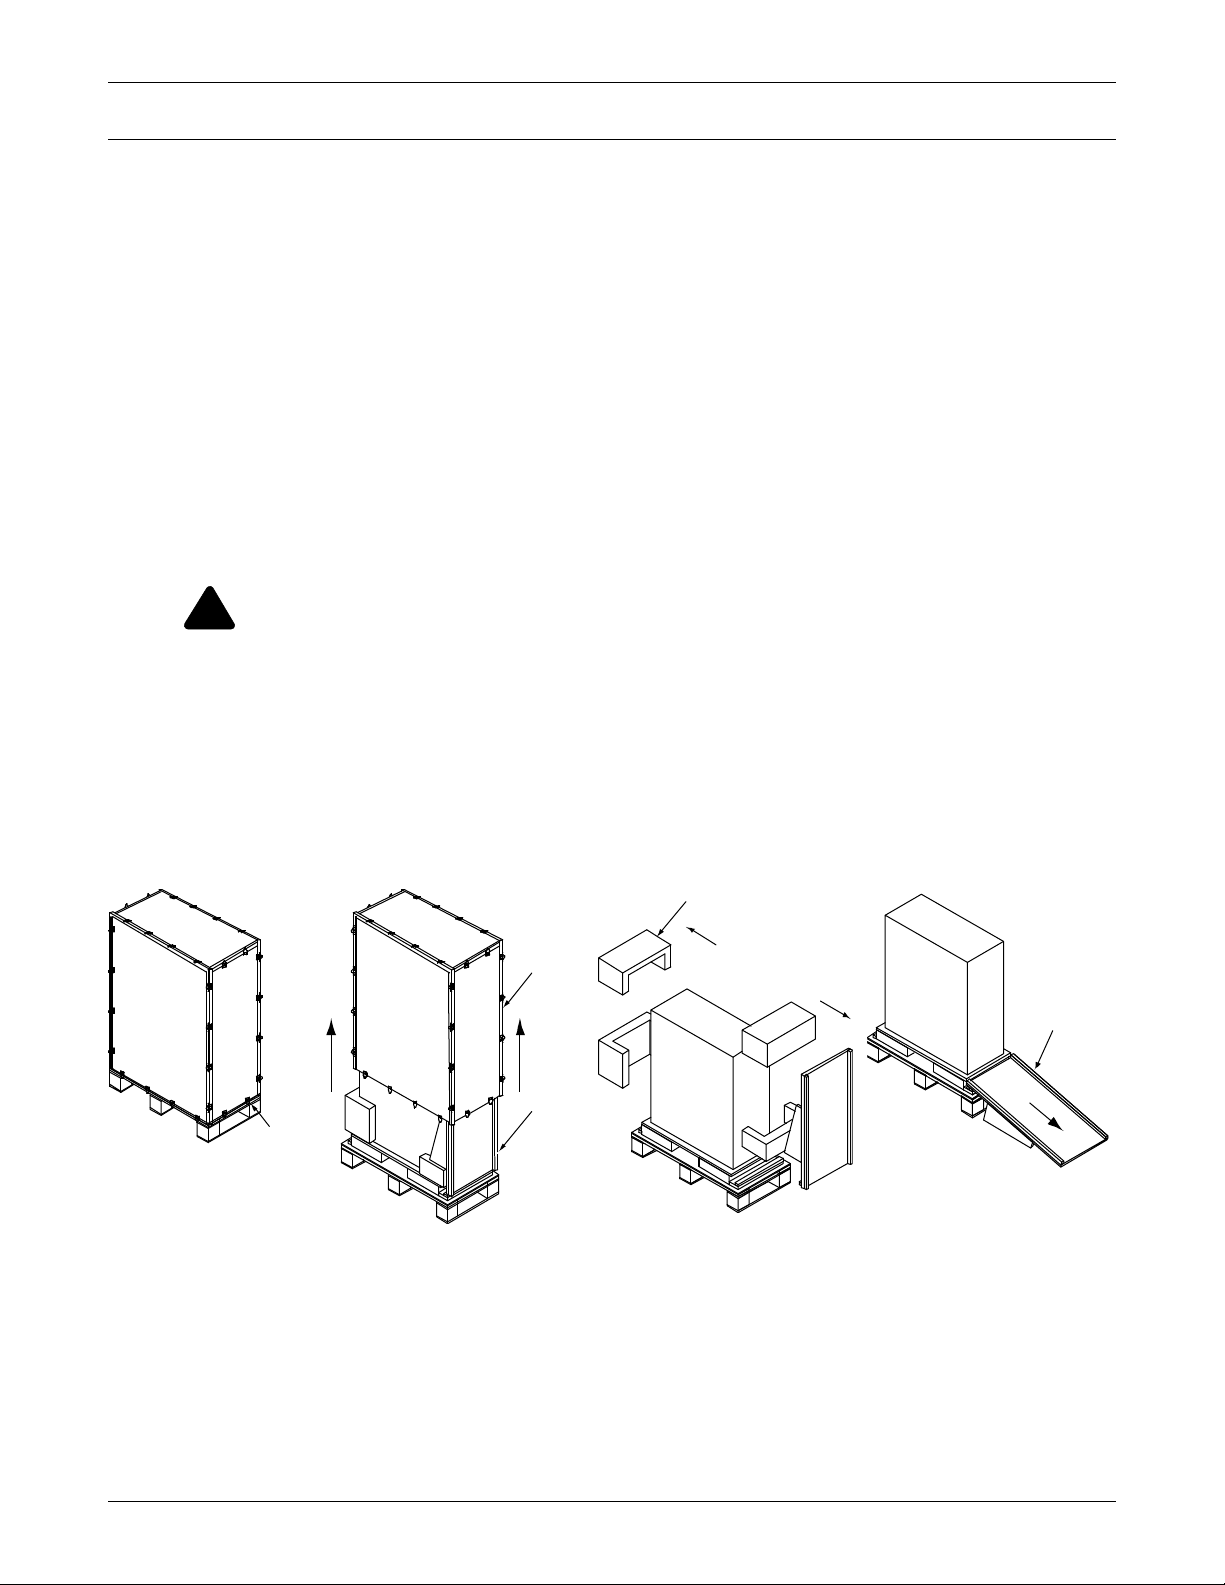
Figure 3 Unpacking . . . . . . . . . . . . . . . . . . . . . . . . . . . . . . . . . . . . . . . . . . . . . . . . . . . . . . . . . . . . . . . . . . . . . . 6
Figure 4 Side view . . . . . . . . . . . . . . . . . . . . . . . . . . . . . . . . . . . . . . . . . . . . . . . . . . . . . . . . . . . . . . . . . . . . . . . 9
Figure 5 Single source input supply—input and output connections . . . . . . . . . . . . . . . . . . . . . . . . . . . . . . . 9
Figure 6 Dual source input supply—input and output connections . . . . . . . . . . . . . . . . . . . . . . . . . . . . . . . 10
Figure 7 Hardwire terminals. . . . . . . . . . . . . . . . . . . . . . . . . . . . . . . . . . . . . . . . . . . . . . . . . . . . . . . . . . . . . . 10
Figure 8 Liebert GXT3-10000T220 with External Battery Cabinet . . . . . . . . . . . . . . . . . . . . . . . . . . . . . . . 11
Figure 9 System block diagram. . . . . . . . . . . . . . . . . . . . . . . . . . . . . . . . . . . . . . . . . . . . . . . . . . . . . . . . . . . . 12
Figure 10 Control Panel. . . . . . . . . . . . . . . . . . . . . . . . . . . . . . . . . . . . . . . . . . . . . . . . . . . . . . . . . . . . . . . . . . . 13
Figure 11 Menu tree . . . . . . . . . . . . . . . . . . . . . . . . . . . . . . . . . . . . . . . . . . . . . . . . . . . . . . . . . . . . . . . . . . . . . 14
Figure 12 Dry contact pin layout . . . . . . . . . . . . . . . . . . . . . . . . . . . . . . . . . . . . . . . . . . . . . . . . . . . . . . . . . . . 21
®
GXT3-10000T220™ front and rear views . . . . . . . . . . . . . . . . . . . . . . . . . . . . . . . . . . . . . . 5
TABLES
Table 1 Overview of UPS devices and batteries . . . . . . . . . . . . . . . . . . . . . . . . . . . . . . . . . . . . . . . . . . . . . . . 5
Table 2 Connection data * . . . . . . . . . . . . . . . . . . . . . . . . . . . . . . . . . . . . . . . . . . . . . . . . . . . . . . . . . . . . . . . . 8
Table 3 Displayed text—system block and main menu . . . . . . . . . . . . . . . . . . . . . . . . . . . . . . . . . . . . . . . . 15
Table 4 Battery setup parameters. . . . . . . . . . . . . . . . . . . . . . . . . . . . . . . . . . . . . . . . . . . . . . . . . . . . . . . . . 16
Table 5 Warning indicators . . . . . . . . . . . . . . . . . . . . . . . . . . . . . . . . . . . . . . . . . . . . . . . . . . . . . . . . . . . . . . 16
Table 6 Fault indicators . . . . . . . . . . . . . . . . . . . . . . . . . . . . . . . . . . . . . . . . . . . . . . . . . . . . . . . . . . . . . . . . . 17
Table 7 Replacement battery pack . . . . . . . . . . . . . . . . . . . . . . . . . . . . . . . . . . . . . . . . . . . . . . . . . . . . . . . . 20
Table 8 Troubleshooting guide . . . . . . . . . . . . . . . . . . . . . . . . . . . . . . . . . . . . . . . . . . . . . . . . . . . . . . . . . . . 24
Table 9 Liebert
Table 10 Battery cabinet specifications . . . . . . . . . . . . . . . . . . . . . . . . . . . . . . . . . . . . . . . . . . . . . . . . . . . . . 26
Table 11 Typical battery run times for the Liebert
®
GXT3™ specifications . . . . . . . . . . . . . . . . . . . . . . . . . . . . . . . . . . . . . . . . . . . . . . . . . . . . . 25
®
GXT3-10000T230™. . . . . . . . . . . . . . . . . . . . . . . . . . . 26
ii
Page 5

IMPORTANT SAFETY INSTRUCTIONS
!
SAVE THESE INSTRUCTIONS
This manual contains important safety instructions. Read all safety and operating instructions before
operating the uninterruptible power system (UPS). Adhere to all warnings on the unit and in this
manual. Follow all operating and user instructions. This equipment must be operated only by
individuals who are properly trained and qualified.
This product is designed for commercial/industrial use only. It is not intended for use with life support
and other designated “critical” devices. Maximum load must not exceed that shown on the UPS rating
label. The UPS is designed for data processing equipment. If uncertain, consult your dealer or local
Emerson Network Power representative.
This UPS is designed for use on a properly earthed (grounded), 208 or 220 VAC, 50Hz or 60Hz supply,
for installation by qualified personnel. A qualified electrician must review and approve customersupplied wiring, circuit breakers and intended loads and verify correct input, output and earth
connections to ensure compliance with technical standards and local electrical codes of practice.
Installation instructions and warning notices only for use by properly trained and qualified personnel
are located after the UPS operator instructions in this manual.
Install the UPS in a clean environment, free from moisture, flammable liquids, gases and corrosive
substances.
This UPS contains no user-serviceable parts except the internal battery pack. The UPS On/Off
push buttons do not electrically isolate internal parts. Under no circumstances attempt to gain access
internally due to the risk of electric shock or burn.
Do not continue to use the UPS if the front panel indications are not in accordance with these
operating instructions or the UPS performance alters in use. Refer all faults to your dealer.
Servicing of batteries should be performed or supervised by personnel knowledgeable of batteries and
the required precautions. Keep unauthorized personnel away from the batteries. Proper disposal of
batteries is required. Refer to your local laws and regulations for disposal requirements.
Never block or insert any object into the ventilation holes or other openings.
DO NOT CONNECT equipment that could overload the UPS or demand DC current from the UPS,
for example: electric drills, vacuum cleaners, laser printers, hair dryers or any appliance using
halfwave rectification.
WARNING
The battery can present a risk of electrical shock and high short circuit current. The following
precautions should be observed before replacing the battery pack:
• Wear rubber gloves and boots
• Remove rings, watches and other metal objects.
• Use tools with insulated handles.
• Do not lay tools or other metal objects on the batteries.
• If the battery kit is damaged in any way or shows signs of leakage, contact your local Emerson representative immediately.
• Do not dispose of batteries in a fire. The batteries may explode.
• Handle, transport and recycle batteries in accordance with local regulations.
• Even when all switches and interrupters are open, hazardous voltages are present within
the UPS; any operation that requires protective panels to be opened or removed may be carried out by Emerson-authorized technical personnel only.
1
Page 6

!
WARNING
!
Although the Liebert® GXT3™ has been designed and manufactured to ensure safety,
improper use can result in electrical shock or fire. To ensure safety, observe the following
precautions:
• Turn Off and isolate the Liebert GXT3 before cleaning it. Use only a soft cloth; never use
liquid or aerosol cleaners.
• Never block or insert any objects into the ventilation holes or other openings of the UPS.
• Do not place the Liebert GXT3 power cord where it might be damaged.
CAUTION
• When installed in EU countries, the Liebert® GXT3-10000T220™ is not intended to operate
with isolated neutral (IT systems). Neutral connector must be present and connected to the
UPS.
• Even with all buttons OFF (see 4.2 - Control Panel) the device (UPS) is not isolated from
the utility. To isolate completely from the utility, the power cables must be disconnected.
• In case of interruption of the utility voltage, the integrated battery maintains the power
supply to the user equipment.
• Lay all cables so that nobody can stand on them or trip over them. When connecting the
UPS to the power supply, follow the instructions in 3.0 - Installation.
• In emergencies (e.g., damaged case, controls or power cables, penetration of liquids or foreign matter), switch off the device and contact the appropriate customer service representative.
• Do not connect equipment that will overload the UPS (e.g., laser printers or vacuum cleaners) or demand DC-current (e.g., half-wave rectifiers).
• When cleaning the unit, follow the instructions in 5.0 - Maintenance.
• The sum of the leakage currents (protective conductor current) of the UPS and the connected devices exceeds 3.5 mA for all ratings of the UPS. Ground (earth) connection is
essential before connecting supply.
• Data transmission lines should not be connected or disconnected during a thunderstorm.
• Emergency Power Off (EPO) input is on the rear of the unit (see 6.4 - Remote Emergency
Power Off and 3.6 - Terminal Blocks for UPS). When this connection is open, the logic
circuit will immediately shut down the UPS output.
• When installed in EU countries, an Emergency Switching Device (E.S.D.) must be fitted
downstream of the UPS for the wiring installation safety to comply with the European Harmonized Document HD384-4-46 S1.
• Maintenance bypass breaker is for the use of service personnel only. The breaker is on the
rear of the unit. To operate the breaker, the captive screw must be loosened and the guard
must be lifted out of position.
2
Page 7

Leakage Current
!
WARNING
Connect the ground (earth) safety conductor before connecting any other cables.
ELECTROMAGNETIC COMPATIBILITY—The Liebert® GXT3™ complies with the limits for a
Class A Digital Device, Pursuant to Part 15 of FCC rules. Operation is subject to the following
conditions:
• This device may not cause harmful interference
• This device must accept any interference received, including interference that may cause
undesired operation. Operating this device in a residential area is likely to cause harmful
interference that users must correct at their own expense.
The Liebert GXT3 series complies with the requirements of EMC Directive 2004/108/EC and the
published technical standards. Continued compliance requires installation in accordance with these
instructions and use of accessories approved by Emerson.
NOTICE
Operating the Liebert GXT3 in residential areas may cause radio interference that the user
must to correct at his own expense.
Information for the Protection of the Environment
UPS SERVICING—This UPS makes use of components dangerous for the environment (electronic
cards, electronic components). The components removed must be taken to specialized collection and
disposal centers.
3
Page 8
1.0 INTRODUCTION AND SYSTEM DESCRIPTION
!
Congratulations on your choice of the Liebert® GXT3™-10000T220 UPS. It provides conditioned power
to microcomputers and other sensitive electronic equipment.
When generated, AC power is clean and stable. However, during transmission and distribution it is
subject to voltage sags, spikes and complete power failure that may interrupt computer operations,
cause data loss and damage equipment. The Liebert GXT3-10000T220 protects equipment from these
disturbances.
The Liebert GXT3-10000T220 is an on-line UPS. An on-line UPS continuously conditions and
regulates its output voltage whether utility power is present or not. It supplies connected equipment
with clean sinewave power. Sensitive electronic equipment operates best from sinewave power.
The liquid crystal display is used for controlling operation of the UPS, as well as monitoring its
status, condition, alarm status and history. For ease of use, the Liebert GXT3-10000T220 features a
light-emitting diode (LED) display to indicate operational status. It also provides self-diagnostic tests,
a combination On/Alarm Silence/Battery Test button, a Standby button, user configurable program
and two levels of alarms when the unit is operating on battery.
The Liebert GXT3-10000T220 has an interface port for communication between the UPS and a
network server or other computer system. This port provides detailed operating information including
voltages, currents and alarm status to the host system when used in conjunction with Liebert’s
MultiLink
®
software. Liebert MultiLink software may also control UPS operation remotely.
Introduction and System Description
CAUTION
This UPS may be operated only by properly trained and qualified personnel.
Figure 1 Liebert GXT3-10000T220 control panel
4
Page 9
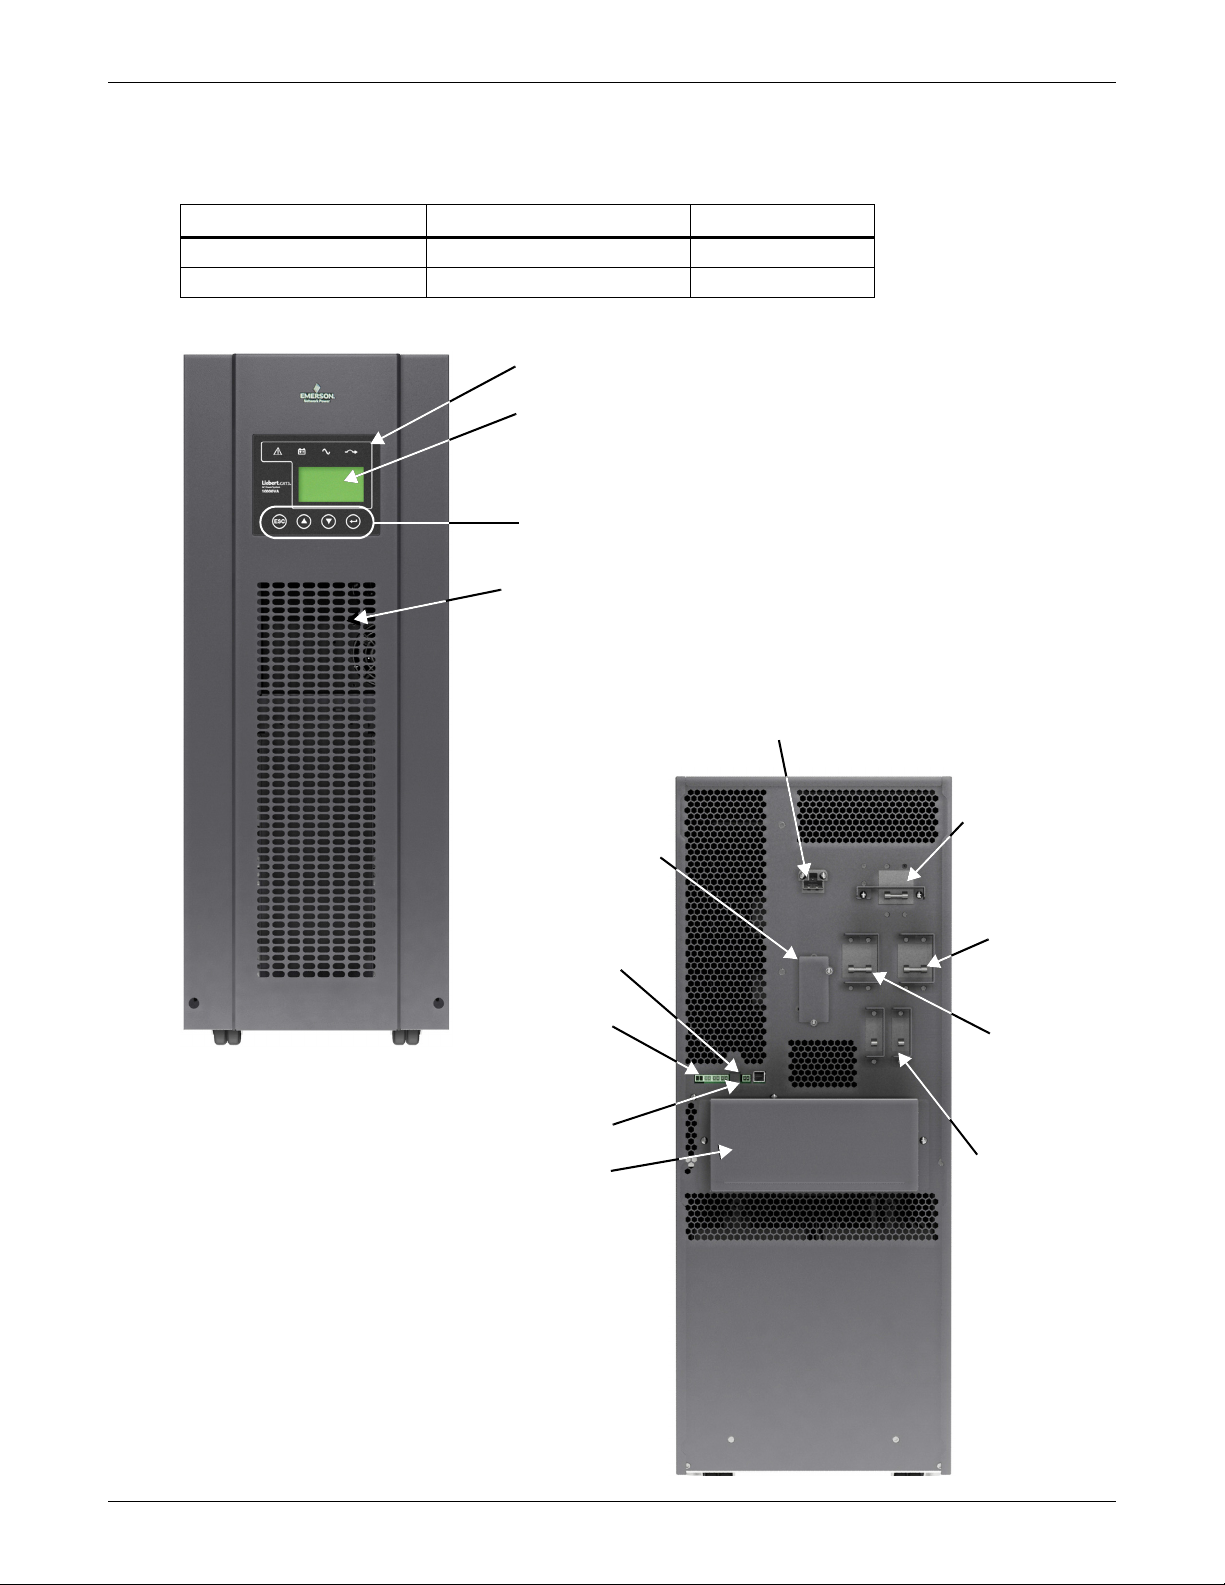
1.1 Device Overview
Control Panel
Liquid Crystal
Display
Push Button
Controls
Ventilation
Louvers
Bypass
Circuit
Breaker
Hardwire Input
and Output
Connectors
(Protective
Cover Shown)
Liebert IntelliSlot
®
Communication
Card slot
Dry Contacts
Input
Circuit
Breaker
REPO
Maintenance
Bypass Breaker
(cover removed
for clarity)
Output
Circuit
Breaker
External
Battery
Connector
USB Port
External
Battery
Connector
The following table provides an overview of the various versions of the device:
Table 1 Overview of UPS devices and batteries
Type Model # Nominal power
UPS with Integrated Battery Liebert
Battery Cabinet Liebert GXT3-240TBATTCE
GXT3-10000T220
®
™
10000VA/90000W
™
Introduction and System Description
—
Figure 2 Liebert
®
GXT3-10000T220™ front and rear views
5
Page 10
2.0 UNPACKING THE UPS AND SITE PREPARATION
!
Unlock
Plywood
Case
Ramp
Packing Cushion
(EPE)
Ramp in slot
on shipping pall et
GXT3 T220
UPS
2.1 Inspection
Upon receiving your Liebert® GXT3-10000T220™, examine the packaging for any signs of
mishandling or damage. While removing shipping materials, inspect the UPS for damage. If any
damage is noted, notify your local Liebert representative and your carrier.
2.2 Required Setup Equipment
The following tools are required to set up your Liebert GXT3-10000T220:
•pallet jack
• utility knife or scissors
• screwdrivers—Phillips and straight blade
2.3 Unpacking
Exercise care when removing the packaging to avoid damaging the UPS. Check all packaging to
ensure that no items are discarded. Remove the packaging following the sequence in Figure 3.
WARNING
The UPS is heavy and will roll when on an incline. When removing the unit from its shipping
pallet, use at least two persons.
Unpacking the UPS and Site Preparation
1. Using a pallet jack, move the Liebert GXT3-10000T220 near its installation site.
2. Unlock all the snaps securing the shipping case to the shipping pallet.
3. Lift the shipping case off the UPS.
4. Remove the EPE packing cushions from around the Liebert GXT3-10000T220.
5. Remove the ramp from the front and slip into the slot on the front of the shipping pallet.
6. Roll the UPS off the shipping pallet.
Figure 3 Unpacking
Storage
If the UPS will be stored, it must be placed indoors in a clean, dry area. Protect all the equipment,
including its batteries, from extreme temperatures, high humidity, spills and other damaging
conditions. Refer to Table 9 for permissible environmental conditions for storage.
Handling
The equipment must be kept upright at all times and handled with care. It may be damaged if
dropped or subjected to severe impact.
6
Page 11

2.4 Environmental Conditions
Install the Liebert® GXT3™ indoors in a controlled environment where it cannot be accidentally
turned off. Place it on a level, even surface in an area with unrestricted airflow around the unit. The
installation location must be free of water, flammable liquids, gases, corrosives and other conductive
contaminants. Maintain a minimum clearance of 100mm (4 inches) in the front and rear of the UPS.
Maintain an ambient temperature range of 0 to 40°C (32 -104°F).
See 8.0 - Specifications for acceptable environmental conditions.
NOTE
UPS operation in sustained temperatures outside the range of 15-25°C (59°-77°F) will reduce
battery life.
2.5 Access to Area
The area where the Liebert GXT3-10000T220 is to be placed must have sufficient space for
installation procedures and for routine maintenance. The UPS is narrow enough to pass through
standard doorways.
2.6 Floor Loading
Ensure that the floor where the UPS will be installed will support the unit’s weight (see Table 9 for
the unit’s weight).
Unpacking the UPS and Site Preparation
2.7 Inventory List
• CD containing:
• Liebert MultiLink
•Configuration Software
• User Manual
• Terminal Block Communication terminals
• Floor-mount brackets
• Warnings, safety instructions booklet and WEEE recycling sheet (ISO 14001 compliance)
•USB cable
• Hardwire terminal block cover plate and mounting screws
• Single input bypass jumper
• Battery cabinets contain one DC power cable
®
shutdown software
7
Page 12

3.0 INSTALLATION
!
!
!
!
!
3.1 Electrical preparations
Before beginning installation, the input source must be isolated and locked out to prevent connection
during installation. The input circuit breaker on the rear of the UPS must be in the Off position.
WARNING
Installation may be carried out only by qualified technicians and in conformity with the
applicable safety standards.
WARNING
Electric shock hazard: Even when the unit is disconnected from the utility, hazardous voltage
may still be supplied by the battery. Both poles must be disconnected before any work is
performed inside the UPS.
WARNING
If the Maintenance Bypass Breaker is in the Bypass position, output power is available
immediately upon application of AC input.
3.2 Suggested Cable Sizes
Table 2 Connection data *
Description
Connector size AWG (mm2)6 (10)
Max input current Arms 56*
Input cable size (
Max output current Arms 56*
Output cable size (
Ground (Earth) Cable Size AWG (mm
Terminal Torque lb-in (Ncm) 10 (113)
* Cable must be 90°C copper wire
∅ and neutral) AWG (mm
∅ and neutral) AWG (mm
Units Liebert® GXT3-10000T220
2
)6 (10)
2
)6 (10)
2
)6 (10)
Installation
™
NOTE
To reduce electromagnetic interference:
• Enclose input and output cables to the UPS in separate metal conduits.
• Use shielded communication cables and route separately from power cables
3.3 External Protection and Isolating Devices
An external 70A disconnect switch must be installed upstream of the UPS to protect power cabling
and provide a means of isolating the UPS from utility.
WARNING
The following label must be displayed on all switching devices installed in the same electrical
system as the UPS, even when these are located at a distance from the area.
ENSURE THAT THE UNINTERRUPTIBLE POWER SYSTEM IS ISOLATED BEFORE
WORKING ON THIS CIRCUIT
CAUTION
A disconnect switch must be provided by others for AC output circuit. To reduce the risk of
fire, connect only to a circuit provided with branch circuit overcurrent protection for 70A
rating in accordance with the National Electric Code, ANSI/NFPA 70.
8
Page 13

3.4 External Electrical Connections
!
!
Rear Panel
Cable Entry Cover
L1 L2 GET X1 X2
UPS Input ~ Output ~
BYP L1 L2
Bypass Input ~
X4X3
Single Feed
Jumper
120
208
220
120
0
240
The external electrical connections may be accessed by removing the protective panel on the rear of
the UPS (see Figure 2) (panel ships loose from factory). Select a conduit knockout appropriate for
your cabling, based on local electrical codes.
WARNING
Before removing electric protective panel, ensure that the UPS is isolated.
Figure 4 Side view
Installation
NOTE
Once installation has been completed, adjust leveling feet to prevent the UPS from moving.
3.5 Connecting Utility and Load
Connect the utility supply to the input terminals of the UPS. If the Liebert® GXT3-10000T220™ is
supplied by single-phase utility, connect the live phase to input L1.
3.6 Terminal Blocks for UPS
CAUTION
Power is connected through the input breaker, even when the UPS is in bypass mode.
Opening the input breaker when in bypass mode will disconnect output power to the
connected load.
Figure 5 Single source input supply—input and output connections
9
Page 14

Figure 6 Dual source input supply—input and output connections
L1 L2 GET X1 X2
UPS Input ~ Output ~
BYP L1 L2
Bypass Input ~
X4X3
UPS Feed
120
208
220
120
0
240
Bypass Feed
Jumper
removed
for clarity
Figure 7 Hardwire terminals
Installation
3.6.1 Input and Output Connection Requirements
• Any 120V loads must be distributed evenly between X1-X2, X1-X4 and X4-X2. Do not connect
loads between X3-X2 or between X3-X4—these are not standard voltages.
• The single-phase isolation output transformer is a separately derived source. The output Neutral
(X2) is bonded to Ground within the UPS cabinet. No other bonding wire is needed.
• Install a Grounding Electrode Terminal (GET) to the nearest grounding electrode in the building
grounding electrode system. If the grounding electrode conductor must be protected, non-metallic
conduit is recommended. If metal conduit must be used, bond both ends of the conduit to the
grounding electrode conductor. Conduit is not an acceptable grounding electrode conductor.
• The utility may be derived from a single-phase or three-phase source. The line-to-ground voltages
are dependent on the grounding of the utility and do not affect the output voltages. Do not use a
floating AC source.
• With dual input source configuration, both sources are tied together within the UPS cabinet. Two
additional ground screw terminals are supplied for use as needed.
10
Page 15

3.7 Connecting Power Cables
!
UPS
Rear View
External
Battery
Cabinet
Rear View
Battery Breaker
(Liebert GXT3-240TVBATTCE)
External
Battery
Cabinet
Connector
Connector for
additional cabinet
External Battery Cabinet
Liebert GXT3-240TVBATTCE
1. Open the UPS input breaker.
2. Open the UPS bypass breaker.
3. Set the maintenance breaker to the Bypass position.
4. Remove the electrical connection protective panel, if installed, from the rear UPS panel.
5. Connect loads to the output terminals as illustrated in Figure 7.
6. Connect the utility to the corresponding input terminals (see Figure 7).
• If the bypass input is to be supplied separately, connect the bypass source to the corresponding
bypass terminals.
• If the UPS is supplied from a single feed, connect the factory-supplied jumper between terminal
UPS Input-BYP and Bypass Input-L1.
3.8 External Battery Cabinets
Up to four external battery cabinets may be connected to the Liebert® GXT3-10000T220™. A cable to
connect the battery cabinet and the Liebert GXT3-10000T220 is supplied with each battery cabinet.
Open the breaker before making battery cable connections.
Plug one end of this cable into the UPS and the other end into the battery cabinet—slotted fittings on
each end ensure that the connection is properly made. If your UPS has an integrated battery, a
compensating current may occur during connection. Once both ends of the cable have been connected,
the circuit breaker on the external battery cabinet must be closed.
Installation
Figure 8 Liebert GXT3-10000T220 with External Battery Cabinet
CAUTION
Battery maintenance must be performed only by authorized personnel who are properly
trained and qualified.
External battery cabinets are hot-swappable; they can be replaced during normal UPS
operation.
DO NOT connect or disconnect batteries when the UPS is in Battery Mode.
11
Page 16

4.0 OPERATION
TVSS &
EMI/RFI
Filters
Rectifier/
PFC
DC-to-DC
Converter
Inverter
Isolation
Transformer
Battery
Battery
Charger
L1
N
L1
N
X1
X3
X4
X2
OutputInput
Dynamic
Bypass
V bp
G G
4.1 Block Diagram
The Liebert® GXT3-10000T220™ consists of the following main components:
• 2 utility inputs with separate breakers—utility and bypass
• rectifier/booster, inverter and charger
• electronic bypass
• 2-position Maintenance Bypass Breaker—UPS and BYPASS
• integrated battery
Figure 9 System block diagram
Operation
12
Page 17

4.2 Control Panel
Enter keyEscape key
Menu Up key Menu Down key
LCD
UPS On
LED
Battery
LED
Fault
LED
Bypass
LED
The Control Panel’s LCD and buttons are used to initiate various UPS operations, tests and
commands and to view the status of the UPS.
By pressing the Menu Up or Menu Down and Enter keys , it is possible to scroll through the
various menus. For details, see 4.2.1 - Controls and Messages and Figure 11.
Figure 10 Control Panel
Operation
4.2.1 Controls and Messages
Lighted LEDs
• UPS ON—UPS is in normal, online operation
• BYPASS—Load is supplied by the utility via automatic bypass
• BATTERY—Load is supported by the battery
• FAULT—A problem has developed within the UPS
Flashing LED
When the BYPASS LED is flashing, the utility is out of tolerance.
NOTICE
Risk of loss of power to connected load. Can cause equipment damage.
Never switch the UPS Off or switch from Online to Bypass in this status, because the load
would no longer be supplied.
13
Page 18

Figure 11 Menu tree
Start
Window
System
Status
Main
Setup
Control
Contrast
Set
Battery
Test
Alarm
Control
Turn UPS
On/Off
Status
Log
About
Version
Language
Tag
Number
UPS
Address
DC Start
Battery
Test
Inte rval
Battery
Pack
Audible
Alarm
Output
Voltage
Clear
Event Log
IP
Types
Battery
Test
Battery
Test
Battery
Test
Parallel
Menu
Parallel
Model
Operation
14
Page 19

Table 3 Displayed text—system block and main menu
Item # and Name Description
Status Menu
Setup Menu
Logging
Menu
Firmware
Version
Start Window
Main Menu
Measure
value
Output Volt V
Output Freq 0.1Hz
Output
Current
Output Watt W
Output VA VA
Output Load %
Input Volt V
L2 Input Volt N/A
L3 Input Volt N/A
Input Freq 0.1Hz
Back Voltage V
Batt Capacity %
Backup Time min:sec
Run Time day:hr:min:sec
Tag Number
Setting item Setting (level 1)
* : Max 4 fault event record
Type of UPS Liebert GXT 10KVA Liebert
Internet IP Web: www.liebert.com
Software
version
Unit
A
Audible alarm Disable/Enable
Output voltage 208/220/230/240V
Battery pack 1-3
Battery Test interval
DC start Disable/Enable
Tag Number 00000-99999
Language English/French/Spanish/German/Italian/ Russian
Event and time
*
Clear event log
Display Firmware
version
10kVA UPS Self testing
please wait
Wait about 6 sec
Control
Status
Setup
Log
About
1
®
GXT3-10000T220™ Capacity 10KVA
DSP Firmware version
Operation
15
Page 20

Table 3 Displayed text—system block and main menu (continued)
Item # and Name Description
Turn UPS ON/OFF Turn UPS to ONLINE
Turn UPS to BYPASS
Turn UPS to shutdown
Turn UPS to no output
Alarm control Alarm ON
Control
Menu
Test in
progress
Test OK! Cancel Battery test
Test fail Battery Test report
Battery
Test Report
1. For setup parameters regarding battery pack quantity, refer to 4.2.2 - Battery Setup Parameters
Test stop by
user
Test
unknown
Alarm OFF
Batt Test Batt Test
Cancel Battery Test
Battery Test Report
Contrast Darker
Lighter
Test to Low-Battery
Operation
4.2.2 Battery Setup Parameters
Table 4 Battery setup parameters
Parameter
1X — 20
2X 1 60
3X 2 100
Internal Battery
(X = Integrated)
4.2.3 Warning Indicators
If a warning indication appears, the UPS continues to operate. The warning message alternates with
UPS mode once a second.
The various possible warning indicators are listed in the following table:
Table 5 Warning indicators
Warning Cause Corrective steps
1 Batt undervolt. N/A
2 Utility failure N/A
4 Over temp. 65 Reduce load
Quantity External
Battery Cabinets
Quantity 12V Battery
Blocks in Sum
16
Page 21

4.2.4 Fault Indicators
If a fault occurs, the UPS automatically switches to BYPASS mode, ONLY in case of a battery
disconnect fault will the original operating mode be maintained. The fault message alternates with
UPS mode once a second, the red Fault LED illuminates on the control panel and the buzzer sounds
continuously. If a fault occurs, proceed as follows:
Buzzer alarm operation—The buzzer alarm can be switched On or Off.
Clear fault—Present fault condition can be reset if fault condition is cleared, either automatically or
by the operator/technician.
Fault information—A maximum of 4 fault events may be displayed in this window. All fault
displays include: the nature of the fault event, and the time it occurred; the time is relative to the
UPS operating time.
Display faults—
Table 6 Fault indicators
Fault
1.
2.
3.
4.
5.
6.
7.
8.
9.
10.
11.
12.
13.
14.
Cause Corrective steps
DC BUS fault Call customer service
Inverter fault Call customer service
Overtemperature Reduce load
Batt over volt. Call customer service
Batt. mode overload Reduce load
Output overload Reduce load
Output short Call customer service
Fan lock fault Call customer service
Batt. Disconnect Check battery connector
Charger failure Call customer service
ESD activated NA
Parallel fault Call customer service
Internal fault Call customer service
Output failure Call customer service
Operation
The various possible fault indicators are listed in the following table.
17
Page 22

4.3 Initial UPS Startup Procedure
!
1. Inspect all power connections to ensure they are correct and secure.
2. Open external circuit breakers/fused disconnects to the connected loads.
3. Close all upstream circuit breakers and fused disconnects.
4. Use a voltmeter to verify proper input voltage is present on the UPS and Bypass input terminals.
See Table 9 for the range.
5. Close the input breakers on the rear panel of the UPS (UPS input and Bypass input).
6. Turn the Maintenance Bypass Breaker to the Bypass position (remove the cover plate if
attached).
7. Use a voltmeter to verify that the proper output voltage is present on the UPS output terminals.
See Table 9 for the range.
8. Turn the Maintenance Bypass Breaker to the Off position and reinstall the cover plate..
NOTE
The maintenance bypass breaker cover must be installed behind the captive screw and the
screw must be tightened for the UPS to operate on inverter mode.
9. Use a voltmeter to verify the output voltage is NOT present on UPS output terminals.
10. Use the LCD display and control buttons to start the UPS, refer to 4.2.1 - Controls and
Messages.
11. Use a voltmeter to verify proper output voltage is present on UPS output terminals. See Table 9
for range.
Operation
CAUTION
Before reinstalling the hardwire terminal protective panel, follow the shutdown procedure in
4.4 - UPS Shutdown Procedure
12. Open all upstream circuit breakers and fused disconnects.
13. Reinstall the hardwire terminal protective panel.
4.4 UPS Shutdown Procedure
NOTE
Carrying out this procedure will interrupt the supply to the load.
1. Press the Menu button, select Control and press the Enter key .
2. Select Turn UPS On/Off and press the Enter key .
The LCD displays Turn UPS to BYPASS.
3. Press the Enter key to switch off the inverter.
4. Open any external circuit breakers/fused disconnects connecting the load (if present).
5. Switch both Input circuit breakers to the Off position.
6. Ensure all circuit breakers/fused disconnects upstream of the UPS are open.
7. Ensure that all LEDs on the control panel are extinguished.
The UPS is now completely shut down.
4.5 Maintenance Bypass Procedure
1. Press the Menu button, select Control and press the Enter key .
2. Select Turn UPS On/Off and press the Enter key .
The LCD displays Turn UPS to BYPASS. The UPS is now on Internal Bypass Mode.
3. Press the Enter key to switch off the inverter (see Figure 10).
4. Remove the safety cover from the Maintenance Bypass Breaker and turn UPS to BYPASS.
NOTE
At this point the load is no longer protected against interruptions and disturbances on the
utility supply.
The UPS is now in Maintenance Bypass Mode. The Bypass LED on the front panel is illuminated
(amber) and the load is supplied directly from the utility.
18
Page 23

4.6 Return from Maintenance Bypass
!
1. Ensure all switches and circuit breakers upstream of the UPS are closed.
2. Ensure that both input circuit breakers are in the On position.
3. Turn the Maintenance breaker from BYPASS to UPS and replace the cover.
The load now is supplied via electronic bypass.
4. Press the Menu button, select Control and press the Enter key .
5. Select Turn UPS On/Off and press the Enter key .
The LCD displays Turn UPS to ONLINE.
6. Press the Enter key to switch on the inverter.
The UPS is now in online operation.
4.7 Maintenance Breaker, Off Position
• Move the breaker to the Off position to transfer the load from the UPS to utility.
WARNING
The output breaker on this unit does not protect every output configuration. Power to the load
could be supplied immediately when the output is enabled. (Figure 9 illustrates the location of
the output breaker in the output configuration.)
4.8 Self-Tests
Operation
4.8.1 Lamp Test
NOTE
This test involves putting the Liebert
protected against any utility disturbances or interruptions while the UPS is in bypass mode.
1. With the Liebert GXT3-10000T220 connected to the utility, press the Menu button, select Control
and press OK.
2. Select Turn UPS On/Off and press OK.
3. The LCD will show Turn UPS to BYPASS.
4. Press OK to off the inverter to Bypass mode.
5. A single acoustic signal confirms the operation.
6. Select Turn UPS On/Off and press OK to place the UPS back in Normal Mode operation. The UPS
performs the test during Start-up.
4.8.2 Battery Test
NOTE
During the test an acoustic signal will be heard as though the device is operating in battery
mode.
1. Press the Menu button.
2. Select SETUP and press OK.
3. Select BATT TEST and press OK.
A single acoustic signal confirms the operation and the load will be supplied by the battery.
®
GXT3-10000T220™ into bypass mode. The load is not
If the test is successful, the BATT LED will stop flashing and the UPS will return to Line mode. If the
UPS circuitry detects a battery malfunction, Liebert GXT3-10000T220 will display an alarm (see
4.2.1 - Controls and Messages).
19
Page 24

5.0 MAINTENANCE
5.1 Test, Replacement and Disposal of Batteries
The Liebert® GXT3™ is designed to allow the user to replace the internal battery pack safely. Refer to
Table 7 for internal battery pack part numbers for Liebert GXT3 UPS and Liebert External Battery
Cabinets:
Table 7 Replacement battery pack
Replacement Internal Battery
Unit Type and Model #
Liebert UPS GXT3-10000T220 GXT3-240BATKIT 2
Liebert External Battery Cabinet
GXT3-240VBATTCE
Read all safety cautions before proceeding. Contact your local dealer or Emerson representative to
obtain the part number and pricing of the appropriate replacement battery pack.
Disposal of the UPS and batteries should be carried out by a certified disposal company—observe all
local regulations and laws. Lead-acid batteries are classified as harmful toxic waste and as such the
law demands that they be disposed of by an authorized recycling centre.
The typical battery lifecycle is 3 to 5 years at an ambient temperature of 25 C, but is also dependent
on the frequency and duration of utility failures.
Pack Model Number
GXT3-240BATKIT 2
Maintenance
Quantity
Required
The BATTERY TEST (see 4.8.2 - Battery Test) should be run periodically (6 to 12 months) to
ascertain the general condition of the batteries and ensure maximum run time.
5.2 Storage
For extended storage at ambient temperatures cooler than 25°C (77°F), the batteries should be
charged for 24 hours once every six months.
Connect the UPS to a utility outlet socket having a ground (earth) connection and ensure the
miniature circuit breaker is closed. If charging batteries with fixed utility connections, make
connections in accordance with 3.0 - Installation.
After 24 hours, disconnect the UPS from the utility supply.
5.3 Cleaning
The UPS may be cleaned by wiping it off with a dry cloth. Do not use liquids or solvents.
20
Page 25

6.0 COMMUNICATION
!
1234
(Low Battery Warning)
(On- Battery Warning)
(Any Mode Shutdown)
(Battery Mode Shutdown)
6.1 Communication Interface Port
The Liebert® GXT3™ UPS has a terminal block on the rear of the UPS unit. Several signals are
provided on this port and are assigned as follows.
6.2 Dry Contact
The Dry Contact includes eight pins, as shown and defined in Figure 12.
Figure 12 Dry contact pin layout
Communication
6.2.1 Any Mode Shutdown
The purpose of Any Mode Shutdown is to shut down the UPS output by turning Off the rectifier,
inverter and static switch so that there is no power to the loads.
Any Mode Shutdown can be operated locally or remotely:
• Local Any Mode Shutdown can be performed by shorting the pins in Set 3.
• Remote Any Mode Shutdown can be performed using a switch connected to the pins in Set 3 and
mounted at a remote location.
Activation of the Any Mode Shutdown will be logged as an event in the event history log.
NOTE
Remote Power Off will be performed either by NO or NC contact of Any Mode Shutdown.
The current limited source (+12VDC, 50mA) will be available from UPS.
The connection to UPS for remote connection will be via terminal block connector.
Any Mode Shutdown wiring must conform to all national, regional and local wiring codes and
laws.
WARNING
When the Auto-enable output option is selected and the UPS output is disabled using the pins
in Set 3, the Liebert GXT3-G’s output can turn On automatically and without warning if the
connection of the pins in Set 3 is changed.
21
Page 26

6.2.2 Battery Mode Shutdown
Battery Mode Shutdown permits shutting down the UPS by turning off the rectifier, inverter and
static switch so that there is no power to the load when the UPS is On Battery. The auxiliary power
for the UPS will still be active.
Battery Mode Shutdown can be performed locally or remotely:
• Local Battery Mode shutdown can be performed by shorting the pins in Set 4.
• Remote Battery Mode Shutdown can be performed using a switch connected to the pins in Set 4
and mounted at remote location.
Activation of the Battery Mode Shutdown will be logged as an event in the event history log.
NOTE
Remote Power Off will be performed by NO contact.
The current limited source (+12VDC, 50mA) will be available from UPS.
The connection to the Liebert
connector.
Battery Mode Shutdown wiring must conform to all national, regional and local wiring codes
and laws.
This signal must last for 1.5 seconds or longer.
A battery shutdown signal will not cause an immediate shutdown. It will start a 2-minute
shutdown timer. This timer cannot be stopped once triggered. If the utility power returns
during this countdown, the Liebert GXT3 will still shut down and must remain shut down for
10 seconds. Whether the UPS turns back On when the power is restored depends on the
auto-restart setting.
Communication
®
GXT3™ for remote connection will be via terminal block
6.2.3 On Battery
On Battery signal is a Normally Open (NO) dry contact. When the UPS is supplying output power
from the battery this dry contact will be closed.
6.2.4 Low Battery
Low Battery signal is a Normally Open (NO) dry contact. When the UPS is supplying output power
from the battery and has reached the Low Battery Warning time selected in the configuration
program, this dry contact will be closed.
NOTE
The rated values for the dry contacts are:
• Rated Voltage: 30V (AC or DC)
• Rated Current: 300mA
6.3 Liebert IntelliSlot® Communication Cards
The Liebert IntelliSlot port accepts three optional cards:
• Liebert IntelliSlot SNMP Card
• Liebert IntelliSlot Relay Card
• Liebert IntelliSlot 485 Card.
The Liebert IntelliSlot SNMP Card provides SNMP monitoring and control of the UPS across the
network.
The Liebert IntelliSlot Relay Card provides dry contact relay outputs for custom-wired applications
and delivers support for built-in shutdown for AS/400 systems.
The Liebert IntelliSlot 485 Card is used to connect the UPS and computer system.
Follow instructions provided with the Liebert IntelliSlot card to configure Liebert MultiLink
UPS or any additional ancillary product for the Liebert GXT3. These instructions are available at
multilink.liebert.com
®
, the
22
Page 27

Communication
!
!
12
Normally closed switch system
(fail-safe)
UPS ships with REPO jumper
installed allowing the UPS
to operate
Opening the REPO connection will disable the UPS.
Manual restart using the front panel is required after
the REPO connection is closed again.
12
6.3.1 Liebert® MultiLink
Liebert MultiLink continually monitors the UPS and can shut down your computer or server in the
event of an extended power failure.
Liebert MultiLink can also be configured for use without the USB cable when the Liebert IntelliSlot
SNMP/Web card is installed in the UPS. Additionally, Liebert MultiLink can be configured to
coordinate shutdown across the network with other computers running Liebert MultiLink when you
purchase a Liebert MultiLink License Kit. For more information about the Liebert IntelliSlot
SNMP/Web Card and Liebert MultiLink License Kits, visit our Web site (www.liebert.com) or
contact your local dealer or Emerson representative.
Several option cards are available for use in the Liebert IntelliSlot port of the Liebert GXT3
Liebert IntelliSlot SNMP/Web Card provides SNMP and Web-based monitoring and control of the
UPS across the network.
The Liebert IntelliSlot MultiPort 4 Card allows installing Liebert MultiLink software on four
computers and coordinate shutdown in the event of a power failure.
The Liebert IntelliSlot Relay Card provides dry contact relay outputs for custom wired applications
and delivers support for built-in shutdown for AS/400 systems.
®
CAUTION
To maintain safety (SELV) barriers and for electromagnetic compatibility, signal cables
should be shielded and run separate from all other power cables, where applicable.
6.4 Remote Emergency Power Off
™
. The
®
The UPS is equipped with a Remote Emergency Power Off (REPO) connector.
The user must supply a means of interfacing with the REPO circuit to allow disconnecting the UPS
input feeder breaker to remove all sources of power to the UPS and connected equipment to comply
with national and local wiring codes and regulations.
REPO switch connection diagram
CAUTION
To maintain safety (SELV) barriers and electromagnetic compatibility, signal cables should
be shielded and run separately from power cables.
23
Page 28

7.0 TROUBLESHOOTING
If any technical problems should occur, check the following before contacting Liebert® technical
support:
• Is the utility voltage present at the UPS input?
• Has the input fuse blown or have the circuit breakers tripped?
• Has the UPS startup procedure been followed correctly?
When contacting Liebert technical support, have the following information available:
• Device model number
• Serial number (from the nameplate)
• Exact description of the problem (what loads are being operated, does the problem occur regularly
or sporadically, etc.)
For descriptions of the indicators mentioned in the following table, see 4.2.1 - Controls and
Messages.
Table 8 Troubleshooting guide
Problem Possible Cause Solution
Utility mains switched off Switch on utility breaker
No display
No alarm
(UPS switched Off)
UPS on LED does not light up,
alarm beeps sound at intervals
UPS on LED does not illuminate
when utility mains voltage present,
acoustic alarm active at intervals
FAULT LED illuminates, alarm
sounding constantly
Battery Run time less than specified
OVERLOAD message displayed Overload at UPS output Reduce load to the permissible value
No communication between UPS
and PC
No mains voltage present
Input fuse blown or input
circuit breaker tripped
No utility mains voltage
present
Input fuse defective or input
circuit breaker tripped
UPS error Contact technical support
Overheating Decrease ambient temperature
The battery breaker is open,
in the OFF position
Batteries are not fully charged
Batteries are defective Contact technical support
Charging device is defective Contact technical support
Wrong serial connection
cable
Interface on the PC is being
used by another process or is
defective
Interference on the data cable Lay cable differently/Reinstall cabling
Have utility mains inspected by a qualified
technician
Replace with fuse of same type or switch on circuit
breaker. If the problem persists, contact technical
support.
Have utility mains inspected by a qualified
technician
Replace with fuse of same type or switch on circuit
breaker. If the problem persists, contact technical
support
Move the battery breaker to the ON position
Charge batteries (see Battery Test on page 19)
and test backup time. If the problem persists,
contact technical support.
Check whether the correct cable has been used
(standard modem/null modem cables are not
permissible)
Check whether other software/service is accessing
the interface on the PC; try selecting a different
serial interface
Troubleshooting
24
Page 29

8.0 SPECIFICATIONS
Table 9 L i e bert® GXT3™ specifications
Model Rating, VA (W)
Dimensions, in. (mm)
Unit, W x D x H 31.5 x 11.81 x 26.57 (800 x 300 x 675)
Shipping, W x D x H 41.8 x 16.7 x 34 (1062 x 426 x 866)
Weight, lb (kg)
Input AC Parameters
Nominal Operating Frequency 50 or 60Hz (Factory Default = 60)
Factory Default VAC 120/208 at 120 degrees
User-Configurable VAC 120 / 208 / 220 / 240
Operating Voltage Range
Without Battery Operation
Maximum Allowable VAC 280
Input Frequency
Without Battery Operation
Input Power Connection BYP, L1, L2, GND
Output AC Parameters
Factory Default, VAC 208
Output Connections
Main Mode Overload
Battery Parameters
Battery Mfr. / Part # CSB HR1234R or Panasonic UP-RW1245
Recharge Time (Internal Batteries) 3 hr. to 90% capacity after full discharge into 100% load
Bypass Protection Limits
Maximum Bypass Current 50A
Disable Bypass Operation If input voltage exceeds ±10% of the nominal voltage
Re-Enable Bypass Operation If input voltage returns to within ±8% of nominal output voltage
Disable Bypass Operation When the input frequency prevents synchronous operation
Environmental
Operating Temperature, °F (°C)
Storage Temperature, °F (°C) 5 to 122 (-15 to 50)
Transportation, °F (°C)
Relative Humidity 0-95% non-condensing
Operating Elevation Up to 3281 ft (1000m) at 80°F (27°C) without derating
Agency
Surge Immunity IEC/EN 61000-4-5, ANSI C62.41 (for North America)
Specifications
10,000 (9000)
Unit 308 (140)
Shipping 428 (194)
100 - 185 ±5VAC
40 - 70Hz
Hardwire Terminal Block
Output: (GEC, X1, X2, X3, X4, GND) Bypass: L1, L2, GND
Frequency 50Hz or 60Hz, Nominal
Waveform Sinewave
>200% for 5 cycles; 151 - 200% for 1 second; 131-150% 10 seconds;
105 - 130% 1 minute
Type Valve-regulated, non-spillable, lead acid
Quantity x V 20 x 12V
Backup Time See Table 11
32 to 86 (0 to 30) with 0.9 pf
86 to 104 (30 to 40) with 0.8pf
Audible Noise <55 dBA at 3.3ft (1m) from rear; <50 dBA at 3.3ft (1m) from front or sides
Safety UL 1778, c-UL
RFI/EMI FCC Part 15, Subpart B, Class A
Transportation ISTA Procedure 1B
25
Page 30

Table 10 Battery cabinet specifications
Model Number
Dimensions, W x D x H, in. (mm)
Unit 31.5 x 11.81 x 26.57 (800 x 300 x 675)
Shipping 41.8 x 16.7 x 34 (1062 x 426 x 866)
Weight, lb (kg)
Unit 243 (110)
Shipping 309 (140)
Internal Battery Parameters
Type Valve-regulated, non-spillable, lead acid
Quantity x V 2 x 20 x 12V
Battery Manufacturer, Part # CSB HR1234R or Panasonic UP-RW1245
Temperature Limits, Batteries Only,
°F (°C)
Backup Time See Table 11
Environmental
Operating Temp, °F (°C) 32 to 80 (0 to 27)
Storage Temp 5 to 104 (-15 to 40)
Transportation Temp, °F (°C) 5 to 122 (-15 to 50)
Relative Humidity 0-95% non-condensing
Operating Elevation Up to 3281 ft (1000m) at 80°F (27°C) without derating
Agency
Safety UL 1778, c-UL Listed
Transportation ISTA Procedure 1B
Specifications
GXT3-240TBATTCE
32 to 104 (0 to 40)
Table 11 Typical battery run times for the Liebert® GXT3-10000T230
Number of Batteries,
Battery Cabinets
Internal Battery 81 39 22 15 11 8 6 5 4 3
Internal Battery + 1
External Battery Cabinet
Internal Battery + 2
External Battery Cabinets
Approximate discharge times are at 77°F (25°C) with a 100% resistive load.
10% 20% 30% 40% 50% 60% 70% 80% 90% 100%
190 127 81 60 46 39 32 26 22 18
316 162 136 106 82 69 52 48 44 39
Load %
™
26
Page 31

9.0 PRODUCT WARRANTY REGISTRATION
To register for warranty protection:
• Visit the Quick Links section of Liebert’s Web site at:
http://www.liebert.com
• Click on Product Warranty Registration and fill in the form.
If you have any questions, please contact us at:
• US: 800-222-5877
• Outside the US: 614-841-6755
liebert.upstech@emerson.com
Product Warranty Registration
27
Page 32

Ensuring The High Availability
Of Mission-Critical Data And Applications.
Emerson Network Power, a business of Emerson (NYSE:EMR),
is the global leader in enabling Business-Critical Continuity
™
from grid to chip for telecommunication networks, data centers,
health care and industrial facilities. Emerson Network Power
provides innovative solutions and expertise in areas including
AC and DC power and precision cooling systems, embedded
computing and power, integrated racks and enclosures,
power switching and controls, infrastructure management,
and connectivity. All solutions are supported globally by local
Emerson Network Power service technicians. Liebert AC power,
precision cooling and monitoring products and services
from Emerson Network Power deliver Efficiency Without
Compromise™ by helping customers optimize their data center
infrastructure to reduce costs and deliver high availability.
While every precaution has been taken to ensure the accuracy
and completeness of this literature, Liebert Corporation assumes no
responsibility and disclaims all liability for damages resulting from use of
this information or for any errors or omissions.
© 2010 Liebert Corporation
All rights reserved throughout the world. Specifications subject to change
without notice.
® Lieber t is a registered t rademark of Lieber t Corporation.
All names referred to are trademarks
or registered trademarks of their respective owners.
SL-23187_REV1_04-12
Technical Support / Service
Web Site
www.liebert.com
Monitoring
liebert.monitoring@emerson.com
800-222-5877
Outside North America: +00800 1155 4499
Single-Phase UPS & Server Cabinets
liebert.upstech@emerson.com
800-222-5877
Outside North America: +00800 1155 4499
Three-Phase UPS & Power Systems
800-543-2378
Outside North America: 614-841-6598
Environmental Systems
800-543-2778
Outside the United States: 614-888-0246
Locations
United States
1050 Dearborn Drive
P.O. Box 29186
Columbus, OH 43229
Europe
Via Leonardo Da Vinci 8
Zona Industriale Tognana
35028 Piove Di Sacco (PD) Italy
+39 049 9719 111
Fax: +39 049 5841 257
Asia
29/F, The Orient Square Building
F. Ortigas Jr. Road, Ortigas Center
Pasig City 1605
Philippines
+63 2 687 6615
Fax: +63 2 730 9572
Emerson Network Power.
The global leader in enabling Business-Critical Continuity
AC Power
Connectivity
DC Power
Emerson, Business-Critical Continuity, Emerson Network Power and the Emerson Network Power logo are trademarks of Emerson Electric Co. or one of its affiliated companies.
©2010 Emerson Electric Co.
Embedded Computing
Embedded Power
Infrastructure Management & Monitoring
™
Outside Plant
Power Switching & Controls
Precision Cooling
EmersonNetworkPower.com
Racks & Integrated Cabinets
Services
Surge Protection
 Loading...