

Page 1
- This user manual contains instructions on how to use the product properly.
- Please read this manual carefully. Be sure to follow the instructions and notices.
- GUI and package contents are subject to change without prior notice to improve the product quality.
- To view HD quality resolution, you must connect the HDMI cable.
- Firmware can be updated frequently to improve the product quality.
- To download the latest firmware, please visit www.lge.com or LG service sites
(LG service sites are listed on the last page)
Page 2

Table of Contents
Check Before Use ………………………………………………………………………………………………………………
Regulations ………………………………………………………………………………………………………………………….
Package Contents ……………………………………………………………………………………………………………..
Name of Parts …………………………………………………………………………………………………………………….
Connect Multimedia HDD to PC …………………………………………………………………………………….
Connect Multimedia HDD to TV ……………………………………………………………………………………..
Remote control …………………………………………………………………………………………………………………..
Touch Button ………………………………………………………………………………………………………………………
Playing Multimedia File
Movie menu ……………………………………………………………………………………………………………………..
Photo menu ……………………………………………………………………………………………………………………..
Music menu ……………………………………………………………………………………………………………………..
All files menu …………………………………………………………………………………………………………………..
Setup menu ……………………………………………………………………………………………………………………..
System Tab
Menu Language …………………………………………………………………………………..…………….
Text Encoding …………………………………………………………………………………………………….
Screen Saver ……………………………………………………………………………………………………….
System Upgrade ….....…………………………………………………………………………………………
Restore Default …………………………………………………………………………………………………..
System Version ……………………………………………………………………………………………….....
HDD Capacity ……………………………………………………………………………………………………..
Movie Tab
Aspect Ratio ………………………………………………………………………………………………………..
Brightness …………………………………………………………………………………………………………….
Contrast ………………………………………………………………………………………………………………..
TV System …………………………………………………………………………………………………………….
Subtitle Size …………………………………………………………………………………………………………
DivX Register ……………………………………………………………………………………………………….
DivX Deregister ……………………………………………………………………………………………………
Photo Tab
Slide show Time …………………………………………………………………………………………………
Transition Effect ………………………………………………………………………………………………….
Background Music ……………………………………………………………………………………………..
Play Mode …………………………………………………………………………………………………………….
Music Tab
Night Mode ………………………………………………………………………………………………………….
Digital Output ……………………………………………………………………………………………………..
Play Mode …………………………………………………………………………………………………………….
EQ Mode ………………………………………………………………………………………………………………
Safely remove (Unplug) for Windows …………………………………………………………………………….
FAT32 format for Mac …..………………………………………………………………………………………………….
Troubleshooting (FAQ) ……………………………………………………………………………………………………..
LG Service Site …………………………………………………………………………………………………………………..
03
05
07
08
09
10
13
17
18
20
22
24
25
26
26
27
28
29
29
30
31
32
32
33
34
35
35
36
36
37
37
38
38
39
40
41
42
43
47
LG Multimedia HDD User’s Manual
2
Page 3
Check Before Use
Check before use
- This user manual contains instructions on how to use the product properly.
- Please read this manual carefully.
- Be sure to follow the instructions and notices.
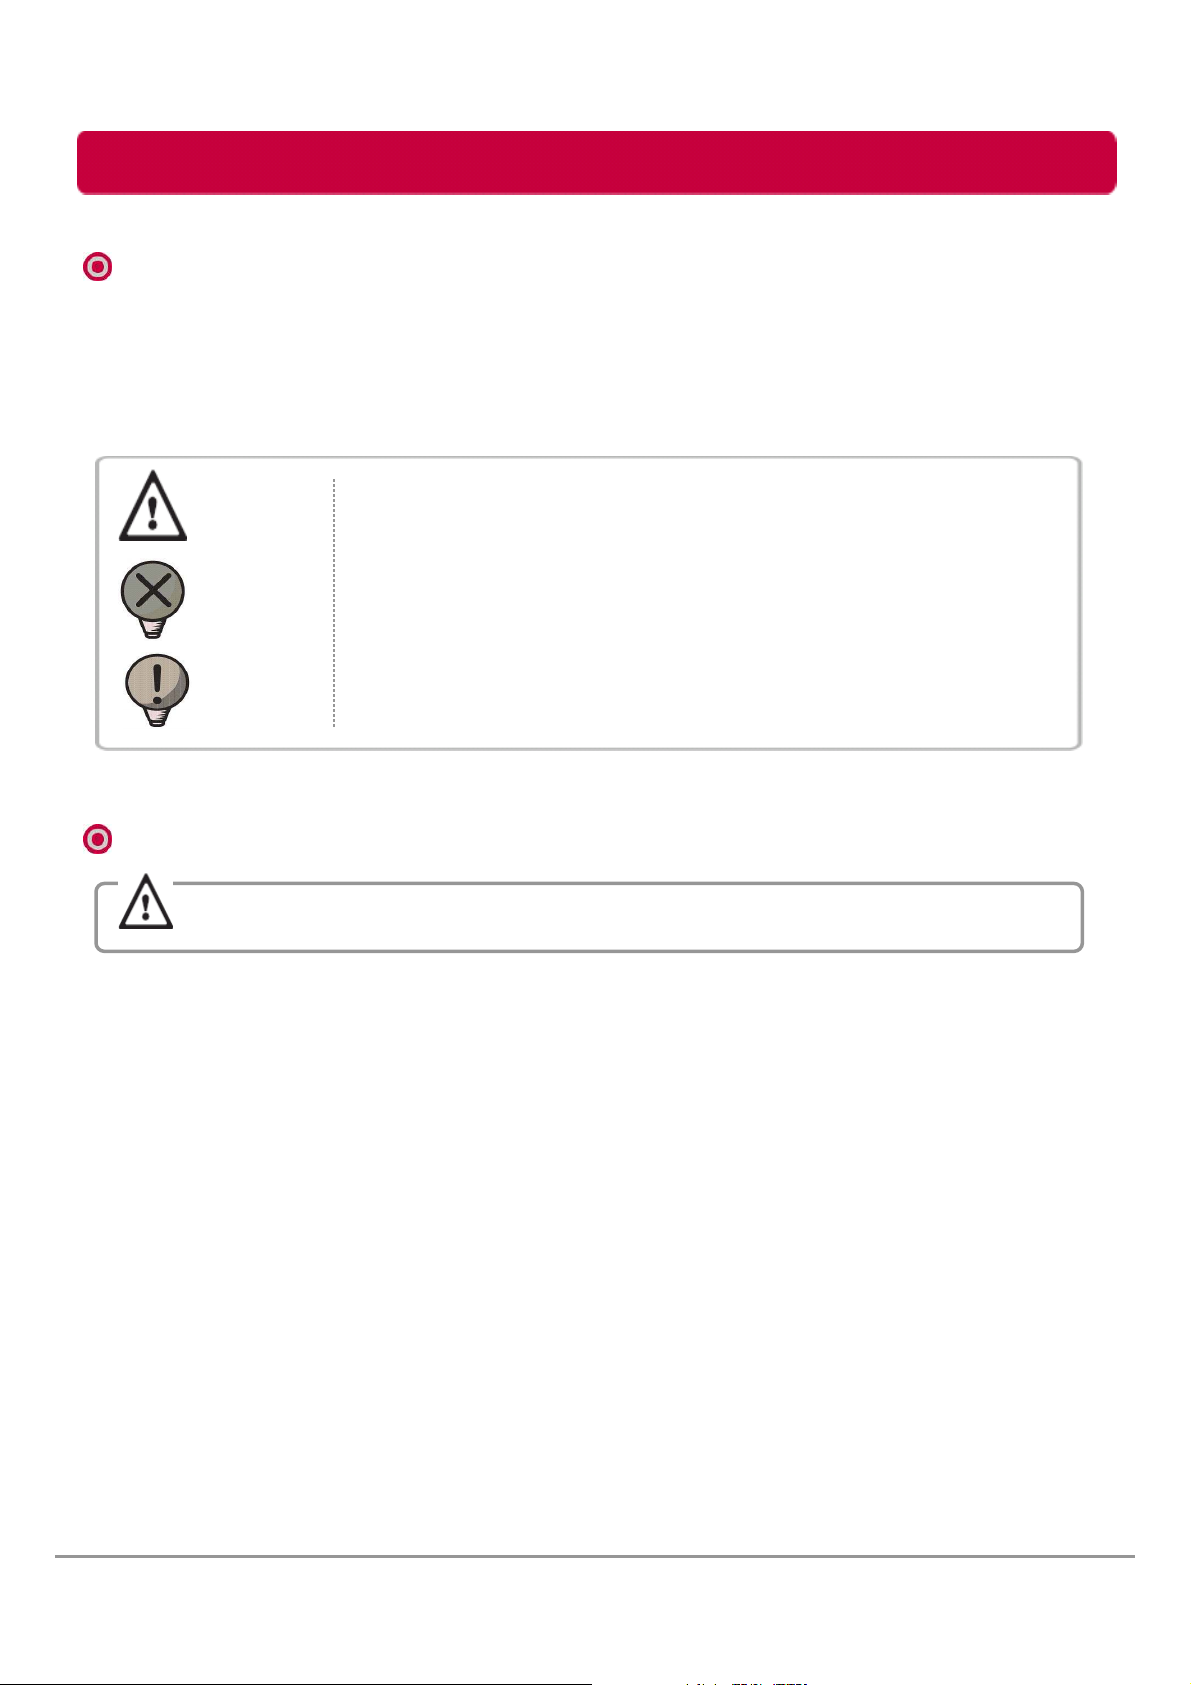
Notes are divided into “Warning”, “Caution” and “Tip” each denotes the following:
Warning
Caution
Tip
Failure to follow the instructions below may result in injuries
or product damage.
Failure to follow the instructions below may result in serious injuries
or product damage.
It provides a recommendation to prevent product failure or
malfunction in advance when using the product.
Warning
Warning
It may cause defect under following circumstance.
- Keep away from humidity, dust, and soot (may cause fire or electrocution).
- Keep away from areas with temperature of above 35℃(95℉).
- Keep away from magnetic fields, water, heat.
- Do not use during thunder and lightning.
- Do not drop the product or place heavy objects on it.
The product may not work properly in areas with high static electricity.
Make sure no dust or other foreign matter gets inside the port. It may cause data
damage.
Keep important data separately. We shall not be responsible for any loss of or
damage to saved or recorded data caused by product defect, product repair or
any other reason.
Fan may make small noise depending on the environment.
LG Multimedia HDD User’s Manual
3
Page 4

Check Before Use
Caution
Caution
- LG Electronics will replace this product if it is faulty due to a manufacturing or
materials defect, except where damage is caused by your use or negligence.
- LG EXCLUDES LIABILITY FOR ALL CONSEQUENTIAL AND OTHER LOSS,
INCLUDING LOSS OF DATA.
- Do not use this product while it is in the pouch, it may cause the product to
malfunction.
- Do not touch the heat vent or Fan when the unit is operating. It may become
hot and may result in burns.
- This product is intended for use with TV’s and monitors. Do not use this product
other than its intended purpose.
- Do not use the product for the commercial purpose.
- Do not use the product for a long time without cooling it down.
- Do not attempt to modify this product in any way without authorization from
LG Electronics. Unauthorized modification could void the user’s authority to operate
this product
- Do not place this product on a soft surface where the heat vent can be blocked.
i.e. blanket, pouch, bed and etc. The heat vent is located on the bottom of the unit.
- DO NOT PLACE THIS PRODUCT WHERE IT CAN BE REACHED BY CHILDREN.
THE PRODUCT CAN GET HOT WHILE WORKING. IT MAY RESULT IN BURNS.
- If smoke, unpleasant odor or noise is produced, unplug the power and peripherals
immediately and remove all of cables.
- Do not disassemble, repair or rebuild the product.
- Do not pull out the USB cable while the Multimedia HDD operating. (The product
may cause malfunction.)
LG Multimedia HDD User’s Manual
4
Page 5
Regulations
Regulations
Dolby
* Manufactured under license from Dolby
Laboratories.
* "Dolby" and the double-D symbol are
trademarks of Dolby Laboratories.
DivX
ABOUT DIVX VIDEO: DivX® is a digital video
format created by DivX,Inc. This is an official
DivX Certified device that plays DivX video.
Visit www.divx.com for more information and
software tools to convert your files into DivX video.
ABOUT DIVX VIDEO-ON-DEMAND:
This DivX Certified® device must be registered
in order to play DivX Video-on-Demand (VOD) content.
To generate the registration code, locate the DivX VOD section
in the device setup menu. Go to vod.divx.com with this code
to complete the registration process and learn more about DivX VOD.
“DivX Certified to play DivX video up to HD 1080p, including premium content.”
“Pat. 7,295,673; 7,519,274; 7,515,710”
DTS
Manufactured under license under U.S. Patent #’s:
5,451,942; 5,956,674; 5,974,380; 5,978,762;
6,487,535 & other U.S. and worldwide patents
issued & pending. DTS and the Symbol are
registered trademarks, & DTS 2.0+ Digital Out
and the DTS logos are trademarks of DTS, Inc.
Product includes software.
© 1996-2009 DTS, Inc., All Rights Reserved.
LG Multimedia HDD User’s Manual
5
Page 6

Regulations
Regulations
Battery directive
This symbol is applicable in Europe Union.
Hand over used batteries to recycling collection point
of waste batteries.
FCC
“This device complies with Part 15 of the FCC Rules.
Operation is subject to the following two conditions:
(1) this device may not cause harmful interference, and
(2) this device must accept any interference received,
including interference that may cause undesired operation”
LG Multimedia HDD User’s Manual
6
Page 7

Package Contents
Package Contents
Components
1. Multimedia HDD
2. Remote control
3. SCART adapter (EU only)
4. USB Y-cable
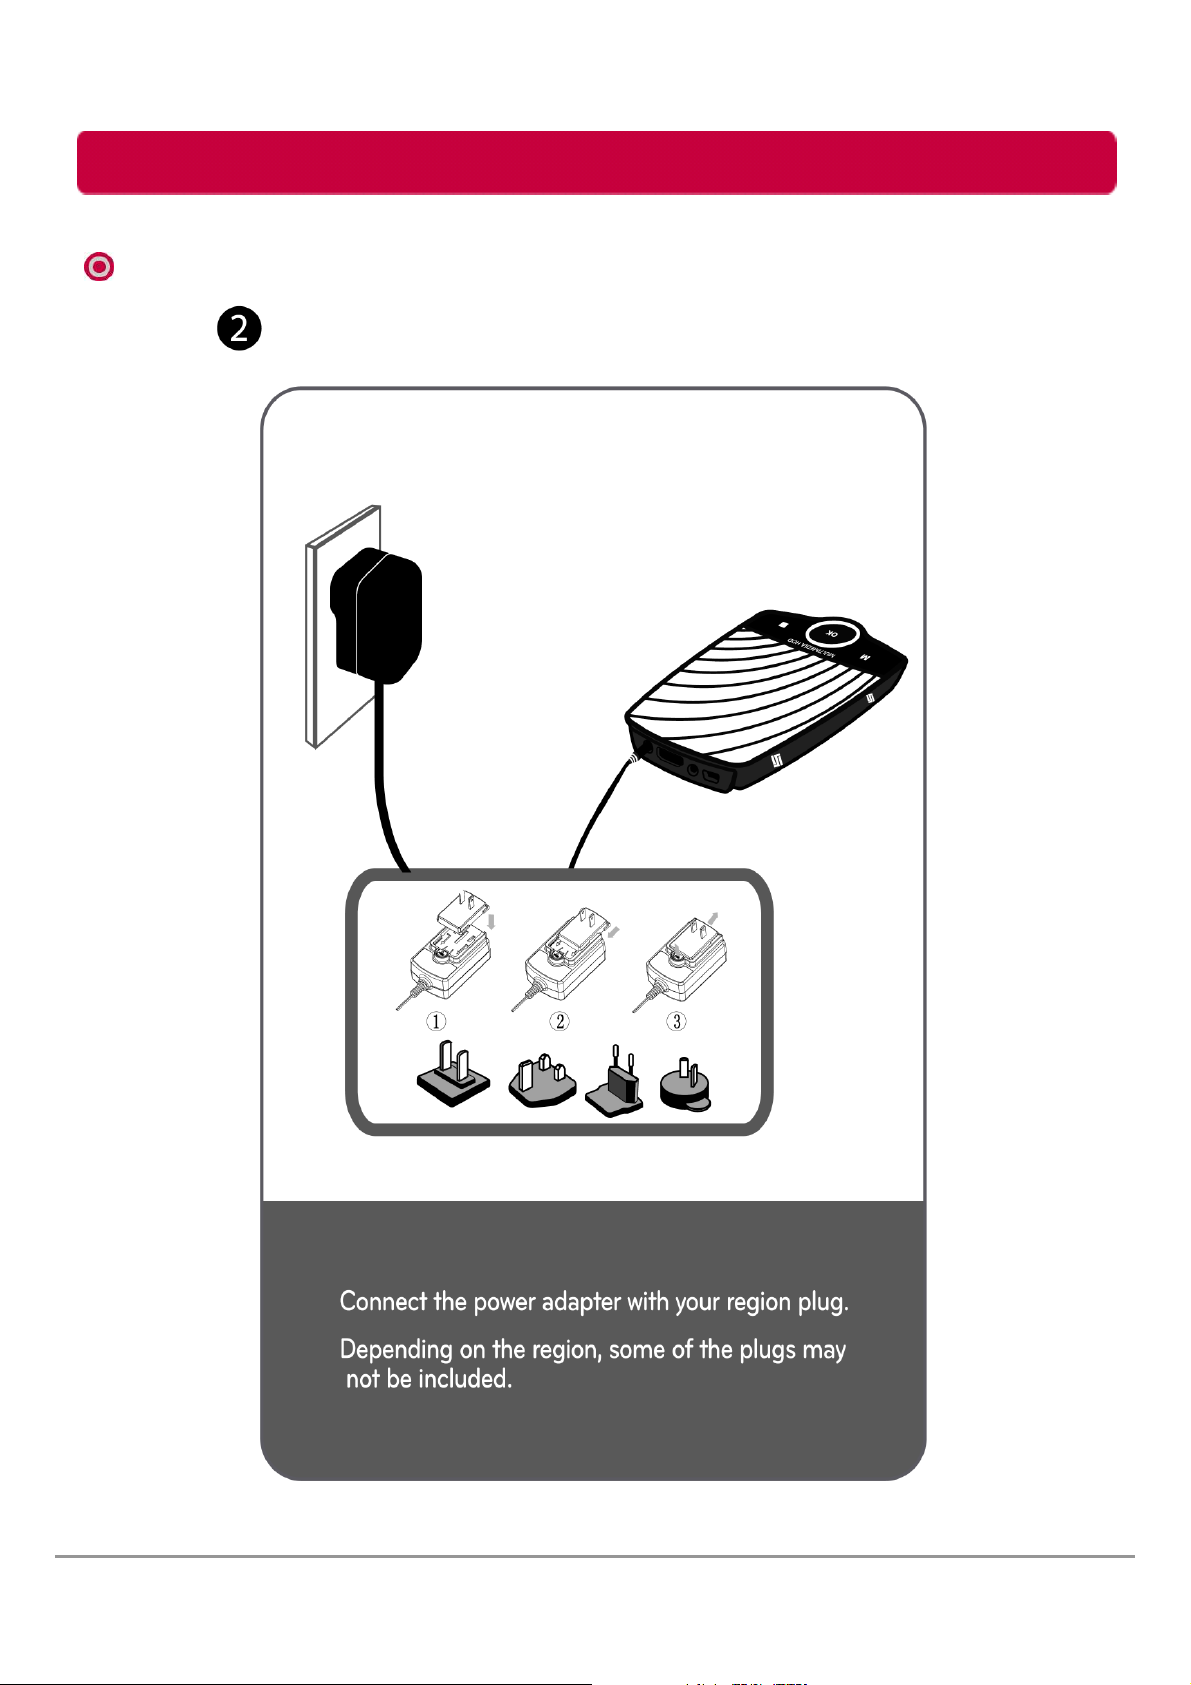
※ Components are subject to change without prior notice to improve the product quality.
※ Depending on the region, some of the plugs may not be included.
※ The accessories included may differ from the images.
LG Multimedia HDD User’s Manual
5. Power adapter (Optional Plug)
6. A/V composite cable
7. Quick guide
8. Manual CD
7
Page 8
Package Contents
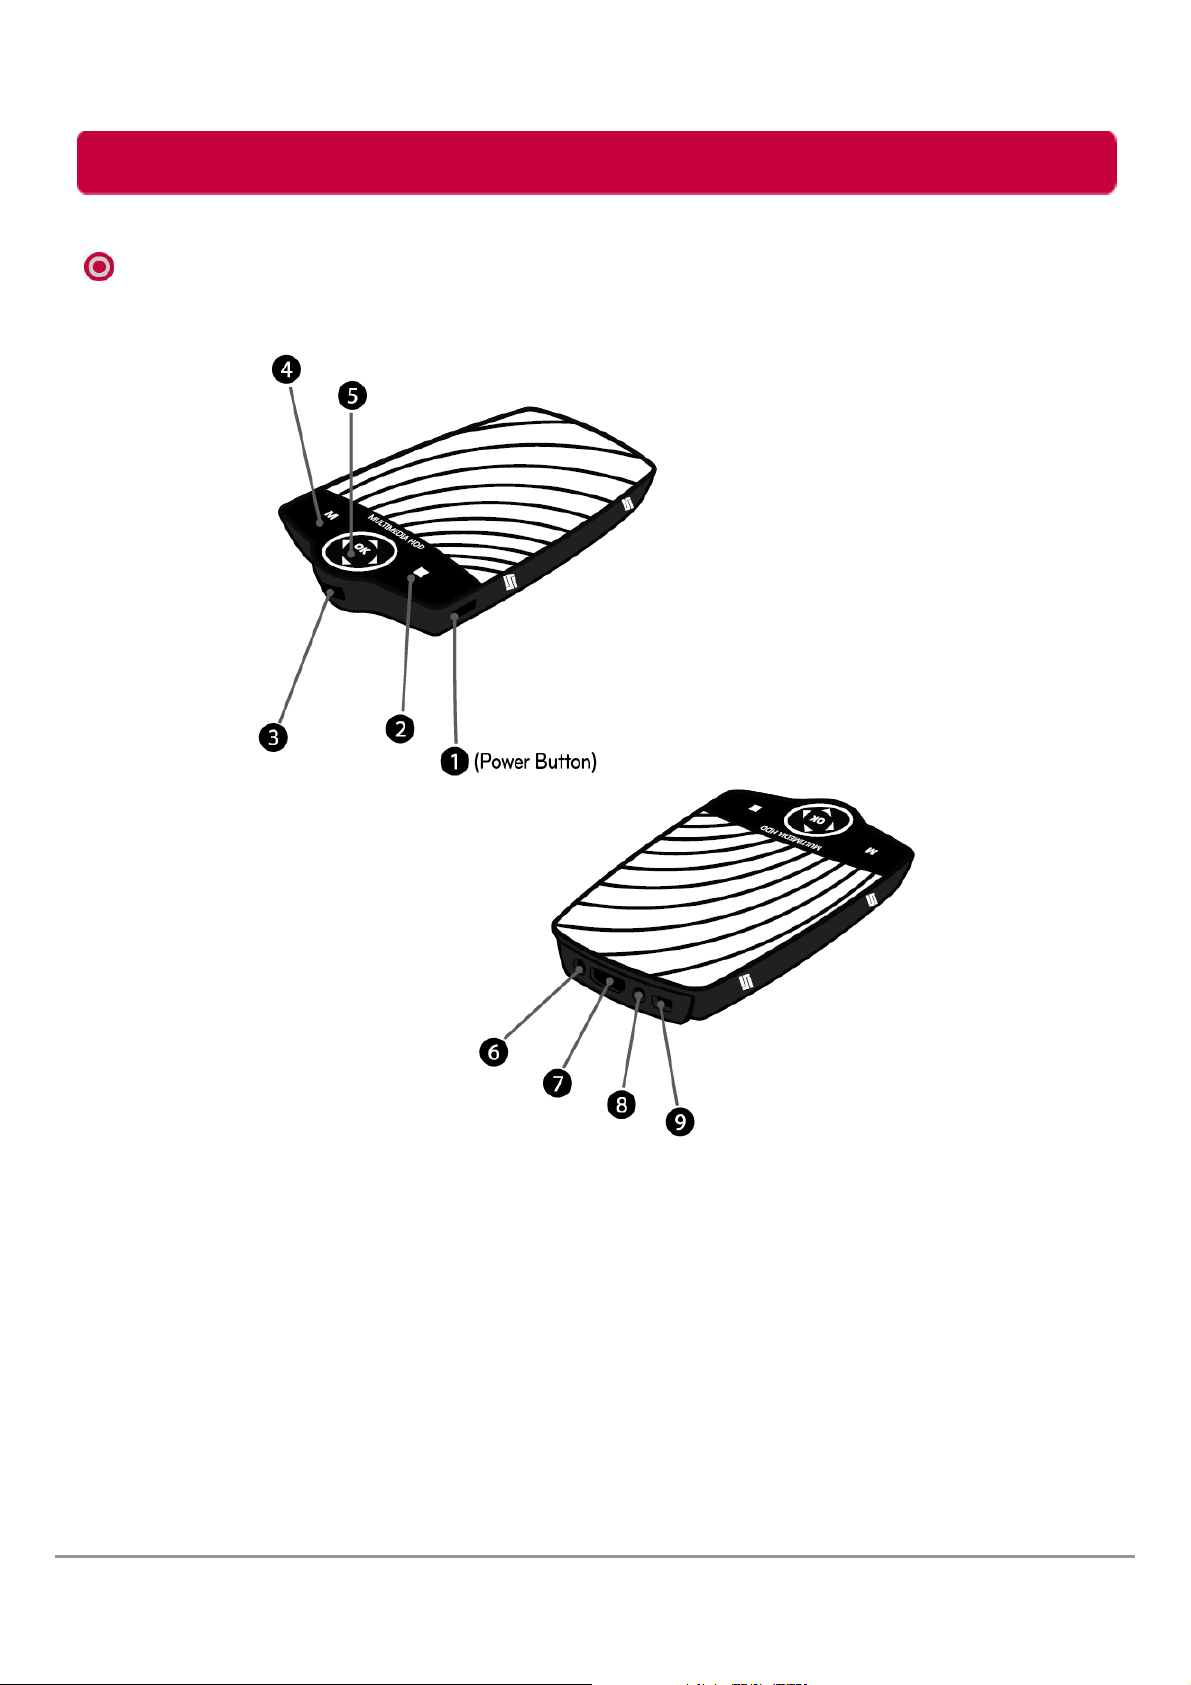
Name of Parts
Name of Parts
1. Power Button
2. Stop & Return (Touch Button)
3. IR (for remote control)
4. Menu (Touch Button)
5. Left, Right, OK, Up, Down
(Touch Button)
LG Multimedia HDD User’s Manual
6. Power supply connector
7. HDMI connector
8. A/V composite (Phone Jack type)
9. USB port (Mini-B type)
8
Page 9
Package Contents
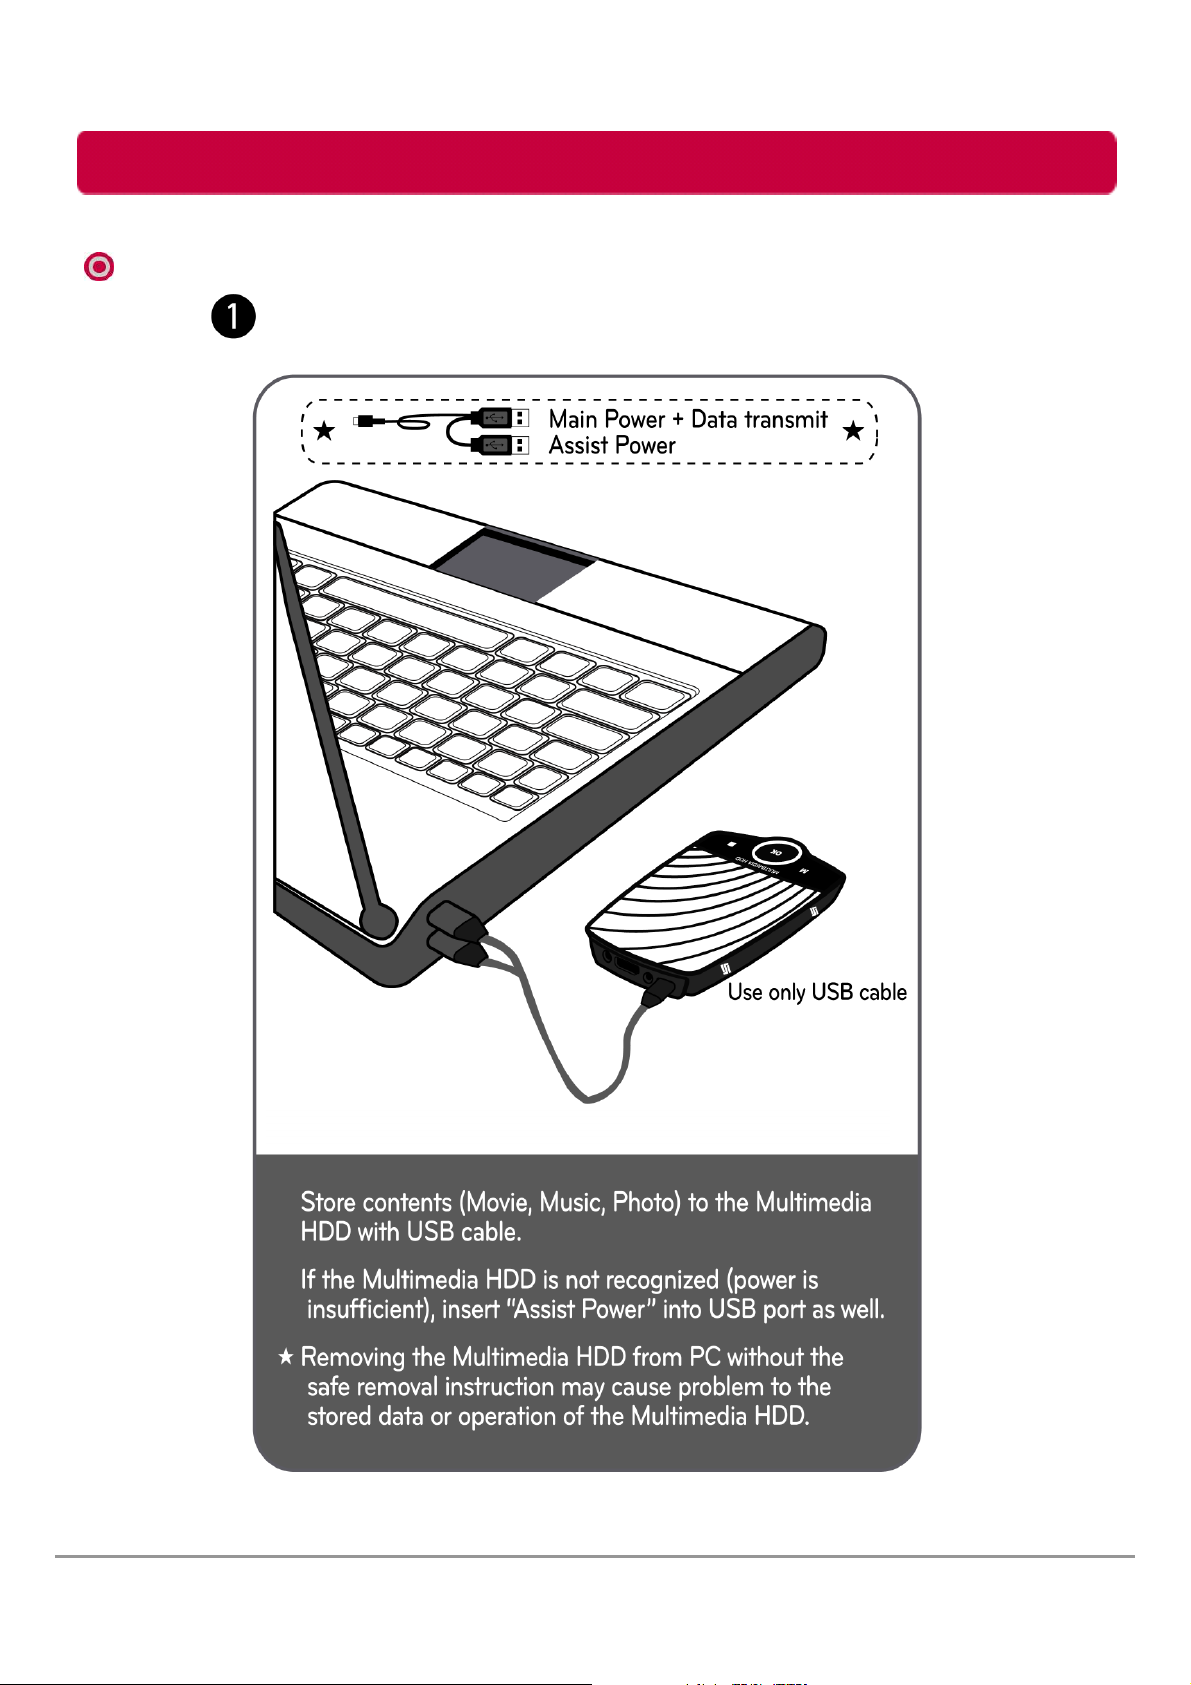
Connect Multimedia HDD to PC
Connect to PC
LG Multimedia HDD User’s Manual
9
Page 10
Package Contents
Connect Multimedia HDD to TV
Connect to TV
LG Multimedia HDD User’s Manual
10
Page 11

Package Contents
Connect Multimedia HDD to TV
Connect to TV
LG Multimedia HDD User’s Manual
11
Page 12
Package Contents
Connect Multimedia HDD to TV
Connect to TV
LG Multimedia HDD User’s Manual
12
Page 13
Package Contents
Remote control
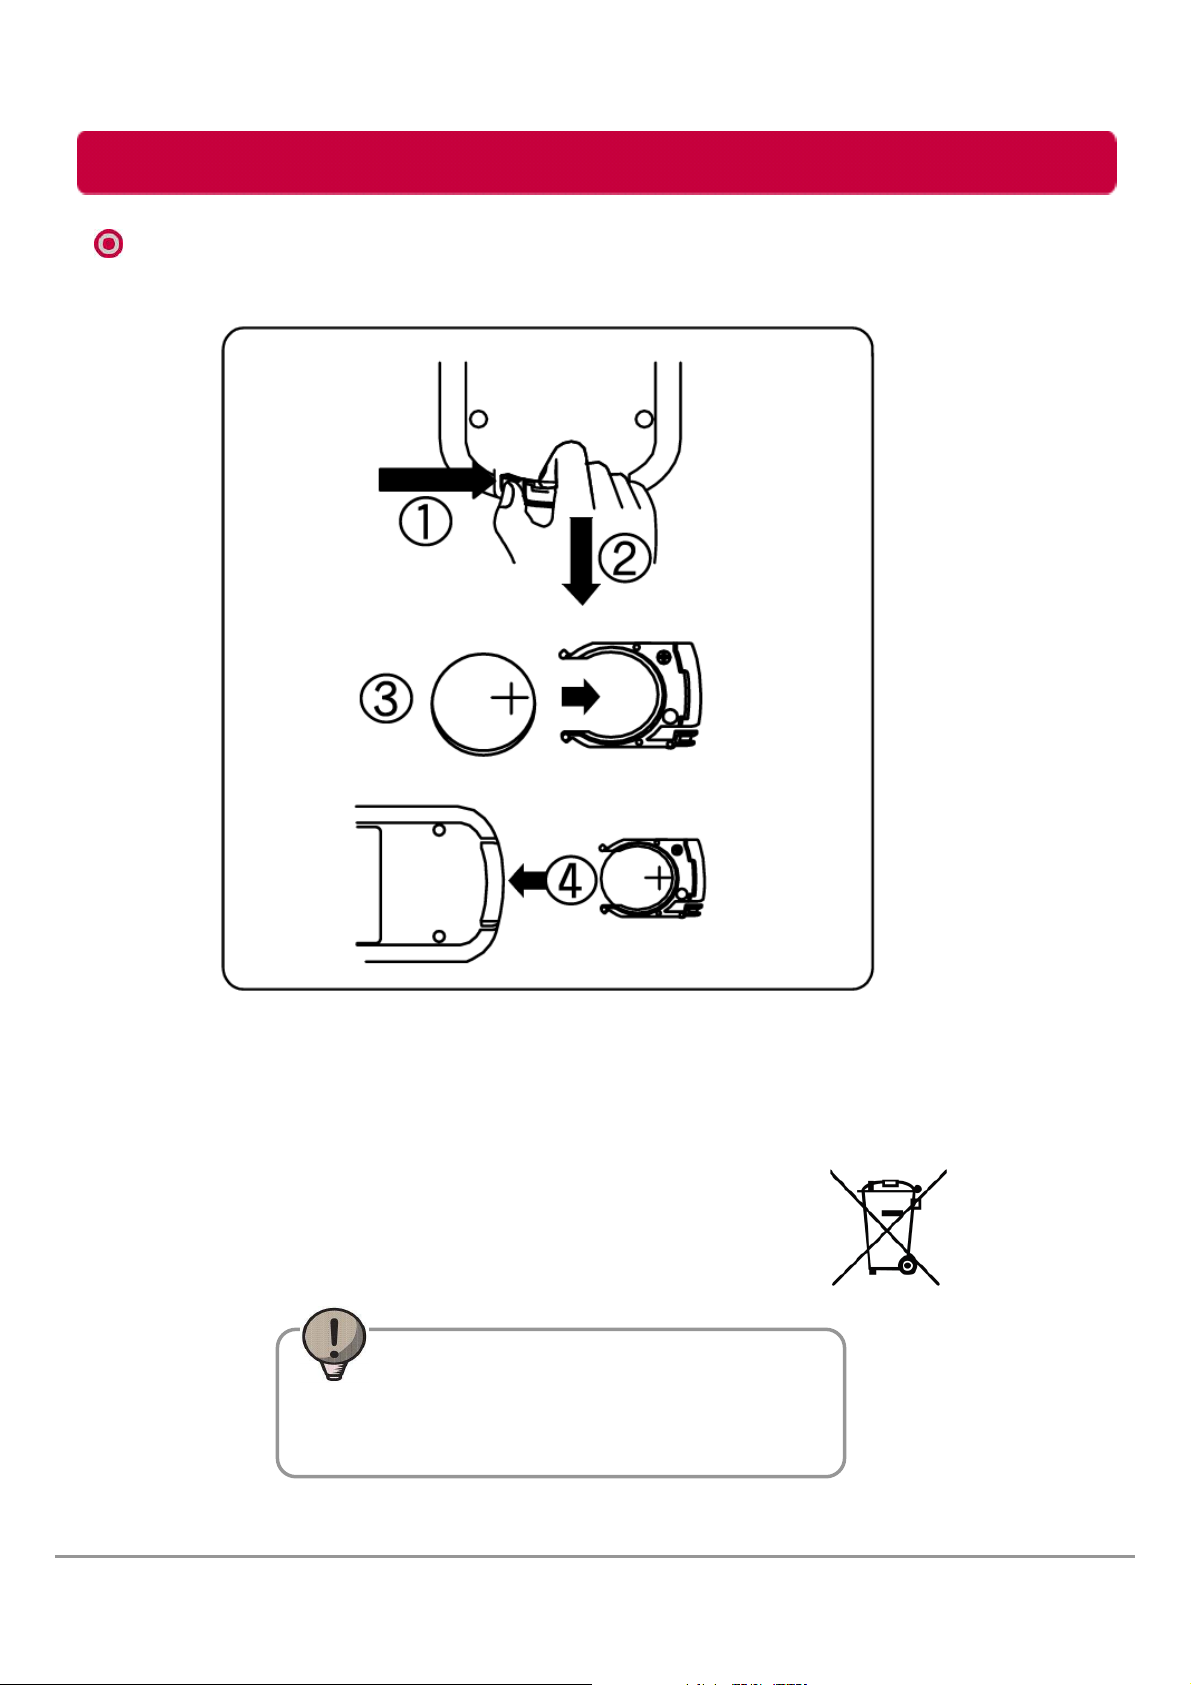
Remote control battery installation
*To install/change the remote control battery pull out the battery tray by
pulling the tab. Place the battery with the + side facing up. Insert the
battery tray back into the remote control in its original position.
*This symbol is applicable in Europe Union.
Hand over used batteries to recycling collection point
of waste batteries.
Tip
Battery Type : Li Coin Battery CR2032
Operating Voltage : 3V
LG Multimedia HDD User’s Manual
13
Page 14
Package Contents
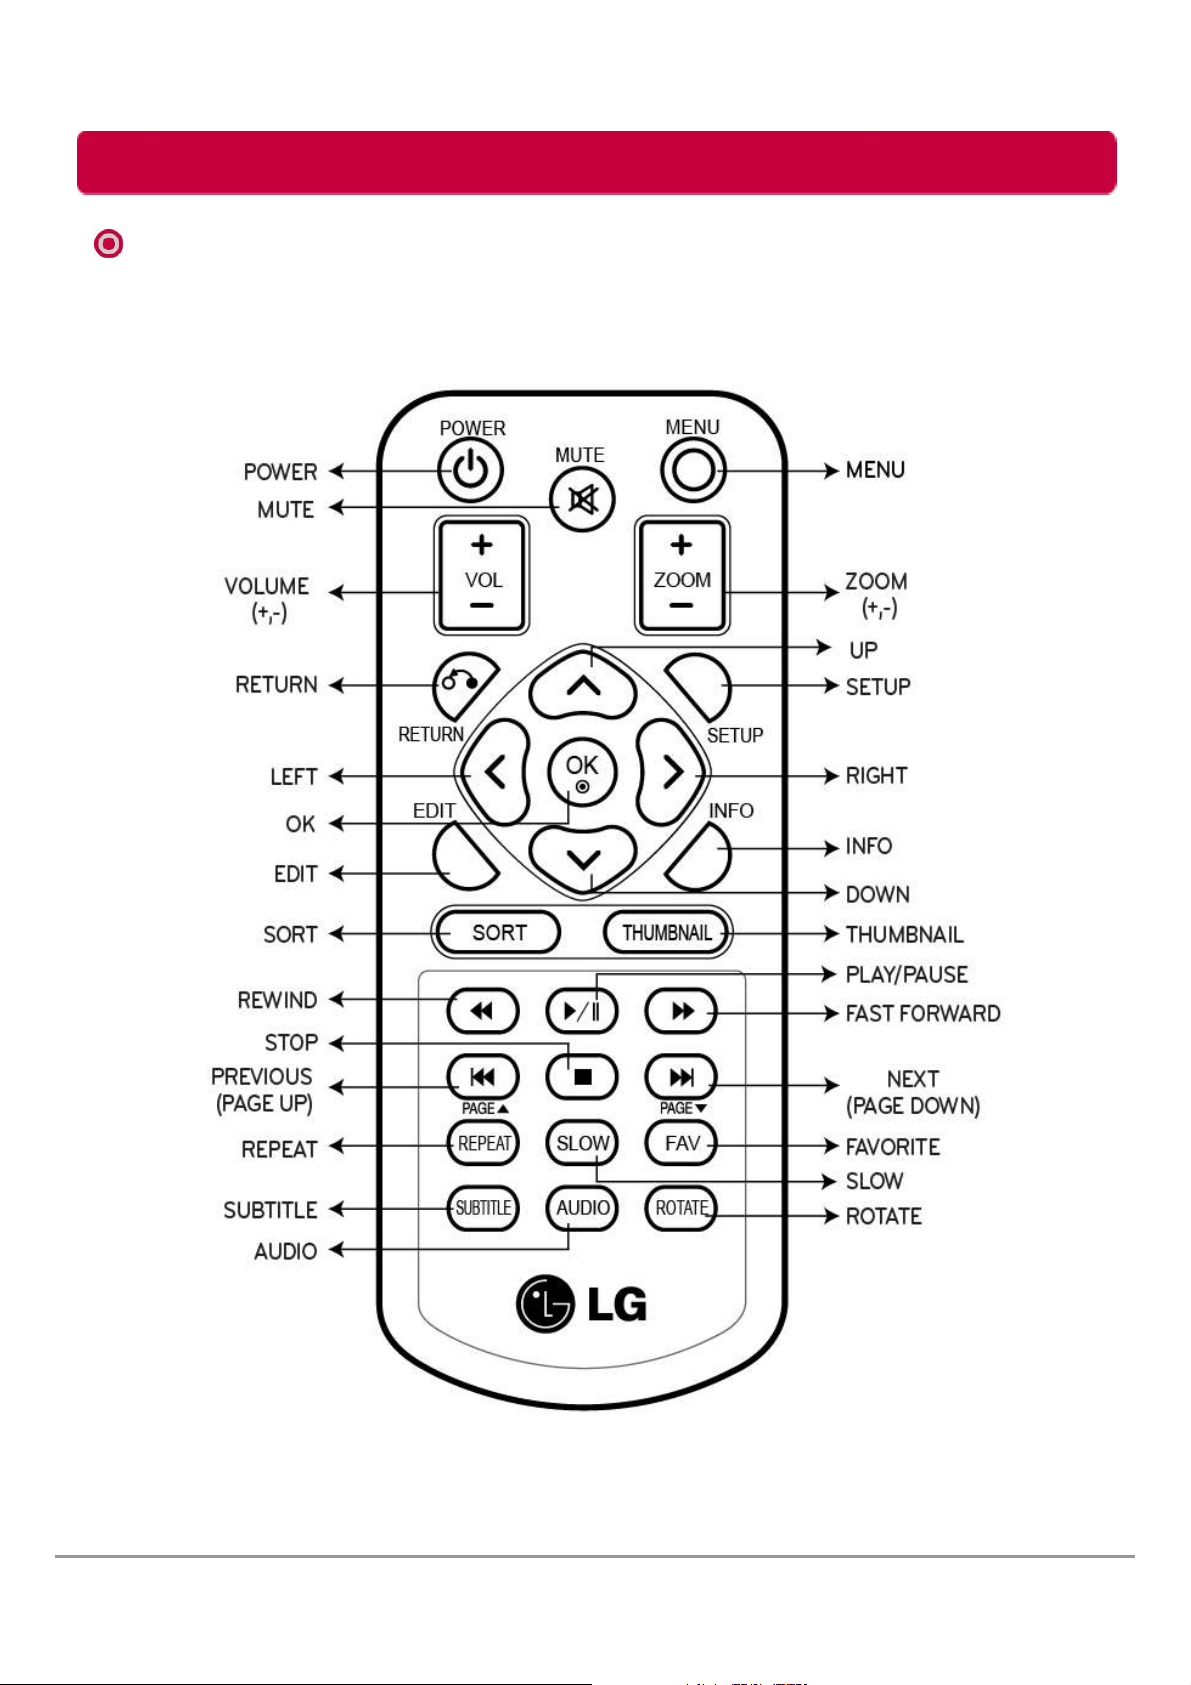
Remote control
Remote control
*If you press and hold the button, it may jump to the next step due to the remote control sensitivity.
LG Multimedia HDD User’s Manual
14
Page 15

Package Contents
Remote control
Remote control
*If you press and hold the button, it may jump to the next step due to the remote control sensitivity.
LG Multimedia HDD User’s Manual
15
Page 16

Package Contents
Remote control
Remote control
*If you press and hold the button, it may jump to the next step due to the remote control sensitivity.
LG Multimedia HDD User’s Manual
16
Page 17

Package Contents
Touch Button
Touch Button
*If you press and hold the button, it may jump to the next step due to the touch button sensitivity.
LG Multimedia HDD User’s Manual
17
Page 18

Playing Multimedia File
Movie Menu
*On main menu, use LEFT and RIGHT to anchor on the movie icon,
and press
*Use the movie menu to play movie files from the Multimedia HDD.
This Multimedia HDD cannot playback DRM files.
(The On Screen Display on your model may be slightly different.)
*Use the UP and DOWN for navigation in the movie menu.
Press
Tip) Only movie files are shown on the list.
Tip) Specific files cannot support some of functions.
LG Multimedia HDD User’s Manual
OK to enter the movie menu.
OK to play the movie file.
18
Page 19

Playing Multimedia File
Movie Menu
수정
FUNCTIONS
1. Change the sub menu (All files, Movie, Photo and Music)
Press LEFT and RIGHT to change the sub menu (All files, Movie, Photo and Music)
Tip) For user’s convenience, change the folder first.
(Depending on the sub menu, some of files are not shown on the list)
2. Slow motion, Rewind / Forward movie
Slow motion: Press SLOW to see the slow motion. (3/4, 1/2, 1/4, 1/8, 1/16x)
Rewind : Press REW to fast rewind the current playback. (2X, 4X, 8X, 16X, 32X)
Forward : Press FF to fast forward the current playback. (2X, 4X, 8X, 16X, 32X)
Press OK to return to the regular playback.
Tip) Depending on the file properties, actual running speed may differ from displayed speed.
Specific files may not support some of FF/REW/SLOW.
3. Zoom
Press ZOOM(+, -) to zoom in/out during movie playback. (2x, 3x, 4x, 8x)
4. Stop playing movie
Press RETURN to stop/return playback when playing movie.
Press STOP to stop playing.
Tip) To resume playing from the beginning or where you left off,
you have to stop playing movie with RETURN before the power off.
5. Volume
Press VOLUME(+, -) to increase/decrease the volume, MUTE to mute/resume audio output.
(To maximize the volume, increase the TV volume)
6. Subtitle / Movie audio track
Press SUBTITLE to display/hide the subtitle setting menu. File name of subtitle and movie should be
same. Subtitle may not be displayed properly, depending on TV aspect ratio or subtitle file property.
(If there is no subtitle, it is not working)
Tip) Press UP, DOWN and OK to change the subtitle, text encoding, time sync, color, size and offset.
Press AUDIO to change the available audio track of movie.
(If there is no dubbing audio track, it is not working)
7. File rename and delete
Press EDIT to delete/rename file on the list.
8. Go to Setup/Main menu
Press SETUP to go the setup menu. Press MENU to go the main menu.
Tip) (NTSC : A/V phone jack mode (480P), HDMI mode (480P, 720P 60Hz, 1080i 60Hz, 1080p 60Hz)
PAL : A/V phone jack mode (576P), HDMI mode (576P, 720P 50Hz, 1080i 50Hz , 1080p 50Hz))
9. Sort
Press SORT the files on list. (Name, date, type and size)
Caution)
In case of display “Bitstream Error” during playing, please press FF to skip the error section of
abnormal file before message comes up again. The movie may or may not play depending on the
error severity of file. It may not work depending on the file.
LG Multimedia HDD User’s Manual
19
Page 20

Playing Multimedia File
20
Photo Menu
*On main menu, use LEFT and RIGHT to anchor on the photo icon,
and press
*Use the photo menu to play photo files from the Multimedia HDD.
This Multimedia HDD cannot playback DRM files.
(The On Screen Display on your model may be slightly different.)
*Use the UP and DOWN for navigation in the photo menu.
Press
Tip) Only photo files are shown on the list.
Tip) Specific files cannot support some of functions.
LG Multimedia HDD User’s Manual
OK to enter the photo menu.
OK to play the photo file.
Page 21

Playing Multimedia File
Photo Menu
FUNCTIONS
1. Change the sub menu (All files, Movie, Photo and Music)
Press LEFT and RIGHT to change the sub menu (All files, Movie, Photo and Music)
Tip) For user’s convenience, change the folder first.
(Depending on the sub menu, some of files are not shown on the list)
2. Go to previous, next photo file
Previous : Press PREVIOUS or LEFT to go to previous photo file.
Next : Press NEXT or RIGHT to go to next photo file.
3. Zoom
Press ZOOM to zoom in/out during photo playing. (2x, 4x, 8x, 16x)
4. Rotate the photo
Press Rotate to rotate the picture to 90 degrees. (Clockwise)
5. Stop playing photo
Press RETURN to stop/return playback when playing photo.
Press STOP to stop playing.
6. File rename and delete
Press EDIT to delete/rename file on the list.
7. Go to Setup/Main menu
Press SETUP to go the setup menu. Press MENU to go the main menu.
Tip) Select “Folder” or “Favorite” (Setup Photo Background music) to listen
to music while viewing photo files.
8. Thumbnail
Press THUMBNAIL to change displayed photos in thumbnail/list.
9. Favorite
Press FAV to add/delete music file in favorite folder for Slideshow background music.
10. Sort
Press SORT the files on list. (Name, date, type and size)
LG Multimedia HDD User’s Manual
21
Page 22

Playing Multimedia File
22
Music Menu
*On main menu, use LEFT and RIGHT to anchor on the music icon,
and press
*Use the music menu to play music files from the Multimedia HDD.
This Multimedia HDD cannot playback DRM files.
(The On Screen Display on your model may be slightly different.)
*Use the UP and DOWN for navigation in the music menu.
Press
Tip) Only music files are shown on the list.
Tip) Specific files cannot support some of functions.
LG Multimedia HDD User’s Manual
OK to enter the music menu.
OK to play the music file.
Page 23

Playing Multimedia File
23
Music Menu
FUNCTIONS
1. Change the sub menu (All files, Movie, Photo and Music)
Press LEFT and RIGHT to change the sub menu (All files, Movie, Photo and Music)
Tip) For user’s convenience, change the folder first.
(Depending on the sub menu, some of files are not shown on the list)
2. Go to previous, next music file
Previous : Press PREVIOUS to go to previous music file.
Next : Press NEXT to go to next music file.
3. Rewind / Forward music
Rewind : Press REW to fast rewind the current playback. (2X, 4X, 8X, 16X, 32X)
Forward : Press FF to fast forward the current playback. (2X, 4X, 8X, 16X, 32X)
Press OK to return to the regular playback.
Tip) Depending on the file properties, actual running speed may differ from displayed speed.
Specific files may not support some of FF/REW/SLOW.
4. Volume
Press +, - to increase/decrease the volume, MUTE to mute/resume audio output.
(To maximize the volume, increase the TV volume)
5. Stop playing music
Press RETURN to stop/return playback when playing music.
Press STOP to stop playing.
6. File rename and delete
Press EDIT to delete/rename file on the list.
7. Go to Setup/Main menu
Press SETUP to go the setup menu. Press MENU to go the main menu.
Tip) Repeat-track, Repeat-All, Shuffle and Off Play modes can be selected
in “Setup Music Play Mode”.
Tip) Select “Folder” or “Favorite” (Setup Photo Background music) to listen
to music while viewing photo files.
8. Favorite
Press FAV to add/delete music file in favorite folder for Slideshow background music.
9. Sort
Press SORT the files on list. (Name, date, type and size)
Caution)
To play music file with all functions support in setup menu, please play through music menu.
In case of playing music file through All files menu, some functions may not be supported.
LG Multimedia HDD User’s Manual
Page 24

Playing Multimedia File
24
All Files Menu
*On main menu, use LEFT and RIGHT to anchor on the All files icon,
and press
*Use the All files menu to play movie, photo and music files from the
Multimedia HDD.
*This Multimedia HDD cannot playback DRM files.
(The On Screen Display on your model may be slightly different.)
*Use the UP and DOWN for navigation in the All files menu.
Press
*For more detail, please see the “Movie, photo and music menu” Chapter.
Tip) Movie, photo and music files are shown on the list.
Tip) Specific files cannot support some of functions.
LG Multimedia HDD User’s Manual
OK to enter the All files menu.
OK to play the movie, photo and music files.
Page 25

Playing Multimedia File
25
Setup Menu
*On main menu, use LEFT and RIGHT to anchor on the setup icon,
and press
*Use
*Use
Tip) Most of changes will be saved automatically without any further notice.
*Exit Setup menu, press SETUP or RETURN
(The On Screen Display on your model may be slightly different.)
LG Multimedia HDD User’s Manual
LEFT and RIGHT to toggle between System, Movie, Photo and Music.
UP and DOWN to select sub menu of System, Movie, Photo and Music,
and press
the setting.
OK to enter the setup menu.
OK to access the next level items, and press again to confirm
Page 26

Playing Multimedia File
26
Setup Menu – System Tab
Language : Select to choose the OSD (On Screen Display) language.
*Press
to select the items, press OK to confirm the setting.
*Total 15 different languages are supported, they are English, Spanish, French,
German, Italian, Russian, Polish, Portuguese, Dutch, Greek, Turkish, Korean,
Chinese, Simplified Chinese and Japanese.
(Depending on the region, supported GUI language may change)
OK to unfold the sub items of Language, and use UP and DOWN
Text Encoding : Select to choose the text encoding subtitle language.
*Press
select the items, press
LG Multimedia HDD User’s Manual
OK to show the checkbox of Text Encoding, and use UP and DOWN to
OK to confirm the setting.
Page 27

Playing Multimedia File
Setup Menu – System Tab
Tip) Language – Text encoding table
Portuguese, Spanish, Italian, Dutch
Text encodingLanguages
EnglishEnglish
WesternFrench, German, Polish
KoreanKorean
CyrillicRussian
TurkishTurkish
GreekGreek
繁體中文(BIG5)Chinese
简体中文(GBK)Simplified Chinese
JapaneseJapanese
Screen Saver : Select to set screen saver time.
*Press
the items, press
*User can select among Off / 5 / 10 / 20 minutes.
LG Multimedia HDD User’s Manual
OK to unfold the sub items of Screen Saver, use UP and DOWN to select
OK to confirm the setting.
27
Page 28

Playing Multimedia File
28
Setup Menu – System Tab
System Upgrade : Select to upgrade system firmware.
*Put new firmware named
HDD through USB port by PC or Mac.
(※ You can get the latest firmware file at www.lge.com)
*Press OK to show the sub items of System Upgrade, choose “Cancel” to abort
the operation and choose “Upgrade” to upgrade the system firmware. Afterward,
the system will reboot and the firmware upgrade page begin to show. After
firmware upgrade completed, the system will reboot and show the language
selection page, just like below.
“install.img” under the root directory of multimedia
Caution)
- Do not turn off the power while the firmware is updating.
- If the firmware is not updated correctly the Multimedia HDD will not function properly.
(Refer to #14 in Trouble Shooting)
LG Multimedia HDD User’s Manual
Page 29

Playing Multimedia File
29
Setup Menu – System Tab
Restore Default : Select to restore factory setting.
*Press
Cancel or Restore. Choose “Cancel” to abort the operation and “Restore” to
start to restore factory setting.
*After Restore to default is completed, the system will reboot and show the
language selection page.
System Version : Show the system version.
OK to show sub items of Restore Default, use UP and DOWN to select
*System Version will be displayed.
LG Multimedia HDD User’s Manual
Page 30

Playing Multimedia File
30
Setup Menu – System Tab
HDD Capacity : Show the hard disk capacity information.
*Information of HDD Capacity will be displayed.
LG Multimedia HDD User’s Manual
Page 31

Playing Multimedia File
Setup Menu – Movie Tab
Aspect Ratio : Select to set aspect ratio.
*Press
select the items, press
Pan Scan 4:3 Display a wide picture on the entire screen and cuts off the
Letter Box 4:3 Display a wide picture with two black borders on the top and
16:9 Compress the image to convert the whole image.
OK to unfold the sub items of aspect ratio, and use UP and DOWN to
OK to confirm the setting.
redundant portions. Select when a standard 4:3 TV is connected.
bottom of 4:3 screen. Select when a standard 4:3 TV is connected.
Select when a 16:9 TV is connected.
LG Multimedia HDD User’s Manual
31
Page 32

Playing Multimedia File
32
Setup Menu – Movie Tab
Brightness : Select to set brightness levels.
*Press
the brightness level, press
Contrast : Select to set contrast levels.
OK to pop up the brightness status bar, and use LEFT and RIGHT to adjust
OK to confirm the setting.
*Press
the contrast level, press
LG Multimedia HDD User’s Manual
OK to pop up the contrast status bar, and use LEFT and RIGHT to adjust
OK to confirm the setting.
Page 33

Playing Multimedia File
33
Setup Menu – Movie Tab
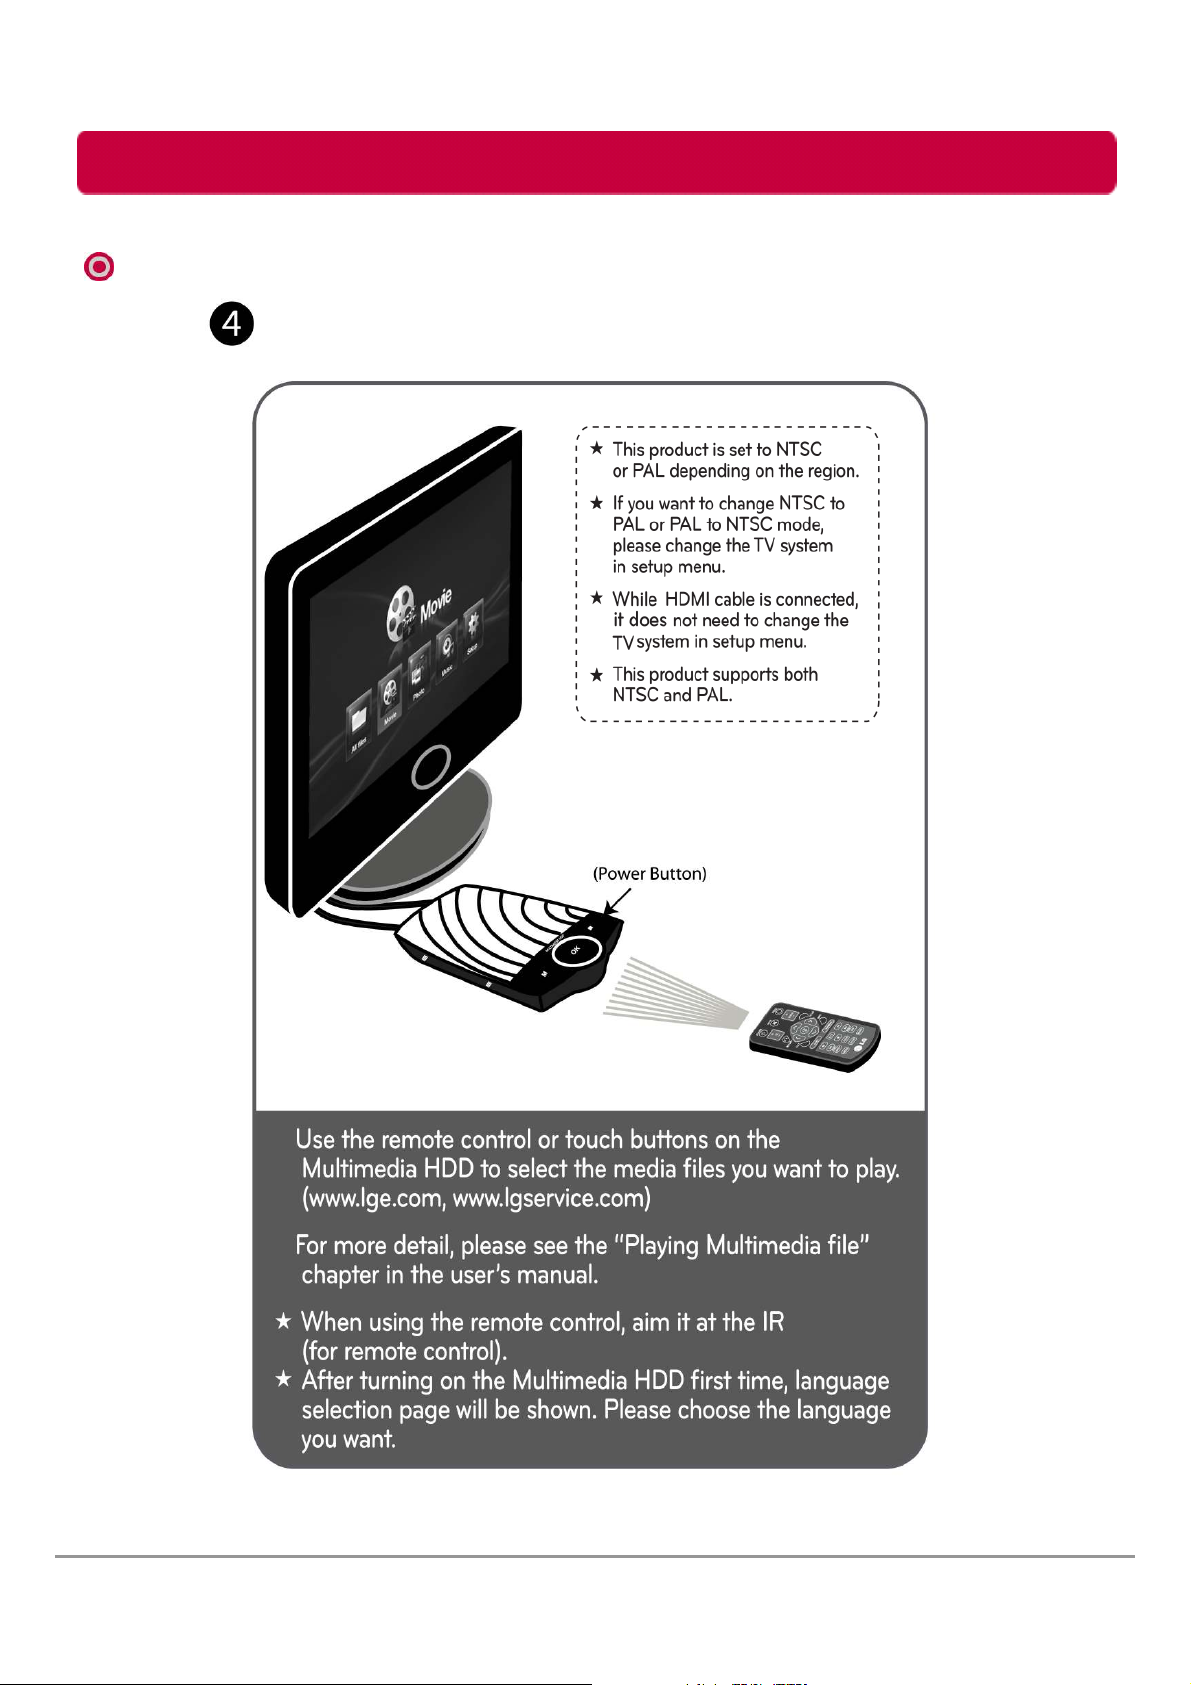
TV System : Select to adjust TV system.
*Press
select the items, press
1. A/V cable connection 1) NTSC TV 480P
2. HDMI Connection 1) NTSC TV 720P 60Hz, 1080i 60Hz, 1080p 60Hz
Tip) Auto: TV system (TV resolution) will be set automatically.
Tip) If the main menu does not show up on the screen after booting,
OK to unfold the sub items of TV System, and use UP and DOWN to
OK to confirm the setting.
2) PAL TV 576P
2) PAL TV 720P 50Hz, 1080i 50Hz, 1080p 50Hz
modify the resolution in TV System.
(For example, new firmware upgrade, HDMI to A/V cable change, etc)
LG Multimedia HDD User’s Manual
Page 34

Playing Multimedia File
34
Setup Menu – Movie Tab
Subtitle Size : Select to set subtitle size.
*Press
select the items, press
*User can select among Small / Normal / Large
OK to unfold the sub items of subtitle size, and use UP and DOWN to
OK to confirm the setting.
LG Multimedia HDD User’s Manual
Page 35

Playing Multimedia File
35
Setup Menu – Movie Tab
DivX Register : Select to set DivX Register.
*Press
DivX Deregister : Select to set DivX deregister.
*Press
press
OK to see the DivX register, press again to confirm the setting.
OK to see the DivX deregister, and use UP and DOWN to select the items,
OK to confirm the setting.
LG Multimedia HDD User’s Manual
Page 36

Playing Multimedia File
36
Setup Menu – Photo Tab
Slide Show Time : Select to set slide show time.
*Press
select the items, press
*User can select among Off / 2 / 5 / 10 / 30 Seconds / 1 minute / 2 minutes.
OK to unfold the sub items of Slide Show Timing, use UP and DOWN to
OK to confirm the setting.
Transition Effect : Select to set the transition effect of photos.
*Press
select the items, press
1) Shuffle : shuffle in and out
2) Waterfall : like a steep descent of water from a height
3) Left to Right : from left to right
4) Top to Bottom : from top to bottom
5) Strip Left Down : like strip cover from top of left to bottom of right
6) Cross Fade : fade in and fade out
7) Snake : like snake motion
8) Dissolve : like water dissolve
OK to unfold the sub items of Transition Effect, and use UP and DOWN to
OK to confirm the setting.
LG Multimedia HDD User’s Manual
Page 37

Playing Multimedia File
Setup Menu – Photo Tab
Background Music : Select to play the music file during slide show.
*Press
select the items, press
Off: Turn off the background music during.
Folder: Turn on the music on the same folder during slide show.
Favorite: Turn on the music on the favorite list during slide show.
Play Mode : Select to set Play Mode from Repeat Off/All.
OK to show sub items of background music, use UP and DOWN to
OK to confirm the setting.
*Press
to select the items, press OK to confirm the setting.
Repeat Off: Turn off the repeat function.
Repeat All: Select to repeat all files under the same folder.
LG Multimedia HDD User’s Manual
OK button to unfold the sub items of Play Mode, and use UP and DOWN
37
Page 38

Playing Multimedia File
38
Setup Menu – Music Tab
Night Mode : Select to toggle Night Mode on, off and comfort.
*This function reduces the maximum dynamic audio range.
*Press
select the items, press
Off: Close night mode function.
On: Reduces most of the maximum dynamic audio range.
Comfort: Reduces half of the maximum dynamic audio range.
Digital Output : Select from HDMI LPCM or RAW.
OK to unfold the sub items of Night Mode, and use UP and DOWN to
OK to confirm the setting.
*Press
select the items, press
HDMI LPCM: 2 channels audio output. (default setting)
HDMI RAW: Provide a better audio output quality. (5.1 channels, the original bit stream)
LG Multimedia HDD User’s Manual
OK to unfold the sub items of Digital output, and use UP and DOWN to
OK to confirm the setting.
Page 39

Playing Multimedia File
39
Setup Menu – Music Tab
Play Mode : Select to set Play Mode from Off, Repeat-track, Repeat-All or Shuffle.
*Press
select the items, press
Repeat Off: Turn off the repeat function.
Repeat Track: Select to repeat on single file.
Repeat All: Select to repeat all the files under the same folder/Favorite list.
Shuffle: Repeat on the files randomly under the same folder/Favorite list.
OK to unfold the sub items of Play mode, and use UP and DOWN to
OK to confirm the setting.
LG Multimedia HDD User’s Manual
Page 40

Playing Multimedia File
40
Setup Menu – Music Tab
EQ Mode : Select to set EQ Mode from Glass Ball, Graph or Two Way Graph.
*Press
select the items, press
OK to unfold the sub items of EQ mode, and use UP and DOWN to
OK to confirm the setting.
LG Multimedia HDD User’s Manual
Page 41

Safely remove (Unplug) for Windows
Safely remove (unplug)
※ Removing the external HDD from the PC without following the safe removal instruction
may cause problem to the stored data or operation of the external HDD.
1. Double-click the Safely Remove Hardware Icon in the notification area.
2. On the window, click the Stop button followed by OK.
3. When the message indicates that is safe to remove the device appears,
click OK and remove the external HDD after checking LED
LG Multimedia HDD User’s Manual
Operation Status.
41
Page 42

FAT32 format for Mac
42
FAT32 format for Mac
*LG Multimedia HDD do not support Mac format (HFS+). To use this product on
Mac, it needs to be formatted as FAT32. (Files more than 4GB cannot copied at
one time. Please copy them separately.)
1. Connect the Multimedia HDD to your Mac.
2. Go to [Finder Menu Bar] [Go Menu] [Utilities], double click [Disk Utility]
3. Select the Multimedia HDD and choose the partition tab.
4. In the Volume Scheme, choose only one partition. If you choose more than one
partition, the unit may not work properly.
5. In the [Volume Option], enter the name and choose [MS-DOS(FAT)].
6. Click [Apply], to start formatting. It could take several minutes depending on your Mac.
LG Multimedia HDD User’s Manual
Page 43

Troubleshooting (FAQ)
43
When connect Multimedia HDD to PC
1. Once connected, the Multimedia HDD is recognized but not displayed.
Make sure that the mounted external HDD is initialized, partitioned, and formatted.
2. Files larger than 4GB cannot be copied to the Multimedia HDD on Mac.
The partition of the external HDD is FAT 32. Files lager than 4GB cannot be copied to the
Multimedia HDD on Mac.
3. Power is insufficient.
[Major symptoms]
Not recognized/Sometimes recognized/Tick sound heard/Data move failed/Driver
disappeared.
[Solution]
Connect all USB Y-cables, connect directly to the rear of the PC, connect power adapter.
4. Data in Multimedia HDD is lost.
- Data may be lost when running Disk Defragmenter or Scan Disk with “Precise”
Data may be lost due to shock when the Multimedia HDD is operating.
Data after a format may be lost.
- Data may be lost if USB cable is disconnected while files are copied via USB port.
Also, resume function, skip function or FF/REW does not work properly during movie
playback because file attribute data were damaged.
5. The “Hi-Speed USB device is connected to a Non Hi-Speed USB hub” message is
displayed.
This message is displayed when a multimedia HDD is connected to a USB Low speed
host adapter (12Mbps max) or if the USB driver is incorrect.
In this case, purchase a USB 2.0 hub or install the driver manually.
6. Check the sequence when the multimedia HDD does not work.
Check whether the USB cable is connected correctly.
Check the operation of LED.
Check the driver recognition.
Check if the internal motor of the multimedia HDD works during operation.
Check the normal operation of the USB port from the Control Panel in the following
sequence:
1) Windows 2000/XP/VISTA, Windows 7
Control Panel System Hardware Device Manager Common Parallel Bus
Controller
7. After copying files from Mac, Multimedia HDD is not working.
Multimedia HDD does not support Mac format (HFS+). To use this product on Mac, it
needs to be formatted as FAT32. Please see the FAT32 format for Mac in previous page.
(Files larger than 4GB cannot copied at one time. Please copy them separately)
8. The HDD capacity is smaller than indicated capacity on the package
The capacity is usually different because calculation method. It depends on method of
decimal or binary.
LG Multimedia HDD User’s Manual
Page 44

Troubleshooting (FAQ)
44
When connect Multimedia HDD to TV
[Operation-Remote control]
1. The remote control doesn’t work.
- Check the power adapter connection.
- Check to see if there is any object between the product and the remote control
causing obstruction.
- Ensure you are pointing the remote control directly at the Multimedia HDD.
- Ensure that the battery is installed with correct polarity (+ to +, - to -).
- Install new battery.
[Operation-Connection]
2. Power is suddenly turned off.
- Check the power adapter connection.
- Do not connect USB cable and Power adapter together.
3. No picture & No sound.
- Check whether the product is turned on.
- Is the power cord inserted into power outlet?
4. Picture appears slowly after turning on.
- This is a normal process, the image is not displayed during the product startup process.
- The picture will appear within two minutes.
5. The product does not turn on.
- You must first turn on the main power (on the actual product itself). Only after the main
power has been turned on will you be able to turn on/off the product by remote control.
- The Multimedia HDD will turn on after the power has been turned off for more than 5
seconds. (It takes a moment for the main HDD to reboot.)
[Operation-Display]
6. I see a blank screen when I select "HDMI auto" in the Setup Menu.
- Depending on your TV model, the Multimedia HDD may not recognize the TV resolution.
With A/V cable, it does not support over 720P.
(A/V recommended resolution : 576P for PAL TV's, and 480P for NTSC TV's)
7. TV screen can shake and blur while viewing booting logo.
- Depending on your TV system (NTSC, PAL), TV screen can shake and blur while viewing
booting logo. Main menu GUI is not showing properly. Please modify the resolution.
(Setup menu Movie tab TV System)
8. After booting, the main menu does not show up on the screen.
- This situation may occur due to resolution problems. Please modify the resolution.
(Setup menu Movie tab TV System)
- Please remove the cable and power adapter and retry.
9. After booting, the files I copied are not shown on TV.
- After booting, if the files you copied are not shown on TV properly, please unplug the
power adapter and retry.
LG Multimedia HDD User’s Manual
Page 45

Troubleshooting (FAQ)
45
When connect Multimedia HDD to TV
[Operation-Display]
10. After the boot up while the loading screen is showing the TV turns off or the "No
Signal" message appears.
- The TV may turn off momentarily or the "No Signal" message might appear depending on
the model of your TV. This is a normal process when your Multimedia HDD is booting.
11. Do not see the GUI on the screen properly.
- The GUI is optimized for 720p resolution. In other resolutions, the letters may appear
blurry or broken, however it will not have affect playing the files.
[Operation-Others]
12. The product stops operating when exposed to excess heat.
- This product has a HDD attached inside. Therefore, if played for over a certain amount
of time, the product will get hot. The reason the product stops operating is to protect the
HDD circuit from the hot temperature. Please cool the product down and restart the
product. (Depending on the environment, it may take over 30 minutes)
13. I can still hear the unit operating after it’s been turned off.
- The Hard Disk included in the product will need 20-30 seconds to turn it off completely.
14. The Multimedia HDD will not boot up.
- There may be a firmware problem and the product may not be functioning properly.
- Do as follows to correct the problem.
1) Download the latest firmware from www.lge.com, www.lgservice.com and place the file in
the root(D:/, E:/, etc) directory.
2) Connect the A/V or HDMI cable to the TV and then connect the power cord.
3) Press the main POWER button (located on the side of the unit) for 5 seconds.
(Under Multimedia HDD power off status)
(If Multimedia HDD power is on already, firmware update does not start)
4) The system will boot and automatically update the firmware. This process may
take 2-3 minutes or longer depending on the system.
5) When the update process is complete, the Multimedia HDD will automatically reboot.
6) It is now ready for use.
15. The screen shakes when playing music, movie and photo files.
- The optimized mode for PAL TV’s and NTSC TV’s is 50Hz and 60Hz, respectively.
- Choosing the wrong frequency mode(50Hz or 60Hz) can cause the screen to shake
during movie or picture playback.
16. It sounds noisy from fan.
- Fan sound level is less than 30dB. Sometimes it sounds different because of
environmental condition such as floor flatness or material.
LG Multimedia HDD User’s Manual
Page 46

Troubleshooting (FAQ)
46
When connect Multimedia HDD to TV
[Play-Movie]
17. AVI, WMV, MKV and MOV file extension movies are not played.
- Please check the codec first. This product doesn’t support wmv1 and wmv2 codecs.
- Movie file including OGG and rt29 audio codecs are not supported.
18. During playing movie, “Bitstream error” message is shown.
- In case of display “Bitstream Error” during playing, please press FF to skip the error section
of abnormal file before message comes up again. The movie may or may not play
depending on the error severity of file. (It may not work depending on the file.)
19. The quality of HD movie is not good.
- AV connection only supports the SD movie even though HD movie plays.
- HDMI cable is required to enjoy the HD movie.
20. Subtitle is not displayed properly.
- Subtitle may not be displayed properly, depending on TV aspect ratio or subtitle file.
- Change the position and color in the subtitle menu.
21. The audio does not work during movie playback.
- The audio depends on setting of HDMI RAW or HDMI LPCM. Try to change the audio
setting. If it does not work, audio codec in movie may not be supported.
22. How can DivX paid VOD be played?
- Please visit www.divx.com. There is detail information on the website.
[Play-Music]
23. Some functions are not supported during playing music.
- To play music file with all functions support in setup menu, please play through music
menu.
- In case of playing music file through all files menu, some functions may not be supported.
24. Music is not stopping.
- After playing music, background music is basic function
- If you want to turn off the music, press
RETURN or STOP.
[Play-Photo]
25. The screen blurs or shakes when playing slide show.
- Depending on the model of TV, the screen may blur or shake while viewing a photo image.
[Play-Function]
26. It does not go to the main menu screen when I press MENU.
- In full movie or photo screen mode, MENU button is not activated.
- Press
RETURN, and then press MENU to go to the Main menu.
LG Multimedia HDD User’s Manual
Page 47

LG Service Site
LG Multimedia HDD User’s Manual
47
Page 48

LG Service Site
48
LG Multimedia HDD User’s Manual
 Loading...