

LG WM3988HA Service Manual

Website: http://biz.lgservice.com
WASHING MACHINE
SERVICE MANUAL
CAUTION
READ THIS MANUAL CAREFULLY TO DIAGNOSE
PROBLEMS CORRECTLY BEFORE SERVICING THE UNIT.
MODEL : WM3988H*A

AUG. 2007 PRINTED IN KOREA
P/No.: MFL30599110

CONTENTS
1. SPECIFICATIONS ...............................................................................................................3
2. FEATURES & TECHNICAL EXPLANATION ....................................................................... 4
3. PARTS IDENTIFICATION ................................................................................................... 7
4. INSTALLATION AND TEST ................................................................................................ 8
5. OPERATION ...................................................................................................................... 11
5-1. CONTROL PANEL FEATURES ................................................................................. 11
5-2. CYCLE GUIDE ........................................................................................................... 14
5-3. SPECIAL FUNCTIONS .............................................................................................. 15
6. WIRING DIAGRAM/PROGRAM CHART .......................................................................... 17
7. TEST MODE ..................................................................................................................... 19
7-1. SAFETY CAUTION .................................................................................................... 19
7-2. LOAD TEST MODE ................................................................................................... 19
7-3. HOW TO READ THE DISPLAY IN LOAD TEST MODE ............................................ 20
7-4. HOW TO CHECK THE WATER LEVEL FREQUENCY ............................................. 20
8. TROUBLESHOOTING ...................................................................................................... 21
8-1. SAFETY CAUTION .................................................................................................... 21
8-2. ERROR MODE SUMMARY ...................................................................................... 21
8-3. TROUBLESHOOTING SUMMARY ..........................................................................23
8-4. TROUBLESHOOTING WITH ERROR ....................................................................... 24
8-5. TROUBLESHOOTING ELSE ..................................................................................... 33
9. COMPONENT TESTING INFORMATION ........................................................................ 38
9-1. FILTER ASSEMBLY (LINE FILTER) .......................................................................... 38
9-2. DOOR LOOK SWITCH ASSEMBLY .......................................................................... 39
9-3. STATOR ASSEMBLY ................................................................................................. 41
9-4. PUMP MOTOR ASSEMBLY ...................................................................................... 44
9-5. INLET VALVE ASSEMBLY ......................................................................................... 45
9-6. HEATER ASSEMBLY ................................................................................................. 46
9-7. THERMISTOR ASSEMBLY ....................................................................................... 47
9-8. STEAM GENERATOR ASSEMBLY ........................................................................... 48
9-9. LAMP ......................................................................................................................... 49
10. DISASSEMBLY INSTRUCTIONS .................................................................................... 52
11.EXPLODED VIEW ............................................................................................................ 63
11-1. CABINET AND CONTROL PANEL ASSEMBLY ...................................................... 63
11-2. DRUM AND TUB ASSEMBLY .................................................................................. 64
11-3. DISPENSER ASSEMBLY ........................................................................................ 65
11-4. Dryer ......................................................................................................................... 66
2

3
1. SPECIFICATIONS
ITEM WM3988H*A
COLOR W:BLUE WHITE, N:NAVY BLUE
POWER SUPPLY AC 120 V, 60 Hz
PRODUCT WEIGHT 192 lbs (87kg)
WASHING 280 W
DRAIN MOTOR
80 W
WASH HEATER 1000 W
WASH 46 rpm
SPIN
1320 rpm
CYCLES 9
WASH/RINSE TEMPERATURES 5
SPIN SPEEDS 5
OPTIONS
WATER CIRCULATION Incorporated
OPERATIONAL WATER PRESSURE 14.5
-
116 psi (100-800 kPa)
CONTROL TYPE Electronic
WASH CAPACITY [cu.ft] 3.47 (4.0 IEC)
DIMENSIONS
27” (W) X 293/4” (D) X 3811/16” (H), 5013/16” (D, door open)
DELAY WASH up to 19 hours
DOOR SWITCH TYPE PTC + Solenoid
WATER LEVEL 10 steps (by sensor)
LAUNDRY LOAD SENSING Incorporated
ERROR DIAGNOSIS Incorporated
AUTO POWER OFF Incorporated
CHILD LOCK Incorporated
RLM ENABLE Incorporated
STEAM Incorporated
ELECTRIC POWER
CONSUMTION
Prewash, Rinse+Spin, Extra Rinse, Stain Cycle, Water Plus, Drum Light
Tub Clean, SPINSENSE
TM
‚ Delay Wash, Steam
REVOLUTION SPEED
4
2. FEATURES & TECHNICAL EXPLANATION
2-1. FEATURES
■
Ultra Capacity
The Larger drum enables not just higher head drop and stronger centrifugal force, but
also less tangling and wrinkling of the laundry. Heavier loads, such as king size
comforters, blankets, and curtains, can be washed.
■
Direct Drive System
The advanced Brushless DC motor directly drives the drum without
belt and pulley.
■
Tilted Drum and Extra Large Door Opening
Tilted drum and extra large opening make it possible to load
and unload clothing more easily.
■
Steam Washing and SteamFresh
TM
Steam Washing features upgraded washing performance with low energy and water
consumption. SteamFreshTMcycle removes wrinkles from dry clothes.
■
RollerJets
Washing ball enhances the wash performance and reduces damage
to the clothing. The jets spray and help tumble clothes to enhance
washing performance while maintaining fabric care.
■
Automatic Wash Load Detection
Automatically detects the load and optimizes the washing time.
■
Built-in Heater
Internal heater helps to maintain water temperature at its optimum level for selected
cycles.
■
Child Lock
The Child lock prevents children from pressing any button to change the settings
during operation.
추가선택, 예약,
추가선택, 예약,
5
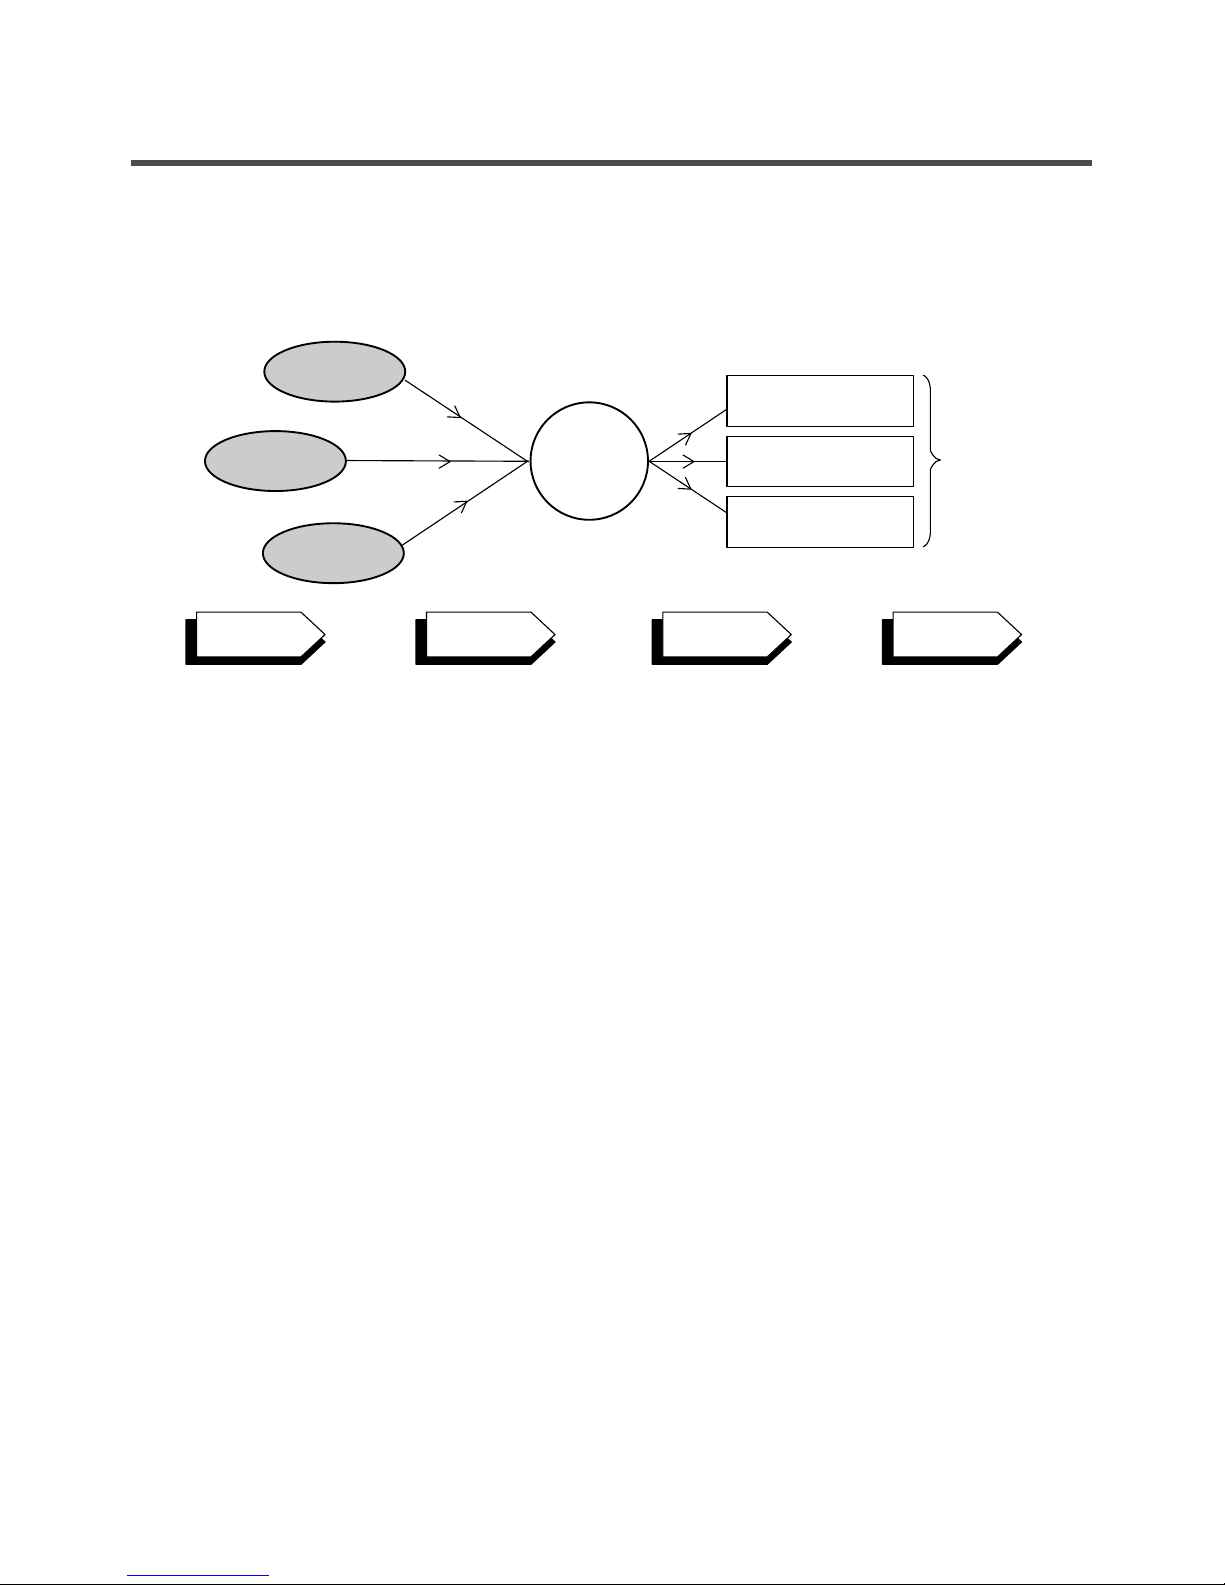
2-2. NEURO FUZZY WASHING TIME OPTIMIZATION
To get the best washing performance, optimal time is determined by the water temperature,
the selected washing temperature, and the size of the load.
2-3. WATER LEVEL CONTROL
● This model incorporates a pressure sensor which can sense the water level in the tub.
● The water supply is stopped when the water level reaches the preset level, the washing
program then proceeds.
● Spinning does not proceed until the water in the tub drains to a certain level.
2-4. DOOR CONTROL
● The door can be opened by pulling the door handle whenever washer is not in operation.
● When the cycle is completed, the DOOR LOCKED light will turn off.
● If a power failure has occurred while in operation, the door will unlock after 5 minutes.
● Clicking sounds can be heard when the door is locked/unlocked.
NEURO-
FUZZY
load
size
selected
washing
temperature
water
temperature
washing time
rinsing time
spin rhythm, time
the best
washing
performance
SENSING
PROCESSING
DETERMINATION
EFFECT

2-5. THE DOOR CAN NOT BE OPENED
While program is operating.
When a power failed and power plug is taken out in operation
While Door Lock lights turn on.
White the motor is in the process of intertial rotating, through the operation is paused.
2-6. DOOR LOCKED LAMP LIGHTS
When the frequency of water level is lower than 22.9 kHz
(It can be canceled when the frequency is more than 23.8 kHz)
When the temperature inside the tub is higher than 45 °C and water level is not 25.5 kHz
(It can be canceled when the water level is 25.5 kHz or the temperature inside the tub is lower
than 40 °C)
2-7. CHILD LOCK
Use this option to prevent unwanted use of the washer. Press and hold PRE WASH button for 3
seconds to lock/unlock control.
When child lock is set, CHILD LOCK lights and all buttons are disabled except the Power button.
You can lock the controls of the washer while washing.
2-8. WATER CIRCULATION
When washing and rinsing function of shower at the upper part of Gasket.
When washing, it continuously operates for 3 minutes and intermittently.
When rinsing, it continuously operates after completion of water supply.
2-9. STEAM
For tough stained clothes, sick room linens or baby clothes.
Steam Wash is available with Sanitary, Bulk/Large, Perm. Press, Cotton/Normal, and Baby Wear cycles.
This option features upgraded washing performance with low energy and water consumption
Do not load delicates such as wool, silk, and easily discolored clothes.
2-10. DRUM LIGHT
The Drum Light comes on when the Power button is pressed. It goes off when the door is closed
and the washer starts operation.
The Drum Light remains off when the door is locked.
The Drum Light can be turned on while the washer is in operation by pressing the Rinse+Spin
button for 3 seconds. The light will turn off automatically 4 minutes later.
The Drum Light comes on when the washing cycle is finished and goes off 4 minutes later.
6
7
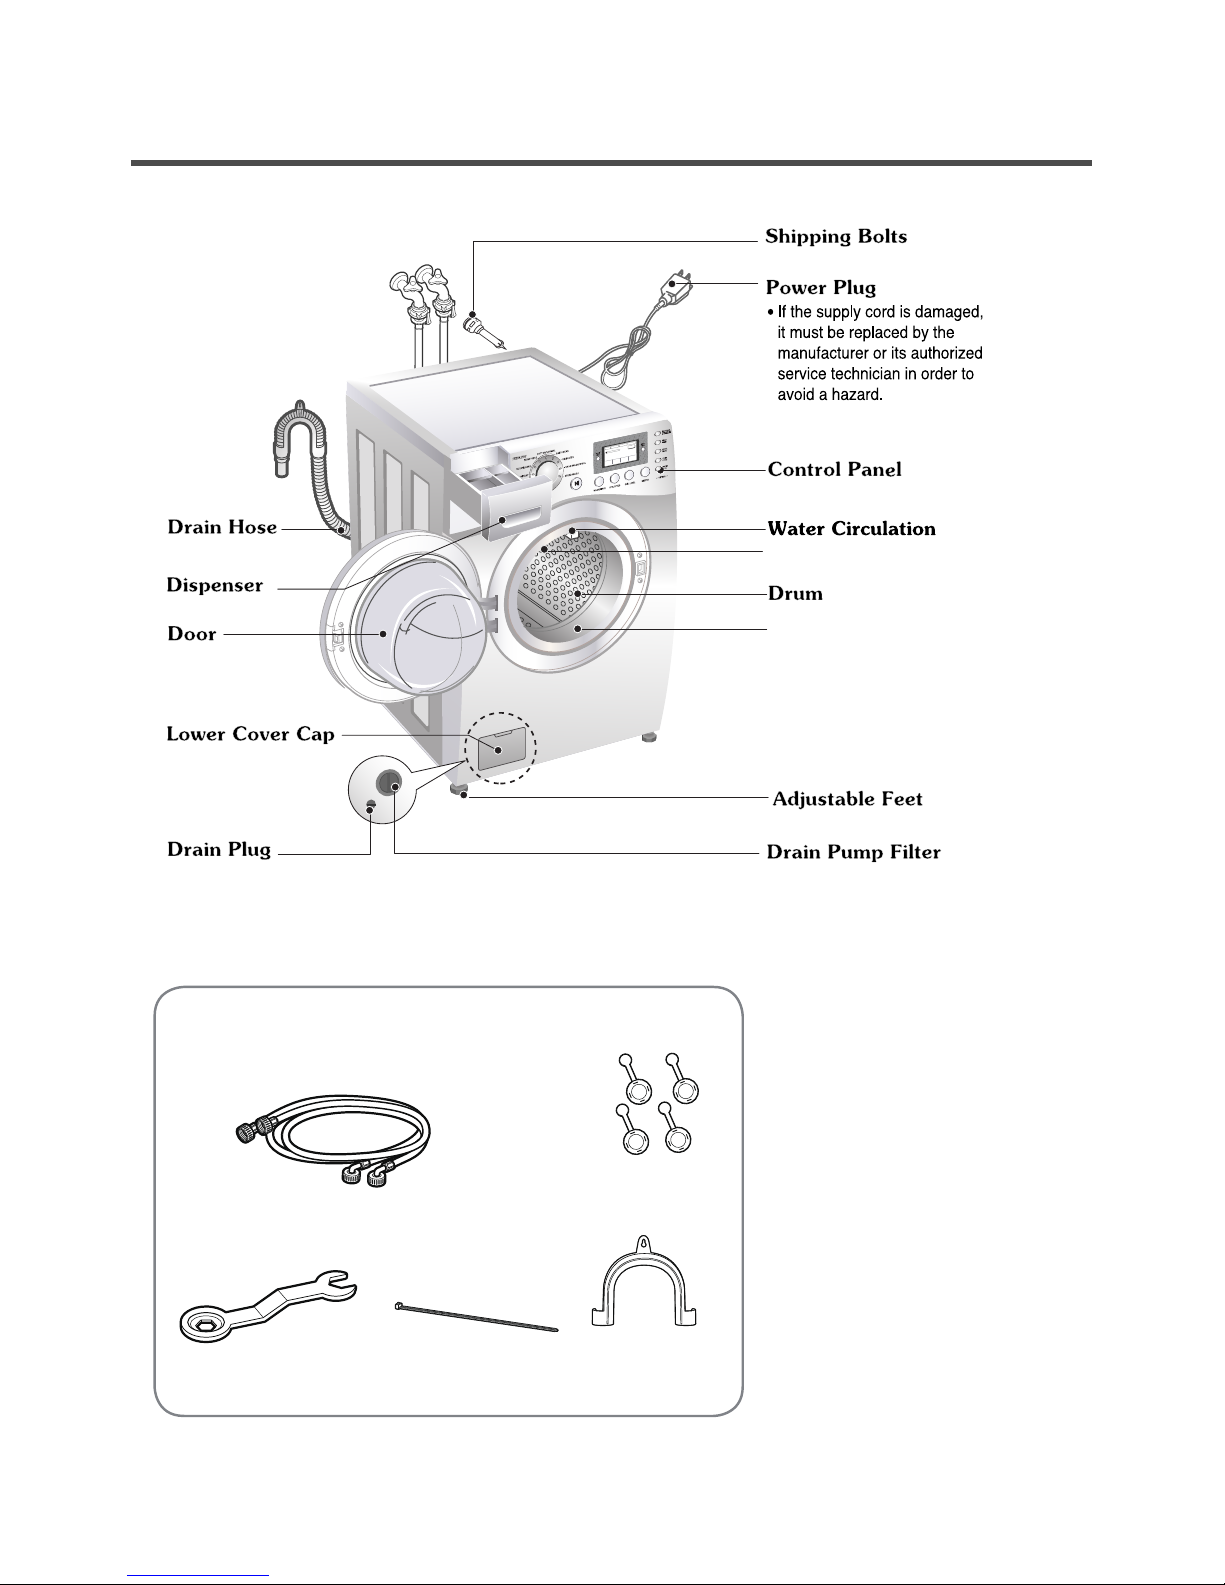
3. PARTS IDENTIFICATION
■ ACCESSORIES
& Steam Nozzle
Drum Light
Door Seal
H
I
G
H
W
ASHING
H
I
G
H
H
O
T
/
C
O
L
D
S
T
E
A
M
D
O
O
R
L
O
C
K
EST
. TIM
E:
REM
ANING
5
%
N
O
R
M
A
L
C
H
I
L
D
L
O
C
K
D
E
L
A
Y
W
A
S
H
1:21
Included Accessories
Hot and Cold
Water Hoses
Wrench
(for removing
shipping bolts and
adjusting leveling feet)
Tie Strap
(for securing
drain hose)
Elbow Bracket
(for securing
drain hose)
Caps (4)
(for covering
shipping bolt holes)
4. INSTALLATION & TEST
1
Before servicing, ask the customer what the trouble is.
2
Check the setup (power supply is 120V AC, remove the transit bolts, level the washer....).
Check with the troubleshooting guide.
3
Plan your service method by referring to the disassembly instructions.
4
Service the unit.
5
After servicing, operate the appliance to see whether it functions correctly.
6
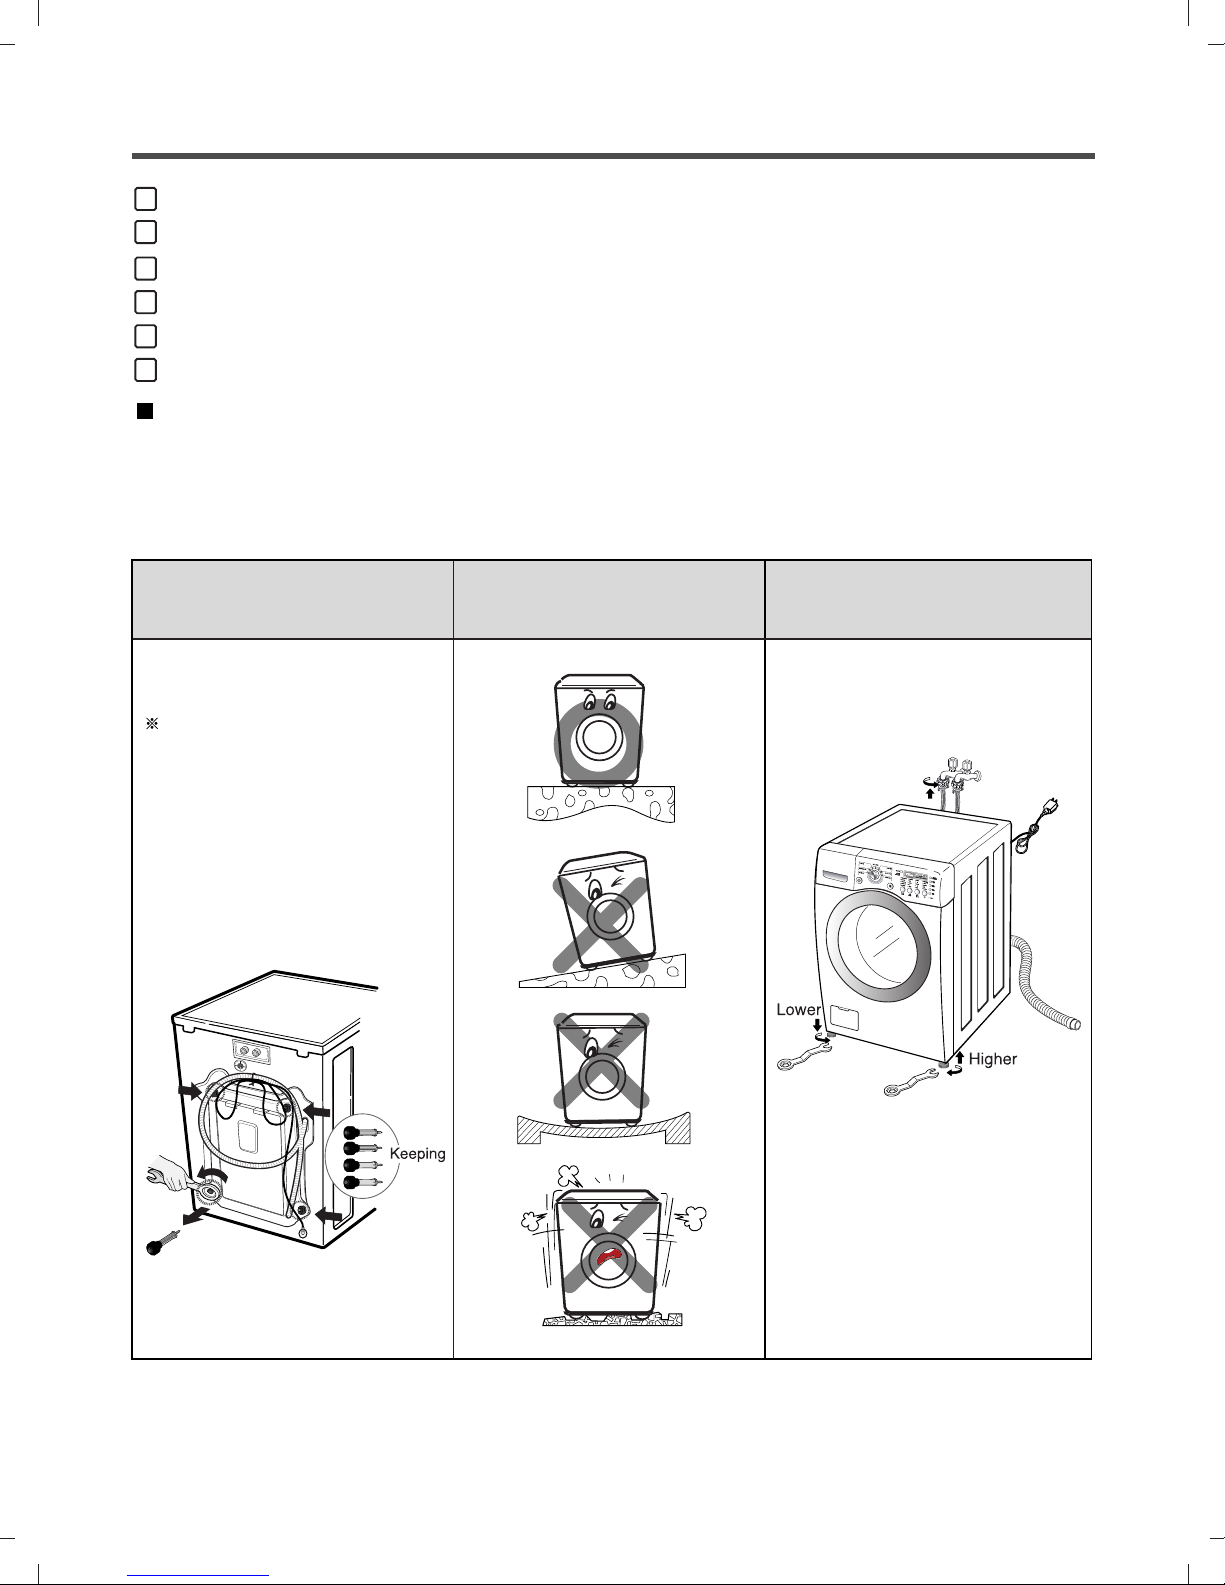
STANDARD INSTALLATION
The appliance should be installed as follows:
REMOVE THE SHIPPING
6
• Remove the 4 shipping bolts
with the supplied wrench.
Do first lower side to remove easily.
•
Keep the shipping bolts and
spanner for future use.
•
Insert the 4 caps (provided)
into the hole.
BOLTS
INSTALL THE APPLIANCE
ON A FLAT AND FIRM SURFACE
ADJUST THE
LEVELING
•
Turn the leveling feet to adjust
the appliance.
•
Turn clockwise to raise;
counterclockwise to lower.
8
9
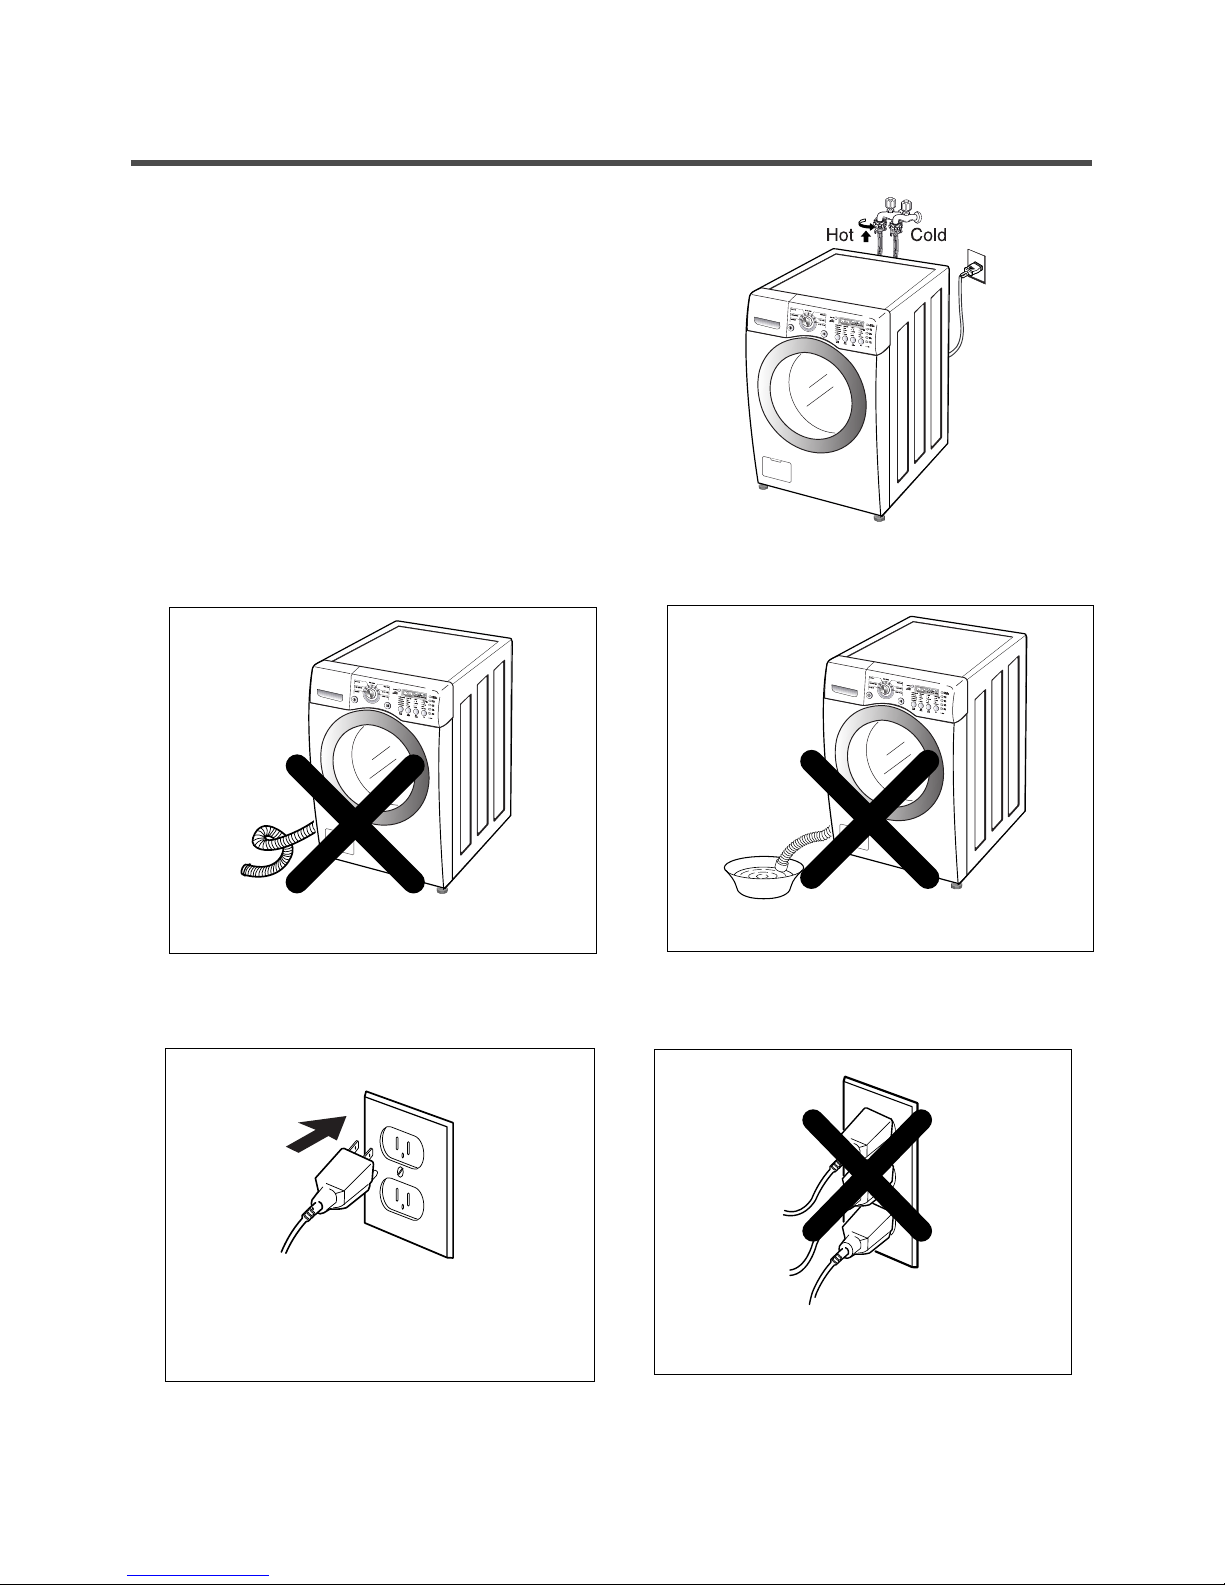
■ HOW TO CONNECT THE INLET HOSE
Verify that the rubber washer is inside of the
valve connector.
Tighten the inlet hose securely to prevent leaks.
■ CONNECT THE DRAIN HOSE
■ CONNECT POWER PLUG
※ The end of the drain hose should be placed less than 96”from the floor.
· Connect the power plug to the wall outlet.
· Avoid connecting several electric devices, as
doing so may cause a fire.
· Make sure that the hose is not twisted.
· Avoid submerging the end of the hose.
7
TEST OPERATION
Preparation for
1
washing.
• Connect the power plug to
the outlet.
• Connect the inlet hose.
Check the water heating
6
function.
Press the POWER button.
2
Check the automatic
5
reverse rotation.
Press the Start/Pause
3
button.
• Listen for a click to determine if
the door has locked.
Check the water supply.
4
• Press the WASH/RINSE button
and the present temperature will
be displayed.
Check the drain and spin
7
functions.
• Power off and the power on.
•
Press the SPIN SPEED button.
• Press the START/PAUSE button.
• Check the spin and drain
functions.
• Check if the drum rotates
clockwise and counterclockwise.
Press the
8
START/PAUSE button.
•
Listen for a click to determine
if the door is unlocking.
10
• Check if water is supplied
through the detergent dispenser.
Water removal.
9
•
If SERVICE is needed during
check, remove the remaining
water by pulling out the hose cap.
5. OPERATION
5-1. CONTROL PANEL FEATURES
WM3988HWM
11
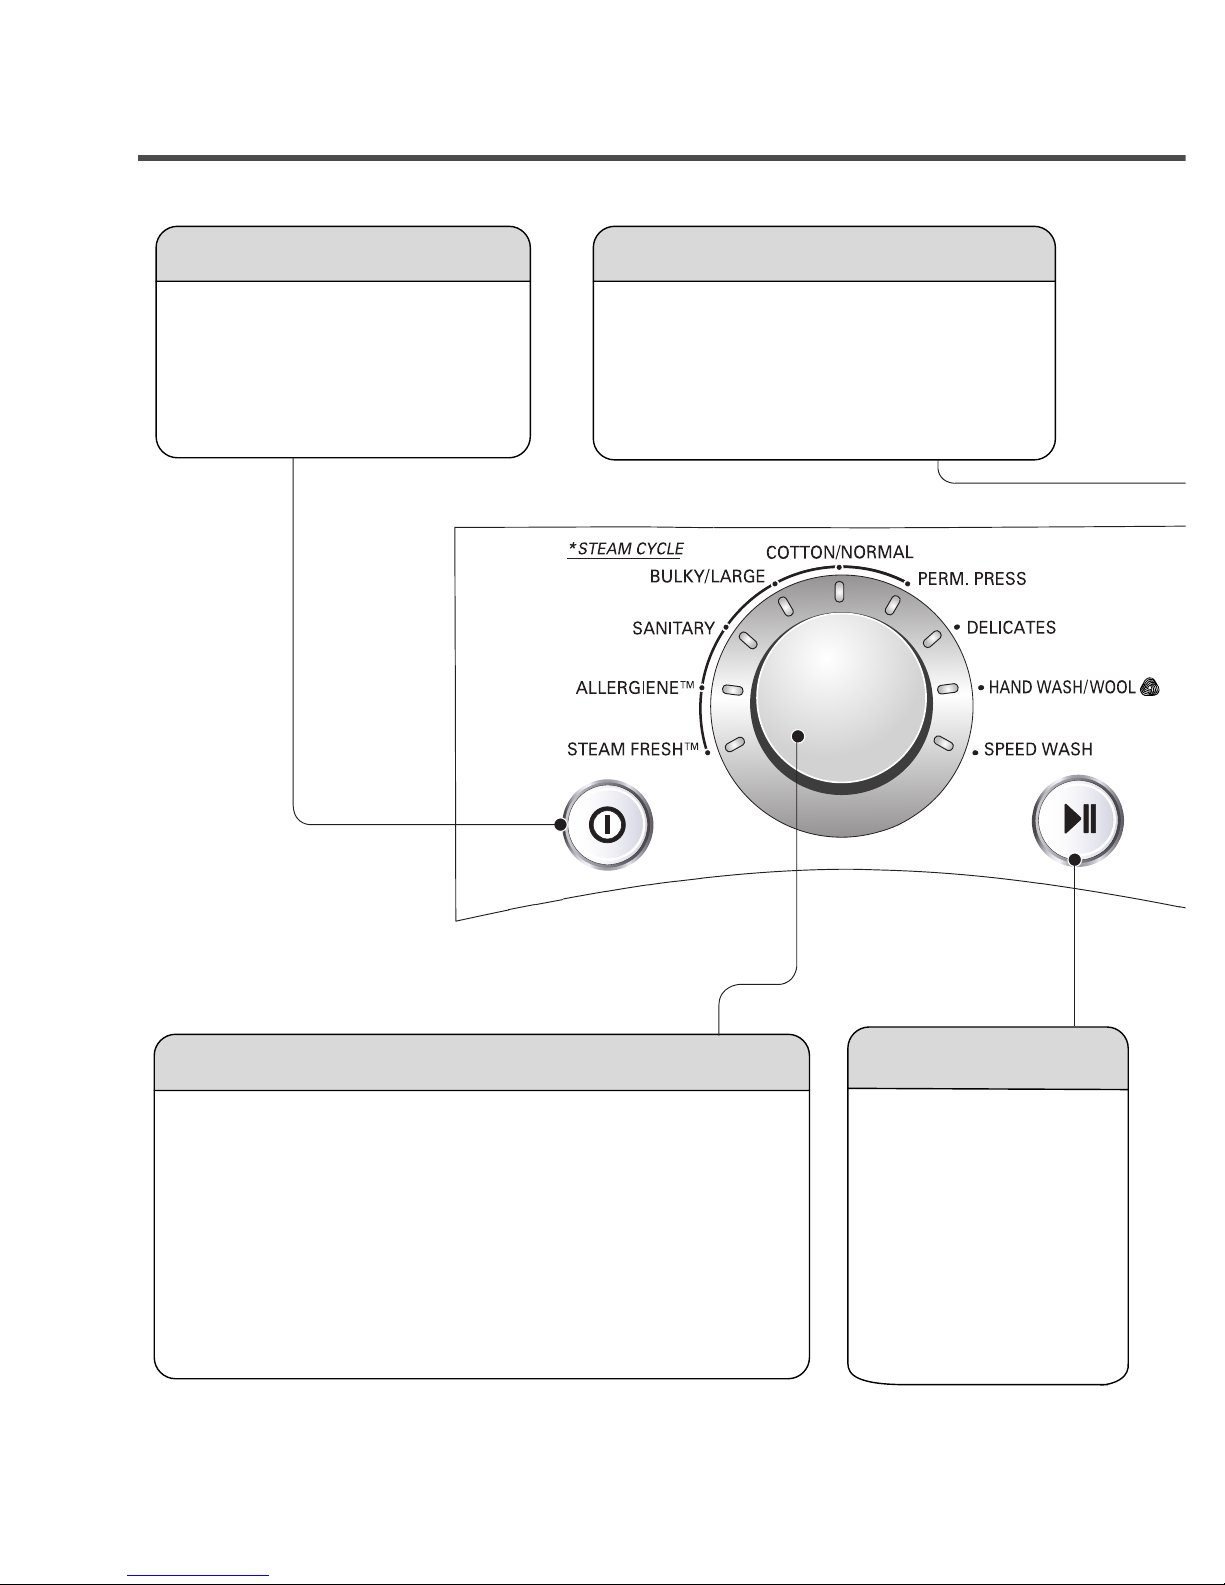
12
• Use this button to turn the power
On/Off.
• Rotate the Cycle selector knob to select the cycle designed for
different types of fabric and soil levels.
• Use this button to Start/
Stop the washer.
• It shows elapsed time of the cycle the washer is
operating.
Power Button Status Indicator
Start/Pause
Cycle Selector Knob
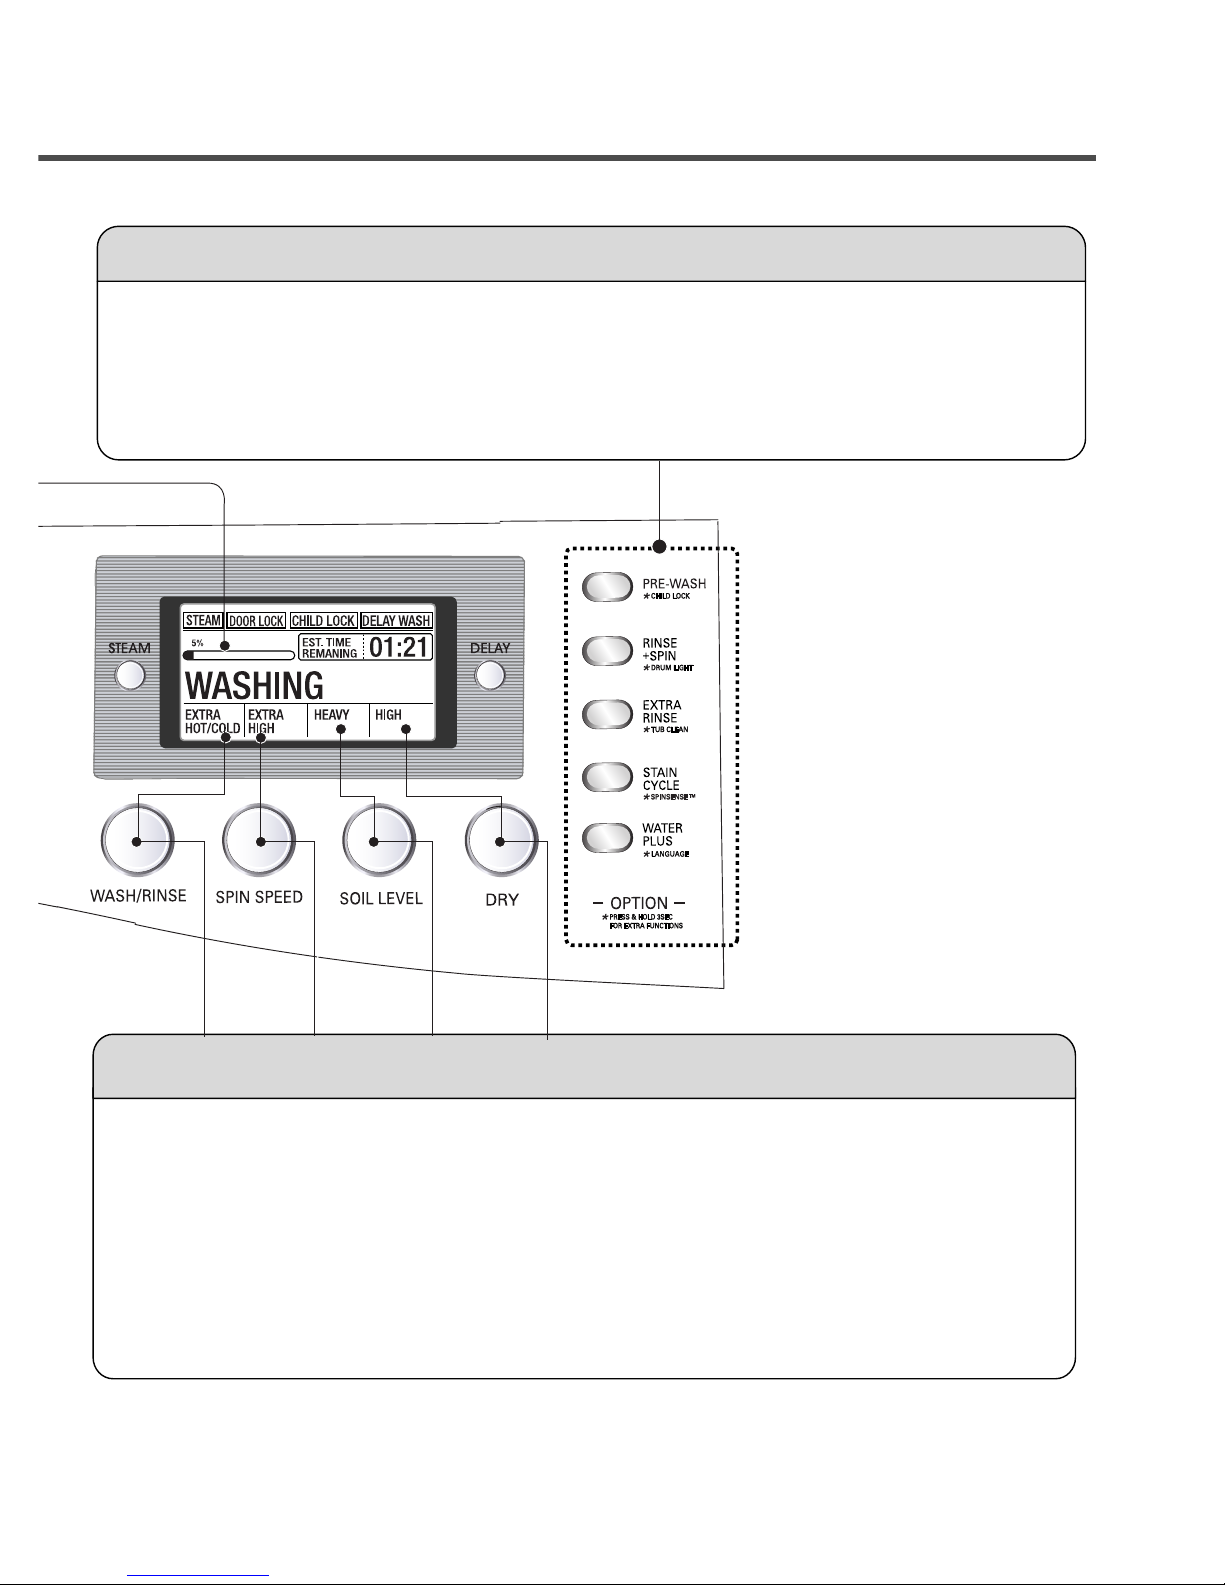
13
• PREWASH: Use this option for loads that need pretreatment. It adds 16 minutes prewash and a spin cycle.
• RINSE+SPIN: Use this option to rinse and then spin.
• EXTRA RINSE: This option provides an additional rinse.
• STAIN CYCLE: Adds time to the wash and rinse cycles for better stain removal. Automatically provides a rinse.
• WATER PLUS: Add extra water to the wash and rinse cycles for superior results.
• Select a water temperature based on the type of load you are washing.
• To change the spin speed, press the Spin Speed button repeatedly to cycle through available options.
• To change the soil level, press the Soil Level button repeatedly until the desired setting is on.
• Press repeatedly to adjust the volume of the Beeper
• To set the type of or amount of drying time press DRY button repeatedly.
Option Button
Wash/Rinse, Spin speed, Soil Level, Dry Beeper Button

5-2. CYCLE GUIDE
The cycle guide below shows the options and recommended fabric types for each cycle.
Cycle
Steam
TM
Fresh
Sanitary
Bulky/Large
Perm Press
Cotton/
Normal
Fabric type Spin Speed Soil Level SteamDry
Wash/Rinse
Temp.
Pre-
Wash
Rinse +
Spin
Extra
Rinse
Stain
Cycle
Water
Dress shirts, blouses
Extra Hot/Cold
Heavily soiled
underwear, work
clothes, diapers, etc.
High
Extra High
No Spin
Low
Normal
Heavy
Light
Medium
Large items such as
blankets and
comforters
Dress shirts/pants,
wrinkle-free clothing,
poly/cotton blend
clothing, tablecloths
Cotton, linen, towels,
shirts, sheets, jeans,
mixed loads
Warm/Cold
Warm/Warm
Hot/Cold
Cold/Cold
Warm/Cold
Warm/Warm
Hot/Cold
Cold/Cold
Warm/Cold
Warm/Warm
Hot/Cold
Cold/Cold
Low
Medium
No Spin
Medium
High
No Spin
Low
High
Extra High
No Spin
Low
Normal
Heavy
Light
Normal
Heavy
Light
Normal
Heavy
Light
Medium
Plus
High
Allergiene
Cotton, underwear,
TM
pillow covers, bed
sheets, baby wear
Extra High
No Spin
Low
Medium
Delicates
Hand Wash/
Wool
Dress shirts/blouses,
nylons, sheer or lacy
garments
Items labeled
“hand-washable”
Cold/Cold
Warm/Cold
Warm/Warm
Warm/Cold
Medium
No Spin
Low
Low
No SpinWarm/Cold
Normal
Heavy
Light
Normal
Light
Warm/Warm
Speed
Wash
Lightly soiled clothing
and small loads
Hot/Cold
Cold/Cold
Warm/Cold
Warm/Warm
Extra High
No Spin
Low
Medium
Light
Normal
Heavy
High
NOTE: To protect your garments, not every wash/rinse temperature, spin speed, soil level, or option is available
with every cycle.
14
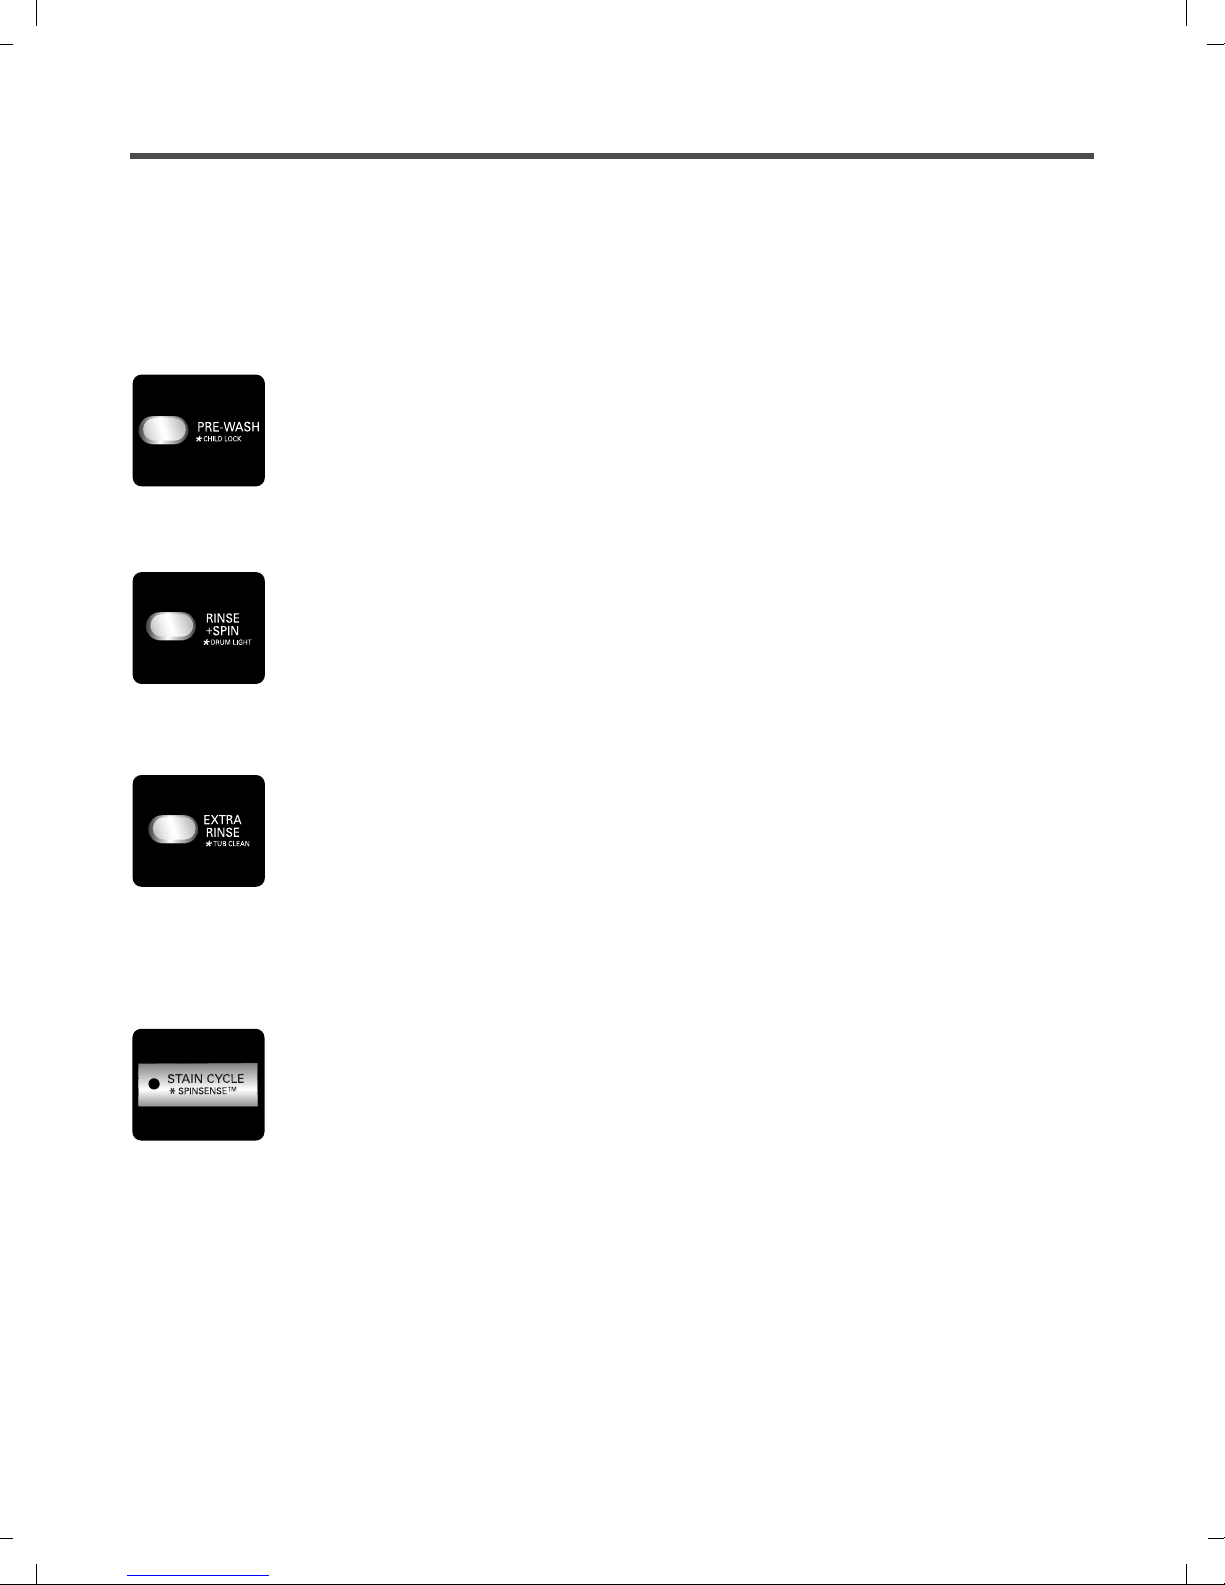
5-3. SPECIAL FUNCTIONS
The option buttons also activate special functions, including CHILD LOCK, DRUM LIGHT, TUB CLEAN, and
LANGYAGE. Press and hold the option button marked with the special function for 3 seconds to activate.
CHILD LOCK
Use this option to prevent unwanted use of the washer or to keep cycle settings from being
changed while the washer is operating. Press and hold the PREWASH button for 3 seconds
to activate or deactivate CHILD LOCK. CHILD LOCK will be shown in the display, and all
controls are disabled except the ON/OFF button. The washer can be locked during a cycle.
DRUM LIGHT
The drum is equipped with a blue LED light that illuminates when the washer is turned on.
This light automatically turns off when the door is closed and the cycle starts. To turn on the
light during a cycle, press and hold the RINSE+SPIN button for 3 seconds. The drum light
will illuminate and then turn off automatically after 4 minutes.
TUB CLEAN
A buildup of detergent residue can occur in the wash tub over time and can lead to a mildew
or musty smell. The TUB CLEAN cycle is specially designed to remove this buildup. Press
and hold the EXTRA RINSE button for 3 seconds to activate this cycle. The display will show
a message to add liquid bleach to the dispenser. After the cycle has ended, open the door
and allow the drum interior to dry completely. NOTE: Do NOT use this cycle with clothes, and
do NOT add detergent or fabric softener.
SPIN SENSE
To activate SPINSENSE :
While the washing machine is runnung in any cycle, press and hold the STAIN CYCLE button
for 3 seconds. The STAIN CYCLE button light will remain lit while the washer is running to
show that SPINSENSE is active. The SPINSENSE function will remain active for every cycle,
even after a power failure.
To cancel SPINSENSE :
Press and hold the STAIN CYCLE button for 3 seconds to turn off the SPINSENSE
function
15
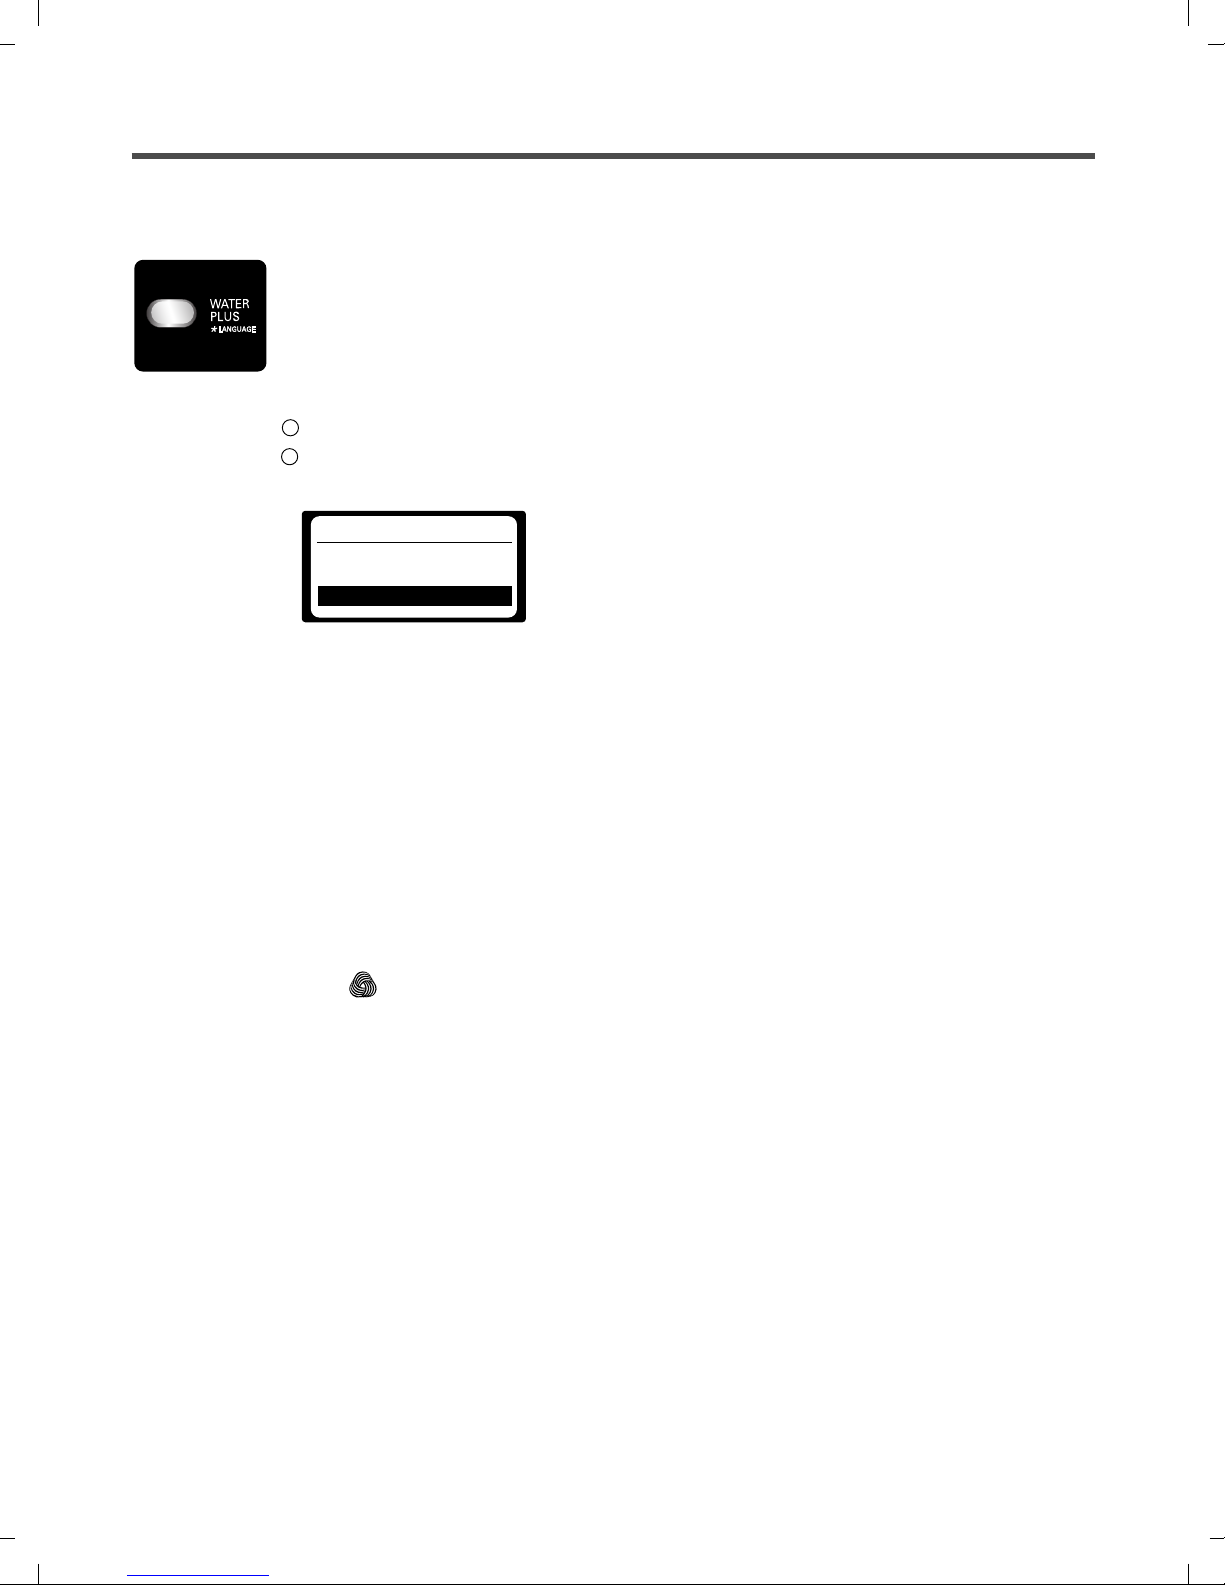
LANGUAGE
This option allows you to change the language shown in the display. Once set, the selected
language will stay set even after the power is turned off. The display language options are
English, French, and Spanish; English is the default language.
To change the language:
1
Press the ON/OFF button to turn on the washer.
2
Press and hold the WATER PLUS button for 3 seconds, until the following screen
appears in the display.
SELECT A LANGUAGE
ESPAÑOL
FRANÇAIS
ENGLISH
Press the WATER PLUS button repeatedly to cycle through FRANÇAIS (French),
ESPAÑOL (Spanish), and then back to English.
ALLERGIENE™
• The ALLERGINE™ cycle is a powerful, high temperature cycle designed specifically to reduce allergens.
• Selecting the ALLERGIENE™ cycle automatically incorporates steam into the wash cycle.
• The ALLERGIENE™ cycle is most effective for washing clothes such as undergarments, bedding, and
baby wear that are likely sources of allergic reactions.
• The ALLERGIENE™ cycle helps reduce dust mite populations and helps reduce allergens.
• Due to the high energy and temperatures used, the ALLERGIENE™ cycle is not recommended for wool,
silk, leather, or any other delicate or temperature sensitive items.
HAND WASH/WOOL
• Only woolen items that are designated as “Machine-Washable” should be washed in this washing machine
•Wash only small loads for optimum fabric care (less than 8 lbs.)
• Use only neutral (wool safe) detergents should be used (Only a small quantity of detergent is needed due
to the small load size and low volume of water in the cycle.)
• The HAND WASH/WOOL cycle uses a gentle tumble action and low speed spin for ultimate fabric care.
16

6. WIRING DIAGRAM/PROGRAM CHART
17
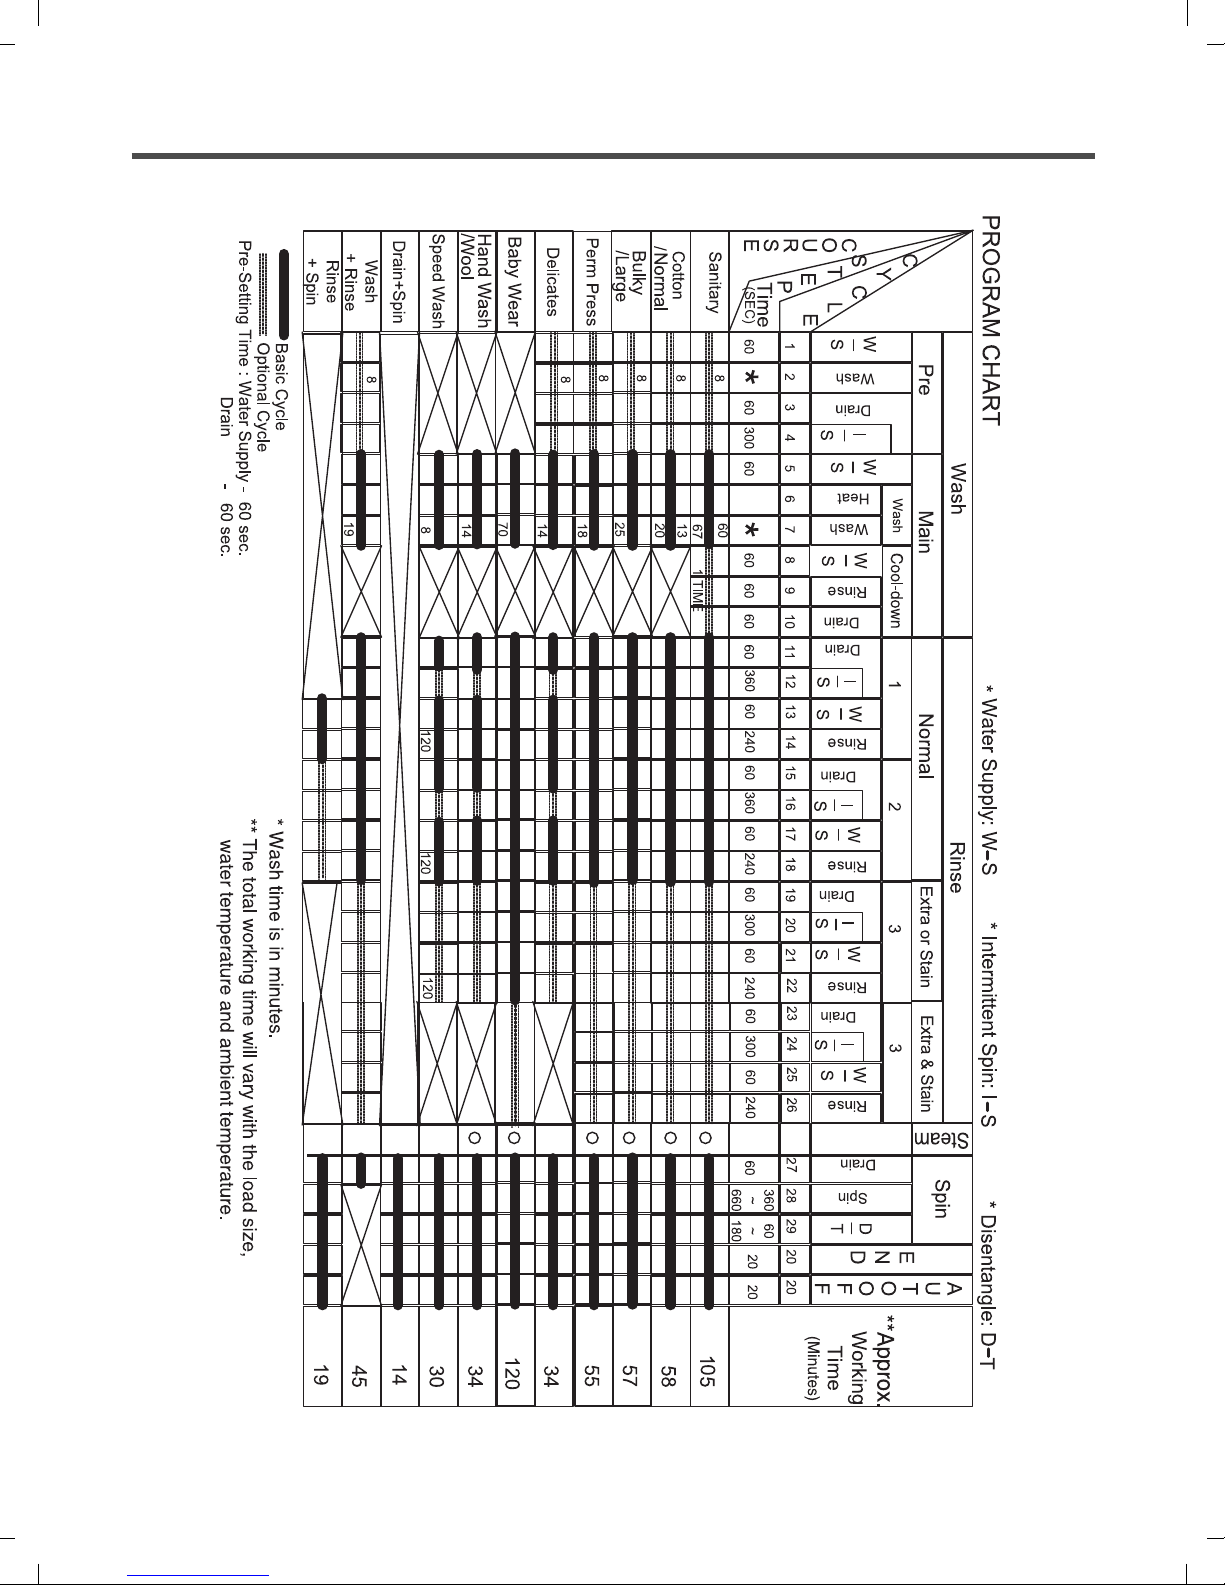
18
7. TEST MODE
7-1. SAFETY CAUTION
There's built-in AC 110V and DC power in output terminal of PWB assembly in common. Be careful electric
shock when disconnecting parts while trouble shooting. (Wear Electro Static Discharge gloves when working.)
After cutting off the power when changing PWB assembly, disconnect or assemble.
Be careful static when handling PWB assembly, and use Electro Static Discharge plastic pack when delivering
or keeping it.
7-2. LOAD TEST MODE.
The washer must be empty and the controls must be in the off state.
1. Press the SPIN SPEED and SOIL LEVEL buttons simultaneously.
2. Press the Power button, while the above condition. Then buzzer will sound twice.
3. Press the Start/Pause button repeatedly to cycle through the test modes.
Number of times the
Start/Pause button is pressed
None
1 time
2 times
3 times
4 times
5 times
6 times
7 times
8 times
9 times
10 times
11 times
12 times
13 times
14 times
15 times
Check Point
Turns on all lamps and locks the door.
Tumble clockwise.
Low speed Spin.
High speed Spin.
Inlet valve for prewash turns on.
Inlet valve for main wash turns on.
Inlet valve for hot water turns on.
Inlet valve for steam turns on.
Inlet valve for bleach turns on.
Tumble counterclockwise.
Heater turns on for 3 sec.
Circulation pump turns on.
Drain pump turns on.
Steam Heater turns on for 1.2 sec.
Water level Sensor for Steam
Off
Display Status
rpm
rpm + Water Level
rpm + Water Temperature
Water level frequency (25~65)
Water level frequency (25~65)
Water level frequency (25~65)
Water level frequency (25~65)
Water level frequency (25~65)
rpm (42~50)
Water temperature
Water level frequency (25~65)
Water level frequency (25~65)
TSG temperature
Water level frequency of TSG (0~255)
-
19
7-3. HOW TO READ THE DISPLAY IN LOAD TEST MODE
RPM
Water level
frequency
*** *** ***
*** *** ***
Steam temperature
*** ***
*** ***
Fan Motor RPM
*** ***
***
Wash temperature
7-4. HOW TO CHECK THE WATER LEVEL FREQUENCY
* Press the WASH/RINSE and SOIL LEVEL button simultaneously.
Duct temperature
*** *** ***
*** *** ***
*** ***
*** ***
*** ***
***
The digits indicate the water level frequency.
For example, if the display indicate 058,
the water level frequency is 20+(58 X 0.1) = 25,8 kHz.
20
 Loading...