

LG WM3987H Schematic

Website:http://biz.lgservice.com
WASHING MACHINE
SERVICE MANUAL
CAUTION
READ THIS MANUAL CAREFULLY TO DIAGNOSE
PROBLEMS CORRECTLY BEFORE SERVICING THE UNIT.
MODEL : WM3987H*

NOV. 2009 PRINTED IN KOREA
P/No.: MFL30138960

CONTENTS
1. SPECIFICATIONS .........................................................................................................................3
2. FEATURES & TECHNICAL EXPLANATION ................................................................................ 4
3. PARTS IDENTIFICATION ............................................................................................................ 7
4. INSTALLATION & TEST ............................................................................................................... 8
5. WIRING DIAGRAM ......................................................................................................................11
6. OPERATION ................................................................................................................................12
7. TROUBLESHOOTING.................................................................................................................14
7-1. BEFORE PERFORMING SERVICE ...................................................................................14
7-2. QC TEST MODE.................................................................................................................14
7-3. HOW TO CHECK THE WATER LEVEL FREQUENCY ......................................................14
7-4. ERROR DISPLAY ...............................................................................................................15
8. ERROR DIAGNOSIS AND CHECK LIST ....................................................................................17
8-1. DIAGNOSIS AND SOLUTION FOR ABNORMAL OPERATION ........................................17
8-2. FAULT DIAGNOSIS AND TROUBLESHOOTING ..............................................................20
9. DISASSEMBLY INSTRUCTIONS ...............................................................................................31
10. EXPLODED VIEW .....................................................................................................................40
10-1. CABINET & CONTROL PANEL ASSEMBLY ....................................................................40
10-2. DRUM & TUB ASSEMBLY................................................................................................41
10-3. DISPENSER ASSEMBLY .................................................................................................42
10-4. DRYER............................................................................................................................. 43
22
1. SPECIFICATIONS
ITEM
COLOR
POWER SUPPLY
PRODUCT WEIGHT
ELECTRIC
POWER
CONSUMTION
REVOLUTION
SPEED
CYCLES
WASH/RINSE TEMPERATURES
SPIN SPEEDS
OPTIONS
WATER CIRCULATION
OPERATIONAL WATER PRESSURE
WASHING
DRAIN MOTOR
WASH HEATER
WASH
SPIN
WM3987H*
BLUE WHITE
AC 120 V, 60 Hz
201 lbs (91kg)
280 W
80 W
1000 W
46 rpm
0 - 1200 rpm
9
5
5
Prewash, Extra Rinse, Stain Cycle, Water Plus, Drum Light Tub Clean,
SPINSENSE
14.5-116 psi (100-800 kPa)
TM
‚ Delay Wash
Incorporated
CONTROL TYPE
WASH CAPACITY [cu.ft]
DIMENSIONS
DELAY WASH
DOOR SWITCH TYPE
WATER LEVEL
LAUNDRY LOAD SENSING
ERROR DIAGNOSIS
AUTO POWER OFF
CHILD LOCK
RLM ENABLE
27" (W) X 29
Electronic
3.63 (4.2 IEC)
3
/
" (D) X 38
4
11
up to 19 hours
PTC + Solenoid
10 steps (by sensor)
Incorporated
Incorporated
Incorporated
Incorporated
-
/
" (H), 50
16
13
/
" (D, door open)
16
3
2. FEATURES & TECHNICAL EXPLANATION
ᆺંቚ လ
2-1. FEATURES
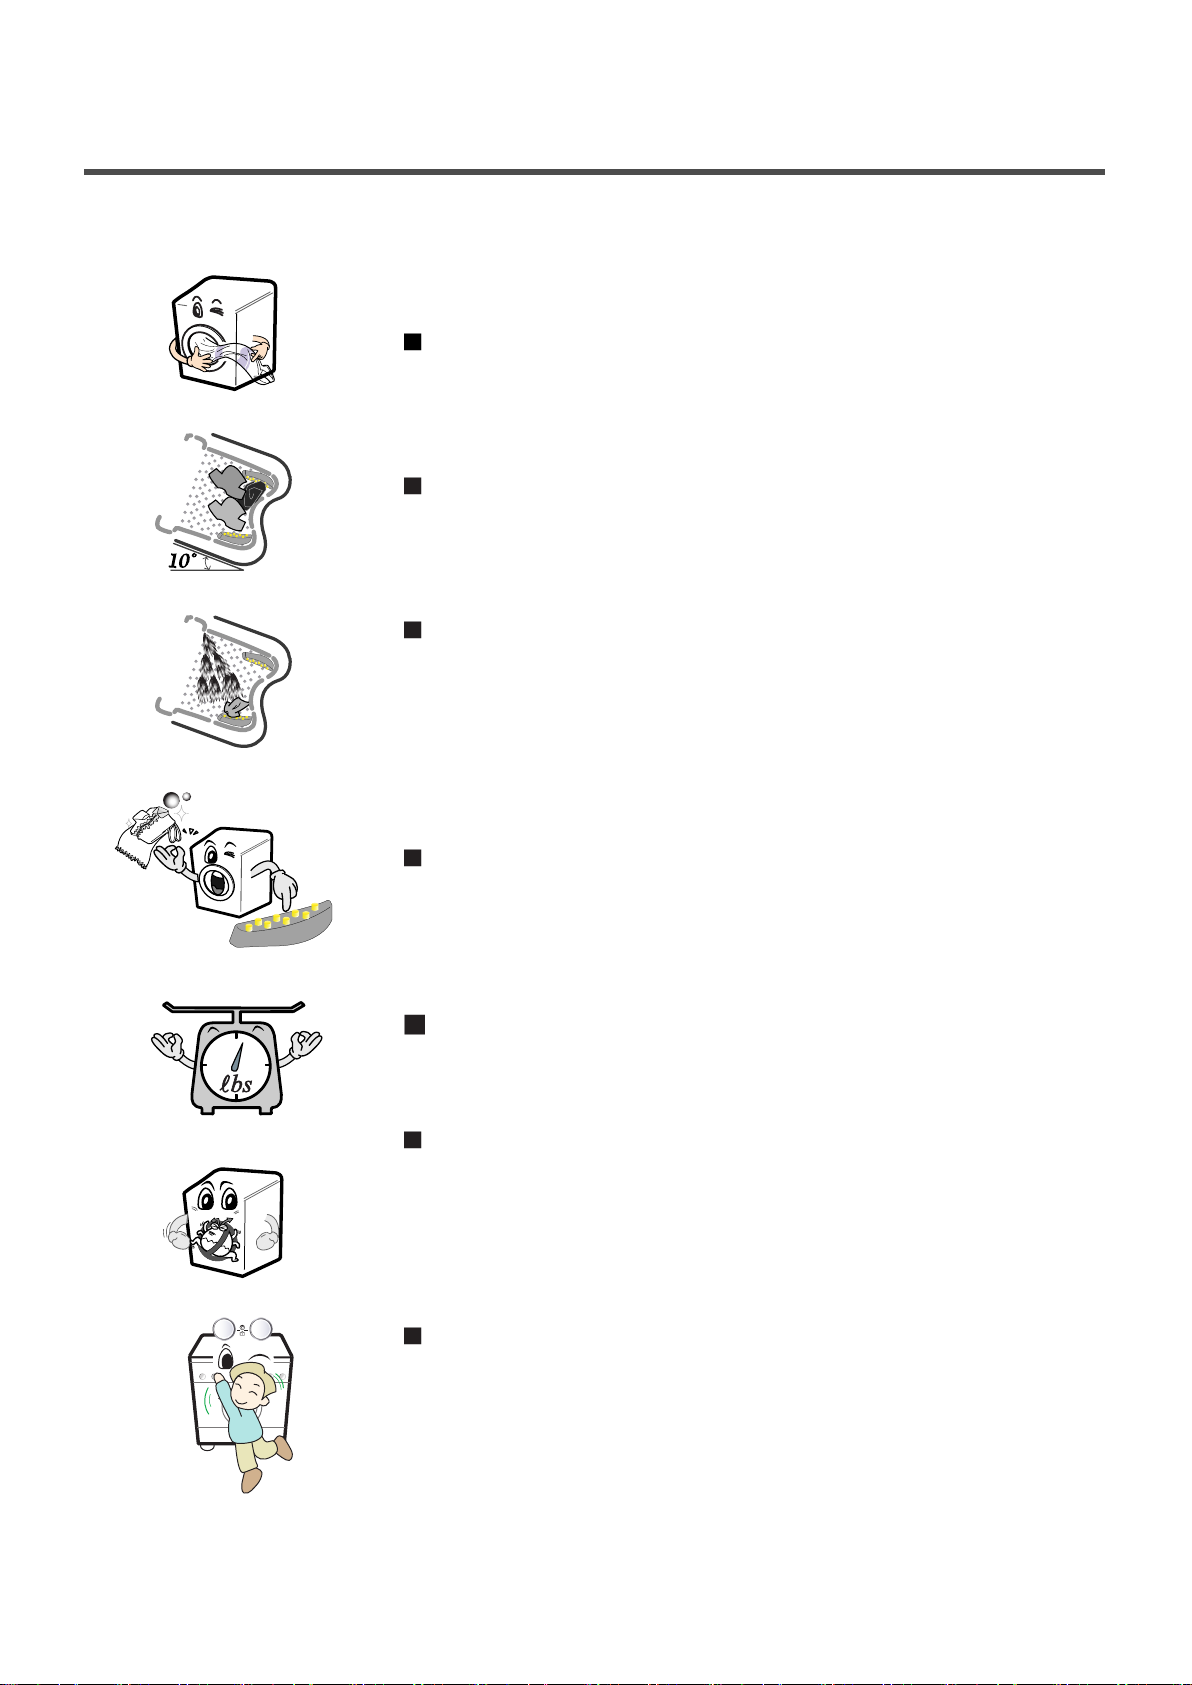
Direct Drive System
The advanced Brushless DC motor directly drives the drum
without belt and pulley.
Tilted Drum and Extra Large Door Opening
The tilted drum and extra large door opening make it possible
to load and unload easily.
Water Circulation
Spray detergent solution and water onto the load repeatedly.
Clothes are soaked more quickly and thoroughly during the wash cycle.
Detergent suds are eliminated more easily by the water shower
during rinse cycle. The water circulation system uses both
water and detergent more efficiently.
RollerJets
The washing ball enhances wash performance and reduces
damage to clothing.
washing performance while maintaining fabric care.
The jets spray and help tumble clothes to enhance
Automatic Wash Load Detection
Automatically detects the load and optimizes the washing time.
Built-in Heater
The internal heater automatically heats the water to the optimum
temperature on selected cycles.
Child Lock
The Child lock feature prevents children from pressing any buttons
to change the settings during operation.
4
2-2. NEURO FUZZY WASHING TIME OPTIMIZATION
To get the best washing performance, optimal time is determined by the water temperature,
the selected washing temperature, and the size of the load.
water
temperature
washing time
selected
washing
temperature
SENSING
load
size
PROCESSING
NEURO-
FUZZY
2-3. WATER LEVEL CONTROL
This model incorporates a pressure sensor which can sense the water level in the tub.
The water supply is stopped when the water level reaches the preset level, the washing
program then proceeds.
Spinning does not proceed until the water in the tub drains to a certain level.
rinsing time
spin rhythm, time
DETERMINATION
the best
washing
performance
EFFECT
2-4. DOOR CONTROL
The door can be opened by pulling the door handle whenever washer is not in operation.
When the cycle is completed, the DOOR LOCKED light will turn off.
If a power failure has occurred while in operation, the door will unlock after 5 minutes.
Clicking sounds can be heard when the door is locked/unlocked.
5

2-5. THE DOOR CAN NOT BE OPENED
While program is operating
When a power failed and power plug is taken out in operation
While Door Lock lights turn on.
White the motor is in the process of intertial rotating, through the operation is paused.
2-6. DOOR LOCKED LAMP LIGHTS
When the frequency of water level is lower than 22.9 kHz
(It can be canceled when the frequency is more than 23.8 kHz)
When the temperature inside the tub is higher than 45 °C and water level is not 25.5 kHz
(It can be canceled when the water level is 25.5 kHz or the temperature inside the tub is lower than 40 °C)
2-7. CHILD LOCK
Use this option to prevent unwanted use of the washer. Press and hold PRE WASH button for 3 seconds to
lock/unlock control.
When Child lock is set, CHILD LOCK lights and all buttons are disabled except the Power button.
You can lock the washer while it is operating.
2-8. WATER CIRCULATION
When Washing and Rinsing function of shower at the upper part of Gasket.
When Washing, it continuously operates for 3 minutes and intermittently.
When Rinsing, it continuously operates after completion of water supply.
2-9. DRUM LIGHT
The Drum Light comes on when the Power button is pressed. It goes off when the door is closed and the
washer starts operation.
The Drum Light remains off when the door is locked.
The Drum Light can be turned on while the washer is in operation by pressing the Rinse+Spin button for 3
seconds. The light will turn off automatically 4 minutes later.
The Drum Light comes on when the washing cycle is finished and goes off 4 minutes later.
6
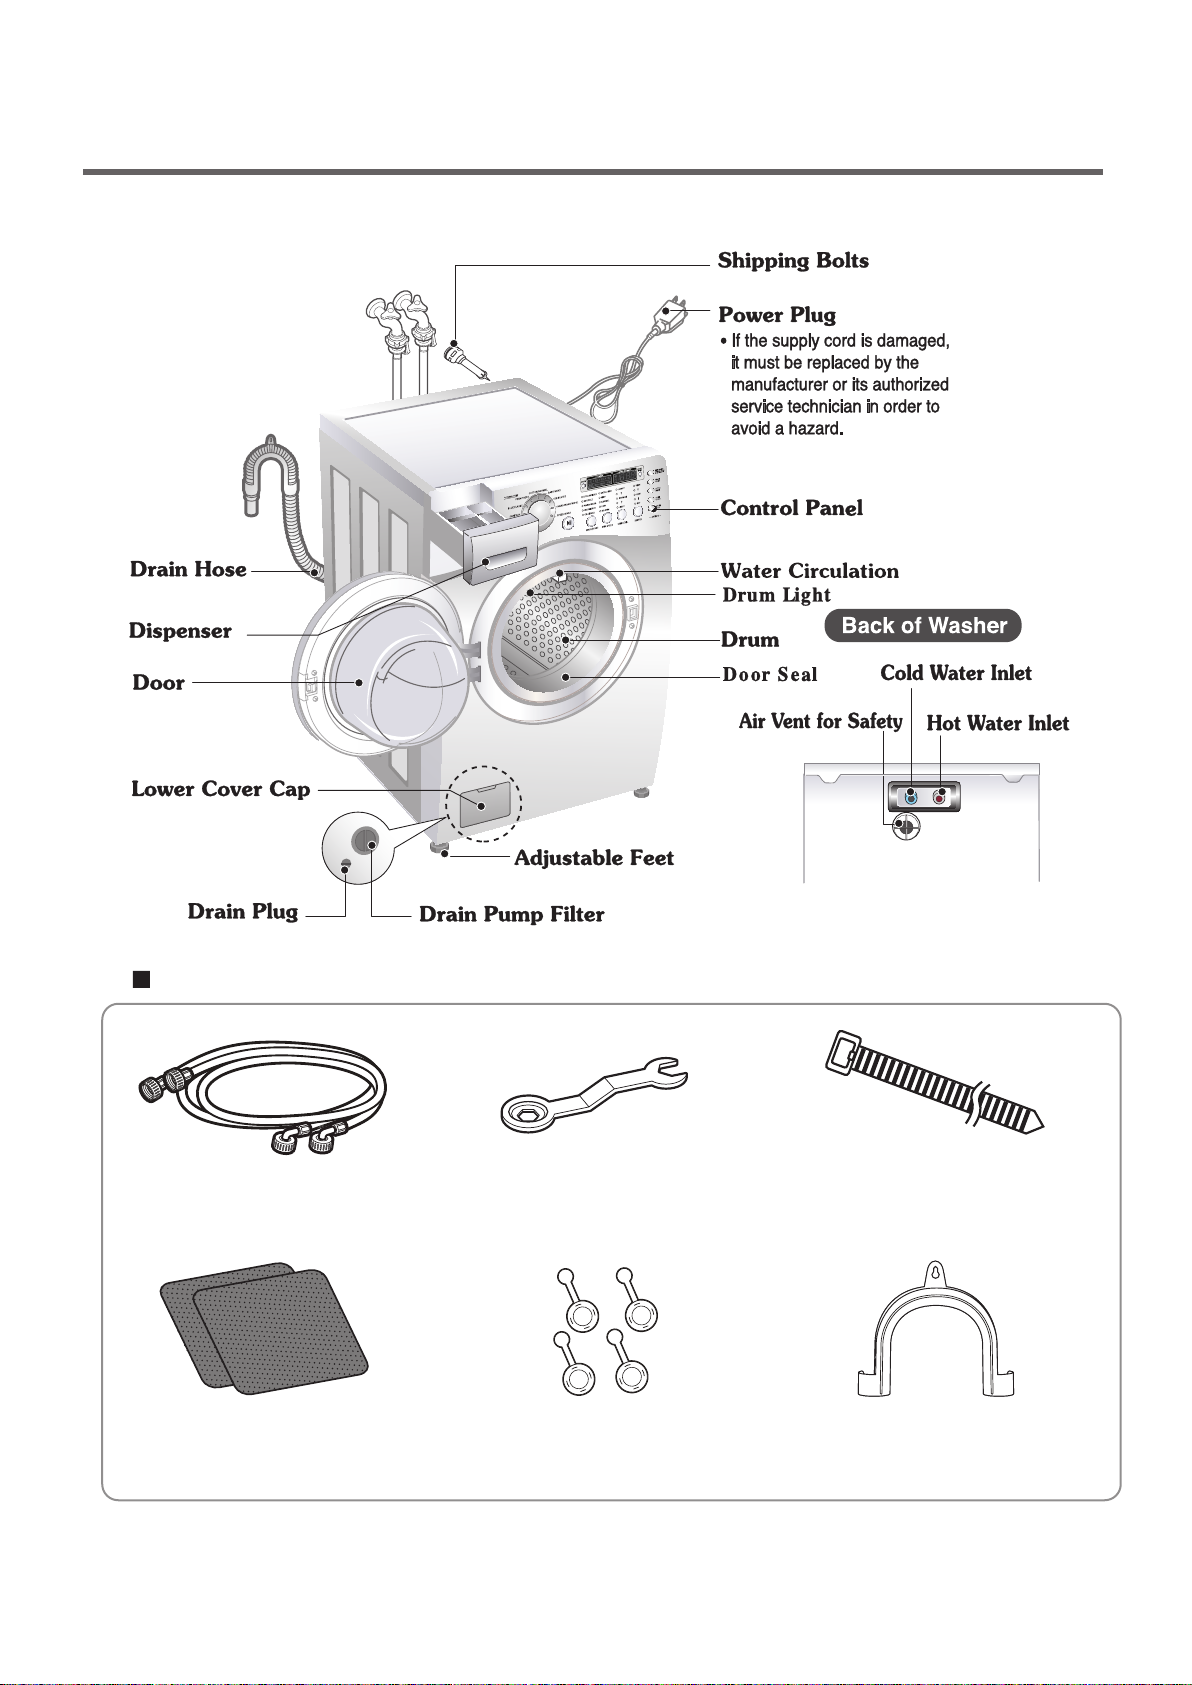
3. PARTS IDENTIFICATION
ACCESSORIES
Hot/Cold (1 each)
Hose
Non-skid pads
Wrench
Caps(4)
(for covering shipping
bolt holes)
7
Tie strap (Option)
to secure drain hose to standpipe,
inlet hose, or laundry tub
Elbow Bracket
(for securing drain hose)
4. INSTALLATION & TEST
Before servicing, ask the customer what the trouble is.
Check the setup (power supply is 120V AC, remove the transit bolts....).
Check with the troubleshooting guide.
Plan your service method by referring to the disassembly instructions.
Service the unit.
After servicing, operate the appliance to see whether it functions correctly.
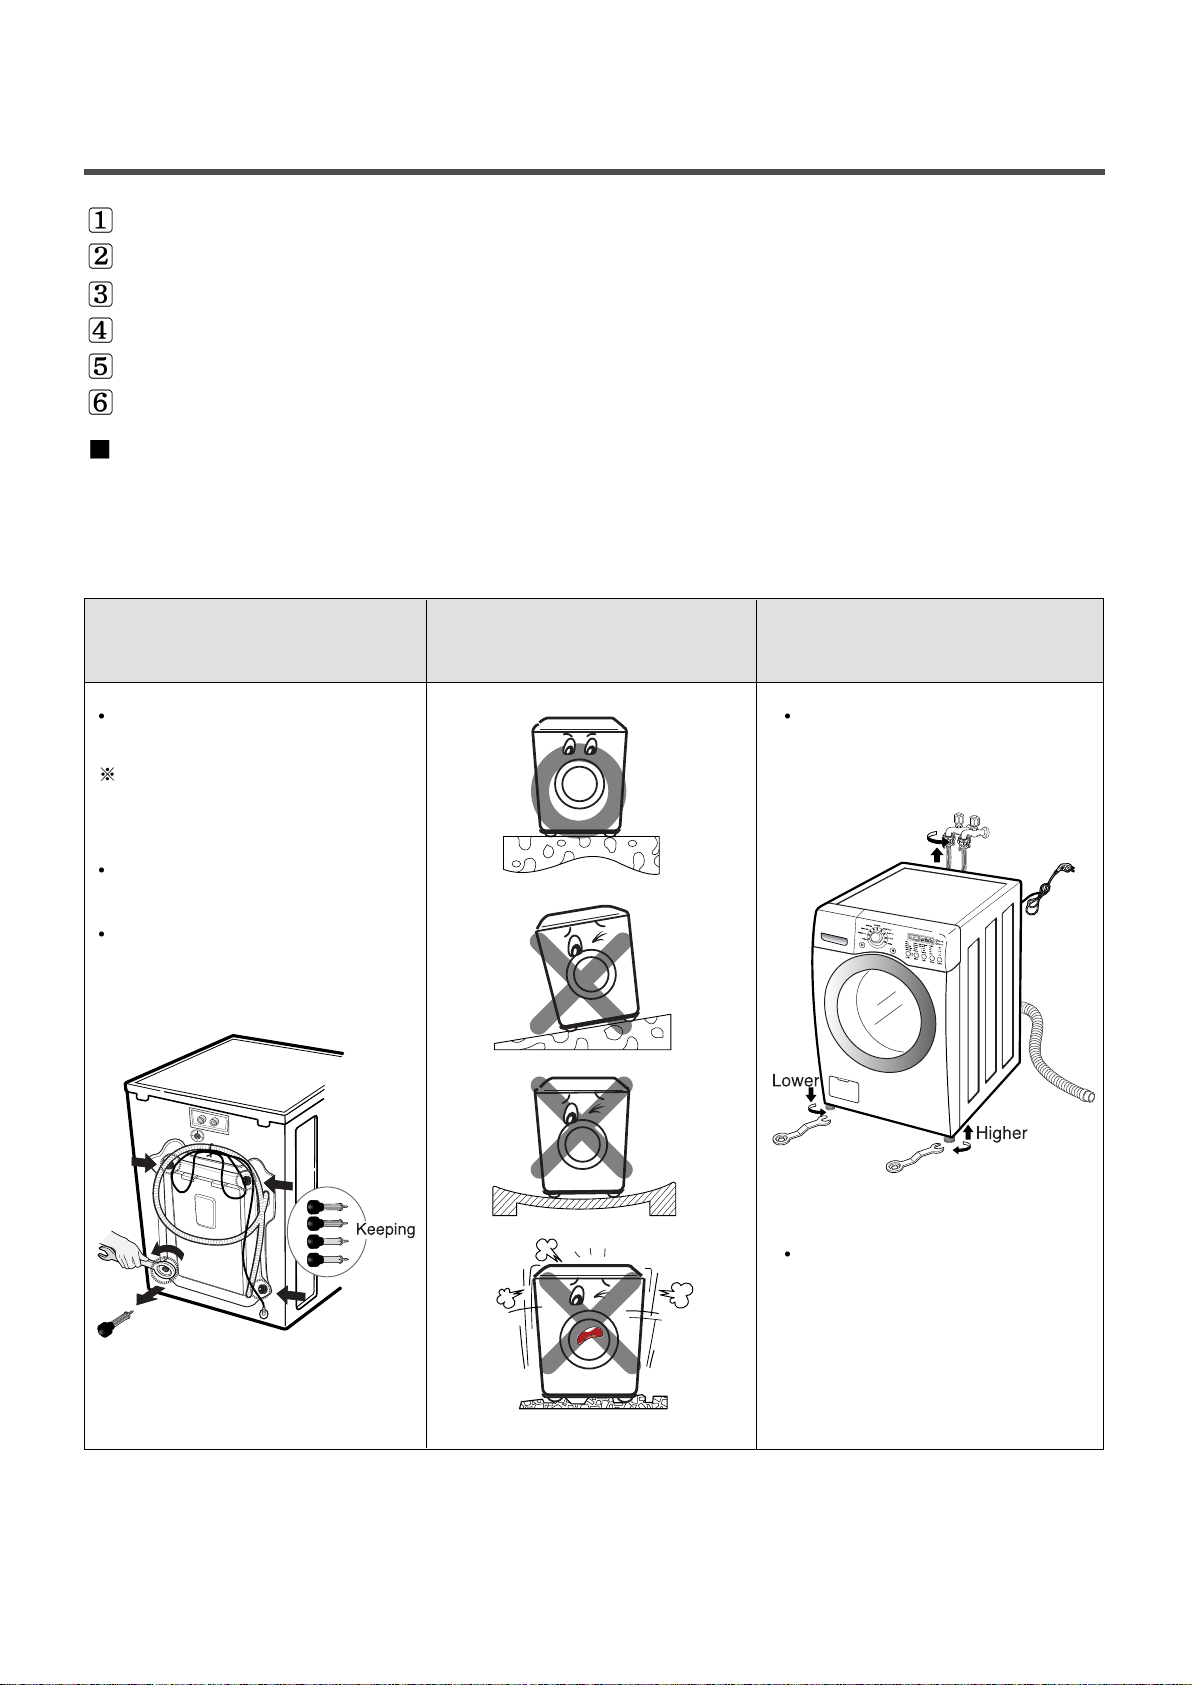
STANDARD INSTALLATION
The appliance should be installed as follows:
REMOVE THE SHIPPING INSTALL THE APPLIANCE ADJUST THE
BOLTS
Remove the 4 shipping bolts Turn the leveling feet to adjust
with the supplied wrench. the appliance.
Do first lower side to remove easily.
Keep the shipping bolts and
spanner for future use.
Insert the 4 caps
(provided) into the hole.
ON A FLAT AND FIRM SURFACE
LEVELING
Turn clockwise to raise;
counterclockwise to lower.
8
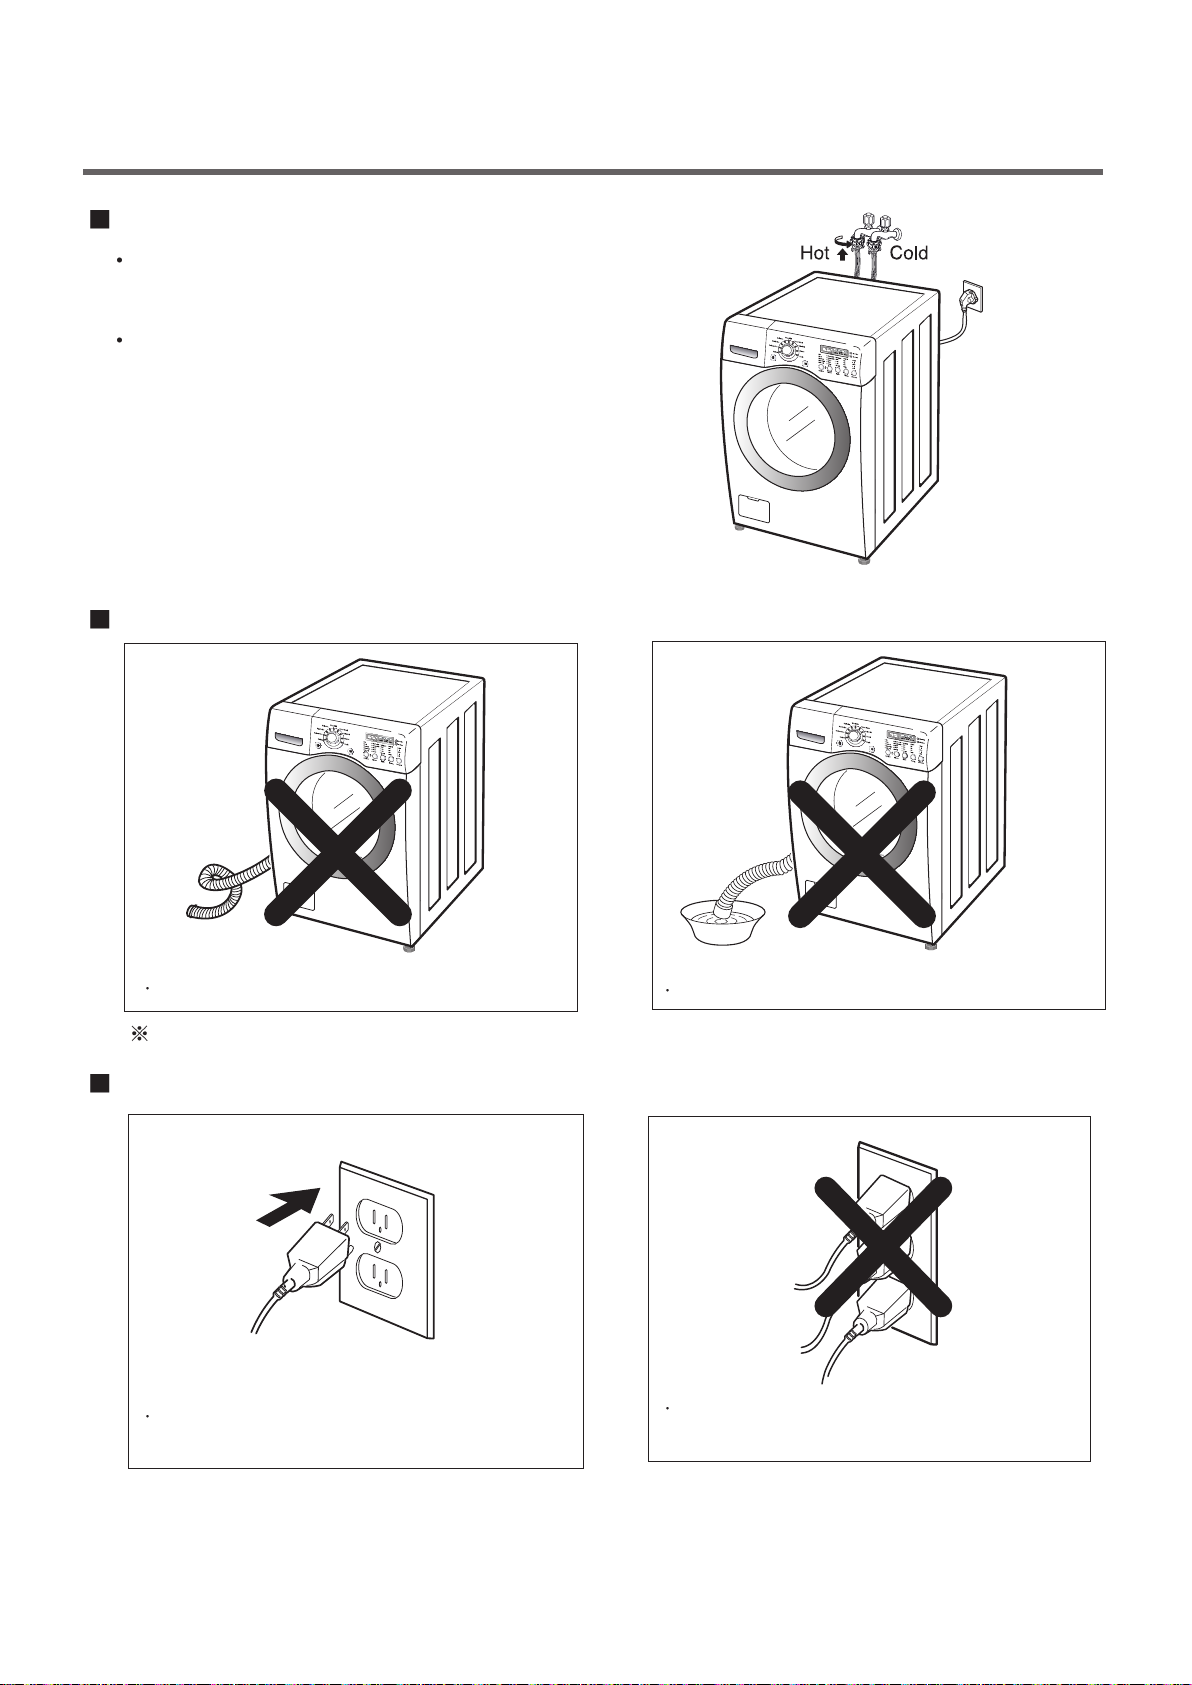
HOW TO CONNECT THE INLET HOSE
Verify that the rubber washer is inside of the
valve connecto
Tighten the inlet hose securely to prevent leaks.
r.
CONNECT THE DRAIN HOSE
Make sure that the hose is not twisted.
Avoid submerging the end of the hose.
The end of the drain hose should be placed less than 100 cm from the floor.
CONNECT POWER PLUG
Connect the power plug to the wall outlet.
Avoid connecting several electric devices, as
doing so may cause a fire
99
.
;7.<-6-:
5)@
7
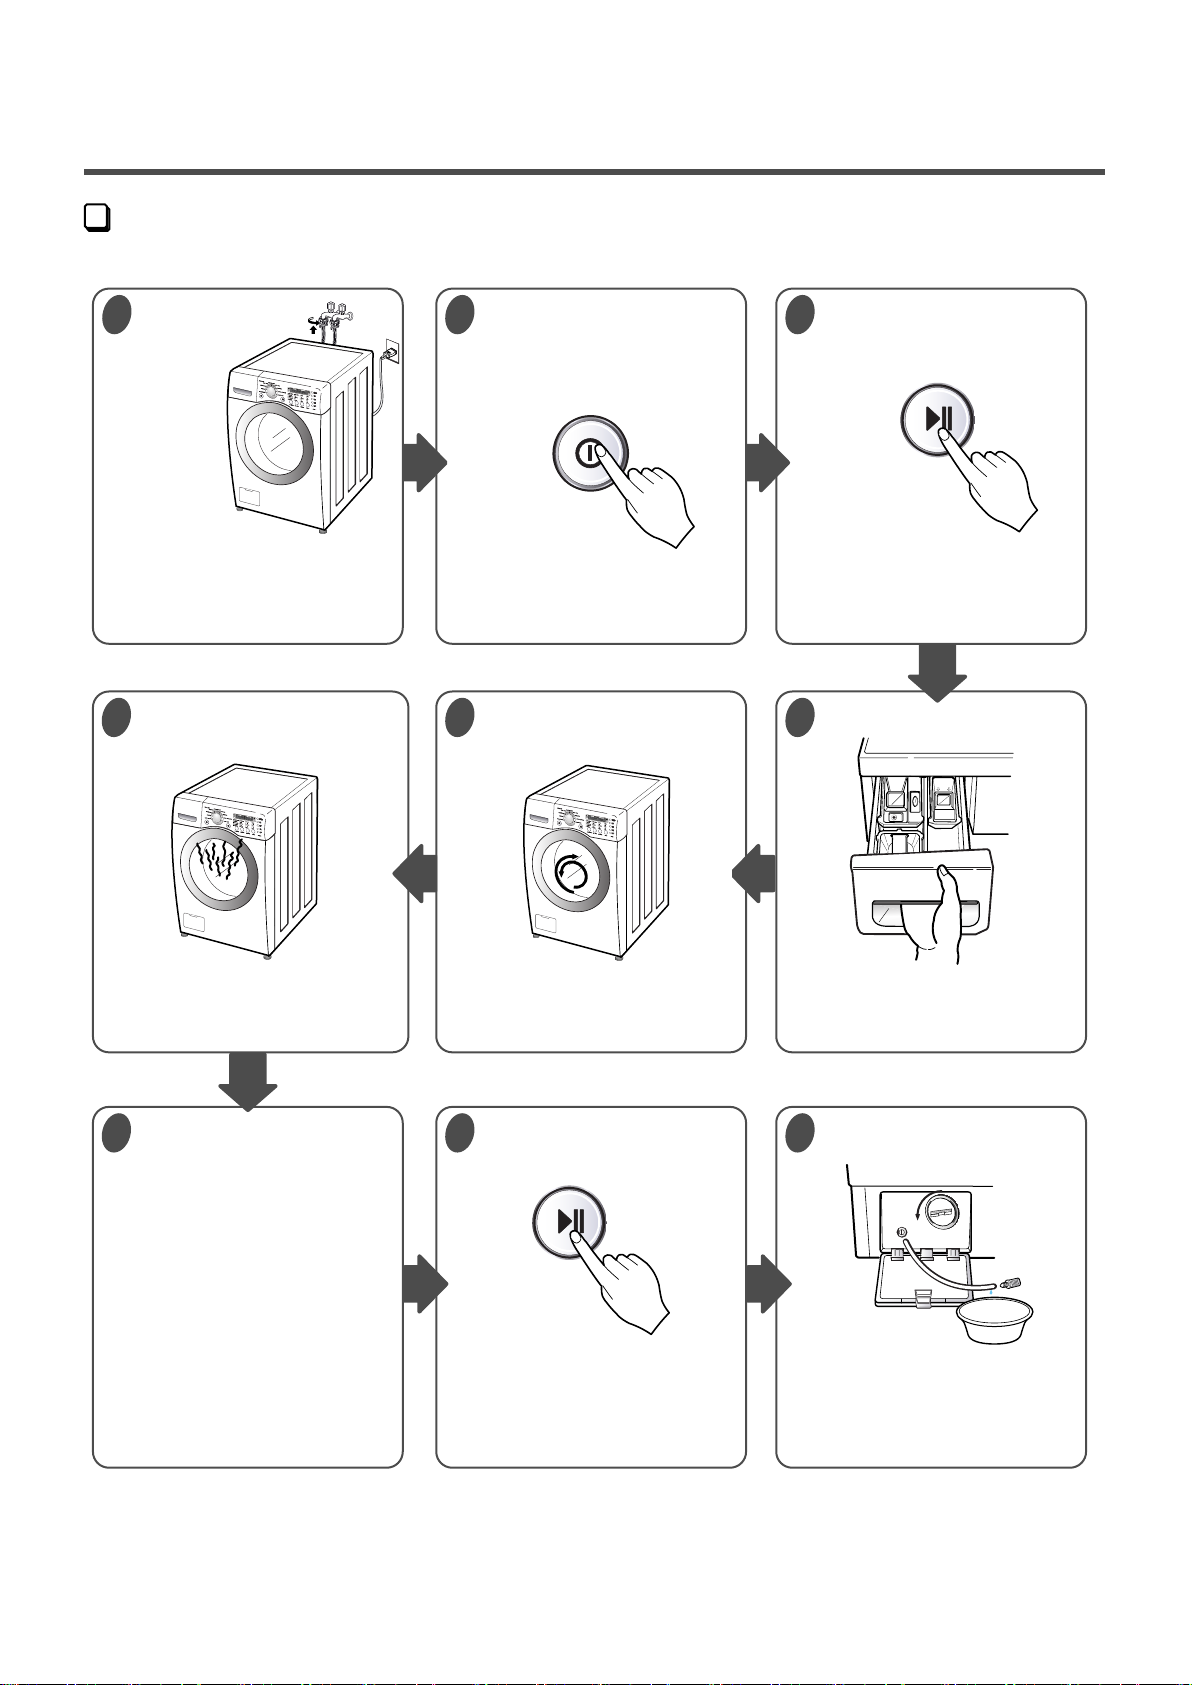
TEST OPERATION
Preparation for
1
washing.
• Connect the power plug to
the outlet.
• Connect the inlet hose.
Check the water heating
6
function.
Press the POWER button.
2
Check the automatic
5
reverse rotation.
Press the Start/Pause
3
button.
• Listen for a click to determine if
the door has locked.
Check the water supply.
4
•
Press the WASH/RINSE button
and the present temperature will
be displayed.
Check the drain and spin
7
functions.
• Power off and the power on.
• Press the SPIN SPEED button.
• Press the START/PAUSE button.
• Check the spin and drain
functions.
• Check if the drum rotates
clockwise and counterclockwise.
Press the
8
START/PAUSE button.
• Listen for a click to determine
if the door is unlocking.
10
• Check if water is supplied
through the detergent dispenser.
Water removal.
9
• If SERVICE is needed during
check, remove the remaining
water by pulling out the hose cap.
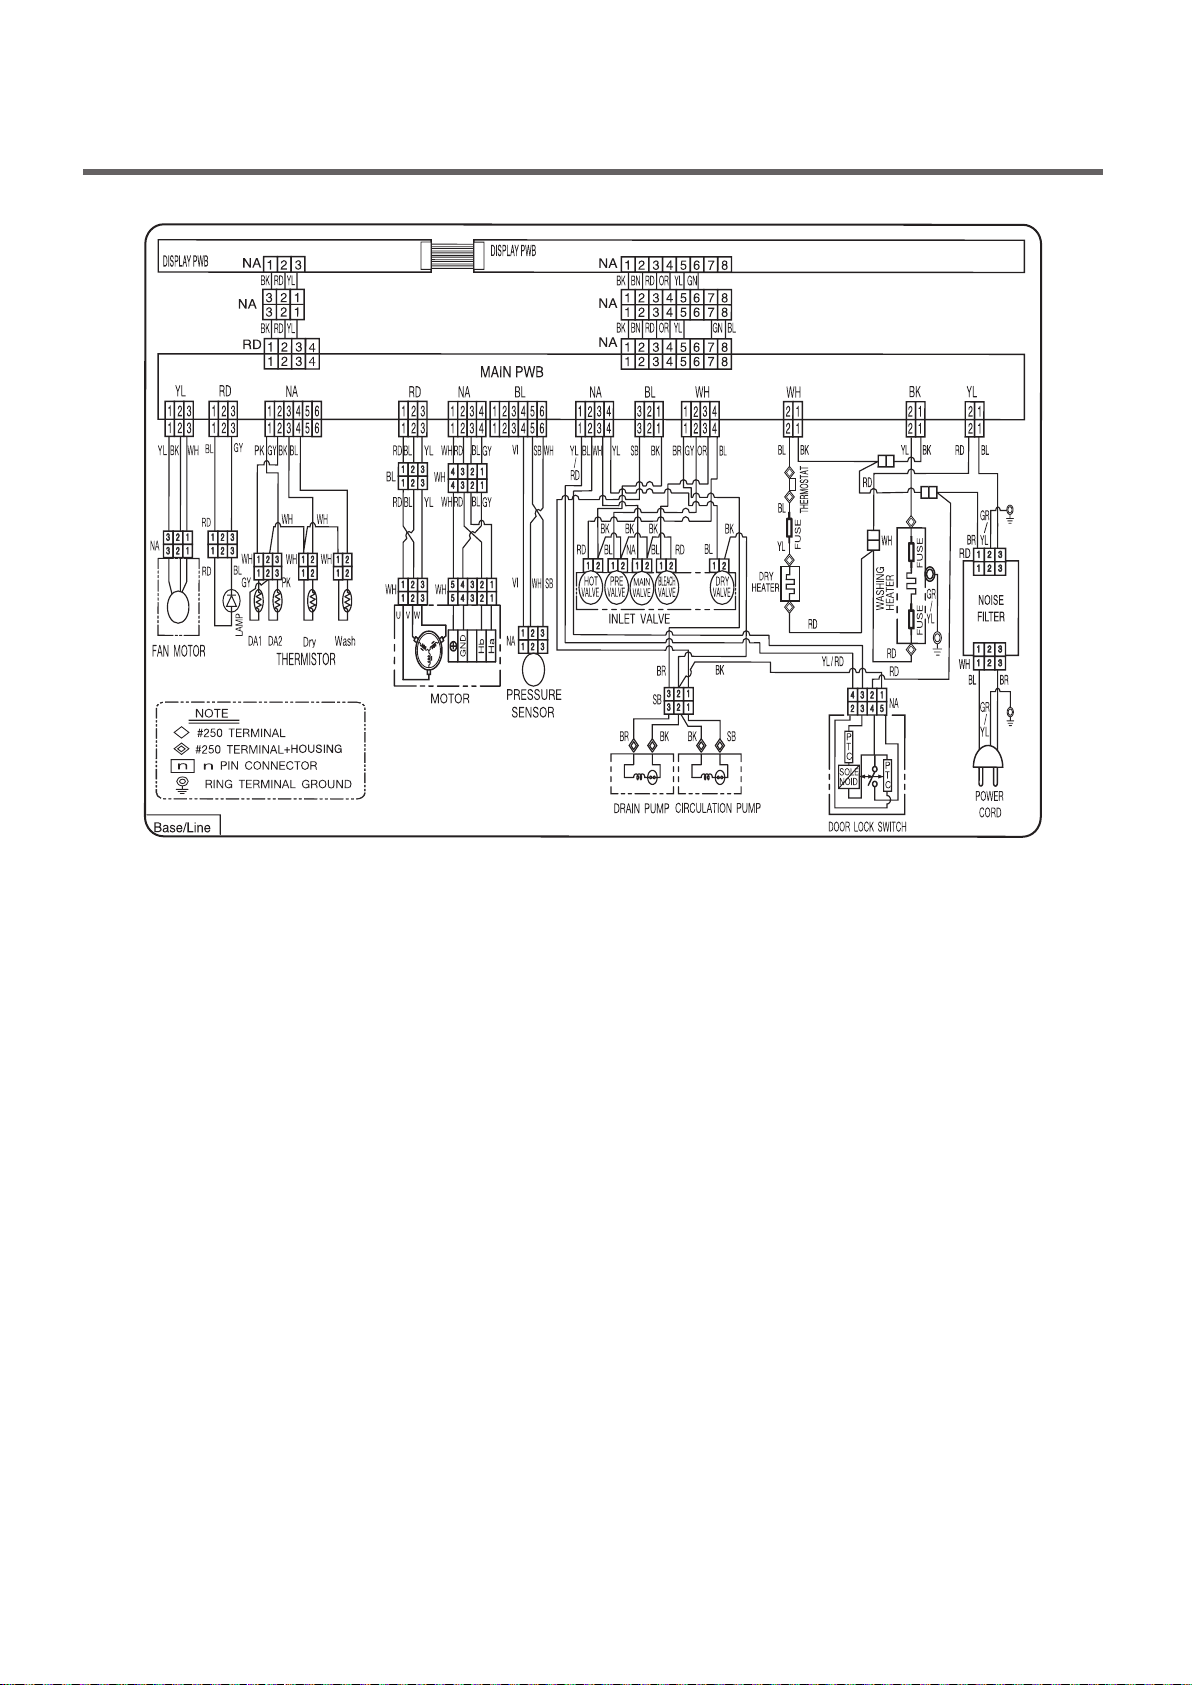
5. WIRING DIAGRAM
11
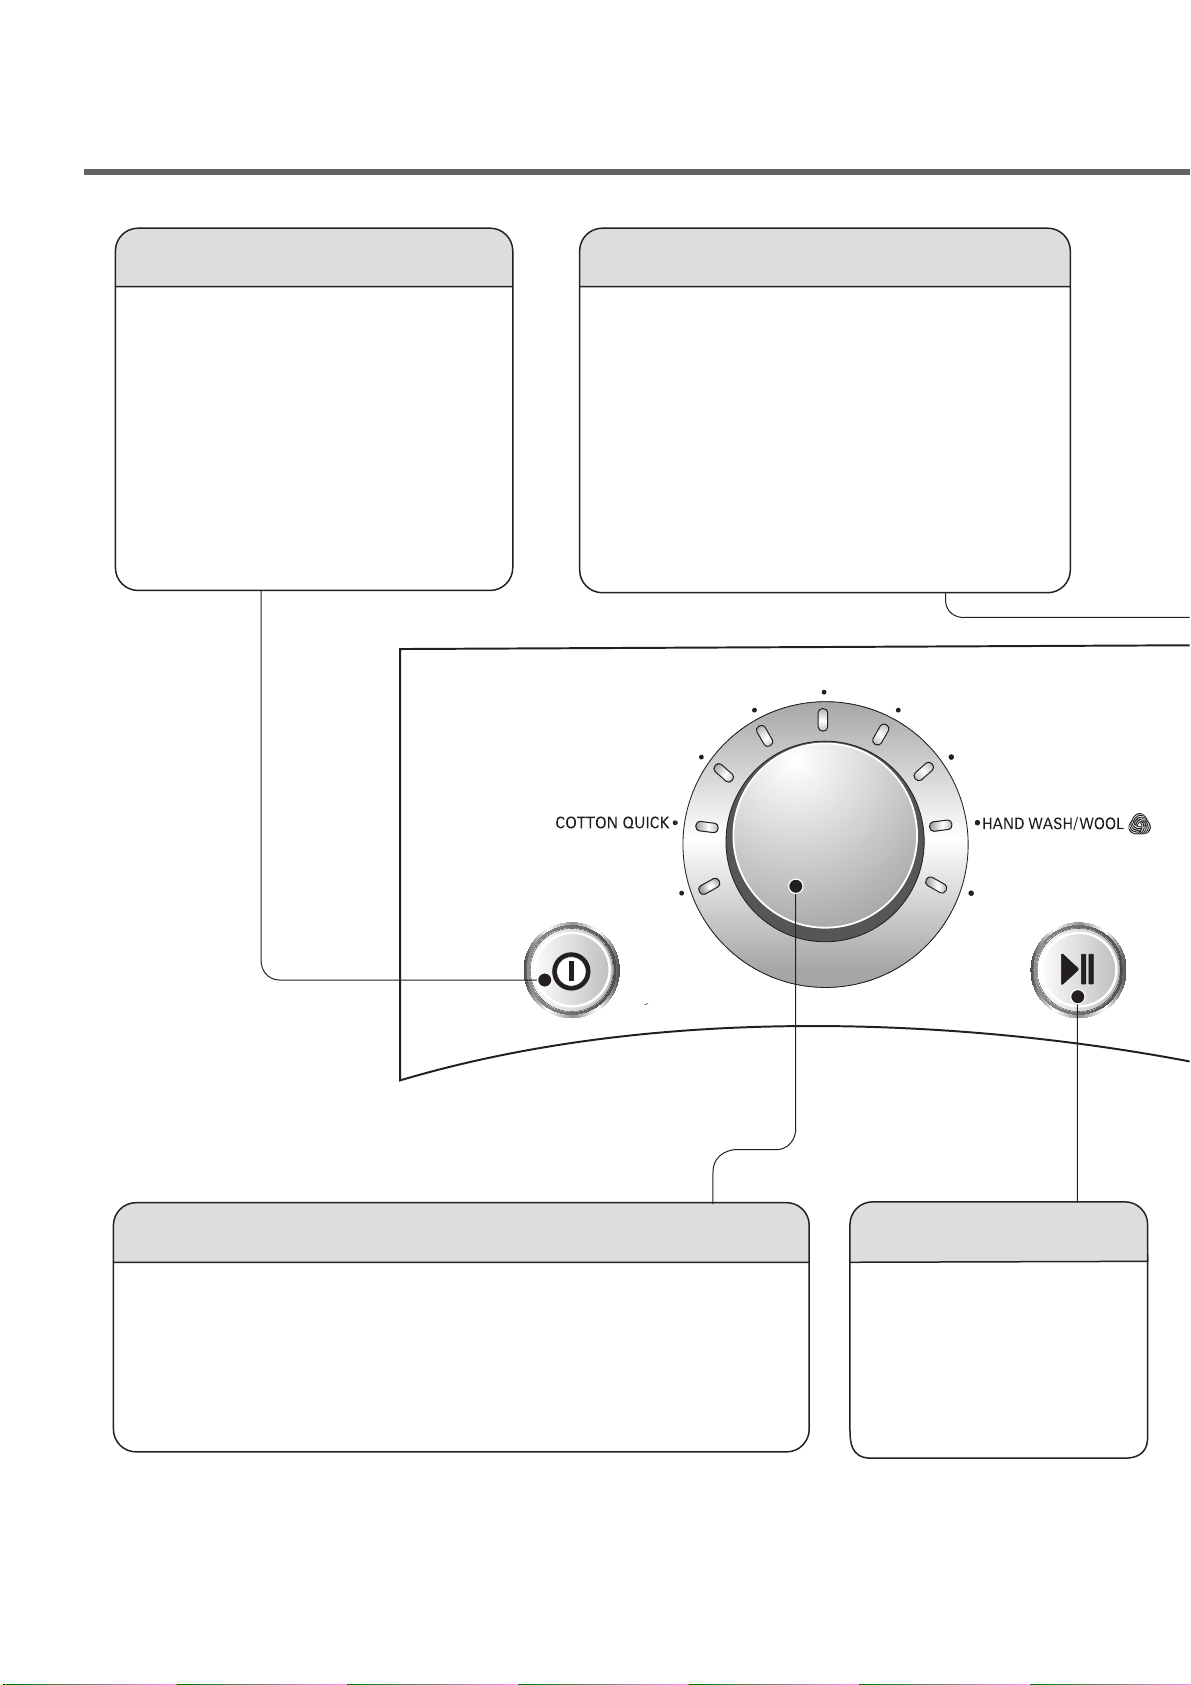
6. OPERATION
SSAANNIITTAARRYY
SSPPEEEEDD WWAASSHH
BBUULLKKYY//LLAARRGGEE
PPRREEMM..PPRREESSSS
DDEELLIICCAATTEE
RRIINNSSEE++SSPPIINN
CCOOTTTTOONN//NNOORRMMAALL
Power Button
• Use this button to turn the power
On/Off.
Status Indicator
• It shows elapsed time of the cycle the washer
is operating.
Cycle Selector Knob
• Rotate the Cycle selector knob to select the cycle designed for
different types of fabric and soil levels.
Start/Pause
• Use this button to Start/
Stop the washer.
12
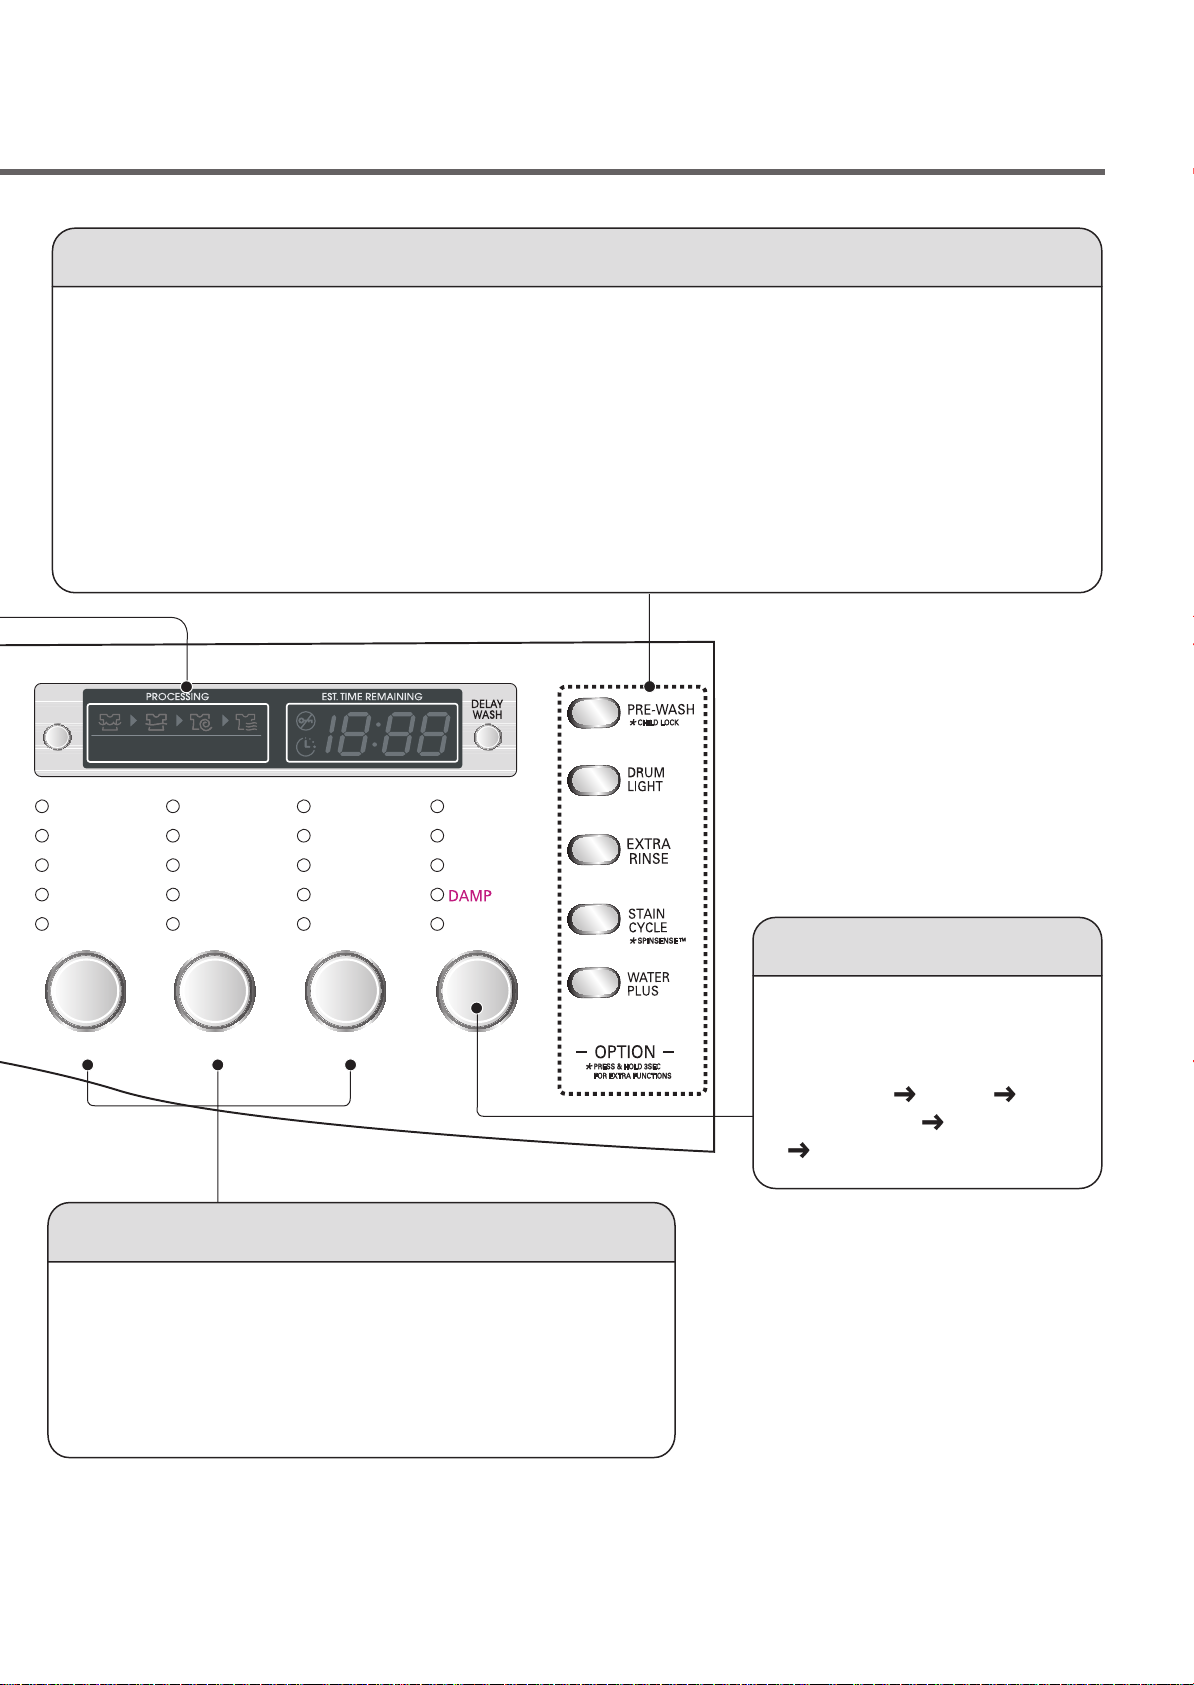
WWASH/RINSEASH/RINSE SPIN SPEEDSPIN SPEED SOILSOIL LEVEL LEVEL DDRRYY
EE XXTTRR AA HHOOTT//CCOOLLDD
HOT/COLDHOT/COLD
WWARM/WARM/WARMARM
WWARM/COLDARM/COLD
COLD/COLDCOLD/COLD
EXTRAEXTRA HIGH HIGH
HIGHHIGH
MEDIUMMEDIUM
LOWLOW
NO SPINNO SPIN
3300//6600//9900//112200((MMIINN))
MOREMORE
NORMALNORMAL
LOWLOW TEMPTEMP..
HEAHEAVYVY
▼▼
▼▼
NORMALNORMAL
LIGHTLIGHT
WWAASSHH RRIINNSSEE SSPPIINN DDRRYY
TUB CLEANTUB CLEAN
Option Button
• PREWASH : Use this option for loads that need pretreatment. It adds 16 minutes prewash and
a spin cycle.
• EXTRA RINSE: This option provides an additional rinse.
• STAIN CYCLE: Adds time to the wash and rinse cycles for better stain removal.
Automatically provides a rinse.
• WATER PLUS: Add extra water to the wash and rinse cycles for superior results.
WASH/RINSE, SPIN SPEED, SOIL LEVEL button
• Select a water temperature based on the type of load you
are washing.
• To change the spin speed, press the Spin Speed button
repeatedly to cycle through available options.
• To change the soil level, press the Soil Level button
repeatedly until the desired setting is on.
DRY SELECTOR
• Dry program can be selected
by pressing the DRY button.
• By pressing the DRY button,
[NORMAL
30/60/90/120 LOW TEMP.
DAMP] can be selected.
MORE
13
 Loading...