

Page 1

OWNER’S MANUAL
LG CORDLESS
HANDY-STICK CLEANER
This manual contains important information and instructions for
the safe use and maintenance of the vaccum cleaner. Please read
all of the information on page 3, 4, 5 for your safety. Please keep
this manual in an easily accessible place for future reference.
VS84** Series
www.lg.com
Page 2

Table of contents
Important safety instructions ............................................................................ 3~5
Components and functions ..................................................................................... 6
How to use ........................................................................................................ 7~15
Assembling vacuum cleaner ................................................................................................ 7
Assembling Charger ............................................................................................................. 8
Using the Product .......................................................................................................... 9~11
Charging ............................................................................................................................. 12
Cleaning Dust bin ............................................................................................................... 13
Assembling Dust bin ......................................................................................................... 14
Cleaning Nozzle ................................................................................................................ 15
Troubleshooting Guide ........................................................................................ 16
2
Page 3
IMPORTANT SAFETY INSTRUCTIONS
Read and follow all instructions before using your vacuum cleaner to prevent the risk of fire, electrical shock, personal
injury, or damage when using the vacuum cleaner. This guide does not cover all possible conditions that may occur.
Always contact your service agent or manufacturer about problems that you do not understand. This appliance
complies with the following EC Directives :-2006/95/EC Low Voltage Directive -2004/108/EC EMC Directive.
This is the safety alert symbol.
This symbol alerts you to potential hazards that can kill or hurt you and others.
All safety messages will follow the safety alert symbol and either the word “WARNING” or “CAUTION.”
These words mean:
WARNING
CAUTION
WARNING
This symbol will alert you to hazards or unsafe practices which could cause serious
bodily harm or death.
This symbol will alert you to hazards or unsafe practices which could cause bodily
injury or property damage.
1. This appliance is not intended for use by persons
(including children) with reduced physical, sensory
or mental capabilities, or lack of experience and
knowledge, unless they have been given supervision
or instruction concerning use of the appliance by a
person responsible for their safety.
2. Children should be supervised to ensure that they
do not play with the appliance.
3. If the supply cord is damaged, it must be replaced
by LG Electronics Service Agent in order to avoid a
hazard.
4. This appliance can be used by children aged from 8
years and above and persons with reduced physical,
sensory or mental capabilities or lack of experience
and knowledge if they have been given supervision
or instruction concerning use of the appliance in
a safe way and understand the hazards involved.
Children shall not play with the appliance. Cleaning
and user maintenance shall not be made by children
without supervision.
3
Page 4
IMPORTANT SAFETY INSTRUCTIONS
WARNING
• This appliance is designed for normal indoor
domestic use only. It is not to be used for any
office or commercial application.
• No one other than a repair technician shall
disassemble or modify the product.
It may cause fire or electrical shock.
•
Do not spray combustible materials such as
gasoline or solvents, or surfactants such as
detergents or bathing goods, or drinks near the
cleaner and its charging stand.
It can cause an explosion or fire.
•
Do not allow the power cord to be crushed,
kinked or cut by heavy objects.
Using a damaged cord or plug could cause fire or
electrical shock. When the power cord is damaged,
it is dangerous, so please have the cord replaced by
an authorised service center
• Do not let liquid such as water enter the product,
and do not use the unit to pick up liquids, sharp
pointy objects, or hot embers.
It causes fire or electrical shock.
If water accidently enters the unit, immediately turn
of
f the power switch of the main body, pull out the
power plug, and contact LG Electronics Service
Agent to avoid hazard.
• Do not insert pins or sharp pointy utensils into or
around the cleaner or its charging stand.
There is a risk of electrical shock.
•
Do not use the appliance if gas odors can be
detected. Unplug the unit and provide ventilation
to avoid possible dangers.
There is a risk of fire or explosion.
•
Make sure that the unit is plugged into a wall
socket over 10amp and not overloaded.
Overloading of any wall socket can cause fires and
product malfunction.
•
Do not use the appliance if the power cord or
socket is in any way loose or damaged.
It can cause fire or electrical shock.
•
Do not operate the appliance with the suction
inlet or outlet blocked.
It may cause deformation of main body or fire by
overheating.
•
Do not operate the cleaner while dust bin is taken
out.
There is a risk of product damage or electrical shock
injur
y.
• Do not place power cord and the product near
heating devices.
It can cause deformation of main body, malfunction,
or fire.
.
•
•
•
•
•
•
• Do not wash the exterior of inlet or bottom
•
• Do not use the product at a place subject to lots of
•
•
•
•
•
•
Be careful that your fingers do not touch the pins
when you pull out the plug from the mains outlet.
It can cause electrical shock.
Do not allow children or pets to play with the
product or use the product as a toy.
It can cause personal injury and damage to the unit.
Do not handle the plug with wet hands.
It may cause electrical shock.
Do not clean the inlet with water and then use
immediately without sufficiently drying the
components first.
It may cause electrical shock and malfunction.
When you clean the exterior, make sure to pull
out the power plug, and do not wash with harsh
or abrasive solutions.
It can cause electrical shock and exterior damage.
Do not place hands into the intake while the
appliance is operating. Allow the unit to stop
operating and disconnect from the wall socket to
avoid any personal injury.
surface with water or detergent. Use only a damp
cleaning cloth.
It may damage product or cause electrical shock.
If the supply cord is damaged, it must be
replaced by the manufacturer, its authorised
service agent or similarly qualified persons in
order to avoid a hazard.
industrial oil fumes or metal particulates.
Doing so can cause fire or product failure.
Do not use the product at a place subject to
leakage or probable leakage of combustible
gases.
It may result in fire or explosion.
Do not disassemble the battery.
There is a risk of fire or electric shock.
Do not expose product to heat or fire.
Do not expose product direct sunlight.
There is a risk of fire and explosion.
Do not physically impact the battery.
There is a risk of fire and explosion.
Charge the unit only with the specified Charging
Station. Do not use the Charging Station for any
other purpose other than its intended purpose.
Failing to do so can result in a fire or serious damage.
If any liquid leaks from the batteries, avoid
contact with the skin or eyes.
If you touched the liquid, wash contact area with
plenty of water and get medical attention.
There is a risk of burns and blindness.
4
Page 5
IMPORTANT SAFETY INSTRUCTIONS
CAUTION
• Do not use this cleaner on anything other than
rated voltage.
It may cause fire and unrepairable product
damage.
• If the product is not in use for a long period of
time, pull out the power plug.
• Static Electricity may be generated at main
body during the cleaning.
Cleaner may malfunction due to electrostatic
energy, so pull out the power cord and put it back
in again.
• Big objects such as socks, stocking, tissues,
etc., may block the inlet during the cleaning,
so please remove them before starting the
cleaning.
This appliance must be used to remove dust only.
• Do not stop on one spot or use it on the same
spot repeatedly for a long time.
The surface may be damaged by the friction and
vibration.
• Do not touch the bottom surface with hand or
foot while the appliance is in operation.
• Do not operate the appliance without the dust
bin and its covers in place. Always ensure the
dust bin is cleaned when it reaches its limit or
beforehand.
If it is used continuously while dust bin is full, it
will cause malfunction and overheating.
• To avoid the risk of fire or electric shock,
always grip it from the plug when removing.
And never pull on the power cord when
removing it from the wall socket.
• If a foreign object is attached to the bottom
surface of dust bin, remove it before using the
product.
It could compromise the suction motor and cause
malfunction and damage.
• Never use the product for removing toxic
gases.
The product may fail, and toxic gases will not be
removed.
• Use or place the unit on a level surface and
area and do not apply undue force to the unit
when using it.
Doing so can cause fire or product failure.
• If disposing the unit, it must be done correctly
as it contains battery cells that can cause fire
or explode if not disposed of correctly.
5
Page 6
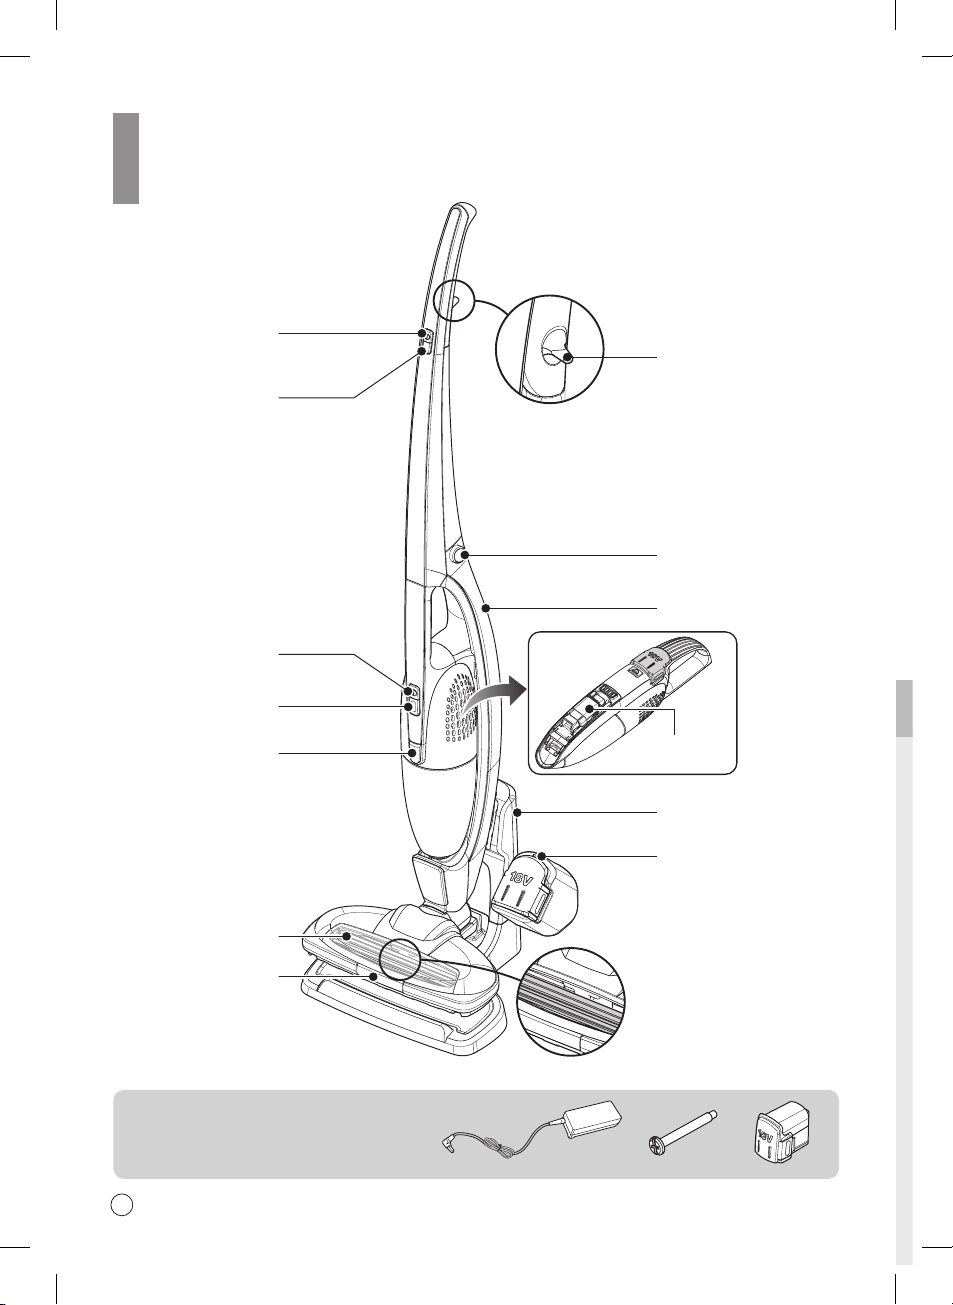
Components and functions
Power ON/OFF button
Speed control button
Handy power button
Battery indicator
Finger rest
- Place your finger here
for comfortable use.
Handy release buttons
Main body
Dust bin release button
Anti-tangle brush
LED lighting
Components:
Charger, Handle holding screw,
Spare battery
6
Built-in brush
Charging stand
Charging indicator
Page 7

How to use
Assembling vacuum cleaner
1 2
Upper body part
Lower body part
➊
Assembling the Upper and Lower body parts
➋ Fasten the fixing screw
Attach upper body part to the lower body part in
arrow direction as shown in the figure.
(When assembling the product, make sure not to
get your finger stuck.)
There is a fixing hole on the rear side the
product.
Use the fixing screw provided with the
product to assemble and secure upper and
lower parts.
7
Page 8

How to use
Assembling Charger
Insert the upper part of the charging stand to
the base until you hear a “click” sound.
8
Page 9

How to use
Using the Product
Power ON/OFF button
Power control button
(Power or Regular)
Vacuum power button
Battery indicator
Press the power button to turn on the
product.
• When you use the vacuum cleaner,
select the motor speed with the speed
control button.
• If the product doesn’t work, check the
battery indicator for a visual display.
Battery
indicator
Projection
Groove
Make sure the assembly
part has docked correctly.
Place the rear bottom of the main
body on the charger as shown on
the figure.
Make sure the assembly part has
docked correctly.
Battery indicator shows remaining charge.
• A fully charged battery can last up to 20 minutes
on the Power mode and up to 30 minutes on the
Regular mode (depending on the floor type).
• When the battery power level is low, the battery
indicator shows one blinking light, and then the
power turns off soon after.
WARNING
Do not use this cleaner to vacuum liquids.
Vacuuming liquids will cause the unit to
malfunction.
9
Page 10

How to use
Using the Product
10
The anti-tangle brush is ideal for cleaning short-furred carpet or a normal timber floor
surface.
①
It is not recommended to vacuum a carpet with long fur.
②
If you vacuum a long piled carpet, it may cause the anti-tangle brush to stop
rotating.
– When the anti-tangle brush stops due to a motor overload, turn the vacuum
cleaner off and on again to allow it to work again.
③
After you have finished using the vacuum, place the vacuum cleaner on the floor or
on the charging stand.
– If the product falls over due to improper placement when not in use, it may
damage the unit or harm children or pets.
The Anti-hair brush motor is fitted with overload protection which stops the
motor from rotating, to help prevent accidental injury or damage to tangled
threads and fabrics.
Page 11

How to use
Using the Product
For the convenience of the user,a built-in brush is attached to the hand held cleaner.
When using the hand held cleaner alone, refer to the following instructions.
Using built-in brush
Pull out the built-in brush until it secures into place at
the bottom of the vacuum cleaner in the arrow direction.
Move the brush in the arrow direction until it is locked
into place.
Retracting the built-in brush
Firmly slide the built-in brush in the
arrow direction.
Fold the built-in brush body back
into the enclosure in the arrow
direction.
11
Page 12

How to use
Charging
1
Battery indicator
Charging indicator
2
➊ If the voltage gets low during
operation, the power is
automatically turned off to protect
the battery.
You must then recharge the
battery.
Before beginning the recharge,
check that the hand held cleaner is
properly docked to the main body,
and then place it on the charging
stand.
12
➋ The charging time may vary depending on the battery
condition.
When the minimum amount of charge is left, it takes about
4.5 hours to fully charge the battery. (Charging one battery)
• The battery fitted to the vacuum cleaner is charged first,
and then the battery attached to the charging stand is
charged.
• While the hand held cleaner is charging, the battery
indicator light blinks to show the charge amount.
• When the battery is fully charged, the hand held battery
status indicator stays on.
• While the battery on the charging stand is charging, the
single LED indicator on the charging stand will blink, and
when the battery is fully charged, the LED will remain on.
• If the vacuum is not used for a long period of time, it is
recommended to, remove the charging adaptor plug from
the wall socket.
• To get a full charge for the two discharged batteries, it may
take up to 9 hours.
Page 13

How to use
Cleaning Dust bin
①
Dust bin
Dust bin
release button
②
③
Dust separator
Inner Filter
⑤
Clean and dry
①
To detach the dust bin, push and hold the release button and pull it in arrow
direction.
②
Detach the dust separator in arrow direction.
③
Empty the dust bin.
④
Disassemble the dust separator to clean the filter.
(Beware that the dust that may fall off the filter in the process.)
⑤
Rinse the detached filter under water until the water runs clear and completely
dry the filter in the shade.
(Do not use hot water or detergent. They may cause deformation to the filter.)
(non mesh side)
④
Disassembling filter
The filter cover is easily removed by
pressing the side of fixing holes.
When removing filter cover, be careful
as dust will fall from it.
Helpful tip
• To maintain the vacuum cleaner, clean the filter once a week with a cleaning brush
or by using another vacuum cleaner, and at least twice a month with water.
(Frequent cleaning of the filter can help maintain its performance.)
• To maintain the best performance of your vacuum cleaner, empty the dust bin after
every use.
• After cleaning the dust separator, be sure to put it back into the dust bin.
• Always use the vacuum cleaner with the dust separator assembled. If not, dust will
be sucked into the main body and motor, causing a malfunction and damage to the
vacuum cleaner.
13
Page 14

How to use
Assembling Dust bin
Filter cover
Inner Filter
① ② ③
Dust separator
14
①
Attach the inner filter back onto the filter cover.
②
Attach the dust separator back onto the filter cover.
③
Put the dust separator back into the dust bin.
Helpful tip
• Refer to the following figure to assemble the filter cover,
filter holder and dust bin by aligning in the right direction.
Page 15

How to use
Cleaning Nozzle
1 2 3
Hook
Anti-tangle brush
4 5 6
Belt
➊ As showing in the
figure, press the hook
to release the antitangle brush cover.
➍ Put the anti-tangle brush
back onto the belt inside
the vacuum nozzle.
➋ Lift the anti-tangle
brush in the arrow
direction and detach it
from the drive belt.
➎ Secure the brush into
the vacuum nozzle.
Click
➌
Clean the brush when brush
is tangled with hairs and
threads.
- Use another vacuum cleaner
to remove the hair and threads
from the anti-tangle brush.
- Use a pair of scissors to cut
the hairs, threads etc. that
have collected around the
brush.
(Do not use water to clean the
brush.)
➏ Refit the brush cover
until you hear a “click”
sound.
Click
Hook
Helpful tip
• After cleaning or for replacement, assemble the anti-tangle brush properly in the
opposite way of removal.
• Before beginning your cleaning, check the nozzle wheels and brush to see if
other foreign objects are stuck in them.
• Remove the objects to protect the floor surface.
15
Page 16

Troubleshooting Guide
If there is an abnormality in the product, check the following items first before requesting for a
service center or calling the store.
A service cost will be charged if the appliance has a user related malfunction, or no malfunction
is found.
Following simple actions in the user manual may solve the problem.
CHECK PLEASE PERFORM THE FOLLOWING ACTIONS
Weak or no suction and
vibration noise.
Cleaner is not working at
all?
Odor comes out of the
cleaner?
Hot air comes out, and
main body is hot?
It only vibrates, and there
is no suction.
Adaptor cord is defective
• Check if inlet or dust bin is blocked by any foreign objects or
debris that weaken the suction.
• Separate dust bin from the main body, and check if the filters are
dirty.
• Check that the switch is turned on.
• Check if battery level is low.
• Check if the operation procedure is correct according to the
instructions within this manual.
• Some odors are normal when the product is first operated and will
diminish within 3 months of normal operation.
• Odors can also be caused by old dust in the dust bin and filters
that has not been cleaned for some time. Empty, clean and wash
the dust bin and filters thoroughly before reusing the appliance.
• The air coming out of the outlet holes may be warm because it is
coming out after cooling the motor. This is normal.
• Because of the suction motor overheat prevention device, this
may occur when 1) dust bin is full, 2) filter or inlet is blocked, or 3)
it is used for a long time. Allow the unit to rest and cool for at least
40 minutes before attempting to operate again.
– Before using it again, clean the filter and dust bin.
– If the inlet is blocked, please remove the foreign object.
• The defective plug should be replaced by a qualified electrician.
16
Page 17

Disposal of your old appliance
1. All electrical and electronic products should be disposed of separately from the municipal waste
stream via designated collection facilities appointed by the government or the local authorities.
2. The correct disposal of your old appliance will help prevent potential negative consequences for
the environment and human health.
3. For more detailed information about disposal of your old appliance, please contact your city office,
waste disposal service or the shop where you purchased the product.
Disposal of waste batteries/accumulators
1. When this crossed-out wheeled bin symbol is attached to batteries/accumulators of Your product
it means they are covered by European Directive 2006/66/CE.
2. This symbol may be combined with chemical symbols for mercury(Hg), cadmium(Cd) or lead(Pb)
if the battery Contains more that 0.0005% of mercury, 0.002% of cadmium or 0.004% of lead.
3. All batteries/accumulators should be disposed separately from the municipal waste stream via
designated collection facilities appointed by the government or the local authorities.
4. The correct disposal of Your old batteries/accumulators will help to prevent potential negative
consequences for the environment, animal and human health.
5. For more detailed information about disposal of Your old batteries/accumulators, please contact
Your city office, waste disposal service or the shop where You purchased the product.
Page 18

Note
Page 19

Note
Page 20

Made in Korea
 Loading...