

Page 1

USER
GUIDE
Page 2

Copyright©2010 LG Electronics, Inc. All rights reserved.
LG and the LG logo are registered trademarks of LG Group
and its related entities. FATHOM
TM
is a trademark of Verizon
Wireless. All other trademarks are the property of their
respective owners.
Page 3

Important Health Information and Safety Precautions
When using this product, the safety precautions below must be taken to
avoid possible legal liabilities and damages.
Retain and follow all product safety and operating instructions. Observe all
warnings in the operating instructions on the product. To reduce the risk
of bodily injury, electric shock, fire, and damage to the equipment,
observe the following precautions.
ELECTRICAL SAFETY
This product is intended for use when supplied with power from the
designated battery or power supply unit.
Other usage may be dangerous and will invalidate any approval given to
this product.
SAFETY PRECAUTIONS FOR PROPER GROUNDING INSTALLATION
CAUTION
an electric shock to your device. This product is equipped with a USB
Cable for connecting to a desktop or notebook computer. Be sure your
computer is properly grounded (earthed) before connecting this product
to the computer. The power supply cord of a desktop or notebook
computer has an equipment-grounding conductor and a grounding plug.
The plug must be plugged into an appropriate outlet which is properly
installed and grounded in accordance with all local codes and ordinances.
SAFETY PRECAUTIONS FOR POWER SUPPLY UNIT
Use the correct external power source
A product should be operated only from the type of power source
indicated on the electrical ratings label. If you are not sure of the type of
power source required, consult your authorized service provider or local
power company. For a product that operates from battery power or other
sources, refer to the operating instructions that are included with the
product.
: Connecting to improperly grounded equipment can result in
1
Page 4

Important Health Information and Safety Precautions
Handle battery packs carefully
This product contains a Li-ion battery. There is a risk of fire and burns if
the battery pack is handled improperly. Do not attempt to open or service
the battery pack. Do not disassemble, crush, puncture, short external
contacts or circuits, dispose of in fire or water, or expose a battery pack to
temperatures higher than 60°C (140°F).
WARNING: Danger of explosion if battery is incorrectly replaced. To reduce
risk of fire or burns, do not disassemble, crush, puncture, short external
contacts, expose to temperature above 60°C (140°F), or dispose of in fire or
water. Replace only with specified batteries. Recycle or dispose of used
batteries according to the local regulations or reference guide supplied with
your product.
Take extra precautions
●
Keep the battery or device dry and away from water or any liquid as it
may cause a short circuit.
●
Keep metal objects away so they don’t come in contact with the
battery or its connectors as it may lead to short circuit during
operation.
●
The phone should be only connected to products that bear the USB-IF
logo or have completed the USB-IF compliance program.
●
Do not use a battery that appears damaged, deformed, or discolored,
or one that has any rust on its casing, overheats, or emits a foul odor.
●
Always keep the battery out of the reach of babies and small children,
to avoid swallowing of the battery. Consult a doctor immediately if the
battery is swallowed.
2
Page 5

●
Only use the battery with a charging system that has been qualified
with the system per this standard, IEEE-Std-1725-200x. Use of an
unqualified battery or charger may present a risk of fire, explosion,
leakage or other hazard.
●
Replace the battery only with another battery that has been qualified
with the system per this standard, IEEE-Std-1725-200x. Use of an
unqualified battery may present a risk of fire, explosion, leakage or other
hazard.
●
Avoid dropping the phone or battery. If the phone or battery is dropped,
especially on a hard surface, and the user suspects damage, take it to a
service centre for inspection.
●
If the battery leaks:
Do not allow the leaking fluid to come in contact with skin or clothing. If
contact occurs, flush the affected area immediately with clean water and
seek medical advice.
Do not allow the leaking fluid to come in contact with eyes. If contact
occurs, DO NOT rub;
rinse with clean water immediately and seek medical advice.
Take extra precautions to keep a leaking battery away from fire as there is
a danger of ignition or explosion.
SAFETY PRECAUTIONS FOR DIRECT SUNLIGHT
Keep this product away from excessive moisture and extreme temperatures.
Do not leave the product or its battery inside a vehicle or in places where
the temperature may exceed 60
window sill, or behind glass that is exposed to direct sunlight or strong
ultraviolet light for extended periods of time. This may damage the product,
overheat the battery, or pose a risk to the vehicle.
°C (140°F), such as on a car dashboard,
3
Page 6

Important Health Information and Safety Precautions
PREVENTION OF HEARING LOSS
CAUTION: Permanent hearing loss may occur if earphones or headphones are
used at high volume for prolonged periods of time.
SAFETY IN AIRCRAFT
Due to the possible interference caused by this product to an aircraft’s
navigation system and its communications network, using this device’s phone
function on board an airplane is against the law in most countries. If you
want to use this device when its use is restricted on board an aircraft,
remember to switch to Airplane Mode which turns off RF functions that
could cause interference.
ENVIRONMENT RESTRICTIONS
Do not use this product in gas stations, fuel depots, chemical plants or
where blasting operations are in progress, or in potentially explosive
atmospheres such as fuelling areas, fuel storehouses, below deck on boats,
chemical plants, fuel or chemical transfer or storage facilities, and areas
where the air contains chemicals or particles, such as grain, dust, or metal
powders. Please be aware that sparks in such areas could cause an explosion
or fire resulting in bodily injury or even death.
EXPLOSIVE ATMOSPHERES
When in any area with a potentially explosive atmosphere or where
flammable materials exist, the product should be turned off and the user
should obey all signs and instructions. Sparks in such areas could cause an
explosion or fire resulting in bodily injury or even death. Users are advised
not to use the equipment at refueling points such as service or gas stations,
and are reminded of the need to observe restrictions on the use of radio
equipment in fuel depots, chemical plants, or where blasting operations are
in progress. Areas with a potentially explosive atmosphere are often, but not
always, clearly marked. These include fueling areas, below deck on boats,
fuel or chemical transfer or storage facilities, and areas where the air
contains chemicals or particles, such as grain, dust, or metal powders.
4
Page 7

ROAD SAFETY
Vehicle drivers in motion are not permitted to use telephone services with
handheld devices, except in the case of emergency. In some countries, using
hands-free devices as an alternative is allowed.
SAFETY PRECAUTIONS FOR RF EXPOSURE
●
Avoid using your phone near metal structures (for example, the steel
frame of a building).
●
Avoid using your phone near strong electromagnetic sources, such as
microwave ovens, sound speakers, TV and radio.
●
Use only original manufacturer-approved accessories, or accessories that
do not contain any metal.
●
Use of non-original manufacturer-approved accessories may violate your
local RF exposure guidelines and should be avoided.
INTERFERENCE WITH MEDICAL EQUIPMENT FUNCTIONS
This product may cause medical equipment to malfunction. The use of this
device is prohibited in most hospitals and medical clinics.
If you use any personal medical device(s), consult the manufacturer of your
device(s) to determine if they are adequately shielded from external RF
energy. Your physician may be able to assist you in obtaining this
information.
Turn your phone OFF in health care facilities when any regulations posted in
these areas instruct you to do so.
Hospitals or health care facilities may be using equipment that could be
sensitive to external RF energy.
HEARING AIDS
Some digital wireless phones may interfere with some hearing aids. In the
event of such interference, you may want to consult your service provider, or
call the customer service line to discuss alternatives.
5
Page 8

Important Health Information and Safety Precautions
NON-IONIZING RADIATION
Your device has an internal antenna. This product should be operated in its
normal-use position to ensure the radiative performance and safety from
interference. As with other mobile radio transmitting equipment, users are
advised that for satisfactory operation of the equipment and for personal
safety, it is recommended that no part of the human body be allowed to come
too close to the antenna during operation of the equipment.
Use only the supplied integral antenna. Use of unauthorized or modified
antennas may impair call quality and damage the phone, causing loss of
performance and SAR levels exceeding the recommended limits as well as result
in non-compliance with local regulatory requirements in your country.
To assure optimal phone performance and ensure human exposure to RF
energy is within the guidelines set forth in the relevant standards, always use
your device only in its normal-use position. Contact with the antenna area may
impair call quality and cause your device to operate at a higher power level
than needed. Avoiding contact with the antenna area when the phone is IN
USE optimizes the antenna performance and the battery life.
6
Page 9

Table of Contents
Important Health Information
and Safety Precautions . . . . . .1
ELECTRICAL SAFETY . . . . . . . . . . . . . . .1
SAFETY PRECAUTIONS FOR PROPER
GROUNDING INSTALLATION . . . . . . .1
SAFETY PRECAUTIONS FOR
POWER SUPPLY UNIT . . . . . . . . . . . . . .1
SAFETY PRECAUTIONS FOR DIRECT
SUNLIGHT . . . . . . . . . . . . . . . . . . . . . . . .3
PREVENTION OF HEARING LOSS . . .4
SAFETY IN AIRCRAFT . . . . . . . . . . . . . . .4
ENVIRONMENT RESTRICTIONS . . . . .4
EXPLOSIVE ATMOSPHERES . . . . . . . . .4
ROAD SAFETY . . . . . . . . . . . . . . . . . . . . .5
SAFETY PRECAUTIONS FOR RF
EXPOSURE . . . . . . . . . . . . . . . . . . . . . . . .5
INTERFERENCE WITH MEDICAL
EQUIPMENT FUNCTIONS . . . . . . . . . .5
HEARING AIDS . . . . . . . . . . . . . . . . . . . .5
NON-IONIZING RADIATION . . . . . . . .6
Table of Contents . . . . . . . . . .7
Welcome . . . . . . . . . . . . . . . . .13
Important Information . . . . . . . . . . . . .14
Technical Details . . . . . . . . . .14
Chapter 1 Getting Started . .18
1.1 About Your Phone . . . . . . . .18
1.2 Getting to Know Your Touch
Phone . . . . . . . . . . . . . . . . . .18
1.3 Qwerty Keyboard . . . . . . . .20
1.4 Menus and Applications
Overview . . . . . . . . . . . . . . .21
1.5 Installing the Battery and
Storage Card . . . . . . . . . . . .24
The Battery . . . . . . . . . . . . . . . . . . . . . .24
1.6 Charging the Battery . . . . .25
Battery Charge Level . . . . . . . . . . . . . . .25
Charging with USB . . . . . . . . . . . . . . . .26
1.7 Starting Up . . . . . . . . . . . . .26
Turning the power on and off . . . . . . .26
1.8 Today Screen . . . . . . . . . . . .27
1.9 Notification and Status
Icon Taskbar . . . . . . . . . . . .27
1.10 Options Taskbar . . . . . . . .28
1.11 Start Menu . . . . . . . . . . . .29
1.12 Lock . . . . . . . . . . . . . . . . . .30
Notifications on the Lock panel . . . . .31
1.14 Finger Movement
Gestures . . . . . . . . . . . . . . .33
Finger scrolling . . . . . . . . . . . . . . . . . . . .33
Finger panning . . . . . . . . . . . . . . . . . . . .34
1.15 Using the Zoom Bar . . . . .34
Changing Networks with Your LG
TM
FATHOM
Global Phone . . . . . . . . . .35
Chapter 2 Using Phone
Features . . . . . . . . . . . . . . . . .36
7
Page 10

Table of Contents
2.1 Seamless Switching of
Networks . . . . . . . . . . . . . . .36
2.2 Making Calls with the
Phone Dialpad . . . . . . . . . . .36
Making a call from a text message . . .37
Making a call from an email message .38
Making a call from a meeting
request or reminder . . . . . . . . . . . . . . .38
Making an emergency call . . . . . . . . . .38
Making an international call . . . . . . . .38
Assisted Dialing . . . . . . . . . . . . . . . . . . .38
2.3 Answering and Ending
Calls . . . . . . . . . . . . . . . . . . .40
Using the call functions . . . . . . . . . . . .41
2.4 Using Call History . . . . . . . .42
2.5 Speed Dial . . . . . . . . . . . . . .43
2.6 Making Three-way Calls . . .43
2.7 CDMA Phone Settings . . . .44
Setting the phone connection to
CDMA-only mode . . . . . . . . . . . . . . . .44
CDMA Services . . . . . . . . . . . . . . . . . . .45
2.8 Using the LG FATHOM
TM
as a GSM Phone . . . . . . . . .45
GSM international roaming . . . . . . . . .45
Using the Verizon Wireless GSM SIM
card . . . . . . . . . . . . . . . . . . . . . . . . . . . . .46
2.9 GSM settings . . . . . . . . . . . .47
2.9 Turning the Phone
Function On and Off . . . . .49
Chapter 3 Using the Today
Screen . . . . . . . . . . . . . . . . . . .50
3.1 What’s on the Today
Screen . . . . . . . . . . . . . . . . .50
3.2 Today Screen . . . . . . . . . . .50
Changing the Today Screen . . . . . . . .51
3.3 Phone . . . . . . . . . . . . . . . . .52
3.4 Message . . . . . . . . . . . . . . . .52
Changing the message account
settings . . . . . . . . . . . . . . . . . . . . . . . . . .52
Text Messages . . . . . . . . . . . . . .52
Composing and sending text
messages . . . . . . . . . . . . . . . . . . . . . . . .52
Managing text messages . . . . . . . . . . .53
MMS . . . . . . . . . . . . . . . . . . . . . .54
Viewing and replying to MMS
messages . . . . . . . . . . . . . . . . . . . . . . . .55
3.5 E-mail . . . . . . . . . . . . . . . . . .55
Setting Up E-mail Accounts . . . . . . . .55
Synchronizing Outlook e-mail
with your computer . . . . . . . . . . . . . . .56
Setting up an Internet e-mail
account . . . . . . . . . . . . . . . . . . . . . . . . . .56
Setting up a custom domain
e-mail . . . . . . . . . . . . . . . . . . . . . . . . . . .58
Creating and sending e-mail
messages . . . . . . . . . . . . . . . . . . . . . . . .59
Searching e-mail messages . . . . . . . . .60
Synchronizing e-mail messages . . . . . .61
8
Page 11

Customizing e-mail settings . . . . . . . . .62
3.6 Contacts . . . . . . . . . . . . . . .63
Creating a contact . . . . . . . . . . . . . . . .63
Editing and calling a contact . . . . . . . .64
Finding a contact . . . . . . . . . . . . . . . . .64
Sharing contact information . . . . . . . .65
3.7 Visual Voice Mail . . . . . . . . .65
3.8 Mobile Email . . . . . . . . . . . .66
3.9 Mobile IM . . . . . . . . . . . . . .66
3.10 City ID . . . . . . . . . . . . . . . .67
3.11 Internet Explorer . . . . . . . .68
Browsing the Web . . . . . . . . . . . . . . . . .68
Navigating web pages . . . . . . . . . . . . .68
Copying web page text . . . . . . . . . . . .68
3.12 Settings . . . . . . . . . . . . . . .69
3.12.1 Clock & Alarms . . . . . . . . . . . .73
3.12.2 Home . . . . . . . . . . . . . . . . . . . . .75
3.12.3 Lock . . . . . . . . . . . . . . . . . . . . . .75
3.12.4 Sounds & notifications . . . . . .76
3.12.5 Connections . . . . . . . . . . . . . . .76
3.12.6 Personal . . . . . . . . . . . . . . . . . . .77
3.12.7 System . . . . . . . . . . . . . . . . . . . .81
3.12.8 Bluetooth . . . . . . . . . . . . . . . . .83
Bluetooth pairing . . . . . . . . . . . . . . . . .85
Connecting a Bluetooth hands-free
or stereo headset . . . . . . . . . . . . . . . . .86
3.12.9 Microsoft My Phone . . . . . . . .87
3.13 Bing . . . . . . . . . . . . . . . . . .87
3.14 RSS Viewer . . . . . . . . . . . . .88
3.15 Alarms . . . . . . . . . . . . . . . .89
3.16 Calendar . . . . . . . . . . . . . .89
Viewing your appointments . . . . . . . .90
Sending meeting requests and
appointments . . . . . . . . . . . . . . . . . . . . .91
3.17 Tasks . . . . . . . . . . . . . . . . .92
3.18 Notes . . . . . . . . . . . . . . . . .93
Entering Information in Notes . . . . . .93
3.19 File Explorer . . . . . . . . . . .94
3.20 Office Mobile . . . . . . . . . .95
3.21 Pictures & Videos . . . . . . .96
3.22 Windows Media . . . . . . . . .98
3.23 World Clock . . . . . . . . . .100
3.24 Search Phone . . . . . . . . .100
3.25 Calculator . . . . . . . . . . . .101
3.26 Adobe Reader LE . . . . . .101
3.27 Voice Commands . . . . . .102
3.28 Games . . . . . . . . . . . . . . .104
3.29 Task Manager . . . . . . . . .104
3.30 Camera . . . . . . . . . . . . . .105
3.30.1 Camera . . . . . . . . . . . . . . . . . .105
3.30.2 Video . . . . . . . . . . . . . . . . . . . .106
3.31 Getting Started . . . . . . . .108
3.32 ActiveSync . . . . . . . . . . . .108
3.33 EnableDUN . . . . . . . . . . .110
Before you proceed . . . . . . . . . . . . . . .110
9
Page 12

Table of Contents
Using VZAccess Manager . . . . . . . . . .110
Setting up your phone as a USB
modem in Windows Vista
Windows 7 or Windows XP . . . . . . . .111
Setting up your phone as a Bluetooth
modem in Windows Vista™ or
Windows 7 . . . . . . . . . . . . . . . . . . . . . .112
™
,
3.34 Domain Enroll . . . . . . . . .113
Chapter 4 Entering Text . . .114
4.1 On-screen Input
Methods . . . . . . . . . . . . . . .114
4.2 Using the QWERTY
Keyboard . . . . . . . . . . . . . .115
4.3 Using XT9 Mode . . . . . . . .116
4.4 Using Numeric and
Symbol Mode . . . . . . . . . . .117
Chapter 5 Synchronizing
Information . . . . . . . . . . . . . .118
5.1 About Synchronization . . .118
5.2 Before Synchronizing
with Your Computer . . . . .118
5.3 Setting Up Windows Mobile
Device Center on Windows 7
or Windows Vista™ . . . . . . .119
Setting up synchronization in
Windows Mobile Device Center . . . .119
Using Windows Mobile Device
Center . . . . . . . . . . . . . . . . . . . . . . . . . .120
5.4 Setting Up ActiveSync®on
Windows®XP . . . . . . . . . . .121
®
Setting up synchronization in
ActiveSync . . . . . . . . . . . . . . . . . . . . . .121
5.5 Synchronizing With Your
Computer . . . . . . . . . . . . . .121
Starting and stopping
synchronization . . . . . . . . . . . . . . . . . .121
Selecting information to sync . . . . . .122
Troubleshooting sync connection
problem . . . . . . . . . . . . . . . . . . . . . . . . .123
5.6 Synchronizing via
Bluetooth . . . . . . . . . . . . . .123
5.7 Synchronizing Music
and Video . . . . . . . . . . . . .124
5.8 Synchronizing with
Setting up your My Phone
account . . . . . . . . . . . . . . . . . . . . . . . . .125
Changing sync settings . . . . . . . . . . .125
Stopping the sync partnership
with your My Phone account . . . . . .126
Managing your My Phone Web
account from your computer . . . . . .126
Microsoft
®
My Phone . . . .124
6.1 Text Messages . . . . . . . . . .127
Creating and sending a new text
message . . . . . . . . . . . . . . . . . . . . . . . .127
Managing text messages . . . . . . . . . .127
Making calls directly from text
messages . . . . . . . . . . . . . . . . . . . . . . .128
6.2 Multimedia Messages . . . .128
10
Page 13

Creating and sending MMS
messages . . . . . . . . . . . . . . . . . . . . . . .129
Viewing MMS messages . . . . . . . . . . .131
Synchronizing Outlook email
with your computer . . . . . . . . . . . . . .131
Chapter 7 Working With
Company Email and
Meeting Appointments . . .132
7.1 Synchronizing with the
Exchange Server . . . . . . . . .132
Setting up an Exchange Server
connection . . . . . . . . . . . . . . . . . . . . . .132
Starting synchronization . . . . . . . . . .133
7.2 Working With Company Email
Messages . . . . . . . . . . . . . .134
Automatic synchronization through
Direct Push . . . . . . . . . . . . . . . . . . . . . .134
Scheduled synchronization . . . . . . . .135
Instant download through Fetch
Mail . . . . . . . . . . . . . . . . . . . . . . . . . . . .135
Searching for email messages
on the Exchange Server . . . . . . . . . . .136
Flagging your messages . . . . . . . . . . .137
7.3 Managing Meeting
Requests . . . . . . . . . . . . . . .137
7.4 Finding Contacts in the
Company Directory . . . . . .138
When browsing Contacts, composing
email, or creating a meeting
request . . . . . . . . . . . . . . . . . . . . . . . . .139
When viewing a received
Outlook email message . . . . . . . . . . .139
Chapter 8 Programs . . . . . .140
8.1 Managing Programs . . . . .140
Installing a program . . . . . . . . . . . . . .140
Chapter 9 Managing Your
Phone . . . . . . . . . . . . . . . . . .142
9.1 Copying and Managing
Files . . . . . . . . . . . . . . . . . .142
9.2 Settings on your Phone . .143
9.3 Changing Basic Settings . .143
Display settings . . . . . . . . . . . . . . . . . .143
Phone name . . . . . . . . . . . . . . . . . . . . .144
Ringer settings . . . . . . . . . . . . . . . . . . .145
9.4 Using Wireless Manager . .146
9.5 Using Task Manager . . . . .146
9.6 Protecting Your Phone . . .147
Protecting your phone with a
password . . . . . . . . . . . . . . . . . . . . . . .147
Encrypting files on your
storage card . . . . . . . . . . . . . . . . . . . . .148
9.7 Resetting Your Phone . . . .148
Performing a soft reset . . . . . . . . . . . .148
Performing a hard reset . . . . . . . . . . .149
11
Page 14

Table of Contents
Safety . . . . . . . . . . . . . . . . . .150
TIA Safety Information . . . . . .150
Safety Information . . . . . . . . . .153
Caution: Avoid potential
hearing loss. . . . . . . . . . . . . . . .158
FDA Consumer Update . . . . . .160
10 Driver Safety Tips . . . . . . . .167
Consumer Information
on SAR . . . . . . . . . . . . . . . . . . .170
Accessories . . . . . . . . . . . . .173
Glossary . . . . . . . . . . . . . . . .177
Terminology . . . . . . . . . . . . . .177
Acronyms and Abbreviations .177
Index . . . . . . . . . . . . . . . . . . .183
12
Page 15

Welcome
Thank you for choosing the
LG FATHOM
TM
global phone
designed to operate with the latest
digital mobile communication
technology, Code Division Multiple
Access (CDMA). Along with the
many advanced features of the
CDMA system, such as greatly
enhanced voice clarity, this
compact phone offers:
●
Mobile IM.
●
Mobile Email.
●
47-key internal keypad.
●
Built-in 3.2 Megapixel digital
camera.
●
Outlook Email, messaging,
voicemail, and caller ID.
●
Long battery standby and talk
time.
●
Any key answer, auto answer
with hands-free accessories,
one-touch and speed dialing
with thousands of available
contact memory locations.
●
Bluetooth®wireless technology.
●
Easy organizing with the
Calendar and Alarms
●
Voice Commands
●
Visual Voice Mail
●
City ID
●
Bing Search
●
VZ Navigator
●
Internet Explorer and File
®
Explorer
●
Connection options: Wireless
LAN, Wi-Fi, USB, USB to PC, DUN
●
Multitasking with Task Manager
●
Microsoft Office for Mobile:
Word, Excel, Powerpoint, and
OneNote
●
RSS Viewer
●
Adobe Reader LE
●
Windows Media Player
●
Encryption capabilities and
password protection
●
Ability to search the Phone
●
Microsoft My Phone
●
Windows Live services
●
Windows Marketplace for
Mobile
●
MSN Money and MSN Weather
●
Outlook data synchronization
●
Preloaded and downloadable
games
13
Page 16

Technical Details
NOTE
The Bluetooth®word mark and
logos are owned by the
Bluetooth SIG, Inc. and any use
of such marks by LG Electronics
is under license. Other
trademarks and trade names are
those of their respective owners.
©2010 Microsoft Corporation. All rights
reserved.
Microsoft, Windows, and Windows
Mobile are trademarks of the Microsoft
group of companies.
Available programs, features, and
functionality vary by: device, version of
Windows Mobile software,
mobile network provider, and availability
of supporting technology (such as
Exchange Server).
See www.windowsmobile.com, your
device reseller and mobile network
provider for more information.
TIP
Find the interactive user guide on the
web for your convenience where you
can freely surf and interactively learn
how to use your phone step-by-step.
1. Go to
http://www.verizonwireless.com
2. Hover over the Support tab, then
click on Phones & Devices.
3. Select LG from the Phone/Device
manufacturer drop-down menu.
4. Click on the Link for this model.
5. Click on Interactive User to start the
interactive Guide.
Important Information
This user’s guide provides important
information on the use and
operation of your phone. Please
read this guide carefully prior to
using the phone to be able to use
your phone to its greatest
advantage and to prevent any
accidental damage or misuse. Any
unapproved changes or
modifications will void your warranty.
Technical Details
The
LG FATHOMTMGlobal Phone is
an all digital phone that operates
on both Code Division Multiple
Access (CDMA) frequencies:
cellular services at 800 MHz and
Personal Communication Services
(PCS) at 1.9 GHz.
CDMA technology uses a feature
called DSSS (Direct Sequence
Spread Spectrum) that enables the
phone to keep communication
from being crossed and to use one
frequency channel by multiple
users in the same specific area.
This results in a 10-fold capacity
increase when compared with
analog mode. In addition, features
such as soft/softer handoff, hard
14
Page 17
CDMA
Standard
Basic Air
Interface
Network
Service
1x EV-DO
Related
Interface
Designator Description
TIA/EIA-95A
TSB-74
ANSI J-STD-008
TIA/EIA-IS2000
TIA/EIA/IS-634
TIA/EIA/IS-651
TIA/EIA/IS-41-C
TIA/EIA/IS-124
TIA/EIA/IS-96-B
TIA/EIA/IS-637
TIA/EIA/IS-657
IS-801
TIA/EIA/IS-707-A
TIA/EIA/IS-856
TIA/EIA/IS-878
TIA/EIA/IS-866
TIA/EIA/IS-890
CDMA Dual-Mode Air Interface
14.4kbps Radio Link Protocol and
Inter-Band Operations
IS-95 Adapted for PCS Frequency Band
CDMA2000 1xRTT Air Interface
MAS-BS
PCSC-RS
Intersystem Operations
Non-Signaling Data Communications
Speech CODEC
Short Message Service
Packet Data
Position Determination Service (gpsOne)
High Speed Packet Data
CDMA2000 High Rate Packet Data Air Interface
1x EV-DO Inter-Operability Specification for HRPD
Access Network Interfaces
Recommended Minimum Performance Standards for
HRPD High Rate Packet Data Access Terminal
Test Application Specification (TAS) for High Rate
Packet Data Air Interface
handoff, and dynamic RF power
control technologies combine to
reduce call interruptions.
The Cellular and PCS CDMA
networks consist of MSO (Mobile
Switching Office), BSC (Base
Station Controller), BTS (Base
Station Transmission System), and
MS (Mobile Station).
1xRTT system receives twice as
many subscribers in the wireless
section as IS-95. Its battery life is
twice as long as IS-95. High-speed
data transmission is also possible.
EV-DO system is optimized for data
service and is much faster than
1xRTT system in applicable area.
The table on the following page
lists some major CDMA standards.
15
Page 18

Technical Details
FCC RF Exposure Information
WARNING! Read this information
before operating the phone.
In August 1996, the Federal
Communications Commission (FCC)
of the United States, with its action
in Report and Order FCC 96-326,
adopted an updated safety standard
for human exposure to Radio
Frequency (RF) electromagnetic
energy emitted by FCC regulated
transmitters. Those guidelines are
consistent with the safety standard
previously set by both U.S. and
international standards bodies. The
design of this phone complies with
the FCC guidelines and these
international standards.
Bodily Contact During Operation
This device was tested for typical
use with the back of the phone
kept 0.79 inches (2.0 cm) from
the body. To comply with FCC RF
exposure requirements, a minimum
separation distance of 0.79 inches
(2.0 cm) must be maintained
between the user’s body and the
back of the phone, including the
antenna. Third-party belt-clips,
holsters, and similar accessories
containing metallic components
should not be used. Avoid the use
of accessories that cannot maintain
0.79 inches (2.0 cm) distance
between the user’s body and the
back of the phone and have not
been tested for compliance with
FCC RF exposure limits.
Vehicle-Mounted External Antenna
(Optional, if available.)
To satisfy FCC RF exposure
requirements, keep 8 inches (20
cm) between the user / bystander
and vehicle-mounted external
antenna. For more information
about RF exposure, visit the FCC
website at www.fcc.gov.
FCC Notice and Cautions
This device and its accessories
comply with part 15 of FCC rules.
Operation is subject to the
following two conditions: (1) This
device and its accessories may not
cause harmful interference, and (2)
this device and its accessories must
accept any interference received,
including interference that causes
undesired operation.
Any changes or modifications not
expressly approved in this user
guide could void your warranty for
this equipment. Use only the
16
Page 19

supplied antenna. Use of
unauthorized antennas (or
modifications to the antenna)
could impair call quality, damage
the phone, void your warranty
and/or violate FCC regulations.
Don't use the phone with a
damaged antenna. A damaged
antenna could cause a minor skin
burn. Contact your local dealer for
a replacement antenna.
Part 15.21 statement
Changes or modifications that are
not expressly approved by the
manufacturer could void the user's
authority to operate the
equipment.
Part 15.19 statement
This device and its accessories
comply with part15 of FCC rules.
Operation is subject to the
following two conditions:
(1) This device & its accessories
may not cause harmful
interference.
(2) This device & its accessories
must accept any interference
received, including interference
that may cause undesired
operation.
Part 15.105 statement
This equipment has been tested
and found to comply with the limits
for a class B digital device, pursuant
to Part 15 of the FCC Rules. These
limits are designed to provide
reasonable protection against
harmful interference in a residential
installation. This equipment
generates, uses, and can radiate
radio frequency energy and, if not
installed and used in accordance
with the instructions, may cause
harmful interference to radio
communications. However, there is
no guarantee that interference will
not occur in a particular installation.
if this equipment does cause
harmful interference or television
reception, which can be determined
by turning the equipment off and
on, the user is encouraged to try to
correct the interference by one or
more of the following measures:
- Reorient or relocate the receiving
antenna.
- Increase the separation between
the equipment and receiver.
- Connect the equipment into an
outlet on a circuit different from
that to which the receiver is
connected.
- Consult the dealer or an experienced
radio/TV technician for help.
17
Page 20
Chapter 1
Getting Started
1.1 About Your Phone
Your LG FATHOM™Global Phone allows you to keep in touch with friends
and family back home when traveling to another country or outside your
network carrier service area. There's no need to purchase or lease another
cell phone because your LG FATHOM
™
Global Phone covers all the bases by
incorporating a SIM slot into its CDMA architecture.
Now when you travel outside the range of the Verizon CDMA coverage area
or roam internationally, you can use the pre-installed GSM SIM card to
access wireless services to make calls, send email messages, browse the
Internet and more using GSM network technology.
Don’t worry—you’re connected!
NOTE
For more information on using the Global Phone service, visit
http://b2b.vzw.com/international/Global_Phone/index.html
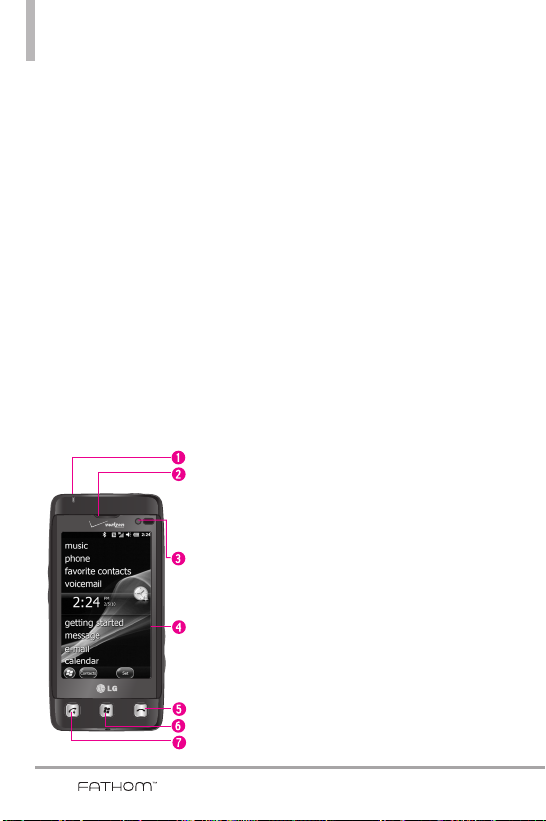
1.2 Getting to Know Your Touch Phone
Front panel
1. Notification LED LED lights blue when there are pending
notifications, lights red when charging, and lights green when fully
charged.
2. Earpiece Allows you to hear the caller.
3. Light and Proximity Sensor Senses the ambient light and adjusts the
screen backlight accordingly. Will also lock the screen during a call, so
that keys are not accidentally pressed.
4. LCD Screen Allows you to view incoming calls, messages and icon
indicators as well as a wide variety of content you select for viewing.
5. End Key Use to end a call. Also returns to the Today Screen.
6. Start Key Press to open the Start menu.
7. SEND Key Use to make and answer calls. Press and hold to activate
voice commands.
18
Page 21
R
S
T
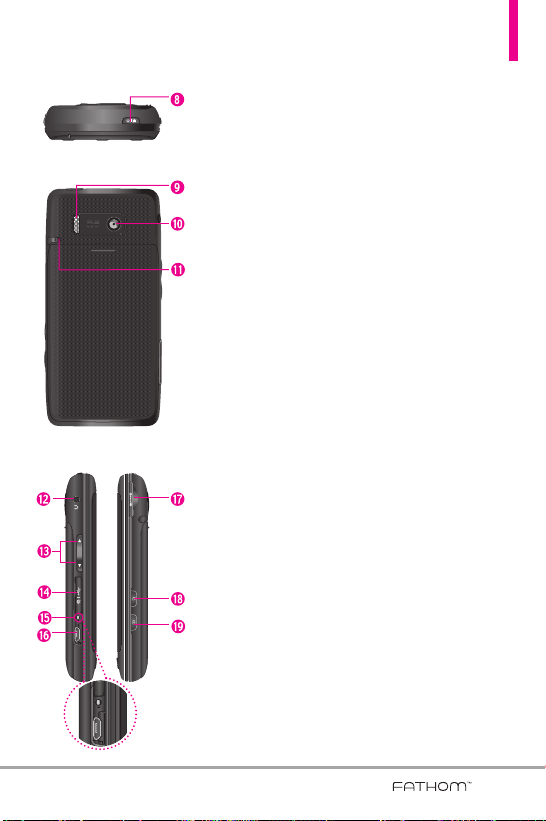
Top panel
R
S
T
8. Power/Lock(Unlock) Key Press and hold to turn the power on/off.
Press to lock and unlock the phone.
Back panel
Left panel Right panel
9. Speaker Lets you hear the caller's voice in speakerphone mode. Also
lets you hear music and video sounds.
10. Camera Lens Use to take pictures and record video. Keep it clean
for optimal image quality.
11. Stylus Use to activate the Touch screen commands with ease. The
slot allows for convenient storage so your stylus is always at hand.
12. Headset Jack Allows you to plug in an optional 3.5mm headset for
convenient, hands-free conversations.
13 . Volume Keys Use to adjust the Master Volume in standby mode
and the Earpiece Volume during a call.
14 . Accessory/Charger Port Cover
15 . Reset Key Resets your phone (will end all applications currently
running).
16 . Accessory/ Charger Port Connects the phone to the battery
charger, or other compatible accessories.
™
17 . microSD
18 . Task Manager Key Allows you to view all programs currently
19. Camera/Video Key Press for quick access to the Camera function.
Slot Accommodates an optional microSD™card.
running on the device and corresponding memory usage. Also
allows you to end or go to those tasks.
Press and hold this key to record a video.
19
Page 22
Getting Started
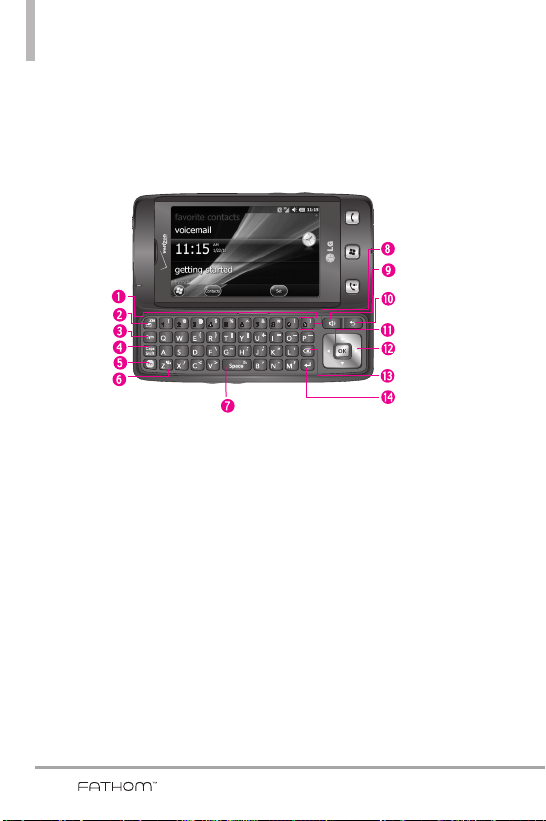
1.3 Qwerty Keyboard
The Qwerty keyboard allows you to quickly and easily enter any kind of
data, whether it's a message (Text, Picture or Video), an Office file (Word,
Excel, Powerpoint or OneNote), or when using the Internet.
1. QWERTY Keypad Use to enter numbers and characters and select menu items.
2. Email Tab Key Use to access E-mail account(s) to send/receive email messages.
3. Sym Key Use to insert symbols when entering text. Press the key, then touch the symbol on screen or press the
Qwerty key that corresponds with the onscreen symbol. Press the Sym Key again to exit from symbol mode.
4. Caps/ Shift Key Use to change letter case when typing.
5. Fn Key Use to insert symbols (at the top of each Qwerty key) into text or change input function from abc to
XT9.
6. Vibrate Key Use to turn Vibrate mode on/off (From the Today Screen, press and hold for about 3 seconds).
7. Space/Voice Command Key Use to enter a space while entering text. From the Today Screen, press to access
the call history or hold down for 3 seconds to access Voice Commands.
8. International Dial Key Press and hold the International Dial Key to display the + symbol. The symbol
automatically inserts the exit code for the country from which you are calling.
9. Speakerphone Key Use to activate Speakerphone during a call.
10. Back Key Press to return to back out of menus.
11. OK Key Use to activate a selected screen item.
12. Directional Key Use for quick, convenient navigation. In menus use to scroll to choices and settings.
13. Clear Key Press to delete a single space or character, or press and hold to delete a specific word plus its space.
14. Return Key Moves cursor to the next line.
20
Page 23
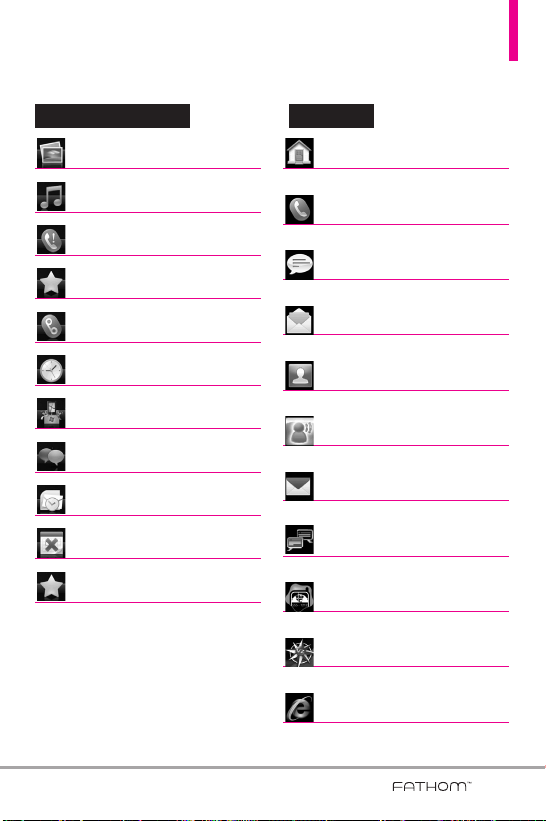
1.4 Menus and Applications Overview
Today Screen Menu Start Menu
pictureess
pictur
usic
mmusic
phone
phone
orit
e cont
fafavvorit
e cont
oicemail
vvoicemail
clock
clock
ting starartteded
gegettting st
ssage
memessage
e-mail
e-mail
calendar
calendar
oriteess
fafavvorit
actss
act
Home
Home
Phone
Phone
ssage
MeMessage
E-mail
E-mail
ont
actss
CCont
act
isual V
y ID
y ID
erne
erne
vigattoror
oice Mail
oice Mail
viga
t Explorerer
t Explor
VVisual V
Mobile Email
Mobile Email
Mobile IM
Mobile IM
Cit
Cit
VZ Na
VZ Na
Int
Int
21
Page 24
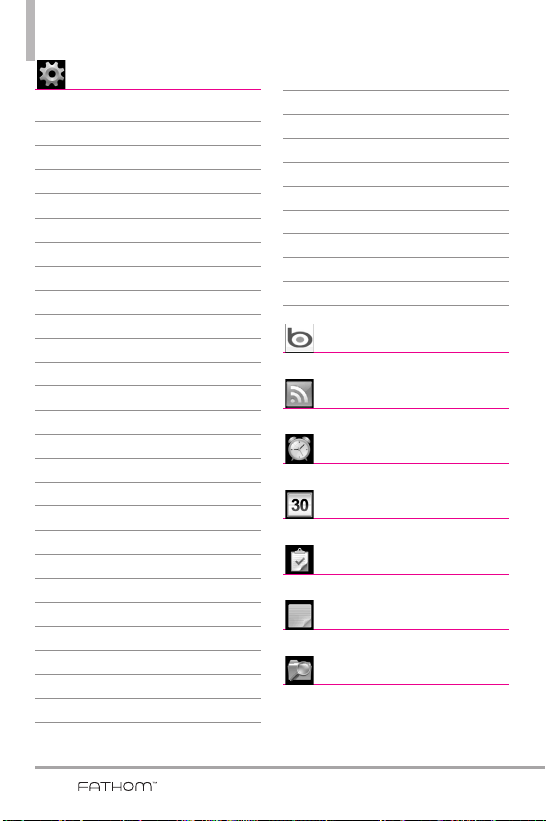
Getting Started
tings
SeSetttings
Clock & Alarms
Home
Lock
Sounds & Notifications
Connections
Connections
Domain Enroll
GPRS Setting
Switch USB
USB to PC
Wi-Fi
Wireless Manager
Personal
Buttons
Owner Information
Phone
Voice Commands
System
About
Backlight
Certificates
Customer Feedback
Encryption
Error Reporting
External GPS
Managed Programs
Memory
Powe r
Regional Settings
Remove Programs
Screen
Sensor
System information
Task Manager
Microsoft My Phone
Bluetooth
Lock Key
Bing
Bing
SS Vieiewwerer
RRSS V
Alarms
Alarms
Calendar
Calendar
sks
TTaasks
s
NoNottees
ile Explorerer
FFile Explor
22
Page 25

Office Mobile
Office Mobile
Picturee
s & V
Pictur
indoww
WWindo
ideos
s & V
ideos
s Media
s Media
MSN Moneyy
MSN Mone
MSN Weaea
MSN W
Cameraa
Camer
ther
ther
orld Clock
WWorld Clock
Sear
ch Phone
Sear
ch Phone
Calculattoror
Calcula
dobe R
AAdobe R
oice C
VVoice C
Gamess
Game
Solitaire
TTaask Manager
Markee
Mark
Micr
Micr
ommands
ommands
sk Manager
tplace
tplace
osoft My Phone
osoft My Phone
eader LE
eader LE
ting Starartteded
GeGettting St
ctiv
e S
indoww
:
e S
ync
ync
s Livee
s Liv
AActiv
WWindo
NOTES
●
All screen shots in this guide are
simulated. Actual displays may vary.
●
Instructions to perform tasks in this
guide may change depending on the
software version of your phone.
●
Unless specified otherwise, all
instructions to perform tasks in this
guide assume that you are starting
from the Today screen.
●
All instructions are written using the
default theme. See page 50-51 if you
need to change to specific theme.
23
Page 26

Getting Started
LGI
P
-
400V
SBPP0027402 SPM
DC090913
Li
t
hium-I
o
n Polymer Batte
r
y
Made in Ko
rea/Fabricado na C
or
eia / Fabricado
en Corea
NOM
3.7V 15
0
0mAh 5.6Wh
●
●
R
EFE
R
TO US
E
R
’S GUIDE
●
REPORT
EZ -VOUS
AU GUID
E DE L
’UTI
L
ISA
T
EUR
●
CONSU
L
T
E LA GUI
A
DEL USUARIO
To dis
p
ose of
properly Recycling
number
:
1-800-822-8837
●
CONSULTE O M
ANUAL DO USUARIO
NYCE
1.5 Installing the Battery
and Storage Card
The Battery
NOTE
It is important to fully charge the
battery before initial use of the phone.
The phone comes with a
rechargeable battery. Keep the
battery charged while not in use in
order to maximize talk and standby
time. The battery charge level is
shown at the top of the LCD screen.
Installing the Battery
To install the battery, insert the top
edge (aligning the battery
terminals) of the battery into the
opening on the back of the phone.
Push the battery down until it clicks
into place. Place the top edge of
battery cover with the tabs and
slots aligned, then apply steady
upward pressure until it clicks into
place.
Removing the Battery
Turn power off. Apply steady
downward pressure to the center of
the battery cover release it. Remove
the cover, then use the fingertip
cutout to lift the bottom edge of
the battery out.
Installing the microSD
1. Remove the microSD card slot
cover.
24
2. Push the microSD card into the
slot with its gold contacts facing
down until it clicks into place
and then replace the slot cover.
Page 27
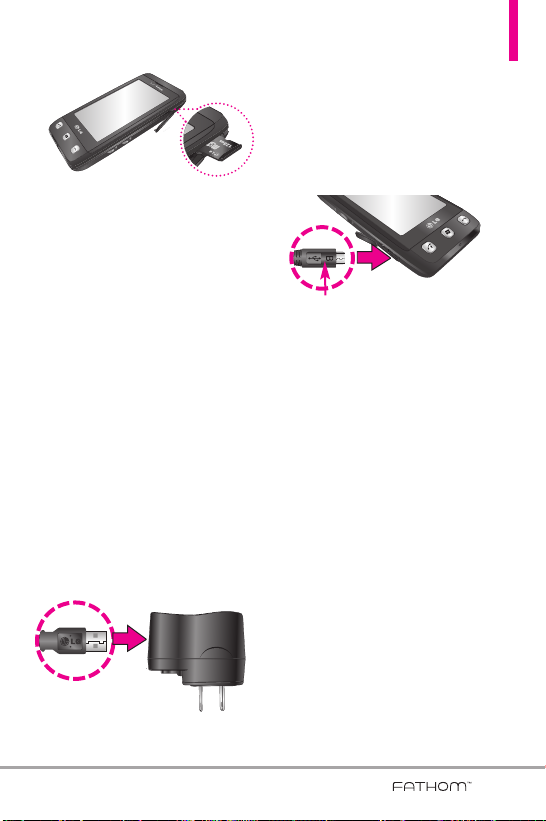
1.6 Charging the Battery
Your LG FATHOM™Global Phone
device comes with a cableless wall
adapter and a USB data cable
which connect together to charge
your phone. To charge your phone:
NOTICE
Please use only an approved charging
accessory to charge your LG phone.
Improper handling of the charging port, as
well as the use of an incompatible charger,
may cause damage to your phone and
void the warranty.
1. Connect the cableless wall
adapter and USB data cable.
When connecting as shown, the
LG logo on the USB cable
should face toward you.
2. Gently uncover the accessory
charging port, then plug the end
of the AC adapter into the
phone’s charger port and the
other end into an electrical
outlet.
NOTICE
Please make sure that the side with the
USB symbol faces up before inserting a
charger or data cable into the charger
port of your phone.
3. The charge time varies
depending upon the battery
level.
Battery Charge Level
You can find the battery charge
level at the top right of the LCD
screen. When the charge level
becomes low, the phone blinks the
battery icon, and displays a warning
message. As the charge level
approaches empty, the phone will
turn off. Unsaved items may be lost.
25
Page 28

Getting Started
Charging with USB
You can use your computer to
charge your phone. Connect one
end of the USB cable to the
charging accessory port on your
phone and the other end to a
highpower USB port on your PC
(commonly located on the front
panel of the computer). It is best to
use the rear USB port when
connecting to a desktop PC. A USB
Hub should be powered by an
external power source (see Note
below).
●
NOTES
Low-power USB ports are not
supported, such as the USB
port on your keyboard or buspowered USB hub.
●
When the device needs to
charge from USB port of the
computer, the necessary USB
driver should be first installed
on the computer.
- When the device is in
VZAccess Manager mode, LG
USB Modem Driver should be
installed in advance for USB
charging.
- When the device is in
ActiveSync mode as a default
setting, the computer needs
ActiveSync program including
USB driver to be installed for
USB charging.
- On the other hand, you do not
need to install the specific
driver for USB charging when
the device is in USB Mass
Storage, because OS like
Windows has the driver.
●
Another way for USB charging
with ActiveSync mode
1 Press the Start Key , tap
Settings , tap Connections
, and then tap USB to PC.
2. Unchecked "Enable advanced
network functionality.
1.7 Starting Up
Turning the power on and off
Turning the Phone On
1. Press and hold the Power/Lock
Key for a couple of
seconds.
NOTE
When you turn on your phone
for the first time, follow the
instructions on the screen to
activate your device.
Turning the Phone Off
1. Press and hold the Power/Lock
Key for a few seconds.
Ye s
2. Tap
to confirm that you want
to shut down the device.
26
Page 29
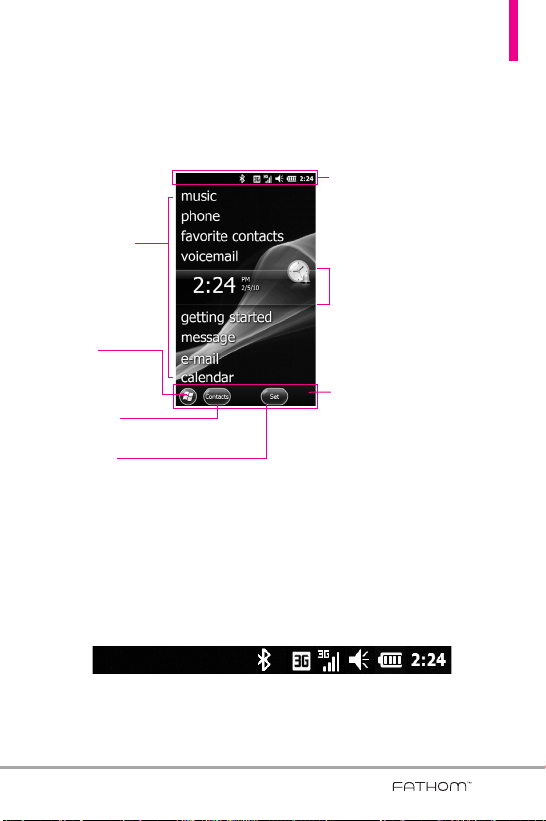
1.8 Today Screen
The Today Screen provides quick access to various frequently used device
programs and applications. It also displays the Notification and Status Icon
taskbar and the Options taskbar for additional quick and easy access options.
Notification and Status
Icon taskbar
See "Notification and Status
Today Screen
See "Today Screen"
on page 50 for
details.
Start icon
Tap to open the
Start menu.
Contacts Icon
Tap to open Contacts panel.
Options Icon
Options will depend on the selected menus.
Icon Taskbar" below for details.
Current selection
Options taskbar
See "Options Taskbar" on page
28 for details.
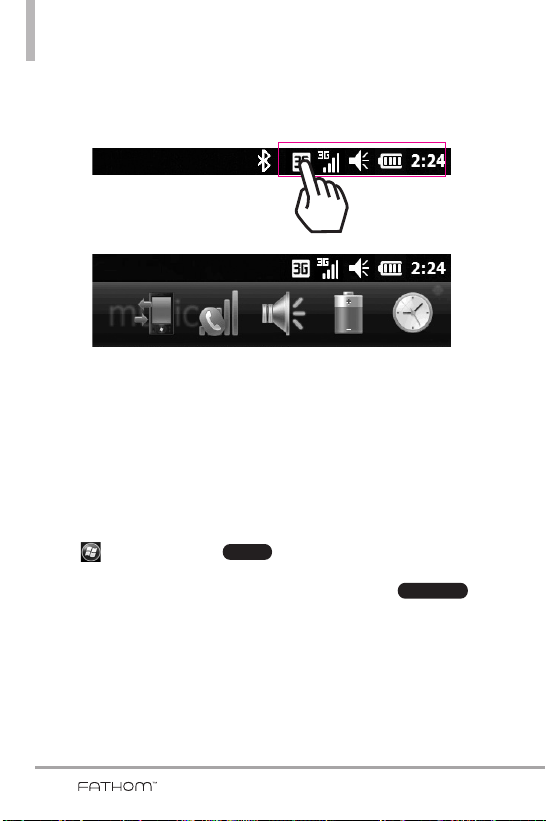
1.9 Notification and Status Icon Taskbar
The Icon taskbar displays a variety of icons to let you know device status
and notification of events. Status icons can include connectivity, network,
signal strength, volume, battery and time. Notifications can include missed
calls, new SMS/MMS messages, and more. The following is an example of
the icons you may see on the Icon taskbar.
27
Page 30
Getting Started
Notifications
Contacts
Tap the Icon taskbar to display a drop-down menu that allows you to zoom,
access the wireless manager for network connection status, change volume,
see remaining battery power, set the Clock/Alarm, and more.
Notification and Status
Icon taskbar
Drop-down taskbar
1.10 Options Taskbar
The Options Taskbar displays options that are dependent on the current
menu or function.
Today Screen Options Taskbar
The Today Screen Options taskbar includes access icons for the Start
screen , and Contacts list .
NOTE
If you have new notifications waiting, the Notifications icon will be
displayed instead.
28
Page 31

1.11 Start Menu
The Start menu is home to all the programs, applications and settings of
your Windows Phone-powered device, giving you complete access at the tip
of your finger.
Start
To open the Start screen press the
the phone or tap the Start icon in the Options taskbar on the lower left
corner of the LCD.
Tap to return to the
Today Screen.
Lock icon
Tap to temporarily lock.
See page 30 for details.
To launch a program application or open a panel, simply tap the
program icon.
Key at the bottom center of
Notification and Status
Icon taskbar
Flick up or down to scroll the screen.
Tap an icon to launch it.
Options taskbar
Close icon
Tap to close the Start menu.
29
Page 32

Getting Started
1.12 Lock
Locking the Phone
You can lock your phone to guard
against accidental or intentional
use. Press the Power/Lock Key
to lock your phone.
Unlocking the Phone
To unlock your phone, press the
Power/Lock Key to turn the
screen on. Then, touch and slide
the Lock icon to either left or
right. If you wish, you can set the
phone to require a password before
it is unlocked. To set up a password
requirement, go to the Lock menu
(Start > Settings > Lock ).
Unlocking with Gestures
Another option to unlock your
phone is available that allows you to
go to a specific function. Gestures
allows you to perform the gesture
on the lock screen. For Gestures
information, go to the Gesture
Unlock page on the Lock menu
(Start > Settings > Lock >
scroll to Gesture Unlock page).
To go to the Calendar from the
Lock screen, follow the images
below:
Sleep Mode
Sleep mode automatically locks the
phone against accidental actions
and conserves battery power. While
in Sleep mode, only the Power/Lock
Key at the top edge of the
phone will wake up your phone.
The phone automatically enters
Sleep mode after a period of
inactivity.
Locked Screen Gesture Entered on
Locked Screen
30
Activated Gesture
Page 33

NOTE
If a phone password is required to
unlock, you will be prompted for
the password when you unlock
the phone.
Unlocking the Phone
The steps and instructions in this
guide begin with the screen already
unlocked. If your phone screen is in
sleep mode, press the Power/Lock
button on the top side of the
phone. Then, slide the Unlock icon
to the left, or right, to unlock the
screen.
Notifications on the Lock
panel
Your phone still alerts you to
incoming calls and alarms even if the
screen is locked. The device only
responds to a deliberate touch and
slide action, not to simple taps which
could be accidental. To unlock the
screen, touch and slide a displayed
icon. For instance, to answer an
incoming call, touch and slide the
Answer icon to the right.
Tracking notifications on the Lock
panel
Your phone keeps track of
notifications not responded to on
the lock screen. When the screen is
locked, the Lock icon shows the
number of pending notifications,
including missed calls, new
messages and upcoming
appointments.
To view notifications on the Lock
panel
1. On the Lock screen, tap the Lock
icon ( ). Notification icons
representing each type of
notification are then displayed
below the Lock icon.
2. Slide a notification icon right or
left to view the respective
information. For instance, slide
the Missed Call icon to view your
list of missed calls.
31
Page 34

Getting Started
OK
1.13 Adjusting the Volume
A single Volume Control panel
adjusts both the system volume
(notifications and audio/video
playback volume) and the phone
ring volume of your phone.
Accessing the Volume Control panel
To open the Volume Control panel:
●
Press the Volume Keys on the
left side of the phone.
●
Tap the Volume Control icon in
the Status Icon taskbar.
NOTE
The Volume Control panel
automatically closes after a few
seconds if accessed by pressing
the Volume Keys. If accessed from
the Status Icon taskbar, tap
to close the panel.
To change volume settings using
the Volume Keys
1. Press the side volume keys .
2. Tap the volume bar you want to
adjust, then press the Volume
Up/ Down Key to adjust the
volume level. You can also:
●
Tap
Vibrate
to switch to vibrate
mode.
●
Tap
Off
to mute the volume.
NOTE
If you press the Volume Down Key
repeatedly, both volumes are
silenced.
To change volume settings using
the volume bars
1. Open the Volume Control panel.
2. Tap or drag your finger up/down
either of the volume bars. You
can also:
●
Tap
Vibrate
to switch to vibrate
mode.
●
Tap
Off
to mute the volume.
NOTE
Use the Volume Up / Down Key
on the left side of your phone
to adjust the conversation phone
volume during an ongoing call.
32
Page 35

1.14 Finger Movement
Gestures
The touch screen is sensitive to
fingertip movements allowing you to
scroll and pan with ease.
Finger scrolling
Finger scrolling is available in all
directions (up and down or left and
right) and can be used to move
through web pages, documents, and
lists (like the Contacts, file,
message, calendar, and
appointments lists).
To scroll up and down
●
To scroll down, drag your finger
upward on the touch screen.
When finger
scrolling, drag or
flick your finger
on the touch
screen.
●
To scroll up, drag your finger
downward on the touch screen.
●
To auto-scroll, flick your finger
upward or downward on the
touch screen. Tap the screen to
stop scrolling.
To scroll left and right
●
To scroll towards the right, drag
your finger to the left.
●
To scroll towards the left, drag
your finger to the right.
●
To auto-scroll, flick your finger
left or right. Tap the screen to
stop scrolling.
33
Page 36

Getting Started
Finger panning
Finger panning doesn't limit you to
opposite 90 degree directions. You
can use finger panning to move to
and view other parts of a zoomed-in
photo, web page, document, or an
email. To pan, touch and keep your
finger on the touch screen, then
drag your finger in any direction.
1.15 Using the Zoom Bar
Your LG FATHOMTMphone has a
handy and unique zoom control
tool right on the touch screen.
When viewing a Web page in the
Web browser, touch the Menu icon
to display the Zoom bar. Simply
slide your finger across the Zoom
bar to easily set the zoom to the
level that's best for you.
34
Page 37

Changing Networks with Your
OK
LG FATHOMTMGlobal Phone
Your wireless phone is set to Global
mode by default. However, you can
change network modes manually in
phone settings.
To change networks manually
1. From the Today Screen, tap the
Notification and Status Icon
taskbar.
2. Tap the connections indicator
to access the following
menu.
Settings
3. Tap
Settings
.
4. Scroll horizontally (at the top of
the screen) to the
Network
5. Tap under Mode of
operation, then tap the network
you want to set.
●
CDMA Mode
CDMA network only.
●
GSM/UMTS Mode:
networks only (even if the
Verizon CDMA network is
available).
●
Global Mode:
Verizon CDMA network first, and
if unavailable, searches for GSM
networks.
6. Tap to save settings.
tab.
Network
tab
: access the Verizon
access GSM
searches for the
35
Page 38

Chapter 2
Using Phone Features
2.1 Seamless Switching of
Networks
Your LG FATHOM™Global Phone
allows you to roam outside of your
CDMA network by accommodating
a GSM SIM card. Your phone has a
SIM card pre-installed and is set to
Global mode by default. When the
phone is in Global mode it will
automatically search for the
appropriate network for your
location (CDMA or GSM) and
connect to it.
If you need to set the phone to
connect to CDMA mode only, see
“Changing Networks with Your LG
TM
FATHOM
previous page.
Global Phone” in the
2.2 Making Calls with the
Phone Dialpad
The phone's dialpad allows you to
manually dial a number, or select a
number stored in the phone's
memory.
To open the phone's dialpad, press
the SEND Key .
Smart Dial
Your LG FATHOM™Global Phone
has a Smart Dial feature that makes
it quick and easy to call any number
stored in your phone's memory. As
you start entering either numbers or
letters on the Phone panel, Smart
Dial automatically searches for
matches in Contacts and call history
and lists them. Just tap an entry on
the list, then press the SEND Key
to call it.
To call a phone number or contact
1. Press the SEND Key , then
begin entering the first few
numbers or characters by tapping
the keys. If you tap a wrong
number or character, tap Delete
to erase each mistake. Touch
and hold Delete to erase the
entire entry.
NOTE
By default, a numeric touch
keypad is displayed for you to
enter numbers. If you want to
enter letters instead, in the
Options taskbar, tap Hide Keypad
, then tap Show Keyboard .
36
Page 39

2. The list of matching entries is
displayed above the touch keys.
Tap Hide to view the list
only. Slide (or flick) your finger
up or down to scroll through the
list.
Smart Dial panel
3. To call from the list, tap the
desired entry, then tap the
phone number to call.
●
TIPS
Depending on the information
saved on each contact, Smart
Dial will make it easy to place a
call, send a text or email to that
contact.
Making a call from a text
message
While you are viewing a text
message, you can directly call the
sender of the message.
1. While viewing the text message,
press the SEND Key .
2. A verification message appears
with the phone number from the
text message. To call the
displayed number, press the
SEND Key .
Tapping a phone number that is
displayed in the body of the text
message also allows you to call that
number.
37
Page 40

Using Phone Features
Making a call from an email
message
While viewing a received email
message, you can directly place a
call to the sender of the message.
Tap a phone number that is
displayed in the body of the email
message to call that number.
Making a call from a meeting
request or reminder
When you receive a calendar
reminder or meeting request email
that contains a phone number, you
can tap the number to directly
place the call.
For example, if you are traveling and
need to join a conference bridge
call back in the home office, rest
assured that you can join the call
without delay. Appointment
reminders you receive on your
phone will conveniently display the
phone number and PIN, ready for
you to dial.
If you made a call from a meeting
request email, you can view the
meeting details in the email directly
on the Phone panel while the call is
in progress. An email indicator is
shown on the Keypad key. Tap this
icon to view the meeting details.
Making an emergency call
Even if the phone is locked, slide
the slider to unlock the screen, then
tap 911 (where you would enter
your lock code). Then press the
SEND Key to place the call.
Making an international call
To make an international call, you
need to press and hold the
International Dial Key to replace
the international prefix of the
country that you are calling. After
the plus sign, enter the full phone
number which includes the country
code, area code (without the leading
zero, if any), and phone number.
1. Press the SEND Key , then
tap and hold the number 0 key
on the dialpad until the plus (+)
sign appears.
2. Enter the full phone number you
want to dial, then press the
SEND Key on your phone.
Assisted Dialing
Assisted Dialing allows you to easily
dial international calls while roaming
in another country. When enabled,
Assisted Dialing On
Phone panel.
appears in the
38
Page 41

To turn Assisted Dialing on
Done
Menu
Done
Done
Save
1. Press the SEND Key to
display the Phone panel.
2. Tap Options in the Options
taskbar, then tap
.
Dialing
3. Tap the check box next to
Assisted Dialing
Assisted
Enable
.
4. Tap Change next to
Reference Country / Region
.
5. Tap the country you want to call,
then tap .
6. Tap .
To edit a country’s international
call settings
1. Press the SEND Key to
display the Phone panel.
2. Tap Options in the Options
taskbar, then tap
.
Dialing
Assisted
3. Tap any of the call settings,
including Country code, IDD
Prefix (International Direct Dial),
NDD Prefix (National Direct
Dial), Area/City Code and
National Number Length (length
of phone number).
4. Use the Keypad to make the
changes you want.
5. Tap .
To reset Assisted Dialing to the
default
1. Press the SEND Key to
display the Phone panel.
2. Tap Options in the Options
taskbar, then tap
.
Dialing
Assisted
3. Tap Menu in the Options
taskbar.
Restore Default
4. Tap
, then tap
.
Calling voice mail
Speed Dial Number 1
is generally
reserved for your voice mail. Touch
and hold this key on the phone's
dialpad to call voice mail and
retrieve your voice mail messages.
You can also double-tap
voicemail
from the Today Screen.
(visual*)
*After subscribing to Visual
Voicemail, the option name on the
Today Screen will change to Visual
Voicemail.
39
Page 42

Using Phone Features
Send
Menu
Menu
Answer
2.3 Answering and Ending
Calls
When you receive a phone call, the
Incoming message will appear,
allowing you to either answer or
ignore the call.
Accepting or rejecting an
incoming voice call
To answer a call
Do either of the following:
●
Tap .
●
Press the SEND Key .
To reject a call
Do either of the following:
●
Tap in the Options
Ignore
taskbar, then tap
●
Press the End Key .
.
To reject a call and send a text
message
If you can't take a call, you can
reject it and automatically reply to
the caller with a text message
instead. When the phone alerts you
to a call:
1. Tap in the Options
taskbar, then tap
text message
Respond with
.
2. Tap the text message you want
to respond with, such as
meeting; I'll call you later
I'm in a
.
3. Tap Send in the Options
taskbar.
To accept a phone call when the
phone is locked
You can receive an incoming call
when the phone is locked. When
the phone is locked, the following
screen is shown when you accept
the call:
40
Page 43

Touch and slide the onscreen touch
Answer
or
Ignore
key (
).
Using the call functions
When a call is in progress, use the call
function buttons to put a call on
hold, dial another contact for a threeway phone, enter notes about the
conversation, and more.
Call Waiting
Your phone notifies you when you
have another incoming call, and
gives you the option of rejecting or
accepting the call. If you are already
on a call and accept the new call,
you can choose to start a three-way
call for all participants.
To use the speakerphone
During a call, do one of the
following to turn the speakerphone
on or off:
●
Tap Speakerphone On
to turn the speakerphone on. Tap
Speakerphone Off to
turn the speakerphone off.
●
Tap Options in the Options
taskbar, then tap
Speakerphone On
Speakerphone Off
NOTE
The speakerphone icon
appears in the Notifications and
Status Icon taskbar when the
speakerphone is on.
Turn
or
.
Turn
WARNING!
To avoid damage to your
hearing, do not hold the
phone against your ear when
the speakerphone is on.
41
Page 44

Using Phone Features
To mute the microphone during a
call
Tap Mute to turn the
microphone off and tap Unmute
to turn on.
To create Notes while in a call
Tap Note .
To end a call
When a call is in progress, tap End
or press the End Key .
2.4 Using Call History
View call history in the Phone panel.
1. Press the SEND Key , then
tap Call History .
NOTE
You can also tap Options
in the Options taskbar, tap View,
then tap All Calls to view your
recent call history.
2. Swipe or flick to scroll through
the list, then tap an entry to view
call details.
3. Tap the entry to call it, or press
the End Key to exit.
View Call history from the
Notifications and Status Icon taskbar
1. Tap the Notifications taskbar,
then tap the missed call icon
in the drop-down taskbar to
display all missed calls.
2. Tap Options in the Options
Filter
taskbar, then tap
All Calls
3. Tap
.
.
4. Swipe or flick to scroll through
the list, then tap an entry to view
call details.
Received call
Dialed call
Missed call
5. Tap the entry to call it, or press
the End Key to exit.
42
Page 45

2.5 Speed Dial
OK
Use Speed Dial to call frequentlyused numbers with a single touch.
For example, if you assign a contact
to location 2 in Speed Dial, you can
touch and hold the number 2 key
on the Phone panel keypad to dial
the contact’s number.
To create a Speed Dial entry
1. Open your Contacts list.
2. Find and tap the desired Contact.
3. Tap Options in the Options
taskbar, then tap
.
Dial
4. Tap the Location field and tap
the Speed Dial location.
5. To save, tap .
To delete a Speed Dial
1. Open your Contacts list.
2. Find and tap the desired Contact.
3. Tap Options in the Options
taskbar, then tap
.
Dial
4. Tap Trash and tap Yes.
Add to Speed
Edit Speed
NOTES
• Number “0” and “1” keys are
reserved and cannot be
assigned as speed dial keys. The
number “1” key is reserved for
voicemail. You can set any
number between “2” and “99”
as a speed dial key.
• If you attempt to assign a speed
dial that is already assigned, you
will be asked if you want to
replace the existing one.
To make a call using Speed Dial
To call any assigned speed dial key,
press the SEND Key to display
the Phone panel, then
●
Touch and hold the assigned key,
to automatically dial a singledigit speed dial number.
●
To dial a two-digit Speed Dial,
tap the first number key, then
touch and hold the second
number key.
2.6 Making Three-way
Calls
To set up a three-way call, directly
dial the participants and add each
connected call to the three-way call.
43
Page 46

Using Phone Features
OK
Starting a three-way call
1. Press the SEND Key to
open the Phone panel.
2. Make the call to the first person.
3. After the first call is connected,
tap Dialpad , dial the other
number and press the SEND Key
.
Ending the three-way call
Tap End or press the End
Key .
2.7 CDMA Phone Settings
Setting the phone connection
to CDMA-only mode
When the phone is in CDMA-only
mode, it can only access the Verizon
network if available, or access other
CDMA roaming networks when
outside the Verizon network
coverage area. You may want to set
the phone to CDMA-only mode
when you want to access CDMA
services or to prevent the phone
from accessing GSM networks and
accruing data charges.
To change to CDMA-only mode
1. Press the
tap
2. Tap
Phone
3. In the banner at the top of the
screen, flick horizontally to
display the
4. Tap under Mode of operation,
then tap
drop-down menu.
5. Tap .
Start
Settings
Personal
.
CDMA Mode
Key , then
.
, then tap
Network
tab.
from the
44
Page 47

CDMA Services
OK
Your phone can directly link to the
Verizon Wireless CDMA network,
and enable you to access and
change the settings of various
phone services for your phone when
it is in CDMA mode. Contact
Verizon Wireless to find out about
the availability of phone services for
your phone.
To access CDMA services and
change their settings
1. Press the
tap
2. Tap
Phone
3. In the banner at the top of the
screen, flick horizontally to
display the
NOTE
4. Tap the setting(s) to activate,
then tap .
CDMA Settings
Home only / Automatic
(Automatic A/ Automatic B)
GSM / UMTS Settings
GSM Only/ UMTS Only/
GSM/UMTS Dual
Start
Key , then
Settings
Personal
.
, then tap
.
Band
tab.
You must be in CDMA mode to
access CDMA services.
-
-
NOTE
For more information about
customizing phone services
settings, see Help on your phone.
2.8
Using the LG FATHOM
TM
as a GSM Phone
Your wireless phone is set to Global
Mode by default enabling you to
roam internationally on GSM
networks.
You can manually change the phone
to GSM/UMTS Mode or CDMA
Mode. See “GSM settings” and
“CDMA Phone Settings” in this
chapter for details.
GSM international roaming
Your phone can operate in a
number of countries on both CDMA
(Code Division Multiple Access)
and GSM (Global Systems for
Mobile) networks. Use your phone
in GSM/UMTS Mode or Global
Mode while in countries serviced by
GSM networks. You may want to
use GSM/UMTS Mode when you
want to prevent the phone from
using CDMA roaming networks and
to access GSM/UMTS Mode. See
“GSM Settings” on page 47 more
information on GSM/UMTS Mode.
If you want to enable the phone to
45
Page 48

Using Phone Features
select the network that is most
accessible for your locale, select
Global mode.
Using the Verizon Wireless
GSM SIM card
Your wireless phone comes with a
SIM card preinstalled which, along
with a Global feature on your
account, enables you to make calls
and access email in GSM networks
while traveling overseas. Should
your SIM card be lost or damaged,
please follow these instructions for
the installation of your new SIM.
SIM Card Slot
To remove the SIM card
1. Remove the back cover and the
battery if it is installed. See
Chapter 1 for details.
2. Locate the SIM card slot.
3. Slide the SIM card out from the
slot with your finger.
To install the SIM card
1. Remove the back cover and the
battery if it is installed. See
Chapter 1 for details.
2. Locate the SIM card slot, then
insert the SIM card with its gold
contacts facing down and its
angled corner facing out the card
slot.
3. Slide the SIM card completely
into the slot.
46
TIP
Any contacts on the SIM card are
automatically added to Contacts.
Page 49

2.9 GSM settings
Angled
corner
If you do not want to enter the PIN
to turn on the phone, you can
disable it.
1. Press the
tap
2. Tap
Phone
Start
Settings
Personal
Key , then
.
, then tap
.
3. In the banner at the top of the
screen, flick horizontally to
Security
display the
tab.
To protect your SIM card with a
PIN code
The preinstalled Verizon SIM card
may be locked with a PIN. If you
choose to protect your SIM card
with a PIN code, the PIN will be
required each time the phone is
powered on. When prompted, enter
Enter
the PIN, then tap
NOTE
If the wrong PIN is entered three
times, the SIM card is blocked.
To unblock it, obtain the PUK
(PIN Unblocking Key) from
Verizon.
.
NOTE
You must be in GSM/UMTS
Mode to access GSM/UMTS
services.
4. Tap the checkbox
when phone is used
TIPS
• To change the PIN, tap Change
PIN, then enter the PIN you
want to use. Tap Change PIN 2,
then re-enter your PIN to verify
it.
• Emergency calls can be placed
at any time, without requiring a
PIN.
Require PIN
to clear it.
47
Page 50

Using Phone Features
OK
Get Settings...
To set the phone connection to
GSM-only mode
You can set the phone connection
to GSM-only mode to prevent the
phone from accessing CDMA
networks.
1. Press the
tap
2. Tap
Phone
Start
Settings
Personal
Key , then
.
, then tap
.
3. In the banner at the top of the
screen, flick horizontally to
display the
Network
tab.
4. Tap under Mode of operation,
GSM/UMTS Mode
then tap
from the drop-down menu.
To access GSM services and
change their settings
Your phone can directly link to the
Verizon network, and enable you to
access and change the settings of
various phone services for your
phone when it is in GSM mode.
Contact Verizon to find out about
the availability of phone services for
your phone.
Start
1. Press the
Settings
tap
2. Tap
Personal
Phone
Key , then
.
, then tap
.
3. In the banner at the top of the
screen, flick horizontally to
display the
NOTE
GSM Services
You must be in GSM/UMTS
Mode to access GSM/UMTS
services.
tab.
4. Tap the service you want access,
Get Settings
then tap
.
5. Tap .
The following are some of the
optional phone services that you
may find on your phone. For more
information about customizing
settings of phone services, see Help
on your phone.
48
Page 51

GSM Service Usage Information
Calling Barring
Caller ID
Call Forwarding
Call Waiting
Voice Mail and Text
Messages
Fixed Dialing
Allows you to block incoming or
outgoing calls.
Allows you to set caller ID options.
An incoming call to be redirected to
a mobile telephone or other telephone
number
Enable and disable call wating.
Provide a Service Center Number
and Voice Mail
Outgoing calls are allowed to only
a set of phone numbers.
2.9 Turning the Phone
Function On and Off
In many countries, you are required
by law to turn off the phone while
on board an aircraft, or in areas
sensitive to RF transmissions.
To enable or disable the phone
function
1. Press the
tap
2. Tap
Wireless Manager
3. Tap the item(s) to enable or
disable.
●
Tap All to
disable all wireless functions.
●
Tap
to disable individually.
Start
Key , then
Settings
.
Connections
Wi-Fi, Bluetooth
, then tap
.
, or
Phone
49
Page 52

Chapter 3
Using the Today Screen
3.1 What’s on the Today
Screen
The Today Screen of your phone
allows quick access to your most
frequently used information and
functions you want to keep at hand.
The Today Screen is organized into
three sections: Notifications and
Status Icons taskbar, Today Screen,
and Options taskbar.
Notifications and Status Icons taskbar
(see page 27 for details)
Today
Screen
Options taskbar
(see page 28 for details)
3.2 Today Screen
The Today Screen portion of the
screen is organized as panels of
information and programs. It
provides you with current
information, easy swipe viewing, and
quick tap access. Some of the
panels provide at-a-glance
notification by displaying indicators
to alert you to pending information
(e.g.,
new messages are pending).
Default Today Screen
The default for Today Screen
includes: pictures, music, phone,
favorite contacts, (visual*)voicemail,
clock, getting started, message, email, calendar and favorites. You can
disable the Windows Default setting
and choose from selected panels to
display instead.
*After subscribing to Visual
Voicemail, the option name on the
Today Screen will change to Visual
Voicemail.
message
2
alerts you that two
50
Page 53

Using the Today Screen
Browse
Tap a Today Screen panel to select
it. The select bar surrounds it and
displays current detail information.
For panels with multiple items (e.g.,
multiple calendar events), swipe
horizontally to scroll through them,
then tap again to open the item.
TIP
Double-tap a Today Screen panel
to open it directly.
Changing the Today Screen
Panel items from the Today Screen
are set by default, but you can
choose to display other selected
items instead, then set their order
and set customized options.
1. Press the
tap
2. Tap
the Home Settings tabs at the
top of the screen.
3. Tap the checkbox next to the
item(s) you want as your Today
Screen (all Windows Default
items will be deactivated).
Start
Settings
Home
Key , then
.
, then tap
Items
Changing Screen background
Set the Today Screen and Start
screen background to suit your
personality.
1. Press the
tap
2. Tap
3. In the
Start
Settings
Home
Appearance
the background:
●
Tap a theme from the list, or
●
Tap the
Use this picture as
the background
then tap to set a
Background image from your
Pictures.
in
Key , then
.
.
tab, choose
checkbox,
51
Page 54

Using the Today Screen
New
3.3 Phone
Your LG FATHOM™Global Phone
has many calling capabilities,
including Speed Dialing, emergency
calls, international calls (see page
38), and Smart Dial (see page 36)
as well as many ways to access the
phone's dialpad, including:
●
Press the SEND Key .
●
Double-tap
phone
from the
Today Screen.
●
Press the
tap
Phone
Start
Key , then
.
3.4 Message
The Message panel contains your
messages (text, picture and video)
all in one place.
To access the Message panel:
●
Double-tap
Today Screen.
OR
●
Press the
tap
Start
Message
message
Key , then
.
from the
Changing the message
account settings
Message Settings
To access Settings for Messaging,
Start
press the
Message
Key , tap
, then tap
Settings
.
There are four message settings
tabs: General Settings, MMS
Settings, SMS Settings and About.
Text Messages
Send text messages (SMS) to other
mobile phones. If your message is
more than 160 characters, it will be
sent as two or more separate
messages and will be billed
accordingly.
Composing and sending text
messages
To compose and send a text
message
1. Double-tap
Today Screen, then tap .
NOTE
message
If you have unread messages, tap
text, swipe horizontally past
pending messages (No New
Messages is displayed), then tap
the Message panel again.
from the
52
Page 55

2. Tap
Send via Picture Message
Menu
Reply
Menu
Send
Done
Reply
Menu
Send
Done
Menu
Text message
3. Tap the
To
.
: box to enter the
mobile phone number of one or
more recipients. There are
additional ways to add contacts:
●
Tap , tap Add Recipient.
From Contacts/ From Call
History/ From Sent History/
Online album
●
After entering a destination, then
tap .
TIP
To delete a recipient, tap to
the right of the entry.
4. Tap the text area to compose
your message. Begin tapping the
displayed keys to enter your text.
5. When finished, tap .
TIP
To cancel the text message, tap
, then tap Cancel
Message.
Managing text messages
To reply to a text message
1. In the Message Inbox, tap a
message to open it.
2. At the bottom of the screen, tap
, tap the text area to
enter your message, then tap
, and then .
To delete a message
1. In the Message Inbox, scroll up
or down and touch a message
that you want to delete.
Delete
2. Tap , then tap
To reply to a text message with an
MMS message
You are able to easily reply to a text
message with an MMS message.
1. In the Message Inbox, tap a
message to open it.
2. Tap .
3. Tap , tap .
.
53
Page 56

Using the Today Screen
Menu
Menu
Menu
Done
Menu
OK
MMS
Creating and sending MMS
(Multimedia Message Service)
messages to your friends and family
is fun and easy.
NOTES
Your phone is already preconfigured
with your wireless service provider's
MMS settings. MMS is a charged
service and must be provisioned
with your mobile phone plan.
Contact your wireless service
provider to have MMS provisioned
as part of your call plan.
To configure MMS settings
1. Press the
Message
2. Tap
3. Configure as necessary and tap
Creating and sending MMS
messages
You can compose MMS messages
with various slides, where each slide
can consist of a photo, audio,
and/or video files.
NOTE
Start
Key ,
, then tap
MMS Settings
Settings
.
to save.
Make sure the size of the MMS is
within the limits of the wireless
service provider while sending it
to another mobile phone user or
to an e-mail address.
1. Press the
Message
Message
2. Tap
Message
3. Tap the
Start
Key , tap
and tap
.
Picture Message
.
To
: field to enter the
recipient's phone number or tap
, tap Add Recipient.
From Contacts/ From Call
History/ From Sent History/From
Blog/ Online album
After entering a destination, then
tap .
Subject
4. Tap
.
enter a subject for your message.
box, tap keys to
5. Tap Photo (or Video ),
then tap the photo (or video
clip) you want to send.
OR
(or
Insert
Video
), then tap the
Tap , tap
Picture
desired item type.
NOTE
To take a new photo, tap (or
tap , tap Capture, tap
Image). To record a new video,
tap (or tap , tap
Capture, tap Video).
New
or
, tap
Video
54
Page 57

You can also insert an audio clip
Reply
Send
Menu
Menu
into a picture message. To insert
an existing clip, tap , tap
Insert, tap Audio, then tap the
clip you want. To record a new
clip instead, tap Microphone
, tap Record , say the
recording, then tap Stop .
6. Tap the text message area to
enter text. To insert My Text
phrases, tap , then tap
Edit Text
. To insert Emoticons,
Insert Emoticon
tap
, then tap
the one you want.
7. Tap .
NOTES
• To designate recipient(s) as
addressee, copied addressee, or
blindcopy addressee, tap the
To : box, the To : box again
then tap To , Cc or Bcc as
needed.
• To remove a photo, text, or
audio, tap next to the item
to remove.
• Additional slides are added
automatically if you insert
multiple photos into the
message.
Viewing and replying to MMS
messages
To view an MMS message
In the Message Inbox, MMS
messages are identified by the MMS
icon .
To reply to an MMS message
1. In the Message inbox, find the
message you want to reply to.
2. While still in the Inbox, touch and
hold the message.
3. Once the popup menu appears,
tap , then tap the type of
message.
4. Complete the message as
necessary.
3.5 E-mail
Setting Up E-mail Accounts
Before you can send and receive email, you need to set up your e-mail
account on your phone. You can set
up the following types of e-mail
accounts on your phone:
●
Outlook e-mail that you sync
with your computer or the
Exchange Server.
●
E-mail account that you have
from an Internet Service Provider
(ISP) or other e-mail provider.
●
Web-based e-mail accounts such
®
as Yahoo!
●
Custom domain e-mail accounts.
The e-mail domain name is
Mail Plus or AOL®.
55
Page 58

Using the Today Screen
hosted by a different e-mail
provider.
●
Work account that you access
using a VPN connection.
TIP
For more information on how to
set up your email, visit
https://smartphones.verizonwir
eless.com/. Click on the
Smartphone Support tab and
select your phone.
Synchronizing Outlook e-mail
with your computer
If you've installed the
synchronization software on your
PC and created a partnership with
your phone, then your phone is
ready to send and receive Outlook
e-mail. If you have not yet installed
the synchronization software or
created a partnership, follow the
procedures in page 121.
TIP
To set up your company e-mail
account so that you can access
Outlook e-mail messages
wirelessly, you must set up your
phone to synchronize via an overthe-air connection with your
company’s Exchange Server. For
more information about
synchronizing with your company
e-mail server, see Chapter 7.
Setting up an Internet e-mail
account
Set up a POP3 or IMAP4 e-mail
account on your phone if you have
an e-mail account from an Internet
service provider (ISP), or a Webbased account such as Yahoo! Mail
Plus, etc. You can also add a work
account that you access using a
VPN server connection as a
POP3/IMAP4 account.
Start
1. Press the
mail
Key , tap
, then tap
Setup E-mail
2. Enter the E-mail address and
Password for the e-mail account
and tap the checkbox
then tap
password
Next
3. Tap
NOTE
.
E-mail Setup searches your phone
for preloaded e-mail configuration
settings. If the phone cannot find
the server settings for the
specified e-mail account, your
phone needs to connect to the
Internet and try to download the
settings. If it cannot find the
settings online, you need to enter
the settings manually.
Next
E-
Save
.
.
56
Page 59

4. Enter your name and the
Account display name, then tap
Next
.
5. If prompted, choose how often
you want e-mail messages to be
automatically sent and
downloaded on your phone.
NOTE
Ta p Review all download settings
to select download options, set
the e-mail format as HTML or
plain text, and more. For more
information, see “To customize
download and format settings.“
6. Tap
Finish
.
To specify e-mail server settings
If Auto Setup is unsuccessful,
contact your ISP or e-mail provider
for the incoming mail server and
outgoing mail server settings so you
can enter them on your phone.
Other options that you can select
include the following:
●
Select the checkbox
Outgoing
server requires authentication
required by your provider.
●
If the outgoing e-mail server
requires a different user name
and password for sending e-mail,
clear the checkbox
Use the same
user name and password for
sending e-mail
. You will then be
prompted to enter this
information.
●
Tap
Advanced Server Settings
then select the checkbox
if your e-mail provider uses
SSL
Require
an SSL connection for more
secured e-mail.
●
From the Network connection
list, select the data connection
that you use for connecting to
the Internet.
To customize download and
format settings
Before you tap
Finish
when setting
up your Internet e-mail account,
you can tap
settings
Review all download
to choose download
options, message format, and other
settings. Tap
Advanced Settings
for
further options.
if
,
57
Page 60

Using the Today Screen
Options Description
Automatic
Send/Receive
Download
messages
Send/receive
when I click
Send
Use automatic
send/receive
schedule when
roaming
When deleting
messages
Message format Select HTML or Plain Text.
Message
download limit
Download
attachments
You can select a time interval for
connecting to the Internet
automatically to send and receive
messages.
Set the number of days of messages
that you want to be downloaded to
your phone.
By default, messages are
immediately delivered when you tap
Send. If you prefer to save outgoing
messages to the Outbox folder first,
clear the check box. (In this case,
you will need to manually send
messages by tapping Menu, then
tap Send/Receive).
This allows your phone to data roam
when there is a set time interval for
connecting to the Internet
automatically. Since this may result
in higher connection costs, you may
want to leave the check box cleared.
Choose whether to delete messages
from the mail server when you delete
them on your phone.
Select the e-mail download size. If
you have large volumes of e-mail,
use a lower size or select to
download headers only.
Set your preference when there is an
e-mail attachment
Setting up a custom domain
e-mail
When you are using an e-mail
domain name that is hosted by a
different e-mail provider (for
example, your e-mail address may
be johndoe@work.com but Email.com hosts the e-mail account
and provides e-mail services), select
the Custom Domain option in the
E-mail Setup wizard to set up your
e-mail account on your phone.
Start
, then tap
.
, then tap
Key , tap
Setup
. Tap
Next
.
Try to get e-
Next
.
then tap
Next
Next
.
1. Press the
E-mail
E-mail
2. Enter your E-mail address and
the Password for your e-mail
account and select the checkbox
Save password
3. Clear the checkbox
mail settings automatically from
the Internet
4. In your e-mail provider, select
Custom domain
5. Enter the domain of your e-mail
provider, then tap
.
58
Page 61

6. The E-mail Setup wizard then
Menu
Send
Menu
Menu
Menu
tries to find the e-mail provider
settings on your phone or from
the Internet. If the settings are
found, it shows a successful
Next
message. Tap
.
7. Enter your name and the
Account display name, then tap
Next
.
NOTE
If the E-mail Setup wizard was
unsuccessful in finding the
settings, you will be prompted to
enter e-mail server settings on the
succeeding screens. See “To
specify e-mail server settings” for
details.
8. In the Automatic Send/Receive
list, choose how often you want
e-mail messages to be
automatically sent and
downloaded on your phone.
NOTE
Ta p Review all download settings
to select download options, set
the e-mail format as HTML or
plain text, and more. For more
information, see “To customize
download and format settings."
9. Tap
Finish
.
Creating and sending e-mail
messages
After setting up e-mail accounts on
your phone, you can start sending
and receiving e-mail messages.
To compose and send an e-mail
1. Double-tap
Today Screen, then tap the email
account to use.
2. Tap , then tap
3. Enter the e-mail address(es) (put
semicolon between addresses).
To copy address(es) from your
phone's memory, with the cursor
in the
Add recipient
contact.
4. Enter a subject and compose
your message. To quickly add
common phrases, tap , tap
My Text
insert.
5. Tap .
TIPS
e-mail
from the
New
.
To
: box, tap , tap
, then tap the
, then tap the phrase to
• To change message options, tap
, then tap Message
Options to set priority, security,
permission, and language.
59
Page 62

Using the Today Screen
Menu
Menu
• If you are working offline, e-mail
messages are moved to the
Outbox folder and will be sent
the next time you connect.
To add an attachment to an e-mail
1. In the message that you are
composing, tap , tap
Insert
, then tap the items to
Picture, Voic e N ot e
attach:
File
.
, or
2. Tap the file you want to attach,
or record a voice note, then
complete the message as
necessary.
Searching e-mail messages
To search the Inbox message list
Filter the e-mail messages in your
Inbox to only display the e-mail
messages that contain the sender
or e-mail subject you are searching
for. Use touch keys or keyboard to
enter the characters or numbers for
your filter search. As you enter, the
list narrows down to the conditions
you set.
For example, tap (or press) “J” then
"A" to narrow the list to only the email messages that contain sender
names and e-mail subjects that start
with “JA.”
To download a complete e-mail
By default, each e-mail in the inbox
on your phone contains only the
first few kilobytes of the message.
When you open an e-mail, it
displays only the headers and part
of the message. You must download
the whole e-mail to view the
complete content.
To download a complete e-mail
message, open the e-mail and then
do one of the following:
●
Scroll down to the end of the
message and tap
this message
●
Tap , then tap
Message
Get the rest of
.
Download
.
60
Page 63

NOTE
Send
Menu
The Fetch Mail feature, which is
available for POP3 and IMAP4
Internet e-mail accounts,
downloads an entire e-mail
without the need for you to
perform a full synchronization.
This limits the download to just
the e-mail message(s) that you
want and helps save data costs.
Fetch Mail is also available for
Outlook E-mail. See “Instant
download through Fetch Mail” in
page 137.
To use shortcuts
When in an e-mail account, press
and then touch and hold to open a
shortcut list of often-used
commands. Touch and hold the
shortcut key to execute the
command.
To download an attachment
In an open message with an
attachment to download, tap the
attachment. If there is more than
one attachment, tap the other
attachments to download them. You
can directly open the file in the
associated program after download
by tapping the attachment again.
To reply to or forward an e-mail
1. Open the message, tap ,
Reply/Forward
tap
Reply, Reply All
, then tap
, or
Forward
.
2. Enter your response (also enter
the address(es) if you are
forwarding the message), then
tap .
NOTE
You can receive and view HTML
e-mail messages from any type of
e-mail account. The HTML format
is retained, without layout shifting
or resizing. HTML e-mail support
in Outlook Mobile is available
only if you are synchronizing your
phone with a Microsoft Exchange
Server.
Synchronizing e-mail
messages
Synchronizing e-mail messages
ensures that new e-mail messages
are downloaded to the phone Inbox
folder, e-mail messages in the
Outbox folder are sent, and e-mail
messages deleted from the server
are removed from your phone. The
manner in which you synchronize
e-mail messages depends on your
e-mail account type.
61
Page 64

Using the Today Screen
Done
Menu
OK
Menu
Menu
To automatically synchronize an
Outlook e-mail account
1. Connect your phone to your
computer through USB or
Bluetooth. Otherwise, connect
through Wi-Fi or a data
connection if you are
synchronizing Outlook e-mail
with the Exchange Server. For
more information, see Chapter 7.
2. Synchronization automatically
begins, and your phone send.s
and receives Outlook e-mail.
To manually synchronize your
Outlook or Internet e-mail
account
1. Double-tap
e-mail
from the
Today Screen, then select your email account.
2. Tap , then tap
Send/Receive
.
Customizing e-mail settings
To change the download size and
format for Outlook e-mail
1. Disconnect your phone from the
computer.
Start
2. Press the
the screen up, then tap
ActiveSync
3. Tap , tap
E-mail
4. On the E-mail Sync Settings
screen, set the
and
limit
5. Tap .
To change the download size and
format for POP3/IMAP4 e-mail
1. While viewing POP3/IMAP4 email Account, tap
Options, tap the account to
modify, then tap
settings
2. On the E-mail Setup, set the
Message format, Message
download limit
attachments
3. Tap .
Key , scroll
.
Options
, then tap
Settings
Download size
Message format
Download size
.
and Download
,
, tap
.
.
,
tap
62
Page 65

3.6 Contacts
Menu
Menu
OK
OK
Contacts
Contacts is your address book and
information storage for the people
and businesses you communicate
with. If you use Outlook on your
PC, you can synchronize contacts
between your phone and PC.
Creating a contact
1. From the Today Screen, tap
, tap New , then tap
Outlook Contact
NOTE
To create a new contact on your
SIM card (if one is installed), tap
SIM Contact. You can also use
SIM Manager to add contacts to
your SIM card. For more
information about SIM Manager,
see “SIM Manager” in this chapter.
2. Tap a field to select it, then enter
contact details as necessary.
Contact information is contained
in three tabs. Communicate, Info,
and Notes. Tap these tabs to
complete the entry as necessary.
3. To easily identify the caller, you
can assign a custom ring tone to
each Outlook contact. To assign
a custom ring tone, tap the
tab at the top of the screen, tap
Set Ringtone
you want to set, then tap .
.
Info
, tap the ringtone
4. To assign a picture to a contact,
tap the
Communicate
tab at the
top of the screen, tap the Picture
box , tap the picture to set,
then tap .
TIPS
• If someone calls who is not in
your list of contacts, you can
quickly add it to Contacts from
the phone's call history. Tap the
call entry, tap Option , tap
Save to Contacts, tap New
Contact, then enter the
necessary remaining information.
• If someone who is not in your list
of contacts sends you a message,
tap the message, tap , tap
Contact Details, tap , tap
Save As New Contact, then enter
the necessary remaining
information.
63
Page 66

Using the Today Screen
Contacts
Contacts
OK
Contacts
Editing and calling a contact
To view and edit a contact
information
1. From the Today Screen, tap
.
2. Tap the contact whose
information you want to view or
edit.
3. Tap the name field.
4. Tap the field(s) you want to edit.
5. Make changes as needed, then
tap .
To call a contact from the
Contacts panel
1. From the Today Screen, tap
.
2. Tap the contact to call and press
the SEND Key . The
contact’s default phone number
is dialed.
TIP
To call a phone number other
than the default, tap the contact,
tap the number you want to dial,
and press the SEND Key .
Finding a contact
To find a contact
1. From the Today Screen, tap
.
2. Do one of the following:
●
Begin entering a name or phone
number of the contact until the
contact is displayed. As soon as
you enter a character, contacts
that begin with that character are
displayed (e.g., entering
V
et, Victor Smith, or Joe
display
V
ick). The next character entry
continues to narrow the search.
●
If you have assigned categories
(e.g., Business) to your Outlook
contacts, you can filter the
Contacts list by category. In the
Contacts list, tap Options ,
Filter
, then tap a category. To
tap
show all contacts again, tap
.
Contacts
V
could
All
64
Page 67

●
Send
Done
Contacts
Contacts
If you have entered information
under Company for your
Outlook contacts on your phone,
you can quickly locate the
contacts that work for a specific
company. In the Contacts list, tap
View By
Options , tap
tap
Company
. Tap the company
, then
to see the contacts who work
there.
NOTE
To return to the previous view, tap
Options , tap Vi ew By, then
tap Name.
Sharing contact information
To beam contact information to
another device via Bluetooth
1. Turn on the Bluetooth
functionality (Start > Settings >
Bluetooth).
2. From the Today Screen, tap
.
3. Touch and hold the contact until
the popup menu appears.
Send via Bluetooth
4. Tap
5. Tap the device you want to beam
the contact details to and follow
the instructions, as necessary.
.
NOTE
For more information, see
“Bluetooth” in Chapter 8.
To send contact information via a
text message
1. From the Today Screen, tap
.
2. Touch and hold the contact, tap
Send Contact
Messages
and tap
. Select the contact
information that you want to
send and tap .
3. In the new text message, enter
the mobile phone number of the
person you want to send the
contact information to and tap
.
3.7 Visual Voice Mail
Visual Voice Mail allows the
management of voice mail directly
from the device rather than
accessing voice mail via traditional
method(s). Visual Voice Mail
displays a list of messages and
allows the user to choose which
message to listen to or delete,
without having to dial into their
mailbox, listen to voice instructions,
or prior messages.
65
Page 68

Using the Today Screen
1. Press the
tap
Start
Key , then
Visual Voice Mail
.
2. Follow the instructions to sign in.
3.8 Mobile Email
Mobile Email is an application
already downloaded on your device.
Don't miss an important email.
Thanks to Mobile Email, you can get
your emails on your phone, while
you're on the go. Mobile Email
works with many providers,
including Yahoo!, AOL, Verizon.net
and others. Get alerts from your
LG FATHOM
TM
smart phone when
new email has arrived.
Additional fees may apply.
See brochure for details or visit
www.verizonwireless.com.
1. Press the
tap
Start
Key , then
Mobile Email
.
3.9 Mobile IM
Mobile IM provides you with access
to popular instant messaging (IM)
communities, including AOL
Messenger (AIM
®
), Windows Live™
Messenger, and Yahoo!
Instant Messaging enables you to
sign in to multiple communities at
the same time.
66
®
Instant
®
Messenger.
Start
1. Press the
Mobile IM
tap
Key , then
.
2. Read the disclaimer and tap
Accept
.
3. Tap the Mobile IM provider, enter
the required sign-in information
for the selected community, such
as user name or password, then
Sign In
tap
NOTE
.
The information required to sign
in will vary depending on the
instant messaging community you
are accessing.
The instant messaging screen for
your selected community will then
be displayed, and you can start
chatting online with your friends or
family.
For more information on using
Help
Mobile IM, tap
NOTE
Separate charges apply to
send/receive instant messages.
.
Page 69

3.10 City ID
Subscribe
City ID is an enhanced Caller ID
feature on select Verizon Wireless
handsets that automatically displays
the city and state of every wireless
call received. City ID reads the area
code and local exchange of an
incoming call and displays the
location associated with that
number. City ID includes over
20,000 cities, towns and
neighborhoods in North America
and over 200 country codes from
around the world - providing mobile
subscribers with a remarkably
accurate tool to help identify
incoming callers.
City ID enabled handsets also
feature outgoing and call log
identification which displays the city
and state of outgoing calls as well
as calls within the handset’s call
history.
City ID is a feature with a free trial
that works automatically –
displaying the city and state with
the very first incoming phone call.
1. After the free trial period,
subscribers will receive a message
to purchase the application.
2. Subscribers are then presented
with available purchase options.
If after purchasing City ID a
subscriber decides to cancel the
application, the subscriber can
follow the standard Media Center
process to cancel a subscription.
3. To purchase City ID if you said
“no” during the trial?
Start
1. Tap
City ID
2. Tap
Subscription Status
3. Tap
tap to purchase the
application.
.
.
, then
67
Page 70

Using the Today Screen
3.11 Internet Explorer
Internet Explorer Mobile is a fullfeatured Internet browser, optimized
for use on your phone.
Browsing the Web
1. Press the
tap
2. Tap the web address bar, enter
the URL/address, then tap .
While browsing the Web, tap Menu
access the browser's options.
Start
Key , then
Internet Explorer
, then tap Browser menu to
.
Navigating web pages
Viewing and navigating web pages is
easy, even on large sites.
1. Go to the web page that you
want to view.
2. Use your fingertip or stylus which
is attached on the back side of
the device to easily drag page
contents into view anywhere on
the web page.
3. Tap Menu to display the
zoom bar at the right side of the
LCD and full menu bar along the
bottom.
4. Touch and slide the zoom indicator
up or down the zoom bar, or tap
any of the menu bar icons.
Copying web page text
Copy text from a web page and
then paste it on a text message or
e-mail.
To copy text on a web page
1. On the web page, tap Menu ,
tap Browser menu , then tap
Copy/Paste
.
68
Page 71

2. Tap
Copy
Make
Selection, then use
your fingertip, or stylus which is
attached on the back side of the
device, to touch and drag over
the text you wish to copy.
3. Tap .
3.12 Settings
Enjoy the freedom of customizing
your LG FATHOM
according to your own preferences
using the Settings menus. Within
Settings on the Start screen, there
are several Settings menus. The
submenus and options in some of
the Settings menus are organized
into tabs. Tabs are displayed at the
top of the screen allowing you to
easily tap to view and change
settings as needed.
Access Settings
1. Press the
Settings
Settings menu you want to view.
TIP Settings options are often
organized into separate tabs. Use
the Tab Bar (as shown in the
following image) to access all
options.
TM
to operate
Start
Key , tap
, then tap the
Tab Bar
Settings and
choices
Options
taskbar
Settings Menus and Tabs Overview
Clock & Alarms
Menu for
setting time and alarms.
Alarms
tab: View or set alarms.
Time
tab: View or change time
and date settings.
Home
Sets Today Screen
display.
Appearance
tab: Sets
background theme for LCD.
Items
tab: Sets items
displayed on Today Screen.
69
Page 72

Using the Today Screen
Lock
Use to secure your
phone.
Password
password.
Gesture Unlock
you to use gestures to unlock
screen and launch program.
tab: Sets your
tab: Allows
Sounds and Notifications
Sets your alerts.
Sounds
tab: Enables sounds.
Notifications
type and ring tone for
selected events.
Vibrations
vibration.
Connections
connection(s) setup.
Connections
Ta s k s
tab: Sets modem, VPN
server and proxy server.
Advanced
selection, dialing rules and
exceptions.
Domain Enroll
GPRS Setting
Switch USB
USB to PC
tab: Sets ring
tab: Sets screen
settings Use for
tab: Sets network
Wi-Fi
Wireless
tab: Use to select or
add a Wi-Fi connection.
Network Adapters
network connection adapters.
Wireless Manager
Personal
your phone functionality
preferences.
Buttons
Program Buttons
functions for selected keys.
Up Down Control
Volume Key sensitivity.
Owner Information
Identification
identifying information.
Notes
tab: Free-form text area.
Phone
Sounds
tab: Sets default ring
type and tone, keypad tone,
voicemail access, and voice
privacy alert.
Security
tab: Sets PIN security
(password required to power up).
tab: Sets
settings Use to set
tab: Changes
tab: Sets
tab: Your
70
Page 73

GSM Services
services such as Call Barring,
Caller ID, Call Forwarding, Call
Waiting, Voicemail and Text
Messages, and more.
Network
network and mode of operation.
CDMA Services
available CDMA services.
Band
and GSM/UMTS settings.
Voice Commands
System
Use for system configuration.
About
Version
information.
Device ID
identification (used to identify it
to other devices).
Copyrights
text.
Backlight
Battery power
backlight duration when running
on battery power.
tab: Sets provider
tab: Let's you select the
tab: Sets
tab: Sets CDMA settings
settings
tab: View device version
tab: Enter your device
tab: View copyright
tab: Sets
External power
backlight duration when fed from
external power.
Button
duration for the key backlights
presses.
Brightness
brightness or enable the
Luminous sensor.
Certificates
Personal
personal authority certificates.
Intermediate
view intermediate authority
certificates.
Root
tab: Select and view root
authority certificates.
Customer Feedback
Encryption
Error Reporting
External GPS
Programs
port for GPS data.
Hardware
hardware port and baud rate.
tab: Sets
tab: Sets backlight
tab: Lets you set the
tab: Select and view
tab: Select and
tab: Lets you set the
tab: Lets you set the
71
Page 74

Using the Today Screen
Access
tab: Lets you enable the
GPS access management.
Managed Programs
Memory
Main
tab: View storage and
program memory (used and free
space).
Storage Card
memory.
Clear Storage
erase all data and resets to the
factory defaults.
Powe r
Battery
and status.
Advanced
timeout for sleep mode on
battery or external power.
Regional Settings
Region
and displays regional information.
Number
number formats.
Currency
currency formats.
tab: View card
tab: Allows you to
tab: View battery type
tab: Lets you set the
tab: Lets you set region
tab: Lets you set
tab: Lets you set
Time
tab: Lets you set time
formats.
Date
tab: Lets you set date
formats.
Remove Programs
Screen
Alignment
the screen.
Clear Type
clearer fonts.
Text Size
size.
Accelerometer
automatic screen rotation (left
and right handed).
Luminous
luminosity sensor.
Proximity
to lock the touch screen when
the device is held to your ear.
Version
hardware, software, PRL, and ERI.
tab: Lets you calibrate
tab: Lets you set
tab: Lets you set text
Sensor
tab: Lets you set
tab: Enables the
tab: Enables the sensor
System Information
tab: View OS, ROM date,
72
Page 75

Product
OK
tab: View product,
manufacturer, language, model ID
and processor.
Owner
tab: View owner
information.
Phone Info
tab: View MEID,
MDN, IMEI, MCCID MNCID,
warranty code date, SIM ICCID
Task Manager
Microsoft My Phone
Bluetooth
Lock Key
3.12.1 Clock & Alarms
You can set up to three alarms.
Start
1. Press the
Settings
Alarms
Alarms.
Key , tap
, then tap
Clock &
to open the Clock &
2. On the Alarms tab, tap any of
the alarms to display Alarm
Settings for that alarm.
3. Tap the time, then tap arrows
to set the alarm time.
4. Tap the description box, then
enter a description for the alarm.
5. Tap the day(s) of the week for
the alarm to sound.
TIP
You are able to select any days of
the week for your alarm.
6. Tap Arrow in the Sound box,
then tap the sound to be played
at the alarm time.
7. Tap Arrow in the notification
type box, then tap how to play
the alarm alert.
Play once/ Repeat/ Repeat and
Vibrate/ Vibrate only
8. Tap when settings are
completed.
SHORTCUT
NOTE
Tap from the Today
Screen for quick access to
Clock & Alarms.
Your alarms will not be audible if
your phone is set to silent or
vibrate.
73
Page 76

Using the Today Screen
OK
[Alarm Settings]
To activate and deactivate
alarm(s)
If you want to disable an alarm,
simply turn it off by tapping the
checkbox next to it. The X is
removed, but the settings remain
allowing you to simply tap the
checkbox to reactivate later.
Dismissing an alarm
When an alarm goes off, you can
choose to Snooze or Dismiss the
alarm. When you select
the alarm will sound again
after five minutes.
Snooze
To set time
Tap
Time
in the tab bar at the top
of the screen to move to the Time
tab, then adjust the settings for
time zone, date or time.
Touch to save settings.
[Time]
74
Page 77

3.12.2 Home
OK
OK
OK
Home settings allow you to set the
appearance of your Today Screen.
1. Press the
2. On the
Settings
Start
Key , tap
, then tap
Appearance
theme to set as the background
screen.
Items
3. Tap the
tab to select items
displayed from the Today Screen
and set the timeout for the
Today Screen.
4. Tap .
3.12.3 Lock
Protect your phone from
unauthorized use by assigning
password(s) to gain access.
To Protect your Phone
Protect your phone from
unauthorized use by assigning a
type of password or a PIN (personal
identification number).
1. Press the
Settings
2. On the Password tab, tap the
checkbox
unused for
and tap the amount of time
Start
Key , tap
, tap
Lock
Prompt if device
, then tap Arrow
Home
tab, tap the
.
before a password is required.
3. Tap the arrow in the
.
Password type
Simple PIN
alphanumeric
box, then tap
or
Strong
.
4. Enter the PIN or alphanumeric
password and then enter it again
to confirm.
TIP
If your device is configured to
connect to a network, use a
strong password to help protect
network security.
4. Tap . The next time you unlock
your device, you will be prompted
to enter your password.
To Change your Password
1. Press the
Settings
Start
, then tap
Key , tap
Lock
You will be prompted to enter
your current password, then reenter it in the Confirm box.
2. Tap the Password box, enter your
new password.
4. Tap .
.
75
Page 78

Using the Today Screen
OK
3.12.4 Sounds & notifications
To Set Sounds & Notifications of
Actions
1. Press the
Settings
Notifications
2. On the
checkbox(es) to enable sounds
as you want.
3. Tap the
select notification event(s) and
corresponding ring type and tone
to alert you. Tap next to
Event
next to
type you want, then tap next
to Ring tone and tap the tone
you want.
4. Tap the Vibrations tab, tap the
checkbox to enable vibrations for
screen taps, then tap the
vibration type.
5. Tap when finished.
3.12.5 Connections
The Connections Settings menu has
additional sub-menus which provide
you with control over how your
phone uniquely connects to
network(s) and other devices.
Start
Key , tap
, then tap
Sounds
Notifications
and tap an event, tap
Ring type
Sounds &
.
tab, tap the
tab, to
and tap the
Start
1. Press the
Settings
Connections
2. Tap a Connections sub-menu.
Connections
network server connections. It has a
Ta s k s
tab and
●
The
Ta s k s
(settings cannot be modified)
My Work Network
and
connections. Tap
modem connection
VPN server connection
up my proxy server
information as necessary.
●
The
Advanced
set which networks are
automatically used (tap
Networks
Dialing Rules
(tap
exceptions for intranet (tap
Exceptions
Domain Enroll
your phone with company
resources. Tap
information as necessary.
GPRS Setting
GPRS authentication method. Tap
None, PAP Authentication or CHAP
Authentication.
Key , tap
, then tap
.
Tap to set up
Advanced
tab has
tab.
Verizon
Add a new
,
Add a new
or
Set
and enter
tab allows you to
Select
) as well as create rules
) and URL
).
Tap to connect
Enroll
and enter
Tap to select the
76
Page 79

Switch USB
Save
Tap to select USB
access during a USB connection.
ActiveSync, VZAccess
Tap
, or
Manager
The LG FATHOM
USB Mass Storage
™
can connect with
and charge through your PC with
ActiveSync, VZAccess Manager, or
USB Mass Storage.
●
When set to ActiveSync, the
phone will automatically sync
with your PC via ActiveSync.
ActiveSync must be installed on
your PC before using this
connection mode.
●
VZAccess Manager configures
your PC to use your wireless
phone as a modem. VZAccess
Manager must be installed on
your PC before using this
connection mode.
●
USB Mass Storage allows your
PC to use your phone as an
external drive.
To set your USB default connection
Start
preference, press the
Key
> Settings > Connections
> Switch USB .
Be sure to press to save
your preferences.
USB to PC
Tap to change the
advanced network functionality. Tap
the checkbox to enable or disable.
.
Wi-Fi
Tap to select or add Wi-
Fi connection. It has a
Network Adapters
and
●
The
Wireless
tab allows you to
select or add a router.
●
The
Network Adapters
allows you set and enter network
connection adapters.
Wireless Manager
manage your RF transmissions. You
can disable (and enable) all RF
functionality by tapping All
enable selectively by tapping
Bluetooth
, or
Phone
3.12.6 Personal
The Personal Settings menu has four
additional sub-menus which provide
you with control over how your
phone alerts you, usage, services,
and identification to other devices.
1. Press the
2. Tap a Personal sub-menu.
Start Key , tap
Settings , then tap Personal
.
Wireless
tab.
tab
Tap to
, or disable/
.
tab
Wi-Fi
,
77
Page 80

Using the Today Screen
Buttons
Tap to set
functionality for specific hardware
keys. It has a
Up/Down Control
and
The
Program Buttons
Program Buttons
tab
tab.
tab has a
box to select the button and a
box to select the program it will
access. Tap available selections in
the boxes to set to your
preferences.
●
The
Up/Down Control
tab allows
you to customize the Volume Keys
reaction. Touch and drag across
the slide bar for
first repeat
Long, and for
Delay before
between Short and
Repeat rate
between Slow and Fast.
Owner Information
Tap to enter
your infomation and notes. It has an
Identification
●
The
tab and
Identification
Notes
tab.
tab has boxes
to enter name, company, address
telephone, and email.
●
The
Notes
tab is a free-form text
area.
Phone
Tap to customize
settings to define how you use your
Sounds
tab,
tab,
Security
Network
Band
tab.
phone. It has a
tab,
GSM Services
CDMA Services
tab, and
tab,
●
The
Sounds
tab displays your
phone number, sound settings
and voicemail access number.
Ring type
Tap how you want to be notified
of incoming calls.
Ring / Increasing ring / Ring
once / Vibrate / Vibrate and ring
/ Vibrate then ring / None
Ring tone
Tap a ringtone in the list.
Keypad
Tap the tone length heard when
touch keys are tapped.
Long tones / Short tones / Off
●
The
Security
tab activates PIN
security features.
●
The
GSM Services
tab displays
available access services. Tap a
service in the list from your
service provider, then tap
.
Settings
Call Barring
(emergency calls
excluded)
Block incoming calls: Off / All
calls / When roaming
Block outgoing calls:
Off / All calls / International /
International except to home
country
Get
78
Page 81

NOTE
Set Networks
Find Network
Call Barring is a network
subscription service. Upon
subscription, your service
provider will give you the
password to edit these
settings.
Caller ID
Everyone: Displays your caller ID
No one: Hides your caller ID
Only to contacts: Displays your
caller ID for Contacts calls only
Call Forwarding
Forwards calls to another number.
Call Waiting
Notify me: Alerts you to waiting
calls.
Voice Mail and Text Messages
The SIM card in your phone
automatically sets your voice mail
and SMS servers by default.
Open to view settings.
NOTE
You can also view your voice
mail number on the Speed
Dial screen and in the Phone
settings Sounds tab.
Fixed Dialing
Select Fixed Dial numbers to turn
on and compile a list of numbers
that can be called from your
phone. When activated, only
numbers included in the fixed dial
list can be called from your
phone.
●
The
Network
tab displays the
current network, mode of
operation, GSM Network
selection, and preferred
networks.
NOTE
The ability to choose between
available networks can be
beneficial when traveling.
Current network
Tap to find other
available networks.
Mode of operation
CDMA Mode / GSM/UMTS
Mode / Global Mode
GSM network selection
Manual / Automatic
TIP
Manual setting can be useful when
you know that one network is less
expensive than another or that it
provides faster data transmission.
Preferred networks
Tap (retrieving
settings may take a few minutes).
Tap a network to select it, then
tap Move Up or Move Down to
reprioritize the order for network
usage.
79
Page 82

Using the Today Screen
The
CDMA Services
available call services. Tap a service
in the list from your service
provider, then tap
Answer Options
Any Key / Auto Answer with
handsfree
TTY
Full / Talk / Hear / Off
Alerts
ERI Banner: On / Off
ERI Sound: On / Off
Emergency Tone
Alert / Vibrate / Off
GPS
Location On / 911 Only
Voice Privacy
On / Off
Assisted Dialing
Enables assisted dialing for
international calls. See page 38
for details.
The
Band
tab displays frequency
channels used to access service.
tab displays
Get Settings
.
CDMA Settings
Home only / Automatic
(Automatic A/ Automatic B)
GSM/UMTS Settings
GSM Only/ UMTS Only/
GMS/ UMTS Dual
Voice Command
voice command functionality. Tap a
voice command setting in the list,
then tap the setting you want.
Tap to set
Confirmation
Automatic / Always Confirm /
Never Confirm
Sensitivity
Most Sensitive / Recommended /
Least Sensitive
Adaptation
Adapt voice to your speech
patterns.
Prompts
Mode: Prompts/ Readout +
Menu / Readout/ Tones Only
Timeout: 5 seconds/ 10 seconds
About
80
Page 83

3.12.7 System
The System Settings has additional
sub-menus which allow you to set
up the phone management
environment.
1. Press the
Settings
2. Tap a System sub-menu.
information on three tabs.
●
The
Windows Mobile Professional
information.
●
The
name and description to identify
your device to other devices.
●
The
copyright text.
illumination settings on four tabs.
●
The
backlight duration when battery
powered.
●
The
backlight duration when powered
from an external source.
Start
.
About
Tap to view device
Version
Device ID
Copyrights
Backlight
Battery power
External power
Key , tap
, then tap
System
tab displays
tab enter device
tab displays
Tap to set
tab sets the
tab sets the
●
The
Button
tab sets the
backlight duration when any
hardware key is pressed.
●
The
Brightness
tab sets the
screen brightness manually or
activates the Luminous Sensor.
Certificates
Tap to manage
certification authority on three tabs.
●
The
Personal
tab displays
personal certificates for positive
identification.
●
The
Intermediate
tab displays
intermediate certification
authorities.
●
The
Root
tab displays positive
root certification authorities.
Customer Feedback
Tap to
elect to participate in customer
feedback to Microsoft.
Encryption
Tap to encrypt files
placed on a storage card for
increased security.
Error Reporting
Tap to set the
device to report software operation
errors to Microsoft to diagnose
problems.
External GPS
Tap to set GPS
information on three tabs.
81
Page 84

Using the Today Screen
●
The
Programs
program port.
●
The
Hardware
hardware port.
●
The
Access
to manage GPS automatically.
Managed Programs
view list of installed managed
programs.
Memory
manage memory usage on two tabs.
●
The
Main
used for storage and programs.
●
The
Storage Card
memory used and memory free.
●
The
Clear Storage
phone to reset to factory default
or your custom configuration.
Power
power settings on two tabs.
●
The
Battery
battery status.
●
The
Advanced
conserving settings.
tab sets the GPS
tab sets the GPS
tab sets the device
Tap to
Tap to view and
tab displays memory
tab displays
tab sets the
Tap to view and manage
tab displays the
tab sets power
Regional Settings
Tab to set
regional information on five tabs.
Region
The
tab set region from
the drop-down list.
Number
The
tab sets your data
numbers format.
The
Currency
tab sets your data
currency format.
Time
The
The
tab sets time format.
Date
tab sets date format.
Remove Programs
Tap to
select program(s) to remove from
device memory.
Screen
Tap to set screen
responsiveness and font settings on
three tabs.
The
Alignment
tab calibrates the
screen to your touch.
The
ClearType
tab sets
ClearType to smooth font edges.
The
Text Size
tab sets text size.
82
Page 85

Sensor
Menu
End Task
Tap to set sensors on
three tabs.
Accelerometer
The
tab sets
device to automatically rotate
screen contents.
The
Luminous
tab sets light
sensor.
The
Proximity
tab sets proximity
sensor.
System Information
Tap to
view system information on four
tabs.
Version
The
tab displays OS,
ROM date, hardware, software,
PRL, and ERI.
Product
The
tab displays name,
manufacturer, language, model
ID, and processor.
Owner
The
tab displays owner
information.
The Phone Info tab displays
MEID, MDN, IMEI, MCCID
MNCID, Warranty date code, and
SIM ICCID.
Task Manager
Tap to manage
your device tasks. Tap an
application, then tap to
end the task. You can also tap Menu
to switch applications, end
all tasks, change view, change sort,
refresh, or exit Task Manager.
Wireless LAN
Tap to manage
your wireless LAN on two tabs.
Main
The
tab displays wireless
LAN information.
Station
The
tab sets status,
mode, SSID, BSSID, channel,
speed, and signal quality.
3.12.8 Bluetooth
Bluetooth enables compatible
mobile devices, peripherals, and
computers that are in close
proximity to communicate directly
with each other wirelessly. This
handset has built-in Bluetooth
connectivity, which makes it
possible to connect it with
compatible Bluetooth headsets,
computer applications, and so on.
Bluetooth QD ID B016063
●
NOTE
If you use PC Sync via
Bluetooth, you can exchange
data with your PC.
83
Page 86

Yes
Using the Today Screen
●
When you receive data from
another Bluetooth device, the
phone requests confirmation.
●
Bluetooth must be turned on to
use these features.
1. Press the
Settings
2. If Bluetooth power is set to off,
you will be prompted to turn
power on. Tap
Bluetooth.
3. There are three tabs for
Bluetooth: My Devices,
Accessories any Settings.
●
Settings
Add a device
Allows you to set up a new
Bluetooth device.
Disable Bluetooth
Turns off Bluetooth.
Advanced
Allows you to set up additional
options.
●
My Devices
Allows you to see the information
and properties of the paired
devices.
Start
Key , tap
, then tap
Bluetooth
.
Ye s
to turn on
tab
:
:
:
tab
●
Accessories
Print Images
tab
: Allows you to lay
out and print pictures from your
handset.
PC Remote Control
: Allows you
to remotely control a PC with
your device.
Business Card Exchange
: Allows
you to send and receive business
cards.
BT Send Object
send objects such as
,
Contacts, Tasks, Notes,
mail
: Allows you to
Outlook E-
Calendar Items, Audio, Ring
, and
Tones, Images
Videos
another Bluetooth device.
To make your phone Bluetooth
visible
1. Press the
Start
Key , tap
Settings , then tap Bluetooth
.
NOTE
If Bluetooth power is off, you will
be prompted to turn power on.
Tap to turn on Bluetooth.
2. Tap
Settings
in the tab bar at the
top of the screen, then tap
Discoverable
(which is the
default setting).
to a
Not
84
Page 87

3. Tap , then tap the setting you
Done
OK
Done
Yes
Done
Always Visible/ Visible for
want.
180 seconds/ Never Visible
4. Tap .
NOTE
To turn off Bluetooth capabilites
on your phone, tap Disable
Bluetooth on the Bluetooth
Settings tab.
TIP
Enter a Bluetooth phone name for
your phone. This will be the
phone name that will be shown on
another Bluetooth-enabled device
when it searches and detects your
phone. To enter a name, on the
Bluetooth screen, tap Security
and enter a device name.
Bluetooth pairing
Pairing is a Bluetooth partnership
relationship that you create
between your phone and another
Bluetooth-enabled device in order
to exchange information in a secure
manner.
To create a Bluetooth pairing
1. Press the
Settings , then tap Bluetooth
2. Tap to turn Bluetooth On,
if it is Off.
Start
Key , tap
.
Add
3. Tap
. Your phone searches
for other Bluetooth-enabled
devices and lists them.
4. Select the desired device name in
the list.
5. The handset may automatically
send a passcode to try and
autopair. Once complete, Tap
. If the handset does not
autopair, continue on to the next
step.
6. Enter, or confirm, a passcode
(typically “0000”) to establish a
secure connection, then tap .
7. Wait for the paired device to
accept the partnership. The
receiving party needs to enter
the same passcode that you
specified.
8. After the receiving party enters
the passcode, tap to
confirm the partnership.
NOTE
Creating a Bluetooth pairing
between two devices is a one-time
process. Once a pairing
partnership is created, the devices
can recognize each other and
exchange information without
entering a passcode again.
85
Page 88

Using the Today Screen
Yes
Menu
Done
Properties
Done
Next
To accept a Bluetooth pairing
1. Ensure that Bluetooth is turned
on and in visible mode.
2. Tap Yes when prompted to
establish a partnership with the
other device.
3. Enter a passcode (the same
passcode that is entered on the
device requesting pairing) to
establish a secure connection
and tap .
NOTE
Ta p Advanced tab to change the
paired device name and to set the
services you want to use for the
paired device.
4. Tap .
To change the display name of a
Bluetooth device
1. Press the
Start
Key , tap
Settings , then tap Bluetooth
.
2. Tap a Bluetooth device.
3. Tap .
4. Enter a new display name for the
Bluetooth device in the Nickname
field, then tap .
To delete a Bluetooth pairing
1. Press the
Start
Key , tap
Settings , then tap Bluetooth
.
2. Tap a Bluetooth device.
3. Tap , tap
Delete, and then
tap in the confirmation
screen.
Connecting a Bluetooth
hands-free or stereo headset
For hands-free phone conversations
or to listen to music, you can use a
Bluetooth hands-free or stereo
headset.
To connect a Bluetooth hands-free
or stereo headset
1. Make sure that both your phone
and the Bluetooth headset are
turned on and that the headset
is in visible mode. Refer to the
manufacturer’s documentation to
find out how to set the headset
in visible mode.
86
Page 89

2. Press the
Sign In
Accept
Next
Menu
Next
Start
Key , tap
Settings then, tap
Bluetooth .
Add
3. On My Devices tab, tap
.
4. Tap the name of the Bluetooth
headset, then tap . The
phone will automatically pair with
the Bluetooth headset.
Windows Mobile will automatically
try one of the preconfigured
passcodes (0000, 1111, 8888,
1234) to pair the Bluetooth headset
with the phone. If this fails, you have
to manually enter the passcode
delivered with your headset.
NOTE
If the Bluetooth stereo headset
becomes disconnected, turn the
headset on and repeat steps 1 to
3 above, then select the stereo
headset. Tap , then tap
Set as Wireless Stereo.
3.12.9 Microsoft My Phone
Microsoft My Phone allows you to
synchronize your phone's contacts,
calendar, tasks, text messages, music,
photos, videos and other documents
with your My Phone account at
http://myphone.microsoft.com. You
can configure this service on your
phone using the Settings tab of
Microsoft My Phone.
1. Press the
Start
Key , scroll
the screen up, then tap
Microsoft My Phone
.
or
Start
Press the
Settings
My Phone
Key , tap
,then tap
.
Microsoft
2. Tap .
3. Tap the Privacy Statement and
Service Agreement links, review
these documents, then tap
.
4. Tap the sign in box and enter
your Windows Live ID.
5. Tap the password box and enter
your password in the password
box, then tap .
3.13 Bing
The Bing search application
provides Verizon Wireless
subscribers with a superior,
comprehensive mobile search
experience that includes highly
relevant search results from top
quality content sources, locationbased results and local points of
interest.
87
Page 90

Using the Today Screen
Speak
Accept
Access and Use
1. Press the
Start
Key , then
tap Bing .
NOTE
Standard mobile rates apply.
Check with your service provider
for details.
2. Read the screen, then tap
.
3. Start your search.
●
Tap the search field, begin
entering search text, then tap the
search result you want to view.
●
Tap , say what you want
to find, then tap the search
button.
TIP
Search results are based on your
location (displayed at the top of
the screen). Tap Change location
to change the location and
receive search results for the area
you want.
3.14 RSS Viewer
RSS Viewer is an RSS reader that
keeps you up-to-date with the
latest news from the Internet. It
monitors Internet news channels
and downloads the most current
news updates and podcasts so you
are instantly informed of breaking
news and events. For more
88
information and tips on using RSS
Viewer, see Help on your phone.
NOTE
Make sure you have an active
Internet connection (such as WiFi or a data connection) before
using RSS Viewer.
Subscribing to and organizing
news channels
You must subscribe to news
channels before you can receive
RSS feeds.
To subscribe to news channels
1. Press the
2. Tap Channels and a
Start
Key , then
RSS Viewer .
tap
list of RSS channels is displayed.
Page 91

3. Tap the channels you want to
Set
Done
subscribe to, then tap New
in the task bar.
4. Select the check boxes of the
RSS channels you want to
subscribe to, then tap Done
.
TIP
Channels are grouped by
categories. If you want to select
all channels in a category, tap the
category check box.
5. The channel list appears. Tap
Refresh
to update the channels.
3.15 Alarms
You can set up to three alarms that
activate or deactivate with a simple
tap. See page 73 for details.
SHORTCUTS
There are two shortcuts to the
Clock and Alarms panel. Tap Set
in the Options taskbar
from the Today Screen, or tap the
Clock standby panel from the
Today Screen.
1. Press the
tap
2. Tap an alarm to display the Alarm
Settings, then tap fields and
enter information as necessary.
Alarms
Start
Key , then
.
To activate and deactivate
alarm(s)
If your schedule changes temporarily,
disable a set alarm simply by tapping
the checkbox next to it. The X is
removed, but the settings remain
allowing you to simply tap the
checkbox to reactivate later.
When an alarm sounds
When an alarm goes off, you can
choose to Snooze or Dismiss the
alarm. When you touch and drag
Snooze
the alarm will sound
again after five minutes.
3.16 Calendar
Use Calendar to schedule
appointments, including meetings
and other events. If you use
Outlook on your PC, you can
synchronize appointments between
your phone and PC.
SHORTCUT
Double-tap calendar from the
Today Screen.
Creating an appointment
1. Press the
Start
Key , scroll
the screen up, then tap
.
Calendar
89
Page 92

Using the Today Screen
OK
OK
2. Tap the current date at the top
of the screen to display the
current month.
TIP
Tap the arrow icons to move to
the next/previous dates or tap
Today to return to the
current date.
3. Tap Options , then tap
Appointment
.
New
4. Enter appointment information.
Subject
: Manually enter using
the keyboard or tap Arrow ,
then tap one of the listed
subjects.
Location
: Manually enter using
the keyboard or tap Arrow ,
then tap one of the listed
locations (based on previous
entered locations).
Starts
: Manually enter the
appointment time or tap Arrow
and tap the time to set.
Ends
: Manually enter the time or
tap Arrow and tap the time
to set.
All Day
: Tap
Ye s
or No.
Occurs
: Tap the appointment
recurrance.
Reminder
me
: Tap
None
or
Remind
. If Remind me is selected,
enter when to remind you.
Categories
Business/ Holiday/ Personal
(
Seasonal
Attendees
: Tap checkbox
/
), then tap .
: Tap
or
then add
attendees as necessary.
Status
: Tap
Free, Tentative,
or
Out of Office
Busy,
Sensitivity
: Tap
Personal, Private
Confidential
.
Normal
or
.
,
5. When the appointment settings
are complete, tap .
NOTE
All-day events do not occupy
blocks of time in Calendar;
instead, they appear in banners at
the top when viewing the day's
agenda.
Viewing your appointments
View your schedule in Day, Agenda,
Week, Month, or Year view.
1. Press the
Start
Key , scroll
the screen up, then tap
.
Calendar
90
Page 93

2. Tap in the Options task bar,
OK
OK
and your day's appointments are
listed. Tap to change to the next
appointment view (each tap
changes to the next view).
Sending meeting requests and
appointments
You can send meeting requests via
e-mail to persons that use Outlook
or Outlook Mobile. You can also
send a calendar appointment to
another phone using MMS.
To send a meeting request
1. Press the
Start
Key , scroll the
screen up, then tap
Calendar
2. Schedule a new appointment (or
open an existing appointment)
scroll down to Attendees tap
Attendees
. Tap
3. Tap the contact(s) you want to
send the meeting request to and
tap .
NOTE
Only contacts that contain email
addresses can be selected as
attendees.
4. On the New Appointment screen,
tap . The meeting request is
sent out.
NOTES
•
You can only specify if an
attendee is required or optional
if your phone is connected to a
Microsoft Exchange Server 2007
or later. Otherwise, all attendees
are designated as required. For
more information, see Chapter 7.
• To remove an attendee from the
list, select the attendee and tap
Options , then tap Remove
Attendee.
• When attendees accept your
meeting request, the meeting is
automatically added to their
schedules. When their response
.
is sent back to you, your
calendar is updated as well.
No
or
.
91
Page 94

Using the Today Screen
OK
3.17 Tasks
Use Tasks to keep track of things
you need to do.
To create a task
1. Press the
2. Tap
3. Enter task details including
4. When finished, tap .
NOTES
To manage your Tasks list
1. Press the
Start
Key , scroll
, then tap
Tasks
New
the screen up, then tap
Menu
.
Ta s k
Priority, Status, Starts, Due,
Occurs, Reminder, Categories,
and Sensitivity.
• You can synchronize information
on your phone with your PC to
keep your task list up to date in
both locations.
• If you create a new task with a
reminder on your PC and then
synchronize tasks with your
phone, the reminder will play at
the time that was set on your
PC.
Start
Key , scroll
the screen up, then tap
Ta s k s
.
2. Tap Options to access task
management options.
New Task
: Starts a new task
entry.
Delete Task
: Deletes the selected
task.
.
Edit
: Allows edits.
Options
: Enables reminders and
shows dates and Task entry bar
on the Tasks panel.
Sort By
: Sorts by Status, Priority,
Subject, Start Date, or Due Date.
Filter
: Filters list view to include
either active or completed tasks
plus shows All Tasks or selected
task categories.
Send via Bluetooth
to send a task via Bluetooth
Send as vCalendar
: Starts
message (video or picture) with
task attached.
To mark a task as completed
1. Press the
Start
Key , scroll
the screen up, then tap
.
2. Tap the checkbox next to the
: Allows you
®
.
Tasks
92
Page 95

task to mark it as completed (tap
Send
OK
again to unmark).
3.18 Notes
Notes helps you to quickly capture
thoughts, questions, reminders, todo lists, and meeting notes. You can
create handwritten and typed notes,
record voice notes, convert
handwritten notes to text for easy
readability, and send notes to others.
1. Press the
the screen up, then tap
Entering Information in Notes
You can enter typed text by using
the on-screen keyboard or
Start
Key , scroll
Notes
.
handwriting recognition software.
You can also use the stylus which is
attached on the back side of the
device to write or draw directly on
the screen. Tap Options in the
Options taskbar, then tap
Recording Toolbar
View
to record sound
directly on your note.
1. Press the
2. Tap
Start
Key , scroll
the screen up, then tap
New Note
to write a
Notes
new note.
Tap Keyboard , type the note,
3.
then tap .
Managing Note entries
1. Access Notepad and tap an entry.
2. Tap Options .
●
Erase a note
Tools
, tap
Delete
Tap
Ye s
.
●
Rename or move a note
Tools
, tap
Tap
, then tap
Rename/Move
,
then enter changes as necessary.
●
Send a note
Tools
, tap
Send
Tap
, then
complete message fields as
necessary and tap .
.
93
Page 96

Using the Today Screen
Note file storage
You can file your Notes into specific
file folders for easy organization and
retrieval. To select a file folder to
All Folders
view, tap
left corner of the screen, then tap
the file folder to open.
To change how your Notes are
sorted, tap
right corner of the screen, then tap
how you want to sort your notes.
Name
in the upper-
in the upper-
3.19 File Explorer
The File Explorer application allows
you to open an explorer window
similar to a desktop Windows based
system. The explorer window allows
you to navigate through your phone
to locate and manage desired
folders and files.
The file structure starts with
location (phone memory or storage
card memory), then lists category
folders. Within the category folders
are sub-folders and/or documents.
Start
1. Press the
the screen up, then tap
Explorer
2. Tap a file folder from those listed,
then tap the folders (or file) you
want.
94
Key , scroll
File
.
To change the current location
Tap the current folder in the
upper left corner of the LCD,
then tap a folder from the dropdown menu.
Page 97

To manage your files
OK
Menu
Menu
Menu
Tap , then tap
New Folder
to create a new folder, tap
Rename
to change the name of
the highlighted item, folder, tap
Delete
to delete the highlighted
item, folder, or tap
Edit
(cut, paste, and more) the
highlighted item.
To manage the file list
Tap , then tap
refresh the list, tap
Refresh
Sort By
change how the list is sorted.
To open a file on a network
Tap , tap
Open Path
, tap
Go To
, tap
New Path
the new path, then tap .
TIP
Tap and hold a file to bring up a
pop-up menu with options to cut,
copy, rename, delete, send, or set
as Home background.
to edit
to
, enter
3.20 Office Mobile
Microsoft®Office Mobile consists of
four applications that let you create,
view, and edit Microsoft documents.
These four applications are:
●
Microsoft®Office Word Mobile:
view and edit Microsoft Word
documents and text files.
●
Microsoft®Office Excel®Mobile:
use Microsoft Excel worksheets.
to
●
Microsoft®Office PowerPoint
Mobile: view Microsoft
PowerPoint slides.
●
Microsoft®Office OneNote
Mobile: lets you easily create
notes with audio and images.
To use Microsoft Office Mobile
1. Press the
2. Tap the Office Mobile application
Start
Key , scroll
the screen up, then tap
Mobile
.
that you want to use.
®
®
Office
95
Page 98

Using the Today Screen
OK
Menu
Menu
OK
Menu
NOTE
Word Mobile and Excel Mobile do
not fully support some features of
®
Microsoft
Microsoft
Microsoft Mobile document
formats
By default, Word Mobile saves
documents in .docx format, while
Excel Mobile saves workbooks in
.xlsx format. If you want to open
these file types on a computer that
uses Microsoft Office 2000, Office
XP, or Office 2003, you may need
to download and install the File
Format Converter in your computer.
You can find this converter at
http://www.microsoft.com/downloa
ds/details.aspx?FamilyId=941B3470
-3AE9-4AEE-8F43-
C6BB74CD1466&displaylang=en.
Changing document format on
your device
To save a Word Mobile file in a
different format, tap , tap
Tools
, tap
template arrow , tap
2003 Document (.doc)
.
®
Options
Office Word and
Office Excel®.
, tap Default
Word 97-
, then tap
NOTE
If no document is opened, tap
, then tap Options to
access the Default template
settings.
To save Excel Mobile workbooks in
the .xls format, start Excel Mobile,
but do not open a workbook. Tap
Options
, tap
, tap
for new workbook
97-2003 Workbook
Template
, tap
Blank
, then tap .
3.21 Pictures & Videos
Pictures & Videos allows you to
view and manage media files on
your phone.
SHORTCUT
Double-tap pictures from the
Today Screen to view picture files.
To view media files
1. Press the
2. Tap a media file to view or play
Start
Key , scroll
the screen up, then tap
& Videos
.
back the file.
Pictures
96
Page 99

TIP
Menu
Menu
Rotate
Menu
You can make minor touch ups to
the picture such as rotate, crop,
and auto correct. View a file, tap
, then tap Edit. To rotate,
tap . To crop or auto
correct, tap again, then
tap Crop or Auto Correct.
NOTE
If you cannot find the media file
in the default My Pictures folder,
tap My Pictures at the top left
side of the screen, tap My
Device, then browse the folders.
Picture and Video files
There are a number of things you
can do with your picture and video
files beyond simple viewing. You can
send the selected file, beam it to
another device, or play a slide show.
1. Press the
the screen up, then tap
& Videos
Start
Key , scroll
.
Pictures
2. Highlight a media file, then tap
.
NOTE
The available menu options
depend on the selected media
file.
Send the media file
Tap
Send
, tap the account to use,
then complete the fields as
necessary to send the message or
email.
Manage your media file(s)
●
Tap
Delete
, then tap
●
Tap
Edit
, then tap
●
Tap
Go To
to jump to another
Cut
Ye s
or
.
Copy
file area, such as My Device.
Using Pictures
●
Tap
Save to Contact
, then tap
the contact you want to set with
with the picture.
●
Tap
Play Slide Show
. To display
control buttons to rotate, play,
pause, rewind, fast-forward, or
exit, tap the screen.
●
Tap
Set as Home Background
tap the percent of transparency,
then tap [ok graphic].
File tools
●
Tap
Tools
, then tap
Properties
to view the detail properties of
the selected file.
.
,
97
Page 100

Using the Today Screen
●
Tap
Tools
, then tap
change the sort to Name, Date
or Size.
●
Tap
Tools
, then tap
customize picture settings and
slideshow playback preferences.
TIP
Tap and hold a file to display a
pop-up menu for that file to cut,
copy, delete, send, or set as
Home Background.
To copy a picture or video clip to
your phone
You can copy pictures and video
files from your PC to the My
Pictures folder on your phone, and
then view them on your phone. For
more information about copying
files from your PC to your phone,
see Windows Mobile Device Center
or ActiveSync Help on your PC.
NOTE
You can also copy pictures and
video files from your PC to your
phone using a storage card. Install
the storage card to your phone,
and then copy them from your PC
to the folder you created on the
storage card.
Sort By
Options
to
to
3.22 Windows Media
You can use Microsoft Windows
Media Player 10 Mobile for Pocket
PC to play digital audio and video
files that are stored on your device
or on a network, such as on a Web
site.
Using Windows Media Player, you
can play both audio and video files.
The following file formats are
supported by this version of
Windows Media Player: WAV, WMA,
WMV, MP3, MIDI, AAC, MP4 and
more.
Start
1. Press the
the screen up, then tap
Media
Playback Screen
The Playback screen displays the
playback controls (such as Play,
Pause, Next, Previous, and Volume),
album art window, and video
window. You can change the
appearance of the default Playback
screen by choosing a different skin.
Key , scroll
Windows
.
98
 Loading...