

Page 1

Service
Guide
Guía de Servicio
MBM63939601 (1.0)
This booklet is made from 60% post-consumer recycled paper.
This booklet is printed with soy ink.
© 2013 Verizon Wireless. All Rights Reserved.
© 2013 Verizon Wireless. All Rights Reserved. Todos los derechos reservados.
Todos los derechos reservados.
Printed in Mexico
MW
Page 2

Getting Started
This guide will make things easy by providing you with information on
making payments, included features, services, managing your account,
and much more.
If you haven’t activated your phone, follow the instructions
in the Activation Guide.
READ THIS FIRST
START HERE TO
ACT IVATE SERVICE
1. Install battery, turn on phone and select your
language.
2. Press ACTIVATE and listen for instructions.
3. Enter your zip code and confirm your plan when
prompted.
4. Write down your phone number and account
security code.
5. Make a payment to begin using your device.
6. Follow the Setup Wizard to customize your
device.
7. Register for My Verizon, go to
verizonwireless.com/myverizon.
NOTE: Once the activation is complete, fully
charge your device.
Need More Help?
If you have a question, or you can’t find what you´re looking for in here,
check out verizonwireless.com.
1
Page 3
For existing customers with active prepaid service.
$
30
Talk • Text • Web • Email
•
Apps
•
Games
Tones
•
Music
•
Mobile Broadband
REFILL CARD
$
30
PREPAID
For existing customers with active prepaid service.
$
60
Talk • Text • Web • Email
•
Apps
•
Games
Tones
•
Music
•
Mobile Broadband
REFILL CARD
$
60
PREPAID
For existing customers with active prepaid service.
$
70
Talk • Text • Web • Email
•
Apps
•
Games
Tones
•
Music
•
Mobile Broadband
REFILL CARD
$
70
PREPAID
Make a Payment
Have Your Credit, Debit or Verizon Wireless Refill Card Handy So You
Can Make a Payment.
1. My Verizon
Control how and when you make payments.
• Sign up for Auto Pay
• Use your credit/debit card
• Add a Refill Card/PIN
From Your Phone—Select My Verizon Mobile
My Verizon.* Visit us online at verizonwireless.com/myverizon
or tap and then dial .
2. Customer Service
Tap and then dial from your
Verizon Wireless phone.
3. At a Store
Visit a Verizon Wireless Communications Store or any of our
participating agents or retailers.
4. Auto Pay
Make automatic payments with your major debit or credit card.†
Pay by the day of the month or by low balance.
† Visa, MasterCard, American Express or Discover accepted.
Refill Rates and Expiration
(once applied to the account)
$15–$29.99 30 days
$30–$74.99 90 days
$75–$99.99 180 days
$100 and above 365 days
to launch
Cards sold separately.
*Compatible phone required.
2
Page 4
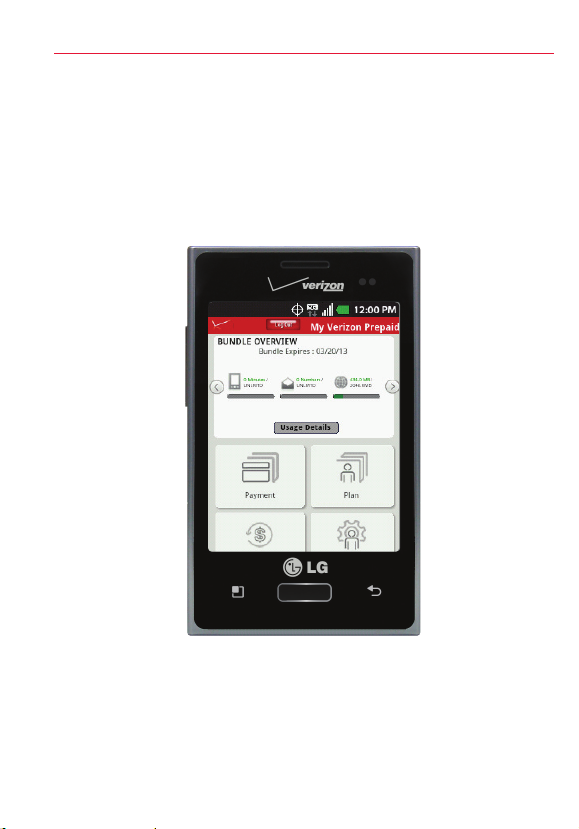
My Verizon*
On Your Phone
Now you can manage your account from the palm of your hand.
• Check your balance, usage and expiration
• Make payments or find payment locations
• Add or remove features
• Change your password and more
*Compatible phone required. For automated account information, dial * 611 from your wireless
phone or dial 1-888-294-6804 from a landline phone.
NOTE: Voice announcements that contain important service updates cannot be skipped.
3
Page 5
Optional Services
Text Messaging*—Unlimited with payment of Monthly Access fee.
If your balance is less than your plan’s monthly access, pay 20¢ per
message sent (per recipient) or received.
1. From the Home screen, tap
where you can create a new message or open an ongoing message
thread.
2. Tap New message to start a new message.
3. Enter the contact’s name or number in the To field, then type your
message in the text field.
4. After you complete your message, tap
Messages to participating networks in Canada, Mexico and Puerto Rico
are charged at domestic rates.
Picture & Video Messaging*—Unlimited with payment of Monthly
access fee. If your balance is less than your plan’s monthly access, pay
25¢ per message sent (per recipient) or received.
Take pictures or videos and send them to almost any email address, or to
other phones.
1. From the Home screen, tap
2. Enter the contact’s name or number in the To field, then type your
message in the text field.
3. Tap
and select the type of file you want to attach.
4. Browse for the desired attachment and select it.
5. Tap
to send the message.
. The Messaging screen will open,
to send it.
> New message.
*Additional and Unlimited Texting applies when sending and receiving (i) Instant Messages,
Text Alerts and Picture Messaging Portal Messages; (ii) messages with non-Ve rizon Wireless
customers in the U.S. or participating networks in Canada, Mexico and Puerto Rico; or (iii)
via email. Unlimited Texting also includes Mobile to Mobile Messages with Verizon Wireless
Customers. For Additional Tex ts, overage messaging rates default to those of your Calling Plan.
Premium Messaging programs, International Messaging and International Roaming not included.
Compatible device required for text, picture and/or video messaging. Data charges will apply for
sending and receiving picture and video messages.
4
Page 6
Included Features
• Voice Mail
To setup or retrieve, dial *86 from your device.
• Domestic Long Distance
• Domestic Roaming
20¢ per minute. This includes airtime and nationwide long distance.
• 411® Search
Directory Assistance and more. $1.99 per call plus airtime.
• Caller ID
• Caller ID Blocking
Dial
67 before the number you’re calling.
*
• Call Waiting
While on a call, tap Answer
• 3-Way Calling
While on a call, tap the Menu Key
number, then tap . Tap Merge calls to connect all parties.
to answer the new call.
, select Add call , enter the
Voice mail may not be available in some areas. Voice mailboxes not set up within 45 days will be
canceled. Follow the setup tutorial to password-protect your Verizon Wireless Voice Mailbox.
Airtime and other charges are incurred when using voice mail from your wireless phone. Mobile to
Mobile Calling minutes do not apply to voice mail retrievals; you will be charged to maintain your
connection to voice mail. Verizon Wireless is not responsible for missed messages or deletions of
messages from your voice mailbox, even if you have saved them.
5
Page 7

International Services
International Calling
Anytime Minute rate plus the following international surcharges:
• 10¢/min. to Mexico landline numbers
• 29¢/min. to Mexico wireless numbers, Canada, Guam, U.S. Virgin
Islands and Northern Mariana Islands
• $1.49/min. to other available locations
International Text Messaging
• 25¢ per message, per address sent
• Messages received are billed according to your Calling Plan
International Picture and Video Messaging
• 50¢ per message, per address sent
• 25¢ per message received
For further information, as well as latest available services, location
and rates, including International Roaming, visit verizonwireless.com/
prepaidglobal.
Locations and rates subject to change without notice. While roaming internationally, you may
be prompted to dial the phone number you are calling twice. Unlimited Calling, Text Bundles and
Unlimited Night, Weekend, Mobile to Mobile and Anytime Minutes do not apply to International
Services. International Roaming Coverage only available on participating network s and is not
guaranteed. Data services and features not available when roaming.
6
Page 8

Phone Features
Speaker
Quick Keys
Menu Key
Home Key
WARNING! Please use only an approved charging accessory to charge your device. Improper
handling of the USB/Charger Port, as well as the use of an incompatible charger, may cause
damage to your device and void the warranty.
Back Key
Power/ Lock Key
Stereo Earphone
Jack
Rear Camera Lens
Volume Keys
USB/ Charger Port
7
Page 9
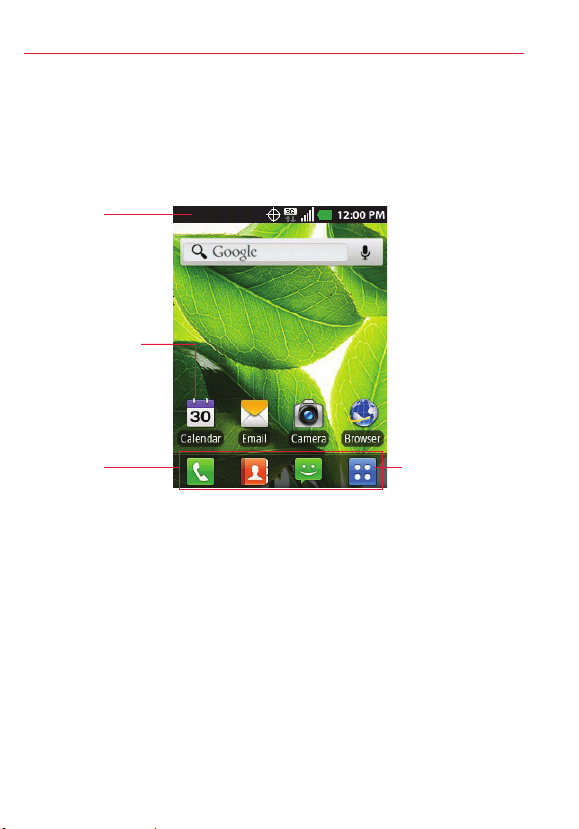
Home Screen
The Home screen is your starting point to access all of the features on
your phone. It displays application shortcuts, icons, widgets, and other
features.
Status Bar
Shows device
status in formation,
including the time,
signal st rength,
batte ry status, and
notification icons .
Applica tion Icon
Tap an icon to open
the application and
use it.
Quick Keys
Provide easy, one-tap
access to the pho ne
functions used most
often .
NOTE: Screen image and icons are simulated. Actual display may vary. Instructions in this guide
may change depending on the software version on your device. All procedures begin with the
phone unlocked and from the Home Screen unless otherwise stated.
Applica tions Key
Tap to open the
Applications
screen to view all
of your installed
applications.
8
Page 10

Touch Screen Tips
There are several touch motions recognized by the phone:
• Touch or tap—A single finger tap selects an item. For example,
tap an icon(e.g., application or menu item), tap words (e.g., menu
selection or to answer an on-screen question), or tap letters and
numbers to type.
• Tap and hold—Tap and hold an item on the screen by tapping it and
not lifting your finger until an action occurs. For example, to open a
Context menu for customizing the Home screen, tap a call log entry
until the Context menu appears.
• Drag—Tap and hold an item for a moment and then, without lifting
your finger, move your finger on the screen until you reach the target
position. You can drag items on the Home screen to reposition them
and drag the Status Bar downward to open the Notifications panel.
• Swipe or slide—Move your finger quickly across the surface of
the screen, without pausing when you first tap it (so you don’t drag
an item instead). For example, you can slide the screen up or down
to scroll a list, or browse through the different Home screens by
swiping from left to right (and vice versa).
• Double-tap—Double-tap to zoom a web page or a map. For
example, quickly double-tap a section of a web page to zoom in
or out on that section to fit the width of the screen. You can also
double-tap to control the zoom in Maps and in other applications.
• Pinch-to-Zoom—Use your index finger and thumb in a pinch or
spread motion to zoom in or out when using the Browser, a map, or
pictures. This motion can also be used to expand or compress the
Applications screen items. It also changes the Home screen to mini
canvas view.
9
Page 11
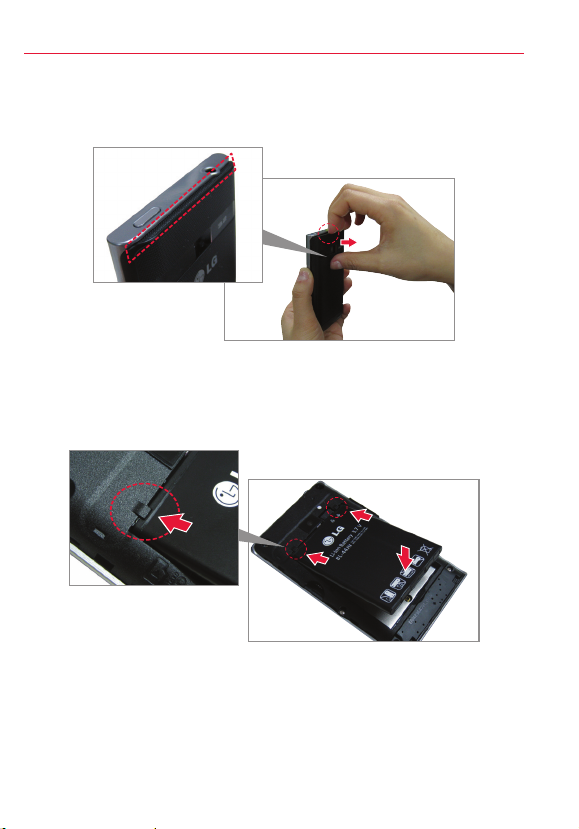
Setting Up Your Device
Step1. Remove the Back Cover
Place your fingertips under the ledge at the top of phone and gently lift
back to remove.
Step2. Insert the Battery
Insert the battery by aligning the gold contacts on the phone and the
battery. Then press it downwards to lock it in place.
10
Page 12
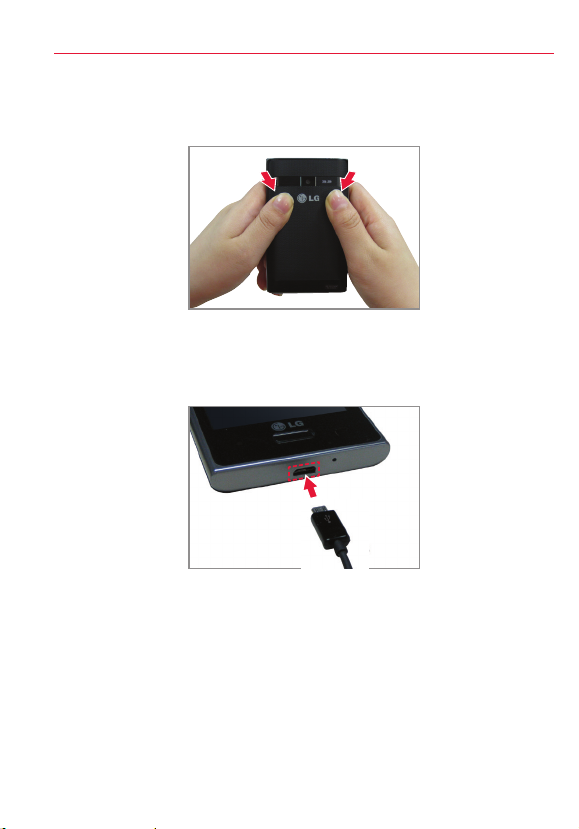
Step3. Replace the Back Cover
Align the back cover over the battery compartment and press it down
until it locks into place.
Step4. Charge the phone
Before turning on your phone, charge it fully. Be sure to use the charger
that came with your phone.
11
Page 13
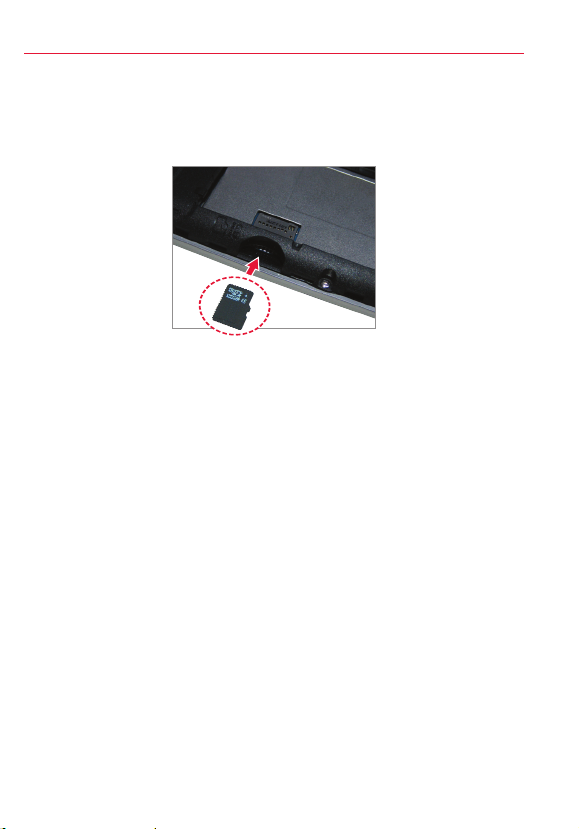
Inserting the microSD Card
If you have a microSD Card, slide the microSD card into the microSD card
slot, located under the Back Cover.
NOTE: The microSD c ard is sold separately .
Removing the microSD Card
1. Remove the back cover and locate the microSD card slot.
2. Gently pull the microSD card out to remove it.
12
Page 14
Follow the on-screen instructions to quickly set up your phone and email
accounts, and to sign in to social networking sites.
For more information visit verizonwireless.com/smartphones. Click
Smartphone Support tab and select your phone.
Powering On/Off
It’s important to fully charge the battery before turning on your phone.
1. To turn on the phone, press and hold the Power/Lock Key
couple of seconds until the screen lights up.
2. To turn off the phone, press and hold the Power/Lock Key
until the Phone options menu is displayed. Then tap Power off >
OK.
• If your screen turns off, press the Power/Lock Key
back on.
Locking/Unlocking Screen
1. Press the Power/Lock Key . Your Lock Screen will appear.
2. Slide the screen up to unlock it.
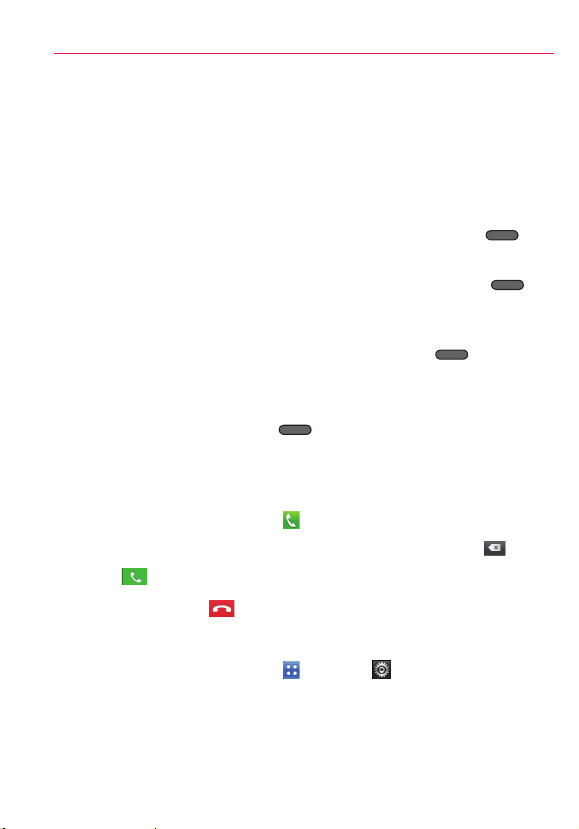
Making a Call
1. From the Home screen, tap
2. Enter the number using the keypad. To delete a digit, tap
3. Tap
4. To end a call, tap
Ringtones
1. From the Home screen, tap
2. On the Incoming calls section, tap Phone ringtone.
3. Tap the ringtone to select it and listen to it. Tap OK to save the
to make a call.
.
desired tone.
to open the dial pad.
> Settings > Sound.
for a
to turn it
.
13
Page 15

Bluetooth®
1. From the Home screen, tap > Settings > Wireless & networks.
2. Tap Bluetooth
to turn the function on or off.
3. Tap Bluetooth settings, then Scan for devices to search for and
display information about nearby Bluetooth devices.
4. Tap the name of the device you want to pair with your phone.
NOTE: Depending on the type of device you are pairing with, you will be asked to ent er a passkey,
confirm matc hing passkeys, or the devi ce will automaticall y pair.
Setting Up Your Google Account
Create or sign in to your Google account. Now your Gmail, Google
contacts, and Google calendar events can all be loaded to your phone
automatically.
1. From the Home screen, tap
> Settings > Accounts & sync >
Add account > Google.
2. Tap Next, then tap Sign in to add an existing account or Create to
create a new account.
3. Enter the necessary information and tap Sign in.
Record your Google account information. Please keep this document in
a safe place.
Username: @gmail.com
Password:
14
Page 16

Setting Up Other Email Accounts
1. From the Home screen, tap
> Email , then select the email
service provider.
2. Enter your email address and password and any other necessary
login credentials.
Set Up Voice Mail
From the Home screen, tap
. Dial *86 (*VM) and tap . Follow the
setup tutorial.
Access Voice Mail
From your phone—Dial *86 and tap . When you hear the greeting,
press # to interrupt. Follow the prompts.
From any phone—Dial your wireless number. When you hear the
greeting, press # to interrupt. Follow the prompts.
NOTE: Voice mailboxes not set up within 45 days will be canceled. Your voice mailbox is not
password protected until you create a password by following the setup tutorial.
15
Page 17

Apps & More
Play it up with music, ringtones, wallpapers, apps and games. Keep up
with Twitter™ and Facebook. We’ve got apps that help you do it all. For
details and pricing, go to verizonwireless.com.
Data charges may apply.
Installing Apps
More than hundreds of thousands of apps are available for download
from Google Play.™ From the Home screen, tap
access the Google Play™ Store.
Web Browsing
Take the Internet with you on the go. From the Home screen, tap
Browser
.
Location Based Services
This phone can determine its location, which is useful for services such
as navigation, shopping and weather. For your safety, it’s defaulted to
only acquire your location when you dial 911. To use Location Based
Services, from the Home screen, tap > Settings > Location &
security.
Your wireless device can determine its (and your) physical, geographical location (“Location
Information”) and can associate Location Information with other data. Additionally, certain
applications, services and programs are capable of accessing, collecting, storing and using
Location Information and disclosing Location Information to others. You should use caution
when determining whether or not Location Information should be made available to others and
you should review any applicable third party policies before providing access. To limit potential
unauthorized access to your Location Information, Verizon Wireless offers various mechanisms
and settings to manage access to location data. By enabling location settings you are permitting
third party access to Location Information through software, widgets or peripheral components
you choose to download, add or attach to your wireless device or through web access, messaging
capabilities or other means and you are authorizing Verizon Wireless to collect, use and disclose
your Location Information as appropriate to provide you with any location services that you
enabled.
16
> Play Store to
Page 18

Recycle Your Old Device
With the Verizon Wireless Trade-In Program, you may be eligible to
trade in your old device for a Verizon Wireless gift card that can be used
to purchase equipment or accessories. Visit www.trade-in.vzw.com.
HopeLine®
With HopeLine you can donate your old phone to support domestic
violence victims and survivors. Simply drop off your old phone at your
local Verizon Wireless store, or check your shipment to see if you
received a HopeLine bag with instructions. Your state may also provide
recycling options and requirements for your device. If so, additional
information can be found by visiting the state website or calling the
phone number identified at the bottom of your receipt on the enclosed
Electronic Device Recycling sheet.
NOTE: If you are a business customer, please check with your company prior to donating or trading
in your old company -owned phone.
17
Page 19

Assistance
Warranty Replacements
If you’re having a problem with your wireless device, just contact Verizon
Wireless toll-free at 1-866-406-5154 from a landline phone. We’ll
diagnose the issue with you right over the phone. If we can’t resolve
the problem while you’re on the line and the problem is caused by a
manufacturing defect within the first year you own the device, we’ll
send you a Certified Like-New Replacement (either a like unit or one of
comparable quality) right to your door.
Assistive Communication Devices
TTY (Text Telephony) and TDD (Telecommunications Device for the
Deaf) allow individuals who are deaf, hard of hearing, or have speech or
language disabilities to communicate by telephone.
When a user types his or her conversation on a TTY keyboard, it is
transmitted as tones through the telephone. Tones are received by the
other person’s TTY, translated into text and displayed on the screen. In
order to use the TTY network, you must have a TTY-compatible phone
and be in the TTY mode to place or receive calls. Note that most digital
wireless devices are TTY-compatible.
18
Page 20

Important Customer Information
Data Charges and Location Based Services
Verizon Wireless charges you for all data and content sent or received
using our network (including any network overhead and/or Internet
Protocol overhead associated with content sent or received), as well
as resolution of Internet Protocol addresses from domain names.
Sending or receiving data using a virtual private network (VPN) involves
additional VPN overhead for which you will be charged. Please note that
certain applications or widgets periodically send and receive data in
the background, without any action by the user, and you will be billed for
such data use. Periodically Verizon Wireless may send you updates to
your software. You will also be charged for the data associated to these
updates.
Many services and applications offered through your device may
be provided by third parties. Before you use, link to or download a
service provided by a third party, or an application such as a non–
Verizon Wireless location-based GPS-type service, chat room,
marketplace or social network from your device, you should review
the terms of such service or application and applicable privacy policy.
Personal information you submit may be read, collected or used by the
service or application provider and/or other users of those forums.
Verizon Wireless is not responsible for any information, content
or services you access, download or use from the Internet. You
are responsible for maintaining virus and other Internet security
protections when accessing service. For additional information, visit the
Verizon Content Policy at responsibility.verizon.com/contentpolicy.
Your Verizon Wireless customer agreement terms and conditions
and certain other specifically identified terms govern your use of any
Verizon Wireless products and services.
The services described in this brochure are only for your personal use.
They are subject to the Customer Agreement, your Calling Plan, the
Verizon Wireless Privacy Principles and Internet Privacy Policy (both of
which can be viewed at verizonwireless.com) and the following terms
and conditions, as applicable.
19
Page 21

Prepaid Calling Plans
If you want to change from prepaid service to postpay service, any
remaining funds in your account will be credited to your postpay
account. We can’t give you any credit for transaction taxes you may
have paid when depositing funds into your account, so you could end up
paying the same taxes twice.
Your balance may not exceed $1,000 and you may be prevented from
making payments to your account if it reaches $1,000. Cash applied to
your account through Verizon Wireless’ Bill Payment Kiosks will have
taxes deducted from the total amount entered at the applicable rate.
Minimum payment is $15; maximum payment is $600. When paying
with a credit card maximum is $250. You may replenish up to 10 times
or $600 in a rolling 30-day period. Transaction fees may apply for some
methods of payment.
Verizon Wireless Prepaid
If you are on a Prepaid Monthly Plan, you must have a sufficient account
balance at the time of renewal to cover the Monthly Access in order
to receive your plan benefits. Monthly Access will be charged on the
same date each month, unless you have insufficient funds to cover the
Monthly Access.
Some Verizon Wireless services and features, including Verizon (Video
and Mobile TV), Extended Warranty, Wireless Phone Protection,
Total Equipment Coverage, Roadside Assistance, Detailed Billing and
Premium and Visual Voice Mail are not available with the Prepaid Calling
Plans.
411 Search: When outside the Verizon Wireless Prepaid Rate and
Coverage Area, 411 Search rates, automatic connection and enhanced
services may vary. For connected calls, the part of the call that occurs
prior to connection may be billed at a different rate than the part of
the call that occurs after connection. Additional toll and long distance
charges may apply.
20
Page 22

Hearing Aid Compatibility Information
This phone has been tested and rated for use with hearing aids for some
of the wireless technologies that it uses. However, there may be some
newer wireless technologies used in this phone that have not been
tested yet for use with hearing aids. It is important to try the different
features of this phone thoroughly and in different locations, using your
hearing aid or cochlear implant, to determine if you hear any interfering
noise. Consult your service provider or the manufacturer of this phone
for information on hearing aid compatibility. If you have questions about
return or exchange policies, consult your service provider or phone
retailer.
21
Page 23

Para comenzar
Para facilitar las cosas, esta guía te ofrecerá información sobre cómo
hacer pagos, sobre funciones y servicios incluidos, información para
administrar tu cuenta y mucho más.
Si aún no has activado tu teléfono, sigue las instrucciones de
la Guía de Activación.
LEE ESTO PRIMERO
COMIENZA AQUÍ PARA
ACT IVAR E L SERVICIO
1. Instala la batería, enciende el teléfono y elige
tu idioma.
2. Oprime ACTIVAT E (ACTIVAR) y sigue las
instrucciones.
3. Ingresa tu código postal y confirma tu plan
cuando se te indique.
4. Escribe tu número de teléfono y el código de
seguridad de la cuenta.
5. Haz un pago para comenzar a usar tu aparato.
6. Sigue las instrucciones del asistente de
configuración para personalizar tu aparato.
7. Regístrate en Mi Verizon en
verizonwireless.com/miverizon.
NOTA: Una vez realizada la activación, cargue su
teléfono completamente.
¿Necesitas más ayuda?
Si tienes alguna pregunta, o si no puedes encontrar aquí lo que buscas,
vaya a verizonwireless.com/espanol.
22
Page 24

For existing customers with active prepaid service.
$
30
Talk • Text • Web • Email
•
Apps
•
Games
Tones
•
Music
•
Mobile Broadband
REFILL CARD
$
30
PREPAID
For existing customers with active prepaid service.
$
60
Talk • Text • Web • Email
•
Apps
•
Games
Tones
•
Music
•
Mobile Broadband
REFILL CARD
$
60
PREPAID
For existing customers with active prepaid service.
$
70
Talk • Text • Web • Email
•
Apps
•
Games
Tones
•
Music
•
Mobile Broadband
REFILL CARD
$
70
PREPAID
Para hacer un pago
Ten a mano tu tarjeta de crédito, débito o de recarga de
Verizon Wireless para que puedas hacer un pago.
1. Mi Verizon
Controla cómo y cuándo haces tus pagos.
• Suscríbete al pago automático Auto Pay
• Usa tu tarjeta de crédito/débito
• Agrega una tarjeta de recarga/número de identificación personal
PIN
En tu teléfono—
Mi Verizon*. Visita nuestro sitio web verizonwireless.com/
miverizon o toque
2. Servicio al cliente
Toque y después marque desde tu teléfono
de Verizon Wireless.
3. En una tienda
Visita una tienda de comunicaciones de Verizon Wireless, o
cualquiera de nuestros agentes o centros de venta participantes.
4. Pago automático Auto Pay
Haz pagos automáticos con tu tarjeta de débito o crédito†. Paga un
día específico del mes o cuando el saldo esté bajo.
† Se aceptan Visa, MasterCard, American Express o Discover.
Tarifas de recarga y vencimiento
(una vez aplicada a la cuenta)
$15–$29.99 30 días
$30–$74.99 90 días
$75–$99.99 180 días
$100 o más 365 días
Selecciona My Verizon Mobile para abrir
y luego marque
.
Las tarjetas se venden por separado.
*Requiere teléfono compatible.
23
Page 25

Mi Verizon*
En tu teléfono
Ahora puedes administrar tu cuenta desde la palma de tu mano.
• Revisa tu saldo, uso y fecha de vencimiento
• Haz pagos o busca lugares para hacer pagos
• Agrega o borra funciones
• Cambia tu contraseña y más
*Requiere teléfono compatible. Para información automatizada de la cuenta, marque * 611
desde su teléfono móvil o marque 1-888-294-6804 desde un teléfono de línea fija.
NOTA: Los anuncios de voz que contengan actualizaciones importantes del servicio no se pueden
saltar.
24
Page 26

Servicios opcionales
Mensajería de texto*—Ilimitada con el pago del cargo de acceso
mensual. Si tu saldo es menor que el acceso mensual de tu plan, pagas
20¢ por mensaje enviado (por destinatario) o recibido.
1. En la Pantalla principal, toque
donde podrá crear un nuevo mensaje.
2. Toque Nuevo mensaje para iniciar un mensaje nuevo.
3. Introduzca el nombre o número del contacto en el campo Para y
escriba su mensaje.
4. Después de completar el mensaje, toque
Los mensajes a redes participantes en Canadá, México y Puerto Rico se
cobran según las tarifas nacionales.
Mensajería de foto y video*—Ilimitada con el pago del cargo de acceso
mensual. Si tu saldo es menor que el acceso mensual de tu plan, pagas
25¢ por mensaje enviado (por destinatario) o recibido.
Toma fotos o videos y envíalos a prácticamente cualquier dirección de
correo electrónico o a otros teléfonos.
1. En la Pantalla principal, toque
2. Introduzca el nombre o número del contacto en el campo Para y
escriba su mensaje.
3. Toque
y seleccione el tipo de archivo que desea adjuntar.
4. Busque el archivo deseado y selecciónelo.
5. Toque
para enviar el mensaje.
. La pantalla Mensajes se abre,
para enviarlo.
> Nuevo mensaje.
*Aplican textos adicionales e ilimitados al enviar y recibir (i) mensajes instantáneos, alertas
de texto y mensajes del portal de fotomensajería; (ii) mensajes con clientes que no sean de
Verizon Wireless en EE.UU. o en redes participantes en Canadá, México y Puerto Rico; o (iii) a
través de correo electrónico. Los textos ilimitados también incluyen mensajes de Móvil a Móvil
con clientes de Verizon Wireless. Para los textos adicionales, las tarifas por exceso de mensajería
se cobrarán según las tarifas de su plan de llamadas. No incluye los programas de mensajería
Premium, mensajería internacional ni roaming internacional. Requiere aparato compatible para
mensajería de texto, foto y/o video. Aplicarán cargos de datos por enviar y recibir mensajes de
foto y video.
25
Page 27

Funciones incluidas
• Buzón de voz
Para configurarlo o escuchar mensajes, marca *86 desde tu
teléfono.
• Larga distancia nacional
• Roaming nacional
20¢ por minuto, incluye tiempo de uso y larga distancia nacional.
• 411 Search
Servicio de información y más. $1.99 por llamada más tiempo de
uso.
• Identificador de llamadas
• Bloqueo de identificador de llamadas
Marca
67 antes del número al que estás llamando.
• Llamada en espera
• Llamada entre tres
*
Mientras está hablando, toque Responder
nueva llamada.
Cuando estás en una llamada, toque la Tecla Menú
Agregar llam. , introduzca el número y toque . Toque Unir
para conectar todas las llamadas.
para contestar la
, seleccione
Es posible que el buzón de voz no esté disponible en algunas áreas. Los buzones de voz que no
se configuren en 45 días serán cancelados. Siga las instrucciones del tutorial de configuración
para proteger con una contraseña su buzón de voz de Verizon Wireless. Incurrirá en cargo por
tiempo de uso y otros cargos cuando use el buzón de voz desde su teléfono móvil. Los minutos de
llamadas de Móvil a Móvil no aplican al revisar los mensajes de su buzón de voz; se le cobrará por
mantener su conexión al buzón de voz. Verizon Wireless no se hace responsable por mensajes
perdidos o por la eliminación de mensajes de su buzón de voz, aun cuando los haya guardado.
26
Page 28

Servicios internacionales
Llamadas internacionales
Tarifa por minutos a cualquier hora, más los siguientes recargos
internacionales:
• 10¢/min a números de línea telefónica fija en México
• 29¢/min a números de móvil en México, a Canadá, Guam, las Islas
Vírgenes de los EE.UU y las Islas Marianas del Norte.
• $1.49 /min a otros sitios disponibles
Mensajería de texto internacional
• 25¢ por mensaje enviado, por cada dirección
• Los mensajes recibidos se facturan según tu plan de llamadas
Mensajería de foto y video internacional
• 50¢ por mensaje enviado, por cada dirección
• 25¢ por mensaje recibido
Para más información, así como para conocer los servicios, localidades
y tarifas disponibles más recientes, incluido el roaming internacional,
visita verizonwireless.com/prepaidglobal.
Las localidades y tarifas están sujetas a cambios sin aviso previo. Cuando esté en roaming en el
extranjero, tal vez se le pida que marque dos veces el número de teléfono al que está llamando.
Las llamadas ilimitadas, paquetes de texto y los minutos ilimitados de noche, fin de semana, de
Móvil a Móvil y a cualquier hora no aplican a los servicios internacionales. La cobertura de roaming
internacional sólo está disponible en redes participantes y no está garantizada. Los servicios y las
funciones de datos no están disponibles cuando está en roaming.
27
Page 29

Características del teléfono
Altavoz
Teclas Rápidas
Tecla Menú
Tecla Inicio
¡ATENCIÓN! Para cargar su teléfono, por favor, use únicamente un cargador aprobado. Un manejo
incorrecto del Puerto para USB/Cargador, así como el uso de un cargador incompatible, pueden
causar daños a su teléfono y anular la garantía.
Tecla Atrás
Tecla Encender/
Bloquear
Toma para audífono
estéreo
Lente de la Cámara
posterior
Teclas de Volumen
Puerto para USB/
Cargador
28
Page 30

Pantalla principal
La pantalla principal es el punto de inicio para acceder a todas las
characterísticas en su teléfono. Muestra atajos a aplicaciones, iconos,
widgets y otras characterísticas.
Barra de estado
Muestra información
de estado del teléfono,
incluyendo la hora,
potencia de la señal,
estado de batería e
iconos de notificación.
Icono de aplicación
Toque un icono para
abrír la aplicación y
usarla.
Teclas Rápidas
Proporciona acceso
fácil y de un toque a las
funciones que usa más.
NOTA: La imagen de pantalla y los iconos son simulados. La pantalla real puede ser diferente. Las
instrucciones de esta guía pueden cambiar dependiendo de la versión de software de su teléfono.
Todos los procedimientos comienzan con el teléfono desbloqueado y desde la Pantalla principal, a
menos que se especifique lo contrario.
Tecla Aplicaciones
Toque para
abrir el menu de
aplicaciones para
ver las aplicaciones
instaladas.
29
Page 31

Consejos sobre la pantalla táctil
Hay varios movimientos táctiles reconocidos por el teléfono:
• Tocar—Un solo toque con el dedo selecciona elementos. Por
ejemplo, toque un icono (puede ser una aplicación o un elemento de
menú), toque palabras (para seleccionar un menú o responder una
pregunta en pantalla) o toque letras para escribir.
• Tocar y mantener presionado—Toque y mantenga presionado un
elemento en la pantalla al tocarlo sin levantar el dedo hasta que
ocurra una acción. Por ejemplo, para abrir un menú emergente y
personalizar la pantalla principal, toque un área vacía en la pantalla
principal hasta que aparezca el menú.
• Arrastrar—Toque y mantenga presionado un elemento por un
momento y, a continuación, sin levantar el dedo, muévalo por la
pantalla hasta encontrar la ubicación de destino que desea usar.
Puede arrastrar elementos en la pantalla principal para reubicarlos.
• Desplazar o deslizar—Para desplazar o deslizar, mueva el dedo por
la superficie de la pantalla con rapidez, sin detenerse cuando toca
la pantalla por primera vez (de lo contrario, arrastrará el elemento
en vez de desplazarlo o deslizarlo). Por ejemplo, puede deslizar la
pantalla hacia arriba o abajo para desplazar una lista, o examinar
a través de las diferentes pantallas principales al desplazarse de
izquierda a derecha (y viceversa).
• Tocar dos veces—Toque dos veces para acercar a una página web
o un mapa. Por ejemplo, toque una sección de una página web dos
veces rápidamente para acercar a esa sección de forma que se
ajuste al ancho de la pantalla. Además, puede tocar dos veces para
controlar el zoom de la cámara, en Maps y en otras aplicaciones.
• Pellizcar para acercar—Junte el dedo índice y el pulgar y
expándalos para alejar o acercar cuando usa el Internet, un mapa o
fotografías.
30
Page 32

Para configurar tu aparato
Paso1. Para quitar la tapa posterior
Coloque sus dedos debajo del borde en la parte superior del teléfono y
levante suavemente para retirar la tapa.
Paso2. Instalar la batería
Inserte la batería alineando los contactos dorados del teléfono y la
batería. Luego presiónela hacia abajo para encajarla en su lugar.
31
Page 33

Paso3. Cómo volver a colocar la tapa posterior
Alinee la tapa posterior sobre el compartimiento de la batería y presione
hacia abajo hasta que se trabe en su lugar.
Paso4. Cargar el teléfono
Cargue su teléfono completamente antes de encenderlo. Asegúrese de
usar el cargador que viene con el teléfono.
32
Page 34

Insertar la tarjeta microSD
Si tiene una tarjeta microSD, deslícela dentro de la ranura para tarjeta
microSD ubicada debajo de la tapa posterior.
NOTA: La tarjeta microSD se vende por separado.
Cómo extraer una tarjeta microSD
1. Retire la tapa posterior y ubique la ranura de la tarjeta microSD.
2. Tire con cuidado de la tarjeta microSD para extraerla.
33
Page 35

Sigue las instrucciones en pantalla para configurar rápidamente tu
teléfono y tus cuentas de email, y para ingresar en tus páginas de redes
sociales.
Para más información, visita verizonwireless.com/smartphones. Haz
clic en la sección Asistencia para smartphones y selecciona tu teléfono.
Para encenderlo/apagarlo
Es importante cargar completamente la batería antes de encender el
teléfono.
1. Para encender el teléfono, mantenga presionada la Tecla
Encender/Bloquear
pantalla se encienda.
2. Para apagar el teléfono, mantenga presionada la Tecla Encender/
Bloquear
muestre. Toque Apagar y luego Aceptar para confirmar.
• Si la pantalla se apaga, presione la Tecla Encender/Bloquear
para volver a encenderla.
Para bloquear/desbloquear la pantalla
1. Presione la Tecla Encender/Bloquear . Aparecerá la pantalla
de bloqueo.
2. Deslice la pantalla hacia arriba para desbloquearla.
Para hacer una llamada
1. En la Pantalla principal, toque
marcación.
2. Introduzca el numero en el teclado. Para borrar un digito toque
3. Toque
4. Para finalizar una llamada, toque
hasta que el menú Opciones del teléfono se
para realizar una llamada.
por un par de segundos hasta que la
para abrir el teclado de
.
.
34
Page 36

Timbres
1. En la Pantalla principal, toque
> Configuración > Sonido.
2. En la sección Llamadas recibidas, toque Tono de timbre del
Teléfono.
3. Toque el tono de timbre para seleccionarlo y escucharlo. Toque
Aceptar para guardar el tono deseado.
Bluetooth®
1. En la Pantalla principal, toque
> Configuración > Redes
inalámbricas.
2. Toque Bluetooth
para encender o apagar la función.
3. Toque Ajustes de Bluetooth y luego Buscar dispositivos para
buscar y mostrar información acerca de dispositivos cercanos.
4. Toque el nombre del dispositivo que desea vincular con el teléfono.
NOTA: Dependiendo del ti po de dispositivo con el que se esté vincu lando, se le solicit ará que
introduzca u na clave de paso, que confirme las claves de paso coincidentes o el dispositivo se
vinculará auto máticamente.
Para configurar tu cuenta de Google
Crea una cuenta de Google o ingresa si ya la tienes. Ahora tu Gmail,
contactos de Google y los eventos del calendario de Google se pueden
cargar a tu teléfono automáticamente.
1. En la Pantalla principal, toque > Configuración > Cuentas y
sincronización > Agregar cuenta > Google.
2. Toque Siguiente y luego Acceder para agregar una cuenta
existente o Crear para crear una cuenta.
3. Introduzca la informacion necesaria y toque Acceder.
35
Page 37

Anota la información de tu cuenta de Google. Por favor, guarda este
documento en un lugar seguro.
Nombre de usuario: @gmail.com
Contraseña:
Para configurar otras cuentas de email
1. En la pantalla principal, toque
> Email y luego seleccione el
proveedor de servicios de correo electrónico.
2. Introduzca su dirección de correo electrónico y contraseña y
cualquier otra información necesaria para iniciar sesión.
Para configurar el buzón de voz
En la pantalla principal, toque
. Marque *86 (*VM) y toque . Siga
las instrucciones del tutorial de configuración.
Para acceder al buzón de voz
Desde tu teléfono—Marque *86 y toque . Cuando escuches el
saludo, oprime # para interrumpirlo y sigue las instrucciones.
Desde cualquier teléfono—Marque su número de móvil. Cuando
escuches el saludo, oprime # para interrumpirlo y sigue las
instrucciones.
NOTA: Los buzones de voz que no se configuren en 45 días serán cancelados. Su buzón de voz no
está protegido con contraseña hasta que usted cree una contraseña siguiendo las instrucciones
del tutorial de configuración.
36
Page 38

Aplicaciones y más
Disfruta de música, timbres, fondos de pantalla, aplicaciones y juegos.
Mantente al día con Twitter™ y Facebook. Tenemos aplicaciones para
ayudarte a hacerlo todo. Para detalles y precios, visita verizonwireless.
com/espanol.
Pueden aplicar cargos por datos.
Para instalar aplicaciones
Más de cientos de miles de aplicaciones están disponibles para
descargar desde Google Play™. En la Pantalla principal, toque
Play Store para acceder a Google Play™ Store.
Navegación por Internet
Llévate Internet donde vayas. En la Pantalla principal,
toque Navegador
.
>
Servicios Basados en Localización
Este teléfono puede determinar su ubicación, lo cual es útil para
servicios como navegación, compras y el clima. Para tu seguridad, está
programado para mostrar tu ubicación sólo cuando marcas 911. Para
usar los Servicios Basados en Localización, en la Pantalla principal
toque > Configuración > Ubicación y seguridad.
Su aparato móvil puede determinar la ubicación geográfica y física de sí mismo (y de usted)
(“Información de Ubicación”) y puede asociar la Información de Ubicación con otros datos.
Además, ciertas aplicaciones, servicios y programas pueden acceder, recopilar, almacenar y usar
la Información de Ubicación, así como divulgar la Información de Ubicación a otros. Usted deberá
tener precaución al determinar si la Información de Ubicación debe o no estar disponible a otros
y deberá leer todas las políticas de terceros que apliquen antes de permitir el acceso. Para limitar
un posible acceso no autorizado a su Información de Ubicación, Verizon Wireless ofrece diversos
mecanismos y configuraciones para administrar el acceso a los datos de ubicación. Al habilitar
la configuración de ubicación, usted está permitiendo el acceso de terceros a la Información de
Ubicación a través de software, widgets o componentes periféricos que decida descargar, añadir
o adjuntar a su aparato móvil o por medio de acceso a Internet, capacidades de mensajería u otros
medios y usted está autorizando que Verizon Wireless recopile, use y divulgue su Información de
Ubicación según corresponda para ofrecerle todos los servicios de ubicación que usted habilite.
37
Page 39

Recicla tu aparato viejo
Con el programa Trade-In de Verizon Wireless, podrías ser elegible para
canjear tu aparato viejo por una tarjeta de regalo de Verizon Wireless
que puedes usar para comprar equipo o accesorios. Visita www.trade-in.
vzw.com/espanol.
HopeLine®
Con HopeLine puedes donar tu viejo teléfono para ayudar a las víctimas
y sobrevivientes de la violencia doméstica. Simplemente deposita tu
viejo teléfono en tu tienda local de Verizon Wireless, o revisa tu paquete
de envío para ver si recibiste una bolsa de HopeLine con instrucciones.
Puede que en tu estado también se ofrezcan opciones y requisitos de
reciclaje para tu aparato. De ser así, puedes encontrar información
adicional en la página web del estado o llamando al número de teléfono
que aparece al final de tu recibo en la hoja adjunta de Reciclaje de
Aparatos Electrónicos.
NOTA: Si usted es un cliente de negocios, por favor consulte con su compañía antes de donar o
canjear su teléfono viejo propiedad de la empresa.
38
Page 40

Asistencia
Reemplazos de garantía
Si tienes un problema con tu aparato móvil, simplemente contacta
a Verizon Wireless al número gratuito 1-866-406-5154 desde
un teléfono de línea fija. Haremos un diagnóstico de la situación al
momento de tu llamada. Si no podemos resolver el problema mientras
estás en la línea, y este se debe a un defecto de fábrica en el primer año
que tienes el aparato, te enviaremos uno de reemplazo certificado como
nuevo (ya sea una unidad igual o de calidad similar) directo a tu domicilio.
Equipo auxiliar de comunicación
TTY (telefonía de texto) y TDD (equipo de telefonía para sordos)
permiten la comunicación por teléfono a personas sordas, con
problemas auditivos o que tienen impedimentos del habla o del lenguaje.
Cuando un usuario escribe su conversación en un teclado TTY, esta
se transmite en forma de tonos por medio del teléfono. Los tonos
son recibidos por el TTY de la otra persona, que los traduce a texto y
aparecen en una pantalla. Para poder usar la red TTY, debes tener un
teléfono compatible con TTY y estar en la modalidad TTY para hacer o
recibir llamadas. Ten en cuenta que la mayoría de los aparatos móviles
digitales son compatibles con TTY.
39
Page 41

Información importante al cliente
Cargos por datos y Servicios Basados en Localización
Verizon Wireless le cobra por todos los datos y contenidos enviados o
recibidos usando nuestra red (incluidos los de cualquier overhead de red
y/o overhead de Protocolo de Internet asociado con contenido enviado
o recibido), así como por la resolución de direcciones de Protocolo de
Internet de nombres de dominio. Enviar o recibir datos usando una red
privada corporativa (VPN) implica overhead adicional de VPN por el que
se le cobrará. Por favor, tenga en cuenta que determinadas aplicaciones
o widgets envían y reciben datos periódicamente de forma automática,
sin ninguna acción por parte del usuario, y se le cobrará por dicho uso de
datos. Verizon Wireless podría enviarle periódicamente actualizaciones
de su software. También se le cobrará por los datos asociados a estas
actualizaciones.
Muchos servicios y aplicaciones ofrecidos a través de su aparato
pueden ser proporcionados por terceros. Antes de usar, enlazar o
bajar un servicio proporcionado por terceros, o una aplicación como un
servicio de tipo GPS basado en la localización, una sala de chat, tienda
o red social que no pertenezca a Verizon Wireless desde su aparato,
deberá leer detenidamente los términos de dicho servicio o aplicación,
así como la política de privacidad correspondiente. La información
personal que usted envíe puede ser leída, recopilada o usada por el
proveedor del servicio o aplicación y/u otros usuarios de esos foros.
Verizon Wireless no se hace responsable por ningún tipo de información,
contenido o servicio al que tenga acceso, descargue o use en Internet.
Usted es responsable de mantener activas sus protecciones antivirus y
otras protecciones de seguridad de Internet cuando acceda al servicio.
Para más información, visite la Política de Contenido de Verizon en
responsibility.verizon.com/contentpolicy.
Los términos y condiciones de su acuerdo con el cliente de
Verizon Wireless, así como otros términos identificados
específicamente, rigen su uso de cualquier producto y servicio de
Verizon Wireless.
40
Page 42

Los servicios descritos en este folleto son sólo para su uso personal.
Están sujetos al acuerdo con el cliente, su plan de llamadas, los principios
de privacidad de Verizon Wireless y la política de privacidad de Internet
(ambos se pueden consultar en verizonwireless.com/espanol) y los
siguientes términos y condiciones, según corresponda.
Planes de llamadas de Servicio Prepagado
Si desea cambiarse de un servicio prepagado a un servicio de pospago,
todos los fondos restantes en su cuenta serán acreditados a su cuenta
de pospago. No podemos darle ningún crédito por impuestos de
transacción que usted pueda haber pagado al depositar fondos en su
cuenta, por lo que podría terminar pagando los mismos impuestos dos
veces.
Su saldo no podrá ser superior a $1,000 y es posible que no pueda
hacer pagos a su cuenta si esta llega a los $1,000. Al dinero en efectivo
depositado en su cuenta en los kioscos de pago de facturas de
Verizon Wireless se le deducirán los impuestos de la cantidad total
depositada según la tarifa correspondiente. El pago mínimo es de $15; el
pago máximo es de $600. Al pagar con una tarjeta de crédito, el máximo
es de $250. Usted puede hacer una recarga hasta 10 veces o hasta $600
en un período seguido de 30 días. Pueden aplicar cargos de transacción
para algunos métodos de pago.
Servicio Prepagado de Verizon Wireless
Si está en un Plan Mensual de Servicio Prepagado, usted debe tener
suficiente saldo en su cuenta en el momento de la renovación para cubrir
el acceso mensual para poder recibir los beneficios de su plan. El acceso
mensual se cobrará en la misma fecha cada mes, a menos que no tenga
fondos suficientes para cubrir el acceso mensual.
Algunos servicios y funciones de Verizon Wireless, como Verizon
(Video y TV Móvil), garantía extendida, protección del teléfono móvil,
cobertura total del equipo, auxilio vial, facturación detallada y el Buzón
de Voz Visual y Premium no están disponibles en los Planes de Llamadas
Prepagados.
41
Page 43

Servicio de información 411 Search: Al estar fuera del área de cobertura
con tarifas de Servicio Prepagado de Verizon Wireless, pueden variar
las tarifas de 411 Search, la conexión automática y los servicios
optimizados. Para llamadas conectadas, la parte de la llamada que
ocurre antes de la conexión puede facturarse a una tarifa diferente
de la correspondiente a la parte de la llamada que ocurre después de
la conexión. Pueden aplicar cargos por conexión y de larga distancia
adicionales.
Información sobre compatibilidad con equipos de asistencia auditiva
Este teléfono ha sido probado y clasificado para su uso con equipos
de asistencia auditiva para ciertas tecnologías de servicio móvil
que usa. Sin embargo, pueden existir ciertas tecnologías nuevas de
servicio móvil usadas en este teléfono que no han sido probadas aún
para su uso con equipos de asistencia auditiva. Es importante probar
minuciosamente y en diferentes sitios las distintas funciones de este
teléfono, usando su equipo de asistencia auditiva o implante coclear,
para determinar si usted escucha algún ruido de interferencia. Consulte
con su proveedor de servicio o el fabricante de este teléfono para
información sobre compatibilidad con equipos de asistencia auditiva.
Si tiene preguntas sobre las políticas de devolución o cambios, consulte
con su proveedor de servicio o vendedor de teléfonos.
42
Page 44

Notes/Notas
Page 45

Notes/Notas
Page 46

Notes/Notas
Page 47

Notes/Notas
Page 48

Notes/Notas
Page 49

Notes/Notas
 Loading...