

LG V-CP243RDN User Manual
V-CP243NDN / NTN
V-CP243RDN / RTN
E
M
C
L
S
Å
H
– 2 –
9
3
1
2
4
7
8
6 5
9
17
12
18
13
4
2
7
8
1
3
5
6
7
8
10
11

– 3 –
12
18
21
V-CP243NDN/NTN
13
16
17
15
14
20
22
19
11
10
13
V-CP243RDN/RTN

– 4 –
E
Please read all the following information,
which contains important instructions for the
safety, the use and the maintenance of the
appliance.
This appliance complies with the following EC
Directives: -73/23/EEC, 93/68/EEC-Low
Voltage Directive-89/336EEC -EMC Directive.
■ Never allow children to use the appliance
unsupervised.
■ Do not use the appliance If the supply
cord is damaged or faulty.
■ If the mains lead is damaged, it must be
replaced by an approved LG Electronics
Service Agent in order to avoid a hazard.
■ Always switch the vaccum cleaner off
before :
• changing the dust bag.
• changing or cleaning the filters.
■
If no dustbag is inserted, the cover cannot
be closed. Please do not use force!
■ Do not vacuum flammable or explosive
substances(liquids or gases).
■ Do not vacuum hot ash, embers etc. nor
sharp objects.
■ Do not vacuum water or other liquids.
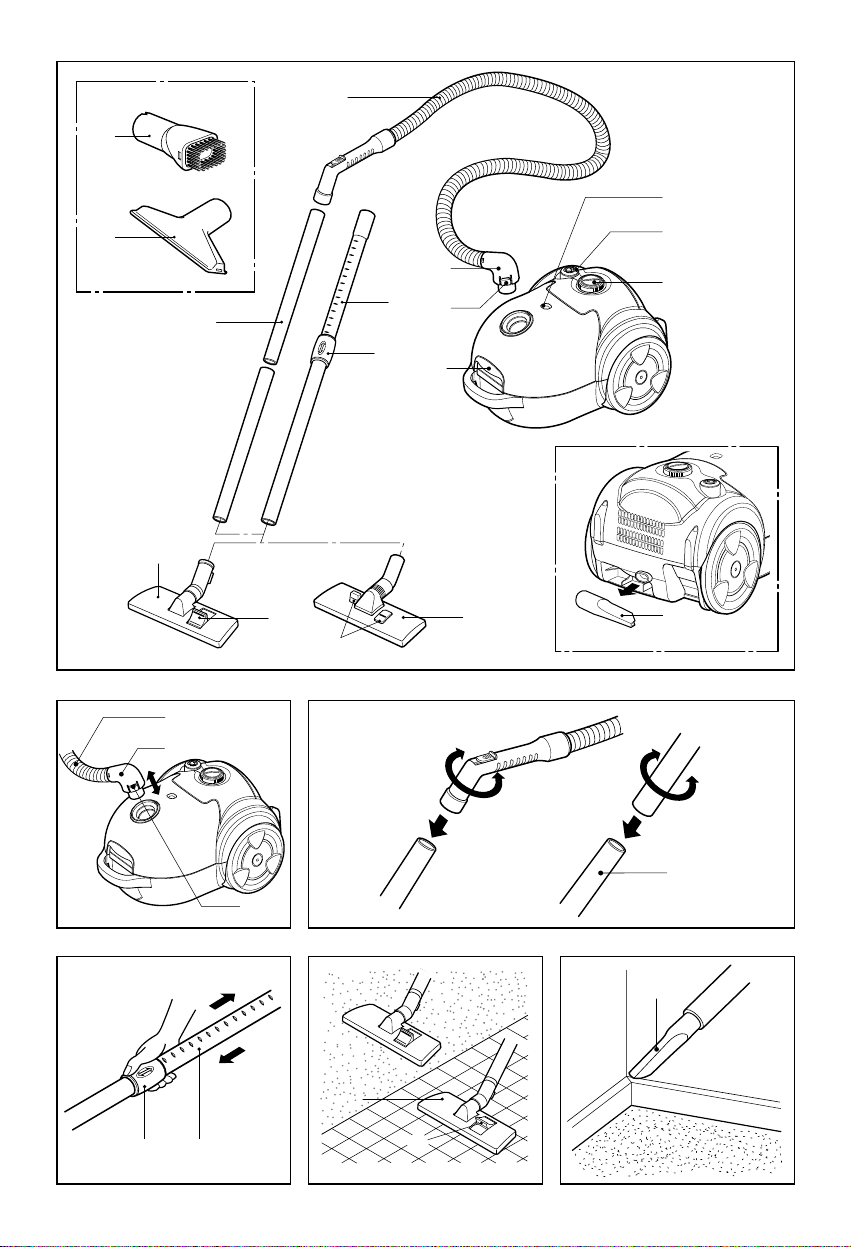
Connecting the flexible hose
Push the end of the head(1) on the flexible
hose(2) into the attachment point on the
vacuum cleaner.
To remove the flexible hose from the
vacuum cleaner, press on the button(3)
situated on the head, then pull upwards.
Assembling the tubes
(depending on model)
• Metal tube(4)
- Fit together the two tubes by twisting
slightly.
•Telescopic tube(5)
- Push spring latch(6) forward.
- Pull out tube to required length.
- Release spring latch to lock.
Using the cleaning head and Accessory
Nozzles
(depending on model)
Fit the large cleaning head onto the end of
the tube.
• The 2 position head(7) is equipped with a
pedal(8) which allows you to alter its
position according to the type of floor to be
cleaned.
Hard floor position(tiles, parquet
floors...). Press on the pedal to lower the
brush.
Carpet or rug position. Press on the
pedal to lift the brush up.
• Crevice Tool(9)
For vacuuming in those normally inaccessible places i.e. reaching cobwebs, or down
the side of a sofa!
• Dusting brush(10)
For vacuuming picture frames furniture
outlines, books and other uneven objects.
• Upholstery Nozzle(11)
For vacuuming uphostery, mattresses, etc.
The thread collectors help to pick up the
threads and fluff.
How to plug in and use
Pull out the supply cord to the desired
length and plug into the socket.
Press button (13) to start the vacuum cleaner.
To stop it press the button (13) again.
Adjusting the power level
• If your appliance is equipped with an
electronic variable power control(13), you
can choose the power appropriated for the
task.
(depending on model)
•
The flexible hose handle(14) has a manual
air flow regulator(15) which allows you to
briefly reduce the suction level.
Storage(16)
When you have switched off and unplugged
the appliance, press on the button (12) to
automatically rewind the cord.
You can move or store your appliance in a
vertical position by sliding the hook on the
large cleaning head into the clip on the
underside of the appliance.
Information for your safety
How to Use

– 5 –
E
Changing the dust bag
The dustbag needs changing when the cleaner
is set to maximum power and the cleaner head
is off the floor but the “bag full” indicator
window(17) is completely coloured red.
Even if the dustbag does not appear to be
full at this stage, it should be changed.
It could be that a great deal of very fine dust
has clogged up the pores of the dust bag.
• Turn off the appliance and unplug it.
• Open the cover by pressing the hook(18)
and lifting it up until it snaps into place.
Your appliance is equipped with either a
paper dust bag (19) or a fabric dust bag
(21)(depending on model).
• Take hold of the dust bag by the handle
and pull.Remove the bag and throw it
away.
• To refit a new bag push the cardboard
support of a new bag into the bag mount
(20)until it will go no furthe
r.
If your appliance is fitted with a fabric dust bag
follow the same instructions
as above.
Empty it and replace it(21).
Note: as the appliance is fitted with a safety
device which checks that the bag is in place
you cannot close the lid if the bag is not
fitted correctly.
Cleaning the motor filter
The motor filter is situated inside the
appliance between the dust bag and the
motor. Each time that you change the air
outlet filter we advise you to remove the
motor filter(22)and to clean it by tapping to
remover the dirt and then replacing it in the
vacuum cleaner.
Check that the appliance is correctly plugged
in and that the electrical socket is working.
• Stop the appliance and unplug it.
• Check that the tubes, flexible hose and
cleaning tool are not blocked.
• Check that the dust bag is not full.Replace
if necessary.
What to do if your appliance
does not work?
What to do when the suction
performance reduces?

– 6 –
M
Kérjük, olvassa végig az alábbi leírást, amely
fontos útmutatót tartalmaz a készülék bi
tonságára, használatára és karbantartására
vonatkozóan.
A készülék megfelel a következò EU irányelvek
elòírásainak: 73/23/EWG, 93/68/EWG irányelv,
amely az alacsony feszültségre vonatkozik,
89/336/EWG irányelv, amely az
elektromágneses összeegyeztethetòségre
vonatkozik.
■ Soha ne hagyja, hogy a gyerekek felügyelet
nélkül használják a készüléket.
■ Ne használja a készüléket, ha a hálózati
kábel sérült vagy hibás.
■ Ha a hálózati kábel sérült, azt csak egy
jogosult LG Electronics karbantartási
szakember cserélheti, mivel megjavításához
speciális eszközökre van szükség.
■ Mindig kapcsolja ki a porszívót, mielòtt:
• kicserélné a porzsákot.
• kicserélné vagy megtisztítaná a szûròket.
■ Ha nincs porzsák behelyezve, a fedél nem
csukható vissza. Kérjük, ne csukja be
eròvel!
■ Ne porszívózzon gyúlékony vagy
robbanékony anyagokat (folyadékokat vagy
gázokat).
■ Ne porszívózzon forró hamut, parazsat vagy
éles tárgyakat.
■ Ne porszívózzon vizet vagy más folyadékot.
A gégecsò csatlakoztatása
A gégecsòn (2) lévò felsò rész (1) végét nyomja a
porszívón található csatlakozási helybe.
A gégecsò eltávolításához nyomja meg a felsò
részen található gombot (3), majd húzza felfelé a
csövet.
A csövek összeszerelése
(a típus függvényében)
• Fém vagy mûanyag csò (4)
-
Enyhe csavarással illessze össze a két csövet.
• Teleszkópos csò (5)
- Fogja meg a rugós zárat(6)
- Hózza ki a csövet a kívánt hosszra.
- Záráshoz engedje fel a rugós zárat.
A nagy szívófej és a kiegészítò
tartozékok használata
(típus függvényében)
Illessze a nagy szívófejet a csò végére.
• A kétállású fej(7) egy pedállal vagy két
pedállal (8) van ellátva, mely lehetòvé teszi a
fej állásának módosítását a tisztítandó
padlótípusnak megfelelòen.
Kemény padló-állás (padlólap, parketta...).
A kefe leengedéséhez nyomja meg a pedált.
Padlószònyeg vagy szònyeg-állás.
A kefe felemeléséhez nyomja meg a pedált.
• Tartozék keskeny rések porszívózásához
(9) Az olyan egyébként elérhetetlen helyeken
való porszívózáshoz, mint egy ablakkeret
vagy egy mélyedés a falban.
• Portalanító kefe (10)
Képkeretek, bútorélek, könyvek és más
egyenetlen tárgyak porszívózásához.
• Bútorszövet porszívózására alkalmas
szívófej (11)
Bútorszövet, matracok, stb. porszívózásához.
Áram alá helyezés és használat
Húzza ki a kívánt hosszra a hálózati kábelt és
csatlakoztassa a dugaszolóaljzatba.
A porszívó bekapcsolásához nyomja meg a
gombot (13). Kikapcsolásához ismét nyomja
meg a gombot (13).
A teljesítményszint módosítása
•
Amennyiben az Ön készüléke elektronikus
változtatható teljesítmény-szabályozóval (13) van
ellátva, megválaszthatja a feladatnak megfelelò
teljesítményt.
(a típus függvényében)
• A gégecsò fogantyúján található egy
(14)
kézi
levegòáram-szabályozó (15), mely lehetòvé
teszi a szívás-szint rövid ideig tartó
csökkentését.
Tárolás (16)
A készülék kikapcsolása és áramtalanítása
után a vezeték automatikus
visszatekercseléséhez nyomja meg a gombot
(12).
A készülék függòleges helyzetben
mozgatható vagy tárolható a nagy szívófejen
lévò kampónak a készülék alsó részén található
bilincsbe való csúsztatásával.
Az Ön biztonságát célzó
információk
A készülék használata
 Loading...