

Page 1

Model
Language
Page
Material
Date
Part No.
V-CE641HTG.CAQPLGT
English+Chinese
28
Weight 100g
2009.1.16
MFL57903810
Color(cover/body)
Size(W*H)
Designer
Description
Chage Record
No. Date
Add SVC card description
1
2
3
4
5
6
7
8
9
Change content
ECO No.
ACTT901725 09.03.13 GEYANG
2/1
150 x 220(mm)
Zhang Xianli
Owner's manual
Designer
Confirm
CUI.Y.T
Page 2

V-CE641HTG
1-14
Page15-27
Page 3
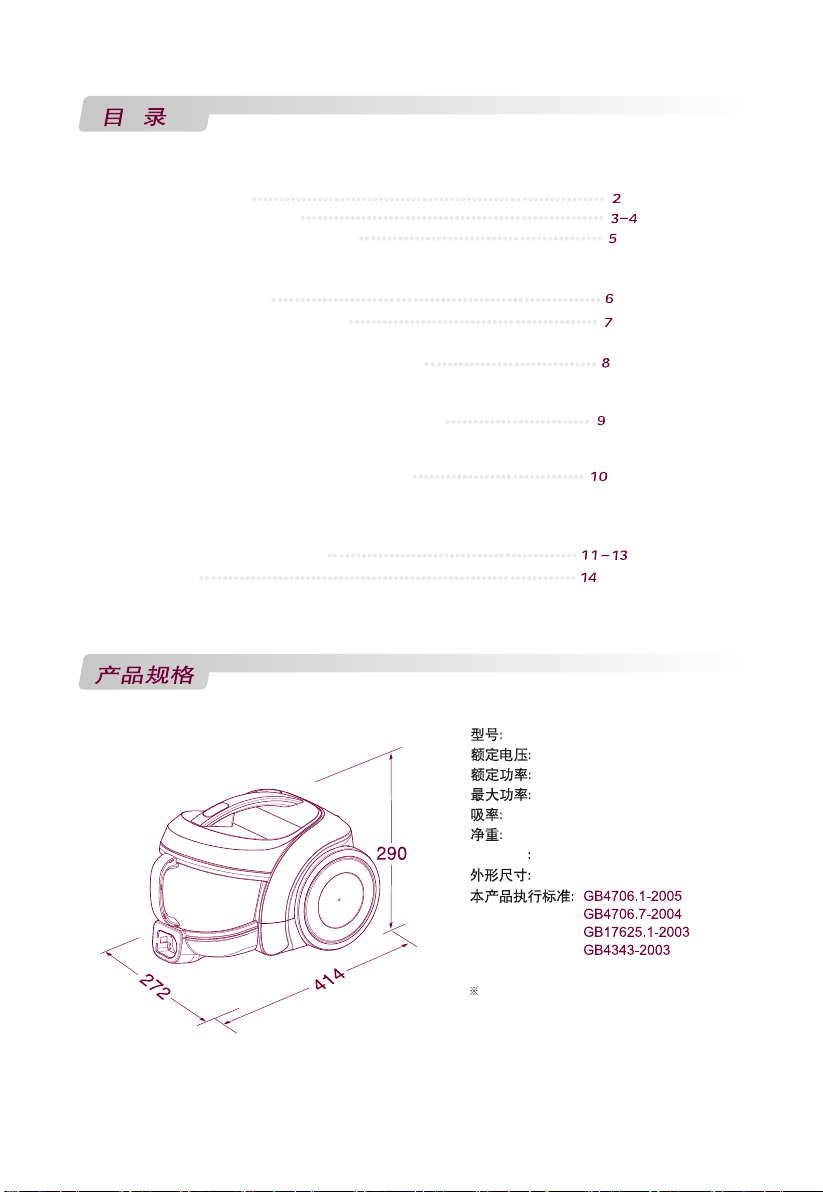
产品规格
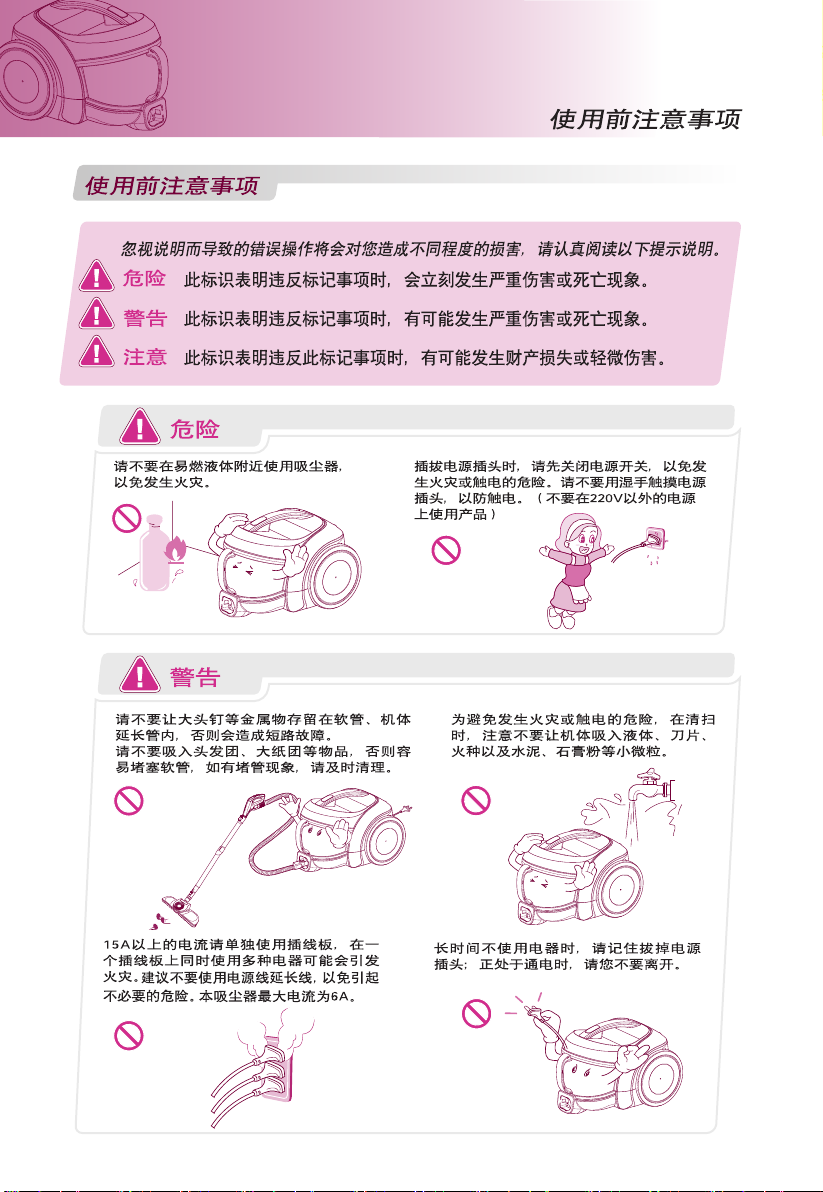
使用前注意事项
吸尘器的组装与吸力调节
部分名称与连接方法
附件
尖吸嘴的使用
集尘桶的拆卸/清理方法
灰尘分离器的清理方法
集尘桶、
清洗方法
安装方法
电机保护过滤器的拆卸/洗涤/安装方法
拆卸方法
清洗方法
排气过滤器的拆卸/清洁/安装方法
拆卸方法
清洗方法
安装方法
申报故障维修的确认事项
装相单
灰尘分离器的清理安装
方法
V-CE641HTG
集尘容量
220V~ 50Hz
1200W
1400W
300W
5.3Kg
1.5L
272mm x 414mm x 290mm
为了提高产品质量而进行的外观
及设计规格上的变更将不再另行
通知。
2
Page 4
345
Page 5

Page 6
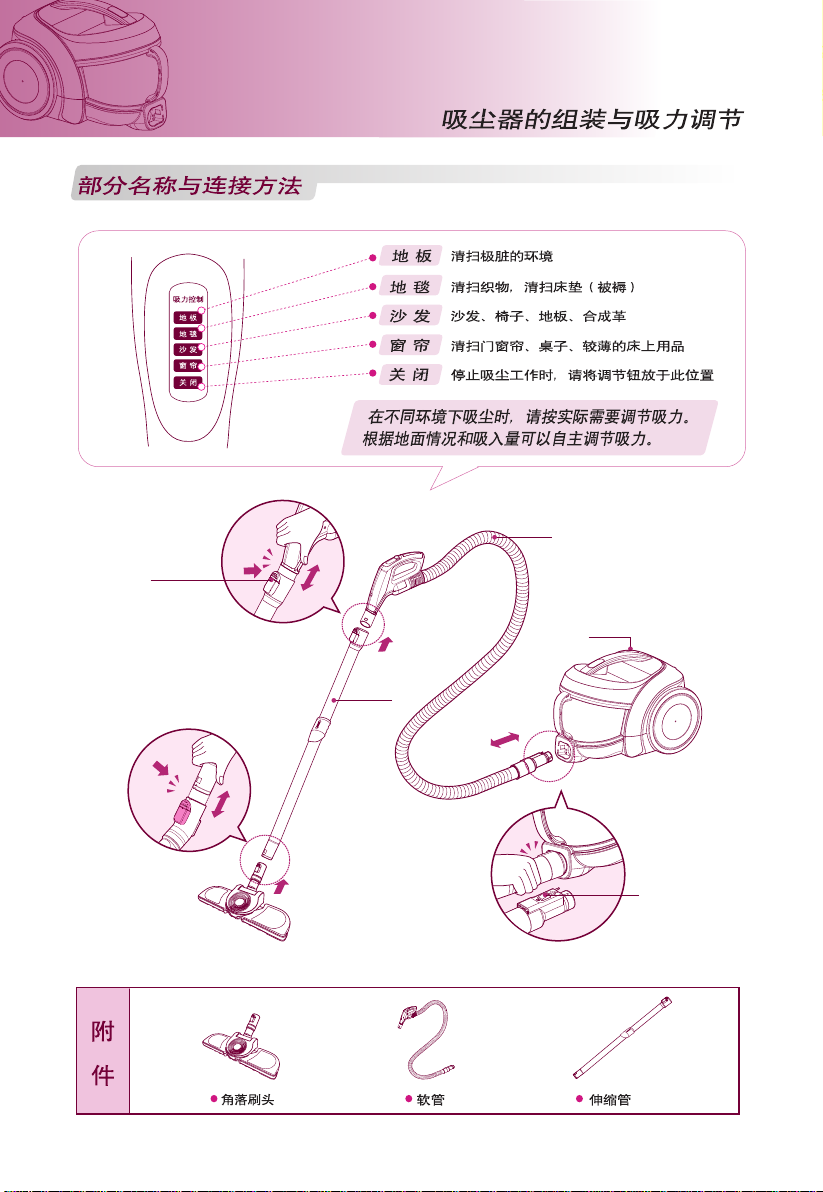
控制按钮
软管
卷线器
伸缩管
按钮
Page 7

尖吸嘴尖吸嘴
尖吸嘴尖吸嘴
尖吸嘴可以用来清理房间角落等不易清理到的地方。
尖吸嘴
6
Page 8
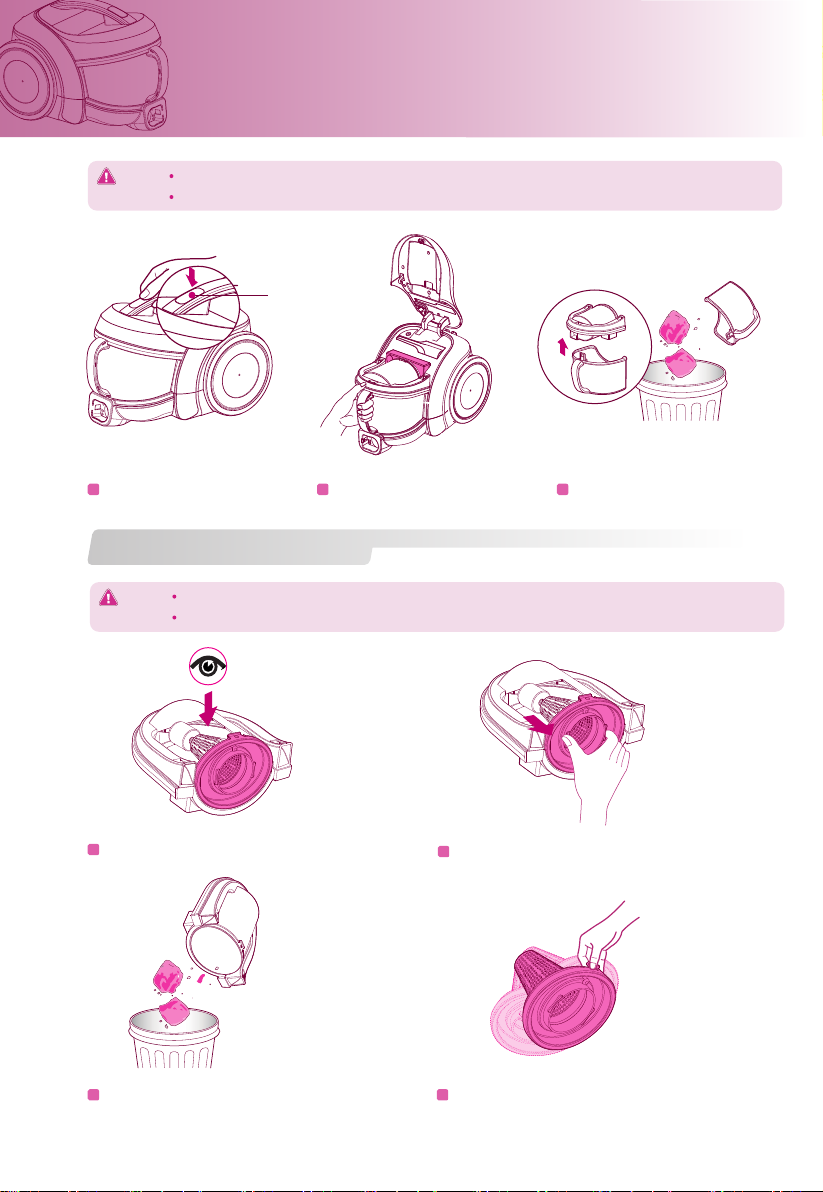
集尘桶的拆卸/清理方法集尘桶的拆卸/清理方法
注意: 集尘量达到集尘桶上标记的MAX线时,清理集尘桶。
集尘量超过MAX时,吸入力可能降低。
按钮
按住主机盖按钮,打开主机盖。
21
灰尘分离器的清理方法灰尘分离器的清理方法
注意: 清洁集尘桶时,检查灰尘分离器内部。
灰尘分离器内部有很多废纸、塑料等异物时,可能降低吸入力,请及时清理灰尘分离器。
检查灰尘分离器内部是否有灰尘。
1
握住集尘桶手柄,取下集尘桶。 打开集尘桶的盖子,倒掉灰尘。
握住灰尘分离器盖的手柄拆卸盖子。
2
3
倒掉灰尘。
3
堵住灰尘分离器盖的小孔,抖掉灰尘。
4
7
Page 9
集尘桶、灰尘分离器的清洗/安装方法集尘桶、灰尘分离器的清洗/安装方法
清洗方法清洗方法
冲洗干净集尘桶、灰尘分离器、灰尘分离器盖。 在阴凉、通风处干燥一天左右,待完全干燥再使用。
安装方法安装方法
对准灰尘分离器盖的突起部和灰尘分离器
1
槽后安装盖子。
将集尘桶安装在吸尘器上。
3
注意: 吸尘器盖子没有完全盖好的情况下握住手柄移动吸尘器时,盖子有可能被打开,而导致产品的
损坏及集尘桶掉落,所以请务必确认盖子是否盖好, 在听到咔的一声响后,证明已经盖好。
在没有安装灰尘分离器盖的情况下使用吸尘器时,有可能出现噪音变大、吸入力急剧降低的现
象,所以请务必再次确认是否安装好。
安装灰尘分离器和集尘桶。
2
握住主机移动手柄,盖上吸尘器的盖子。
4
8
Page 10

拆卸方法拆卸方法
电机保护过滤器的拆卸/洗涤/安装方法电机保护过滤器的拆卸/洗涤/安装方法
按钮
按住主机盖按钮,打开主机盖。
1
握住过滤器外壳手柄,从过滤器盖分离。
3
拆卸集尘桶后,从主机取出电机保护过滤器。
2
取出电机保护过滤器。
4
清洗方法清洗方法
冲洗干净
1
注意: 安装方法与拆卸方法相反。
在没有安装电机保护过滤器的情况下使用吸尘器时,可能出现噪音变大、灰尘进入电机,导致产品
寿命缩短等现象,所以请再次确认安装情况。
彻底去除水分
2 3
在阴凉、通风处干燥一天左右,
待完全干燥后再使用。
将电机保护过滤器装
1
入过滤器外壳内。
2
盖上过滤器盖。
3
将组装好的过滤器插入
过滤器安装部位后安装
集尘桶。
握住主机的移动手柄,
4
盖上吸尘器盖。
9
Page 11

集尘桶、灰尘分离器的清洗/安装方法集尘桶、灰尘分离器的清洗/安装方法
拆卸方法拆卸方法
排气过滤器至少半年清洗一次或根据使用频率酌情清理。
排气过滤器盖按钮
排气过滤器按钮
排气过滤器
排气过滤器盖子
清洁方法清洁方法
抖动排气过滤器进行清洁。
1
卷线器按钮
使用吸尘器后的保管方法使用吸尘器后的保管方法
安装方法安装方法
放入排气过滤器,按钮处有"咯哒”声时,
2
表示排气过滤器盖安装准确。
咯哒
按下卷线器按钮时吸尘器电线自动被卷入。
吸入口的突起部插入主机背面或底面的凹槽后进行保管。
10
Page 12

申报故障维修前的确认事项申报故障维修前的确认事项
我们应该避免产品并没有出现故障,却因申请维修服务而带来的不必要的麻烦。
产品出现异常时,在申请服务中心或代理店的服务之前请确认以下事项。
或许按照使用说明书的简单操作就可以解决了。
吸入力差?
第一阶段
第二阶段
确认吸入力调节键是否设为“最强”。
清洗电机保护过滤器。
拆卸方法
按住主机盖按钮,打开主体盖。
1
握住过滤器外壳手柄,从过滤器盖分离。
3 4
卸下集尘桶,从主机取出电机保护过滤器。
2
取出电机保护过滤器
。
清洗方法 (用凉水清洗)
用流动水冲洗干净
1 3
彻底去除水分。
2
在阴凉、通风处干燥一天左右,
待完全干燥后再使用。
11
Page 13

集满(到达MAX处),
12
Page 14

13
Page 15

14
Page 16

Product specifications
Attention before using the appliance
Assembling and adjusting the Cleaner
Parts description and assembly
Accessories
Elbow Tube
How to separate or empty the dust box
How to empty the dust separator
How to clean and assemble the dust box
and separator
Cleaning
Assembling
How to separate, clean and assemble the
protection filter of the motor
Disassembling
Cleansing
How to separate, clean and assemble exhaust filter
Disassembling
Cleansing
Assembling
Check before reporting the trouble
Packing List
15
16~17
18
19
20
21
22
23
24~26
27
V-CE641HTG
220V~ 50Hz
1200W
1400W
300W
5.3Kg
Dust Capacity: 1.5L
272mm x 414mm x 290mm
15
Page 17

16
Page 18

17
Page 19

Control button
Flexible Hose
Cord winding
Telescopic tube
Button
18
Page 20

Nozzle, Crevice
Nozzle, Crevice can be used for cleaning the place hard to reach.
Nozzle, Crevice
19
Page 21

How to separate or empty the dust box
Warning: • Empty the box when the dust settles up to the MAX line.
• Too much dust beyond this line may reduce the inhaling power.
Button
Uncover by pressing the button.
21
Detach the dust box by holding its handle. Empty the dust box.
3
How to empty the dust separator
Warning: • Check the inside of the dust separator when cleaning the dust box.
• Clean the inside of the dust separator, because too much foreign substance such as waste
paper or plastic in the dust separator may reduce the inhaling power.
Check if the dust has settled in the dust separator. Separate the cover by holding its handle.
1
2
Empty the separator.
3
20
Remove the dust from the small holes in the
4
cover of the separator.
Page 22

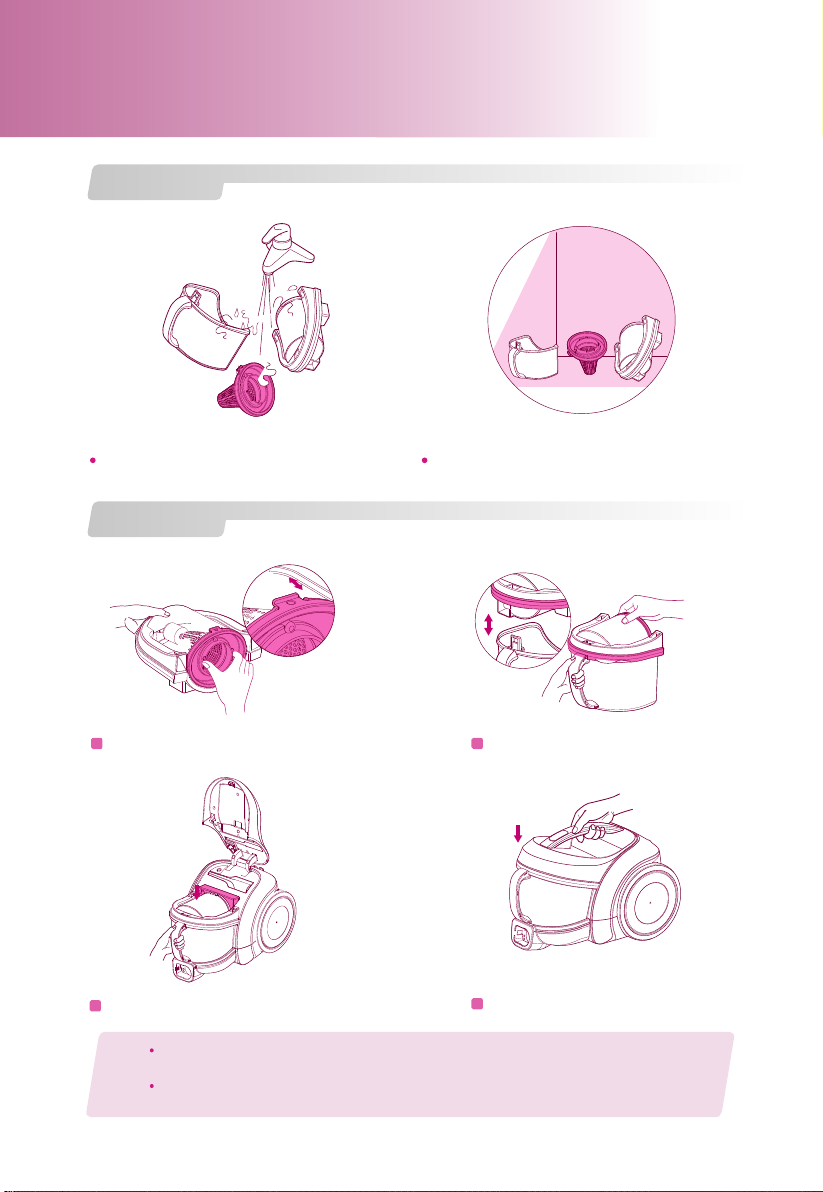
CleaningCleaning
How to clean and assemble the dust
box and separator
Cleanse the dust box, separator and its
cover with running water.
AssemblingAssembling
Attach the cover by inserting the spiral in the
1
cover into the groove.
Attach the assembled dust box to the body of
3
the cleaner.
Dry them in the well-ventilated shade for
a day before using.
2
Assemble the dust separator and box.
2
Cover the cleaner by holding the carrying
handle of the body.
Warning: If you move the cleaner by holding the carrying handle with the cover not fully closed, the cover
may open, causing damage to the parts and the dust box. So check if the cover has been properly
closed.
If you use the cleaner without assembling the cover of the dust separator, it will increase the noise
and reduce the inhaling power when cleaning. So check the assembling once again.
21
Page 23

How to separate, clean and assemble the
protection filter of the motor
Disassembling
Button
1 2
Uncover by pressing the button. Detach the protection filter of the motor from the
3 4
Separate it from the filter cover by
holding the handle of the case.
Cleansing
body after disassembling the dust box.
Detach the filter.
1
Clean with running water.
Warning: Assembling is done in reverse order of disassembling.
If you use the cleaner without assembling the protection filter of the motor, noise increases and dust
gets into the motor when cleaning, thus leading to the shorter life of the cleaner. So check the assembling
once again.
1
Put the filter into
the case.
2
Cover the filter.
2
Remove the water completely.
3
Mount the assembled filter
and assemble the dust box.
3
Dry in the well-ventilated shade
for a day before using.
4
Cover the cleaner by
holding the carrying
handle of the body.
22
Page 24

How to separate, clean and assemble
exhaust filter
Disassembling
The exhaust filter should be cleaned at least once half a year.
Allow exhaust filter to dry in a shaded location for a dry.
Cover button of the exhaust filter
Exhaust filter button
Exhaust filter
Cover of the
exhaust filter
Cleansing
1
Shake off the exhaust filter.
How to keep the cleaner after using
Cord winding button
Assembling
2
Insert the exhaust filter and join the cover
properly until you hear the click of the button.
The cord winds up when you press the button.
Insert the spiral of the inhaler into the groove in the back or at the bottom of the body.
23
Page 25

Check before reporting the trouble
You won't be happy to waste money by calling for service when there is no trouble with the cleaner.
Here is good advice to follow for trouble shooting before calling for service. Read the instructions
carefully, and you can remove the trouble by yourself.
If inhaling is
Stage 1
not well done?
Stage 2
Disassembling
1
Uncover the body by pressing
the button of the cover.
3 4
Separate the filter from the cover by
holding the handle of the case.
Check if the control button of the inhaling power
has been put to “MAX”.
Clean the protection filter of the motor.
2
Detach the protection filter of the motor
from the body after disassembling the
dust box.
Detach the protection filter of the motor.
Cleansing (with cold water)
1
Cleanse it with running water.
24
2
Remove the water completely.
3
Dry it in the well-ventilated
shade for a day before
using.
Page 26

25
Page 27

26
Page 28

27
Page 29

P/No.: MFL57903810
 Loading...