

USER GUIDE
LG-V530KB
ENGLISH
Copyright ©2017 LG Electronics, Inc. All Rights Reserved.
MFL69657601 (1.0) www.lg.com

ENGLISH
About This User Guide
Thank you for choosing LG. Please carefully read this user guide before
using the device for the first time to ensure safe and proper use.
Ţ Always use genuine LG accessories. The supplied items are designed
only for this device and may not be compatible with other devices.
Ţ This device is not suitable for people who have a visual impairment due
to the touchscreen keyboard.
Ţ Descriptions are based on the device default settings.
Ţ Default apps on the device are subject to updates and support for
these apps ma
questions about an app provided with the device, please contact a
LG Service center. For user-installed apps, please contact the relevant
service provider.
Ţ Modifying the device’s operating system or installing software from
unofficial sources may damage the device and lead to data corruption
or data loss. Such actions will violate your LG license agreement and
avoid your warranty.
Ţ Some contents and illustrations may differ from your device depending
on the region, service provider, software version, or OS version, and are
subject to change without prior notice.
Ţ Software, audio, wallpaper, images, and other media supplied with
your device are licensed for limited use. If you extract and use these
materials for commercial or other purposes, you may be infringing
copyright laws. As a user, you are fully are entirely responsible for the
illegal use of media.
Ţ Additional charges may apply for data services, such as messaging,
uploading, downloading, auto-syncing and location services. To avoid
additional charges, select a data plan suitable to your needs. Contact
your service provider to obtain additional details.
y be withdrawn without prior notice. If you have any
1

Instructional Notices
WARNING: Situations that could cause injury to the user and third
CAUTION: Situations that may cause minor injury or damage to the
NOTE: Notices or additional information.
parties.
device.
2

Table of Contents
01
Custom-designed
Features
6 Comfort View
7 Gesture Shot
8 KnockON
9 Knock Code
10 Multi-tasking Feature
11 Capture+
13 QSlide
02
Basic Functions
15 Accessories
16 Device Overview
19 LG G Pad Plus Pack Overview
21 Attaching the Tablet to the LG
G P
ad Plus Pack
22 Charging the Battery
25 Connecting a USB Device to
Your Tablet
26 Installing the SIM Card or
microSD Card
28 Removing the Memory Card
29 Touch Screen
32 Home Screen
40 Locking and Unlocking the
Device
42 On-screen Keyboard
43 Connecting to Networks and
Devices
51 Google Account Setup
3

03
04
Useful Apps
53 Contacts
55 Messaging
56 Email
58 Camera and Video
66 Multimedia
68 Clock
69 Calculator
69 Calendar
69 Downloads
70 File Manager
70 LG Backup
71 Google Apps
Settings
74 Settings
75 WIRELESS NETWORKS
77 DEVICE
82 PERSONAL
86 SYSTEM
05
Appendix
90 Software Update
91 FAQ
92 Anti-Theft Guide
93 More Information
06
For Your Safety
07
LIMITED WARRANTY
STATEMENT
4Table of Contents

01
Custom-designed
Features
Comfort View
This feature reduces the amount of blue light on the screen to reduce eye
strain.
Turning the Comfort View On/Off
Ţ Slide the Status bar downward, tap , then tap / .
OR
Ţ Tap
Adjust the Blue Light Filter
1
2
> > Display > Comfort view, and then tap / .
Tap > > Display > Comfort view.
Select the desired blue light filter setting.
Custom-designed Features 6
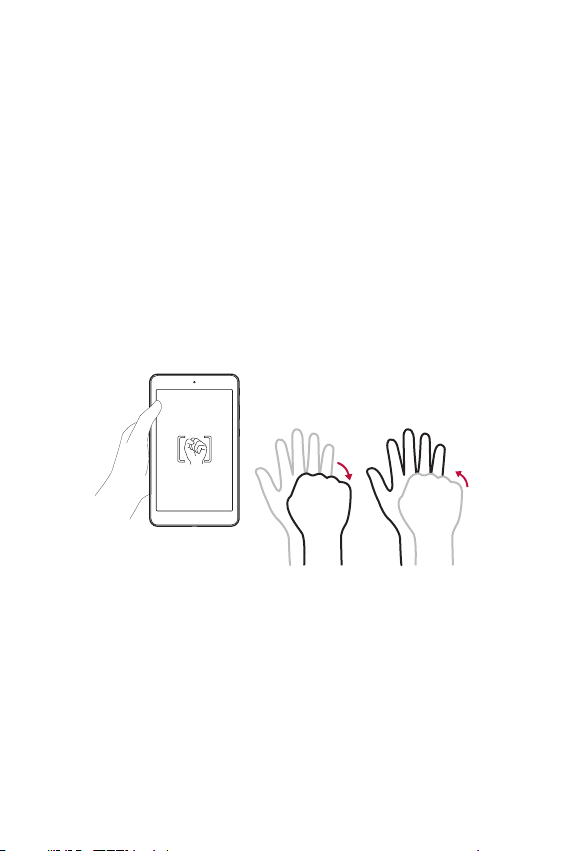
Gesture Shot
The Gesture shot feature allows you to take a picture with a hand gesture
using the front camera.
To Take a Photo
There are two methods for using the Gesture shot feature.
Ţ Raise your hand, with an open palm, until the front camera detects it
x appears on the screen. Then close your hand into a fist to
and a bo
start the timer, allowing you time to get ready.
OR
Ţ Raise your hand, in a clenched fist, until the front camera detects it and
a box appears on the screen. Then unclench your fist to start the timer,
allowing you time to get ready.
OR
Custom-designed Features 7
KnockON
The KnockON feature allows you to double-tap the screen to easily turn
it on or off.
Turning the Screen On
While the screen is off, quickly double-tap the center of the screen to turn
on the backlight and display the Lock screen.
Turning the Screen Off
Quickly double-tap the Status bar, an empty area on the Home screen, or
the Lock screen to turn the screen off.
Ţ Tap on the center area of the screen. If you tap on the bottom or the
top area, the recognition rate may decrease.
Custom-designed Features 8
Knock Code
The Knock Code feature allows you to create your own unlock code using
a combination of knocks on the screen. You can access the Home screen
directly when the screen is off by tapping the same sequence on the
screen.
Ţ You can use your Knock Code together with the KnockOn feature.
Ţ Make sure to use your fingertip when tapping the screen.
Setting Up the Knock Code Feature
Tap > > Display > Lock screen > Select screen lock > Knock
1
Code.
Tap the squares in a pattern to set your Knock Code. Your Knock Code
2
pattern can be 6 to 10 taps.
Unlocking the Acreen Using the Knock Code
When the screen is off, you can unlock it by tapping the Knock Code
pattern you’ve previously set.
Custom-designed Features 9

Multi-tasking Feature
Multi-window
You can use two apps at the same time by separating the screen into
multiple windows.
While using an app, touch and hold
then select an app from the recently-used apps list.
Ţ You can use two apps at the same time.
Ţ To stop the Multi-Window feature, touch and hold
Ţ The Multi-Window feature is not supported by some apps, including
downloaded apps.
from the Home touch buttons,
.
Overview Screen
The Overview screen provides a preview of your recently-used apps.
To view the list of recently-used apps, tap
Ţ Touch and hold an app and drag it to the top of the screen to start the
app with the Multi-Window feature. You can also tap
each app preview.
Custom-designed Features 10
on the Home touch buttons.
at the top of
Capture+
The Capture+ feature allows you to create memos.
Using Capture+
You can use Capture+ function to easily and efficiently create memos
with a saved picture or on the current device screen.
Touch and slide the Status bar downward and tap .
1
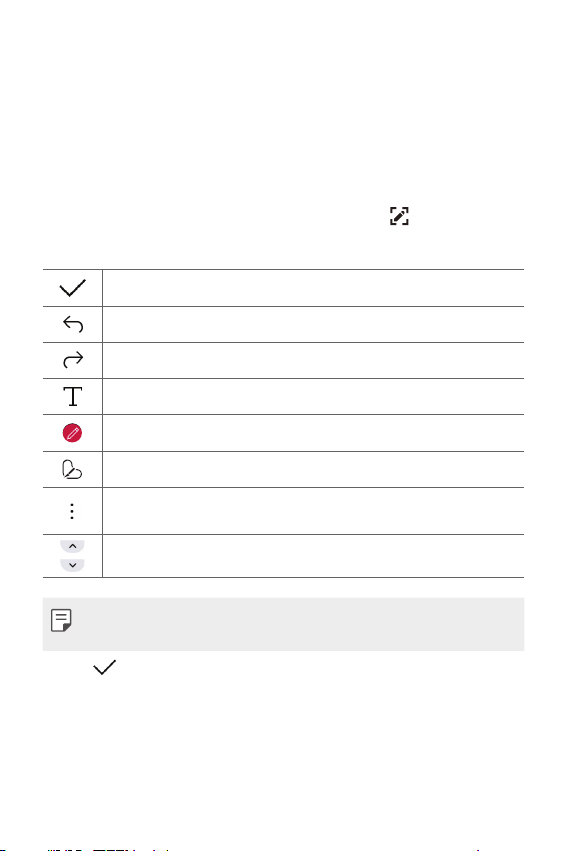
Create a memo using the following options:
2
Tap to save the memo you've created.
Tap to undo the most recent action.
Tap to redo the most recently deleted action.
Tap to insert text into your memo.
Tap to select the pen type and color.
Tap to crop the image of memo.
Tap to share the memo or change the background paper style.
Tap to hide or display the toolbar.
Ţ Please use a fingertip while using the Capture+ feature. Do not use your
fingernail.
Tap to save the current memo to the QuickMemo+ or the
3
Gallery.
Custom-designed Features 11

Viewing the Saved Memo
Tap > and select the Capture+ album.
OR
> and select the desired memo.
Tap
Custom-designed Features 12
QSlide
You can display several apps simultaneously on the same screen and freely
switch between them.
Using QSlide
When an app is running, tap > QSlide.
1
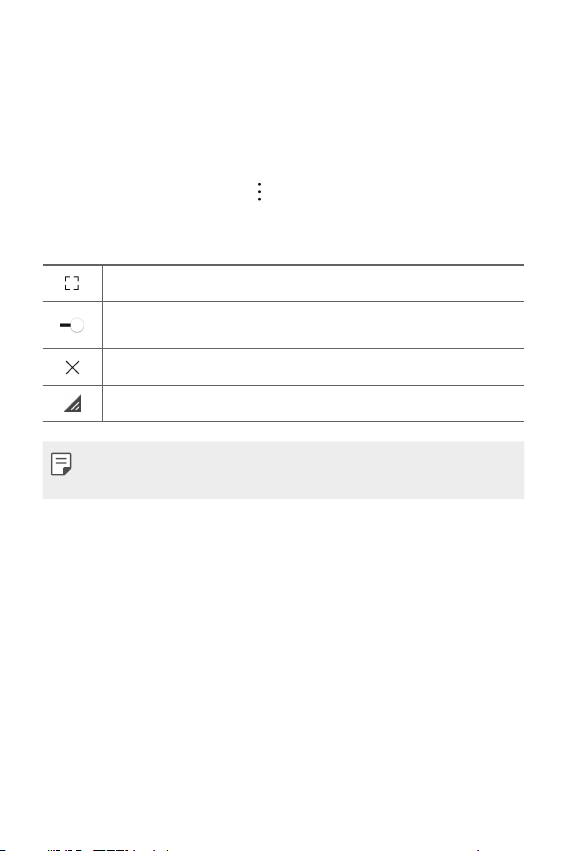
The app switches to the QSlide mode. The following options are
2
available.
Switch to full-screen mode.
Adjust the opacity of the QSlide window. If the window is transparent,
you can interact with the background.
Close the QSlide window.
Adjust the size of the QSlide window.
Ţ QSlide can support up to two windows at the same time.
Ţ This feature may not be supported by some apps.
Custom-designed Features 13

02
Basic Functions

Accessories
There are a variety of accessories available for your mobile device, some of
which may be sold separately. You can select these options according to
your personal communication requirements.
Ţ Always use genuine LG accessories. Failure to do this may void your
warranty.
Ţ Accessories may be different in different regions; please check with our
regional service company or agent for further inquiries.
Basic Functions 15
Device Overview
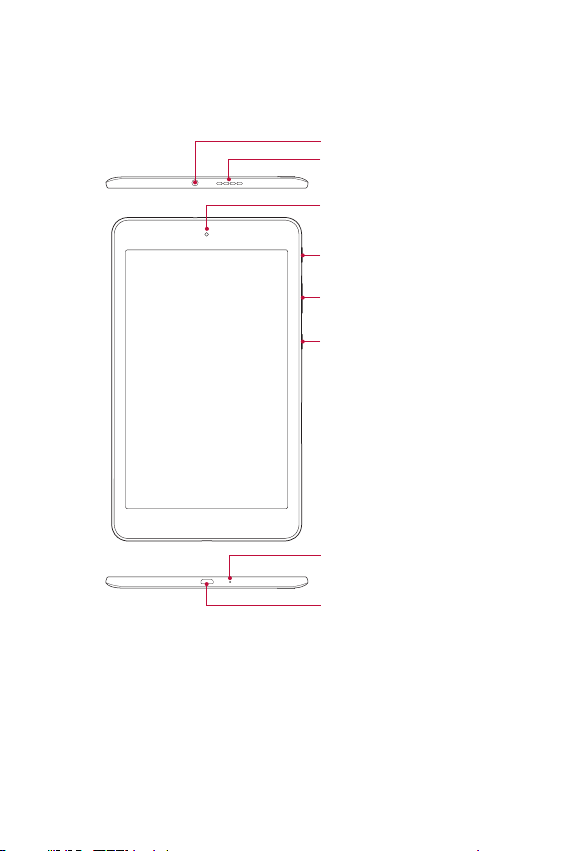
Front View
Earphone jack
Speaker
Front-facing camera
Power/Lock key
Volume keys
QuickButton key
Microphone
Charger/USB cable port
Basic Functions 16
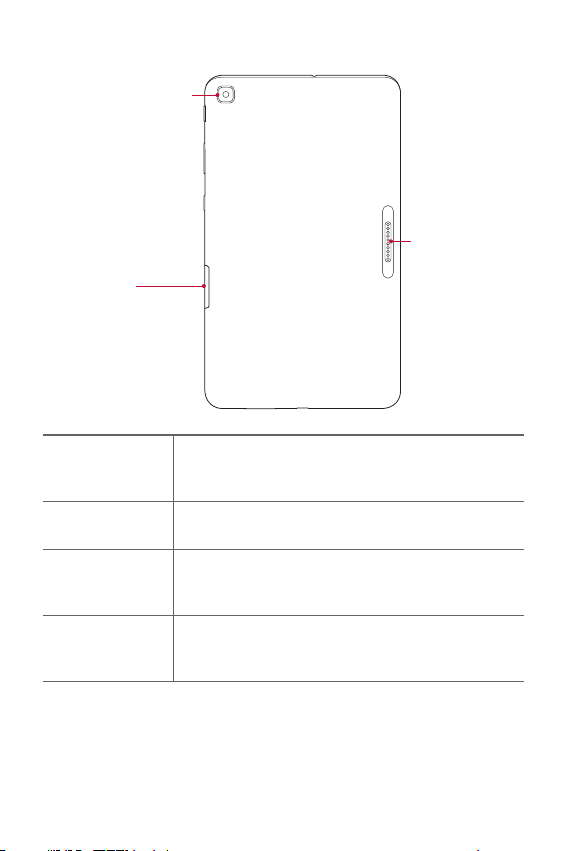
Back View
Rear-facing camera
SIM card/
microSD card tray
Connecting
terminals
Earphone jack
hands-free conversations. You can also plug in
headphones to listen to music.
Allows you to plug in an optional headset for convenient,
Speaker
Front-facing
camera
Use to listen to the audio from the selected function (e.g.,
music, videos, sound clips, etc.).
Use to take pictures and record videos of yourself. You
can also use this for video chatting. Keep it clean for
optimal performance.
Press to lock/unlock the screen. Press and hold to turn
Power/Lock key
the tablet on/off, restart it, and activate/deactivate
airplane mode.
Basic Functions 17

Volume keys
QuickButton key
Microphone
Charger/USB
cable port
Rear-facing
camera
SIM card/microSD
card tray
Connecting
terminals
While the screen is off:
Ţ Press the Volume Up Key twice to launch Capture+.
Ţ Press the Volume Down Key twice to launch the
Camera.
On the Home screen:
Ţ Control ringer volume.
During a call:
Ţ Control your earpiece volume.
When pl
aying audio/video:
Ţ Control volume continuously.
Press to launch an app. Press and hold to change the app
you wish to get quick access to.
Records your voice and allows use for voice-activated
functions.
Allows you to connect the tablet and the USB cable
for use with the charger adapter, your PC, or other
compatible accessories.
Use to take photos and record videos. Keep it clean for
optimal performance.
Allows you to insert your SIM card and a microSD card.
Attach the LG G Pad Plus pack matching the terminals.
Basic Functions 18
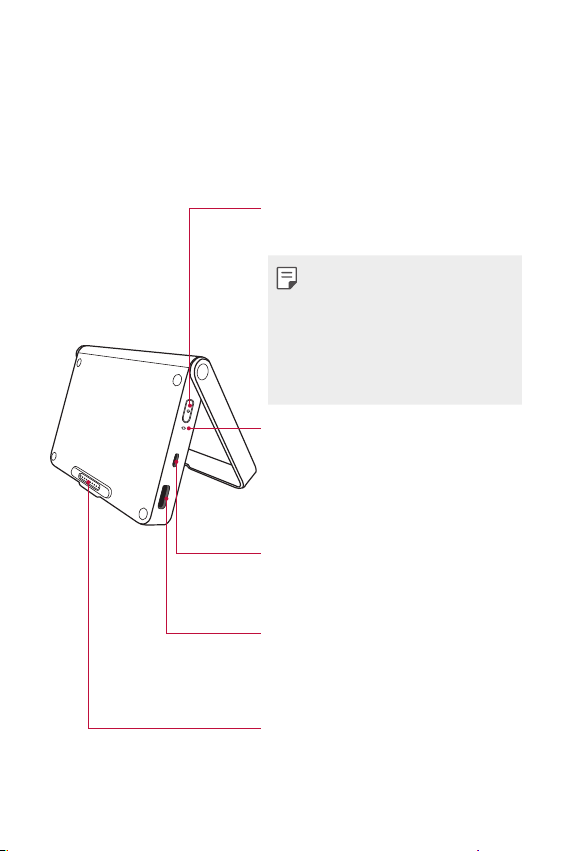
LG G Pad Plus Pack Overview
The LG G Pad Plus pack is a portable speaker and battery pack designed
for the LG G Pad X2 8.0 PLUS tablet.
When attached to the tablet and turned on, you can listen to the tablet's
sound through the LG G Pad Plus pack and charge the tablet at the same
time.
Power Button
Press to turn on.
Press and hold to turn off.
• If the LG G Pad X2 8.0 PLUS
tablet is detached,
the LG G Pad Plus pack will
omatically turn off.
aut
• If no device is connected to the
LG G Pad Plus pack for 15 sec, the
LG G Pad Plus pack will automatically
ff.
turn o
LED Indicator
Indicates the charging status and battery level.
It is red while charging and turns green when
charging is completed. When the battery
reaches 30% of its capacity, it turns red. When
the battery reaches 5% of its capacity, the red
LED blinks.
USB Type-B Port (micro USB Port)
Connect a cable to charge the
LG G Pad Plus pack or the LG G Pad Plus pack
and the tablet (when they are attached).
USB Type-A Port (Output 2)
(USB Peripheral Port)
Plug an USB Type-A cable into the port to
connect OTG devices (such as a keyboard) or
charge other phones.
Connecting Terminals (Output 1)
Attach the tablet by matching the terminals.
Magnets on the LG G Pad Plus pack align the
tablet properly.
Basic Functions 19
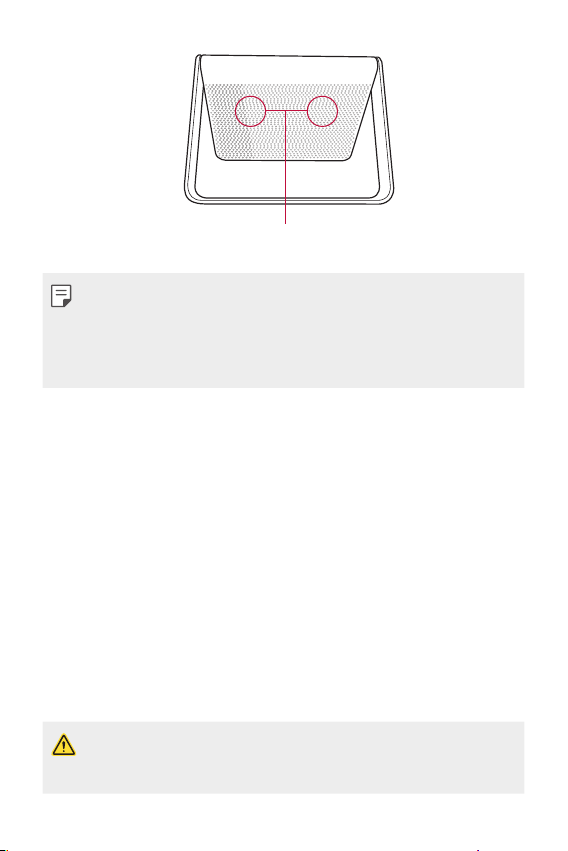
Stereo Speakers
Ţ When you connect another device to charge using a USB cable without
the LG G Pad X2 8.0 PLUS tablet attached, charging will start after
about 4 seconds to check the output mode.
Ţ To perform a reset of the Plus Pack, simply press and hold the Power
button for about 8 seconds.
Ţ Risk of fire and burns. Do NOT open, crush, heat above 60°C/140°F
or incinerate. Violation of the instructions may cause minor or serious
damage to the product.
Basic Functions 20
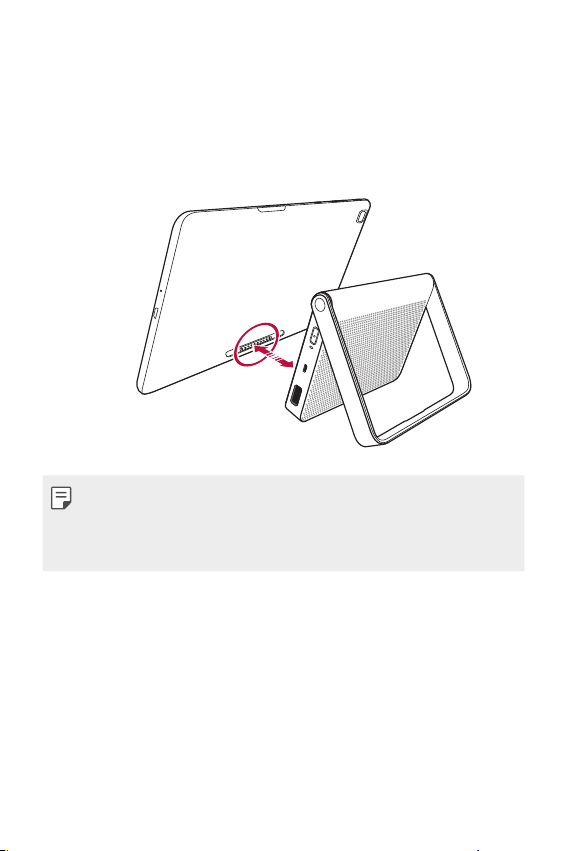
Attaching the Tablet to the LG G
Pad Plus Pack
Simply match the charging terminals on the tablet and LG G Pad Plus
pack.
Magnets on the LG G Pad Plus pack align the tablet properly.
Ţ Do not detach the LG G Pad Plus pack while playing music or a video.
Ţ Every time you attach or detach the LG G Pad Plus pack, it is
recommended that you calibrate the motion sensor. See
calibration
.
Motion sensor
Basic Functions 21
Charging the Battery
You can charge your tablet’s battery using the included AC adapter.
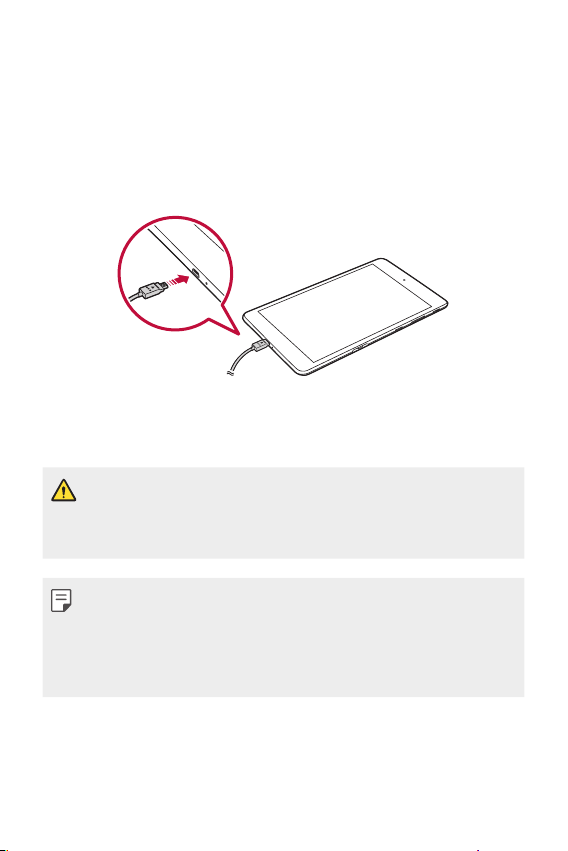
Charging the Tablet
The Charger/USB cable port is located at the bottom of the device. Insert
the charger and plug it into a power outlet.
Charge the battery before using it for first time. Use the charger included
with your device to charge the battery. A computer can also be used to
charge the battery by connecting the device to it using the USB cable.
Ţ Use only LG-approved chargers and cables. The use of unapproved
chargers or cables may cause a battery charging delay or display a popup message regarding slow charging. It can also cause the battery to
explode or damage the device, which is not covered by the warranty.
Ţ Your device has an internal rechargeable battery. For your safety, do not
remove the embedded battery.
Ţ The battery must be fully charged initially to improve battery lifetime.
Ţ Remove the charger from the power socket after the device is fully
charged. This prevents unnecessary power consumption.
Basic Functions 22

Charging the LG G Pad Plus Pack
Plug the USB cable into the micro USB port (USB Type-B port) on the LG
G Pad Plus pack. The LED indicator turns green when the battery is fully
charged.
LED Indicator
Charging the Tablet While It's Attached to the LG G
Pad Plus Pack
To charge the tablet and the LG G Pad Plus pack at the same time, plug
the USB cable into the micro USB port on the LG G Pad Plus pack while
it's attached to the tablet. When both are fully charged, the LED indicator
on the LG G Pad Plus pack turns green and “Battery fully charged” on the
tablet is displayed.
LED Indicator
Basic Functions 23

Ţ Always unplug the charger from the wall socket after the device is fully
charged to save unnecessary power consumption of the charger.
Using the Battery Efficiently
Battery lifespan may decrease if you keep many apps and functions
running simultaneously and continuously.
Stop apps and functions from running in the background to increase
battery life.
To minimize battery consumption, follow these tips:
Ţ Turn off the Bluetooth® or Wi-Fi network function when not using
them.
Ţ Set the screen timeout to as short a time as possible.
Ţ Minimize the screen brightness.
Ţ Set a screen lock when the device is not in use.
Ţ Check the battery usage details and close any downloaded apps that
ar
e draining the battery.
Basic Functions 24

Connecting a USB Device to Your
Tablet
Attach the tablet to the LG G Pad Plus pack.
1
Plug in the USB cable into an OTG (On The Go) device.
2
Insert the other end of USB cable into the USB peripheral port (Type-A
3
port) located on the side of the LG G Pad Plus pack.
Some of the USB devices supported through the USB port include a
keyboard, mouse, game controller, digital camera, and storage device
(including an Android smartphone acting as external storage device).
As most USB keyboards, mouse and game controllers are designed
for desktop computers and operation systems, some devices may not
function.
Basic Functions 25

Ţ Only devices that meet the USB specs may connect to the USB
peripheral port.
Ţ If you are experiencing errors with device recognition, please use a
shorter USB cable or check the USB Hub with external power supply
(Self-Powered Hub).
Ţ Only file systems such as FAT32, exFAT, and NTFS are supported for the
external USB storage device.
Ţ Transferring data through both USB devices at the same time is not
supported. The first device that is connected has priority. The USB device
connected second can only be charged.
Ţ You cannot store data in the USB storage when the battery level is
below 15%. Please charge the battery above 15% in order to use the
USB storage function.
Installing the SIM Card or microSD
Card
Before you can start exploring your new device, you need to set it up.
Your device supports the use of microSD memory cards of up to 2TB
capacity. Multimedia contents can be saved in the microSD card.
Pull out the card tray using the fingertip cutout.
1
Basic Functions 26
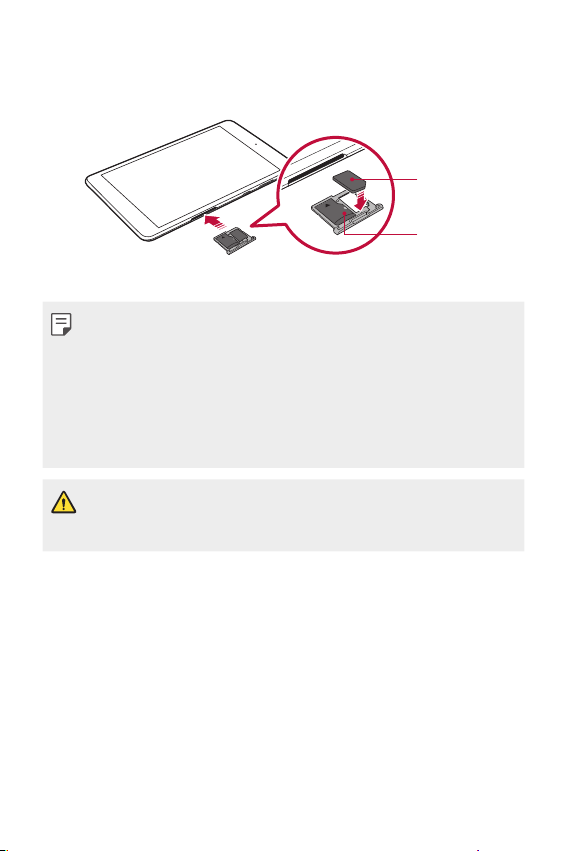
Put the Nano-SIM card and a microSD card (optional) on the card tray,
2
then slide the card tray into the slot as shown in the figure below.
Make sure the gold contact area on the card is facing downward.
Nano-SIM
microSD card
(optional-sold
separately)
Ţ Cards must be positioned as shown.
Ţ microSD card is not included.
Ţ Only Nano SIM cards work with this device.
Ţ For problem-free performance, it is recommended to use the device
with the correct type of SIM card.
Ţ Frequent writing and erasing of data may shorten the memory card
lifespan.
Ţ Some memory cards may not be fully compatible with the device. If you
use an incompatible card, it may damage the device or the memory card,
or corrupt the data stored in it.
Precautions when using the SIM card
Ţ Do not lose your SIM card. LG is not responsible for damage and other
issues caused by loss or transfer of a SIM card.
Ţ Be careful not to damage the SIM card when you insert or remove it.
Basic Functions 27

Removing the Memory Card
Before removing the memory card, first unmount it for safe removal.
Tap > > Storage > .
1
Pull out the card tray and remove the memory card.
2
Ţ Do not remove the memory card while the device is transferring or
accessing information. Doing so can cause data to be lost or corrupted
or damage to the memory card or device. LG is not responsible for
losses that result from the misuse of damaged memory cards, including
the loss of data.
Basic Functions 28
Touch Screen
You can familiarize yourself with how to control your device by using
touch screen gestures.
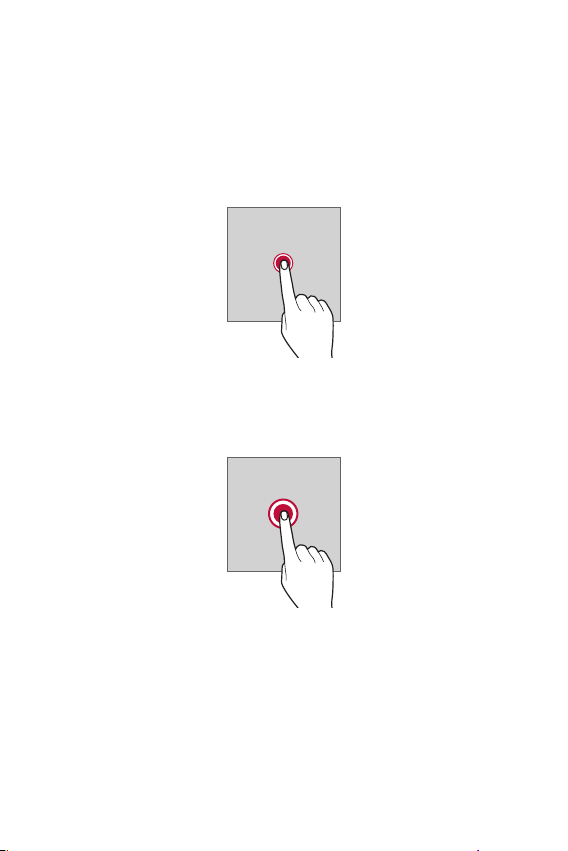
Tapping
Lightly tap with your fingertip to select or run an app or option.
Touching and holding
Touch and hold for several seconds to display a menu with available
options.
Basic Functions 29
 Loading...