

LG V5000 Owner’s Manual

OWNER’S MANUAL
Video Conference System
Please read this manual carefully before operating
your set and retain it for future reference.
MODEL
V5000
V5500
VR5010H
1212 (V1.5)
Safety Information
2
1 Safety Information
1
Safety Information
CAUTION
RISK OF ELECTRIC SHOCK
DO NOT OPEN
CAUTION: TO REDUCE THE RISK OF ELECTRIC SHOCK
DO NOT REMOVE COVER (OR BACK)
NO USER-SERVICEABLE PARTS INSIDE
REFER SERVICING TO QUALIFIED SERVICE PERSONNEL.
This lightning flash with arrowhead symbol
within an equilateral triangle is intended to
alert the user to the presence of uninsulated
dangerous voltage within the product’s
enclosure that may be of sufficient magnitude
to constitute a risk of electric shock to persons.
The exclamation point within an equilateral
triangle is intended to alert the user to
the presence of important operating and
maintenance (servicing) instructions in the
literature accompanying the product.
FCC WARNING: This equipment may generate or use radio
frequency energy. Changes or modifications to this equipment may
cause harmful interference unless the modifications are expressly
approved in the instruction manual. The user could lose the
authority to operate this equipment if an unauthorized change or
modification is made.
REGULATORY INFORMATION: FCC Part 15
This equipment has been tested and found to comply with the
limits for a Class A digital device, pursuant to Part 15 of the FCC
Rules. These limits are designed to provide reasonable protection
against harmful interference when the equipment is operated in a
commercial environment.
This equipment generates, uses, and can radiate radio frequency
energy and, if not installed and used in accordance with the
instruction manual, may cause harmful interference to radio
communications.
Operation of this equipment in a residential area is likely to cause
harmful interference in which case the user will be required to
correct the interference at his own expense.
• A suitable conduit entries, knock-outs or glands shall be
provided in the cable entries of this product in the end user.
• Caution: Danger of explosion if battery is incorrectly replaced.
Replaced only with the same or equivalent type recommended
by the manufacturer. Dispose of used batteries according to the
manufacturer’s instructions.
• Holes in metal, through which insulated wires pass, shall
have smooth well rounded surfaces or shall be provided with
brushings.
This Class A digital apparatus complies with Canadian ICES-003.
Cet appareil numérique de la classe A est conforme à la norme
NMB-003 du Canada.
Warning: Do not install this equipment in a confined space such as
a bookcase or similar unit.
Warning: Wiring methods shall be in accordance with the National
Electric Code, ANSI/NFPA 70.
Warning: This is a class A product. In a domestic environment this
product may cause radio interference in which case the user may
be required to take adequate measures.
Warning: To reduce a risk of fire or electric shock, do not expose
this product to rain or moisture.
Caution: This installation should be made by a qualified service
person and should conform to all local codes.
Caution: To avoid electrical shock, do not open the cabinet. Refer
servicing to qualified personnel only.
Caution: The apparatus should not be exposed to water (dripping
or splashing) and no objects filled with liquids, such as vases, should
be placed on the apparatus.
To disconnect power from mains, pull out the mains cord plug.
When installing the product, ensure that the plug is easily
accessible.
LG Electronics hereby declares that this/these
product(s) is/are in compliance with the essential
requirements and other relevant provisions of
Directive 2004/108/EC, 2006/95/EC, and 2009/125/
EC.
European Standards Centre:
Krijgsman 1, 1186 DM Amstelveen The Netherlands.
Safety Information
3
Disposal of your old appliance
1. When this crossed-out wheeled bin symbol is
attached to a product it means the product is
covered by the European Directive 2002/96/EC.
2. All electrical and electronic products should
be disposed of separately from the municipal
waste stream via designated collection facilities
appointed by the government or the local
authorities.
3. The correct disposal of your old appliance will help
prevent potential negative consequences for the
environment and human health.
4. For more detailed information about disposal of
your old appliance, please contact your city office,
waste disposal service or the shop where you
purchased the product.
• EEE Compliance with Directive. (for Turkey only)
• The equipment complies with requirements of the Technical
Regulation, in terms of restrictions for the use of certain
dangerous substances in electrical and electronic equipment.
(for Ukraine only)
Safety way to remove the battery or the battery from the
equipment:
Remove the old battery or battery pack, follow the steps in
reverse order than the assembly. To prevent contamination of the
environment and bring on possible threat to human and animal
health, the old battery or the battery put it in the appropriate
container at designated collection points. Do not dispose of
batteries or battery together with other waste. It is recommended
that you use local, free reimbursement systems batteries and
accumulators. The battery shall not be exposed to excessive heat
such as sunshine, fire or the lile.
Disposal of waste batteries/accumulators
1. When this crossed-out wheeled bin symbol
is attached to batteries/accumulators of Your
product it means they are covered by European
Directive 2006/66/EC.
2. This symbol may be combined with chemical
symbols for mercury(Hg), cadmium(Cd) or
lead(Pb) if the battery Contains more that
0.0005% of mercury, 0.002% of cadmium or
0.004% of lead.
3. All batteries/accumulators should be disposed
separately from the municipal waste stream via
designated collection facilities appointed by the
government or the local authorities.
4. The correct disposal of Your old batteries/
accumulators will help to prevent potential
negative consequences for the environment,
animal and human health.
5. For more detailed information about disposal of
Your old batteries/accumulators, please contact
Your city office, waste disposal service or the
shop where You purchased the product.
IMPORTANT SAFETY INSTRUCTIONS
1
Safety Information
1. Read these instructions.
2. Keep these instructions.
3. Heed all warnings.
4. Follow all instructions.
5. Do not use this apparatus near water.
6. Clean only with dry cloth.
7. Do not block any ventilation openings. Install in accordance
with the manufacturer’s instructions.
8. Do not install near any heat sources such as radiators, heat
registers, stoves, or other apparatus (including amplifiers) that
produce heat.
9. Do not defeat the safety purpose of the polarized or groundingtype plug. A polarized plug has two blades with one wider
than the other. A grounding type plug has two blades and
a third grounding prong. The wide blade or the third prong
are provided for your safety. If the provided plug does not fit
into your outlet, consult an electrician for replacement of the
obsolete outlet.
10. Protect the power cord from being walked on or pinched
particularly at plugs, convenience receptacles, and the point
where they exit from the apparatus.
11. Only use attachments/accessories specified by the
manufacturer.
12. Use only with the cart, stand, tripod, bracket, or table specified
by the manufacturer, or sold with the apparatus. When a
cart is used, use caution when moving the cart/apparatus
combination to avoid injury from tip-over.
13. Unplug this apparatus during lightning storms or when unused
for long periods of time.
14. Refer all servicing to qualified service personnel. Servicing is
required when the apparatus has been damaged in any way,
such as power-supply cord or plug is damaged, liquid has been
spilled or objects have fallen into the apparatus, the apparatus
has been exposed to rain or moisture, does not operate
normally, or has been dropped.

Safety Information
4
Safety Warnings and Cautions
1
The following are warnings and cautions for the safety of the users and for the prevention of any property damage. Please read the following
Safety Information
carefully. The safety instructions are divided into "Warning" and "Caution" and below is the definition.
- Warning: When you violate the instructions, it probably results in serious injury or death.
- Caution: When you violate the instructions, minor injury or damage that may occur.
WARNING
• Turn off the system before installation. Do not plug in several electric devices to the same outlet.
- This may cause over heating, fire, or electric shock.
• Do not place any liquid container on the system, such as water, coffee, or other beverage.
- If liquid is poured into the system, it can cause a system breakdown or fire.
• Prevent the power cable from being severely bent or having pressure exerted on it by a heavy object.
- This may cause fire.
• Dust around the system on a regular basis. When cleaning the system, always use a dry cloth. Do not use a wet cloth or other organic
solvents.
- This may damage the surface of the system and can cause a system breakdown or electric shock.
• Avoid placing the system near moisture, dust, or soot.
- This can cause fire or electric shock.
• When pulling the power cable from the plug, do so gently. Do not touch the plug with wet hands and avoid using the plug if the holes in
the outlet are too loose.
- This may cause fire or electric shock.
• Do not attempt to disassemble, repair, or modify the system on your own without seeking assistance from LG Electronics. It is extremely
dangerous due to the high voltage running through the system.
- This may cause fire, electric shock, or serious injury.
• Check for any danger signs such as a wet floor, a loosened or damaged power cable, or an unstable surface. If you encounter any problems,
ask your dealer for assistance.
- This may cause fire or electric shock.
• Install the system in a place with sufficient air ventilation. Keep at least 15 cm between the back of the system and the wall for the cables
connected to the system, otherwise they may be bent, damaged, or cut.
- This may cause fire, electric shock, or injury.
• Install the system in a cool place without direct sunlight and always maintain room temperature. Avoid candlelight and heat generating
devices such as heaters. Keep the system away from places where many people pass.
- This may cause fire.
- Recommended operating temperature is over 0 °C (32 °F).
• Install the system on a plain surface with sufficient air ventilation. Do not place the system on an elevated surface.
- This may cause system breakdown or serious injury.
• The power outlet must be placed on the ground, and the voltage range must be within 10 % of the voltage rate. Do not use the same
outlet with a hair dryer, iron, refrigerator, or any heating appliances.
- This may cause fire, over heating or electric shock.
• Do not touch power cords and signal cables while thunder and lightning.
- This can cause electric shock.
• Do not disconnect power cord during using.
- This may cause electric shock to product.
• Do not turn on or off the product by using power plug. (Do not use power plug as switch. This may cause electric shock or malfunction)
• If you are not used for a long time, separate from its power cord.
- Dust accumulation may cause due to leakage, electric shock or fire due to heat, fire and insulation degradation due to leakage, electric
shock or fire.
• When transporting the product, be sure to turn off and disconnect all cables connected to pins and transport.
- This may cause a electric shock and system breakdown.

Safety Information
• Main blocking device of power supply is power cord, this blocking device must be in a location that can be easily manipulated. The
product is connected to AC wall power, the switch is turned off when AC power is not completely blocked. Disconnecting the power
supply should be '0 ' power consumption.
• The product has been dropped or the case is broken, turn off the power and unplug the power cord.
- This may cause fire or electric shock. Please contact Service center.
• If the product has no video out or sound, please stop using. Unplug the power cable immediately and contact the service center.
- This may cause fire or electric shock.
CAUTION
Please beware of the following precautions before installing the VCS.
• Keep the system turned off before installation.
• Keep the product away from electric sparks or magnetic substances.
• Avoid temperature extremes. (Recommended operating temperature is between 0 °C and 40 °C)
• Ensure enough space is left for cable connections.
• Place the system on a solid surface with sufficient air ventilation. Avoid any surface that vibrates.
• Placing the system near electronic devices such as a radio may cause the product to breakdown.
• Prevent any substances from being inserted into the system.
- This may cause system breakdown.
• Do not install the system in a place with high magnetic, electric wave, or wireless devices such as a radio.
- Do not install the system in a place with magnetic objects, electric frequencies, or vibration.
• Do not place any heavy object on the system.
- This may cause system breakdown.
• Install the system on a stable, level surface.
- The system may not operate properly.
• Install the system in a place with appropriate moisture and temperature levels.
- Avoid installing the system in a place with high (over 40 °C) or low (under 0 °C) temperature.
• The system can be damaged from a strong impact or vibration. Avoid throwing objects within the vicinity of the system.
• Avoid direct sunlight or any heating appliances.
• Ventilate the air inside the system operation room, and tighten the system cover firmly.
- System breakdown may be caused by an inappropriate environment. It is recommended to use AVR (Automatic Voltage Regulator)
for a stable power supply. It is recommended to coil the core-ferrite around the connector of the system to avoid electromagnetic
interference.
• The outlet must be placed on the ground.
• If there is strange sound or smell, unplug the power cable immediately and contact the service center.
- This may cause fire or electric shock.
• In order to maintain stable system performance, have your system checked regularly by the service center.
- LG Electronics is not held responsible for system breakdown caused by user mishandling.
- There is a risk of explosion if a battery is replaced by an incorrect type. Dispose of used batteries according to the instructions.
• Do not overturn the product during use.
• Do not use or place near flammable materials.
- This may cause explosion or fire.
• If you use only a specific screen for a long time, it may remain badly damaged. Use a screen saver mode.
• The device as business type EMC Equipment (A grade), the seller or the user should be operated outside of the home is intended to be
used in.
5
1
Safety Information

Contents
6
Table of Contents
1 Safety Information
3 IMPORTANT SAFETY INSTRUCTIONS
4 Safety Warnings and Cautions
2 Preparation
8 Introduction
8 What is the VCS?
8 Features
9 Unpacking
10 Codec Unit Overview
11 HD Camera Overview
12 Remote Control
12 Before Using the Remote Control
13 Remote Control Functions
3 Installation
14 Connections
14 Precautions
14 Connection Overview
15 HDMI Connection
16 HD Camera Connection
17 PC Connection
18 Connecting to a Network
19 Connecting an Audio device
20 Connecting a Microphone
21 Connecting Power
21 System Connection Check
22 Using the CODEC UNIT STAND
24 Initial Settings
27 Main Screen Overview
28 System Configuration Menu
29 User Settings
29 General
30 Camera
31 Date Time
32 Admin Settings
32 Call Settings
36 Network Settings
42 System Settings
44 System Information
44 System Status
44 Video
45 Audio
45 Network Utility
46 Server Status

4 Operation
47 Before Using the System
47 Placing a Call
47 Placing a Call Manually
48 Multipoint Call (V5500 Only)
48 Placing a Call from the Call History
49 Placing a Call from the Directory
49 Placing a Call using the Speed Dial
49 Answering or Rejecting a Call
49 Managing a Call
49 Ending a Call
49 Hiding or Showing User Interface Elements
50 Managing Audio
50 Managing Video Layout
51 Managing Video Contents
53 Viewing Call Information
53 Get the Snapshot
54 Managing the Directory
54 Adding an Entry to the Directory
55 Editing or Deleting an Entry from the Directory
55 Copying an Entry from the Call History
55 Copying an Entry from the Corporate Contact
56 Deleting an Entry from the Call History
56 Sorting and Searching
56 Placing a Call when the Device is Registered in Gatekeeper Server
56 Making a Call when the Device is Registered in SIP Server
57 Using the Camera Control
57 Using Preset function
58 Using SnapShot
58 Using Power Off
59 Using the Web Service
59 Login the web service
60 Using the web monitoring function
61 Using the web recording function
62 Upgrading your System Software
62 Uploading the Certification File
63 Importing or Exporting the Address Book
Contents
7
1
2
3
4
5
5 Appendix
64 Troubleshooting
66 Open Source Software Notice
67 Specifications

Preparation
8
2 Preparation
2
Preparation
Introduction
What is the VCS?
The LG VCS (Video Conference System) is designed to be used for video conferencing that enables people in different places to have a meeting
by seeing, listening and speaking to each other on a screen.
Through this device, not only can executives or managers have a meeting and communicate with customers, subcontractors and coworkers
in real time but decisions can be made and information can be exchanged virtually and immediately, saving travel time, cost and energy.
VCS
Features
• Convenient and easy graphical user interface
• H.323 / SIP network Internation Standard codec
• HD video quality – 1 280 X 720 (30 fps)
• Selectable screen layouts
• Graphic presentation using Content Sharing Function
• Administrator password for security
• One-touch call connection using speed dial
• Graphical directory using snapshot and specific group management
• Easy phonebook search function
• 720p high-definition camera
• Natural sounding conversation using full duplex mode
• 3.5 mm Micpod with Mute
• Pan/Tilt/Zoom control of the camera
Network
VCS
Preparation
Video Conference System
Quick Setup Guide
V5500
4
Optional
3
TV
Optional
5
Optional
Optional
2
6
HDMI
CABLE
HDMI
CABLE
CAMERA
CABLE
D-sub
CABLE
LAN
CABLE
DC 12 V
1
Video Conference System
Quick Setup Guide
V5500
4
Optional
3
TV
Optional
5
Optional
Optional
2
6
HDMI
CABLE
HDMI
CABLE
CAMERA
CABLE
D-sub
CABLE
LAN
CABLE
DC 12 V
1
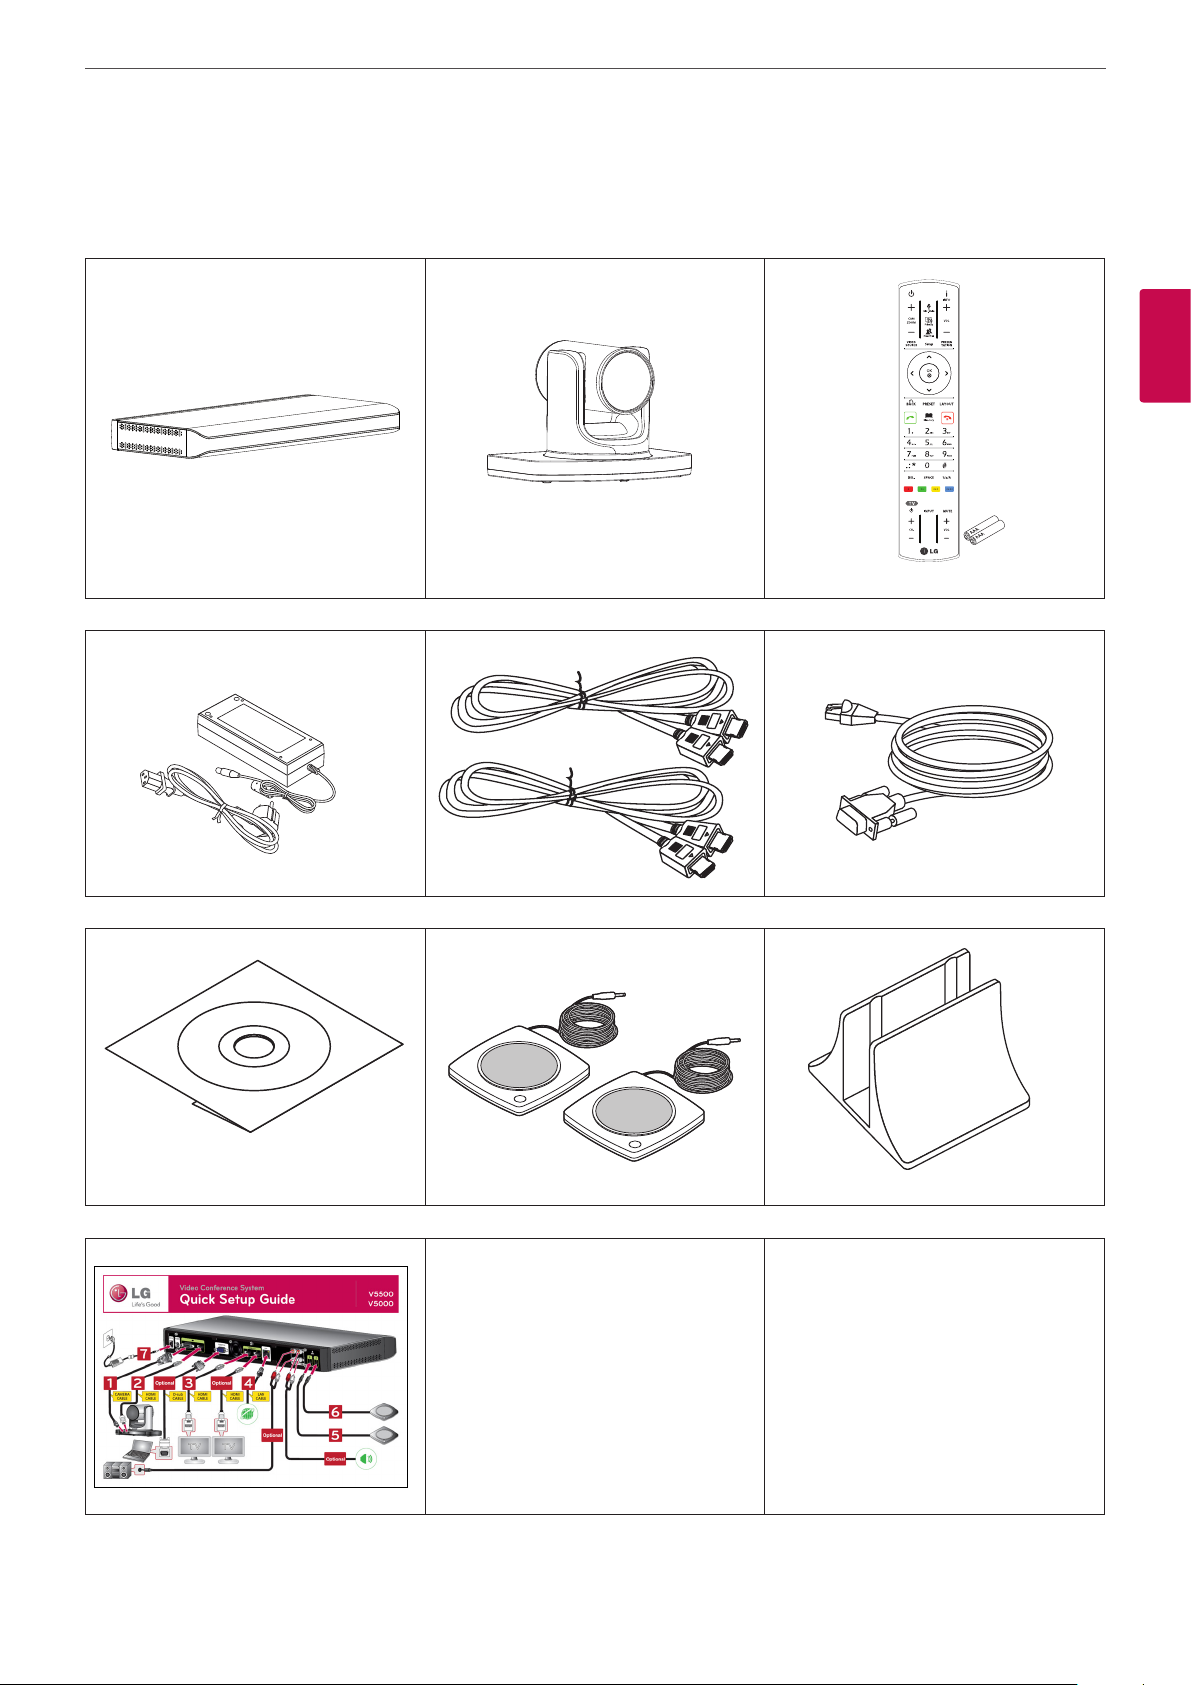
Unpacking
Check your product box for the following items. If there are any missing accessories, contact the local dealer where you purchased your
product. The illustrations in this manual may differ from the actual product and item.
Codec Unit HD Camera Remote Control and Batteries
9
2
Preparation
Power Adapter HDMI Cable Camera Connection Cable
Owner’s Manual CD MicPod Codec Unit Stand
Quick Setup Guide
Preparation
10
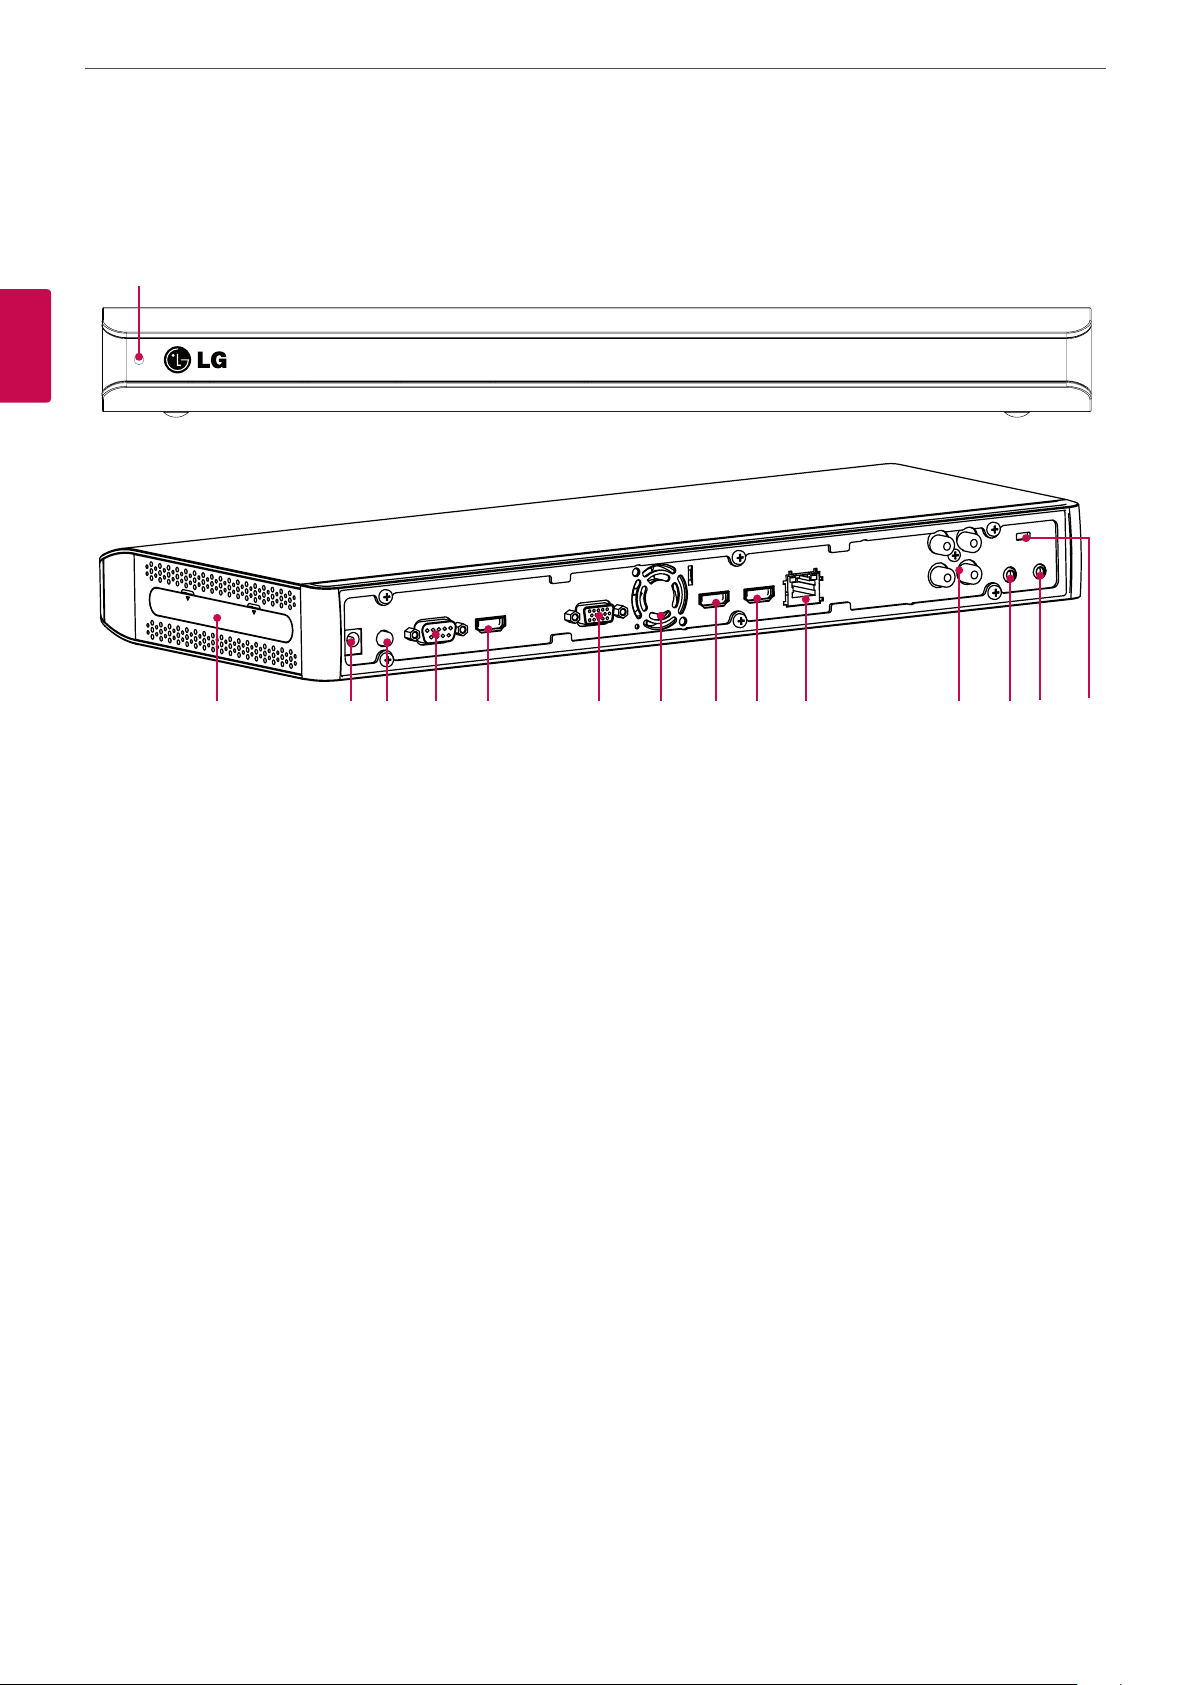
Codec Unit Overview
a
2
Preparation
b c d e f g h i j k l m n o
Power indicator: Lights when the unit turns on.
a
If you use the codec unit as stand type, attach the codec unit to the codec unit stand. For more details, refer to 22 page.
b
Power input jack: Connects to a DC 12 V power supply using proper cables.
c
Power button: Turns the unit on or off. You must turn the unit on using the Power button after connecting the power cable. You can
d
use this button to reset the system.
Camera connection port: Connects the HD camera.
e
HDMI Input port: Connects the codec unit and the camera with a HDMI cable.
f
RGB(PC) IN port: Connects the PC with a D-sub cable for presentation.
g
Cooling fan.
h
HDMI OUT 1 port: Connects the codec unit and the display device with a HDMI cable for main output.
i
HDMI OUT 2 port: Connects the codec unit and the display device with a HDMI cable for contents output.
j
LAN port: Connects to a network via a hub with RJ-45 connector.
k
AUDIO IN/OUT: Connects to the external audio device.
l
Microphone jack 1: Connects a microphone.
m
Microphone jack 2: Connects a microphone.
n
LOCK: Connects the Kensington security system cable between the Codec Unit and a large object such as a desk.
o
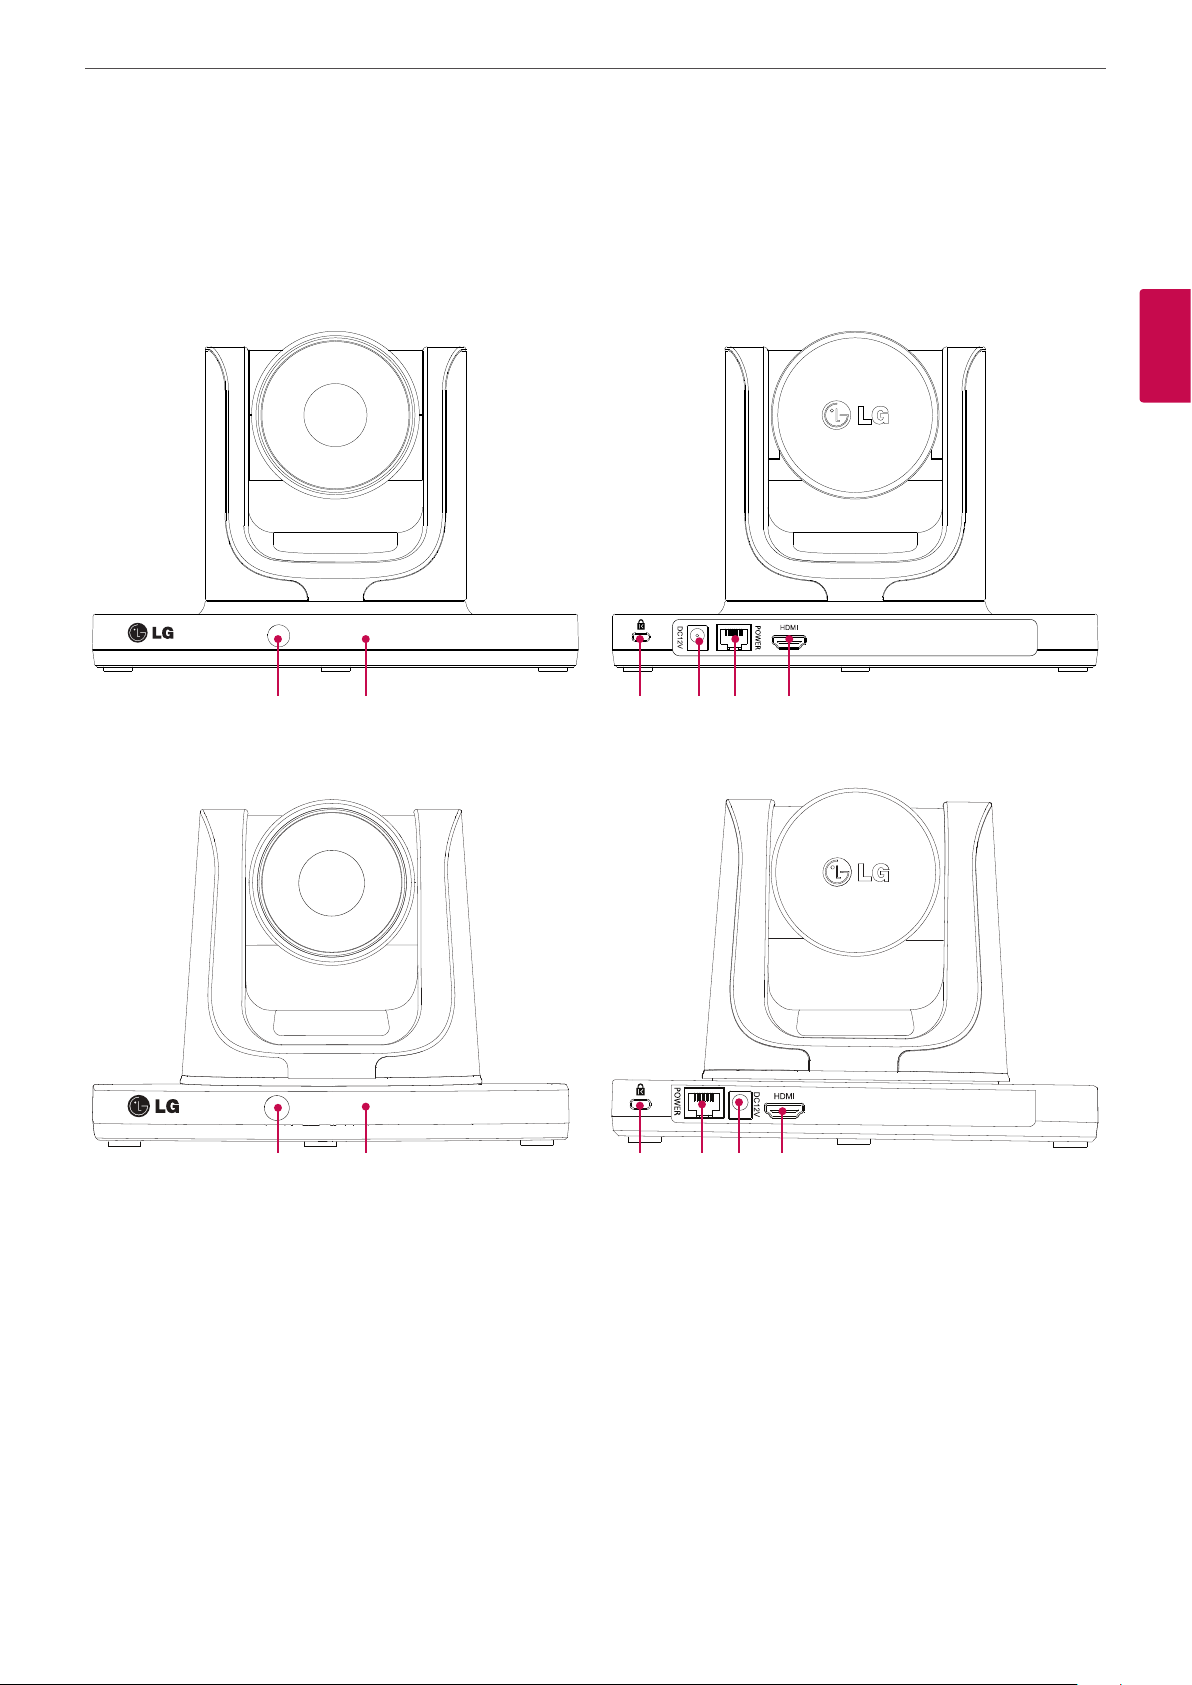
HD Camera Overview
V5000
Preparation
11
2
Preparation
a b c d e f
VR5010H
a b c e d f
Remote sensor: Point the Remote control here.
a
Camera activation indicator: Lights when the camera is connected to the codec unit and activates correctly.
b
LOCK: Connects the Kensington security system cable between the Camera and a large object such as a desk.
c
Power input jack: Connects to a DC 12 V power supply using proper cables.
d
RJ-45 connection port: Connects the codec unit and the HD camera with the supplied camera connection cable. It enables power
e
to be provided to the camera and communicate with codec unit. The camera is operated without external power supply when the
camera and codec unit are connected with the supplied Camera connection cable.
HDMI port: Connects the codec unit and the camera with a HDMI cable.
f

Preparation
12
Remote Control
This remote control provides wireless control of all video conference system functions and enables you to navigate the user interface, place
and receive calls and control the far end of the camera connected to the system.
Before Using the Remote Control
2
Open the battery cover, replace batteries (1.5 V AAA) matching 2 and 3 ends to the label inside the compartment and then close the
Preparation
battery cover.
CAUTION
Do not mix old and new batteries as this may damage the Remote Control.
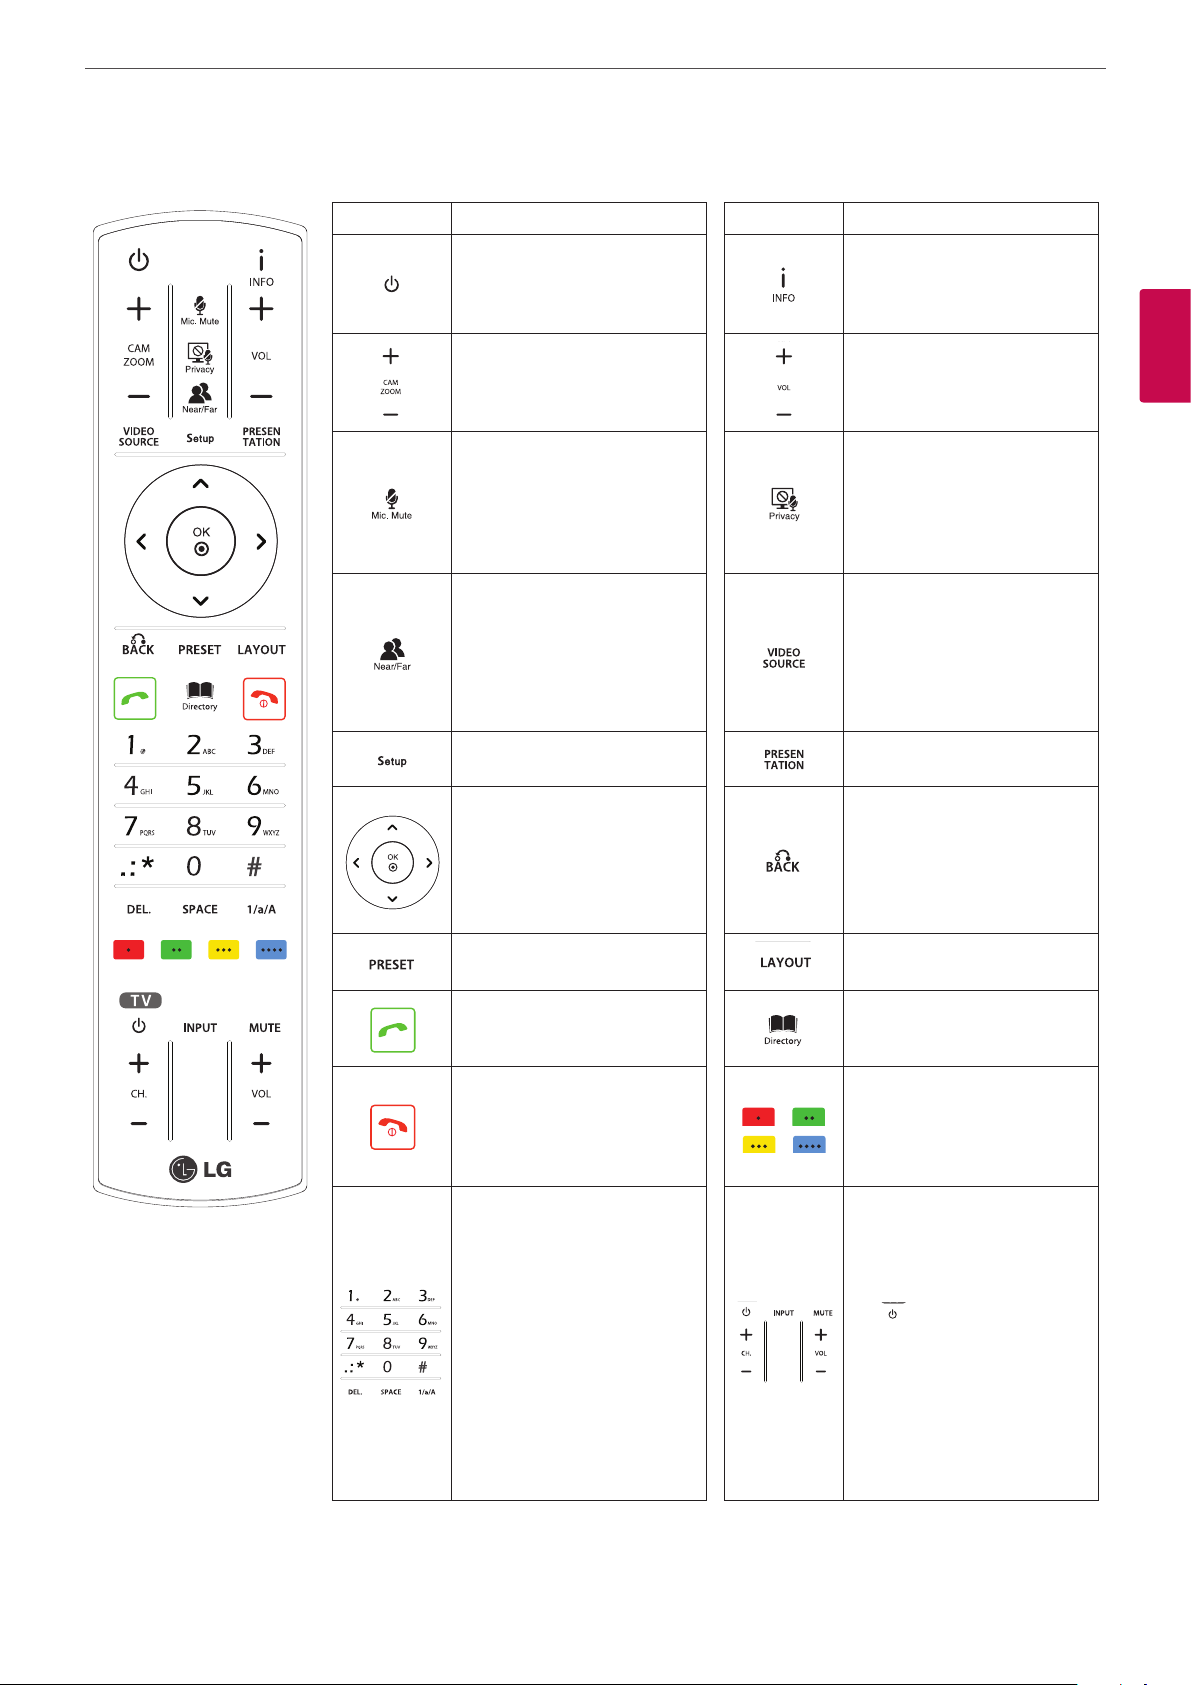
Remote Control Functions
Button Description Button Description
Changes the unit to idle (ON) or
standby (OFF) mode. For more
details by using the power off,
refers 58 page.
Use this button to zoom in or
zoom out of the near end and
the far end camera.
Preparation
Displays the system or call
information.
Use this button to adjust the
volume of the system in a call.
13
2
Preparation
Use this button to mute
microphones of the near end
system.
Use this button to select the near
or far end camera. You can use
the below functions.
• Preset setting
• PTZ control
• Selects a video source
Displays the system setup menu. Use this button to enable the
• Arrow buttons: Navigate
the menu options. Use this
button to Pan/Tilt control for
far end camera.
• OK: Confirms menu
selections.
Use this button to set the far end
camera preset.
Use this button when you want
to make a call.
If you press this button during
a call, the camera image will be
displayed to the opposite sides
of the current camera position
and mute the microphones of
the near end system.
Use this button to select the
video input source (camera or
PC) of the near camera.
presentation function.
Use this button to return to the
previous condition.
Use this button to change the
screen layout.
Displays the directory menu.
Use this button when you want
to hang up the call.
Use these buttons to input text
or numbers.
• DEL.: Delete a character
before the cursor position.
• SPACE: Insert a space at the
cursor position.
• 1/a/A: Change the input type
among the number, lower
case and upper case.
Function buttons.
Each button function changes as
the condition of the menu and
system operation refers to the
each screen for more details.
Use these buttons to control
the LG TV. If you want to use this
function, the VCS is connected
with HDMI TV via the HDMI
Output 1 port.
• : Turns the TV power On
or Off.
• CH. +/- : Use this button to
change the channel.
• INPUT: Selects the input
source.
• MUTE: To mute the sound.
• VOL +/-: Use this button to
adjust the volume of the TV.
Installation
14
3 Installation
Connections
Precautions
Before setting up the system, ensure that the monitor, the computer system and other attached devices are turned off.
3
Installation
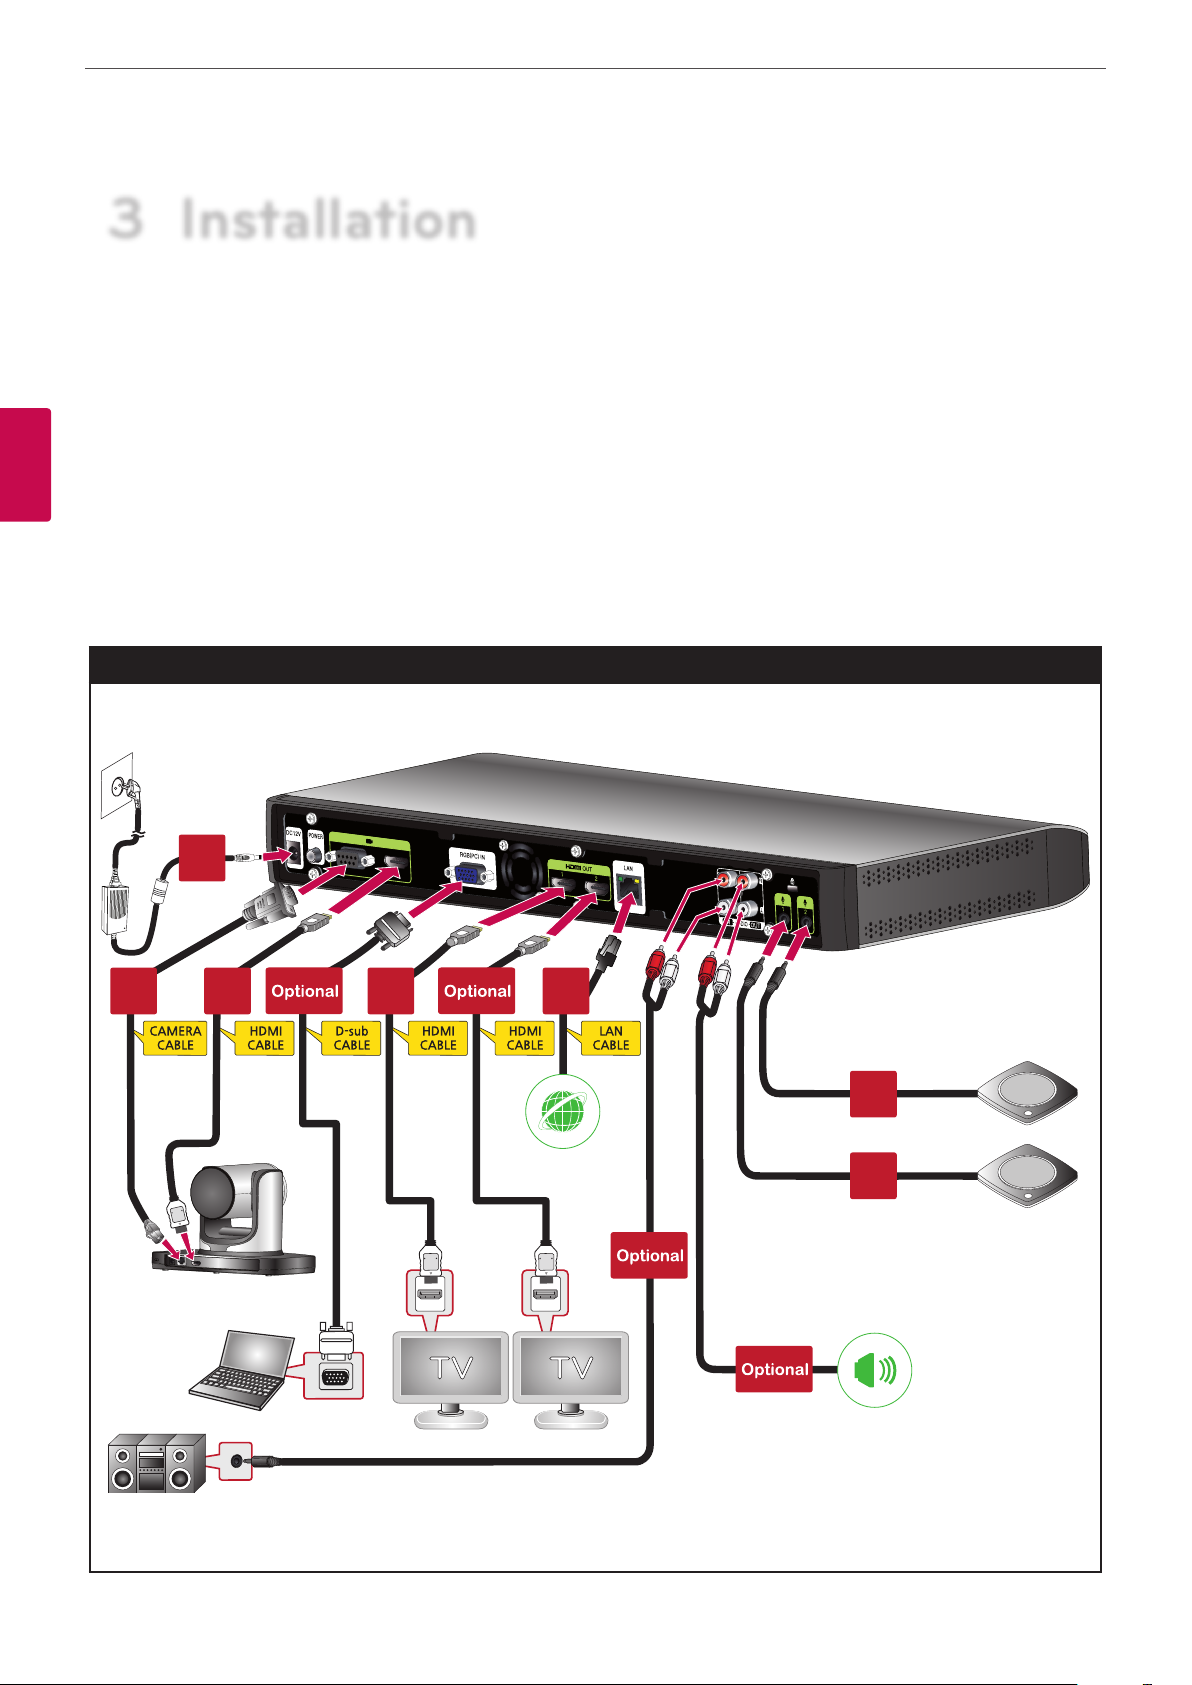
Connection Overview
The illustration below shows the connections of the system. For specific information of each connection, refer to the next pages.
Connection Overview
7
1 2 3 4
6
5
Installation
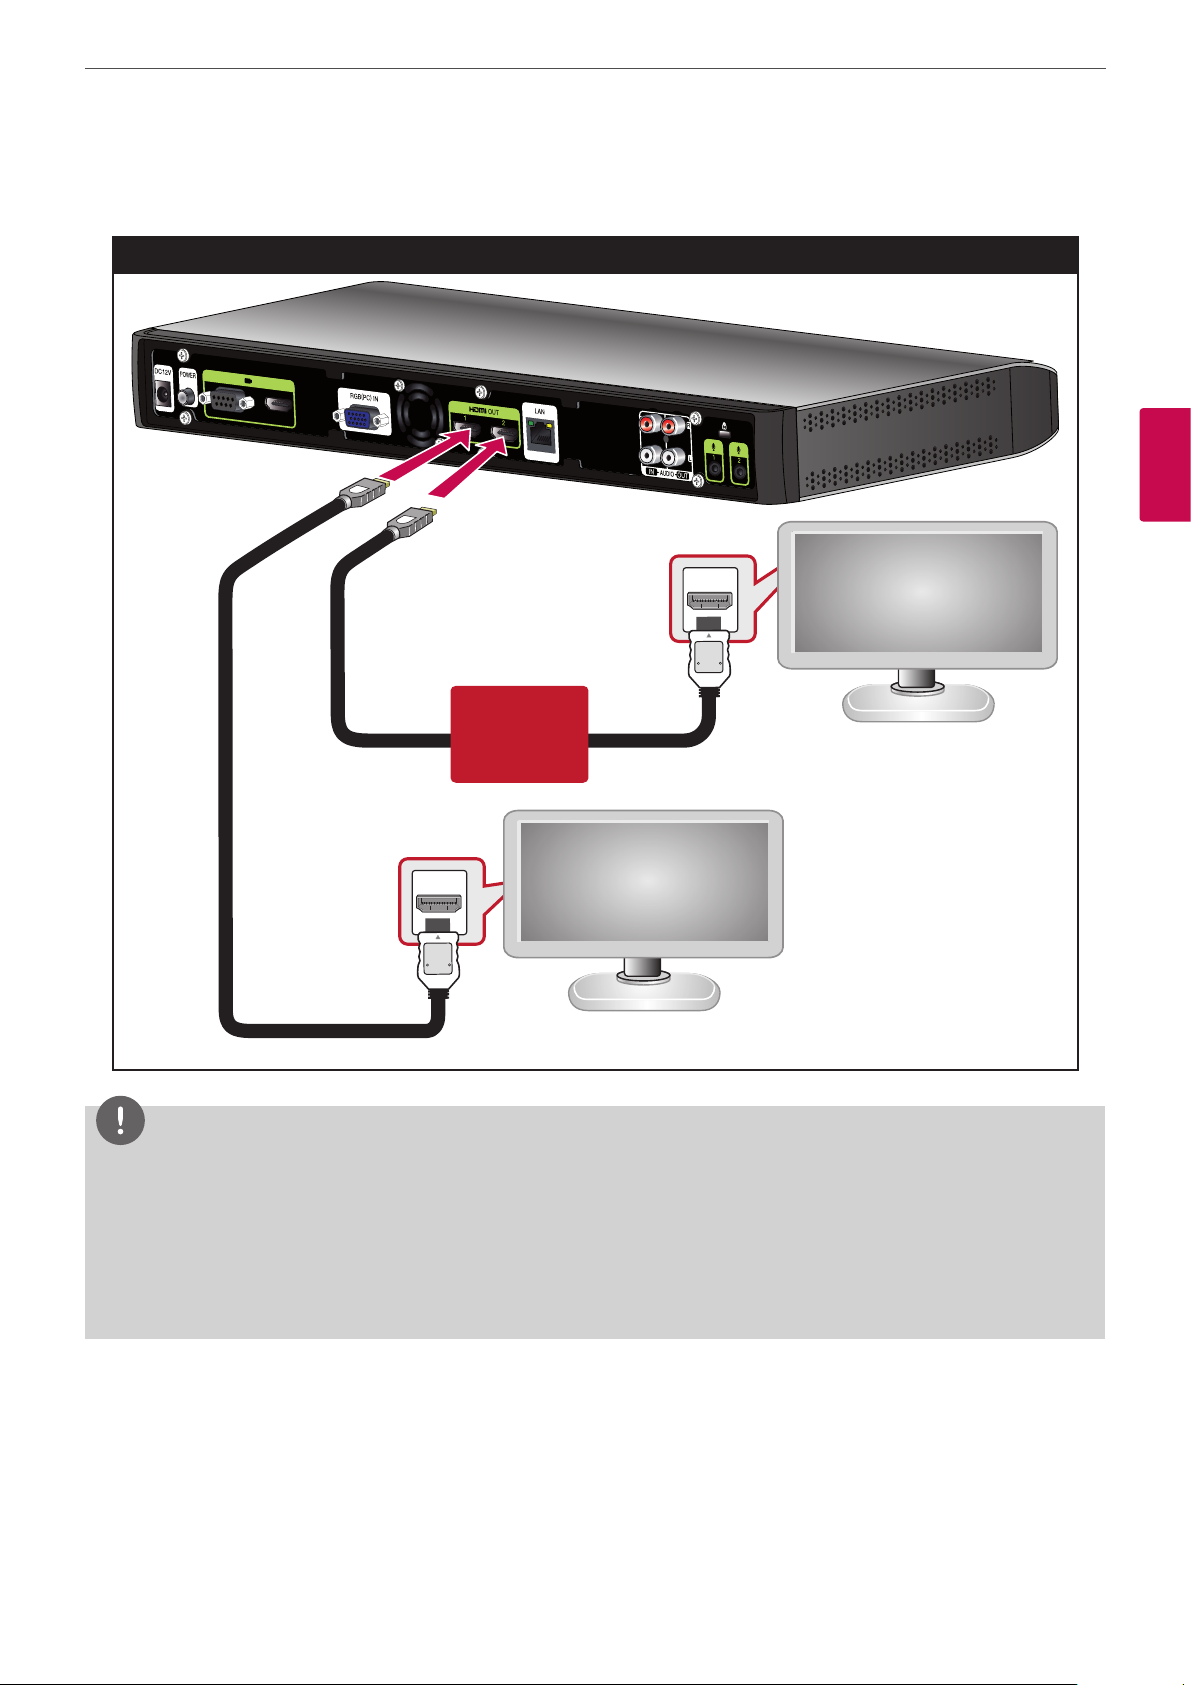
HDMI Connection
Transmit the digital video and audio signals from the system to your monitor with the HDMI cable as shown in the following illustrations.
HDMI Cable Connection
15
3
Installation
Optional
NOTE
• It is recommended to use the monitor with built-in speaker and 1280X720 mode for the best image quality.
• If you connect the codec unit to the DVI port of monitor (TV) using HDMI to DVI converter, you should hear the audio through Audio out
device because DVI does not support audio interface. Please go to [Setup > Admin > System > Audio > Audio Out] and change [Audio
Out] to “Line Out”.
• The HDMI OUT 2 port is used to output the contents. If you connect the HDMI OUT 2 port and use it, please go to [Setup > User >
General > Second Display] and set to On.
• Do not connect Camera Input HDMI Cable to HDMI TV or monitor.
Installation
16
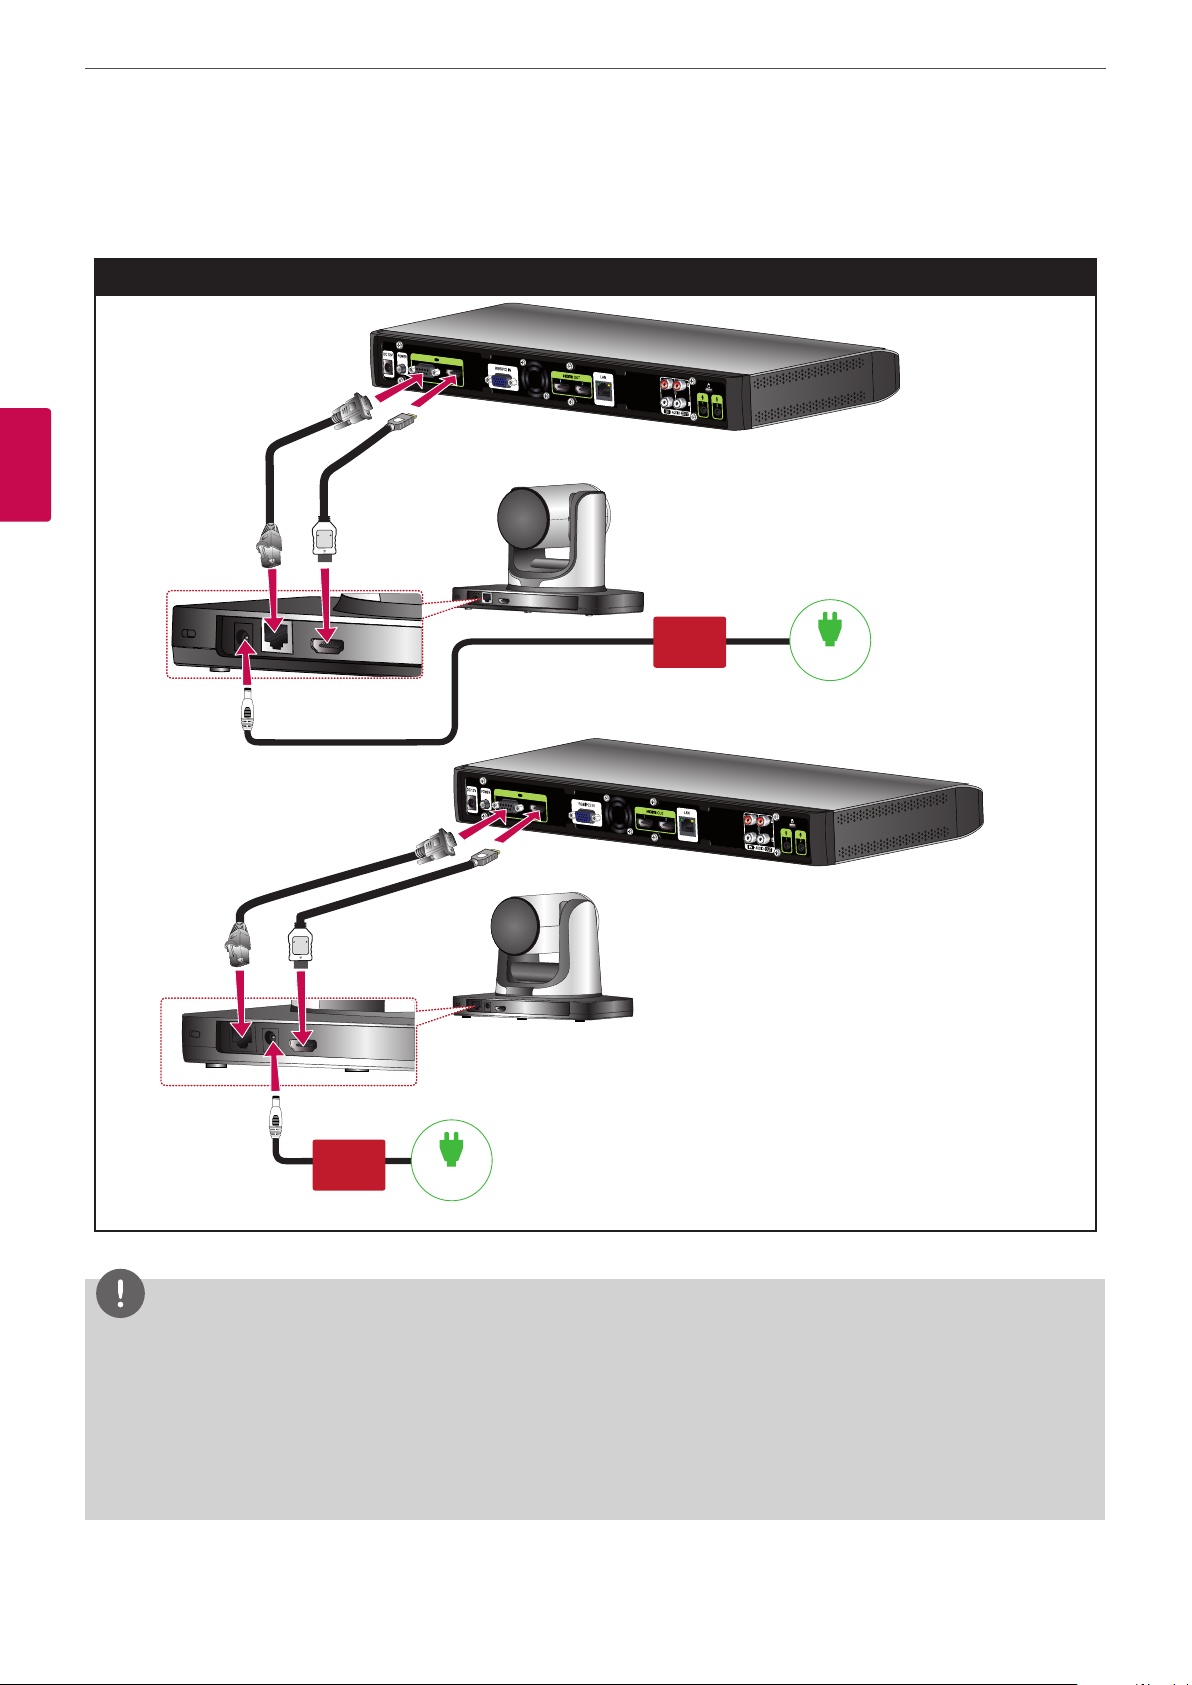
HD Camera Connection
Connects the HD camera to the camera jack of the codec unit with the supplied camera connection cable(RJ-45[with power] to D-sub Cable)
as shown in the following illustrations.
HD Camera Connection
3
Installation
V5000,V5500
Optional
Optional
DC 12 V
VR5010H
DC 12 V
NOTE
• After connection is completed, adjust the angle of the camera to suit your view.
• Do not Connect HDMI Out Cable to Camera HDMI Input Port.
• It is recommended to use the camera with the 1280 x 720p60 mode.
• Do not connect Camera Connection Cable (RJ-45[with power] to D-Sub Cable) to other device's LAN Jack. (e.g. Note book LAN Jack)
• After connecing the Camera Connection Cable properly, turn on the Codec Box. Otherwise the VCS may cause malfunction.
• Do not hold the camera forced for a long time. Install the camera in a place with sufficient not to interrupt the rotation. This may cause
product to breakdown or power may turn OFF automatically.
Installation
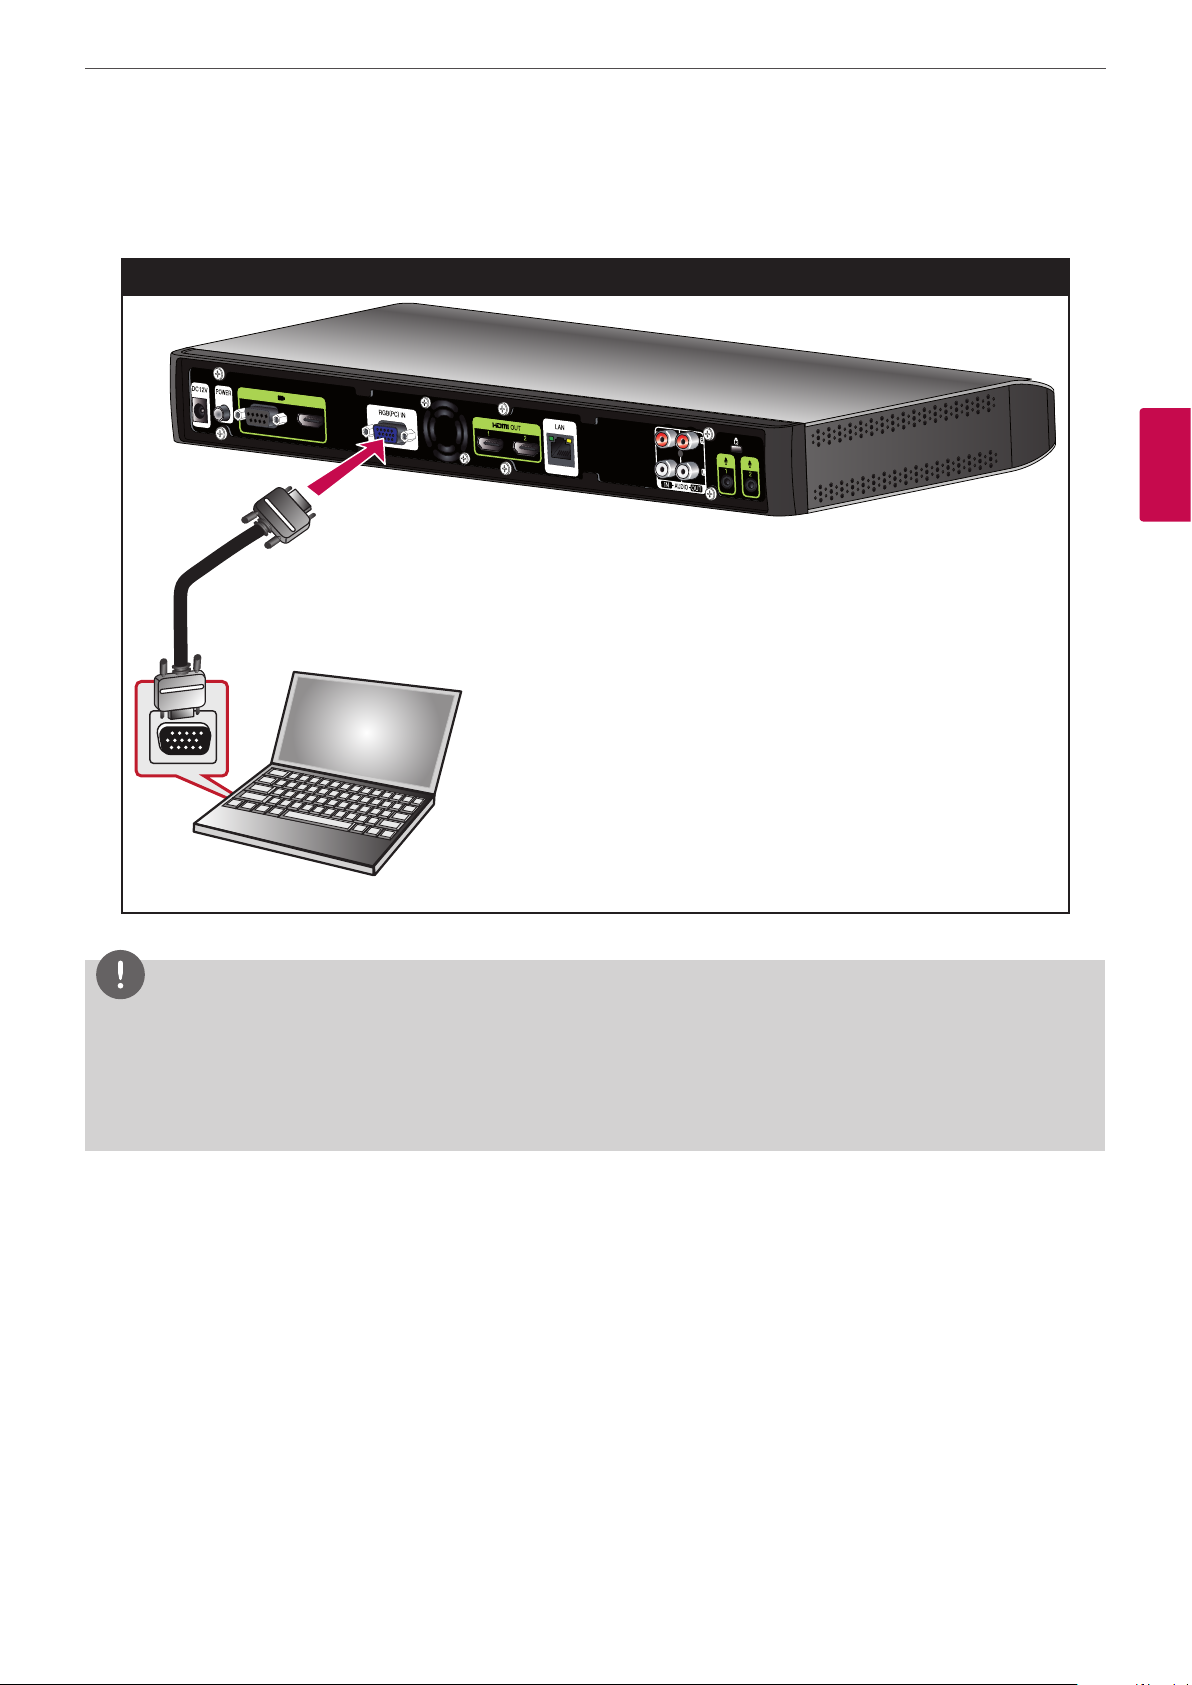
PC Connection
Transmits an analog video signal from your PC to codec unit. Connect the PC and the codec unit with the optional D-sub 15-pin signal cable
as shown in the following illustrations. You can give a presentation to the far-end user with this connection.
PC Connection
17
3
Installation
NOTE
• The D-sub Cable (D-Sub 15 pin female to D-sub 15 pin) is not included. So purchase the cables separately.
• This unit supports 640 x 480, 800 x 600, 1 024 x 768, 1 280 x 720, 1 280 x 768, 1 280 x 1 024, 1 400 x 1 050 and 1 920 x 1 080 and 60Hz for
PC output resolutions.
• If the PC screen can not see properly after D-sub cable insert or remove from the VCS, check the PC video output connection again .
Installation
18
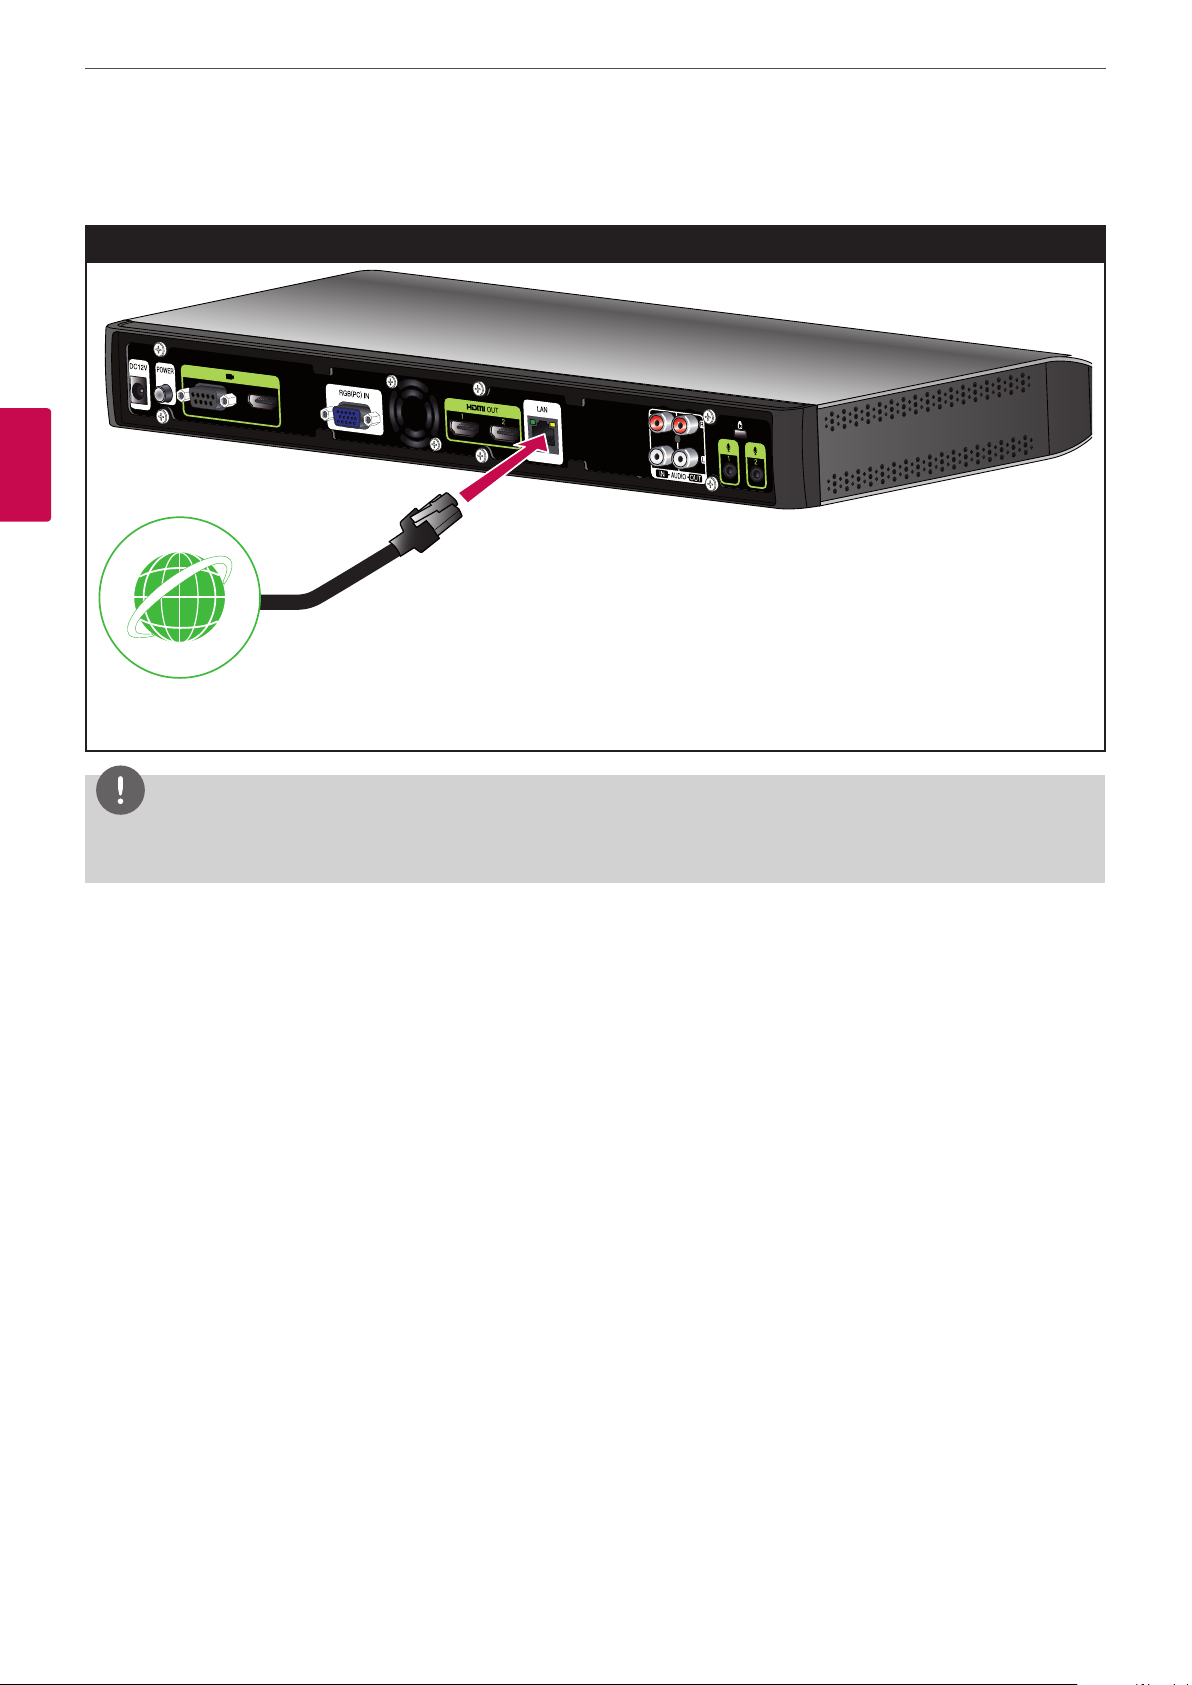
Connecting to a Network
Connects the codec unit’s LAN port to a corresponding port on your router or network using an optional LAN cable with RJ-45 connector.
Network Connection
3
Installation
NOTE
When plugging or unplugging the LAN cable, hold the plug portion of the cable. When unplugging, you should hold the lock of the plug
portion.
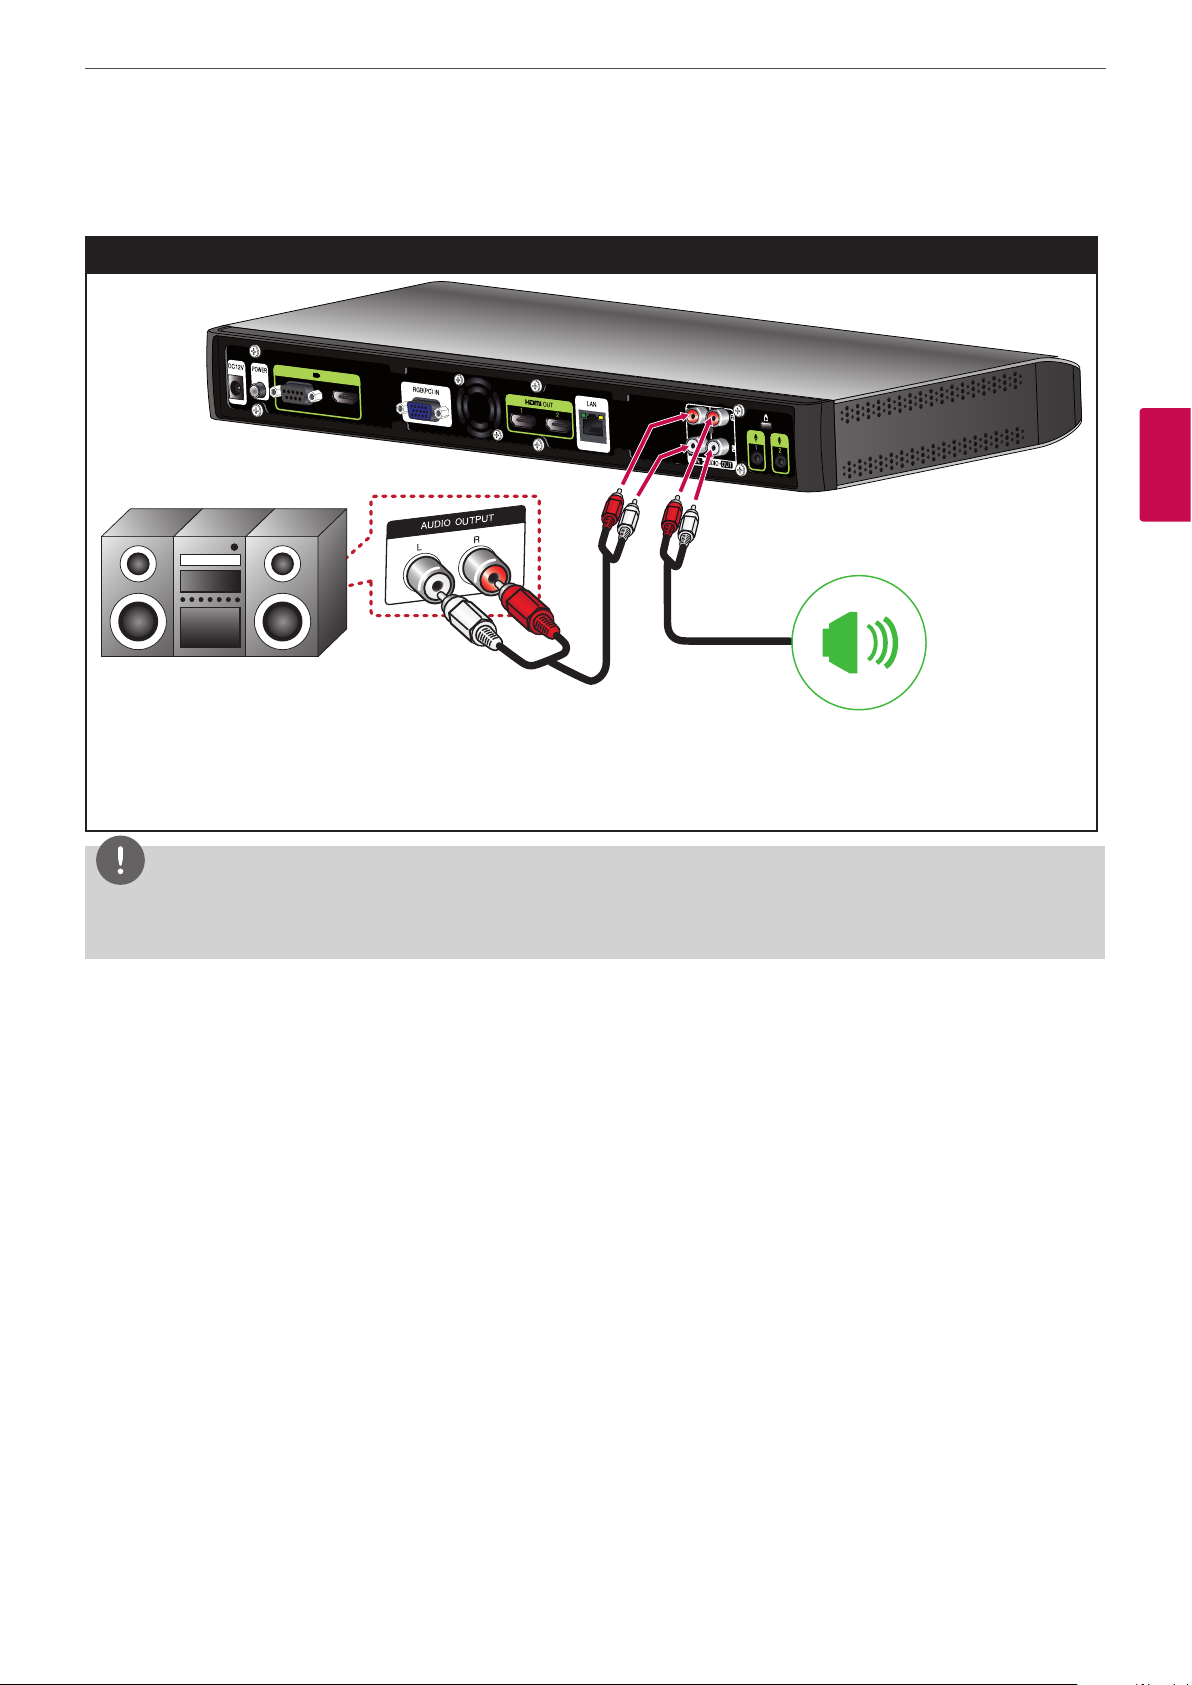
Connecting an Audio device
Connects an audio device to the AUDIO OUT port of the codec unit as shown in the following illustrations.
Audio Device Connection
Installation
19
3
Installation
NOTE
• You can transport sound by connecting the AUDIO OUT device to the AUDIO IN Port.
• If you connect the AUDIO IN port and use it, please go to [Setup > Admin > System > Audio > Audio IN] and set to [Line IN].
Installation
20
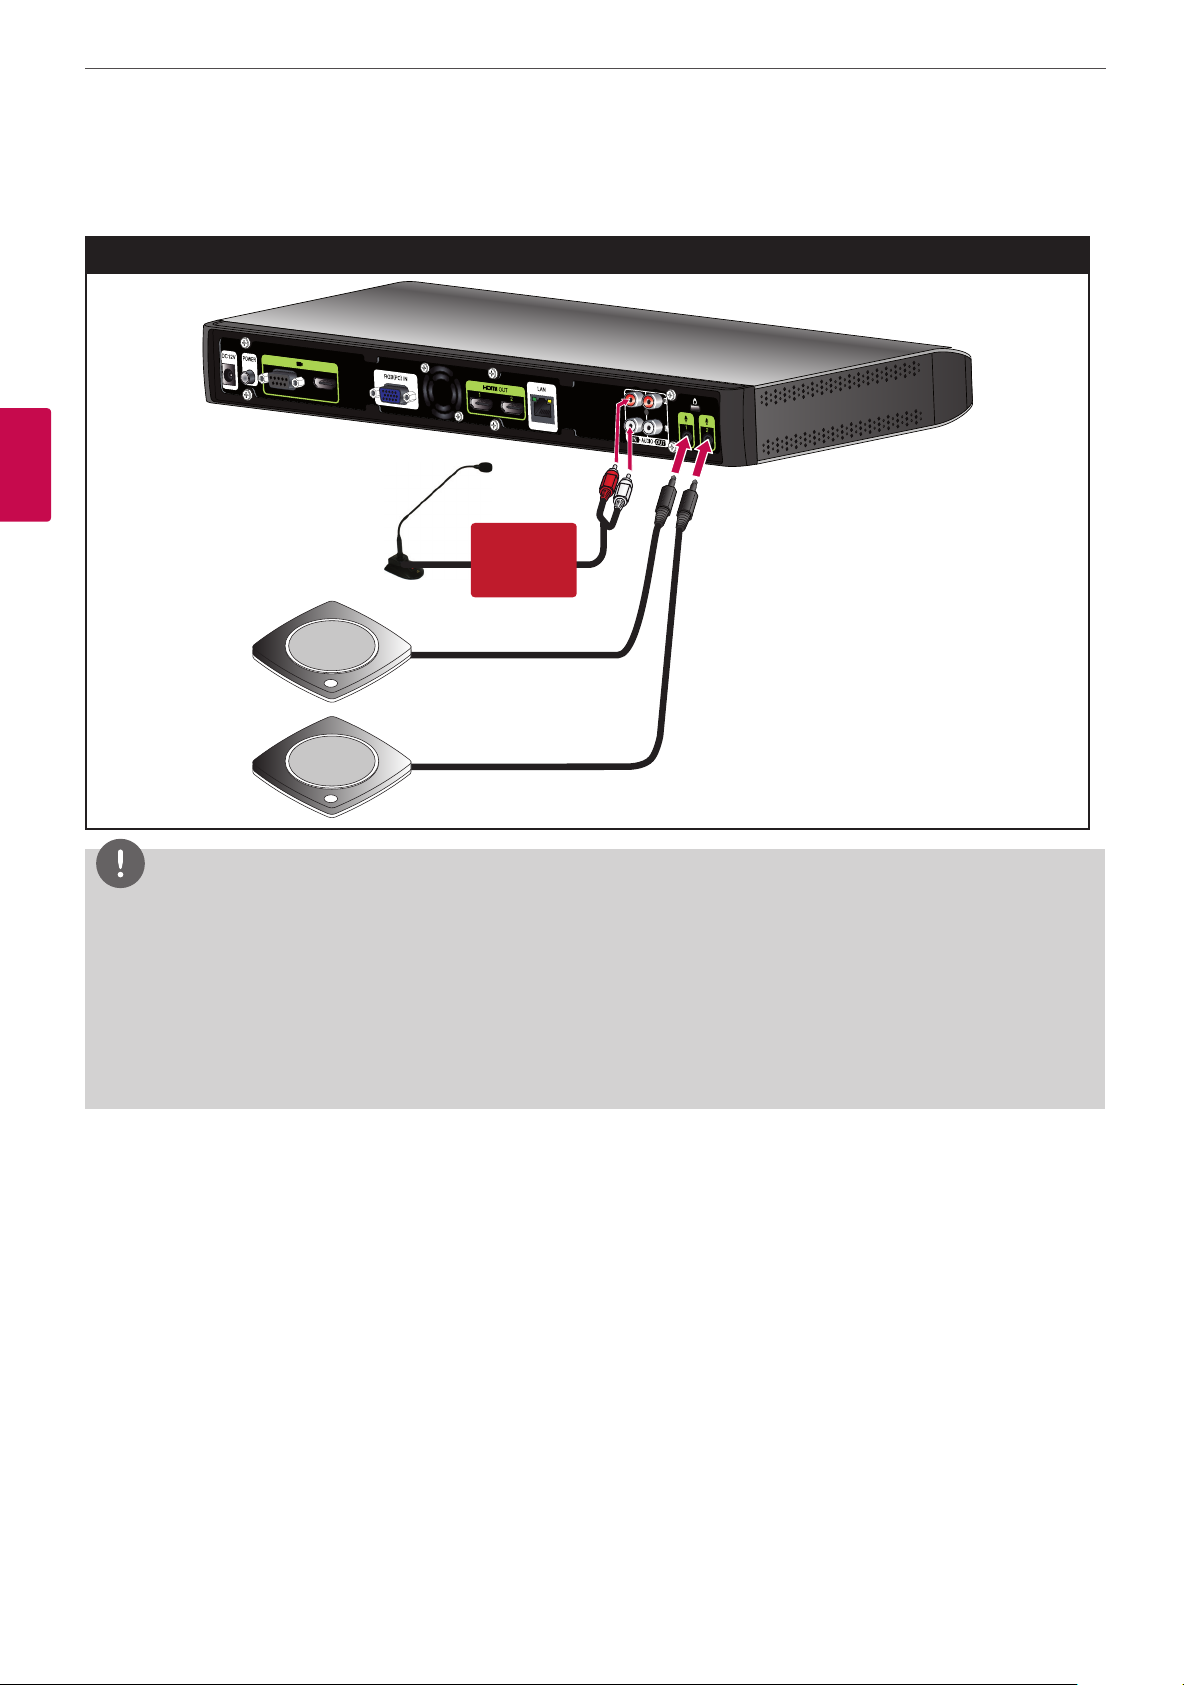
Connecting a Microphone
Connects a microphone to the MIC port or ADUIO IN port of the codec unit as shown in the following illustrations.
Microphone Connection
3
Installation
Optional
NOTE
• Refer to QSG (Quick Setup Guide) for details.
• The recommended distance between the microphone and the user is about 1 m to 2 m.
• It is recommended to use two of microphone in the auditorium.
• Place two of microphone to fill the sounds whole of conference room and leave space more than 4 m distance between each
microphone.
• You can transport voice by connecting the microphone device like as Gooseneck microphone to the AUDIO IN Port.
• If you connect the AUDIO In port and use it, please go to [Setup > Admin > System > Audio > Audio In] and set to [Microphone].
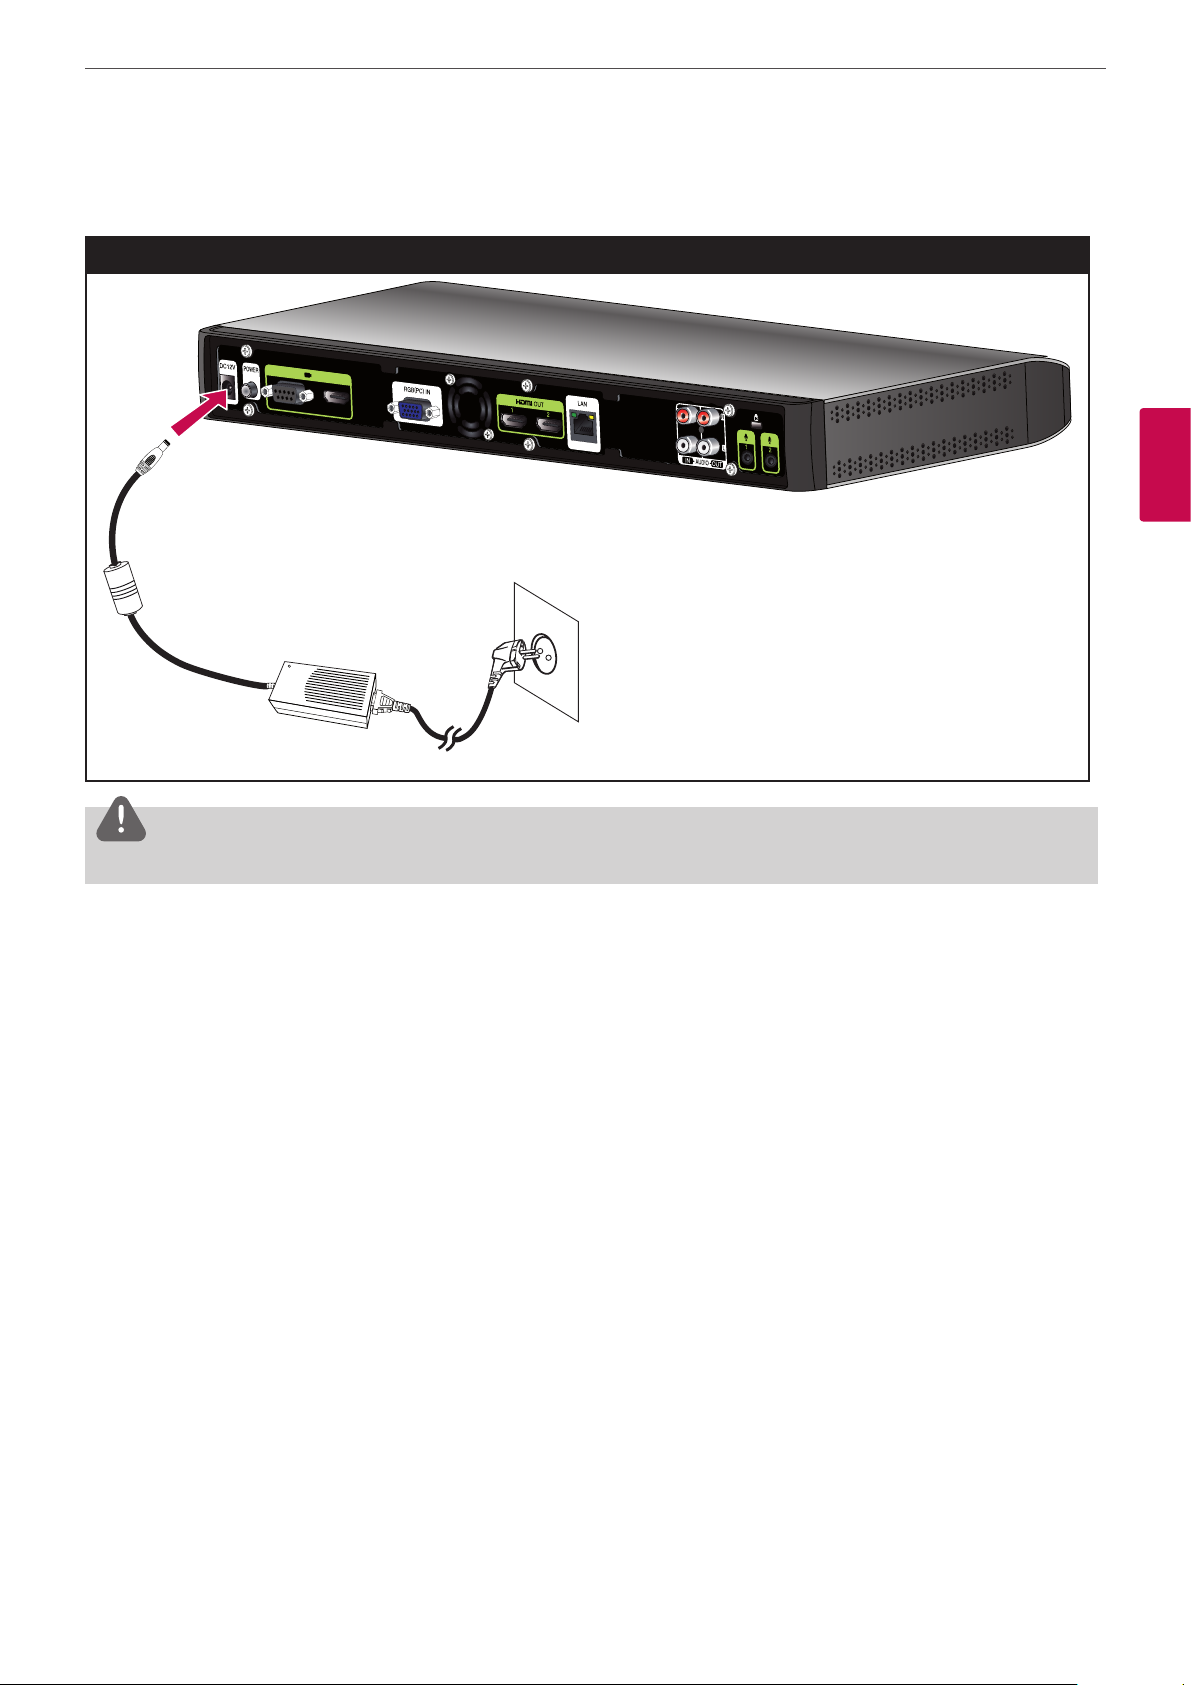
Connecting Power
Connects the power cable as shown in the following illustrations.
Power Connection
Installation
21
3
Installation
CAUTION
You must use a supported adapter. If you connect another adapter not offered with the system, you may cause a malfunction, failure or fire.
System Connection Check
After all of the connections are completed, follow the steps below to check the system operation.
1. Turn on the monitor.
2. Press POWER on the rear of the codec unit.
System booting will commence. When the booting is completed, the initial configuration menu will be displayed.
If it is not displayed, check the device connections and make sure the connections are correctly set.
Now, you can use the system. Do the next configuration.
 Loading...