

LG V498 Users manual
ENGLISH
USER GUIDE
LG-V498
MFL69281501 (1.0) |
www.lg.com/ca |
User Guide
ENGLISH
•Some of the contents in this manual may differ from your device depending on the software version of the device, OS version or your service provider, and are subject to change without prior notice.
•Always use genuine LG accessories. The supplied items are designed only for this device and may not be compatible with other devices.
•This device is not suitable for people who have a visual impairment due to the touchscreen keyboard.
•All screen shots in this guide are simulated.
•Actual displays and the colour of the device may vary.

Table of contents |
|
Important Notice....................................... |
4 |
Getting to know your device .................... |
7 |
Phone layout .............................................. |
7 |
Connecting cables to the ports................. |
10 |
Installing the microSD card ...................... |
13 |
Removing the memory card..................... |
14 |
Locking and unlocking the device............ |
14 |
Your Home screen................................... |
16 |
Touch screen tips..................................... |
16 |
Home screen............................................ |
17 |
Customizing the Home screen ................. |
18 |
Returning to recently-used applications... |
20 |
Notifi cations panel ................................... |
20 |
On-screen keyboard................................. |
23 |
Special Features ..................................... |
24 |
Gesture shot............................................. |
24 |
Gesture View............................................ |
25 |
KnockON.................................................. |
26 |
Knock Code.............................................. |
26 |
Dual window............................................ |
27 |
QuickMemo+........................................... |
28 |
QSlide ...................................................... |
29 |
QuickRemote ........................................... |
30 |
Google Account Setup ............................ |
31 |
Connecting to Networks and Devices.... |
33 |
Wi-Fi ........................................................ |
33 |
Bluetooth ................................................. |
34 |
Wi-Fi Direct.............................................. |
35 |
SmartShare.............................................. |
36 |
QPair........................................................ |
37 |
Transferring data between a PC and your |
|
device ...................................................... |
39 |
Contacts.................................................. |
40 |
Searching for a contact............................ |
40 |
Adding a new contact .............................. |
40 |
Favourites contacts.................................. |
40 |
Creating a group ...................................... |
41 |
Email ....................................................... |
42 |
Managing email accounts........................ |
42 |
Working with account folders................... |
42 |
Composing and sending email................. |
43 |
Camera and Video................................... |
44 |
Using the advanced settings .................... |
45 |
Taking a photo ......................................... |
46 |
Once you have taken a photo................... |
46 |
Recording a video .................................... |
47 |
After recording a video............................. |
47 |
Gallery...................................................... |
48 |
|
|
Table of contents |
|
2 |
|||
|
|||

Multimedia.............................................. |
51 |
Music....................................................... |
51 |
Utilities .................................................... |
53 |
Clock........................................................ |
53 |
Calculator................................................. |
54 |
Calendar .................................................. |
55 |
Voice Recorder......................................... |
55 |
Voice Search............................................ |
55 |
Downloads............................................... |
56 |
Browsing the Web................................... |
57 |
Chrome.................................................... |
57 |
Settings................................................... |
58 |
WIRELESS NETWORKS............................. |
58 |
DEVICE..................................................... |
59 |
PERSONAL ............................................... |
63 |
SYSTEM ................................................... |
66 |
Software Update ..................................... |
70 |
Device Software Update........................... |
70 |
LG Device Software Update via Over-the-Air |
|
(OTA)........................................................ |
70 |
About this user guide ............................. |
71 |
About this user guide ............................... |
71 |
Trademarks............................................. |
72 |
Trademarks.............................................. |
72 |
DivX HD.................................................... |
72 |
Accessories............................................. |
73 |
Troubleshooting ...................................... |
74 |
For Your Safety........................................ |
76 |
Table of contents |
3 |
|

Important Notice
Please read this before you start using your device!
Please check to see whether any problems you encountered with your device are described in this section before taking the device in for service or calling a service representative.
1. Device memory
You may need to check your device memory and delete some data, such as applications to make more memory available.
To uninstall applications:
1 |
Tap |
> |
> |
> Apps. |
2 |
Once all applications appear, scroll to and select the application you want to uninstall. |
|||
3 |
Tap Uninstall. |
|
|
|
2. Optimizing battery life
Extend your battery's power by turning off features that you do not need to run constantly in the background. You can monitor how applications and system resources consume battery power.
Extending your device's battery life:
•Turn off radio communications when you are not using. If you are not using Wi-Fi, Bluetooth or GPS, turn them off.
•Reduce screen brightness and set a shorter screen timeout.
•Turn off automatic syncing for Gmail, Calendar, Contacts and other applications.
•Some applications you download may consume battery power.
|
|
Important Notice |
|
4 |
|||
|
|||

•While using downloaded applications, check the battery charge level.
3.Before installing an open source application and OS
 WARNING
•If you install and use an OS other than the one provided by the manufacturer it may cause your device to malfunction. In addition, your device will no longer be covered by the warranty.
•To protect your device and personal data, only download applications from trusted sources, such as Play Store™. If there are improperly installed applications on your device, the device may not work normally or a serious error may occur. You must uninstall those applications and all associated data and settings from the device.
4. Using the Hard Reset (Factory Reset)
If your device does not restore to its original condition, use a Hard Reset (Factory Reset) to initialise it.
1 Turn the power off.
2Press and hold the Power/Lock Key + Volume Down Key on the right side of the device until the LG logo is displayed.
3 Briefl y release only the Power/Lock Key when the LG logo is displayed. 4 Immediately press and hold the Power/Lock Key again.
5 Release all keys when the Factory reset screen is displayed.
6Press the Volume Keys to select Yes, and then press the Power/Lock Key to perform a Hard Reset. Perform this step twice.
Important Notice |
5 |
|

 WARNING
If you perform a Hard Reset, all user applications, user data and DRM licenses will be deleted. Please remember to backup any important data before performing a Hard Reset.
5. Opening and switching applications
Multitasking is easy with Android; you can keep more than one application running at the same time. There is no need to quit an application before opening another. Use and switch between several open applications. Android manages each application, stopping and starting them as needed to make sure that idle applications don't consume resources unnecessarily.
1 Tap  . App previews of recently used applications will be displayed.
2Tap the application you want to access. This does not stop the previous app from running in the background. Make sure to tap  to back out of an app after using it.
•To close an app from the recent apps list, swipe the app preview to the left or right. To clear all apps, tap Clear all.
6. If the screen freezes
If the screen freezes or the device does not respond when you try to operate it:
Press and hold the Power/Lock Key for about 10 seconds to reset your device. To turn your device off, press and hold the Power/Lock Key for about 20 seconds. If it still does not work, please contact the service centre.
|
|
Important Notice |
|
6 |
|||
|
|||

Getting to know your device
Phone layout
Earphone jack |
Infrared (IR) LED |
|
Microphone |
USB peripheral port |
|
Front-facing camera |
||
|
||
|
Power/Lock key |
|
|
Volume keys |
Getting to know your device |
7 |
|

Rear-facing camera
microSD card slot
Speaker
Stylus Pen
Charger / USB port
Front-facing
Use to take pictures and record videos of yourself. You can
camera
also use this for video chatting. Keep it clean for optimal performance.
Press to lock/unlock the screen. Press and hold to turn
Power/Lock key
the tablet on/off, restart it, and activate/deactivate airplane mode. Press and hold Power/Lock key and Volume Down key to the same time to capture the screen.
|
|
Getting to know your device |
|
8 |
|||
|
|||

|
Allow you to adjust the media volumes. Press and hold both |
|
Volume keys |
keys at the same time to access the QuickMemo+ while |
|
screen is unlocked. Press and hold Down or Up to access |
||
|
||
|
the Camera while screen is off or locked. |
|
|
|
|
|
Allows you to plug in an optional headset for convenient, |
|
Earphone jack |
hands-free conversations. You can also plug in headphones |
|
|
to listen to music. |
|
|
|
|
Infrared (IR) LED |
Used as a sensor for the QuickRemote app. |
|
|
|
|
MicroSD card slot |
Allows you to insert your microSD card. |
|
|
|
|
Microphone |
Records your voice and allows use for voice-activated functions. |
|
|
|
|
USB peripheral |
Allow you to connect a USB peripheral, such as a keyboard, |
|
mouse, and external storage to your tablet. Also allows you |
||
port |
||
to charge another device. |
||
|
||
|
|
|
|
Allows you to connect the tablet and the USB cable for |
|
Charger / USB port |
use with the charger adapter, your PC, or other compatible |
|
|
accessories. |
|
|
|
|
Rear-facing |
Use to take photos and record videos. Keep it clean for |
|
camera |
optimal performance. |
|
|
|
|
Speaker |
Use to listen to the audio from the selected function (e.g., |
|
music, videos, sound clips, etc.). |
||
|
||
|
|
|
|
Allows you to use a convenient stylus pen that you can use |
|
Stylus Pen |
to input commands and navigate your device. It also works |
|
well with popular writing and drawing applications. To use |
||
|
||
|
the stylus, slide it out from the bottom of the device. |
|
|
|
Getting to know your device |
9 |
|
Connecting cables to the ports
1. Charging the battery
The Charger/USB Port is located at the bottom of the device. Insert the charger and plug it into a power outlet.
Charge the battery before using it for first time. Use the charger included with your device to charge the battery. A computer can also be used to charge the battery by connecting the device to it using the USB cable.
|
|
Getting to know your device |
|
10 |
|||
|
|||

 WARNING
Use only LG-approved chargers, batteries and cables. If you use unapproved chargers, batteries or cables, it may cause a battery charging delay or pop up message regarding slow charging. This can also cause the battery to explode or damage the device, which is not covered by the warranty.
NOTE:
•Your device has an internal rechargeable battery. For your safety, do not remove the embedded battery.
•The battery must be fully charged initially to improve battery lifetime.
Your device supports up to a 128GB microSD card. Depending on the memory card manufacturer and type, some memory cards may not be compatible with your device.
2. Connecting a USB device to your tablet
The USB peripheral port is located at the top of the device. Insert the USB port and plug it into the desired device.
Some of the USB devices supported through the USB port include a keyboard, mouse, game controller, digital camera, and storage device (including an Android smartphone acting as external storage device). As most USB keyboards, mouse and game controllers are designed for desktop computers and operation systems, some devices may not function.
Getting to know your device |
11 |
|

NOTE:
•Only devices that meet the USB specs may connect to the USB peripheral port.
•If you are experiencing errors with device recognition, please use a shorter USB cable or check the USB Hub with external power supply (Self-Powered Hub).
•Only file systems such as FAT32, exFAT, and NTFS are supported for the external USB storage device.
•Transferring data through both USB devices at the same time is not supported. The first device that is connected has priority. The USB device connected second can only be charged.
 WARNING
You cannot store data in the USB storage when the battery level is below 15%. Please charge the battery above 15% in order to use the USB storage function.
|
|
Getting to know your device |
|
12 |
|||
|
|||
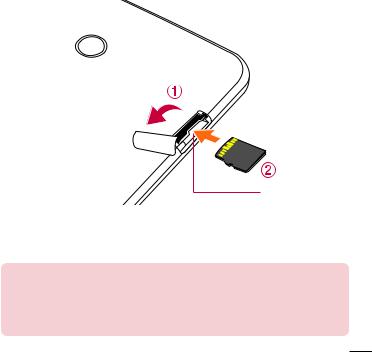
Installing the microSD card
Before you can start exploring your new device, you need to set it up.
Your device supports the use of microSD memory cards of up to 128GB capacity. Multimedia contents can be saved in the microSD card.
1 Open the microSD slot cover.
microSD card slot
2If you want to use a memory card, insert the memory card into the lower slot. Make sure the gold contact area is facing upwards. Slide the microSD card into the slot until it “clicks” into place and then close the slot cover.
NOTE:
•Cards must be positioned as shown.
•MicroSD card is not included.
•Depending on the memory card manufacturer and type, some memory cards may not be compatible with your device.
Getting to know your device |
13 |
|

Removing the memory card
Before removing the memory card, first unmount it for safe removal.
1 Tap  >
>  >
>  > Storage > Unmount SD card.
2Open the card slot cover and press the memory card in to unlock it. Then pull it out of the slot.
 WARNING
Do not remove the memory card while the device is transferring or accessing information. Doing so can cause data to be lost or corrupted or damage to the memory card or device. LG is not responsible for losses that result from the misuse of damaged memory cards, including the loss of data.
Locking and unlocking the device
Pressing the Power/Lock Key turns off the screen and puts the device into lock mode. The device automatically gets locked if it is not used for a specified period. This helps to prevent accidental taps and saves battery power.
To unlock the device, press the Power/Lock Key and swipe the screen in any direction.
NOTE: Double-tapping on the screen also can wake up the screen instead of the Power/Lock Key.
Changing the screen lock method
You can change the way that you lock the screen to prevent others accessing your personal information.
1 Tap  >
>  >
>  > Lock screen > Select screen lock.
2Select a desired screen lock from None, Swipe, Knock Code, Pattern, PIN and Password.
|
|
Getting to know your device |
|
14 |
|||
|
|||

NOTE: Create a Google account before setting an unlock pattern and remember the Backup PIN you created when creating your pattern lock.
Caution! If you haven't created a Google account on the device and you forgot your PIN, Password, and the backup PIN, you need to perform a hard reset. If you perform a hard reset, all user applications and user data will be deleted. Please remember to back up any important data before performing a hard reset.
TIP! Smart Lock
•You can use Smart Lock to make unlocking your device easier. You can set it to keep your device unlocked when you have a trusted Bluetooth device
connected to it, when it's in a familiar location like your home or work, or when it recognises your face.
•Setting up Smart Lock
1 Tap  >
>  >
>  > Lock screen > Smart Lock.
2 Before you add any trusted devices, trusted places, or trusted face, you need to set up a screen lock (pattern, PIN, or password).
Getting to know your device |
15 |
|

Your Home screen
Touch screen tips
Here are some tips on how to navigate on your device.
•Tap or touch – A single finger tap selects items, links, shortcuts and letters on the on-screen keyboard.
•Touch and hold – Touch and hold an item on the screen by tapping it and not lifting your finger until an action occurs.
•Drag – Touch and hold an item for a moment and then, without lifting your finger, move your finger on the screen until you reach the target position. You can drag items on the Home screen to reposition them.
•Swipe or slide – To swipe or slide, quickly move your finger across the surface of the screen, without pausing when you first tap it (so you don't drag an item instead).
•Double-tap – Double-tap to zoom on a webpage or a map.
•Pinch-to-Zoom – Use your index finger and thumb in a pinching or spreading motion to zoom in or out when using the browser, Maps, or when viewing pictures.
•Rotate the screen – From many applications and menus, the screen orientation adjusts to the device's physical orientation.
NOTE:
•Do not press too hard; the tap screen is sensitive enough to pick up a light, yet firm tap.
•Use the tip of your finger to tap the option you want. Be careful not to tap any other buttons.
|
|
Your Home screen |
|
16 |
|||
|
|||
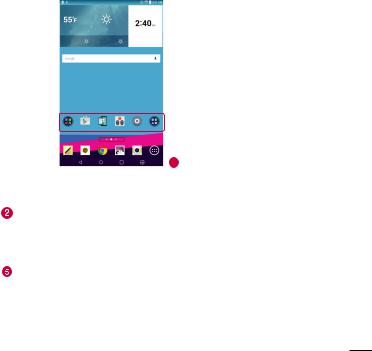
Home screen
The Home screen is the starting point for many applications and functions. It allows you to add items like app shortcuts and Google widgets to give you instant access to information and applications. This is the default canvas and accessible from any menu by tapping  .
.

 Status Bar
 Widget
 Application Icons

 Location Indicator

 Quick Button Area

 Home Touch Buttons
 Shows the device's status information, including the time, signal strength, battery status and notification icons.
 Tap an icon (application, folder, etc.) to open and use it.
 Indicates which Home screen canvas you are currently viewing.
Provides one-touch access to the function from any Home screen canvas.
Your Home screen |
17 |
|
|
|
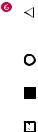
Back Button |
Returns to the previous screen. Also closes pop-up |
|
|
|
items, such as menus, dialogue boxes and the on-screen |
|
|
|
keyboard. |
|
|
|
|
|
|
Home Button |
Return to the Home screen from any screen. Touch and hold |
|
|
|
to access the Google Now shortcut. |
|
|
|
|
|
|
Recent Apps |
Displays recently used applications. If you touch and hold |
|
|
Button |
this button, it opens a menu of available options. |
|
|
|
|
|
|
Dual Window |
Tap to change to dual window mode. It allows you to |
|
|
||
|
|
button |
manage two different apps at the same time by splitting the |
|
|
|
screen in two. |
Extended Home screen
The operating system provides multiple Home screen canvases to provide more space for adding icons, widgets and more.
•Slide your finger left or right across the Home screen to access additional canvases.
Customizing the Home screen
You can customise your Home screen by adding apps and widgets and changing wallpapers.
Adding items on your Home screen
1 Touch and hold the empty part of the Home screen.
2Tap the Widgets tab and select the item you want to add. You then see this added item on the Home screen.
3 Drag it to the desired location and lift your fi nger.
|
|
Your Home screen |
|
18 |
|||
|
|||

TIP! To add an application icon to the Home screen from the Apps screen, touch and hold the application you want to add.
Removing an item from the Home screen
•While on the Home screen, touch and hold the icon you want to remove then drag it to  and release it.
Adding an app to the Quick Button area
•From the Apps screen or on the Home screen, touch and hold an application icon and drag it to the Quick Button area. Then release it in the desired location.
Removing an app from the Quick Button area
• Touch and hold the desired Quick Button, drag it to  , and release it.
NOTE: The Apps Button  cannot be removed.
Customizing app icons on the Home screen
1Touch and hold an application icon until it unlocks from its current position, then release it. The editing icon  appears in the upper-right corner of the application.
2 Tap the application icon again and select the desired icon design and size. 3 Tap OK to save the change.
NOTE: You can also tap Add new to personalize icons with your pictures.
Your Home screen |
19 |
|
Returning to recently-used applications
1 Tap  . App previews of recently used applications will be displayed.
2Tap an app preview to open the application. Or tap  to return to your previous screen.
Notifications panel
Notifications alert you to the arrival of new messages, calendar events and alarms, as well as ongoing events, such as downloads.
When a notification arrives, its icon appears at the top of the screen. Icons for pending notifications appear on the left, and system icons, such as Wi-Fi and battery strength are shown on the right.
NOTE: The available options may vary depending on the region or service provider.
Pending |
System |
notifications |
notifications |
|
|
Your Home screen |
|
20 |
|||
|
|||
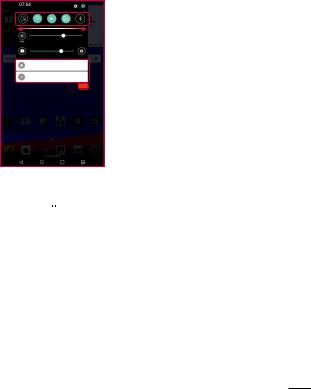
Opening the Notifications panel
Swipe the Status bar to open the Notifications panel. To close the Notifications panel, swipe the screen upwards or tap  .
.
 Quick Settings Area
 Notifications
 Clear
Clear
 Tap each quick setting button to toggle it on/off. Touch and hold the desired button to directly access the settings menu for the function. To see more toggle keys, swipe left or right. Tap
  to remove, add or rearrange quick setting buttons.
  Current notifications are listed, each with a brief description. Tap a notification to view it.
 Tap to clear all of the notifications.
Your Home screen |
21 |
|

Indicator icons on the Status Bar
Indicator icons appear on the Status bar at the top of the screen to calendar events, device status and more.
The icons displayed at the top of the screen provide information about the status of the device. The icons listed in the table below are some of the most common ones.
Icon |
Description |
|
Icon |
Description |
|
|
|
|
|
|
Airplane mode is on |
|
|
Vibrate mode is on |
|
|
|
|
|
|
Connected to a Wi-Fi network |
|
|
Battery fully charged |
|
|
|
|
|
|
Wired headset connected |
|
|
Battery is charging |
|
|
|
|
|
|
Bluetooth is on |
|
|
The device is connected to a |
|
|
|
PC via a USB cable |
|
|
|
|
|
|
|
|
|
|
|
|
System warning |
|
|
Downloading data |
|
|
|
|
|
|
An alarm is set |
|
|
Uploading data |
|
|
|
|
|
|
VPN is active |
|
|
GPS is on |
|
|
|
|
|
|
Media server content sharing |
|
|
Data is synchronizing |
|
is on |
|
|
|
|
|
|
|
|
|
|
|
|
|
|
The mouse is connected |
|
|
Choose input method |
|
|
|
|
|
|
A song is currently playing |
|
|
The keyboard is connected |
|
|
|
|
|
|
|
Your Home screen |
|
22 |
|||
|
|||

NOTE: The icon's location in the Status bar may differ according to the function or service.
On-screen keyboard
You can enter text using the on-screen keyboard. The on-screen keyboard appears on the screen when you tap an available text entry field.
Using the keypad and entering text
 Tap once to capitalise the next letter you type. Double-tap for all caps.
 Tap to go to the keyboard settings. Touch and hold to enter text by voice, handwriting, or access the clip tray.
 Tap to enter a space.
 Tap to create a new line.
 Tap to delete the previous character.
Entering special characters
The on-screen keyboard allows you to enter special characters.
For example, to input "á", touch and hold the "a" button until the pop-up appears and displays related special characters. Without lifting the finger, drag your finger to the desired special character. Once it's highlighted, lift your finger.
NOTE: A symbol at the top right corner of a key indicates that additional characters are available for that key.
Your Home screen |
23 |
|

Special Features
Gesture shot
The Gesture shot feature allows you to take a picture with a hand gesture using the front camera.
To take photo
There are two methods for using the Gesture shot feature.
•Raise your hand, with an open palm, until the front camera detects it and a box appears on the screen. Then close your hand into a fist to start the timer, allowing you time to get ready.
OR
•Raise your hand, in a clenched fist, until the front camera detects it and a box appears on the screen. Then unclench your fist to start the timer, allowing you time to get ready.
or
|
|
Special Features |
|
24 |
|||
|
|||

Gesture View
After taking a photo with the front camera lens, you can automatically check the captured photo with this gesture.
1 |
Tap |
> |
> . |
2 |
Take a picture with the front camera. |
||
3After taking the picture, bring the device close to your face. The captured photo will be displayed.
Taking a picture Quick preview Returning front camera mode
NOTE:
•Depending on the speed and angle of the gesture, this feature may not work properly.
•When the angle is changed after the quick preview, the device returns to camera mode. You must access the Gallery to view the picture again.
Special Features |
25 |
|

KnockON
The KnockON feature allows you to double-tap the screen to easily turn it on or off.
To turn the screen on
1 Double-tap the centre of the screen to turn the screen on.
2 Unlock the screen or access any of the available shortcuts or widgets.
To turn the screen off
1 Double-tap an empty area of the Home screen or the Status Bar. 2 The screen will turn off.
NOTE: Tap on the centre area of the screen. If you tap on the bottom or the top area, the recognition rate may decrease.
Knock Code
The Knock Code feature allows you to create your own unlock code using a combination of knocks on the screen. You can access the Home screen directly when the screen is off by tapping the same sequence on the screen.
NOTE:
•If you enter the wrong Knock Code 6 times, it will compulsorily take you to your google account log in/backup PIN.
•Use the fingertip instead of finger nail to tap the screen for turning it on or off.
1 Tap  >
>  >
>  > Lock screen > Select screen lock > Knock Code.
2Tap the squares in a pattern to set your Knock Code. Your Knock Code pattern can be 3 to 8 taps.
Unlocking the screen using the Knock Code
You can unlock the screen by tapping the Knock Code pattern you already set, when the screen turns off.
|
|
Special Features |
|
26 |
|||
|
|||

Dual window
This feature allows you to multi-task by splitting up the screen into two, allowing you to use two compatible applications at the same time.
1Tap  > Dual window OR
tap  .
.
2 Tap or drag the app icon for the corresponding application you wish to use.
 : Tap to view the Dual window menu options, or drag to resize the split screens.
 : Switch the two screens.
 : View the app list.
 : Change the selected window to full screen.
  : Close the currently selected app window.
NOTE: Dual window is enabled by default. You can enable or disable Dual window through the Settings menu.
1 Tap  >
>  >
>  > Dual window.
2 Slide the toggle button to On or Off.
Special Features |
27 |
|

QuickMemo+
The QuickMemo+ feature allows you to create memos and capture screen shots. You can use QuickMemo+ to easily and efficiently when you create memos, capture screens, and share them with family and friends.
1While viewing the screen you want to capture and use in your memo, drag the Status bar down and tap  .
.
2 Create a memo using the following options:
Tap to undo the most recent action.
Tap to redo the most recently deleted action.
Tap to insert text into your memo.
Tap to select the pen type and colour.
Tap to use the eraser to erase the pen marks on the memo.
Tap to save the memo you've created.
Tap to hide or display the toolbar.
NOTE: Please use a fingertip or Stylus Pen while using the QuickMemo+ feature. Do not use your fingernail.
3 Tap  to save the current memo to the QuickMemo+ or Gallery.
|
|
Special Features |
|
28 |
|||
|
|||

Discard Memos
• Tap  .
.
View the Saved Memo
Tap  >
>  >
>  and select the QuickMemo+ album or tap
  and select the desired memo.
QSlide
From any screen, use the Notification panel to easily access and use the Calendar, Calculator, and more with QSlide.
|
Tap to expand the window to full |
|
|
window size. |
|
OR |
Tap to adjust the window's |
|
transparency. |
||
|
||
|
Tap to close the QSlide window. |
|
|
Drag to adjust the size. |
1Slide the Status bar downward, then tap QSlide to view the available QSlide apps. Then tap the desired app from the QSlide Apps section.
OR
Also, while using applications that support QSlide, tap  . The function is displayed as a small window on your screen.
2You can use and tap the screen under the QSlide windows when the transparency bar is not full  .
.
NOTE: QSlide can support up to two window at the same time.
Special Features |
29 |
|
 Loading...