

Page 1
ENGLISH
FRANÇAIS
PORTUGUESE
BAHASA
OWNER’S MANUAL
AIR CONDITIONER
Please read this manual carefully before operating
your set and retain it for future reference.
TYPE : CONVERTIBLE
TYPE:
MFL67840701
P/NO.:MFL67840701
www.lg.com
Page 2
Floor Standing- Type Air Conditioner Owner’s Manual
TABLE OF CONTENTS
FOR YOUR RECORDS
Safety Precautions.................3
Operating Instructions...........
Maintenance and Service ....1
6
7
Write the model and serial numbers here:
Model #
Serial #
You can find them on a label on the side of each unit.
Dealer's Name
Date Purchased
Staple your receipt to this page in the event you need it
■
to prove date of purchase or for warranty issues.
READ THIS MANUAL
Inside you will find many helpful hints on how to use and
maintain your air conditioner properly. Just a little
preventive care on your part can save you a great deal
of time and money over the life of your air conditioner.
You'll find many answers to common problems in the
chart of troubleshooting tips. If you review our chart of
Troubleshooting Tips first, you may not need to call for
service at all.
PRECAUTION
• Contact the authorized service technician for repair or
maintenance of this unit.
• Contact the installer for installation of this unit.
• The air conditioner is not intended for use by young
children or invalids without supervision.
• Young children should be supervised to ensure that
they do not play with the air conditioner.
• When the power cord is to be replaced, replacement
work shall be performed by authorized personnel only
using only genuine replacement parts.
• Installation work must be performed in accordance
with the National Electric Code by qualified and
authorized personnel only.
2 Floor Standing-Type Air Conditioner
Page 3
Safety Precautions
WARNING
Safety Precautions
To prevent injury to the user or other people and property damage, the following instructions
must be followed.
ƵIncorrect operation due to ignoring instruction will cause harm or damage. The seriousness is
classified by the following indications.
WARNING
CAUTION
ƵMeanings of symbols used in this manual are as shown below.
ƵInstallation
Do not use a defective or
underrated circuit breaker.
Use this appliance on a
dedicated circuit.
• There is risk of fire or electric
shock.
Install the panel and the
cover of control box
securely.
• There is risk of fire or electric
shock.
Do not modify or extend the
power cable.
• There is risk of fire or electric
shock.
For installation, always contact the
dealer or an Authorized Service Center.
• There is risk of fire, electric
shock, explosion, or injury.
This symbol indicates the possibility of death or serious injury.
This symbol indicates the possibility of injury or damage.
Be sure not to do.
Be sure to follow the instruction.
For electrical work, contact
the dealer, seller, a qualified
electrician, or an Authorized
Service Center.
• Do not disassemble or repair the
product. There is risk of fire or
electric shock.
Always install a dedicated
circuit and breaker.
• Improper wiring or installation
may cause fire or electric shock
Do not install, remove, or reinstall the unit by yourself
(customer).
• There is risk of fire, electric
shock, explosion, or injury.
Do not install the product on a
defective installation stand.
• It may cause injury, accident, or
damage to the product.
Always ground the product.
• There is risk of fire or electric
shock.
Use the correctly rated
breaker or fuse.
• There is risk of fire or electric
shock.
Be cautious when unpacking
and installing the product.
• Sharp edges could cause injury.
Be especially careful of the case
edges and the fins on the
condenser and evaporator.
Be sure the installation area
does not deteriorate with age.
• If the base collapses, the air
conditioner could fall with it,
causing property damage,
product failure, and personal
injury.
Owner's Manual 3
ENGLISH
Page 4

Safety Precautions
ƵOperation
Do not let the air conditioner run for a
long time when the humidity is very high
and a door or a window is left open
• Moisture may condense and wet
or damage furniture.
Take care to ensure that power
cable could not be pulled out or
damaged during operation.
.
• There is risk of fire or electric
shock.
Do not place anything on the
power cable.
• There is risk of fire or electric
shock.
Do not plug or unplug the
power supply plug during
operation.
• There is risk of fire or electric
shock.
Do not allow water to run
into electric parts.
• It may cause There is risk of fire,
failure of the product, or electric
shock.
When flammable gas leaks,
turn off the gas and open a
window for ventilation
before turn the product on.
• Do not use the telephone or turn
switches on or off.
There is risk of explosion or fire
Do not open the inlet grill of the
product during operation.
(Do not touch the electrostatic
filter, if the unit is so equipped.)
• There is risk of physical injury,
electric shock, or product failure.
Do not touch(operate) the
product with wet hands.
• There is risk of fire or electrical
shock.
Do not store or use flammable
gas or combustibles near the
product.
• There is risk of fire or failure of
product.
If strange sounds, or small or
smoke comes from product. Turn
the breaker off or disconnect the
power supply cable.
• There is risk of electric shock or
fire.
When the product is soaked
(flooded or submerged),
contact an Authorized
Service Center.
• There is risk of fire or electric
shock.
Do not place a heater or
other appliances near the
power cable.
• There is risk of fire and electric
shock.
Do not use the product in a
tightly closed space for a
long time.
• Oxygen deficiency could occur.
Stop operation and close the window
in storm or hurricane. If possible,
remove the product from the window
before the hurricane arrives.
• There is risk of property damage,
failure of product, or electric shock.
Be cautious that water could
not enter the product.
• There is risk of fire, electric shock,
or product damage.
Ventilate the product from time to time when
operating it together with a stove, etc.
• There is risk of fire or electric shock.
When the product is not be used for a long
time, disconnect the power supply plug or
turn off the breaker.
• There is risk of product damage or failure, or
unintended operation.
4 Floor Standing-Type Air Conditioner
Turn the main power off when cleaning or
maintaining the product.
• There is risk of electric shock.
Take care to ensure that nobody could step
on or fall onto the outdoor unit.
• This could result in personal injury and product
damage.
Page 5

ƵInstallation
CAUTION
Always check for gas
(refrigerant) leakage after
installation or repair of product.
• Low refrigerant levels may cause
failure of product.
Install the drain hose to
ensure that water is drained
away properly.
• A bad connection may cause
water leakage.
Safety Precautions
ENGLISH
Keep level even when
installing the product.
• To avoid vibration or water
leakage.
Do not install the product where the
noise or hot air from the outdoor unit
could damage the neighborhoods.
• It may cause a problem for your
neighbors.
Use two or more people to
lift and transport the
product.
• Avoid personal injury.
ƵOperation
Do not expose the skin directly to cool air for
long periods of time. (Don't sit in the draft.)
• This could harm to your health.
Do not block the inlet or
outlet of air flow.
• It may cause product failure.
Do not step on or put
anyting on the product.
(outdoor units)
• There is risk of personal injury and
failure of product.
Use a soft cloth to clean. Do
not use harsh detergents,
solvents, etc.
• There is risk of fire, electric shock,
or damage to the plastic parts of
the product.
Always insert the filter securely.
Clean the filter every two weeks or
more often if necessary.
• A dirty filter reduces the efficiency
of the air conditioner and could
cause product malfunction or
damage.
Do not install the product where
it will be exposed to sea wind
(salt spray) directly.
• It may cause corrosion on the
product. Corrosion, particularly on
the condenser and evaporator fins,
could cause product malfunction or
inefficient operation.
Do not use the product for special purposes, such as
preserving foods, works of art, etc. It is a consumer air
conditioner, not a precision refrigeration system.
• There is risk of
damage or
loss of property.
Do not touch the metal parts of
the product when removing the
air filter. They are very sharp!
• There is risk of personal injury.
Do not insert hands or other objects
through the air inlet or outlet while
the product is operated.
• There are sharp and moving parts
that could cause personal injury.
Do not drink the water
drained from the product.
Use a firm stool or ladder
when cleaning or
maintaining the product.
• It is not sanitary and could cause
serious health issues.
• Be careful and avoid personal
injury.
Do not recharge or disassemble the batteries.
Do not dispose of batteries in a fire.
• They may burn or explode.
Replace the all batteries in the
remote control with new ones of
the same type. Do not mix old
and new batteries or different
types of batteries.
• There is risk of fire or explosion
If the liquid from the batteries gets onto your
skin or clothes, wash it well with clean water. Do
not use the remote if the batteries have leaked.
• The chemicals in batteries could cause burns or other
health hazards.
Owner's Manual 5
Page 6
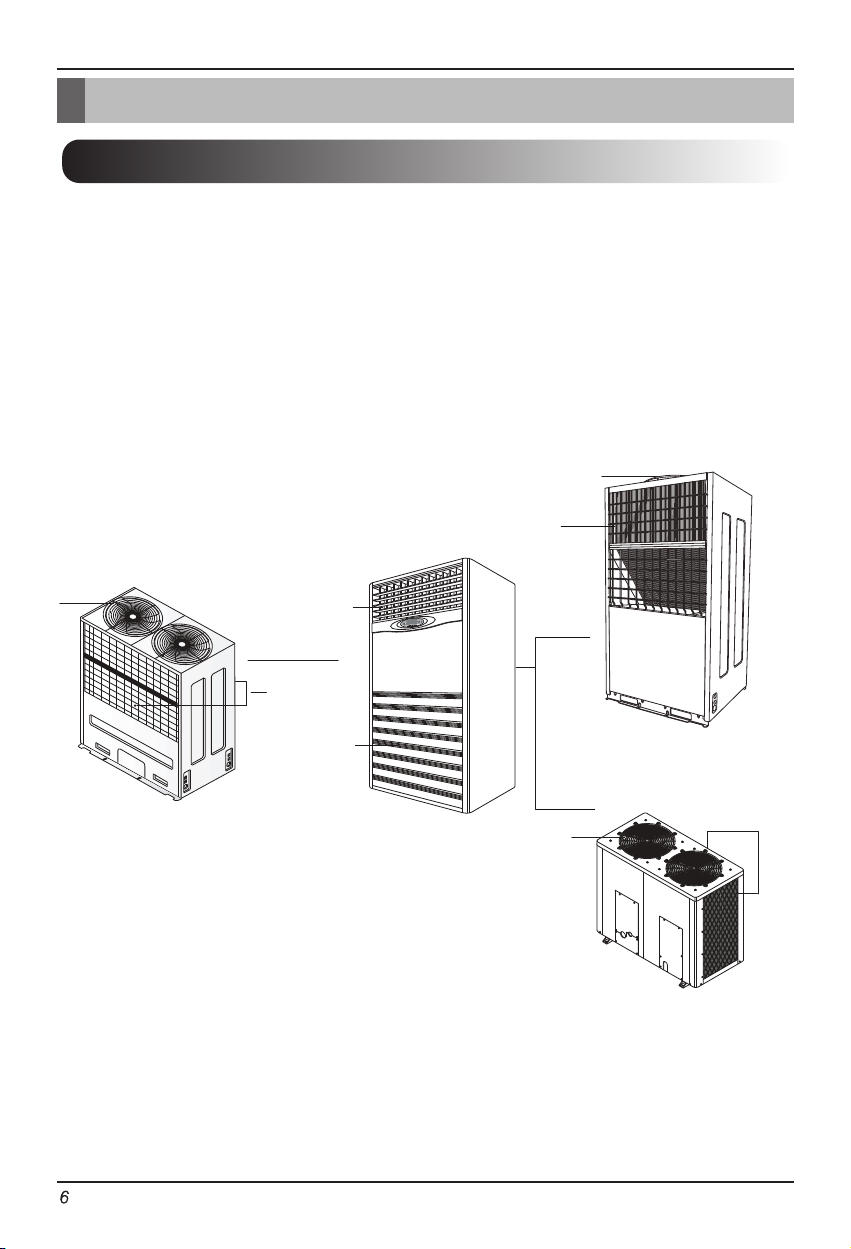
Operating Instructions
Operating Instructions
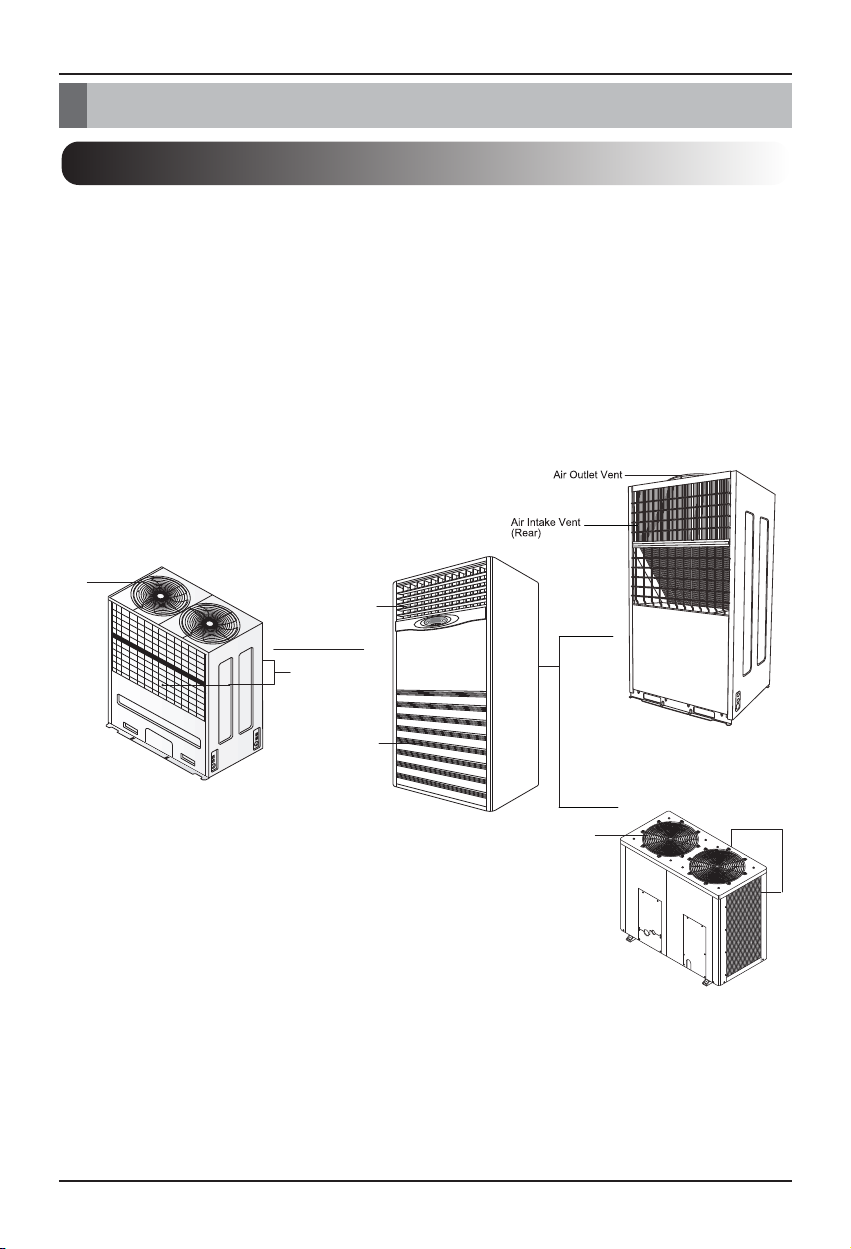
Features and Specifications
1. Design for cooling and heating
2. Super energy efficiency
3. Micom control
4. Whisper quiet operation
Air Outlet Vent
Air Outlet Vent
TP-C1008FA*
TP-H1008FA*
Air Intake Vent
(Rear)
Air Intake Vent
5. 2 cooling/heating speeds
6. Removable air filter
7. Anti-Bacteria filter
8. 3 minutes delay circuit
TP-C808FLA*
Remark:
* :develop serial number
6 Floor Standing-Type Air Conditioner
H *ALF808-PT
Air Outlet Vent
Air Intake Vent
(Rear)
Page 7
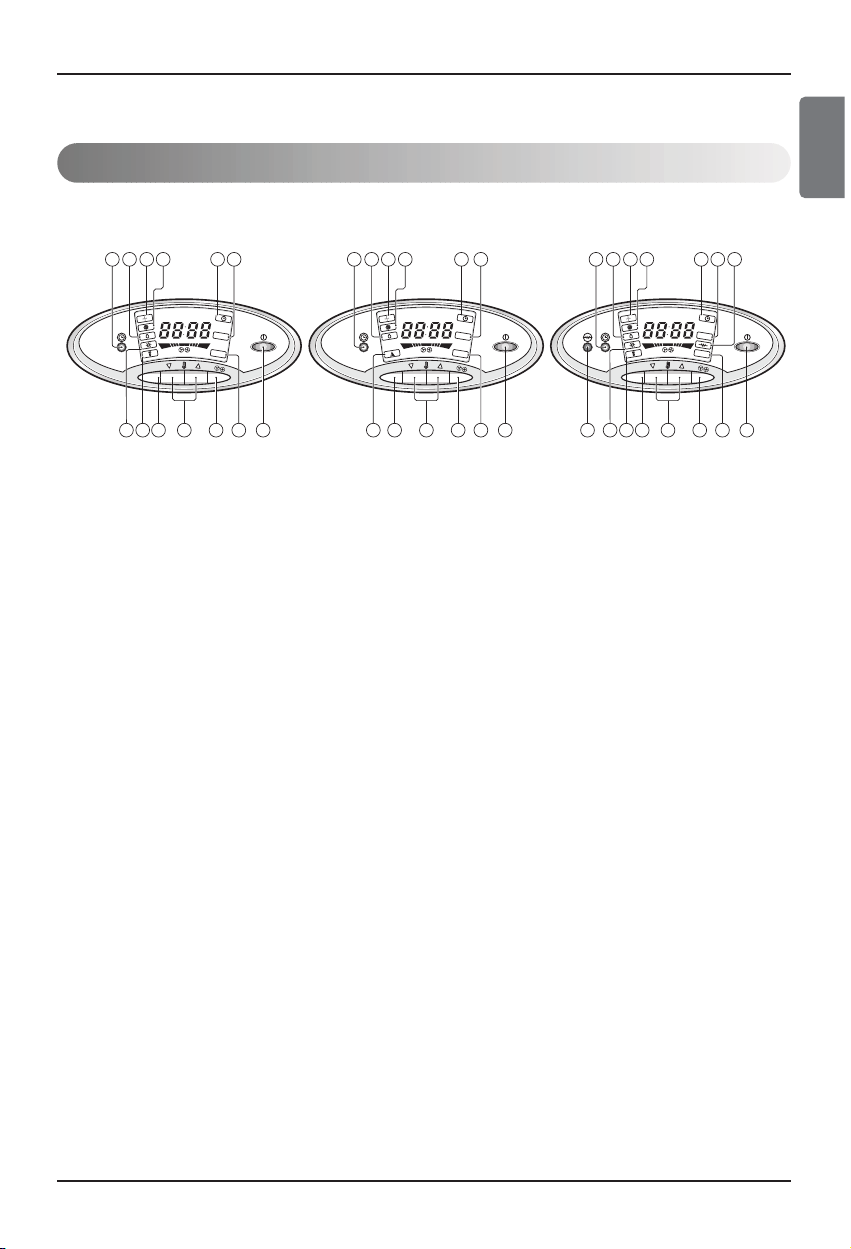
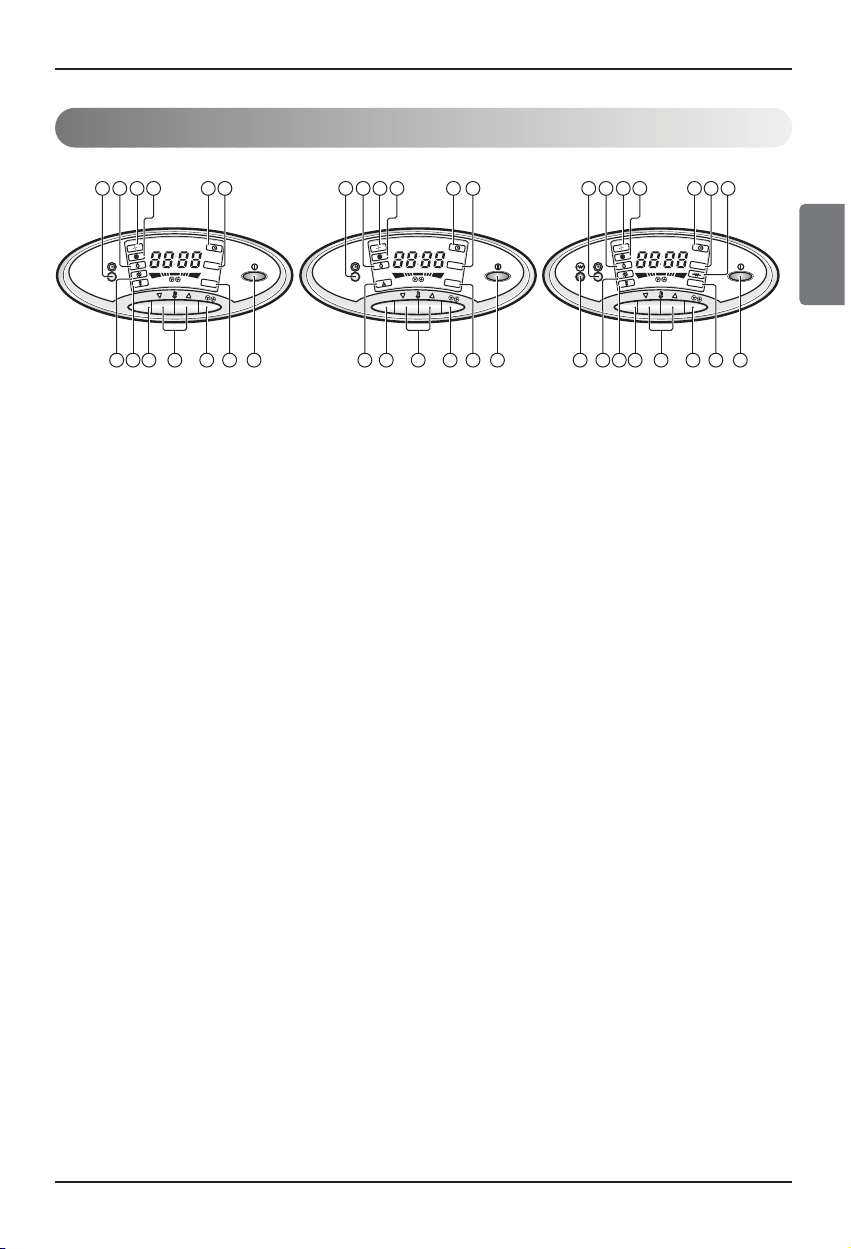
Indoor Unit Controls and Indicators
Operating Instructions
ENGLISH
65 14 11
ROOM TEMP. SET TEMP.
LH
E
D
O
M
2 3 4 12 18 9
DUCT
O
U
T D
OO
R
13
M
10
(Heat Pump) (Cooling Model)
1. START/STOP BUTTON
Operation starts when this button is pressed and
stops when the button is pressed again.
2. OPERATION MODE SELECTION
BUTTON
Used to select the operation Mode.
3. ROOM TEMPERATURE SETTING
BUTTONS
Used to select the room temperature.
4. INDOOR FAN SPEED SELECTION
Used to select fan speed in two steps-low, high.
5. FAN OPERATION LAMP
6. COOLING OPERATION LAMP
147
65 11713
ROOM TEMP. SET TEMP.
DUCT
LH
O
U
E
D
O
2 3 4 12
T D
OO
R
1
713
65 14 11 15
ROOM TEMP. SET TEMP.
LH
E
D
O
M
2 3 4 12 1816 9
(Heat Pump & Electric Heater
9. DEFROST OPERATION LAMP
10. AUTO OPERATION LAMP
11. DUCT AIR FLOW LAMP(OPTION)
12. OUTDOOR UNIT OPERATION LAMP
13. TIMER SETTING BUTTON
(OPERATION STOPS AT ON)
14. TIMER OPERATION LAMP
15. ELECTRIC HEATER OPERATION
LAMP
16. ELECTRIC HEATER OPERATION
BUTTON
DUCT
OU
T D
OO
R
Model)
7. SOFT DRY OPERATION LAMP
8. HEATING OPERATION LAMP
Owner's Manual
7
Page 8
Operating Instructions
How to use the Operation Mode Button
• Each time the Operation Mode Selection Button is pressed, the Operation Mode is shifted in the arrow direction.
E
D
O
M
ROOM TEMP.
LH
OUT DO
ROOM TEMP. SET TEMP.
A/CL
LH
OR
OUT DO
ROOM TEMP. SET TEMP.
A/CL
L
OR
OUT DOOR
A/CL
ROOM TEMP. SET TEMP.
A/CL
LH
OUT DO
OR
Cooling OperationFan Operation
Soft Dry Operation Heating Operation
(Heat pump Model)
E
D
O
M
ROOM TEMP. SET TEMP.
A/CL
LH
OUT DO
OR
ROOM TEMP. SET TEMP.
LH
OUT DO
ROOM TEMP. SET TEMP.
A/CL
L
OR
OUT DOOR
A/CL
ROOM TEMP.
LH
Cooling Operation Fan OperationSoft Dry OperationAuto Operation
(Cooling Model)
How to use the Fan speed Button
• Each time the Fan speed Button is pressed, the Fan speed is shifted in the arrow direction.
E
D
O
M
ROOM TEMP. SET TEMP.
A/CL
LH
OUT DOOR
ROOM TEMP. SET TEMP.
LH
A/C
L
OUT DO
OR
A/CL
OUT DOOR
Floor Standing-Type Air Conditioner
8
High
Low
Page 9
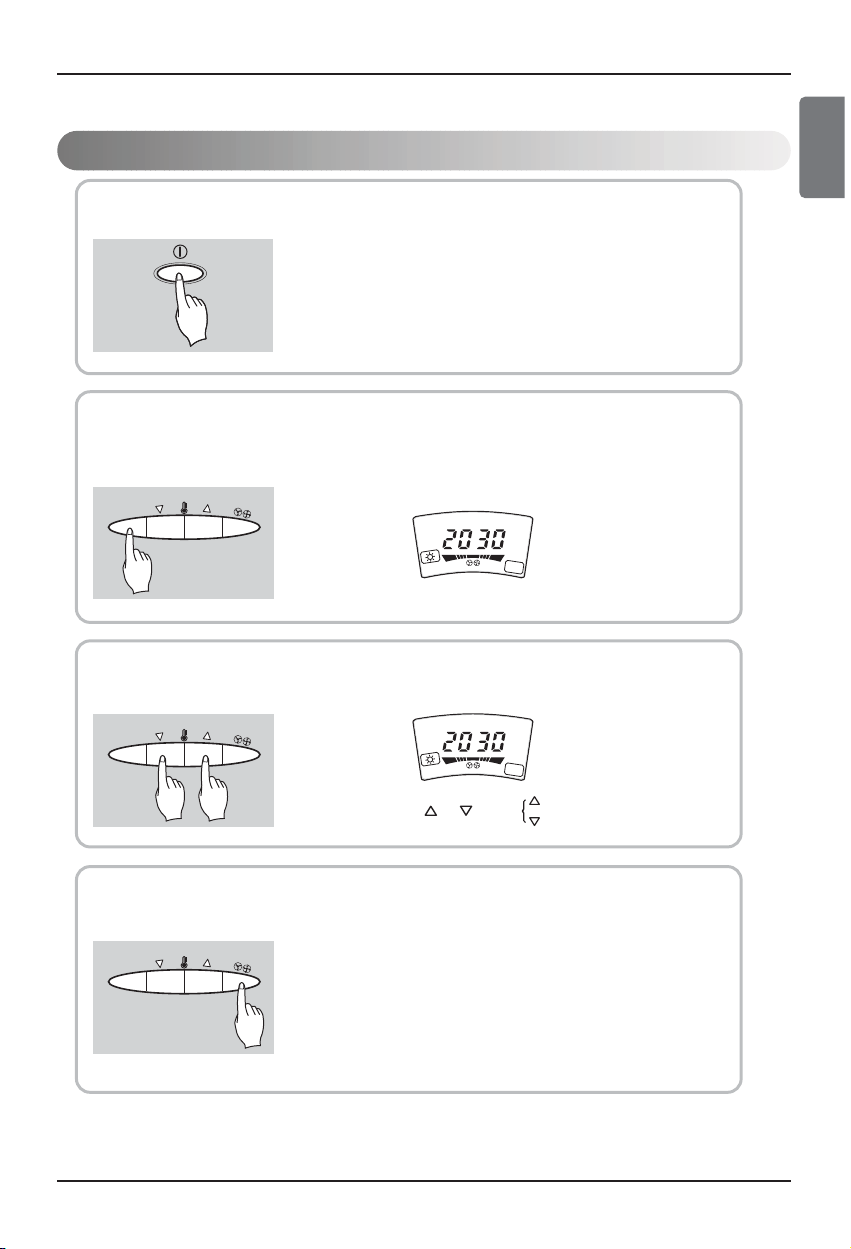
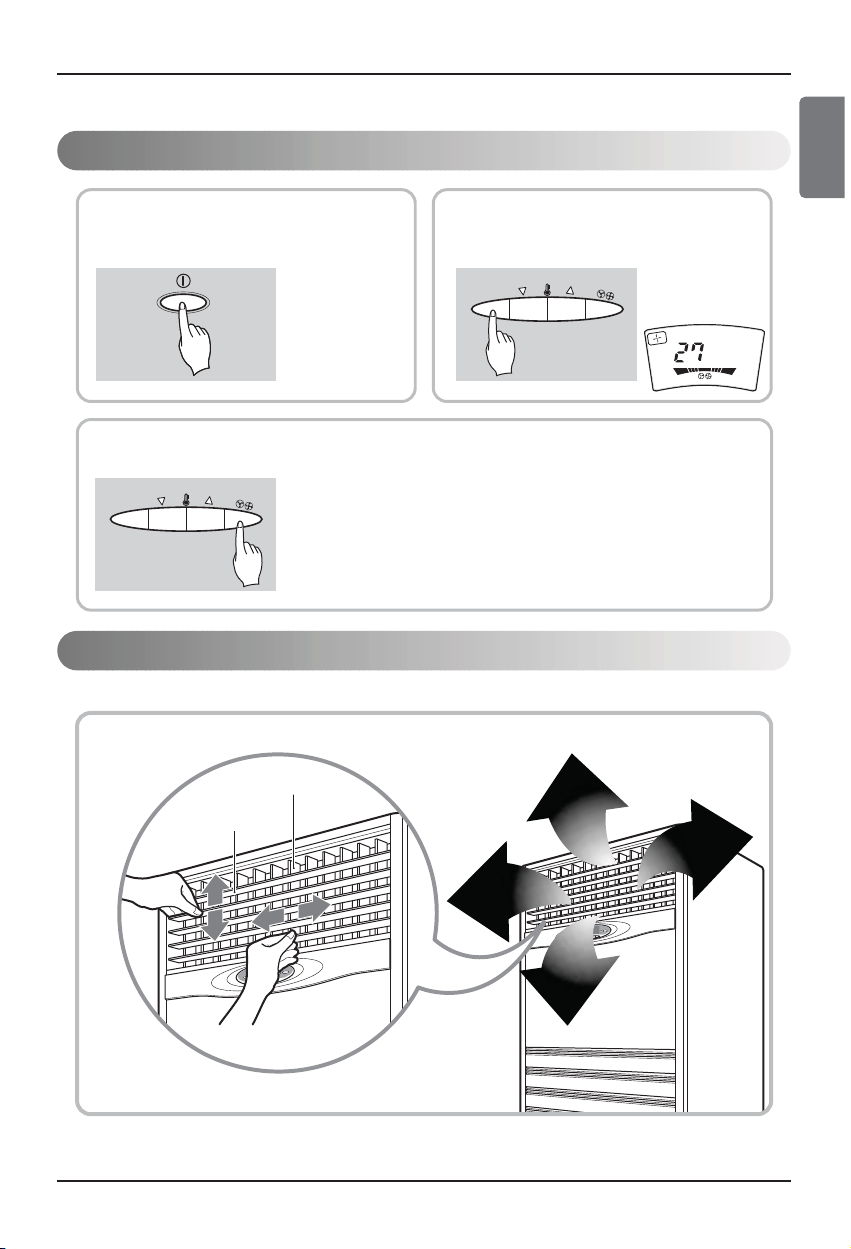
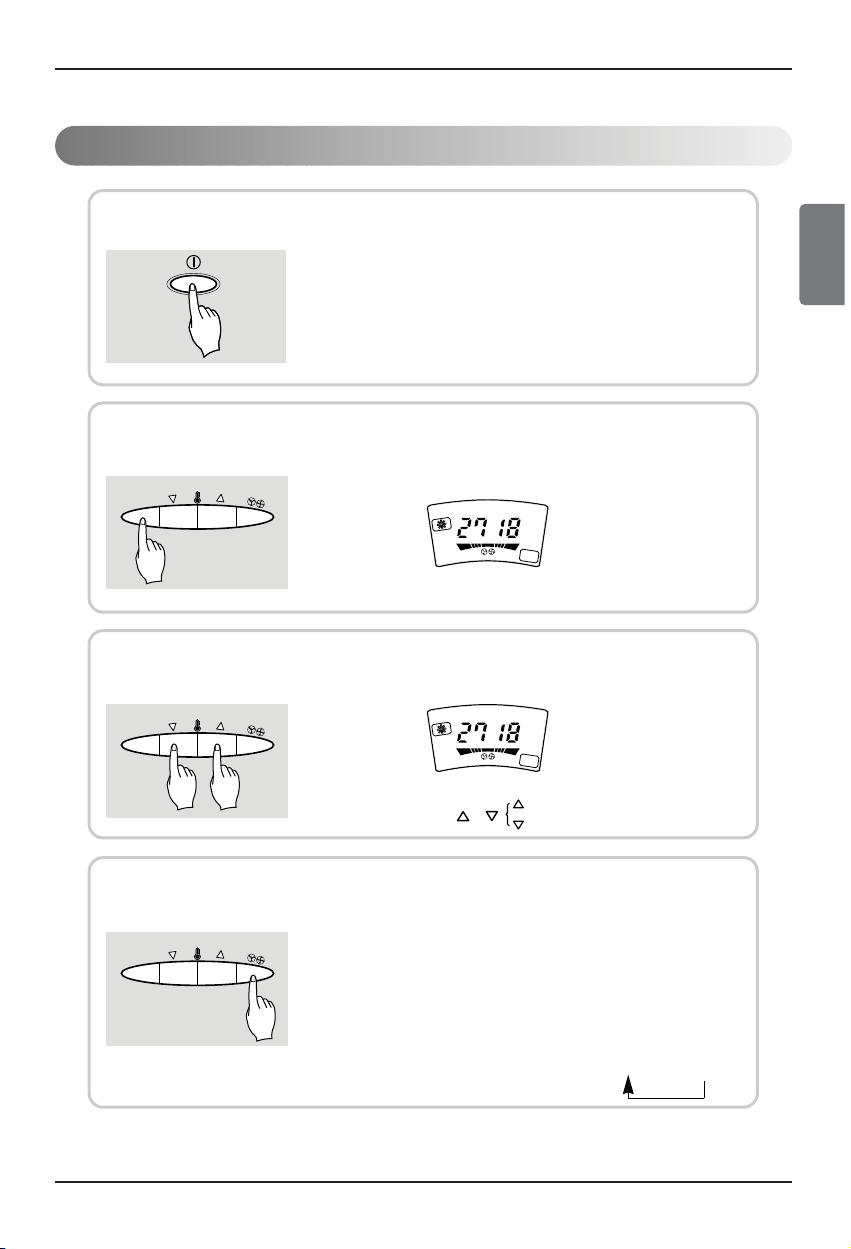
Cooling Operation Mode
Press the Start/Stop Button.
1
Select Cooling Operation.
Press the Operation Mode Selection Button.
2
E
D
O
M
ROOM TEMP. SET TEMP.
A
LH
/CL
OUT DOOR
Operating Instructions
ENGLISH
Set the temperature lower than the room temperature.
The temperature can be set within a range of 1 °C~30°C by 1°C.
3
E
D
O
M
• Press the or button
8
ROOM TEMP. SET TEMP.
LH
A
/CL
OUT DOOR
To raise the temperature.
To lower the temperature.
Set the Fan Speed.
4
E
D
O
M
• Each time the Button is pressed, the Fan Speed mode is shifted. (HIGH ➯ LOW)
Owner's Manual
9
Page 10
Operating Instructions
Soft Dry Operation
Press the Start/Stop Button.
1
Select Soft Dry Operation.
2
Press the Operation Mode Selection Button.
E
D
O
M
ROOM TEMP. SET TEMP.
L
A/CL
OUT DOOR
Set the temperature lower than the room temperature.
3
The temperature can be set within a range of 18°C~30°C by 1°C.
E
D
O
M
ROOM TEMP. SET TEMP.
L
A/CL
OUT DOOR
• Press the or button
During softy Dry Operation
• The indoor fan speed is automatically set to low and cannot be adjusted.
1 Floor Standing-Type Air Conditioner
0
To raise the temperature.
To lower the temperature.
Page 11
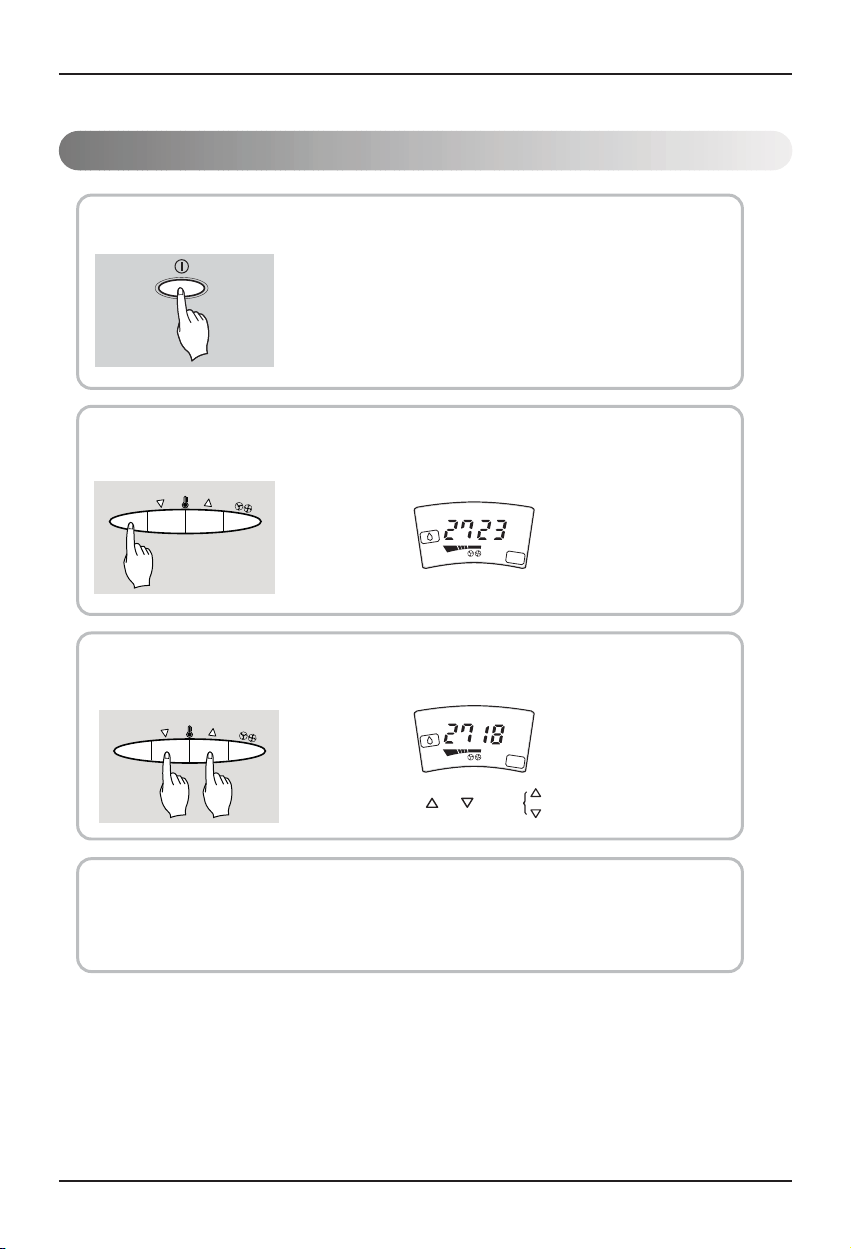
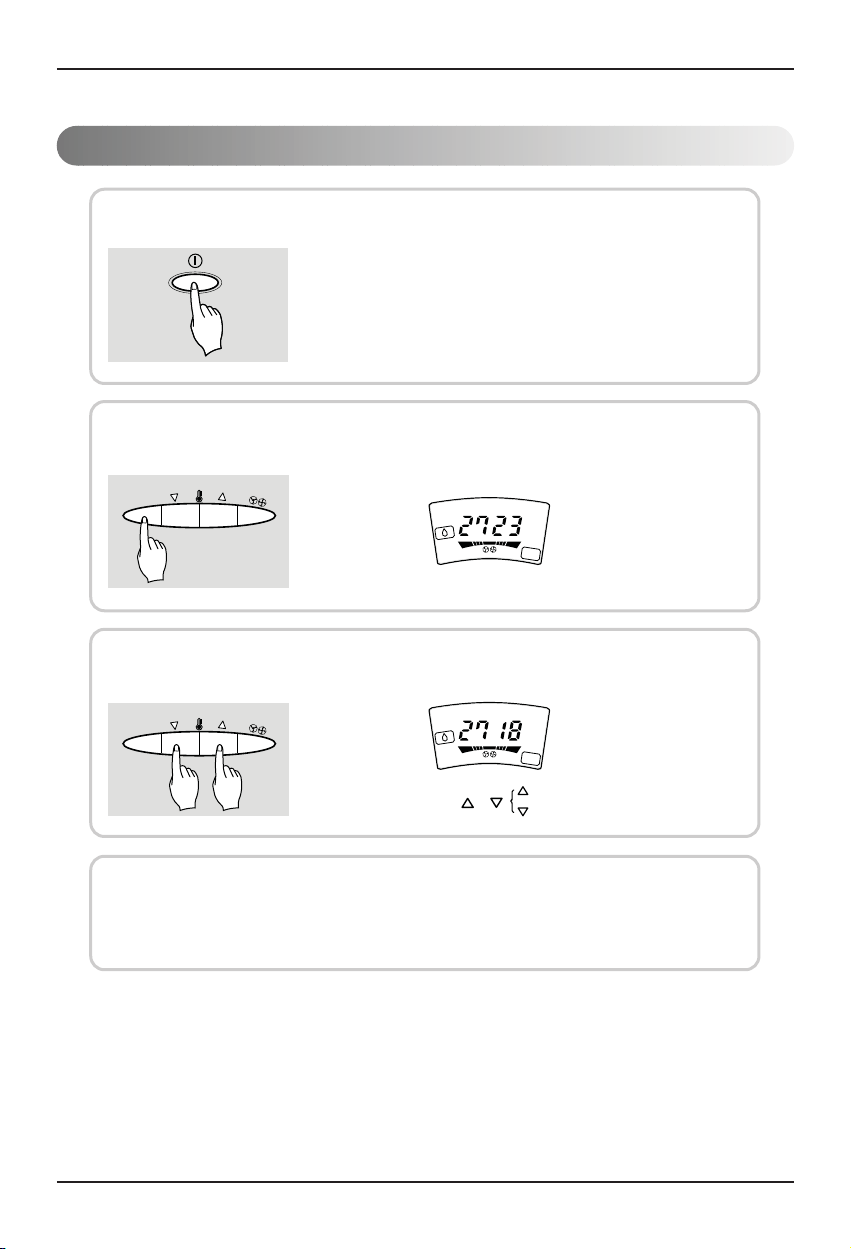
Heating Operation Mode(Except Cooling Model)
Press the Start/Stop Button.
1
Select heating Operation.
2
Press the Operation Mode Selection Button.
E
D
O
M
ROOM TEMP. SET TEMP.
A
LH
/CL
OUT DOOR
Operating Instructions
ENGLISH
Set the temperature upper than the room temperature.
The temperature can be set within a range of 1 °C~30°C by 1°C.
3
E
D
O
M
8
ROOM TEMP. SET TEMP.
LH
A/CL
OUT DOOR
• Press the or button
Set the Fan Speed.
4
E
D
O
M
• Each time the Button is pressed, the Fan Speed mode is shifted.
To raise the temperature.
To lower the temperature.
Owner's Manual 1
1
Page 12
Operating Instructions
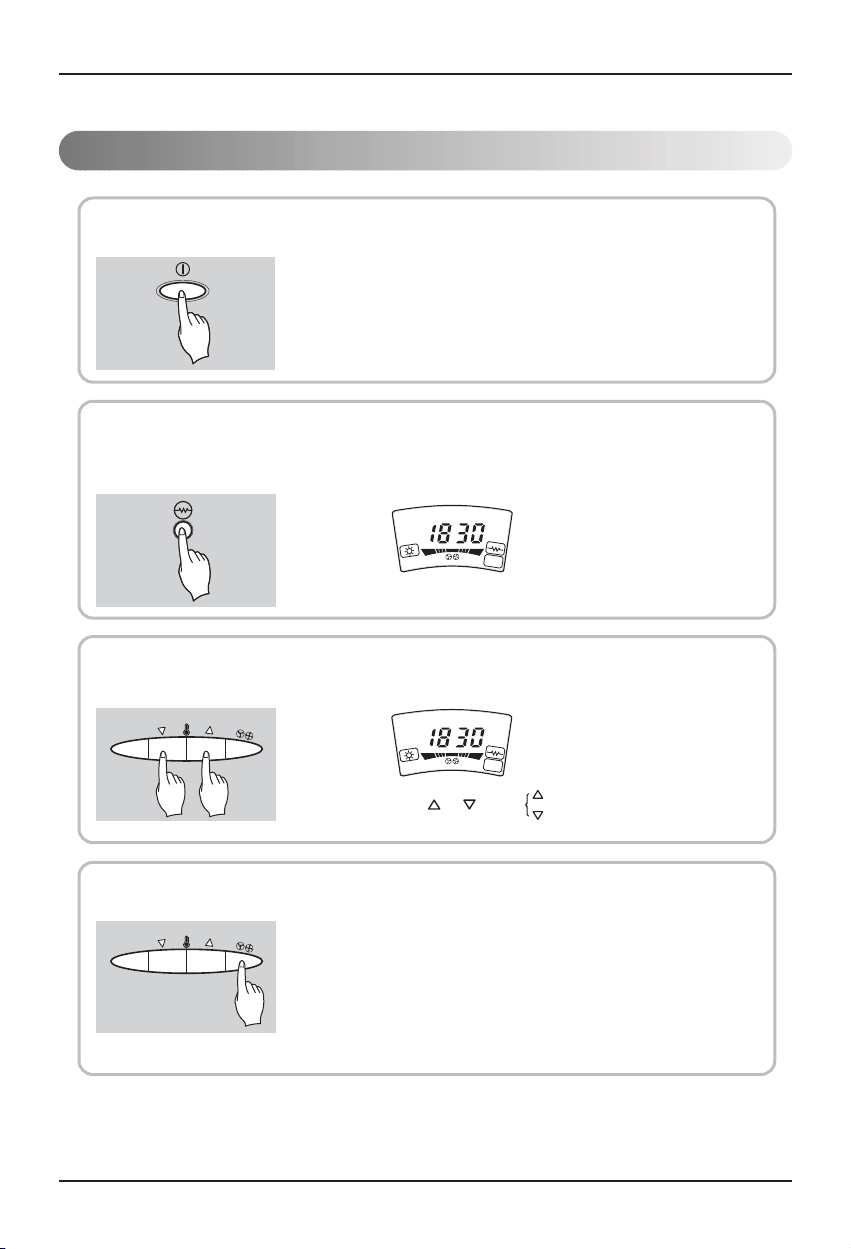
Electric Heater Operation Mode(Heat pump & Electric heater product only)
Press the Start/Stop Button.
1
Select heating+ E/heater Operation.
❶ Press the Operation Mode Selection Button to select heating Operation.
2
❷ Press the E/Heater Operation Button.
(When the unit operates in heating mode).
ROOM TEMP. SET TEMP.
A/CL
LH
OUT DOOR
Set the temperature upper than the room temperature.
The temperature can be set within a range of 1 °C~30°C by 1°C.
3
E
D
O
M
• Press the or button
Set the Fan Speed.
8
ROOM TEMP. SET TEMP.
LH
4
E
D
O
M
• Each time the Button is pressed, the Fan Speed mode is shifted.
1 Floor Standing-Type Air Conditioner
2
A/CL
OUT DOOR
To raise the temperature.
To lower the temperature.
Page 13
Auto Operation Mode(Cooling Model Only)
Press the Start/Stop Button.
1
Select Auto Operation.
2
Press the Operation Mode Selection Button.
E
D
O
M
ROOM TEMP. SET TEMP.
LH
A/C
OUT DOOR
Operating Instructions
ENGLISH
L
Set the temperature upper or lower than the standard temperature.
3
The temperature can be set within a range of by 1 level.
E
D
O
M
ROOM TEMP. SET TEMP.
A/CL
LH
OUT DOOR
Cold HotWarmCool Proper
(This indication will be shifted to the initial Auto Mode Display state after 4 seconds.)
• Press the or button
To raise the temperature.
To lower the temperature.
During Auto Operation
• It is impossible to switch the indoor fan speed because of being already set to the best conditioner by
fuzzy rule.
Owner's Manual 1
3
Page 14
Operating Instructions
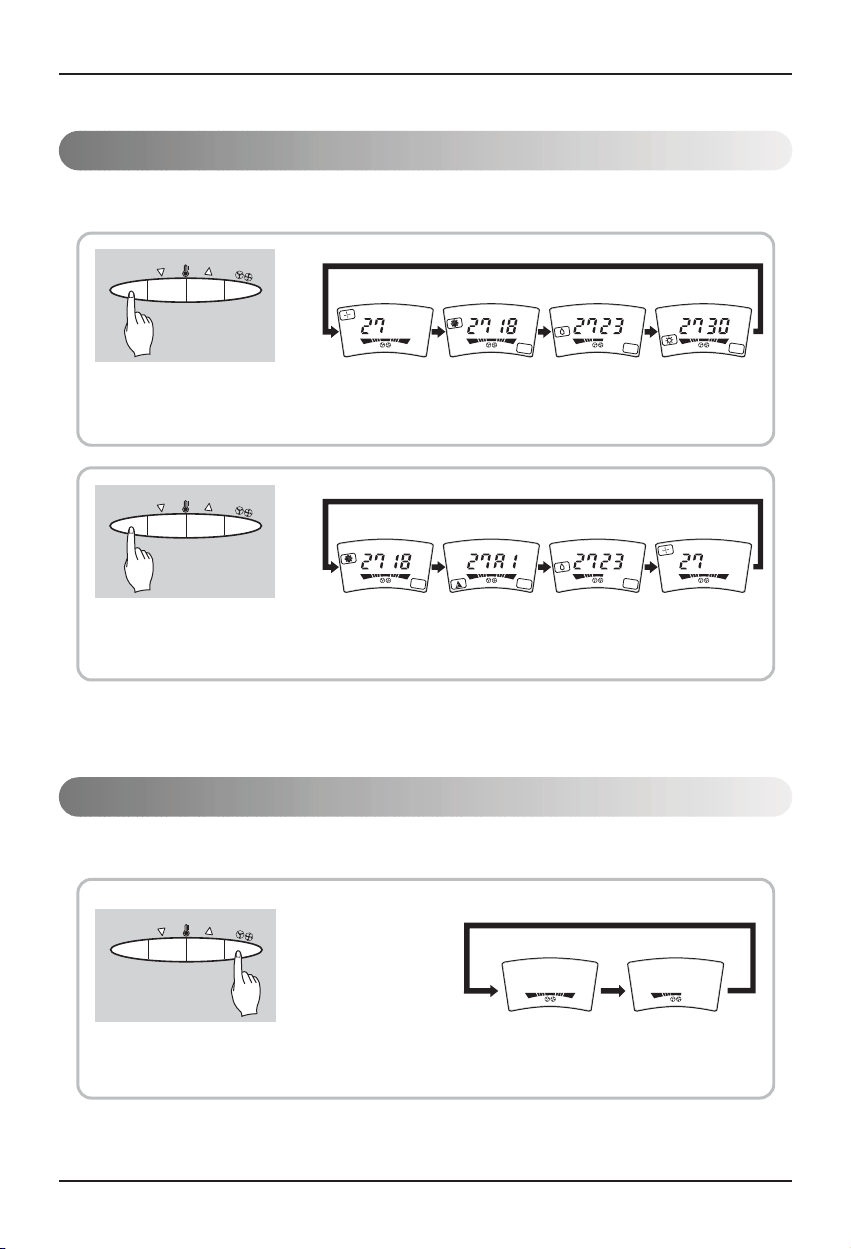
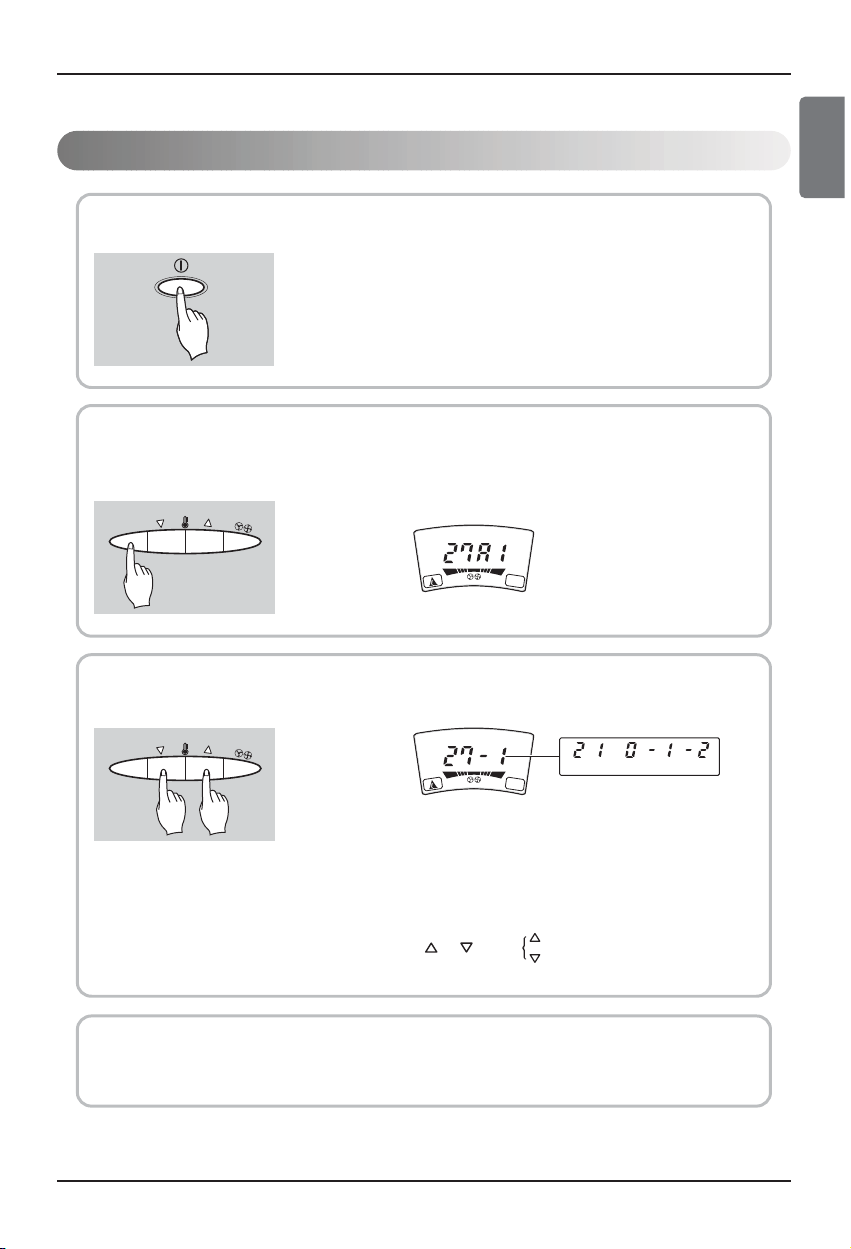
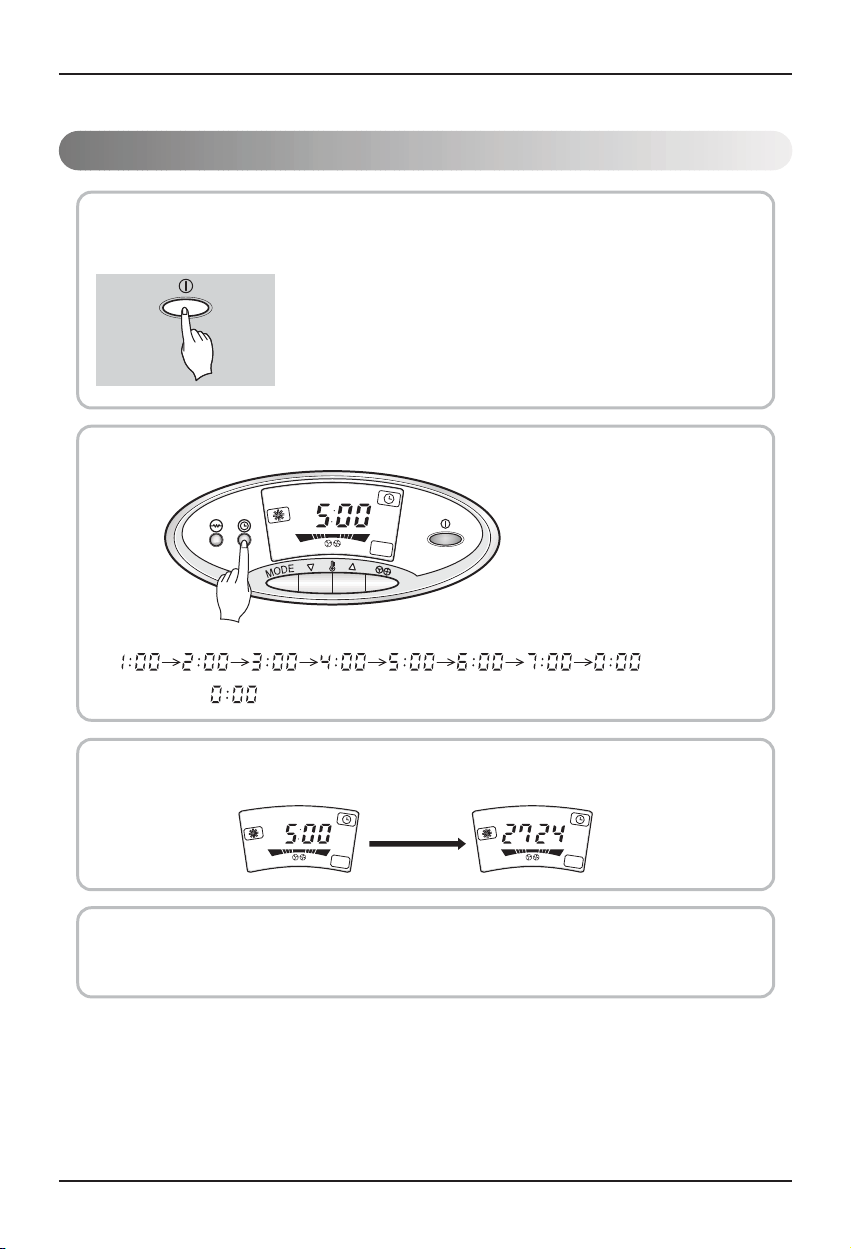
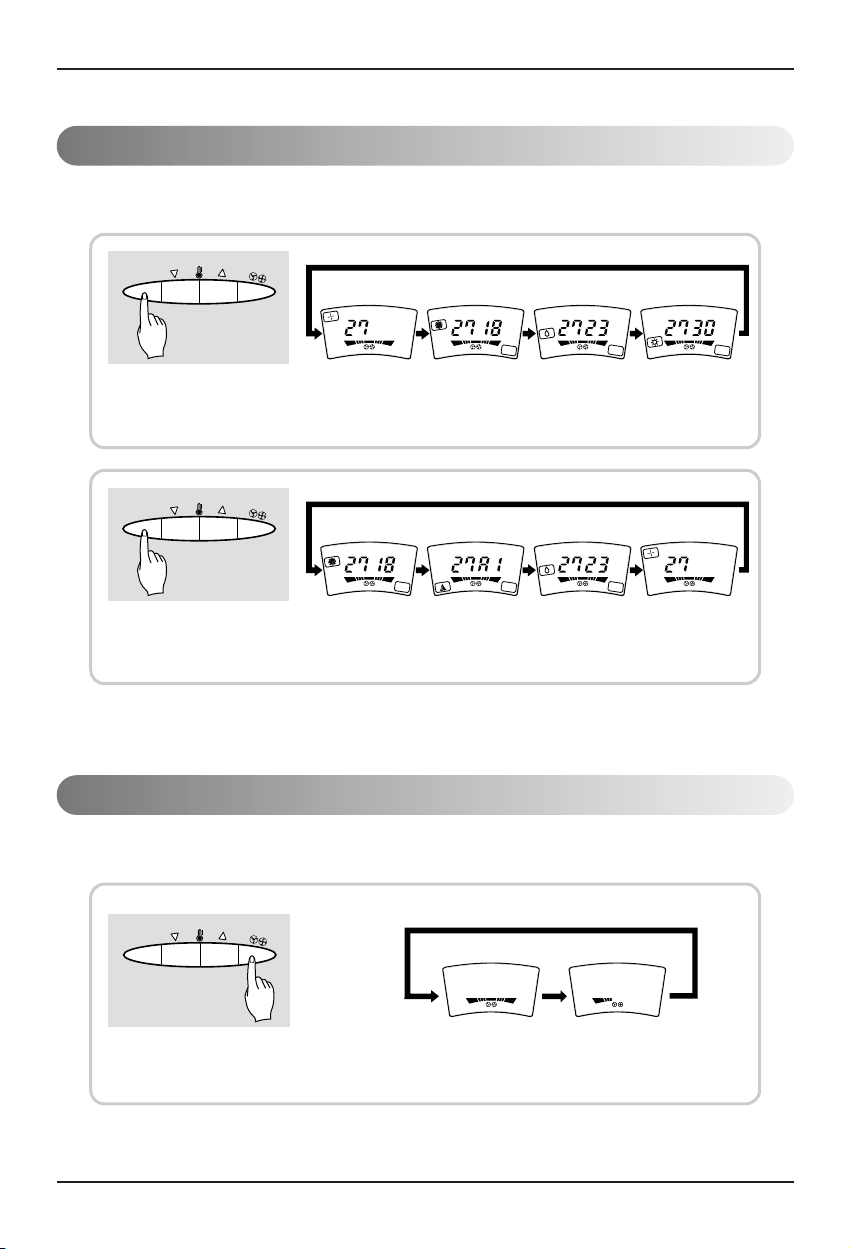
OFF Timer Setting Procedure(OFF TIMER Setting, or CANCEL)
Press the Start/Stop Button.
1
Press the Timer Button.
2
ROOM TEMP. SET TEMP.
LH
LH
• If you press the button, the selected off timer is displayed as follows;
• If you select ‘ ’, the Off Timer function will be cancelled.
When you finish the Off Timer setting, the Timer indicator lights off.
OUT DO
OR
OUT DOOR
3
LH
During off-timer operation if you press the Timer Button, the rest time will be displayed.
After 4 seconds
OUT DOOR
ROOM TEMP. SET TEMP.
LH
OUT DOOR
4
1 Floor Standing-Type Air Conditioner
4
Page 15
UP
RIGHT
DOWN
LEFT
Horizontal Louver
Vertical Louver
Fan Operation Mode
Operating Instructions
ENGLISH
Press the Start/Stop
1
Button.
Set the Fan Speed.
Select Fan Operation.
Press the Operation Mode
2
Selection Button.
E
D
O
M
ROOM TEMP.
LH
3
E
D
O
M
Airflow Direction Procedure
Adjust air flow direction manually by moving the horizontal or vertical louvers with hand.
• Each time the Button is pressed, the
Fan Speed mode is shifted.
A/CL
OUT DOOR
Owner's Manual 1
5
Page 16
Operating Instructions
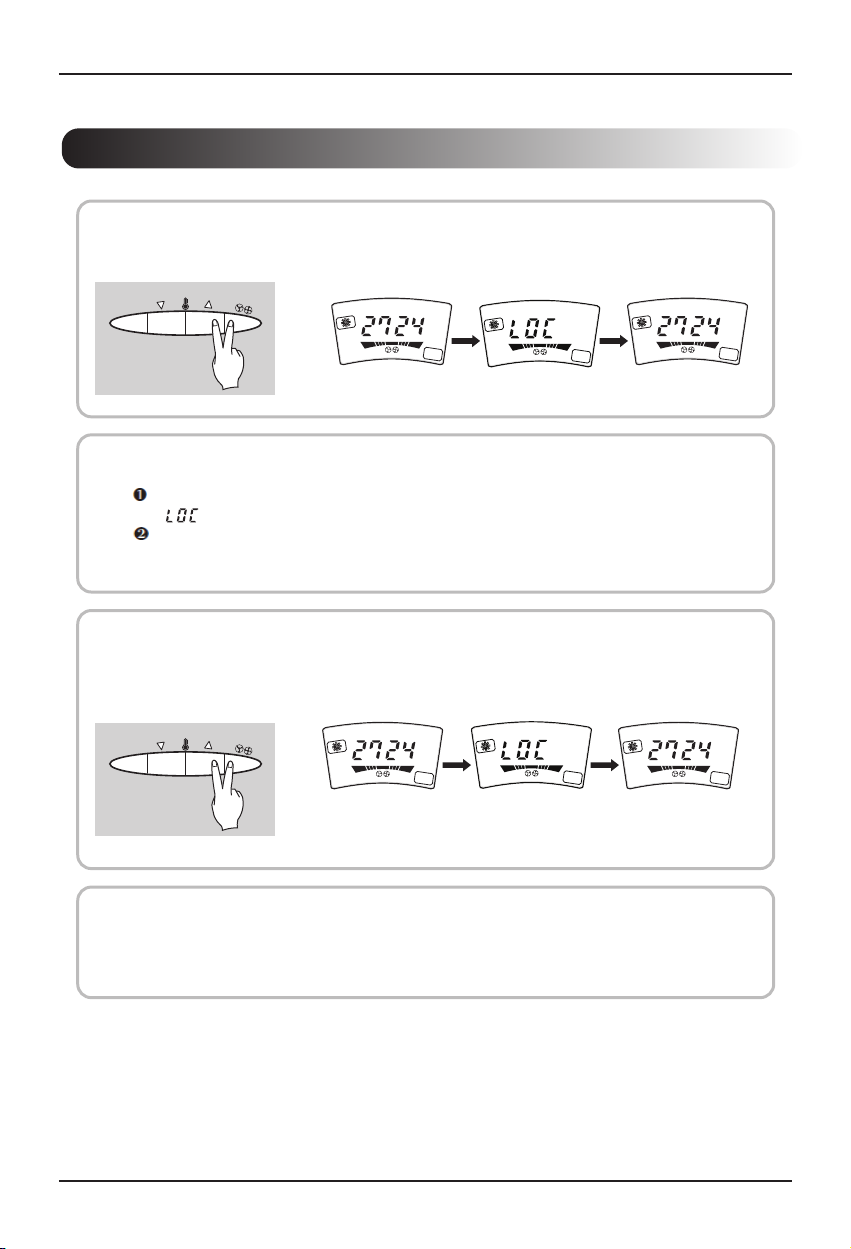
Child Lock Operation Procedure
Press the fan speed button and High temperature setting buttons simultaneously for 3 conds.
1
The unit will respond with beep.
E
D
O
M
During Child Lock Operation
2
Whenever you press any Button on Display Panel, it will immediately display
“ ”, which means Display panel is Locked.
All the Button on the indoor unit Display panel will not work.
For releasing child lock Operation
3
Press the fan speed button and High temperature setting buttons simultaneously for 3 conds.
The unit will respond with beep, Child Lock Operation will removed.
ROOM TEMP. SET TEMP.
L H
A/CL
OUT DOOR
After 3 seconds,
it will shift.
ROOM TEMP. SET TEMP.
L H
A/CL
OUT DOOR
After 3 seconds,
it will shift.
ROOM TEMP. SET TEMP.
L H
A/CL
OUT DOOR
E
D
O
M
ROOM TEMP. SET TEMP.
L H
A/CL
OUT DOOR
After pressing
the buttons
it will shift
immediately.
ROOM TEMP. SET TEMP.
L H
A/CL
OUT DOOR
After 3 seconds,
it will shift.
ROOM TEMP. SET TEMP.
L H
OUT DOOR
Auto restart
In case the power comes on again after a power failure, Auto Restarting Operation is the function to
operate procedures automatically to the previous operating conditions.
1 Floor Standing-Type Air Conditioner
6
A/CL
Page 17
Maintenance and Service
Maintenance and Service
CAUTION: Before performing any maintenance, turn off the main power to the system.
During the season
Cleaning of the air filters.
Recommended about once every two weeks
Remove the Air Filter.
Take hold of the tab and pull slightly forward to
remove the filter.
Clean.
To remove the dust adhering to the filters, either use a
•
vacuum cleaner, or wash them in water and dry in the
shade.
• Re-insert the filter to the original position.
Cleaning of the air conditioner
• Don’t wash with water.
• Wipe with a soft dry cloth.
• Water hotter than 40°C.
Could cause deformation
and/or discoloration.
When the air conditioner is not going to be used for a long time.
At the end of the season
Operate the air conditioner at the following
settings for 2 to 3 hours.
• Type of operation : Cooling.
• Temperature setting : 30°C.
This will dry out the internal mechanisms.
Cleaning of the air cleaner.
Recommended about once every three months
Remove the Air Cleaner.
Take hold of the tab and pull slightly forward to
remove the air cleaner.
Clean.
• Dip the air cleaner into the water mixed with
detergent, for 20~30 minutes, and dry in the shade.
• Re-insert the air cleaner to the original position.
Never use any of the followings.
• Volatile substances.
Could damage the surfaces
of the air conditioner.
At the start of the season
Clean the air filters, re-insert, then operate
the air conditioner.
ENGLISH
Turn off the circuit breaker.
CAUTION
Turn off the circuit breaker when the air conditioner
is not going to be used for a long time.
Dirt may collect and may cause a fire.
CAUTION
Operation Tips
Do not overcool the room.
This is not good for your health and
wastes electricity.
Make sure that the doors and windows
are shut tight.
Avoid opening doors and windows as
much as possible to keep the cool air in
the room.
Keep blinds or curtains closed.
Do not let direct sunshine enter the room
when the air conditioner is in operation.
Clean the air filter regularly.
Blockages in the air filter reduce the
airflow and lower cooling and
dehumidifying effects. Clean at least once
every two weeks.
Be sure that nothing obstructs the air outlet
and intake vents.
Keep the room temperature uniform.
Adjust the vertical and horizontal airflow
direction to ensure a uniform temperature
in the room.
Ventilate the room occasionally.
Since windows are kept closed, it is a
good idea to open them and ventilate the
room now and then.
Owner's Manual 1
7
Page 18
Maintenance and Service
Troubleshooting
Check the following points before requesting repairs or service.... If the malfunction persist, please contact your
dealer.
Case Explanation See page
Does not operate.
The room has a peculiar
odor.
It seems that condensation is
leaking from the air
conditioner.
Air conditioner does not
operate for about 3 minutes
when restarted.
Does not cool or heat
effectively.
The air conditioner operation
is noisy.
• Have you made a mistake in timer operation?
• Has the fuse blown or has the circuit breaker been
tripped?
• Is the power Switch at Off?
• Is the unit at the starting of Heating Operation?
If yes, Hot-start is activating.
• Is the unit in the Deicing?
If yes, wait for finishing the Deicing.
• Check that this is not a damp smell exuded by the
walls, carpet, furniture, or cloth items in the room.
• Condensation occurs when the airflow from the air
conditioner cools the warm room air.
• This is the Protection device of the air conditioner .
• Wait about three minutes and operation will begin.
• If the airflow begins before its temperature become
warm, it will cause an undesired cooling effect. In
order to prevent this, the airflow will not begin until
it is sufficiently warm.
• Is the air filter dirty? See air filter cleaning
instructions.
• The room may have been very hot when the room
air conditioner was first turned on. Allow time for it
to cool down.
• Has the temperature been set incorrectly?
• Are the indoor unit's air inlet or outlet vents
obstructed?
• For a noise that sounds like water flowing.
-This is the sound of freon flowing inside the air
conditioner unit.
• For a noise that sounds like the compressed air
releasing into atmosphere.
-This is the sound of the dehumidifying water being
processed inside the air conditioning unit.
-
-
-
17
-
-
-
18
Floor Standing-Type Air Conditioner
Page 19

MANUEL D’UTILISATION
FRANÇAIS
CLIMATISEUR
Veuillez lire attentivement ce manuel avant d’utiliser
votre appareil, et le conserver pour toute consultation ultérieure.
TYPE : Climatiseur suspendu au plafond
www.lg.com
Page 20

Manuel du propriétaire du climatiseur sur pied.
TABLE DES MATIERES
Pour vos archives
Précautions de sécurité.........3
Instructions d’utilisation .......
Entretien et Service..............1
Écrire le modèle et le numéro de série ici :
Modèle #
Série #
Vous pouvez les trouver sur la marque sur le coté
de chaque unité
Nom du vendeur
Date de l'achat
Agrafez votre reçu à cette page au cas où vous en
■
auriez besoin pour démontrer la date d'achat du produit
ou pour avoir droit à la garantie.
Lire ce manuel
À l'intérieur vous trouverez beaucoup de conseils utiles sur la
façon d'employer et d'entretenir votre climatiseur correctement.
Juste un peu de soin préventif de votre part peut vous sauver
beaucoup de temps et d'argent au cours de la vie de votre
climatiseur.
Vous trouverez beaucoup de réponses aux problèmes
communs dans le diagramme des conseils de dépannage. Si
vous passez en revue en premier notre diagramme du
dépannage, vous pouvez ne pas avoir besoin du service de
réparation
2 Climatiseur de Type Posé au Sol
Avertissement
• Contactez le service technique autorisé pour réparer et
entretenir cette unité.
• Contacter l'installateur pour l'installation de cette unité.
• Le climatiseur ne doit pas être manipuler par des jeunes
enfants sans surveillance
• Les jeunes enfants ne devraient pas être laissés sans
supervision pour s'assurer qu'ils ne jouent pas avec le
climatiseur.
• Lorsque le cordon électrique doit être remplacer, le travail de
emplacement devraient être fait par du personnel seulement.
• Le travail d'installation doit être fait selon les normes de
câblages par du personnel autorisé seulement.
Page 21
Mesures de sécurité
AVERTISSEMENT
Mesures de sécurité
Les instructions ci-après doivent être observées dans le but de prévenir tout risque de
dommages corporels ou matériels.
■ L'utilisation non conforme, résultant de la négligence des instructions, est susceptible de
provoquer des dommages corporels ou matériels dont la gravité est signalée par les
indications suivantes :
FRANÇAIS
AVERTISSEMENT
ATTENTION
Ce symbole indique un risque de blessure grave, voire mortelle.
Ce symbole indique un risque de blessure ou des
dommages matériels seulement.
■ Les significations des symboles utilisés dans ce manuel sont indiquées ci-dessous.
Veillez à ne pas faire cela.
Veillez à suivre les instructions de ce manuel.
■ Installation
N'utilisez pas un coupe-circuit
défectueux ou à valeur
nominale inférieure. Utilisez cet
appareil sur un circuit dédié.
• Ceci risquerait de provoquer un
incendie ou un choc électrique.
Installez fermement le
panneau et le couvercle du
tableau de commande.
•
Autrement vous risquerez de
provoquer un incendie ou un choc
électrique.
Ne modifiez ni prolongez le
cordon d'alimentation.
• Ceci risquerait de provoquer un
incendie ou un choc électrique.
Contactez toujours le revendeur ou un
centre de service après vente agréé
pour effectuer l'installation.
• Autrement, Vous pourriez
provoquer un incendie, un choc
électrique, une explosion ou
vous blesser.
Pour un travail électrique, contactez
le distributeur, le vendeur, un
électricien qualifié ou un Centre de
Service Après Vente Agrée.
• Ne démontez ni réparez le produit.
Ceci risquerait de provoquer un
incendie ou un choc électrique.
Installez toujours un circuit
et un disjoncteur dédiés.
• Un câblage ou une installation
inappropriés peuvent provoquer
un incendie ou un choc
électrique.
N'installez, n'enlevez ni
remettez en place l'unité vousmême (si vous êtes un client).
• Vous pourriez provoquer un
incendie, un choc électrique, une
explosion ou vous blesser.
N'installez pas le produit sur
un support d'installation
défectueux.
• Ceci peut provoquer des
blessures, un accident ou bien
endommager le produit.
Faites toujours une
connexion reliée à la terre.
• Autrement vous risquerez de
provoquer un incendie ou un
choc électrique.
Utilisez un disjoncteur ou
fusible à valeur nominale
appropriée.
• Autrement vous risquerez de
provoquer un incendie ou un
choc électrique.
Prenez soin lorsque vous
déballez et installez ce
produit.
•
Les bords aiguisés peuvent provoquer
des blessures. Faites attention en
particulier aux bords du boîtier et aux
ailettes du condenseur et de
l'évaporateur.
Vérifiez que la zone
d'installation n'est pas abîmée
par le temps.
•
Si la base s'écroule, le climatiseur
pourrait tomber avec elle, provoquant
des dommages matériels, une
défaillance du produit et des blessures.
Manuel du propriétaire 3
Page 22
Mesures de sécurité
Ne laissez pas le climatiseur marcher trop
longtemps lorsque l'humidité est très élevée et
qu'il y a une porte ou une fenêtre ouverte.
• De l'humidité peut se condenser
et mouiller ou endommager le
mobilier.
■ Fonctionnement
Assurez-vous qu'on ne puisse pas
tirer des câbles ou les endommager
en cours de fonctionnement.
• Ceci risquerait de provoquer un
incendie ou un choc électrique.
Ne placez aucun objet sur le
cordon d'alimentation.
• Ceci risquerait de provoquer un
incendie ou un choc électrique.
Ne branchez ni débranchez
la fiche d'alimentation en
cours de fonctionnement.
• Ceci risquerait de provoquer un
incendie ou un choc électrique.
Veillez à ne pas faire couler
d’eau sur les parties
électriques.
• Ceci pourrait provoquer un
incendie, une défaillance de
l'appareil ou un choc électrique..
S'il y a une fuite de gaz inflammable,
fermez le robinet à gaz et ouvrez une
fenêtre pour ventiler la pièce avant
de mettre en marche le climatiseur.
• N'utilisez le téléphone ni déplacez les
interrupteurs sur les positions marche/arrêt.
Ceci risquerait de provoquer une explosion
ou un incendie.
N'ouvrez pas la grille d'entrée d'air du
produit en cours de fonctionnement.
(Ne touchez pas le filtre électrostatique,
si l'unité en est équipée.)
•
Autrement, vous risquerez de subir des
blessures physiques, un choc
électrique ou de provoquer une
défaillance du produit.
Ne touchez pas (ne faites
pas fonctionner)le produit
avec les mains humides.
• Ceci risquerait de provoquer un
incendie ou un choc électrique.
N'emmagasinez ni utilisez de
substances inflammables ou
combustibles près de ce produit
• Ceci entraînerait un risque
d'incendie ou de défaillance du
produit.
Si le climatiseur dégage des sons, des
odeurs ou de la fumée, mettez le
disjoncteur sur la position arrêt (off) ou
débranchez le cordon d'alimentation.
• Il y a risque de choc électrique ou
d'incendie.
Contactez le centre de
service après vente agréé si
le produit est trempé(rempli
d'eau ou submergé).
• Ceci risque de provoquer un
incendie ou un choc électrique.
Ventilez la pièce de temps en temps lorsque
vous l'utilisez simultanément avec une poêle,
etc.
• Autrement, vous risquerez de provoquer un incendie
ou un choc électrique.
Si vous n'allez pas utiliser le produit pour une longue
période de temps, débranchez le cordon d'alimentation ou
mettez le disjoncteur sur la position Arrêt (off).
• Autrement, vous risquerez d'endommager le produit
ou de provoquer une défaillance de
celui-ci ou bien une mise en
marche involontaire.
Ne placez pas de radiateurs
ou d'autres appareils près
du cordon d'alimentation.
• Ceci risquerait de provoquer un
incendie ou un choc électrique.
N'utilisez pas ce produit dans espace
fermé hermétiquement pendant une
.
longue période de temps.
• Il peut se produire un manque
d'oxygène.
Arrêtez le climatiseur et fermez la fenêtre
en cas de tempête ou d'ouragan. Si
possible, enlevez le produit de la fenêtre
avant que l'ouragan arrive.
• Il y a risque de dommages à la
propriété, de défaillance du produit
ou de choc électrique.
Veuillez à ce que l'eau ne
pénètre pas dans le produit.
• Ceci risquerait de provoquer un
incendie, un choc électrique ou
d'endommager le produit.
Arrêtez le climatiseur avant de procéder à des
opérations de nettoyage ou de maintenance
du produit.
• Autrement, vous risquerez de provoquer un incendie
ou un choc électrique.
Assurez-vous que personne ne peut marcher
ou tomber sur l'unité extérieure.
• Ceci pourrait provoquer des blessures personnelles et
des dommages au produit.
4 Climatiseur de Type Posé au Sol
Page 23
■ Installation
ATTENTION
Mesures de sécurité
Vérifiez toujours s'il y a des fuites de
gaz (frigorigène) suite à l'installation
ou réparation du produit.
• Des niveaux de frigorigène trop
bas peuvent provoquer une
défaillance du produit.
N'installez pas le produit à un endroit
où le bruit ou l'air chaud dégagés de
l'unité extérieure dérangent les voisins.
• Ceci pourrait entraîner des
problèmes avec vos voisins.
Installez le raccord de drainage de
manière à assurer un drainage
approprié.
• Une mauvaise connexion peut
provoquer des fuites d'eau.
Faites appel à deux ou plusieurs
personnes pour enlever et
transporter ce produit.
• Evitez des blessures.
■ Fonctionnement
N'exposez pas la peau directement sous le jet d'air
froid pendant des longues périodes de temps (Ne
vous asseyez pas sous le courant d'air).
• Ceci peut nuire à votre santé.
Ne bloquez pas l'entrée ou la
sortie d'air.
• Ceci peut provoquer une
défaillance du produit.
Ne marchez ni mettez rien
sur le produit (unités
extérieures).
• Ceci risquerait de provoquer des
blessures et une défaillance du
produit.
Ne buvez pas d'eau drainée
du produit.
• Ceci n'est pas hygiénique et
pourrait provoquer de sérieux
problèmes de santé.
Ne rechargez ni démontez les piles. Ne placez
pas les piles sur le feu.
• Elle peuvent brûler ou exploser.
Utilisez un chiffon doux pour le nettoyage.
N'employez pas de détergents agressifs,
de dissolvants, etc.
•
Ceci risquerait de provoquer un incendie,
un choc électrique ou des dommages aux
pièces plastiques du produit.
Insérez toujours fermement le filtre.
Nettoyez le filtre toutes les deux
semaines ou plus souvent si besoin.
• Un filtre sale réduit l'efficacité du
climatiseur et pourrait provoquer
un dysfonctionnement ou des
dommages à l'appareil.
Utilisez un outil ou une
échelle solide lorsque vous
faites des opérations de
nettoyage ou de
maintenance du produit.
• Faites attention et évitez des
blessures.
Maintenez le produit au
niveau lors de son.
• Installation afin d'éviter des
vibrations ou des fuites d'eau.
N'installez pas ce produit à un endroit
où il serait exposé directement au vent
de la mer (pulvérisation d'eau de mer).
•
Ceci peut provoquer de la corrosion sur le
produit. La corrosion, particulièrement sur
les ailettes du condenseur et de
l'évaporateur, peut provoquer un
dysfonctionnement ou un fonctionnement
inefficace du produit.
N'utilisez pas ce produit pour des objectifs spéciaux tels que la
préservation d'aliments, d'oeuvres d'art, etc. C'est un climatiseur pour
consommateurs, non pas un système frigorifique de précision.
• Il y a risque de dommage à
la propriété ou pertes
matérielles.
Ne touchez pas les pièces métalliques
du produit lorsque vous enlevez le filtre
à air. Elles sont très aiguisées!
• Vous risquez de subir des
blessures.
N'insérez pas les mains ou d'autres objets
à travers l'entrée ou la sortie d'air en cours
de fonctionnement du produit.
• Il y a des bords aiguisés et des
pièces mobiles qui pourraient vous
blesser.
Remplacez les piles vieilles de la
télécommande par des piles neuves
du même type. Ne mélangez pas de
piles usées et neuves ou de
différentes types de piles.
• Ceci risquerait de provoquer un
incendie ou une explosion.
Si le liquide des piles tombe sur votre peau ou vos
vêtements, lavez-les avec de l'eau propre. N'utilisez
pas la télécommande si les piles ont des fuites.
• Les substances chimiques
des piles pourraient
provoquer des brûlures ou
d'autres risques pour la
santé.
FRANÇAIS
Manuel du propriétaire 5
Page 24
Instructions d’utilisation
Instructions d’utilisation
Fonctions et Spécifications
1. Dessin pour réfrigération et
chauffage
2. Super rendement énergétique
3. Contrôle Micom
4. Opérations silencieuse
Sortie d'air de ventilation
Sortie d'air de ventilation
TP-C1008FA*
TP-H1008FA*
Ouverture d'entrée d'air
(arrière)
Ouverture d'entrée d'air
5. 2 vitesses
réfrigération/chauffage
6. Filtre à air amovible
7. Filtre Anti –Bactéries
8. Circuit à 3 minutes de retard
Sortie d'air de ventilation
Ouverture d'entrée d'air
(arrière)
TP-C808FLA*
Remarque
* :développer numéro de série
Climatiseur de Type Posé au Sol
Sortie d'air de ventilation
H *ALF808-PT
Ouverture d'entrée d'air
(arrière)
Page 25
Instructions d’utilisation
M
O
D
E
DUCT
OUT DOOR
ROOM TEMP. SET TEMP.
LH
M
O
D
E
DUCT
OUT DOOR
ROOM TEMP. SET TEMP.
LH
13
147
2 3 4 12
1
10
65 11713
2 3 4 12 18 9
65 14 11
M
O
D
E
DUCT
OUT DOOR
ROOM TEMP. SET TEMP.
LH
713
2 3 4 12 1816 9
65 14 11 15
Contrôles et voyants des contrôles de l’unité interne
(Pompe à chaleur) (Modèle Refroidissement) (Modèle Pompe à chaleur et
radiateur électrique)
FRANÇAIS
1. BOUTON MARCHE/ARRET
L’appareil se met en marche quand on appuie
sur ce bouton. L’appareil s’arrête quand on
appuie sur ce bouton encore une fois.
2. BOUTON SELECTEUR DU MODE DE
FONCTIONNEMENT
Utilisé pour sélectionner le Mode de
Fonctionnement.
3. BOUTONS POUR REGLAGE DE LA
TEMPERATURE AMBIANCE
Utilisés pour choisir la température ambiance.
4. SELECTION DE VITESSE DU VENTILATEUR
INTERNE
Utilisé pour choisir la vitesse du ventilateur
interne à deux niveaux: faible, forte.
5. TEMOIN LUMINEUX DE VENTILATEUR
6. TEMOIN LUMINEUX DE REFROIDISSEMENT
7. TEMOIN LUMINEUX DE REFRIGERATION
FAIBLE
8. TEMOIN LUMINEUX DE CHAUFFAGE
9. TEMOIN LUMINEUX DE DEGIVRAGE
10. TEMOIN LUMINEUX DE MARCHE
AUTOMATIQUE
11. TEMOIN LUMINEUX DE FLUX D’AIR DU
CONDUIT
12. TEMOIN LUMINEUX DE MARCHE D’UNITE
EXTERNE
13. BOUTON POUR REGLAGE MINUTERIE
(L’OPERATION S’ARRETE LORSQUE CELUICI EST ALLUME)
14. TEMOIN LUMINEUX DE LA MINUTERIE
15. TEMOIN LUMINEUX DE CHAUFFAGE
ELECTRIQUE
16. BOUTON DE MARCHE DE CHAUFFAGE
ELECTRIQUE
Manuel du propriétaire 9
Manuel du propriétaire 7
Page 26
Instructions d’utilisation
Comment utiliser le Bouton de Mode de Fonctionnement
• A chaque fois que l’on appuie sur le Bouton Sélecteur de Mode de Fonctionnement, le mode de fonctionnement
change dans le sens de la flèche.
E
D
O
M
ROOM TEMP.
LH
OUT DOOR
Opération Ventilation Opération
E
D
O
M
ROOM TEMP. SET TEMP.
LH
OUT DOOR
Opération Ventilation Opération
A/CL
ROOM TEMP. SET TEMP.
LH
A/CL
OUT DOOR
ROOM TEMP. SET TEMP.
LH
Opération
Refroidissement
Refroidissement Faible
(Modèle Pompe à Chaleur)
ROOM TEMP. SET TEMP.
A/CL
LH
Refroidissement
ROOM TEMP. SET TEMP.
A/CL
LH
OUT DOOR
Opération
Refroidissement Faible
(Modèle Refroidissement)
ROOM TEMP. SET TEMP.
A/CL
OUT DOOR
LH
Opération Chauffage
ROOM TEMP.
A/CL
OUT DOOR
LH
Opération Chauffage
A/CL
OUT DOOR
A/CL
OUT DOOR
Comment utiliser le Bouton de Vitesse du Ventilateur
• A chaque fois que l’on appuie sur le Bouton de Vitesse du Ventilateur, la vitesse du ventilateur change suivant la
direction de la flèche.
E
D
O
M
ROOM TEMP. SET TEMP.
A/CL
M
LH
OUT DOOR
Climatiseur de Type Posé au Sol
ROOM TEMP. SET TEMP.
A/CL
L H
OUT DOOR
Forte Faible
Page 27
Mode de Fonctionnement Refroidissement
Instructions d’utilisation
1
Appuyez sur le Bouton Marche/Arrêt.
Sélectionnez l’opération Refroidissement.
2
Appuyez sur le Bouton Sélecteur du Mode de Fonctionnement.
E
D
O
M
ROOM TEMP. SET TEMP.
LH
Sélectionnez une température inférieure à la température ambiante.
La température peut être réglée entre 1 C et 30°C par 1°C.
3
E
D
O
M
8°
ROOM TEMP. SET TEMP.
LH
FRANÇAIS
A/CL
OUT DOOR
A/CL
OUT DOOR
•
Appuyez sur les boutons
Pour faire augmenter la température.
o
Pour faire diminuer la température.
Sélectionnez la Vitesse du Ventilateur.
4
E
D
O
M
A chaque fois que l’on appuie sur le Bouton, le Mode de Vitesse du Ventilateur change (FORTE ➯ FAIBLE)
Manuel du propriétaire
Page 28
Instructions d’utilisation
Opération Refroidissement Faible
Appuyez sur le Bouton Marche/Arr
êt.
1
Sélectionnez l’Opération Refroidissement Faible.
2
Appuyez sur le Bouton Sélecteur du Mode de Fonctionnement.
E
D
O
M
Sélectionnez une température inférieure à la température ambiante.
La température peut être réglée entre 1 C et 30°C par 1°C.
3
E
D
O
M
ROOM TEMP. SET TEMP.
LH
8°
ROOM TEMP. SET TEMP.
LH
A/CL
OUT DOOR
A/CL
OUT DOOR
Pour faire augmenter la température.
•
Appuyez sur les boutons
o
Pour faire diminuer la température.
Pendant l’Opération Refroidissement Faible
• La vitesse du ventilateur interne est fixée automatiquement en Faible et elle ne peut pas être
réglée.
1 Climatiseur de Type Posé au Sol
Page 29

Instructions d’utilisation
Fonctionnement en mode chauffage (à l’exception du modèle refroidissement)
Appuyez sur le Bouton Marche/Arr
êt.
1
Sélectionnez l’Opération Chauffage.
Appuyez sur le Bouton Sélecteur du Mode de Fonctionnement.
2
E
D
O
M
Sélectionnez une température supérieure à la température ambiante.
La température peut être réglée entre 1 °C et 30°C par 1°C.
3
E
D
O
M
8
ROOM TEMP. SET TEMP.
LH
ROOM TEMP. SET TEMP.
LH
FRANÇAIS
A/CL
OUT DOOR
A/CL
OUT DOOR
Pour faire augmenter la température.
•
Appuyez sur les boutons
o
Pour faire diminuer la température.
Sélectionnez la Vitesse du Ventilateur.
4
E
D
O
M
• A chaque fois que l’on appuie sur le Bouton, le Mode de Vitesse du Ventilateur change.
Manuel du propriétaire 1
Page 30

Instructions d’utilisation
Mode de Fonctionnement du Radiateur Électrique (Modèle Pompe à chaleur et Radiateur électrique uniquement)
Appuyez sur le Bouton Marche/Arr
êt.
1
Sélectionnez l’Opération Chauffage en plus de l’Opération Chauffage Electrique.
❶
2
3
Appuyez sur le Bouton Sélecteur du Mode de Fonctionnement pour choisir l’Opération Chauffage.
❷ Appuyez sur le Bouton Opération Chauffage Electrique.
(Lorsque l’unité est en marche en Mode Chauffage).
ROOM TEMP. SET TEMP.
LH
Sélectionnez une température supérieure à la température ambiante.
La température peut être réglée entre 1 °C et 30°C par 1°C.
E
D
O
M
8
ROOM TEMP. SET TEMP.
LH
A/CL
OUT DOOR
A/CL
OUT DOOR
•
Appuyez sur les boutons
Sélectionnez la Vitesse du Ventilateur.
Pour faire augmenter la température.
o
Pour faire diminuer la température.
4
E
D
O
M
• A chaque fois que l’on appuie sur le Bouton, le Mode de Vitesse du Ventilateur change.
1 Climatiseur de Type Posé au Sol
Page 31

Instructions d’utilisation
Mode de Fonctionnement Automatique (Modèle Refroidissement)
Appuyez sur le Bouton Marche/Arr
êt.
1
Sélectionnez l’Opération Automatique.
Appuyez sur le Bouton Sélecteur du Mode de
2
Fonctionnement.
E
D
O
M
Sélectionnez une température supérieure ou inférieure à la température standard.
La température peut être réglée dans une plage par 1 niveau.
3
E
D
O
M
ROOM TEMP. SET TEMP.
LH
ROOM TEMP. SET TEMP.
LH
A/CL
OUT DOOR
A/CL
OUT DOOR
FRANÇAIS
Cold HotWarmCool Proper
(Cette indication changera à l’état d’Affichage de Mode Automatique initial après 4 secondes).
•
Appuyez sur les boutons
Pour faire augmenter la température.
o
Pour faire diminuer la température.
Pendant l’Opération Automatique
• Il est impossible de changer la vitesse du ventilateur interne car celle-ci a été électroniquement
réglée au niveau le plus convenable.
Manuel du propriétaire 1
Page 32

Instructions d’utilisation
Procédure pour Fixer la Minuterie sur la position OFF (Réglage de la Minuterie en OFF ou ANNULER)
Appuyez sur le Bouton Marche/Arrêt.
1
Appuyez sur le Bouton de la Minuterie.
2
ROOM TEMP. SET TEMP.
ROOM TEMP. SET TEMP.
LH
L H
•
Si l’on appuie sur ce bouton, la Minuterie réglée sur la position off est affichée de la manière suivante:
OUT DOOR
OUT DOOR
• Si l’on choisi ‘0:00’, la fonction de Minuterie en Off est annulée.
Lorsque vous finirez de régler la Minuterie en Off, le témoin lumineux de la Minuterie
3
s’éteindra.
ROOM TEMP. SET TEMP.
LH
OUT DOOR
Après 4 secondes
ROOM TEMP. SET TEMP.
L H
OUT DOOR
Pendant l’opération de Minuterie en off, si l’on appuie sur le Bouton Minuterie, le temps
4
restant est affiché.
1 Climatiseur de Type Posé au Sol
Page 33

Mode de Fonctionnement Ventilation
HAUT
DROITE
BAS
GAUCHE
Volet Vertical
Volet Horizontal
Instructions d’utilisation
Appuyez sur le Bouton
Marche/Arrêt.
1
Sélectionnez la Vitesse du Ventilateur.
Sélectionnez le mode de
fonctionnement du ventilateur.
2
Appuyez sur le Bouton Sélecteur du
Mode de Fonctionnement.
E
D
O
M
3
E
D
O
M
• A chaque fois que l’on appuie sur le Bouton, le Mode de Vitesse
du Ventilateur change.
Procédure pour régler la Direction du Flux d’Air
Réglez manuellement la direction du flux d’air en manipulant les volets horizontaux ou verticaux avec la main.
ROOM TEMP.
A/CL
LH
OUT DOOR
FRANÇAIS
Manuel du propriétaire 1
Page 34

Instructions d’utilisation
Procédure de Fonctionnement Dispositif pour Sécurité d’Enfants
Appuyez en même temps sur le bouton de sélection de la vitesse de ventilation et sur le
bouton d'augmentation de la température pendant 3 secondes.
1
L’unité émet un bip.
E
D
O
M
ROOM TEMP. SET TEMP.
L H
A/CL
OUT DOOR
Après 3 secondes,
cela changera.
ROOM TEMP. SET TEMP.
L H
A/CL
OUT DOOR
Après 3 secondes,
cela changera.
Pendant l’Opération Sécurité pour Enfants
2
A chaque fois qu’un Bouton quelconque du Panneau d’Affichage est appuyé,
l’inscription “L0C” s’affiche, ce qui veut dire que le Panneau d’Affichage est bloqué.
Aucun bouton ne marchera au Panneau d’Affichage de l’unité interne.
ROOM TEMP. SET TEMP.
L H
A/CL
OUT DOOR
Pour désactiver le verrouillage
3
Appuyez en même temps sur le bouton de sélection de la vitesse de ventilation et sur le
bouton d'augmentation de la température pendant 3 secondes.
L’unité émet un bip et le verrouillage est désactivé.
E
D
O
M
ROOM TEMP. SET TEMP.
L H
A/CL
OUT DOOR
Après avoir appuyé sur
les boutons, cela
changera
automatiquement.
ROOM TEMP. SET TEMP.
L H
A/CL
OUT DOOR
Après 3 secondes,
cela changera.
Redémarrage automatique
En cas de panne d’électricité, lorsque le courant est rétabli, l’unité se remet en fonctionnement de
manière automatique et selon les conditions de fonctionnement établies au préalable.
16 Climatiseur de Type Posé au Sol
ROOM TEMP. SET TEMP.
L H
A/CL
OUT DOOR
Page 35

Entretien et Service
Entretien et Service
ATTENTION: Avant de réaliser n’importe quel type d’entretien, coupez l’alimentation principale du système.
Pendant la saison.
Il est recommandé de le faire environ une fois tous les quinze jours.
Nettoyage des filtres à air.
Enlevez les filtres à air.
Ôtez l’étiquette et tirez légèrement en avant pour
enlever le filtre.
Nettoyez.
Enlevez la poussière adhérée aux filtres à l’aide d’un
•
aspirateur, ou bien lavez-les avec de l’eau et faites-les
sécher à l’ombre.
• Replacez le filtre dans sa position originale.
Nettoyage du climatiseur.
• Ne le lavez pas avec de l’eau.
• Essuyez avec un tissu doux et sec.
Il est recommandé de le faire environ une fois tous les trois mois.
•
Nettoyage du purificateur d’air.
Enlevez le Purificateur d’air.
Ôtez l’étiquette et tirez légèrement en avant pour enlever
le purificateur d’air.
Nettoyez.
• Plongez le purificateur d’air pendant 20 ~30 minutes
dans de l’eau contenant du détergent, puis faites-le
sécher à l’ombre.
• Replacez le purificateur d’air dans sa position originale.
N’utilisez jamais:
De l’eau au-dessus de 40°C.
Ceci peut provoquer des
déformations et/ou des décolorations.
Lorsque le climatiseur ne sera pas utilisé pendant une longue période.
À la fin de la saison.
Faites fonctionner le climatiseur selon les
réglages suivants pendant 2 ou 3 heures.
• Type de fonctionnement: Refroidissement.
• Réglage de la température : 30°C
Ceci fera sécher les mécanismes internes.
Arrêtez le disjoncteur.
ATTENTION
ATTENTION
Arrêtez le disjoncteur lorsque le climatiseur ne sera
pas utilisé pendant une longue période.
De la saleté peut s’accumuler et provoquer un incendie.
Audébutdelasaison.
Nettoyez les filtres à air, remettez-les à
leur place, puis mettez en marche le
climatiseur.
Veillez à ce qu’aucun obstacle ne bloque
les grilles d’entrée et de sortie d’air.
FRANÇAIS
• Des substances volatiles.
Ceci peut endommager les
surfaces du climatiseur.
Conseils d’utilisation.
Ne refroidissez pas à l’excès la pièce.
Ce n'est pas bon pour la santé et cela vous
fera gaspiller l'électricité.
Veillez à ce que les portes et les fenêtres
soient bien fermées.
Évitez autant que possible d’ouvrir les portes
et les fenêtres afin de conserver l'air froid
dans la pièce.
Maintenez fermés stores et rideaux.
Veillez à ce que le soleil n’entre pas
directement dans la pièce lorsque le
climatiseur est en fonctionnement.
Nettoyez les filtres à air régulièrement.
Les obstacles dans le filtre à air réduisent le
flux d'air ainsi que les effets de refroidissement
et de déshumidification. Nettoyez-les au moins
une fois toutes les quinze jours.
Gardez une température ambiante
uniforme.
Réglez la direction du flux d’air vertical et
horizontal afin d’assurer une température
ambiante uniforme.
Aérez la salle de temps en temps.
Puisque les fenêtres restent fermées, il est
conseillé de les ouvrir et d'aérer la pièce de
temps en temps.
Manuel du propriétaire 1
Page 36

Entretien et Service
Guide de dépannage
Vérifiez les points ci-dessous avant de demander des réparations ou de contacter le service technique. Si vous
ne parvenez pas à résoudre le problème, veuillez contacter votre distributeur.
Problème Explication Voir page
L’appareil ne marche pas.
La pièce a une odeur
particulière.
Il semble que la condensation cule
depuis le conditionneur d’air.
Le conditionneur d’air ne
fonctionne pas pendant environ 3
minutes quand il se remet en
marche.
L’appareil ne refroidit ou ne
réchauffe pas.
Le conditionneur d’air est
bruyant.
•
Avez-vous fait une erreur dans le fonctionnement du timer?
• Le fusible a sauté ou l’interrupteur automatique
s’est déclenché?
• Le commutateur d’alimentation est sur OFF?
•
L’unité est au début du fonctionnement de réchauffement?
Si oui, Hot-start est activé?
• L’unité est en situation d’élimination du givre?
Si oui, attendez que le dégivrage se termine.
• Contrôlez qu’il n’y ait pas d’odeur d’humidité
provenant des murs, des tapis, des meubles ou de
vêtements dans la pièce.
• La condensation se forme quand le flux d’air depuis le
conditionneur d’air refroidit l’air chaud de la pièce.
• C’est le système de protection du conditionneur d’air.
• Attendez environ 3 minutes et le fonctionnement reprend.
• Si le flux d’air commence avant que la température
devienne chaude, cela provoque un effet de
refroidissement non désiré. Pour éviter cela, le flux d’air
ne commencera pas avant qu’il ne soit suffisamment
chaud.
• Le filtre à air est-il sale? Voir les instructions de
nettoyage.
• La pièce a été très chaude quand le conditionneur
d’air a été allumé pour la première fois. Laissez-lui
temps de refroidir.
le
• La température a-t-elle été mal réglée?
• Les ouvertures de ventilation d’entrée et de sortie
d’air sont-elles bloquées?
• Un bruit comme de l’eau qui coule.
-C’est le bruit du Fréon qui coule dans le
conditionneur d’air.
• Un bruit comme de l’air comprimé relâché dans
l’atmosphère.
-C’est le bruit de l’eau de déshumidification qui
avance dans le conditionneur d’air.
-
-
-
1
7
-
-
-
Climatiseur de Type Posé au Sol
Page 37

MANUAL DO UTILIZADOR
AR CONDICIONADO
PORTUGUESE
Por favor leia este manual cuidadosamente antes de utilizar o seu
aparelho e guarde-o para futuras referências.
TIPO: Ar Condicionado Suspenso no Tecto
www.lg.com
Page 38

Manual do Proprietário do Ar Condicionado de Chão
ÍNDICE DE CONTEÚDOS
PARA OS SEUS REGISTOS
Precauções de Segurança
.......3
Instruções de
Funcionamento
Manutenção e Assistência
........................6
.....17
Escreva, a seguir, os números do modelo e de série:
Modelo #
Número de Série #
Encontra-os numa etiqueta na parte lateral de cada unidade.
Nome do Vendedor
Data da Compra
Agrafe o seu recibo de compra a esta página na
■
eventualidade de necessitar de fazer prova da data da
compra ou para questões relacionadas com a garantia.
LEIA ESTE MANUAL
No interior, encontrará muitos conselhos úteis sobre a utilização e
manutenção do seu aparelho de ar condicionado. A realização de
pequenos cuidados de prevenção pela sua parte poderá vir a
poupar-lhe muito tempo e dinheiro durante o período de vida útil
do seu aparelho de ar condicionado. Encontrará, também,
respostas para os problemas mais comuns na tabela de resolução
de problemas. Em muitos casos, a consulta da nossa tabela de
Resolução de Problemas será suficiente para não precisar de
recorrer aos serviços de assistência técnica.
PRECAUÇÕES
•
Contacte técnicos de assistência autorizados para procederem
às reparações e manutenção desta unidade.
•
Contacte um instalador para proceder à instalação desta
unidade.
•
O aparelho de ar condicionado não deve ser utilizado por
crianças pequenas ou pessoas portadoras de deficiência sem
supervisão.
•
As crianças pequenas devem ser vigiadas para não brincarem
com o aparelho de ar condicionado.
•
Quando o cabo de fornecimento de energia eléctrica necessitar
de ser substituído, a substituição deverá ser efectuada por
pessoal técnico autorizado, utilizando apenas peças de
substituição genuínas.
•
Os procedimentos de instalação têm de ser executados dando
cumprimento às Normas Nacionais para o Sector Eléctrico,
apenas por pessoal técnico qualificado e autorizado.
2 Ar Condicionado de Chão
Page 39

Precauções de Segurança
AVISO
Precauções de Segurança
Para evitar lesões no utilizador ou noutras pessoas e danos de propriedade, devem ser seguidas as
seguintes instruções.
■
O funcionamento incorrecto por ignorar as instruções pode causar danos ou prejuízos. A seriedade
destes é classificada pelas seguintes instruções.
AVISO
CUIDADO
Este símbolo indica a possibilidade de morte ou graves danos.
Este símbolo indica a possibilidade de danos ou prejuízos apenas
de propriedade.
■ Os significados dos símbolos utilizados neste manual são indicados a seguir.
Nunca faça isto.
Siga sempre estas instruções.
■ Instalação
Não use um disjuntor de
circuito defeituoso ou de
voltagem inferior. Use este
aparelho com um circuito
dedicado.
•Existeperigodefogoouchoque
eléctrico.
Instale firmemente o painel e a
tampa da caixa de controlo.
•Existeperigodefogoouchoque
eléctrico.
Não modifique ou faça uma
extensão do cabo eléctrico.
• Existe perigo de incêndio ou choque
eléctrico.
Para a instalação, contacte
sempre o vendedor ou um Centro
de Assistência Autorizado.
• Existe perigo de incêndio, choque
eléctrico, explosão ou danos.
Para trabalhos de electricidade,
contacte o vendedor ou
revendedor, um electricista
qualificado ou um Centro de
Assistência Autorizado.
• Não desmonte ou repare o produto.
Existe perigo de incêndio ou choque
eléctrico.
Instale sempre disjuntor de
circuito dedicado.
• Uma cablagem ou instalação
impróprias podem causar incêndio ou
choque eléctrico.
Não instale, retire ou reinstale a
unidade por si próprio (cliente).
• Existe perigo de incêndio, choque
eléctrico, explosão ou danos.
Não instale o produto num
ponto de instalação defeituoso.
• Este pode causar lesões, acidentes ou
danos no produto.
Ligue sempre o produto à terra.
•Existeperigodeincêndioouchoque
eléctrico.
Use um disjuntor ou fusível com
a voltagem correcta.
•Existeperigodeincêndioouchoque
eléctrico.
Tenha cuidado ao desempacotar
e instalar o produto.
• As extremidades afiadas podem causar
danos. Seja especialmente cuidadoso
no caso de extremidades e arestas do
condensador e do evaporador.
Certifique-se de que a área de
instalação não se deteriorou
com a passagem dos anos.
• Se a base cair, o aparelho de ar
condicionado pode cair também,
causando danos de propriedade, a
avaria do produto e danos pessoais.
PORTUGUESE
Manual do Proprietário 3
Page 40

Precauções de Segurança
■ Funcionamento
Nãodeixeoaparelhodear
condicionado a funcionar durante muito
tempo se a humidade estiver muito
elevada ou se tiver uma janela aberta.
• A humidade pode condensar e molhar
ou danificar o mobiliário.
Não desligue a ficha de
alimentação durante o
Certifique-se de que o cabo
eléctrico não pode ser puxado
ou danificado durante o
funcionamento.
• Existe risco de incêndio ou choque
eléctrico.
Não toque (accione) o produto
com as mãos molhadas.
funcionamento.
• Existe risco de incêndio ou choque
eléctrico.
Não deixe entrar água nos
componentes eléctricos.
• Existe risco de incêndio ou choque
eléctrico.
Não armazene ou use gases ou
combustíveis inflamáveis perto
do produto.
• Existe perigo de incêndio, avaria do
produto ou choque eléctrico.
Se ocorrer uma fuga de gás
inflamável, desligue o gás e
abra uma janela para ventilação
antes de ligar o produto.
• Não use o telefone nem ligue ou
desligue interruptores. Existe risco de
explosão ou incêndio.
Não abra a grade de entrada do
produto durante o funcionamento.
(Não toque no filtro electrostático,
se a unidade estiver equipada
• Existe risco de incêndio ou avaria do
produto.
Se o aparelho emitir ruídos ou
libertar fumos, desligue o
interruptor ou o cabo de
alimentação.
• Existe risco de choque eléctrico ou
incêndio.
Se o produto estiver
encharcado (inundado ou
submerso), contacte um Centro
de Assistência Autorizado.
com o mesmo.)
• Existe risco de lesões físicas, choque
eléctrico ou avaria do produto.
• Existe risco de incêndio ou choque
eléctrico.
Ventile regularmente o produto se o utilizar
juntamente com um fogão, etc.
• Existe risco de incêndio
ou choque eléctrico.
Se não prever a utilização do produto durante um
longo período de tempo, desligue a ficha ou o
disjuntor de circuito.
• Existe risco de danos ou avarias no produto, ou de
funcionamento não
intencional.
Não coloque objectos por cima
do cabo eléctrico.
• Existe risco de incêndio ou choque
eléctrico.
Não coloque aquecedores ou
outros aparelhos perto do cabo
eléctrico.
• Existe risco de incêndio ou choque
eléctrico.
Não use o produto num espaço
confinado durante um longo
período de tempo.
• Pode ocorrer uma falha de oxigénio.
Suspenda o funcionamento e
feche a janela em caso de
trovoada ou furacão. Se possível,
retire o produto da janela antes
de ocorrer o furacão.
• Existe risco de danos de propriedade,
avaria do produto ou choque eléctrico.
Tenha cuidado para a água não
entrar no produto.
• Existe risco de incêndio, choque
eléctrico ou danos no produto.
Desligue a corrente ao limpar ou efectuar trabalhos
de manutenção no produto.
• Existe risco de choque eléctrico.
Certifique-se de que não é possível alguém
tropeçar ou cair na unidade exterior.
• Tal pode resultar em lesões pessoais ou em danos no
produto.
4 Ar Condicionado de Chão
Page 41

■ Instalação
CUIDADO
Inspeccione sempre a
existência de fugas de gás
(refrigerador) após a instalação
ou reparação do produto.
• Baixos níveis do refrigerador podem
causar a avaria do produto.
• Uma má conexão pode causar o
Não instale o produto num local
onde o ruído ou ar quente
libertado pela unidade externa
possa incomodar os vizinhos.
• Tal pode causar problemas aos seus
vizinhos.
• Evite lesões pessoais.
■ Funcionamento
Não exponha directamente a pele ao ar fresco
durante longos períodos de tempo. (Não se sente
em frente da tiragem de ar.)
• Tal pode prejudicar a sua saúde.
Não bloqueie a entrada ou saída
do fluxo de ar.
• Tal pode causar a avaria do produto.
Não se coloque em cima, nem
coloque objectos em cima do
produto. (unidades externas)
• Existe risco de danos pessoais e avaria
do produto.
Não beba a água drenada pelo
produto.
• Esta água é imprópria para consumo e
pode causar danos graves à saúde.
Não recarregue ou desmonte as pilhas.
Não elimine as pilhas através do fogo.
• Estas podem arder ou explodir.
Instale a mangueira de
drenagem para se certificar de
que a água é adequadamente
drenada.
derramamento
de água.
O produto deve ser levantado e
transportado por duas ou mais
pessoas.
Não use o produto para fins especiais, tais como
conservar comida, obras de arte, etc. Este é um
aparelho de ar condicionado, não um sistema de
refrigeração de precisão.
• Existe risco de perdas ou
danos na propriedade.
Use um pano macio para limpar.
Não use detergentes
agressivos, solventes, etc.
• Existe risco de incêndio, choque
eléctrico ou danos das partes eléctricas
do produto.
Insira sempre o filtro firmemente.
Limpe o filtro a cada duas
semanas ou com maior
frequência, se necessário.
• Um filtro sujo reduz a eficácia do ar
condicionado e pode causar o mau
funcionamento ou danos no produto.
Use um banco ou escadote
firme ao limpar ou efectuar
trabalhos de manutenção no
produto.
• Seja cuidadoso e evite danos pessoais.
Se o líquido das pilhas tocar na sua pele ou nas
suas roupas, lave bem com água limpa. Não use o
controlo remoto se as pilhas tiverem derramado.
• As substâncias químicas das pilhas podem causar
queimaduras ou riscos para a saúde.
Precauções de Segurança
Mantenha o produto nivelado ao
instalá-lo.
• Para evitar vibração ou derramamento
de água.
Não instale o produto num local
onde fique directamente
exposto à brisa marinha
(salina).
• Tal pode causar corrosão no produto.
A corrosão, sobretudo nas pás do
condensador e do evaporador, pode
causar anomalias no produto ou um
funcionamento ineficaz.
Não toque nas peças metálicas
doprodutoaoremoverofiltro
de ar. Estas são muito afiadas!
• Existe risco de lesões pessoais.
Não introduza as mãos ou
outros objectos nas entradas ou
saídas de ar com o aparelho em
funcionamento.
• Existem peças afiadas e em
movimento que podem causar danos
pessoais.
Substitua todas as pilhas do
controlo remoto por pilhas novas
do mesmo tipo. Não misture
pilhas antigas com pilhas novas
ou diferentes tipos de pilhas.
• Existe perigo de incêndio ou explosão.
PORTUGUESE
Manual do Proprietário 5
Page 42

InstruçõesdeFuncionamento
InstruçõesdeFuncionamento
Características e Especificações
1. Modelo para refrigeração e
aquecimento
2. Super eficiência de energia
3. Controlo Micom
4. Funcionamento silencioso
Ar de saída de
Ar de saída de
TP-C1008FA*
TP-H1008FA*
Vent de admissão
(traseira)
Vent de admissão
5. 2 velocidades de
refrigeração/aquecimento
6. Filtro de ar amovível
7. Filtro anti-bactérias
8. Circuito de 3 minutos de
retardamento
Ar de saída de
Vent de admissão
(traseira)
TP-C808FLA*
H *ALF808-PT
Ar de saída de
Vent de admissão
(traseira)
observação
* :
desenvolver número de série
6 ArCondicionadodeChão
Page 43

M
O
D
E
DUCT
OUT DOOR
ROOM TEMP. SET TEMP.
LH
M
O
D
E
DUCT
OUT DOOR
ROOM TEMP. SET TEMP.
LH
13
147
2 3 4 12
1
10
65 11713
2 3 4 12 18 9
65 14 11
M
O
D
E
DUCT
OUT DOOR
ROOM TEMP. SET TEMP.
LH
713
2 3 4 12 1816 9
65 14 11 15
Instruções de Funcionamento
Controlos e Indicadores da Unidade Interna
(Bomba de Calor) (Modelo de Refrigeração) (Modelo Bomba de Calor e
Aquecedor Eléctrico)
PORTUGUESE
1. BOTÃO START/STOP
A operação começa quando este botão é
premido e pára quando é premido novamente.
2. BOTÃO DE SELECÇÃO DO MODO DE
FUNCIONAMENTO
Utilizar para seleccionar o Modo de
funcionamento.
3. BOTÕES DE DEFINIÇÃO DA
TEMPERATURA AMBIENTE
Utilizar para seleccionar a temperatura
ambiente.
4. SELECÇÃO DA VELOCIDADE DA
VENTOINHA INTERNA
Utilizar para seleccionar a velocidade em dois
passos: baixa, alta.
5. LÂMPADA DA OPERAÇÃO DA VENTOINHA
6. LÂMPADA DA OPERAÇÃO DE
REFRIGERAÇÃO
7. LÂMPADA DA OPERAÇÃO SOFT DRY
8. LÂMPADA DA OPERAÇÃO DE
AQUECIMENTO
9. LÂMPADA DE OPERAÇÃO DE
DESCONGELAMENTO
10. LÂMPADA DE OPERAÇÃO AUTOMÁTICA
11. LÂMPADA DE FLUXO DE AR (OPÇÃO)
12. LÂMPADA DE FUNCIONAMENTO DA
UNIDADE EXTERNA
13. BOTÃO DE ACERTO DO TEMPORIZADOR
(OPERAÇÃO PÁRA EM ON)
14. LÂMPADA DE OPERAÇÃO
PROGRAMADA
15. LÂMPADA DA OPERAÇÃO DO
AQUECEDOR ELÉCTRICO
16. BOTÃO DE OPERAÇÃO DO AQUECEDOR
ELÉCTRICO
Manual do Proprietário 9
Manual do Proprietário 7
Page 44

Instruções de Funcionamento
Como utilizar o Botão Modo de Operação
• Sempre que premir o Botão de Selecção de Modo de Operação, o Modo de Operação é alterado na direcção da seta.
E
D
O
M
ROOM TEMP.
LH
OUT DOOR
Operação da
Ventoinha
E
D
O
M
ROOM TEMP. SET TEMP.
LH
OUT DOOR
Operação da
Ventoinha
A/CL
ROOM TEMP. SET TEMP.
LH
OUT DOOR
Operação de
Refrigeração
A/CL
Secagem Suave
ROOM TEMP. SET TEMP.
A/CL
LH
OUT DOOR
Operação de
(Modelo de bomba de calor)
A/CL
ROOM TEMP. SET TEMP.
LH
OUT DOOR
Operação de
Refrigeração
A/CL
ROOM TEMP. SET TEMP.
A/CL
LH
OUT DOOR
Operação de
Automática
(Modelo de Refrigeração)
ROOM TEMP. SET TEMP.
LH
Operação de
Aquecimento
ROOM TEMP.
LH
Operação de
Aquecimento
A/CL
OUT DOOR
A/CL
OUT DOOR
Como utilizar o Botão de Velocidade da Ventoinha
• Sempre que o Botão de Velocidade da Ventoinha é premido, a velocidade da Ventoinha é alternada na direcção da seta.
E
D
O
M
ROOM TEMP. SET TEMP.
A/CL
M
LH
OUT DOOR
Baixa
8 Ar Condicionado de Chão
ROOM TEMP. SET TEMP.
A/CL
LH
OUT DOOR
Alta
Page 45

Modo de Operação de Refrigeração
Prima o Botão Iniciar/Parar.
1
Seleccione a Operação de Refrigeração.
2
Prima o Botão de Selecção do Modo de Operação.
E
D
O
M
Instruções de Funcionamento
ROOM TEMP. SET TEMP.
LH
A/CL
OUT DOOR
PORTUGUESE
Regule a temperatura para um valor inferior ao da temperatura ambiente.
3
A temperatura pode ser regulada entre 1 C e 30°C por incrementos de 1°C.
E
D
O
M
8°
• Prima o botão ou
ROOM TEMP. SET TEMP.
LH
A/CL
OUT DOOR
Para aumentar a temperatura.
Para baixar a temperatura.
Regule a Velocidade da Ventoinha.
4
E
D
O
M
• Sempre que o Botão é premido, o modo de Velocidade da Ventoinha é alternado. (ALTA ➯ BAIXA)
Manual do Proprietário 9
Page 46

Instruções de Funcionamento
Operação Soft Dry
Prima o Botão Iniciar/Parar.
1
Seleccione a Operação Soft Dry.
2
Prima o Botão de Selecção do Modo de Operação.
E
D
O
M
ROOM TEMP. SET TEMP.
L H
A/CL
OUT DOOR
Regule a temperatura para um valor inferior ao da temperatura ambiente.
A temperatura pode ser regulada de 1 C a 30°C, por incrementos de 1°C.
3
E
D
O
M
• Prima o botão ou
8°
ROOM TEMP. SET TEMP.
A/CL
L H
OUT DOOR
Para aumentar a temperatura.
Para baixar a temperatura.
Durante a Operação Soft Dry
• A velocidade da ventoinha interna é automaticamente regulada para baixa e não pode ser
ajustada.
10 Ar Condicionado de Chão
Page 47

Instruções de Funcionamento
Modo de Funcionamento de Aquecimento (Exclui Modelo de Refrigeração)
Prima o Botão Iniciar/Parar.
1
Seleccione a Operação de Aquecimento.
2
Prima o Botão de Selecção do Modo de Operação.
E
D
O
M
ROOM TEMP. SET TEMP.
LH
A/CL
OUT DOOR
PORTUGUESE
Regule a temperatura para um valor superior ao da temperatura ambiente.
3
A temperatura pode ser regulada de 1 C a 30°C, por incrementos de 1°C.
E
D
O
M
8°
• Prima o botão ou
ROOM TEMP. SET TEMP.
LH
A/CL
OUT DOOR
Para aumentar a temperatura.
Para baixar a temperatura.
Regule a Velocidade da Ventoinha.
4
E
D
O
M
• Sempre que o Botão é premido, o modo
de Velocidade da Ventoinha é alternado.
Manual do Proprietário 11
Page 48

Instruções de Funcionamento
Modo de Funcionamento do Aquecedor Eléctrico (Apenas nos produtos Bomba de calor e Aquecedor Eléctrico)
Prima o Botão Iniciar/Parar.
1
Seleccione a operação heating+ E/heater.
2
Prima o Botão de Selecção do Modo de Operação, para seleccionar a Operação de Aquecimento.
❶
❷
Prima o Botão de Operação E/Heater. (Quando a unidade operar no modo de aquecimento).
ROOM TEMP. SET TEMP.
LH
A/CL
OUT DOOR
Regule a temperatura para um valor superior ao da temperatura ambiente. A
temperatura pode ser regulada de 1 °C a 30°C, por incrementos de 1°C.
3
E
D
O
M
Regule a Velocidade da Ventoinha.
4
E
D
O
M
12 Ar Condicionado de Chão
8
ROOM TEMP. SET TEMP.
LH
• Prima o botão ou
• Sempre que o Botão é premido, o modo de Velocidade
da Ventoinha é alternado.
A/CL
OUT DOOR
Para aumentar a temperatura.
Para baixar a temperatura.
Page 49

Instruções de Funcionamento
Modo de Operação Automática(Modelo de refrigeração)
Prima o Botão Iniciar/Parar.
1
Seleccione a Operação Automática.
2
Prima o Botão de Selecção do Modo de Operação.
E
D
O
M
ROOM TEMP. SET TEMP.
LH
A/CL
OUT DOOR
PORTUGUESE
Regule a temperatura para um valor superior ou inferior à temperatura padrão. A
3
temperatura pode ser regulada dentro de um intervalo, por incrementos de 1 nível.
E
D
O
M
ROOM TEMP. SET TEMP.
A/CL
LH
OUT DOOR
• Prima o botão ou
Cold HotWarmCool Proper
Para aumentar a temperatura.
Para baixar a temperatura.
(Esta indicação pode ser alterada para o estado de Visualização do
Modo Automático inicial após 4 segundos.)
Durante o Funcionamento Automático
• É impossível alterar a velocidade da ventoinha interna, porque esta já está regulada para o ar
condicionado por regra.
Manual do Proprietário 13
Page 50

Instruções de Funcionamento
Desactivação Temporizada (DESACTIVAÇÃO TEMPORIZADA ou CANCELAMENTO)
Prima o Botão Iniciar/Parar.
1
Prima o Botão Timer.
2
ROOM TEMP. SET TEMP.
ROOM TEMP. SET TEMP.
LH
LH
OUT DOOR
OUT DOOR
• Se premir o botão, o temporizador de desactivação que seleccionar será apresentado do seguinte modo;
• Se seleccionar ‘ ’, a função Temporizador de Desactivação será cancelada.
Quando terminar as definições do Temporizador de Desactivação, o indicador do
Temporizador apaga-se.
3
ROOM TEMP. SET TEMP.
LH
OUT DOOR
Após 4 segundos
ROOM TEMP. SET TEMP.
LH
OUT DOOR
Durante a função temporizador de desactivação se premir o Botão Temporizador, o
4
tempo remanescente será apresentado.
14 Ar Condicionado de Chão
Page 51

PARA
CIMA
DIREITA
PARA
BAIXO
ESQUERDA
Persiana Horizontal
Persiana Vertical
Modo de Operação de Ventoinha
Instruções de Funcionamento
Prima o Botão Iniciar/Parar.
1
Regule a Velocidade da Ventoinha.
Seleccionar o Funcionamento do
2
Ventilador.
Prima o Botão de Selecção do Modo
de Operação.
E
D
O
M
ROOM TEMP.
LH
3
E
D
O
M
Procedimento de Direcção de Fluxo de Ar
Ajuste manualmente a direcção do fluxo de ar, movendo à mão as persianas horizontais ou verticais.
• Sempre que o Botão é premido, o modo de
Velocidade da Ventoinha é alternado.
PORTUGUESE
A/CL
OUT DOOR
Manual do Proprietário 15
Page 52

Instruções de Funcionamento
Função de Bloqueio para Crianças
Prima os botões de regulação da ventoinha e da velocidade alta em simultâneo durante 3 segundos.
1
A unidade emite um sinal sonoro.
E
D
O
M
Durante a Função para Impedimento de Utilização por Crianças.
2
Sempre que premir qualquer Botão, será imediatamente apresentada no Mostrador do Painel a
mensagem “ ”, que significa que o Mostrador do painel está bloqueado.
Deixam de funcionar todos os Botões do painel do Mostrador da unidade interna.
Para desbloquear o Funcionamento Bloqueio para Crianças.
3
Prima os botões de regulação da ventoinha e da velocidade alta em simultâneo durante 3 segundos.
A unidade responde com um sinal sonoro, o Funcionamento Bloqueio para Crianças será cancelado.
ROOM TEMP. SET TEMP.
L H
A/CL
OUT DOOR
Mudará após
3 segundos
ROOM TEMP. SET TEMP.
L H
A/CL
OUT DOOR
Mudará após
3 segundos
ROOM TEMP. SET TEMP.
L H
A/CL
OUT DOOR
E
D
O
M
ROOM TEMP. SET TEMP.
L H
A/CL
OUT DOOR
Depois de premir
os botões mudará
imediatamente
ROOM TEMP. SET TEMP.
L H
A/CL
OUT DOOR
Mudará após
3 segundos
ROOM TEMP. SET TEMP.
L H
Reinício Automático
Caso o fornecimento de energia seja restabelecido após um corte, a Função de Reinício Automático será
responsável para realizar os adequados procedimentos para repor as condições de funcionamento
anterior.
16 Ar Condicionado de Chão
A/CL
OUT DOOR
Page 53

Manutenção e Assistência
Manutenção e Assistência
CUIDADO: Antes de executar qualquer trabalho de manutenção, desligue a corrente da máquina.
Durante a estação
Recomendado uma vez a cada duas semanas
Limpar os filtros de ar.
Retire o Filtro de Ar.
Segure na patilha e puxe ligeiramente para diante
para retirar o filtro.
Limpe.
Para remover a sujidade aderente aos filtros, use um
•
aspirador ou lave com água e seque à sombra.
• Volte a instalar o filtro na posição original.
Limpar o aparelho de ar condicionado
• Não lave com água.
• Limpe com um pano seco macio.
Recomendado uma vez a cada três semanas
• Água a uma temperatura
superior a 40°C.
Pode causar deformação
e/ou descoloração
Limpar o purificador de ar.
Retire o Purificador de Ar.
Segure na patilha e puxe ligeiramente para diante para
retirar o purificador de ar.
Limpe.
Mergulhe o purificador de ar em água com detergente,
•
durante 20~30 minutos, e seque à sombra.
• Volte a instalar o purificador de ar na posição original.
NUNCA USE O SEGUINTE.
• Substâncias voláteis.
Podem danificar as
superfícies do aparelho
de ar condicionado.
Quando o ar condicionado não vai ser utilizado durante um longo período de tempo.
No fim da estação
Accione o ar condicionado com as definições
seguintes durante 2 a 3 horas.
• Tipo de operação: Refrigeração.
• Regulação da temperatura: 30°C.
Tal irá secar os mecanismos internos.
Desligue o disjuntor de circuito.
CUIDADO
Desligue o disjuntor de circuito quando não prever a
utilização do aparelho durante um longo período de tempo.
A sujidade pode acumular-se e provocar um incêndio.
CUIDADO
No início da estação
Limpe os filtros de ar, volte a instalá-los e ligue
o ar condicionado.
Certifique-se de que nada obstrui as aberturas
de entrada e saída de ar.
PORTUGUESE
Conselhos Operativos
Não arrefeça demasiado o quarto.
Tal não é bom para a sua saúde e
desperdiça electricidade.
Certifique-se de que as portas e janelas
estão bem fechadas.
Evite ao máximo abrir portas e janelas
para manter o ar fresco no quarto.
Mantenha as persianas ou cortinas
fechadas.
Não deixe a luz solar directa entrar no
quarto quando o ar condicionado estiver
em funcionamento.
Limpe o filtro de ar com regularidade.
Os bloqueios no filtro de ar reduzem o fluxo
de ar, baixam o nível de refrigeração e os
efeitos de desumidificação. Limpe pelo menos
uma vez a cada duas semanas.
Mantenha a temperatura ambiente
uniforma.
Ajuste a direcção de fluxo de ar vertical e
horizontal para assegurar uma temperatura
uniforme no quarto.
Ventile o quarto ocasionalmente.
Como as janelas são mantidas fechadas,
devem ser abertas de vez em quando para
ventilar o quarto.
Manual do Proprietário 17
Page 54

Manutenção e Assistência
Resolução de Problemas
Verifique os seguintes pontos antes de solicitar uma reparação ou assistência... Se a anomalia persistir, por
favor contacte o seu vendedor.
Caso Explicação Ver página
Não funciona.
A divisão tem um cheiro
estranho.
A condensação parece estar
a verter do ar condicionado.
O ar condicionado não
funciona durante cerca de 3
minutos quando é reiniciado.
Não aquece nem arrefece
eficazmente.
O funcionamento do ar
condicionado é ruidoso.
• Pode ter ocorrido algum erro ao temporizar o
aparelho?
• O fusível queimou ou o disjuntor de circuito
disparou?
• O interruptor de ligação está desligado?
• A unidade está no início da Operação de
Aquecimento?
Se sim, está activado o Iniciar Quente.
• A unidade está a funcionar em Degelo?
Se sim, aguarde até terminar o desgelo.
• Verifique se não se trata de um cheiro a humidade
exalado pelas paredes, tapetes, mobília ou objectos
húmidos na divisão.
• A condensação ocorre quando o fluxo de ar do ar
condicionado arrefecer o ar quente da divisão.
• Trata-se do Dispositivo de Protecção do ar
condicionado.
• Aguarde cerca de três minutos para a operação
começar.
• Se o fluxo de ar começa antes da respectiva
temperatura estar quente, causa um efeito
indesejável de arrefecimento. Para o evitar, o fluxo
de ar não começa até estar suficientemente quente.
• O filtro de ar está sujo? Consulte as instruções de
limpeza do filtro de ar.
• A divisão podia estar muito quente quando o ar
condicionado foi ligado pela primeira vez. Aguarde
algum tempo até arrefecer.
• A temperatura foi regulada incorrectamente?
• As aberturas de entrada ou de saída de ar da
• Para um ruído que soa como água a fluir.
• Para um ruído que soa como ar comprimido a
interna estão obstruídas?
unidade
- Este é o som do freon a fluir no interior do
aparelho de ar condicionado.
libertar-se para a atmosfera.
- Este é o som da água desumidificada a ser
processada no interior do aparelho de ar
condicionado.
-
-
-
1
7
-
-
-
18 Ar Condicionado de Chão
Page 55

PANDUAN BAGI PEMILIK
AC
Bacalah panduan ini dengan saksama sebelum mengoperasikan
perangkat Anda, dan simpanlah untuk referensi di masa mendatang.
TIPE: Berdiri
BAHASA
P/No: MFL40255109
www.lg.com
Page 56

Panduan bagi Pemilik AC Tipe Berdiri
DAFTAR ISI
Tindakan Pencegahan
Demi Keselamatan ................. 3
Petunjuk Pengoperasian .......
Pemeliharaan dan Servis ...... 1
UNTUK DATA ANDA
Tulis model dan nomor seri di sini:
Model #
Seri #
Anda dapat menemukan keduanya di label di setiap
sisi dari unit.
Nama Dealer
Tanggal Pembelian
Staples menjadi satu tanda terima ke halaman ini
apabila Anda kelak memerlukan bukti tanggal
pembelian atau kalau ada masalah dengan garansi.
BACALAH PANDUAN INI
Di dalamnya Anda akan menemukan berbagai tips
berguna tentang cara menggunakan dan merawat AC
secara benar. Dengan melakukan tindakan preventif
sederhana Anda dapat menghemat banyak waktu dan
uang sepanjang AC masih dapat digunakan. Anda
mungkin akan menemukan banyak jawaban atas
masalah umum di bagan tips pemecahan masalah.
Apabila Anda melihat bagan Tips Pemecahan
Masalah terlebih dahulu, Anda mungkin tidak perlu
mengundang petugas servis sama sekali.
TINDAKAN PENCEGAHAN
t)VCVOHJQFUVHBTTFSWJTSFTNJVOUVLNFSFQBSBTJ
atau merawat unit ini.
t)VCVOHJCBHJBOQFNBTBOHBOVOJUJOJ
t"$JOJUJEBLCPMFIEJHVOBLBOPMFIBOBLBOBLBUBV
orang cacat tanpa pengawasan.
t"OBLBOBLIBSVTEJBXBTJVOUVLNFNBTUJLBONFSFLB
UJEBLCFSNBJONBJOEFOHBO"$
t"QBCJMBLBCFMMJTUSJLIBSVTEJHBOUJQFOHHBOUJBO
harus dilakukan oleh petugas resmi dengan
menggunakan hanya suku cadang penggantian asli.
t1FLFSKBBOQFNBTBOHBOIBSVTEJMBLVLBOTFTVBJ
dengan Peraturan Listrik setempat dan hanya oleh
petugas resmi saja.
2 AC Tipe Berdiri
Page 57

Tindakan Pencegahan Demi Keselamatan
Tindakan Pencegahan Demi Keselamatan
Untuk mencegah cedera terhadap pengguna atau orang lain dan mencegah kerusakan properti,
petunjuk berikut ini harus diikuti.
kerusakan. Tingkat keseriusan diklasifikasikan sesuai indikasi berikut.
uata ayahab nakbabeynem tapad kujnutep nakiabagnem anerak raneb kadit gnay naisarepogneP
AWAS
HATI-HATI
Arti simbol-simbol yang digunakan dalam panduan ini adalah seperti ditunjukkan berikut.
Simbol ini menunjukkan kemungkinan fatal atau cedera parah.
Simbol ini menunjukkan kemungkinan luka atau kerusakan.
Jangan dilakukan.
Pastikan Anda mengikuti petunjuknya.
AWAS
Pemasangan
Jangan menggunakan pemutus
sirkuit yang rusak atau di bawah
rating. Gunakan perangkat ini
dengan sirkuit yang sesuai.
kejutan listrik.
Pasang panel dan penutup
kotak kontrol dengan kencang.
kejutan listrik.
Jangan mengganti atau
memanjangkan kabel listrik.
kejutan listrik.
hubungi dealer atau Pusat
Servis Resmi.
atau Pusat Servis Resmi.
memperbaiki produk. Berisiko
kebakaran atau kejutan listrik.
Selalu pasang sirkuit dan
pemutus yang sesuai.
yang tidak tepat dapat
menyebabkan kebakaran atau
kejutan listrik.
Jangan melakukan sendiri
atau pemasangan ulang unit
(Pelanggan).
listrik, meledak, atau cedera.
Jangan memasang produk
pada badan penyangga yang
rusak.
Selalu pasang arde ke
produk.
kejutan listrik.
Gunakan pemutus atau sekering
dengan rating yang sesuai.
Berisiko kebakaran atau kejutan
listrik.
kemasan dan memasang
produk.
kan cedera. Berhati-hatilah dengan
bagian tepi casing serta sirip-sirip
kondensor dan evaporator.
Pastikan area pemasangan
tidak rusak karena termakan
usia.
BAHASA
-
listrik, meledak, atau cedera.
cedera, kecelakaan, atau
kerusakan produk.
AC dapat jatuh sehingga
menyebabkan kerusakan alat,
kegagalan produk, dan luka
badan.
3Panduan Bagi Pemilik
Page 58

Tindakan Pencegahan Demi Keselamatan
Pengoperasian
Jangan biarkan AC bekerja
dalam waktu lama jika tingkat
kelembaban sangat tinggi dan
jika pintu atau jendela dalam
keadaan terbuka.
embun dan membasahi atau
merusak perabotan.
Jangan mencolokkan atau
mencabut steker listrik
selama pengoperasian.
Jangan biarkan air mengenai
bagian listrik.
produk, atau kejutan listrik.
Saat terjadi kebocoran gas yang
dan buka jendela untuk ventilasi
sebelum menghidupkan produk.
atau menggunakan switch
untuk menghidupkan atau
mematikan unit. Ada risiko
ledakan atau kebakaran.
Jangan membuka gril lubang
udara masuk selama operasional.
(Jangan menyentuh filter
dilengkapi dengan filter ini.)
sampai kabel listrik tertarik
Jangan menempatkan apa
pun di atas kabel listrik.
atau rusak selama
pengoperasian.
kejutan listrik.
Jangan menyentuh
(mengoperasikan) perangkat
dengan tangan basah.
kejutan listrik.kejutan listrik.
Jangan menyimpan atau
menggunakan gas atau bahan
yang mudah terbakar di dekat
produk.
kegagalan produk.
kejutan listrik.
Jangan menempatkan
pemanas atau perangkat lain
di dekat kabel listrik.
kejutan listrik.
Jangan menggunakan produk
di tempat yang tertutup rapat
dalam waktu yang lama.
oksigen.
Hentikan operasional dan
atau muncul asap dari produk.
tutup jendela saat terjadi badai
Ubah pemutus sirkuit ke OFF
atau cabut kabel listrik.
bongkar produk dari jendela
sebelum topan datang.
kejutan listrik. kegagalan produk, atau
kejutan listrik.
Ketika produk terendam
sampai air masuk ke dalam
hubungi Pusat Servis Resmi.
produk.
kejutan listrik, atau kegagalan
kejutan listrik.
produk.
Berikan ventilasi ke produk sepanjang waktu
ketika dioperasikan di tempat yang sama
dengan kompor dll.
Apabila produk akan tidak gunakan dalam
matikan pemutus sirkuit.
produk, atau pengoperasian yang tidak
diinginkan.
4 AC Tipe Berdiri
listrik atau kerusakan produk.
Matikan aliran listrik saat membersihkan
atau memelihara produk.
dapat menginjak atau jatuh menimpa unit luar
ruangan.
-
kan produk.
Page 59

Pemasangan
Selalu periksa kebocoran gas
(refrigeran) setelah pemasangan
atau perbaikan produk.
Tindakan Pencegahan Demi Keselamatan
HATI-HATI
Pasang pipa pembuangan
untuk memastikan bahwa air
disalurkan dengan benar.
Usahakan produk tetap rata
saat pemasangan.
dapat menyebabkan kegagalan produk.
Jangan memasang produk di
tempat di mana derau atau
udara panas dari unit luar
ruangan dapat mengganggu
lingkungan sekitar.
bagi tetangga Anda.
Pengoperasian
Jangan memaparkan kulit secara langsung ke
udara dingin dalam jangka waktu lama.
(Jangan duduk di depan aliran angin.)
Jangan menghalangi aliran
udara masuk atau keluar.
kegagalan produk.
Jangan menginjak atau
meletakkan apa pun di atas
produk. (unit luar ruangan)
menyebabkan kebocoran air.
Minta dua orang atau lebih
untuk mengangkat dan
mengangkut produk.
Gunakan kain lembut untuk
membersihkan. Jangan
pelarut dll.
listrik, atau kerusakan bagian
produk yang terbuat dari plastik.
Selalu pasang filter dengan
kencang. Bersihkan filter
setiap dua minggu atau lebih
atau kebocoran air.
Jangan memasang produk jika
ada kemungkinan terpapar
angin laut (hembusan garam)
secara langsung.
pada sirip kondensor dan evaporator,
dapat
menyebabkan malfungsi produk
atau pengoperasian yang tidak efisien.
Jangan menggunakan produk untuk tujuan
pendingin presisi.
Jangan menyentuh bagian
produk yang terbuat dari logam
saat melepas filter udara. Bagian
tersebut sangat tajam!
Jangan sisipkan tangan atau
benda lain ke dalam lubang
udara masuk atau keluar ketika
produk sedang bekerja.
produk
BAHASA
kegagalan produk.
Jangan minum air yang keluar
dari produk.
menyebabkan sakit yang
serius.
Jangan mengisi ulang atau membongkar
baterai. Jangan melempar baterai ke nyala api.
mengurangi efisiensi AC dan
dapat menyebabkan AC tidak
bekerja atau rusak.
Gunakan bangku atau tangga
yang kokoh saat
membersihkan atau
memelihara produk.
jangan sampai terjadi cedera
badan.
bergerak yang dapat
menimbulkan luka.
Gantilah semua baterai di remote
control dengan yang baru dengan
tipe yang sama. Jangan mencampur
baterai lama dan baru atau baterai
dari tipe yang berbeda.
kebakaran.
Apabila cairan dari baterai mengenai kulit atau
gunakan remote apabila baterai bocor.
menimbulkan sensasi terbakar atau
menyebabkan bahaya kesehatan lainnya.
5Panduan Bagi Pemilik
Page 60

Petunjuk Pengoperasian
Petunjuk Pengoperasian
Fitur dan Spesifikasi
pemanasan
2. Efisiensi energi super
3. Kontrol micom
4. Pengoperasian whisper quiet
Air Vent Outlet
TP-C1008FA*
TP-H1008FA*
Air Vent Outlet
Air Vent Intake
(Belakang)
Air Vent Intake
nad nanignidnep kutnu niaseD .1
natapecek 2 .5
pendinginan/pemanasan
6. Filter udara yang dapat dilepas
8. Jeda sirkuit 3 menit
Air Vent Outlet
Air Vent Intake
(Belakang)
TP-C808FLA*
ucapan
* :
mengembangkan nomor seri
AC Tipe Berdiri
H *ALF808-PT
Air Vent Outlet
Air Vent Intake
(Belakang)
Page 61

Kontrol dan Indikator Unit Dalam-Ruangan
65 14 11
ROOM TEMP.
LH
E
D
O
M
SET TEMP.
13
DUCT
OUT DOOR
D
O
M
65 11713
SET TEMP.
ROOM TEMP.
LH
E
147
DUCT
OUT DOOR
Petunjuk Pengoperasian
713
65 14 11 15
SET TEMP.
ROOM TEMP.
DUCT
LH
OUT DOOR
E
D
O
M
BAHASA
2 3 4 12 18 9
10
(POMPA PANAS ) Model Pendinginan
1. TOMBOL MULAI/BERHENTI
Pengoperasian dimulai ketika tombol ini ditekan dan
berhenti jika tombol ini ditekan kembali.
2.
TOMBOL PEMILIHAN MODE PENGOPERASIAN
Digunakan untuk memilih mode pengoperasian.
3. TOMBOL PENGATURAN SUHU RUANGAN
Digunakan untuk memilih suhu ruangan.
4. PEMILIHAN KECEPATAN KIPAS DALAM
RUANGAN
Digunakan untuk memilih kecepatan kipas dalam dua
kecepatan – low (rendah) dan high (tinggi).
5. LAMPU PENGOPERASIAN KIPAS
6. LAMPU PENGOPERASIAN PENDINGINAN
7. LAMPU PENGOPERASIAN SOFT DRY
8. LAMPU PENGOPERASIAN PEMANASAN
2 3 4 12
1
2 3 4 12 1816 9
(Model Pompa Panas &
Pemanas Elektrik)
9. LAMPU PENGOPERASIAN DEFROST
10. LAMPU PENGOPERASIAN OTOMATIS
11. LAMPU ALIRAN UDARA SALURAN
(OPSIONAL)
12. LAMPU PENGOPERASIAN UNIT
LUARRUANGAN
13. TOMBOL PENGATURAN TIMER
(PENGOPERASIAN DIHENTIKAN SAAT
DIHIDUPKAN)
14. LAMPU PENGOPERASIAN TIMER
15. LAMPU PENGOPERASIAN PEMANAS
ELEKTRIK
16. TOMBOL PENGOPERASIAN PEMANAS
LISTRIK
BAHASA
BAHASA
Panduan Bagi Pemilik
7
Page 62

Petunjuk Pengoperasian
Cara menggunakan Tombol Operation Mode
arah sesuai tanda panah.
E
D
O
M
A/CL
L H
OUT DOOR
(Model pompa panas)
E
D
O
M
SET TEMP.
ROOM TEMP.
A/CL
L H
OUT DOOR
Pengoperasian
Cooling
(Pendinginan)
(Model Pendinginan)
SET TEMP.
ROOM TEMP. ROOM TEMP.
L H
Pengoperasian
Cooling
(Pendinginan)
SET TEMP.
ROOM TEMP.
L H
Pengoperasian
Otomatis
A/CL
OUT DOOR
A/CL
OUT DOOR
SET TEMP.
ROOM TEMP.
A/CL
L
OUT DOOR
Pengoperasian
Soft Dry
SET TEMP.
ROOM TEMP. ROOM TEMP.
A/CL
L
OUT DOOR
Pengoperasian
Soft Dry
SET TEMP.
ROOM TEMP.
L H
Pengoperasian
(Pemanasan)
L H
A/CL
OUT DOOR
A/CL
OUT DOOR
Cara menggunakan Tombol Operation Mode
E
D
O
M
AC Tipe Berdiri
8
ROOM TEMP. SET TEMP.
L H
Tinggi
A/CL
OUT DOO
R
ROOM TEMP. SET TEMP.
L H
A/CL
OUT DO
OR
Page 63

Mode Pengoperasian Pendinginan
5FLBO5PNCPM.VMBJ#FSIFOUJ
1
Pilih Pengoperasian Pendinginan.
2
5FLBO5PNCPM1FNJMJIBO0QFSBUJPO.PEF.PEF1FOHPQFSBTJBO
E
D
O
M
SET TEMP.
ROOM TEMP.
A/CL
LH
OUT DOOR
Petunjuk Pengoperasian
BAHASA
BAHASA
BAHASA
Tetapkan suhu supaya lebih rendah dari suhu ruangan.
3
Suhu dapat ditetapkan antara 18°C~30°C dengan ketelitian 1°C.
SET TEMP.
E
D
O
M
4FUFM,FDFQBUBO,JQBT
4
E
D
O
M
t5FLBOUPNCPM
ROOM TEMP.
LH
atau
A/CL
OUT DOOR
Untuk menaikkan suhu.
Untuk menurunkan suhu.
t4FUJBQLBMJUPNCPMEJUFLBONPEF,FDFQBUBO,JQBTBLBOCFSHBOUJ5*/((*
Panduan Bagi Pemilik
3&/%")
9
Page 64

Petunjuk Pengoperasian
Pengoperasian Soft Dry
5FLBO5PNCPM.VMBJ#FSIFOUJ
1
Pilih Pengoperasian Soft Dry.
2
5FLBO5PNCPM1FNJMJIBO0QFSBUJPO.PEF.PEF1FOHPQFSBTJBO
E
D
O
M
ROOM TEMP.
L
SET TEMP.
A/CL
OUT DOOR
Tetapkan suhu supaya lebih rendah dari suhu ruangan.
3
Suhu dapat ditetapkan antara 18°C~30°C dengan ketelitian 1°C.
SET TEMP.
E
D
O
M
t5FLBOUPNCPM
ROOM TEMP.
L
atau
A/CL
OUT DOOR
Untuk menaikkan suhu.
Untuk menurunkan suhu.
Selama pengoperasian Soft Dry
t,FDFQBUBOLJQBTEBMBNSVBOHBOTFDBSBPUPNBUJTEJUFUBQLBOLFSFOEBIUBOQBNFN-
perhatikan tampilan pada panel dan tidak dapat disetel.
10 AC Tipe Berdiri
Page 65

Petunjuk Pengoperasian
Mode Pengoperasian Pemanasan(Kecuali Model Pendinginan)
5FLBO5PNCPM.VMBJ#FSIFOUJ
1
BAHASA
Pilih Pengoperasian pemanasan.
2
5FLBO5PNCPM1FNJMJIBO0QFSBUJPO.PEF.PEF1FOHPQFSBTJBO
E
D
O
M
Tetapkan suhu supaya lebih rendah dari suhu ruangan.
3
Suhu dapat ditetapkan antara 18°C~30°C dengan ketelitian 1°C.
E
D
O
M
t5FLBOUPNCPM
4FUFM,FDFQBUBO,JQBT
4
E
D
O
M
SET TEMP.
ROOM TEMP.
LH
SET TEMP.
ROOM TEMP.
LH
atau
A/CL
OUT DOOR
A/CL
OUT DOOR
Untuk menaikkan suhu.
Untuk menurunkan suhu.
BAHASA
t,FDFQBUBOLJQBTJOEPPSEJTFUFMPUPNBUJTLFSFOEBIUBOQBNFNQFEVMJLBOUBNQJMBO
pada panel dan tidak dapat diubah.
Panduan Bagi Pemilik 11
Page 66

Petunjuk Pengoperasian
Mode Pengoperasian Pemanas Elektrik (Hanya produk Pompa Panas & pemanas Elektrik)
5FLBO5PNCPM.VMBJ#FSIFOUJ
1
1JMJI1FOHPQFSBTJBOQFNBOBTBO&)FBUFS&1FNBOBT
2
5FLBO5PNCPM1FNJMJIBO.PEF1FOHPQFSBTJBOVOUVLNFNJMJI1FOHPQFSBTJBOQFNBOBTBO
5FLBO5PNCPM1FOHPQFSBTJBO&)FBUFS&1FNBOBT4BBUVOJUCFLFSKBQBEBNPEFQFNBOBTBO
SET TEMP.
ROOM TEMP.
LH
A/CL
OUT DOOR
Tetapkan suhu supaya lebih tinggi dari suhu ruangan.
3
Suhu dapat ditetapkan antara 18°C~30°C dengan ketelitian 1°C.
SET TEMP.
E
D
O
M
ROOM TEMP.
LH
t5FLBOUPNCPM
4FUFM,FDFQBUBO,JQBT
4
E
D
O
M
t4FUJBQLBMJUPNCPMEJUFLBONPEF,FDFQBUBO,JQBTBLBOCFSHBOUJ
12
AC Tipe Berdiri
A/CL
OUT DOOR
atau
Untuk menaikkan suhu.
Untuk menurunkan suhu.
Page 67

Petunjuk Pengoperasian
Mode Pengoperasian Otomatis(Hanya Model Pendinginan)
5FLBO5PNCPM.VMBJ#FSIFOUJ
1
BAHASA
Pilih Pengoperasian Otomatis.
2
5FLBO5PNCPM1FNJMJIBO0QFSBUJPO.PEF.PEF1FOHPQFSBTJBO
E
D
O
M
Tetapkan suhu supaya lebih tinggi atau lebih rendah dari suhu standar.
3
Suhu dapat ditetapkan dengan kisaran tiap 1 tingkatan.
E
D
O
M
SET TEMP.
ROOM TEMP.
LH
ROOM TEMP.
LH
A/CL
OUT DOOR
SET TEMP.
A/CL
OUT DOOR
Cold mraWtoHCool Proper
5BOEBJOJBLBOCFSQJOEBILFQPTJTJBXBM5BNQJMBO.PEF0UPNBUJTTFUFMBIEFUJL
t5FLBOUPNCPM atau
Untuk menaikkan suhu.
Untuk menurunkan suhu.
BAHASA
Selama Pengoperasian Otomatis
t5JEBLNVOHLJONFOHVCBILFDFQBUBOLJQBTEBMBNSVBOHBOLBSFOBUFMBIEJUFUBQLBOQBEB
kondisi terbaik oleh pengaturan acak.
Panduan Bagi Pemilik
13
Page 68

Petunjuk Pengoperasian
Prosedur Pengaturan OFF Timer (Pengaturan OFF TIMER, atau CANCEL (Batalkan)
5FLBO5PNCPM.VMBJ#FSIFOUJ
1
Tekan Tombol Timer.
2
ROOM TEMP. SET TEMP.
LH
t4BBU"OEBNFOFLBOUPNCPMPGGUJNFSZBOHEJQJMJIBLBOEJUBNQJMLBOTFCBHBJCFSJLVU
t"QBCJMB"OEBNFNJMJIA
’ maka fungsi Off Timer akan dibatalkan.
HL
OUT DOOR
OUT DOOR
)
3
4
14
AC Tipe Berdiri
,FUJLB"OEBNFOZFMFTBJLBOQFOHBUVSBO0GG5JNFSMBNQVJOEJLBUPS5JNFSBLBONBUJ
SET TEMP.
4FUFMBIEFUJL
LH LH
OUT DOOR
Selama pengoperasian off-timer, sisa waktu akan ditampilkan jika Anda menekan
Tombol Timer.
ROOM TEMP.
OUT DOOR
Page 69

Mode Pengoperasian Fan
NAIK
KANAN
TURUN
KIRI
Petunjuk Pengoperasian
1 2
D
O
M
Tekan Tombol Pemilihan Operation
E
ROOM TEMP.
L H
A/CL
OUT DOOR
3
E
D
O
M
Prosedur Arah Aliran Udara
Setel arah aliran udara secara manual dengan menggeser bilah secara horizontal atau vertikal
dengan tangan.
BAHASA
BAHASA
Bilah Vertikal
Bilah Horizontal
Panduan Bagi Pemilik
15
Page 70

Petunjuk Pengoperasian
Prosedur Pengoperasian Child Lock
Tekan tombol kecepatan kipas dan tombol pengaturan suhu Tinggi secara serentak
1
selama 3 detik. Unit akan merespons dengan bunyi bip.
E
D
O
M
ROOM TEMP.
L H
SET TEMP.
A/CL
OUT DOOR
SET TEMP.
ROOM TEMP.
L H
OUT DOOR
A/CL
ROOM TEMP.
L H
SET TEMP.
A/CL
OUT DOOR
Selama Pengoperasian Child Lock.
2
Setelah 3 detik, tampilan
akan berubah.
Setelah 3 detik, tampilan
akan berubah.
” akan ditampilkan,
yang menandakan panel Tampilan dalam keadaan Terkunci.
Semua Tombol pada panel Tampilan unit dalam-ruangan tidak akan bekerja.
Untuk melepaskan Pengoperasian child lock.
3
Tekan tombol kecepatan kipas dan tombol pengaturan suhu Tinggi secara serentak
selama 3 detik.
Unit akan merespons dengan bunyi bip, Pengoperasian Child Lock akan dimatikan.
SET TEMP.
SET TEMP.
E
D
O
M
ROOM TEMP.
L H
A/CL
OUT DOOR
Setelah menekan tombol,
tampilan akan berubah.
ROOM TEMP.
L H
A/CL
OUT DOOR
Setelah 3 detik, tampilan
akan berubah.
Auto restart
menjalankan prosedur otomatis ke kondisi pengoperasian sebelumnya.
SET TEMP.
ROOM TEMP.
L H
A/CL
OUT DOOR
16
AC Tipe Berdiri
Page 71

Pemeliharaan dan Servis
HATI-HATI: Sebelum melakukan tindakan pemeliharaan, matikan daya sistem.
Selama musim
Petunjuk Pengoperasian
Pembersihan filter udara. Disarankan
dilakukan sekali tiap dua minggu.
-FQBTLBO'JMUFS6EBSB
Pegang tab kemudian tarik perlahan-lahan
ke arah depan untuk melepas filter.
Bersihkan.
t6OUVLNFNCFSTJILBOEFCVZBOHNFOFNQFMQBEB
filter, gunakan vacuum cleaner, atau bersihkan
dengan air dan keringkan di tempat teduh.
t1BTBOHLFNCBMJmMUFSLFQPTJTJTFNVMB
Pembersihan AC
t+BOHBONFNCFSTJILBOEFOHBOBJS
t4FLBEFOHBOLBJOMFNCVUZBOHLFSJOH
Pembersihan pembersih udara. Disarankan
dilakukan sekali tiap tiga bulan
Lepaskan Pembersih Udara.
Pegang tab kemudian tarik perlahan-lahan ke
arah depan untuk melepas pembersih udara.
Bersihkan.
.BTVLLBOQFNCFSTJIVEBSBLFEBMBNBJSZBOH
t
dicampur dengan deterjen selama 20~30 menit,
dan keringkan di tempat teduh.
t1BTBOHLFNCBMJQFNCFSTJIVEBSBLFQPTJTJTFNVMB
+BOHBOQFSOBINFOHHVOBLBOCBIBOCBIBOCFSJLVUJOJ
t"JSEFOHBOTVIVEJ
BUBT$%BQBU
menyebabkan deformasi
EBOBUBVXBSOBQVEBS
t#BIBOZBOHNVEBI
menguap. Dapat merusak
permukaan AC.
Jika AC akan tidak digunakan untuk jangka waktu lama.
Di akhir musim
Operasikan AC dengan pengaturan berikut
ini selama 2 hingga 3 jam.
t+FOJTQFOHPQFSBTJBO1FOEJOHJOBO
t1FOHBUVSBOTVIV$
Pengaturan ini akan mengeringkan mekanisme internal.
.BUJLBOQFNVUVTTJSLVJU
)"5*)"5*
Matikan pemutus sirkuit ketika AC akan tidak
digunakan dalam waktu yang lama.
Debu dapat terkumpul dan ini dapat menyebabkan
kebakaran.
)"5*)"5*
Bersihkan filter udara, pasang kembali, dan
operasikan AC.
Pastikan tidak ada yang menghalangi
lubang udara masuk dan keluar.
Di awal musim
BAHASA
BAHASA
Tips Pengoperasian
+BOHBONFOZFUFMTVIVEJEBMBN
ruangan terlalu dingin.
*OJUJEBLCBHVTVOUVLLFTFIBUBO
dan boros energi.
Pastikan pintu dan jendela
ditutup rapat.
Sedapat mungkin, hindari membuka pintu
dan jendela untuk mempertahankan
udara dingin di dalam-ruangan.
Tutup kerai maupun tirai.
+BOHBOCJBSLBOTJOBSNBUBIBSJ
masuk ke dalam-ruangan saat AC
dioperasikan.
Bersihkan filter udara secara rutin.
Sumbatan di filter udara dapat
mengurangi aliran udara dan
mengurangi pengaruh pendinginan dan
penghilangan kelembaban. Bersihkan
sekurangnya dua minggu sekali.
Usahakan suhu ruangan tetap
Setel arah aliran udara vertikal
dan horisontal untuk memastikan
keseragaman suhu di dalam-ruangan.
4FTFLBMJBMJSLBOVEBSBLFEBMBN
,BSFOBKFOEFMBTFMBMVUFSUVUVQ
Anda dapat membukanya
kemudian mengalirkan udara ke
dalam-ruangan.
seragam.
ruangan.
17Panduan Bagi Pemilik
Page 72

Petunjuk Pengoperasian
Pemecahan Masalah
1FSJLTBIBMIBMCFSJLVUJOJTFCFMVNNFNJOUBQFSCBJLBOBUBVTFSWJT+JLBNBTJIUFSKBEJHBOHHVBO
hubungi dealer.
Casing Penjelasan Buka halaman
Tidak beroperasi. • Apakah Anda melakukan kesalahan dalam
Bau aneh di dalam-ruangan.
Sepertinya kondensasi
penyejuk ruangan bocor.
AC tidak bekerja selama
sekitar 3 menit sejak restart.
Tidak mendinginkan atau
memanaskan ruangan
secara efektif.
AC berbunyi amat berisik. • Untuk suara seperti air mengalir.
pengoperasian timer?
• Apakah sekering putus atau pemutus sirkuit
jatuh ke posisi OFF?
• Apakah Switch daya berada pada posisi Off?
• Apakah unit sedang memulai Pengoperasian
Pemanasan? Jika ya, Hot-start menyala.
• Apakah unit sedang dalam proses De-icing
(Pencairan Es)?
Jika ya, tunggulah sampai proses De-icing
selesai.
• Periksalah apakah tidak ada bau busuk yang
keluar dari dinding, karpet, perabotan, atau
pakaian di dalam kamar.
• Terbentuk embun jika aliran udara dari AC
mendinginkan udara hangat di
dalamruangan.
• Ini adalah alat pengaman AC.
• Tunggu sekitar tiga menit kemudian
pengoperasian akan berjalan kembali.
• Apabila aliran udara berhembus
sebelum suhu menghangat, hal ini akan
menyebabkan efek pendinginan yang tidak
diinginkan. Untuk mencegahnya, aliran
udara tidak akan berhembus sebelum cukup
hangat.
• Apakah filter udara kotor? Baca petunjuk
pembersihan filter udara.
• Ruangan mungkin terlalu panas saat AC
dihidupkan untuk yang pertama kalinya.
Tunggu sebentar hingga udara dingin.
• Apakah suhu sudah ditetapkan dengan
benar?
• Apakah saluran udara masuk atau keluar
unit dalam-ruangan terhalang?
- Ini adalah suara aliran freon di dalam unit AC.
• Untuk suara seperti udara terkompresi yang
dilepaskan ke udara terbuka.
- Ini adalah suara air penghilang kelembaban
yang sedang diproses di dalam unit AC.
-
-
-
1
7
-
-
-
AC Tipe Berdiri
18
Page 73

www.lg.com
21$,/$7,
Page 74

66
3.........
........
6
..........
17
17
2
Page 75

3
Page 76

4
Page 77

5
Page 78

1
ﻡﻥﻑﺫ ﺍﻝﻩﻭﺍء ﺕﻥﻑﻱﺱ
ﻡﻥﻑﺫ ﺍﻝﻩﻭﺍء ﺕﻥﻑﻱﺱ
TP-C1008FA*
TP-H1008FA*
ﺕﻥﻑﻱﺱ ﺍﻝﻩﻭﺍء ﻙﻡﻱﺓ
(ﺍﻝﺥﻝﻑﻱ)
ﺕﻥﻑﻱﺱ ﺍﻝﻩﻭﺍء ﻙﻡﻱﺓ
8
ﻡﻥﻑﺫ ﺍﻝﻩﻭﺍء ﺕﻥﻑﻱﺱ
ﺕﻥﻑﻱﺱ ﺍﻝﻩﻭﺍء ﻙﻡﻱﺓ
(ﺍﻝﺥﻝﻑﻱ)
TP-C808FLA*
ﻡﻥﻑﺫ ﺍﻝﻩﻭﺍء ﺕﻥﻑﻱﺱ
H *ALF808-PT
4
ﺕﻥﻑﻱﺱ ﺍﻝﻩﻭﺍء ﻙﻡﻱﺓ
(ﺍﻝﺥﻝﻑﻱ)
: *
6
Page 79

65 14 11
13
147
65 11713
713
65 14 11 15
ON
ROOM TEMP. SET TEMP.
LH
E
D
O
M
2 3 4 12 18 9
ROOM TEMP. SET TEMP.
DUCT
O
UT D
OO
R
E
D
O
M
2 3 4 12
10
DUCT
LH
O
UT
D
OOR
1
.8
ROOM TEMP. SET TEMP.
LH
E
D
O
M
2 3 4 12 1816 9
DUCT
O
UT D
OOR
.1
.9
.10
.11
.2
.3
.12
.4
.13
.14
.15
.16
.5
.6
.7
7
Page 80

ROOM TEMP. SET TEMP.
A/CL
LH
OUT D
OOR
ROOM TEMP.
A/CL
LH
OUT D
OOR
ROOM TEMP. SET TEMP.
L
ROOM TEMP. SET TEMP.
L
E
D
O
M
A/CL
A/CL
OOR
OOR
ROOM TEMP.
A/CL
LH
OUT D
OOR
ROOM TEMP. SET TEMP.
A/CL
LH
OUT D
OOR
E
D
O
M
ROOM TEMP. SET TEMP.
A/CL
LH
OUT D
OO
R
A/CL
OUT D
OOR
OUT D
ROOM TEMP. SET TEMP.
LH
OUT D
E
D
O
M
ROOM TEMP. SET TEMP.
L H
A/CL
OUT D
OOR
ROOM TEMP. SET TEMP.
L H
A/CL
OUT D
OOR
8
Page 81

ROOM TEMP. SET TEMP.
A/CL
LH
OUT DOOR
١٨
E
D
O
M
ROOM TEMP. SET TEMP.
LH
A/CL
OUT DOOR
E
D
O
M
E
D
O
M
9
Page 82

ROOM TEMP. SET TEMP.
L
A/CL
OUT DOOR
١٨
E
D
O
M
10
ROOM TEMP. SET TEMP.
L
A/CL
OUT DOOR
E
D
O
M
Page 83

ROOM TEMP. SET TEMP.
A/CL
LH
OUT DOOR
ROOM TEMP. SET TEMP.
A/CL
LH
OUT DOOR
١٨
E
D
O
M
E
D
O
M
E
D
O
M
11
Page 84

ROOM TEMP. SET TEMP.
LH
A/CL
OUT DOOR
١٨
ROOM TEMP. SET TEMP.
LH
A/CL
OUT DOOR
1
2
E
D
O
M
E
D
O
M
12
Page 85

ROOM TEMP. SET TEMP.
A/CL
LH
O
UT DOOR
E
D
O
M
ROOM TEMP. SET TEMP.
LH
A/CL
OUT DOO
R
Cold HotWarmCool Proper
E
D
O
M
13
Page 86

ROOM TEMP. SET TEMP.
ROOM TEMP. SET TEMP.
L H
OUT DOOR
L H
L H
LH
OUT
DOOR
OUT DOOR
OUT DOOR
14
Page 87

E
D
O
M
ROOM TEMP.
L H
A/CL
OUT DOOR
E
D
O
M
15
Page 88

ROOM TEMP. SET TEMP.
L H
E
ROOM TEMP. SET TEMP.
A/CL
OUT D OOR
L H
A/CL
OUT DOOR
ROOM TEMP. SET TEMP.
L H
A/CL
O UT D OOR
D
O
M
16
ROOM TEMP. SET TEMP.
L H
OUT DOO R
A/CL
ROOM TEMP. SET TEMP.
L H
A/CL
OUT DOOR
ROOM TEMP. SET TEMP.
L H
O UT DOO R
E
D
O
A/CL
M
Page 89

1
1
1
1
40
2
2
1
1
30
2
2
2
2
1
1
2
2
3
3
17
Page 90

-
-
-
17
-
-
18
-
-
-
Page 91

 Loading...