

Page 1

website http://www.lgservice.com
LG
Floor Standing-Type
Air Conditioner
OWNER'S MANUAL
LG
ENGLISH
ENGLISH
ENGLISHENGLISH
+6,/*1(
,/$7,
21$
FRANÇAIS
嘰$36(
/2
IMPORTANT
• Please read this owner's manual carefully and thoroughly
before installing and operating your air conditioner.
• Please retain this owner's manual for future reference after
reading it thoroughly.
Page 2
Floor Standing- Type Air Conditioner Owner’s Manual
TABLE OF CONTENTS
FOR YOUR RECORDS
Safety Precautions.................3
Operating Instructions...........8
Maintenance and Service ....19
Write the model and serial numbers here:
Model #
Serial #
You can find them on a label on the side of each unit.
Dealer's Name
Date Purchased
■
Staple your receipt to this page in the event you need it
to prove date of purchase or for warranty issues.
READ THIS MANUAL
Inside you will find many helpful hints on how to use and
maintain your air conditioner properly. Just a little
preventive care on your part can save you a great deal
of time and money over the life of your air conditioner.
You'll find many answers to common problems in the
chart of troubleshooting tips. If you review our chart of
Troubleshooting Tips first, you may not need to call for
service at all.
PRECAUTION
• Contact the authorized service technician for repair or
maintenance of this unit.
• Contact the installer for installation of this unit.
• The air conditioner is not intended for use by young
children or invalids without supervision.
• Young children should be supervised to ensure that
they do not play with the air conditioner.
• When the power cord is to be replaced, replacement
work shall be performed by authorized personnel only
using only genuine replacement parts.
• Installation work must be performed in accordance
with the National Electric Code by qualified and
authorized personnel only.
2 Floor Standing-Type Air Conditioner
Page 3
Safety Precautions
WARNING
Safety Precautions
To prevent injury to the user or other people and property damage, the following instructions
must be followed.
ƵIncorrect operation due to ignoring instruction will cause harm or damage. The seriousness is
classified by the following indications.
ENGLISH
ENGLISH
ENGLISHENGLISH
WARNING
CAUTION
ƵMeanings of symbols used in this manual are as shown below.
This symbol indicates the possibility of death or serious injury.
This symbol indicates the possibility of injury or damage.
Be sure not to do.
Be sure to follow the instruction.
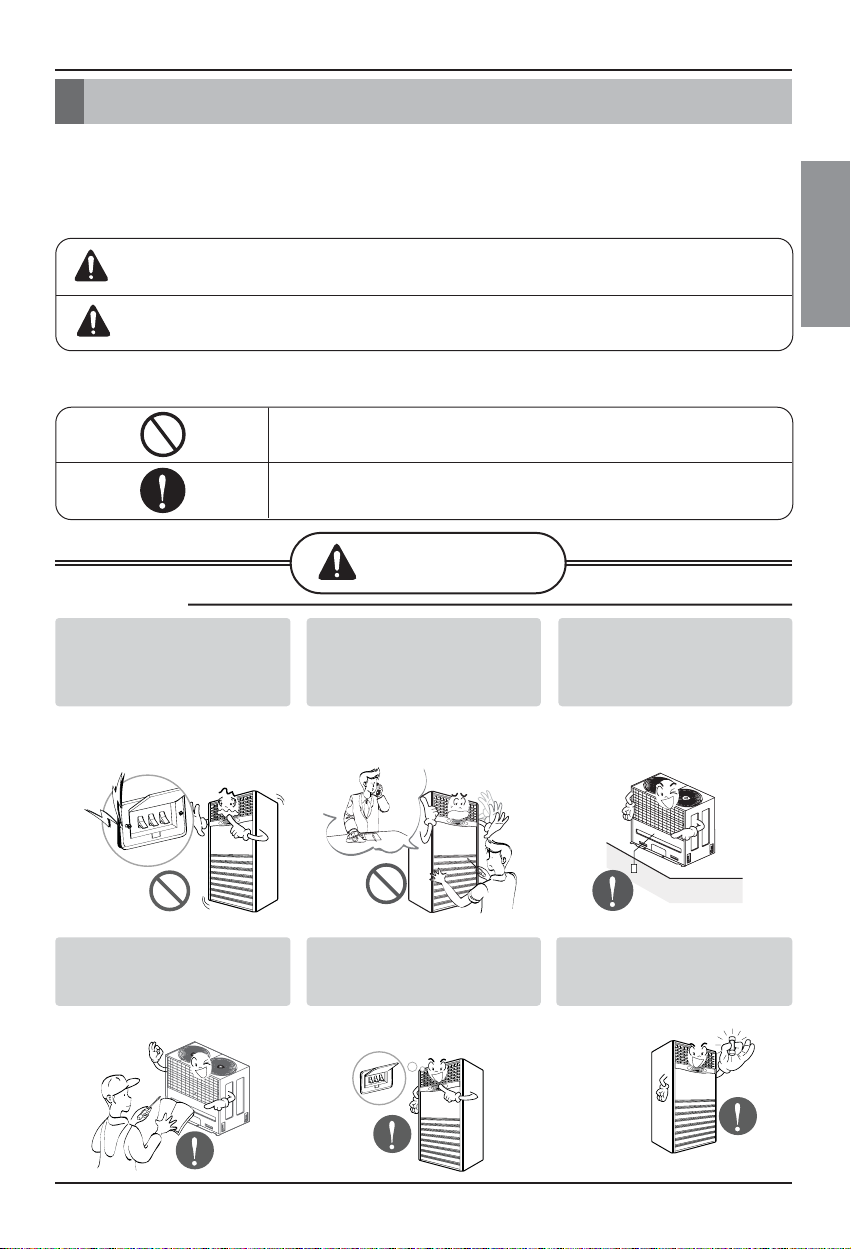
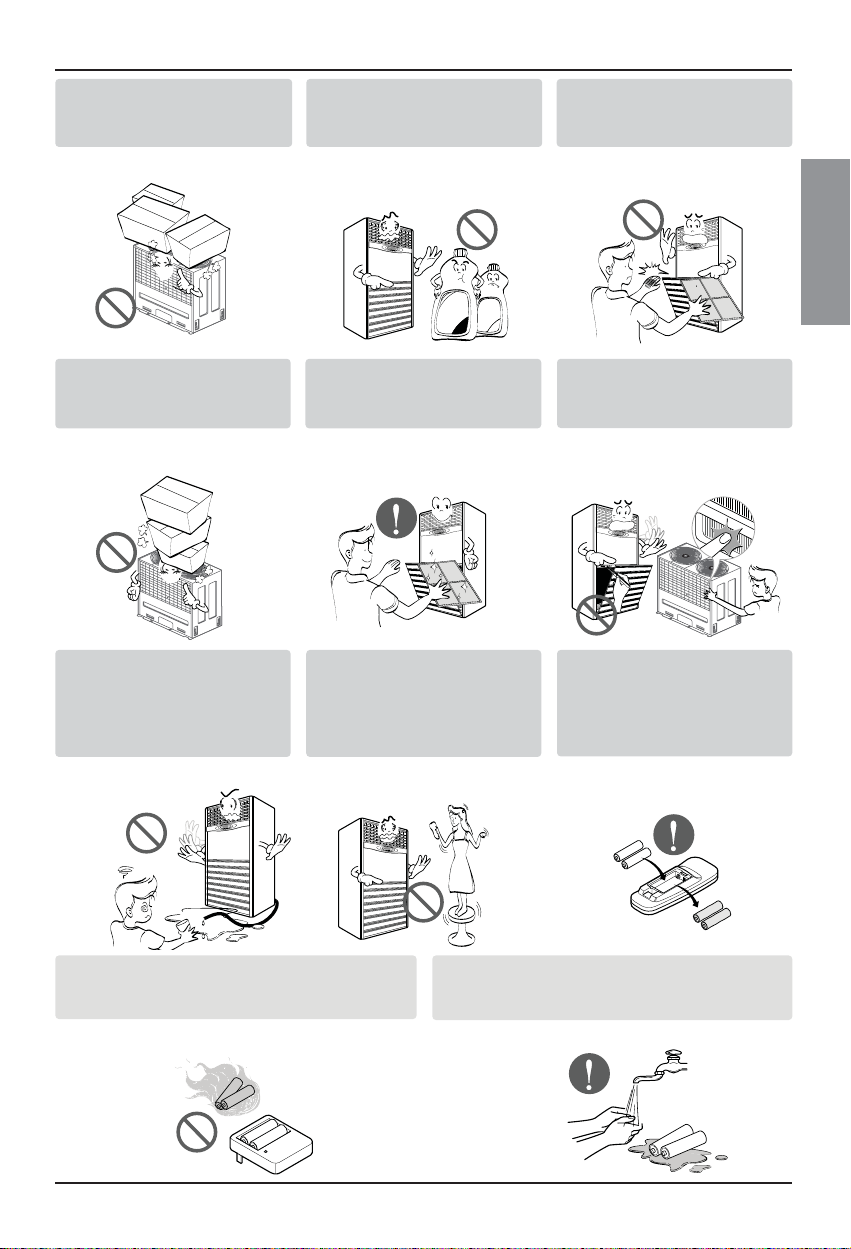
ƵInstallation
Do not use a defective or
underrated circuit breaker.
Use this appliance on a
dedicated circuit.
• There is risk of fire or electric
shock.
For electrical work, contact
the dealer, seller, a qualified
electrician, or an Authorized
Service Center.
• Do not disassemble or repair the
product. There is risk of fire or
electric shock.
+6,/*1(
Always ground the product.
• There is risk of fire or electric
shock.
Install the panel and the
cover of control box
securely.
• There is risk of fire or electric
shock.
Always install a dedicated
circuit and breaker.
• Improper wiring or installation
may cause fire or electric shock
Use the correctly rated
breaker or fuse.
• There is risk of fire or electric
shock.
Owner's Manual 3
Page 4
Safety Precautions
Do not modify or extend the
power cable.
Do not install, remove, or reinstall the unit by yourself
(customer).
• There is risk of fire or electric
shock.
For installation, always contact the
dealer or an Authorized Service Center.
• There is risk of fire, electric
shock, explosion, or injury.
• There is risk of fire, electric
shock, explosion, or injury.
Do not install the product on a
defective installation stand.
• It may cause injury, accident, or
damage to the product.
ƵOperation
Do not let the air conditioner run for a
long time when the humidity is very high
and a door or a window is left open
• Moisture may condense and wet
or damage furniture.
Take care to ensure that power
cable could not be pulled out or
.
damaged during operation.
• There is risk of fire or electric
shock.
Be cautious when unpacking
and installing the product.
• Sharp edges could cause injury.
Be especially careful of the case
edges and the fins on the
condenser and evaporator.
Be sure the installation area
does not deteriorate with age.
• If the base collapses, the air
conditioner could fall with it,
causing property damage,
product failure, and personal
injury.
Do not place anything on the
power cable.
• There is risk of fire or electric
shock.
Do not plug or unplug the
power supply plug during
Do not touch(operate) the
product with wet hands.
operation.
• There is risk of fire or electric
shock.
• There is risk of fire or electrical
shock.
4 Floor Standing-Type Air Conditioner
Do not place a heater or
other appliances near the
power cable.
• There is risk of fire and electric
shock.
Page 5
Safety Precautions
Do not allow water to run
into electric parts.
• It may cause There is risk of fire,
failure of the product, or electric
shock.
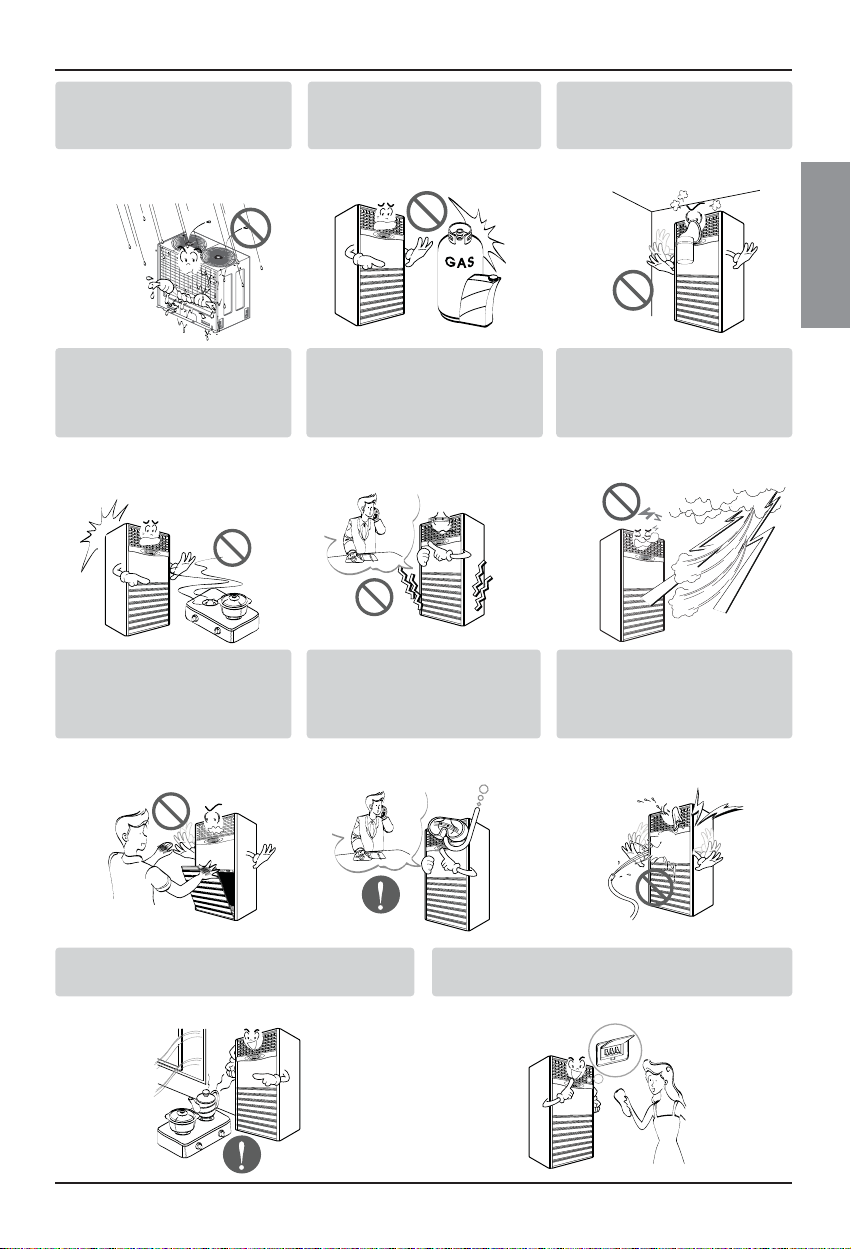
When flammable gas leaks,
turn off the gas and open a
window for ventilation
before turn the product on.
• Do not use the telephone or turn
switches on or off.
There is risk of explosion or fire
Do not open the inlet grill of the
product during operation.
(Do not touch the electrostatic
filter, if the unit is so equipped.)
• There is risk of physical injury,
electric shock, or product failure.
Do not store or use flammable
gas or combustibles near the
product.
• There is risk of fire or failure of
product.
Gasolin
If strange sounds, or small or
smoke comes from product. Turn
the breaker off or disconnect the
power supply cable.
• There is risk of electric shock or
fire.
When the product is soaked
(flooded or submerged),
contact an Authorized
Service Center.
• There is risk of fire or electric
shock.
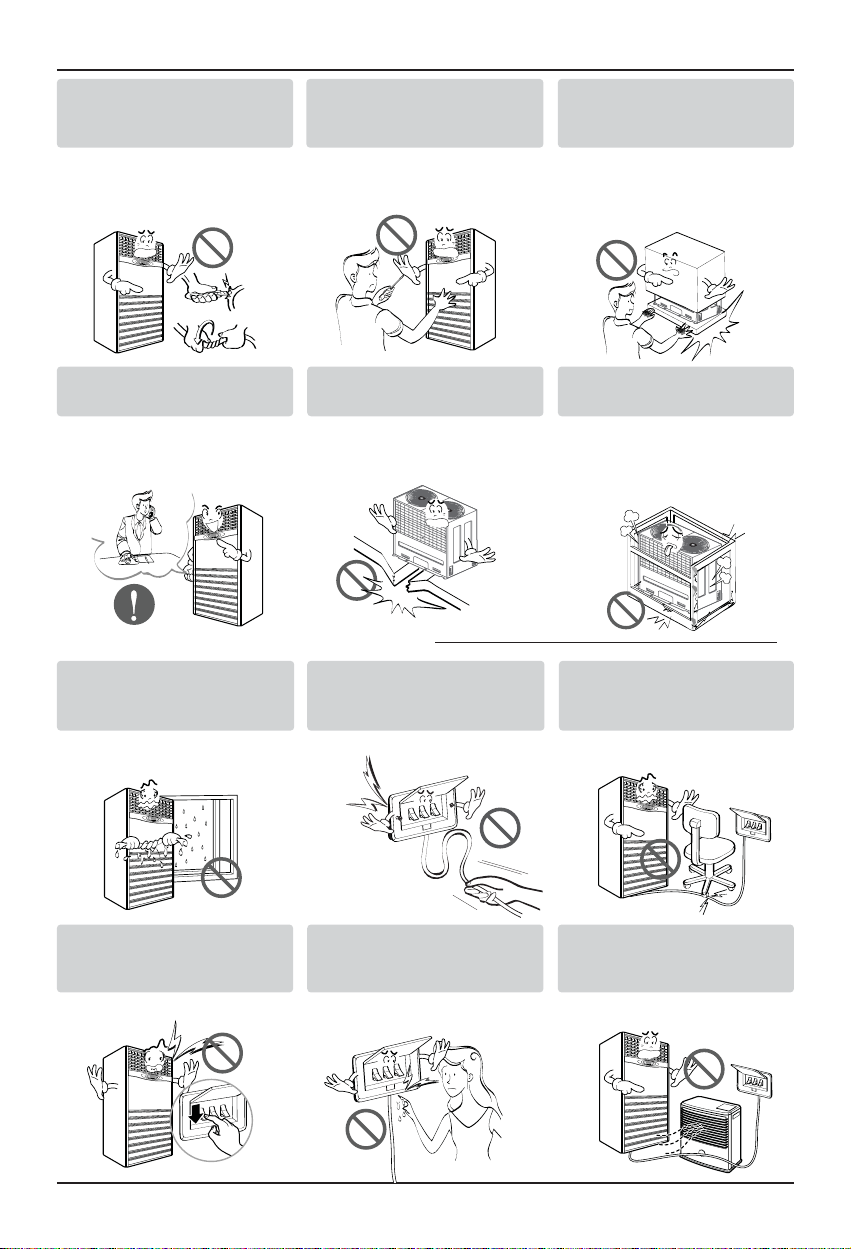
Do not use the product in a
tightly closed space for a
long time.
• Oxygen deficiency could occur.
ENGLISH
ENGLISH
ENGLISHENGLISH
+6,/*1(
Stop operation and close the window
in storm or hurricane. If possible,
remove the product from the window
before the hurricane arrives.
• There is risk of property damage,
failure of product, or electric shock.
Be cautious that water could
not enter the product.
• There is risk of fire, electric shock,
or product damage.
Ventilate the product from time to time when
operating it together with a stove, etc.
• There is risk of fire or electric shock.
Turn the main power off when cleaning or
maintaining the product.
• There is risk of electric shock.
Owner's Manual 5
Page 6

Safety Precautions
CAUTION
When the product is not be used for a long
time, disconnect the power supply plug or
turn off the breaker.
• There is risk of product damage or failure, or
unintended operation.
ƵInstallation
Always check for gas
(refrigerant) leakage after
installation or repair of product.
• Low refrigerant levels may cause
failure of product.
Do not install the product where the
noise or hot air from the outdoor unit
could damage the neighborhoods.
• It may cause a problem for your
neighbors.
Install the drain hose to
ensure that water is drained
away properly.
• A bad connection may cause
water leakage.
Use two or more people to
lift and transport the
product.
• Avoid personal injury.
Take care to ensure that nobody could step
on or fall onto the outdoor unit.
• This could result in personal injury and product
damage.
Keep level even when
installing the product.
• To avoid vibration or water
leakage.
˚
Do not install the product where
it will be exposed to sea wind
(salt spray) directly.
• It may cause corrosion on the
product. Corrosion, particularly on
the condenser and evaporator fins,
could cause product malfunction or
inefficient operation.
ƵOperation
Do not expose the skin directly to cool air for
long periods of time. (Don't sit in the draft.)
• This could harm to your health.
6 Floor Standing-Type Air Conditioner
Do not use the product for special purposes, such as
preserving foods, works of art, etc. It is a consumer air
conditioner, not a precision refrigeration system.
• There is risk of
damage or
loss of property.
Page 7
Safety Precautions
Do not block the inlet or
outlet of air flow.
• It may cause product failure.
Do not step on or put
anyting on the product.
(outdoor units)
• There is risk of personal injury and
failure of product.
Do not drink the water
drained from the product.
• It is not sanitary and could cause
serious health issues.
Use a soft cloth to clean. Do
not use harsh detergents,
solvents, etc.
• There is risk of fire, electric shock,
or damage to the plastic parts of
the product.
7KLQQHU
Wax
Always insert the filter securely.
Clean the filter every two weeks or
more often if necessary.
• A dirty filter reduces the efficiency
of the air conditioner and could
cause product malfunction or
damage.
Use a firm stool or ladder
when cleaning or
maintaining the product.
• Be careful and avoid personal
injury.
• There is risk of personal injury.
• There are sharp and moving parts
• There is risk of fire or explosion
Do not touch the metal parts of
the product when removing the
air filter. They are very sharp!
ENGLISH
ENGLISH
ENGLISHENGLISH
+6,/*1(
Do not insert hands or other objects
through the air inlet or outlet while
the product is operated.
that could cause personal injury.
Replace the all batteries in the
remote control with new ones of
the same type. Do not mix old
and new batteries or different
types of batteries.
Do not recharge or disassemble the batteries.
Do not dispose of batteries in a fire.
• They may burn or explode.
If the liquid from the batteries gets onto your
skin or clothes, wash it well with clean water. Do
not use the remote if the batteries have leaked.
• The chemicals in batteries could cause burns or other
health hazards.
Owner's Manual 7
Page 8
Operating Instructions
Operating Instructions
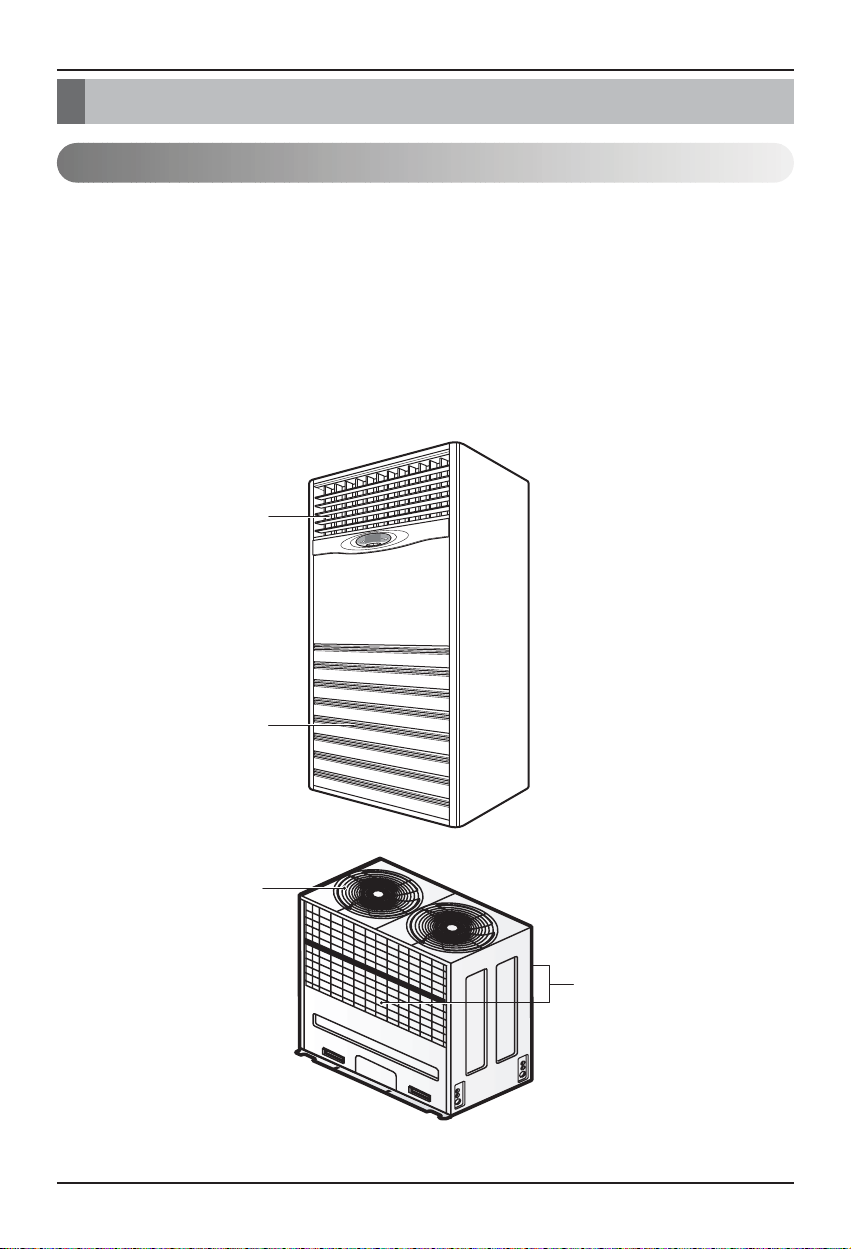
Features and Specifications
1. Design for cooling and heating
2. Super energy efficiency
3. Micom control
4. Whisper quiet operation
Air Outlet Vent
Air Intake Vent
5. 2 cooling/heating speeds
6. Removable air filter
7. Anti-Bacteria filter
8. 3 minutes delay circuit
Air Outlet Vent
8 Floor Standing-Type Air Conditioner
Air Intake Vent
(Rear)
Page 9
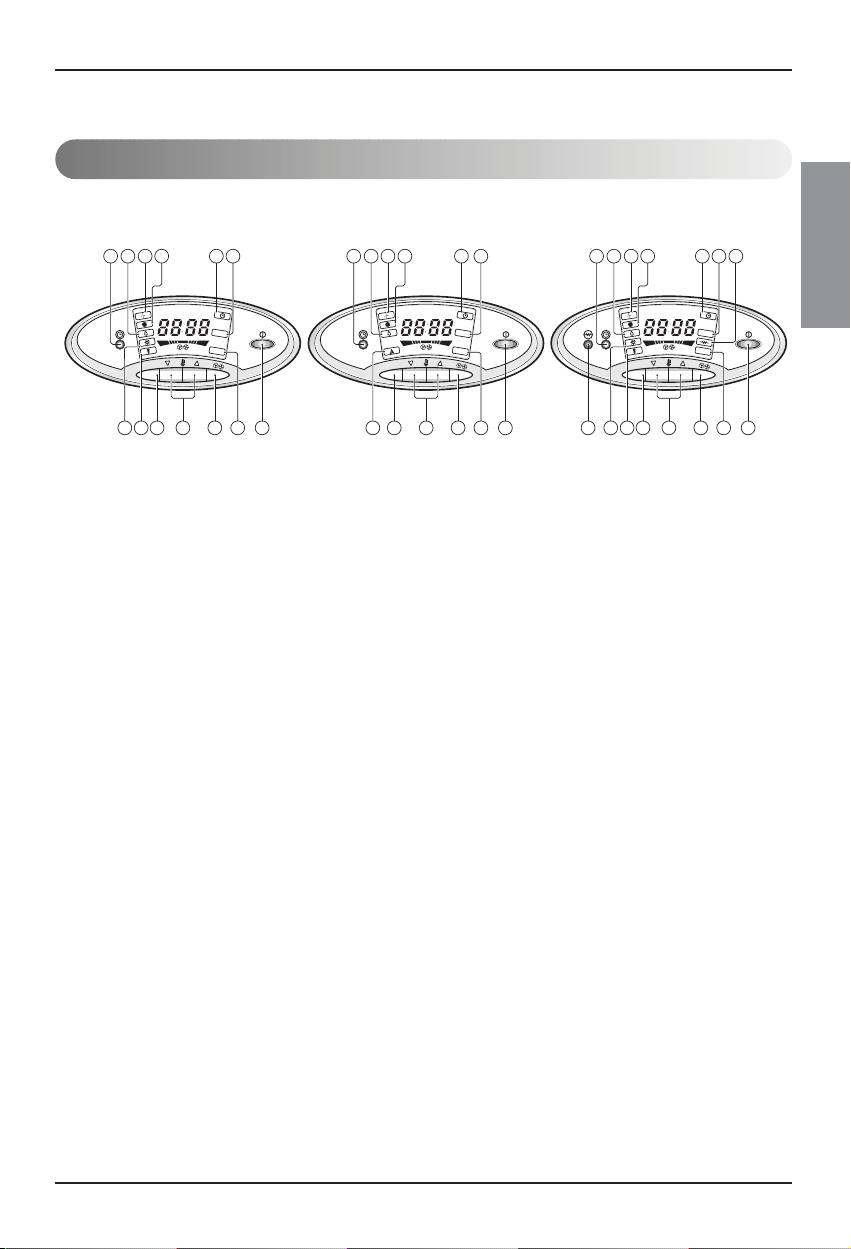
Indoor Unit Controls and Indicators
Operating Instructions
ENGLISH
ENGLISH
ENGLISHENGLISH
65 14 11
ROOM TEMP. SET TEMP.
LH
E
D
O
M
2 3 4 12 18 9
DU
CT
O
U
T
D
O
O
R
13
M
10
(Heat Pump) (Cooling Model)
1. START/STOP BUTTON
Operation starts when this button is pressed and
stops when the button is pressed again.
2. OPERATION MODE SELECTION
BUTTON
Used to select the operation Mode.
3. ROOM TEMPERATURE SETTING
BUTTONS
Used to select the room temperature.
4. INDOOR FAN SPEED SELECTION
Used to select fan speed in two steps-low, high.
5. FAN OPERATION LAMP
6. COOLING OPERATION LAMP
147
65 11713
ROOM TEMP. SET TEMP.
DU
LH
O
U
T
E
D
O
2 3 4 12
D
CT
O
O
R
1
713
65 14 11 15
ROOM TEMP. SET TEMP.
LH
E
D
O
M
2 3 4 12 1816 9
(Heat Pump & Electric Heater
9. DEFROST OPERATION LAMP
10. AUTO OPERATION LAMP
11. DUCT AIR FLOW LAMP(OPTION)
12. OUTDOOR UNIT OPERATION LAMP
13. TIMER SETTING BUTTON
(OPERATION STOPS AT ON)
14. TIMER OPERATION LAMP
15. ELECTRIC HEATER OPERATION
LAMP
16. ELECTRIC HEATER OPERATION
BUTTON
DU
CT
O
U
T
D
OO
R
+6,/*1(
Model)
7. SOFT DRY OPERATION LAMP
8. HEATING OPERATION LAMP
Owner's Manual 9
Page 10
Operating Instructions
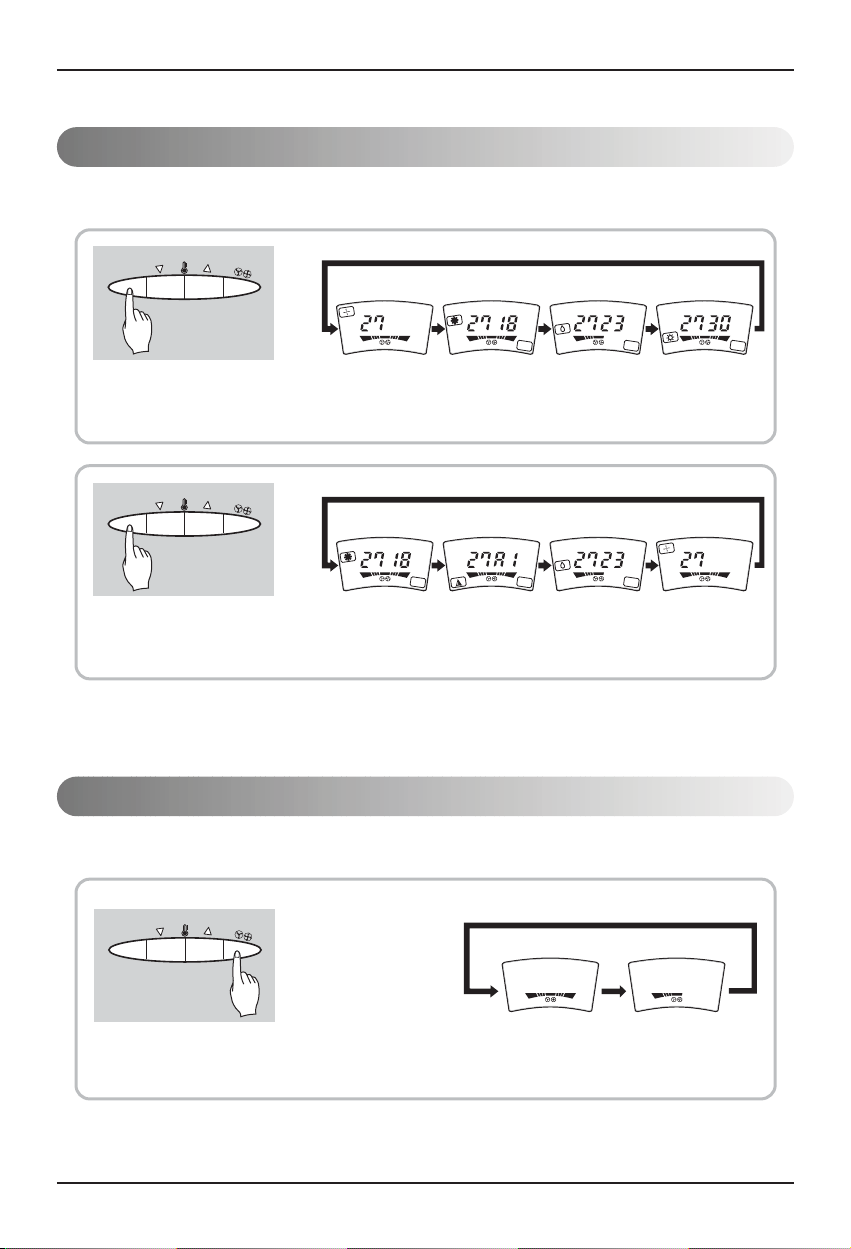
How to use the Operation Mode Button
• Each time the Operation Mode Selection Button is pressed, the Operation Mode is shifted in the arrow direction.
E
D
O
M
ROOM TEMP.
LH
OUT DO
ROOM TEMP. SET TEMP.
A
/C
L
LH
OR
OUT DO
ROOM TEMP. SET TEMP.
A
/C
L
L
OR
OU
A/C
T D
L
OOR
ROOM TEMP. SET TEMP.
A
/C
L
LH
OU
T DOOR
Cooling OperationFan Operation
Soft Dry Operation Heating Operation
(Heat pump Model)
E
D
O
M
ROOM TEMP. SET TEMP.
A
/C
L
LH
OU
T DO
OR
ROOM TEMP. SET TEMP.
LH
OU
ROOM TEMP. SET TEMP.
A/C
L
L
T DO
OR
OU
A/CL
T DO
OR
ROOM TEMP.
LH
Cooling Operation Fan OperationSoft Dry OperationAuto Operation
(Cooling Model)
How to use the Fan speed Button
• Each time the Fan speed Button is pressed, the Fan speed is shifted in the arrow direction.
E
D
O
M
ROOM TEMP. SET TEMP.
A/C
L
LH
O
UT DOO
R
ROOM TEMP. SET TEMP.
LH
OUT DO
A
/C
L
OU
T DO
OR
A/C
L
O
R
10 Floor Standing-Type Air Conditioner
High
Low
Page 11
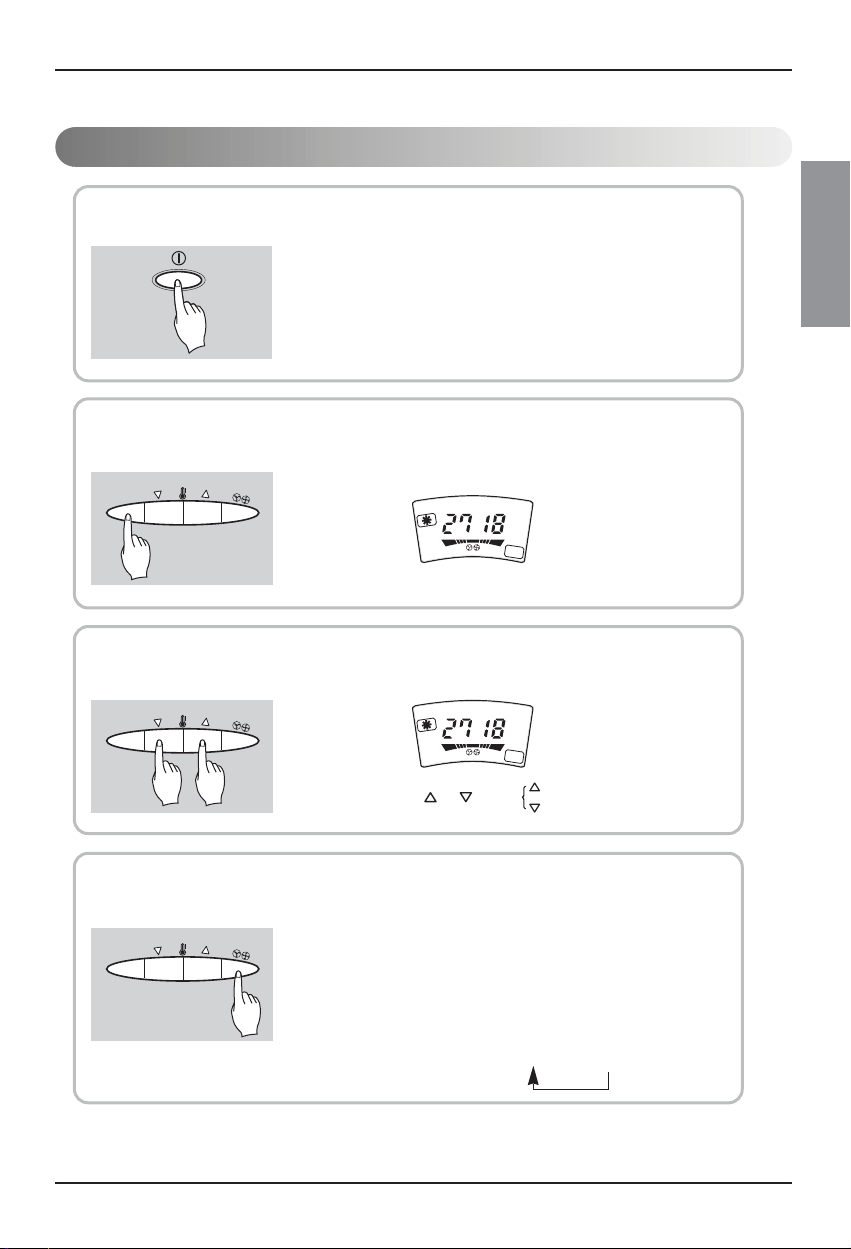
Cooling Operation Mode
Press the Start/Stop Button.
1
Select Cooling Operation.
2
Press the Operation Mode Selection Button.
E
D
O
M
ROOM TEMP. SET TEMP.
A
/C
LH
L
OUT DOOR
Operating Instructions
ENGLISH
ENGLISH
ENGLISHENGLISH
+6,/*1(
Set the temperature lower than the room temperature.
3
The temperature can be set within a range of 1 °C~30°C by 1°C.
E
D
O
M
• Press the or button
8
ROOM TEMP. SET TEMP.
LH
A
/C
L
OUT DOOR
To raise the temperature.
To lower the temperature.
Set the Fan Speed.
4
E
D
O
M
• Each time the Button is pressed, the Fan Speed mode is shifted. (HIGH ➯ LOW)
Owner's Manual 11
Page 12
Operating Instructions
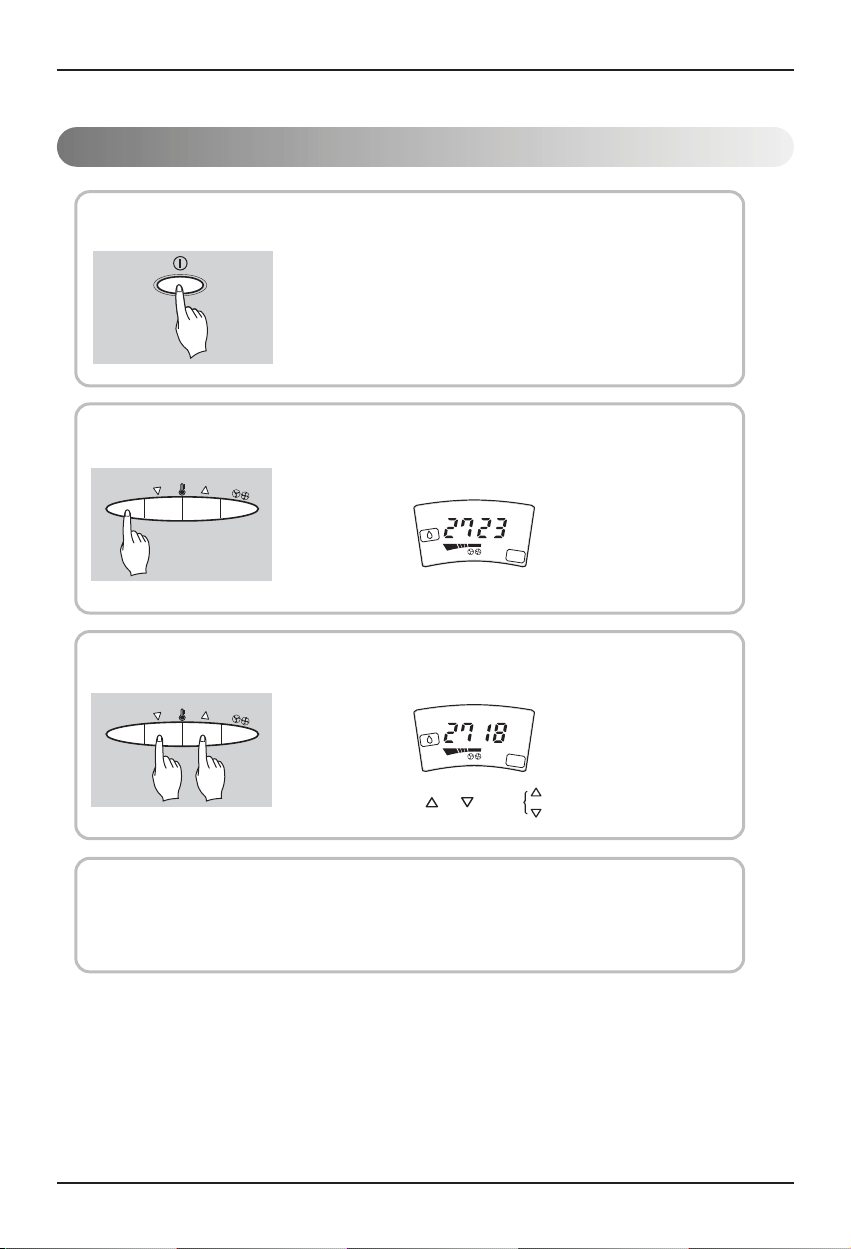
Soft Dry Operation
Press the Start/Stop Button.
1
Select Soft Dry Operation.
2
Press the Operation Mode Selection Button.
E
D
O
M
ROOM TEMP. SET TEMP.
L
A
/C
OUT DOOR
L
Set the temperature lower than the room temperature.
3
The temperature can be set within a range of 18°C~30°C by 1°C.
E
D
O
M
• Press the or button
ROOM TEMP. SET TEMP.
L
A
/C
L
OUT DOOR
To raise the temperature.
To lower the temperature.
During softy Dry Operation
• The indoor fan speed is automatically set to low irrespective to the display on panel
and cannot be adjusted.
12 Floor Standing-Type Air Conditioner
Page 13
Heating Operation Mode(Except Cooling Model)
Operating Instructions
Press the Start/Stop Button.
1
Select heating Operation.
2
Press the Operation Mode Selection Button.
E
D
O
M
Set the temperature upper than the room temperature.
3
The temperature can be set within a range of 1 C~30°C by 1°C.
E
D
O
M
8°
ROOM TEMP. SET TEMP.
A
/C
OUT DOOR
A
/C
OUT DOOR
L
L
LH
ROOM TEMP. SET TEMP.
LH
ENGLISH
ENGLISH
ENGLISHENGLISH
+6,/*1(
• Press the or button
Set the Fan Speed.
4
E
D
O
M
• Each time the Button is pressed, the Fan Speed mode is shifted.
To raise the temperature.
To lower the temperature.
Owner's Manual 13
Page 14
Operating Instructions
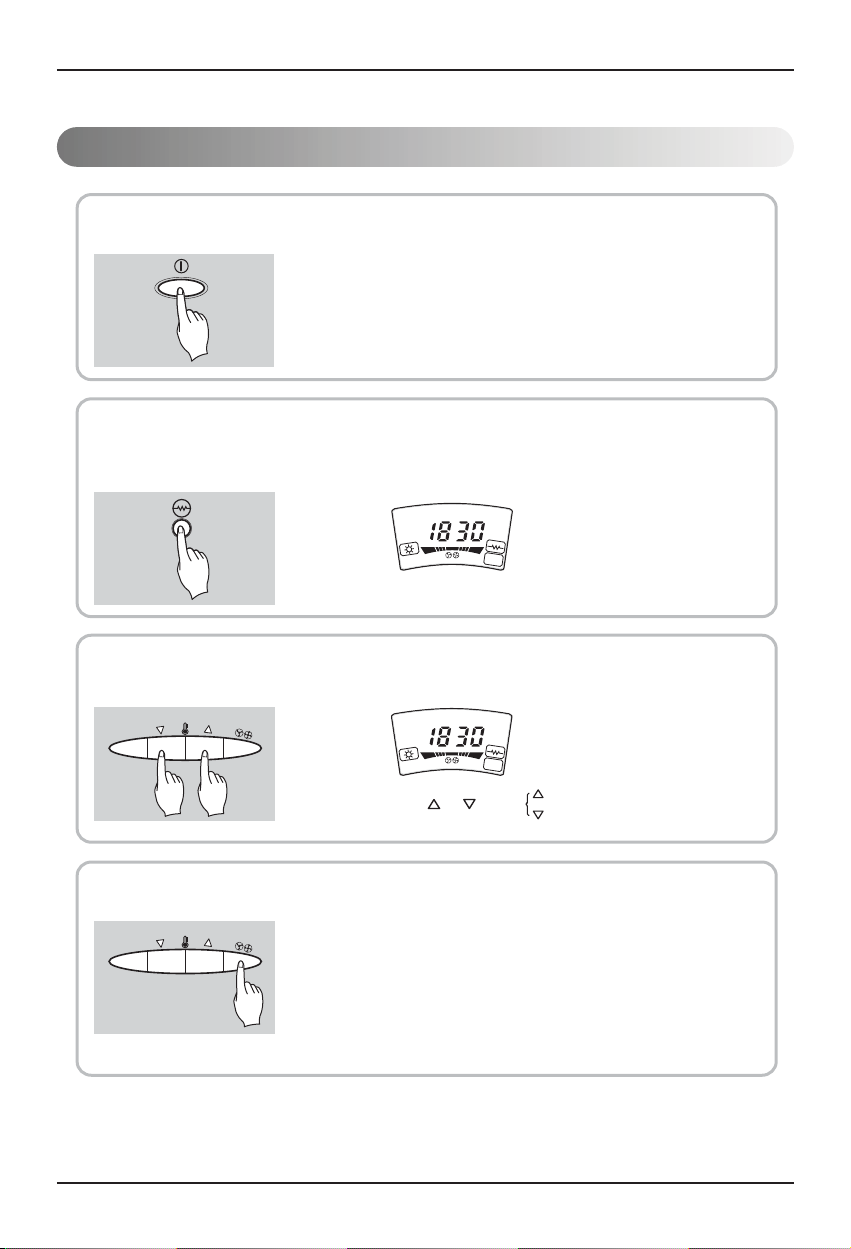
Electric Heater Operation Mode(Heat pump & Electric heater product only)
Press the Start/Stop Button.
1
Select heating+ E/heater Operation.
2
❶ Press the Operation Mode Selection Button to select heating Operation.
❷ Press the E/Heater Operation Button.
(When the unit operates in heating mode).
ROOM TEMP. SET TEMP.
A
/C
LH
L
OUT DOOR
Set the temperature upper than the room temperature.
3
The temperature can be set within a range of 1 °C~30°C by 1°C.
E
D
O
M
8
ROOM TEMP. SET TEMP.
LH
• Press the or button
Set the Fan Speed.
4
E
D
O
M
• Each time the Button is pressed, the Fan Speed mode is shifted.
14 Floor Standing-Type Air Conditioner
A/C
OUT DOOR
L
To raise the temperature.
To lower the temperature.
Page 15
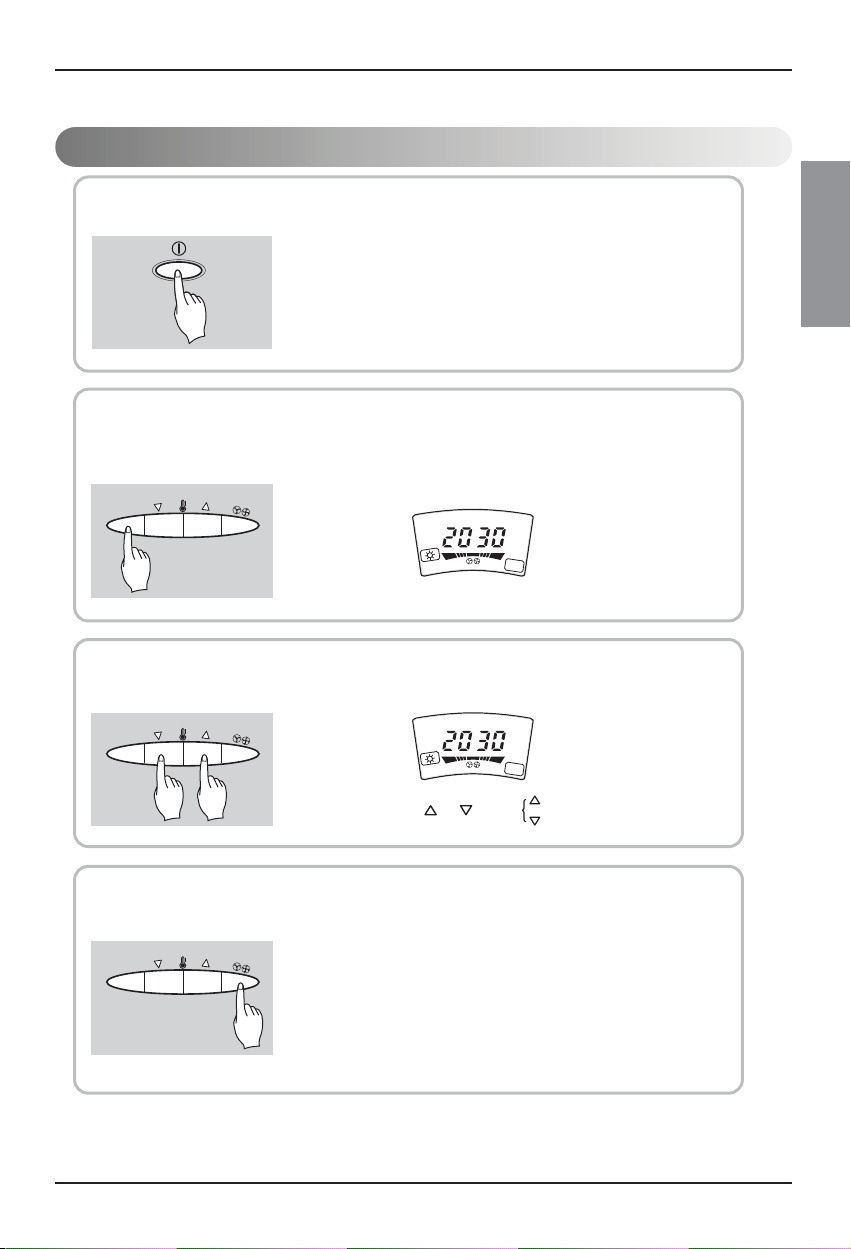
Auto Operation Mode(Cooling Model Only)
Press the Start/Stop Button.
1
Select Auto Operation.
2
Press the Operation Mode Selection Button.
E
D
O
M
ROOM TEMP. SET TEMP.
LH
A
/C
OUT DOOR
Operating Instructions
ENGLISH
ENGLISH
ENGLISHENGLISH
+6,/*1(
L
Set the temperature upper or lower than the standard temperature.
3
The temperature can be set within a range of by 1 level.
E
D
O
M
ROOM TEMP. SET TEMP.
A
/C
LH
L
OUT DOOR
Cold HotWarmCool Proper
(This indication will be shifted to the initial Auto Mode Display state after 4 seconds.)
• Press the or button
To raise the temperature.
To lower the temperature.
During Auto Operation
• It is impossible to switch the indoor fan speed because of being already set to the best conditioner by
fuzzy rule.
Owner's Manual 15
Page 16
Operating Instructions
OFF Timer Setting Procedure(OFF TIMER Setting, or CANCEL)
Press the Start/Stop Button.
1
Press the Timer Button.
2
ROOM TEMP. SET TEMP.
LH
LH
O
UT
DO
O
R
OUT DOOR
• If you press the button, the selected off timer is displayed as follows;’
• If you select ‘’, the Off Timer function will be cancelled.
When you finish the Off Timer setting, the Timer indicator lights off.
3
LH
After 4 seconds
OUT DOOR
During off-timer operation if you press the Timer Button, the rest time will be displayed.
ROOM TEMP. SET TEMP.
LH
OUT DOOR
4
16 Floor Standing-Type Air Conditioner
Page 17
UP
RIGHT
DOWN
LEFT
Horizontal Louver
Vertical Louver
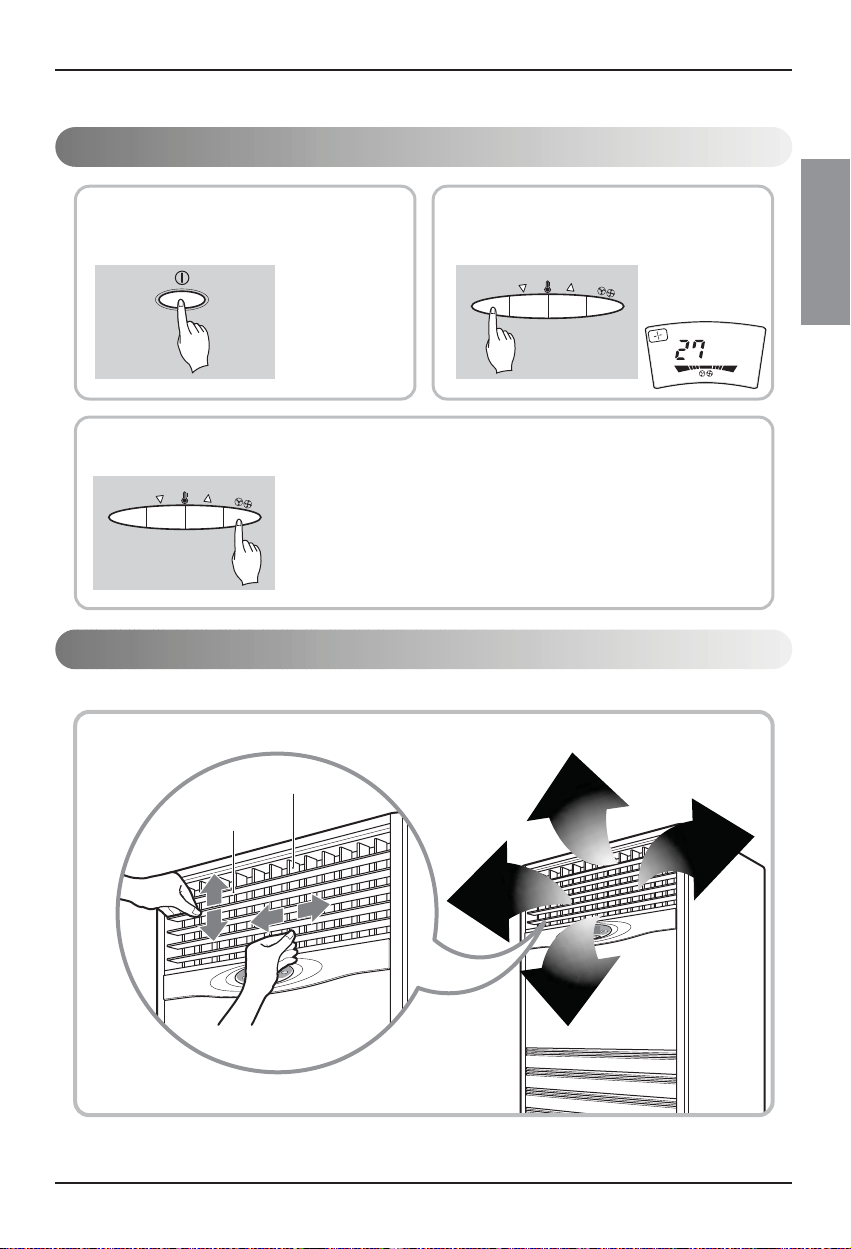
Fan Operation Mode
Press the Start/Stop
1
Button.
Set the Fan Speed.
3
E
D
O
M
Operating Instructions
Select Fan Operation.
2
Press the Operation Mode
Selection Button.
E
D
O
M
ROOM TEMP.
LH
• Each time the Button is pressed, the
Fan Speed mode is shifted.
A
/C
OUT DOOR
L
ENGLISH
ENGLISH
ENGLISHENGLISH
+6,/*1(
Airflow Direction Procedure
Adjust air flow direction manually by moving the horizontal or vertical louvers with hand.
Owner's Manual 17
Page 18
Operating Instructions
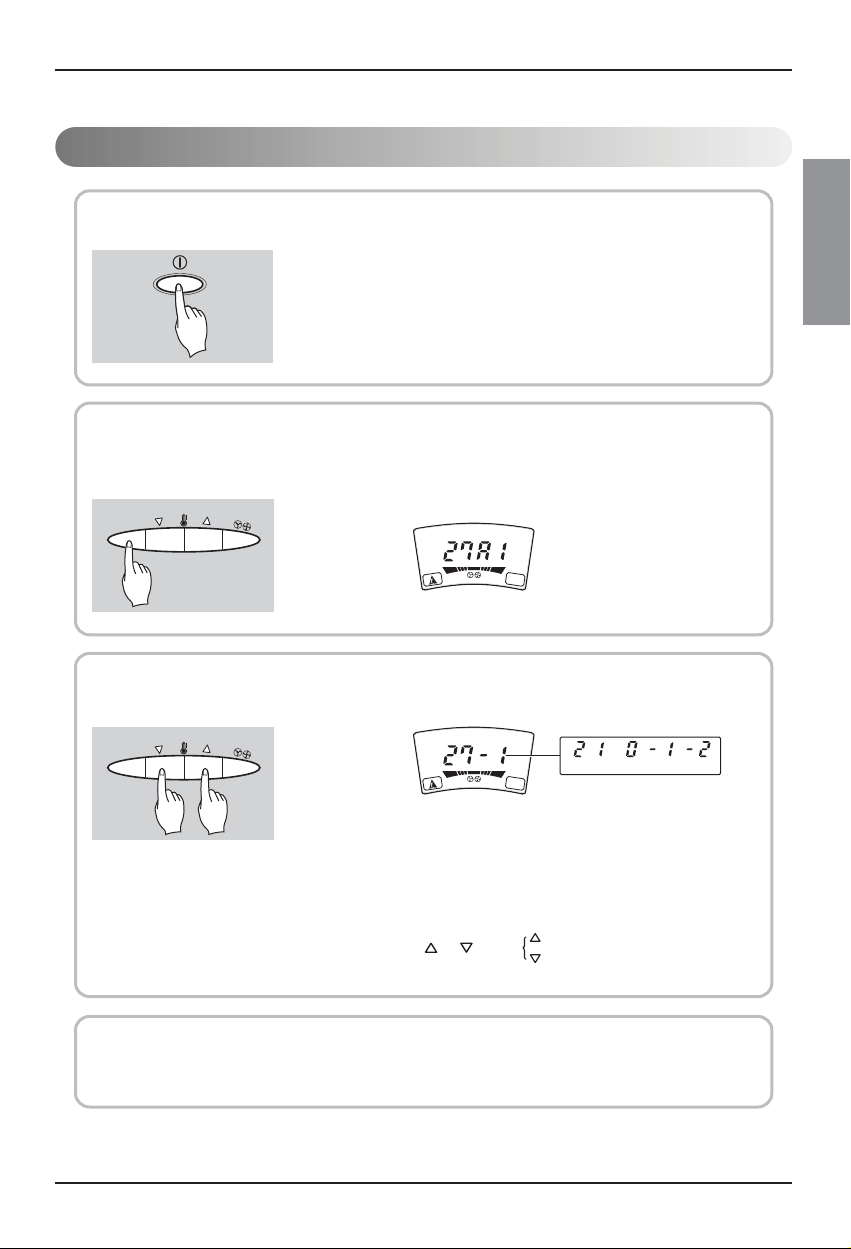
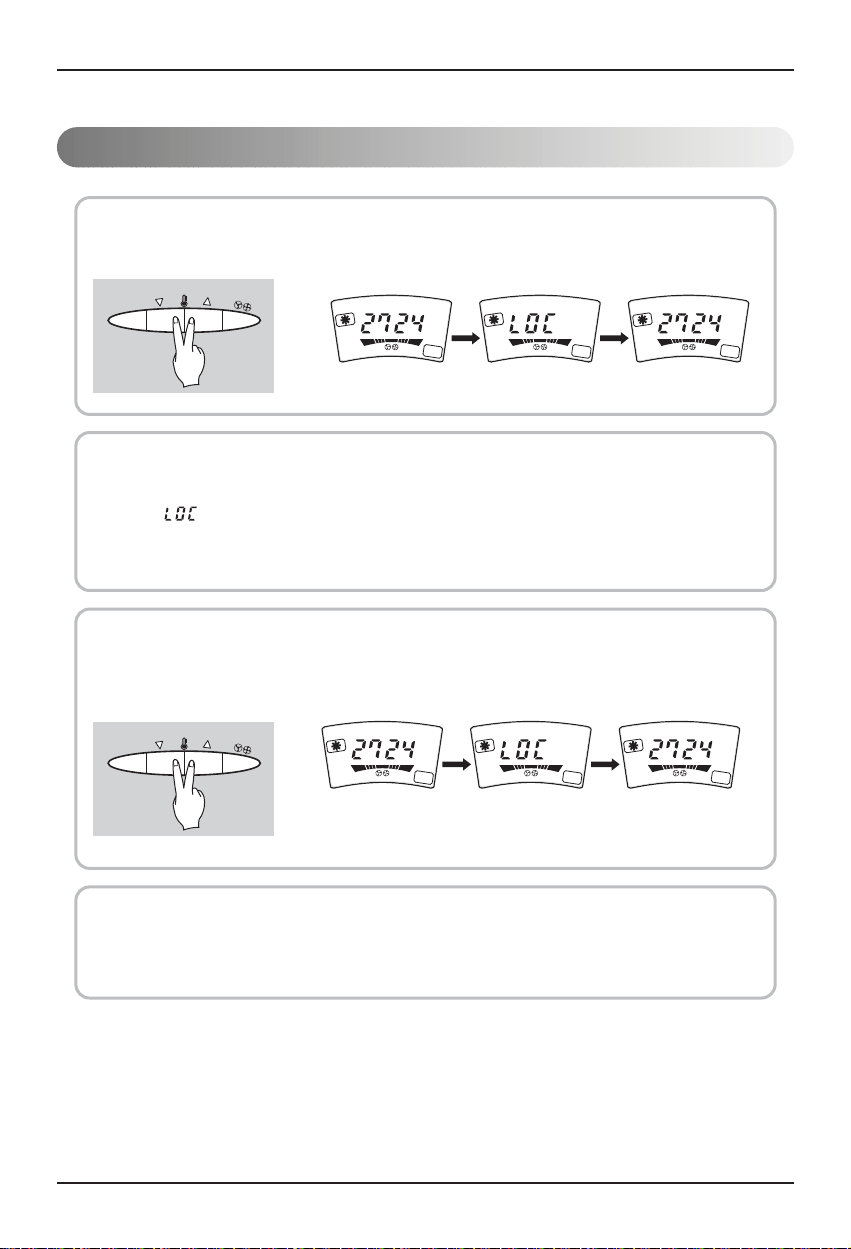
Child Lock Operation Procedure
Press the low and high temperature setting buttons simultaneously for 3 seconds.
1
The unit will respond with beep.
E
D
O
M
During Child Lock Operation
2
➊ Whenever you press any Button on Display Panel, it will immediately display
“”, which means Display panel is Locked.
❷ All the Button on the indoor unit Display panel will not work.
For releasing child lock Operation
3
Press the low and high temperature setting buttons simultaneously for 3 seconds again.
The unit will respond with beep, Child Lock Operation will removed.
ROOM TEMP. SET TEMP.
A
/C
LH
L
OUT DOOR
After 3 seconds,
it will shift.
A
/C
LH
L
OUT DOOR
After 3 seconds,
it will shift.
ROOM TEMP. SET TEMP.
A
/C
LH
L
OUT DOOR
E
D
O
M
ROOM TEMP. SET TEMP.
A
/C
LH
L
OUT DOOR
After pressing
the buttons
it will shift
immediately.
A/C
LH
L
OUT DOOR
After 3 seconds,
it will shift.
ROOM TEMP. SET TEMP.
LH
OUT DOOR
Auto restart
In case the power comes on again after a power failure, Auto Restarting Operation is the function to
operate procedures automatically to the previous operating conditions.
18 Floor Standing-Type Air Conditioner
A
/C
L
Page 19
Maintenance and Service
Maintenance and Service
CAUTION: Before performing any maintenance, turn off the main power to the system.
During the season
Cleaning of the air filters.
Recommended about once every two weeks
Remove the Air Filter.
Take hold of the tab and pull slightly forward to
remove the filter.
Clean.
To remove the dust adhering to the filters, either use a
•
vacuum cleaner, or wash them in water and dry in the
shade.
• Re-insert the filter to the original position.
Cleaning of the air conditioner
• Don’t wash with water.
• Wipe with a soft dry cloth.
• Water hotter than 40°C.
Could cause deformation
and/or discoloration.
Cleaning of the air cleaner.
Recommended about once every three months
Remove the Air Cleaner.
Take hold of the tab and pull slightly forward to
remove the air cleaner.
Clean.
• Dip the air cleaner into the water mixed with
detergent, for 20~30 minutes, and dry in the shade.
• Re-insert the air cleaner to the original position.
Never use any of the followings.
• Volatile substances.
Could damage the surfaces
of the air conditioner.
When the air conditioner is not going to be used for a long time.
At the end of the season
Operate the air conditioner at the following
settings for 2 to 3 hours.
• Type of operation : Cooling.
• Temperature setting : 30°C.
This will dry out the internal mechanisms.
Turn off the circuit breaker.
CAUTION
Turn off the circuit breaker when the air conditioner
is not going to be used for a long time.
Dirt may collect and may cause a fire.
CAUTION
At the start of the season
Clean the air filters, re-insert, then operate
the air conditioner.
Be sure that nothing obstructs the air outlet
and intake vents.
ENGLISH
ENGLISH
ENGLISHENGLISH
+6,/*1(
Operation Tips
Do not overcool the room.
This is not good for your health and
wastes electricity.
Make sure that the doors and windows
are shut tight.
Avoid opening doors and windows as
much as possible to keep the cool air in
the room.
Keep blinds or curtains closed.
Do not let direct sunshine enter the room
when the air conditioner is in operation.
Clean the air filter regularly.
Blockages in the air filter reduce the
airflow and lower cooling and
dehumidifying effects. Clean at least once
every two weeks.
Keep the room temperature uniform.
Adjust the vertical and horizontal airflow
direction to ensure a uniform temperature
in the room.
Ventilate the room occasionally.
Since windows are kept closed, it is a
good idea to open them and ventilate the
room now and then.
Owner's Manual 19
Page 20

Maintenance and Service
Troubleshooting
Check the following points before requesting repairs or service.... If the malfunction persist, please contact your
dealer.
Case Explanation See page
Does not operate.
The room has a peculiar
odor.
It seems that condensation is
leaking from the air
conditioner.
Air conditioner does not
operate for about 3 minutes
when restarted.
Does not cool or heat
effectively.
The air conditioner operation
is noisy.
• Have you made a mistake in timer operation?
• Has the fuse blown or has the circuit breaker been
tripped?
• Is the power Switch at Off?
• Is the unit at the starting of Heating Operation?
If yes, Hot-start is activating.
• Is the unit in the Deicing?
If yes, wait for finishing the Deicing.
• Check that this is not a damp smell exuded by the
walls, carpet, furniture, or cloth items in the room.
• Condensation occurs when the airflow from the air
conditioner cools the warm room air.
• This is the Protection device of the air conditioner .
• Wait about three minutes and operation will begin.
• If the airflow begins before its temperature become
warm, it will cause an undesired cooling effect. In
order to prevent this, the airflow will not begin until
it is sufficiently warm.
• Is the air filter dirty? See air filter cleaning
instructions.
• The room may have been very hot when the room
air conditioner was first turned on. Allow time for it
to cool down.
• Has the temperature been set incorrectly?
• Are the indoor unit's air inlet or outlet vents
obstructed?
• For a noise that sounds like water flowing.
-This is the sound of freon flowing inside the air
conditioner unit.
• For a noise that sounds like the compressed air
releasing into atmosphere.
-This is the sound of the dehumidifying water being
processed inside the air conditioning unit.
-
-
-
19
-
-
-
20 Floor Standing-Type Air Conditioner
Page 21

website http://www.lgservice.com
LG
LG
,/$7,
21$
Page 22

3.........
8 ........
19..........
2
Page 23

,/$7,
21$
3
Page 24

4
Page 25

Gasolin
,/$7,
21$
5
Page 26

˚
6
Page 27

Wax
Thinner
,/$7,
21$
7
Page 28

5
1
6
7
8
2
3
4
8
Page 29

65 14 11
13
147
65 11713
713
65 14 11 15
ON
ROOM TEMP. SET TEMP.
LH
E
D
O
M
2 3 4 12 18 9
ROOM TEMP. SET TEMP.
DUCT
O
UT
D
OO
R
D
O
M
2 3 4 12
10
LH
E
DUCT
O
UT
D
OOR
1
ROOM TEMP. SET TEMP.
LH
E
D
O
M
2 3 4 12 1816 9
DUCT
O
UT
D
O
O
R
,/$7,
21$
.8
.1
.9
.10
.11
.2
.3
.12
.4
.13
.14
.15
.16
.5
.6
.7
9
Page 30

ROOM TEMP. SET TEMP.
A/CL
LH
OUT D
OOR
ROOM TEMP.
A/CL
LH
OUT D
OOR
ROOM TEMP. SET TEMP.
L
ROOM TEMP. SET TEMP.
L
E
D
O
M
A/CL
A/CL
OOR
OOR
ROOM TEMP.
A/CL
LH
OUT D
OOR
ROOM TEMP. SET TEMP.
A/CL
LH
OUT D
OOR
E
D
O
M
ROOM TEMP. SET TEMP.
A/CL
LH
OUT D
OO
R
A/CL
OUT D
OOR
OUT D
ROOM TEMP. SET TEMP.
LH
OUT D
10
ROOM TEMP. SET TEMP.
L H
E
D
O
M
A/CL
OU
T D
OOR
ROOM TEMP. SET TEMP.
L H
A/CL
OU
T D
OOR
Page 31

ROOM TEMP. SET TEMP.
A/CL
LH
OUT DOO
R
ROOM TEMP. SET TEMP.
A/CL
LH
OUT DOO
R
١٨
,/$7,
21$
E
D
O
M
E
D
O
M
E
D
O
M
11
Page 32

ROOM TEMP. SET TEMP.
L
ROOM TEMP. SET TEMP.
L
A/CL
OUT DOOR
A/CL
OUT DOOR
١٨
E
D
O
M
E
D
O
M
12
Page 33

ROOM TEMP. SET TEMP.
A/CL
LH
OUT DOOR
ROOM TEMP. SET TEMP.
A/CL
LH
OUT DOO
R
١٨
,/$7,
21$
E
D
O
M
E
D
O
M
E
D
O
M
13
Page 34

ROOM TEMP. SET TEMP.
LH
A/CL
OUT DOOR
١٨
ROOM TEMP. SET TEMP.
A/CL
LH
OUT DOO
R
1
2
E
D
O
M
E
D
O
M
14
Page 35

ROOM TEMP. SET TEMP.
LH
A/CL
O
UT D
OO
R
,/$7,
21$
E
D
O
M
ROOM TEMP. SET TEMP.
LH
A/CL
OUT DOO
R
Cold HotWarmCool Proper
E
D
O
M
15
Page 36

ROOM TEMP. SET TEMP.
ROOM TEMP. SET TEMP.
L H
OUT DOOR
L H
L H
LH
OUT
DOOR
OUT DOOR
OUT DOOR
16
Page 37

E
D
O
M
ROOM TEMP.
LH
A/CL
OUT DOOR
,/$7,
21$
E
D
O
M
17
Page 38

ROOM TEMP. SET TEMP.
OUT D
A/CL
OOR
LH
A/CL
LH
O
UT D
OOR
ROOM TEMP. SET TEMP.
LH
A/CL
O
UT D
OOR
E
D
O
M
18
ROOM TEMP. SET TEMP.
LH
A/CL
OUT DOOR
LH
A/CL
O
UT D
OOR
ROOM TEMP. SET TEMP.
LH
A/CL
O
UT D
OO
R
E
D
O
M
Page 39

1
1
1
1
40
2
2
2
2
,/$7,
21$
1
1
30
2
2
1
1
2
2
3
3
19
Page 40

-
-
-
19
-
-
20
-
-
-
Page 41

website http://www.lgservice.com
LG
LG
Climatiseur de Type
Posé au Sol
MANUEL DU PROPRIÉTAIRE
FRANÇAIS
嘰$36(
/2
IMPORTANT
• Veuillez lire ce manuel du propriétaire soigneusement et
au complet avant d’installer et de mettre en marche votre
climatiseur.
• Après l’avoir lu au complet, veuillez conserver ce manuel
du propriétaire pour une référence ultérieure.
Page 42

Manuel du propriétaire du climatiseur sur pied.
TABLE DES MATIERES
Pour vos archives
Précautions de sécurité.........3
Instructions d’utilisation .......8
Entretien et Service..............19
Écrire le modèle et le numéro de série ici :
Modèle #
Série #
Vous pouvez les trouver sur la marque sur le coté
de chaque unité
Nom du vendeur
Date de l'achat
■
Agrafez votre reçu à cette page au cas où vous en
auriez besoin pour démontrer la date d'achat du produit
ou pour avoir droit à la garantie.
Lire ce manuel
À l'intérieur vous trouverez beaucoup de conseils utiles sur la
façon d'employer et d'entretenir votre climatiseur correctement.
Juste un peu de soin préventif de votre part peut vous sauver
beaucoup de temps et d'argent au cours de la vie de votre
climatiseur.
Vous trouverez beaucoup de réponses aux problèmes
communs dans le diagramme des conseils de dépannage. Si
vous passez en revue en premier notre diagramme du
dépannage, vous pouvez ne pas avoir besoin du service de
réparation
2 Climatiseur de Type Posé au Sol
Avertissement
• Contactez le service technique autorisé pour réparer et
entretenir cette unité.
• Contacter l'installateur pour l'installation de cette unité.
• Le climatiseur ne doit pas être manipuler par des jeunes
enfants sans surveillance
• Les jeunes enfants ne devraient pas être laissés sans
supervision pour s'assurer qu'ils ne jouent pas avec le
climatiseur.
• Lorsque le cordon électrique doit être remplacer, le travail de
emplacement devraient être fait par du personnel seulement.
• Le travail d'installation doit être fait selon les normes de
câblages par du personnel autorisé seulement.
Page 43

Mesures de sécurité
AVERTISSEMENT
Mesures de sécurité
Les instructions ci-après doivent être observées dans le but de prévenir tout risque de
dommages corporels ou matériels.
■ L'utilisation non conforme, résultant de la négligence des instructions, est susceptible de
provoquer des dommages corporels ou matériels dont la gravité est signalée par les
indications suivantes :
AVERTISSEMENT
ATTENTION
■ Les significations des symboles utilisés dans ce manuel sont indiquées ci-dessous.
Ce symbole indique un risque de blessure grave, voire mortelle.
Ce symbole indique un risque de blessure ou des
dommages matériels seulement.
Veillez à ne pas faire cela.
Veillez à suivre les instructions de ce manuel.
■ Installation
N'utilisez pas un coupe-circuit
défectueux ou à valeur
nominale inférieure. Utilisez cet
appareil sur un circuit dédié.
• Ceci risquerait de provoquer un
incendie ou un choc électrique.
Pour un travail électrique, contactez
le distributeur, le vendeur, un
électricien qualifié ou un Centre de
Service Après Vente Agrée.
• Ne démontez ni réparez le produit.
Ceci risquerait de provoquer un
incendie ou un choc électrique.
Faites toujours une
connexion reliée à la terre.
• Autrement vous risquerez de
provoquer un incendie ou un
choc électrique.
FRANÇAIS
嘰$36(
/2
Installez fermement le
panneau et le couvercle du
tableau de commande.
•
Autrement vous risquerez de
provoquer un incendie ou un choc
électrique.
Installez toujours un circuit
et un disjoncteur dédiés.
• Un câblage ou une installation
inappropriés peuvent provoquer
un incendie ou un choc
électrique.
Utilisez un disjoncteur ou
fusible à valeur nominale
appropriée.
• Autrement vous risquerez de
provoquer un incendie ou un
choc électrique.
Manuel du propriétaire 3
Page 44

Mesures de sécurité
Ne modifiez ni prolongez le
cordon d'alimentation.
• Ceci risquerait de provoquer un
incendie ou un choc électrique.
Contactez toujours le revendeur ou un
centre de service après vente agréé
pour effectuer l'installation.
• Autrement, Vous pourriez
provoquer un incendie, un choc
électrique, une explosion ou
vous blesser.
Ne laissez pas le climatiseur marcher trop
longtemps lorsque l'humidité est très élevée et
qu'il y a une porte ou une fenêtre ouverte.
• De l'humidité peut se condenser
et mouiller ou endommager le
mobilier.
N'installez, n'enlevez ni
remettez en place l'unité vousmême (si vous êtes un client).
• Vous pourriez provoquer un
incendie, un choc électrique, une
explosion ou vous blesser.
N'installez pas le produit sur
un support d'installation
défectueux.
• Ceci peut provoquer des
blessures, un accident ou bien
endommager le produit.
■ Fonctionnement
Assurez-vous qu'on ne puisse pas
tirer des câbles ou les endommager
en cours de fonctionnement.
• Ceci risquerait de provoquer un
incendie ou un choc électrique.
Prenez soin lorsque vous
déballez et installez ce
produit.
•
Les bords aiguisés peuvent provoquer
des blessures. Faites attention en
particulier aux bords du boîtier et aux
ailettes du condenseur et de
l'évaporateur.
Vérifiez que la zone
d'installation n'est pas abîmée
par le temps.
•
Si la base s'écroule, le climatiseur
pourrait tomber avec elle, provoquant
des dommages matériels, une
défaillance du produit et des blessures.
Ne placez aucun objet sur le
cordon d'alimentation.
• Ceci risquerait de provoquer un
incendie ou un choc électrique.
Ne branchez ni débranchez
la fiche d'alimentation en
cours de fonctionnement.
• Ceci risquerait de provoquer un
incendie ou un choc électrique.
Ne touchez pas (ne faites
pas fonctionner)le produit
avec les mains humides.
• Ceci risquerait de provoquer un
incendie ou un choc électrique.
4 Climatiseur de Type Posé au Sol
Ne placez pas de radiateurs
ou d'autres appareils près
du cordon d'alimentation.
• Ceci risquerait de provoquer un
incendie ou un choc électrique.
Page 45

Mesures de sécurité
Veillez à ne pas faire couler
d’eau sur les parties
électriques.
• Ceci pourrait provoquer un
incendie, une défaillance de
l'appareil ou un choc électrique..
S'ilyaunefuitedegazinflammable,
fermez le robinet à gaz et ouvrez une
fenêtre pour ventiler la pièce avant
de mettre en marche le climatiseur.
• N'utilisez le téléphone ni déplacez les
interrupteurs sur les positions marche/arrêt.
Ceci risquerait de provoquer une explosion
ou un incendie.
N'ouvrez pas la grille d'entrée d'air du
produit en cours de fonctionnement.
(Ne touchez pas le filtre électrostatique,
si l'unité en est équipée.)
•
Autrement, vous risquerez de subir des
blessures physiques, un choc
électrique ou de provoquer une
défaillance du produit.
N'emmagasinez ni utilisez de
substances inflammables ou
combustibles près de ce produit
• Ceci entraînerait un risque
d'incendie ou de défaillance du
produit.
.
Gasolin
Si le climatiseur dégage des sons, des
odeurs ou de la fumée, mettez le
disjoncteur sur la position arrêt (off) ou
débranchez le cordon d'alimentation.
• Il y a risque de choc électrique ou
d'incendie.
Contactez le centre de
service après vente agréé si
le produit est trempé(rempli
d'eau ou submergé).
• Ceci risque de provoquer un
incendie ou un choc électrique.
N'utilisez pas ce produit dans espace
fermé hermétiquement pendant une
longue période de temps.
• Il peut se produire un manque
d'oxygène.
Arrêtez le climatiseur et fermez la fenêtre
en cas de tempête ou d'ouragan. Si
possible, enlevez le produit de la fenêtre
avant que l'ouragan arrive.
• Il y a risque de dommages à la
propriété, de défaillance du produit
ou de choc électrique.
FRANÇAIS
嘰$36(
/2
Veuillez à ce que l'eau ne
pénètre pas dans le produit.
• Ceci risquerait de provoquer un
incendie, un choc électrique ou
d'endommager le produit.
Ventilez la pièce de temps en temps lorsque
vous l'utilisez simultanément avec une poêle,
etc.
• Autrement, vous risquerez de provoquer un incendie
ou un choc électrique.
Arrêtez le climatiseur avant de procéder à des
opérations de nettoyage ou de maintenance
du produit.
• Autrement, vous risquerez de provoquer un incendie
ou un choc électrique.
Manuel du propriétaire 5
Page 46

Mesures de sécurité
ATTENTION
Si vous n'allez pas utiliser le produit pour une longue
période de temps, débranchez le cordon d'alimentation ou
mettez le disjoncteur sur la position Arrêt (off).
• Autrement, vous risquerez d'endommager le produit
ou de provoquer une défaillance de
celui-ci ou bien une mise en
marche involontaire.
■ Installation
Vérifiez toujours s'il y a des fuites de
gaz (frigorigène) suite à l'installation
ou réparation du produit.
• Des niveaux de frigorigène trop
bas peuvent provoquer une
défaillance du produit.
N'installez pas le produit à un endroit
où le bruit ou l'air chaud dégagés de
l'unité extérieure dérangent les voisins.
• Ceci pourrait entraîner des
problèmes avec vos voisins.
Installez le raccord de drainage de
manière à assurer un drainage
approprié.
• Une mauvaise connexion peut
provoquer des fuites d'eau.
Faites appel à deux ou plusieurs
personnes pour enlever et
transporter ce produit.
• Evitez des blessures.
Assurez-vous que personne ne peut marcher
ou tomber sur l'unité extérieure.
• Ceci pourrait provoquer des blessures personnelles et
des dommages au produit.
Maintenez le produit au
niveau lors de son.
• Installation afin d'éviter des
vibrations ou des fuites d'eau.
˚
N'installez pas ce produit à un endroit
où il serait exposé directement au vent
de la mer (pulvérisation d'eau de mer).
•
Ceci peut provoquer de la corrosion sur le
produit. La corrosion, particulièrement sur
les ailettes du condenseur et de
l'évaporateur, peut provoquer un
dysfonctionnement ou un fonctionnement
inefficace du produit.
■ Fonctionnement
N'exposez pas la peau directement sous le jet d'air
froid pendant des longues périodes de temps (Ne
vous asseyez pas sous le courant d'air).
• Ceci peut nuire à votre santé.
6 Climatiseur de Type Posé au Sol
N'utilisez pas ce produit pour des objectifs spéciaux tels que la
préservation d'aliments, d'oeuvres d'art, etc. C'est un climatiseur pour
consommateurs, non pas un système frigorifique de précision.
• Il y a risque de dommage à
la propriété ou pertes
matérielles.
Page 47

Mesures de sécurité
Ne bloquez pas l'entrée ou la
sortie d'air.
• Ceci peut provoquer une
défaillance du produit.
Ne marchez ni mettez rien
sur le produit (unités
extérieures).
• Ceci risquerait de provoquer des
blessures et une défaillance du
produit.
Ne buvez pas d'eau drainée
du produit.
• Ceci n'est pas hygiénique et
pourrait provoquer de sérieux
problèmes de santé.
Utilisez un chiffon doux pour le nettoyage.
N'employez pas de détergents agressifs,
de dissolvants, etc.
•
Ceci risquerait de provoquer un incendie,
un choc électrique ou des dommages aux
pièces plastiques du produit.
Thinner
Wax
Insérez toujours fermement le filtre.
Nettoyez le filtre toutes les deux
semaines ou plus souvent si besoin.
• Un filtre sale réduit l'efficacité du
climatiseur et pourrait provoquer
un dysfonctionnement ou des
dommages à l'appareil.
Utilisez un outil ou une
échelle solide lorsque vous
faites des opérations de
nettoyage ou de
maintenance du produit.
• Faites attention et évitez des
blessures.
Ne touchez pas les pièces métalliques
du produit lorsque vous enlevez le filtre
à air. Elles sont très aiguisées!
• Vous risquez de subir des
blessures.
N'insérez pas les mains ou d'autres objets
à travers l'entrée ou la sortie d'air en cours
de fonctionnement du produit.
• Il y a des bords aiguisés et des
pièces mobiles qui pourraient vous
blesser.
FRANÇAIS
嘰$36(
/2
Remplacez les piles vieilles de la
télécommande par des piles neuves
du même type. Ne mélangez pas de
piles usées et neuves ou de
différentes types de piles.
• Ceci risquerait de provoquer un
incendie ou une explosion.
Ne rechargez ni démontez les piles. Ne placez
pas les piles sur le feu.
• Elle peuvent brûler ou exploser.
Si le liquide des piles tombe sur votre peau ou vos
vêtements, lavez-les avec de l'eau propre. N'utilisez
pas la télécommande si les piles ont des fuites.
• Les substances chimiques
des piles pourraient
provoquer des brûlures ou
d'autres risques pour la
santé.
Manuel du propriétaire 7
Page 48

Instructions d’utilisation
Instructions d’utilisation
Fonctions et Spécifications
1. Dessin pour réfrigération et
chauffage
2. Super rendement énergétique
3. Contrôle Micom
4. Opérations silencieuse
Ouverture de
ventilation externe
Ouverture
d’aspiration
de l’air
5. 2 vitesses
réfrigération/chauffage
6. Filtre à air amovible
7. Filtre Anti –Bactéries
8. Circuit à 3 minutes de retard
Ouverture
de ventilation
externe
8 Climatiseur de Type Posé au Sol
Ouverture d’aspiration
de l’air (Arrière)
Page 49

Contrôles et voyants des contrôles de l’unité interne
Instructions d’utilisation
65 14 11
ROOM TEMP. SET TEMP.
LH
E
D
O
M
2 3 4 12 18 9
13
DUCT
OU
T
D
O
OR
D
O
M
2 3 4 12
10
65 11713
ROOM TEMP. SET TEMP.
LH
E
147
DUCT
OU
T
D
O
O
R
1
713
65 14 11 15
ROOM TEMP. SET TEMP.
LH
E
D
O
M
2 3 4 12 1816 9
OU
(Pompe à chaleur) (Modèle Refroidissement) (Modèle Pompe à chaleur et
radiateur électrique)
1. BOUTON MARCHE/ARRET
L’appareil se met en marche quand on appuie
sur ce bouton. L’appareil s’arrête quand on
appuie sur ce bouton encore une fois.
2. BOUTON SELECTEUR DU MODE DE
FONCTIONNEMENT
Utilisé pour sélectionner le Mode de
Fonctionnement.
3. BOUTONS POUR REGLAGE DE LA
TEMPERATURE AMBIANCE
Utilisés pour choisir la température ambiance.
4. SELECTION DE VITESSE DU VENTILATEUR
INTERNE
Utilisé pour choisir la vitesse du ventilateur
interne à deux niveaux: faible, forte.
5. TEMOIN LUMINEUX DE VENTILATEUR
6. TEMOIN LUMINEUX DE REFROIDISSEMENT
7. TEMOIN LUMINEUX DE REFRIGERATION
FAIBLE
8. TEMOIN LUMINEUX DE CHAUFFAGE
9. TEMOIN LUMINEUX DE DEGIVRAGE
10. TEMOIN LUMINEUX DE MARCHE
AUTOMATIQUE
11. TEMOIN LUMINEUX DE FLUX D’AIR DU
CONDUIT
12. TEMOIN LUMINEUX DE MARCHE D’UNITE
EXTERNE
13. BOUTON POUR REGLAGE MINUTERIE
(L’OPERATION S’ARRETE LORSQUE CELUICI EST ALLUME)
14. TEMOIN LUMINEUX DE LA MINUTERIE
15. TEMOIN LUMINEUX DE CHAUFFAGE
ELECTRIQUE
16.BOUTONDEMARCHEDECHAUFFAGE
ELECTRIQUE
DUC
T
T
D
O
O
R
FRANÇAIS
嘰$36(
/2
Manuel du propriétaire 9
Page 50

Instructions d’utilisation
Comment utiliser le Bouton de Mode de Fonctionnement
• A chaque fois que l’on appuie sur le Bouton Sélecteur de Mode de Fonctionnement, le mode de fonctionnement
change dans le sens de la flèche.
E
D
O
M
ROOM TEMP.
LH
O
Opération Ventilation Opération
E
D
O
M
ROOM TEMP. SET TEMP.
LH
OU
Opération Ventilation Opération
U
A/CL
T DOO
R
ROOM TEMP. SET TEMP.
LH
O
ROOM TEMP. SET TEMP.
A/CL
LH
U
T DOO
R
Opération
Refroidissement
Refroidissement Faible
(Modèle Pompe à Chaleur)
ROOM TEMP. SET TEMP.
A/CL
LH
T
DOO
R
Refroidissement
OU
ROOM TEMP. SET TEMP.
A/CL
LH
T
DOO
R
Opération
Refroidissement Faible
(Modèle Refroidissement)
ROOM TEMP. SET TEMP.
A/CL
LH
O
U
T DO
OR
Opération Chauffage
ROOM TEMP.
A/CL
LH
OU
T
DOO
R
Opération Chauffage
A/CL
O
U
T DO
OR
A/CL
OU
T
DOO
R
Comment utiliser le Bouton de Vitesse du Ventilateur
• A chaque fois que l’on appuie sur le Bouton de Vitesse du Ventilateur, la vitesse du ventilateur change suivant la
direction de la flèche.
E
D
O
M
ROOM TEMP. SET TEMP.
A/CL
M
LH
OU
T D
OOR
10 Climatiseur de Type Posé au Sol
ROOM TEMP. SET TEMP.
A/CL
L H
OU
T D
OOR
Forte Faible
Page 51

Mode de Fonctionnement Refroidissement
Instructions d’utilisation
1
Appuyez sur le Bouton Marche/Arrêt.
Sélectionnez l’opération Refroidissement.
2
Appuyez sur le Bouton Sélecteur du Mode de Fonctionnement.
E
D
O
M
ROOM TEMP. SET TEMP.
LH
Sélectionnez une température inférieure à la température ambiante.
La température peut être réglée entre 1 C et 30°C par 1°C.
3
E
D
O
M
8°
ROOM TEMP. SET TEMP.
LH
O
O
A/CL
UT DOO
A/CL
UT D
FRANÇAIS
R
嘰$36(
/2
OOR
•
Appuyez sur les boutons
Pour faire augmenter la température.
o
Pour faire diminuer la température.
Sélectionnez la Vitesse du Ventilateur.
4
E
D
O
M
A chaque fois que l’on appuie sur le Bouton, le Mode de Vitesse du Ventilateur change (FORTE ➯ FAIBLE)
Manuel du propriétaire 11
Page 52

Instructions d’utilisation
Opération Refroidissement Faible
Appuyez sur le Bouton Marche/Arr
êt.
1
Sélectionnez l’Opération Refroidissement Faible.
2
Appuyez sur le Bouton Sélecteur du Mode de Fonctionnement.
E
D
O
M
Sélectionnez une température inférieure à la température ambiante.
La température peut être réglée entre 1 C et 30°C par 1°C.
3
E
D
O
M
•
Appuyez sur les boutons
ROOM TEMP. SET TEMP.
LH
8°
ROOM TEMP. SET TEMP.
LH
A/CL
OUT DOO
R
A/CL
O
UT DOO
R
Pour faire augmenter la température.
o
Pour faire diminuer la température.
Pendant l’Opération Refroidissement Faible
• La vitesse du ventilateur interne est fixée automatiquement en Faible et elle ne peut pas être
réglée.
12 Climatiseur de Type Posé au Sol
Page 53

Instructions d’utilisation
Fonctionnement en mode chauffage (à l’exception du modèle refroidissement)
Appuyez sur le Bouton Marche/Arr
êt.
1
Sélectionnez l’Opération Chauffage.
Appuyez sur le Bouton Sélecteur du Mode de Fonctionnement.
2
E
D
O
M
Sélectionnez une température supérieure à la température ambiante.
La température peut être réglée entre 1 °C et 30°C par 1°C.
3
E
D
O
M
•
Appuyez sur les boutons
ROOM TEMP. SET TEMP.
LH
8
ROOM TEMP. SET TEMP.
LH
A/CL
OUT DOOR
A/CL
O
UT DOO
R
Pour faire augmenter la température.
o
Pour faire diminuer la température.
FRANÇAIS
嘰$36(
/2
Sélectionnez la Vitesse du Ventilateur.
4
E
D
O
M
• A chaque fois que l’on appuie sur le Bouton, le Mode de Vitesse du Ventilateur change.
Manuel du propriétaire 13
Page 54

Instructions d’utilisation
Mode de Fonctionnement du Radiateur Électrique (Modèle Pompe à chaleur et Radiateur électrique uniquement)
Appuyez sur le Bouton Marche/Arr
êt.
1
Sélectionnez l’Opération Chauffage en plus de l’Opération Chauffage Electrique.
❶
2
3
Appuyez sur le Bouton Sélecteur du Mode de Fonctionnement pour choisir l’Opération Chauffage.
❷ Appuyez sur le Bouton Opération Chauffage Electrique.
(Lorsque l’unité est en marche en Mode Chauffage).
ROOM TEMP. SET TEMP.
LH
A/CL
OUT DOO
R
Sélectionnez une température supérieure à la température ambiante.
La température peut être réglée entre 1 °C et 30°C par 1°C.
E
D
O
M
8
ROOM TEMP. SET TEMP.
A/CL
LH
O
UT DOO
R
•
Appuyez sur les boutons
Pour faire augmenter la température.
o
Pour faire diminuer la température.
Sélectionnez la Vitesse du Ventilateur.
4
E
D
O
M
• A chaque fois que l’on appuie sur le Bouton, le Mode de Vitesse du Ventilateur change.
14 Climatiseur de Type Posé au Sol
Page 55

Instructions d’utilisation
Mode de Fonctionnement Automatique (Modèle Refroidissement)
Appuyez sur le Bouton Marche/Arr
êt.
1
Sélectionnez l’Opération Automatique.
Appuyez sur le Bouton Sélecteur du Mode de
2
Fonctionnement.
E
D
O
M
Sélectionnez une température supérieure ou inférieure à la température standard.
La température peut être réglée dans une plage par 1 niveau.
3
E
D
O
M
ROOM TEMP. SET TEMP.
A/CL
LH
OUT DOOR
ROOM TEMP. SET TEMP.
A/CL
LH
O
UT D
OO
R
FRANÇAIS
嘰$36(
/2
Cold HotWarmCool Proper
(Cette indication changera à l’état d’Affichage de Mode Automatique initial après 4 secondes).
•
Appuyez sur les boutons
Pour faire augmenter la température.
o
Pour faire diminuer la température.
Pendant l’Opération Automatique
• Il est impossible de changer la vitesse du ventilateur interne car celle-ci a été électroniquement
réglée au niveau le plus convenable.
Manuel du propriétaire 15
Page 56

Instructions d’utilisation
Procédure pour Fixer la Minuterie sur la position OFF (Réglage de la Minuterie en OFF ou ANNULER)
Appuyez sur le Bouton Marche/Arrêt.
1
Appuyez sur le Bouton de la Minuterie.
2
ROOM TEMP. SET TEMP.
ROOM TEMP. SET TEMP.
LH
L H
•
Si l’on appuie sur ce bouton, la Minuterie réglée sur la position off est affichée de la manière suivante:
OUT DOOR
OUT DOOR
• Si l’on choisi ‘0:00’, la fonction de Minuterie en Off est annulée.
Lorsque vous finirez de régler la Minuterie en Off, le témoin lumineux de la Minuterie
3
s’éteindra.
ROOM TEMP. SET TEMP.
LH
OUT DOOR
Après 4 secondes
ROOM TEMP. SET TEMP.
L H
OUT DOOR
Pendant l’opération de Minuterie en off, si l’on appuie sur le Bouton Minuterie, le temps
4
restant est affiché.
16 Climatiseur de Type Posé au Sol
Page 57

Mode de Fonctionnement Ventilation
HAUT
DROITE
BAS
GAUCHE
Volet Vertical
Volet Horizontal
Instructions d’utilisation
Appuyez sur le Bouton
Marche/Arrêt.
1
Sélectionnez la Vitesse du Ventilateur.
Sélectionnez le mode de
fonctionnement du ventilateur.
2
Appuyez sur le Bouton Sélecteur du
Mode de Fonctionnement.
E
D
O
M
3
E
D
O
M
• A chaque fois que l’on appuie sur le Bouton, le Mode de Vitesse
du Ventilateur change.
Procédure pour régler la Direction du Flux d’Air
Réglez manuellement la direction du flux d’air en manipulant les volets horizontaux ou verticaux avec la main.
ROOM TEMP.
O
UT DOO
A/CL
R
LH
FRANÇAIS
嘰$36(
/2
Manuel du propriétaire 17
Page 58

Instructions d’utilisation
Procédure de Fonctionnement Dispositif pour Sécurité d’Enfants
Appuyez sur les boutons pour régler la température haute et basse simultanément pendant
3 secondes. L’unité répondra avec un bip .
1
E
D
O
M
ROOM TEMP. SET TEMP.
LH
A/CL
OUT DOOR
Après 3 secondes,
cela changera.
ROOM TEMP. SET TEMP.
LH
A/CL
OUT DOOR
Après 3 secondes,
cela changera.
Pendant l’Opération Sécurité pour Enfants
2
❶ A chaque fois qu’un Bouton quelconque du Panneau d’Affichage est appuyé,
l’inscription “L0C” s’affiche, ce qui veut dire que le Panneau d’Affichage est bloqué.
❷ Aucun bouton ne marchera au Panneau d’Affichage de l’unité interne.
Pour annuler l’Opération du Dispositif de Sécurité pour Enfants
3
Appuyez simultanément les boutons pour régler la température haute et basse pendant 3
secondes encore une fois. L’unité répondra par un bip , la Opération Sécurité pour
Enfants sera annulée.
ROOM TEMP. SET TEMP.
LH
A/CL
OUT DOOR
E
D
O
M
ROOM TEMP. SET TEMP.
LH
A/CL
O
UT DOO
R
Après avoir appuyé sur
les boutons, cela
automatiquement.
changera
ROOM TEMP. SET TEMP.
LH
A/CL
O
UT DOO
R
Après 3 secondes,
cela changera.
Redémarrage automatique
En cas de panne d’électricité, lorsque le courant est rétabli, l’unité se remet en fonctionnement de
manière automatique et selon les conditions de fonctionnement établies au préalable.
18 Climatiseur de Type Posé au Sol
ROOM TEMP. SET TEMP.
LH
A/CL
OUT DOO
R
Page 59

Entretien et Service
Entretien et Service
ATTENTION: Avant de réaliser n’importe quel type d’entretien, coupez l’alimentation principale du système.
Pendant la saison.
Il est recommandé de le faire environ une fois tous les quinze jours.
Nettoyage des filtres à air.
Enlevez les filtres à air.
Ôtez l’étiquette et tirez légèrement en avant pour
enlever le filtre.
Nettoyez.
Enlevez la poussière adhérée aux filtres à l’aide d’un
•
aspirateur, ou bien lavez-les avec de l’eau et faites-les
sécher à l’ombre.
• Replacez le filtre dans sa position originale.
Nettoyage du climatiseur.
• Ne le lavez pas avec de l’eau.
• Essuyez avec un tissu doux et sec.
Il est recommandé de le faire environ une fois tous les trois mois.
•
Nettoyage du purificateur d’air.
Enlevez le Purificateur d’air.
Ôtez l’étiquette et tirez légèrement en avant pour enlever
le purificateur d’air.
Nettoyez.
• Plongez le purificateur d’air pendant 20 ~30 minutes
dans de l’eau contenant du détergent, puis faites-le
sécher à l’ombre.
• Replacez le purificateur d’air dans sa position originale.
N’utilisez jamais:
De l’eau au-dessus de 40°C.
Ceci peut provoquer des
déformations et/ou des décolorations.
Lorsque le climatiseur ne sera pas utilisé pendant une longue période.
À la fin de la saison.
Faites fonctionner le climatiseur selon les
réglages suivants pendant 2 ou 3 heures.
• Type de fonctionnement: Refroidissement.
• Réglage de la température : 30°C
Ceci fera sécher les mécanismes internes.
Arrêtez le disjoncteur.
ATTENTION
ATTENTION
Arrêtez le disjoncteur lorsque le climatiseur ne sera
pas utilisé pendant une longue période.
De la saleté peut s’accumuler et provoquer un incendie.
Audébutdelasaison.
Nettoyez les filtres à air, remettez-les à
leur place, puis mettez en marche le
climatiseur.
Veillez à ce qu’aucun obstacle ne bloque
les grilles d’entrée et de sortie d’air.
• Des substances volatiles.
Ceci peut endommager les
surfaces du climatiseur.
FRANÇAIS
嘰$36(
/2
Conseils d’utilisation.
Ne refroidissez pas à l’excès la pièce.
Ce n'est pas bon pour la santé et cela vous
fera gaspiller l'électricité.
Veillez à ce que les portes et les fenêtres
soient bien fermées.
Évitez autant que possible d’ouvrir les portes
et les fenêtres afin de conserver l'air froid
dans la pièce.
Maintenez fermés stores et rideaux.
Veillez à ce que le soleil n’entre pas
directement dans la pièce lorsque le
climatiseur est en fonctionnement.
Nettoyez les filtres à air régulièrement.
Les obstacles dans le filtre à air réduisent le
flux d'air ainsi que les effets de refroidissement
et de déshumidification. Nettoyez-les au moins
une fois toutes les quinze jours.
Gardez une température ambiante
uniforme.
Réglez la direction du flux d’air vertical et
horizontal afin d’assurer une température
ambiante uniforme.
Aérez la salle de temps en temps.
Puisque les fenêtres restent fermées, il est
conseillé de les ouvrir et d'aérer la pièce de
temps en temps.
Manuel du propriétaire 19
Page 60

Entretien et Service
Guide de dépannage
Vérifiez les points ci-dessous avant de demander des réparations ou de contacter le service technique. Si vous
ne parvenez pas à résoudre le problème, veuillez contacter votre distributeur.
Problème Explication Voir page
L’appareil ne marche pas.
La pièce a une odeur
particulière.
Il semble que la condensation cule
depuis le conditionneur d’air.
Le conditionneur d’air ne
fonctionne pas pendant environ 3
minutes quand il se remet en
marche.
L’appareil ne refroidit ou ne
réchauffe pas.
Le conditionneur d’air est
bruyant.
•
Avez-vous fait une erreur dans le fonctionnement du timer?
• Le fusible a sauté ou l’interrupteur automatique
s’est déclenché?
• Le commutateur d’alimentation est sur OFF?
L’unité est au début du fonctionnement de réchauffement?
•
Si oui, Hot-start est activé?
• L’unité est en situation d’élimination du givre?
Si oui, attendez que le dégivrage se termine.
• Contrôlez qu’il n’y ait pas d’odeur d’humidité
provenant des murs, des tapis, des meubles ou de
vêtements dans la pièce.
• La condensation se forme quand le flux d’air depuis le
conditionneur d’air refroidit l’air chaud de la pièce.
• C’est le système de protection du conditionneur d’air.
• Attendez environ 3 minutes et le fonctionnement reprend.
• Si le flux d’air commence avant que la température
devienne chaude, cela provoque un effet de
refroidissement non désiré. Pour éviter cela, le flux d’air
ne commencera pas avant qu’il ne soit suffisamment
chaud.
• Le filtre à air est-il sale? Voir les instructions de
nettoyage.
• La pièce a été très chaude quand le conditionneur
d’air a été allumé pour la première fois. Laissez-lui
le temps de refroidir.
• La température a-t-elle été mal réglée?
• Les ouvertures de ventilation d’entrée et de sortie
d’air sont-elles bloquées?
• Un bruit comme de l’eau qui coule.
-C’est le bruit du Fréon qui coule dans le
conditionneur d’air.
• Un bruit comme de l’air comprimé relâché dans
l’atmosphère.
-C’est le bruit de l’eau de déshumidification qui
avance dans le conditionneur d’air.
-
-
-
19
-
-
-
•
Cet appareil n’est pas prévu pour être utilisé par des personnes dont les
capacités physiques, sensorielles ou mentales sont réduites (dont les enfants),
ou présentant un manque d’expérience et de connaissance, à moins qu’elles
soient placées sous la surveillance ou l’instruction sur l’utilisation de l’appareil
d’une personne responsable de leur sécurité.
Les capacités sont basées sur les conditions T1.
20 Climatiseur de Type Posé au Sol
Page 61

P/No.: MFL63731602
 Loading...