

Page 1

Sprint PCS
®
The clear alternative to cellular.
SM
Page 2

© 2000 Sprint Spectrum L.P. All rights reserved. No reproduction in whole or in part without
prior written approval. Sprint, Sprint PCS, Sprint PCS Phone, Sprint PCS Wireless Web and the
diamond logo are trademarks of Sprint Communications Company L.P. All other trademarks
areproperty of their respective owners.
Printed in the U.S.A.
T able of Contents
Welcome to Sprint PCS . . . . . . . . . . . . . . . . . . . . . . . .11
1. Sprint PCS Service Basics . . . . . . . . . . . . . . . . . . . . . .13
Getting Started with Sprint PCS Service . . . . . . . . . . . . . . . . . . . . . . . . . . . . . .15
Setting up Your Voicemail . . . . . . . . . . . . . . . . . . . . . . . . . . . . . . . . . . . . . . . .14
Getting Help . . . . . . . . . . . . . . . . . . . . . . . . . . . . . . . . . . . . . . . . . . . . . . . . . .18
Understanding Differences Between Phone and Personal Information Manage-
ment Mode . . . . . . . . . . . . . . . . . . . . . . . . . . . . . . . . . . . . . . . . . . . . . . . . . . .22
Understanding this User Guide . . . . . . . . . . . . . . . . . . . . . . . . . . . . . . . . . . . .24
2. Getting to Know Your Sprint PCS Phone
TM
. . . . . . . .25
Front View of Phone — Flip Closed . . . . . . . . . . . . . . . . . . . . . . . . . . . . . . . .26
Front View of Phone — Flip Open . . . . . . . . . . . . . . . . . . . . . . . . . . . . . . . . .28
Understanding the Display Screen . . . . . . . . . . . . . . . . . . . . . . . . . . . . . . . . . .30
Navigating the Menus . . . . . . . . . . . . . . . . . . . . . . . . . . . . . . . . . . . . . . . . . . .31
Entering Information in Phone Mode . . . . . . . . . . . . . . . . . . . . . . . . . . . . . . .34
Entering Information in PIM Mode . . . . . . . . . . . . . . . . . . . . . . . . . . . . . . . .37
Turning Your Phone On and Off . . . . . . . . . . . . . . . . . . . . . . . . . . . . . . . . . . .39
Turning Your PIM System On and Off . . . . . . . . . . . . . . . . . . . . . . . . . . . . . . .40
Using the Battery . . . . . . . . . . . . . . . . . . . . . . . . . . . . . . . . . . . . . . . . . . . . . . .41
3. Understanding Roaming . . . . . . . . . . . . . . . . . . . . . . .45
Understanding How Roaming Works . . . . . . . . . . . . . . . . . . . . . . . . . . . . . . .46
Setting Your Phone’s Roam Mode . . . . . . . . . . . . . . . . . . . . . . . . . . . . . . . . . .47
Setting an Alert When Roam Charges Apply (Call Guard) . . . . . . . . . . . . . . .48
4. Making Calls . . . . . . . . . . . . . . . . . . . . . . . . . . . . . . . .51
Making Calls . . . . . . . . . . . . . . . . . . . . . . . . . . . . . . . . . . . . . . . . . . . . . . . . . .52
Correcting Dialing Mistakes . . . . . . . . . . . . . . . . . . . . . . . . . . . . . . . . . . . . . .52
Page 3

4 Learning the basis
Answering Calls . . . . . . . . . . . . . . . . . . . . . . . . . . . . . . . . . . . . . . . . . . . . . . . .52
Calling Emergency Numbers . . . . . . . . . . . . . . . . . . . . . . . . . . . . . . . . . . . . . .53
Dialing from an Internal Phone Book . . . . . . . . . . . . . . . . . . . . . . . . . . . . . .53
Using Abbreviated Dialing . . . . . . . . . . . . . . . . . . . . . . . . . . . . . . . . . . . . . . . .54
Adding a Phone Book . . . . . . . . . . . . . . . . . . . . . . . . . . . . . . . . . . . . . . . . . . .55
Using One-Touch/Two-Touch Dialing . . . . . . . . . . . . . . . . . . . . . . . . . . . . . . .55
Displaying Your Phone Number . . . . . . . . . . . . . . . . . . . . . . . . . . . . . . . . . . .58
5. Adjusting Tones . . . . . . . . . . . . . . . . . . . . . . . . . . . . . .59
Changing Audio Volume . . . . . . . . . . . . . . . . . . . . . . . . . . . . . . . . . . . . . . . . .60
Changing Ringer Type . . . . . . . . . . . . . . . . . . . . . . . . . . . . . . . . . . . . . . . . . .60
Changing Tone Length . . . . . . . . . . . . . . . . . . . . . . . . . . . . . . . . . . . . . . . . . .63
Silencing the Ringer . . . . . . . . . . . . . . . . . . . . . . . . . . . . . . . . . . . . . . . . . . . .64
Adjusting Volume During a Conversation . . . . . . . . . . . . . . . . . . . . . . . . . . . .64
Muting a Call . . . . . . . . . . . . . . . . . . . . . . . . . . . . . . . . . . . . . . . . . . . . . . . . .65
Using the Speakerphone . . . . . . . . . . . . . . . . . . . . . . . . . . . . . . . . . . . . . . . . .65
6. Managing Call History . . . . . . . . . . . . . . . . . . . . . . . . .67
Viewing the Call History List (Incoming and Outgoing) . . . . . . . . . . . . . . . . .68
Making a Call from the Call History List . . . . . . . . . . . . . . . . . . . . . . . . . . . . .70
Changing a Phone Number in the Call History List . . . . . . . . . . . . . . . . . . . .72
Viewing Call Details . . . . . . . . . . . . . . . . . . . . . . . . . . . . . . . . . . . . . . . . . . . . .73
Saving a Phone Number from the Call History List . . . . . . . . . . . . . . . . . . . . .75
Adding a Speed Dial Entry . . . . . . . . . . . . . . . . . . . . . . . . . . . . . . . . . . . . . . . .76
7. Using Sprint PCS Service Features . . . . . . . . . . . . . .79
Using Caller ID . . . . . . . . . . . . . . . . . . . . . . . . . . . . . . . . . . . . . . . . . . . . . . . .80
Responding to Call Waiting . . . . . . . . . . . . . . . . . . . . . . . . . . . . . . . . . . . . . . .81
Using Three-Way Calling . . . . . . . . . . . . . . . . . . . . . . . . . . . . . . . . . . . . . . . .82
Forwarding Your Calls . . . . . . . . . . . . . . . . . . . . . . . . . . . . . . . . . . . . . . . . . . .83
8. Managing Messaging . . . . . . . . . . . . . . . . . . . . . . . . .85
Setting up Voicemail . . . . . . . . . . . . . . . . . . . . . . . . . . . . . . . . . . . . . . . . . . . .86
Message Types . . . . . . . . . . . . . . . . . . . . . . . . . . . . . . . . . . . . . . . . . . . . . . . . .86
Knowing When You have Messages . . . . . . . . . . . . . . . . . . . . . . . . . . . . . . . . .88
Knowing When You have Sprint PCS Wireless Web and
Numeric Page Messages . . . . . . . . . . . . . . . . . . . . . . . . . . . . . . . . . . . . . . . . .88
Receiving Messages . . . . . . . . . . . . . . . . . . . . . . . . . . . . . . . . . . . . . . . . . . . . .89
Adding/Editing Folders . . . . . . . . . . . . . . . . . . . . . . . . . . . . . . . . . . . . . . . . . .94
Erasing Folders . . . . . . . . . . . . . . . . . . . . . . . . . . . . . . . . . . . . . . . . . . . . . . . .98
Erasing All Pager and Text Messages — Phone Mode . . . . . . . . . . . . . . . . . .99
Erasing All Pager and Text Messages — PIM Mode . . . . . . . . . . . . . . . . . . . .99
Using a Phone Other than Your Sprint PCS Phone
to Access Your Voicemail . . . . . . . . . . . . . . . . . . . . . . . . . . . . . . . . . . . . . . . .100
9. Using Your Internal Phone Book . . . . . . . . . . . . . . . .101
Viewing Phone Numbers . . . . . . . . . . . . . . . . . . . . . . . . . . . . . . . . . . . . . . . .102
Saving Phone Numbers . . . . . . . . . . . . . . . . . . . . . . . . . . . . . . . . . . . . . . . . .102
Adding a Voice Dial Entry . . . . . . . . . . . . . . . . . . . . . . . . . . . . . . . . . . . . . . .103
Making Phone Numbers Secret . . . . . . . . . . . . . . . . . . . . . . . . . . . . . . . . . . .104
Finding and Retrieving Numbers . . . . . . . . . . . . . . . . . . . . . . . . . . . . . . . . .105
Adding Alternate Phone Numbers to a Phone Book Entry . . . . . . . . . . . . . . .108
Erasing a Phone Book Entry . . . . . . . . . . . . . . . . . . . . . . . . . . . . . . . . . . . . .110
Erasing a Phone Book Entry’s Phone Number . . . . . . . . . . . . . . . . . . . . . . .111
Erasing All Contacts . . . . . . . . . . . . . . . . . . . . . . . . . . . . . . . . . . . . . . . . . . .112
Page 4

Listening to a Voice Dial Entry . . . . . . . . . . . . . . . . . . . . . . . . . . . . . . . . . . .113
Erasing a Voice Dial Entry . . . . . . . . . . . . . . . . . . . . . . . . . . . . . . . . . . . . . . .113
Setting an Alarm to Call a Contact . . . . . . . . . . . . . . . . . . . . . . . . . . . . . . . .114
Receiving Alarms . . . . . . . . . . . . . . . . . . . . . . . . . . . . . . . . . . . . . . . . . . . . . .116
Changing Stored Phone Numbers . . . . . . . . . . . . . . . . . . . . . . . . . . . . . . . . .117
Changing a Stored Name . . . . . . . . . . . . . . . . . . . . . . . . . . . . . . . . . . . . . . .119
Storing Special Numbers in the Phone Book . . . . . . . . . . . . . . . . . . . . . . . .120
Dialing from a Speed Dial Entry . . . . . . . . . . . . . . . . . . . . . . . . . . . . . . . . . .121
Dialing Using Abbreviated Dialing . . . . . . . . . . . . . . . . . . . . . . . . . . . . . . . .121
Changing a Speed Dial for a Phone Book Entry . . . . . . . . . . . . . . . . . . . . . .122
Changing the Ringer for a Phone Book Entry . . . . . . . . . . . . . . . . . . . . . . . .123
Adding a Prefix for a Phone Book Entry . . . . . . . . . . . . . . . . . . . . . . . . . . . .124
10. Changing Your Phone’s Display . . . . . . . . . . . . . . . .127
Changing the Backlight Time Length . . . . . . . . . . . . . . . . . . . . . . . . . . . . . .128
Changing Your Standby Mode Display Banner . . . . . . . . . . . . . . . . . . . . . . .129
Changing Your Phone’s Contrast . . . . . . . . . . . . . . . . . . . . . . . . . . . . . . . . . .130
11. Setting Your Phone’s Security . . . . . . . . . . . . . . . . .131
Using KeyGuard . . . . . . . . . . . . . . . . . . . . . . . . . . . . . . . . . . . . . . . . . . . . . . .132
Locking the Phone . . . . . . . . . . . . . . . . . . . . . . . . . . . . . . . . . . . . . . . . . . . .132
Unlocking the Phone . . . . . . . . . . . . . . . . . . . . . . . . . . . . . . . . . . . . . . . . . . .133
Restricting Your Calls . . . . . . . . . . . . . . . . . . . . . . . . . . . . . . . . . . . . . . . . . .134
Changing Your Lock Code . . . . . . . . . . . . . . . . . . . . . . . . . . . . . . . . . . . . . . .135
12. Setting Preferences . . . . . . . . . . . . . . . . . . . . . . . . . .137
Selecting an Environment . . . . . . . . . . . . . . . . . . . . . . . . . . . . . . . . . . . . . . .138
Changing Your Phone’s Environment . . . . . . . . . . . . . . . . . . . . . . . . . . . . . .139
Setting Sound Preferences . . . . . . . . . . . . . . . . . . . . . . . . . . . . . . . . . . . . . . .144
Setting Display Preferences . . . . . . . . . . . . . . . . . . . . . . . . . . . . . . . . . . . . . .149
Setting Security . . . . . . . . . . . . . . . . . . . . . . . . . . . . . . . . . . . . . . . . . . . . . . .151
Setting Up the Phone . . . . . . . . . . . . . . . . . . . . . . . . . . . . . . . . . . . . . . . . . . .156
Setting Roaming . . . . . . . . . . . . . . . . . . . . . . . . . . . . . . . . . . . . . . . . . . . . . .159
Setting Formats . . . . . . . . . . . . . . . . . . . . . . . . . . . . . . . . . . . . . . . . . . . . . . .161
Setting General Preferences . . . . . . . . . . . . . . . . . . . . . . . . . . . . . . . . . . . . . .163
Defining the Owner . . . . . . . . . . . . . . . . . . . . . . . . . . . . . . . . . . . . . . . . . . . .164
Configuring the Stylus . . . . . . . . . . . . . . . . . . . . . . . . . . . . . . . . . . . . . . . . . .165
13. Managing Contacts . . . . . . . . . . . . . . . . . . . . . . . . . .167
Adding Contacts . . . . . . . . . . . . . . . . . . . . . . . . . . . . . . . . . . . . . . . . . . . . . . .168
Looking Up Contacts . . . . . . . . . . . . . . . . . . . . . . . . . . . . . . . . . . . . . . . . . . .172
Finding Contacts . . . . . . . . . . . . . . . . . . . . . . . . . . . . . . . . . . . . . . . . . . . . . .173
Changing Contacts . . . . . . . . . . . . . . . . . . . . . . . . . . . . . . . . . . . . . . . . . . . .174
Erasing Contacts . . . . . . . . . . . . . . . . . . . . . . . . . . . . . . . . . . . . . . . . . . . . . .175
Editing Group Names . . . . . . . . . . . . . . . . . . . . . . . . . . . . . . . . . . . . . . . . . .176
14. Using the Date Book . . . . . . . . . . . . . . . . . . . . . . . . .177
Adding Appointments . . . . . . . . . . . . . . . . . . . . . . . . . . . . . . . . . . . . . . . . . .178
Changing the Date Book View . . . . . . . . . . . . . . . . . . . . . . . . . . . . . . . . . . . .184
Finding a Date Book Entry . . . . . . . . . . . . . . . . . . . . . . . . . . . . . . . . . . . . . .186
Erasing a Date Book Entry . . . . . . . . . . . . . . . . . . . . . . . . . . . . . . . . . . . . . .187
15. Using the To Do List . . . . . . . . . . . . . . . . . . . . . . . . .189
Adding a Task to the To Do List . . . . . . . . . . . . . . . . . . . . . . . . . . . . . . . . . . .190
Changing a Task . . . . . . . . . . . . . . . . . . . . . . . . . . . . . . . . . . . . . . . . . . . . . .191
Completing a Task . . . . . . . . . . . . . . . . . . . . . . . . . . . . . . . . . . . . . . . . . . . . .192
Page 5

21. Experiencing the Sprint PCS Wireless Web . . . . . . .213
The Sprint PCS Wireless Web Browser . . . . . . . . . . . . . . . . . . . . . . . . . . . . . .214
Launching the Sprint PCS Wireless Web Browser . . . . . . . . . . . . . . . . . . . . .215
Using the Sprint PCS Wireless Web Browser . . . . . . . . . . . . . . . . . . . . . . . . .218
Going to a Wireless Web Site . . . . . . . . . . . . . . . . . . . . . . . . . . . . . . . . . . . . .221
Going Back . . . . . . . . . . . . . . . . . . . . . . . . . . . . . . . . . . . . . . . . . . . . . . . . . .222
The Browser Menu . . . . . . . . . . . . . . . . . . . . . . . . . . . . . . . . . . . . . . . . . . . . .227
Troubleshooting . . . . . . . . . . . . . . . . . . . . . . . . . . . . . . . . . . . . . . . . . . . . . .229
The Sprint PCS Wireless Connection . . . . . . . . . . . . . . . . . . . . . . . . . . . . . . .232
Sprint PCS Wireless Web Updates . . . . . . . . . . . . . . . . . . . . . . . . . . . . . . . . . .234
22. Learning the Settings on Your Sprint PCS Phone . .237
Viewing the Menus . . . . . . . . . . . . . . . . . . . . . . . . . . . . . . . . . . . . . . . . . . . .238
Working within the Menu Structure . . . . . . . . . . . . . . . . . . . . . . . . . . . . . . .241
About the Menu Categories . . . . . . . . . . . . . . . . . . . . . . . . . . . . . . . . . . . . . .242
23. Selecting Your Accessories . . . . . . . . . . . . . . . . . . . .253
Accessory Options . . . . . . . . . . . . . . . . . . . . . . . . . . . . . . . . . . . . . . . . . . . . . .254
How to Order . . . . . . . . . . . . . . . . . . . . . . . . . . . . . . . . . . . . . . . . . . . . . . . . .256
24. Knowing Performance and Safety Guidelines . . . . .257
Getting the Most Out of Your Reception . . . . . . . . . . . . . . . . . . . . . . . . . . . .258
Maintaining Safe Use and Access to Your Phone . . . . . . . . . . . . . . . . . . . . . .261
Caring for Your Battery . . . . . . . . . . . . . . . . . . . . . . . . . . . . . . . . . . . . . . . . .265
Acknowledging Special Precautions and the FCC Notice . . . . . . . . . . . . . . . .267
25. Index . . . . . . . . . . . . . . . . . . . . . . . . . . . . . . . . . . . . . .271
Finding a Task . . . . . . . . . . . . . . . . . . . . . . . . . . . . . . . . . . . . . . . . . . . . . . . .193
Viewing Tasks . . . . . . . . . . . . . . . . . . . . . . . . . . . . . . . . . . . . . . . . . . . . . . . .194
Erasing a Task . . . . . . . . . . . . . . . . . . . . . . . . . . . . . . . . . . . . . . . . . . . . . . . .194
16. Using the Calculator . . . . . . . . . . . . . . . . . . . . . . . . .195
Performing Simple Calculations . . . . . . . . . . . . . . . . . . . . . . . . . . . . . . . . . .196
Working with Numbers Stored in Memory . . . . . . . . . . . . . . . . . . . . . . . . . .196
17. Using Memo Pad . . . . . . . . . . . . . . . . . . . . . . . . . . . .197
Adding or Changing a Memo . . . . . . . . . . . . . . . . . . . . . . . . . . . . . . . . . . . .198
Finding a Memo . . . . . . . . . . . . . . . . . . . . . . . . . . . . . . . . . . . . . . . . . . . . . .199
Erasing a Memo . . . . . . . . . . . . . . . . . . . . . . . . . . . . . . . . . . . . . . . . . . . . . .199
18. Using Sketch Pad . . . . . . . . . . . . . . . . . . . . . . . . . . .201
Creating a New Sketch . . . . . . . . . . . . . . . . . . . . . . . . . . . . . . . . . . . . . . . . . .202
Naming or Renaming a Sketch . . . . . . . . . . . . . . . . . . . . . . . . . . . . . . . . . . .202
Adding Text to a Sketch . . . . . . . . . . . . . . . . . . . . . . . . . . . . . . . . . . . . . . . . .203
Drawing Lines . . . . . . . . . . . . . . . . . . . . . . . . . . . . . . . . . . . . . . . . . . . . . . . .204
Drawing Rectangles or Squares . . . . . . . . . . . . . . . . . . . . . . . . . . . . . . . . . . .204
Erasing Parts of a Sketch . . . . . . . . . . . . . . . . . . . . . . . . . . . . . . . . . . . . . . . .205
Zooming In and Out of a Sketch . . . . . . . . . . . . . . . . . . . . . . . . . . . . . . . . . .205
Erasing a Sketch . . . . . . . . . . . . . . . . . . . . . . . . . . . . . . . . . . . . . . . . . . . . . .205
19. Using the World Clock . . . . . . . . . . . . . . . . . . . . . . .207
Viewing a Different City’s Time . . . . . . . . . . . . . . . . . . . . . . . . . . . . . . . . . . .208
20. Syncing to Your PC . . . . . . . . . . . . . . . . . . . . . . . . . .209
Connecting to Your PC . . . . . . . . . . . . . . . . . . . . . . . . . . . . . . . . . . . . . . . . .210
Syncing to Your PC . . . . . . . . . . . . . . . . . . . . . . . . . . . . . . . . . . . . . . . . . . . .211
Page 6

Welcome to
Sprint PCS
S
print PCS built the only all-digital, all-PCS nationwide network from the
ground up for clearer calls, serving more than 300 major metropolitan areas.
We built our network to give you what we believe you really want from a wireless
phone: clear sound, private conversations and time-saving features.
And Sprint Personal Communications Services®can do something even more
far -reaching – simplify your life. Our advanced technology is designed to grow with
your communications needs so that one day , you’ll be able to rely entirely on your
Sprint PCS PhoneTMto stay connected.
This guide will introduce you to our technology and your new Sprint PCS Phone
through simple, easy-to-follow instructions. Since you’re probably anxious to start
using your phone, we encourage you to immediately flip to Section One – Getting
Started With Sprint PCS Service. This section provides all the information you need
to quickly activate your phone, set up your voicemail and much more. It also
contains information on how to contact Sprint PCS should you have questions
about service, want to purchase additional products or services, or just check your
account balance.
Thank you for choosing Sprint PCS.
Basic Functions 11
Page 7

1
Sprint PCS Service Basics
In This Section
Activating Your Phone
Setting up Your V oicemail
Getting Help
Receiving Automated Billing Information
Understanding Phone and Personal Information
Management Mode
Understanding this User Guide
T
his section walks you through the step-by-step basics of setting up
service to
your Sprint PCS PhoneTM, including activating or unlocking
your phone,
selecting your Sprint PCS Service Plan, receiving your new Sprint PCS Phone
Number and setting up your voicemail.
Once you have completed this section, you’re ready to explore the advanced
features of your new phone.
1
Sprint PCS Ser-
vice Basics
Getting Started with Sprint PCS Service 1312 Basic Functions
Page 8

Getting Started with Sprint PCS Service 15
Activating Your Phone
There are two ways to activate your phone. Follow
these steps:
The fastest way is to call from your new
Sprint PCS Phone
TM
.
1. Fully charge your battery (see instructions on
page 41).
2. T urn on your Sprint PCS Phone.
3. Press to reach a
Sprint PCS Customer Advocate. You must be in a
Sprint PCS Service Area when making this call.
The other way is to call
Sprint PCS Customer Care from any phone other
than your new Sprint PCS Phone (which isn’t
yet activated).
Call us toll-free at 1-888-715-4588.
During this call you will be guided through the
activation process. The call typically takes
approximately 30 minutes, but could be longer
during peak times. You can streamline the process by
reviewing the Clear and Simple Facts brochure and
pre-selecting your Sprint PCS Service Plan.
Note:
The activation
process varies in
certain Affiliate
areas.
1
Sprint PCS Ser-
vice Basics
14 Getting Started with Sprint PCS Service
Getting Started with
Sprint PCS Service
Determine if Your Phone is Already Activated
If you received your phone in the mail or purchased
it at a Sprint PCS Center , your phone is probably
already activated. All you need to do is unlock
your phone.
Unlocking Your Phone
Follow these steps to unlock your phone:
1. T urn your phone on by pressing for
approximately two seconds.
2. Enteryour lock code. For security purposes, the
code is not visible as you type.
Tip:
If you can’t recall
your lock code, try
using the last four
digits of either your
Social Security
number or
Sprint PCS Phone
Number or try 0000.
If none of these
work, call Sprint
PCS Customer Care
at 1-888-211-4PCS
(4727).
Page 9

Getting Started with Sprint PCS Service 17
Setting Up Y our Voicemail
All unanswered calls to your Sprint PCS Phone are
automatically transferred to voicemail, even if your
phone is off or in use. And don’t worry about missing
important messages before setting up your
Sprint PCS voicemail box. Voicemail works with a
generic greeting even without setup.
To set up your personal greeting:
1. Press and hold .
2. Follow the system prompts to create your
passcode, record your greeting, record your name
announcement and choose whether to activate
One-Touch Message Access (a feature that lets
you press one key to access messages and bypasses
the need for you to enter your passcode).
For more information on accessing voicemail
messages, see “Receiving Messages”on page 89.
Note:
The voicemail
setup process may
vary in certain Affiliate areas.
1
Sprint PCS Ser-
vice Basics
16 Getting Started with Sprint PCS Service
What you Should have Handy
When you Call:
Your new Sprint PCS Phone
The original packaging from your phone
Your Social Security number or
Tax ID number
Your driver’ s license number
Pen and paper to write down your new Sprint PCS
Phone Number
Page 10

Getting Started with Sprint PCS Service 19
Sprint PCS Customer Care
Sprint PCS Customer Advocates are available to
assist you 24 hours a day , seven days a week. You
can reach Customer Care by three methods:
Dial 1-888-211-4PCS (4727) and press
.
or
Press
from your
activated Sprint PCS Phone while on the
Sprint PCS Nationwide Network.
or
1. From the main menu, highlight Phone Book
and press .
2. Highlight Servicesand press .
3. Press
to select Customer Care.
4. Press
to place the call.
Once you dial Sprint PCS Customer Care, you can
access a number of helpful account services through
our automated Customer Care line. By following the
voice prompts, you’ll learn more about Sprint PCS
Products and Services, get Sprint PCS coverage by
ZIP code or request a copy of your invoice.
Sprint PCS Directory Assistance
Sprint PCS Directory Assistance provides a variety of
services, including: residential, business and
government listings; assistance with local or
long-distance calls; movie listings; hotel, restaurant
and shopping information and major local event
Tip:
If you need to
reach
Customer Care
while you
are off
the Sprint PCS
Network, dial
1-888-211-4PCS
(4727).
1
Sprint PCS Ser-
vice Basics
18 Getting Started with Sprint PCS Service
Getting Help
In addition to the methods of getting help outlined
in the following sections, you can also find
information and interactive demos on your
Sprint PCS Phone.
Visit our Web Site
Stop by www .sprintpcs.com to get up-to-date
information on Sprint PCS. You can also:
Review coverage maps
Learn how to use voicemail
Access your customer account
Purchase accessories
Add additional options to your service plan
Check out frequently asked questions
And much more
Page 11

Getting Started with Sprint PCS Service 21
Sprint PCS Operator Services
Sprint PCS Operator Services can provide assistance
in placing collect calls or calls billed to a local
telephone calling card or a third party .
Press
.
For more information or to see the latest in products
and services, visit us online at www .sprintpcs.com.
1
Sprint PCS Ser-
vice Basics
20 Getting Started with Sprint PCS Service
information. There is a per call charge and you are
billed for airtime.
Press
.
or
1. From the main menu, highlight Phone Book
and press .
2. Highlight Servicesand press .
3. Highlight Directory Assistanceand press
.
4. Press to place the call.
Page 12

Getting Started with Sprint PCS Service 23
Understanding Differences
Between Phone and Personal
Information Management Mode
Your Sprint PCS Phone contains two different
modes that you can use.
When the flip is closed, the phone is in Phone mode.
From this mode, you can make calls, manage your
phone book, place or view calls logged in your call
history , and set preferences.
When the flip is open, the phone is in Personal
Information Management (PIM) mode. This mode
includes all the same features as are available in
Phone mode, plus extra features like Date Book,
To Do List, Memo Pad, and Sketch Pad. PIM mode
helps you manage your time more effectively .
1
Sprint PCS Ser-
vice Basics
22 Getting Started with Sprint PCS Service
Receiving Automated Billing Information
For your convenience, your phone gives you free
access to billing information on your Sprint PCS
Account. This information includes balance due,
payment received, billing cycle and the amount of
minutes used since your last billing cycle. Follow
these steps to access this information:
1. Press
.
2. Follow the voice prompts to receive the
information you want.
or
1. From the main menu, highlight Phone Book
and press .
2. Highlight Servicesand press .
3. Highlight Account Infoand press
.
4. Press to place the call.
Page 13

2
Getting to Know
Your Phone
Getting to Know Your Sprint PCS Phone 25
2
Getting to Know
Your Sprint PCS Phone
TM
In This Section
Viewing the Display Screen
Navigating the Menus
Entering Information in Phone Mode
Entering Information in PIM Mode
T urning Your Phone ON and OFF
T urning PIM System ON and OFF
Using the Battery
Y
our Sprint PCS Phone is packed with features that can simplify your life and
expand your ability to stay connected to the people and information that are
important to you. We know that you’re anxious to start using it, so this section will
give you a quick introduction to your new phone. Easy-to-follow instructions will
guide you through the basics of the most common features of your phone and
you’ll be on your way to using it in no time.
Don’t forget the other chapters in this guide. They’re filled with information
about the capabilities and benefits of your new Sprint PCS Phone. They include
detailed step-by-step instructions to familiarize you with all the features, and how
to customize your phone to meet your specific needs.
24 Getting Started with Sprint PCS Service
Understanding this User Guide
This user guide introduces you to our technology
and all the advantages of your new Sprint PCS
Phone through easy-to-follow instructions.
Sections breakdown categories of information
to progressively take you all the way from
learning the basics to using the most advanced
phone features.
Tips highlight special shortcuts and timely
reminders to help you make the most of your
new phone.
The Index helps you find specific information
quickly.
We know that your time is valuable and that’ s why
we’ve designed this guide to be used in a building
block format or in stand-alone sections. You’ll get
the most out of your phone if you read each section.
However , if you’d like to get right to a specific
feature, you’ll be able to locate the specific section
through color coded tabbing. Follow the
instructions in that section and you’ll be ready to
use your phone in no time.
Page 14
Getting to Know Your Sprint PCS Phone 2726 Getting to Know Your Sprint PCS Phone
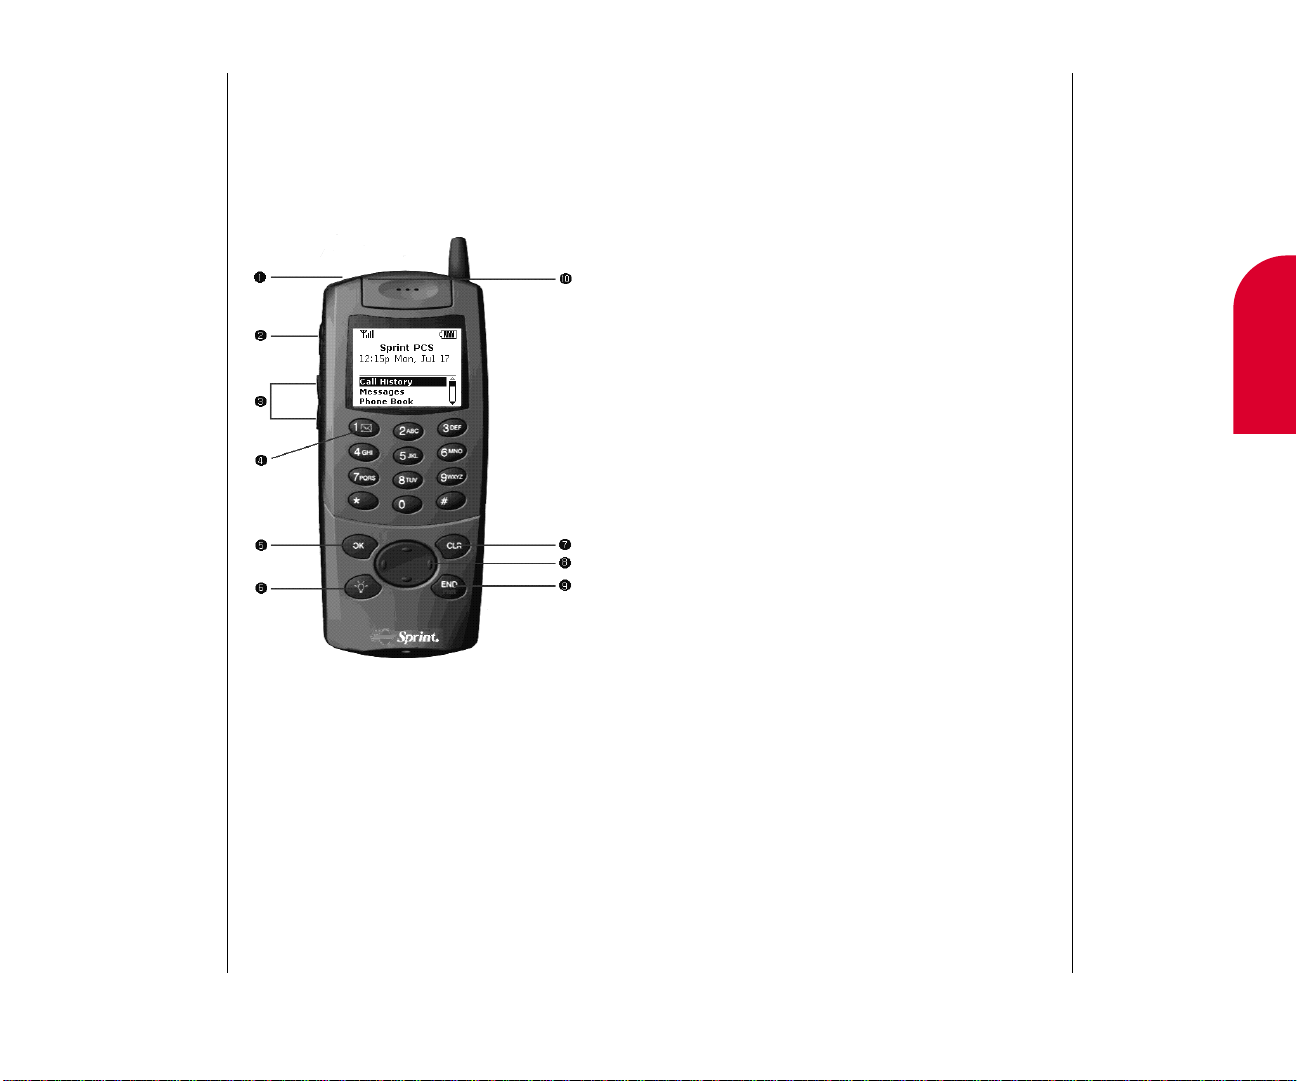
4. Message Button: Press and hold to access
your voicemail box and listen to your messages.
5. OK Key: Completes an entry, accepts and saves
any information you enter into one of the
applications, such as Phone Book, or selects a
menu item.
6. Web Key:Press to launch the Sprint PCS
Wireless Web Browser . For more information on
the Sprint PCS Wireless Web, see “Experiencing
the Sprint PCS Wireless Web” on page 213.
7. CLR Key: Use to correct mistakes. To erase one
character at a time, press it once. To erase all
characters, press and hold it until all the
characters are erased. You may also use this key to
go back one menu level.
8. Rocker Key:Use to navigate the menus on the
display . For more information on using the rocker
key , see page 31.
9. END/PWR Key: Use to end a call, return to
the main menu or press and hold to turn the
phone off.
10. Call Indicator Light: Notifies you of an
incoming call when the light flashes red.
Front View of Phone — Flip Closed
When your Sprint PCS Phone’s flip is closed, it looks
like a regular phone with some special features.
Please refer to the callouts and related text below to
view descriptions of each special feature.
1. Stylus Pen: Use when the flip is open to
navigate the menu system and enter data in
Personal Information Management (PIM) mode.
The stylus is located on the back of the phone. To
remove it, slide it up and out of the slot it fits into.
2. Headset Jack: Use to plug in a headset.
3. Volume Control: Use to increase or decrease
volume during a call when the flip is closed or
modify the contrast of the phone when the flip
is open.
2
Getting to Know
Your Phone
Page 15
Getting to Know Your Sprint PCS Phone 29
2
Getting to Know
Your Phone
28 Getting to Know Your Sprint PCS Phone
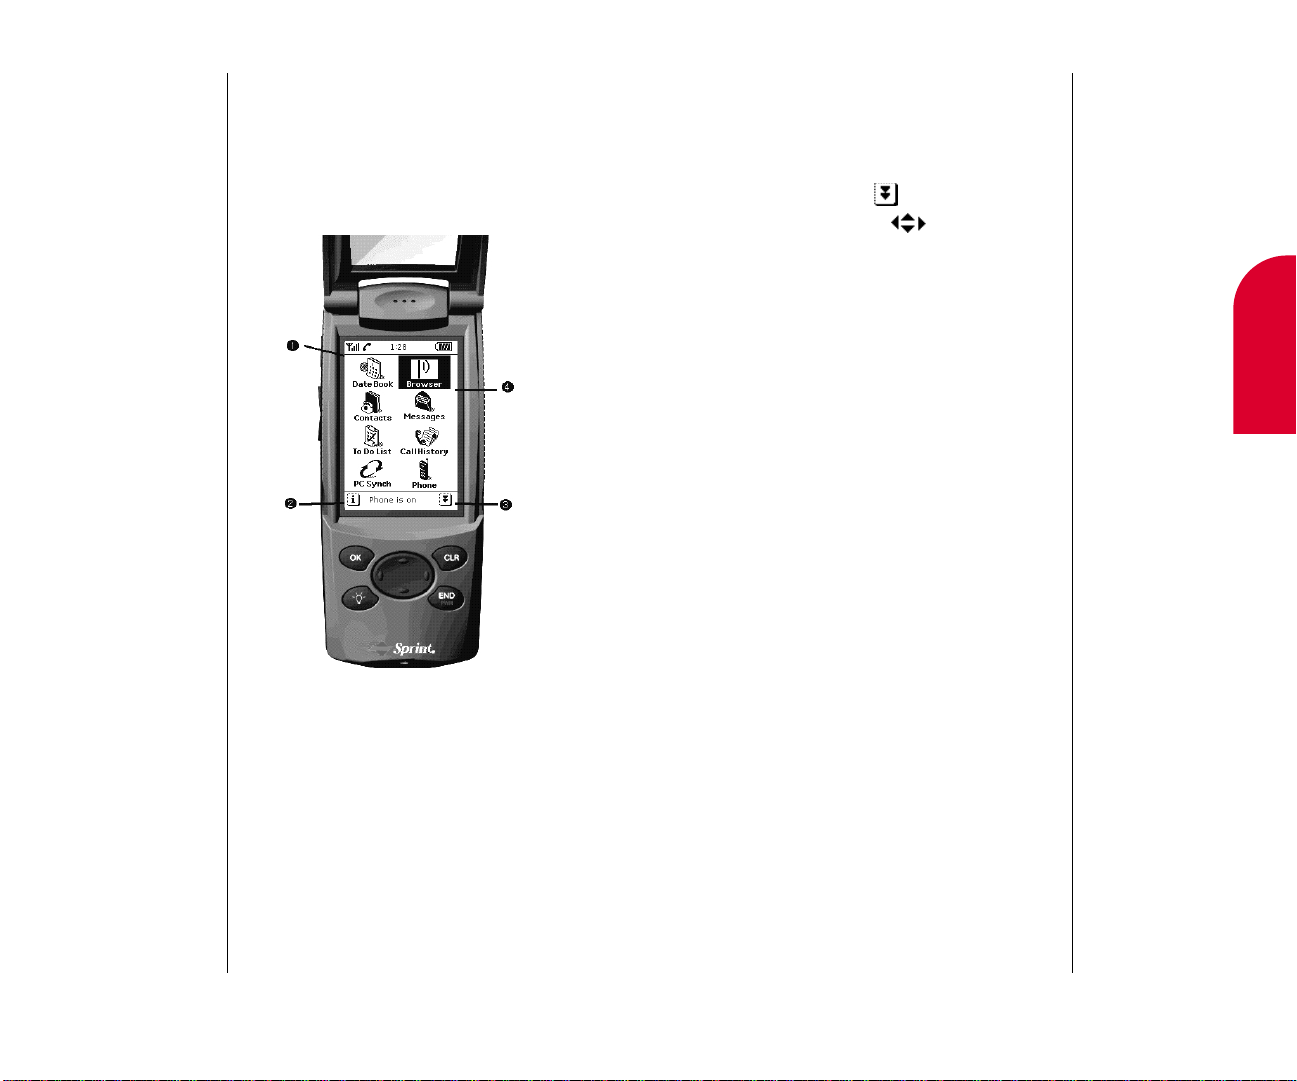
2. Information: Use to learn who to call or send
the phone to if it has been lost. This screen also has
important information about status when the
phone is off.
3. Scroll Key: Use to scroll up and down in
the main menu. Use to scroll up and
down or left and right through a screen.
4. Main Menu: Contains all the applications
available in PIM mode.
Front View of Phone — Flip Open
When your Sprint PCS Phone’s flip is open, it offers
you all kinds of data management tools and
features. Please refer to the callouts and related text
below to view descriptions of each special feature.
1. Touch Screen: Use to navigate and enter
information in conjunction with the stylus pen by
tapping menus and options. For more
information on using the touch screen, see
page 32.
Page 16

Getting to Know Your Sprint PCS Phone 31
2
Getting to Know
Your Phone
30 Getting to Know Your Sprint PCS Phone
Tip:
Display indicators
let you know
when you’re off
the Sprint PCS
Nationwide Network and whether
you’re operating in
digital mode.
Navigating the Menus
Depending on whether the phone flip is open or
closed, the method you use to navigate screens and
enter information is different. To navigate when
the flip is closed, use the rocker key . To navigate
when the flip is open, use the touch screen or the
rocker key .
Using the Rocker Key
When the flip on your phone is closed, you can use
the rocker key to navigate through menus.
To move down through a menu, press the down
arrow on the rocker key .
To move up through a menu, press the up arrow
on the rocker key .
Use the left and right arrows to move from record
to record.
To select the highlighted item, press .
Tip:
You can also use
the rocker key to
navigate the menu
system when the
phone’s flip is open.
Understanding the Display Screen
This list identifies some of the more common
symbols you’ll see on your display screen.
shows your current signal strength. The
more lines you have, the stronger your signal.
means your phone cannot find a signal or it
is off and the flip is open.
tells you a call is in progress.
means your phone is in vibrate mode.
indicates you are “roaming” off the
Sprint PCS Nationwide Network.
indicates you have voicemail messages
waiting. Press and hold to hear your
message.
indicates you have Sprint PCS Wireless
Web messages waiting. Scroll to Messages
and press to see your message.
Keyguardlets you know the keyguard is on,
which avoids accidental key presses. Scroll to
Keyguardand press to activate
keyguard. Press and hold to turn
keyguard off.
Page 17

Getting to Know Your Sprint PCS Phone 33
2
Getting to Know
Your Phone
32 Getting to Know Your Sprint PCS Phone
Using the Buttons on the Bottom of the
PIM Screen
There are threee buttons that appear on most
screens. These buttons can be used to navigate
between applications, select menu options, or
indicate that you are done with a screen.
They include:
Action: T ap to show the various menu options
that you can perform from the current screen.
Go T o: Tap to go to a different application or to go
back to the Home screen that lists all applications.
Done: T ap to indicate you are done with a screen
and that changes should be saved. The previously
displayed screen or menu will appear.
Scrolling
Sometimes you may need to scroll up or down a
screen while in PIM mode. To scroll within an
application:
Tap the down and up arrows on the navigation
icon to move up or down a screen. T ap the
side arrows to move between records.
Using the Touch Screen
When the flip is open, you can use your stylus pen to
select menus or enter text.
To select a menu, tap it.
To enter a new field, tap it to show the onscreen
keyboard. Then tap the letters you want to add,
and tap Donewhen you are done.
Page 18

Getting to Know Your Sprint PCS Phone 35
Punctuating Names
You can use any of the nine punctuation characters
whenever you’re storing or editing Phone Book
memory locations. This includes —“ . ’, & ( ) and :.
To use punctuation:
1. Press to add a period. Pressing a key
repeatedly changes the punctuation mark in the
flashing cursor position on the screen.
For instance, to enter a question mark, press
twice.
To add an apostrophe, press four times.
If you accidentally pass the punctuation
mark you want, keep pressing the key until it
cycles back.
2
Getting to Know
Your Phone
34 Getting to Know Your Sprint PCS Phone
Entering Information in Phone Mode
Entering Names
To enter a name when the flip is closed, follow the
steps outlined below:
1. Press the key labeled with the letter you want.
Pressing a key repeatedly changes the letter or
number in the flashing cursor position on
the screen.
For instance, to enter the letter G, press
one time.
To enter the letter H, press a second
time. If you accidentally pass the letter you
want, keep pressing the key until it cycles back.
To move the cursor forward, press or
wait two seconds. Placing an empty space
after the last name automatically inserts a
comma. You can add a space by pressing
. Press to correct any
mistakes.
Page 19

36 Getting to Know Your Sprint PCS Phone
Changing Case Name During Entry
By default, only the first letter in a word is capitalized.
If you’d like to change a letter to a different case:
1. Repeatedly press the key associated with the letter
you want to add. The second time you see the
letter , the case will be changed.
For instance, to enter a lowercase letter g as the
first letter of a word, press five times.
Getting to Know Your Sprint PCS Phone 37
Entering Information in PIM Mode
Using the Onscreen Keyboard
You can use the onscreen keyboard to enter text or
numbers into applications like Memo Pad or
Contacts.
T o use your onscreen keyboard:
1. Open any application that requires entering text
or numbers (such as To Do List).
2. Tap any record or tap Actionand then New.
The record displays.
3. Tap the text field. The keyboard displays.
4. Tap the letters you want to add in the entry .
T o switch to ALL CAP letters:
Tap .
T o capitalize the next letter:
Tap .
T o switch to numeric and special
characters (such as ?,#, or @):
Tap .
T o insert a tab:
Tap .
T o insert a paragraph return:
Tap .
2
Getting to Know
Your Phone
Page 20

Getting to Know Your Sprint PCS Phone 39
T urning Your Phone ON and OFF
Turning Your Phone ON
Press for approximately two seconds.
Once your phone is ON, it displays “Searching for
Service” while your phone looks for a signal.
When your phone finds a signal, it automatically
enters Standby mode – the phone’s idle state. At
this point, you're ready to begin making and
receiving calls.
If your phone is unable to find a signal after 15
minutes of searching, a Power Save feature is
automatically activated. When a signal is found,
your phone returns to Standby mode.
Your phone searches for a signal periodically
without your intervention. You can also initiate
a
search for Sprint PCS Service by pressing any key
(when your phone is turned ON).
Tip:
The Power Save
feature helps to
conserve your
battery power while
outside a
Sprint PCS
Service Area.
Tip:
You can use your
Date Book, Contacts,
Memo Pad, Sketch
Pad, and other
applications while
the phone is off by
opening the flip.
However, the phone
cannot make or
receive calls
.
2
Getting to Know
Your Phone
38 Getting to Know Your Sprint PCS Phone
T o erase characters:
Tap .
T o insert a space:
Tap .
5. Tap Doneafter inserting all the characters.
Copying and Pasting Text
You can copy text from one keyboard to another . T o
do so:
1. From the keyboard in which you want to copy
text, highlight the desired text you want to copy
by dragging the stylus over the text.
2. Tap Menu.
3. Tap Copy.
To paste the text:
1. Go to the menu and keyboard in which you want
to paste text.
2. Tap the stylus where you want the text.
3. Tap Menu.
4. Tap Paste.
Page 21

Getting to Know Your Sprint PCS Phone 41
Using the Battery
Installing the Battery
Your Sprint PCS Phone comes with a Lilon
(1300mAh) battery . To insert the battery:
1. Place the contacts on the inside of the battery and
the phone together .
2. Gently press down on the top of the battery until it
snaps in place.
Removing the Battery
To remove your battery:
Slide the battery release latch towards the top of
the phone while lifting the battery from the sides.
Tip:
Be sure to charge
your phone’s
battery and watch
your indicator
to ensure your
battery level is OK.
2
Getting to Know
Your Phone
40 Getting to Know Your Sprint PCS Phone
Turning Your Phone OFF
Press for two seconds until you see
“Powering Down” on the display .
Your screen remains blank while your phone is
off, unless you’re charging the battery or you
open the flip.
T urning Your PIM System ON
and OFF
To turn your PIM System ON:
Open the cover of the phone.
To turn your PIM System OFF:
Close the cover of the phone.
Page 22

Getting to Know Your Sprint PCS Phone 43
Using the Desktop Charger or
Adapter Charger
1.
Plug one end of the AC adapter into the charger
holder and the other end into the electrical outlet.
2. Insert the phone with the battery installed into
the slot.
A red lighton the charger lets you know the
battery is charging.
A green lightlets you know that the battery is at
least 90 percent charged. It is safe to remove and
use your phone at this point.
It generally takes about 2.5hours to fully recharge a
completely run-down battery . With the Lilon
(1300mAh) battery , it is okay to recharge the battery
before it becomes completely run down.
42 Getting to Know Your Sprint PCS Phone
Charging the Battery
Your Sprint PCS Phone comes with a rechargable
battery . You should charge the battery as soon as
possible so you can begin using your phone.
Keeping track of your battery’s charge is important.
If your battery level becomes too low , your phone
automatically turns off. To check your phone’ s
battery level, look at the battery charge indicator
located in the upper -right corner of your phone’s
display screen . Fewer bars mean less charge.
If the battery charge gets too low , the phone sounds a
warning tone and displays a message.
Always use the manufacturer-approved Desktop
Charger , Travel Charger or
Cigarette Lighter Adapter to
charge your battery .
Tip:
You can charge
your battery while
it is in the phone
and make calls
while doing so.
Warning!
Using the wrong
battery charger
could cause
damage to your
phone and void the
warranty.
2
Getting to Know
Your Phone
Page 23

44 Getting to Know Your Sprint PCS Phone
3
Understanding
Roaming
Understanding Roaming 45
3
Understanding Roaming
In This Section
Understanding the Difference Between Roaming and
Sprint PCS Calls
Setting Your Phone’s Roaming Mode
Setting Call Guard
R
oaming is the ability to make or receive calls while you’re off the Sprint PCS
Nationwide Network. Your new Sprint PCS PhoneTMworks anywhere on the
Sprint PCSNationwide Network and allows you to roam digital networks.
This section explains how roaming works as well as special features that let you
manage your roaming experience.
Page 24

3
Understanding
Raoming
Understanding Roaming 47
Setting Y our Phone’s Roam Mode
Your Sprint PCS Phone allows you to control your
ability to roam. By using the Setup menu option,
you determine which signals your phone accepts.
Set Mode
Choose from two different settings on your phone
to control your roaming experience:
1. From the main menu, highlight Setupand
press .
2. HighlightRoamingand press .
3. Highlight Set Modeand press .
4. Highlight an option and press .
Options are:
Automatic: This setting seeks Sprint PCS
Service. When Sprint PCS Service is unavailable,
it searches for an alternative system.
Sprint PCS: This setting allows you to select
only theSprint PCS Nationwide Network and
prevents roaming on other networks.
46 Understanding Roaming
Understanding How Roaming Works
Recognizing Icons on the Display Screen
Your phone’ s display screen lets you know when
you’re off the Sprint PCS Network.
Roaming on Other PCS CDMA Networks
When you’re roaming on other PCS CDMA networks,
your call quality will be similar to the quality you
receive when making calls while on the Sprint PCS
Network. You may not be able to access certain
calling features, such as Sprint PCS Wireless Web,
however , all of your calls are still private and secure.
Your air time charges may be higher for
roaming calls.
Page 25

3
Understanding
Roaming
Understanding Roaming 49
To Place Roaming Calls with
Call Guard On:
1. From the main menu, dial
1 + area code + the seven-digit number .
2. Highlight Roaming Calland press .
To Answer Incoming Roaming Calls
with Call Guard On:
From the main menu, highlight Answerand
press .
48 Understanding Roaming
Setting an Alert When Roam
Charges Apply (Call Guard)
In addition to the roaming icon, call guard alerts
you when roaming charges apply . The following
settings apply to Call Guard.
Call Guard
This feature requires you to take additional steps
before placing or answering a roaming call. These
additional steps are not required when you make
or receive calls while on the Sprint PCS Nationwide Network.
To turn Call Guard on/off:
1. From the main menu, highlight Setupand
press .
2. Highlight Roamingand press .
3. Highlight Call Guardand press .
A message displays notifying you that an extra
step is required when Call Guard is on.
4. HighlightOnor Offand press .
Page 26

Making Calls 51
Making Calls
4
4
Making Calls
In This Section
Making Calls
Correcting Dialing Mistakes
Answering Calls
Calling Emergency Numbers
Dialing from an Internal Phone Book Memory Location
Using Abbreviated Dialing
Using One-Touch/T wo-Touch Dialing (Speed Dial)
Displaying Your Phone Number
Y
our Sprint PCS PhoneTMgives you different options for making calls so that
you can use the method that works best for you. Once you learn the basics
here, the possibilities are endless.
Making Call
50 Understanding Roaming
Page 27

Making Calls 53
Making Calls
52 Making Calls
4
Calling Emergency Numbers
You can place calls to 911,
(dial and press )
even if your keypad is locked or your account is
restricted, just as long as you are in a
Sprint PCS Service Area.
Dialing from the Internal
Phone Book
To dial directly from an Internal Phone Book
memory location:
1. From the main menu, highlight Phone Book
and press .
2. Highlight the Phone Book entry you want to call
and press .
3. Press again to place the call.
Making Calls
1. Make sure your phone is on.
2. Dial the phone number and press .
3. When you’re finished, press .
Correcting Dialing Mistakes
If you make a mistake while dialing, press
to erase one digit at a time. Or, if you need to erase the
entire number all at once, press and hold for
at least one second.
Answering Calls
1.
Make sure your phone is on. If your phone is off,
incoming calls go to voicemail.
2. When your phone rings, press .
3. To disconnect the call, press .
Tip:
When making calls
off
the Sprint PCS
Network,
always
dial using 11 digits
(1 + area code +
number).
Tip:
If Any Key Answer
is turned on, you
can press any key to
answer a call. For
more information on
setting up Any Key
Answer, see “Setting
Up the Phone” on
page 156
.
Making Calls
Page 28

Making Calls 55
Making Calls
54 Making Calls
Note:
If Abbreviated Dialing is set up and you
dial a number that
contains the same
last four digits as a
phone number in
your phone book,
you will get a
choice of which
number to dial
.
Using Abbreviated Dialing
Abbreviated dialing allows you to make a call by
dialing either the last four -digits or last five-digits of
a phone number .
There are two types of 4-digit calling:
Dial the last four 4 digits of a phone number in
your phone book. No setup is required.
Dial the last 4 digits of a phone number in which
you specify the first 6 digits in Abbreviated
Dialing. Setup of Abbreviated Dialing is required.
To set up abbreviated dialing, see “Abbreviated
Dialing” on page 158. To place a call using
abbreviated calling:
1. Enter either the last four or last five digits of the
phone number you want to call and press
.
Tip:
You can save a
phone number
without a name
.
4
Making Calls
Using One-T ouch/
T wo-T ouch Dialing
With this feature, you can dial Phone Book entries
through one key press for locations 2-9or two key
presses for locations 10-99. To use this feature, there
must be phone numbers in your phone book.
Adding a Phone Book Entry
To add a phone number and associated name to
your phone book:
1. From the main menu, highlight Phone Book
and press .
2. Highlight Add New Entryand press .
3. Enter the last name of the person to correspond
with the phone number (up to 16 characters).
Adding a Name
To enter a name, follow the steps outlined below:
1. Press the key labeled with the letter you want.
Pressing a key repeatedly changes the letter or
number in the flashing cursor position on
the screen.
For instance, to enter the letter G, press
one time.
To enter the letter H, press a second
time. If you accidentally pass the letter you
want, keep pressing the key until it cycles back.
Page 29

Making Calls 57
Making Calls
56 Making Calls
Tip:
You may want to add
names using the
onscreen
keyboard when the
flip is open.
Using One-Touch Dialing
To use One-T ouch Dialing for memory
locations 2-9:
Press and hold the key related to the phone book
location for approximately two seconds.The
display confirms that the number has been
dialed when it shows “Connecting.”
Using Two-Touch Dialing
To use T wo-T ouch Dialing for memory
locations 10-99:
1. Press the first digit of the phone book location.
2. Press and hold the second digit of the phone book
location for approximately two seconds.
The display confirms that the number has been
dialed when it shows “Connecting.”
4
Making Calls
To move the cursor forward press
or
wait two seconds. Placing an empty space
after the last name automatically inserts a
comma. Press to correct any
mistakes.
2. Enter the first name of the person to correspond
with the phone number (up to 16 characters)
and press .
Adding a Phone Number
Enter the phone number you want to save
and press .
Adding a Label
Highlight the appropriate label, such as home,
work or mobile and press .
Adding a Speed Dial
Highlight the appropriate empty speed dial
entry and press . “Phone Book Changed”
appears.
Page 30

5
Adjusting Tones
58 Making Calls Adjusting the Sound 59
5
Adjusting Tones
In This Section
Changing Audio Volume
Changing Ringer Type
Changing Tone Length
Silencing the Ringer
Adjusting Volume During a Conversation
Muting a Call
Using the Speakerphone
W
ith all the things that demand your attention in today’s fast paced world,
it’s important to tune-in to what really matters. Y our Sprint PCS Phone
TM
gives you the ability to control your phone’s volume with the touch of a button.
Not only can you control what you hear , you can also control what your
caller hears.
Displaying Y our Phone Number
Just in case you forget your own number , your
Sprint PCS Phone can remind you.
To display your phone number:
1. From the main menu, highlight Phone Bookand
press .
2. Highlight My Phone Numberand press
.
Page 31

5
Adjusting Tones
Adjusting the Sound 61
Voice Calls
You can designate a phone call from someone that
has a recognizable phone number (with caller ID)
to have a different ring from someone whose phone
number is not recognizable (no caller ID). Your
choices are:
With Caller ID
Blocked Caller ID (the caller has decided to
prevent caller ID information from being
available)
No Caller ID (the caller has no caller ID)
Roaming
To adjust the ringer type for voice calls:
1. Press to select voice calls.
2. Highlight the type of call you want to specify a
ring type and press
.
3. Highlight the ring type you want. The phone’s
ringer sounds as you select it. Press .
60 Adjusting the Sound
Changing Audio Volume
To change the ringer volume:
1. From the main menu, highlight Soundsand
press .
2. Press to select Audio Volume.
3. Press to select Ringer.
4. Highlight the sound level you want. The phone’s
ringer sounds as you select a volume. Press
.
Changing Ringer T ype
You can change the ring type of various calls, such
as voice calls, messages and alarms:
1. From the main menu, highlight Soundsand
press .
2. Highlight Ringer Typeand press .
Tip:
You can also press
the volume keys on
the side of the
phone to adjust the
ringer volume
.
Tip:
You can adjust
the default setting
for your phone’s
ringer, key beep
and earpiece
volume with the
Sounds menu.
Page 32

5
Adjusting Tones
Adjusting the Sound 63
Changing T one Length
You can set the length of the tone that sounds when
you press a key . Your options are long or short. The
key beep length may be important if you use your
phone to pick up messages from your home
answering machine or to access an automated
phone system.
To change the length of the tone:
1. From the main menu, highlight Soundsand
press .
2. Highlight T one Lengthand press .
3. Highlight either Shortor Longand press
.
62 Adjusting the Sound
Messages
To adjust the ringer type for messages:
1.
Highlight Messagesand press
.
2. Highlight the message type for which you want to
set a ring type and press
. Choices include
voicemail, Sprint PCS Wireless Web messages,
numeric pages, and browser alerts.
3. Highlight the ring type you want. The phone’s
ringer sounds as you select it. Press
.
Alarms
To adjust the ringer type for alarms:
1. Highlight Alarmsand press
.
2. Highlight the ring type you want. The phone’s
ringer sounds as you select it. Press .
Page 33

Tip:
You can also
open the flip of
the phone to
automatically use
speakerphone.
Tip:
For the best sound
quality, place
the phone on a
hard surface, such
as a table.
5
Adjusting Tones
Adjusting the Sound 65
Muting a Call
There are times when it’s necessary to mute a
call so
that your caller does not hear you
or certain
background noise. To use this function during a call:
1. Highlight Muteand press . When the
phone is muted, “MUTE” shows on the display .
Using the Speakerphone
To use speakerphone:
1. Dial the phone number or select the number
from the phone book and press .
2. Highlight Speaker Onand press .
64 Adjusting the Sound
Silencing the Ringer
You can silence the ringer on incoming calls in one
of two ways:
1. When the phone rings, press .
2. Press to answer the call.
OR
1. When the phone rings, highlight Silence
Ringerand press .
2. Press to answer the call.
Adjusting Volume During
a Conversation
Whether you need to hear more or less of a
conversation, adjust the volume keys on the side of
your phone. You can do this during a call or in
between calls.
To increase the volume:
Press the top volume button on the side of
the phone.
To decrease the volume:
Press the bottom volume button on the side of
the phone.
Page 34

Managing Call History 67
6
Managing
Call History
6
Managing Call History
In This Section
Viewing the Call History List (Incoming and Outgoing)
Making a Call from the Call History List
Changing a Phone Number in the Call History List
Viewing Call Details
Saving a Phone Number from the Call History List
T
he call history list helps you manage your time more effectively. It keeps track
of incoming calls, missed calls, and calls made from your Sprint PCS PhoneTM.
This section guides you through accessing and making the most of your call
history list.
66 Adjusting the Sound
Page 35

Managing Call History 69
6
Managing
Call History
68 Managing Call History
To view call history in Personal Information
Management (PIM) mode:
1. Open the flip.
2. If the Main Menu appears, tap Call History. If
the Main Menu does not appear , tap Go T o, and
then tap Home. The Main Menu screen
appears. Tap Call History. The call history list
screen appears.
3. From the top right part of the screen, tap the
down arrow .
4. Tap the type of call log you want to view . Y our
choices include Outgoing,Incoming, or
Missed. The call history screen appears.
Viewing the Call History List
(Incoming and Outgoing)
The call history list consists of three separate lists:
outgoing, incoming, and missed calls. The call
history list makes redialing a number fast and easy.
It is updated as new numbers are added to the
beginning of the list and the oldest entries are
removed from the bottom of the list.
Each entry may contain a phone number , name,
length of call and time stamp of when the call
occurred. Duplicate calls (same number and type of
call) may only appear once on the list, except in
Missed Calls.
To view call history in Phone Mode:
1.
Press
to view call history .
2. Press
to view outgoing calls, or highlight
the appropriate call log and press .
3. Scroll to review the call history.
4. Press to return to the main menu.
Note:
Sprint PCS Wireless
Web
calls are not
saved in the call
history list.
Tip:
You can redial the last
number by pressing
and holding
.
Page 36

Managing Call History 71
6
Managing
Call History
70 Managing Call History
PIM Mode
To place a call from the recent call history list,
follow these steps:
1. Open the flip.
2. If the Main Menu appears, tap Call History. If
the Main Menu does not appear , tap Go T o, and
then tap Home. The Main Menu screen
appears. Tap Call History. The call history list
screen appears.
3. From the top right part of the screen, tap the
down arrow to select the type of call in the list.
4. Tap the scroll arrows at the bottom of the screen
to find the phone number you want to call.
5. Tap the phone number you want to call. The Call
Detail screen appears.
6. Tap Callto place the call.
Making a Call from the
Call History List
Phone Mode
To place a call from the call history list, follow
these steps:
To view call history:
1. Press
to view call history .
2. Highlight the type of call log (incoming,
outgoing or missed) and press .
3. Highlight the phone number or name you want
to call and press .
4. Press again to place the call.
Page 37

Managing Call History 73
6
Managing
Call History
72 Managing Call History
Viewing Call Details
You can view additional information or options on
a particular call.
Phone Mode
1. Press to view call history.
2. Highlight the type of call from which the call
originated and press .
3. Highlight the phone number you want to review
and press .
4. Highlight Time/Dateand press . The
time, date and call length display .
5. Press
.
Changing a Phone Number in the
Call History List
If you need to make a call from your call history list
and you happen to be outside your local area code,
you can edit existing phone numbers in your list
and add the appropriate prefix by following
these steps:
1. Press to view call history.
2. Highlight the list type from which the call
originated and press .
3. Highlight the phone number and press .
4. Highlight Prepend and press .
5. Dial the digits that you want to add to the front.
The numbers you press are added to the
beginning of the phone number .
Page 38

Managing Call History 75
Note:
You can save phone
numbers to your
phone book without
a name by pressing
OK when prompted to
enter a name.
6
Managing
Call History
74 Managing Call History
Saving a Phone Number from the
Call History List
Each entry can contain up to 32 digits, with an
associated name of up to 32 characters.
Phone Mode
1. Press
to view call history
.
2. Highlight the call history list type and press
.
3. Highlight the phone number you want to save
and press .
4. Highlight Saveand press .
Adding a Label
Highlight the label you want to give this
phone number , such as work or home, and
press .
Adding a Name
1. Enter the last name of the person to correspond
with the phone number (up to 16 characters).
For information on how to add names, see
“Entering Information in Phone Mode” on
page 36.
2. Enter the first name of the person (up to 16
characters) and press .
PIM Mode
1. If the Main Menu appears, tap Call History.
If the Main Menu does not appear , tap Go T o,
and then tap Home. The Main Menu screen
appears. Tap Call History. The Call History list
screen appears.
2. From the top right part of the screen, tap the
down arrow to select the type of call.
3. Tap the scroll arrows at the bottom right of
the screen to find the phone number you want
to view .
4. Tap the phone number you want to view . The
Call Detail screen appears with the contact
name, (if it exists) phone number , date, time
and duration.
Page 39

Managing Call History 77
PIM Mode
1. Open the flip.
2. If the Main Menu appears, tap Call History.
If the Main Menu does not appear , tap Go T o,
and then tap Home. The Main Menu screen
appears. Tap Call History. The Call History list
screen appears.
3. From the top right part of the screen, tap the
down arrow to select the type of call.
4. Tap the scroll arrows at the bottom right of
the screen to find the phone number you want
to save.
5. Tap the phone number you want to save. The
Call Detail screen appears with the phone
number , date, time and duration.
6. Tap Add New Contacts. The Add to Contacts
screen appears.
7. Tap OKto add the contact.
8. Add any pertinent information about the contact
and tap Done. For more information on adding
contact information, see “Adding Contacts” on
page 168.
6
Managing
Call History
76 Managing Call History
Note:
To use voice
activated dialing,
press the left arrow
on the rocker key
and say the name.
Adding a Speed Dial Entry
1. Highlight the appropriate speed dial entry and
press .
If you choose an existing speed dial entry , you are
asked if you want to overwrite the existing entry .
Choose Yesand press to overwrite.
Choose Noand press to reselect a speed
dial entry .
2. Press .
Adding a Voice Dial Entry
To save a phone number without a voice dial
entry , press . “Phone Book Saved”
displays.
If you do want to record a voice dial entry:
1. Highlight Recordand press .
2. Hold the phone close to your mouth.
3. After hearing “Please Say the Name,” say
the name and label associated with the
phone number .
4. After hearing “Please Repeat the Name,” repeat
the name and label associated with the phone
number . “Phone Book Saved” displays.
Page 40

7
Service
Features
Service Features 79
7
Using Sprint PCS
Service Features
In This Section
Using Caller ID
Responding to Call Waiting
Using Three-Way Calling
Forwarding Your Calls
N
ow that you’ve mastered the basics, you can begin to focus on where you
want to go. This section guides you step-by-step through the calling features
that enhance your Sprint PCS Service. From Caller ID to Call Forwarding, using
these features will help you make the most of your Sprint PCS Service.
78 Managing Call History
Page 41

Service Features 81
7
Service
Features
80 Service Features
Responding to Call Waiting
Call Waiting alerts you of incoming calls while you’re
on a call by sounding two beeps. The display screen
informs you that a call is coming in and shows the
caller’s phone number (if available). T o respond to
an incoming call while you’re on a call:
Press . This puts the first caller on hold
and answers the second call.
To switch back to the first caller , press
again.
Pressing disconnects both calls.
Tip:
You don’t have to
worry
about being
interrupted
during a
Sprint PCS Wireless
Web call because
Call Waiting and
Three-Way Calling
are automatically
disabled.
Tip:
For those calls
where you don’t
want to be
interrupted, you can
temporarily disable
Call Waiting by
pressing
before placing your
call. Call Waiting is
automatically
reactivated once
you end the call.
Using Caller ID
Caller ID lets you know who’s calling by displaying
the number of the person calling when your phone
rings. If the caller’s name
and number are already
stored in your
Phone Book, the corresponding name
appears with the number. In the same way , if you call
someone who has this feature, your phone number
displays on their phone.
Blocking Your Phone Number
If you want to block your phone number from
being displayed for a specific outgoing call, follow
these steps:
1. Press .
2. Dial the number you want to call and press
.
To permanently block your number , call Sprint PCS
Customer Care (see page 19 for the number).
Page 42

Service Features 83
Tip:
Charges for Call Forwarding will be
applied to your
account on a per
minute basis.
7
Service
Features
82 Service Features
Forwarding Y our Calls
Call Forwarding lets you forward all your incoming
calls to another phone number—even when your
phone is turned off. You can continue to make calls
from your phone with Call Forwarding activated.
To Activate Call Forwarding:
1. Press .
2. Enter the area code and phone number to which
your calls should be forwarded.
3. Press . The phone makes the call and you
will hear a tone confirming the activation of
Call Forwarding. The call ends automatically in
a few seconds.
To Deactivate Call Forwarding:
1. Press .
2. Press . The phone makes the call and you
will
hear a tone to confirm the deactivation. The
call ends automatically in a few seconds.
Using Three-Way Calling
With Three-Way Calling, you can talk to two
different people at the same time. When using this
feature, the normal airtime rates will be charged for
each of the two calls.
1. During a call, highlight Dial
3-Way Calland press .
2. Dial the second number you want to call and
press .
3. When you’re connected to the second party, press
once more to begin your three-way call.
If one of the people you called hangs up, you and
the remaining caller stay connected. If you
initiated the call and are the first to hang up, all
three callers are disconnected.
Page 43

8
Managing
Messaging
Managing Messaging 85
84
Service Features
8
Managing Messaging
In This Section
Setting up Voicemail
Message Types
Knowing When you Have Messages
Retrieving Your Messages
Adding/Editing a Folder
Erasing Folders
Erasing Messages
Y
our Sprint PCS PhoneTMis always working to help you stay connected even
when you’re unavailable. With three types of messaging, you
can depend on
your callers being able to leave you important information. This section steps you
through the messaging functions available on your phone including Sprint PCS
Wireless WebSMMessaging.
Page 44

Managing Messaging 87
8
Managing
Messaging
86 Managing Messaging
Sprint PCS Wireless Web Messaging
(also known as Text Messaging) allows messages to
appear as short alphanumeric messages on your
phone’s display screen. Y ou must purchase the
Sprint PCS Wireless Web Messaging Option in order
to receive text messages on your Sprint PCS Phone.
There are three ways to send a text message to a
Sprint PCS Phone:
E-mail (your phone number @
messaging.sprintpcs.com).
Through the Sprint PCS Web site –
www .sprintpcs.com. Select the wireless web
messaging link.
Using messaging software (TAP 1.5 compatible).
Note:
Because a
Sprint PCS Wireless
Web message
only displays 100
characters, e-mail
messages only
display the sender’s
name and part of the
subject line.
Setting up Voicemail
The first thing you’ll want to do after activating your
phone is to set up voicemail. See “Setting up Your
Voicemail” on page 17 for instructions.
Message T ypes
There are three types of messaging functions
available through your Sprint PCS Phone —
Voicemail, Numeric Paging and Sprint PCS
Wireless Web Messaging.
Voicemail captures calls automatically when you
can’t answer your phone or it is turned off. The
voicemail system sends a notification to your phone
letting you know when you have new voice messages
waiting in your voicemail box.
Numeric pagingallows a caller to enter a phone
number into your voicemail box
instead of a voice
message. The phone number
appears on your phone
as a numeric page.
Tip:
When you are
roaming off the
Sprint PCS Network,
you may not
receive
notification of new
voicemail messages.
It is recommended
that you periodically
check your
voicemail by dialing
1 + area code + your
Sprint PCS Phone Number.
Note:
Sprint PCS
Wireless Web
services
may not be
available in certain
Affiliate areas.
Page 45

Managing Messaging 89
8
Managing
Messaging
88 Managing Messaging
Receiving Messages
All unanswered calls to your Sprint PCS Phone are
automatically transferred to voicemail, even if your
phone is off or in use.
After reviewing a message, you will want to delete it.
Deleting old messages keeps memory space
available for new messages. Erasing the message
notification does not erase the messages. New
messages are rejected if your phone’s memory is full.
Voicemail-Phone Mode
To get your voicemail:
1. Press and hold
for two seconds to dial
your voicemail.
2. Enter your password and press .
3. Press to listen to a message and to
delete a message.
4. Press to end the call.
Tip:
Your phone accepts
messages even
when it is turned
off. However, you
are only notified of
new messages
when your phone is
turned on.
Tip:
You are charged for
airtime minutes
when you are
accessing
your
voicemail.
Knowing When Y ou have Voicemail
Messages
There are several ways your Sprint PCS Phone alerts
you of new voicemail messages:
By displaying a message on the screen.
By sounding a distinctive beep that you can set
from the Sounds menu (if the ringer is on).
By displaying at the top of your screen.
Knowing When Y ou have
Sprint PCS Wireless Web and
Numeric Page Messages
There are several ways your
Sprint PCS Phone alerts you of new text messages:
By displaying the message on the screen.
By sounding a distinctive beep that you can set
from the Sounds menu (if the ringer is on).
By displaying at the top of your screen.
Page 46

Managing Messaging 91
8
Managing
Messaging
90 Managing Messaging
To erase a Sprint PCS Wireless W eb/numeric page
message while it is displayed:
1. While the message is displayed, press to
show message options.
2. Highlight Eraseand press .
3. Press to confirm the deletion.
Sprint PCS Wireless Web MessagesPIM Mode
1. Open the flip.
2. If the Main Menu appears, tap Messages. If
the Main Menu does not appear , tap Go T o, and
then tap Home. Tap Messages. The
Messages screen appears.
3. Tap Page/Text. The Message View screen
appears. A list of messages appear .
4. Tap the message that you want to view details.
To erase a Sprint PCS Wireless Web or numeric page
message while it is displayed:
1. While details of the message appear, tap Action .
2. Tap Erase. Erase Item appears.
3. Tap OKto erase the message. The list of text
messages reappears without the message.
Voicemail-PIM Mode
1. Open the flip.
2. If the Main Menu appears, tap Messages. If
the Main Menu does not appear , tap Go T o, and
then tap Home. Tap Messages. The Messages
screen appears.
3. Tap Voicemail. The Message V iew screen
appears. The phone connects to your voicemail
and a numeric keypad displays.
4. Enter your password.
5. Tap Action.
6. Tap Listen. Your messages will play
automatically.
7. Tap 7to erase a message or 9to save it.
8. Press to end the call.
Sprint PCS Wireless Web MessagesPhone Mode
1. Highlight Messagesand press .
2. Highlight Page/Textand press .
3. Highlight the message you want to view and
press . The message displays.
Note:
No password is
necessary if onetouch access is
set up.
Page 47

Managing Messaging 93
8
Managing
Messaging
92 Managing Messaging
Browser Alerts-PIM Mode
1. Open the flip.
2. If the Main Menu appears, tap Messages. If
the Main Menu does not appear , tap Go T o, and
then tap Home. Tap Messages. The
Messages screen appears.
3. Tap Browser Alerts. The Message View
screen appears. A list of browser alerts appear .
4. Tap the alert that you want to view details. If
you want, you can go directly to the web page
indicated.
To erase a browser alert while it is displayed:
1. While details of the alert appear, tap Action .
2. Tap Erase. Erase Item appears.
3. Tap OKto erase the alert. The Browser Start
screen appears.
Browser Alerts-Phone Mode
1. Highlight Messagesand press .
2. Highlight Browser Alertsand press .
3. Highlight the alert you want to view and press
. The alert displays. If you want, you can
go directly to the web page indicated.
To erase a browser alert while it is displayed:
1. While the alert is displayed, press to show
message options.
2. Highlight Eraseand press .
3. Press to confirm the deletion. The
Browser Start screen appears.
Page 48

Managing Messaging 95
Filtering Using a Sender
1. If you want to specify that a message from a
certain sender be filed into a new folder, tap the
circle to the left of Use.
2. Tap the blank line to the right of Use.
3. Select whether you want to use a matched name
from the Contacts list or call-back phone number
to determine if the incoming message is filed in
the folder .
4. If you selected Contact Name, enter the last name
of the person you want to use on the Lookup
Contacts screen. If you selected Call-Back Phone
number , enter the call back phone number in the
Call-Back Phone # screen.
5. Tap Done. The Matching Conditions screen
appears.
Filtering Using Keywords
1. If you want to specify that certain keywords are
used to file a message, tap the line under
Keywords Match.
2 Enter a keyword and tap Done. For more on
using the onscreen keyboard, see “Entering
Information in PIM Mode” on page 37.
3. If a message contains another word in order to
meet the filing criteria, tap the down arrow after
the first keyword. If a message must either meet one
keyword or another , tap the arrow to the right of the
first keyword and tap OR. For example, you may
want to filter using the words “stock” and “Yahoo.”
4. If you need to add another keyword, tap the line
under the first keyword.
Tip:
If you receive
messages from an
information provider,
you might want to
use the provider’s
name as a keyword.
8
Managing
Messaging
94 Managing Messaging
Adding/Editing Folders
Folders are a powerful way to manage all your
messages. With folders, you can specify a keyword or
a sender so that a message will automatically be
filed into that folder . For instance, you may want to
file all stock market updates as soon as you receive
them so that you won’t be disturbed with a stock
update during a meeting.
To add and set up a folder:
1. While in the Message Summary screen,
tap Action .
2. Tap Edit Folder. The Edit Folders screen
appears.
3. If you are adding a folder, make sure that New
displays at the top of the screen. If it doesn’t, tap
the down arrow next to the folder name and
tap New.
If you are editing a folder, make sure that the name of
the folder displays at the top of the screen. If it doesn’t,
tap the down arrow next to the folder name and tap
the folder you want to edit.
Note:
Folders can only
be added and
edited when the
flip is open.
Page 49

Managing Messaging 97
Defining Alert Methods
1. If you want to be alerted of a new message in this
folder by an envelope icon, tap the check box to
the left of Envelope icon.
2. If you want to be alerted of a new message in this
folder by a pop-up message, tap the check box to
the left of Pop-Up Message.
3. If you want to be alerted of a new message in this
folder by a certain ring type, tap the down arrow to
the right of Ringer.
4. Tap the ring type you want.
5. Tap Done.
8
Managing
Messaging
96 Managing Messaging
5. Enter the next word and tap Done.
6. Tap Next.
Giving the Folder a Name
1. Tap the line to the right of Name. The Folder
Name screen appears.
2. Enter the folder name. For more on using the
onscreen keyboard, see page 37.
3. Tap Next.
4. Tap Done.
Placing a Limit on the Amount of
Messages in a Folder
1. Tap the line to the right of # of Messages.
The # of Messages screen appears.
2. Enter the folder name.
3. Tap Done.
Page 50

Managing Messaging 99
Erasing All Page and T ext
Messages — Phone Mode
If you choose to, you can erase all your page and text
messages at once. To do this:
1. Highlight Messagesand press .
2. Highlight Erase Alland press . “Erase
All” displays.
3. Press
to erase all messages
or
Highlight NOand press
to return to the
main menu.
Erasing All Page and T ext
Messages — PIM Mode
If you choose to, you can erase all your page and text
messages at once when the flip is open. To do this:
1. Open the flip.
2. If the Main Menu appears, tap Messages. If
the Main Menu does not appear , tap Go T o, and
then tap Home. Tap Messages. The
Messages screen appears.
3. Tap Action.
4. Tap Erase.
5. Tap Page/Text. An X appears in the box.
6. Tap OK. “All messages in the selected
category(s) will be deleted” appears.
8
Managing
Messaging
98 Managing Messaging
Erasing Folders
You may want to erase a folder if it is not needed. T o
erase a folder .
1. Open the flip.
2. While in the Message screen, tap Action.
3. Tap Erase Folders. The Erase Folders screen
appears with a list of folders.
4. Tap the box(es) to the left of folder(s) you want to
erase. An X appears in the box.
5. Tap OK. “The selected folder(s) and all
messages in it will be deleted” appears.
6. Tap OKto confirm that you want to delete the
folder(s). The Messages screen appears without
the folders.
Page 51

100 Managing Messaging
Using a Phone Other than Y our
Sprint PCS Phone to Access Y our
Voicemail
1. Dial your Sprint PCS Phone Number.
2. When your voicemail box answers, press
.
3. Enter your passcode.
Using Your Phone Book 101
9
Internal
Phone Book
9
Using Your Internal
Phone Book
In This Section
Viewing Phone Numbers
Finding and Retrieving Numbers
Saving Phone Numbers
Adding Alternate Phone Numbers
Erasing a Stored Phone Number
Erasing a Phone Book Entry’ s Phone Number
Erasing all Contacts
Setting an Alarm to Call a Phone Book Entry
Receiving Alarms
Erasing Secret Phone Numbers
Storing Special Numbers into the Phone Book
Using Different Dialing Methods
N
ow you know the basics and you’ve learned some advanced features that can
help make it easier to stay in touch with people and information. This
section helps you make the most of your contacts and use your time more
effectively when you’re trying to connect with the important people in your life.
Page 52

Using Your Phone Book 103
Note:
To use voice
activated dialing,
press the left
arrow on the
rocker key and
say the name.
9
Internal
Phone Book
102 Using Your Phone Book
Adding a Speed Dial Entry
Next, select the appropriate speed dial entry for the
phone number .
1. Highlight the appropriate empty speed dial entry
and press .
2. If you choose to overwrite an existing speed dial
entry , you are asked if you want to overwrite the
existing entry . Choose Yes to overwrite and press
. Choose Noand press to select a
different speed dial entry .
Adding a Voice Dial Entry
If you do not want to record a voice dial entry ,
press . “Phone Book Saved” displays.
If you do want to record a voice dial entry:
1. Highlight Recordand press .
2. Hold the phone close to your mouth.
3. After hearing “Please Say the Name,” say the name
and label associated with the phone number .
4. After hearing “Please Repeat the Name,” repeat
the name and label associated with the phone
number . “Phone Book Saved” displays.
Viewing Phone Numbers
In some cases where a Phone Book entry is too long,
the entire number will wrap to the next line.
Saving Phone Numbers
Saving Numbers to Your Phone Book
1. Dial the phone number you want to save.
2. Highlight Saveand press .
Adding a Label
Highlight the appropriate label, such as home,
work or mobile, and press .
Adding a Name
1. Enter the last name of the person to correspond
with the phone number (up to 16 characters). For
more information on adding names, see
“Entering Information in Phone Mode” page 34.
2. Enter the first name of the person to correspond
with the phone number (up to 16 characters) and
press .
Tip:
Save your speed
dial locations 2-9
for one-touch
dialing or your
most commonly
used phone
numbers.
Page 53

Using Your Phone Book 105
9
Internal
Phone Book
104 Using Your Phone Book
Finding and Retrieving Numbers
There are several ways to access numbers in your
Phone Book.
Reviewing All Contacts
You can review all the contacts stored in your Phone
Book by name or the speed dial entries by speed dial
numbers. Follow these steps:
1. From the main menu, highlight Phone Book
and press .
2. Highlight V iew Speed Dialand press
to look up the name.
3. Highlight the entry you want and press .
OR
Enter the two-digit speed dial number of the
contact you want to find (such as 02 for the
second entry) and press . The name of
the contact is displayed at the top of the Phone
Book list.
Making Phone Numbers Secret
You may choose to make a phone number stored in
your Phone Book secret. When you make a Phone
Book entry secret, the phone number is not
displayed, but the name remains visible. You can
still make calls to that entry.
To make a phone number secret, follow these steps:
1. Highlight Phone Bookand press .
2. Press to select Look Up Name.
3. Scroll to the Phone Book entry that you want to
make secret.
4. Highlight Editand press .
5. Highlight Make Secretand press .
6. Press to confirm that you want to make
the entry secret.
Page 54

Using Your Phone Book 107
9
Internal
Phone Book
106 Using Your Phone Book
Tip:
You can use upper
or lower case
letters when you’re
searching for a
name because the
name search is not
case sensitive.
Tip:
Press the right
arrow on the
rocker key to view
all Contacts.
Finding a Number When you Know at
Least Four Digits
You can search for a phone number in the Phone
Book even if all you can remember are four
consecutive numbers. Enter the four digits in order
and the phone lists all numbers with those four
numbers consecutive. Scroll up or down through
the list.
Finding a Number Using a
Person’s Name
To find a number by using a person’ s name:
1. From the main menu, highlight Phone Book
and press .
2. Press to select Look Up Name.
3. Enter the first letter of either the first or last name
of the person as it appears in the Phone Book.
Names of people in the Phone Book that start
with that letter are displayed at the top of the
Phone Book list.
4. Scroll to the name you want or enter the second
letter of the name as it appears in the Phone
Book. Names of people in the Phone Book
starting with that two-letter combination are
displayed at the top of the Phone Book list.
5. Scroll to the name you want or continue to add
letters until the list is narrowed to the name you
want.
6. Press .
Page 55

Using Your Phone Book 109
9
Internal
Phone Book
108 Using Your Phone Book
Adding a Speed Dial Entry
Next, select the appropriate speed dial entry for the
phone number .
1. Scroll to the appropriate speed dial entry and
press .
2. If you choose to overwrite an existing speed dial
entry , you are asked if you want to overwrite the
existing entry . Choose Yes to overwrite and press
.
OR
Choose Noand press to reselect a speed
dial entry .
Adding a Voice Dial Entry
If you do not want to record a voice dial entry ,
press . “Phone Book Changed” displays.
If you want to record a voice dial entry:
1. Highlight Recordand press
.
2. Hold the phone close to your mouth.
3. After hearing “Please Say the Name,” say the name
and label associated with the phone number .
4. After hearing “Please Repeat the Name,” repeat
the name and label associated with the phone
number . Phone Book Saved” displays.
Note:
To use voice
activated dialing,
press the left arrow
on the rocker key
and say the name.
Adding Alternate Phone Numbers to
a Phone Book Entry
You may have multiple phone numbers for one
person. To add alternate phone numbers to an
existing Phone Book entry:
1. From the main menu, highlight Phone Book
and press .
2. Press to select Look Up Name.
3. Highlight the Phone Book entry to which you
want to add an alternate phone number and
press .
4. Highlight Add Phone #and press .
Adding an Alternate Phone Number
Enter the alternate phone number and press
.
Adding a Label
Highlight the appropriate label, such as home,
work or mobile, for that number and press
.
Page 56

Using Your Phone Book 111
9
Internal
Phone Book
110 Using Your Phone Book
Tip:
To skip over a
screen without
changing anything
or if you’re ready
to accept the
changes you have
made and move on
to the next step,
press
.
Erasing a Phone Book Entry’ s
Phone Number
To erase a phone number associated with a Phone
Book entry from your Phone Book:
1. From the main menu, highlight Phone Book
and press .
2. Highlight Look Up Name to view the entries
alphabetically.
3. If the phone number you want to erase is not
displayed at the top of the screen, scroll to it and
press .
4. Highlight Erase Numberand press .
5. Press again to confirm that you want to
erase the phone number . “Phone Number
Erased” appears to confirm that you have
successfully deleted the phone number.
Erasing a Phone Book Entry
To erase a phone book entry completely from your
Phone Book:
1. From the main menu, highlight Phone Book
and press .
2. Highlight the Phone Book entry you want to erase
and press
.
3. Highlight Eraseand press .
4. Press again to confirm that you want to
erase the contact. “Erased”appears on the display
to confirm that you have successfully deleted
the entry .
Page 57

Using Your Phone Book 113
9
Internal
Phone Book
112 Using Your Phone Book
Listening to a Voice Dial Entry
You can review a voice dial entry at any time.
To do so:
1. From the main menu, highlight Phone Book
and press .
2. Highlight V oice Dial Entryand press
.
3. Highlight the Phone Book entry to which you
want to listen and press .
4. Press to play . You can then review
previous and next entries or erase the entry .
Erasing a Voice Dial Entry
You can erase a voice dial entry at any time. T o do so:
1. From the main menu, highlight Phone Book
and press .
2. Highlight V oice Dial Entryand press
.
3. Highlight the Phone Book entry you want to
erase and press .
4. Highlight Eraseand press .
5. Press again to confirm that you want to
erase the voice dial entry. “V oice Dial Entry
Erased” appears to confirm that you have
successfully deleted the entry.
Erasing all Contacts
If you choose to, you can erase all contacts from
your Phone Book. To erase all contacts:
1. From the main menu, highlight Securityand
press .
2. Enter the lock code for the phone. This is usually
0000, the last four digits of your social security
number , or the last four digits of your
phone number .
3. Highlight Erase All Contactsand press
.
4. Press to verify that you want to delete all
contacts. “Phone Book Erased” displays.
Page 58

Using Your Phone Book 115
9
Internal
Phone Book
114 Using Your Phone Book
Setting a Recurring Alarm for a Phone
Book Entry
In addition to setting a call alarm, you can also set a
recurring alarm to remind you call to someone at
the same time every day , week, month or year . For
instance, if you need to call your boss every T uesday
at a certain time, you can set a recurring reminder
on your Sprint PCS Phone. To set a recurring call
alarm, follow steps 1 through 7 on page 114 and
then add the following steps:
1. Highlight Set Recurringand press .
2. Highlight either Daily, W eekly , Monthly or Yearly
and press . “Call Alarm Set” displays.
Setting an Alarm to Call a Contact
One of the powerful features of your Sprint PCS
Phone is the ability to remind you to place a call on
a certain day at a certain time. To set an alarm:
1. Highlight Phone Bookand press .
2. Press to select Look Up Name.
3. Highlight the phone book entry to which you
want to set an alarm and press .
4. Highlight Call Alarmand press .
5. Enter the time in which you want the alarm to
sound. For instance, to set an alarm for 1:00,
enter .
6. Enter the date in which you want the alarm to
sound. For instance, to set an alarm for
November 21, 2001, enter
.
7. If the alarm is set for the incorrect time period
(am or pm), highlight AM/PM and press
. “Call Alarm Set” displays.
Page 59

Using Your Phone Book 117
9
Internal
Phone Book
116 Using Your Phone Book
Changing Stored Phone Numbers
You can change the phone number , name and
memory location of any phone number stored in
your Phone Book. You can also make non-secret
numbers secret.
To change a number:
1. From the main menu, highlight Phone Book
and press .
2. Press to selectLook Up Name.
3. Highlight the Phone Book entry you want to edit
and press .
4. HighlightEditand press .
5. Press to select Phone Number.
6. Highlight the phone number you want to edit for
that person and press .
7. Press to erase digits.
8. Add the appropriate digits and press .
Adding a Label
Highlight the appropriate label, such as
home, work or mobile, for that number and
press .
Receiving Alarms
When you receive an alarm, press to review
alarm information and options.
Snoozing an Alarm
If a call alarm goes off at a time when you cannot
make a call, you can choose to set snooze on the
alarm. Snooze temporarily turns off the alarm. In
ten minutes the alarm again sounds. To snooze
the alarm:
1. Press when the alarm sounds.
2. Highlight Snoozeand press .
Page 60

Using Your Phone Book 119
9
Internal
Phone Book
118 Using Your Phone Book
Changing a Stored Name
You can change the name of a person in your
Phone Book.
To change a name:
1. From the main menu, highlight Phone Book
and press .
2. Press to select Look Up Name.
3. Highlight the Phone Book entry for which you
want to edit the name and press .
4. Highlight Editand press .
5. Highlight Nameand press
.
6. Press to erase letters.
7. Add the appropriate letters and press .
Adding a Speed Dial Entry
Highlight a speed dial location and press
. If the speed dial entry is already taken,
select YESand press to overwrite
the entry .
Adding a Voice Dial Entry
If you do not want to record a voice dial entry ,
press . “Phone Book Changed” displays.
If you want to record a voice dial entry:
1. Highlight Recordand press
.
2. Hold the phone close to your mouth.
3. After hearing “Please Say the Name,” say the
name and label associated with the phone
number .
4. After hearing “Please Repeat the Name,” repeat
the name and label associated with the phone
number . “Phone Book Saved” displays.
Page 61

Using Your Phone Book 121
Tip:
If you know the
speed dial entry
number, use onetouch or two-touch
dialing. For
example, to dial
entry number 12,
press and
press and hold
.
Note:
If Abbreviated Dialing is set up and you
dial a number that
also matches a
phone number in
your Phone Book,
you will get a
choice of which
number to dial
.
9
Internal
Phone Book
120 Using Your Phone Book
To insert pauses into a number:
1. Enter the first part of the phone number.
2. Highlight either >or , and press .
3. Finish entering the rest of the numbers, then dial
or save the entered number .
Dialing from a Speed Dial Entry
1. Highlight Phone Bookand press .
2. Highlight V iew Speed Dialand press
.
3. Highlight the Phone Book entry you want to call
and press .
4. Press again to place the call.
Dialing Using Abbreviated Dialing
Abbreviated dialing allows you to make a call by
dialing either the last four -digits or last five-digits of
a phone number . To set up abbreviated dialing, see
“Abbreviated Dialing” on page158.
There are two types of 4-digit calling:
Dial the last four 4 digits of a phone number in
your phone book. No setup is required.
Dial the last 4 digits of a phone number in which
you specify the first 6 digits in Abbreviated
Dialing. Setup of Abbreviated Dialing is required.
To place a call using abbreviated calling:
Enter either the last four or last five digits
of the phone number you want to call and
press .
Storing Special Numbers in the
Phone Book
Using the Pause Feature
Generally , when you call automated systems, like
voicemail boxes or banks, you are required to enter a
password or calling card number. Rather than
entering the numbers manually each time, you can
store the numbers in your Phone Book, separated by
special characters, called pauses. When you make the
call, the phone automatically sends the number.
Using Two Different Types of Pauses
There are two different pauses that you can use
when storing a number in your Phone Book.
Hard pauses (>)cause the phone to stop
dialing until you press . This allows you
to send the digit when you know the automated
system is ready .
2 Sec pauses (,)causes the phone to wait two
seconds before sending the next string of digits.
Page 62

Using Your Phone Book 123
9
Internal
Phone Book
122 Using Your Phone Book
Changing the Ringer for a Phone
Book Entry
You can set your Sprint PCS Phone to sound a
distinctive ring when an incoming call comes from
a particular contact within the Phone Book.
To do so:
1. From the main menu, highlight Phone Book
and press .
2. Press to select Look Up Name.
3. Highlight the Phone Book entry you want to set
up with a distinctive ringer and press .
4. Highlight Set ID Ringer and press .
5. Highlight the ring type you want. The phone’s
ringer sounds as you select it. After selecting the
ring you want, press . “Phone Book
Changed” displays.
Changing a Speed Dial for a Phone
Book Entry
You may want to change the speed dial number of a
phone book entry . To change a speed dial number:
1. From the main menu, highlight Phone Book
and press .
2. Press to select Look Up Name.
3. Highlight the Phone Book entry you want to
change and press .
4. Highlight Set Speed Dialand press .
5. Highlight the appropriate speed empty entry
location and press .
Overwriting an Existing Speed
Dial Entry
If you choose to overwrite an existing speed dial
entry , you are asked if you want to overwrite the
existing entry . Choose Yes to overwrite and press
. Choose Noand press to reselect a
speed dial entry .
Press . “Speed Dial Entry Saved” displays.
Page 63

Using Your Internal Phone Book 125
9
Internal
Phone Book
124 Using Your Phone Book
Adding a Prefix for a Phone
Book Entry
You can edit existing phone numbers and add the
appropriate prefix by following these steps:
1. From the main menu, highlight Phone Book
and press .
2. Press to select Look Up Name.
3. Highlight the Phone Book entry to which you
want to give a prefix and press .
4. Highlight Prependand press .
5. Dial the numbers that you want added to the
front. The numbers you press are added to the
beginning of the phone number .
In addition, there are two different pauses that you
can use when storing a number .
Hard pauses (>) cause the phone to stop
dialing until you press .
2 Sec pauses (,)cause the phone to wait two
seconds before sending the next string of digits.
To insert pauses into a number:
1. Enter the phone number.
2. Highlight either >or ,and press .
Page 64

Changing Your Phone’s Display 127
10
Changing Your
Phone’s Display
10
Changing Your
Phone’s Display
In This Section
Changing the Backlight Time Length
Changing Your Standby Mode Display Banner
Changing Your Phone’s Contrast
T
his section describes how you can change your phone’s display to best suit your
viewing requirements. Every function and feature is displayed through your
phone’s menu. T ake a few moments to review these options and adjust or add
settings that are right for you.
126 Using Your Internal Phone Book
Page 65

Changing Your Phone’s Display 129
Tip:
Press and hold
to erase the
entire banner.
10
Changing Your
Phone’s Display
128 Changing Your Phone’s Display
Changing Y our Standby Mode
Display Banner
The banner lets you customize up to 16 characters
of text displayed on the first line of your phone’s
display screen in Standby mode. To create or change
your banner:
1. From the main menu, highlight Displayand
press .
2. Highlight Bannerand press .
The current banner displays.
3. Highlight Changeand press .
4. Press to erase current text.
5. Enter characters the same way you do for the
Phone Book. (See “Getting to Know your
Sprint PCS Phone” on page 25 for details).
Changing the Backlight Time Length
Backlight lets you choose how long the display
screen and keypad are backlit after any key press is
made. Options are:
Always Off
8 seconds
15 seconds
30 seconds
Always On
To change the time of backlight:
1. From the main menu, highlight Displayand
press .
2. Press to select Backlight.
3. Highlight the amount of time you want the
backlight to be turned on and press .
Page 66

Setting Your Phone’s Security 131
11
Your Phone’s
Security
11
Setting Your
Phone’s Security
In This Section
Using Key Guard
Locking the Phone
Unlocking the Phone
Restricting Your Calls
Changing Your Lock Code
B
y using the security setting on your Sprint PCS PhoneTM, you receive peace of
mind without sacrificing flexibility . With several options available, you can
customize your phone to meet your personal needs.
130 Changing Your Phone’s Display
Tip:
You can also open
the phone’s flip and
use the volume
keys to adjust the
contrast.
Changing Y our Phone’s Contrast
You can change the amount of contrast, allowing
for lighter or darker text on the display . You can
choose:
Highest
High
Medium
Low
Lowest
To change the contrast of the text on the display:
1. From the main menu, highlight Displayand
press .
2. Highlight Contrastand press .
3. Highlight the amount of contrast you want for
the display and press .
Page 67

Setting Your Phone’s Security 133
11
Your Phone’s
Security
132 Setting Your Phone’s Security
Unlocking the Phone
1. Press to select Unlock.
2. Enter the lock code for the phone. This is usually
0000, the last four digits of your social security
number or the last four digits of your phone
number . The phone becomes unlocked.
Using KeyGuard
Keyguard is a safeguard against you accidently
dialing numbers. To enable keyguard:
From the main menu, highlight KeyGuard
and press . The keypad is locked.
To disable keyguard:
Press and hold .
Locking the Phone
Locking the phone prevents any changes to your
phone and also prevents outgoing calls. This feature
can only be activated when your phone is in
Standby mode.
To lock your phone:
1. From the main menu, highlight Securityand
press .
2. Enter the lock code for the phone and press
. This is usually 0000, the last four digits
of your social security number or the last four
digits of your phone number .
3. Press to select Lock Phone.
4. Highlight OKand press .
“--Locked--” displays. You are now restricted
from making outgoing calls, except for special
numbers, such as 911.
Tip:
To receive an
incoming call while
your keypad is
locked, press
to answer
the call and unlock
the keypad. Once
you end the call,
keyguard
automatically
reactivates.
Page 68

Setting Your Phone’s Security 135
11
Your Phone’s
Security
134 Setting Your Phone’s Security
Changing Y our Lock Code
You can enter a personal lock code and then change
it as often as you like. To enter a new lock code:
1. From the main menu, highlight Securityand
press .
2. Enter the lock code for the phone. This is usually
0000, the last four digits of your social security
number , of the last four digits of your phone
number . The Security screen displays.
3. Highlight Change Lockand press .
4. Enter the new lock code.
5. Re-enter the new lock code. “New Lock Code
Saved” displays.
If you’ve changed your lock code and forgotten
what you changed it to, call Sprint PCS Customer
Care for assistance. (See page 19 for number).
Restricting Y our Calls
You can limit your outgoing calls to emergency
numbers, Sprint PCS Customer Care and three
special numbers you specify when your Sprint PCS
Phone is locked. You may answer incoming calls,
but you cannot erase, add or edit any numbers.
To specify the numbers that can be called when the
phone is locked:
1. From the main menu, highlight Securityand
press .
2. Enter the lock code for the phone. This is usually
0000, the last four digits of your social security
number or the last four digits of your phone
number.
3. Highlight Edit Special Numbersand press
.
4. Highlight the special number location and
press .
5. Enter the phone number you want to be able to
call when the phone is locked and press .
“Special # Changed” displays. You can continue
to enter special numbers.
Page 69

12
Setting Pref-
erences
136 Setting Your Phone’s Security
Setting Preferences 137
12
Setting Preferences
In This Section
Selecting a Phone’s Environment
Changing Your Phone’s Environment
Setting Sound Preferences
Setting Display Preferences
Setting Security
Setting up the Phone
Setting Roaming
Setting Formats
Setting General Preferences
Defining the Owner
Configuring the Stylus
B
y using the Environment setting on your Sprint PCS PhoneTM, you can
customize the tone, ring type, acceptance list and backlight for typical
situations you are in. In addition to the Environment setting, you can also set up
security for the phone, define whether you can receive data or fax transmissions
and configure the stylus. With the several options available, you can customize
your phone to meet your personal needs.
Page 70

12
Setting Pref-
erences
Setting Preferences 139
Changing Y our Phone’s Environment
Sometimes the default environment settings do not
meet your needs, or you may want to customize the
Custom environments. For instance, in a meeting
you may not want to be disturbed except for an
expected phone call from you boss.
If you use environments, making changes to the
environment through a different menu than
Environment only temporarily changes the
environment.
To customize an environment:
1. From the main menu, highlight
Environmentand press .
2. Highlight Editand press . A message
displays stating that you must open the cover to
edit an environment.
Personal Information
Management Mode
1. If the Main Menu appears, tap Settings. If the
Main Menu does not appear , tap Go T o, and
then tap Home. The Main Menu screen
appears. Scroll to view the bottom of the screen
and tap Settings. The Settings screen appears.
2. On the top right part of the screen, tap the down
arrow and select Environment.
3. Tap the environment you want to customize.
The Environment Edit menu displays.
Adjusting Audio Volume
1. To adjust the volume of sounds, tap Sounds
from the Environment drop-down menu.
2. Tap Audio Volume.
138 Setting Preferences
Selecting an Environment
You can select a preset environment. T o do so:
Phone Mode
1. From the main menu, highlight
Environmentand press .
2. Highlight the appropriate setting for your
current environment and press .
Choices include: Normal, Meeting, Car , Silent,
Noisy , and two custom settings.
PIM Mode
1. If the Main Menu appears, tap Settings. If the
Main Menu does not appear , tap Go T o, and
then tap Home. The Main Menu screen
appears. Scroll to view the bottom of the screen
and tap Settings. The Settings screen appears.
2. On the top right part of the screen, tap the down
arrow and select Environment.
3. Tap the default environment for the phone.
Page 71

12
Setting Pref-
erences
Setting Preferences 141
Adjusting Ringer Type
To adjust the ring type of voice calls, messages
and alarms, tap Ring T ype. The Ringer Type
screen displays.
Caller ID
1. Tap the down arrow next to W Caller ID.
2. Tap the ring type. After tapping the ring type, the
phone plays the ring.
Block Caller ID
1. Tap the down arrow next to Blocked
Caller ID.
2. Tap the ring type. After tapping the ring type, the
phone plays the ring.
No Caller ID
1. Tap the down arrow next to No Caller ID.
2. Tap the ring type. After tapping the ring type, the
phone plays the ring.
Roaming Calls
1. Tap the down arrow next to Roaming.
2. Tap the ring type. After tapping the ring type, the
phone plays the ring.
140 Setting Preferences
T o adjust the ringer volume:
1. Tap the down arrow next to Ringer.
2. Tap the volume you want. Settings include: High
+ Vibrate, High, Medium High, Medium Low ,
Low , Off and Vibrate.
Key Beep Volume
1. Tap the arrow next to Key Beep.
2. Tap the volume you want. Settings include: High,
Medium High, Medium Low , Low and Off.
Charging Vibration
1. Tap the down arrow below When Charging.
2. Tap either Set Vibrate to Off or Set V ibrate to Low .
3. Tap OK.
Page 72

Setting Preferences 143
Defining an Acceptance List
With your Sprint PCS Phone, you can determine
who you can reach during a certain time, such as
only family members can reach you during a
meeting. However , in order to use this feature, you
must file your contacts into different categories
(see “Filing a Contact” on page 170 for more
information.)
To define the type of person you will accept a call
from when you are in a certain environment:
1. Tap Acceptance List. The Acceptance List
screen displays.
2. De-select and select the group of people by
tapping the check box next to the category .
3. Tap OK.
Adjusting Backlight
To change how long the backlight stays on in a
certain environment:
1. Tap the down arrow next to Backlight.
2. Tap the amount of time you want the backlight
to stay on after a key press. The choices are
Always Off, 8 sec., 15 secs., 30 secs., and
Always On.
3. Tap OK. The list of environments appears.
4. Tap Done. The Main Menu appears.
12
Setting Pref-
erences
142 Setting Preferences
Voicemail Messages
1. Tap the down arrow next to Voicemail.
2. Tap the ring type. After tapping the ring type, the
phone plays the ring.
Page/T ext Messages
To adjust the ring type of page/text messages
(applies to messages not in a user -defined folder):
1. Tap the down arrow next to Page/Text.
2. Tap the ring type. After tapping the ring type, the
phone plays the ring.
Browser Messages
1. Tap the down arrow next to Browser.
2. Tap the ring type. After tapping the ring type, the
phone plays the ring.
Alarms
1. Tap the down arrow next to Alarms.
2. Tap the ring type. After tapping the ring type,
the phone plays the ring.
3. Tap OK. The Edit Environment screen
reappears.
Page 73

Setting Preferencest 145
Adjusting Caller Volume
1. Tap the down arrow to the right of Earpiece.
2. Tap the sound level you want.
Adjusting Vibrate when Charging
1. Tap the down arrow below Charging.
2. Tap whether you want the phone to vibrate
when it is charging, or make no sound when
it is charging.
3. Tap OK. A messages displays that the setting is in
effect until another environment is selected.
4. Tap OKagain.
Adjusting Ringer Type
You can change the ring type of various calls, such
as voice calls, messages and alarms. To change the
ringer type:
Tap Ringer Type. The Ringer T ype screen
appears.
Caller ID
1. Tap the down arrow next to W Caller ID.
2. Tap the ring type. After tapping the ring type, the
phone plays the ring.
Blocked Caller ID
1. Tap the down arrow next to Blocked
Caller ID.
2. Tap the ring type. After tapping the ring type, the
phone plays the ring.
12
Setting Pref-
erences
144 Setting Preferences
Setting Sound Preferences
To change the sounds used with your Sprint PCS
Phone:
1. Make sure the cover is open.
2. If the Main Menu appears, tap Settings. If the
Main Menu does not appear , tap Go T o, and
then tap Home. The Main Menu screen
appears. Tap Settings. The Settings screen
appears.
3. On the top right part of the screen, tap the down
arrow.
4. Tap Sounds. The Sounds screen appears.
Adjusting Ringer Volume
1. Tap Audio Volume. The Audio V olume screen
appears.
2. Tap the down arrow to the right of Ringer.
3. Tap the sound level you want.
Adjusting Key Beep Volume
1. Tap the down arrow to the right of Key Beep.
2. Tap the sound level you want.
Page 74

Setting Preferences 147
Page/T ext Messages
1. Tap the down arrow next to Page/Text.
2. Tap the ring type. After tapping the ring type, the
phone plays the ring.
Browser Messages
1. Tap the down arrow next to Browser.
2. Tap the ring type. After tapping the ring type, the
phone plays the ring.
Date Book Alarms
1. Tap the down arrow next to Alarms.
2. Tap the ring type. After tapping the ring type, the
phone plays the ring.
3. Tap OK. A message displays stating that the
setting will be changed temporarily until
another environment is selected.
4. Tap OKagain.
12
Setting Pref-
erences
146 Setting Preferences
Without Caller ID
1. Tap the down arrow next to No Caller ID.
2. Tap the ring type. After tapping the ring type, the
phone plays the ring.
Roaming Calls
1. Tap the down arrow next to Roaming.
2. Tap the ring type. After tapping the ring type, the
phone plays the ring.
Voicemail messages
1. Tap the down arrow next to Voicemail.
2. Tap the ring type. After tapping the ring type, the
phone plays the ring.
Page 75

148 Setting Preferences
Adjusting Tone Length
To change the length of the tone:
1. Tap the down arrow to the right of
T one Length.
2. Tap either Shortor Long.
Adjusting Alerts
To turn on an alert for service change:
When the phone exits a digital coverage area, a
service change has occurred. You can be alerted of
these service changes. To do so:
1. Tap the down arrow to the right of SVC
Change.
2. Tap either On or Off.
To turn on an alert for a minute beep:
If you want to track the amount of minutes you have
been on a call, you can have the phone beep every
minute. To turn this on or off:
1. Tap the down arrow to the right of
Minute Beep.
2. Tap either Onor Off.
3. Tap Doneto finish changing the default
sounds.
12
Setting Pref-
erences
Setting Preferences 149
Setting Display Preferences
To change your display:
1. Make sure the cover is open.
2. If the Main Menu appears, tap Settings. If the
Main Menu does not appear , tap Go T o, and
then tap Home. The Main Menu screen
appears. Scroll to view the bottom of the screen
and tap Settings. The Settings screen appears.
3. On the top right part of the screen, tap the
down arrow .
4. Tap Display.
Backlight lets you choose how long the display
screen and keypad are backlit after any key press is
made. Options are:
Always Off
8 seconds
15 seconds
30 seconds
Always On
To change the time of backlight:
1. Tap the down arrow next to Backlight.
2. Tap the amount of time you want the backlight
to be turned on. A message displays stating that
the setting is changed temporarily until another
environment is selected. To change an
environment, see page 137. Environments are
used to customize the tone, ring type, acceptance
list and backlight for typical situations you
encounter.
3. Tap OKagain.
Page 76

Setting Preferences 151
Setting Security
Using the security setting on your phone, you
receive peace of mind without sacrificing flexibility .
With several options available, you can customize
your phone to meet your personal needs.
To enter into the Security menu:
1. Open the flip.
2. If the Main Menu appears, tap Settings. If the
Main Menu does not appear , tap Go T o, and
then tap Home. The Main Menu screen
appears. Scroll and tap Settings. The Settings
screen appears.
3. On the top right part of the screen, tap the
down arrow .
4. Tap Security. The Lock Code screen appears.
5. Enter the lock code for the phone by tapping the
numbers on the keypad. This is usually 0000, the
last four digits of your social security number , or
the last four digits of your phone number .
6. Tap OK. The Security menu displays.
12
Setting Pref-
erences
150 Setting Preferences
You can change the amount of contrast, allowing
for lighter or darker text on the display . You
can choose:
Highest
High
Medium
Low
Lowest
To change the contrast of text on the display:
1. Tap the arrow next to Contrast.
2. Tap the amount of contrast you want for
the display .
The banner lets you customize the 16 characters of
text displayed on the first line of your phone’s
display screen in Standby mode.
To create or change your banner:
1. Tap the line to the right of Banner.
2. Enter the new banner . For more information on
using the onscreen keyboard, see page37.
Page 77

Setting Preferences 153
Unlocking the Phone
To unlock the organizer:
1. Enter the lock code for the phone by tapping the
numbers on the keypad. This is usually 0000, the
last four digits of your social security number or
the last four digits of your phone number .
2. Tap OK. The organizer becomes unlocked.
12
Setting Pref-
erences
152 Setting Preferences
Locking the Phone
Locking the phone prevents any changes to your
phone and also prevents outgoing calls. This feature
can only be activated when your phone is in
Standby mode.
To lock your organizer:
1. After entering the lock code, tap Lock
Organizerin the Security menu. The Lock
Organizer screen appears.
2. Tap Lock Now.
3. Tap OK. The Lock Code screen appears.
4. Enter the lock code for the phone by tapping the
numbers on the keypad. This is usually 0000, the
last four digits your social security number or the
last four digits of your phone number .
5. Tap OK. “--Locked--” displays. Your organizer
is locked.
Page 78

Setting Preferences 155
Changing the Lock Code
You can enter a personal lock code and then change
it as often as you like. To enter a new lock code:
1. On the Security menu, tap Change
Lock Code.
2. Using the keypad, enter the current lock code.
3. Using the keypad, enter the new lock code.
4. Using the keypad, re-enter the lock code.
“New Lock Code Saved” displays.
5. Tap OK. The Security Menu redisplays.
If you’ve changed your lock code and forgotten what
you changed it to, call Sprint PCS Customer Care for
assistance. (See page 19 for number).
12
Setting Pref-
erences
154 Setting Preferences
Restricting Outgoing Calls
You can limit your outgoing calls to emergency
numbers, such as 911, Sprint PCS Customer Care
and three special numbers you specify . You may
answer incoming calls, but you cannot erase, add or
edit any numbers.
To specify the numbers that can be called when the
phone is locked:
1. On the Security menu, tap Special #. The
Special #s screen appears.
2. Tap the line next to the special number you want
to add. The Edit Special #s screen appears.
3. Using the keypad, enter the phone number you
want to be able to call when the phone is locked.
For more on using the onscreen keyboard, see
“Entering Information in PIM Mode” on
page 36.
4. Tap Done. The Special #s screen reappears.
5. Tap OK. The Security menu appears.
Page 79

Setting Preferences 157
Any Key Answer
To allow answering the phone by pressing any key:
1. Tap the down arrow to the right of
Any Key Answer.
2. Tap Onto enable Any Key Answer .
To allow answering the phone by pressing any key
when using the Car Kit:
1. Tap the down arrow to the right of
Car Kit Auto Ans.
2. Tap Onto enable Car Kit Auto Answer .
Web Guard
To turn on Web Guard, which requires an extra
confirmation before ending a browser session:
1. Tap the down arrow below W eb Guard.
2. Tap Prompt to Endor At Start Onlyto
enable Web Guard.
Speaker Phone
To change how Speaker Phone is turned on:
1. Tap the down arrow to the right of Spk Phone.
2. Tap Open Flipto turn on speaker phone when
you open the flip or tap Select Menu to turn
on speaker phone by selecting a menu option.
12
Setting Pref-
erences
156 Setting Preferences
Setting Up the Phone
Phone setup allows you to set advanced options
such as how to activate speakerphone, whether or
not to allow data/fax transmittals to your phone, or
whether you want to use any key answer .
To enter into the Phone Setup menu:
1. Open the flip.
2. If the Main Menu appears, tap Settings. If the
Main Menu does not appear , tap Go T o, and
then tap Home. The Main Menu screen
appears. Scroll and tap Settings. The Settings
screen appears.
3. On the top right part of the screen, tap the
down arrow .
4. Tap Phone Setup. The Phone Setup
screen appears.
5. Define the settings as outlined in the following
sections. After making changes, tap Done.
Receiving Data/Fax Transmittals:
1. Tap the down arrow under Data/Fax In.
2. Tap whether you want to receiving Incoming
Faxes, Incoming Data , or Off.
Note:
If you decide to
receive incoming
faxes or data, no
incoming voice calls
can be received.
Page 80

Setting Preferences 159
Setting Roaming
Your Sprint PCS Phone allows you to control your
ability to roam. By using the menu option, you
determine which signals your phone accepts.
Setting Roam Mode
Choose from two different settings on your singleband phone to control your roaming experience:
1. Make sure the cover is open.
2. If the Main Menu appears, tap Settings. If the
Main Menu does not appear , tap Go T o, and
then tap Home. The Main Menu screen
appears. Tap Settings. The Settings screen
appears.
3. On the top right part of the screen, tap the
down arrow .
4. Tap Roaming. A screen displays stating that
Call Guard requires an extra step to make or take
a roaming call.
5. Tap OK. The Roaming screen appears.
6. Tap the down arrow to the right of Set Mode.
12
Setting Pref-
erences
158 Setting Preferences
Abbreviated Dialing
To define the area code and prefix you want to use
for 4-digit calling:
1. Tap the number to the right of 4Digit. The Enter
Abbrev Dialing screen appears.
2. Tap the numbers related to the area code and
dialing prefix that you want to use for 4-digit
dialing.
3. Tap OK.
To define the area code and
2-number prefix you want to use for 5-digit calling:
1. Tap the number to the right of 5Digit. The Enter
Abbrev Dialing screen appears.
2. Tap the numbers related to the area code and
2-digit dialing prefix that you want to use for
5-digit dialing.
3. Tap OK.
Page 81

Setting Preferences 161
Setting Formats
You can set how the time, date and name displays in
your organizer , along with the day of the week in
which the calendar’s week view starts, and what
phone book category displays when you open the
phone book.
Default Formats
To set default formats:
1. Make sure the cover is open.
2. If the Main Menu appears, tap Settings. If the
Main Menu does not appear , tap Go T o, and
then tap Home. The Main Menu screen
appears. Tap Settings. The Settings screen
appears.
3. On the top right part of the screen, tap the
down arrow .
4. Tap Formats. The Formats screen appears.
Time Display
To set how time is displayed:
1.
Tap the down arrow next to Time.
2. Tap either 24 hr . format or 12 hr . format.
A sample of how time displays is shown below
the arrow .
12
Setting Pref-
erences
160 Setting Preferences
7. Tap the roaming option you want. The
choices are:
Automatic: This setting seeks Sprint PCS
Service. When Sprint PCS Service is unavailable, it
searches for an alternative system.
Sprint PCS: This setting allows you to select
the Sprint PCS Nationwide Network only and
prevents roaming on other networks.
A message displays after selecting a roaming option.
If Sprint PCS is selected, the Sprint PCS Phone will
operate only in the Sprint PCS Service Area. If
Automatic is selected, a roaming rate will apply
to calls made while outside the Sprint PCS
Service Area.
8. Tap OK.
Setting Call Guard
1. Tap the down arrow to the right of Call Guard.
2. Tap Onto display a warning every time you
make or receive a roaming call, or tap Offto not
display the warning.
3. Tap OK.
4. Tap Done.
Page 82

Setting Preferences 163
Setting General Preferences
General formats sets the amount of inactive time
before the phone will shut off and what happens
when you press and hold the Web key .
To set general formats:
1. Open the flip.
2. If the Main Menu appears, tap Settings. If the
Main Menu does not appear , tap Go T o, and
then tap Home. The Main Menu screen
appears. Scroll and tap Settings. The Settings
screen appears.
3. On the top right part of the screen, tap the
down arrow .
4. Tap General.
To set what happens when you press and hold the
WEB key:
1. Tap the down arrow below Press & Hold
Web Key.
2. Tap either Backlight, KeyGuard, Voice
Dialor Environment.
3. Tap Done.
Note:
Your phone
number displays
under Phone #.
12
Setting Pref-
erences
162 Setting Preferences
Date Display
To set how dates are displayed:
1.
Tap the down arrow next to Date.
2. Tap the format you want dates displayed as. A
sample of how dates display is shown below
the arrow .
Name Display
To set how names are displayed:
1.
Tap the down arrow next to Name.
2. Tap either last name, first name or first name,
last name. A sample of how names will display is
shown below the arrow .
Week Display
To set the day by which the weekly view of the
calendar starts:
1. Tap the down arrow next to Weekstart.
2. Tap either Sundayor Monday.
Contact Display
To set whether you want the Speed Dial List or All
Contacts displayed:
1. Tap the down arrow under Phone Book
View.
2. Tap to select All Contacts or Speed Dial List.
3. Tap Done.
Note:
Switching to a
different name
format may take
some time to
complete. Tap OK
to continue the
operation.
Page 83

Setting Preferences 165
Configuring the Stylus
If the screen isn’t reacting to your taps, you may
need to synchronize the screen with your stylus.
1. Make sure the cover is open.
2. If the Main Menu appears, tap Settings. If the
Main Menu does not appear , tap Go T o, and
then tap Home. The Main Menu screen
appears. Scroll and tap Settings. The Settings
screen appears.
3. On the top right part of the screen, tap the
down arrow .
4. Tap Stylus. A screen displays verifying that you
want to configure the stylus.
5. Tap OK.
6. Tap and press the middle of each plus sign on the
screen until you hear a beep.
Tip:
If you cannot get
the touch screen
to do this, close
the flip, highlight
Setup, highlight
Touch Calibration,
highlight Yes,
and follow the
instructions.
12
Setting Pref-
erences
164 Setting Preferences
Defining the Owner
You may also put your personal information into
your organizer . You can add your:
Name
Company Name
Phone Number (home or office)
Address
To add this information:
1. Open the flip.
2. If the Main Menu appears, tap Settings. If the
Main Menu does not appear , tap Go T o, and
then tap Home. The Main Menu screen
appears. Scroll and tap Settings. The Settings
screen appears.
3. On the top right part of the screen, tap the
down arrow .
4. Tap Owner. The Owner Settings screen
appears.
5. Enter the information that you want defined for
the phone. When done, tap Done.
Page 84

166 Setting Preferences
13
Managing
Contacts
Managing Contacts 167
13
Managing Contacts
In This Section
Adding Contacts
Looking Up Contacts
Finding Contacts
Changing Contacts
Erasing Contacts
Editing Group Names
I
n Chapter 9, you learned how to add a phone number for a person in the
Internal Phone Book. However , within Personal Information Management
mode, you can do more than just define a phone number for a person, but also
add other contact information. You can add various phone numbers, such as fax,
mobile, and work, along with an e-mail address or postal address.
You can also synchronize your contacts with the contacts you have stored in
Microsoft Outlook. This section helps you to make use of your contact list so that
you can spend time doing what is most important to you–connecting with the
important people in your life.
Page 85

13
Managing
Contacts
Managing Contacts 169
Tip:
For more on using
the onscreen
keyboard, see
page 37.
Note:
You can change
the type of phone
number you enter by
tapping the down
arrow next to an
irrelevant phone
type and tapping the
new phone number
type. You can only
have one number of
each type.
Adding a Name
To add the contact’ s name:
1. Tap the empty line to the right of Last Name. The
onscreen keyboard appears.
2. Enter the last name of the person you want to
add to your Contacts.
3. Tap Done.
4. Tap the empty line to the right of First Name.
5. Enter the first name of the person you want to
add to your Contacts.
6. Tap Done.
Adding Phone Numbers
To add phone numbers:
1. If you have the contact’s home phone number ,
tap the empty line to the right of Home. The
onscreen keyboard appears.
2. Enter the home phone number of the person you
want to add to your Contacts.
3. Tap Done.
4 If you have the contact’s work phone number , tap
the empty line to the right of Work. The onscreen
keyboard appears.
5. Enter the work phone number of the person you
want to add to your Contacts.
6. Tap Done.
7. If you have the contact’s mobile phone number ,
tap the empty line to the right of Mobile. The
onscreen keyboard appears.
168 Managing Contacts
Note:
The first word
in an entry is
automatically
capitalized.
Adding Contacts
You can either add contacts directly into your
Sprint PCS Phone or create contacts using the
TP3000 Desktop software that came with the phone
and then download the contacts to your phone
through the synchronization process. For more
information about downloading contacts to your
Sprint PCS Phone, see “Syncing to your PC” on
page 209.
To add a contact directly into your Sprint PCS
Phone:
1. Make sure the cover is open.
2. If the Main Menu appears, tap Contacts. If the
Main Menu does not appear , tap Go T o, and
then tap Contacts. The Contacts screen
appears.
3. Tap Action.
4. Tap New.
5. Continue to add information as outlined in the
next sections. Tap Donewhen done adding
information.
Page 86

13
Managing
Contacts
Tip:
For more on using
the onscreen
keyboard, see
“Entering Information in PIM Mode”
on page 37.
Managing Contacts 171
Adding an Address
To add the contact’ s address:
1. Tap the empty line to the right of Address. The
onscreen keyboard appears.
2. Enter the address by switching between the
numeric and alphabetic keypad.
3. Tap Done.
Adding Notes
To add any notes about the contact:
1. Tap the empty line to the right of Notes. The
onscreen keyboard appears.
2. Enter any notes pertaining to the contact.
3. Tap Done.
170 Managing Contacts
8. Enter the contact’s mobile phone.
9. Tap Done.
10. If you have the contact’s pager number, tap the
empty line to the right of Pager . The onscreen
keyboard appears
11. Enter the contact’s pager number.
12. Tap Done.
Adding an E-mail Address
Toadd the contact’ s e-mail address:
1. Tap the empty line to the right of E-mail. The
onscreen keyboard appears.
2. Enter the contact’s e-mail address.
3. Tap Done.
Adding an Identifying Ring
To add a specific ring to be used when the contact
calls you:
1. Tap the down arrow to the right of ID Ringer .
2. Tap the ring type you want used for the contact.
Filing a Contact
To file the contact with a certain group of people,
such as business, friends or personal:
1. Tap the down arrow to the right of Group.
2. Tap the group to which you want to file
the contact.
Page 87

13
Managing
Contacts
Tip:
You can exit the
application by
tapping Done.
Tip:
To turn the phone
on, press and hold
.
Managing Contacts 173
Finding Contacts
You can also search for a contact by last or first
name, phone number , e-mail address or address.
To find a contact:
1. Open the flip.
2. If the Main Menu appears, tap Contacts.
If the Main Menu does not appear , tap Go T o,
and then tap Contacts. The Contacts screen
appears.
3. Tap Action.
4. Tap Find. The Find screen appears.
5. Enter any information that you know about
the contact. This can be a phone number or
a first name.
6. Tap Done. The Search Results screen appears
with a list of matching contacts.
7. Tap the contact you want. The phone numbers
for that person appears. You can then view details
or call the contact if the phone is on.
172 Managing Contacts
Looking Up Contacts
To search for a contact by last name, perform the
following steps:
1. Open the flip.
2. If the Main Menu appears, tap Contacts.
If the Main Menu does not appear , tapGo To,
and then tap Contacts. The Contacts screen
appears.
3. Tap Action.
4. Tap Look Up. The Lookup Contacts screen
appears.
5. Enter the last name of the person for which you
are searching. As you add each letter , the display
updates to show names with the same characters.
6. Once you see the contact you are looking for, tap
the name. The phone numbers for that person
appear . To call the person when the phone is on,
you can tap the phone icon. To view more details
on the person, tap Detail.
Page 88

13
Managing
Contacts
Tip:
For more on using
the onscreen
keyboard, see Using
the Touch Screen
on page 32.
Managing Contacts 175
Erasing Contacts
There may be times when you do not need a
person’s address and phone number . T o erase
a contact:
1. Open the flip.
2. If the Main Menu appears, tap Contacts. If the
Main Menu does not appear , tap Go T o, and
then tap Contacts. The Contacts screen
appears.
3. Tap the tab containing the first letter of the
contact’s last name.
4. Highlight the contact you want to delete.
5. Tap Action.
6. Tap Erase. The “Erase Item?” screen appears.
7. Tap OKto confirm that you want to erase
the contact.
174 Managing Contacts
Changing Contacts
To change information about a contact:
1. Open the flip.
2. If the Main Menu appears, tap Contacts. If the
Main Menu does not appear , tap Go T o, and
then tap Contacts. The Contacts screen
appears.
3. Tap the tab containing the first letter of the
contact’s last name.
4. Tap the contact’ s name.
5. Tap Details. Details about the contact appears.
6. Tap the lines to the right of a field that has
changed.
7. Enter the new information.
8. Repeat steps 6 and 7 until all the information
is updated.
9. Tap Done.
Page 89

14
Date Book
Using the Date Book
177
14
Using the Date Book
In This Section
Adding Appointments
Changing the Date Book View
Finding a Date Book Entry
Erasing a Date Book Entry
W
ouldn’t life be much easier if you could consolidate all the items you carry
around on a daily basis into your Sprint PCS Phone? Your dreams have
finally been answered. This section explains how to turn your Sprint PCS Phone
into your daily planner , allowing you to set appointments, add appointment
attendees and set alarms for appointments so that you can throw away that
clunky planner you’ve been carrying around everywhere.
176 Managing Contacts
Editing Group Names
You can file contacts into different groups. With
your Sprint PCS Phone, there are six predefined
groups. If a group name does not fit into your
lifestyle, you can change the name of the group. To
change a group’s name:
1. Open the flip.
2. If the Main Menu appears, tap Contacts. If the
Main Menu does not appear , tap Go T o, and
then tap Contacts. The Contacts screen
appears.
3. Tap Action.
4. Tap Edit Group. A list of groups appears.
5. Tap the group name you want to change.
6. Enter the new name for the group.
7. Tap Done. The list of group names reappears.
8. Tap Doneagain.
Page 90

Note:
You can set an
appointment for all
day by tapping
All Day.
14
Date Book
Tip:
You can also
synchronize your
Sprint PCS Phone to
Microsoft Outlook.
Tip:
You can scroll to
the right by tapping
the rocker key or
using the right
button on the
navigation arrows.
Using the Date Book 179
Adding a Date
To define the date the appointment:
1. Tap the line to the right of Date. The Select Date
screen appears.
2. Tap the month in which the appointment will
take place. The Calendar for that month appears.
3. Tap the date in which the appointment will
take place.
4. Tap OK.
Adding a Start and End Time
To define the appointment’ s start and end time:
1. Tap the line to the right of Start T imeor the Set
Time button in the Select Date screen. The Set
Time screen appears.
2. Tap Start Time — Hour .
3. Tap the hour in which the appointment starts
from the Set Hourfield. One column is AM and
the other column is for PM.
4. Tap Start Time-minutes .
5. Tap the minutes in which the appointment starts
from Set Min.
6. To define the end time of the appointment, repeat
steps 2 through 5 for the End Time fields.
7. Tap OK.
178 Using the Date Book
Adding Appointments
You can either add appointments directly into your
Sprint PCS Phone or create appointments using the
TP3000 Desktop software that came with the phone
or Microsoft Outlook 97, 98, or 2000 and then
download the appointments to your phone through
the synchronization process. For more information
about downloading appointments to your
Sprint PCS Phone, see “Syncing to your PC” on
page 209.
To add an appointment directly into your
Sprint PCS Phone:
1. Open the flip.
2. If the Main Menu appears, tap Date Book. If
the Main Menu does not appear , tap Go T o, and
then tap Date Book. The Date Book screen
appears.
3. Tap Action.
4. Tap New.
5. Add the information related to the appointment
as outlined in the following sections. After
adding appointment information, tap Doneto
add the appointment.
Page 91

14
Date Book
Using the Date Book 181
Defining an Appointment as Repeating
To set an appointment to repeat:
1. Tap the line to the right of Repeat. The Set
Repeat By screen appears.
2. Tap either Day, Week, Monthor Year
according to how often you want to be notified of
the appointment.
3. Depending on how often the appointment is
repeated, the bottom of the screen is different.
If Day was selected, select either Every
Day or Weekday by tapping it. You can customize
the Every 01 Day by tapping the right arrow .
If Week was selected, tap either Every
Day or Every Day (S, M, T u, W , etc.).
Then tap the left arrow to select the number of
weeks between appointments.
If Month was selected, tap either Every
Month X Day or Every Month Day of
the Week. Then tap the left arrow to select the
number of months between appointments.
If Year was selected, tap either Every
Year , X Day , Month or Every Y ear Day ,
Month for the following years. Then tap the left
arrow to select the number of years between
appointments.
4. Tap the date to the right of Until. The calendar
appears.
5. Tap the month in which the appointment ends.
6. Tap the day in which the appointment ends.
7. Tap OK.
180 Using the Date Book
Adding an Alarm
To define when an alarm will go off for the
appointment:
1. Tap the line to the right of Alarm. The Set Alarm
screen appears.
2. Tap either None, On T imeor 00:15 before.
Selecting None indicates that no alarm will
sound.
Selecting On Time indicates that an alarm will
sound at the exact time that the appointment is
to start.
Selecting 00:15 before indicates that an alarm
will sound 15 minutes before the appointment is
to happen.
3. If you select 00:15 before, you can change the
amount of time to be more or less. To change the
amount of time, tap the numbers related to the
time in the onscreen keypad.
4. Tap OK.
Tip:
If the information for
an appointment
does not fit on the
screen, use the
rocker key or the
down arrow on the
navigation keys to
view the
information.
Page 92

14
Date Book
Tip:
For more on using
the onscreen
keyboard, see
“Entering Information in PIM Mode”
on page 37.
Using the Date Book 183
Adding a Description
To add a description for the appointment:
1. Tap the line to the right of Description. The
Description screen appears.
2. Enter a description of the appointment, which
appears on the summary screen of all
appointments.
3. Tap Done.
182 Using the Date Book
Adding Attendees
You can add attendees from your contacts list. This
allows an easy way to get a contact’s phone number
you might want to call during the appointment.
To define appointment attendees:
1. Tap the line to the right of Attendees. The
Lookup Contacts screen appears.
2. Enter the last name of a person that will be
attending the appointment. The list of names
updates to match the characters you enter .
3. Tap the person you want to add to the
appointment. The Meeting Attendees screen
appears.
4. Tap Add Attendees.
5. Repeat 2 through 4 until all attendees are added.
6. When done adding attendees, tap Done. A list of
meeting attendees appears.
7. Tap Doneagain.
Adding a Location
To define a location for the appointment:
1.
Tap the line to the right of Location. The Set
Location screen appears.
2. Enter the name of the location.
3. Tap Done. The Datebook Edit screen appears.
Page 93

14
Date Book
Using the Date Book 185
Month View
Month View shows the calendar of your events for an
entire month.
To display month view:
1.
Tap Action.
2. Tap Month View.
3. Tap the right arrow on the navigation control
to display the next month. Tap the left
arrow to display the previous month.
4. Tap a day to see a list of appointments for
that day .
184 Using the Date Book
Changing the Date Book View
You can choose to view your appointments for a
week or for a month.
Week View
Week View shows appointments for an entire week.
This view lets you quickly review your appointments
and available time slots. In addition, you can spot
appointment conflicts and overlaps with this view .
To display week view:
1.
Tap Action.
2. Tap Week View.
3. Tap the right arrow on the navigation control
to display the next week. Tap the left
arrow to display the previous week.
4. Tap an event to see a description of the event.
To add an event in week view:
1. Tap the day in which you want to add an
appointment. A list of appointments for that
day appears.
2. Tap Action.
3. Tap New.
4. Enter the information for the appointment as
you did on page 178.
The Week View automatically shows appointments
between 8 a.m. and 5 p.m. If you have an event
before or after this time span, tap the onscreen up
and down scroll arrows or the rocker key to
scroll to an event.
Page 94

14
Date Book
Tip:
For more on using
the onscreen
keyboard, see
“Entering Information In PIM Mode”
on page 37.
Using the Date Book 187
Erasing a Date Book Entry
There may be times when you want to erase an
appointment. To do so:
1. While in the Daily View of the Datebook, find and
tap the box to the left of the appointment you
want to erase.
2. Tap Action.
3. Tap Erase. “Erase Item?” appears.
4. Tap OKto erase the entry . The Daily View of the
Datebook appears without the appointment.
186 Using the Date Book
Finding a Date Book Entry
You may have an appointment coming up, but you
don’t remember when it will take place. If you know
some of the details regarding the appointment, such
as attendees or description, you can search for that
appointment using that criteria.
To find an appointment:
1. Open the flip.
2. While in the Daily View of the Datebook, tap
Action.
3. Tap Find. The Find screen appears.
4. Enter any information that you know about the
appointment.
5. Tap Done. The Search Results screen appears.
6. Tap the appointment you want to view .
Page 95

15
To Do List
Using the To Do List
189
15
Using the To Do List
In This Section
Adding a Task to the T o Do List
Changing a Task
Completing a Task
Finding a Task
Viewing Tasks
Erasing a Task
M
anaging your daily tasks can be a chore, but not with your Sprint PCS
Phone. This section outlines how you can manage your time more
effectively by using the To Do List.
188 Using the Date Book
Page 96

Tip:
You can set your
synchronization
software to remove
completed tasks
from the phone.
15
To Do List
Tip:
For more on using
the onscreen
keyboard, see
“Entering Information in
PIM Mode” on
page 37.
Using the To Do List 191
Changing a T ask
There may be a time when you need to change
the task name or the due date of the task. To change
a task:
While in the To Do List screen, tap the task you
want to change. The To Do Edit screen appears.
Changing a Due Date
To change the task’ s due date:
1. Tap the line to the right of Due. The Select Due
Date screen appears.
2. Tap the month in which you need to complete
the task.
3. Tap the day in which you need to complete
the task.
4. Tap OK. The onscreen keyboard displays.
Changing a Title
To change the title of a task:
1. Tap the line to the right of Note. The T o Do Note
Edit screen appears.
2. Change or add information about the task.
3. Tap Done. The T o Do Edit screen appears.
4. Tap Doneagain to save changes to the task.
190 Using the To Do List
Adding a T ask to the T o Do List
A task is a reminder of something you need to do.
To add a task to the To Do List:
1.
Open the flip.
2. If the Main Menu appears, tap T o Do List. If the
Main Menu does not appear , tap Go T o, and
then tap T o Do List. The To Do List screen
appears.
3. Tap Action.
4. Tap New. The T o Do Note Edit screen appears.
5. Tap the empty line.
6. Enter the task that you need to complete.
7. Tap Done. The T o Do Edit screen appears.
8. Tap Doneagain. The To Do List screen appears
with the new task added.
Adding a Due Date
1. Tap the line to the right of Due. The Select Due
Date screen appears.
2. Tap the month in which you need to complete
the task.
3. Tap the day in which you need to complete
the task.
4. Tap OK. The T o Do Edit screen appears.
5. Tap Done. The T o Do screen appears with task
items listed by the date in which they must be
completed. Tasks that do not have due dates are
listed last.
Page 97

15
To Do List
Using the To Do List 193
Finding a T ask
If you have a long list of tasks, you may not want to
scroll through the list. To find the task quickly:
1. While in the list you want to search (All,
Completed or Active) on the To Do List screen,
tap Action.
2. Tap Find. The Find screen appears.
3. Enter any information that you know about
the task.
4. Tap Done. The Search Results screen appears.
5. Tap the task that you want to review .
192 Using the To Do List
Completing a T ask
After completing a task, you will want to mark it as
being completed. To do so:
While in the To Do List screen, tap the box to the
right of the task. A check mark displays in the
box, indicating the task is complete.
If you were only displaying active tasks, marking
an active task complete displays the Completed
List. If you were displaying all tasks, the
completed task is moved to the end of the list.
Page 98

16
Calculator
Using the Calculator
195
16
Using the Calculator
In This Section
Performing Simple Calculations
Working with Numbers Stored in Memory
E
ver been in a situation in which a calculator would have come in handy?
With the Personal Information Management (PIM) System on your
Sprint PCS Phone, you can perform addition, subtraction, multiplication,
division, exponentials, percentages and square root functions. Within the
calculator , you can perform basic calculations, store and retrieve values,
display
the last series of calculations and copy figures from the calculator to be pasted into
other programs.
194 Using the To Do List
Viewing T asks
There are many methods by which you can choose
to display tasks. For instance, you may want to
review the tasks you have completed. The following
section provides steps to do just that.
To show tasks:
1. While on the To Do List screen, tap the down
arrow on the top right of the screen. The
available list types appear .
2. Tap the type of task you want to view . Y ou can
choose between Active, Completedor All.
Erasing a T ask
There may be times when you want to erase a task.
To do so:
1. While on the To Do List screen, tap the box to the
left of the task you want to erase.
2. Tap Action.
3. Tap Erase. “Erase Item?” appears.
4. Tap OKto erase the task. The To Do List screen
appears without the task.
Page 99

17
Memo Pad
Using the Memo Pad
197
17
Using the Memo Pad
In This Section
Adding or Changing a Memo
Finding a Memo
Erasing a Memo
T
he Memo Pad provides a place to take notes that are not associated with
records in the Date Book, Contacts or To Do List. Use it like a piece of scratch
paper to make a note during a meeting or write down your grocery list.
196 Using the Calculator
Performing Simple Calculations
To perform a simple calculation:
1. Open the flip.
2. If the Main Menu appears, tap Calculator. If
the Main Menu does not appear , tap Go T o, and
then tap Home. Tap Calculator. The
Calculator screen appears.
2. Tap the first number in the calculation.
3. Tap +to add, -to subtract, *to multiply, or /
to divide.
4. Tap the next number in the calculation.
5. Tap =.
Working with Numbers Stored
in Memory
To store a number:
Tap STO. When you store a number in
memory , an M= appears in the box above the
memory options.
To recall a displayed number:
Tap Rcl. If you store another number in
memory , it replaces the number currently
in memory .
To clear the memory:
Tap Ctwice.
Page 100

Tip:
You can set your
sychronization
software to archive
older memos on
your computer.
Note:
If no items are
checked, the
currently selected
item will be erased.
17
Memo Pad
Tip:
For more on using
the onscreen
keyboard, see
“Entering Information in
PIM Mode” on
page 37.
Tip:
If the information for
a memo does not fit
on the screen, use
the rocker key or tap
the down arrow on
the navigation keys
to view the
information.
Using the Memo Pad 199
Finding a Memo
If you have a long list of memos, you may not want
to scroll through the list. To find the memo quickly:
1. While in the MemoPad List screen, tap Action.
2. Tap Find. The Find screen appears.
3. Enter any information that you know is in
the memo.
4. Tap Done. The Search Results screen appears.
5. Tap the memo that you want to review . The
Memo Pad Edit screen appears.
Erasing a Memo
There may be times when you want to erase a
memo. To do so:
1. While on the MemoPad List screen, tap the box to
the left of the task you want to erase.
2. Tap Action.
3. Tap Erase. “Erase Item?” appears.
4. Tap OKto erase the memo. The Memo Pad List
screen appears without the task.
198 Using the Memo Pad
Adding or Changing a Memo
T o add or change a memo to the
Memo Pad:
1. Open the flip.
2. If the Main Menu appears, tap Memo Pad. If
the Main Menu does not appear , tap Go T o, and
then tap Memo Pad. The MemoPad List
screen appears.
3. Tap Action.
4. Tap New. The Memo Pad Edit screen appears.
5. Enter the memo that you want to add.
6. Tap Done. The Memo Pad Edit screen appears.
7. Tap Doneagain. The Memo Pad List screen
appears with the new memo added.
 Loading...