

Page 1
Phone and Feature Guide
•
Touch Screen and Navigation
•
3.2 MP Camera/Camcorder
•
PC-like Web Browsing
•
Android™ Market
•
Wi-Fi® and Bluetooth® Connectivity
Additional charges may apply. Visit att.com/
gophone for more details. Phone features subject
to change without prior notice. All phone screens
are simulated. Product color may vary. See user
guide for Spanish instructions.
Printed in Mexico QSG MFL67223701
Page 2
Setting Up Your Phone
Before you can start exploring your
LG Thrive, you’ll need to set it up.
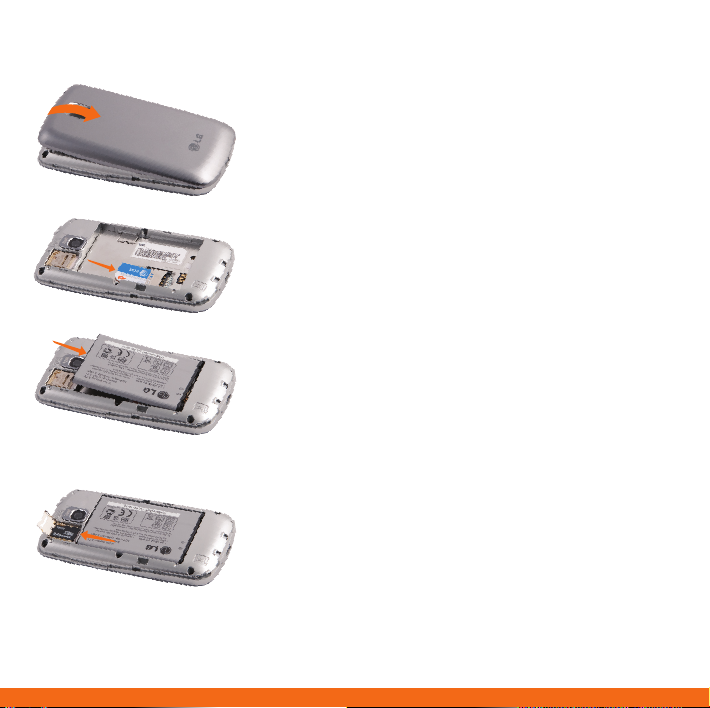
Installing the SIM Card and Battery
1. To remove the back cover, hold the phone firmly
in your hand. With the other hand, firmly press
your thumb on the back cover and lift off the
battery cover with your forefinger via the notch
at the top of the cover.
2. Slide the SIM card into the SIM card holder. Make
sure the gold contacts on the card are facing
downward.
3. Insert the battery into place by aligning the gold
contacts on the phone and the battery.
4. Replace the back cover of the phone.
Installing the Memory Card
1. Turn the phone off before inserting or removing
the memory card. Remove the back cover.
2. Slide up on the slot protector to open it. Insert
the memory card into the slot. Make sure the
gold contacts are facing downward.
3. Close the slot protector and slide it down until it
locks into place.
4. Replace the back cover of the phone.
Page 3
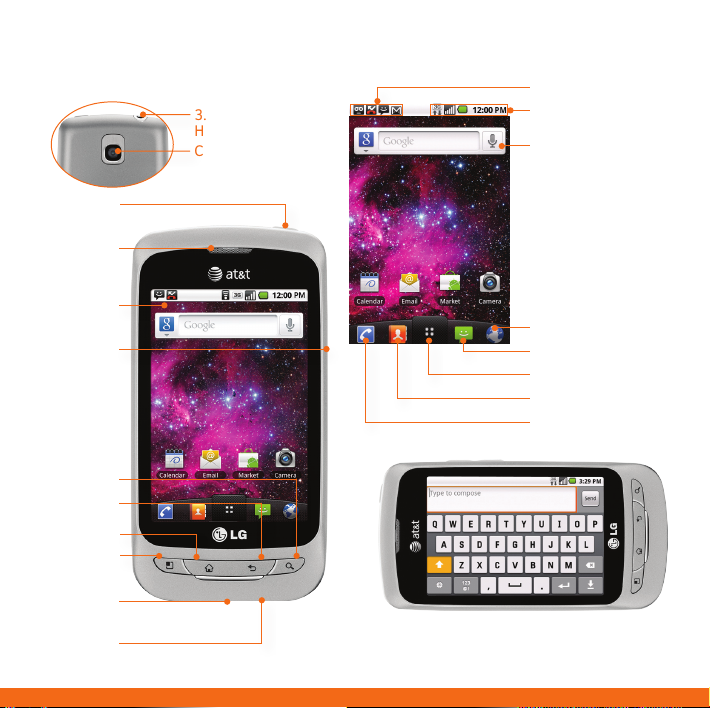
Getting to Know Your Phone
(back)
3.5mm
Headset Jack
Camera Lens
Power/
Lock Key
Earpiece
Touch
Screen
Volume Up/
Down Keys
Search Key
Back Key
Home Key
Menu Key
Micro USB
Charging Port
Microphone
For more information, visit att.com/Tutorials.
Notification Bar
Network & Time
Indicators
Google Search Bar
Web
Messaging
Application Launcher
Address Book
Dialer
When entering text, turn phone
to a horizontal position to use
the landscape keyboard.
Page 4
Calling and Voicemail
Quickly call family and friends and check
voicemail with just a few touches!
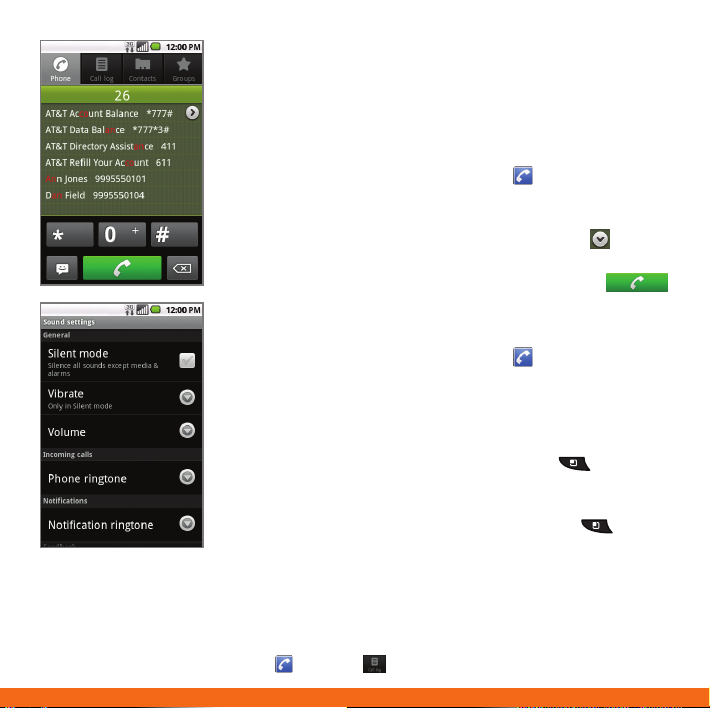
Making a Call
1. From the home screen, touch .
2. Dial the number you want to call or start spelling
the name of the desired contact. You will see a
list of contact options to choose. Touch
expand the list.
3. Touch the desired contact and then touch
to place the call.
Accessing Voicemail
1. From the home screen, touch .
2. Press and hold the 1 Key.
3. Follow voice prompts to listen to messages.
Managing Ringtones
1. To change your ringtone, press the (Menu)
Key. Then touch Settings > Sound > Phone
ringtone.
2. To change ringtone volume, press the
(Menu) Key. Then touch Settings > Sound >
Volume. You may also press the Volume Keys
when the phone is ringing.
to
Note: To view your call log, touch and then Call log.
Page 5
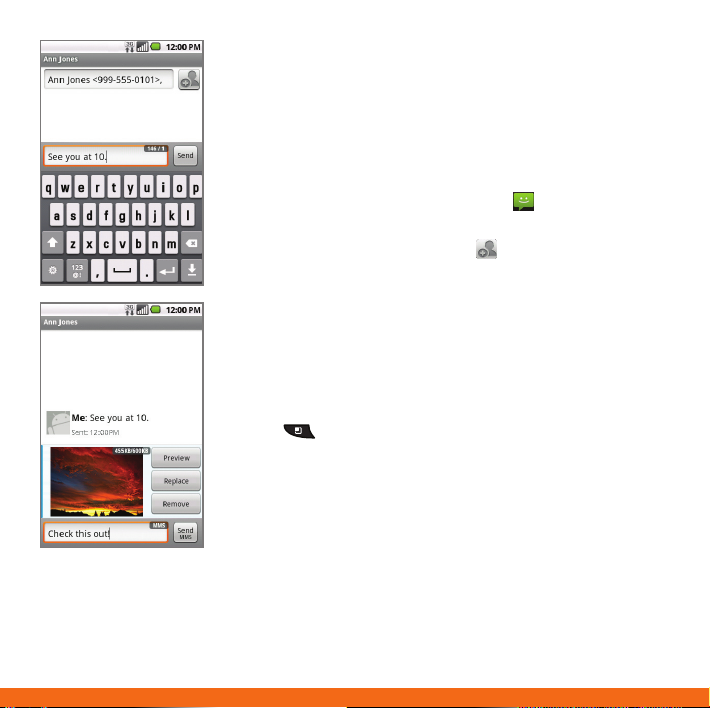
Text Messaging
When you need to communicate privately
and quickly, use text messaging to send text
messages to other wireless phones.
Sending a Text Message
1. From the home screen, touch .
2. Touch New message.
3. Enter a number or touch
Address Book. Touch a contact to address
the message.
4. Touch the Type to compose field and use the
keyboard to enter your message.
5. Touch Send.
Inserting a Picture or Video
1. While composing a message, press the
(Menu) Key.
2. Touch Attach > Pictures or Videos.
3. Touch an album, and then touch a picture
or video in the album to attach it.
4. Touch Send MMS.
Please don’t text and drive.
to browse your
Note: When entering text, turn the phone to a horizontal position to use the larger
landscape keyboard.
Page 6

Touch Screen and Navigation
Your phone features a touch screen that makes
navigation as quick and easy as a simple tap or
swipe of the finger.
Navigation Tips
• Use your fingertip to lightly touch the screen and
select options.
• Use quick flicks of your finger on the touch screen
to scroll up/down and left/right.
• The Notification Bar includes timely information,
including new message, email, and voicemail
notifications; missed calls; and calendar
reminders. Touch the bar and slide it down with
your finger to see full details. Press the
Key to close the bar.
•
•
•
•
(Back) Key: Return to previous screen.
(Home) Key: Return to the main home
screen.
: Opens the Application Launcher, where you
can find all of your applications.
(Menu) Key: Opens a contextual menu with
more options for the current screen.
Entering Text
Use the full keyboard for entering text when
composing text messages, emails, etc.
(Back)
Note: Turn phone to a horizontal position to use the larger landscape keyboard.
Page 7

Customizing Home Screens
Add shortcuts and widgets to your home
screens to personalize your phone!
Adding Custom Elements to the Home Screen
1. Touch and hold a blank space on one of the
home screens. You will be presented with 4
options to choose from:
• Shortcuts: Add application, web bookmark,
contact, email, and music playlist shortcuts to
the home screen.
• Widgets: Add dynamically updating widgets
to your home screen to allow quick access to
applications without opening the full app.
• Folders: Add folders to organize contacts
and shortcuts.
• Wallpapers: Change your home screen
wallpaper.
2. Touch the option you desire and follow
instructions.
3. To move a widget, shortcut, or folder, touch and
hold it and drag it to a new location. To delete it,
touch and hold it and drag it to
.
Note: For additional space, expand to 7 home screens. From the home screen, press the
(Menu) Key. Touch Home settings > 7 > OK.
Page 8

Address Book
With your Address Book, you can easily keep in
touch with all of your favorite people.
Adding a Contact
1. From the home screen, touch .
2. Touch
3. Touch each field and enter the contact’s
information. To add more fields, touch
To remove a field, touch
4. Touch More to see more categories, such as
IM, Nickname, and Event (to enter events such
as a birthday or anniversary).
5. Touch Done to save the contact.
Note: To add a recent call to your Address Book, locate the number in your call log, touch
and hold the number, and select Add to contacts. Touch or choose from a list of
existing contacts.
.
.
.
Page 9

Note: While 3G data
connection is turned off,
applications like your
web browser, Android
Market and others that
use data will not work,
unless you are connected
to a WiFi network.
Data & Account Management
Monitor and manage your data usage on your
phone with these easy tools!
Data Network Widget
1. From the home screen, swipe left to move right, to
the second home screen.
2. Touch the Data network widget and then touch
OK to turn 3G data off. (The 3G symbol will become
grayed out.)
3. To turn 3G data back on, touch the icon and then
touch OK again. (The 3G symbol will become white.)
Application Manager
1. From the home screen, swipe left to the second
home screen.
2. Touch the Running Apps widget to open the
application.
Data Balance Check
1. From the home screen, tap .
2. Touch AT&T Data Balance.
3. Touch the number in the contact record to create
a balance request. You will receive a text message
with your current data balance.
4. To quickly add this link to your home screen, from
the full contact record, press
then touch Add to homescreen.
(Menu) Key and
Page 10

Camera
Take pictures and record videos with the
3.2 megapixel camera/camcorder. Then
easily share them with friends and family.
1. From the home screen, touch and
rotate the phone to a horizontal position.
2. Adjust settings, such as zoom, brightness,
resolution, and picture mode, by touching
buttons on the left side of the screen. To
take a picture, touch
3. When done, touch Share.
• To post immediately to social
networks, select Facebook or Twitter.
• To post to an online Picasa photo
album, select Picasa.
• Select Messaging to send the photo
directly to a phone.
• Email the photo to an email address.
Note: To use the camcorder, slide the camera indicator to camcorder . Touch to
start and to stop recording video.
Photos are saved in the Gallery. If you have a Gmail™ account, you can also access your
Picasa albums in the Gallery. When emailing, sharing or uploading photos, data charges
will apply.
.
Page 11

Note: Data use charges
will apply.
Internet
Browse the web with ease with the full HTML
PC-like web browser!
1. From the home screen, touch .
2. Scroll up and down the screen to navigate and
touch links to open them. Double-tap on the
screen to zoom in; double-tap again to zoom
back out.
3. Press the
• New window – Open a new window.
• Bookmarks – View and add bookmarks and
see your browsing history and
most-visited sites list.
• Windows – Show all open windows.
• Refresh – Refresh the current page.
• Forward – Goes to the next page in your
browsing history, if available.
4. To visit another website, touch the web address
bar
an address, and touch
(Menu) Key to view options:
at the top of the page, enter
.
Page 12

Note: Data usage and
subscription charges
may apply.
AT&T Services
Make your phone do more for you with useful
apps from AT&T.
AT&T Code Scanner: Scan barcodes you find in
magazines, in stores, and online, and see video
clips, get coupons, or learn more about your
favorite products and services!
AT&T Hot Spots: Locate free AT&T Wi-Fi Hot
Spot locations around the country.
AT&T Mobile Care: Get up-to-date account
information, refill, and manage your account,
right from your phone!
AT&T Navigator: Get voice-guided, turn-by-turn
driving directions and traffic updates right on
your phone!
AT&T Radio: Listen to your favorite personal,
genre, and local music, news, and talk radio
stations from around the country, wherever
you are!
YPmobile: Find restaurants, bars, businesses,
and more, whether around the corner or across
the nation.
For more AT&T apps, visit the AT&T tab in Android Market. For more information about how
to use these services on your phone, visit att.com/Tutorials.
Page 13

Note: When you log in
to Gmail, your phone will
also sync with your other
Google services, such as
contacts, calendar, and
Picasa™ photo albums.
Data charges will apply.
Email
Carry your email inbox in your pocket! You can
access numerous providers, including Gmail and
corporate email.
Setting Up Gmail
1. From the home screen, touch .
2. Touch
3. Touch Next > Sign in.
4. Enter your username and password and touch
Sign in.
5. Touch Finish setup to view your inbox.
Setting Up Additional Accounts
1. From the home screen, touch .
2. Touch MS Exchange or Others. Contact your IT
administrator to help set up your corporate MS
Exchange account.
3. Enter your email address and password and
touch Next.
4. Follow additional instructions. When complete,
touch Done to view your inbox.
Sending an Email
1. From the home screen, touch from the App
menu or
2. Press the
3. Complete your message and touch Send.
.
from the home screen.
(Menu) Key, and select Compose.
Page 14

Android Market™
With thousands of apps to choose from, you’re
sure to find just what you’re looking for in
Android Market.
1. From the home screen, touch .
2. Read the Terms of Service and touch Accept.
3. You can select from featured apps or an app
category, or you can search for a specific app.
Touch
4. Touch an app to view details. Touch FREE (free
apps) or the price (paid apps) to download and
install it.
5. Read the application’s access requirements
and touch OK.
6. Once the app has been downloaded and
installed, you will see a notification in the
Notification Bar and it will appear in the
Downloads category at the bottom of the
Application Launcher.
to enter a search term, and then touch
again to search.
Note: Data usage charges will apply. To purchase a paid app, you’ll need to set up a
payment method with Google Checkout™.
Page 15

Connectivity
Pair with a Bluetooth device or connect
to a Wi-Fi network for data usage, all on
your phone!
Note: Please consult
documentation included
with Bluetooth device for
information on pairing mode
and passcode (typically
0 0 0 0 – four zeroes).
Your qualifying data plan
includes unlimited usage
on AT&T’s national Wi-Fi
network at no additional
charge. Other restrictions
apply. For details and
locations see the AT&T
Hotspots application on your
phone or visit attwificom.
As an added convenience,
AT&T has shipped certain
smartphones with Wi-Fi
enabled as a default setting.
Leaving Wi-Fi enabled
when not connected to a
Wi-Fi network may affect
battery life.
To manage your wireless and Bluetooth settings,
from the home screen, press the
(Menu) Key
and then touch Settings > Wireless & networks.
Using Bluetooth
1. From the Wireless & networks screen, touch
Bluetooth to turn on the Bluetooth setting.
2. Touch Bluetooth settings > Scan for devices.
3. Touch the name of the device you wish to pair
with, and then touch Pair to pair and connect.
Connecting to Wi-Fi
1. From the Wireless & networks screen, touch
Wi-Fi if the setting is not already on. Your phone
will then begin searching for available Wi-Fi
networks.
2. Touch Wi-Fi settings to view a list of available
networks. Once you locate your desired network,
touch the name, and then touch Connect. (You
may be asked to enter a Wi-Fi network password.)
Page 16

Accessories
Accessories for productivity, convenience, and fashion are available at
att.com/WirelessAccessories.
Bluetooth Headset
Custom Cases
Vehicle Power Charger
Find More Information
On The Web – The tutorials on your in-box CD can also be found on the web at
– Detailed support information, including device specifications, trouble-
On The Phone – Access the Mobile Care application on your phone to view account
LG is a registered trademark of LG Electronics, Inc. Thrive™ is a trademark of LG Electronics,
Inc. Google and the Google logo are trademarks of Google Inc. Android is a trademark
of Google Inc. The Bluetooth® word mark and logos are registered trademarks owned
by Bluetooth SIG, Inc. © 2011 AT&T Intellectual Property. All rights reserved. AT&T, the
AT&T logo and all other AT&T marks contained herein are trademarks of AT&T Intellectual
Property and/or AT&T affiliated companies. Subsidiaries and affiliates of AT&T Inc. provide
products and services under the AT&T brand. All other marks contained herein are the
property of their respective owners.
See user manual on the in-box CD for instructions in Spanish.
att.com/Tutorials.
shooting, user forums, and knowledge base articles, is available at
att.com/DeviceSupport.
balance information, add money to your account, view and modify
account features, or contact customer care.
 Loading...