

Page 1
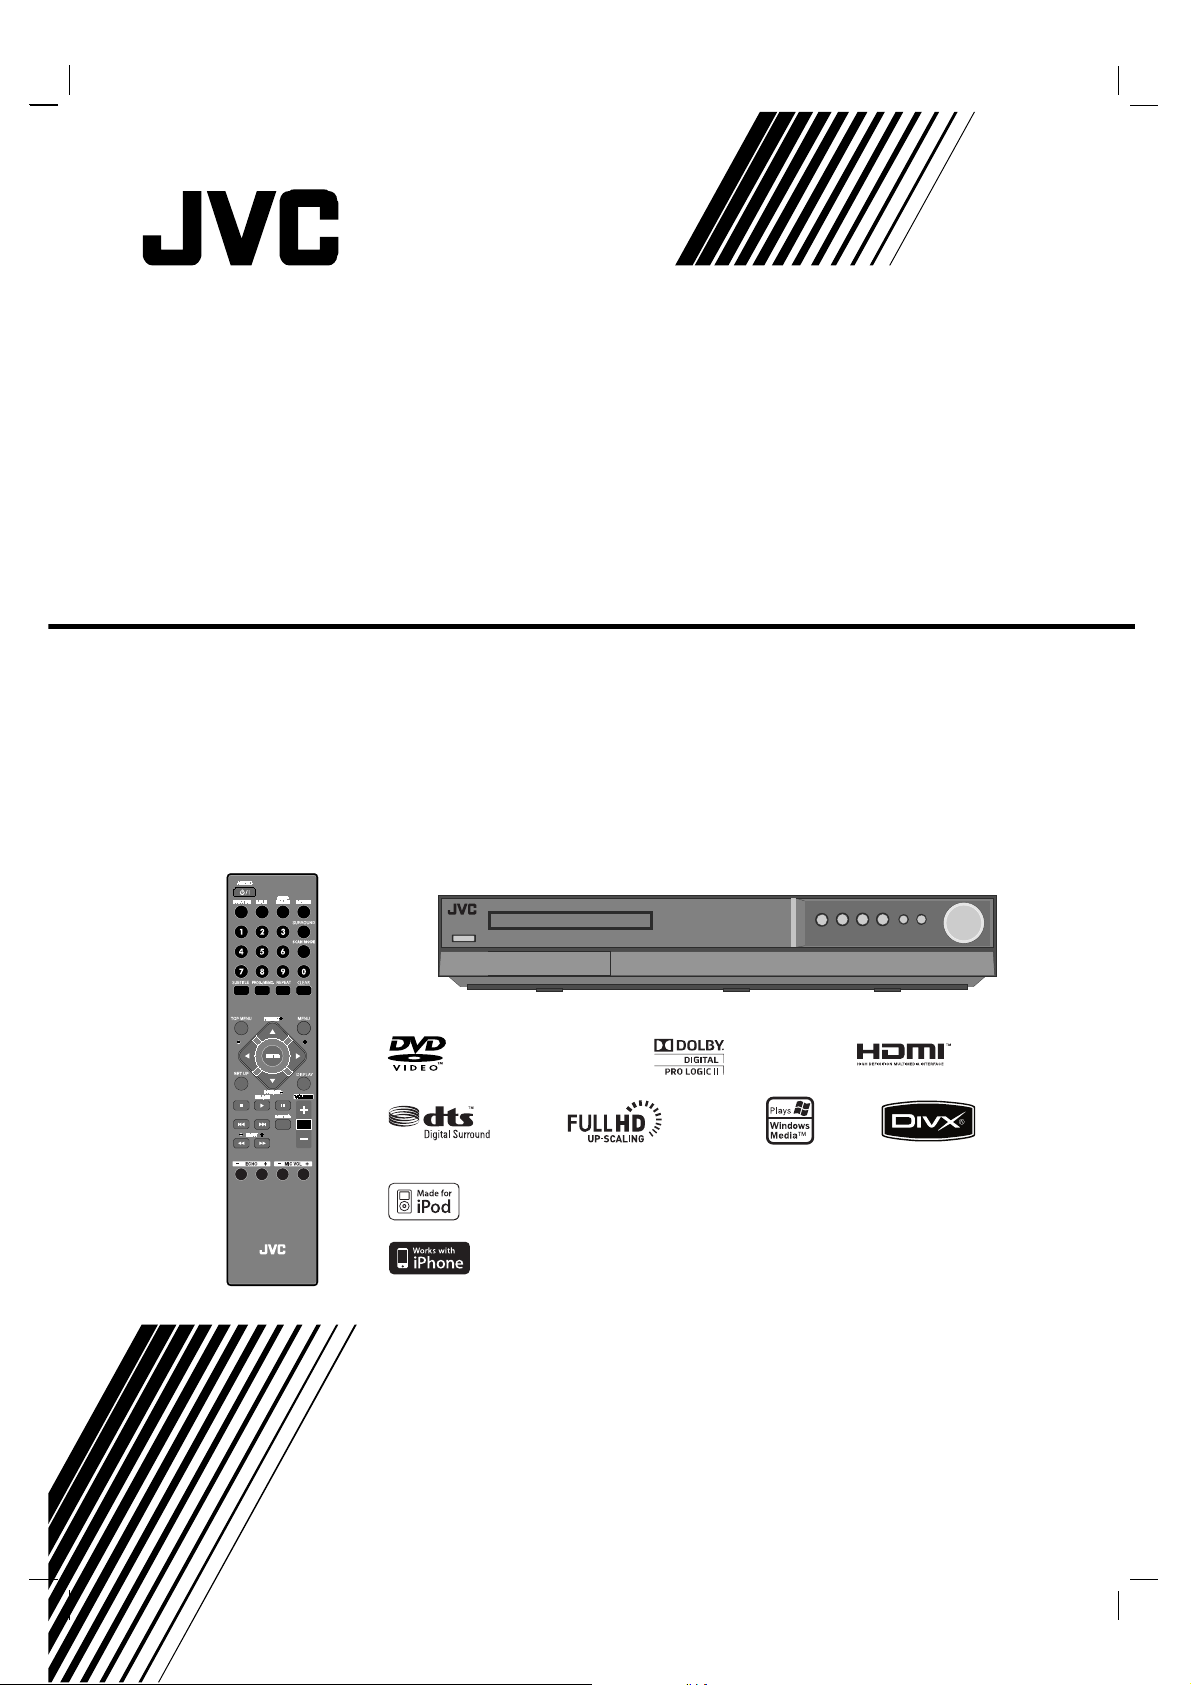
TH-G41
Consists of XV-THG41, SP-THG51F,
SP-THG61C and SP-THG50W
DVD DIGITAL CINEMA SYSTEM
INSTRUCTIONS
LVT2052-022A
[UX]
HT994SJ-AHP_BAREJJK
TUNING TUNING
iPod is a trademark of Apple Inc., registered in the U.S. and other countries.
iPhone is a trademark of Apple Inc.
Page 2
G-1
This lightning flash with arrowhead symbol within
an equilateral triangle is intended to alert the user
to the presence of uninsulated dangerous voltage
within the product’s enclosure that may be of
sufficient magnitude to constitute a risk of electric
shock to persons.
The exclamation point within an equilateral
triangle is intended to alert the user to the
presence of important operating and maintenance
(servicing) instructions in the literature
accompanying the product.
WARNING: Do not install this equipment in a confined space
such as a bookcase or similar unit.
CAUTION: Do not block any ventilation openings. Install in
accordance with the manufacturer's instructions.
Slots and openings in the cabinet are provided for ventilation
and to ensure reliable operation of the product and to protect
it from over heating.
The openings shall be never be blocked by placing the
product on a bed, sofa, rug or other similar surface. This
product shall not be placed in a built-in installation such as a
bookcase or rack unless proper ventilation is provided or the
manufacturer's instruction have been adhered to.
CAUTION:
This product employs a Laser System.
To ensure proper use of this product, please read this
owner’s manual carefully and retain it for future reference.
Shall the unit require maintenance, contact an authorized
service center.
Use of controls, adjustments or the performance of
procedures other than those specified herein may result in
hazardous radiation exposure.
To prevent direct exposure to laser beam, do not try to open
the enclosure. Visible laser radiation when open. DO NOT
STARE INTO BEAM.
CAUTION:
• Do not block the ventilation openings or holes.
(If the ventilation openings or holes are blocked by a
newspaper or cloth, etc., the heat may not be able to
get out.)
• Do not place any naked flame sources, such as lighted
candles, on the apparatus.
• When discarding batteries, environmental problems
must be considered and local rules or laws governing
the disposal of these batteries must be followed
strictly.
• Do not expose this apparatus to rain, moisture,
dripping or splashing and that no objects filled with
liquids, such as vases, shall be placed on the
apparatus.
• Battery shall not be exposed to excessive heat such as
sunshine, fire or the like.
• The STANDBY/ON button does not completely shut off
mains power from the unit, but switches operating
current on and off.
CAUTION: The apparatus should not be exposed to water
(dripping or splashing) and no objects filled with liquids, such
as vases, should be placed on the apparatus.
CAUTION concerning the Power Cord
Most appliances recommend they be placed upon
a dedicated circuit;
That is, a single outlet circuit which powers only that
appliance and has no additional outlets or branch
circuits. Check the specification page of this owner's
manual to be certain.
Do not overload wall outlets. Overloaded wall outlets,
loose or damaged wall outlets, extension cords,
frayed power cords, or damaged or cracked wire
insulation are dangerous. Any of these conditions
could result in electric shock or fire. Periodically
examine the cord of your appliance, and if its
appearance indicates damage or deterioration, unplug
it, discontinue use of the appliance, and have the cord
replaced with an exact replacement part by an
authorized servicer.
Protect the power cord from physical or mechanical
abuse, such as being twisted, kinked, pinched, closed
in a door, or walked upon. Pay particular attention to
plugs, wall outlets, and the point where the cord
exits the appliance.
To disconnect power from the mains, pull out the
mains cord plug. When installing the product, ensure
that the plug is easily accessible.
CAUTION
RISK OF ELECTRIC SHOCK
DO NOT OPEN
WARNING: TO REDUCE THE RISK OF FIRE OR
ELECTRIC SHOCK, DO NOT EXPOSE THIS
APPARATUS TO RAIN OR MOISTURE AND OBJECTS
FILLED WITH LIQUIDS, SUCH AS VASES, SHOULD
NOT BE PLACED ON THIS APPARATUS.
CAUTION: TO REDUCE THE RISK
OF ELECTRIC SHOCK
DO NOT REMOVE COVER (OR BACK)
NO USER-SERVICEABLE PARTS INSIDE
REFER SERVICING TO QUALIFIED SERVICE
PERSONNEL.
Page 3

1
Introduction . . . . . . . . . . . . . . . . . . .2-5
About the Symbol Display . . . . . . . . . . . . . .2
Symbol Used in this Manual . . . . . . . . . . . . . . .2
Screen Saver . . . . . . . . . . . . . . . . . . . . . . . . . . .2
Notes on Discs . . . . . . . . . . . . . . . . . . . . . . . . . .2
Handling Discs . . . . . . . . . . . . . . . . . . . . . . . .2
Storing Discs . . . . . . . . . . . . . . . . . . . . . . . . .2
Cleaning Discs . . . . . . . . . . . . . . . . . . . . . . . .2
Types of Playable Discs . . . . . . . . . . . . . . . . . .3
Regional Code . . . . . . . . . . . . . . . . . . . . . . . . . .3
Front Panel . . . . . . . . . . . . . . . . . . . . . . . . . . . . .4
Remote Control . . . . . . . . . . . . . . . . . . . . . . . . .5
Remote Control operation . . . . . . . . . . . . . . .5
Remote Control Battery installation . . . . . . . .5
Installation and Setup . . . . . . . . .6-15
TV Connection . . . . . . . . . . . . . . . . . . . . . . . . . .6
Video connection . . . . . . . . . . . . . . . . . . . . . .6
Component Video connection . . . . . . . . . . . .6
Antenna Connection . . . . . . . . . . . . . . . . . . . . .6
Optional Equipment Connection . . . . . . . . . . .7
AUX IN connection (A) . . . . . . . . . . . . . . . . . .7
OPTICAL IN connection (O) . . . . . . . . . . . . . .7
HDMI IN connection (H) . . . . . . . . . . . . . . . . .7
AUDIO IN connection (D) . . . . . . . . . . . . . . . .7
USB connection (U) . . . . . . . . . . . . . . . . . . . .8
iPod connection (I) . . . . . . . . . . . . . . . . . . . . .8
HDMI Connection . . . . . . . . . . . . . . . . . . . . . . . .9
About HDMI . . . . . . . . . . . . . . . . . . . . . . . . . .9
Resolution setting . . . . . . . . . . . . . . . . . . . . . .9
Available resolution according to connection .9
Speaker System Connection . . . . . . . . . . . . .10
Displaying Disc Information on-screen . . . . .11
Initial Settings . . . . . . . . . . . . . . . . . . . . . . .11-15
OSD Initial language settings . . . . . . . . . .11
General Operation . . . . . . . . . . . . . . . . . .12
LANGUAGE . . . . . . . . . . . . . . . . . . . . . . .12
• Menu language . . . . . . . . . . . . . . . . . . .12
• Disc Audio / Subtitle / Menu . . . . . . . . .12
DISPLAY . . . . . . . . . . . . . . . . . . . . . . . . . . .12
• TV Aspect . . . . . . . . . . . . . . . . . . . . . . .12
• Display Mode . . . . . . . . . . . . . . . . . . . . .12
AUDIO . . . . . . . . . . . . . . . . . . . . . . . . . . . . .13
• Dynamic Range Control (DRC) . . . . . . .13
•Vocal . . . . . . . . . . . . . . . . . . . . . . . . . . .13
• HD AV Sync . . . . . . . . . . . . . . . . . . . . .13
• Semi Karaoke . . . . . . . . . . . . . . . . . . . .13
5.1 Speaker setup . . . . . . . . . . . . . . . . . .13-14
LOCK (Parental Control) . . . . . . . . . . . . .14-15
• Initial Setting the Area Code . . . . . . . . .14
• Rating . . . . . . . . . . . . . . . . . . . . . . . . . .15
• Password . . . . . . . . . . . . . . . . . . . . . . . .15
• Area Code . . . . . . . . . . . . . . . . . . . . . . .15
OTHERS . . . . . . . . . . . . . . . . . . . . . . . . . . .15
• DivX(R) VOD . . . . . . . . . . . . . . . . . . . . .15
Operation . . . . . . . . . . . . . . . . . .16-25
General features . . . . . . . . . . . . . . . . . . . . . . .16
Additional features . . . . . . . . . . . . . . . . . . . . .17
Playing an Audio CD or MP3/WMA file . . . . .18
Programmed Playback . . . . . . . . . . . . . . . . . .19
Repeat Programmed Tracks . . . . . . . . . . . .19
Erasing a Track from Program List . . . . . . .19
Erasing the Complete Program List . . . . . . .19
Viewing a JPEG file . . . . . . . . . . . . . . . . . .20-21
Slide Show . . . . . . . . . . . . . . . . . . . . . . . . . .20
Still Picture . . . . . . . . . . . . . . . . . . . . . . . . . .21
Moving to another file . . . . . . . . . . . . . . . . . .21
Rotating the picture . . . . . . . . . . . . . . . . . . .21
Listening to music during slide show . . . . . .21
Playing a DivX Movie file . . . . . . . . . . . . . . . .22
Using iPod . . . . . . . . . . . . . . . . . . . . . . . . . . . .23
General operation . . . . . . . . . . . . . . . . . . . .23
General features . . . . . . . . . . . . . . . . . . . . .23
Presetting the Radio Stations . . . . . . . . . . . . .24
To tune in a station with a weak signal . . . .24
To clear all the stored stations . . . . . . . . . .24
Listening to the Radio . . . . . . . . . . . . . . . . . . .24
To turn off the radio . . . . . . . . . . . . . . . . . . .24
To listen to non-preset radio stations . . . . .24
To select a preset radio station directly . . . .24
Sleep Timer Setting . . . . . . . . . . . . . . . . . . . . .25
Dimmer . . . . . . . . . . . . . . . . . . . . . . . . . . . . . . .25
Muting . . . . . . . . . . . . . . . . . . . . . . . . . . . . . . . .25
Setting the disc ejection lock . . . . . . . . . . . . .25
Enjoying audio form an external source . . . .25
Setting the surround mode . . . . . . . . . . . . . . .25
Reference . . . . . . . . . . . . . . . . . . .26-29
Language Codes . . . . . . . . . . . . . . . . . . . . . . . .26
Area Codes . . . . . . . . . . . . . . . . . . . . . . . . . . . .26
Troubleshooting . . . . . . . . . . . . . . . . . . . . . .27-28
Specifications . . . . . . . . . . . . . . . . . . . . . . . . . . .29
Contents
Page 4
2
To ensure proper use of this product, please read this
owner’s manual carefully and retain it for future
reference.
This manual provides information on the operation
and maintenance of your DVD player. Should the unit
require service, contact an authorized service location.
About the Symbol Display
“ ” may appear on your TV display during operation
and indicates that the function explained in this
owner’s manual is not available on that specific DVD
video disc.
Symbol Used in this Manual
Note:
Indicates special notes and operating features.
Tip:
Indicates tips and hints for making the task easier.
A section whose title has one of the following symbols is
applicable only to the disc represented by the symbol.
All discs and file listed below
DVD and finalized DVD±R/RW
Video CDs
Audio CDs
MP3 files
WMA files
JPEG files
DivX files
Screen Saver
The screen saver activates when there is no
operation made for approximately 5 minutes since a
still picture was last displayed.
To cancel the screen saver, push any key.
Notes on Discs
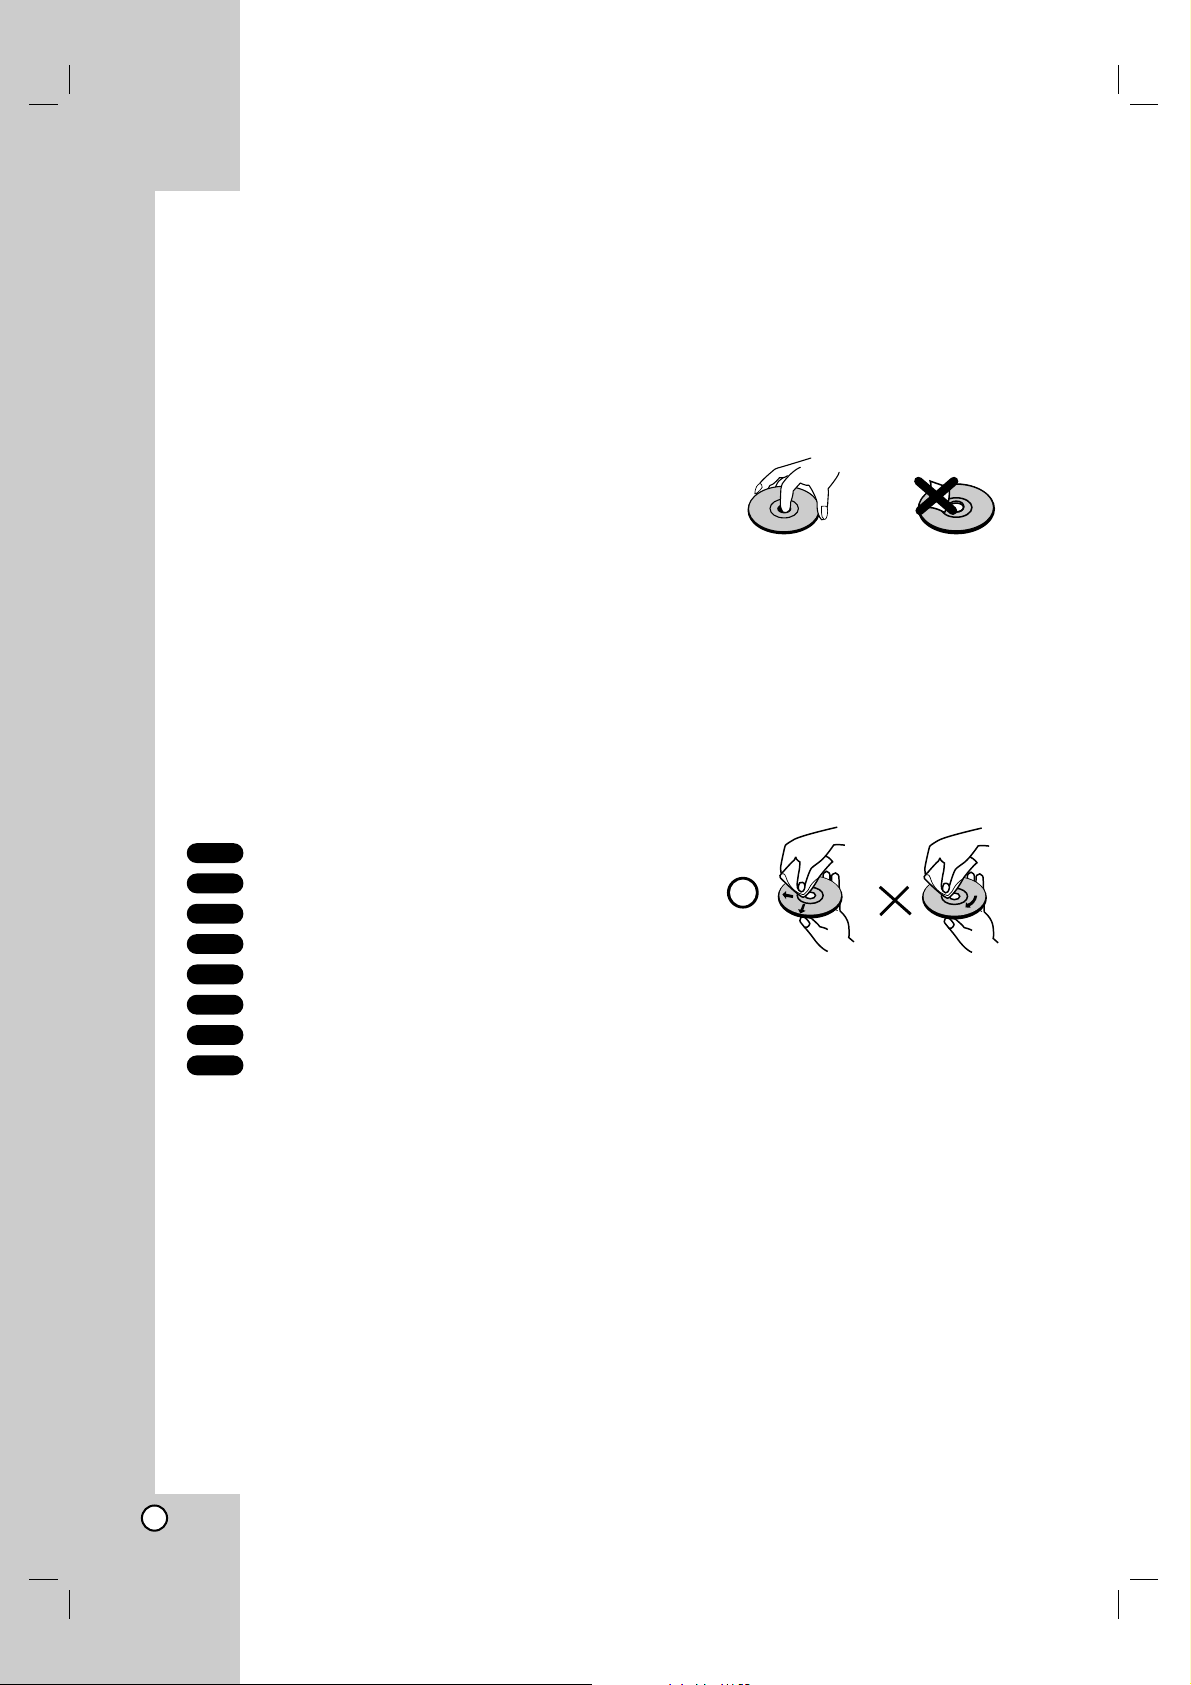
Handling Discs
Do not touch the playback side of the disc. Hold the
disc by the edges so that fingerprints do not get on
the surface. Never stick paper or tape on the disc.
Storing Discs
After playing, store the disc in its case. Do not expose
the disc to direct sunlight or sources of heat and never
leave it in a parked car exposed to direct sunlight.
Cleaning Discs
Fingerprints and dust on the disc can cause poor
picture quality and sound distortion. Before playing,
clean the disc with a clean cloth. Wipe the disc from
the center out.
Do not use strong solvents such as alcohol, benzine,
thinner, commercially available cleaners, or anti-static
spray intended for older vinyl records.
DivX
JPEG
WMA
MP3
ACD
VCD
DVD
ALL
Introduction
Page 5

Operation Reference
Installation and Setup
3
Introduction
Types of Playable Discs
DVD
(8 cm / 12 cm disc)
Video CD (VCD)
(8 cm / 12 cm disc)
Audio CD
(8 cm / 12 cm disc)
In addition, this unit can play a DVD±R, DVD±RW,
SVCD and CD-R or CD-RW that contains audio titles,
MP3, WMA, JPEG or DivX files.
Notes:
• Depending on the conditions of the recording
equipment or the CD-R/RW (or DVD±R/RW) disc
itself, some CD-R/RW (or DVD±R/RW) discs
may not be played on the unit.
• Do not use irregularly shaped CDs (e.g., heartshaped or octagonal) since they may result in
malfunctions.
• This unit requires discs and recordings to meet
certain technical standards in order to achieve
optimal playback quality. Pre-recorded DVDs are
automatically set to these standards. There are
many different types of recordable disc formats
(including CD-R containing MP3 or WMA files) and
these require certain pre-existing conditions (see
above) to ensure compatible playback.
Customers should note that permission is
required in order to download MP3 / WMA files
and music from the Internet. Our company has
no right to grant such permission. Permission
should always be sought from the copyright
owner.
Regional Code
This unit has a regional code printed on the rear of the
unit. This unit can play only DVD discs labelled as the
same as the rear of the unit or “ALL”.
Notes on Regional Codes
• Most DVD discs have a globe with one or more
numbers in it clearly visible on the cover. This
number must match your unit’s regional code or the
disc cannot play.
• If you try to play a DVD with a different regional
code from your player, the message “Check
Regional Code” appears on the TV screen.
Notes on Copyrights:
It is forbidden by law to copy, broadcast, show,
broadcast via cable, play in public, or rent copyrighted
material without permission. This product features the
copy protection function developed by Macrovision.
Copy protection signals are recorded on some discs.
When recording and playing the pictures of these
discs picture noise will appear. This product
incorporates copyright protection technology that is
protected by method claims of certain U.S. patents
and other intellectual property rights owned by
Macrovision Corporation and other rights owners.
The Use of this copyright protection technology must
be authorized by Macrovision Corporation, and is
intended for home and other limited viewing uses only
unless otherwise authorized by Macrovision
Corporation. Reverse engineering or disassembly is
prohibited.
CONSUMERS SHOULD NOTE THAT NOT ALL HIGH
DEFINITION TELEVISION SETS ARE FULLY
COMPATIBLE WITH THIS PRODUCT AND MAY
CAUSE ARTIFACTS TO BE DISPLAYED IN THE
PICTURE. IN CASE OF 525 PROGRESSIVE SCAN
PICTURE PROBLEMS, IT IS RECOMMENDED THAT
THE USER SWITCH THE CONNECTION TO THE
‘STANDARD DEFINITION’ OUTPUT. IF THERE ARE
QUESTIONS REGARDING OUR TV SET
COMPATIBILITY WITH THIS MODEL 525p DVD
PLAYER, PLEASE CONTACT OUR CUSTOMER
SERVICE CENTER.
Page 6
4
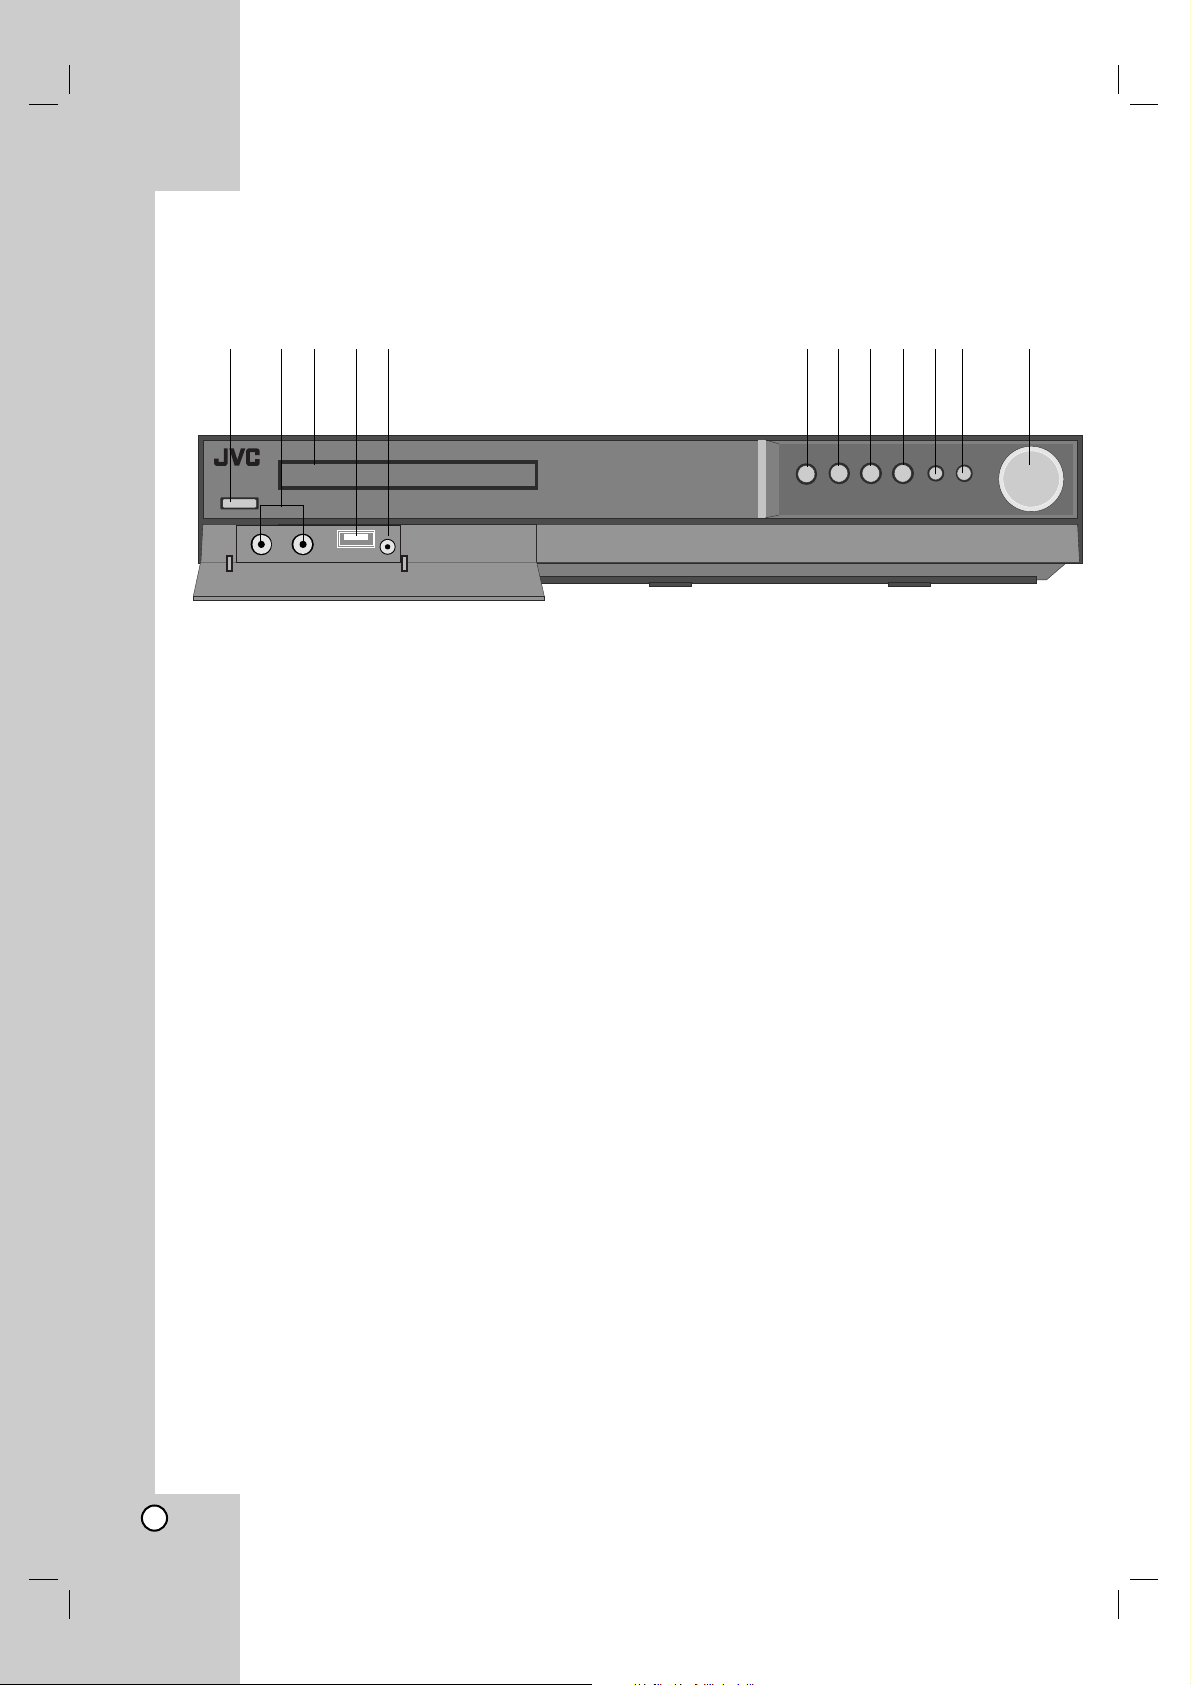
Front Panel
a
11//''
(STANDBY/ON)
Switches the unit ON and OFF.
b MIC1/2
Connect a microphone to MIC 1 or MIC 2 to
sockets.
c Disc Tray
Insert a disc here.
d USB port
Connect to a USB port of a memory device (USB
memory etc.)
e AUDIO IN
The AUDIO IN port means you can connect a
audio device to play through the surround
sound
speakers.
f Z (OPEN/CLOSE)
Opens or closes the disc tray.
g x (STOP)
Stops playback.
h B (PLAY)
Starts playback.
SOURCE
Press and hold down this button about 3 seconds,
then press repeatedly to select other function
i
XX
(PAUSE)
Pause playback.
FM MODE
This will change the tuner from stereo to mono
and usually improve the reception.
j . (SKIP)
Returns to the beginning of current chapter or
track or go to the previous chapter or track.
(SCAN)
During playback, press and hold this button
repeatedly to select the required scan speed.
- TUNING
Tunes in the desired radio station.
k > (SKIP)
Go to the next chapter or track.
(SCAN)
During playback, press and hold this button
repeatedly to select the required scan speed.
+ TUNING
Tunes in the desired radio station.
l VOLUME controller
abcde fghijk l
Page 7
Operation Reference
Installation and Setup
5
Introduction
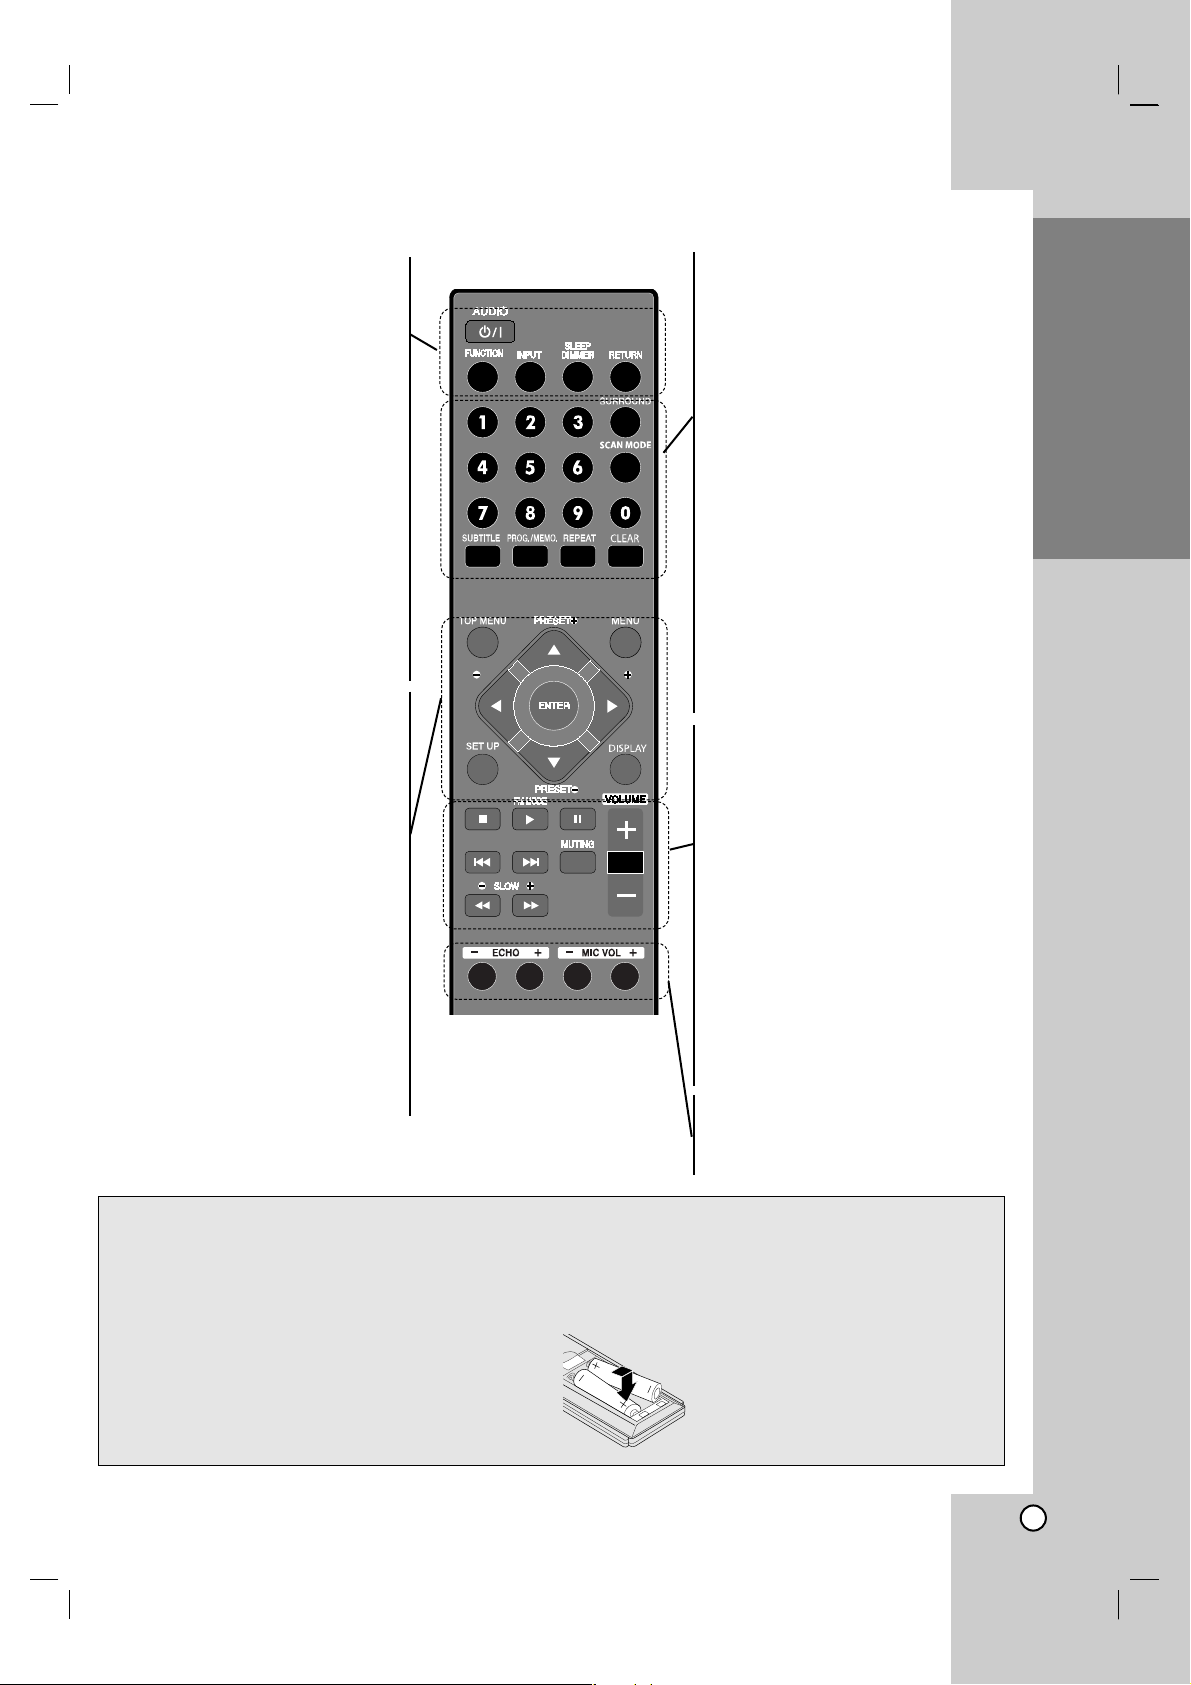
Remote Control
Remote Control operation
Point the remote control at the remote sensor and
press the buttons.
Cautions:
• Do not mix old and new batteries and never mix
different types of batteries such as standard,
alkaline, etc.
• Do not put the batteries in the place where young
children can reach.
• Battery shall not be exposed to excessive heat
such as sunshine, fire or the like.
• When discarding batteries, environmental problems
must be considered and local rules or laws
governing the disposal of these batteries must be
followed strictly.
Remote Control Battery installation
Detach the battery cover on the rear
of the remote control, and insert two
batteries (size AAA) with 3 and #
aligned correctly.
AUDIO (
11//''
)
Switches the unit ON and OFF.
FUNCTION
Selects the function (DVD/CD, FM,
AM)
INPUT
Changes the input source (USB,
AUX, AUX OPT, AUDIO IN, OSD
IPOD, IPOD, HDMI IN)
SLEEP
Sets the System to turn off
automatically at a specified time.
DIMMER
Changes brightness of the display
window on the front panel during in
power-on status.
RETURN
Press to move back wards in the
menu.
TOP MENU
If the current DVD title has a menu,
the title menu appears on the
screen. Otherwise, the disc menu
may appear.
MENU
Accesses the menu on a DVD disc.
SET UP
Accesses or removes setup menu.
DISPLAY
Accesses On-Screen display.
b/B/v/V (left/right/up/down)
Selects an option in the menu.
ENTER
Acknowledges the menu selection.
PRESET (##/33)
Selects program of Radio.
TUNING. (##/33)
Tunes in the desired radio station.
0-9 numerical buttons: Selects
numbered options in a menu.
SURROUND
Selects the surround mode.
SCAN MODE
Sets the output resolution for HDMI
and COMPONENT VIDEO OUT
jacks.
SUBTITLE
Selects a subtitle language (DVD).
PROG./MEMO.
Accesses or removes Program
menu.
Enter a radio station’s frequency into
the tuner.
REPEAT
Repeats chapter, track, title, all
CLEAR
Removes a track number on the
Program List.
SCAN/SLOW(bb/BB)
Searches backward or forward.
Reverse/ Forward slow playback.
SKIP (../>>)
STOP (xx)
PLAY (B)
FM MODE
This will change the tuner from
stereo to mono and usually improve
the reception.
PAUSE (XX)
VOLUME (-/+)
Adjusts speaker volume.
MUTING
To mute the sound
ECHO (-/+)
Adjusts echo volume.
MIC VOL (-/+)
Adjusts microphone volume.
TUNING TUNING
Page 8
6
TV Connection
Make one of the following connections, depending on
the capabilities of your existing equipment.
Tips:
Depending on your TV and other equipment you
wish to connect, there are various ways you could
connect the
DVD/CD Receiver
. Use one of the
connections described below.
Please refer to the manuals of your TV, VCR,
Stereo System or other devices as necessary to
make the best connections.
Caution:
Make sure the DVD/CD Receiver is connected
directly to the TV. Select the correct AV input on
your TV.
Do not connect your
DVD/CD Receiver
to TV via
your VCR. The DVD image could be distorted by
the copy protection system.
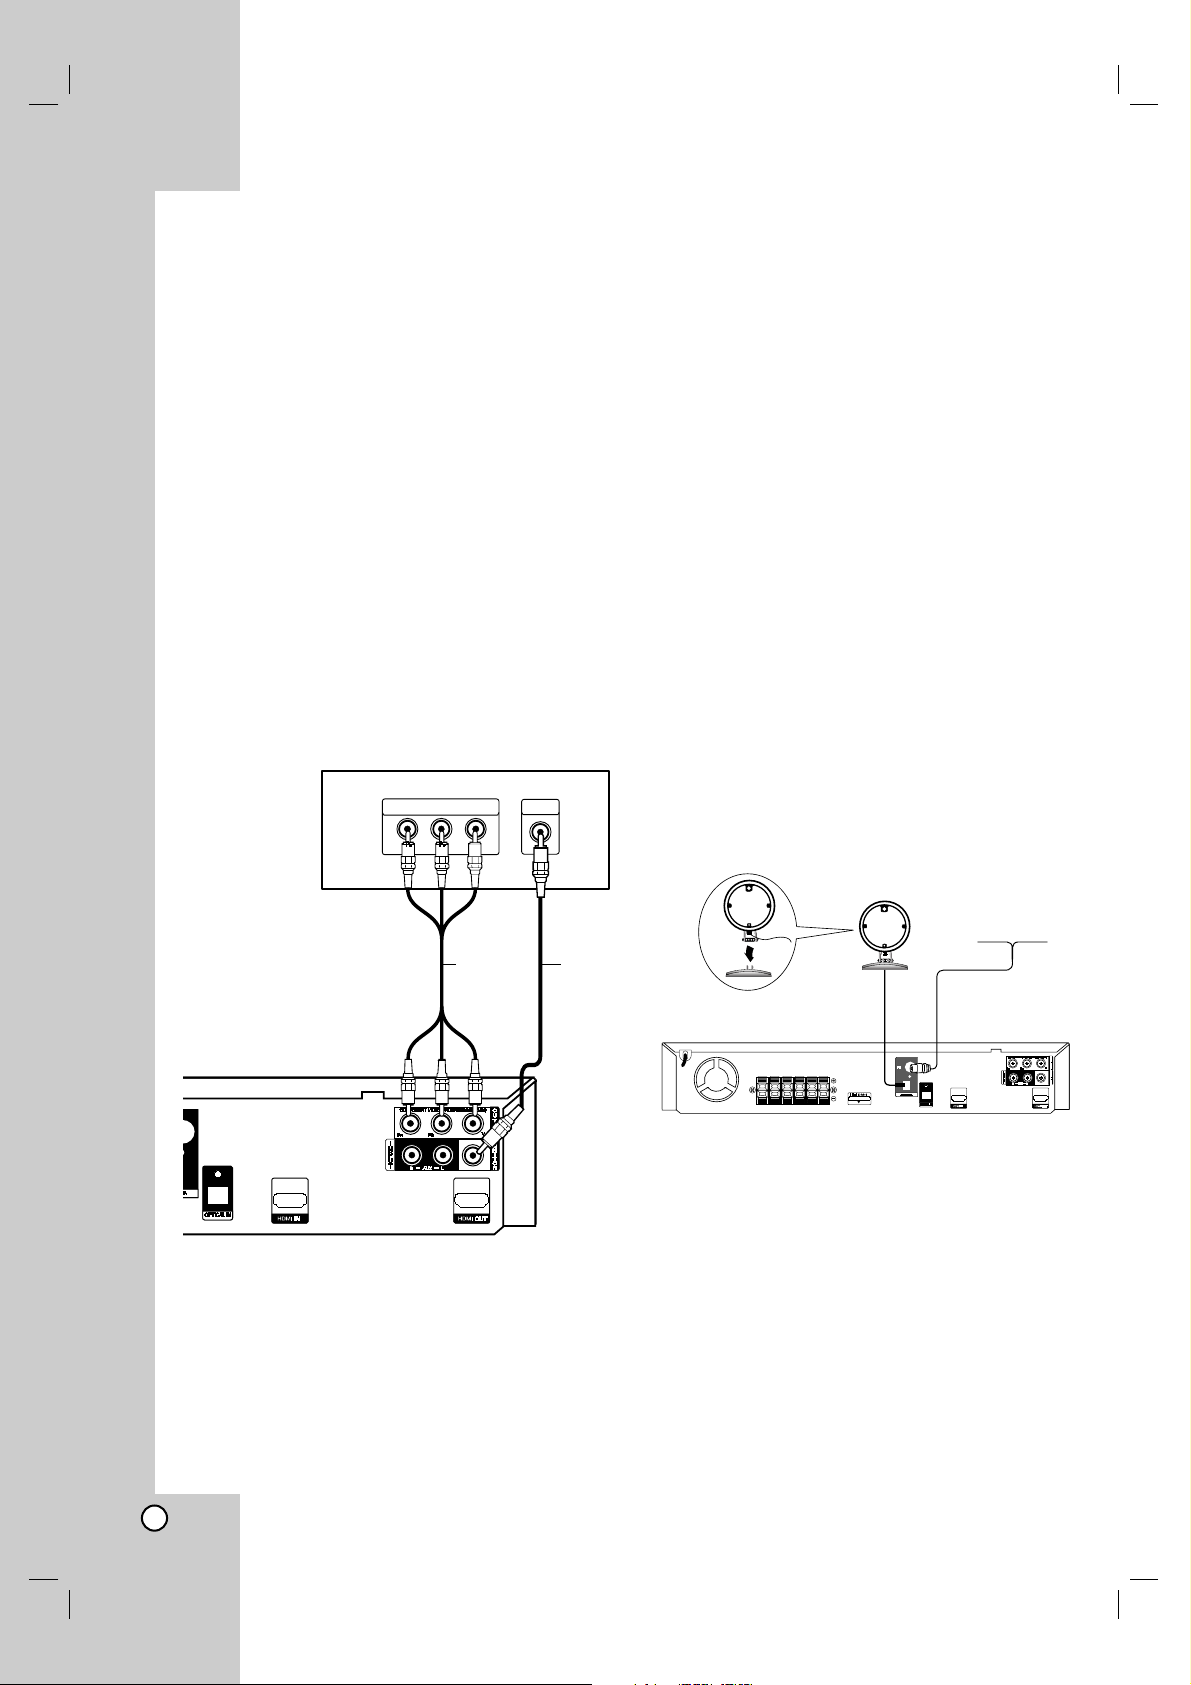
Video connection
Connect the MONITOR OUT jack from the DVD/CD
Receiver to the VIDEO IN jack on the TV using the
video cable (V).
Component Video connection
Connect the COMPONENT VIDEO OUT jacks from
the DVD/CD Receiver to the corresponding jacks on
the TV using an Y P
B P
R cable (C).
If your television is a high-definition or “digital
ready” television, you may take advantage of the
DVD/CD Receiver
’s progressive scan output for the
highest video resolution.
If your TV does not accept your resolution setting,
abnormal picture appears on the screen. Please
read owner’s manual for TV then set the resolution
that your TV can accept.
Antenna Connection
Connect the supplied FM/AM antenna for listening to
the radio.
Connect the AM Loop antenna to the AM antenna
connector.
Connect the FM Wire antenna to the FM antenna
connector.
Notes:
To prevent noise pickup, keep the AM Loop antenna
away from the DVD/CD Receiver and other components.
Be sure to fully extend the FM wire antenna.
After connecting the FM Wire antenna, keep it as
horizontal as possible.
Installation and Setup
Y
COMPONENT VIDEO /
PROGRESSIVE SCAN INPUT
VIDEO
INPUT
Rear of DVD/CD Receiver
Rear of TV
V
C
(supplied)
(not supplied)
FM Wire Antenna
(supplied)
AM Loop Antenna
(supplied)
Page 9
Operation Reference Introduction
7
Installation and Setup
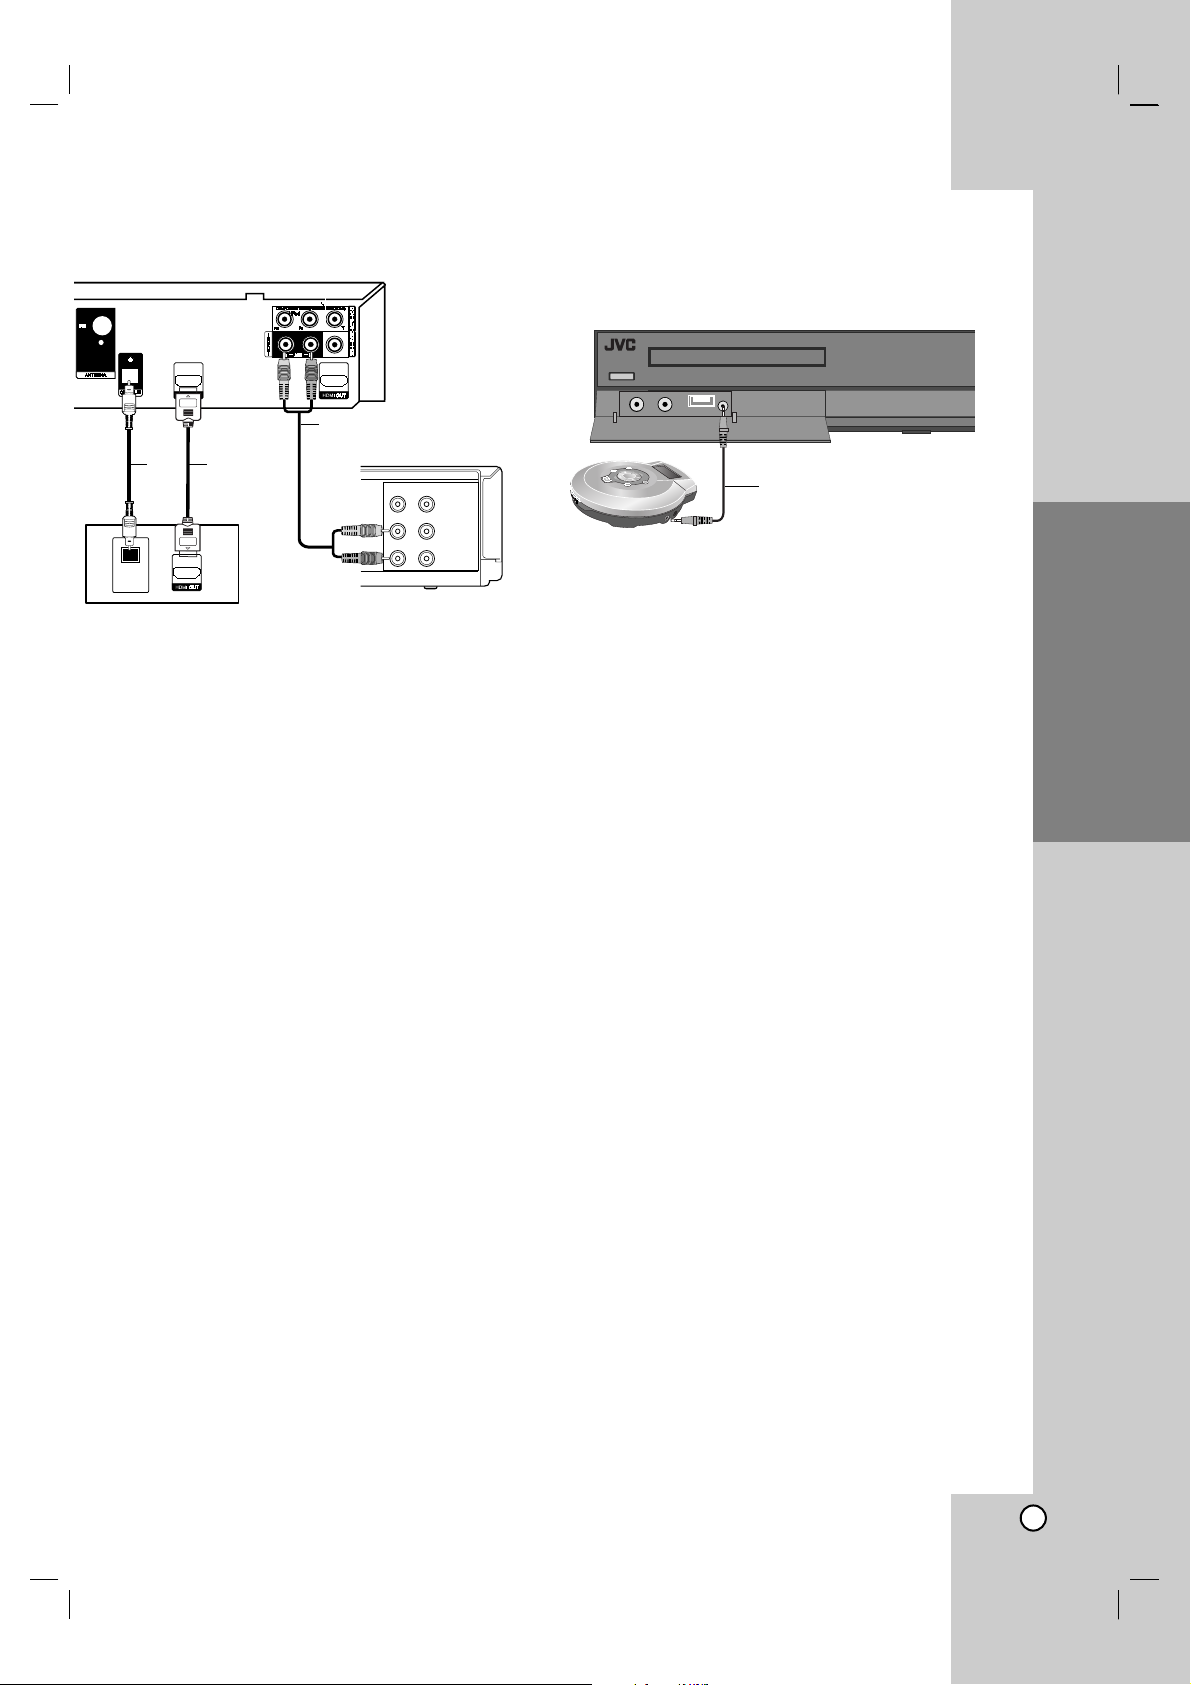
Optional Equipment
Connection
AUX IN connection (A)
Connect a Output of auxiliary device to the AUX
AUDIO Input (L/R) Connector.
OPTICAL IN connection (O)
Connect an optical output of DVD Player (or Digital
Device etc) to the OPTICAL IN connector.
HDMI IN connection (H)
Connect the HDMI INPUT jack on the unit to the
HDMI output jack on your DVD Player (or Digital
Device etc.) using an HDMI cable. Set the external
source to HDMI IN by pressing INPUT. In HDMI IN
mode, you can’t change the resolution. Change the
resolution on your DVD Player (or Digital Device etc.)
by connectiong the unit.
Note:
Image of HDMI input can not output from component
and composite output.
AUDIO IN connection (D)
Connect a output of portable device (MP3 or PMP
etc) to the AUDIO input connector.
OPTICAL
OUT
VIDEO
OUT IN
AUDIO (L)
AUDIO (R)
Rear of DVD/CD Receiver
O
A
Auxiliary device
DVD Player
(or Digital
Device, etc)
(not supplied)
(not
supplied)
H
(not
suppl
ied)
D
Portable device
To AUDIO OUT
To AUDIO IN
(not supplied)
To AUDIO OUT (L/R)
To AV I N
AUDIO (L/R)
Page 10
8
Optional Equipment
Connection
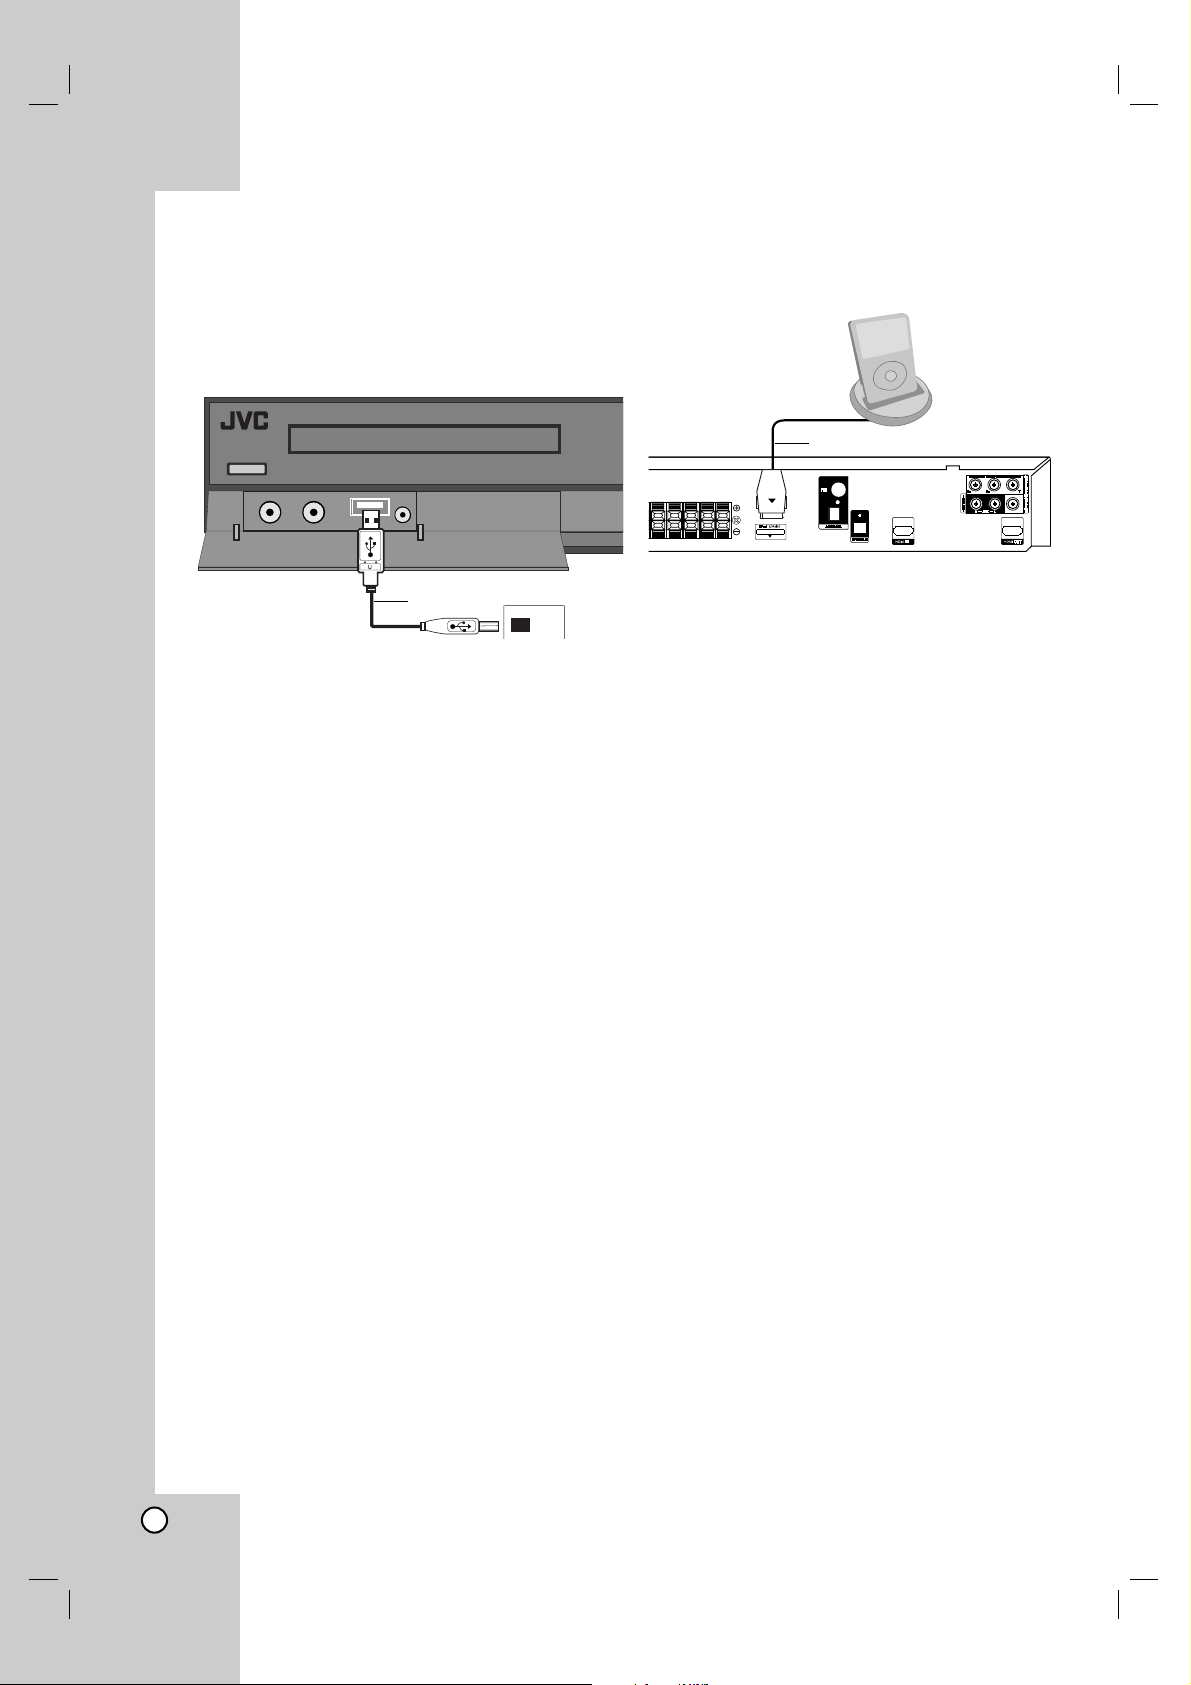
USB connection (U)
Connect the USB port of USB Memory (or MP3
player, etc.) to the USB port on the front of the unit.
If you want to opterate functions, see the operation
section.
Removing the USB Device from the unit
1. Choose a different function mode or press STOP
(x) twice in a row.
2. Remove the USB device from the unit.
Notes:
Don’t extract the USB device while operating.
Music files (MP3/WMA), image files (JPEG) and
video files can be played.
This unit can not use a USB HUB.
Devices which require additional program
installation when you have connected the unit to a
computer are not supported.
In case of a USB HDD, make sure to connect an
auxiliary power cord to the USB HDD for proper
operation. Up to four primary partitions of a drive are
supported. If there is an extension partition, it will not
be supported.
If the drive of USB device is two or more, a drive
folder is displayed on the screen. If you want to
move to the initial menu after you select a folder,
press RETURN.
Digital cameras and mobile phones are not
supported.
iPod connection (I)
Connect the iPod and the unit with iPod docking
station.(I).
Notes:
• The connector plug is protected with a cover when
it is first purchased. Please remove the cover
before operationg the unit.
• When the iPod is not connected, insert the terminal
cover. This prevents dust from entering and
possibly damaging the unit.
• Depending on the type of iPod, you may need to
insert one of the dock adapters into the dock slot
before you station your iPod.
• Adjust the volume to a moderate level before you
connect your iPod and this unit.
• The jack for the iPod cable of docking station are
keyed so that the cable connectors only connect in
one way. Connect the end on the cable with the
marked “v” facing down wards to rear on the unit.
I
iPod
Rear of DVD/CD Receiver
(supplied)
U
USB Memory, MP3 Player (or
Memory Card Reader, etc.)
Page 11

9
HDMI Connection
About HDMI
HDMI (High Definition Multimedia Interface) supports
both video and audio on a single digital connection for an
easy all- digital output to an HDMI or DI-equipped TV.
Connection to an HDMI TV requires an HDMI cable
while connection to a DVI-equipped TV requires a DVI
adapter besides a HDMI cable.
HDMI has the capability to support standard,
enhanced, or high-definition video plus standard to
multi-channel surround-sound audio, HDMI features
include uncompressed digital video, a bandwidth of up
to 5 gigabytes per second, one connector (instead of
several cables and connector), and communication
between the AV source and AV devices such as DTVs.
HDMI, the HDMI logo and High-Definition Multimedia
Interface are trademarks or registered trademarks of
HDMI licensing LLC.
If you have a HDMI TV or monitor, you can connect
it to this DVD/CD Receiver using a HDMI cable.
1. Connect the HDMI OUT jack on the DVD/CD
Receiver to the HDMI jack on a HDMI compatible
TV or monitor (H).
2. Set the TV’s source to HDMI (refer to owner’s
manual for TV).
Notes on HDMI Out connection
•If your TV does not accept your resolution setting,
abnormal picture appears on the screen.(“TV do not
support” will appears in screen)
Please read owner’s manual for TV, and then set
the resolution that your TV can accept.
• Changing the resolution when the unit is connected
with HDMI connector may result in malfunctions. To
solve the problem, turn off the unit and then turn it
on again.
• When you connect a HDMI or DVI compatible
device make sure of the following :
- Try switching off the HDMI/ DVI device and this
unit. Next, switch on the HDMI/ DVI device and
leave it for around 30 seconds, then switch on this
unit.
- The connected device’s video input is set correctly
for this unit.
- The connected device is compatible with
720X576i(480i), 720X576p(480p), 1280X720p,
1920X1080i or 1920X1080p video input.
- The 1080p, 720p and 576p(480p) resolutions are
the progressive scan applied resolution.
• Not all HDCP-compatible DVI devices will work with
this unit.
- The picture will not be displayed properly with nonHDCP device.
Resolution setting
You can change the resolution for component video
and HDMI output.
Press SCAN MODE repeatedly to select the desired
resolution - 480i (or 576i), 480p (or 576p), 720p,
1080i, 1080p
The resolution may not be selected depending on the
connection or TV.
Note:
Depending on your TV, some of the resolution settings
may result in the picture disappearing or an abnormal
picture appearing. In this case, press SCAN MODE
repeatedly until the picture re-appears.
You can set 1080p video resolution to enjoy Full HD picture
quality. (Full HD up-scaling)
Available resolution according to connection
HDMI OUT - 1080p, 1080i, 720p, 480p (or 576p) and
480i (or 576i)
COMPONENT VIDEO OUT - 480i (or 576i) and 480p
(or 576p)
VIDEO OUT - 480i (or 576i)
Note:
If your TV does not accept your resolution setting,
abnormal picture appears on the screen.
Please read owner’s manual for TV, and then set the
resolution that your TV can accept.
Installation and Setup
HDMI
H
HDMI compatible TV
Rear of DVD/CD Receiver
(not supplied)
Page 12

10
Speaker System Connection
Connect the speakers using the supplied speaker
cables.
To obtain the best possible surround sound, adjust the
speaker parameters (volume, distance, etc.).
Notes:
• Be sure to match the speaker cable to the
appropriate terminal on the components: + to + and
– to –. If the cables are reversed, the sound will be
distorted and will lack base.
• If you use front speakers with low maximum input
rating, adjust the volume carefully to avoid
excessive output on the speakers.
Caution:
• The left and right speakers can be installed on a
wall.
• When installing the speakers on a wall, be sure to
have the speakers installed by qualified personnel.
• DO NOT install the speakers on the wall by yourself
to avoid unexpected damage from them falling off
the wall due to incorrect installation or weakness in
wall structure.
• Care must be taken in selecting a location for
speaker installation on a wall. Injury to personnel or
damage to devices may result if the installed
speakers interfere with daily activities.
Front speaker
(Right)
Front speaker
(Left)
Center speaker
Rear speaker
(Right surround)
Subwoofer
Rear speaker
(Left surround)
Page 13

Operation Reference Introduction
11
Installation and Setup
Displaying Disc Information
on-screen
You can display various information about the disc
loaded on-screen.
1. Press DISPLAY to show various playback
information.
The displayed items differ depending on the disc
type or playing status.
2. You can select an item by pressing v / V and
change or select the setting by pressing b / B.
Title – Current title number/ total number of
titles.
Chapter – Current chapter number/total number
of chapters.
Time – Elapsed playing time.
Audio – Selected audio language or channel.
Subtitle – Selected subtitle.
Angle – Selected angle/total number of angles.
Sound – Selected sound mode.
Note:
If any button is not pressed for a few seconds, the onscreen display disappears.
Initial Settings
By using the Setup menu, you can make various
adjustments to items such as picture and sound.
You can also set a language for the subtitles and the
Setup menu, among other things. For details on each
Setup menu item, see pages 11 to 15.
OSD Initial language settings:
When the POWER is turned on for the first time, the
unit need to set the menu language. Follow the
descriptions below after the display connections. After
OSD Initial language setting, to set Area code (see
page 14)
1. Press POWER to turn the unit on. The language
setup menu will appear on the screen.
2. Use b / B / v / V to select a language then press
ENTER. The confirm menu will appear.
3. Use b / B to select the [Enter] then press ENTER
to finish the language setup.
To display and exit the Menu:
Press SETUP to display the menu. A second press of
SETUP will take you back to initial screen.
To go to the next level:
Press B on the remote control.
To go back to the previous level:
Press b on the remote control.
About help menu
Menu Buttons Operation
v / V Move v / V Moving to another
menu
b Prev. b Moving to previous
level
B Select B Moving to next level or
selecting menu
RETURN 5.1 Speaker Setup
menu
ENTER To confirm menu
Page 14

12
General Operation
1. Press SETUP.
The Setup menu appears.
2. Use v / V to select the desired option then press
B to move to the second level. The screen shows
the current setting for the selected item, as well as
alternate setting(s).
3. Use v / V to select the second desired option and
then press B to move to the third level.
4. Use v / V to select the desired setting then press
ENTER to confirm your selection.
Some items require additional steps.
5. Press SETUP or PLAY (N) to exit the Setup
menu.
LANGUAGE
Menu Language
Select a language for the Setup menu and then onscreen display.
Disc Audio / Subtitle / Menu
Select the language you prefer for the audio track
(disc audio), subtitles, and the disc menu.
Original – Refers to the original language in which
the disc was recorded.
Other – To select another language, press
numeric buttons and then ENTER to enter the
corresponding 4-digit number according to the
language code list on the page 26. If you enter the
wrong language code, press CLEAR.
DISPLAY
TV Aspect
4:3 – Select when a standard 4:3 TV is connected.
16:9 – Select when a 16:9 wide TV is connected.
Display Mode
The Display Mode setting works only when the TV
Aspect mode is set to 4:3.
Letterbox – Displays a wide picture with bands on
the upper and lower portions of the screen.
Panscan – Automatically displays the wide picture
on the entire screen and cuts off the portions that
do not fit. (If the disc/file is not compatible with
Pan Scan, the picture is displayed at Letterbox
ratio.)
Page 15

Operation Reference Introduction
13
Installation and Setup
AUDIO
Each DVD disc has a variety of audio output options.
Set the player’s AUDIO options according to the type
of audio system you use.
Dynamic Range Control (DRC)
With the DVD*
1
format, you can hear a program’s
soundtrack in the most accurate and realistic
presentation, thanks to digital audio technology.
However, you may wish to compress the dynamic
range of the audio output (the difference between the
loudest sounds and the quietest ones). Then, you may
listen to a movie at a lower volume without losing
clarity of sound. Set DRC to On for this effect.
*1: Dolby Digital only
Vocal
Set Vocal to On only when a multi-channel karaoke
DVD is playing. The karaoke channels on the disc will
mix into normal stereo sound.
HD AV Sync
When using Digital TV.
Sometimes AV signal could not be transmitted
simultaneously because of later transmission of video
signal compared to audio signal.
Because it takes some time to convert analogue video
signal to digital one in the Digital TV.
And It means that you may not enjoy picture on the
screen and sound from speaker at the same time
even though it is one scene.
In the HD AV Sync menu, you could adjust delay time
to audio signal for simultaneous AV signal
transmission
Delay time could be set up with 10msec unit.
(0 ~ 300ms)
Delay time is different according to each TV Brand.
So you need to adjust optimal delay time complying
with your TV.
Semi Karaoke
When a chapter / title / track is fully finished ,this
function shows the score in the screen with a fanfare
sound. Available discs for the Semi Karaoke function:
DVD discs / DVD Karaoke Discs with more than 2
tracks
On: When you finished singing a score will appear
on the screen.
Off: Fanfare and score do not appears on the
screen.
- DVD ,DVD Karaoke with more than 2 tracks
- This function operate on the DVD/CD mode.
-
The Semi Karaoke function is available only when
a microphone is connected.
- In case that a fanfare or score appears when a
chapter of a movie file is changed during
playback, set the Semi Karaoke to Off at the
setup menu or disconnect the microphone.
5.1 Speaker Setup
Make the following settings for the built-in 5.1 channel
surround decoder.
1. Press ENTER, and the 5.1 Speaker Setup menu
appears.
2. Use b / B to select the desired speaker.
3. Adjust options using v / V / b / B buttons.
4. Press ENTER to confirm your selection. Returns to
the previous menu.
Speaker selection
Select a speaker that you want to adjust. [Front
speaker (Front L), Front speaker (Front R), Center
Speaker (Center), Subwoofer (SubWoofer), Rear
speaker (Rear L), Rear speaker (Rear R)]
Note:
Certain speaker settings are prohibited by the Dolby
Digital licensing agreement.
Page 16

14
5.1 Speaker Setup
Size
Since the speaker settings are fixed, you cannot
change the settings.
Vol ume
Press b / B to adjust the output level of the selected
speaker. (-5dB ~ 5dB)
Distance
After you connected speakers to your DVD Receiver,
set the Distance between the speakers and your
listening point if the distance of Center or Rear
speakers is bigger than the distance of Front
speakers. This allows the sound from each speaker to
reach the listener at the same time.
Press b / B to adjust the Distance of the selected
speaker. This distance is equivalent to a difference of
the distance between Center or Rear speaker and
Front speakers.
Test
Press b / B to test the signals of each speaker. Adjust
the volume to match the volume of test signals
memorized in the system.
Front Left (Front L) → Center→ Front Right (Front R)
→ Rear Right (Rear R) → Rear Left (Rear L) →
SubWoofer
LOCK (Parental Control)
Initial Setting the Area Code:
See the Area Codes on page 26.
1. Select the LOCK menu and then press B.
2. To access the LOCK options, you must input the
password you have created. Input a password and
press ENTER. Enter it again and press ENTER to
verify. If you make a mistake before pressing
ENTER, press CLEAR.
3. Select the first character using v / V buttons.
4. Press B and select the second character using
v / V buttons.
5. Press ENTER to confirm your Area code selection.
Page 17

15
Rating
Blocks playback of rated DVDs based on their
contents. Not all discs are rated.
1. Select “Rating” on the LOCK menu then press B.
2. Input a password and press ENTER.
3. Select a rating from 1 to 8 using the v / V buttons.
Rating 1-8: Rating one (1) has the most restrictions
and rating eight (8) is the least restrictive.
Unlock: If you select unlock, parental control is
not active and the disc plays in full.
4. Press ENTER to confirm your rating selection, then
press SETUP to exit the menu.
Password
You can enter or change password.
1. Select Password on the LOCK menu and then
press B.
2. Follow the step 2 as shown above (Rating).
To change the password, press ENTER when the
“Change” option is highlighted. Input a password
and press ENTER. Enter it again and press
ENTER to verify.
3. Press SETUP to exit the menu.
If you forget your password
If you forget your password, you can clear it using the
following steps:
1. Press SETUP to display the Setup menu.
2. Select the LOCK menu.
3. Input the 6-digit number “210499” and press
ENTER. The password is cleared.
Area Code
Enter the code of the area whose standards were
used to rate the DVD video disc, based on the list on
page 26.
1. Select “Area Code” on the LOCK menu then
press B.
2. Follow the step 2 as shown previous paragraph
(Rating).
3. Select the first character using v / V buttons.
4. Press ENTER and select the second character
using v / V buttons.
5. Press ENTER to confirm your Area code selection.
OTHERS
DivX(R) VOD
We provide you with the DivX®VOD (Video On
Demand) registration code that allows you to rent and
purchase videos using the DivX®VOD service.
For more information, visit www.divx.com/vod.
Press ENTER when [DivX(R) VOD] is highlighted and
you can view the registration code of the unit.
Note:
All the downloaded videos from DivX®VOD can only
be played back on this unit.
Installation and Setup
Page 18

16
Operation
General features
Buttons Operations
Z (OPEN / CLOSE) Opens or closes the disc tray.
X (PAUSE) During playback, press X to pause playback.
Press X repeatedly to play Frame-by-Frame.
. / > During playback, press . or > to go to the next
chapter/track or to return to the beginning of the current
chapter/track.
Press . twice briefly to step back to the previous
chapter/track.
m / M During playback, press m or M repeatedly to select the
required scan speed.
DVD : bb, bbb, bbbb, bbbbb
or
BB, BBB, BBBB, BBBBB
DivX disc, Video CD : bb, bbb, bbbb, bbbbb
or
BB, BBB, BBBB, BBBBB
WMA/MP3, Audio CD : m (X2, X4, X8) or M (X2, X4, X8)
REPEAT During playback, press REPEAT repeatedly to select a
desired repeat mode.
DVD Video discs: Chapter/Title/Off
Video CD, Audio CD, DivX/MP3/WMA discs: Track/All/Off
TOP MENU If the current DVD title has a menu, the title menu appears
on the screen. Otherwise, the disc menu may appears.
MENU The disc menu appears on the screen.
(SUBTITLE) During playback, press SUBTITLE repeatedly to select a
desired subtitle language.
SLOW
In the pause mode, press SLOW (m or M) to select the
required speed.
DVD : t (1/2, 1/4, 1/8, 1/16) or T (1/2, 1/4, 1/8, 1/16)
Video CD : T (1/2, 1/4, 1/8, 1/16)
Discs
VCDDVD
DivXDVD
DVD
DVD
ALL
WMA
MP3ACD
DivXVCDDVD
ALL
DivXVCDDVD
ALL
ALL
Page 19

17
Operation
Additional features
Time Search
To start playing at any chosen time on the disc:
1. Press DISPLAY during playback.
2. Press v / V to select the time clock icon and
“--:--:--” appears.
3. Input the required start time in hours, minutes, and
seconds from left to right. If you enter the wrong
numbers, press CLEAR to remove the numbers
you entered. Then input the correct numbers.
4. Press ENTER to confirm. Playback starts from the
selected time.
1.5 times speed playback
You can play at 1.5 times speed.
The 1.5 speed allows you to watch the pictures and
listen to the sound quicker than playing at a normal
speed on the disc.
1. During playback, press PLAY(B) to play at 1.5
times speed. “BX1.5” appears on the screen.
2. Press PLAY(B) again to exit.
Screen Saver
The screen saver appears when you leave the unit in
Stop mode for about five minutes. To cancel the
Screen Saver, press any button and then operate the
unit.
Last Scene Memory
This receiver memorizes the last scene from the last
disc that is viewed. The last scene remains in the
memory even if you remove the disc from the receiver
or switch off the receiver. If you load a disc that has
the scene memorized, the scene is automatically
recalled.
Note:
This receiver does not memorize the scene of a disc if you
switch off the receiver before commencing to play the disc.
Mixed disc – MP3/WMA and JPEG
When playing a disc contained with MP3/WMA and
JPEG files together, you can select which menu of
files you would like to play by pressing MENU.
System Select
You must select the an appropriate system mode for
your TV system. If NO DISC appears in the display
window, press and hold PAUSE (X) remote control for
more than 5 seconds to be able to select a system
(PAL, NTSC).
When the selected system is not compatible with
the system of your TV, normal colour picture may
not be displayed.
NTSC: Select when DVD/CD Receiver is connected
with NTSC-TV.
PAL: Select when DVD/CD Receiver is connected
with PAL-TV.
To adjust MIC Volume
Press MIC VOL.(-/+) on the remote control to increase
the volume, or MIC VOL.(-/+) to decrease it.
To adjust ECHO Volume
You can give an echo effect to the sound from the
microphones.
Press the ECHO VOL.(-/+) on the remote control to
increase the echo volume or decrease it.
DVD
DVD
DVD
Page 20

18
Playing an Audio CD or
MP3/WMA file
This unit can play Audio CDs or MP3/WMA files.
MP3/ WMA/ Audio CD
Once you insert an MP3/WMA files recording media or
Audio CD a menu appears on the TV screen.
Press v / V to select a track/file and then press PLAY
or ENTER, and playback starts. You can use variable
playback functions. Refer to the page 16.
ID3 TAG
When playing a file containing information such as
track titles, you can see the information by pressing
DISPLAY.
MP3 / WMA disc compatibility with this player is
limited as follows:
• Sampling frequency: within 32 - 48 kHz (MP3),
within 32 - 48kHz (WMA)
• Bit rate: within 32 - 320kbps (MP3), 40 - 192kbps
(WMA)
• The DVD/CD Receiver cannot read an MP3/WMA file
that has a file extension other than “.mp3” / “.wma”.
• CD-R physical format should be ISO 9660
• If you record MP3 / WMA files using software that
cannot create a file system (eg. Direct-CD) it is
impossible to playback MP3 / WMA files.We
recommend that you use Easy-CD Creator, which
creates an ISO 9660 file system.
• File names should have a maximum of 8 letters and
must incorporate an .mp3 or .wma extension.
• They should not contain special letters such as / ? * : “
< > l etc.
• The total number of files on the disc should be less than
999.
This DVD/CD Receiver requires discs and recordings to
meet certain technical standards in order to achieve
optimal playback quality. Pre-recorded DVDs are
automatically set to these standards. There are many
different types of recordable disc formats (including CD-R
containing MP3 or WMA files) and these require certain
pre-existing conditions (see above) to ensure compatible
playback.
Customers should note that permission is required in
order to download MP3 / WMA files and music from
the Internet. Our company has no right to grant such
permission. Permission should always be sought from
the copyright owner.
Page 21

19
Operation
Programmed Playback
The program function enables you to store your
Favourite tracks from any disc in the receiver memory.
A program can contain 30 tracks.
1. Insert a disc.
Audio CD and MP3/WMA Discs:
2. To add a music(s) on the program list, press
PROG/MEMO to enter the program edit mode (
mark appears on the menu).
3. Select a desired music on the [List] by using the v
/ V then press ENTER to add the music to the
program list.
4. Select music from the program list then press
ENTER to start programmed playback.
Repeat Programmed Tracks
1. Press REPEAT when playing a disc. The repeat
icon appears.
2. Press REPEAT to select a desired repeat mode.
• Track: repeats the current track
• All: repeats all the tracks on programmed list.
• Off (No display): does not play repeatedly.
Erasing a Track from “Program” List
1. Use vVto select the track that you wish to erase
from the Program list.
2. Press CLEAR in program edit mode.
Erasing the Complete Program List
Use v / V to select [Clear All] then press ENTER in
program edit mode.
Note:
The programs are also cleared when the disc is removed,
the unit is switched to power off or the function is switched to
others.
E
Page 22

20
Viewing a JPEG file
This unit can play discs with JPEG files.
Before playing JPEG recordings, read the notes on
JPEG Recordings on the right.
1. Insert a disc and close the tray.
The PHOTO menu appears on the TV screen.
2. Press v / V to select a folder, and then press
ENTER. A list of files in the folder appears.
If you are in a file list and want to return to the
previous Folder list, use the v / V buttons on the
remote to highlight and press ENTER.
3. If you want to view a particular file, press v / V to
highlight a file and press ENTER or PLAY. While
viewing a file, you can press STOP to move to the
previous menu (JPEG menu).
Tips:
There are three Slide Speed options : 3s, 5s, 8s
Use v /V /b /B to highlight the Speed. Then, use b / B to
select the option you want to use and then press ENTER.
Note:
Depending on the size and resolution of JPEG files, it may
take longer for slide show to be set.
Slide Show
1. Highlight the file (not folder) which you like
beginning to slide show.
2. Select the slide speed. (Refer to the tips this page)
3. Use v /V /b /B to highlight the (Slide Show)
then press ENTER.
Note:
•
The sequence of slide show is from top to down, cannot
be reverse.
• Slide show cannot repeat automatically, you could start the
slide show again manually.
• During slide show, a help menu appears in the lower part
of the screen. To hide this help menu, press ENTER or
DISPLAY. Then press this button again, a help menu
appears again.
• To close JPEG slide show, press RETURN or STOP (x).
Page 23

21
Operation
Still Picture
1. Press PAUSE (XX) during the slide show.
The DVD/CD Receiver will now go into the PAUSE
(XX) mode.
2. To return to the slide show, press PLAY or press
PAUSE (XX) again.
Moving to another File
Press SKIP (. or >) once during viewing a
picture to advance to the next or previous file.
Rotating the picture
Press v / V during showing a picture to rotate the
picture clockwise or counter-clockwise.
Listening to music during slide show
You can listen to music during slide show, if the disc
contain music and photo files together. Use v /V /b /B
to highlight ( ) icon then press ENTER to start slide
show. This function is available only in disc.
About help menu
Menu Buttons Operation
v / Vv/ V Rotating the picture
b Prev.
/ B
Next b / B Moving to another file
RETURN Closes the slide show
ENTER To hide the help menu
JPEG disc compatibility with this player is
limited as follows:
• Depending upon the size and the number of
JPEG files, it could take a long time for the
DVD/CD Receiver to read the disc’s contents. If
you don’t see an on-screen display after several
minutes, some of the files may be too large —
reduce the resolution of the JPEG files to less
than 2M pixels as 2760 x 2048 pixels and burn
another disc.
• The total number of files and folders on the disc
should be less than 999.
• Some discs may not operate due to a different
recording format or the condition of disc.
• Ensure that all the selected files have the “.jpg”
extensions when copying into the CD layout.
• If the files have “.jpe” or “.jpeg” extensions, please
rename them as “.jpg” file.
• File names without “.jpg” extension will not be
able to be read by this DVD/CD Receiver. Even
though the files are shown as JPEG image files in
Windows Explorer.
Page 24

22
Playing a DivX Movie
file
Using this DVD/CD Receiver you can play DivX disc.
1. Insert a disc and close the tray. The MOVIE menu
appears on the TV screen.
2. Press v / V to select a folder and then press
ENTER. A list of files in the folder appears. If you
are in a file list and want to return to the Folder
list, use the v / V buttons on the remote to
highlight and press ENTER.
3. If you want to view a particular file, press
v / V to highlight a file and press ENTER or PLAY.
4. Press STOP to exit.
Notice for displaying the Divx subtitle
If the subtitle does not display properly during playback,
press and hold SUBTITLE for about 3 seconds then
press SUBTITLE to select another language code until
the subtitle is displayed properly
Notes:
Be sure to select “SUBTITLE ON” mode by
pressing the subtitle file every time before playing a
DivX file .
When the subtile has more than two languages in
the file, original subtile is only available.
DivX disc compatibility with this player is limited
as follows:
• Available resolution size of the DivX file is under
800x600 (W x H) pixel.
• The file name of the DivX subtitle is available by
45 characters.
• If there is impossible code to express in the DivX
file, it may be displayed as " _ " mark on the
display.
• If the number of the screen frame is over 30
per 1 second, this unit may not operate
normally.
• If the video and audio structure of recorded
files are not interleaved, either video or audio
is outputted.
Playable DivX file
• ".avi ", ".mpg ", ".mpeg ", ".divx"
Playable Subtitle format
• SubRip(*.srt/*.txt)
SAMI(*.smi)
SubStation Alpha(*.ssa/*.txt)
MicroDVD(*.sub/*.txt)
SubViewer 2.0(*.sub/*.txt)
VobSub(*.sub)
Playable Codec format
• "DIVX3.xx ", "DIVX4.xx ", "DIVX5.xx ",
"MP4V3 ", "3IVX ".
Playable Audio format
"AC3 ", "DTS ", "PCM ", "MP3 ", "WMA ".
• Sampling frequency: within 32 - 48 kHz (MP3),
within 32 - 48kHz (WMA)
• Bit rate: within 32 - 320kbps (MP3),
40 - 192kbps (WMA)
Page 25

23
Using iPod
For detail refer to iPod guide.
iPod mode: You can operate your iPod by using the
supplied remote control and directly control on your
iPod.
OSD iPod mode: You can operate your iPod by
controlling OSD menu on the TV screen with supplied
remote control. The controls on your iPod are not
operational in the OSD iPod mode.
General operation
1. Connect the iPod and the unit with iPod docking
station. Refer to the page 8.
2. Turn the unit on.
Your iPod is automatically turned on.
3. Press INPUT on the remote control to enter the
iPod mode.
The iPod menu appears on the TV screen.
The initial screen of iPod menu is the OSD iPod
mode.
4. Use v / V and ENTER on the Remote Control to
display the list of menu.
5. Press ENTER to play.
General features
Pausing playback
Press PAUSE (X) or PLAY (B) to pause playback.
Press PAUSE (X) or PLAY (B) to continue playback.
Skipping to the next/previous file
Press SKIP (>) to move to the next file.
Press SKIP (.) to return to the beginning of the
current file.
Press SKIP (.) twice briefly to step back to the
previous file.
Fast forward or fast reverse
During playback, press and hold SCAN (m or M)
and then release at a point you want.
Playing repeatedly
Press REPEAT repeatedly to select an item to be
repeated. The current file will be played back
repeatedly. To return to normal playback, press
REPEAT repeatedly. (On video files, this function is
not available.)
iPod message
“Please, check your iPod” - If the power of your
iPod is insufficient or the iPod is misconnected or
unknown device. Reset the iPod if the iPod is not
operating normally (Refer to
http://www.apple.com/support/)
“If you connect to the [VIDEO OUT] terminal on
this unit and switch TV input mode, you can enjoy
video playback.” - When you connect the unit and
TV to COMPONENT VIDEO OUT or HDMI OUT,
connect the unit and TV to VIDEO OUT (MONITOR).
Compatible iPod
• When the unit is connected with dock connector
may result in malfunctions
• Compatibility with your iPod may vary depending on
the type of your iPod.
• Depending on your iPod’s software version, it may
not be possible to control your iPod from the unit.
We recommend installing the latest software
version.
Notes:
•
Interference may happen depending on iPod devices.
• The video files are outputted only when you connect
the unit to VIDEO OUT (MONITOR).
• Connect the end on the cable with the marked “V“
facing downwards to rear on the unit.
• Be careful not to put iPod dock strongly into the
unit when connecting or disconnecting it. But the
cable may be damaged.
• JVC is not responsible for any loss of data on an
iPod when used with this system.
• This system can receive analog sound from the
following iPod models and iPhone models
- iPod touch
- iPod classic
- iPod 5th generation
- iPod 4th generation
- iPod nano (1st/2nd/3nd generation)
- iPod mini (1st/2nd generation)
- iPhone 3G
• This product support music and video only.
• If content on the iPod is not played back correctly,
update your iPod software to the latest version. For
details about updating the iPod, check the Apple
web site <http://www.apple.com>.
• Adjust the volume to a moderate level before you
connect your iPod and this unit.
Operation
• “Made for iPod” means that an electronic accessory
has been designed to connect specifically to iPod
and has been certified by the developer to meet
Apple performance standards.
•“Works with iPhone” means that an electronic
accessory has been designed to connect
specifically to iPhone and has been certified by the
developer to meet Apple performance standards.
• Apple is not responsible for the operation of this
device or its compliance with safety and regulatory
standards.
Page 26

24
Presetting the Radio Stations
You can preset 50 stations for FM and AM (MW).
Before tuning, make sure that you have turned down
the volume.
1. Press FUNCTION on the remote control until FM
or AM (MW) appears in the display window.
2. And then every time you press FUNCTION, FM
and AM (MW) changes alternately.
3. Press and hold TUNING.(-/+) for about two
seconds until the frequency indication starts to
change, then release.
Scanning stops when the DVD/CD Receiver tunes in a
station.
4. Press PROG./MEMO. on the remote control.
A preset number will flash in the display window.
5. Press PRESET (-/+) on the remote control to
select the preset number you want.
6. Press PROG./MEMO. on the remote control again.
The station is stored.
7. Repeat steps 3 to 6 to store other stations.
To tune in a station with a weak signal
Press TUNING.(-/+) repeatedly in step 3 to tune in the
station manually.
To clear all the stored stations
Press and hold PROG./MEMO. for about two seconds
and “ERASE ALL” is appeared in the display window
and then press PROG./MEMO. again, the stations are
cleared.
If you have accidentally entered into the "ERASE
ALL" mode and you do not wish to clear the
memory, do not press any key. After a few seconds,
"ERASE ALL" will go off by itself and change to
normal mode.
Note:
If all stations have already been entered, the FULL
message will appear in the display window for a
moment and then a preset number will flash.
To change the preset number, follow the steps 5-6 as
above.
Listening to the Radio
Preset radio stations in the DVD/CD Receiver’s
memory first (see “Presetting radio stations” on the
left).
1. Press FUNCTION until FM or AM (MW) appears in
the display window.
The last received station is tuned in.
2. Press PRESET (-/+) repeatedly on the remote
control to select the preset station you want.
Each time you press the button, the DVD/CD Receiver
tunes in one preset station at a time.
3. Adjust the volume by rotating VOLUME on the
front panel or by pressing VOLUME + or - on the
remote control repeatedly.
To turn off the radio
Press POWER to turn the DVD/CD Receiver off or
select another function mode.
To listen to non-preset radio stations
Use manual or automatic tuning in the step 2.
For manual tuning, press TUNING.(-/+) repeatedly.
For automatic tuning, press and hold TUNING.(-/+)
for about two seconds on the front panel.
To select a preset radio station directly
You can use the number buttons on the remote control
to select a preset radio station directly.
For example, to listen to the preset station 4, press 4
on the remote control. To listen to the preset station
19, press 1 and then 9 (within 3 seconds).
For your reference
If an FM program is noisy
To appear “STEREO”, press FM MODE.. Then
press again this button to make “MONO” appear in
the display window. There will be no stereo effect,
but the reception will improve. Press the button
again to restore the stereo effect.
To improve reception
Reorient the supplied antennas.
Page 27

25
Operation
Sleep Timer Setting
Press SLEEP/DIMMER one or more times to select
delay time between 10 and 180 minutes, after the
player will turn off.
To check the remaining time, press SLEEP/DIMMER
To cancel the sleep function, press SLEEP/DIMMER
repeatedly until “SLEEP 10” appears, and then press
SLEEP/DIMMER once again while “SLEEP 10” is
displayed.
Note:
You can check the remaining time before the DVD/CD
Receiver turns off.
Press SLEEP/DIMMER. The remaining time appears
in the display window.
Dimmer
Press SLEEP/DIMMER once. The LED (Light-emitting
diode) of front panel is turned off and the display
window will be darken by half. To cancel it, press
SLEEP/DIMMER repeatedly until dim off.
Muting
Press MUTING to mute your unit.
You can mute your unit in order, for example, to
answer the telephone, the “MUTING” indicator flickers
in the display window.
Note:
This muting doesn’t affect the audio output to HDMI; it
only mutes the output of speakers connected to the
unit.
Setting the disc ejection lock
You can lock the disc tray to prevent the disc form
being ejected.
When the main unit is turned off, hold down the STOP
key at the front panel for 5 seconds
If you attempt to open the disc tray by pressing
OPEN/CLOSE key, the disc tray does not open and
“LOCKED” appears in the display window.
To cancel the disc ejection lock, hold down the STOP
key at the front panel for 5 seconds again when the
main unit is turned off.
“UNLOCKED” is displayed in the display window.
Note:
Before the main unit is turned off, DVD/CD function
should be selected.
Enjoying audio form an external
source
You can enjoy audio form an external source through
your unit.
Press INPUT repeatedly to select the desired input
source. - AUX, AUX OPT, AUDIO IN, HDMI IN, OSD
IPOD, IPOD, USB
Setting the surround mode
This system has a number of pre-set surround sound
fields. You can select a desired sound mode by using
SOURROUND. You can change the SOURROUND
using b /B arrow key while the SOURROUND
information is displayed on.
The displayed items for the Equalizer may be different
depending on sound sources and effects.
[[PLII MOVIE/ PLII MUSIC/ PLII MTRX(matrix)] Dolby
Pro Logic II enables you to play stereo source on 5.1channel.
[Bypass] You can enjoy the sound without equalizer
effect.
Notes:
•
In some of surround modes, some speakers maybe
no sound or low sound, it depends on the mode of
surround and the source of audio, it is not defective.
•You may need resetting the surround mode, after
switch the input, sometimes even after the sound
track changed.
Page 28

26
Area Code
Afghanistan AF
Argentina AR
Australia AU
Austria AT
Belgium BE
Bhutan BT
Bolivia BO
Brazil BR
Cambodia KH
Canada CA
Chile CL
China CN
Colombia CO
Congo CG
Costa Rica CR
Croatia HR
Czech Republic CZ
Denmark DK
Ecuador EC
Egypt EG
El Salvador SV
Area Code
Ethiopia ET
Fiji FJ
Finland FI
France FR
Germany DE
Great Britain GB
Greece GR
Greenland GL
Heard and McDonald Islands
HM
Hong Kong HK
Hungary HU
India IN
Indonesia ID
Israel IL
Italy IT
Jamaica JM
Japan JP
Kenya KE
Kuwait KW
Libya LY
Luxembourg LU
Area Code
Malaysia MY
Maldives MV
Mexico MX
Monaco MC
Mongolia MN
Morocco MA
Nepal NP
Netherlands NL
Netherlands Antilles AN
New Zealand NZ
Nigeria NG
Norway NO
Oman OM
Pakistan PK
Panama PA
Paraguay PY
Philippines PH
Poland PL
Portugal PT
Romania RO
Russian Federation RU
Area Code
Saudi Arabia SA
Senegal SN
Singapore SG
Slovak Republic SK
Slovenia SI
South Africa ZA
South Korea KR
Spain ES
Sri Lanka LK
Sweden SE
Switzerland CH
Taiwan TW
Thailand TH
Turkey TR
Uganda UG
Ukraine UA
United States US
Uruguay UY
Uzbekistan UZ
Vietnam VN
Zimbabwe ZW
Area Codes
Choose a area code from this list.
Language Code
Abkhazian 6566
Afar 6565
Afrikaans 6570
Albanian 8381
Ameharic 6577
Arabic 6582
Armenian 7289
Assamese 6583
Aymara 6588
Azerbaijani 6590
Bashkir 6665
Basque 6985
Bengali; Bangla 6678
Bhutani 6890
Bihari 6672
Breton 6682
Bulgarian 6671
Burmese 7789
Byelorussian 6669
Cambodian 7577
Catalan 6765
Chinese 9072
Corsican 6779
Croatian 7282
Czech 6783
Danish 6865
Dutch 7876
English 6978
Esperanto 6979
Estonian 6984
Faroese 7079
Language Code
Fiji 7074
Finnish 7073
French 7082
Frisian 7089
Galician 7176
Georgian 7565
German 6869
Greek 6976
Greenlandic 7576
Guarani 7178
Gujarati 7185
Hausa 7265
Hebrew 7387
Hindi 7273
Hungarian 7285
Icelandic 7383
Indonesian 7378
Interlingua 7365
Irish 7165
Italian 7384
Japanese 7465
Javanese 7487
Kannada 7578
Kashmiri 7583
Kazakh 7575
Kirghiz 7589
Korean 7579
Kurdish 7585
Laothian 7679
Latin 7665
Latvian, Lettish 7686
Language Code
Lingala 7678
Lithuanian 7684
Macedonian 7775
Malagasy 7771
Malay 7783
Malayalam 7776
Maltese 7784
Maori 7773
Marathi 7782
Moldavian 7779
Mongolian 7778
Nauru 7865
Nepali 7869
Norwegian 7879
Oriya 7982
Panjabi 8065
Pashto, Pushto 8083
Persian 7065
Polish 8076
Portuguese 8084
Quechua 8185
Rhaeto-Romance 8277
Rumanian 8279
Russian 8285
Samoan 8377
Sanskrit 8365
Scots Gaelic 7168
Serbian 8382
Serbo-Croatian 8372
Shona 8378
Sindhi 8368
Language Code
Singhalese 8373
Slovak 8375
Slovenian 8376
Somali 8379
Spanish 6983
Sudanese 8385
Swahili 8387
Swedish 8386
Tagalog 8476
Tajik 8471
Tamil 8465
Tatar 8484
Telugu 8469
Thai 8472
Tibetan 6679
Tigrinya 8473
Tonga 8479
Turkish 8482
Turkmen 8475
Twi 8487
Ukrainian 8575
Urdu 8582
Uzbek 8590
Vietnamese 8673
Volapük 8679
Welsh 6789
Wolof 8779
Xhosa 8872
Yiddish 7473
Yoruba 8979
Zulu 9085
Reference
Language Codes
Use this list to input your desired language for the following initial settings:
Disc Audio, Disc Subtitle, Disc Menu.
Page 29

27
Reference
Troubleshooting
Check the following guide for the possible cause of a problem before contacting service.
Symptom
No power.
The power is on, but
the DVD/CD Receiver
does not work.
No picture.
There is no sound or
only a very low-level
sound is heard.
The playback picture is
poor.
The DVD/CD Receiver
does not start playback.
Loud hum or noise is
heard.
Cause
• The power cord is disconnected.
• No disc is inserted.
• The TV is not set to receive DVD signal
output.
• The video cable is not connected
securely.
• The connected TV power is turned off.
• The equipment connected with the
audio cable is not set to receive DVD
signal output.
• The audio cables are not connected
securely.
• The power of the equipment connected
with the audio cable is turned off.
• The audio connecting cable is damaged.
• The disc is dirty.
• No disc is inserted.
• An unplayable disc is inserted.
• The disc is placed upside down.
• The disc is not placed within the guide.
• The disc is dirty.
•Amenu is on the TV screen.
• The Rating level is set.
• The disc is dirty.
• The speakers and components are
connected poorly.
• The DVD/CD Receiver is located too
close to the TV.
Correction
• Plug the power cord securely into the
wall outlet.
• Insert a disc. (Check that the DVD or,
audio CD indicator in the DVD display
is lit.)
• Select the appropriate video input
mode on the TV so the picture from
the DVD/CD Receiver appears on the
TV screen.
• Connect the video cable into the
jacks securely.
•Turn on the TV.
• Select the correct input mode of the
audio receiver so you can hear the
sound from the DVD/CD Receiver.
• Connect the audio cable into the
jacks securely.
•Turn on the equipment connected
with the audio cable.
• Replace it with new one.
• Clean the disc.
• Insert a disc. (Check that the DVD, or
audio CD indicator in the DVD display
is lit.)
• Insert a playable disc. (Check the
disc type, colour system and Regional
code.)
• Place the disc with the playback side
down.
• Place the disc on the disc tray
correctly inside the guide.
• Clean the disc.
• Press the SETUP button to turn off
the menu screen.
• Cancel the Rating function or change
the rating level.
• Clean the disc.
• Connect the speakers and
components securely.
• Move your TV away from the audio
components.
Page 30

28
Symptom
Radio stations cannot
be tuned in.
The remote control
does not work
properly.
The front panel
display is too dim.
Cause
• The antenna is positioned or connected
poorly.
• The signal strength of the stations is too
weak (when tuning in with automatic
tuning).
• No stations have been preset or preset
stations have been cleared (when
tuning by scanning preset stations).
• The remote control is not pointed at the
remote sensor of the DVD/CD Receiver.
• The remote control is too far from the
DVD/CD Receiver.
• There is an obstacle in the path of the
remote control and the DVD/CD
Receiver.
• The batteries in the remote control are
flat.
• Nothing is displayed on the front panel
display.
Correction
• Connect the antenna securely.
• Adjust the antennas and connect an
external antenna if necessary.
•Tune in the station manually.
• Preset the stations (page 24).
• Point the remote control at the remote
sensor of the DVD/CD Receiver.
• Use the remote control within about 23
ft (7 m).
• Remove the obstacle.
• Replace the batteries with new ones.
• Press DIMMER on the remote control.
Page 31

29
Reference
❋ Designs and specifications are subject to change without notice.
Specifications
GeneralCD/DVDVideo
Amplifier
Speakers
Tuner
FM
Power supply 110 - 240 V ~ 50/60 Hz
Power consumption 130 W
Net Weight 3.6 kg
External dimensions (W x H x D) 430 x 76 x 317 mm
Operating conditions Temperature: 5°C to 35°C, Operation status: Horizontal
Operating humidity 5% to 85%
Laser Semiconductor laser, wavelength 650 nm
Video system PAL/NTSC
Frequency response (audio) 140 Hz to 20 kHz
Signal-to-noise ratio (audio) More than 75 dB (1 kHz, 20 kHz LPF/A-Filter)
Dynamic range (audio) More than 75 dB
Harmonic distortion (audio) 0.5 % (1 kHz, at 1W position) (20 kHz LPF)
Video output 1.0 V (p-p), 75 Ω, negative sync., RCA jack x 1
COMPONENT VIDEO OUT (Y) 1.0 V (p-p), 75 ohms, negative sync, RCA jack x 1
(PB)/(PR) 0.7 V (p-p), 75 ohms, RCA jack x 1
HDMI OUT 480i (or 576i)/480p (or 576p)/720p/1080i/1080p
Tuning Range 87.50 - 108.00 MHz (or 87.5 - 108.0 MHz)
Intermediate Frequency 128 kHz
Signal-to Noise Ratio 60 dB (Mono)
Frequency Response 140 - 10,000 Hz
Tuning Range 522 - 1,620 kHz
Intermediate Frequency 128 kHz
Stereo mode 155 W + 155 W (4Ω at 1 kHz, THD 10 %)
Surround mode Front: 155 W + 155 W (THD 10 %)
center*: 155 W
Surround*: 155 W + 155 W (4Ω at 1 kHz, THD 10 %)
Subwoofer*: 225 W (3Ω at 70 Hz, THD 10 %)
Inputs AUDIO IN, OPTICAL IN, AUX IN, iPod, HDMI IN, USB
Outputs MONITOR OUT, HDMI OUT,
COMPONENT VIDEO OUT
Front/Rear Speaker Center speaker Passive Subwoofer
Type 1 Way 1 Speaker 1 Way 1 Speaker 1 Way 1 Speaker
Impedance 4 Ω 4 Ω 3 Ω
Frequency Response 120 - 18000 Hz 120 -18000 Hz 40 - 1500 Hz
Sound Pressure Level 83 dB/W (1m) 83 dB/W (1m) 82 dB/W (1m)
Rated Input Power 155 W 155 W 225 W
Max. Input Power 310 W 310 W 450 W
Net Dimensions (W x H x D)
113 x 209 x 83 mm 301 x 118 x 83 mm 236 x 435 x 391 mm
Net Weight 0.78 kg 0.9 kg 5.7 kg
Output power DC 5V 500mA
Items with are measured at Front Speaker Terminals in STEREO mode
(*
Depending on the sound mode
settings and the source, there
may be no sound output.)
Supplied Accessories
FM Antenna . . . . . . . . . . . . . . . . . . . . . . . . . . . . .x1
AM Antenna . . . . . . . . . . . . . . . . . . . . . . . . . . . . .x1
Speaker cable . . . . . . . . . . . . . . . . . . . . . . . . . . .x6
Remote control . . . . . . . . . . . . . . . . . . . . . . . . . .x1
Video RCA cable . . . . . . . . . . . . . . . . . . . . . . . . .x1
iPod Docking station . . . . . . . . . . . . . . . . . . . . . .x1
Batteries . . . . . . . . . . . . . . . . . . . . . . . . . . . . . . .x2
AM
USB
Page 32

0709SKMLGEEGL
TH-G41
2009 Victor Company of Japan, Limited
EN
 Loading...