

Page 1

LG-T320g
User Guide
E N G L I S H
FR AN ÇA IS
P/N :
MFL67022101 (1.0)
www.lg.com/ca
Page 2

Bluetooth QD ID B016856
Page 3
LG Flick User Guide
Some of the contents in this manual
may differ from your phone depending
on the software of the phone or your
service provider.
-
English
Page 4

Contents
Installing the SIM card and the
handset battery ....................4
Installing the SIM Card .........4
Illustrations ..........................4
Phone Components ...............5
Using your touch screen .......6
Touch screen tips .................6
Control the touch screen ......6
Your home screen .................7
Your menu screen .................8
Calls ......................................9
Making a Call .......................9
Making a call from your
contacts .............................. 9
Changing the common call
setting ................................. 9
Contacts ..............................10
Searching for a contact ......10
Adding a new contact ......... 10
Changing your contact settings
.........................................
2
Messaging .......................... 11
Entering Text ......................12
Handwriting recognition ......12
Setting up your email .........12
Changing your text message
settings ............................ 12
Changing your multimedia
message settings ...............13
Social network services (SNS) .
.........................................
Facebook (Continued SNS)..14
Camera ...............................14
Taking a quick photo ..........14
After taking a photo ............15
Using the advanced settings 15
Video camera ...................... 16
Making a quick video .........16
After making a video ..........17
Using the advanced settings 17
Music ..................................18
Transferring music onto your
phone ...............................19
11
Managing files ....................19
Games and Applications ....19
14
Page 5

Application .......................... 20
Adding an event to your
calendar ............................20
Setting your alarm .............. 20
Voice recorder ...................20
Using your calculator ..........20
Converting a unit ................ 20
PC Suite .............................. 20
Installing the LG PC Suite on
your computer ..................20
The web ..............................21
Accessing the web .............21
Access to Yahoo! Search ....21
Settings ..............................22
Personalising your profiles ..22
Changing your phone settings .
.........................................
Using memory manager .....22
Changing your connectivity
settings ............................. 22
Sending and receiving your
files using Bluetooth ...........22
Pairing with another Bluetooth
device ............................... 23
Accessories ........................24
Technical data..................... 25
For Your Safety ...................26
Safety Guidelines ................ 33
22
3
Page 6
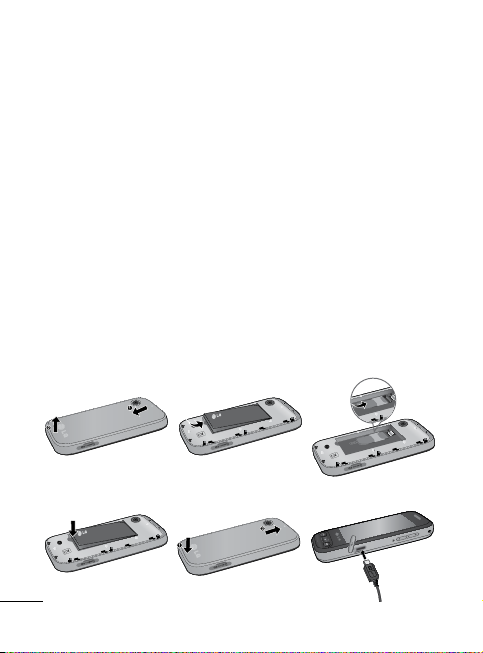
Installing the SIM card and the handset battery
Installing the SIM Card
When you subscribe to a
cellular network, you are
provided with a plug-in
SIM card loaded with your
subscription details, such as
your PIN, any optional services
available and many others.
Important!
The plug-in SIM card and its
contacts can be easily damaged
by scratches or bending, so be
careful when handling, inserting
or removing the card. Keep all
1 2 3
4 5 6
4
SIM cards out of the reach of
small children.
Illustrations
Always switch the device off
and disconnect the charger
before removing the battery.
1 Remove the back cover.
2 Lift battery away.
3 Insert the SIM card.
4 Insert the battery pack.
5 Attach the back cover.
6 Charge the battery.
Page 7
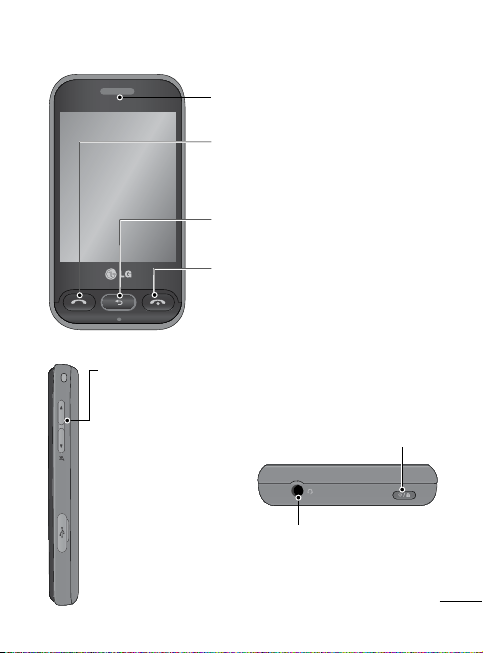
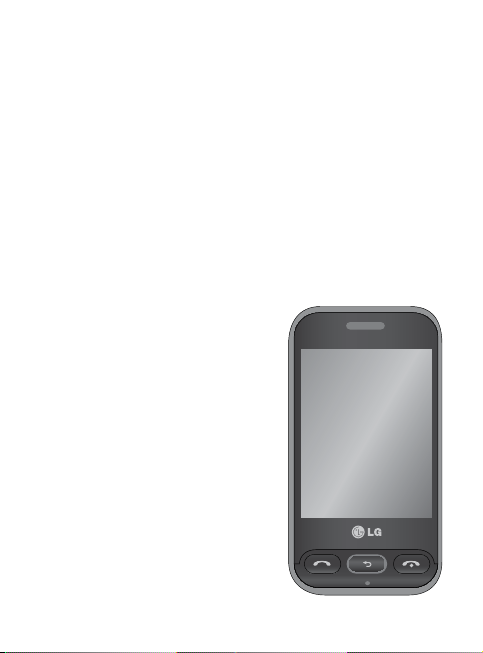
Phone Components
Earpiece
Call key
Dials a phone number and answers
incoming calls.
Clear key
Go back to a previous screen.
End key
Volume keys
• When the screen
is at the Home
screen: Ring tone
and touch tone
volume.
• During a call:
Earpiece volume.
• Down volume key:
Press and hold to
activate/ deactivate
Silent mode.
Power/Lock key
• Short press to turn on/off the
screen.
• Long press for power on/off.
Handsfree or Stereo
earphone connector
5
Page 8
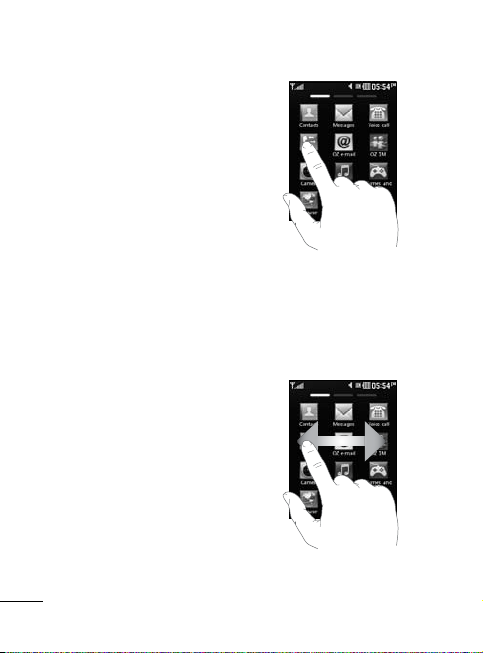
Using your touch screen
Touch screen tips
• To select an item, touch the
centre of the icon.
• Do not press too hard. The
touchscreen is sensitive
enough to pick up a light, firm
touch.
• Use the tip of your finger to
touch the option you require.
Be careful not to touch any
other keys.
• Whenever your LG Flick is not
in use, it will return to the lock
screen.
Control the touch screen
The controls on the LG
Flick touch screen change
dynamically depending on the
task you are carrying out.
Opening Applications
To open any application, simply
touch its icon.
6
Scrolling
Drag from side to side to scroll.
On some screens, such as the
call history list, you can also
scroll up or down.
Page 9
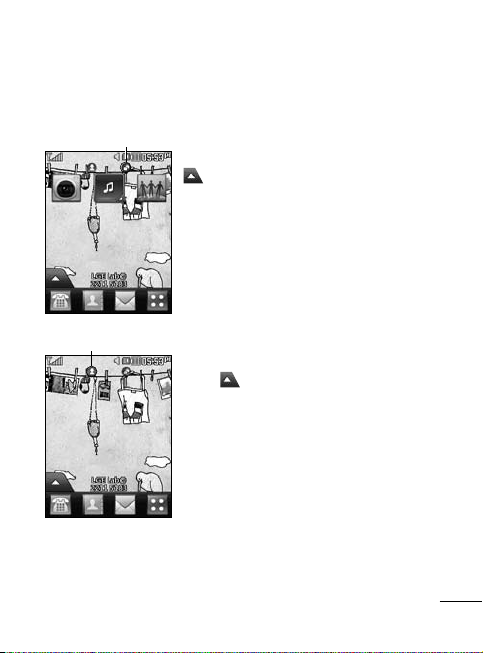
Your home screen
You can drag and click what you need right away in all home
screen types.
Active
Widget home screen - When you touch
on the bottom left of the screen, the
mobile widget panel appears. When you
register widget by dragging it, the widget is
created in the spot.
Active
Speed dial home screen - When you
touch , the speed dial list appears.
You can call, send a message or edit the
contact directly in this home screen.
7
Page 10
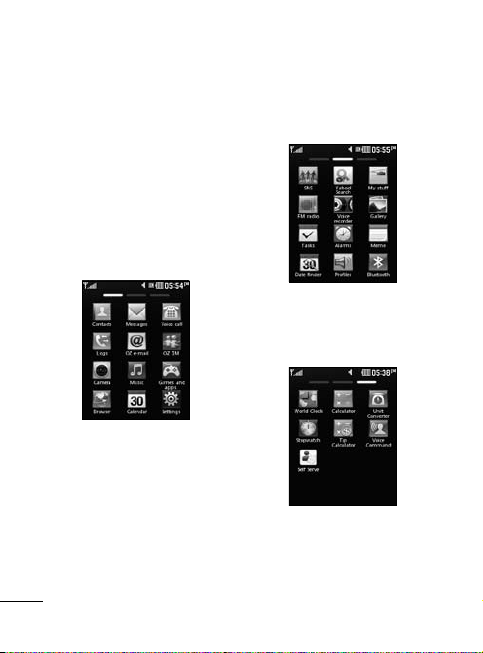
Your menu screen
You can drag from side to
side to scroll what you need
right away in all menu screen.
To swap between the menu
screens just wipe quickly over
the display from left to right, or
right to left.
1 Call screen- Send the
message or make a call in
this menu
8
2 Multimedia screen- Use
Google menu or send
e-mail.
3 Application screen- Use
applications in this menu.
Page 11
Calls
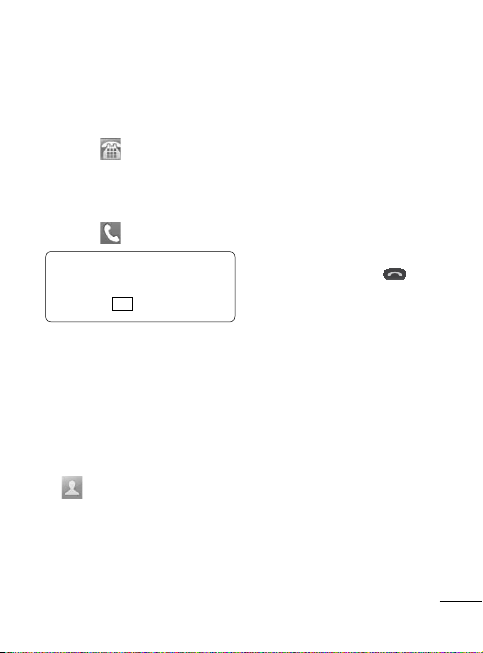
Making a Call
1 Touch to open the
keypad.
2 Key in the number using the
keypad.
3 Touch to initiate the call.
TIP! To enter + for making
an international call, press
and hold
Press the power key to lock the
touchscreen to prevent calls
being made by mistake.
Making a call from your
contacts
1 From the home screen touch
2 Tap the Name field box on
the top of the screen and
enter the first few letters of
the contact you would like to
call using the keypad.
+
0
.
to open the Contacts.
3 From the filtered list, touch
the Call icon next to the
contact you want to call.
The call will use the default
number if there is more than
one for that contact.
4 Or, you can touch the contact
name and select the number
to use if there is more than
one for that contact to use.
You can also press to
initiate the call to the default
number.
Changing the common
call setting
1 Touch Call settings in the
Settings menu.
2 Scroll and touch Common
settings.
• Call reject - Slide the switch
left for ON. You can touch the
Reject list to choose all calls,
specific contacts or groups
or calls from unregistered
numbers (i.e. not in your
contacts).
9
Page 12
• Send my number - Choose
whether to display your
number on an outgoing call.
• Auto-redial - Slide the switch
left for ON or right for OFF.
• Answer mode
Press send key: Allows you
to only answer an incoming
call by pressing the key.
Press any key: Allows you to
answer an incoming call by
pressing any key, except the
key.
• Minute minder - Slide the
switch left to ON to hear a
tone every minute during
a call.
• BT answer mode - Select
Handsfree to be able to
answer a call using a
Bluetooth headset, or select
Handset to press a handset
key to answer a call.
• Save new number - Select
ON or OFF to save a new
number.
10
Contacts
Searching for a contact
1 Touch Contacts.
2 You see a list of contacts.
Typing in the first letter of a
contact’s name in the Name
field will jump the menu to
that alphabetical area of
the list.
Adding a new contact
1 Touch Contacts and touch
Add.
2 Choose whether to save
the contact to your Internal
memory or SIM.
3 Enter your first and last name.
4 You can enter up to five
different numbers per
contact.
5 Add an email addresses. You
can enter up to two different
email addresses per contact.
6 Assign the contact to one or
more groups.
Page 13

7 Touch Save to save the
contact.
Changing your contact
settings
You can adapt your contact
settings so that your Contacts
suits your own preferences.
Touch Options key and
touch Settings.
• Display name - Choose
whether to display the first or
last name of a contact first.
• Copy - Copy your contacts
from your SIM to your
handset, or vice versa. You
can do this one contact at a
time, or all at once.
•
Move - This works in the same
way as Copy, but the contact
is stored at the new location
only. Therefore, once a contact
is moved from the SIM to
the Internal memory it will be
deleted from the SIM memory.
• Send all contacts via
Bluetooth - Sends all contacts
to other handset via Bluetooth.
• Back up contacts/ Restore
contacts - Save or restore
the contacts data to the other
storage.
• Delete all contacts - Delete
all your contacts. Touch Yes
if you are sure you want to
delete all your contacts.
Messaging
Your LG Flick combines SMS
and MMS into one intuitive and
easy-to-use menu.
Sending a message
1
Touch Messages in menu.
And touch Write message
to begin composing a new
message.
2 Touch Insert to add an
image, video, sound,
template and so on.
11
Page 14

3 Touch To at the top of
the screen to enter the
recipients. Then enter the
number or touch to
select a contact. You can
even add multiple contacts.
4 Touch Send when ready.
WARNING: If an
image, video or sound is
added to an SMS it will be
automatically converted to
an MMS and you will be
charged accordingly.
Entering Text
You can choose your input
method by tapping and
Input method.
Touch to turn on T9 mode.
This icon is only shown when
you choose Keypad as the
input method. Touch to
change between numbers,
symbols and text input.
U
se Shift key to change between
capital or lowercase input.
12
Handwriting recognition
In Handwriting mode you
simply write on the screen and
your LG Flick will convert your
handwriting into your message.
Setting up your email
Touch E-mail in Application
screen.
If the email account is not set
up, start the email set up wizard
and finish it.
You can check and edit settings
by selecting . You can also
check the additional settings
that were filled in automatically
when you created the account.
Changing your text
message settings
Touch Messages and
touch Settings. Select Text
message.
Page 15

Text message centre - Enter
the details of your message
centre.
Delivery report - Slide
the switch left to receive
confirmation that your
messages have been delivered.
Character encoding - Choose
how your characters are
encoded. This impacts the size
of your messages and therefore
data charges.
Send long text as - Choose
to send long messages as
Multiple SMS or as an MMS.
Changing your
multimedia message
settings
Touch Messages and, touch
Settings and Multimedia
message.
Retrieval mode - Choose
between Home network or
Roaming network. If you then
choose Manual you will receive
only notifications of MMS and
you can then decide whether to
download them in full.
Delivery report - Choose to
request and/or allow a delivery
report.
Read receipt - Choose to
request and/or allow a reply.
Priority - Choose the priority
level of your MMS.
Validity period - Choose how
long your message is stored at
the message centre.
Slide duration - Choose how long
your slides appear on the screen.
Unsupported attachment -
Choose whether the
unsupported attachment is
restricted or not.
Delivery time - Choose how
long to wait before a message
is delivered.
MMS centre - Choose one
from the list or add a new
message centre.
13
Page 16
Social network services
(SNS)
Your LG Flick has SNS that lets
you enjoy and manage your
social network.
TIP: Facebook, Twitter
and Myspace are java
applications based on java
technology.
NOTE: SNS feature is a
data intensive application.
An additional costs may be
incurred when connecting
and using online services.
Check your data charges
with your network provider.
Facebook (Continued
SNS)
Home: Log in and you will see
your friend’s updated status.
Input your comment about new
status or check others.
14
Profile: You can select the Wall
> Status updates and write
the current status. See your
info detail and upload the photo
by touching Photos > Upload
Photo.
Friends: Search your friends in
facebook by selecting Search
tap.
Inbox: You can see the Inbox/
Sent folder, and write a SN
message.
Camera
Taking a quick photo
1 Touch Camera menu.
2 When the camera has
focused on your subject,
touch the on the right-
center of the screen to take
a photo.
Page 17
TIP: To switch to the camera
mode or video mode, slide
up/down the camera or
video icon on the centreright of the viewfinder.
Edit - Touch to edit the photo.
Touch to delete the image.
Touch to take another
photo immediately.
Touch to view a gallery of
your saved photos.
After taking a photo
Your captured photo will appear
on the screen.
The following options are
available.
Touch .
Send - Touch to send the photo
as a Message, E-mail or via
Bluetooth.
Set as - Touch to set a screen
image (Homescreen wallpaper,
Lockscreen wallpaper, Contacts
image, Incoming call image,
Outgoing call image, Startup
image and Shut down image).
Rename - Touch to rename
the photo.
Using the advanced
settings
From the viewfinder, touch
to open all advanced settings
options.
After selecting the option, touch
the OK button.
Size - Change the size of the
photo to save memory
White balance - Choose
between Auto, Incandescent,
Sunny, Fluorescent, and
Cloudy.
Colour effect - Choose a color
tone for your new photo.
15
Page 18

Continuous shot - Position the
subject in the viewfinder, then
press the capture button as
if taking a normal photo. The
camera will take shots in quick
succession.
Self-timer - The self-timer
allows you to set a delay after
the shutter is pressed. Select
Off, 3 seconds, 5 seconds, or
10 seconds. This is ideal if you
want to be included in a photo.
Night mode - Useful to user in
dark places.
Image quality - Choose
between Super fine, Fine, and
Normal. The finer the quality,
the sharper the photo. However,
the file size will increase as a
result, which means you’ll be
able to store fewer photos in
the memory.
Select storage - Choose
whether to save your photos to
the Handset memory or to the
External memory.
16
Hide icons - Choose the
camera setting icons to hide
manually or automatically.
Show captured image -
Choose On to check the picture
you took right away.
Shutter sound - Select one of
the three shutter sounds.
Grid screen - Choose
between Off, Simple cross, or
Trisection.
Reset settings - Restore all
camera default settings.
Video camera
Making a quick video
To switch to the camera mode
or video mode, slide up/down
the camera or video icon on the
right centre of the viewfinder.
1 Holding the phone
horizontally, point the lens
towards the subject of the
video.
Page 19
2 Press the red dot .
3 Rec will appear at the
bottom of the viewfinder
with a timer at the bottom
showing the length of the
video.
4 To pause the video, touch
and resume by selecting .
5 Touch on screen.
After making a video
A still image representing your
captured video will appear on
the screen. The name of the
video runs along the bottom of
the screen together with icons
down the left and right sides .
Touch to play the video.
The following options are
available.
Touch .
Send - Touch to send the video
as a Message via Bluetooth.
Rename - Touch to rename
the video.
Touch to delete the video
you have just made and
confirm by touching
Yes. The viewfinder will
reappear.
Touch to shoot another
video immediately. Your
current video will be saved.
Touch to view a gallery of
saved videos and images.
Using the advanced
settings
From the viewfinder, touch
to open all advanced settings
options. You can change
the video camera setting
by scrolling the wheel. After
selecting the option, touch the
OK button
Video Size - Choose the
320x240 or 176x144.
Colour Effect - Choose a color
tone to use for your new view.
17
Page 20

White balance - The white
balance ensures any the white
areas in your video are realistic.
To enable your camera to adjust
the white balance correctly, you
may need to determine the light
conditions. Choose between
Auto, Incandescent, Sunny,
Fluorescent, and Cloudy.
Quality - Choose between
Super fine, Fine and Normal.
The finer the quality, the
sharper a video will be, but
the file size will increase. As a
result, you will be able to store
fewer videos in the phone’s
memory.
Duration - Set a duration limit
for your video. Choose between
Normal and MMS to limit the
maximum size to send as an
MMS message.
18
Select storage - Choose
whether to save your videos to
the Handset memory or to the
External memory.
Audio recording - Choose
Mute to record a video without
sound.
Hide icons - Select whether
to hide the icons in the camera
menu automatically or manually.
Reset settings - Reset all the
video camera settings.
Music
To access the music player,
touch Music. From here, you
can access a number of folders:
Recently played - Plays the
songs you have played recently.
All tracks - Contains the songs
you have on your phone except
the pre-loaded default music.
Page 21

Artists - Browse through your
music collection by artist.
Albums - Browse through your
music collection by album.
Genres - Browse through your
music collection by genre.
Playlists - Contains all the
playlists you have created.
Shuffle tracks - Play your
tracks in a random order.
Transferring music onto
your phone
The easiest way to transfer
music onto your phone is via
Bluetooth or the data cable.
To transfer music using
Bluetooth:
1 Make sure both devices have
Bluetooth switched on and
are connected to each other.
2 Select the music file on the
other device and select send
via Bluetooth.
3 When the file is sent, you
will have to accept it on your
phone by touching Yes.
4 The file should appear in
Music > All tracks.
Managing files
You can store multimedia files in
your phone’s memory so you have
easy access to all your pictures,
sounds, videos and games. You
can also save your files to a
memory card. Using a memory
card allows you to free up space
in your phone’s memory.
By touching My stuff, you can
open a list of the folders that
store all your multimedia files.
Games and Applications
You can download new games
and applications to your phone
to keep you enjoy.
19
Page 22

Application
Adding an event to your
calendar
1 Touch Calendar.
2 Select the date you would
like to add an event to.
3 Touch Add.
Setting your alarm
1 Touch Alarms.
2 Touch Add, then you can set
and save your alarm in this
menu.
Voice recorder
Use your voice recorder to record
voice memos or other audio files.
Using your calculator
1 Touch Calculator in
Multimedia screen.
2 Touch the number keys to
enter numbers.
20
Converting a unit
1 Touch Unit converter in
Application screen.
2 Choose whether you want
to convert Currency,
Area, Length, Weight,
Temperature, Volume or
Velocity.
3 Then select the unit and
enter the value you would
like to convert from.
PC Suite
You can synchronise your PC
with your phone to make sure
all your important details and
dates match. You can also
backup your files to put your
mind at ease.
Installing the LG PC
Suite on your computer
1 Touch Settings and select
Connectivity.
Page 23
2 Select USB connection
mode and click PC Suite.
3 Connect handset and PC
via USB cable and wait for
a while. Installation guide
message will be displayed.
4 Follow the instructions on the
screen to complete the LG
PC Suite Installer wizard.
5 Once installation is complete,
the LG PC Suite icon will
appear on your desktop.
WARNING: Do not
disconnect your phone
during the transfer.
The web
Browser gives you a fast, full-
colour world of games, music,
news, sport, entertainment and
loads more, straight to your
mobile phone. Wherever you
are and whatever you’re into.
Accessing the web
1 Touch the Browser.
2 To go straight to the browser
home page, select Home.
Alternately, select Enter
address and type in the
URL, followed by Connect.
NOTE: You will incur extra
cost by connecting to these
services and downloading
content. Check data
charges with your network
provider.
Access to Yahoo! Search
You can launch yahoo services
in this application. Touch Yahoo!
Search in the Multimedia
screen.
21
Page 24

Settings
Personalising your
profiles
You can quickly change
your profile by touching the
Multimedia screen.
You can personalise each profile
setting using the settings menu.
1 Touch Profiles.
2 Choose the profile you want
to edit.
3 You can then change all the
sounds and alert options
available in the list, including
your Ringtone and Volume,
Message tone settings and
more.
Changing your phone
settings
Use the freedom of adapting
the LG Flick to your own
preferences.
From the home screen, select
then Settings.
22
Using memory manager
From the home screen select
then scroll to Settings >
Device Settings > Memory
Info.
Changing your
connectivity settings
Your connectivity settings
have already been set up by
your network operator, so you
can enjoy your new phone
immediately. To change any
settings, use this menu:
Settings > Connectivity
Sending and receiving
your files using Bluetooth
To send a file:
1 Open the file you want to
send, typically this will be a
photo, video or music file.
2 Choose Send. Choose
Bluetooth.
3 If you have already paired
the Bluetooth device, your LG
Flick will not automatically
Page 25

search for other Bluetooth
devices. If not, your LG Flick
will search for other Bluetooth
enabled devices within range.
4 Choose the device you want
to send the file to.
5 Your file will be sent.
To receive a file:
1 To receive files, your
Bluetooth must be both ON
and Visible. See Changing
your Bluetooth settings
below for more information.
2 A message will prompt you
to accept the file from the
sender. Touch Yes to receive
the file.
3 You will see where the file
has been saved. For image
files, you can choose to View
the file. Files will usually be
saved to the appropriate
folder in My stuff.
Changing your Bluetooth
settings:
Touch Bluetooth in the
SETTINGS tab. And select
and choose Settings.
Pairing with another
Bluetooth device
By pairing your LG Flick and
another device, you can set
up a passcode protected
connection.
1 Check that your Bluetooth
is ON and Visible. You can
change your visibility in the
Settings menu.
2 Touch Search.
3 Your LG Flick will search for
devices. When the search
is completed, Refresh will
appear on screen.
4 Choose the device you want
to pair with and enter the
passcode, then touch OK.
5 Your phone will then connect
to the other device, on which
you will need to enter the
same passcode.
6 Your passcode protected
Bluetooth connection is now
ready.
23
Page 26
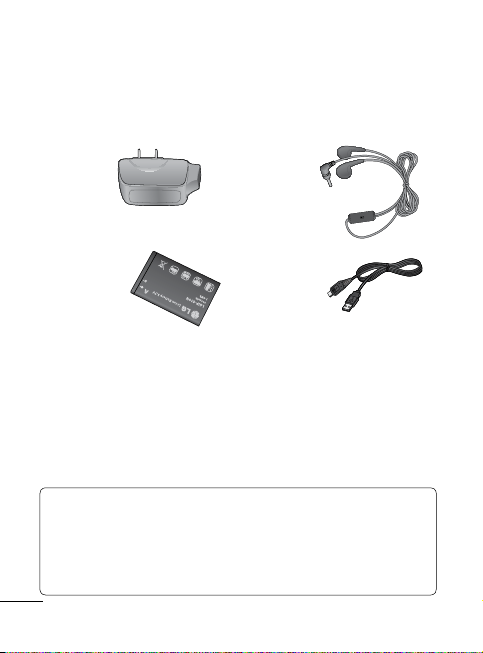
Accessories
There are various accessories for your mobile phone. You can
select these options according to your personal communication
requirements.
Charger Stereo
headset
Battery Data
cable
NOTE
• Always use genuine LG accessories.
• Failure to do this may invalidate your warranty.
• Accessories may vary in different regions.
24
Page 27

Technical data
Ambient Temperatures
Max.: +55°C (discharging) +45°C (charging)
Min.: -10°C
25
Page 28

For Your Safety
Important Information
This user guide contains
important information on the
use and operation of this
phone. Please read all the
information carefully for optimal
performance and to prevent
any damage to or misuse of
the phone. Any changes or
modifications not expressly
approved in this user guide
could void your warranty for this
equipment.
Before You Start
Safety Instructions
WARNING! To reduce the
possibility of electric shock, do
not expose your phone to high
humidity areas, such as the
bathroom, swimming pool, etc.
Always store your phone
away from heat. Never store
your phone in settings that
may expose it to temperatures
less than 32°F or greater than
26
104°F, such as outside during
extreme weather conditions
or in your car on a hot day.
Exposure to excessive cold or
heat will result in malfunction,
damage and/or catastrophic
failure.
Be careful when using
your phone near other
electronic devices. RF
emissions from your mobile
phone may affect nearby in
adequately shielded electronic
equipment. You should consult
with manufacturers of any
personal medical devices such
as pacemakers and hearing
aides to determine if they are
susceptible to interference from
your mobile phone. Turn off your
phone in a medical facility or at
a gas station. Never place your
phone in a microwave oven as
this will cause the battery to
explode.
Page 29

IMPORTANT! Please read the
TIA SAFETY INFORMATION
on page 91 before using your
phone.
Safety Information
Read these simple guidelines.
Breaking the rules may be
dangerous or illegal. Further
detailed information is given in
this user guide.
• Never use an unapproved
battery since this could
damage the phone and/or
battery and could cause the
battery to explode.
• Never place your phone in
a microwave oven as it will
cause the battery to explode.
• Do not dispose of your battery
by fire or with hazardous or
flammable materials.
• Make sure that no sharp-
edged items come into
contact with the battery. There
is a risk of this causing a fire.
• Store the battery in a place
out of reach of children.
• Be careful that children do
not swallow any parts such
as rubber plugs (earphone,
connection parts of the
phone, etc.). This could cause
asphyxiation or suffocation.
•
Unplug the power cord and
charger during lightning storms
to avoid electric shock or fire.
• When riding in a car, do not
leave your phone or set up
the hands-free kit near to the
air bag. If wireless equipment
is improperly installed and the
air bag is activated, you may
be seriously injured.
• Do not use a hand-held
phone while driving.
• Do not use the phone in areas
where its use is prohibited.
(For example: aircraft).
• Do not expose the battery
charger or adapter to direct
sunlight or use it in places
27
Page 30

For Your Safety
with high humidity, such as a
bathroom.
• Never store your phone in
temperatures less than- 4°F
or greater than 122°F.
• Do not use harsh
chemicals(such as alcohol,
benzene, thinners, etc.) or
detergents to clean your
phone. There is a risk of this
causing a fire.
• Do not drop, strike, or shake
your phone severely. Such
actions may harm the internal
circuit boards of the phone.
• Do not use your phone in high
explosive areas as the phone
may generate sparks.
• Do not damage the power
cord by bending, twisting,
pulling, or heating.
• Do not use the plug if it is
loose as it may cause a fire or
electric shock.
• Do not place any heavy items
on the power cord. Do not
28
allow the power cord to be
crimped as it may cause fire
or electric shock.
• Do not handle the phone with
wet hands while it is being
charged. It may cause an
electric shock or seriously
damage your phone.
• Do not disassemble the
phone.
• Do not place or answer calls
while charging the phone as
it may shortcircuit the phone
and/or cause electric shock
or fire.
• Only use the batteries,
antennas, and chargers
provided by LG. The warranty
will not be applied to products
provided by other suppliers.
•
Only authorized personnel
should service the phone
and its accessories. Faulty
installation or service may result
in accidents and consequently
invalidate the warranty.
Page 31

• Do not hold or let the antenna
come in contact with your
body during a call.
• An emergency call can be
made only within a service
area. For an emergency call,
make sure that you are within
a service area and that the
phone is turned on.
•
Use accessories, such as
earphones and headsets, with
caution. Ensure that cables are
tucked away safely and do not
touch the antenna unnecessarily.
Memory card
information and care
• Always insert/ remove the
memory card while the
handset power is off. If you
remove it while the power is
on, it may be damaged.
• If a damage cannot be fixed,
format the memory card.
• The memory card cannot
be used for recording
copyrightprotected data.
• Do not write forcefully on the
memo area.
• Carry and store the memory
card in its case.
• Do not allow the memory card
to get wet.
• Do not leave the memory card
in extremely hot location.
• Do not disassemble or modify
the memory card.
FCC RF Exposure
Information
WARNING! Read this
information before operating
the phone.
In August 1996, the Federal
Communications Commission
(FCC) of the United States,
with its action in Report and
Order FCC 96- 326, adopted
an updated safety standard
for human exposure to radio
frequency (RF) electromagnetic
energy emitted by FCC
29
Page 32

For Your Safety
regulated transmitters. Those
guidelines are consistent
with the safety standard
previously set by both U.S. and
international standards bodies.
The design of this phone
complies with the FCC
guidelines and these
international standards.
CAUTION
Use only the supplied and
approved antenna. Use of
unauthorized antennas or
modifications could impair call
quality, damage the phone, void
your warranty and/or result in
violation of FCC regulations.
Do not use the phone with
a damaged antenna. If a
damaged antenna comes into
contact with skin, a minor
burn may result. Contact your
local dealer for a replacement
antenna.
30
Body-worn Operation
This device was tested for
typical bodyworn operations
with the back of the phone kept
2cm (0.79 inches) between the
user’s body and the back of
the phone. To comply with FCC
RF exposure requirements, a
minimum separation distance
of 2cm (0.79 inches) must
be maintained between the
user s body and the back
of the phone. Third-party
beltclips, holsters, and similar
accessories containing metallic
components should not be
used.
Body-worn accessories that
cannot maintain 2cm (0.79
inches) separation distance
between the user’s body and
the back of the phone, and
have not been tested for typical
body-worn operations may not
comply with FCC RF exposure
limits and should be avoided.
Page 33

Vehicle Mounted
External
Antenna (optional, if
available)
A minimum separation distance
of 20cm (8 inches) must
be maintained between the
user/bystander and the vehicle
mounted external antenna
to satisfy FCC RF exposure
requirements. For more
information about RF exposure,
visit the FCC website at www.
fcc.gov
FCC Part 15 Class B
Compliance
This device and its accessories
comply with part 15 of FCC
rules and ICES-003 Class
Bdigital apparatus requirements
for Industry Canada.
Operation is subject to the
following two conditions:
This device and its accessories
may not cause harmful
interference, and (2) this device
and its accessories must accept
any interference received,
including interference that may
cause undesired operation.
Cautions for Battery
• Do not disassemble.
• Do not short-circuit.
• Do not expose to high
temperature: 60°C (140°F).
• Do not incinerate.
Battery Disposal
• Please dispose of your battery
properly or bring to your local
wireless carrier for recycling.
• Do not dispose in fire or with
hazardous or flammable
materials.
Adapter (Charger)
Cautions
• Using the wrong battery
charger could damage your
phone and void your warranty.
31
Page 34

For Your Safety
• The adapter or battery
charger is intended for indoor
use only.
Do not expose the adapter
or battery charger to direct
sunlight or use it in places
with high humidity, such as the
bathroom.
Avoid damage to your
hearing
• Damage to your hearing can
occur if you are exposed
to loud sound for long
periods of time. We therefore
recommend that you do not
turn on or off the handset
close to your ear. We also
recommend that music and
call volumes are set to a
reasonable level.
• If you are listening to music
whilst out and about, please
ensure that the volume
is at a reasonable level
so that you are aware of
32
your surroundings. This is
particularly imperative when
attempting to cross the street.
NOTE!
Excessive sound
pressure from earphones can
cause hearing loss.
Page 35

Safety Guidelines
TIA Safety Information
Provided herein is the complete
TIA Safety Information for
Wireless Handheld phones.
Inclusion of the text covering
Pacemakers, Hearing Aids,
and Other Medical Devices is
required in the owner’s manual
for CTIA Certification. Use of
the remaining TIA language is
encouraged when appropriate.
Exposure to Radio
Frequency Signal
Your wireless handheld portable
telephone is a lowpower radio
transmitter and receiver. When
it is ON, it receives and also
sends out radio frequency (RF)
signals.
In August, 1996, the Federal
Communications Commissions
(FCC) adopted RF exposure
guidelines with safety levels for
handheld wireless phones.
Those guidelines are consistent
with the safety standards
previously set by both U.S. and
international standards bodies:
ANSI C95.1 (1992) *
NCRP Report 86 (1986)
ICNIRP (1996)
Those standards were based
on comprehensive and
periodic evaluations of the
relevant scientific literature. For
example, over 120 scientists,
engineers, and physicians from
universities, government health
agencies, and industry reviewed
the available body of research
to develop the ANSI Standard
(C95.1).
* American National Standards
Institute; National Council
on Radiation Protection and
Measurements; International
Commission on Non-Ionizing
Radiation Protection
The design of your phone
complies with the FCC
33
Page 36

Safety Guidelines
guidelines (and those
standards).
Antenna Care
Use only the supplied or an
approved replacement antenna.
Unauthorized antennas,
modifications, or attachments
could damage the phone and
may violate FCC regulations.
Phone Operation
NORMAL POSITION: Hold the
phone as you would any other
telephone with the antenna
pointed up and over your
shoulder.
Tips on Efficient
Operation
For your phone to operate most
efficiently:
• Do not touch the antenna
unnecessarily when the
phone is in use. Contact
with the antenna affects call
34
quality and may cause the
phone to operate at a higher
power level than otherwise
needed.
Driving
Check the laws and regulations
on the use of wireless phones
in the areas where you drive.
Always obey them. Also, if
using your phone while driving,
please:
• Give full attention to driving
- driving safely is your first
responsibility;
• Use hands-free operation, if
available;
• Pull off the road and park
before making or answering
a call if driving conditions so
require.
Electronic Devices
Most modern electronic
equipment is shielded from
RF signals. However, certain
Page 37

electronic equipment may
not be shielded against the
RF signals from your wireless
phone.
Pacemakers
The Health Industry
Manufacturers Association
recommends that a minimum
separation of six (6’) inches
be maintained between a
handheld wireless phone
and a pacemaker to avoid
potential interference with the
pacemaker.
These recommendations
are consistent with the
independent research by and
recommendations of Wireless
Technology Research. Persons
with pacemakers:
• Should ALWAYS keep the
phone more than six inches
from their pacemaker when
the phone is turned ON;
• Should not carry the phone in
a breast pocket.
• Should use the ear opposite
the pacemaker to minimize
the potential for interference.
• If you have any reason to
suspect that interference is
taking place, turn your phone
OFF immediately.
Hearing Aids
Some digital wireless phones
may interfere with some
hearing aids. In the event of
such interference, you may
want to consult your service
provider.
Other Medical Devices
If you use any other personal
medical device, consult the
manufacturer of your device to
determine if they are adequately
shielded from external RF
energy.
35
Page 38

Safety Guidelines
Your physician may be able
to assist you in obtaining this
information.
Health Care Facilities
Turn your phone OFF in
health care facilities when any
regulations posted in these
areas instruct you to do so.
Hospitals or health care facilities
may use equipment that could
be sensitive to external RF
energy.
Vehicles
RF signals may affect
improperly installed or
inadequately shielded electronic
systems in motor vehicles.
Check with the manufacturer
or its representative regarding
your vehicle.
You should also consult the
manufacturer of any equipment
that has been added to your
vehicle.
36
Posted Facilities
Turn your phone OFF in any
facility where posted notices so
require.
Aircraft
FCC regulations prohibit using
your phone while in the air.
Turn your phone OFF before
boarding an aircraft.
Blasting Areas
To avoid interfering with blasting
operations, turn your phone OFF
when in a ‘blasting areas or
in areas posted: ‘Turn off twoway radio’. Obey all signs and
instructions.
Potentially Explosive
Atmosphere
Turn your phone OFF when
in any area with a potentially
explosive atmosphere and
obey all signs and instructions.
Sparks in such areas could
Page 39

cause an explosion or fire
resulting in body injury or even
death.
Areas with a potentially
explosive atmosphere are often,
but not always, marked clearly.
Potential areas may include:
fueling areas (such as gasoline
stations); below deck on boats;
fuel or chemical transfer or
storage facilities; vehicles
using liquefied petroleum gas
(such as propane or butane);
areas where the air contains
chemicals or particles (such as
grain, dust, or metal powders);
and any other area where you
would normally be advised to
turn off your vehicle engine.
For Vehicles Equipped
with an Air Bag
An air bag inflates with great
force. DO NOT place objects,
including either installed or
portable wireless equipment, in
the area over the air bag or in
the air bag deployment area. If
in-vehicle wireless equipment
is improperly installed and the
air bag inflates, serious injury
could result.
Safety Information
Please read and observe the
following information for safe
and proper use of your phone
and to prevent damage. Also,
keep the user guide in an
accessible place at all the times
after reading it.
Charger and Adapter
Safety
• The charger and adapter are
intended for indoor use only.
Battery Information and
Care
• Please dispose of your battery
properly or take it to your local
wireless carrier for recycling.
37
Page 40

Safety Guidelines
• The battery does not need
to be fully discharged before
recharging.
• Use only LG-approved
chargers specific to your
phone model since they are
designed to maximize battery
life.
• Do not disassemble or impact
the battery as it may cause
electric shock, short-circuit,
and fire. Store the battery in a
place out of reach of children.
• Keep the battery’s metal
contacts clean.
• Replace the battery when it
no longer provides acceptable
performance. The battery can
be recharged several hundred
times before replacement.
• Recharge the battery after
long periods of non-use to
maximize battery life.
• Battery life will vary due
to usage patterns and
environmental conditions.
38
• Use of extended backlighting,
medai web sites, and data
connectivity kits affect may
reduce battery life and talk/
standby times.
• The self-protection function
of the battery cuts the
power of the phone when its
operation is in an abnormal
state. In this case, remove
the battery from the phone,
reinstall it, and turn the
phone on.
• Actual battery life will depend
on network configuration,
product settings, usage
patterns, battery and
environmental conditions.
Explosion, Shock, and
Fire Hazards
• Do not put your phone in a
place subject to excessive
dust and keep the minimum
required distance between
the power cord and heat
sources.
Page 41

• Unplug the power cord prior
to cleaning your phone, and
clean the power plug pin
when it is dirty.
• When using the power
plug, ensure that it is firmly
connected. If it is not, it may
cause excessive heat or fire.
• If you put your phone in
a pocket or bag without
covering the receptacle of
the phone (power plug pin),
metallic articles (such as a
coin, paperclip or pen) may
short-circuit the phone.
Always cover the receptacle
when not in use.
• Do not short-circuit the
battery. Metallic articles such
as a coin, paperclip or pen in
your pocket or bag may shortcircuit the + and – terminals
of the battery (metal strips
on the battery) upon moving.
Short-circuit of the terminal
may damage the battery and
cause an explosion.
General Notice
• Using a damaged battery
or placing a battery in your
mouth may cause serious
injury.
• Do not place items containing
magnetic components such
as a credit card, phone
card, bank book or subway
ticket near your phone. The
magnetism of the phone may
damage the data stored in
the magnetic strip.
• Talking on your phone for
a long period of time may
reduce call quality due to heat
generated during use.
• When the phone is not used
for a long period time, store it
in a safe place with the power
cord unplugged.
• Using the phone in proximity
to receiving equipment (i.e.,
TV or radio) may cause
interference to the phone.
39
Page 42

Safety Guidelines
• Do not use the phone if the
antenna is damaged. If a
damaged antenna contacts
skin, it may cause a slight
burn. Please contact an LG
Authorized Service Centre
to replace the damaged
antenna.
• Do not immerse your phone
in water. If this happens, turn
it off immediately and remove
the battery. If the phone does
not work, take it to an LG
Authorized Service Centre.
• Do not paint your phone.
• The data saved in your phone
might be deleted due to
careless use, repair of the
phone, or upgrade of the
software. Please backup your
important phone numbers.
(Ring tones, text messages,
voice messages, pictures, and
videos could also be deleted.)
The manufacturer is not liable
for damage due to the loss
of data.
40
• When you use the phone in
public places, set the ring tone
to vibration so as not to disturb
others.
• Do not turn your phone on or
off when phone is close to
your ears.
FDA Consumer Update
The U.S. Food and Drug
Administration Centre for
Devices and Radiological Health
Consumer Update on Mobile
Phones.
1. Do wireless phones pose a
health hazard?
The available scientific evidence
does not show that any health
problems are associated with
using wireless phones. There is
no proof, however, that wireless
phones are absolutely safe.
Wireless phones emit low levels
of radio frequency energy (RF)
in the microwave range while
being used. They also emit
Page 43

very low levels of RF when in
the standby mode. Whereas
high levels of RF can produce
health effects (by heating
tissue), exposure to low level
RF that does not produce
heating effects causes no
known adverse health effects.
Many studies of low level RF
exposures have not found any
biological effects. Some studies
have suggested that some
biological effects may occur,
but such findings have not
been confirmed by additional
research. In some cases, other
researchers have had difficulty
in reproducing those studies, or
in determining the reasons for
inconsistent results.
2. What is the FDA’s role
concerning the safety of
wireless phones?
Under the law, the FDA does
not review the safety of
radiation emitting consumer
products such as wireless
phones before they can be sold,
as it does with new drugs or
medical devices.
However, the agency has
authority to take action if
wireless phones are shown to
emit radio frequency energy
(RF) at a level that is hazardous
to the user. In such a case,
the FDA could require the
manufacturers of wireless
phones to notify users of the
health hazard and to repair,
replace, or recall the phones so
that the hazard no longer exists.
Although the existing scientific
data do not justify FDA
regulatory actions, the FDA
has urged the wireless phone
industry to take a number of
steps, including the following:
• Support needed research into
possible biological effects
of RF of the type emitted by
wireless phones;
• Design wireless phones in a
way that minimizes any RF
41
Page 44

Safety Guidelines
exposure to the user that
is not necessary for device
function; and
• Cooperate in providing of
wireless phones with the
best possible information on
possible effects of wireless
phone use on human health.
The FDA belongs to an
interagency working group
of the federal agencies that
have responsibility for different
aspects of RF safety to ensure
coordinated efforts at the
federal level. The following
agencies belong to this working
group:
• National Institute for
Occupational Safety and
Health
• Environmental Protection
Agency
• Occupational Safety and
Health Administration
(Administración de la
seguridad y salud laborales)
42
• Occupational Safety and
Health Administration
• National Telecommunications
and Information
Administration
The National Institutes of
Health participates in some
interagency working group
activities, as well.
The FDA shares regulatory
responsibilities for wireless
phones with the Federal
Communications Commission
(FCC). All phones that are
sold in the United States
must comply with FCC safety
guidelines that limit RF
exposure. The FCC relies on the
FDA and other health agencies
for safety questions about
wireless phones.
The FCC also regulates the
base stations that the wireless
phone networks rely upon.
While these base stations
operate at higher power
than do the wireless phones
Page 45

themselves, the RF exposures
that people get from these base
stations are typically thousands
of times lower than those they
can get from wireless phones.
Base stations are thus not the
subject of the safety questions
discussed in this document.
3. What kinds of phones are
the subject of this update?
The term ‘wireless phone’
refers here to handheld
wireless phones with built-in
antennas, often called ‘cell’,
‘mobile’, or ‘PCS’ phones.
These types of wireless
phones can expose the user
to measurable radiofrequency
energy (RF) because of the
short distance between the
phone and the user’s head.
These RF exposures are limited
by FCC safety guidelines that
were developed with the advice
of the FDA and other federal
health and safety agencies.
When the phone is located at
greater distances from the user,
the exposure to RF is drastically
lower because a person’s RF
exposure decreases rapidly
with increasing distance from
the source. The so-called
‘cordless phones,’ which have
a base unit connected to the
telephone wiring in a house,
typically operate at far lower
power levels, and thus produce
RF exposures far below the FCC
safety limits.
4. What are the results of the
research done already?
The research done thus far has
produced conflicting results,
and many studies have suffered
from flaws in their research
methods. Animal experiments
investigating the effects of
radiofrequency energy (RF)
exposures characteristic of
wireless phones have yielded
conflicting results that often
cannot be repeated in other
laboratories. A few animal
43
Page 46

Safety Guidelines
studies, however, have
suggested that low levels
of RF could accelerate the
development of cancer in
laboratory animals. However,
many of the studies that
showed increased tumor
development used animals
that had been genetically
engineered or treated with
cancer causing chemicals
so as to be predisposed to
develop cancer in the absence
of RF exposure. Other studies
exposed the animals to RF for
up to 22 hours per day. These
conditions are not similar to
the conditions under which
people use wireless phones, so
we don’t know with certainty
what the results of such studies
mean for human health. Three
large epidemiology studies have
been published since December
2000. Between them, the
studies investigated any
possible association between
44
the use of wireless phones and
primary brain cancer, glioma,
meningioma, or acoustic
neuroma, tumors of the brain
or salivary gland, leukemia,
or other cancers. None of
the studies demonstrated the
existence of any harmful health
effects from wireless phone RF
exposures.
However, none of the studies
can answer questions about
longterm exposures, since the
average period of phone use in
these studies was around three
years.
5. What research is needed
to decide whether RF
exposure from wireless
phones poses a health
risk?
A combination of laboratory
studies and epidemiological
studies of people actually using
wireless phones would provide
some of the data that are needed.
Lifetime animal exposure
Page 47

studies could be completed in a
few years. However, very large
numbers of animals would be
needed to provide reliable proof
of a cancer promoting effect
if one exists. Epidemiological
studies can provide data that
is directly applicable to human
populations, but 10 or more
years follow-up may be needed
to provide answers about some
health effects, such as cancer.
This is because the interval
between the time of exposure
to a cancer-causing agent and
the time tumors develop - if
they do may be many, many
years. The interpretation of
epidemiological studies is
hampered by difficulties in
measuring actual RF exposure
during day-to-day use of
wireless phones. Many factors
affect this measurement, such
as the angle at which the phone
is held, or which model of
phone is used.
6. What is the FDA doing to
find out more about the
possible health effects of
wireless phone RF?
The FDA is working with
the U.S. National Toxicology
Program and with groups of
investigators around the world
to ensure that high priority
animal studies are conducted
to address important questions
about the effects of exposure
to radiofrequency energy (RF).
The FDA has been a leading
participant in the World Health
Organization International
Electromagnetic Fields (EMF)
Project since its inception in
1996. An influential result
of this work has been the
development of a detailed
agenda of research needs that
has driven the establishment
of new research programs
around the world. The project
has also helped develop a
series of public information
45
Page 48

Safety Guidelines
documents on EMF issues.
The FDA and the Cellular
Telecommunications & Internet
Association (CTIA) have a
formal Cooperative Research
and Development Agreement
(CRADA) to do research on
wireless phone safety. The
FDA provides the scientific
oversight, obtaining input from
experts in government, industry,
and academic organizations.
CTIAfunded research is
conducted through contracts
with independent investigators.
The initial research will include
both laboratory studies and
studies of wireless phone
users. The CRADA will also
include a broad assessment of
additional research needs in the
context of the latest research
developments around the world.
46
7. How can I find out how
much radiofrequency
energy exposure I can
get by using my wireless
phone?
All phones sold in the United
States must comply with
Federal Communications
Commission (FCC) guidelines
that limit radiofrequency energy
(RF) exposures.
The FCC established these
guidelines in consultation with
the FDA and the other federal
health and safety agencies. The
FCC limit for RF exposure from
wireless telephones is set at a
Specific Absorption Rate (SAR)
of 1.6 watts per kilogram (1.6
W/kg).
The FCC limit is consistent with
the safety standards developed
by the Institute of Electrical
and Electronic Engineering
(IEEE) and the National Council
on Radiation Protection and
Measurement. The exposure
Page 49

limit takes into consideration
the body’s ability to remove
heat from the tissues that
absorb energy from the wireless
phone and is set well below
levels known to have effects.
Manufacturers of wireless
phones must report the RF
exposure level for each model
of phone to the FCC. The FCC
website (http://www.fcc.gov/
oet/rfsafety) gives directions for
locating the FCC identification
number on your phone so
you can find your phone’s RF
exposure level in the online
listing.
8. What has the FDA
done to measure the
radiofrequency energy
coming from wireless
phones?
The Institute of Electrical and
Electronic Engineers (IEEE)
is developing a technical
standard for measuring the
radiofrequency energy (RF)
exposure from wireless phones
and other wireless handsets
with the participation and
leadership of FDA scientists and
engineers.
The standard, ‘Recommended
Practice for Determining
the Spatial- Peak Specific
Absorption Rate (SAR) in the
Human Body Due to Wireless
Communications Devices:
Experimental Techniques,’ sets
forth the first consistent test
methodology for measuring the
rate at which RF is deposited
in the heads of wireless phone
users. The test method uses
a tissuesimulating model of
the human head. Standardized
SAR test methodology is
expected to greatly improve the
consistency of measurements
made at different laboratories
on the same phone. SAR is the
measurement of the amount
of energy absorbed in tissue,
either by the whole body or
47
Page 50

Safety Guidelines
a small part of the body. It
is measured in watts/kg (or
milliwatts/g) of matter. This
measurement is used to
determine whether a wireless
phone complies with safety
guidelines.
9. What steps can I take to
reduce my exposure to
radiofrequency energy
from my wireless phone?
If there is a risk from these
products - and at this point we
do not know that there is - it is
probably very small.
But if you are concerned about
avoiding even potential risks,
you can take a few simple
steps to minimize your exposure
to radiofrequency energy (RF).
Since time is a key factor in
how much exposure a person
receives, reducing the amount
of time spent using a wireless
phone will reduce RF exposure.
If you must conduct extended
conversations by wireless
48
phone every day, you could
place more distance between
your body and the source of
the RF, since the exposure level
drops off dramatically with
distance. For example, you
could use a headset and carry
the wireless phone away from
your body or use a wireless
phone connected to a remote
antenna. Again, the scientific
data do not demonstrate that
wireless phones are harmful.
But if you are concerned
about the RF exposure from
these products, you can use
measures like those described
above to reduce your RF
exposure from wireless phone
use.
10. What about children
using wireless phones?
The scientific evidence does
not show a danger to users
of wireless phones, including
children and teenagers. If you
want to take steps to lower
Page 51

exposure to radiofrequency
energy (RF), the measures
described above would apply to
children and teenagers using
wireless phones. Reducing the
time of wireless phone use and
increasing the distance between
the user and the RF source will
reduce RF exposure.
Some groups sponsored by
other national governments
have advised that children
be discouraged from using
wireless phones at all. For
example, the government in
the United Kingdom distributed
leaflets containing such a
recommendation in December
2000. They noted that no
evidence exists that using a
wireless phone causes brain
tumors or other ill effects. Their
recommendation to limit wireless
phone use by children was
strictly precautionary; it was not
based on scientific evidence that
any health hazard exists.
11. What about wireless
phone interference with
medical equipment?
Radiofrequency energy (RF)
from wireless phones can
interact with some electronic
devices. For this reason, the
FDA helped develop a detailed
test method to measure
electromagnetic interference
(EMI) of implanted cardiac
pacemakers and defibrillators
from wireless telephones.
This test method is now part
of a standard sponsored
by the Association for the
Advancement of Medical
instrumentation (AAMI).
The final draft, a joint effort
by the FDA, medical device
manufacturers, and many
other groups, was completed
in late 2000. This standard will
allow manufacturers to ensure
that cardiac pacemakers and
defibrillators are safe from
wireless phone EMI. The FDA
49
Page 52

Safety Guidelines
has tested hearing aids for
interference from handheld
wireless phones and helped
develop a voluntary standard
sponsored by the Institute
of Electrical and Electronic
Engineers (IEEE). This standard
specifies test methods and
performance requirements
for hearing aids and wireless
phones so that no interference
occurs when a person uses
a ‘compatible’ phone and a
‘compatible’ hearing aid at
the same time. This standard
was approved by the IEEE in
2000. The FDA continues to
monitor the use of wireless
phones for possible interactions
with other medical devices.
Should harmful interference
be found to occur, the FDA will
conduct testing to assess the
interference and work to resolve
the problem.
50
12. Where can I find
additional information?
For additional information,
please refer to the following
resources:
FDA web page on wireless
phones (http://www.fda.gov/
cdrh/ phones/index.html)
Federal Communications
Commission (FCC) RF Safety
Program (http://www.fcc.gov/
oet/ rfsafety)
International Commission
on Non-lonizing Radiation
Protection (http://www.icnirp.de)
World Health Organization
(WHO) International EMF Project
(http://www.who.int/emf)
National Radiological Protection
Board (UK) (http://www.nrpb.
org.uk/)
Page 53

Driver Safety Tips
Your wireless phone gives
you the powerful ability
to communicate by voice
almost anywhere, anytime.
An important responsibility
accompanies the benefits of
wireless phones, one that every
user must uphold.
When operating a car, driving is
your first responsibility.
When using your wireless
phone behind the wheel of a
car, practice good common
sense and remember the
following tips:
1. Get to know your wireless
phone and its features
such as speed dial and
redial. Carefully read your
instruction manual and learn
to take advantage of valuable
features most phones offer,
including automatic redial
and memory. Also, work to
memorize the phone keypad
so you can use the speed
dial function without taking
your attention off the road.
2. Becase in some provinces
you must use handsfree
device by law? A number of
handsfree wireless phone
accessories are readily
available today. Whether you
choose an installed mounted
device for your wireless
phone or a speaker phone
accessory, take advantage
of these devices if available
to you.
3. Position your wireless phone
within easy reach. Make
sure you place your wireless
phone within easy reach
and where you can reach
it without removing your
eyes from the road. If you
get an incoming call at an
inconvenient time, if possible,
let your voicemail answer it
for you.
51
Page 54

Safety Guidelines
4. Suspend conversations
during hazardous driving
conditions or situations. Let
the person you are speaking
with know you are driving; if
necessary, suspend the call
in heavy traffic or hazardous
weather conditions. Rain,
sleet, snow and ice can be
hazardous, but so is heavy
traffic. As a driver, your
first responsibility is to pay
attention to the road.
5. Do not take notes or look
up phone numbers while
driving. If you are reading an
address book or business
card, or writing a “to-do”
list while driving a car, you
are not watching where you
are going. It is common
sense. Don’t get caught in a
dangerous situation because
you are reading or writing
and not paying attention to
the road or nearby vehicles.
52
6. Becase in some provinces
you cannot dial while
driving? if possible, place
calls when you are not
moving or before pulling into
traffic. Try to plan your calls
before you begin your trip
or attempt to coincide your
calls with times you may be
stopped at a stop sign, red
light or otherwise stationary.
But if you need to dial while
driving, follow this simple tip
— dial only a few numbers,
check the road and your
mirrors, then continue.
7. Do not engage in stressful or
emotional conversations that
may be distracting. Stressful
or emotional conversations
and driving do not mix; they
are distracting and even
dangerous when you are
behind the wheel of a car.
Make people you are talking
with aware you are driving
and if necessary, suspend
Page 55

conversations which have
the potential to divert your
attention from the road.
8. Use your wireless phone to
call for help. Your wireless
phone is one of the greatest
tools you can own to protect
yourself and your family in
dangerous situations — with
your phone at your side,
help is only three numbers
away. Dial 911 or other local
emergency number in the
case of fire, traffic accident,
road hazard or medical
emergency. Remember, it is
a free call on your wireless
phone!
9. Use your wireless phone to
help others in emergencies.
Your wireless phone provides
you a perfect opportunity to
be a “Good Samaritan” in
your community. If you see
an auto accident, crime in
progress or other serious
emergency where lives are
in danger, call 911 or other
local emergency number, as
you would want others to do
for you.
10. Call roadside assistance
or a special wireless
nonemergency assistance
number when necessary.
Certain situations you
encounter while driving
may require attention, but
are not urgent enough to
merit a call for emergency
services. But you can still
use your wireless phone
to lend a hand. If you see
a broken-down vehicle
posing no serious hazard,
a broken traffic signal, a
minor traffic accident where
no one appears injured
or a vehicle. you know to
be stolen, call roadside
assistance or other special
non-emergency wireless
number.
For more information, please call
to 888-901-SAFE, or visit our
website www.ctia.org
53
Page 56

Safety Guidelines
Consumer Information
on SAR (Specific
Absorption Rate)
This Model Phone Meets the
Government’s Requirements for
Exposure to Radio Waves.
Your wireless phone is a radio
transmitter and receiver. It is
designed and manufactured not
to exceed the emission limits
for exposure to radiofrequency
(RF) energy set by the Federal
Communications Commission
(FCC) of the U.S. Government.
These limits are part of
comprehensive guidelines
and establish permitted levels
of RF energy for the general
population. The guidelines are
based on standards that were
developed by independent
scientific organizations
through periodic and thorough
evaluation of scientific studies.
The standards include a
substantial safety margin
designed to assure the safety
of all persons, regardless of
age and health. The exposure
54
standard for wireless mobile
phones employs a unit of
measurement known as the
Specific Absorption Rate, or
SAR. The SAR limit set by the
FCC is 1.6W/kg. *
Tests for SAR are conducted
using standard operating
positions specified by the FCC
with the phone transmitting at
its highest certified power level
in all tested frequency bands.
Although SAR is determined
at the highest certified power
level, the actual SAR level of the
phone while operating can be
well below the maximum value.
Because the phone is designed
to operate at multiple power
levels to use only the power
required to reach the network,
in general, the closer you are to
a wireless base station antenna,
the lower the power output.
Before a phone model is
available for sale to the public,
it must be tested and certified
to the FCC that it does not
exceed the limit established
by the governmentadopted
Page 57

requirement for safe exposure.
The tests are performed in
positions and locations (e.g., at
the ear and worn on the body)
as required by the FCC for each
model. The highest SAR value
for this model phone when
tested for use at the ear is
1,21 W/kg and when worn on
the body, as described in this
user’s manual, is 1,00 W/kg.
(Body-worn measurements
differ among phones models,
depending upon available
accessories and FCC
requirements.) While there may
be differences between SAR
levels of various phones and at
various positions, they all meet
the government requirement for
safe exposure.
The FCC has granted an
Equipment Authorization for
this model phone with all
reported SAR levels evaluated
as in compliance with the
FCC RF emission guidelines.
SAR information on this model
phone is on file with the FCC
and can be found under
the Display Grant section of
http://www.fcc. gov/oet/fccid
after searching on FCC ID BEJ
T320G
Additional information on
Specific Absorption Rates (SAR)
can be found on the Cellular
Telecommunications Industry
Association (CTIA) website at
http://www.ctia.org
* In the United States and
Canada, the SAR limit for
mobile phones used by
the public is 1.6 watts/kg
(W/kg) averaged over one
gram of tissue. The standard
incorporates a substantial
margin of safety to give
additional protection for the
public and to account for any
variations in measurements.
* Product meets current FCC &
IC Radio Frequency Exposure
Guidelines.
FCC ID BEJT320G ,
IC ID: 2703C-T320G
55
Page 58

LIMITED WARRANTY STATEMENT
1. WHAT THIS WARRANTY COVERS:
LG off ers you a limited warranty that the enclosed
subscriber unit and its enclosed accessories will
be free from defects in material and workmanship,
according to the following terms and conditions:
1. The limited warranty for the product extends for
ONE (1) year beginning on the date of purchase of
the product by the original end user.
The limited warranty extends only to the original
2.
end user of the product and is not assignable or
transferable to any subsequent purchaser/end user.
This warranty is good only to the original end user
3.
of the product during the warranty period as long
as it is in Canada.
Upon request from LG, the consumer must
4.
provide information to reasonably prove the date
of purchase.
During the applicable warranty period, LG will
5.
repair or replace at LG’s sole option, without
charge to the original end user, any defective
component part of the phone or accessory.
LG may use rebuilt, reconditioned or new parts
6.
or components when repairing any product or
replace a product with a rebuilt, reconditioned or
new product.
2. WHAT THIS WARRANTY DOES NOT
COVER:
1. Defects or damages resulting from use of the
product in other than its normal and customary
manner.
2. Defects or damages from abnormal use, abnormal
conditions, improper storage, exposure to moisture
or dampness, unauthorized modifi cations,
unauthorized connections, unauthorized repair,
misuse, neglect, abuse, accident, alteration,
improper installation or other acts which are not
the fault of LG, including damage caused by spills
of food or liquids.
Breakage or damage to antennas unless caused
3.
directly by defects in material or workmanship.
The fact that the Customer Ser vice Department at
4.
LG was not notifi ed by the original end user of the
alleged defect or malfunction of the product, during
the warranty period.
5. Products which have had their serial numbers
removed or made illegible.
6. Damage resulting from use of non-LG
approved accessories.
All plastic surfaces and all other externally
7.
exposed parts that are scratched or damaged
due to normal customer use.
Products serviced by non-authorized persons
8.
or companies.
Notes:
1. This limited warranty supersedes all other
warranties, expressed or implied either in fact
or by operations of law, statutory or otherwise,
including, but not limited to any implied
warranty of merchantability or fi tness for a
particular purpose.
2. Shipping damage is the sole responsibility of
the shipping company.
3. EXCLUSION OF LIABILITY:
No other express warranty is applicable to this
product.
THE DURATION OF ANY IMPLIED WARRANTIES,
INCLUDING THE IMPLIED WARRANTY OF
MARKETABILITY, IS LIMITED TO THE DURATION
OF THE EXPRESS WARRANTY HEREIN. LG
ELECTRONICS CANADA, INC. SHALL NOT BE
LIABLE FOR THE LOSS OF THE USE OF THE
PRODUCT, INCONVENIENCE, LOSS OR ANY
OTHER DAMAGES, DIRECT OR CONSEQUENTIAL,
ARISING OUT OF THE USE OF, OR INABILITY
TO USE, THIS PRODUCT OR FOR ANY BREACH
OF ANY EXPRESS OR IMPLIED WARRANTY,
INCLUDING THE IMPLIED WARRANTY OF
MARKETABILITY APPLICABLE TO THIS PRODUCT.
4. HOW TO GET WARRANTY SERVICE:
To obtain warranty service, please call the following
telephone number from anywhere in Canada:
LG Electronics Canada, Inc.
Tel. 1-888-LG-Canada (1-888-542-2623)
www.lg.com/ca (see links to “Support > Mobile
phone support”)
Electronics Canada Inc.
Mississauga, Ontario
Page 59

Guide de l’utilisateur du LG Flick
–
Français
Il est possible que certains
éléments de ce guide soient
différents de ceux de votre
téléphone, selon le logiciel de votre
téléphone ou votre fournisseur de
services.
Page 60

Sommaire
Installation de la carte SIM et
de la batterie du combiné ......4
Installation de la carte SIM .....
Illustrations ...........................4
Composants du téléphone .....5
Utilisation de l’écran tactile ...6
Conseils relatifs à l’écran
tactile ...................................6
Commandes de l’écran tactile ..6
Votre écran d’accueil .............8
Votre écran de menu .............9
Appels ..................................10
Établissement d’un appel ....10
Établissement d’un appel à
partir du répertoire ..............10
Modification des réglages
d’appels les plus courants ...11
Contacts ...............................12
Recherche d’un contact .......12
Ajout d’un contact ...............12
Modification des paramètres de
vos contacts .......................12
2
Messages ............................13
Saisie de texte ....................14
4
Reconnaissance d’écriture ...14
Configuration du courriel .....14
Modification des paramètres
de message texte ...............15
Modification des paramètres
de message multimédia ......15
Services de réseautage
social (SNS) ........................16
Facebook (suite des
services SNS) .....................
Appareil photo .....................17
Prise de photo rapide ..........17
Après la prise d’une photo ...18
Utilisation des paramètres
avancés..............................18
Caméra vidéo .......................20
Prise d’une vidéo rapide ......20
Après avoir enregistré une
vidéo ..................................20
Utilisation des paramètres
avancés..............................21
17
Page 61

Musique ...............................22
Transfert de musique sur
votre téléphone ...................23
Gestion des fichiers .............23
Jeux et applications ...........24
Application ...........................24
Ajout d’un événement à
votre agenda ......................24
Réglage de l’alarme ............24
Enregistreur vocal ...............24
Utilisation de la calculatrice ...24
Conversions ........................24
PC Suite ...............................25
Installation de LG PC Suite
sur votre ordinateur ............25
Sur le Web ...........................25
Accès au Web .....................25
Accès aux services Google ..26
Paramètres ..........................26
Personnalisation de vos profils
..26
Réglages du téléphone ........26
Utilisation du gestionnaire
de mémoire ........................27
Modification des paramètres
de connectivité ...................27
Envoi et réception de fichiers
par liaison Bluetooth ............27
Couplage à un autre
périphérique Bluetooth ........28
Accessoires .........................30
Données techniques ............31
Température ambiante ........31
Pour votre sécurité ..............32
Directives de sécurité ..........40
3
Page 62

Installation de la carte SIM et de la batterie du combiné
Installation de la carte SIM
Lorsque vous vous abonnez
à un réseau cellulaire, vous
recevez une carte SIM
enfichable contenant les détails
relatifs à votre abonnement,
comme votre code PIN, les
services facultatifs disponibles
et bien d’autres options.
Important!
La carte SIM enfichable et s
contacts peuvent être facilement
endommagés si égratignés ou
pliés. Faites attention lorsque vous
manipulez, insérez ou retirez la
carte. Conservez la carte SIM hors
de portée des jeunes enfants.
1 2 3
4 5 6
4
Illustrations
Vous devez toujours mettre
l’appareil hors tension et
déconnecter le chargeur avant
de retirer la batterie.
1 Retirez le couvercle du
compartiment de la batterie
situé à l’arrière.
2 Soulevez la batterie et
retirez-la.
3 Insérez la carte SIM.
es
4 Insérez la batterie.
5 Remettez le couvercle en
place.
6 Rechargez la batterie.
Page 63
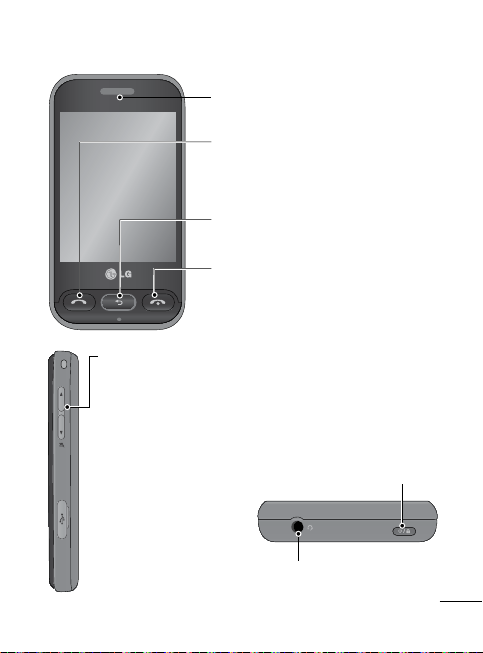
Composants du téléphone
Écouteur
Touche d’appel
Permet de composer un numéro et
de répondre aux appels entrants.
Touche Effacer
Revenir à l’écran précédent
Touche fin
Touches de volume
• Écran d’accueil :
volume des
sonneries et de la
tonalité des touches
• Pendant un appel :
volume de l’écouteur
• Touche de
réduction du
maintenez-
volume :
la enfoncée pour
activer/désactiver le
mode Discrétion.
Touche de mise en marche/
verrouillage
• Appuyez brièvement pour
allumer ou éteindre l’écran.
• Maintenez la touche enfoncée
pour mettre l’appareil sous
tension ou hors tension.
Connecteur d’écouteur
stéréo ou mains libres
5
Page 64
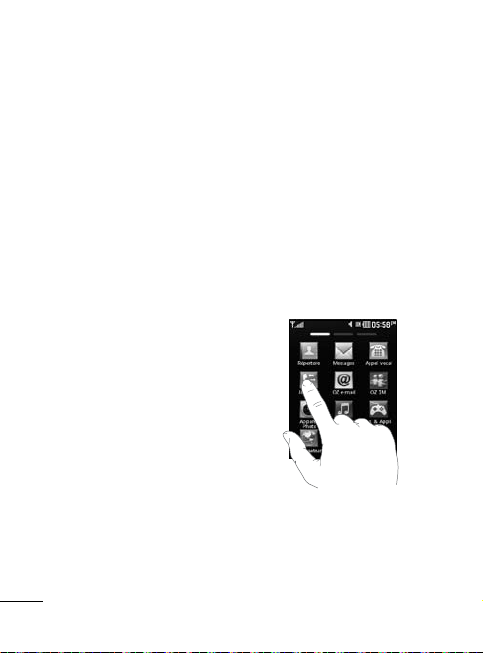
Utilisation de l’écran tactile
Conseils relatifs à
l’écran tactile
• Pour sélectionner un élément,
appuyez au centre de son
icône.
• N’appuyez pas trop fortement
sur l’écran puisque celui-ci
est suffisamment sensible
pour détecter une pression
légère mais ferme.
• Utilisez le bout du doigt pour
appuyer sur l’option visée.
Assurez-vous de ne pas
appuyer sur d’autres touches
en même temps.
• Si vous n’utilisez pas votre LG
Flick pendant un certain
temps, l’écran se verrouille
automatiquement.
6
Commandes de l’écran
tactile
Les commandes de l’écran
tactile du LG Flick changent en
fonction de la tâche que vous
effectuez.
Ouverture d’une application
Pour ouvrir une application,
appuyez simplement sur son
icône.
Page 65

Utilisation de l’écran tactile
Défilement
Glissez l’écran latéralement
pour le faire défiler. Sur certains
écrans, comme celui de
l’historique des appels, vous
pouvez faire défiler l’écran vers
le haut ou vers le bas.
7
Page 66

Votre écran d’accueil
Vous pouvez faire glisser et cliquer sur tout élément désiré dans
tous les types d’écran d’accueil.
Actif
Écran d’accueil de gadget : Lorsque
vous appuyez sur
gauche de l’écran, le volet des gadgets
mobiles apparaît. Lorsque vous enregistrez
un gadget en le faisant glisser, celui-ci
est créé à l’emplacement où vous l’avez
déposé.
Actif
Écran de composition abrégée :
Lorsque vous appuyez sur
composition abrégée apparaît. Vous pouvez
faire un appel, envoyer un message ou
modifier un contact directement à partir de
cet écran.
8
dans le coin inférieur
, la liste de
Page 67
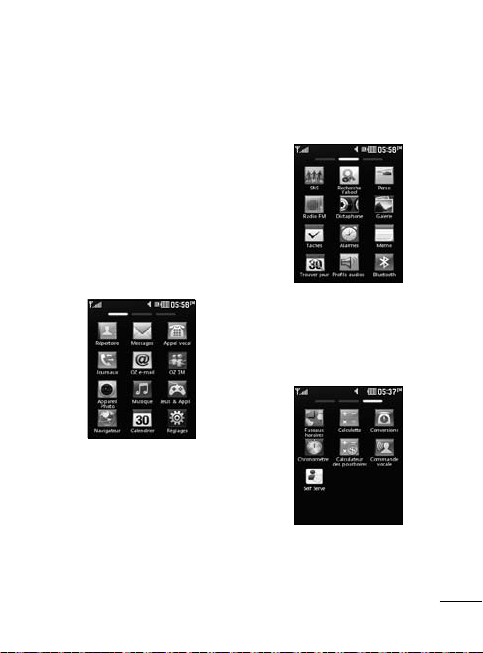
Votre écran de menu
Sur l’ensemble des écrans
de menu, vous pouvez faire
glisser le contenu d’un côté à
l’autre. Pour passer d’un écran
de menu à l’autre, effleurez
rapidement l’écran de gauche à
droite ou de droite à gauche.
1 Écran d’appel – Ce menu
vous permet d’envoyer un
message ou de passer un
appel.
2 Écran Multimédia – Servez-
vous du menu Google ou
envoyez un courriel.
3 Écran Application – Dans ce
menu, vous pouvez accéder
à vos applications.
9
Page 68

Appels
Établissement d’un
appel
1 Appuyez sur pour ouvrir
le clavier.
2 Entrez le numéro de
téléphone au clavier.
3 Appuyez sur pour
effectuer l’appel.
CONSEIL! Pour entrer
le caractère + associé
à un appel international,
maintenez la touche
enfoncée.
Appuyez sur la touche de mise
en marche pour verrouiller
l’écran tactile et éviter
d’appuyer accidentellement sur
des touches.
10
+
0
Établissement d’un appel
à partir du répertoire
1 À partir de l’écran d’accueil,
appuyez sur
le répertoire Contacts.
2 Appuyez sur la boîte du
champ du nom en haut de
l’écran et entrez à l’aide du
clavier les premières lettres
du contact que vous désirez
appeler.
3 Dans la liste filtrée, appuyez
sur l’icône Appeler à côté
du contact que vous voulez
appeler. S’il y a plusieurs
numéros pour ce contact,
l’appareil composera le
numéro par défaut.
4 Ou alors, vous pouvez
appuyer sur le nom du
contact et sélectionner le
numéro désiré, si plusieurs
numéros sont associés à
ce contact. Vous pouvez
également appuyer sur
pour composer le numéro
par défaut.
pour ouvrir
Page 69

Modification des
réglages d’appels les
plus courants
1 Appuyez sur Paramètres
d’appel dans le menu
Paramètres.
2 Faites défiler l’écran puis
appuyez sur Paramètres
communs.
• Rejet d’appel – Faites
glisser le commutateur
vers la gauche pour activer
cette fonction. Vous pouvez
appuyer sur la liste de rejet
de façon à sélectionner tous
les appels, des contacts ou
des groupes précis ou encore
les appels en provenance de
numéros inconnus (c’est-àdire non enregistrés dans vos
contacts).
• Envoyer mon numéro –
Choisissez d’afficher ou non
votre numéro de téléphone
lors d’un appel sortant.
• Rappel auto – Faites glisser
le commutateur vers la
gauche pour activer cette
fonction ou vers la droite pour
la désactiver.
• Mode Réponse
Appuyer sur la touche
– Vous permet de
d’envoi
répondre à un appel entrant
en appuyant sur la touche
.
Appuyer sur une touche –
Vous permet de répondre à
un appel entrant en appuyant
sur n’importe quelle touche, à
l’exception de
• Bip minute – Faites glisser le
.
commutateur vers la gauche
pour activer cette fonction et
ainsi entendre une tonalité
chaque minute durant un
appel.
• Mode réponse BT –
Choisissez si vous préférez
répondre à un appel en mode
mains libres au moyen d’un
casque Bluetooth ou en
11
Page 70

appuyant sur une touche du
téléphone.
• Enregistrer nouveau
numéro – Sélectionnez Activé
ou Désactivé selon que vous
souhaitez enregistrer ou non
un nouveau numéro.
Contacts
Recherche d’un contact
1 Appuyez sur Contacts.
2 Une liste de contacts apparaît.
En tapant la première lettre
du nom d’un contact dans le
champ du nom, le menu de
cette partie alphabétique de
la liste apparaîtra.
Ajout d’un contact
1 Appuyez sur Contacts, puis
sur Ajouter.
2 Sélectionnez l’emplacement
où vous voulez enregistrer le
contact (Mémoire interne
ou Carte SIM).
12
3 Entrez votre prénom et votre
nom de famille.
4 Vous pouvez ajouter jusqu’à
cinq numéros différents par
contact.
5 Ajoutez des adresses de
courriel, si désiré. Vous
pouvez entrer jusqu’à deux
adresses différentes par
contact.
6 Associez le contact à un ou
plusieurs groupes.
7 Appuyez sur Enreg. pour
enregistrer le contact.
Modification des
paramètres de vos
contacts
Vous pouvez modifier les
paramètres de vos contacts en
fonction de vos préférences.
Appuyez sur la touche Options
, puis sur Paramètres.
Page 71

• Affichage du nom – Indiquez
si vous préférez que ce soit
le prénom ou le nom de vos
contacts qui s’affiche en
premier.
• Copier – Copiez les contacts
de votre carte SIM sur votre
téléphone ou inversement.
Vous pouvez procéder contact
par contact ou tous les
contacts à la fois.
•
Déplacer – Cette option
fonctionne de la même façon
que Copier, sauf que les
contacts sont déplacés. En
d’autres termes, un contact
déplacé de la carte SIM vers la
mémoire interne est supprimé
de la carte SIM.
• Envoyer tous les contacts
avec Bluetooth
– Permet
d’envoyer tous les contacts
vers un autre téléphone par
liaison Bluetooth.
• Sauvegarder/restaurer
contacts
– Permet
d’enregistrer ou de restaurer
des contacts sur l’autre
dispositif de stockage.
• Supprimer tous les
contacts – Supprime tous
vos contacts. Appuyez sur Oui
si vous êtes certain de vouloir
supprimer tous vos contacts.
Messages
Votre téléphone LG Flick
combine les fonctions de
messagerie SMS et MMS dans
un menu intuitif et convivial.
Envoi d’un message
1
Dans le menu, appuyez sur
Messages. Appuyez ensuite
sur Écrire message pour
rédiger un nouveau message.
2 Appuyez sur Insérer pour
ajouter, entre autres, une
image, une vidéo, un son ou
un modèle.
13
Page 72

3 Appuyez sur À en haut
de l’écran pour entrer les
destinataires. Entrez ensuite
le numéro ou appuyez sur
pour sélectionner un
contact. Vous pouvez même
ajouter plusieurs contacts.
4 Appuyez sur Envoyer lorsque
vous êtes prêt.
AVERTISSEMENT :
Si un fichier image,
vidéo ou audio a été
ajouté à un SMS, il sera
automatiquement converti
en message MMS et des
frais vous seront facturés
en conséquence.
Saisie de texte
Vous pouvez choisir votre mode
de saisie en appuyant sur
puis sur Mode de saisie.
Appuyez sur pour activer le
mode T9. Cette icône apparaît
seulement si vous sélectionnez
14
le pavé alphanumérique
comme mode de saisie.
Appuyez sur
entre les chiffres, les symboles
et le texte.
Appuyez sur la touche des
majuscules pour changer la
casse des lettres (majuscules ou
minuscules).
pour naviguer
Reconnaissance
d’écriture
En mode Écriture manuscrite,
il vous suffit d’écrire à l’écran
et le LG Flick convertit votre
écriture en message.
Configuration du courriel
Appuyez sur Courriel à l’écran
Application.
Si le compte de courriel n’est
pas encore configuré, lancez
l’Assistant de configuration de
,
courriel.
Vous pouvez vérifier et modifier
les paramètres en sélectionnant
Page 73

. Vous pouvez également
vérifier les paramètres
supplémentaires qui ont été
entrés automatiquement au
moment de la création du
compte.
Modification des
paramètres de message
texte
Appuyez sur Messages,
puis sur Paramètres.
Sélectionnez
Centre SMS – Entrez les
détails relatifs à votre centre de
messagerie.
Accusé de réception – Glissez
le bouton vers la gauche pour
recevoir une confirmation que
vos messages ont été livrés.
Durée de validité – Pour
choisir la durée de conservation
de vos messages dans le
centre de messagerie.
Message texte.
Types de message – Permet
de convertir votre texte en
message texte ou vocal, en
télécopie, en fichier X.400 ou
en courriel.
Codage des caractères –
Permet de choisir la façon dont
les caractères sont encodés. Le
codage choisi peut augmenter
la taille des messages et,
par conséquent, les frais de
transmission des données.
Envoyer txt long par –
Envoyez vos messages longs en
choisissant le mode Plusieurs
SMS ou MMS.
Modification des
paramètres de message
multimédia
Appuyez sur Messages,
puis sur Paramètres et sur
Message multimédia.
15
Page 74

Mode Récupération –
Sélectionnez Réseau local ou
Réseau itinérance. Si vous
sélectionnez ensuite Manuelle,
vous ne recevrez que des avis
de message multimédia (MMS)
et vous pourrez alors décider
de les télécharger au complet
ou non.
Accusé de réception – Permet
de demander ou d’autoriser un
accusé de réception.
Accusé de lecture – Permet
de demander ou d’autoriser un
accusé de lecture.
Priorité – Pour choisir le
niveau de priorité de votre
message MMS.
Durée de validité – Permet de
choisir la durée de conservation
de votre message dans le
centre de messagerie.
Durée diapositive – Permet de
choisir la durée pendant laquelle
les diapositives sont affichées à
l’écran.
16
Pièce-jointe non
compatible –
Indiquez si vous voulez
restreindre ou non la piècejointe non compatible.
Heure de livraison – Permet
de déterminer un délai avant
qu’un message soit livré.
Centre MMS – Choisissez un
centre MMS dans la liste ou
ajoutez-en un.
Services de réseautage
social (SNS)
Votre téléphone LG Flick est
doté d’un SNS qui vous permet
de consulter et gérer vos
réseaux sociaux.
CONSEIL : Facebook,
Twitter et Myspace sont des
applications basées sur la
technologie Java.
Page 75

REMARQUE : La fonction
SNS exploite énormément
la transmission de données.
Des frais supplémentaires
peuvent vous être facturés
lorsque vous accédez à des
services en ligne ou que
vous les utilisez. Vérifiez vos
frais de transmission de
données auprès de votre
fournisseur de services
réseau.
Facebook (suite des
services SNS)
Accueil : Ouvrez une session
pour consulter les mises à jour
du statut de vos amis. Entrez
vos commentaires sur leur
nouveau statut ou consultez le
statut d’autres amis.
Profil : Vous pouvez
sélectionnez Mur > Mises à
jour états et indiquer votre
statut actuel. Consultez vos
infos détaillées et envoyez
la photo en appuyant sur
Photos > Charger la photo.
Amis : Pour rechercher vos amis
dans Facebook, appuyez sur
Rechercher.
Boîte de réception : Vous
pouvez voir le contenu des
dossiers Boîte de réception
et Envoyés, et rédiger un
message.
Appareil photo
Prise de photo rapide
1 Appuyez sur le menu
Appareil photo.
2 Lorsque l’appareil a effectué
sa mise au point, appuyez
sur au centre-droit de
l’écran pour prendre une
photo.
17
Page 76
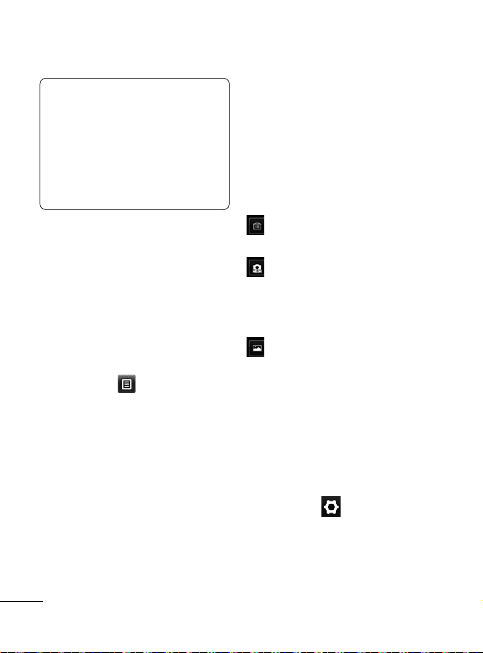
CONSEIL : Pour passer
au mode vidéo ou appareil
photo, faites glisser l’icône
de vidéo ou d’appareil photo
jusqu’au centre-droit du
viseur.
Après la prise d’une
photo
La photo que vous avez prise
apparaît et
Les options proposées sont les
suivantes :
Appuyez sur .
Envoyer – Appuyez sur cette
option pour envoyer la photo
dans un message, un courriel
ou par Bluetooth.
Définir comme – Appuyez sur
cette option pour définir votre
fond d’écran d’accueil, votre
fond d’écran verrouillé, vos
images de contacts, les images
pour les appels entrants et
18
sortants, ainsi que les images
de démarrage et de fermeture.
Renommer – Appuyez sur
cette option pour renommer
la photo.
Modifier – Appuyez sur cette
option pour modifier la photo.
Appuyez sur cette touche
pour supprimer l’image.
Appuyez sur cette
touche pour prendre
immédiatement une autre
photo.
Appuyez sur cette touche
pour afficher la Galerie
des photos que vous avez
enregistrées.
Utilisation des
paramètres avancés
À partir de l’écran de viseur,
appuyez sur
aux options avancées.
pour accéder
Page 77

Après avoir sélectionné
une option, appuyez sur la
OK.
touche
Taille – Vous pouvez changer
le format de photo pour réduire
l’espace mémoire utilisé.
Équilibre des blancs – Vous
pouvez choisir parmi les options
Auto, Incandescent, Soleil,
Fluorescent et Nuageux.
Effets de couleur – Permet de
choisir un effet de couleur pour
votre nouvelle photo.
Prise en continu – Placez le
téléphone de manière à bien
voir le sujet dans le viseur
et appuyez sur le bouton de
prise de photo, de la manière
habituelle. L’appareil prendra
plusieurs photos en rafale.
Retardateur – Le retardateur
vous permet d’activer un délai
d’attente entre le moment où
vous appuyez sur le bouton et
celui où la photo est prise. Vous
avez le choix entre Désactivé,
3 secondes, 5 secondes et
10 secondes. Cette option est
pratique pour vous donner le
temps de vous placer dans la
scène à photographier.
Mode nocturne – Utile pour les
endroits peu éclairés.
Qualité de l’image – Vous
avez le choix entre Super fin,
Fin et Normal. Plus la qualité
est fine et plus la photo sera
nette. Cependant, la taille du
fichier sera également plus
élevée, ce qui signifie que vous
pouvez enregistrer un moins
grand nombre de photos en
mémoire.
Sélectionner stockage – Vous
pouvez choisir d’enregistrer
vos photos dans la mémoire du
téléphone ou dans la mémoire
externe.
Masquer les icônes –
Choisissez les icônes de
paramètres photo qui doivent
être masquées manuellement
ou automatiquement.
19
Page 78

Afficher la photo –
Activez cette option si vous
voulez voir immédiatement
la photo que vous venez de
prendre.
Son de l’obturateur –
Sélectionnez un des trois sons
d’obturateur proposés.
Écran de grille – Sélectionnez
Désactivé, Croix simple ou
Trisection.
Réinitialiser paramètres –
Permet de rétablir tous les
paramètres par défaut de
l’appareil photo.
Caméra vidéo
Prise d’une vidéo rapide
Pour passer au mode vidéo ou
appareil photo, faites glisser
l’icône de vidéo ou d’appareil
photo vers le haut ou vers le
bas au centre-droit du viseur.
20
1 Tenez le téléphone à
l’horizontale et pointez
l’objectif vers le sujet de la
vidéo.
2 Appuyez sur le point rouge
.
3 L’indication ENR. apparaît
au bas du viseur et une
minuterie en bas de l’écran
indique la durée de votre
vidéo.
4 Pour mettre la vidéo en
pause, appuyez sur
. Pour reprendre la vidéo,
sélectionnez .
5 Appuyez sur à l’écran.
Après avoir enregistré
une vidéo
Une image fixe de la vidéo
que vous avez prise apparaît
à l’écran. Le nom de la vidéo
défile au bas de l’écran et des
icônes sont affichées sur les
côtés gauche et droit.
Page 79

Appuyez sur cette touche
pour lancer la lecture de la
vidéo.
Les options proposées sont les
suivantes :
Appuyez sur .
Envoyer – Appuyez sur cette
option pour envoyer la vidéo
dans un message, un courriel
ou par Bluetooth.
Renommer – Appuyez sur
cette option pour renommer
la vidéo.
Appuyez sur cette
option pour supprimer
la vidéo que vous venez
d’enregistrer et sur
Oui pour confirmer la
suppression. Le viseur
réapparaîtra.
Appuyez sur cette
option pour prendre
immédiatement une autre
vidéo. Votre vidéo actuelle
sera enregistrée.
Appuyez sur cette option
pour afficher une galerie
des photos et vidéos que
vous avez enregistrées.
Utilisation des
paramètres avancés
À l’écran du viseur, appuyez sur
pour accéder aux options
avancées. Vous pouvez modifier
les paramètres vidéo au moyen
de la molette de navigation.
Après avoir sélectionné
une option, appuyez sur la
OK.
touche
Effets de couleur – Choisissez
un effet de couleur à appliquer
à votre nouvelle prise de vue.
Équilibre des blancs – Cette
option permet d’obtenir des
blancs plus réalistes dans votre
vidéo. Pour activer l’équilibrage
automatique des blancs, vous
devez déterminer les conditions
d’éclairage. Vous avez le choix
entre Auto, Incandescent,
Soleil, Fluorescent et Nuageux.
21
Page 80

Qualité – Vous avez le choix
entre Super fin, Fin et Normal.
Plus la qualité est élevée et plus
la vidéo est nette. Cependant,
la taille du fichier sera plus
élevée, ce qui signifie que vous
pouvez enregistrer un moins
grand nombre de vidéos dans
la mémoire du téléphone.
Durée – Vous pouvez établir
une durée limite pour la vidéo.
Choisissez entre Normal
et MMS pour limiter la taille
maximale d’envoi dans
un message MMS.
Sélectionner stockage – Vous
pouvez choisir d’enregistrer
vos vidéos dans la mémoire du
téléphone ou dans la mémoire
externe.
Enregistrement audio –
Choisissez Discrétion pour
enregistrer une vidéo sans piste
audio.
Masquer les icônes –
Vous pouvez choisir de
masquer manuellement ou
22
automatiquement les icônes du
menu d’appareil photo.
Réinitialiser paramètres –
Permet de rétablir tous les
paramètres par défaut du mode
vidéo.
Musique
Pour accéder au lecteur
de musique, appuyez sur
Musique. Cette option vous
permet d’accéder à plusieurs
dossiers :
Dernières écoutes – Lisez
les chansons que vous avez
écoutées récemment.
Toutes les pistes – Contient
toutes les chansons de votre
téléphone à l’exception des
chansons préchargées par
défaut.
Artistes – Permet de naviguer
dans votre collection de
musique par artiste.
Page 81

Albums – Permet de naviguer
dans votre collection de
musique par album.
Genres – Permet de naviguer
dans votre collection de
musique par genre.
Listes d’écoute – Contient
toutes les listes d’écoute que
vous avez créées.
Lecture aléatoire – Permet de
lire vos pistes dans un ordre
aléatoire.
Transfert de musique
sur votre téléphone
Le moyen le plus simple de
transférer de la musique sur
votre téléphone est d’utiliser la
liaison Bluetooth ou votre câble
de données.
Pour transférer de la musique
par Bluetooth :
1 Assurez-vous que la liaison
Bluetooth est activée et que
les deux périphériques sont
connectés.
2 Sélectionnez le fichier
de musique sur l’autre
périphérique et choisissez de
l’envoyer par Bluetooth.
3 Lorsque l’autre périphérique
envoie le fichier, vous devez
appuyer sur Oui sur votre
téléphone pour l’accepter.
4 Le fichier devrait apparaître
dans Musique > Toutes les
pistes.
Gestion des fichiers
Vous pouvez stocker des fichiers
multimédias dans la mémoire
de votre téléphone, de façon à
pouvoir accéder facilement à vos
images, sons, vidéos et jeux. Vous
pouvez également enregistrer vos
fichiers sur une carte mémoire.
Le stockage des fichiers sur une
carte mémoire permet de libérer
de l’espace dans la mémoire du
téléphone.
23
Page 82

Pour afficher la liste des
dossiers contenant vos fichiers
multimédias, appuyez sur Mes
affaires.
Jeux et applications
Vous pouvez télécharger de
nouveaux jeux et applications
sur votre téléphone.
Application
Ajout d’un événement à
votre agenda
1 Appuyez sur Calendrier.
2 Sélectionnez la date à
laquelle vous souhaitez
ajouter un événement.
3 Appuyez sur Ajouter.
Réglage de l’alarme
1 Appuyez sur Alarmes.
2 Appuyez sur Ajouter, puis
définissez et enregistrez votre
alarme dans ce menu.
24
Enregistreur vocal
Vous pouvez utiliser l’enregistreur
vocal pour créer des mémos
vocaux ou tout autre fichier
audio.
Utilisation de la
calculatrice
1 Appuyez sur Calculatrice à
l’écran Multimédia.
2 Appuyez sur les touches
de chiffres pour entrer les
nombres voulus.
Conversions
1 Appuyez sur Convertisseur
d’unités à l’écran
Application.
2 Sélectionnez le type d’unité
à convertir :
Surface, Longueur, Poids,
Température, Volume ou
Vitesse.
3 Vous pouvez ensuite
sélectionner l’unité et entrer
la valeur à convertir.
Devise,
Page 83
PC Suite
Vous pouvez synchroniser votre
ordinateur avec le téléphone
pour vous assurer que toutes
les données et les dates
importantes correspondent.
Vous pouvez également
effectuer une copie de
sauvegarde de vos données
pour votre tranquillité d’esprit.
4 Suivez les instructions
à l’écran de l’assistant
LG PC Suite Installer.
5 Une fois l’installation
terminée, l’icône LG PC Suite
apparaît sur votre bureau.
AVERTISSEMENT :
Ne débranchez pas votre
téléphone durant le transfert.
Installation de LG
PC Suite sur votre
ordinateur
1 Appuyez sur Paramètres et
sélectionnez Connectivité.
2 Sélectionnez Mode
connexion USB et appuyez
sur PC Suite.
3 Reliez le téléphone et
l’ordinateur à l’aide du câble
USB et attendez un instant.
Un message du guide
d’installation apparaît.
Sur le Web
Le Navigateur vous donne
accès à un monde palpitant de
jeux, de musique, de sports, de
divertissements et plus encore,
directement sur votre téléphone
mobile. Peu importe l’endroit où
vous êtes et ce que vous faites.
Accès au Web
1 Appuyez sur Navigateur.
2 Pour accéder directement
à la page d’accueil,
sélectionnez Accueil.
25
Page 84

Vous pouvez également
sélectionner Entrer adresse
et taper l’URL suivie de
Connecter.
REMARQUE : Des frais
supplémentaires seront
exigés pour la connexion
à ces services et pour le
téléchargement de contenu.
Informez-vous des frais de
transmission de données
auprès de votre fournisseur
d’accès.
Accès aux services
Google
Vous pouvez lancer les
services Google à l’aide de
cette application. Appuyez sur
Recherche Google à l’écran
Multimédia.
26
Paramètres
Personnalisation de vos
profils
Vous pouvez modifier
rapidement votre profil à partir
de l’écran Multimédia.
Vous pouvez personnaliser
chaque profil à partir du menu
Paramètres.
1 Appuyez sur Profils.
2 Sélectionnez le profil que
vous désirez modifier.
3 Vous pouvez modifier
l’ensemble des sons et
options d’alerte figurant
dans la liste, y compris vos
paramètres de sonnerie,
de volume, de tonalité de
message et bien plus encore.
Réglages du téléphone
Prenez la liberté de
personnaliser le LG Flick selon
vos besoins.
Page 85

À l’écran d’accueil, sélectionnez
, puis faites défiler jusqu’à
Réglages du téléphone.
Utilisation du
gestionnaire de
mémoire
À l’écran d’accueil, sélectionnez
, puis faites défiler jusqu’à
Paramètres de l’appareil
mobile. Sélectionnez Info
mémoire.
Modification des
paramètres de
connectivité
Vos paramètres de connectivité
ont déjà été configurés par
l’exploitant de réseau pour
vous permettre de profiter
immédiatement de votre
nouveau téléphone. Utilisez
ce menu pour modifier les
paramètres.
Appuyez sur Connectivité.
Envoi et réception de
fichiers par liaison
Bluetooth
Pour envoyer un fichier :
1 Ouvrez le fichier que
vous désirez envoyer,
habituellement un fichier
de photo, de vidéo ou de
musique.
2 Choisissez Envoyer.
Choisissez Bluetooth.
3 Si vous avez déjà couplé
votre dispositif Bluetooth,
votre LG Flick n’en
recherchera pas d’autres
automatiquement. Dans le
cas contraire, votre téléphone
LG Flick recherchera d’autres
dispositifs Bluetooth à portée.
4 Sélectionnez le périphérique
auquel vous désirez envoyer
le fichier.
5 Votre fichier sera envoyé.
27
Page 86

Pour recevoir un fichier :
1 Pour recevoir des fichiers,
votre liaison Bluetooth
doit être activée et votre
périphérique doit être
visible. Pour en savoir plus,
voir la section Modification
de vos paramètres
Bluetooth ci-dessous.
2 Un message vous demande
si vous acceptez le fichier du
destinataire. Appuyez sur Oui
pour recevoir le fichier.
3 Vous verrez l’emplacement
où le fichier a été enregistré.
S’il s’agit d’un fichier
image, vous pouvez
l’afficher. Les fichiers seront
automatiquement enregistrés
dans le dossier approprié
sous Mes trucs.
28
Modification des paramètres
Bluetooth :
Dans l’onglet PARAMÈTRES,
appuyez sur Bluetooth
et sélectionnez puis
Paramètres.
Couplage à un autre
périphérique Bluetooth
Lors du couplage de votre LG
Flick à un autre périphérique,
vous pouvez établir une
connexion protégée par mot
de passe.
1 Vérifiez si la liaison Bluetooth
est activée et si votre
périphérique est visible.
Vous pouvez modifier votre
visibilité dans le menu
Paramètres.
2 Appuyez sur Recher.
Page 87

3 Votre LG Flick recherchera
des périphériques. Une
fois la recherche terminée,
l’option Actualiser apparaît
à l’écran.
4 Choisissez le périphérique
que vous voulez associer au
téléphone, puis entrez le mot
de passe et appuyez sur OK.
5 Votre téléphone se
connectera à l’autre
périphérique, sur lequel vous
devez entrer le même mot
de passe.
6 Votre connexion Bluetooth
protégée par mot de passe
est maintenant fonctionnelle.
29
Page 88

Accessoires
Il existe divers accessoires pour votre téléphone mobile. Vous
pouvez choisir ceux qui répondent à vos besoins.
Chargeur Casque
d’écoute
stéréo
Durée de
service
Câble de
données
REMARQUE
• Utilisez toujours des accessoires LG d’origine.
• Autrement, votre garantie pourrait être rendue nulle.
• Les accessoires peuvent varier selon la région.
30
Page 89

Données techniques
Température ambiante
Maximum : +55 °C (décharge), +45 °C (charge)
Minimum : -10 °C
31
Page 90

Pour votre sécurité
Renseignements
importants
Ce guide contient des
renseignements importants sur
l’utilisation et le fonctionnement
de ce téléphone. Veuillez lire
chaque page attentivement
pour obtenir un rendement
optimal, pour éviter
d’endommager l’appareil et
pour l’utiliser correctement.
Les modifications apportées
à l’appareil qui ne sont pas
expressément approuvées dans
ce guide peuvent annuler la
garantie correspondante.
Avant de commencer
Directives de sécurité
AVERTISSEMENT! Afin de
minimiser les risques de choc
électrique, n’exposez pas
l’appareil à une forte humidité
(salles de bain, piscines, etc.).
Rangez toujours l’appareil
loin de la chaleur. Ne
rangez jamais votre appareil
32
à un endroit où il pourrait être
exposé à une température de
moins de 0 °C ni de plus de
40 °C, comme à l’extérieur
lors de conditions climatiques
sévères ou dans votre voiture
en été. L’exposition de l’appareil
à une chaleur ou à un froid
excessifs peut entraîner un
mauvais fonctionnement, des
dommages ou des pannes
graves.
Faites preuve de prudence
si vous utilisez l’appareil
près d’autres appareils
électroniques. Les émissions
RF de votre téléphone cellulaire
peuvent nuire aux appareils
électroniques à proximité
lorsque ceux-ci ne sont pas
convenablement blindés.
Consultez, s’il y a lieu, les
fabricants des appareils
médicaux personnels utilisés
(stimulateur cardiaque
et prothèse auditive, par
exemple) pour savoir si votre
téléphone peut provoquer
des interférences. Éteignez
Page 91

toujours votre appareil dans
les établissements de soins
de santé ainsi que dans les
stations-service. Ne placez
jamais votre téléphone dans
un four à micro-ondes car la
batterie risque d’exploser.
IMPORTANT! Veuillez lire les
CONSIGNES DE SÉCURITÉ
DE LA TIA à la page 91 avant
d’utiliser votre téléphone.
Consignes de sécurité
Veuillez prendre connaissance
de ces directives simples. Il
peut être dangereux, voire
illégal de ne pas suivre les
règles. Ce guide de l’utilisateur
fournit des renseignements
détaillés à ce propos.
• N’utilisez jamais une batterie
non approuvée; cela pourrait
endommager le téléphone et
faire exploser la batterie.
• Ne placez jamais l’appareil
dans un four à microondes car la batterie risque
d’exploser.
• Ne jetez pas la batterie
au feu ni avec des
matières dangereuses ou
inflammables.
• Veillez à ce qu’aucun objet
pointu n’entre en contact avec
la batterie, car cela pourrait
causer un incendie.
• Conservez la batterie hors de
la portée des enfants.
• Veillez à ce que les enfants
n’avalent pas de pièces
comme des bouchons de
caoutchouc (écouteur, pièces
de connexion, etc.), car ils
pourraient s’asphyxier ou
suffoquer.
•
Débranchez le cordon
d’alimentation et le chargeur
pendant les orages électriques
pour éviter les chocs
électriques et les incendies.
• En voiture, ne laissez pas
votre téléphone ni l’ensemble
mains libres près du sac
gonflable. Le déploiement du
sac gonflable alors que de
l’équipement sans fil est mal
33
Page 92

Pour votre sécurité
installé pourrait causer de
graves blessures.
• Ne tenez pas le combiné
lorsque vous conduisez.
• N’utilisez pas le téléphone
dans les endroits où son
usage est interdit. (Par
exemple : dans les avions).
• N’exposez pas l’adaptateur
ni le chargeur à la lumière
directe du soleil et ne l’utilisez
pas dans les endroits très
humides comme les salles
de bain.
• N’exposez jamais l’appareil à
une température inférieure à 15 °C ou supérieure à 50 °C.
• N’utilisez pas de produits
chimiques forts (comme de
l’alcool, du benzène, des
diluants, etc.) ni de détergents
pour nettoyer votre téléphone,
car cela pourrait causer un
incendie.
• Évitez de laisser tomber le
téléphone par terre, de le
frapper ou de le secouer
34
fortement. Le choc ou
les vibrations pourraient
endommager les circuits
électroniques du téléphone.
• N’utilisez pas votre appareil
dans les endroits où il y a
risque d’explosion car il peut
émettre des étincelles.
• N’endommagez pas le cordon
en le pliant, en le tordant, en
le tirant ou en l’exposant à la
chaleur.
• N’utilisez pas la fiche si
elle est desserrée car cela
pourrait causer un incendie
ou un choc électrique.
•
Ne placez pas d’objets lourds
sur le cordon d’alimentation.
Veillez à ce que le cordon
d’alimentation ne soit pas
plié afin d’éviter tout risque
d’incendie et de choc électrique.
• Ne manipulez pas votre
téléphone avec des mains
mouillées pendant qu’il se
charge. Vous pourriez vous
électrocuter ou endommager
le téléphone.
Page 93

• Ne démontez pas le
téléphone.
• N’établissez pas d’appel et
ne répondez à aucun appel
lorsque le téléphone est en
train de se recharger, car cela
pourrait provoquer un courtcircuit, un choc électrique ou
un incendie.
• Utilisez uniquement les
batteries, les antennes et
les chargeurs fournis par
LG. La garantie n’est pas
valide si vous utilisez des
produits provenant d’autres
fournisseurs.
•
Seul le personnel autorisé peut
réparer le téléphone et ses
accessoires. Une installation
ou une réparation incorrecte
pourrait causer des accidents et
annuler la garantie.
• Pendant un appel, ne tenez
pas l’antenne de l’appareil et
évitez également que celle-ci
entre en contact avec votre
corps.
• Les appels d’urgence ne
peuvent être faits que
dans une zone de service.
Avant d’effectuer un appel
d’urgence, assurez-vous que
vous êtes dans une zone de
service et que le téléphone
est allumé.
•
Faites preuve de prudence
lorsque vous utilisez des
accessoires comme un écouteur
ou un casque d’écoute. Assurezvous que les câbles sont placés
de manière sécuritaire et ne
touchez pas inutilement à
l’antenne.
Informations
enregistrées sur la carte
mémoire et précautions
• L’appareil doit toujours être
éteint lorsque vous insérez ou
retirez la carte mémoire. Si
vous retirez la carte pendant
que l’appareil est allumé,
vous pourriez l’endommager.
35
Page 94

Pour votre sécurité
• En cas de problème, formatez
la carte mémoire.
• La carte mémoire ne peut pas
être utilisée pour enregistrer
des données protégées par le
droit d’auteur.
• N’exercez pas une forte
pression lorsque vous écrivez
dans le volet Mémo.
• Rangez et transportez la carte
mémoire dans son étui.
• Ne mouillez jamais la carte
mémoire.
• Ne laissez pas la carte
mémoire dans un endroit
extrêmement chaud.
• Ne démontez pas et ne
modifiez pas la carte mémoire.
Renseignements
de la FCC au sujet
de l’exposition aux
radiofréquences
AVERTISSEMENT! Lisez ces
paragraphes avant d’utiliser
votre appareil.
36
Au mois d’août 1996, la
Federal Communications
Commission (FCC) des ÉtatsUnis a, par l’intermédiaire d’un
document intitulé Report and
Order FCC 96-326, adopté
et mis à jour la norme de
sécurité en ce qui concerne
l’exposition des personnes à
l’énergie électromagnétique des
radiofréquences (RF) émanant
des émetteurs réglementés
par la FCC. Ces directives
s’inscrivent dans la foulée de
la norme de sécurité établie
auparavant par les organismes
de normalisation des États-Unis
et des autres pays.
La conception de cet appareil
est conforme aux directives de
la FCC ainsi qu’à ces normes
internationales.
MISE EN GARDE
N’utilisez que l’antenne
approuvée fournie. L’utilisation
d’antennes non approuvées
Page 95

ainsi que les modifications
non autorisées peuvent
affecter la qualité des appels,
endommager l’appareil, annuler
la garantie ou contrevenir aux
règlements de la FCC. N’utilisez
pas l’appareil si l’antenne est
endommagée. Une antenne
endommagée qui entre en
contact avec la peau peut
provoquer une brûlure légère.
Communiquez, au besoin, avec
votre fournisseur pour obtenir
une antenne de rechange.
Utilisation comme
appareil portatif
Ce téléphone a été testé en vue
d’une utilisation type comme
appareil portatif, avec une
distance de 2 cm (0,79 po)
entre l’arrière de l’appareil et
le corps de l’utilisateur. Pour
satisfaire aux exigences de la
FCC en matière d’exposition
aux radiofréquences, vous
devez maintenir une distance
d’au moins 2 cm (0,79 po)
entre votre corps et l’arrière
du téléphone. N’utilisez pas
de pince de ceinture, d’étui,
ni aucun autre accessoire
tiers semblable contenant des
composantes métalliques.
Les accessoires portatifs qui
empêchent le maintien d’une
distance de 2 cm (0,79 po)
entre le corps de l’utilisateur
et l’arrière du téléphone et
qui n’ont pas été testés en
vue d’une utilisation normale
comme accessoires portatifs
peuvent ne pas satisfaire
aux limites d’exposition aux
radiofréquences stipulées par
la FCC et, par conséquent, ne
doivent pas être utilisés.
Antenne externe montée
sur véhicule (facultative
si disponible)
Selon les exigences de la
FCC en matière d’exposition
aux radiofréquences, on doit
37
Page 96

Pour votre sécurité
maintenir une distance d’au
moins 20 cm (8 po) entre
l’utilisateur ou toute autre
personne et l’antenne externe
montée sur le véhicule.
Pour en savoir davantage
au sujet de l’exposition aux
radiofréquences, visitez le site
Web de la FCC à l’adresse
www.fcc.gov
Conformité aux normes
Part 15 Class B
Cet appareil et ses accessoires
sont conformes à la partie 15
des règles de la FCC et à la
norme ICES-003 classe B
d’Industrie Canada sur les
appareils numériques.
Son fonctionnement est sujet
aux deux conditions suivantes :
(1) Cet appareil et ses
accessoires ne doivent pas
provoquer de brouillage
préjudiciable, et (2) cet
appareil et ses accessoires
doivent accepter toutes les
interférences reçues, y compris
38
celles pouvant causer un
fonctionnement indésirable.
Mises en garde au sujet
de la batterie
• Ne la démontez pas.
• Ne la court-circuitez pas.
• Ne pas exposer la batterie
à des températures élevées
(60°C et plus).
• Ne l’incinérez pas.
Élimination des batteries
usées
• Veuillez jeter la batterie
de façon appropriée
ou rapportez-la à votre
fournisseur de services sans
fil pour recyclage.
• Ne jetez pas la batterie
au feu ni avec des
matières dangereuses ou
inflammables.
Page 97

Mises en garde au
sujet de l’adaptateur
(chargeur)
• L’utilisation d’un chargeur
de batterie inadapté peut
endommager l’appareil et
annuler la garantie.
• L’adaptateur, ou chargeur de
batterie, ne doit être utilisé
qu’à l’intérieur.
N’exposez pas l’adaptateur ni
le chargeur à la lumière directe
du soleil et ne l’utilisez pas
dans les endroits très humides
comme les salles de bain.
Évitez d’endommager
votre ouïe.
• Votre acuité auditive peut
être endommagée si vous
êtes exposé à un son fort
pendant de longues périodes
de temps. Par conséquent,
nous vous recommandons de
ne pas allumer ou éteindre le
combiné près de votre oreille.
Nous vous recommandons
aussi de régler le volume de
la musique et des appels à
un niveau raisonnable.
• Si vous écoutez de la
musique pendant que
vous vaquez à d’autres
occupations, assurez-vous
que le volume soit réglé
à un niveau raisonnable
afin que vous puissiez
demeurer conscient de votre
environnement. Cela est
particulièrement important
quand vous traversez une
rue.
REMARQUE:
pression trop forts au niveau des
écouteurs peuvent entraîner une
perte d’audition.
Du son et une
39
Page 98

Directives de sécurité
Consignes de sécurité
de la TIA
Vous trouverez dans les pages
qui suivent les consignes de
sécurité de la TIA au sujet des
téléphones sans fil portatifs.
L’inclusion, dans le guide
d’utilisation, des paragraphes
concernant les stimulateurs
cardiaques, les prothèses
auditives et autres appareils
médicaux est obligatoire pour
l’obtention de l’homologation
CTIA. L’utilisation des autres
textes de la TIA est encouragée
s’il y a lieu.
Exposition aux signaux
de radiofréquence
Votre téléphone sans fil portatif
est un émetteur-récepteur
radio de faible puissance.
Lorsqu’il est SOUS TENSION, il
reçoit et émet des signaux RF
(radiofréquence).
En août 1996, la Federal
40
Communications Commissions
(FCC) a adopté, en
matière d’exposition aux
radiofréquences, des lignes
directrices établissant des
niveaux de sécurité pour les
téléphones sans fil portatifs.
Ces directives sont conformes
aux normes de sécurité établies
auparavant par les organismes
de normalisation américains et
internationaux :
ANSI C95.1 (1992) *
NCRP Report 86 (1986)
ICNIRP (1996)
Ces normes sont fondées sur
des évaluations périodiques
complètes de documents
scientifiques pertinents. Ainsi, plus
de 120 scientifiques, ingénieurs
et médecins d’universités,
d’organismes de santé
gouvernementaux et de divers
secteurs industriels ont passé en
revue les recherches disponibles
pour créer la norme ANSI (C95.1).
Page 99

* American National Standards
Institute; National Council
on Radiation Protection and
Measurements; International
Commission on Non-Ionizing
Radiation Protection
La conception de votre
téléphone est conforme aux
directives de la FCC (ainsi qu’à
ces normes).
Entretien de l’antenne
N’utilisez que l’antenne fournie
ou une antenne de rechange
approuvée. L’utilisation
d’antennes ou d’accessoires
non approuvés ainsi que les
modifications non autorisées
peuvent endommager l’appareil
et contrevenir aux règlements
de la FCC.
Utilisation de l’appareil
POSITION NORMALE : Tenez
le téléphone cellulaire comme
n’importe quel autre téléphone,
en veillant à ce que l’antenne
pointe vers le haut et pardessus votre épaule.
Conseils pour un
fonctionnement efficace
Pour que votre téléphone
fonctionne le plus efficacement
possible :
• Ne touchez pas l’antenne
inutilement lorsque vous
utilisez l’appareil. Tout contact
avec l’antenne peut affecter
la qualité des appels et
entraîner un fonctionnement
de l’appareil à un niveau de
puissance plus élevé que
nécessaire.
Conduite automobile
Vérifiez les lois et la
réglementation en vigueur aux
endroits où vous utilisez votre
téléphone sans fil. Respectez
toujours ces règlements.
Par ailleurs, si vous utilisez
votre téléphone lorsque vous
conduisez :
41
Page 100

Directives de sécurité
• Accordez toute votre attention
à la conduite de votre
véhicule; votre principale
responsabilité est la prudence
au volant.
• Utilisez le mode mains libres,
si vous avez accès à cette
fonction.
• Si les conditions de la
circulation l’exigent, arrêtezvous et stationnez votre
véhicule avant d’effectuer ou
de répondre à un appel.
Appareils électroniques
La plupart des appareils
électroniques modernes sont
blindés contre les signaux
RF. Cependant, il arrive que
certains appareils électroniques
ne soient pas protégés contre
les signaux RF émis par votre
téléphone.
42
Stimulateurs cardiaques
La Health Industry
Manufacturers Association
recommande une distance de
15 cm entre un téléphone sans
fil portatif et un stimulateur
cardiaque pour éviter les
interférences potentielles.
Ces recommandations sont
conformes aux recherches
indépendantes et aux
recommandations des
travaux de recherche sur
les technologies sans fil.
Les personnes portant un
stimulateur cardiaque :
• doivent TOUJOURS tenir le
téléphone à une distance
d’au moins 15 cm de leur
stimulateur cardiaque lorsque
le téléphone est SOUS
TENSION;
• ne doivent pas transporter
leur téléphone dans une
poche poitrine;
 Loading...