


ENGLISH ESPAÑOL FRANÇAIS
OWNER’S MANUAL
CERAMIC-GLASS INDUCTION COOKTOP
Read this owner’s manual thoroughly before operating the appliance
and keep it handy for reference at all times.
SKSIT3601G
www.signaturekitchensuite.com(USA)
www.signaturekitchensuite.ca(CANADA)
MFL54169109_01
Copyright © 2020 Signature Kitchen Suite. All Rights Reserved.

2
TABLE OF CONTENTS
TABLE OF CONTENTS
IMPORTANT SAFETY
3
INSTRUCTIONS
INTRODUCTION TO INDUCTION
9
COOKING
9 Induction Cookware
PARTS AND FEATURES
13
13 Parts and Features of the Cooktop
13 Accessories
14 Touch Control Features
OPERATING INSTRUCTIONS
15
15 First Operation
15 Getting Started
15 Changing Cooktop Settings
17 Before Using the Cooktop
18 Activating the Cooktop
20 Tips for Induction Cooking
22 Using the Cook Modes
23 Using the Flexible Cooking Zone
23 Using the Dual Cooking Zone
24 Other Functions
CARE AND CLEANING
30
30 Cleaning the Cooktop
INSTALLATION INSTRUCTIONS
32
32 Before You Begin
32 Unpacking the Cooktop
33 Technical Specifications
34 Preparing the Installation Location
37 Electrical Connections
39 Cooktop Installation
39 Final Check
TROUBLESHOOTING
40
40 Before Calling for Service
LIMITED WARRANTY
42
42 USA
LIMITED WARRANTY
45
45 CANADA
SMART FUNCTIONS
27
27 SIGNATURE KITCHEN SUITE Application
28 FCC Notice
28 FCC RF Radiation Exposure Statement
29 Industry Canada Statement
29 IC Radiation Exposure Statement
IMPORTANT SAFETY INSTRUCTIONS
3
IMPORTANT SAFETY INSTRUCTIONS
Read and follow all instructions when using the range to prevent the risk of fire, electric
shock, personal injury, or damage. This guide does not cover all possible conditions that
may occur. Always contact your service agent or manufacturer about problems that you do
not understand.
Download this owner's manual at: www.signaturekitchensuite.com
This is the safety alert symbol. This symbol alerts you to potential hazards that
can result in property damage and/or serious bodily harm or death.
All safety messages will follow the safety alert symbol and either the word
WARNING or CAUTION. These words mean:
WARNING
CAUTION
WARNING
•For your safety, the information in this manual must be followed to minimize the risk of
fire, electric shock, or to prevent property damage, personal injury, or death.
- Indicates a hazardous situation which, if not avoided, could result
in death or serious injury.
Indicates a hazardous situation which, if not avoided, could result
in minor or moderate injury.
ENGLISH
SAFETY PRECAUTIONS
•Proper Installation: Be sure your appliance is properly installed and grounded by a
qualified technician in accordance with the National Electrical Code ANSI/NFPA No.
70, latest edition in the United States, and all local code requirements. Install only per
installation instructions.
•The safety aspects of this appliance comply with accepted technical standards.
•Know how to disconnect the electrical power to the appliance at the circuit breaker
or fuse box in case of an emergency. Mark the breaker or fuse for ease of identification
and swift action if necessary.
•Do not repair or replace any part of the appliance. All servicing should be done only by
a qualified technician to avoid the risk of personal injury and damage to the appliance.
•Never modify or alter the construction of an appliance such as removal of panels,
wire covers or any other permanent part of the product.
WARNING
•Never use your appliance for warming or heating a room.
WARNING
•Persons with a pacemaker or similar medical device should exercise caution using or
standing near an induction unit while it is in operation, as the electromagnetic field may
affect the working of the pacemaker or similar medical device.
It would be advisable to consult your doctor or the pacemaker or medical device
manufacturer about your particular situation.

4
IMPORTANT SAFETY INSTRUCTIONS
CAUTION
•DO NOT touch cooking zones or areas near these surfaces. Cooking zones may
be hot from residual heat even though they are dark in color. Areas near the cooking
zones may become hot enough to cause burns. During and after use, do not touch
or let clothing or other flammable materials touch these areas until they have had
sufficient time to cool.
•Never wear loose fitting or hanging garments while using this appliance.
•Take care to avoid steam burns if using a wet sponge or cloth to wipe spills on a hot
cooking area.
•Wait for cooktop to cool before using cooktopcleaners. Some cleaners can produce
NOXIOUS FUMES if applied to a hot surface.
•Always turn off all controls when cooking is completed.
•Do not use water or flour on grease fires. Smother the fire with a pan lid, or use baking
soda, a dry chemical or foam-type extinguisher.
•Use only dry pot holders. Moist or damp pot holders on hot surfaces may result in burns
from steam. Do not let pot holders touch hot surface units. Do not use a towel or other
bulky cloth instead of a pot holder.
•Do not heat unopened food containers. A buildup of pressure may cause the container
to burst and result in injury.
FLAMMABLE MATERIAL
•Remove all tape and packaging wrap before using the appliance. Destroy the carton and
plastic bags after unpacking the appliance.
Never allow children to play with packaging material.
•Storage on appliance: Flammable materials should not be stored near or on the
cooking surface. This includes paper, plastic and cloth items, such as cookbooks,
plasticware and towels, as well as flammable liquids. Do not store explosives, such as
aerosol cans, on or near the appliance. Flammable materials may explode and result in
fire or property damage.
•Do not store or use gasoline or other flammable vapors and liquids in the vicinity of
this or any other appliance.
•Never place combustible items on the cooktop.
•Never keep any combustible items or aerosol cans in a drawer located under the
cooktop.
DEEP FAT FRYER
•When heating fat or grease, watch it closely. Fat or grease may catch fire if allowed to
become too hot.
•Overheated fats and oils catch fire quickly.
You should supervise cooking when preparing foods in fat or oil.
•Use a deep fat thermometer, if possible, to prevent overheating fat beyond the smoking
point.

IMPORTANT SAFETY INSTRUCTIONS
5
ELECTRICAL SAFETY
WARNING
• If the surface is cracked, switch off the appliance to avoid the possibility of electric
shock. Do not reuse your COOKTOP until the glass surface has been changed.
•When using the COOKTOP, never use aluminum foil, products wrapped in aluminum
foil, or deep-frozen food in aluminum cookware.
•If the supply cord is damaged, it must be replaced by the manufacturer, its service
agent or similarly qualified persons in order to avoid a hazard.
•The installation and connection of the new appliance must only be carried out by qualified
personnel.
•Flush-mounted appliances may only be operated following installation in suitable cabinets
and workplaces which conform to the relevant standards. This ensures sufficient protection
against electric shock as required by certification agencies.
•If your appliance malfunctions or fractures, switch off all cooking zones, and contact the
Signature Kitchen Suite Customer Information Center for service.
CHILD SAFETY
WARNING
•This appliance is not intended for use by young children or infirm persons unless they
have been adequately supervised by a responsible person to ensure that they can use
the appliance safely.
•Young children should be supervised to ensure that they do not play with the appliance.
•Accessible parts may become hot during use. Young children should be kept away.
ENGLISH
CAUTION
•Items of interest to children should not be stored in cabinets above a cooktop or on the
backsplash of a cooktop – children climbing on the cooktop to reach items could be
seriously injured.
•Do not leave children alone. Children should not be left alone or unattended in
the area where an appliance is in use. They should never be allowed to sit or stand
on any part of the appliance.
SAFETY DURING USE
•This appliance may only be used for normal cooking and frying in the home. It is not
designed for commercial or industrial purposes.
•Take care when plugging in electric appliances near the cooktop. Cords must not
come into contact with the hot surface. This could cause damage to the cooktop and cable
insulation.
•After use, switch off the hob element by its control and do not rely on the pan
detector.
•Always keep the control display panel clean and dry.
Do not let liquids or grease remain on the cooktop display area. Spilled or burnt-on foods
can activate or deactivate the appliance. Clean the display area thoroughly to resume
normal operation of the appliance.
•Avoid placing metal cooking utensils on the cooking surface areas. Metal objects
can become hot and cause burns.

6
IMPORTANT SAFETY INSTRUCTIONS
•Clean the appliance regularly to keep all parts free of grease that could catch fire.
Exhaust fan ventilation hoods and grease filters should be kept clean. Do not allow grease
to accumulate on hood or filter. Greasy deposits in the fan could catch fire. Refer to hood
manufacturer's instructions for cleaning.
•Use Proper Pan Sizes. This appliance is equipped with one or more surface units of
different size.
•Select utensils having flat bottoms large enough to cover the cooking zones. The
pan detection sensors will not allow the affected cooking zones to operate without a pan
present.
•Do not place any object on or near the display area in order to prevent accidental
activation of the cooktop controls.
•Cookware handles should be turned inward and not extend over adjacent surface
units. To reduce the risk of burns, ignition of flammable materials, and spillage due to
unintentional contact with the cookware, the handles of cookware should be positioned so
that they are turned inward, and do not extend over adjacent surface units.
•Never leave prepared food on the cooking zones. Boilovers cause smoking and greasy
spillovers that may ignite, or a pan that has boiled dry may melt or become damaged.
•Protective liners: Do not use aluminum foil to line any part of the cooktop. Only use
aluminum foil as recommended after the cooking process, if used as a cover to be placed
over the food. Any other use of aluminum foil may result in the risk of electric shock, fire or
short circuit.
•Glazed cookware: Only certain types of glass, glass/ceramic, ceramic, earthenware,
or other glazed cookware are suitable for rangetop service without breaking due
to the sudden change in temperature. Check the manufacturer’s recommendations for
cooktop use.
•Do not clean or operate a broken cooktop. If cooktop should break, cleaning solutions
and spillovers may penetrate the broken cooktop and create a risk of electric shock.
Contact a qualified technician immediately.
•Do not place hot cookware on cold cooktop glass. This could cause glass to break.
•Do not slide pans across the cooktop surface. They may scratch the cooktop surface.
•Do not let pans boil dry. This may cause permanent damage in the form of breakage,
fusion, or marking that can affect the ceramic-glass cooktop. (This type of damage is not
covered by your warranty.)
•Never leave surface units unattended at high heat settings. Boilover causes smoking
and greasy spillovers that may ignite.
•Always turn off all controls when cooking is completed.
NOTE
Keep pets away from the product to avoid risk of fire or burns. Do not allow pets to climb
on the product even when it is not in operation.
•Liquids such as water, coffee or tea are able to be overheated beyond the boiling point
without appearing to be boiling, due to surface tension of the liquid. Visible bubbling or
boiling is not always present when the container is removed from the cooktop.
This could result in very hot liquids suddenly boiling over when the container is disturbed
or a spoon or other utensil is inserted into the liquid.
To reduce the risk of injury to persons.
- Do not overheat the liquid.
- Stir the liquid both before and halfway through heating it.
- Do not use straight-sided containers with narrow necks.
- After heating, allow the container to stand on the cooktop for a short time before moving
the container.
- Use extreme care when inserting a spoon or other utensil into the container after heating.

IMPORTANT SAFETY INSTRUCTIONS
7
SAFETY WHEN CLEANING
•Always switch off the appliance before cleaning.
•For safety reasons, do not clean the appliance with a steam jet or high-pressure
cleaner.
•Clean the cooktop in accordance with the maintenance and cleaning instructions in
this manual.
•Do not use harsh abrasive cleaners or rough metal scrapers to clean the cooktop
glass since they can scratch the surface, which may result in shattering of the
glass.
•Clean cooktop cautiously. Do not use sponges or cloth to wipe spills on a hot cooking
area. Use a proper metal scraper.
COOK MEAT AND POULTRY THOROUGHLY
•Cook meat and poultry thoroughly-meat to at least an INTERNAL temperature of 160°F
and poultry to at least an INTERNAL temperature of 180°F. Cooking to these temperatures
usually protects against food-borne illnesses.
HOW TO AVOID DAMAGE TO THE APPLIANCE
•Prior to using the cooktop for the first time, apply the recommended cooktop cleaning
cream to the ceramic surface. Buff with a non-abrasive cloth or pad. This will make
cleaning easier when soiled from cooking.
The special cooktop cleaning cream leaves a protective finish on the glass to help prevent
scratches and abrasions.
•Do not use the cooktop as a worksurface or storage space.
•Please be careful at the edges when moving pots and pans.
•Do not operate the cooking zones with empty pots or pans.
•Do not turn on the cooking zones with no pots or pans on the element.
•Ceramic glass is very tough, and impervious to sharp temperature changes but is not
unbreakable. It can be damaged if hard or sharp objects fall on it.
•Be very cautious if using pots made of cast iron, or other pots with rough edges or burrs.
Moving these can cause scratches on glass.
•If sugar or a mixture containing sugar falls onto a hot cooking zone and melts, remove
immediately, while still hot. If left to cool down, it may damage the surface when removed.
•Do not slide metal or glass across the cooktop surface.
•Keep meltable objects or materials away from the ceramic glass surface, for example,
plastic utensils, aluminum foil, or cooking wraps.
If any materials or foodstuffs melt on the ceramic-glass surface, these should be cleaned
up immediately.
NOTE
ENGLISH
There is a risk of burning yourself when the glass scraper is used on a hot cooking zone!
•Do not use cookware with any dirt buildup on the bottom.
•Do not use cookware with rough or uneven bottoms. This cookware can mark and scratch
the cooktop surface.
•Refer to the owner's manual for proper cleaning and maintenance of the cooktop.
•Do not use the glass cooktop surface as a cutting board.

8
IMPORTANT SAFETY INSTRUCTIONS
DISPOSAL OF OLD APPLIANCES
To protect the environment, it is important that worn-out appliances are disposed of in the
correct manner.
•The appliance must not be disposed of with household rubbish.
•You can obtain information about collection dates or public refuse disposal sites from your
local government offices or state environmental protection agency.
CAUTION
Before disposing of old appliances please make them inoperable so they cannot be a
source of danger. To do this, have a qualified person disconnect the appliance from the
house circuitry.
Read and follow this safety information carefully.
SAVE THESE INSTRUCTIONS
INTRODUCTION TO INDUCTION COOKING
9
INTRODUCTION TO
INDUCTION COOKING
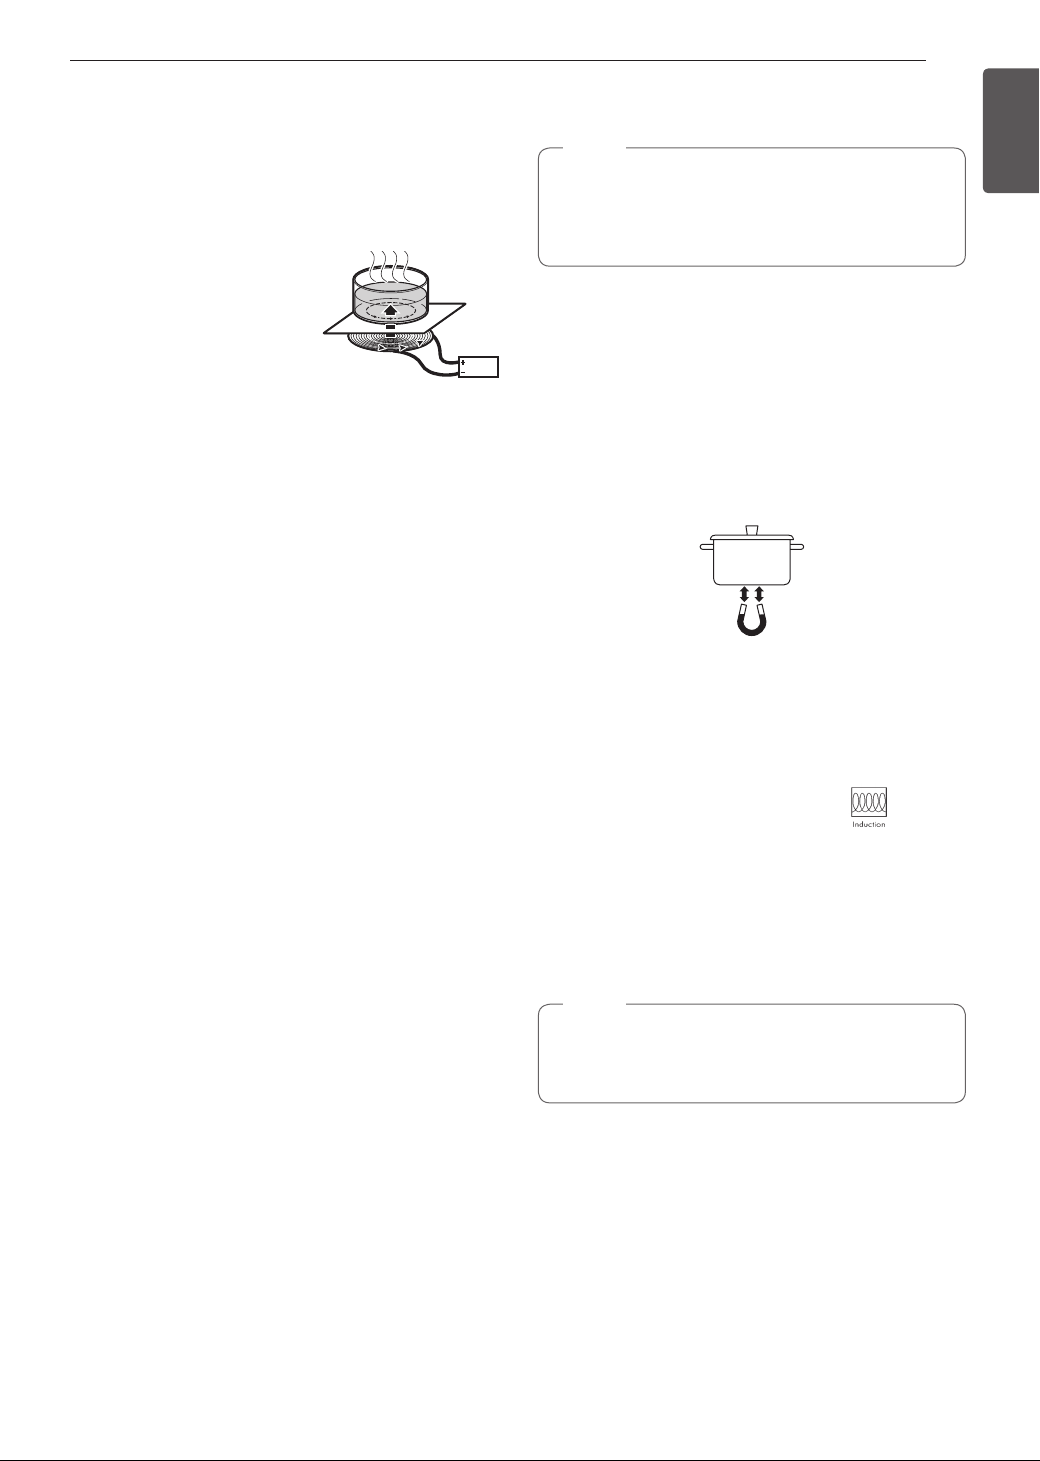
How Induction Cooking Works
An induction coil beneath
the ceramic glass cooking
surface generates magnetic
fields, which act directly on
the base of the pots and
pans.
Instead of heating the ceramic glass, this method
heats the base of the pan immediately, saving time
and energy. Since the heat required for cooking is
generated directly in the base of the pan, the cooking
zone itself warms up only slightly. The cooktop
does become hot when heat is transferred from the
cookware.
IMPORTANT
•Electromagnetic fields can affect electronic circuits
and interfere with portable radios and phones.
•Do not put magnetically active objects (e.g., credit
cards, computer diskettes, cassettes) on or near
the ceramic glass surface while one or more
induction cooking zones are in use.
•Do not put any metal objects (e.g., spoons, pan
lids) on the cooking zones as they can become hot
when the cooking zones are in use.
Induction Cookware
NOTE
Before using the induction cooking elements,
carefully read and follow these cookware
recommendations and the instructions in the pan
sensing sections.
When purchasing pans for use on the induction
cooktop, look for cookware identified by the
manufacturer as "induction ready" or "induction
capable", or that is marked by the manufacturer as
specifically designed for induction cooking.
The base material of the cookware must be magnetic
for the cooking elements to activate. Use a magnet
to check if the cookware base material is suitable. If
the magnet sticks to the bottom of the cookware, the
cookware can be used for induction cooking.
For the best possible surface cooking results, use
only high-quality, heavy gauge steel cookware on the
induction cooking elements. Follow manufacturer's
recommendations when using induction cookware.
Induction Cookware Types
ENGLISH
The three most common induction cookware types
available are stainless steel, cast iron, and porcelainenamel-coated metals.
•Stainless Steel is generally excellent for induction
cooking. It is durable, easy to clean, and resists
staining.
NOTE
Not all stainless steel cookware is magnetic;
stainless steel is not always suitable for induction
cooking.
•Cast iron cooks evenly and is also good for
induction cooking. Do not slide cast iron cookware
on the cooktop; cast iron cookware with a rough
surface will scratch the ceramic cooktop.
•Porcelain-enamel-coated metals have variable
heating characteristics depending on the quality of
the base metal. Make sure the porcelain-enamel
coating is smooth to avoid scratching the ceramic
cooktop.

10
INTRODUCTION TO INDUCTION COOKING
Incompatible Cookware
•Aluminum, nickel-silver pots
•Heat-resistant glass pots
•Roasting pans
•Stone pots
•Stainless steel pots (without the IH mark)
−Without the IH mark, heating may not work well.
•Pots with partially magnetic base
−Even if there is an IH mark, a container that only
has magnetic material on part of the bottom of
the container may not be automatically detected
or the product may not work properly.
Material that sticks to the magnet
Material that does not stick to magnet
•A pot with legs
•A pot with a round bottom
−The smaller contact area
may give poor results.
•Do not use a container with
a flat bottom surface smaller
than the burner size.
Noises during Cooktop Operation
The electronic processes involved with induction
cooking may create some background noises. You
may hear a slight buzzing sound when cooking on
the cooktop. These noises are part of the induction
cooking process and are considered normal.
Some cookware will buzz, depending on the
construction or base material. The buzz may be more
noticeable if the contents of the pan are cold. As the
pan heats up, the noise will decrease. The noise will
also decrease if the power level setting is reduced.
NOTE
•When using the induction cooktop, operational
noises are more noticeable while cooking in
Boost mode. But very loud noises are not
normal when induction cooking.
•The cooktop fan may turn on to reduce the
temperature of the product, even when the
surface elements are not being used.
•Cookware that is not marked "IH" may make a
loud noise.
•Under certain conditions, your cookware may
produce a high-pitched whistling noise when
two elements are in use at the same time.
The power levels at which this occurs may vary
depending on the kind of cookware being used.
Change the power level to eliminate the noise
or reduce its volume.
Pan Preheat Recommendations
Induction cooking may decrease the amount of time
required to preheat cookware compared to cooking
on a radiant element cooktop or gas surface burner.
Pay close attention to all food items while cooking
on the cooktop and until all cooking processes are
complete.
CAUTION
Remember that induction surface cooking initially
heats the cookware VERY QUICKLY if the
cookware does not contain food.
Use Flat-Bottomed Cookware
Cookware must fully contact the
surface of the cooking element.
Use flat-bottomed pans sized
to fit the cooking element and
amount of food being prepared.
Check for flatness by rotating a
ruler across the bottom of the
cookware.
Pan Size
INTRODUCTION TO INDUCTION COOKING
11
Recommended Cookware Size
①
②②
③③
②②
Pan Size
①
Dual
cooking zone
②
Single
cooking zone
③
Flexible
cooking zone
•The Center area is a Dual Cooking Zone which
activates single or dual elements depending on pot/
pan size. If the cooktop detects cookware that is
less than 9” in diameter, only the inner ring (single
element) will activate. If it detects cookware larger
than 9” in diameter, it will activate both the inner
and outer rings (dual element)
•To quickly boil a very large quantity of water, set the
center element to Boost, use a pot that is at least
9" in diameter so that the center dual element is
activated, and turn off all other elements.
Single: 5.5" - 8.0" (140 mm - 203 mm)
Dual: 9.0" - 11.0" (228 mm - 280 mm)
5.5" - 7.1"(140 mm - 180 mm)
4.7" x 10.6"(120 mm x 270 mm)
Cookware Placement
Use the proper cookware and place it correctly on
the cooktop. One or more of the cooking elements
will not heat if any of the incorrect conditions shown
is detected by the sensors located below the
ceramic cooktop surface. Correct the problem before
attempting to use the cooktop.
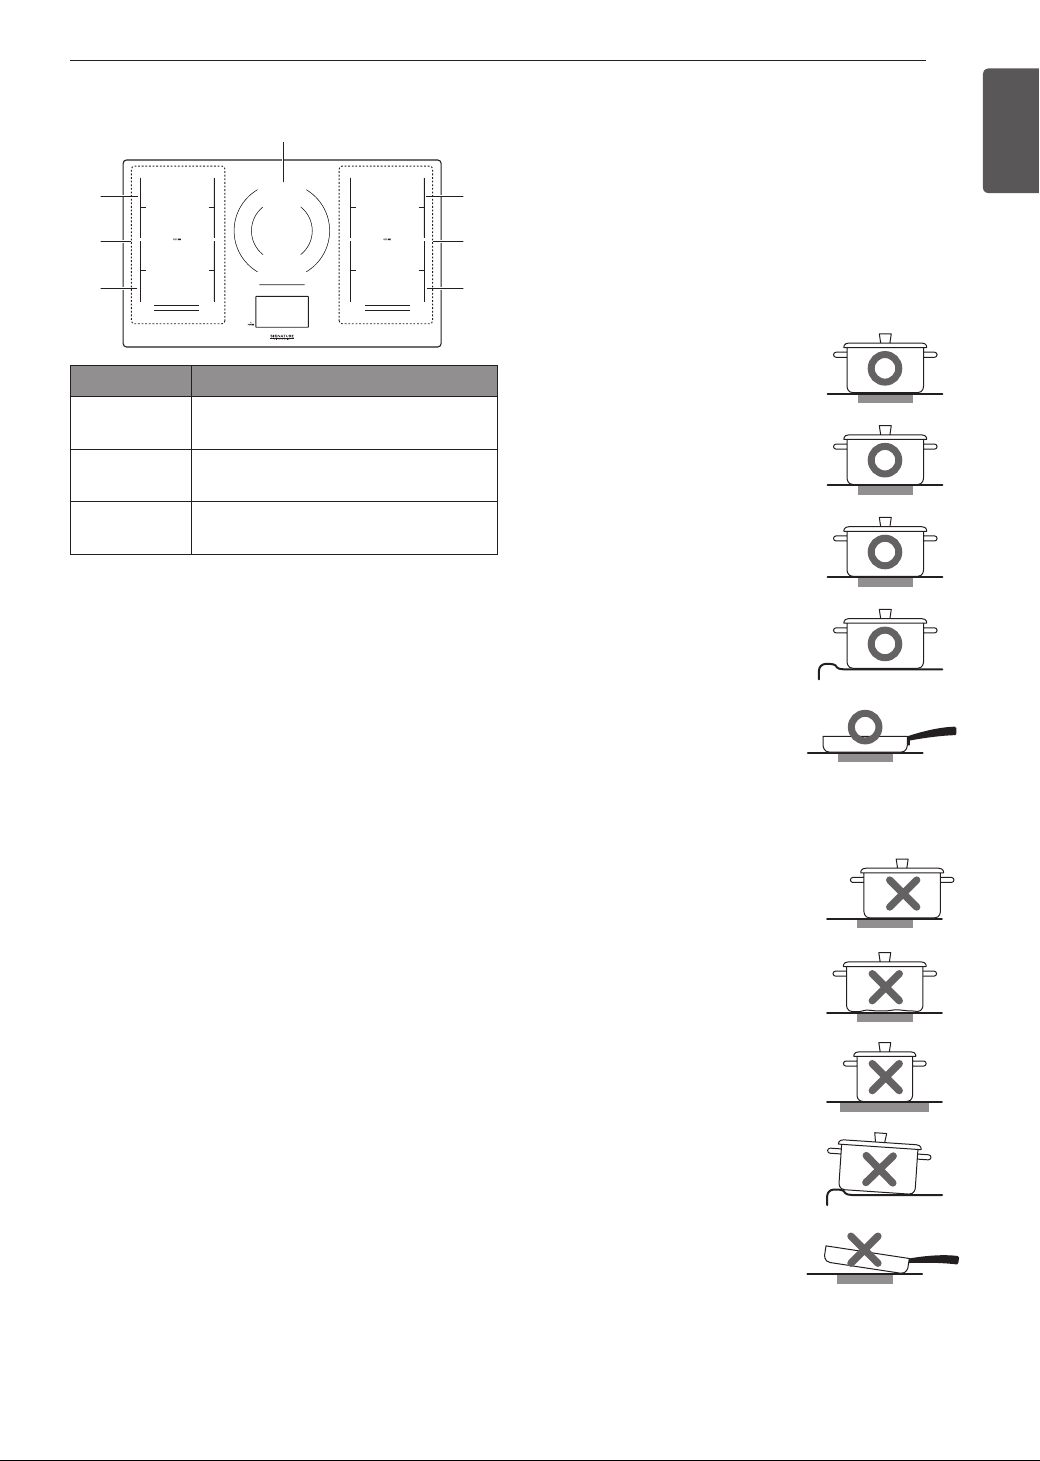
Correct
•Cookware is centered
correctly on surface of
cooking element.
•Pan has flat bottom and
straight sides.
•Pan size meets or exceeds
the recommended minimum
size for the cooking element.
•Pan rests completely on the
cooktop surface.
•Pan is properly balanced.
Incorrect
ENGLISH
Minimum Cookware Size
•Use cookware with a bottom surface diameter of
5.5” (140 mm) or greater.
•For Flexible Cooking Zone, minimum cookware
size is 4.7” x 10.6” (120 mm x 270 mm)
•Cookware is not centered on
surface of cooking element.
•Pan has curved or warped
bottom or sides.
•Pan does not meet the
minimum size required for
the cooking element used.
•Pan bottom rests on
cooktop trim or does not rest
completely on the cooktop
surface.
•Pan is unbalanced by heavy
handle.
12
INTRODUCTION TO INDUCTION COOKING
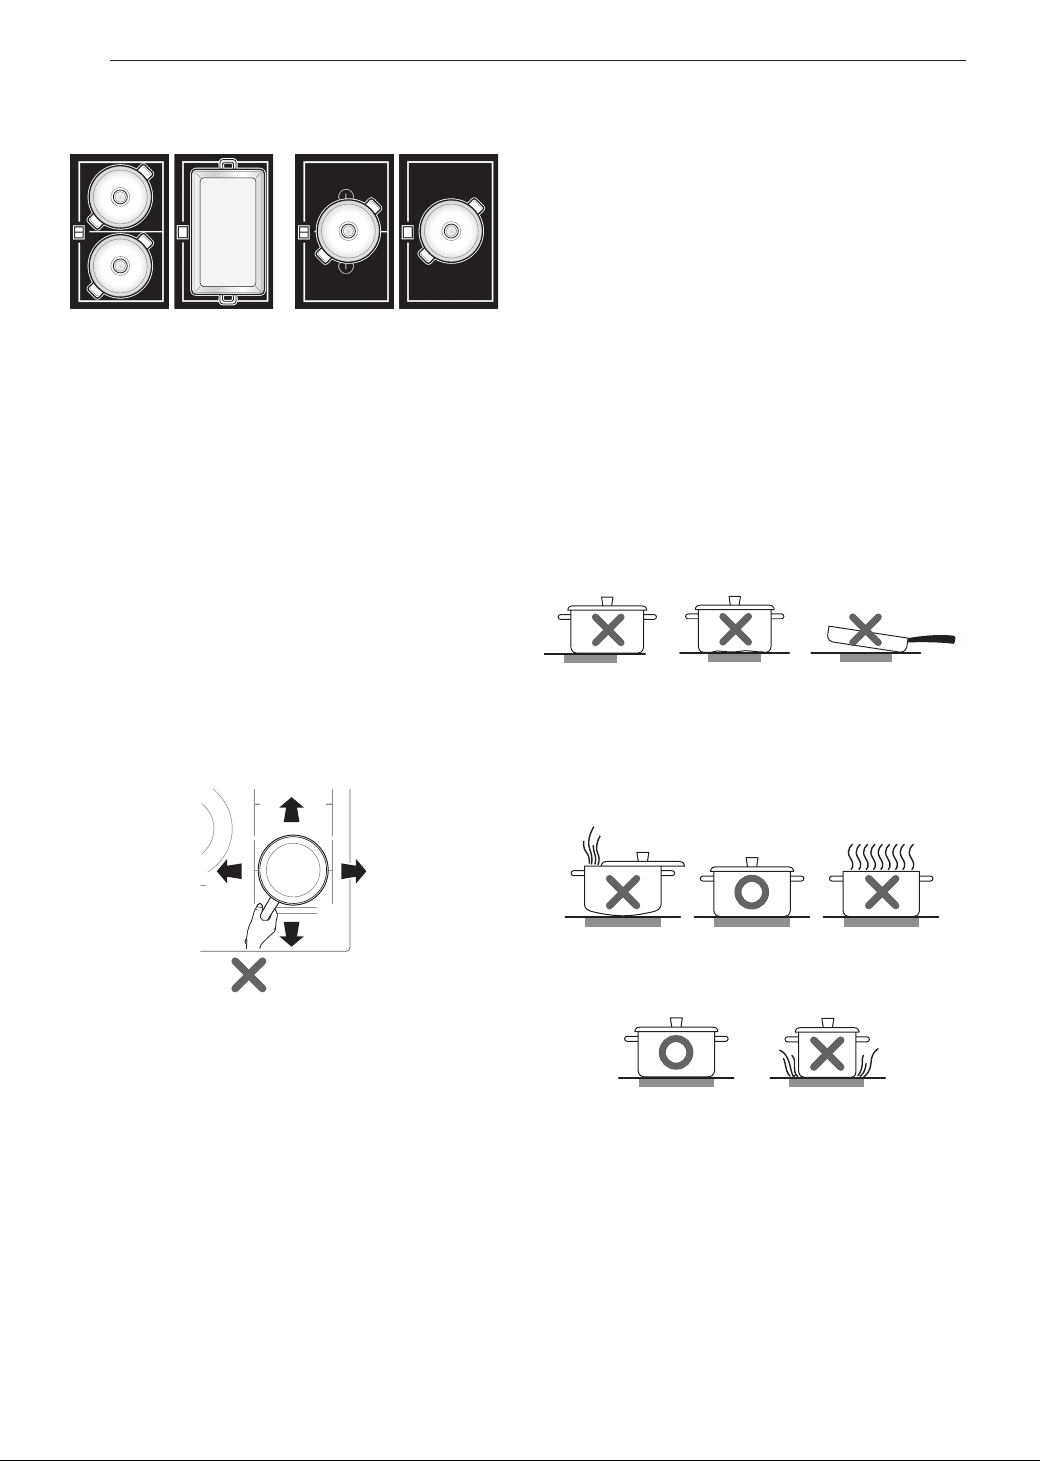
Cookware placement in Flexible
Cooking Zones
Compatible
Not compatible
Avoiding Scratches
Use heavier gauge stainless steel cookware on your
ceramic cooktop surface. This will help reduce the
possibility of developing scratches on the ceramic
surface.
Low-quality cookware can scratch the cooktop
surface.
Cookware should always be lifted over the ceramic
cooktop surface to prevent scratching.
Over time, sliding ANY type of cookware over the
ceramic cooktop may alter the overall appearance of
the cooktop. Eventually, the buildup of scratches can
make cleaning the surface difficult and degrade the
overall appearance of the cooktop.
Scratches can also result from grains of sand (e.g.,
after washing vegetables) which are dragged with the
pot across the cooking surface.
For Best Results:
Always follow the recommendations for proper
cookware type and size. In addition:
•Do not use dirty pans with grease buildup. Always
use pans that are easy to clean after cooking, and
make sure that the bottoms of the pans are clean
and dry.
•When cooking with large amounts of liquid, use
large pots so that nothing can boil over.
•Do not let pans boil dry. This may cause permanent
damage in the form of breakage, fusion, or marring
that can affect the ceramic cooktop. (This type of
damage is not covered by your warranty.)
•Match the pan size and cooking zone to the amount
of food being prepared.
Tips for Saving Energy:
•Always position pots and pans before switching on
the cooking zone.
not aligned bottom not at handle too heavy
•Dirty cooking zones and cookware use more
electricity.
•Whenever possible, place lids firmly on pots and
pans so that they are completely covered.
•The base of the pot should be the same size as the
cooking zone.
PARTS AND FEATURES
13
PARTS AND FEATURES
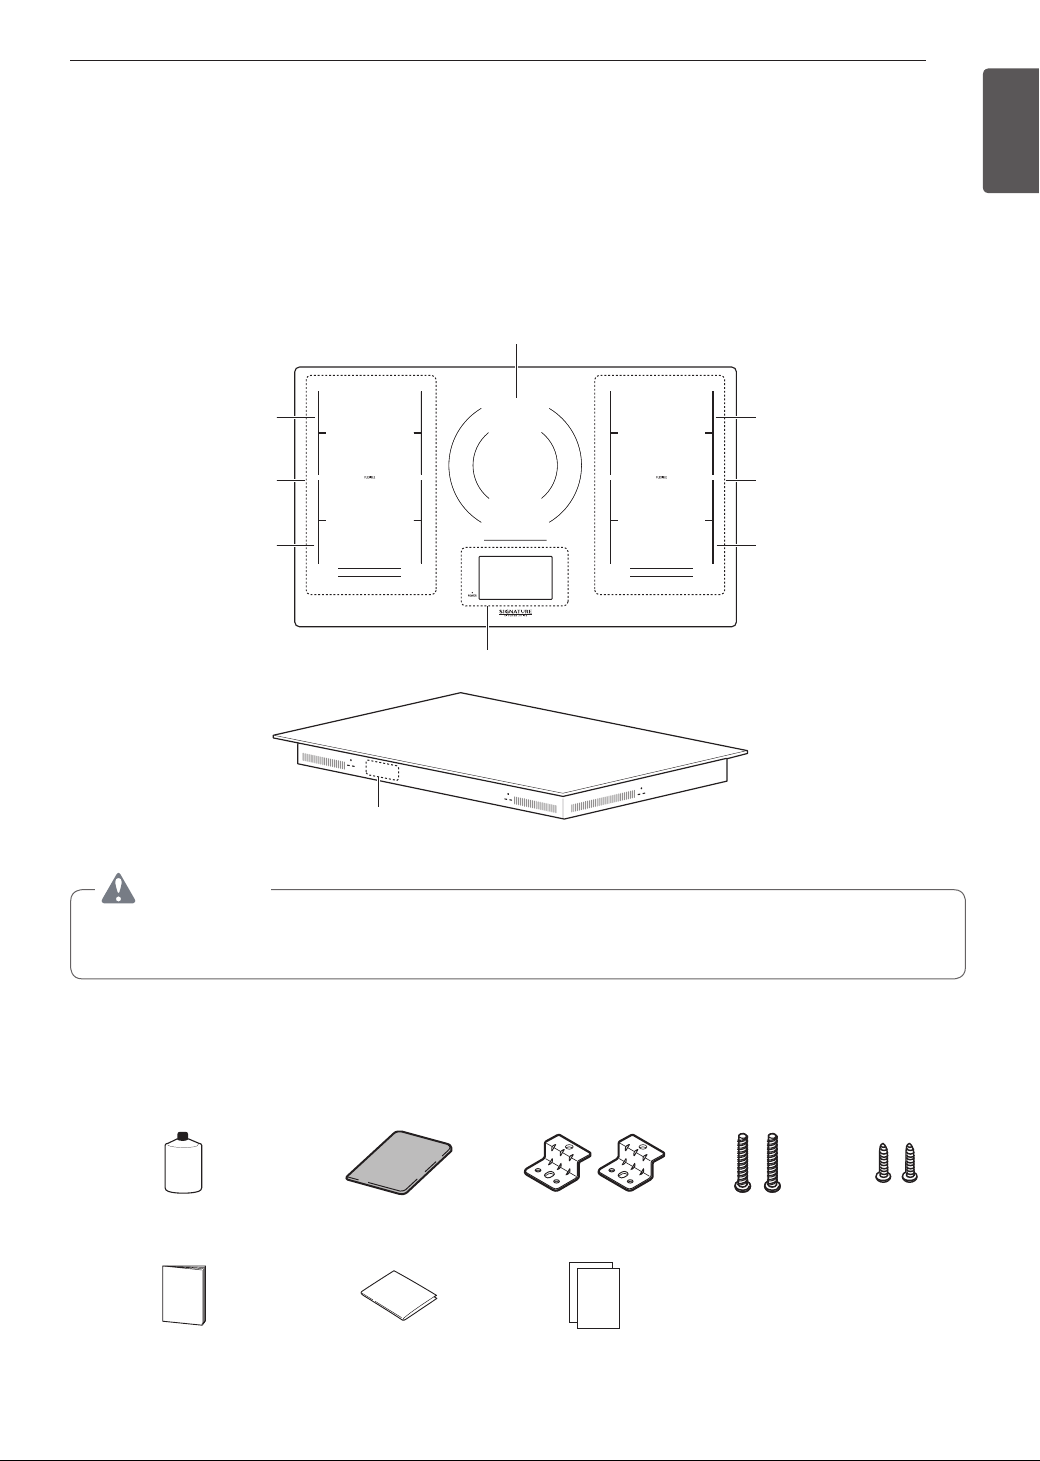
Parts and Features of the Cooktop
Throughout this manual, features and appearance may vary from your model.
Induction Cooktop
Dual Cooking Zone
11" / 7" (280 / 178 mm)
Single Cooking Zone
8" × 7" (216×180 mm)
Flexible Cooking Zone
8" × 14" (216×360 mm)
Single Cooking Zone
8" × 7" (216×180 mm)
Electronic touch controls
ENGLISH
Single Cooking Zone
8" × 7" (216×180 mm)
Flexible Cooking Zone
8" × 14" (216×360 mm)
Single Cooking Zone
8" × 7" (216×180 mm)
Rating label
model and serial number plate
CAUTION
Burn Hazard: The cooking zones may appear cool when turned ON and after they have
been turned OFF.
Accessories
Included Accessories
Cleaner
Cooktop Cleaner
(1 ea)
Owner’s manual
(1 ea)
Non-scratch scouring pad
(1 ea)
User guide
(1 ea)
Retainer brackets
(2 ea)
Registration card
(2 ea)
Bolt
(2 ea)
Screw A
(2 ea)
14
PARTS AND FEATURES
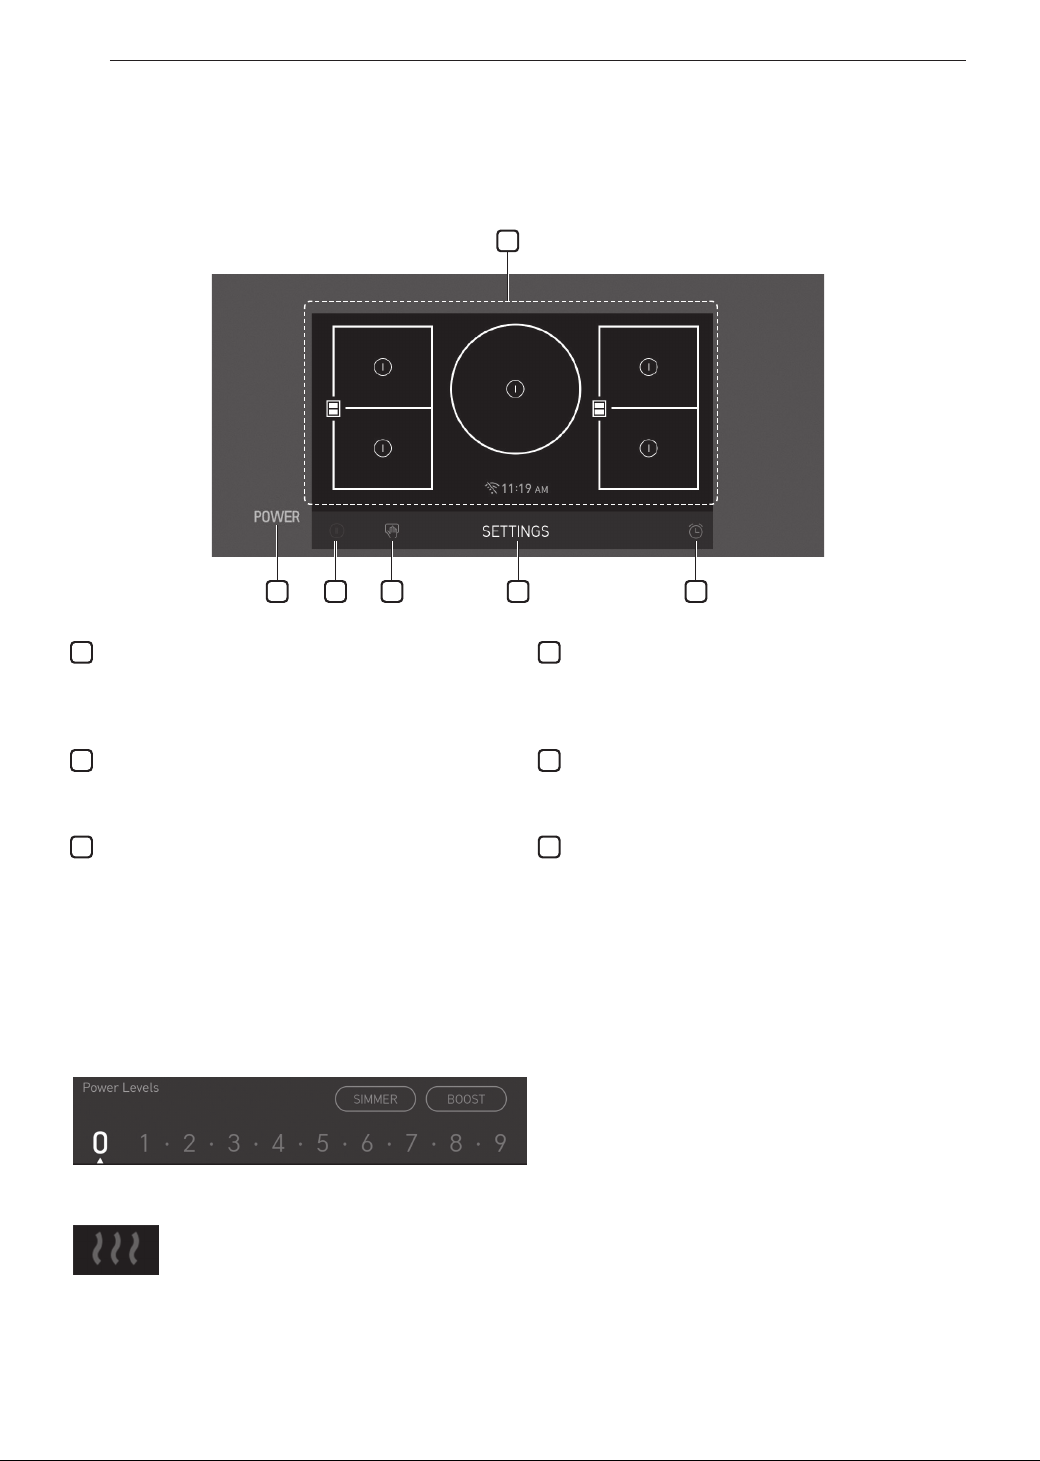
Touch Control Features
Locations of Surface Elements and Controls
The surface burner elements are positioned in the same locations on the cooktop and the control panel for ease
of use.
6
1 2 3 4 5
1
Power
Touch and hold for 1 second to turn the entire cooktop
ON. When it is ON, the cooktop is in standby mode
until a cooking zone is activated.
2
Pause
Sets the active cooking zone to minimum output.
Touch to activate or deactivate.
3
Clean Lock
Touch to lock the touch screen before cleaning it.
To set the element power level
Select the number on the element power settings for the active cooking zone to adjust the power level from 1 to 9.
If you've set 17 power levels in the Settings menu, touch the dots between the numbers to adjust the power level
up or down half a step.
Hot Surface Indicator
•It is displayed when the ceramic glass surface is hot, indicating caution.
•If it is displayed on the screen, be careful because the ceramic glass surface is hot.
−Failure to do so may result in burns or injuries.
•After turning off the burner, it is displayed continuously until the ceramic glass surface cools down.
−If the temperature near the product is high, it may take longer for the ceramic glass surface to
cool down.
•Even after the indicator light has turned off, be careful since the surface may still be hot.
4
Settings
Touch to adjust settings.
For a list of configurable settings, see "Operating
Instructions".
5
Kitchen Timer
Touch to set a kitchen timer.
For details, see "Operating Instructions".
6
Cooktop Control
To check the status of cooking zone and adjust the
cooking zone.
For details, see "Operating Instructions".
OPERATING INSTRUCTIONS
15
OPERATING
INSTRUCTIONS
To operate the touch control pads, touch the pad
firmly with the flat part of your fingertip.
First Operation
The first time that power is supplied to the cooktop,
the Signature Kitchen Suite logo is displayed for 1
second.
Getting Started
After turning on the cooktop for the first time, adjust
the settings to suit your preferences.
Touch POWER on the LCD display.
1
After the startup animation, select the desired
2
language and touch NEXT.
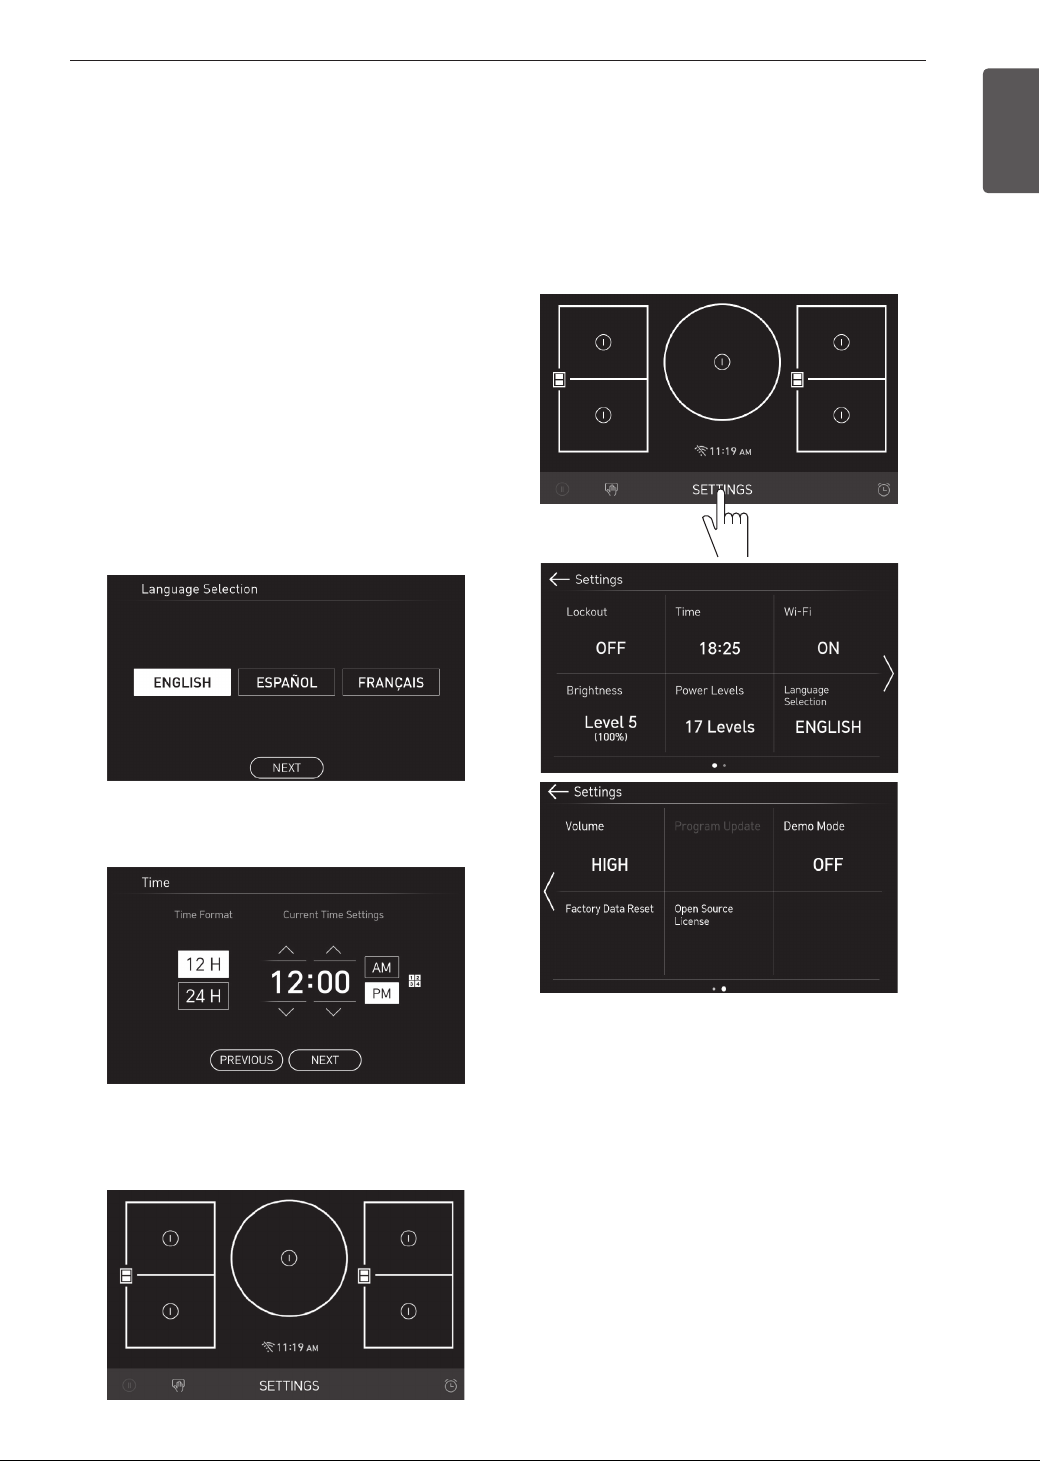
Changing Cooktop Settings
Settings
To adjust settings after the initial setup, touch the
display to open the Main screen. Touch Settings at
the bottom center of the Main screen.
Swipe the screen or touch the "<, >" arrow keys to
navigate through the Settings screens.
ENGLISH
Set the correct time of day and choose between
3
a 12-hour or 24-hour time format, then touch
NEXT.
Read through the application guide in the display
4
and touch DONE.
The Main screen appears in the display.
5
Location of Settings
•Page 1: Lockout, Time, Wi-Fi, Brightness, Power
Levels, Language Selection
•Page 2: Volume, Program Update, Demo Mode,
Factory Data Reset, Open Source License

16
OPERATING INSTRUCTIONS
Lockout
The Lockout feature automatically prevents most
cooktop controls from being turned on. It does not
disable the clock or timer.
•If Lockout is turned on, all cooktop functions are
disabled except the POWER button.
Lock
Touch Settings at the center bottom of the Main
1
screen.
Touch Lockout on the first Settings screen.
2
Touch LOCK on the screen.
3
When Lockout is turned on, the lock icon
4
appears at the center bottom of the display.
Unlock
Touch any part of screen while Lockout is on.
1
A popup screen appears. Touch Unlock for 3
2
seconds.
The lock icon disappears from the bottom of the
3
display.
Time
The time is displayed on the LCD display when the
cooktop is turned on.
Wi-Fi
Connect the appliance to a home Wi-Fi network.
Setting Up Wi-Fi
Touch Settings at the center bottom of the Main
1
screen, and then touch Wi-Fi in the first Settings
screen.
Follow the instructions in the Wi-Fi Guide in the
2
display.
Select ON, OFF, or RESET and touch OK.
3
If ON is selected, the Wi-Fi icon appears at
4
the bottom of the display.
If you select RESET, you will have to re-enter
5
the Wi-Fi password.
Brightness
Adjust the brightness of the LCD display from 20 % to
100 % in increments of 20 %.
Setting Display Brightness
Touch Settings at the center bottom of the Main
1
screen, and touch Brightness.
Adjust the display brightness by touching and
2
dragging the dot across the bar, by tapping
anywhere on the bar, or by touching + or –.
Touch OK.
3
Setting Time of Day
Touch Settings at the center bottom of the Main
1
screen.
Touch Time, then set the correct hour and
2
minutes by scrolling. You can also touch the
number pad icon and enter the desired
numbers.
Select either a 12-hour or 24-hour clock mode
3
(12H/24H).
Touch OK.
4
Power Levels
Touch Settings at the center bottom of the Main
1
screen, and touch Power Levels.
Choose between 17 levels and 9 levels. (the
2
output of each maximum level is the same)
Touch OK.
3

OPERATING INSTRUCTIONS
17
Language Selection
Set the display language to English, Spanish, or
French.
Selecting a Language
Touch Settings at the center bottom of the Main
1
screen, and touch Language Selection.
Select the desired language.
2
Touch OK.
3
Volume
Adjust the volume of the cooktop controls.
Setting the Volume
Touch Settings at the center bottom of the Main
1
screen, swipe to the second Settings screen,
and touch Volume.
Select Mute, Low, or High.
2
Touch OK.
3
Touch OK.
3
NOTE
•When Demo Mode is on, the appliance will not
heat up.
•The cooktop Demo Mode icon appears in the
display if the Demo Mode is on.
Factory Data Reset
This function returns all settings to the factory defaults.
Touch Settings at the center bottom of the Main
1
screen, swipe to the second Settings screen,
and touch Factory Data Reset.
If you want to reset data to the factory defaults,
2
touch RESET and then OK.
NOTE
•All stored data will be deleted.
ENGLISH
Program Update
Once the appliance is connected to a home Wi-Fi
network, use this setting to check for available
programming updates and install them.
Touch Settings at the center bottom of the Main
1
screen, swipe to the second Settings screen,
and touch Program Update.
The display shows available programming
2
updates. Touch UPDATE to download and install
the new version.
Demo Mode
The Demo Mode is for showroom use only. It prevents
the cooking zones from heating up.
Touch Settings at the center bottom of the Main
1
screen, swipe to the second Settings screen,
then touch Demo Mode on the Settings screen.
Select either ON or OFF.
2
Open Source License
This screen contains open source software licensing
information.
Touch Settings at the center bottom of the Main
1
screen and swipe to the second Settings screen.
Touch Open Source License.
2
Before Using the Cooktop
Before using the cooktop for the first time, clean
it thoroughly with the included cleaner or ceramic
cooktop cleaner according to the Care and Cleaning
instructions in this guide. This will help protect the
ceramic surface and make future cleanup easier.
CAUTION
Never use abrasive scrubbing pads or
cleaners. They can cause permanent damage to
the cooktop surface.
18
OPERATING INSTRUCTIONS
Activating the Cooktop
To turn ON the cooktop, touch the POWER key for
approximately 1 second. The LCD panel will turn on.
To turn OFF the cooktop, touch the POWER key.
NOTE
After turning on the cooktop with the POWER key,
you must select one of the cooking zones within
60 seconds. If no selection is made, the cooktop
will turn off for safety.
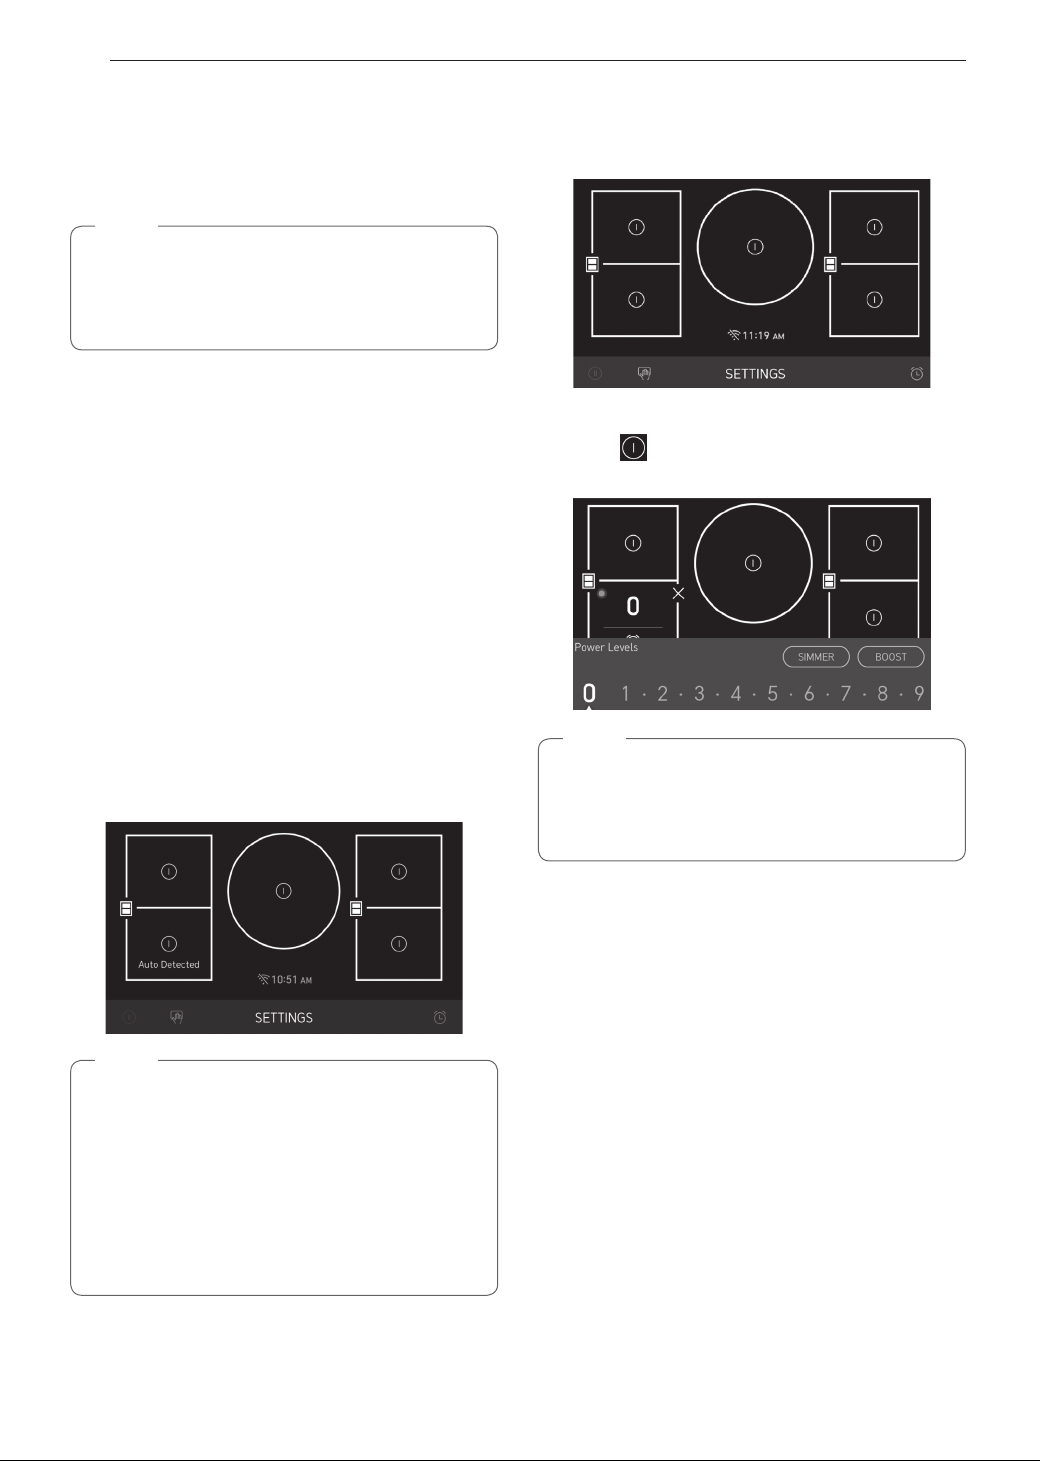
Automatic Detection
•The automatic detection is the function that checks
whether or not a container is placed on top of the
burner.
•When a container is placed on the burner, the
words "Auto Detected" will be displayed.
(The words "Auto Detected" will disappear after 30
seconds or when the burner is running.)
•The words "Auto Detected" will not be displayed
if a container is not placed on the burner, and this
function is activated initially only once after the
power is turned on.
•Depending on the conditions of use (whether
the burner is being used, the container material,
status of the container base, etc.), the automatic
detection time may differ or the cookware may not
be detected automatically.
Selecting the Cooking Zone
Place an induction-compatible pan on top of the
desired cooking zone.
Touch the icon in the desired cooking zone to set
the power level.
NOTE
Once the cooking zone has been selected the
power level must be selected within 3 seconds
with the element power settings. Otherwise, the
power settings will turn off for safety.
NOTE
•If the cookware is too small, the words "Auto
Detected" may not be displayed.
•Minimum Cookware Size
−Use cookware with a bottom surface diameter
of 5.5” (140 mm) or greater.
−For Flexible Cooking Zone, minimum
cookware size is 4.7” x 10.6” (120 mm x 270
mm)
OPERATING INSTRUCTIONS
1
2
3
4
5
6
7
8
9
19
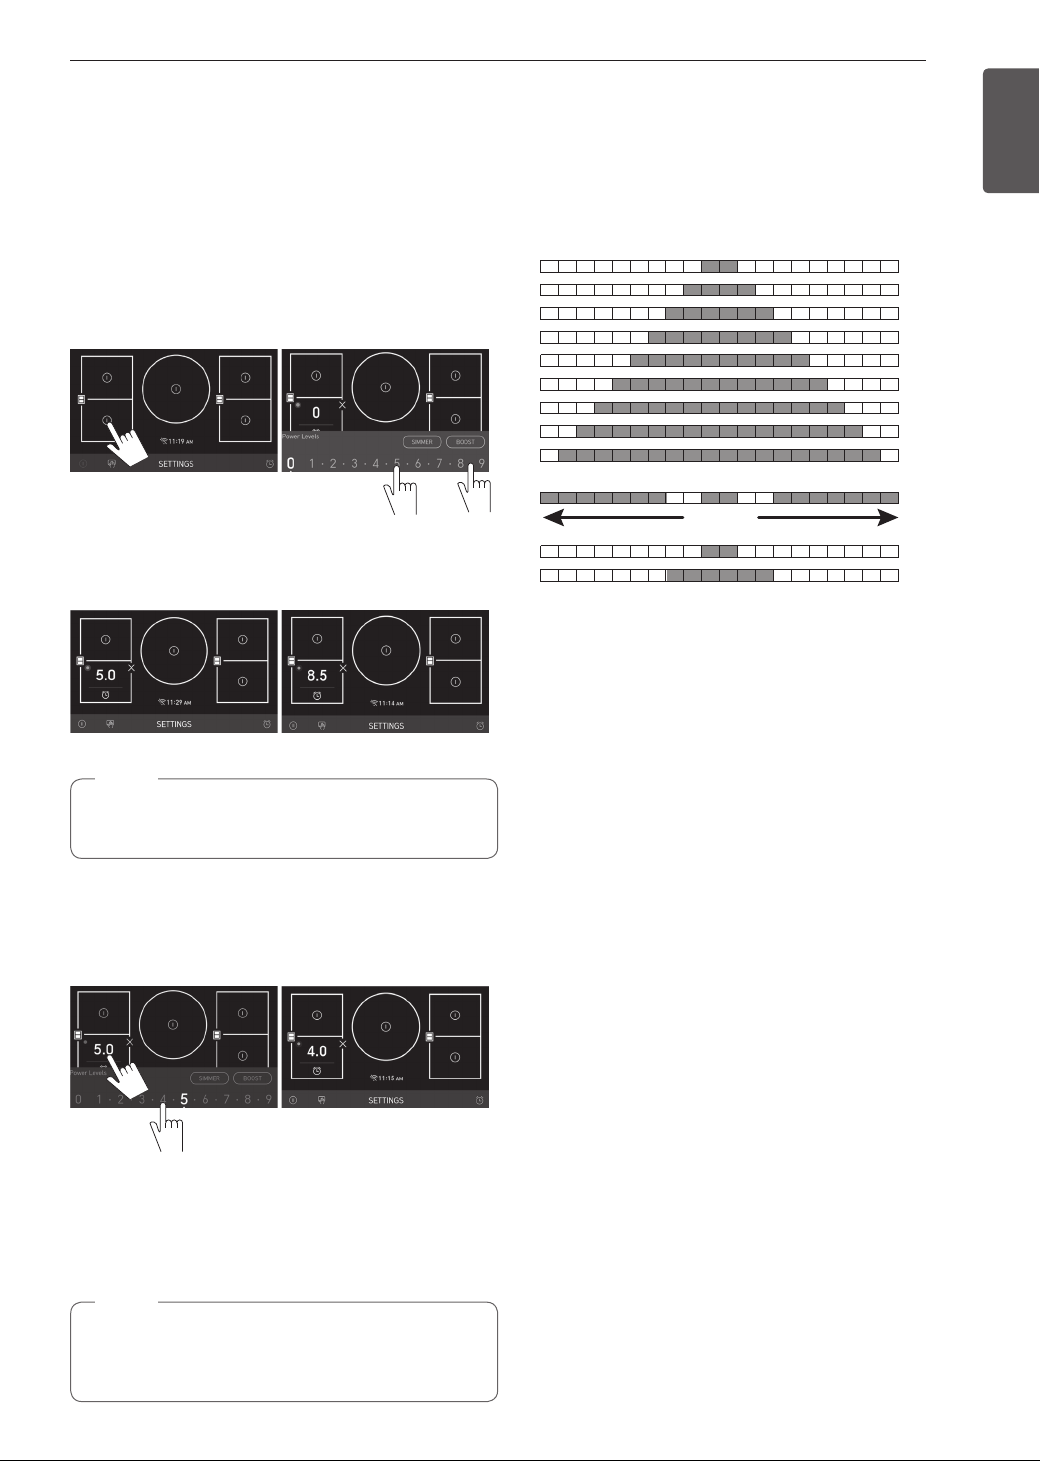
Setting the Power Level
The power level for the selected cooking zone can be
set from 1 to 9.
Selecting the Power Level
Touch a number in the Power Level popup to
1
set the power level from 1 to 9. If you've set 17
power levels in the Settings menu, touch the
dots between the numbers to adjust the power
level up or down half a step.
A
Selecting a power level turns on the cooking
2
zone. The cooking zone indicator remains lit and
the power level is stored.
B
Power Level Indicator
•Cooking Element LED Bar
The range provides an LED bar for each cooking
element on the cooktop.
Check the display and use the LEDs to monitor the
power levels of the elements.
9 Step
Boost
Melt
Simmer
•Available Power Level Settings
The cooktop control’s LED bar displays the
element’s power level settings, ranging from Level
1 to Level 9 to Boost.
ENGLISH
Figure BFigure A
NOTE
If power level is not selected, the power settings
will turn off after 3 seconds.
Readjusting the Power Level
Touch the desired cooking zone to bring up the
1
Power Level popup.
1
2
Readjusting power level 5 to 4
Touch the desired level in the Power Level
2
popup. If no selection is made, the Power Level
popup disappears after 3 seconds and the power
level remains the same.
NOTE
Once the power level is changed, the burner
operation is temporarily stopped and then
restarted at the changed power level.
20
OPERATING INSTRUCTIONS
Turning OFF the Cooking Zone
After the cooking is complete, touch the x icon to
1
turn off the cooking zone.
The corresponding cooking zone display will turn
2
off.
To turn off all cooking zones, touch the POWER
3
key.
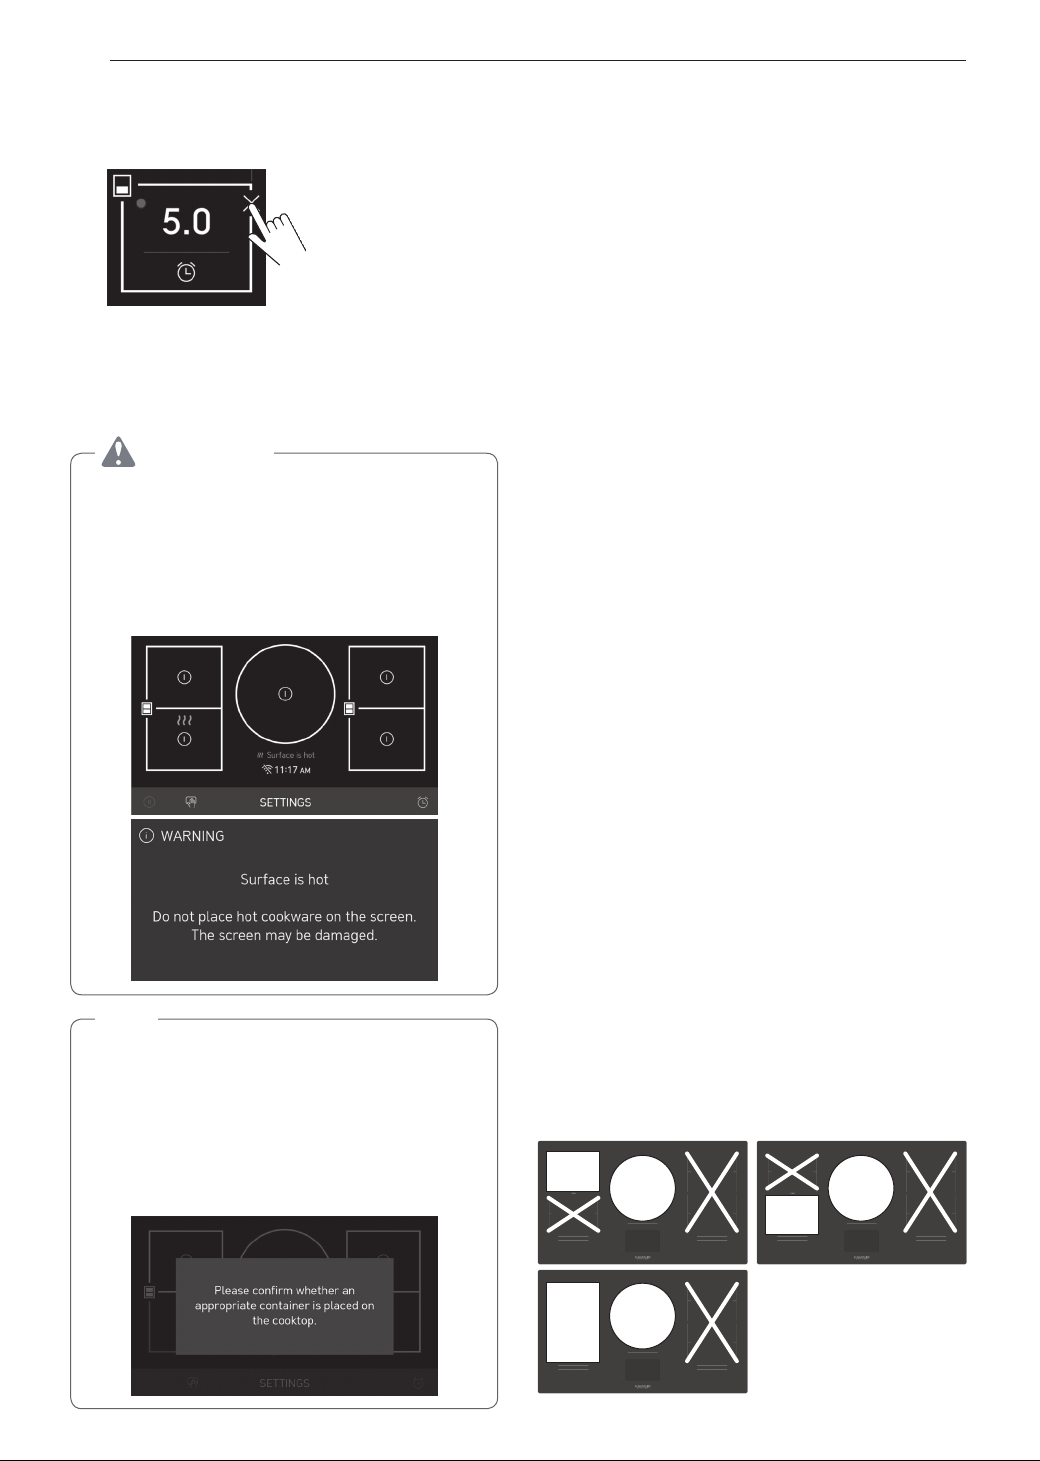
WARNING
Your cooktop has a residual heat indicator for
each cooking zone. This indicator will warn that
this area has been used and is still giving off
enough heat to cause burns. Avoid touching
the cooking zone when this indicator is shown.
Although the cooktop is OFF, the popup message
will stay lit until the cooktop has cooled down.
NOTE
If the following pop-up screen appears during
operation, check the following.
•The cookware is not centered within the
cooking zone.
•The cookware is not compatible with induction
cooking.
•There is no cookware on the cooking zone.
Tips for Induction Cooking
Getting the results you want when cooking can take a bit
of time and effort. If you are not familiar with induction
cooking, it may take a bit of practice or adjusting of your
usual methods to achieve the expected results. Using
the cooking chart and these cooking tips as a guide, you
will soon be enjoying the benefits of induction cooking.
•The quantity or quality of some foods can affect their
cooking times.
•When safe, allow food to come to room temperature
before cooking to take advantage of induction's ability
to heat food quickly.
•Cookware heats up very quickly when induction
cooking. Check food or liquids occasionally and stir
or reduce heat to avoid scorching, overcooking,
splattering, or boilovers.
•Sauces, soups, and stews may heat up more quickly
than you are used to and boil over if not watched. For
best results, stir frequently.
•Overcooked food loses moisture and tastes dry, while
undercooked food can cause illness. For best results,
use a thermometer to ensure that food is heated to a
safe internal temperature.
•Use nonstick or seasoned pans when cooking to
reduce the amount of additional fat added to a recipe.
•Don't overcrowd cookware. To avoid slow cooking
times and poor results, use cookware that is
appropriately sized for the amount of food you are
cooking.
•When boiling water on the center element, an 11”
diameter pot gives the best performance and saves
the most time.
•Use the Boost setting to quickly boil water, or
whenever you need extra heating power in one
element.
•To quickly boil a very large quantity of water, set the
center element to Boost, use a pot that is at least 9" in
diameter so that the center dual element is activated,
and turn off all other elements.
•To prevent damage to the product, if one of the rightside elements is turned on when the center dual
element is using the Boost setting, the power setting
of the center dual element is automatically reduced
to power level 9. To maintain the Boost setting on the
center dual element, use any of the left-side elements
instead.
Boost
Boost
Boost
Boost
Boost
Boost

OPERATING INSTRUCTIONS
21
Cooking
Function
Melting
Reheating •Soups & Stews 3-4
Sweating
Vegetables
Simmering
Sautéing or Other
Searing/Browning
Frying/Deep Frying
Blanching
Vegetables
Boiling
Example Food Item Power Level Notes/Comments
•Chocolate Over Direct
Heat
•Butter 2 Monitor carefully to prevent poor results.
•Onions
•Carrots
•Celery
•Peppers
•Tomato Sauce
•Cheese Sauce
•Potatoes
•Stocks/Broths or Stews
•Steaks/Chops
•Eggs
•Breakfast Meats
•Frozen Vegetables
•Stir Frying
•Browning Beef For Chili
or Stews
•Steaks or Chops
•Fried Chicken
•French Fries
•Battered Fish/Shellfish
•Broccoli
•Cauliflower
•Green Beans
•Pasta Water
•Shellfish
Stir continuously to prevent scorching.
1 or Melt
5-6
Simmer
4-5-6 •Grains
5-6-7
8-9
7-8 Fat may splatter if power level is too high.
8-9 Monitor carefully to prevent spillovers.
8-9-Boost
If using a double boiler to melt chocolate, use power
level 2.
Monitor carefully and stir frequently to achieve
desired results.
To sweat vegetables, cook them until they release
moisture, without browning.
Monitor carefully to prevent spillovers.
To steam vegetables or grains, bring cooking liquid
to a simmer, cover the pot, and reduce heat to power
level 2.
Monitor carefully and stir frequently to achieve
desired results.
Room temperature meats will sear and brown more
effectively.
Fat may splatter if power level is too high.
Do not fill pot to rim. Water can boil over if the power
level is too high.
ENGLISH
NOTE
These settings are recommended guidelines for cooking. You may need to adjust the power level for the
type of food and pan. Cooking times for some foods will vary depending on quantity or quality.
22
OPERATING INSTRUCTIONS
Using the Cook Modes
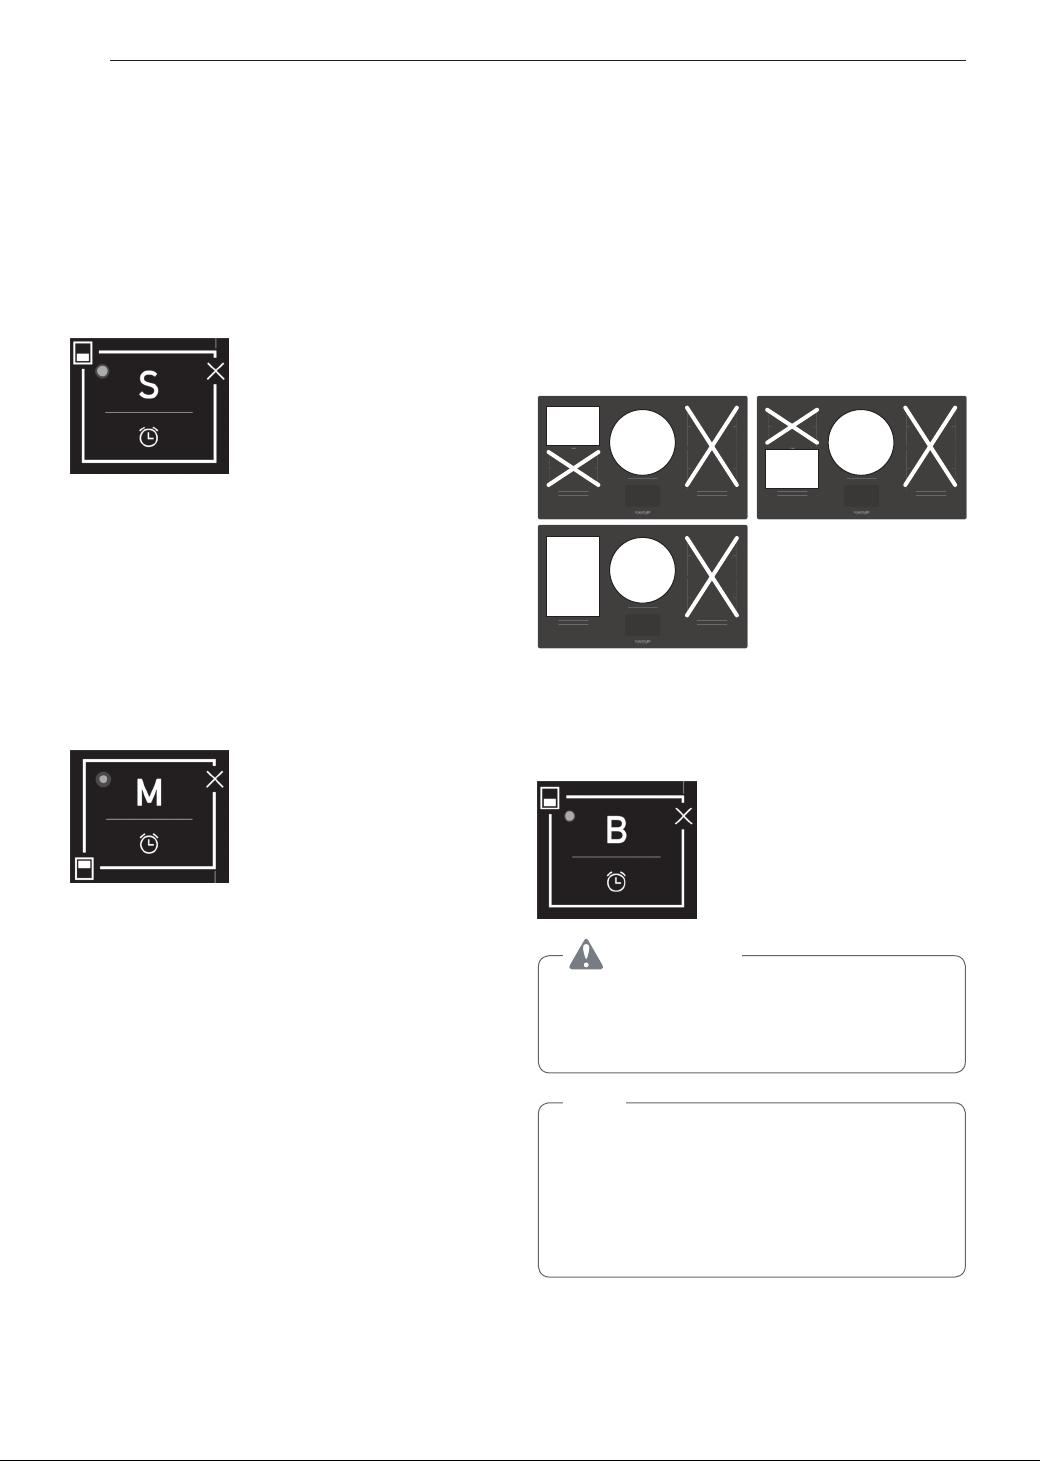
SIMMER
Use SIMMER to simmer sauces or stews.
Turning Simmer On
Place the cookware on any cooking zone except for
the rear right cooking zone. Activate the Power Level
popup and touch the SIMMER key.
MELT
Use MELT to melt items such as chocolate or butter
without scorching.
Turning Melt On
Place the cookware on the rear right cooking zone.
Activate the Power Level popup and touch the MELT
key.
BOOST
Use the Boost function to boil water or heat up large
quantities of food quickly.
To prevent damage to the product, if one of the rightside elements is turned on when the center dual
element is using the Boost setting, the power setting
of the center dual element is automatically reduced
to power level 9. To maintain the Boost setting on the
center dual element, use any of the left-side elements
instead.
For safety, after 6 minutes the Boost setting will
automatically revert to either power level 9 or the
previously set power level.
Boost
Boost
Turning Boost On
Place the cookware on a cooking zone. Activate the
Power Level popup and touch the BOOST key.
Boost
Boost
Boost
Boost
WARNING
Never use the Boost mode to preheat empty
cookware or to heat oil, butter or lard. The
cookware may be damaged and the fat or grease
may catch fire if overheated.
NOTE
•Under certain conditions, the Boost function
will turn off automatically to protect electronic
elements inside the cooktop.
•This can occur if the product is used for long
periods, when frying, or if cookware is lifted or
moved in the Boost mode.
OPERATING INSTRUCTIONS
23
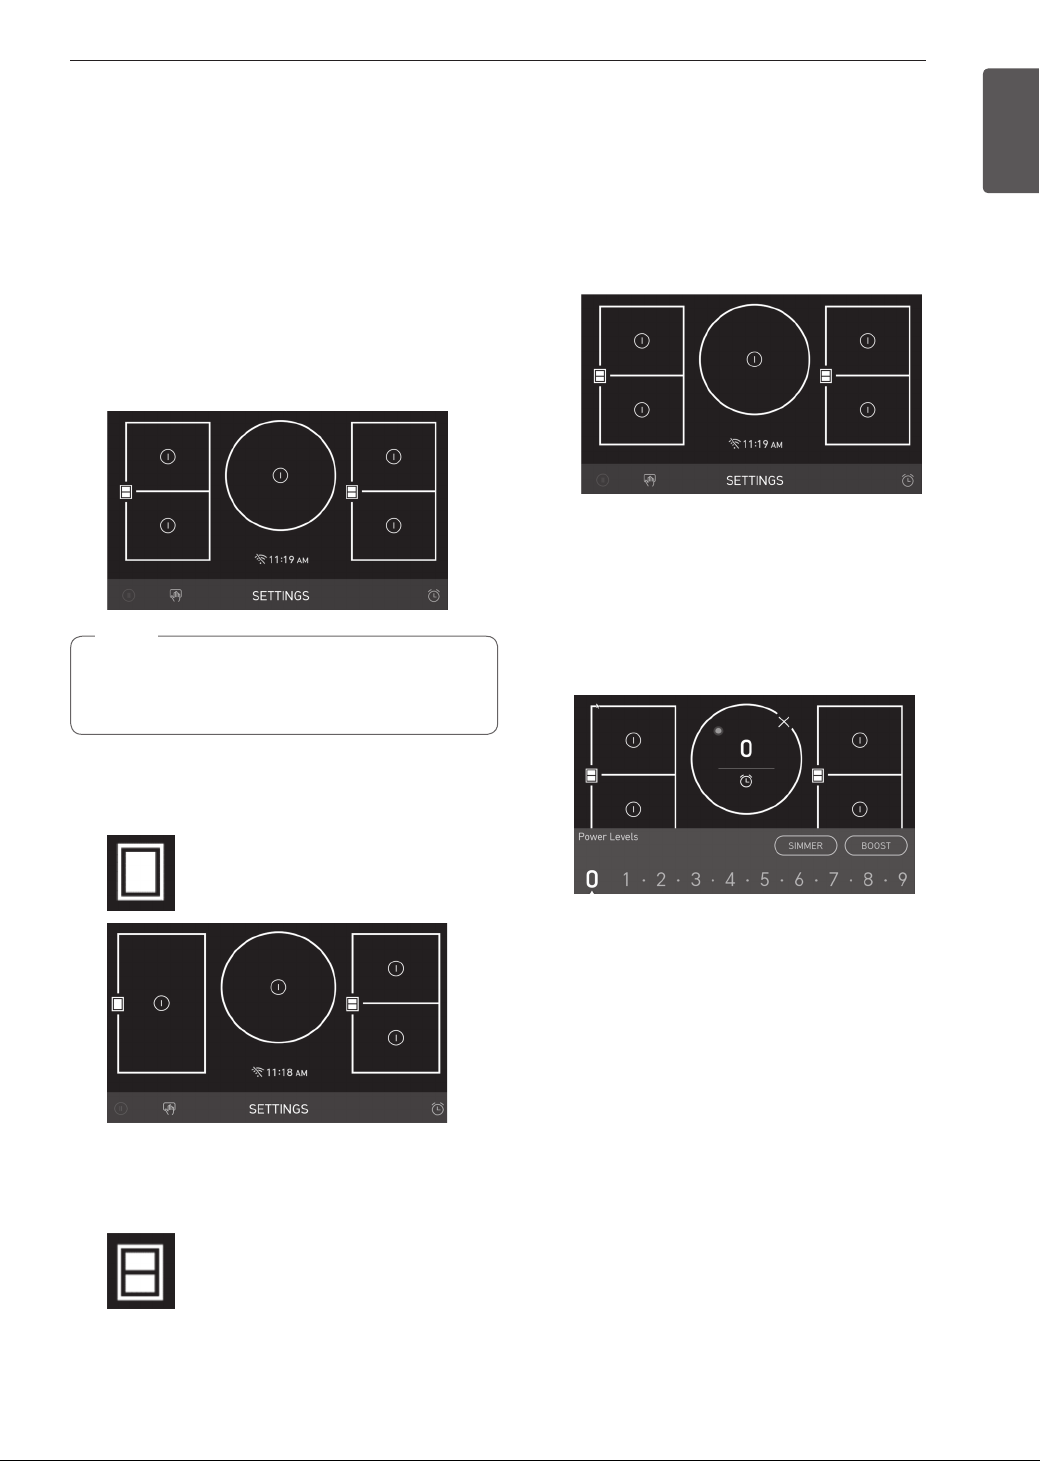
Using the Flexible Cooking
Zone
Adjoining cooking zones can be combined to create
one large cooking zone with the Flex function. This is
especially convenient when cooking in Dutch ovens
or other large oblong pans.
Activating the Flexible Cooking Zone
Place the cookware over 2 side cooking zones
1
and make sure both cooking zones are activated.
The Flex icon will show 2 divided zones.
NOTE
If one of the two burners in the Flex Cooking Zone
is functioning, cancel the burner and use the Flex
feature.
Using the Dual Cooking Zone
The dual element, located in the center position,
offers two different sized elements to accommodate
different pan sizes. Depending on the material and
the properties of the cookware, the cooking zone
automatically activates the single or double cooking
zone, supplying the proper power to obtain good
cooking results.
Activating the Dual Cooking Zone
To activate the larger cooking zone, place a pan
1
that is at least 9" (23 cm) in diameter on the
cooking zone.
Select the desired power level.
2
ENGLISH
To merge the 2 cooking zones, touch the Flex
2
icon. The icon will change to show one combined
zone.
Select the desired power level.
3
Touch the Flex icon again to turn off Flex mode.
4
24
OPERATING INSTRUCTIONS
Other Functions
Pause
The pause function reduces the power level of a
cooking zone to level 1 and maintains it at that
level until deactivated. To use the pause function,
touch the Pause icon. To turn off the pause function,
touch Pause again to return the cooking zone to the
previous power level.
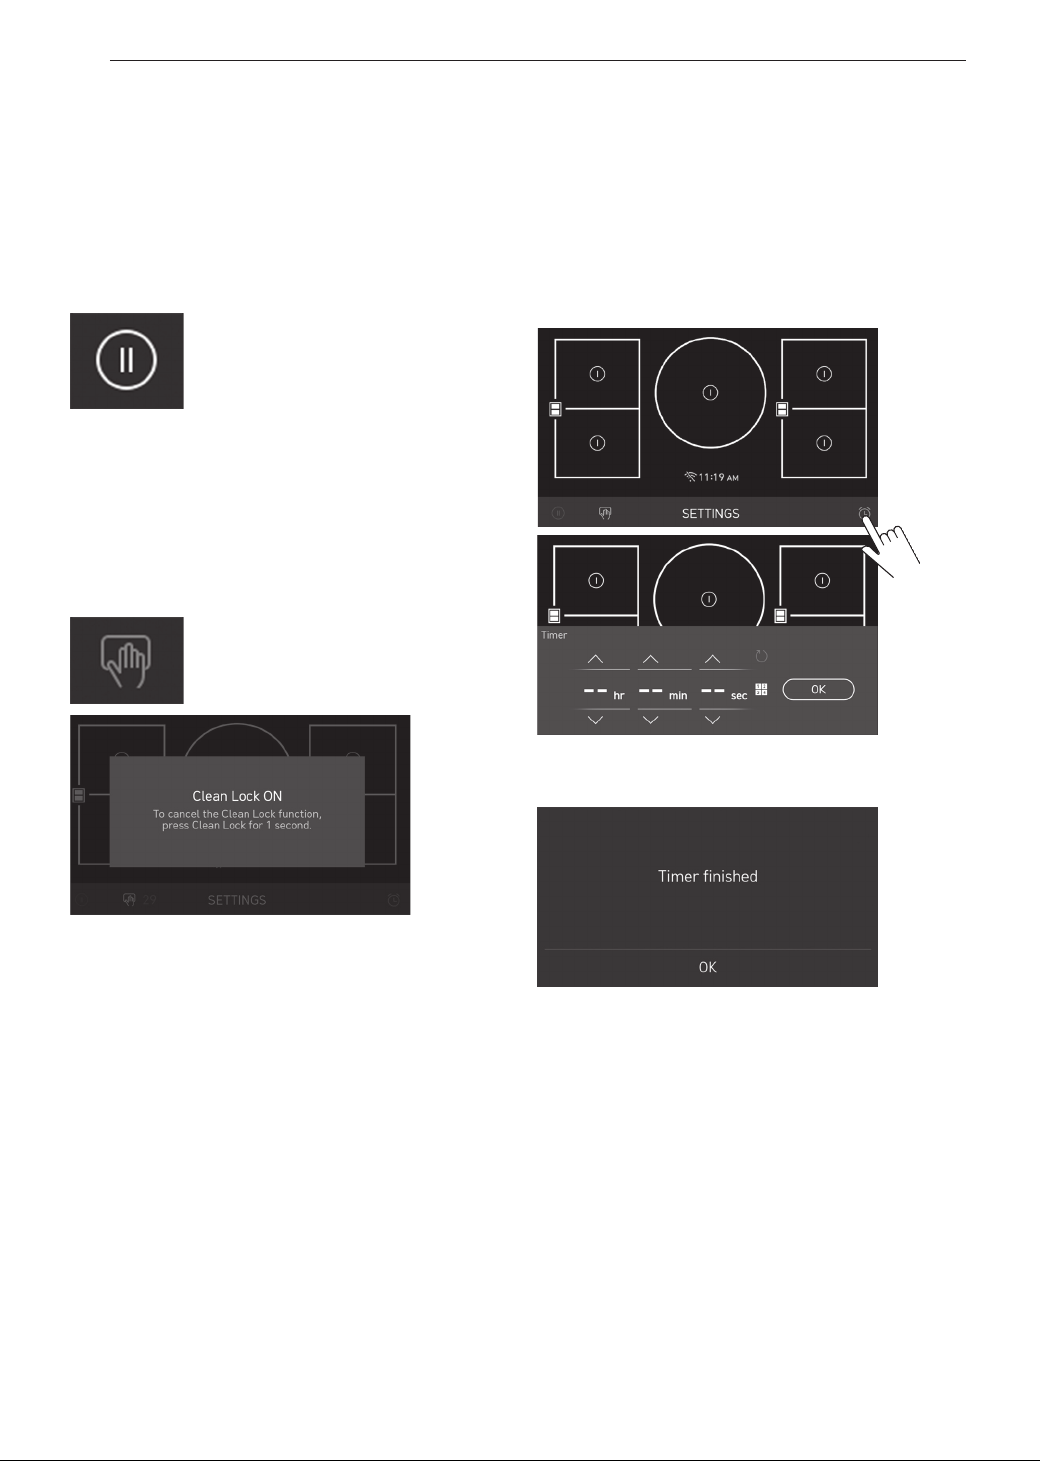
Clean Lock
Use this function when cleaning the screen area
of the cooktop. Touch the Clean Lock icon to lock
the controls for 30 seconds. To unlock the controls,
wait 30 seconds or touch the Clean Lock icon for 1
second.
Timer
Kitchen Timer
The Kitchen Timer acts as a simple timer and does
not turn off the cooking zone. This function informs
you that the set cooking time has passed using an
alarm.
•Touch the Kitchen Timer icon. Scroll (or use the
keypad icon) to set the desired hours, minutes, and
seconds, then touch OK.
•When the set time has passed, a popup screen with
"Timer Finished" appears with the alarm sound.
OPERATING INSTRUCTIONS
25
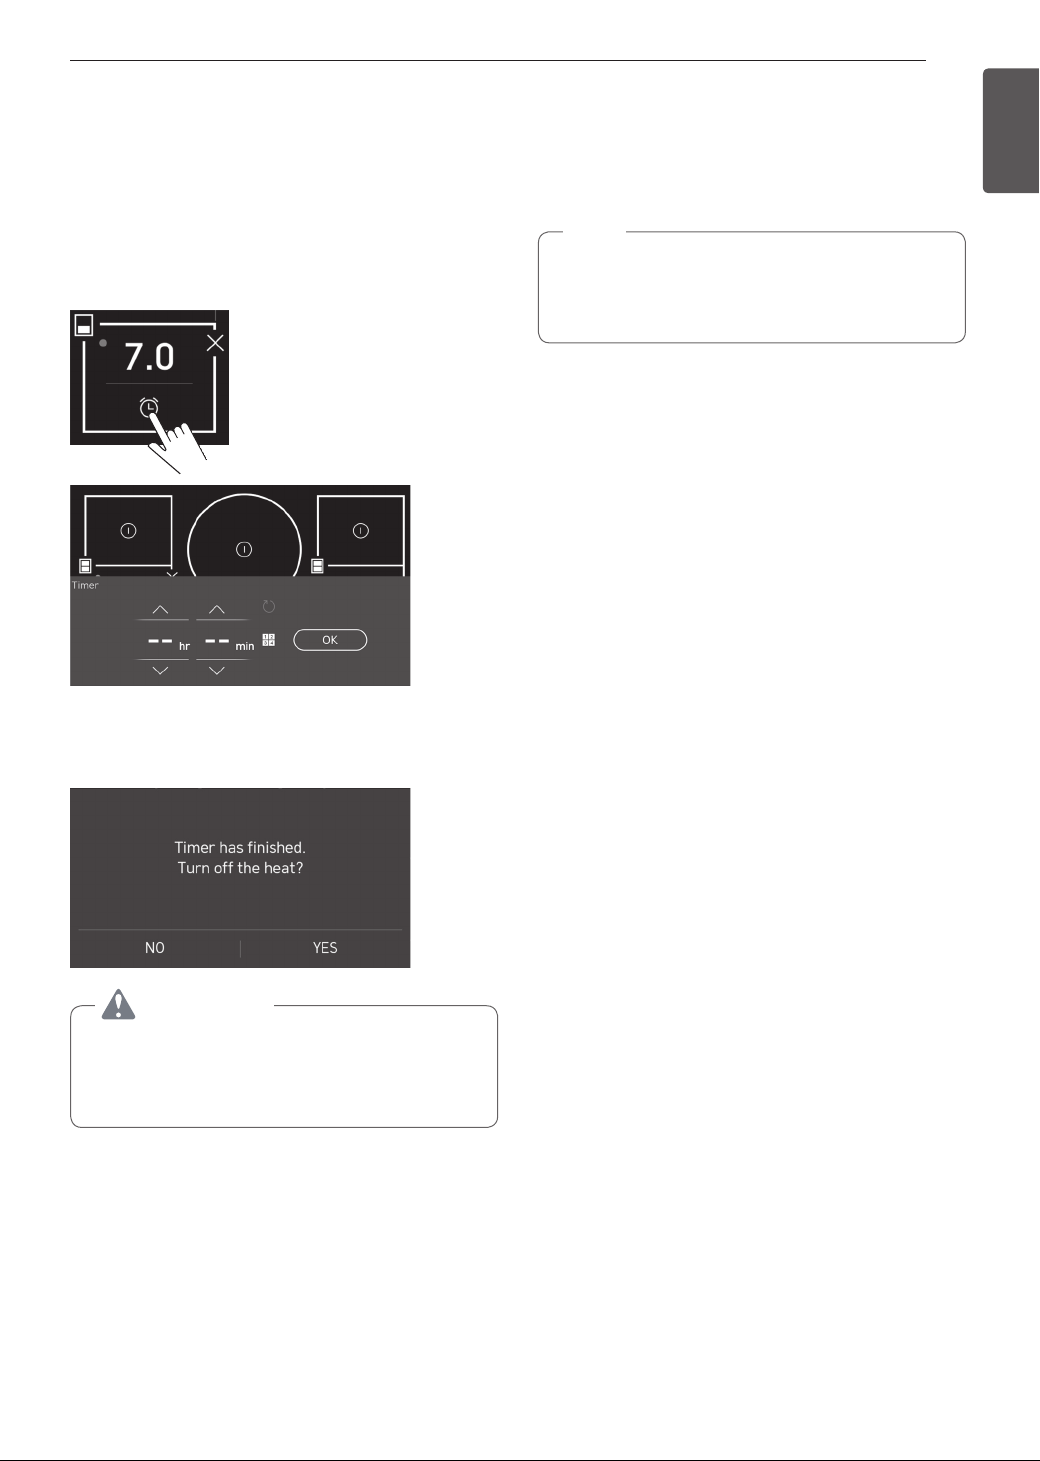
Cooking Timer
The Cooking Timer also acts as a simple timer and
does not automatically turn off the cooking zone. This
function informs you that the set cooking time of each
cooking zone has passed using an alarm.
•If the cooking zone is in use, touch the Cooking
Timer icon on the active cooking zone. Scroll (or
use the keypad icon) to set the desired hours and
minutes, then touch OK.
Automatic Power Level Control
The power level displayed may be different from the
actual power level at the high end of the temperature
range. To prevent the cooktop from overheating, the
power level is controlled automatically.
NOTE
•Power Cycling
−It is normal for heating elements to cycle On/
Off during use to control output power.
ENGLISH
•When the set time has passed, a popup screen
appears with the alarm sound.
•Touch YES to turn off the cooking zone.
WARNING
The Timer function does not automatically turn
off the cooktop or cooking zones. Be sure to
touch the Power key to turn the cooktop off after
cooking.

26
OPERATING INSTRUCTIONS
Cookware Heating Index
The container heating index can be used to determine
if a container will heat well on an induction burner.
•The heating index may vary due to conditions
such as voltage, cookware size, or cookware
temperature. Use cookware with a bottom diameter
that is suitable for the burner size.
•The heating index may vary depending on the
burner.
•The cookware heating index displayed on this
product is based on internal manufacturer
standards. Environmental conditions may cause
inaccurate or variable results. Use the results only
as a reference point.
Using the Heating Index
Turn off all burners.
1
•If more than one burner is running, this
function will not work.
Place the cookware on the burner you want to
2
use.
•Place cookware in the center of the burner.
Set the output level to 9.
3
Long press (more than 3 seconds) on the power
4
level area to display the cookware heating index.
Long press (more than
3 seconds) on level 9.
The cookware heating
index is displayed.
Index 0% 10% 20% 30% 40% 50% 60% 70% 80% 90% 100%
No
Heating
heating
•The higher the index, the better the cookware heats
up (in the range of 0 to 100%, in 10% increments).
•If the index is low, check the material, size and
shape of the cookware base.
−Even if the cookware has an IH mark, if the index
is low it may not heat properly on this appliance.
Low
High
SMART FUNCTIONS
27
SMART FUNCTIONS
SIGNATURE KITCHEN SUITE
Application
The SIGNATURE KITCHEN SUITE application allows
you to communicate with the appliance using a
smartphone.
Before Using SIGNATURE KITCHEN
SUITE
Use a smartphone to check the strength of
1
the wireless router (Wi-Fi network) near the
appliance.
•If the distance between the appliance and the
wireless router is too far, the signal strength
becomes weak. It may take a long time to
register or installation may fail.
Turn off the Mobile data or Cellular Data on
2
your smartphone.
•For iPhones, turn data off by going to Settings
→ Cellular → Cellular Data.
Connect your smartphone to the wireless router.
3
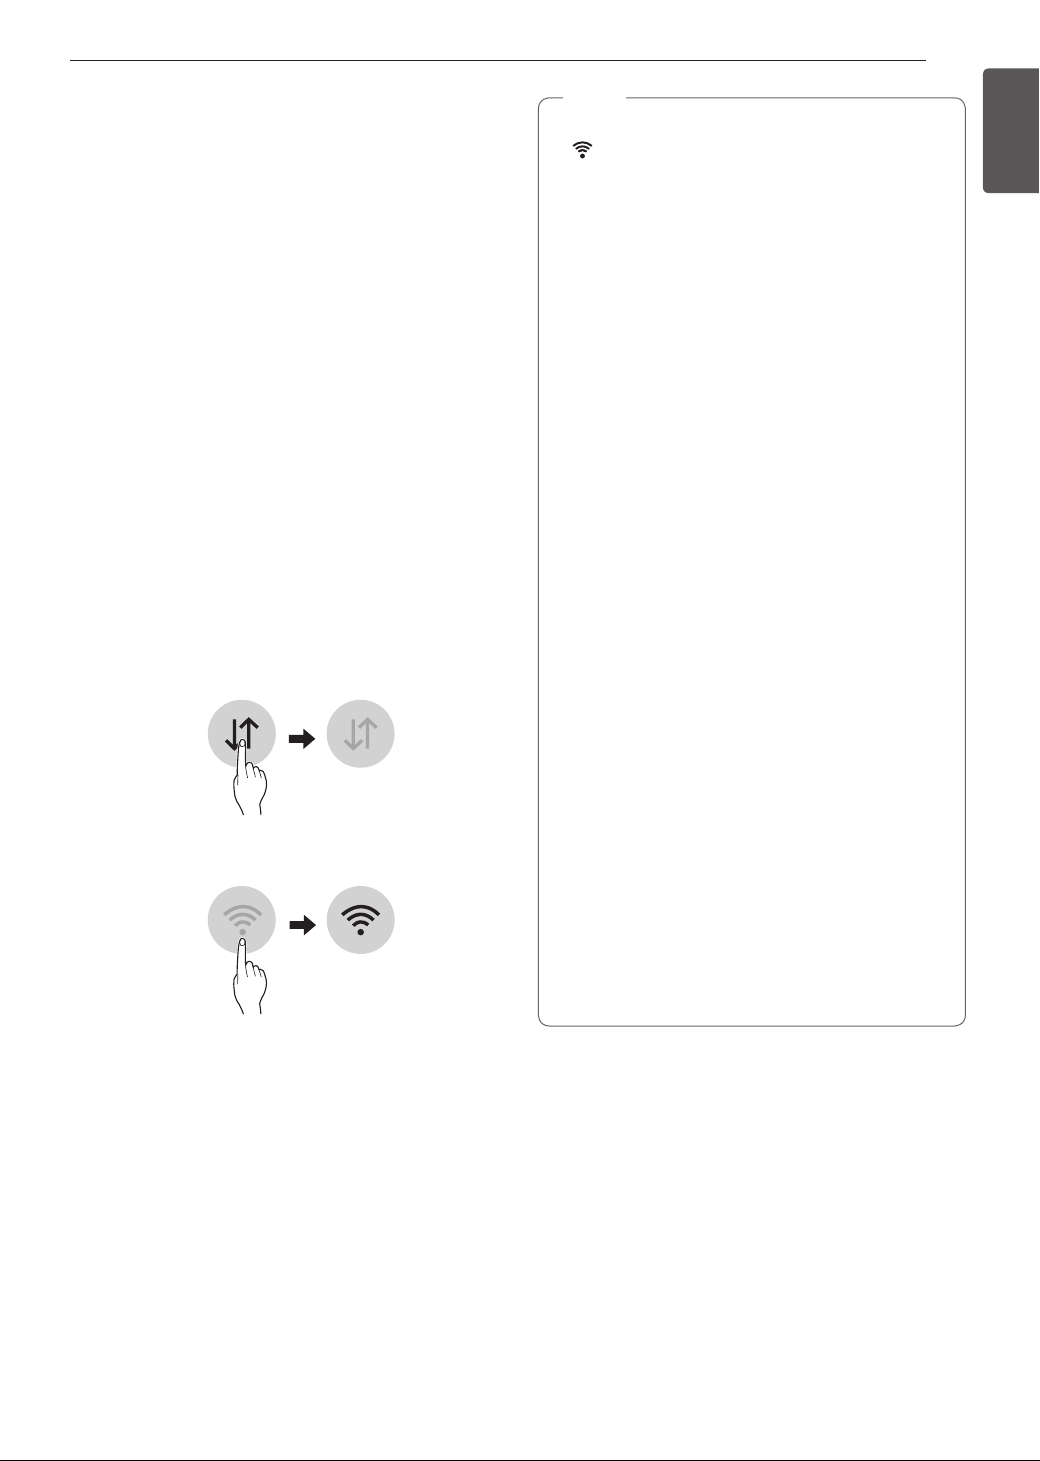
NOTE
•To verify the Wi-Fi connection, check that Wi-Fi
icon on the control panel is lit.
•The appliance supports 2.4 GHz Wi-Fi networks
only. To check your network frequency, contact
your Internet service provider or refer to your
wireless router manual.
•SIGNATURE KITCHEN SUITE is not
responsible for any network connection
problems or any faults, malfunctions, or errors
caused by network connection.
•The surrounding wireless environment can
make the wireless network service run slowly.
•If the appliance is having trouble connecting
to the Wi-Fi network, it may be too far from
the router. Purchase a Wi-Fi repeater (range
extender) to improve the Wi-Fi signal strength.
•The network connection may not work properly
depending on the Internet service provider.
•The Wi-Fi connection may not connect or may
be interrupted because of the home network
environment.
•If the appliance cannot be registered due to
problems with the wireless signal transmission,
unplug the appliance and wait about a minute
before trying again.
•If the firewall on your wireless router is enabled,
disable the firewall or add an exception to it.
•The wireless network name (SSID) should be a
combination of English letters and numbers. (Do
not use special characters.)
•Smartphone user interface (UI) may vary
depending on the mobile operating system (OS)
and the manufacturer.
•If the security protocol of the router is set to
WEP, network setup may fail. Change the
security protocol (WPA2 is recommended), and
register the product again.
ENGLISH
Installing the SIGNATURE KITCHEN
SUITE Application
Search for the SIGNATURE KITCHEN SUITE
application from the Google Play Store or Apple
App Store on a smart phone. Follow instructions to
download and install the application.

28
SMART FUNCTIONS
SIGNATURE KITCHEN SUITE
Application Features
Monitoring
Use this function to check the current status and
operating time from one screen.
Push Alerts
Turn on the Push Alerts to receive appliance status
notifications.
The notifications are triggered even if the
SIGNATURE KITCHEN SUITE application is off.
Interworking Function
The Signature Kitchen Suite hood automatically turns
on/off the vent fan when paired with the cooktop. Both
products must be connected to the Signature Kitchen
Suite application and have an interworking function.
NOTE
•The appliance is not intended to be operated by
means of remote control system.
•To disconnect the appliance from the Wi-Fi
network, delete the cooktop from the list of
connected products in the Signature Kitchen
Suite application.
Open Source Software Notice
Information
To obtain the source code under GPL, LGPL, MPL,
and other open source licenses, that is contained
in this product, please visit http://opensource.
signaturekitchensuite.com. In addition to the source
code, all referred license terms, warranty disclaimers
and copyright notices are available for download.
SIGNATURE KITCHEN SUITE will also provide open
source code to you on CD-ROM for a charge covering
the cost of performing such distribution (such as the
cost of media, shipping, and handling) upon email
request to opensource@signaturekitchensuite.com.
This offer is valid for a period of three years after our
last shipment of this product. This offer is valid to
anyone in receipt of this information.
Wireless LAN Module Specifications
Model LCW-009
Frequency Range 2412 MHz – 2462 MHz
Output Power (max.) < 30 dBm
FCC Notice
The following notice covers the transmitter module
contained in this product.
This equipment has been tested and found to comply
with the limits for a Class B digital device, pursuant
to Part 15 of the FCC Rules and also Part 18 of the
FCC Rules. These limits are designed to provide
reasonable protection against harmful interference in
a residential installation. This equipment generates,
uses, and can radiate radio frequency energy and,
if not installed and used in accordance with the
instructions, may cause harmful interference to radio
communications. However, there is no guarantee that
interference will not occur in a particular installation.
If this equipment does cause harmful interference to
radio or television reception, which can be determined
by turning the equipment off and on, the user is
encouraged to try to correct the interference by one
or more of the following measures:
•Reorient or relocate the receiving antenna.
•Increase the separation between the equipment
and the receiver.
•Connect the equipment into an outlet on a
circuit different from that to which the receiver is
connected.
•Consult the dealer or an experienced radio/TV
technician for help.
This device complies with part 15, Part 18 of the
FCC Rules. Operation is subject to the following two
conditions:
1) This device may not cause harmful interference
and
2) This device must accept any interference received,
including interference that may cause undesired
operation.
Any changes or modifications in construction of this
device which are not expressly approved by the party
responsible for compliance could void the user’s
authority to operate the equipment.
FCC RF Radiation Exposure
Statement
This equipment complies with FCC radiation exposure
limits set forth for an uncontrolled environment. This
transmitter must not be co-located or operating in
conjunction with any other antenna or transmitter.
This equipment should be installed and operated with
minimum distance 20 cm (7.8 inches) between the
antenna and your body. Users must follow the specific
operating instructions for satisfying RF exposure
compliance.

SMART FUNCTIONS
29
Industry Canada Statement
This device contains licence-exempt transmitter(s)/
receiver(s) that comply with Innovation, Science and
Economic Development Canada’s licence-exempt
RSS(s). Operation is subject to the following two
conditions:
(1) This device may not cause interference.
(2) This device must accept any interference,
including interference that may cause undesired
operation of the device.
IC Radiation Exposure
Statement
This equipment complies with IC radiation exposure
limits set forth for an uncontrolled environment. This
equipment should be installed and operated with a
minimum distance of 20 cm (7.8 inches) between the
antenna and your body.
NOTE
THE MANUFACTURER IS NOT RESPONSIBLE
FOR ANY RADIO OR TV INTERFERENCE
CAUSED BY UNAUTHORIZED MODIFICATIONS
TO THIS EQUIPMENT. SUCH MODIFICATIONS
COULD VOID THE USER’S AUTHORITY TO
OPERATE THE EQUIPMENT.
ENGLISH
30
CARE AND CLEANING
CARE AND CLEANING
Cleaning the Cooktop
Normal Daily Use Cleaning
ONLY use Ceramic Cooktop Cleaner on the glass
cooktop. Other creams may not be as effective or
they might damage the surface with scratches or
permanent staining.
To maintain and protect the surface of the glass
cooktop, follow these steps:
Before using the cooktop for the first time, clean
1
it with Ceramic Cooktop Cleaner. This helps
protect the top and makes cleanup easier.
Daily use of Ceramic Cooktop Cleaner will help
2
keep the cooktop looking new.
Shake the cleaning cream well. Apply a few
3
drops of cleaner directly to the cooktop.
Use a paper towel to clean the entire cooktop
4
surface.
Rinse with clear water and use a dry cloth or
5
paper towel to remove all cleaning residue.
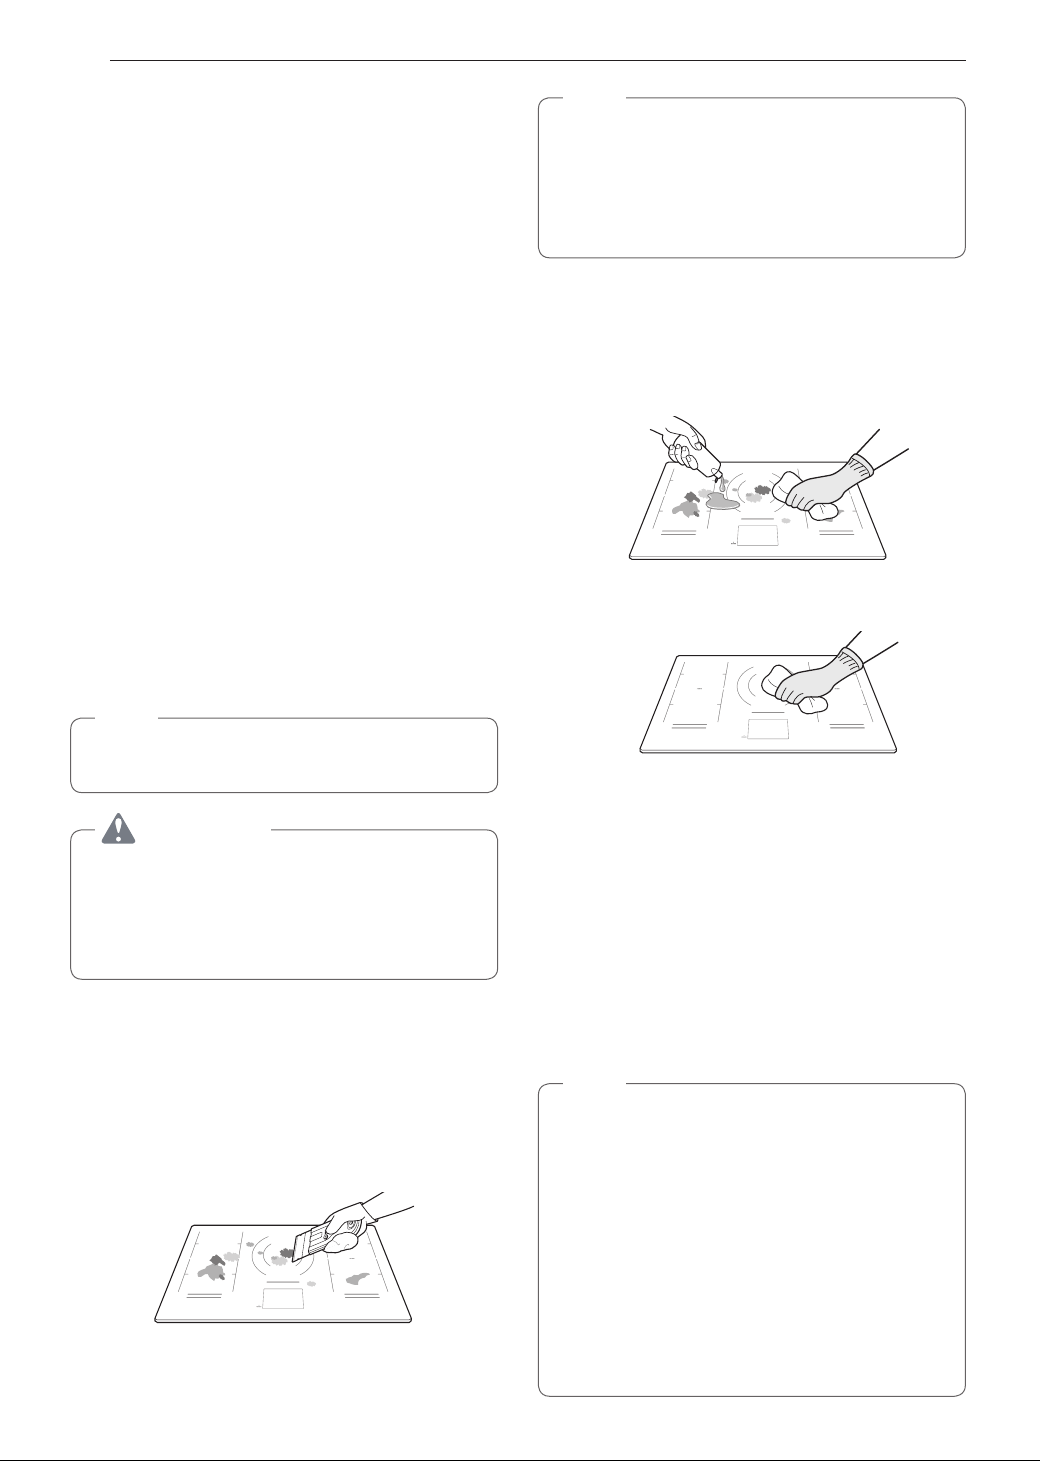
NOTE
•Do not use a dull or nicked blade.
•Hold the scraper at approximately a 30° angle
to the cooktop.
•The razor scraper will not damage the markings
on the cooking surface.
When the cooking surface has completely
2
cooled, apply a few dime-sized dabs of a
ceramic glass cooktop cleaner in each burner
area. Work the cleaning cream over the cooktop
surface with a damp paper towel. Leave the
cleaner on for 10 minutes before rinsing it off.
Rinse with clean water and wipe the cooktop
3
surface with a clean, dry paper towel.
NOTE
It is very important that you DO NOT heat the
cooktop until it has been cleaned thoroughly.
CAUTION
•DO NOT use scrub pads or abrasive
cleaning pads. They may damage the glass
cooktop surface.
•For your safety please wear an oven mitt or pot
holder while cleaning the hot cooking surface.
Burned-On Residue
While the cooktop is still warm, remove any
1
burnt on deposits or spilled food from the glassceramic cooking surface with a suitable metal
razor scraper. To prevent burns, wear an oven
mitt or pot holder while using the metal scraper.
IMPORTANT
•If any sugar or food containing sugar spills, or
plastic or foil melts on the cooktop, remove the
material IMMEDIATELY with a metal razor scraper
while the cooking surface is still hot to avoid the
risk of damage to the glass-ceramic surface.
When used correctly, the scraper will not damage
the cooktop surface. For your safety, please use
an oven mitt or pot holder while scraping the hot
cooking surface.
•If water or food containing water spills, remove the
spill IMMEDIATELY with a dry paper towel.
NOTE
ANY DAMAGE OR FAILURE OF THE
PRODUCT RESULTING FROM 1 OR 2 BELOW
MAY NOT BE COVERED UNDER THE LIMITED
WARRANTY.
1. Sugary spillovers (such as preserves, ketchup,
tomato sauce, jellies, fudge, candy, syrups, or
chocolate) or melted plastics can cause pitting
on the surface of your cooktop.
2. If food or water containing calcium (such as
baking powder, wine, milk, spinach, or broccoli)
is spilled on the cooktop, it can permanently
stain or discolor the surface.
 Loading...