

LG SK3E Owner’s Manual

OWNER’S MANUAL
Wireless
Sound Bar
Please read this manual carefully before operating
your set and retain it for future reference.
MODEL
SK3E (SK3E, SPH4B-W)
www.lg.com
Copyright © 2019 LG Electronics Inc. All Rights Reserved.
1808_Rev01
Getting Started2
Safety Information
1
Getting Started
CAUTION: TO REDUCE THE RISK OF ELECTRIC
SHOCK DO NOT REMOVE COVER (OR BACK)
NO USER-SERVICEABLE PARTS INSIDE REFER
SERVICING TO QUALIFIED SERVICE PERSONNEL.
CAUTION
RISK OF ELECTRIC SHOCK
DO NOT OPEN
This lightning ash with arrowhead
symbol within an equilateral
triangle is intended to alert the
user to the presence of uninsulated
dangerous voltage within the
product’s enclosure that may be of
sufcient magnitude to constitute
a risk of electric shock to persons.
The exclamation point within an
equilateral triangle is intended
to alert the user to the presence
of important operating and
maintenance (servicing)
instructions in the literature
accompanying the product.
WARNING: TO PREVENT FIRE OR ELECTRIC SHOCK
HAZARD, DO NOT EXPOSE THIS PRODUCT TO RAIN
OR MOISTURE.
CAUTION: The apparatus should not be exposed to
water (dripping or splashing) and no objects lled
with liquids, such as vases, should be placed on the
apparatus.
WARNING: Do not install this equipment in a
conned space such as a book case or similar unit.
CAUTION: Do not use high voltage products around
this product. (ex. Electrical swatter) This product may
malfunction due to electrical shock.
CAUTION: No naked ame sources, such as lighted
candles, should be placed on the apparatus.
CAUTION: Do not block any ventilation openings.
Install in accordance with the manufacturer’s
instructions.
Slots and openings in the cabinet are provided
for ventilation and to ensure reliable operation of
the product and to protect it from over heating.
The openings should never be blocked by placing
the product on a bed, sofa, rug or other similar
surface. This product shall not be placed in a builtin installation such as a bookcase or rack unless
proper ventilation is provided or the manufacturer’s
instruction has been adhered to.

Getting Started 3
CAUTION concerning the Power Cord
The Power Plug is the disconnecting device. In case
of an emergency, the Power Plug must remain readily
accessible.
Check the specication page of this owner’s manual
to be certain of the current requirements.
Do not overload wall outlets. Overloaded wall outlets,
loose or damaged wall outlets, extension cords, frayed
power cords, or damaged or cracked wire insulation
are dangerous. Any of these conditions could result
in electric shock or re. Periodically examine the
cord of your device, and if its appearance indicates
damage or deterioration, unplug it, discontinue use of
the device, and have the cord replaced with an exact
replacement part by an authorized service center.
Protect the power cord from physical or mechanical
abuse, such as being twisted, kinked, pinched, closed
in a door, or walked upon. Pay particular attention to
plugs, wall outlets, and the point where the cord exits
the device.
NOTICE: For safety marking information including
product identication and supply ratings, please refer
to the main label on the bottom or the other surface
of the product.
For models using an adapter
Only use the AC adapter supplied with this device.
Do not use a power supply from another device or
another manufacturer. Using any other power cable
or power supply may cause damage to the device
and void your warranty.
1
Getting Started

1
Getting Started
Getting Started4
Symbols
~
0
1
!
Refers to alternating current (AC).
Refers to direct current (DC).
Refers to class II equipment.
Refers to stand-by.
Refers to “ON” (power).
Refers to dangerous voltage.

Table of Contents
Table of Contents 5
1 Getting Started
2 Safety Information
6 Unique features
6 Introduction
6 – Symbols used in this manual
7 Remote control
8 Front panel
8 Rear panel
9 About LED condition
11 Installing the sound bar
2 Connecting
12 Connecting the AC Adapter
12 Wireless subwoofer connection
14 Connecting to your TV
14 – Using an OPTICAL cable
14 – LG Sound Sync
16 Optional equipment connection
16 – OPTICAL IN connection
17 – USB connection
17 – Compatible USB devices
17 – USB device requirement
18 – Playable file
3 Operating
19 Basic operations
19 – USB operation
19 Other operations
19 – Turn off the sound temporarily
19 – Using your TV remote control
20 – Auto display Dimmer
20 – Auto power down
20 – AUTO POWER On/Off
21 – Auto function change
22 Using BLUETOOTH® technology
22 – Listening to music stored on the
BLUETOOTH devices
23 – BLUETOOTH connection lock (BT lock)
24 Using BLUETOOTH App
24 – Install “Music Flow Bluetooth” App onto
Your BLUETOOTH Device
24 – Activate BLUETOOTH with “Music Flow
Bluetooth” App
26 Sound adjustment
26 – Setting sound effect
26 – Adjust the woofer level settings
26 – Night mode
4 Troubleshooting
27 Troubleshooting
27 – General
28 – NOTES to use wireless
1
2
3
4
5
5 Appendix
29 Trademarks and licenses
30 Specifications
31 Maintenance
31 – Handling the unit

Getting Started6
Unique features
Auto power down
1
Getting Started
This unit will turn off by itself for energy saving
consumption.
LG Sound Sync
Controls volume level of this unit by the remote
control of your LG TV that is compatible with LG
Sound Sync.
BLUETOOTH®
Listen to music stored on your Bluetooth device.
USB playback
Listen to music stored on your USB device.
Introduction
Symbols used in this manual
Note
,
Indicates special notes and operating features.
Caution
>
Indicates cautions for preventing possible damages
from abuse.
Getting Started 7
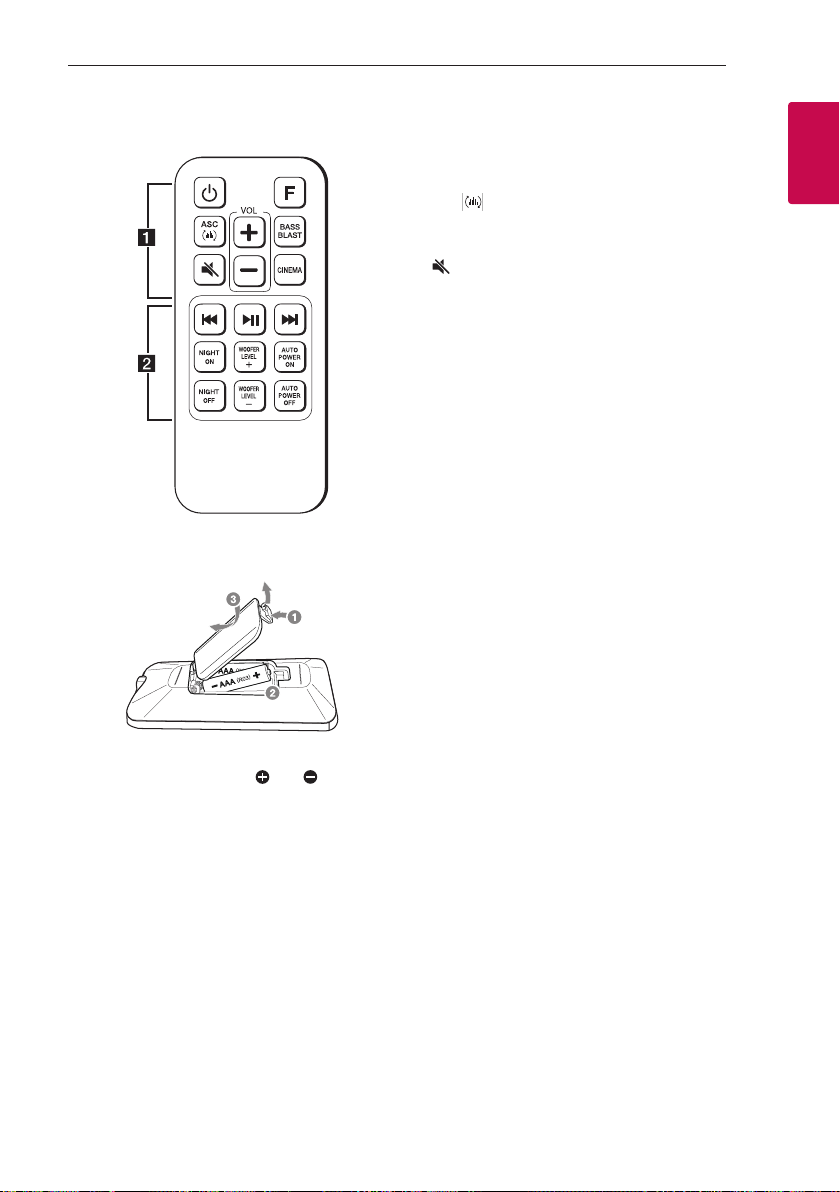
Remote control
Replacement of Battery
• • • • • • • • • • • • • • a • • • • • • • • • • • • •
1 (Power) : Switches the unit ON or OFF.
F (Function) : Selects the function and the input
source.
ASC
: Analyzes the property of input sound and
provides the sound optimized for the content in real
time.
(Mute) : Mutes the sound.
VOL (Volume) o/p : Adjusts speaker volume.
BASS BLAST : Reinforces the bass and powerful
sound.
CINEMA : Selects cinematic surround sound.
• • • • • • • • • • • • • • b • • • • • • • • • • • • •
C/V (Skip/Search) :
- Skips Fast backward or Forward.
- Searches for a section within a le.
dM (Play/Pause) : Starts playback. / Pauses
playback.
NIGHT ON/OFF :
- Turns on or off Night mode.
- Controls this unit using TV remote. (Page 19)
WOOFER LEVEL o/p : Adjusts sound level of
subwoofer.
AUTO POWER ON/OFF :
- Turns on or off AUTO POWER function. (Page 20)
- Turns on or off the Bluetooth connection lock.
(Page 23)
1
Getting Started
Remove the battery cover on the rear of the remote
control, and insert the battery
matched correctly.
with and
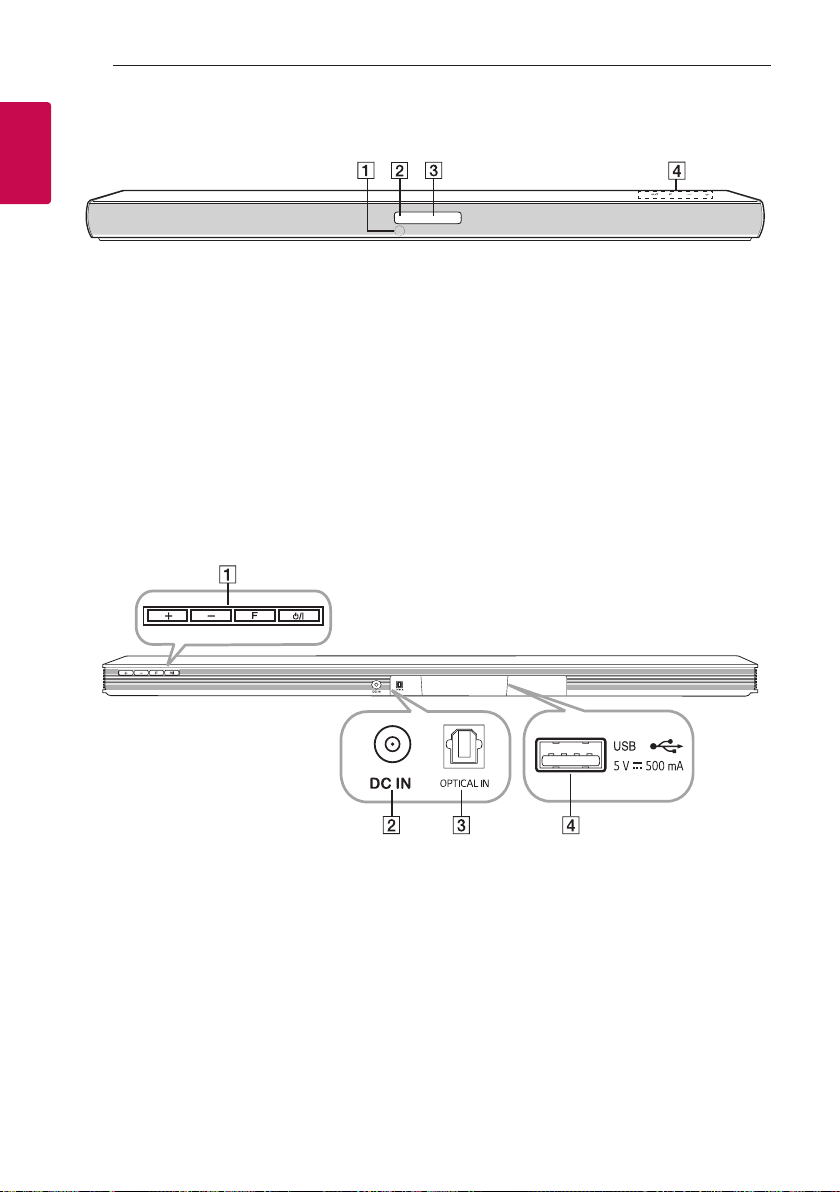
Front panel
1
Getting Started
Getting Started8
A Remote sensor
B Standby LED (Red)
C Function LED (White)
Rear panel
D The buttons are located on the rear.
A o/p (Volume) : Adjusts volume level
F (Function) : Selects the function and input
source.
1/! (Standby/On)
B DC IN : AC adapter input
C OPTICAL IN : Optical input
D USB
/ : Connect to a USB device
About LED condition
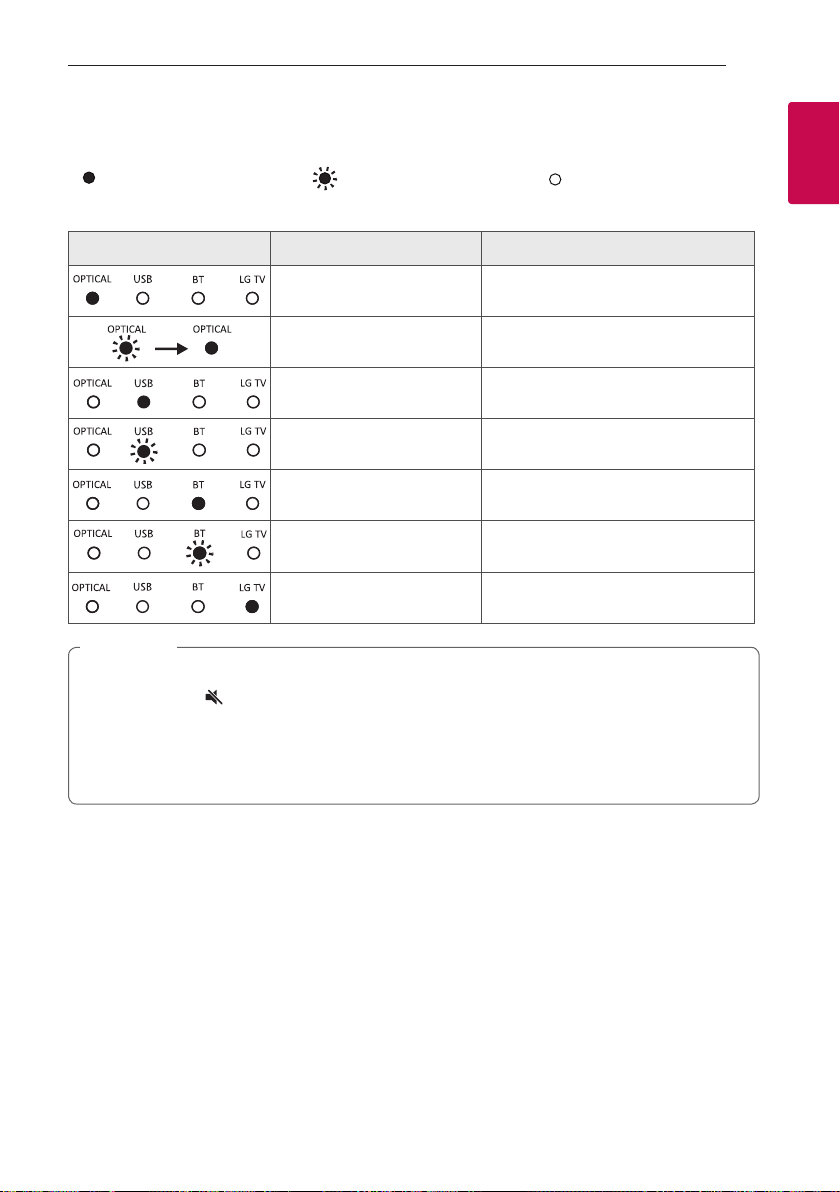
Getting Started 9
: LED is staying on. : LED is blinking. : LED is off.
LED Condition
OPTICAL LED turns on. OPTICAL function is selected.
OPTICAL LED blinks twice and
turns on.
USB LED turns on. USB function is selected.
USB LED blinks. Paused USB playback.
BT (Bluetooth) LED turns on. Paired with Bluetooth device.
BT (Bluetooth) LED blinks. Waiting for Bluetooth connection.
LG TV LED turns on.
Note
,
y When you press any button, standby LED (Red) on the main unit blinks.
y When you press
y When this unit reaches minimum volume, standby LED (Red) turns on for 2 seconds and blinks slowly.
y When this unit reaches maximum volume, standby LED (Red) turns on for 2 seconds.
y When you press volume (o/p) button continually, standby LED (Red) blinks quickly.
(Mute) button, standby LED (Red) blinks slowly.
LG Sound Sync (Optical) function is
selected.
LG Sound Sync (Wireless) function is
selected.
Description
1
Getting Started

Getting Started10
Useful functions for using the unit
Function Description To do Do this
1
Getting Started
TV Remote On/
Off
(Page 19)
BT Lock On/Off
(Page 23)
Auto Power
On/Off
(Page 20)
It allows you to control the
volume of this unit by your TV
remote control even by other
company’s product.
Initial setting of this function
was set to on.
It allows you to connect a
Bluetooth deivce only on
Bluetooth and LG TV functions.
Initial setting of this function
was set to off.
It allows the unit to turn on
and off automatically by input
signals :
Optical, LG TV or Bluetooth.
Initial setting of this function
was set to on.
ON Press and hold NIGHT ON on the remote
OFF Press and hold NIGHT OFF on the remote
ON Press and hold AUTO POWER ON on the
OFF Press and hold AUTO POWER OFF on
ON Press AUTO POWER ON on the remote
OFF Press AUTO POWER OFF on the remote
control for about 2 seconds.
The standby LED (Red) blinks once.
control for about 2 seconds.
The standby LED (Red) blinks once.
remote control for about 2 seconds in
Bluetooth function.
The standby LED (Red) blinks once.
the remote control for about 2 seconds in
Bluetooth function.
The standby LED (Red) blinks once.
control.
The standby LED (Red) blinks once.
control.
The standby LED (Red) blinks once.
 Loading...