

Page 1
Page 2

DLP PROJECTOR
USER’S GUIDE
Thank you for purchasing the DLP Projector.
Please read this user’s guide to ensure correct use of the device. Save this user’s
guide for future reference.
OUTLINE
This DLP Projector can display various computer signals and NTSC/PAL/SECAM video
signals.
FEATURES
1. High Brightness
2. High Resolution
3. Compact Size, Feather Weight for Portability
4. Durable Magnesium Alloy Body
5. RGB input Terminal
6. One Touch Auto-Adjustment Function
7. Easy Keystone Adjustment
Page 3

Copyright
Copyright © 2002. All rights reserved. No part of this publication may be reproduced,
transmitted, transcribed, stored in a retrieval system or translated into any language or
computer language, in any form or by any means, electronic, mechanical, magnetic, optical,
chemical, manual or otherwise, without the prior written permission of the company.
Disclaimer
The company makes no representations or warranties, either expressed or implied, with
respect to the contents hereof and specifically disclaims any warranties, merchantability or
fitness for any particular purpose. Furthermore, the company reserves the right to revise this
publication and to make changes from time to time in the contents hereof without obligation of
the company to notify any person of such revision or changes.
Page 4

Table of Contents
Introduction . . . . . . . . . . . . . . . . . . . . . . . . . . . 1
Safety Instructions . . . . . . . . . . . . . . . . . . . . . . . . . . . . . . . . . . . . . . . . . . . . . . . . 1
FCC Statement . . . . . . . . . . . . . . . . . . . . . . . . . . . . . . . . . . . . . . . . . . . . . . . . . . . 2
Shipping Contents . . . . . . . . . . . . . . . . . . . . . . . . . . . . . . . . . . . . . . . . . . . . . . . . 3
Optional Accessories . . . . . . . . . . . . . . . . . . . . . . . . . . . . . . . . . . . . . . . . . . . 3
Projector Description . . . . . . . . . . . . . . . . . . . . . . . . . . . . . . . . . . . . . . . . . . . . . 4
Projector . . . . . . . . . . . . . . . . . . . . . . . . . . . . . . . . . . . . . . . . . . . . . . . . . . . . . 4
External Control Panel . . . . . . . . . . . . . . . . . . . . . . . . . . . . . . . . . . . . . . . . . 5
Adjuster . . . . . . . . . . . . . . . . . . . . . . . . . . . . . . . . . . . . . . . . . . . . . . . . . . . . . . 6
Projector Features . . . . . . . . . . . . . . . . . . . . . . . . . . . . . . . . . . . . . . . . . . . . . 6
Remote Control Description . . . . . . . . . . . . . . . . . . . . . . . . . . . . . . . . . . . . . . . 7
Remote Control Features . . . . . . . . . . . . . . . . . . . . . . . . . . . . . . . . . . . . . . . 7
Installing or Replacing Batteries . . . . . . . . . . . . . . . . . . . . . . . . . . . . . . . . . 9
Installation . . . . . . . . . . . . . . . . . . . . . . . . . . . 10
Screen Size . . . . . . . . . . . . . . . . . . . . . . . . . . . . . . . . . . . . . . . . . . . . . . . . . . . . . 10
Connecting to Various Equipment . . . . . . . . . . . . . . . . . . . . . . . . . . . . . . . . . . 10
Operation . . . . . . . . . . . . . . . . . . . . . . . . . . . . 11
Start Up . . . . . . . . . . . . . . . . . . . . . . . . . . . . . . . . . . . . . . . . . . . . . . . . . . . . . . . . 11
Digital Keystone Correction . . . . . . . . . . . . . . . . . . . . . . . . . . . . . . . . . . . . . . . 12
Auto Adjustment . . . . . . . . . . . . . . . . . . . . . . . . . . . . . . . . . . . . . . . . . . . . . . . . 12
Source Selection . . . . . . . . . . . . . . . . . . . . . . . . . . . . . . . . . . . . . . . . . . . . . . . . 13
Menu System . . . . . . . . . . . . . . . . . . . . . . . . . . . . . . . . . . . . . . . . . . . . . . . . . . . 13
1. Display Menu . . . . . . . . . . . . . . . . . . . . . . . . . . . . . . . . . . . . . . . . . . . . . 14
2. Image Menu . . . . . . . . . . . . . . . . . . . . . . . . . . . . . . . . . . . . . . . . . . . . . . . 15
3. Source Menu . . . . . . . . . . . . . . . . . . . . . . . . . . . . . . . . . . . . . . . . . . . . . . 16
4. Control Menu . . . . . . . . . . . . . . . . . . . . . . . . . . . . . . . . . . . . . . . . . . . . . . 17
5. PIP Menu . . . . . . . . . . . . . . . . . . . . . . . . . . . . . . . . . . . . . . . . . . . . . . . . . . 17
Shutdown . . . . . . . . . . . . . . . . . . . . . . . . . . . . . . . . . . . . . . . . . . . . . . . . . . . . . . 18
Maintenance . . . . . . . . . . . . . . . . . . . . . . . . . . 19
Lamp Information . . . . . . . . . . . . . . . . . . . . . . . . . . . . . . . . . . . . . . . . . . . . . . . . 19
Use and Replacement of Lamp . . . . . . . . . . . . . . . . . . . . . . . . . . . . . . . . . . 19
LED Status Indicators . . . . . . . . . . . . . . . . . . . . . . . . . . . . . . . . . . . . . . . . . 19
Lamp Replacement . . . . . . . . . . . . . . . . . . . . . . . . . . . . . . . . . . . . . . . . . . . . . . 19
Troubleshooting . . . . . . . . . . . . . . . . . . . . . . . 20
Status Messages . . . . . . . . . . . . . . . . . . . . . . . . . . . . . . . . . . . . . . . . . . . . . . . 21
Specifications . . . . . . . . . . . . . . . . . . . . . . . . . 22
Projector Specifications . . . . . . . . . . . . . . . . . . . . . . . . . . . . . . . . . . . . . . . . . . 22
Timing Chart . . . . . . . . . . . . . . . . . . . . . . . . . . . . . . . . . . . . . . . . . . . . . . . . . . . 23
Dimensions . . . . . . . . . . . . . . . . . . . . . . . . . . . 24
DLP Personal Projector
iii
Page 5
INTRODUCTION
Caution
TO PREVENT SHOCK, DO NOT OPEN THE CABINET. NO USER –SERVICEABLE PARTS INSIDE. REFER SERVICING TO QUALIFIED SERVICE PERSONNEL. PLEASE READ THIS USER’S GUIDE BEFORE YOU OPERATE YOUR
PROJECTOR. SAVE THIS USER’S GUIDE FOR FUTURE REFERENCE .
Safety Instructions
1. Read this user’s guide before you operate your projector and save it for future
reference.
2. The lamp becomes extremely hot during operation. Allow the projector to cool
for approximately 45 minutes prior to removing the lamp assembly for
replacement. Do not operate lamps beyond the rated lamp life. Excessive
operation of lamps beyond the rated life could cause them to explode on rare
occasions.
3. Never replace lamp assembly or any electronic components unless the
projector is unplugged.
4. To reduce the risk of electric shock, do not disassemble this appliance. Take it
to a qualified technician when service or repair is required. Incorrect
reassembly can cause electric shock when the appliance is subsequently used.
5. Do not place this product on an unstable cart, stand, or table. The product may
fall, causing serious damage to the product. This product is capable of
displaying inverted images for ceiling mount installation. Please use suitable
equipment for mounting the unit and ensure it is securely installed.
6. To prevent lamps from bursting, change the lamp after changing the mounting
position of projectors (desktop to ceiling mount or ceiling mount to desktop
mount).
Caution
• Always open the lens shutter or remove the lens cap when the projector
lamp is on.
• Do not look straight at the projector lens during operation. The intense
light beam may damage your eyesight.
• In some countries, the line voltage is NOT stable. This projector is
designed to operate safely within a bandwidth of 100 to 240 volts, but
could fail if power cuts or surges of ±10 volts occur. In these high-risk
areas, it is recommended to install a power stabilizer unit.
• Do not place this projector on the top of cloth or carpet.
• Do not touch the ventilation grill when the projector is under operation.
DLP Personal Projector
1
Page 6

FCC Statement
CLASS B
This equipment generates, uses and can radiate radio frequency energy and, if not
installed and used in accordance with the instructions, may cause harmful
interference to radio communications. However, there is no guarantee that
interference will not occur in a particular installation. If this equipment does cause
harmful interference to radio or television reception, which can be determined by
turning the equipment off and on, the user is encouraged to try to correct the
interference by one or more of the following measures:
— Reorient or relocate the receiving antenna.
— Increase the distance between the equipment and receiver.
— Connect the equipment into an outlet on a circuit different from that to
which the receiver is connected.
— Consult the dealer or an experienced radio/TV technician for help.
Save this user’s guide: The information contained in this manual will assist you in
operating and maintaining your Personal Projector.
2
DLP Personal Projector
Page 7
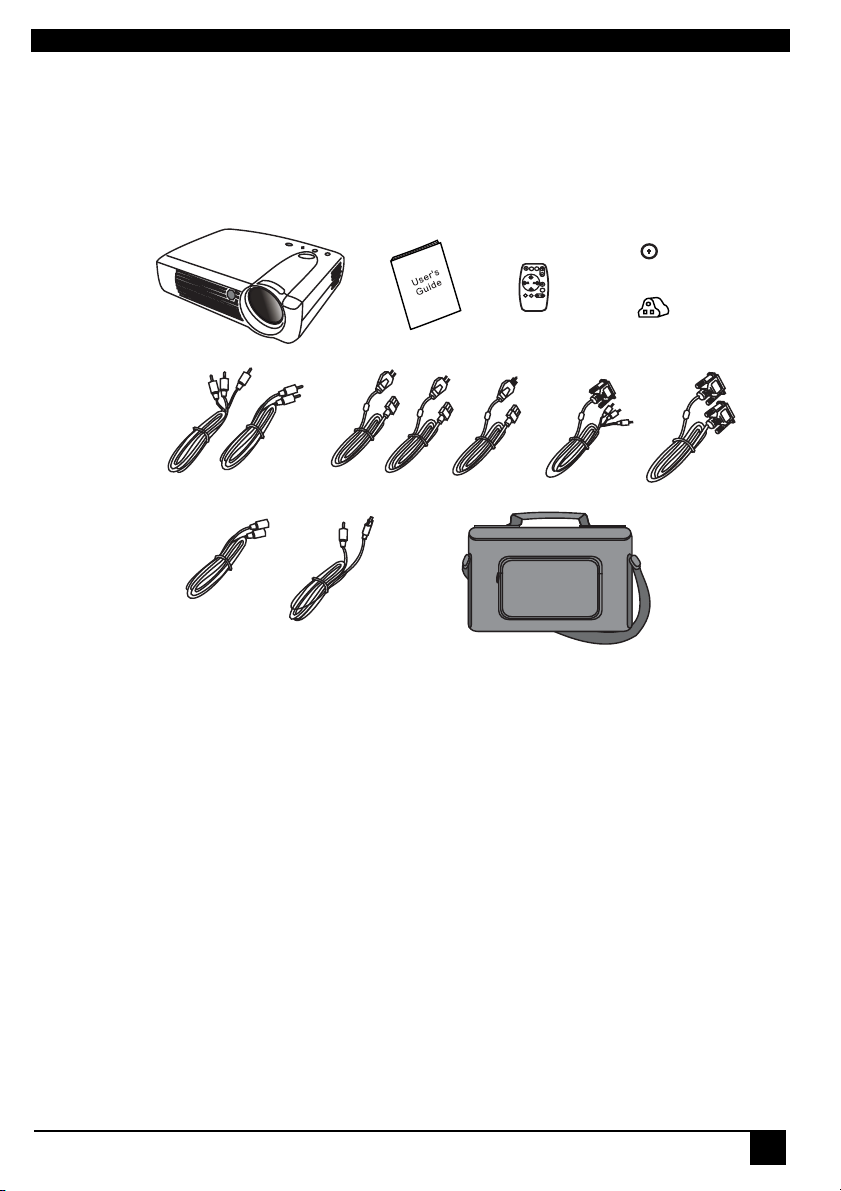
Shipping Contents
The Projector is shipped with the necessary cables required for standard PC,
Macintosh or laptop computer connections.Carefully unpack and verify that you
have all the items shown below. If any of these items are missing, please contact
your place of purchase.
Batteries
Projector
Audio Cable
S-Video Cable
Video Cable
Optional Accessories
1. Spare lamp kit
2. Mac Adapter
User’s Manual
220V
240V
Power Cord
Remote Control
110V
HDTV Cable
Deluxe Soft Carry Case
3-2 Converter
VGA Cable
DLP Personal Projector
3
Page 8
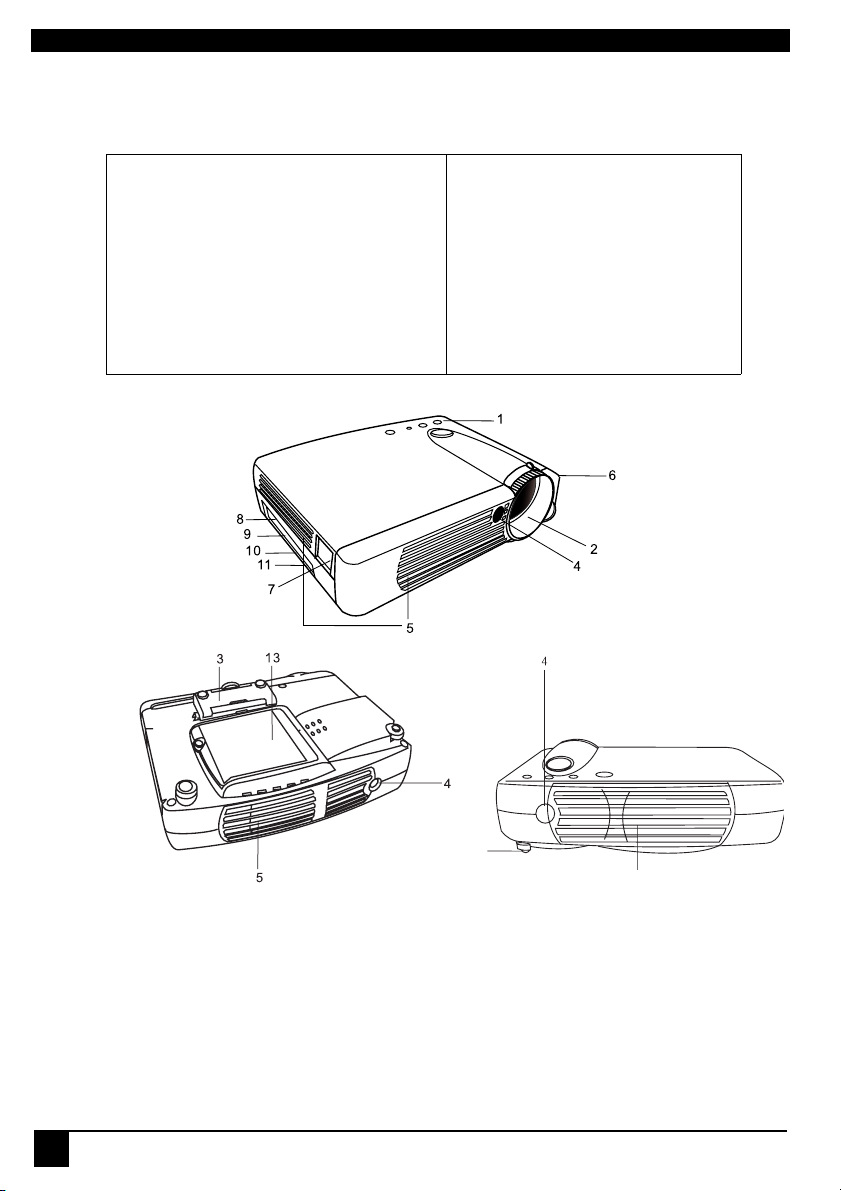
Projector Description
Projector
1. External control panel
(see next page)
2. Projection lens
3. Front adjustment feet
4. IR remote sensor
5. Ventilation grill
6. Kensington lock
7. AC power cord input
8. S-video connector
9. Video connector
10. D-sub connector
(for computer/ input)
11. Audio input
12. Rear adjustment feet
13. Lamp access door
(underneath unit)
12
5
4
DLP Personal Projector
Page 9

External Control Panel
Exit
- Keystone / Left
Menu
KEY
STONE
EXIT
MENU
AUTO SOURCE POWER
KEY
STONE
+
Keystone +/ Right
Lamp status indicator
•The Infrared Remote Receiver (Front and Rear) allows the projector to
accept signals from the remote control. For best results, be sure to aim the
control toward the sensor without any obstructions between the two, and at a
distance no greater than 6 meters.
• Menu will display the menu system on screen. Press Menu again to access the
sub-menus. Left and Right help you navigate among choices and settings in
the menus and sub-menus. However, when the onscreen menu is not
activated, the Left and Right buttons will function as Keystone +/- hot keys.
• Press the Exit button to go back to the main menu. Press Exit again to leave
the menu system.
•The Status Indicator will blink or light up when the lamp needs service, cooling
or replacement. See “Lamp Information” on page 19. for more detailed
information.
• When the projector is on, back-lit Power will blink during warm-up and turn to
solid green to indicate the projector is ready for use.
• Press Power for 1 second to turn the projector on or off.
• Auto key: Automatically sense the best picture quality for current received
signals.
• Source key: Select signal sources, PC, Video, S-video and YPbPr.
DLP Personal Projector
5
Page 10

Adjuster
The projector is equipped with a quick-release adjuster foot and button for adjusting
its tilt angle.
1. Lift the projector up and press the adjuster button to release the adjuster.
2. The adjuster will drop into position and be locked.
Projector Features
The Projector integrates high performance optical engine projection and userfriendly design to deliver high reliability and ease of use experience.
The Projector offers the following features:
• Compact and portable unit
• Full-function remote control
• Manual zoom lens
• One key auto-adjustment to display the best picture quality
• Easy digital keystone correction through hot keys to correct tilted pictures
• Adjustable color balance control for data/video
• Ultra-high brightness projection lamp
• Ability to display high quality 16.7 million colors
• On screen menus in 8 languages: English, French, German, Italian, Spanish,
Japanese, Korean and Simplified Chinese.
• Powerful AV function to provide high AV picture results.
• HDTV compatibility (YPbPr)
Note: The brightness of your machine will vary depending on the ambient
room conditions and contrast/brightness settings.
6
DLP Personal Projector
Page 11

Remote Control Description
Exit
Keystone
Menu
Blank
Mute
PIP Video
Power Source
Auto
Zoom in
Zoom out
Freeze
Return
Volume
PIP S-video
Remote Control Features
The remote control sensors are located in the front/ back of the projector. The
distance between the sensor and the remote control should not exceed 6 meters.
DLP Personal Projector
7
Page 12

FREEZE
The image can be frozen when FREEZE is pressed. A “Pause” icon will appear in
the lower right corner of the screen for three seconds. To release the freeze
function, again press the FREEZE button, RETURN button or SOURCE button
(when the input source is switched over during display). A “Play” icon will appear in
the lower right corner of the screen for three seconds when the freeze function is
released.
BLANK
The image can be blank when BLANK is pressed. To release the blank function,
press BLANK again.
ZOOM +/ -
By pressing ZOOM +, the center of the picture will be magnified. When the + button
is pressed again, the picture is further magnified, up to four times the original size.
By pressing ZOOM -, the size of the image is reduced. When the - button is pressed
again, the picture is further reduced until it is restored to its original size. To return to
the normal display mode, press the RETURN button. (This function can be used in
combination with FREEZE. )
A
After activating the zoom in function, you can pan the screen with the following
buttons.
Menu Move downward to the bottom.
Exit Move upward to the top.
Left (Keystone -) Move toward to the left side.
Right (Keystone +) Move toward to the right side.
8
DLP Personal Projector
Page 13

Installing or Replacing Batteries
• Push and slide the battery compartment lid in the direction shown.
• Install battery as indicated by the diagram inside the compartment.
• Position the lid over the compartment and snap it back into place.
Caution
Avoid excessive heat and humidity. Danger of explosion may happen if battery is incorrectly replaced. Replace only with the same or equivalent type
recommended by the manufacturer. Dispose of used batteries according to
the manufacturer’s instructions.
DLP Personal Projector
9
Page 14

INSTALLATION
Screen Size
Place the projector at the required distance from the screen according to the desired
picture size (see the table below).
L Projetion Distance
Screen Size (Max.)
Diagnal
(in)
30.4 61.8 46.3 100 24.9 50.7 38.0
60.8 123.7 92.7 200 49.9 101.3 76.0
91.2 185.3 138.9 300 74.7 151.9 113.9
121.5 247.0 185.2 400 99.7 202.5 151.9
151.9 308.7 231.6 500 124.6 253.2 189.9
182.3 370.5 277.9 600 149.5 303.8 227.9
212.8 432.2 324.2 700 174.6 354.4 266.2
243.1 494.0 370.5 800 199.4 405.1 303.8
273.5 555.7 416.7 900 224.3 455.7 341.8
303.9 617.5 463.1 1000 249.2 506.3 379.8
A. Width
(cm)
C. Height
(cm)
L. Projection
distance (cm)
Diagnal
Screen Size (Min.)
(in)
B. Width
(cm)
Connecting to Various Equipment
It only takes a few seconds to connect your projector to your computer/notebook,
VCR or other systems. However, a Mac adapter (an optional accessory) is needed
for connection for Macintosh users.
Computer/
HDTV
Audio
Video
S-Video
D. Height
(cm)
S-Video/
Video
10
DLP Personal Projector
Page 15

OPERATION
Start Up
1. Plug the power cord into a wall socket.
2. Press POWER for 1 second.
Projector
AUTO
Remote Control
AUTO
• The back-lit POWER key blinks green and stays green when the power is
turned on.
(When the power is turned off, there is a 60-second cooling period before the
projector can be re-started.)
3. Switch on all connected equipment.
DLP Personal Projector
11
Page 16

Digital Keystone Correction
Keystoning is when the projected image is noticeably wider on either the top or
bottom. To correct this, press KEYSTONE +/- (hot key) on the control panel of the
projector or on the remote control, then adjust the sliding bar labeled Keystone, as
needed. Press + to correct keystoning at the top of the image. Press - to correct
keystoning at the bottom of the image.
Projector
KEY
STONE-
KEY
STONE+
Remote control
Auto Adjustment
In some cases, you may have to optimize the picture quality manually. To do this,
press the AUTO key on the control panel of the projector or on the remote control.
Within 3 seconds, the built-in Intelligent Auto Adjustment function will re-adjust to
the best picture quality.
Projector
Remote control
AUTO
12
AUTO
DLP Personal Projector
Page 17

Source Selection
When several input sources are available, press the SOURCE key to make a
selection from the control panel of the projector or the remote control.
Projector
SOURCE
Remote control
SOURCE
Menu System
Press Menu for the main menu and press 3or
Menu again to select items in the sub-menu.
Menu Bar
4 to
select a sub-menu. Press
Sub-menu Display Image Source Control PIP
PC
Y/Pb/Pr
Video
Keystone
Brightness
Contrast
Phase
H.Size
Keystone
Brightness
Contrast
Color
Tint
Auto resize
H-position
V-position
Color Temp
Information
Auto resize
H-position
V-position
Color
Tint
Color Temp
Ratio
System
Sharpness
Color temp
Information
DLP Personal Projector
Mirror
Source
Vol um e
Treble
Bass
Mute
Langauge
OSD
OSD Time
Auto Off
Reset
Lamp hour
Main page:
PIP Source
PIP size
PIP Pos.
H. Position
V.Pos it io n
More Options
Sub Page:
Brightness
Contrast
Color
Tint
Sharpness
System
13
Page 18

1. Display Menu
Keystone
Brightness
Contrast
Phase
H.Size
Color
Tint
Corrects the keystone of the image.
Adjusts the brightness of image.
Adjusts the degree of difference between darkness and lightness of
image.
Adjusts to fit in the desired image size.
*This function is not available when the input mode are Video, S-video.
Adjusts to avoid the occurrence of flicker.
*This function is not available when the input modes are Video, S-video.
Adjusts to increase or decrease the colors (R, G, B) of image.
*This function is not available when the input mode is PC.
Adjusts to make the image look more red or blue.
*This function is not available when the input mode is PC.
14
DLP Personal Projector
Page 19

2. Image Menu
Auto resize
H-position
V-position
Makes the best fit of the image to the screen,
Adjusts the horizontal position of image.
Adjusts the vertical positon of image.
Color Temp.
Information
Ratio
System
Sharpness
Color
Tint
Adjusts the color templerature to fit your preference.
Shows the current resolution.
Users have 2 options for the image ratio.
1. 4:3 (Normal) 2. 16:9 (Wide)
*This function is not available when the input modes are PC, YPbPr.
4 modes can be selected.
1. Auto 2. PAL-M 3. PAL-N 4.SECAM
*The default setting of System is Auto.
*This function is not available when the input modes are PC, YPbPr.
Adjusts to make the image look sharper or softer.
*This function is not available when the input mode are PC, YPbPr.
Adjusts to increase or decrease the colors (R, G, B) of image.
*This function is not available when the input mode is PC.
Adjusts to make the image look more red or blue.
*This function is not available when the input mode is PC.
DLP Personal Projector
15
Page 20

3. Source Menu
Mirror
1. Default
2. Ceiling mounted
projection
3. Rear screen
projection
4. Ceiling mounted and
rear screen
projection
Source
Volu me
Treble
1.
3.
Selects sources between PC, Video, S-Video, and YPbPr.
Adjusts the volume level.
Adjusts the treble level.
2.
4.
16
Bass
Mute
Adjusts the bass level.
Off
DLP Personal Projector
On
Page 21

4. Control Menu
Language sets the OSD to display in one of 8 languages.
Language
OSD
OSD Time
Auto Off
Reset
Lamp hour
Use3 / 4 key to select the languages: English, French, German,
Italian, Spanish, Japanese, Korean and Simplified Chinese.
Selects a desired OSD position.
Sets the length of time the OSD will remain active after the last time
you pressed a button. The range is from 5 to 60 seconds in 5-second increments.
Sets the length of time to shut off the system when no input is
detected. The range is from 0 to 60 minutes in 1- minute increments.
Returns all settings to those set at the time of manufacturing.
Shows lamp used time.
5. PIP Menu
These functions are valid only when the input mode is PC and the PIP source is
Video or S-video.
PIP Source
PIP Size
PIP Position
H Position
V Position
More Options
Brightness
Contrast
Color
Tint
Sharpness
System
Selects the source from which the PIP picture comes.
Uses 3 / 4 key to scroll through the 4 alternatives: Off, Small,
Medium, Large.
Selects a desired PIP position.
Adjusts the horizontal position of PIP image.
Adjusts the vertical position of PIP image.
Uses 3 / 4 key to select more PIP functions including Brightness,
Contrast, Color, Tint, Sharpness and System.
Adjusts the brightness of PIP image.
Adjusts the degree of difference between darkness and lightness of
PIP image.
Adjusts to increase or decrease the colors (R, G, B) of image.
Adjusts to make the image look more red or blue.
Adjusts to make the image look sharper or softer
Selects PIP image systems: Auto, NTSC, PAL, SECAM
DLP Personal Projector
17
Page 22

Shutdown
1. Press POWER and a warning message will prompt up. To turn off the projector,
press POWER again.
2. The fan will continue to run for approximately 60 seconds.
Projector
POWER
3. Disconnect the power cord from the wall socket.
Remote control
.
18
Caution
Please do not unplug the power cord before POWER is shut down or during
the 60-second cooling process.
DLP Personal Projector
Page 23

MAINTENANCE
Lamp Information
Use and Replacement of Lamp
When the Lamp Indicator lights up red or a message displays to suggest the time of
lamp replacement, please change a new lamp or consult your dealer.An old lamp
could cause a malfunction to the projector and may explode.
LED Status Indicators
Lamp Life Indicators
CHANGE THE LAMP, AND
RESET THE LAMP TIMER
CHANGE THE LAMP. THE
POWER WILL TURN OFF
When this LED shows red continuously, it is warning you that
the lamp life has exceeded
lamp with a new one immediately.
The lamp has been in operation for 1400 hours. Change a new
lamp for optimal performance.
The lamp has been in operation for 1480 hours, and the power
will turn off after 20 hours.
hours. Replace the projection
1500
AFTER 20 HOURS
CHANGE THE LAMP!
Lamp is not properly
The lamp has been in operation for over 1500 hours. The
warning message will display for 30 seconds every 5 minutes
after you turn on the projector and the power will turn off
automatically in 10 minutes
LED blinks rapidly.
attached
Temperature is too high
When the projector’s internal temperature is too hot to operate
safely, the LED blinks slowly for one minute and the lamp turns
off automatically.
If the LED light is off, the projector’s lamp and temperature are
operating under normal conditions.
Caution
The LAMP indicator will light up if the lamp becomes too hot. Turn off the
power and let the projector cool for 45 minutes. If the LAMP indicator is still
red when turning the power on, please contact your dealer.
Lamp Replacement
Please check with LG service center for the information of lamp replacement.
DLP Personal Projector
19
Page 24

TROUBLESHOOTING
Common Problems & Solutions
PROBLEMS
NO POWER
NO PICTURE
TRAPEZOID
IMAGE ON THE
SCREEN
POOR COLOR
BLURRED
IMAGE
REMOTE
CONTROL
DOES NOT
WORK
TRY THESE SOLUTIONS
• Plug the power cord into the AC inlet.
• Plug the power cord into the power inlet.
• Wait two minutes after the projector is turned off before turning
the projector back on.
• Check for the proper input source.
• Ensure all cables are connected properly.
• Adjust the brightness and contrast.
• Remove the lens cap.
• Reposition the unit to improve its angle on the screen.
•Use the Keystone correction key on the control panel of the
projector or the remote control unit.
• Select the correct video system.
• Adjust brightness, contrast, or saturation.
•Press Auto on the control panel of the projector or the remote
control unit to get better picture quality.
• Adjust the focus.
• Reposition the unit to improve its screen angle.
• Ensure the distance between the unit and screen is within the
adjustment range of the lens.
• Replace the batteries with new ones.
• Make sure there is no obstacle between the remote control and
the unit.
• Stand within 4 meters (13 feet) of the unit.
• Make sure nothing blocking the front and rear receivers.
20
DLP Personal Projector
Page 25

Status Messages
On Screen Messages Description
SEARCHING
INPUT SIGNAL
DETECTED, ACTIVATING
AUTO IMAGE
SYNC IS OUT OF RANGE
CHANGE THE LAMP,
AND RESET THE LAMP
TIMER
CHANGE THE LAMP, THE
POWER WILL TURN OFF
AFTER 20 HOURS
CHANGE THE LAMP!
Projector is searching for input.
Projector has identified the input signal and is running the auto
image adjustment function.
Input signal frequency exceeds the projector’s.
The lamp has been in operation for 1400 hours. Lamp replacement
is recommended.
The lamp has been in operation for 1480 hours, and the power will
turn off after 20 more hours. Replace the lamp as soon as possible.
The lamp has been in operation for over 1500 hours, and the power
will turn off automatically in 10 minutes. Replace the lamp immediately.
DLP Personal Projector
21
Page 26

SPECIFICATIONS
Projector Specifications
Technical Specifications
Note: All specifications are subject to change without notice.
General
Product name Personal Projector
Optical
Display system 1-CHIP DMD
Lens F/Number F/2.6
Lamp 120W VIP lamp
Electrical
Power supply AC100 ~ 240V, 2.3A, 50/60 Hz (Automatic)
Power consumption 185 W (Max)
Mechanical
Dimensions 220 mm (W) x 52 mm (H) x 175 mm (D)
Operating
temperature range 0°C ~ 40°C
Weight 3.85 lbs (1.69 Kg)
22
Input terminal
Computer Input
RGB/HDTV input D-sub 15-pin (female)
Video Signal Input
S VIDEO Mini DIN 4-pin terminal
VIDEO RCA Jack terminal
Audio Signal Input
Audio Mini Jack Stereo Terminal
Output
speaker 1 Watt x 1
DLP Personal Projector
Page 27

Timing Chart
Resolution H Sync (kHz)V Sync (Hz) Remark
640x350 31.5 70.1
640x400 37.9 85.1 VESA
720x400 31.5 70.0
720x400 37.9 85.1 VESA
640x480 31.5 60.0 VESA
640x480 37.9 72.8 VESA
640x480 35 66.7 Macintosh
640x480 43.3 85.0 VESA
800x600 35.2 56.3 VESA
800x600 37.9 60.3 VESA
800x600 46.9 75.0 VESA
800x600 48.1 72.2 VESA
800x600 53.7 85.1 VESA
832x624 49.7 74.5 Macintosh
1024x768 48.4 60.0 VESA
1024x768 56.5 70.1 VESA
1024x768 60.0 75.0 VESA
1024x768 68.7 85.0 VESA
1280x1024 64.0 60.0 VESA
DLP Personal Projector
23
Page 28

DIMENSIONS
220 mm
175 mm
52 mm
24
DLP Personal Projector
 Loading...