

LG PREMTA000 Owner’s Manual
INSTALLATION/
USER MANUAL
ENGLISH
FRANÇAIS
ESPAÑOL
PORTUGUÊS
Please read this installation manual completely before installing
the product.
Installation work must be performed in accordance with the
national wiring standards by authorized personnel only.
Please retain this installation manual for future reference after
reading it thoroughly.
Premium Wired Remote Controller
PREMTA000
P/NO : MFL62129216
Rev00_040617
www.lg.com
TIPS FOR SAVING ENERGY
2
IMPORTANT SAFETY INSTRUCTIONS
3
ENGLISH
TIPS FOR SAVING ENERGY
Here are some tips that will help you minimize the power consumption when you use the air
conditioner. You can use your air conditioner more efficiently by referring to the instructions
below:
• Do not cool excessively indoors. This may consume more electricity.
• Block sunlight with blinds or curtains while you are operating the air conditioner.
• Keep doors or windows closed tightly while you are operating the air conditioner.
• Adjust the direction of the air flow vertically or horizontally to circulate indoor air.
• Speed up the fan to cool or warm indoor air quickly, in a short period of time.
• Clean the air filter once every 2 weeks. Dust and impurities collected in the air filter may block the
air flow or reduce the cooling / dehumidifying functions.
For your records
Staple your receipt to this page in case you need it to prove the date of purchase or for warranty
purposes. Write the model number and the serial number here:
Model number :
Serial number :
You can find them on a label on the side of each unit.
Dealer’s name :
Date of purchase :
IMPORTANT SAFETY INSTRUCTIONS
READ ALL INSTRUCTIONS BEFORE USING THE APPLIANCE.
Always comply with the following precautions to avoid dangerous situations and ensure peak
performance of your product
!
WARNING
This symbol indicates potentially hazardous situation which, if not avoided could result in death or
serious injury.
!
CAUTION
This symbol indicates a potentially hazardous situation which, if not avoided, may result in minor
or moderate injury.
!
WARNING
Installation
• For electrical work, contact the dealer, seller, a qualified electrician, or an authorized service Center.
- Do not disassemble or repair the product. There is risk of fire, electric shock, explosion, equipment
malfunction, or injury.
• Request to the service center or installation specialty store when reinstalling the installed product.
- There is risk of fire, electric shock, explosion, equipment malfunction, or injury.
• Do not disassemble, fix, and modify products randomly.
- There is risk of fire, electric shock, explosion, equipment malfunction, or injury.
• The product shall be installed according to the national standards and local code.
• Apply totally enclosed noncombustible conduit in case of local building code requiring plenum.
• Use appropriate unit mounting procedures.
• Avoid direct sunlight.
• Avoid moist areas.
In-Use
• Do not place flammable objects close to the product.
- There is risk of fire, electric shock, explosion, equipment malfunction or injury.
• Do not allow product to get wet.
- There is risk of fire, electric shock, explosion, equipment malfunction or injury.
• Avoid dropping the product.
- There is risk of fire, electric shock, explosion, equipment malfunction or injury.
• If product gets wet, contact your dealer or authorized service center.
- There is risk of fire, electric shock, explosion, equipment malfunction, or injury. If the instructions
are not followed, it may cause death or severe injury of the user.
• Do not use sharp or pointed objects on product.
- There is risk of fire, electric shock, explosion, equipment malfunction or injury.
• Do not touch or pull the lead wire with wet hands.
- There is risk of product breakdown or electric shock.

IMPORTANT SAFETY INSTRUCTIONS
4
TABLE OF CONTENTS
5
ENGLISH
!
CAUTION
In-use
• Do not clean using powerful detergents like solvent but use soft cloths.
There is risk of fire, electric shock, explosion, equipment malfunction or deformation.
• Do not press the screen using powerful pressure.
There is risk of product break-down or malfunction.
TABLE OF CONTENTS
2 TIPS FOR SAVING ENERGY
3 IMPORTANT SAFETY IN-
STRUCTIONS
8 PART DESCRIPTION
9 OPERATION SETTING –
Standard Mode
9 On/Off
10 General Cooling Operation
11 Power Cooling
13 Heating Operation
14 Dehumidification Operation
15 Monsoon Dehumidifying Mode
16 Fan Only Operation
17 Artificial Intelligence / Automatic Operation
19 2 set point auto operation (North America
Only)
20 TEMPERATURE SETTING -
Standard Mode
20 Controlling Desired Temperature
22 WIND SETTING - Standard
Mode
22 Fan speed Control
23 Airflow Control
24 OPERATION SETTING - Ad-
vanced Mode
24 On/Off
25 General Cooling Operation
27 Power Cooling
28 Heating Operation
30 Dehumidification Operation
31 Monsoon Dehumidifying Mode
32 Fan Only Operation
33 Artificial Intelligence / Automatic Operation
35 2 set point auto operation (North America
Only)
36 Override control
39 Hold
40 Zone Control
42 TEMPERATURE SETTING –
Advanced Mode
42 Controlling Desired Temperature
43 Check Room Temperature
44 WIND SETTING - Advanced
Mode
44 Fan speed Control
45 Airflow Control
46 SUB FUNCTION SETTING
46 Up/Down Vane Angle Setting
49 Plasma Purification Setting
51 Energy-Saving Cooling Setting
53 Heater Setting
55 Fan Auto Setting
57 Robot Cleaning Setting
59 Ventilation kit Setting
61 Humidifier Setting
63 Mosquito Away
65 Himalaya Cooling
67 Comfort cooling
69 OPERATION SETTING -
Ventilator
69 Air conditioner - Ventilation Control Switch-
ing
70 General Ventilation Operation Mode
71 Ventilator with DX(Direct eXchanger) Opera-
tion Mode
72 FAN SPEED SETTING - Ven-
tilator
72 Fan speed Control
73 ADDITIONAL MODE SET-
TING - Ventilator
73 Fast Mode
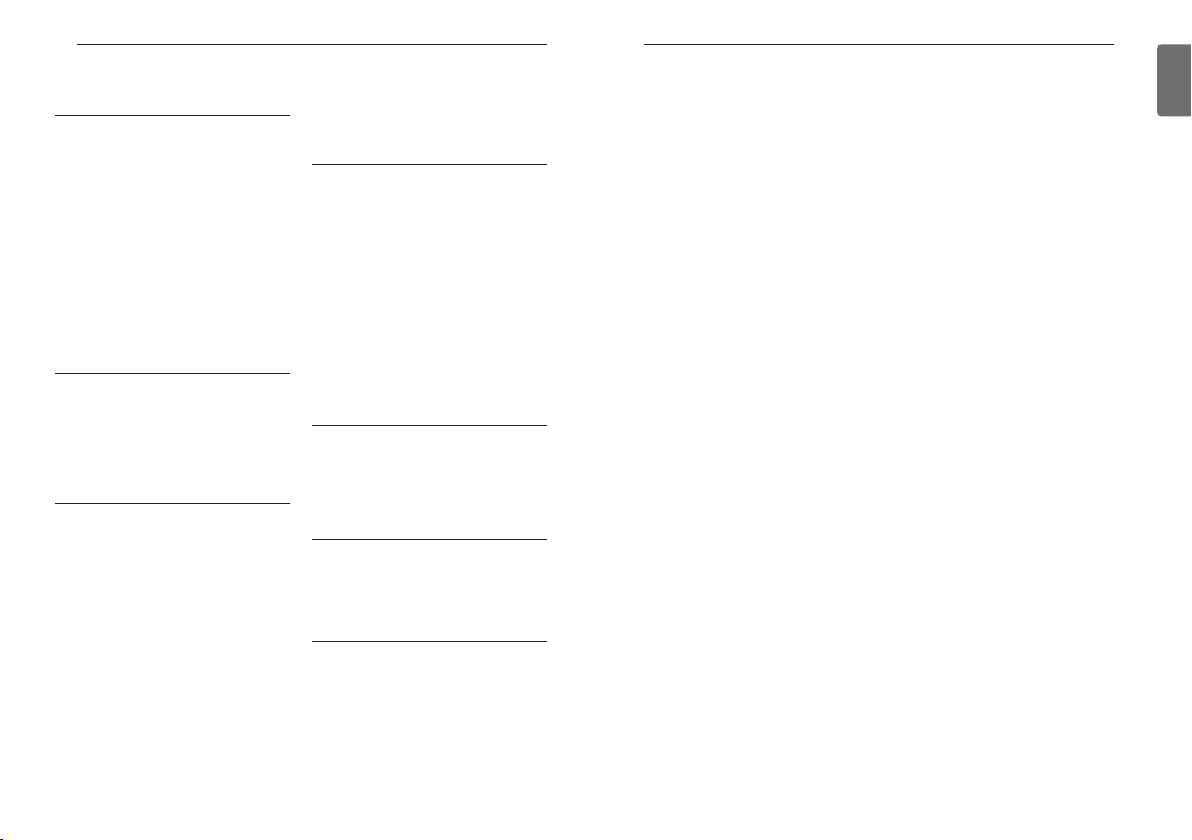
TABLE OF CONTENTS
73 Energy-Saving Mode
74 TIMER & PROGRAM
74 Simple Reservation
77 Sleep Reservation
80 Turn-On Reservation
83 Turn-Off Reservation
86 Create and Edit 7-Days Pattern
91 7-Days Pattern Deletion
93 7-Days Pattern – Day of Week Event
Copy/Paste
94 Weekly Schedule
96 Yearly Schedule
98 Delete Yearly Schedule
99 Holiday
99 Add Holiday
102 Delete Holiday
104 ENERGY
104 Check Energy Usage
107 Target Energy Consumption
109 Operation Time Limit
111 Time Limit Control
113 Alarm Popup
115 Initialization Usage Data
117 FUNCTION SETTING
117 Lock Setting – All Lock, On/Off Lock, Mode
Lock
118 Lock Setting – Temperature Lock
121 Filter Sign Check
123 Elevation Grill Setting
125 Robot Cleaning
126 Auto Dry
127 Change Temperature
128 Example of using the change temperature
function
129 Wireless Module AP mode
130 Zone Name Setting
132 Override Set Time
133 Home Leave Set Temperature
134 Dead Band
136 Smart Load Control(SLC)
138 Comfort cooling setting
140 ODU Refrigerant Noise Reduction setting
142 Low noise mode time setting
144 Defrost mode setting
146 Advanced fan speed “Auto” setting
147 Delay Time - Ventilator
149 USER SETTING
149 Date Setting
151 Time Setting
153 Password Setting
154 Change Password
156 Main Screen Display Setting
158 LCD brightness in idle
160 Screen Saver Timer Setting
162 Schedule Initialization
164 Touch Beep
166 Home theme
168 Temperature Unit Setting
170 Language Setting
172 Control Type Setting(North America Only)
174 Summer Time Setting
176 SERVICE SETTING
176 Service Contact
177 Service number registration and change
179 Model Information
181 Remocon version information
183 Self-diagnosis for Trouble Mode
184 INSTALLATION
184 Installation of Remote Controller
186 Group Control
188 Air conditioner and ventilation interface
189 INSTALLER’S SETTING OP-
TIONS
189 How to enter installer setting mode
190 Installer setting code table
194 Test Run Operation (air conditioner / DX
type ventilator)
195 Central control address (air conditioner
/General, DX type ventilator)
196 ESP setting (air conditioner / Gerneral, DX
type ventilator)
197 Indoor temperature detection sensor setting
(air conditioner)
199 Ceiling height selection (air conditioner)
200 Static pressure setting (air conditioner)
202 Remote controller master / slave setting (air
conditioner / Gerneral, DX type ventilator)
203 Operation master / slave setting (air condi-
tioner / General, DX type ventilator)
205 Dry contact mode setting (air conditioner /
DX type ventilator)
206 Fan speed fixing (air conditioner / DX type
ventilator)
207 Celsius / Fahrenheit Switching (air condi-
tioner)
208 Zone Type Setting(air conditioner)
209 Zone Number Setting(air conditioner)
210 Celsius control unit setting (air conditioner)
211 Emergency Heater Setting(air conditioner)
213 Setting of Function control during group
control (air conditioner)
214 External Devices Of Indoor Unit Setting (air
conditioner)
215 Indoor unit address verification (air condi-
tioner)
216 Setting temperature range (air conditioner)
218 Static Pressure Step Setting(air conditioner)
219 Guard timer(air conditioner)
220 Fan operation in the cooling mode and ther-
mal off conditions (air conditioner)
221 Primary Heater control setting(air condi-
tioner)
222 Air conditioner Fan operation interlocked
with ventilation (air conditioner)
223 Indoor unit Auto-Start setting(air condi-
tioner)
224 Occupancy Duration Time Setting(air condi-
tioner)
225 Setting for Simple Dry contact unit
227 Fan continuous operation setting (air condi-
tioner)
228 Outdoor unit function master setting (air
conditioner)
230 CN_EXT setting (air conditioner)
231 Low Noise Mode Priority setting (air condi-
tioner)
232 Humidity detection location (air conditioner)
233 Product direction (General ventilator)
234 Express ventilation priority (General, DX type
ventilator)
TABLE OF CONTENTS
235 Humidification of Stand-alone Ventilation
mode (General, DX type ventilator)
236 Humidification Of Ventilation With Heating
Operation (DX type ventilator)
237 Ventilator Fan Speed Alignment (General
ventilator)
76
ENGLISH

PART DESCRIPTION
Home button
Reset hole
Back button
Operation
display window
and
Touch screen
Wireless remote
controller signal
receiver part
Connecting cable
(1 EA)
Remote controller
fixing screws (4 EA)
User/Installation Manual
8
OPERATION SETTING – Standard Mode
9
ENGLISH
PART DESCRIPTION
LG Premium Wired remote controller
Operation display window: Displays operation and setting status
Touch screen: Control of product operation and setting status
Back button: Move to the previous setting screen
Home button: Move to the default screen
Wireless remote controller signal receiver part : Receives wireless remote controller signal
Reset button: Reset wired remote controller
Accessories
*If user presses in many places of touch screen at the same time, touch panel
can’t response
- This feature may be disabled depending on the
indoor products.
- If you press the reset hole with a sharp object, the power will be reset.
*If you press it too hard, it may cause failure.
OPERATION SETTING – Standard Mode
On/Off
Air conditioner and ventilator will be turned on or off.
● Press remote controller screen 1 time to turn on.
- If remote controller operation is not used, screen will go into energy savings mode.
● Press On/Off button in the screen.
- If the product is in operation, Go Back button and Home button will be illuminated.
- If the product is in stop, Go Back button's backlight and Home button's backlight will be off.
● If you press On/Off button during the use, product operation will stop.

OPERATION SETTING – Standard Mode
10
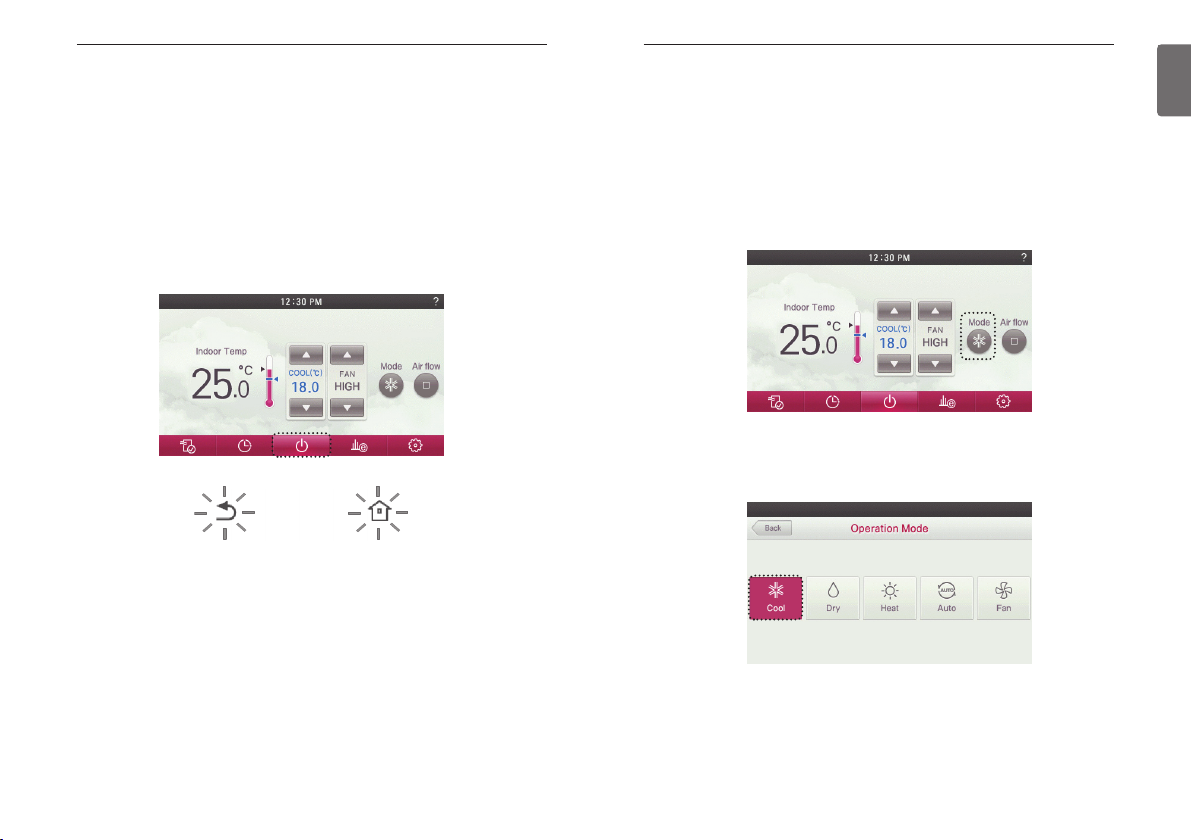
General Cooling Operation
Maintains proper cooling comfort
● Press remote controller screen 1 time to turn on.
- If remote controller operation is not used, screen will go into energy savings mode.
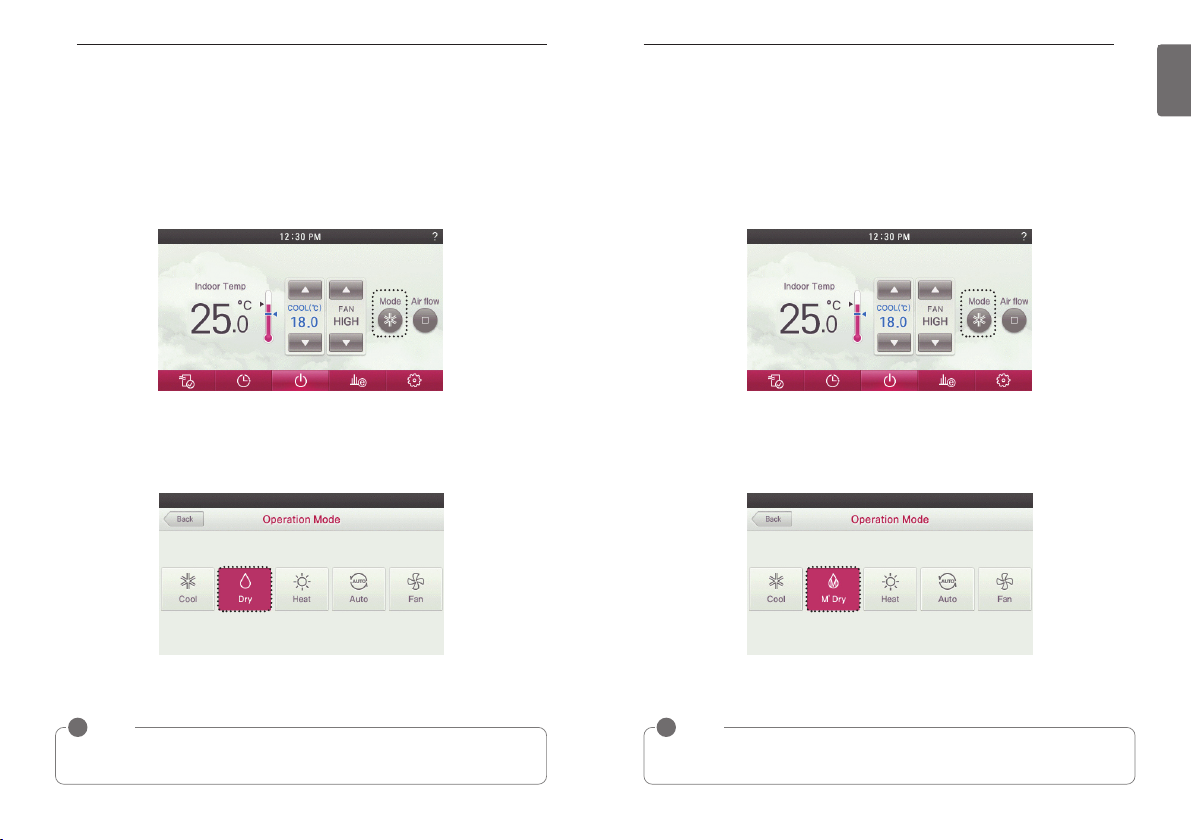
● During the operation of the product, press the mode button on the screen.
- The operation mode selection screen is displayed.
OPERATION SETTING – Standard Mode
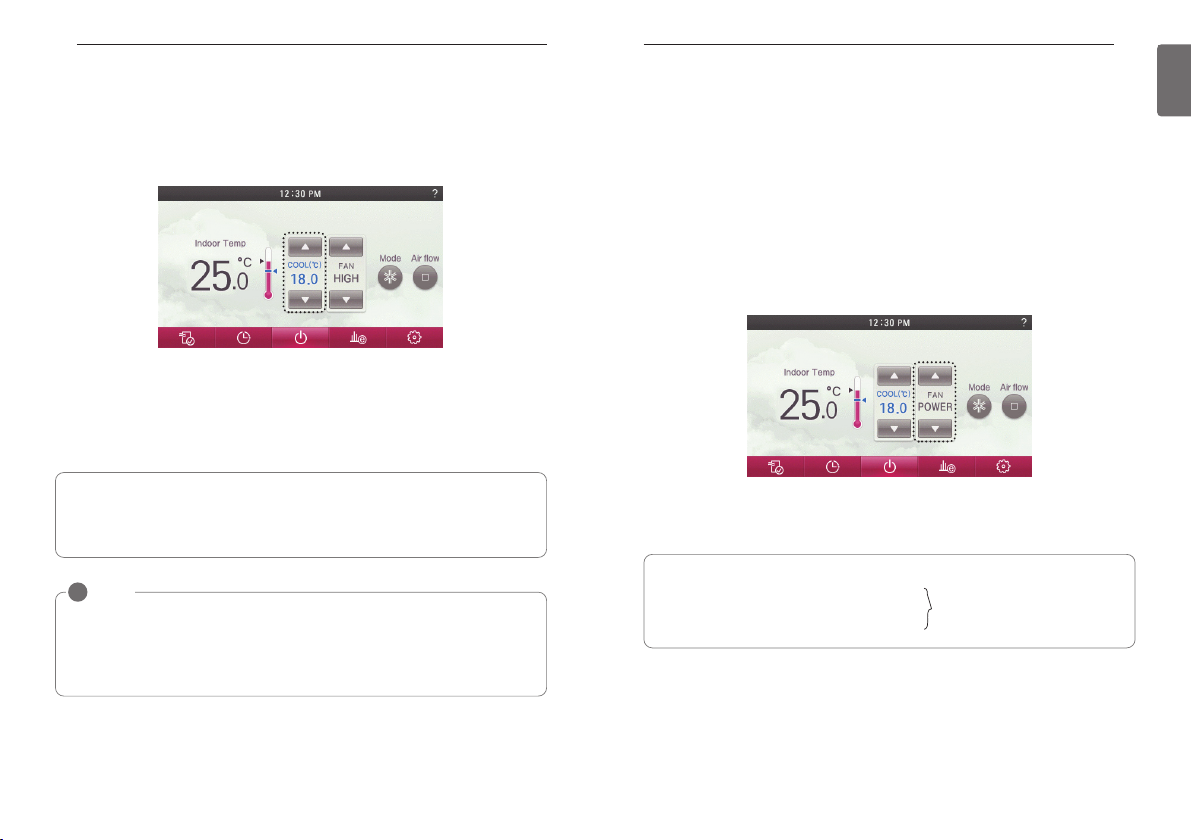
Power Cooling
It performs a strong cooling in a short period of time.
● Press remote controller screen 1 time to turn on.
- If remote controller operation is not used, screen will go into energy savings mode.
● During the operation of the product, press the fan speed button on the screen.
- The fan speed selection screen is displayed.
11
ENGLISH
● In operation mode selection screen, press the ‘Cool’ button.
- The initial temperature set for cooling operation is 18°C (64°F).
● If you press On/Off button during the use, product operation will stop.
● During the cooling operation, if you press fan speed ‘+’ button, power cooling is performed
after fan speed ‘HIGH’.
h For some indoor units products, according to whether there is a wind amount function, power
cooling is performed after fan speed ‘POWER’.
● During the cooling operation, if you press fan speed ‘-’ button, power cooling is performed
after fan speed ‘AUTO’.
h For some indoor units products, according to whether there is a fan speed function, power
cooling is performed after fan speed ‘LOW’ or ‘SLOW’.
OPERATION SETTING – Standard Mode
12
● If you press ‘Go Back’, or ‘Home’ button, it will exit from the setting menu.
- If there is no button input for about 60 seconds, it automatically exits from the setting menu.
● If you operate the fan speed control button during the usage, power cooling is turned off and
fan speed and set temperature returns to the setting before the power cooling.
What is power cooling?
• Desired temperature: 18°C (64°F)
• Fan Speed: ‘POWER’
• Fan direction: fixed to cooling operation position
h Some products do not have the power cooling function.
These operations quickly decrease
the indoor temperature.
OPERATION SETTING – Standard Mode
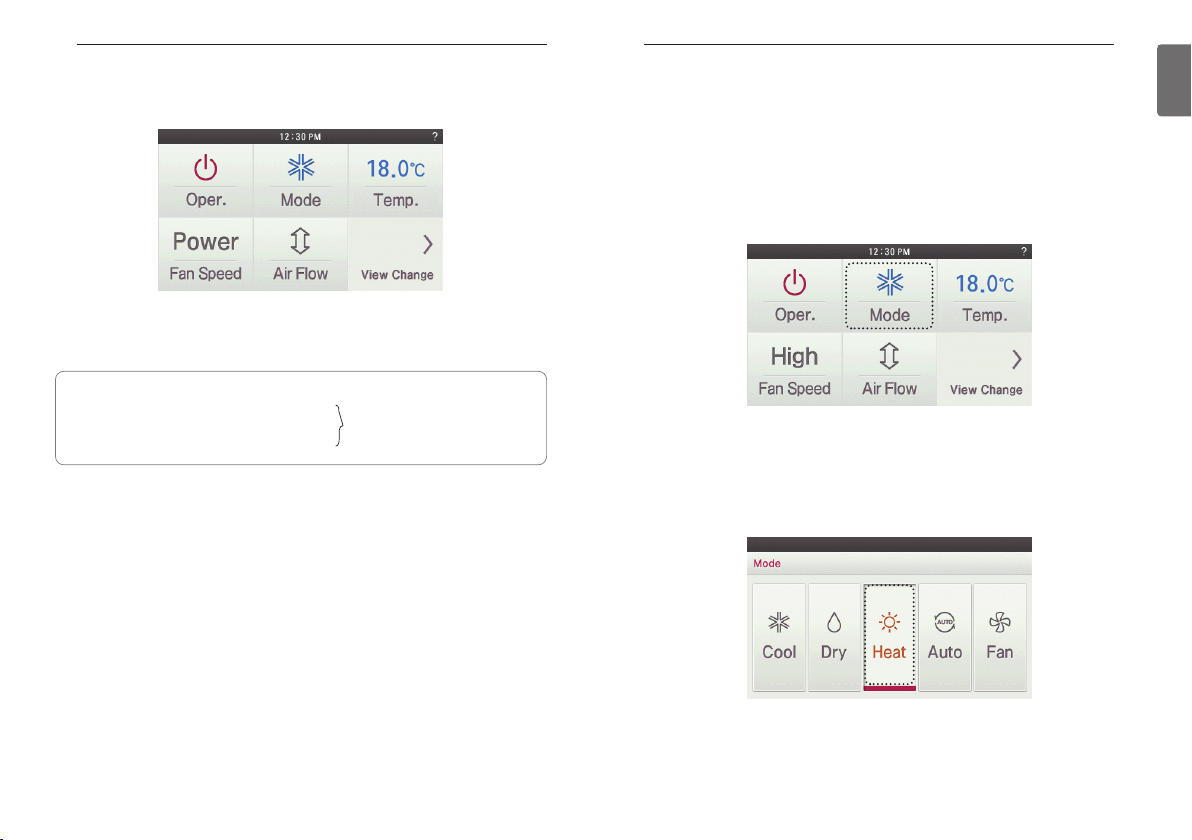
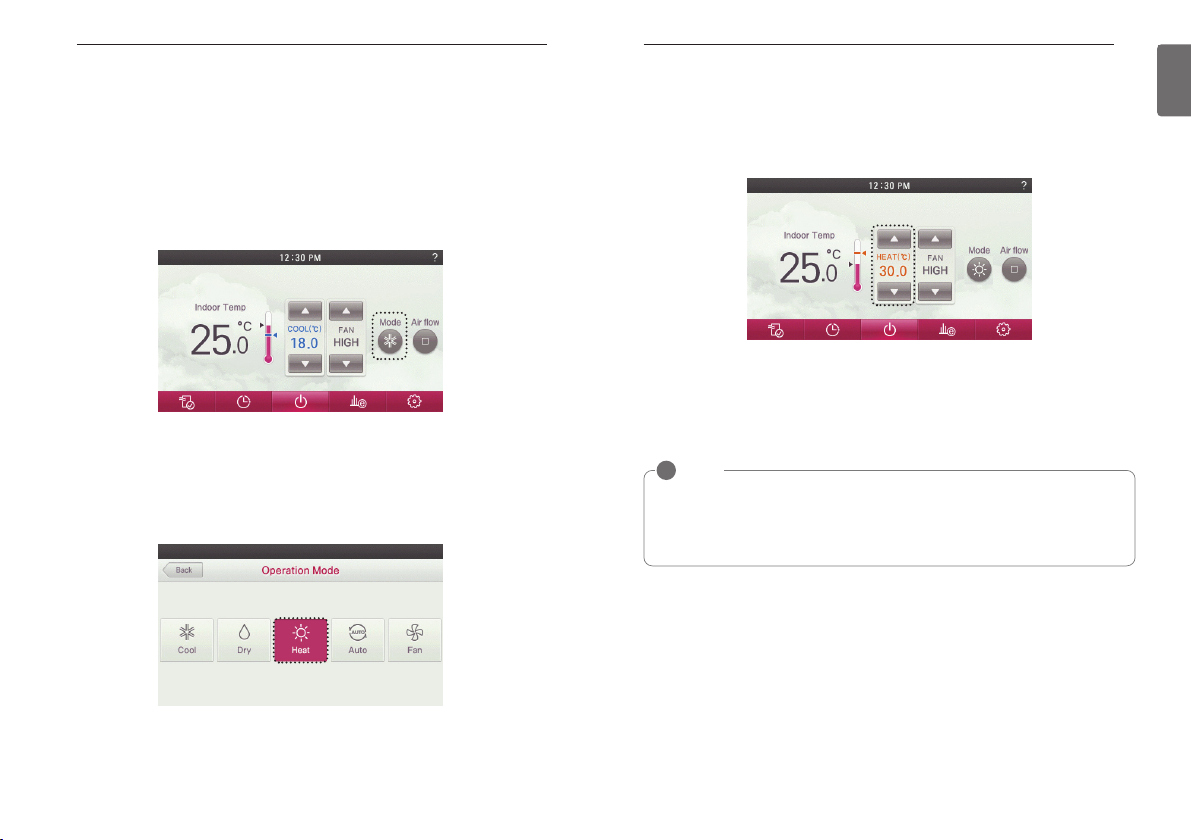
Heating Operation
Provides warm air to the space.
● Press remote controller screen 1 time to turn on.
- If remote controller operation is not used, screen will go into energy savings mode.
● During the operation of the product, press the mode button on the screen.
- The operation mode selection screen is displayed.
● In operation mode selection screen, press the ‘Heat’ button.
- The initial temperature set for Heating operation is 30°C (86°F).
- Depending on the indoor unit type, the desired temperature can be controlled in increments
1°C or 0.5°C(2°F or 1°F)
13
ENGLISH
● If you press On/Off button during the use, product operation will stop.
OPERATION SETTING – Standard Mode
14
Dehumidification Operation
Removes moisture from the air.
● Press remote controller screen 1 time to turn on.
- If remote controller operation is not used, screen will go into energy savings mode.
● During the operation of the product, press the mode button on the screen.
- It moves to the operation mode selection screen.
OPERATION SETTING – Standard Mode
Monsoon Dehumidifying Mode
This is monsoon region-specific dehumidification function.
● Press remote controller screen 1 time to turn on.
- If remote controller operation is not used, screen will go into energy savings mode.
● During the operation of the product, press the mode button on the screen.
- It moves to the operation mode selection screen.
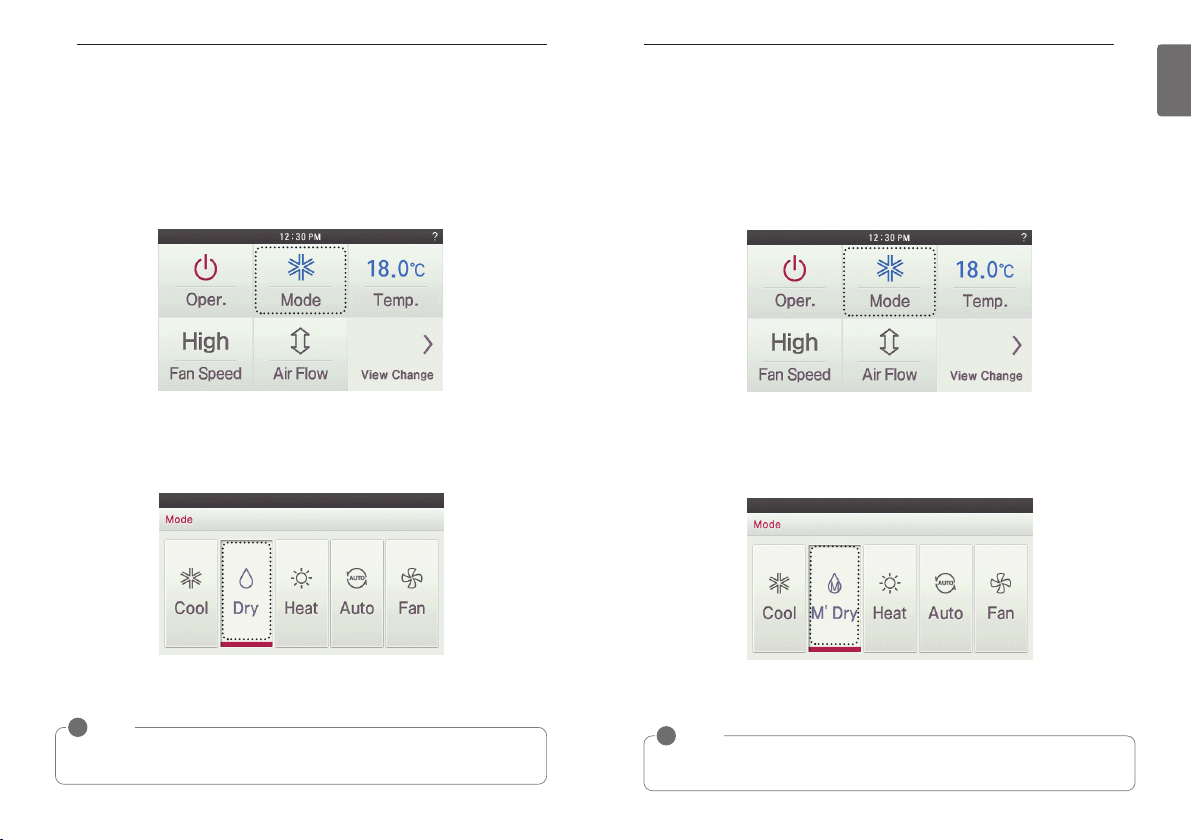
15
ENGLISH
● In operation mode selection screen, press the ‘Dry’ button.
- Dehumidification operation’s initial fan speed is ‘LOW’.
- Desired temperature setting is disabled when the dehumidifying operation.
● If you press On/Off button during the use, product operation will stop.
!
NOTE
You can effectively remove moisture and perform cooling operation at the same time if you
use this function during rainy season or when the humidity is high.
● In operation mode selection screen, press the ‘M’Dry’ button.
- Dehumidification operation’s initial fan speed is ‘LOW’.
- Desired temperature setting is disabled when the Monsoon dehumidifying operation.
● If you press On/Off button during the use, product operation will stop.
!
NOTE
Using this function in the rainy season or high humidity, you can operate simultaneously dehumidifier and cooling mode to remove humidity effectively.
OPERATION SETTING – Standard Mode
16
Fan Only Operation
Only fan will circulate air.
● Press remote controller screen 1 time to turn on.
- If remote controller operation is not used, screen will go into energy savings mode.
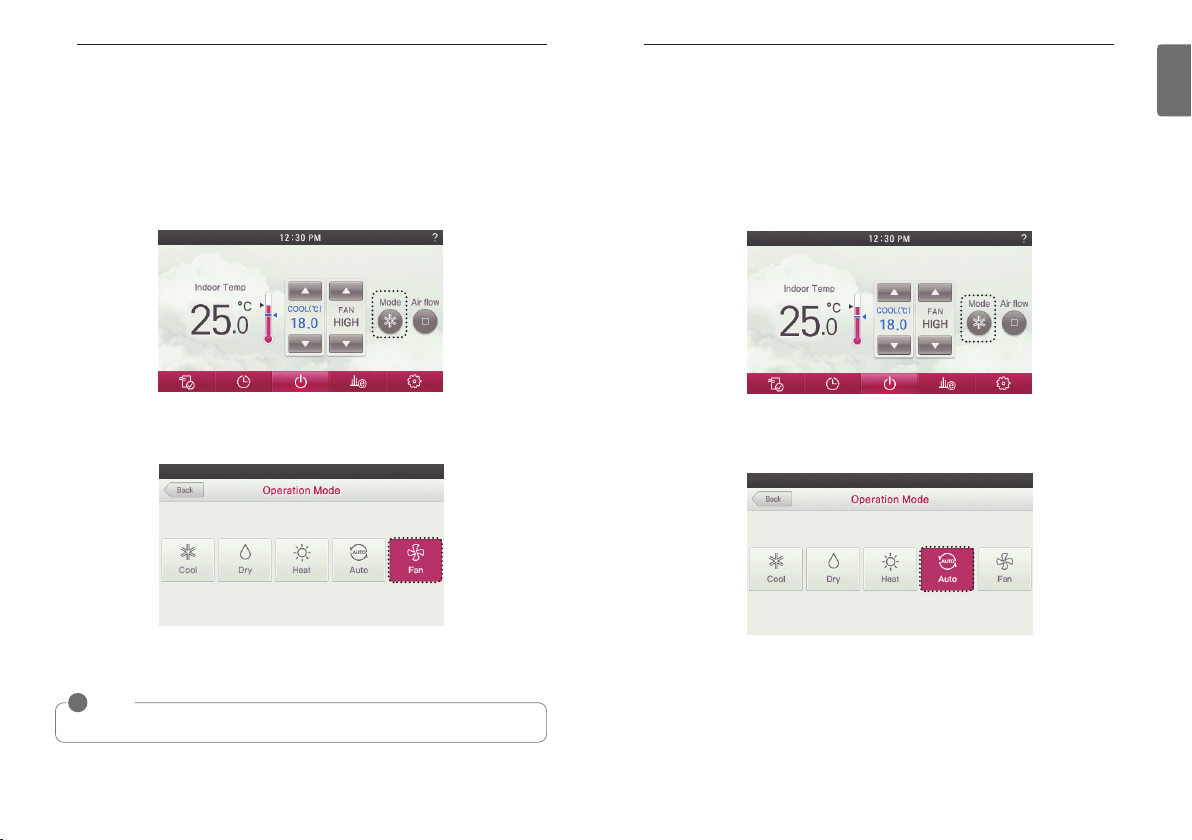
● During the operation of the product, press the mode button on the screen.
- It moves to the operation mode selection screen.
OPERATION SETTING – Standard Mode
Artificial Intelligence / Automatic Operation
Operation provides heating and cooling to satisfy space requirements.
● Press remote controller screen 1 time to turn on.
- If remote controller operation is not used, screen will go into energy savings mode.
● During the operation of the product, press the mode button on the screen.
- It moves to the operation mode selection screen.
17
ENGLISH
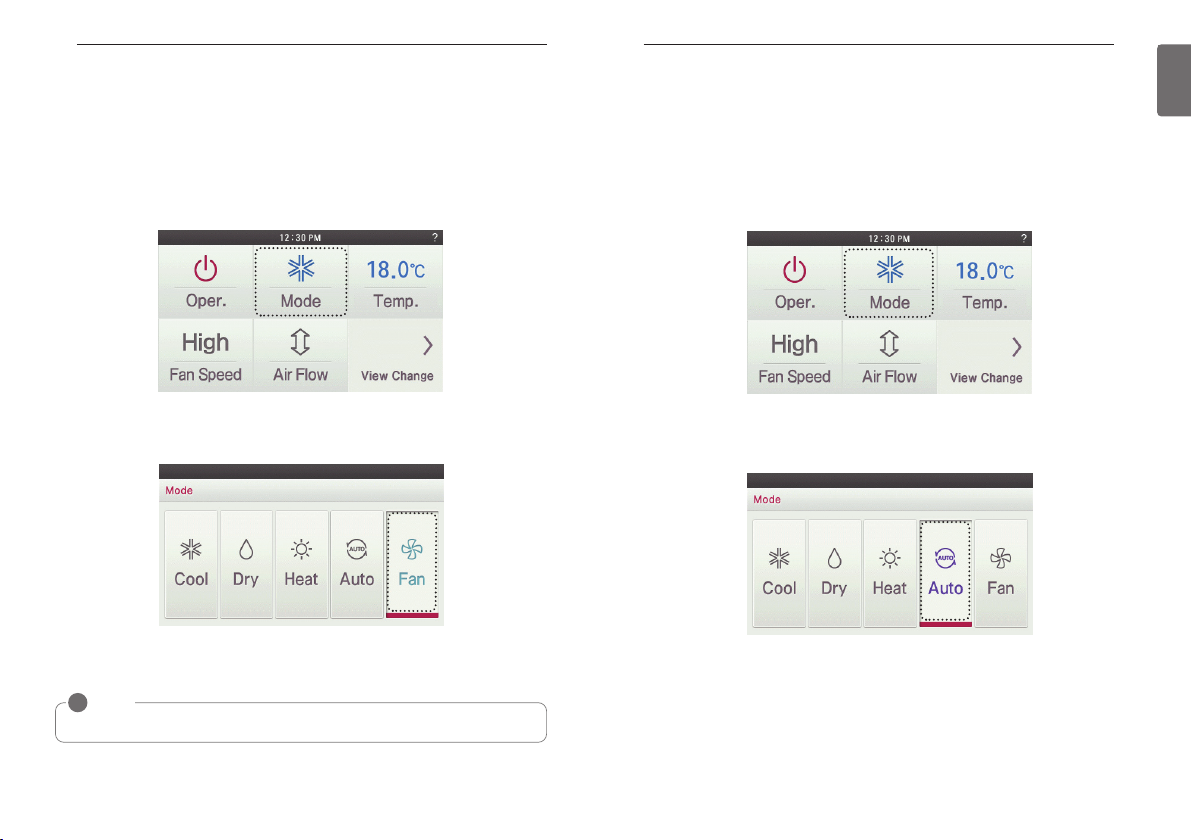
● In operation mode selection screen, press the ‘Fan’ button.
● If you press On/Off button during the use, product operation will stop.
!
NOTE
It only circulates indoor air
In operation mode selection screen, press the ‘AUTO’ button.
●
OPERATION SETTING – Standard Mode
18
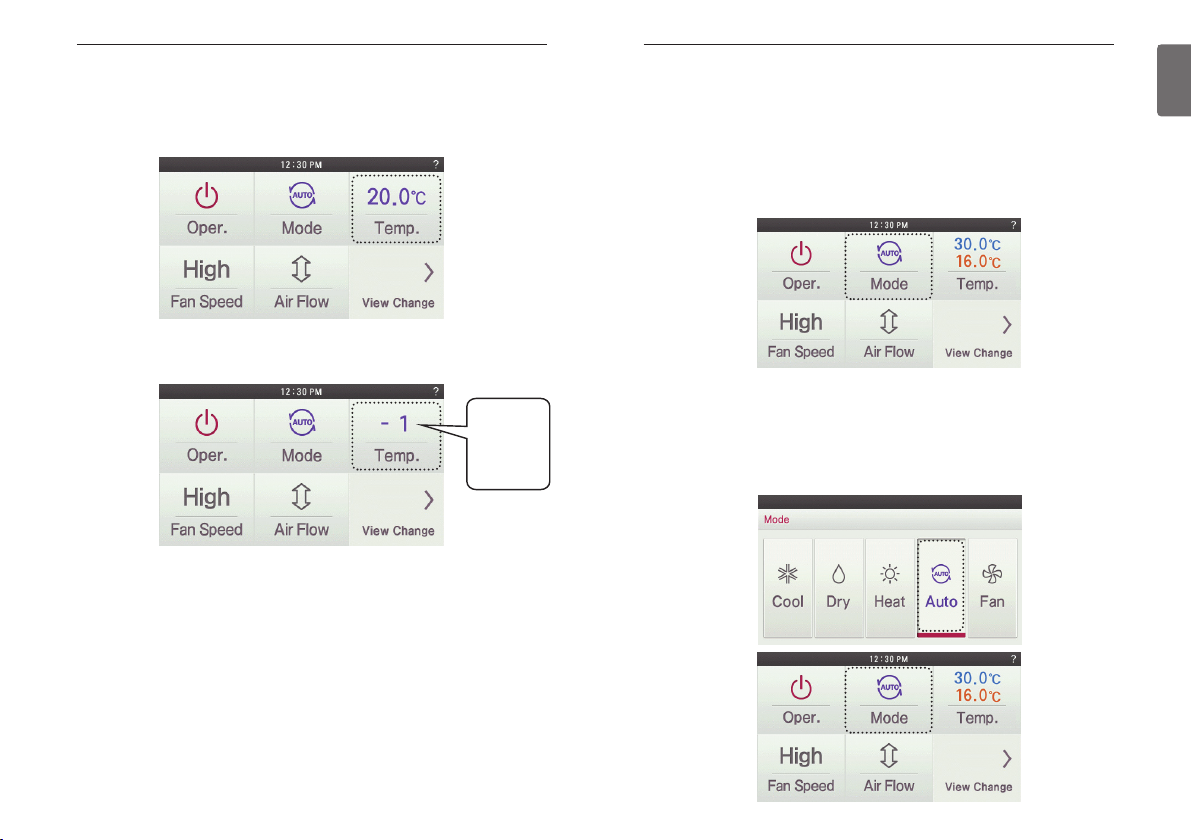
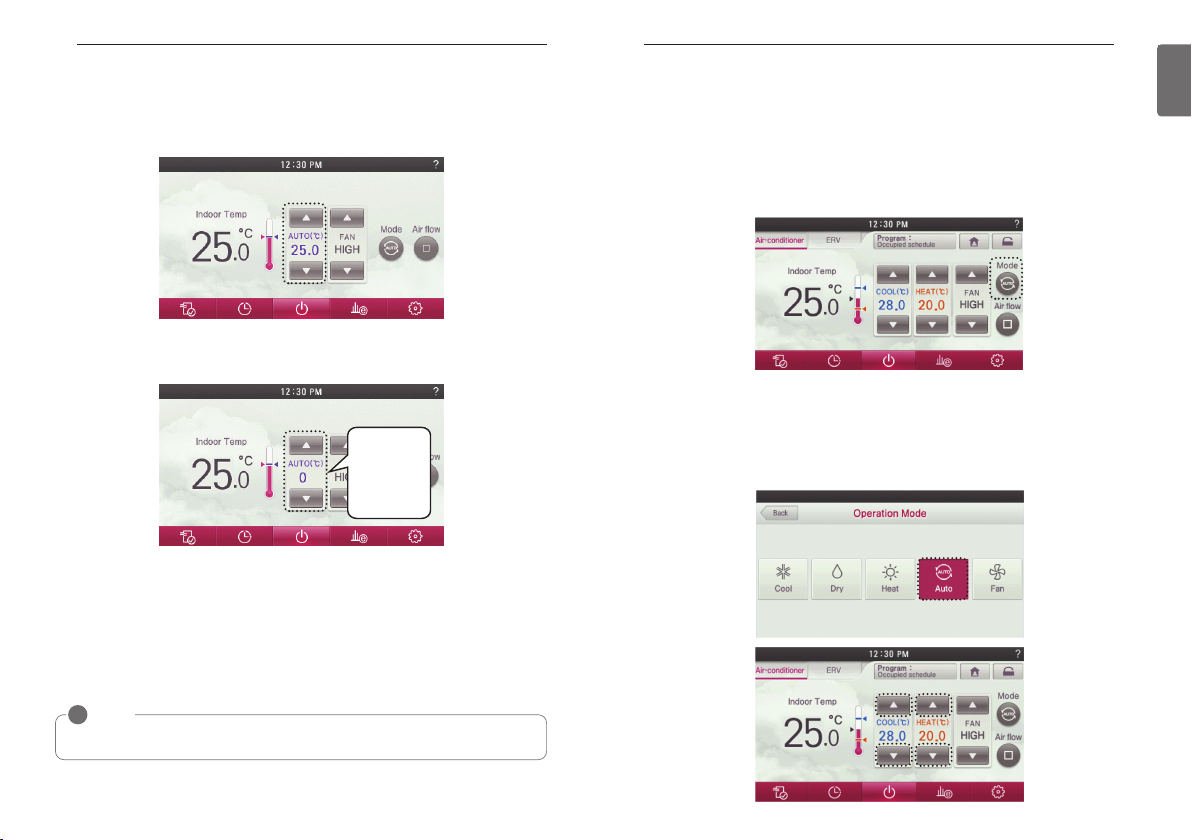
● If it is cooling/heating model, you can control the desired temperature.
- Indoor temperature is displayed on the remote controller default screen.(As below the picture)
- According to the indoor unit type, the desired temperature can be controlled in the units of
1°C or 0.5°C(2°F or 1°F)
● If it is cooling only model, you can control the stages from ‘hot’ to ‘cold’ with values of ‘-2’ to
‘2’ based on ‘0’.
2 : cold
1 : a little cold
0 : adequate
-1 : a little hot
-2 : hot
ex) If you feel cold, select "2".
If you feel a little cold, select "1".
If you want to keep the current state to select "0".
If you feel a little quite warm and select "-1".
If you feel quite warm and select "2".
OPERATION SETTING – Standard Mode
2 set point auto operation (North America Only)
The indoor unit automatically manages room temperature with heating and cooling with extended
setting temperature ranges.
2 set point auto mode can operate in 2 set point control mode.
● Press remote controller screen 1 time to turn on.
- If remote controller operation is not used, screen will go into energy savings mode.
● During the operation of the indoor unit, press the mode button on the screen.
- It moves to the operation mode selection screen.
● In operation mode selection screen, press the ‘AUTO’ button.
- "AUTO" when the operation mode is selected, desired temperature is indicated cooling and
heating temperature is desired.
- "COOL" operation mode when selected,displays only the desired cooling temperature (cooling
only the desired temperature control available)
- "HEAT" only when the operation mode selection, Heating desired temperature is displayed
(only heating temperature control can hope)
19
ENGLISH
● If you press On/Off button during use, product operation will stop.
TEMPERATURE SETTING - Standard Mode
20
TEMPERATURE SETTING - Standard Mode
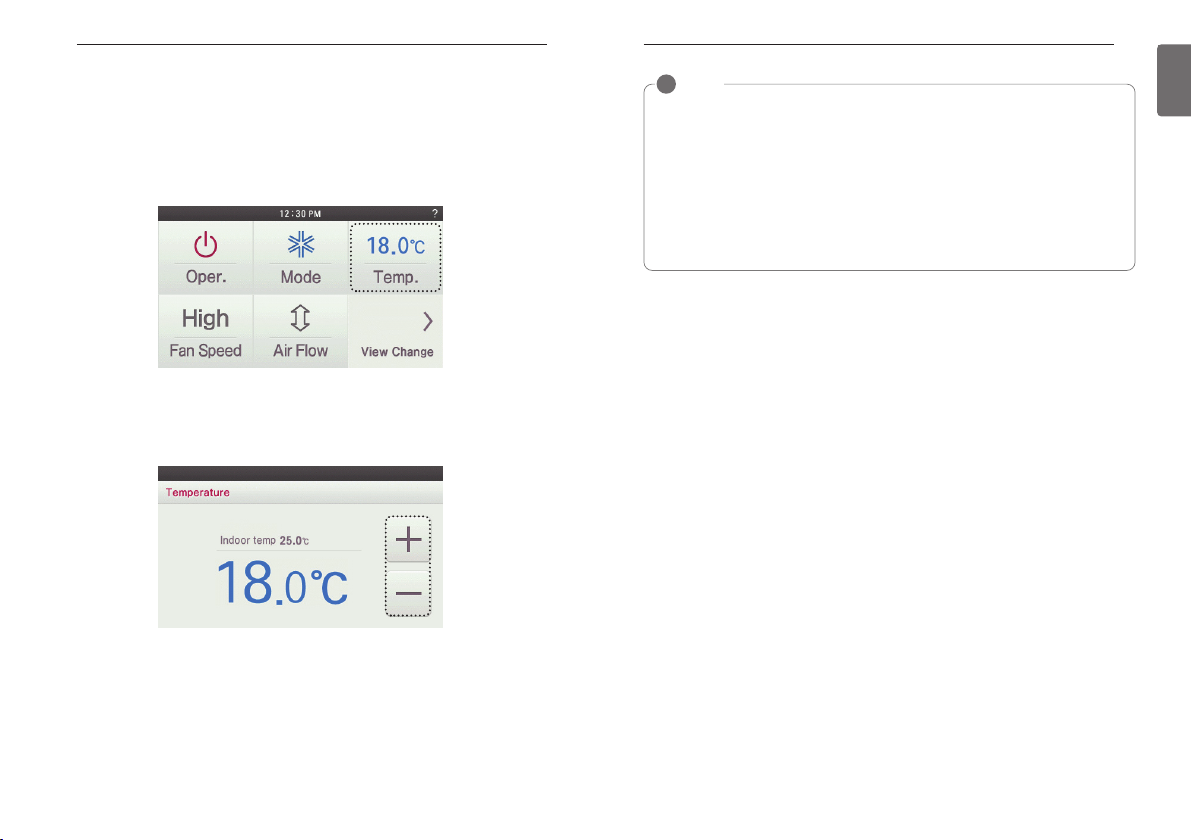
Controlling Desired Temperature
● During the indoor unit operation, press the temperature button on the screen.
- It moves to the temperature selection screen.
● Press the remote controller screen’s temperature setting button to set the desired temperature.
- In cooling, heating, and artificial intelligence And 2setpoint auto mode, you can control the de-
sired temperature.
TEMPERATURE SETTING - Standard Mode
!
NOTE
According to Control type setting value
• 1Set points
- You can select the desired temperature from 18 °C~30 °C(64~86 °F) for cooling operation and 16 °C~30 °C(60~86 °F) for heating operation.
• 2Set points
- You can select the desired temperature from 18 °C ~ 30 °C(64~86 °F) for cooling operation and 16 °C~30 °C(60~86 °F) for heating operation.
* A temperature area of extended range can be selected through desired temperature
range setting option.
- Cooling : 16~37.5 °C (64~99 °F) / Heating : 4~30 °C (40~86 °F)
• The temperature difference between the indoor temperature and the outdoor temperature
is recommended to be 5 °C.(86 °F)
21
ENGLISH
During the cooling operation
• If the desired temperature is higher than the indoor temperature, cooling is not performed.
• Set the desired temperature below the indoor temperature.
During the heating operation
• If the desired temperature is lower than the indoor temperature, heating is not performed.
• Set the desired temperature higher than the indoor temperature.
WIND SETTING - Standard Mode
22
WIND SETTING - Standard Mode
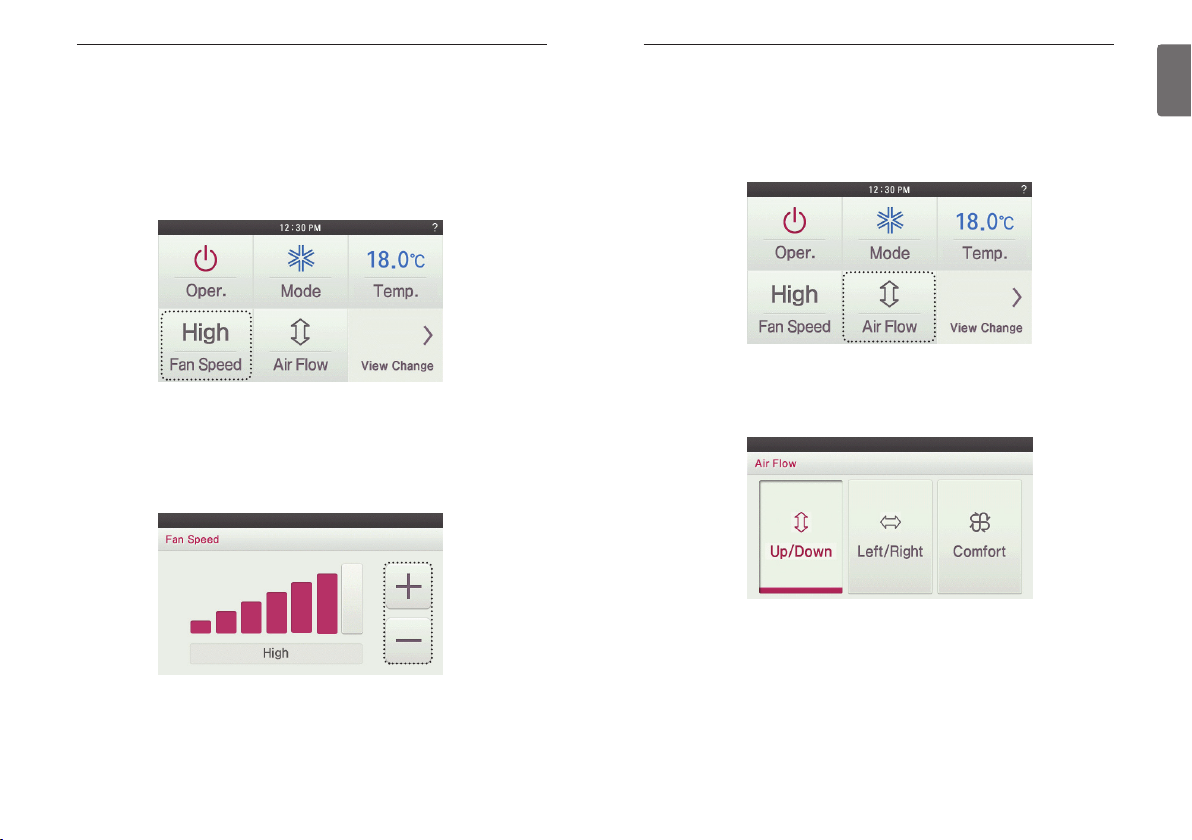
Fan speed Control
● During the indoor unit operation, press the fan speed button on the screen.
- It moves to the fan speed selection screen.
● Press the fan speed button to set the desired fan speed.
- Every time you press the fan speed button
You can select the fan speed in the order of ‘SLOW’ → ‘LOW’ → ‘MED’ → ‘HIGH’ →
‘POWER’ → ‘AUTO’.
- Depending on the product function, some fan speed may not be selected.
WIND SETTING - Standard Mode
Airflow Control
● During the indoor unit operation, press the screen’s ‘Air flow’ button.
- It moves to the direction of air flow selection screen.
● In the airflow selection screen, press the button in the desired air flow direction.
- Some Air Flow options may not be available due to the of indoor unit selected.
23
ENGLISH
OPERATION SETTING - Advanced Mode OPERATION SETTING - Advanced Mode
24
OPERATION SETTING - Advanced Mode
General Cooling Operation
Maintains proper cooling comfort.
On/Off
Air conditioner and ventilator will be turned on or off.
● Press remote controller screen 1 time to turn on.
- If remote controller operation is not used, screen will go into energy savings mode.
● Press On/Off button in the screen.
- If the product is in operation, Go Back button and Home button will be illuminated.
- If the product is in stop, Go Back button's backlight and Home button's backlight will be off.
● If you press On/Off button during the use, product operation will stop.
● Press remote controller screen 1 time to turn on.
- If remote controller operation is not used, screen will go into energy savings mode.
● During the operation of the product, press the mode button on the screen.
- The operation mode selection screen is displayed.
● In operation mode selection screen, press the ‘Cool’ button.
- The initial temperature set for cooling operation is 18°C (64°F).
25
ENGLISH
OPERATION SETTING - Advanced Mode
● Press the temperature control button to adjust the desired Indoor temperature.
- Indoor temperature is displayed on the remote controller default screen.(As below the picture)
- Depending on the indoor unit type, the desired temperature can be controlled in increments
1°C or 0.5°C(2°F or 1°F)
h If the desired temperature is set higher thermal cooling does not turn on and only the fan will
operate.
● If you press On/Off button during the use, product operation will stop.
OPERATION SETTING - Advanced Mode
Power Cooling
It performs a strong cooling in a short period of time.
● Press remote controller screen 1 time to turn on.
- If remote controller operation is not used, screen will go into energy savings mode.
● During the cooling operation, if you press fan speed ‘▲’ button, power cooling is performed
after fan speed ‘HIGH’.
h For some indoor units products, according to whether there is a wind amount function,
power cooling is performed after fan speed ‘POWER’.
● During the cooling operation, if you press fan speed ‘▼’ button, power cooling is performed
after fan speed ‘AUTO’.
h For some indoor units products, according to whether there is a fan speed function, power
cooling is performed after fan speed ‘LOW’ or ‘SLOW’.
2726
ENGLISH
What is a 3 minute delay function?
If the indoor unit is operated right after stopping the cooling, no thermal cooling is allowed.
This function protects the compressor from malfunctioning. Compressor starts 3 minutes
after and the fan starts.
!
NOTE
• Setting temperature range :
Option 1. 64~86 °F (18~30 °C) (default setting)
Option 2. 64~99 °F (18~37.5 °C)
Option 3. 50~99 °F (10~37.5 °C) (if connecting to indoor unit with 2set point function)
• The difference between the indoor temperature and the outdoor temperature is recommended to be 5 °C.
● If you operate the fan speed control button during the usage, power cooling is turned off and
fan speed and set temperature returns to the setting before the power cooling.
What is power cooling?
• Desired temperature: 18°C (64°F)
• Fan Speed: ‘POWER’
• Fan direction: fixed to cooling operation position
h Some products do not have the power cooling function.
These operations quickly decrease
the indoor temperature.
OPERATION SETTING - Advanced Mode
Heating Operation
Provides warm air to the space.
● Press remote controller screen 1 time to turn on.
- If remote controller operation is not used, screen will go into energy savings mode.
● During the operation of the product, press the mode button on the screen.
- It moves to the operation mode selection screen.
OPERATION SETTING - Advanced Mode
● Press the temperature control button to set the desired temperature higher than the indoor
temperature.
- Indoor temperature is displayed on the remote controller default screen.(As below the pic-
ture)
- According to the indoor unit type, the desired temperature can be controlled in the units of
1°C or 0.5°C(2°F or 1°F)
h If the desired temperature is set lower than the indoor temperature, heating mode is disabled.
● Pressing the On/Off button during the use, product operation will stop.
2928
ENGLISH
● In operation mode selection screen, press the ‘Heat’ button.
- The heating operation’s initial set temperature is 30°C (86°F).
- Depending on the indoor unit type, the desired temperature can be controlled in increments
1°C or 0.5°C(2°F or 1°F)
!
NOTE
• Setting temperature range :
Option 1. 60~86 °F (16~30 °C) (default setting)
Option 2. 40~86 °F (4~30 °C)
Option 3. 40~90 °F (10~32 °C) (if connecting to indoor unit with 2set point function)
• For cooling-only model can not be selected heating.
OPERATION SETTING - Advanced Mode
Dehumidification Operation
Removes moisture from the air.
● Press remote controller screen 1 time to turn on.
- If remote controller operation is not used, screen will go into energy savings mode.
● During the operation of the product, press the mode button on the screen.
- It moves to the operation mode selection screen.
OPERATION SETTING - Advanced Mode
Monsoon Dehumidifying Mode
This is monsoon region-specific dehumidification function.
● Press remote controller screen 1 time to turn on.
- If remote controller operation is not used, screen will go into energy savings mode.
● During the operation of the product, press the mode button on the screen.
- It moves to the operation mode selection screen.
3130
ENGLISH
● In operation mode selection screen, press the ‘Dry’ button.
- The dehumidification operation’s initial fan speed is ‘LOW’.
- Desired temperature setting is disabled when the dehumidifying operation.
● If you press On/Off button during the use, product operation will stop.
!
NOTE
You can effectively remove moisture and perform cooling operation at the same time if you
use this function during rainy season or when the humidity is high.
● In operation mode selection screen, press the ‘M’Dry’ button.
- Dehumidification operation’s initial fan speed is ‘LOW’.
- Desired temperature setting is disabled when the Monsoon dehumidifying operation.
● If you press On/Off button during the use, product operation will stop.
!
NOTE
Using this function in the rainy season or high humidity, you can operate simultaneously dehumidifier and cooling mode to remove humidity effectively.
OPERATION SETTING - Advanced Mode
Fan Only Operation
Only fan will circulate air.
● Press remote controller screen 1 time to turn on.
- If remote controller operation is not used, screen will go into energy savings mode.
● During the operation of the product, press the mode button on the screen.
- It moves to the operation mode selection screen.
OPERATION SETTING - Advanced Mode
Artificial Intelligence / Automatic Operation
Operation provides heating and cooling to satisfy space requirements.
● Press remote controller screen 1 time to turn on.
- If remote controller operation is not used, screen will go into energy savings mode.
● During the operation of the product, press the mode button on the screen.
- It moves to the operation mode selection screen.
3332
ENGLISH
● In operation mode selection screen, press the ‘Fan’ button.
● If you press On/Off button during the use, product operation will stop.
!
NOTE
It only circulates indoor air
In operation mode selection screen, press the ‘AUTO’ button.
●
OPERATION SETTING - Advanced Mode
● If it is cooling/heating model, you can control the desired temperature.
- Indoor temperature is displayed on the remote controller default screen.(As below the picture)
- According to the indoor unit type, the desired temperature can be controlled in the units of
1°C or 0.5°C(2°F or 1°F)
● If it is cooling only model, you can control the stages from ‘hot’ to ‘cold’ with values of ‘-2’ to
‘2’ based on ‘0’.
2 : cold
1 : a little cold
0 : adequate
-1 : a little hot
-2 : hot
ex) If you feel cold, select "2".
If you feel a little cold, select "1".
If you want to keep the current state to select "0".
If you feel a little quite warm and select "-1".
If you feel quite warm and select "2".
OPERATION SETTING - Advanced Mode
2 set point auto operation (North America Only)
The indoor unit automatically manages room temperature with heating and cooling with extended
setting temperature ranges.
2 set point auto mode can operate in 2 set point control mode.
● Press remote controller screen 1 time to turn on.
- If remote controller operation is not used, screen will go into energy savings mode.
● During the operation of the indoor unit, press the mode button on the screen.
- It moves to the operation mode selection screen.
● In operation mode selection screen, press the ‘AUTO’ button.
- "AUTO" when the operation mode is selected, desired temperature is indicated cooling and
heating temperature is desired.
- "COOL" operation mode when selected,displays only the desired cooling temperature (cooling only the desired temperature control available)
- "HEAT" only when the operation mode selection, Heating desired temperature is displayed
(only heating temperature control can hope)
3534
ENGLISH
● If you press On/Off button during use, product operation will stop.
!
NOTE
If it does not work as desired, select another operation mode.
OPERATION SETTING - Advanced Mode
36
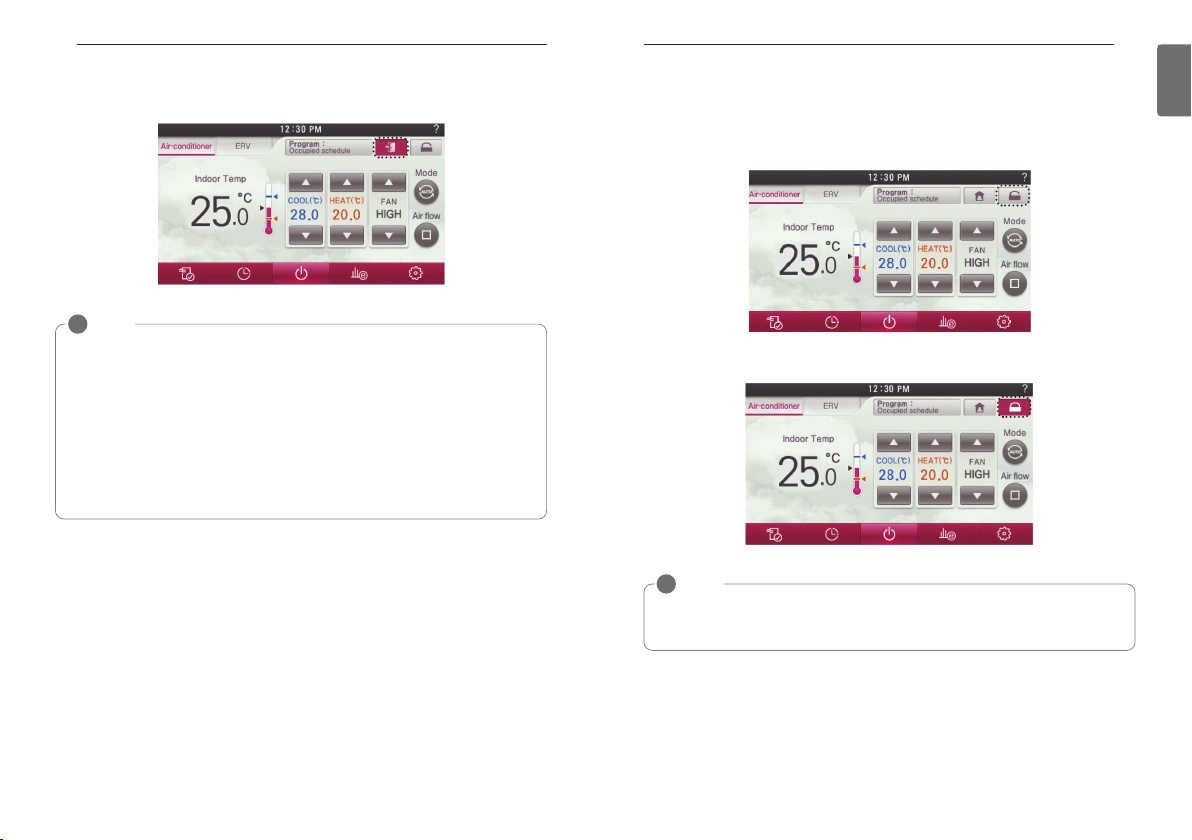
Override control
The wired remote controller manages indoor unit status based on programmed control events.
User can set timer option at override function and return to original schedule event.
The ability to switch temporarily to the current occupancy status Override function.
- If the current "occupied" state, the transition to the "absence" status when "Override" action.
- If you are a "member" status, "Override" switch to "occupied" state during operation.
- Changes to the current reservation status before the close time and basically, (Find based on
occupancy status will be changed by the "Override".).
- Please refer to "Note" for other details.
OPERATION SETTING - Advanced Mode
37
ENGLISH
● Press remote controller screen 1 time to turn on.
- If remote controller operation is not used, screen will go into energy savings mode.
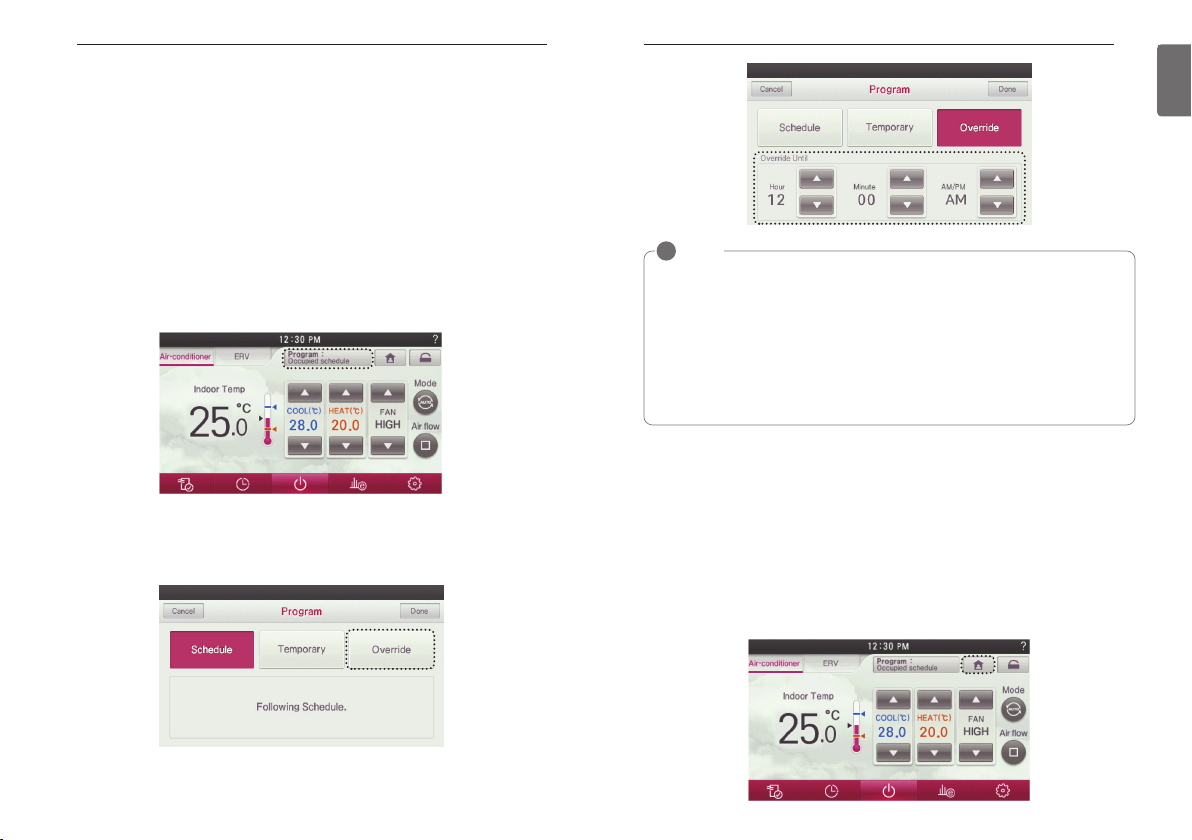
● Press the Program button on the screen.
- It moves to schedule operation mode selection screen.
● In schedule operation mode selection screen, press the ‘Override’ button.
- Press the Override button "Override" menu will be displayed for setting the end time.
- You can default value set ‘Override time’ by ‘Function setting – Override set time’
!
NOTE
• It revert to default operation setting if Thermostat doesn't have last occupied schedule in
unoccupied override.
- default operation setting: Auto operation mode / set temperature : 86 °F(30 °C)(cool),
60 °F(16 °C)(heat)
• It revert to set back operation setting if Thermostat doesn't have last unoccupied schedule
in occupied override.
- set back operation setting : Auto operation mode / set back setting temperature: function
setting – set back temperature.
• It can be canceled, if Thermostat receive command from other controller.
• When changes occur in the setting by a daytime reservation operation, the schedule override mode gets deactivated.
Home leave (Unoccupied Mode)
The "Home Leave " function enables proper operation of indoor unit when a space is left for a period of time.
This feature can only be used when Control type setting is set to the 2 setpoint control mode"
● Press remote controller screen 1 time to turn on.
- If remote controller operation is not used, screen will go into energy savings mode.
● Press the home leave button on the screen.
Change to ‘home leave set temperature’ setting value.
- Home leave operation setting : Setting / Function / Home Leave Set Temperature.
OPERATION SETTING - Advanced Mode
38
●
Touch panel is locked until you release the "Home Leave" mode.
!
NOTE
• You can’t change setting in home leave mode except cancel the set back mode.
- lock popup is displayed on the window.
• It can be canceled ,if remote controller receive command from other controller.
• When commands are received by other controllers, the home leave mode gets deactivated.
• When the home leave mode is deactivated, the following takes place.
- The set points shall go to the current schedule set points.
- If there are no weekly schedule, the set point shall go to the last set points before the
home leave operation.
- If there are no set point before the setback operation, the set points will go to the default
if the values have not been adjusted.
- Default setting will be auto. (heat 60 °F(16 °C), cool 86 °F(30 °C))
OPERATION SETTING - Advanced Mode
Hold
It is a function that holds the current mode of operation.
If it is on hold, weekly or yearly or holiday schedule cannot be operation.
● Press the hold button on the screen.
● Touch panel is locked until you release the “Hold" mode while driving in the “Hold" mode.
!
NOTE
You can You can’t change setting in ‘Hold’ except cancel the ‘Hold’
• It can be canceled ,if Thermostat receive command from other controller.
• When commands are received by other controllers, the Hold mode gets deactivated.
39
ENGLISH
OPERATION SETTING - Advanced Mode
40
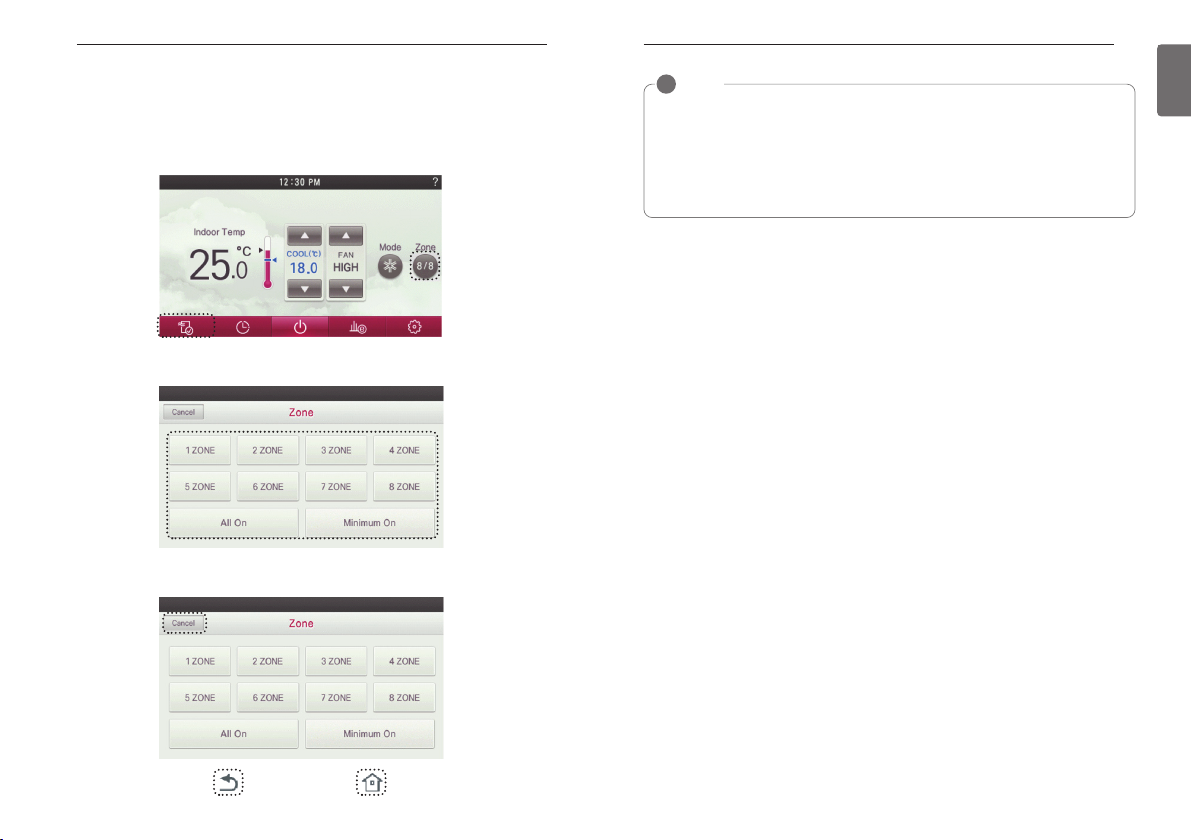
Zone Control
A function to control zone with duct type indoor units.
Wired Remote controller can control maximum 8 zones.
● During the product operation, press the screen’s ‘Zone’ button.
- It moves to the direction of Zone open / close screen.
● Select zone button that you want to control.
● If you press ‘Go Back’ or ‘Home’ button, it will exit from the setting menu.
OPERATION SETTING - Advanced Mode
!
NOTE
according to installation setting value
• If no function is supported
- This entry can not function.
• old type
- Zone control is currently only available to monitor.
• new type(4zone or 8Zone)
- Any number of zones is installed is displayed on the screen can be controlled.
41
ENGLISH
TEMPERATURE SETTING – Advanced Mode
42
TEMPERATURE SETTING – Advanced Mode
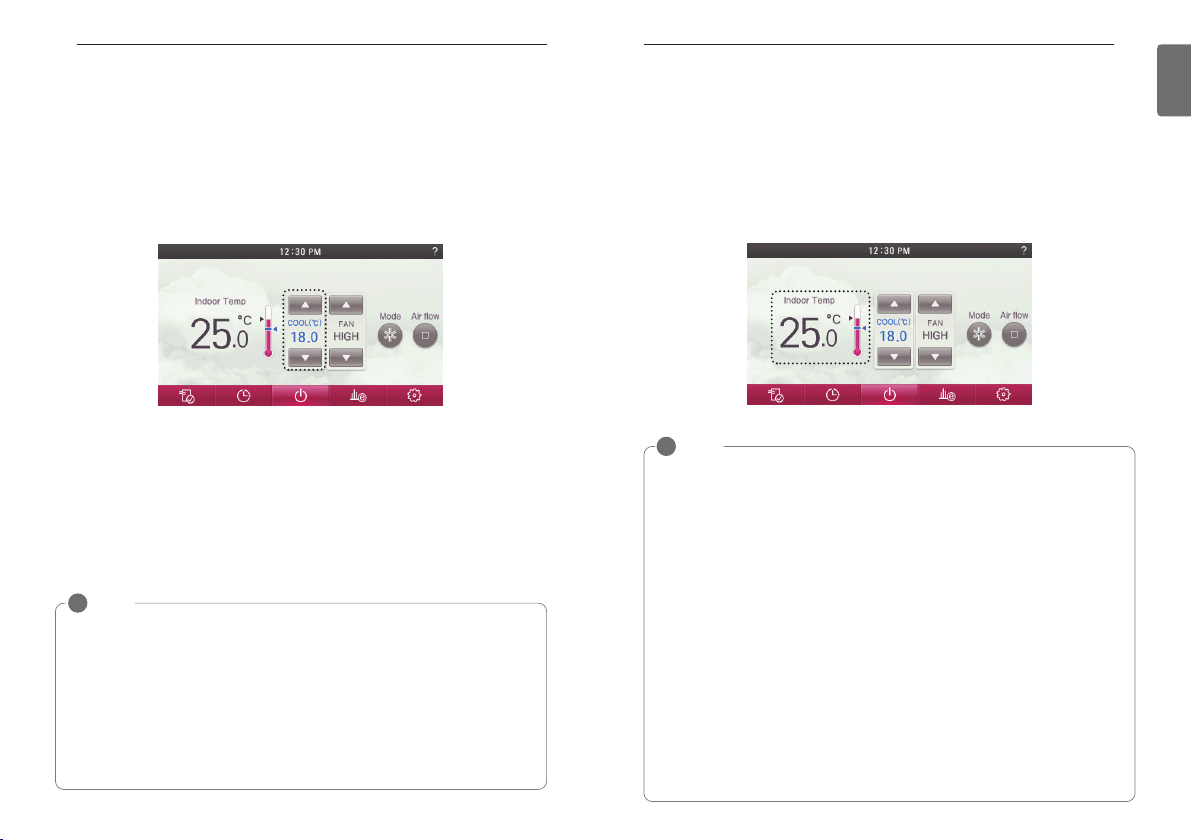
Controlling Desired Temperature
● Press the remote controller screen’s temperature setting button to set the desired temperature.
- In cooling, heating, and artificial intelligence And 2setpoint auto mode, you can control the de-
sired temperature.
During the cooling operation
• If the desired temperature is higher than the indoor temperature, cooling is not performed.
• Set the desired temperature below the indoor temperature.
During the heating operation
• If the desired temperature is lower than the indoor temperature, heating is not performed.
• Set the desired temperature higher than the indoor temperature.
!
NOTE
According to Control type setting value
• 1Set points
- You can select the desired temperature from 18 °C~30 °C(64~86 °F) for cooling operation and 16 °C~30 °C(60~86 °F) for heating operation.
• 2Set points
- You can select the desired temperature from 18 °C ~ 30 °C(64~86 °F) for cooling operation and 16 °C~30 °C(60~86 °F) for heating operation.
* A temperature area of extended range can be selected through desired temperature
range setting option.
- Cooling : 16~37.5 °C (64~99 °F) / Heating : 4~30 °C (40~86 °F)
• The temperature difference between the indoor temperature and the outdoor temperature
is recommended to be 5 °C.(86 °F)
TEMPERATURE SETTING – Advanced Mode
Check Room Temperature
● Press remote controller screen 1 time to turn on.
- If remote controller operation is not used, screen will go into energy savings mode.
● On the remote controller main screen, you can check the room temperature.
!
NOTE
The temperature distribution in the remote controller installation space is not uniform, so
there can be a little difference between the temperature you actually feel and the remote
controller’s room temperature display
According to Control type setting value
• 1Set points
Fahrenheit: 34~99 °F
- below 34 °F: display ‘LO’
- over 99 °F: display ‘HI’
Celsius: 0.5~39.5 °C
- below 0.5 °C: display ‘LO’
- over 39.5 °C: display ‘HI’
• 2Set points
- Room temperature display range
Fahrenheit: 52~99 °F
- below 52 °F: display ‘LO’
- over 99 °F: display ‘HI’
Celsius: 10.5~39.5 °C
- below 10.5 °C: display ‘LO’
- over 39.5 °C: display ‘HI’
- For indoor temperature below 50 °F (10 °C), the value perceived by the Thermostat(with
cable) is displayed.
• Because of location of Temperature sensing, the real room temperature and
the this displayed value can be different.
43
ENGLISH
WIND SETTING - Advanced Mode
44
WIND SETTING - Advanced Mode
Fan speed Control
● Press the fan speed button to set the desired fan speed.
- Every time you press the fan speed button
You can select the fan speed in the order of ‘SLOW’ → ‘LOW’ → ‘MED’ → ‘HIGH’ →
‘POWER’ → ‘AUTO’.
- Depending on the product function, some fan speed may not be selected.
WIND SETTING - Advanced Mode
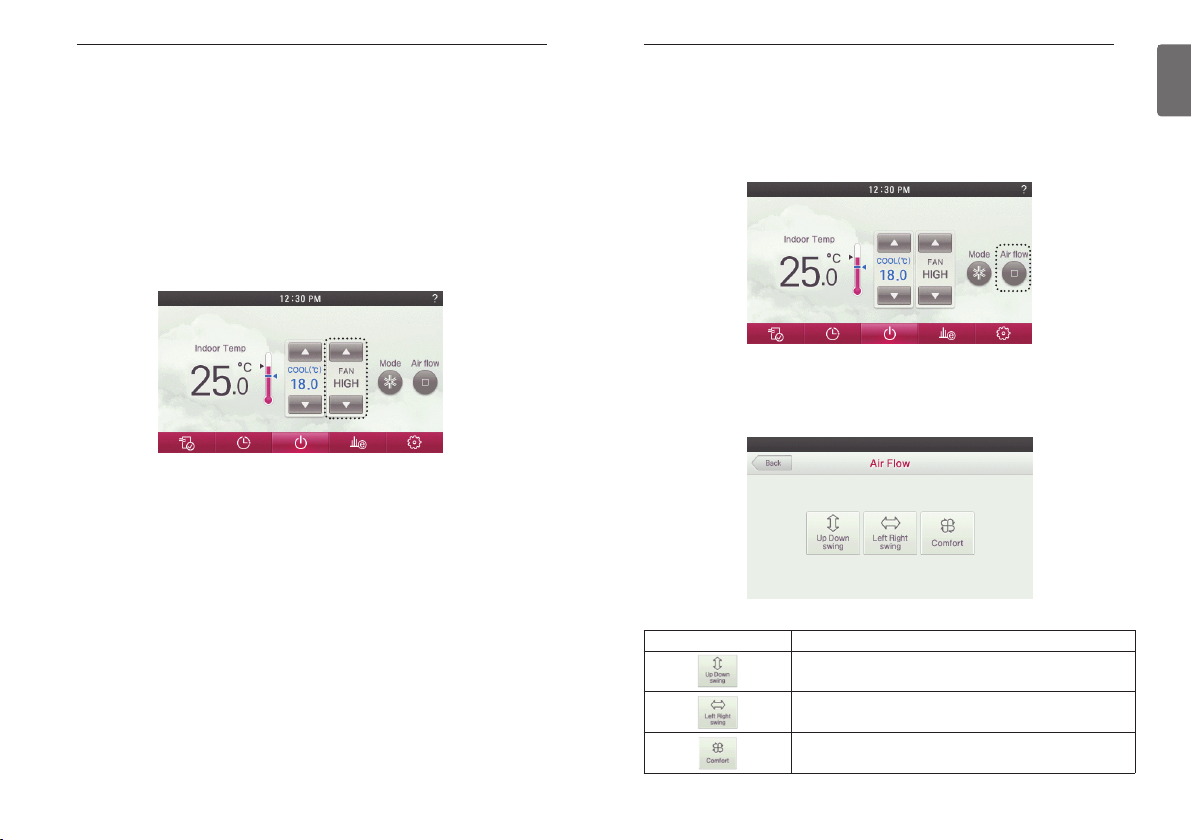
Airflow Control
● During the indoor unit operation, press the screen’s ‘Air flow’ button.
- It moves to the direction of air flow selection screen.
● In the airflow selection screen, press the button in the desired air flow direction.
- Some Air Flow options may not be available due to the of indoor unit selected.
45
ENGLISH
Figure Description
Automatically changes the airflow to up and down.
Automatically changes the airflow to left and right.
If it is connected to a indoor unit with 4 vanes exits, Air moves by
crossing over and swinging 1,3 and 2,4 vanes.
SUB FUNCTION SETTING
46
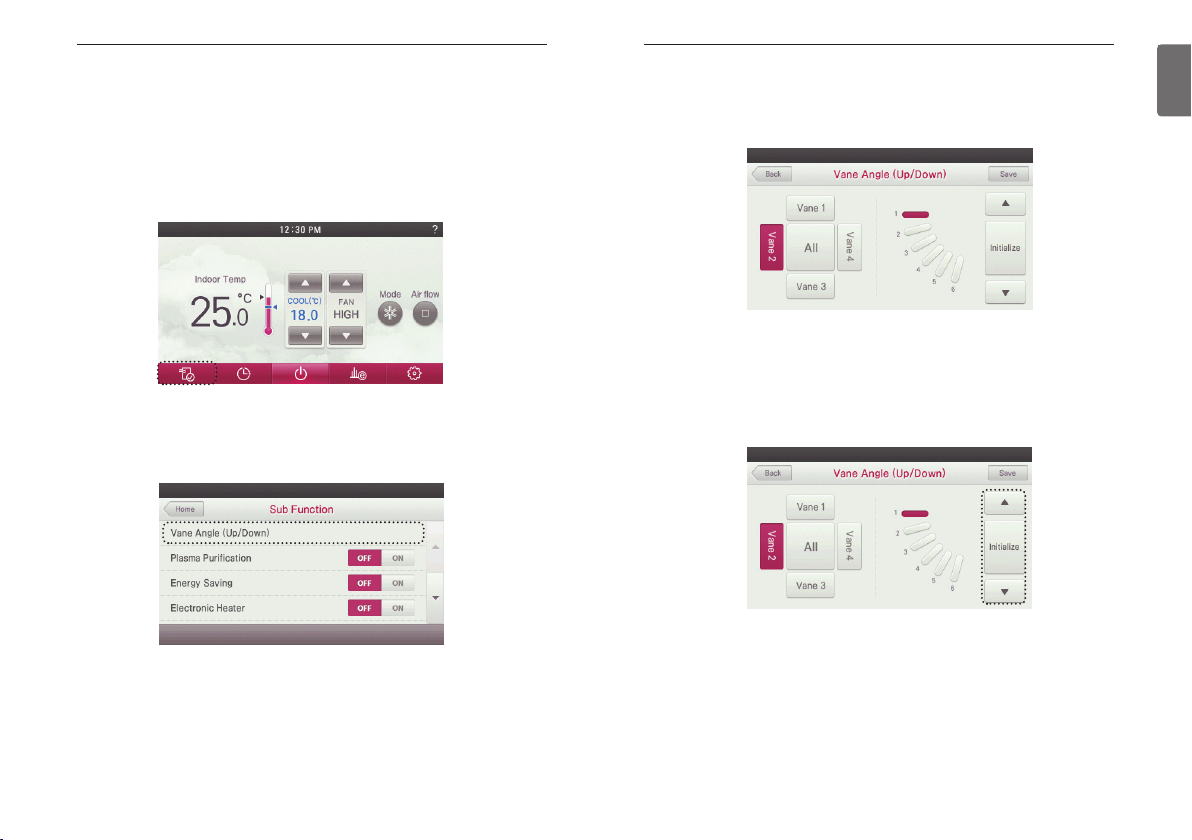
SUB FUNCTION SETTING
Up/Down Vane Angle Setting
● During the indoor unit operation, press screen’s ‘additional function menu‘ button.
- It moves to additional function selection screen.
● In the setting menu list, press ‘Vane Angle(Up/Down)’
- It moves to Vane Angle (Up/Down) Setting screen.
SUB FUNCTION SETTING
●
In Vane Angle (Up/Down) Setting screen, press the button of the vane to control the air flow angle.
- Up and down button and check the moving vane.
- To set the angles of all the vanes at the same time, select ‘All’ button.
● Press ‘▲’ and ‘▼’ button to select the vane angle of the selected one.
-
Vane angles of movement are offered 5 stages or 6 stages according to each indoor unit.
- To reset to the initial factory default setting state, press ‘Initialize’ button.
- "Initialize" is selected, and select all the vanes are fixed to the initial value (vane angle 3)
47
ENGLISH
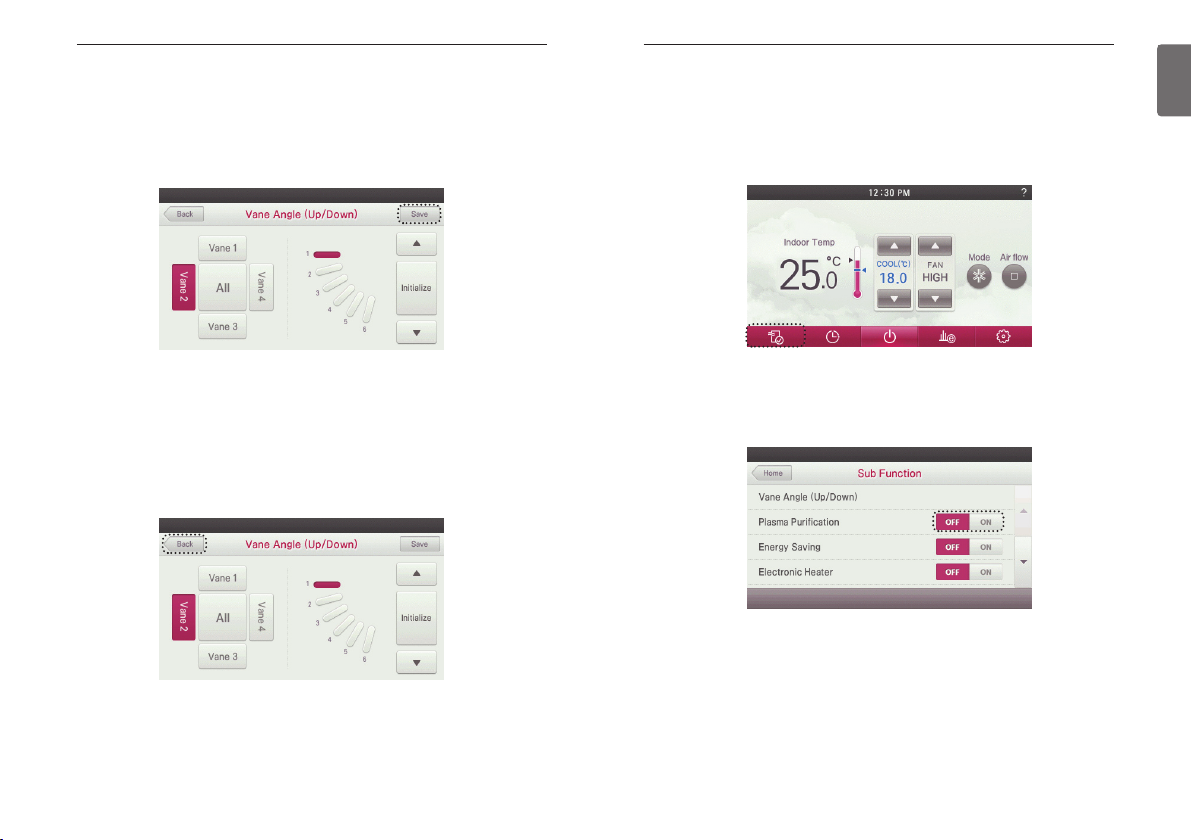
SUB FUNCTION SETTING
48
● Press ‘Save’ button to save the vane angle setting.
- If you exit without pressing the Save button, changed value will not be applied.
- When you press the Save button, only the values currently displayed on the screen will be applied. Example) Select vane 1 → Change angle → Save → Select vane 3 → Save
- Verify by sight that the new vane angle setting has been applied. If the vane angle stays at
the original (pre-setting change) angle, your changes were not saved through the screen display.
SUB FUNCTION SETTING
Plasma Purification Setting
Improves indoor air quality
● During the product operation, press the screen’s ‘additional function menu’ button.
- It moves to additional function selection screen.
49
ENGLISH
● Set the vane angles of the remaining vanes using the same procedure as above.
- Depending on the model of your indoor unit, you may only have 1 or 2 vane settings that can
be applied (i.e., 1-way or 2-way cassettes).
● If you press ‘Back’, ‘Go Back’, or ‘Home’ button, it will exit from the setting menu.
- If there is no button input for about 60 seconds, it automatically exits from the setting menu.
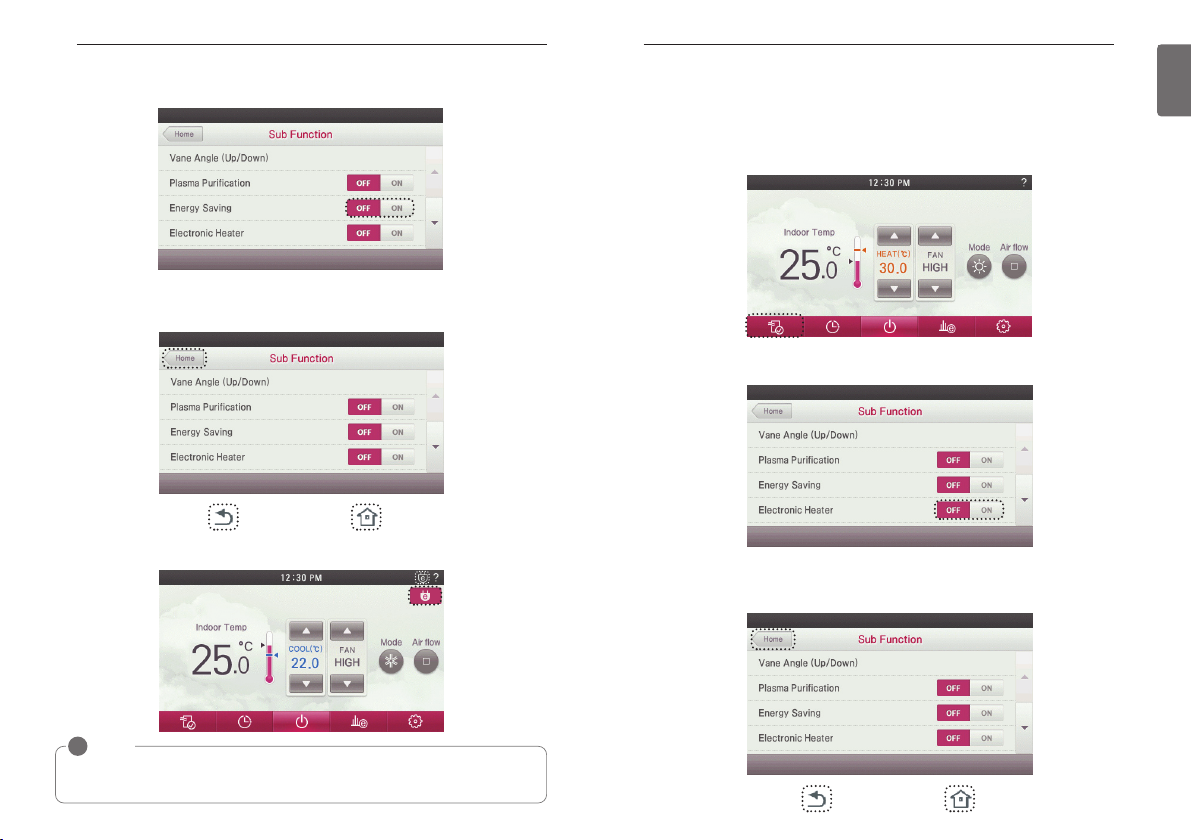
● In Additional Function Setting screen, press ‘Plasma Purification’, ‘OFF/ON’ button to activate
or turn off the desired function.

SUB FUNCTION SETTING
50
● If you press ‘Go Back’ or ‘Home’ button, it will exit from the setting menu.
- If no buttons are pressed within 60 seconds after setting functions, it automatically exits from
the setting menu.
● The set additional operation symbol is displayed at the top right of the remote controller main
screen.
!
NOTE
• Plasma Purification is an additional function, and it may not be displayed or performed in
some indoor unit models.
• Air cleaning function can only work when indoor unit is in operation.
• If you want to operate purification only, set the plasma purification in fan mode.
SUB FUNCTION SETTING
Energy-Saving Cooling Setting
Energy-Saving cooling function enhances the comfort of the user and to improves the EnergySaving performance by controlling the desired temperature during the cooling operation.
This function is only available during the cooling operation.
● During the indoor unit operation, press “Energy Saving” button at the top right of the screen.
- The Energy-Saving cooling is set.
● The set additional operation is displayed at the top right of the main screen.
- If you press ‘Energy Saving’ button one more time, it will be turned off.
● You can also set or turn off the Energy-Saving cooling through the additional operation menu.
● During the indoor unit operation, press the screen’s ‘additional function menu’ button.
- It moves to the additional function selection screen.
51
ENGLISH
SUB FUNCTION SETTING
52
● In additional function setting screen, press ‘Energy Saving’ category’s ‘OFF/ON’ button to set
or turn off the desired state.
● If you press ‘Go Back’ or ‘Home’ button, it will exit from the setting menu.
- If no buttons are pressed for 60 seconds, it automatically exits from the setting menu.
● The set additional operation is displayed at the top right of the main screen.
SUB FUNCTION SETTING
Heater Setting
It is the function to reinforce the heating performance by turning on the electric heater during the
heating operation. It can be set only during heating operation.
● During the indoor unit operation, press the screen’s ‘additional function menu’ button.
- It moves to additional function selection screen.
● In additional function setting screen, press ‘Electric Heater’ category’s ‘OFF/ON’ button to set
or turn off the desired state.
● If you press ‘Go Back’ or ‘Home’ button, it will exit from the setting menu.
- If no buttons are pressed for 60 seconds, it automatically exits from the setting menu.
53
ENGLISH
!
NOTE
• You can set the Energy-Saving function only during the cooling operation.
• Energy-Saving function may not work in some indoor unit products.
SUB FUNCTION SETTING
54
● The set additional operation is displayed at the top right of the default screen.
!
NOTE
Heater function may not work in some indoor unit products.
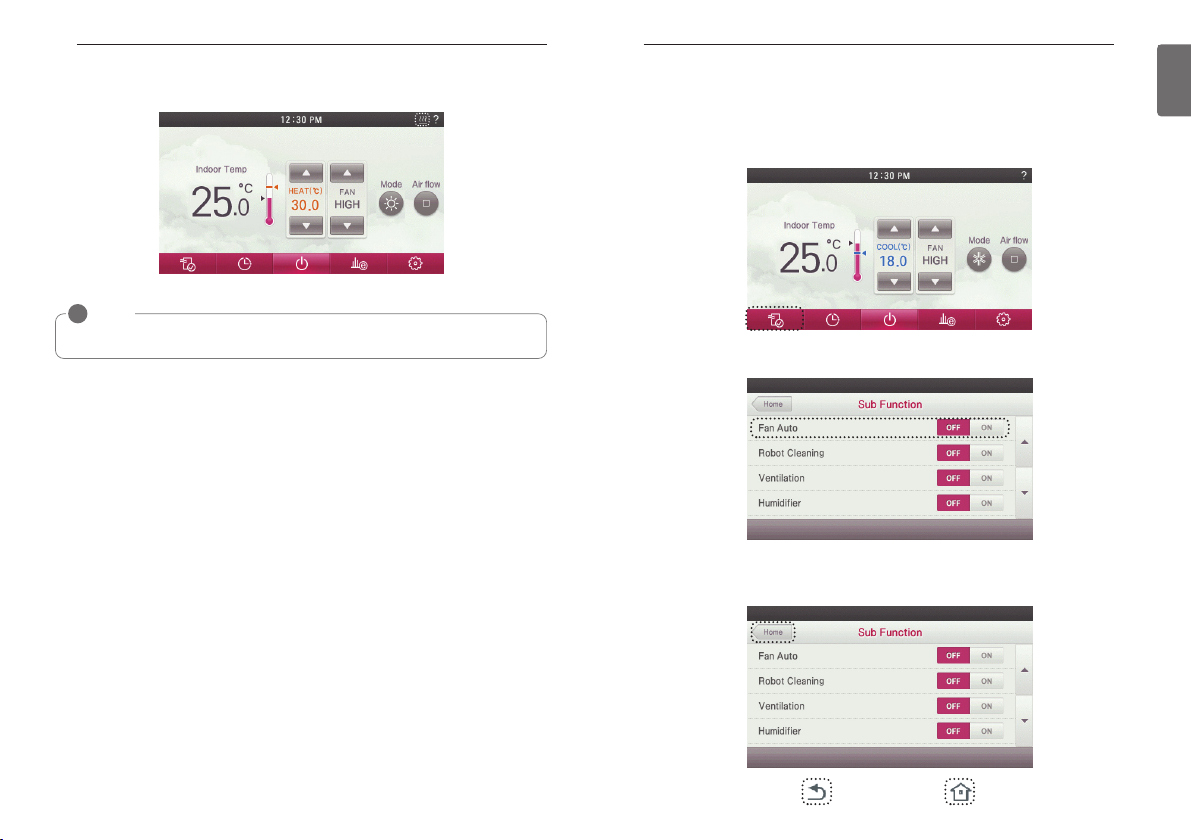
SUB FUNCTION SETTING
Fan Auto Setting
Select fan operation after performing thermal control of indoor units.
If set to 'ON', fan operation keeps on after thermal operation of indoor units.
● During the indoor unit operation, press the screen’s ‘additional function menu’ button.
- It moves to additional function selection screen.
● In additional function setting screen, press ‘Fan Auto’ category’s ‘OFF/ON’ button to set or
turn off the desired state.
● If you press ‘Go Back’ or ‘Home’ button, it will exit from the setting mode.
- If there is no button input for about 60 seconds, it automatically exits from the setting mode.
55
ENGLISH
SUB FUNCTION SETTING
56
● The set additional operation is displayed at the top right of the default screen.
!
NOTE
Fan auto function may not work in some indoor unit products.
SUB FUNCTION SETTING
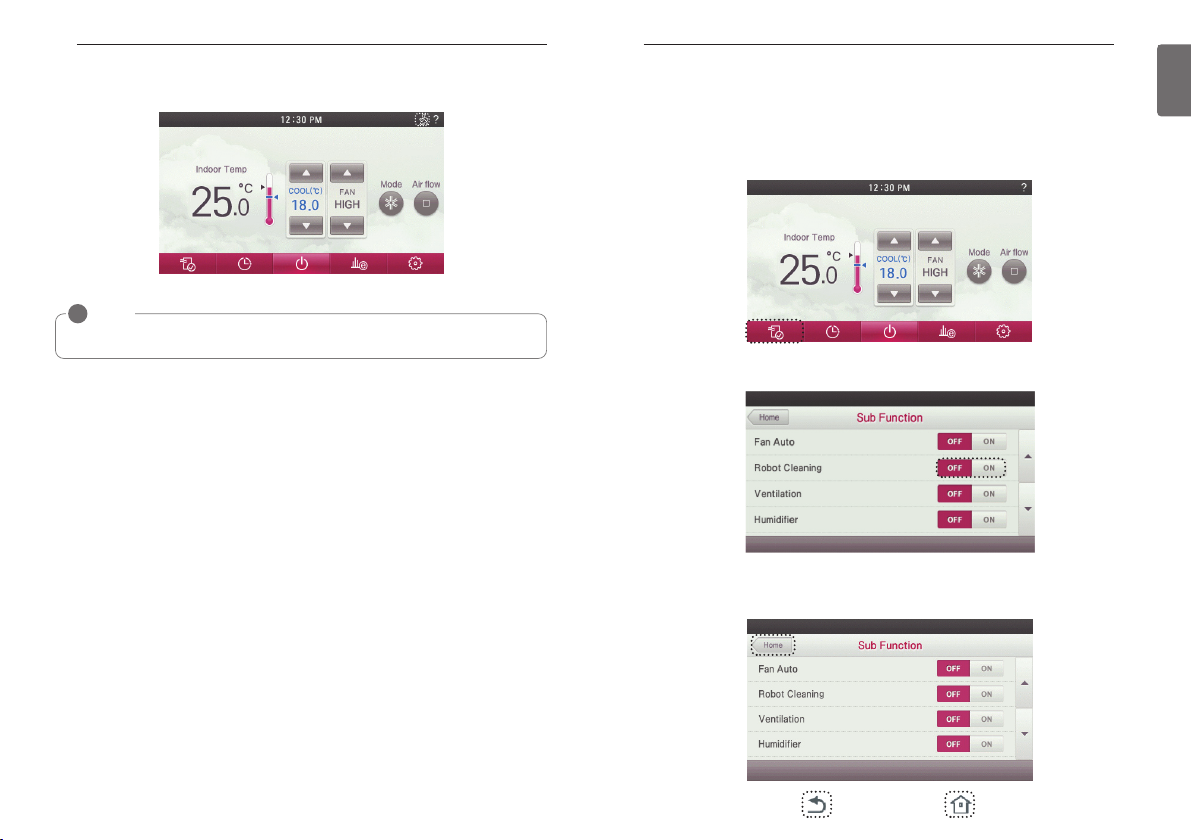
Robot Cleaning Setting
The robot cleaning function is a function to automatically clean the filter with the cleaner installed
in the product after using the air conditioner for certain time period.
It can be set 30 seconds after stopping the operation.
● During the indoor unit operation, press the screen’s ‘additional function menu’ button.
- It moves to additional function selection screen.
● In additional function setting screen, press the ‘Robot Cleaning’, ‘OFF/ON’ button to set or turn
off the desired state.
● If you press ‘Go Back’ or ‘Home’ button, it will exit from the setting menu.
- If no buttons are pressed for 60 seconds, it automatically exits from the setting menu.
57
ENGLISH
SUB FUNCTION SETTING
58
● The set additional operation is displayed at the top right of the default screen.
!
NOTE
Robot cleaning setting function may not work ins soe indoor unit products.
SUB FUNCTION SETTING
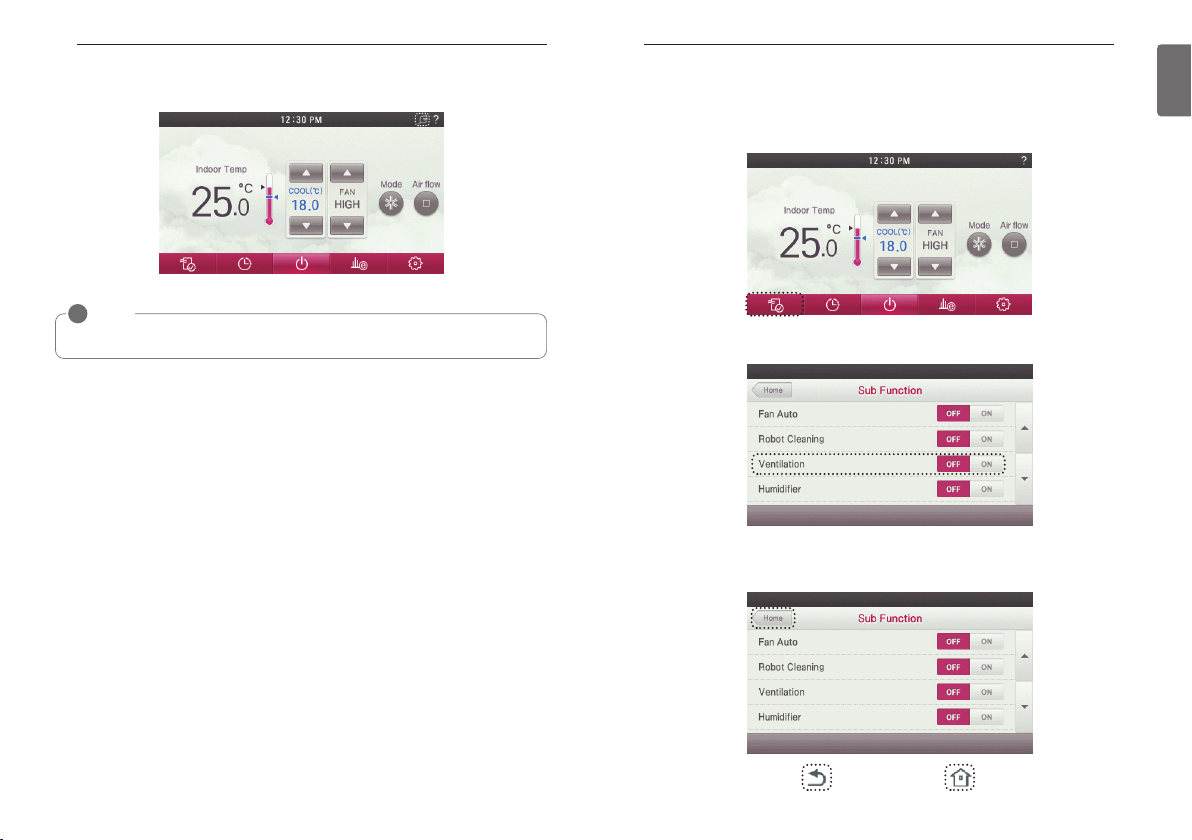
Ventilation kit Setting
Function enables operation of an optional ventilation kit with indoor units
● During the indoor unit operation, press the screen’s ‘additional function menu’ button.
- It moves to additional function selection screen.
● In additional function setting screen, press ‘Ventilation’ category’s ‘OFF/ON’ button to set or
turn off the desired state.
● If you press ‘Go Back’ or ‘Home’ button, it will exit from the setting menu.
- If no buttons are pressed for 60 seconds after the setting, it will automatically exit from the
setting menu.
59
ENGLISH
 Loading...