

LG PL-S860 Owner’s Manual
Drawn Approved
Signature
Eunjoo.Kim Jongok.kim
MMM/DD/YYYY
Feb/10/2017 Feb/10/2017
PL-S860 LG MFL69559214
AL Signage Acc (1704-REV00)
:LGEAK :LGEKR :LGERS
:LGEAZ :LGEMA :LGESY
:LGEEG :LGEMX :LGETH
:LGEIL :LGEND
:LGEIN :LGERA
:LGEAS :LGEWR
:LGEVN
Checked
Feb/10/2017
Minhee.Kim
:Part number
1. Model Description
Printing specification
Printed in Mexico
Printed in Poland
Printed in Kazakhstan
Printed in Brazil
:5. Language
:6. Number of pages
:Model name (factory)
:Suffix
:Brand name
:Product name
:1. Trim size (Format)
2. Printing colors
: • Cover
: • Inside
Printed in Korea
: • Inside
:4. Bindery
(Revision number)
2. Printing Specification
Rev. Number
MMM/DD/YYYY
80
148 mm x 210 mm (A5) (W x H)
1 Color (Black)
1 Color (Black)
Uncoated, wood-free paper 120 g/㎡
Uncoated, wood-free paper 60 g/㎡
Perfect binding
ENG_EU/FRE/SPA/JPN (4)
3. Origin Notification
4. Changes
Printed in Mexico
Printed in Egypt
Printed in India
Printed in Algeria
3. Stock (Paper)
: • Cover
Printed in Indonesia
Printed in Russia
Made by LG Electronics (Only TW Suffix)
Signature
Change Contents
ECO Number
N
O
T
E
“This part contains Eco-hazardous substances (Pb, Cd, Hg, Cr6+, PBB, PBDE, etc.) within LG standard level,
Details should be followed Eco-SCM management standard[LG(56)-A-2524].
Especially, Part should be followed and controlled the following specification.
(1) Eco-hazardous substances test report should be submitted when Part certification test and First Mass Production.
(2) Especially, Don’t use or contain lead(Pb) and cadmium(Cd) in ink.
Printed in China
Printed in China
Printed in Thailand
Printed in Vietnam
Printed in Poland
1
10
9
8
7
6
5
4
3
2
Front Back
(ENG)
P/No. 2 … … … … 19
Front Back
(FRE)
P/No. 2 … … … … 19
Front Back
(SPA)
P/No. 2 … … … … 19
Front Back
(JPN)
P/No. 2 … … … 18 REG
Pagination sheet

User Manual
Single Digital
Pillar
Please read the Safety Precautions carefully before using this product.
After reading this manual, please keep it in an easily accessible location for future
reference.
PL-S860
*MFL69559214*
P/No: MFL69559214 (1704-REV00)
Printed in Korea
www.lg.com

2
ENGLISH
SAFETY PRECAUTIONS
Please read this manual carefully to properly install this product.
After reading the manual, please keep it in an easily accessible location for future reference.
WARNING
• Follow the instructions in the manual to properly install this product.
- Failure to follow the instructions in the manual can result in personal injury or product damage.
• After the product is installed, do not stand on or lean against the product.
- This may cause the product to fall and cause injury.
• Protect the product from severe impact after installation.
- This may cause the product to fall and cause injury.
• Always use the product on a flat surface.
- If used on an uneven or unsteady surface, the product may fall and cause injury.
• Do not attach other objects to the stand aside from displays.
- The objects may fall and cause personal injury or damage.
• Once displays have been installed, only use them indoors.
- If used outdoors, moisture may enter the units and result in fire, electric shock or product malfunction.
• Do not modify or alter the product.
CAUTION
• Before moving the product, disconnect the power cord from any power outlets.
- Moving the product while the power cord is connected may result in electric shock or fire.
• Do not clean the product with a wet towel, and do not place a heater or humidifier beneath it.
- If moisture, steam or heat enters the product, this may cause fire, electric shock or product malfunction.
• Wear work gloves when installing the product. Do not use your bare hands.
- Not wearing gloves may expose you to risk of injury.

ENGLISH
ASSEMBLY AND PREPARATION
3
CAUTION
• Be careful when installing and using the product to prevent product damage or safety hazards.
• If the instructions in the manual are unclear, stop the installation process and contact the service center.
• Check that the accessories provided with the product are all included before beginning installation. LG
Electronics is not liable for any damage or loss of the accessories after the package has been opened.
• Make sure that the accessories are kept out of reach of children to prevent accidents, such as choking
due to swallowing small parts.
• Make sure that the screws are fastened tight.
• Applying excessive force to the screws may cause damage to the wall, affect product performance or
cause product damage.
• Make sure that the installed display does not exceed the specified load and that no external force is
applied to it.
• In order to prevent any accidents, take caution when handling tools during the installation.
NOTE
• Save the content you intend to use to your monitor set before installing the Single Digital Pillar.
ENGLISH
4
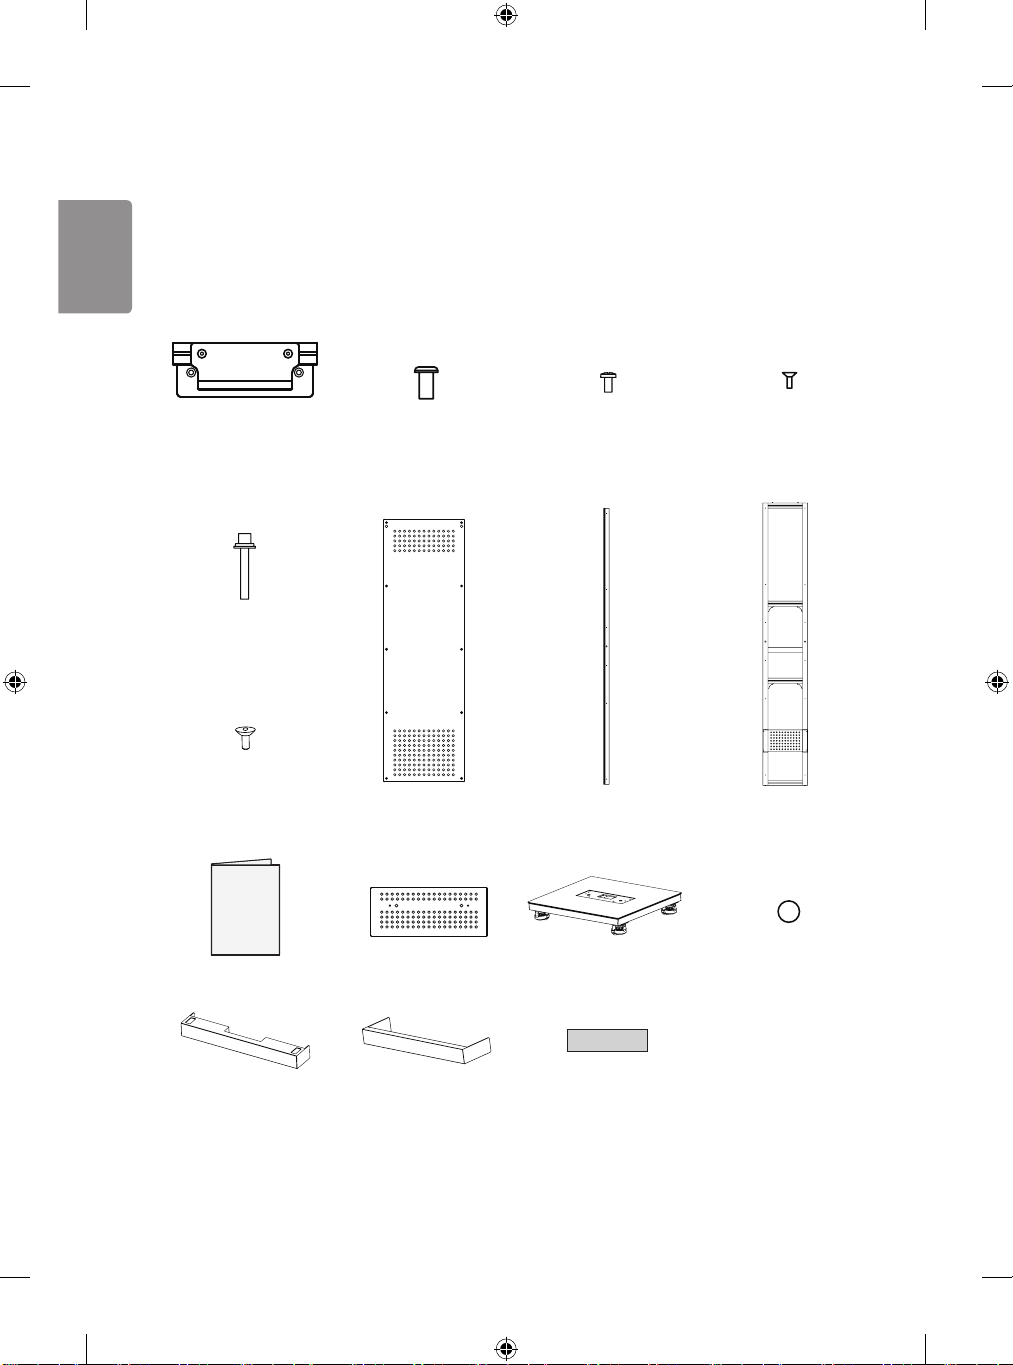
Accessories
Accessories are subject to change without prior notice to improve the performance of the product, and new
accessories may be added as well.
The illustrations in this manual may differ from the actual product and accessories.
Fastening bracket x 2 Angle bracket screw
(M8 x L15) x 4
Pillar screw
(M8 x L50) x 2
Fastening bracket screw
(M8 x L15) x 4
User Manual Top cover x 1 Stand base x 1 Rubber x 12
Back cover x 2 Side cover x 2 Pillar x 1
Stand/Side/Back/Top
cover screw
(M4 x L12) x 38
Side cover screw
(M4 x L12) x 12
Front Stand Bracket x 1 Rear Stand Bracket x 1 Double-sided tape x 1
Required Tools
Wrench, Screwdriver, Ladder

ENGLISH
Assembly
The images may differ from the actual product.
WARNING
• For safety, at least two people must work together to install the product.
• Make sure to use gloves or other protective equipment during assembly for safety.
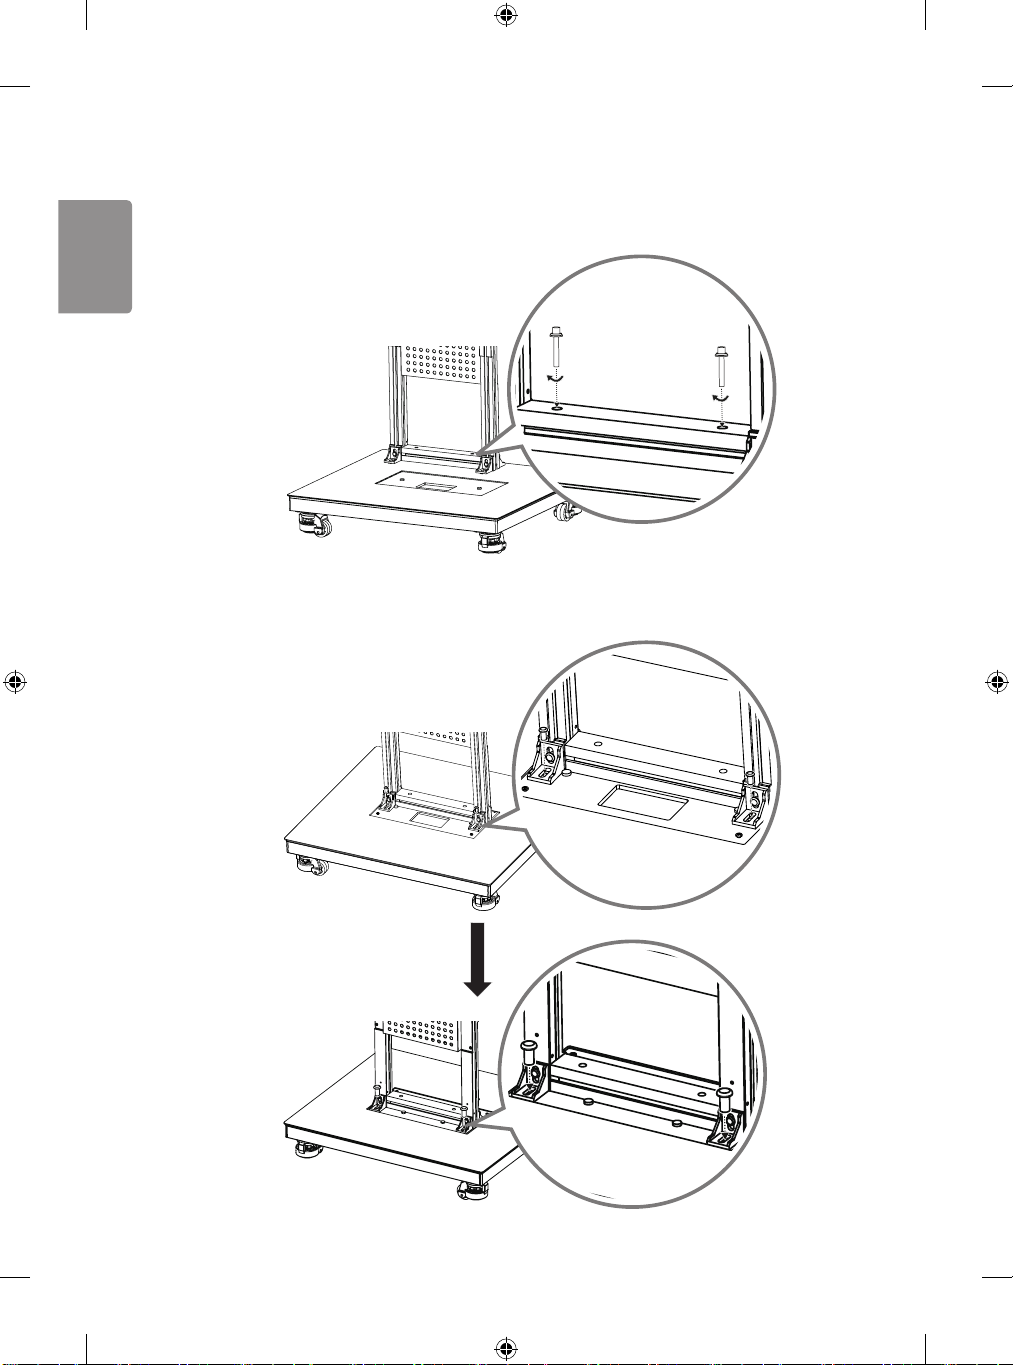
1 Place the stand base on a flat surface.
2 Place the pillar on the stand base, aligning it with the grooves in the base.
Pillar
5
Stand base grooves
ENGLISH
6
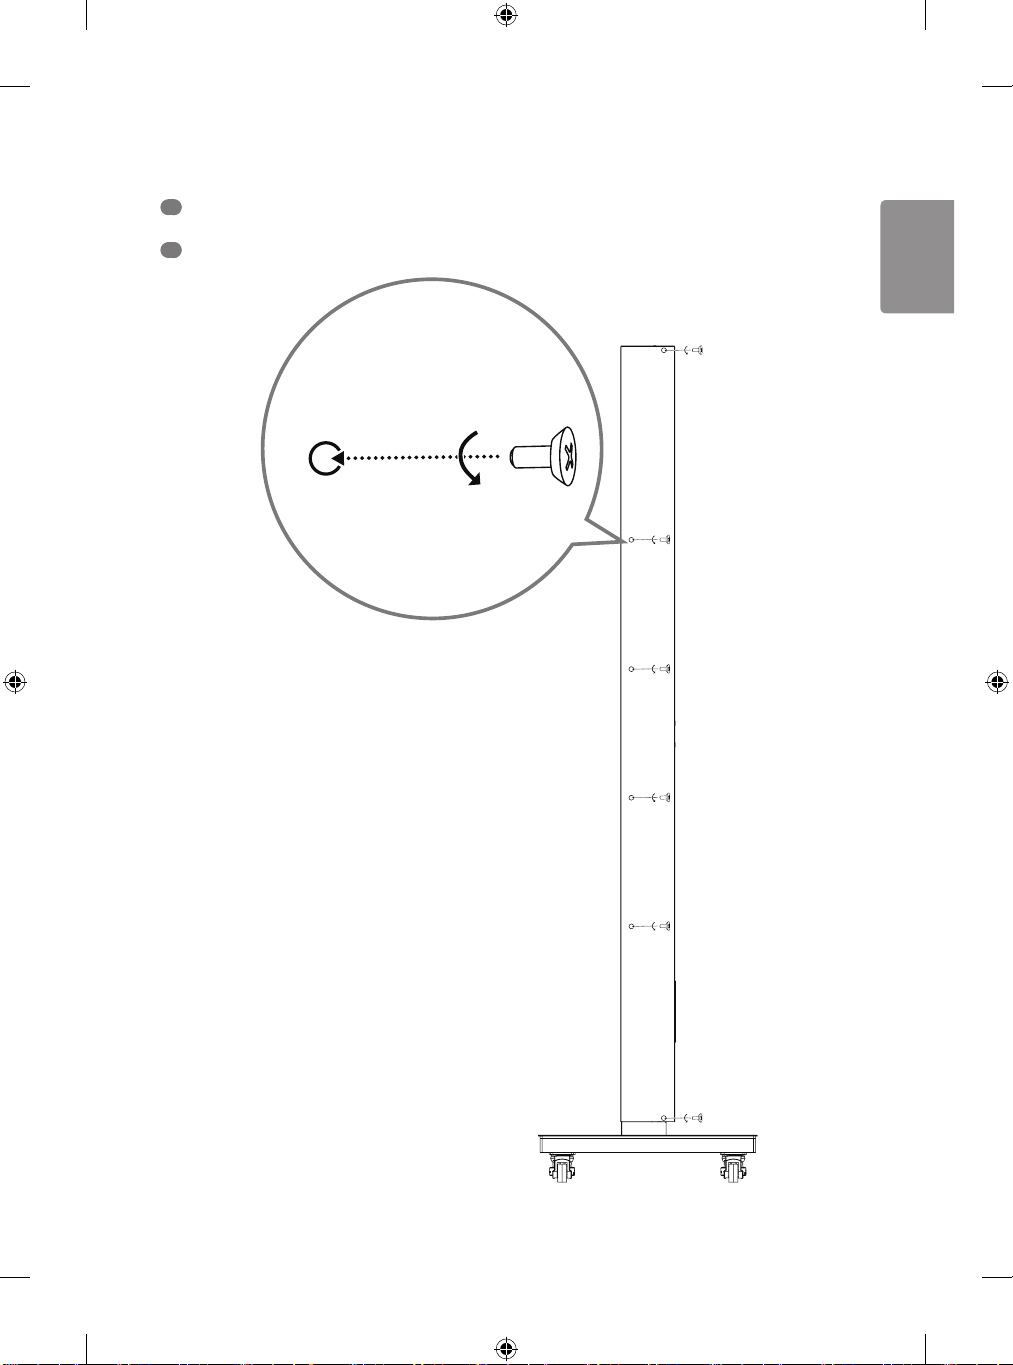
3 After placing the pillar in the indentation of the stand base, fix it in place using the two screws (M8 x
L50) provided.
4 Use the two screws (M8 x L15) provided to attach the angle brackets to the stand base.
Repeat the steps for the rear stand bracket using the two screws (M8 x L15) provided.
ENGLISH
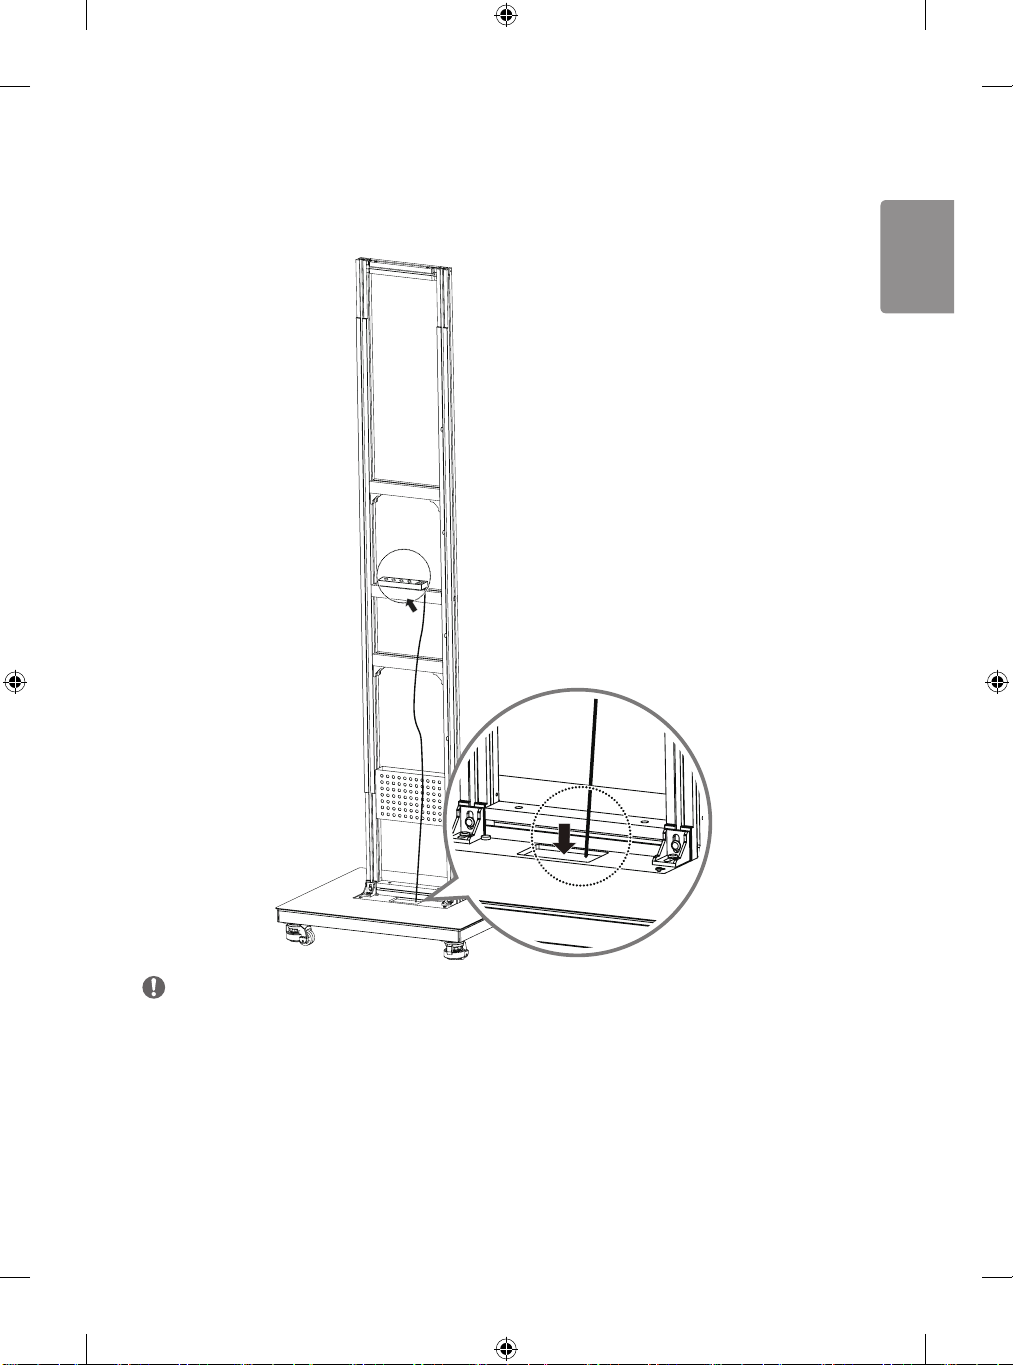
5 Stick the double-sided tape on a power strip and fix it on the middle bar as shown in the image.
6 Put the power cord of the power strip into the hole in the stand base.
7
NOTE
• Cut the double-sided tape to fit the size of the power strip.
• The shape of the power strip may differ by region.
• Make sure the power cord of the power strip points toward the floor.
• Make sure no parts of the power strip protrude from the middle bar.
If the power strip protrudes from the bar, it may bump against the monitor.
ENGLISH
8
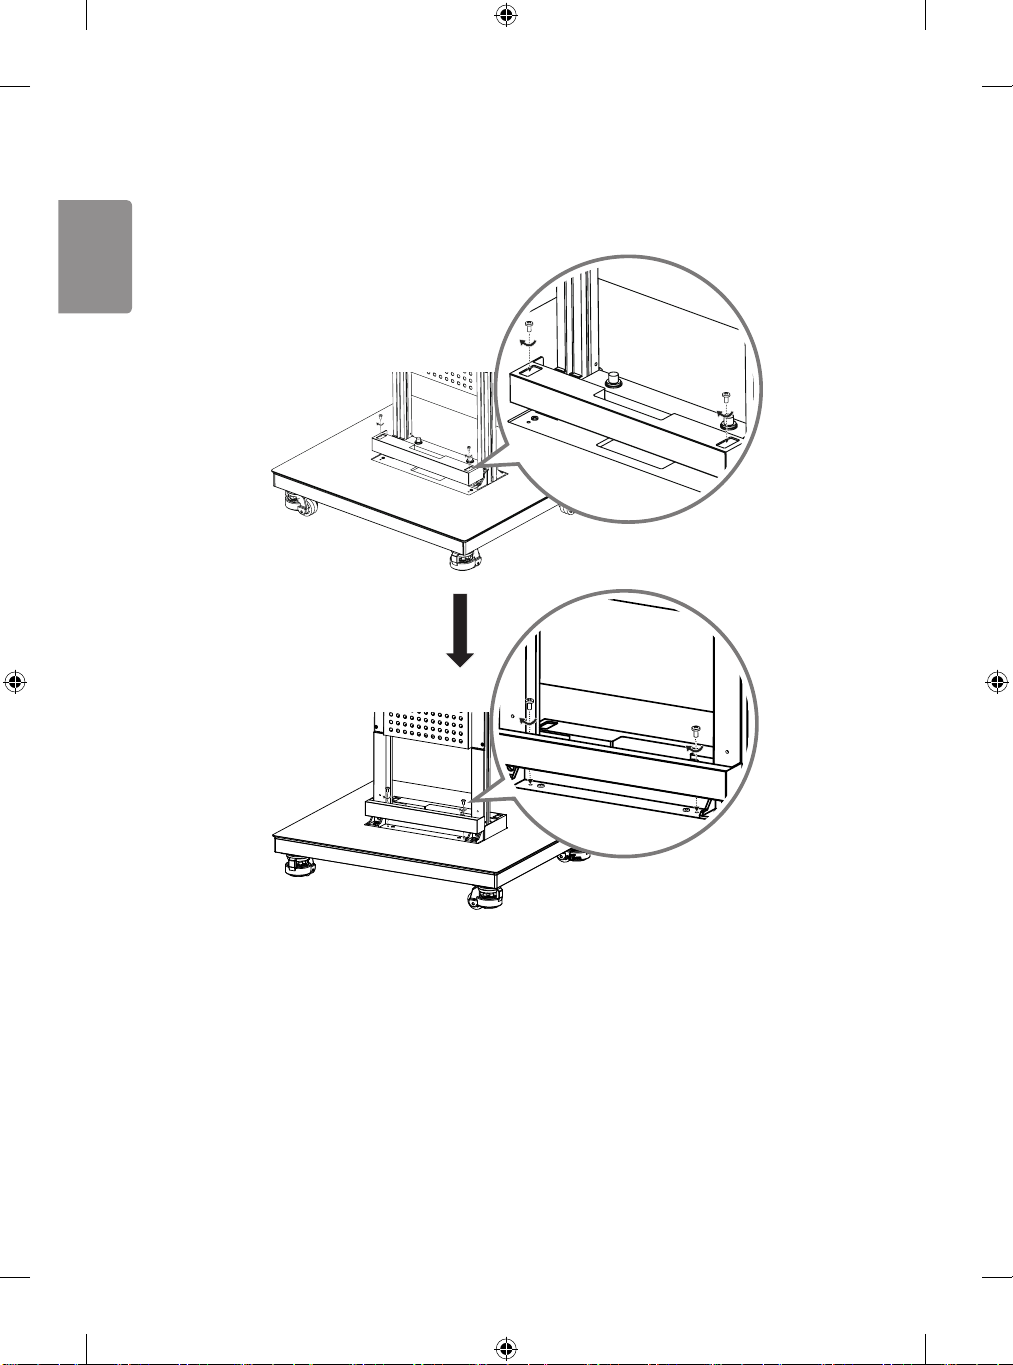
7 Use the two screws (M4 x L12) provided to assemble the front stand bracket onto the stand base.
Repeat the steps for the rear stand bracket using the two screws (M4 x L12) provided.
ENGLISH
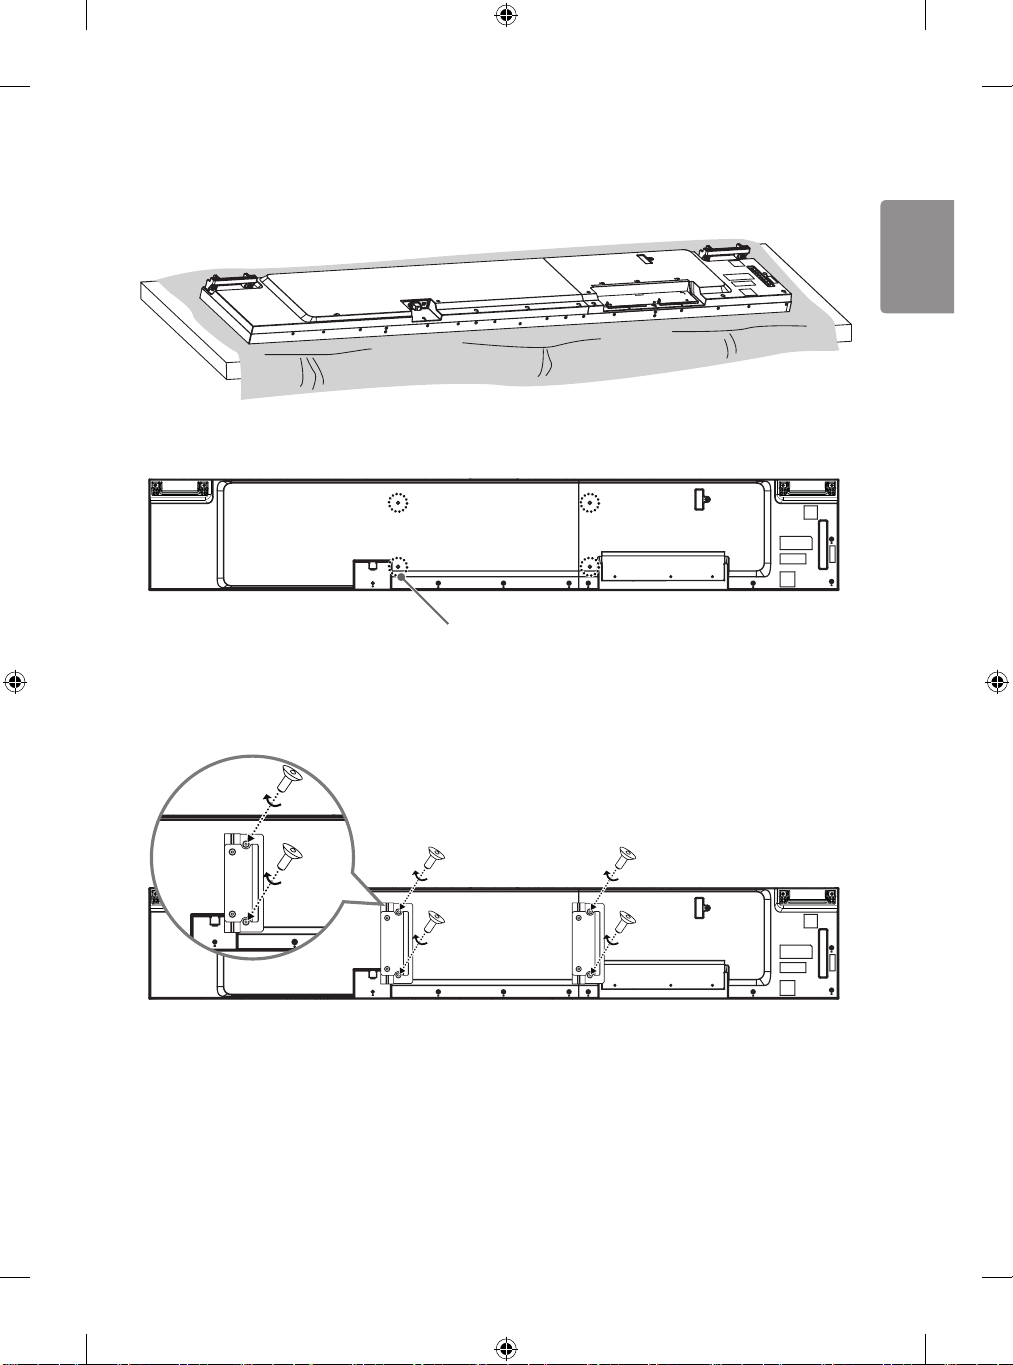
8 Lay a clean cloth on a flat floor, and then put the monitor set on it with the screen face down.
9 Place the fastening brackets on the back of the monitor set, aligning them with the VESA holes.
VESA hole
10
Use the four screws (M8 x L15) provided and an L-wrench to attach the fastening brackets to the
monitor set.
Make sure the holes in the fastening brackets and the VESA holes are aligned.
9
ENGLISH
10
11
Place a soft cushion next to the pillar attached to the stand base.
(Cushion size: At least 100 mm x 400 mm)
12
Hold the assembled fastening brackets and use the cushion to set the monitor set upright.
NOTE
• Make sure that the protective plastic film is removed from each corner of the monitor before installing
the product.
ENGLISH
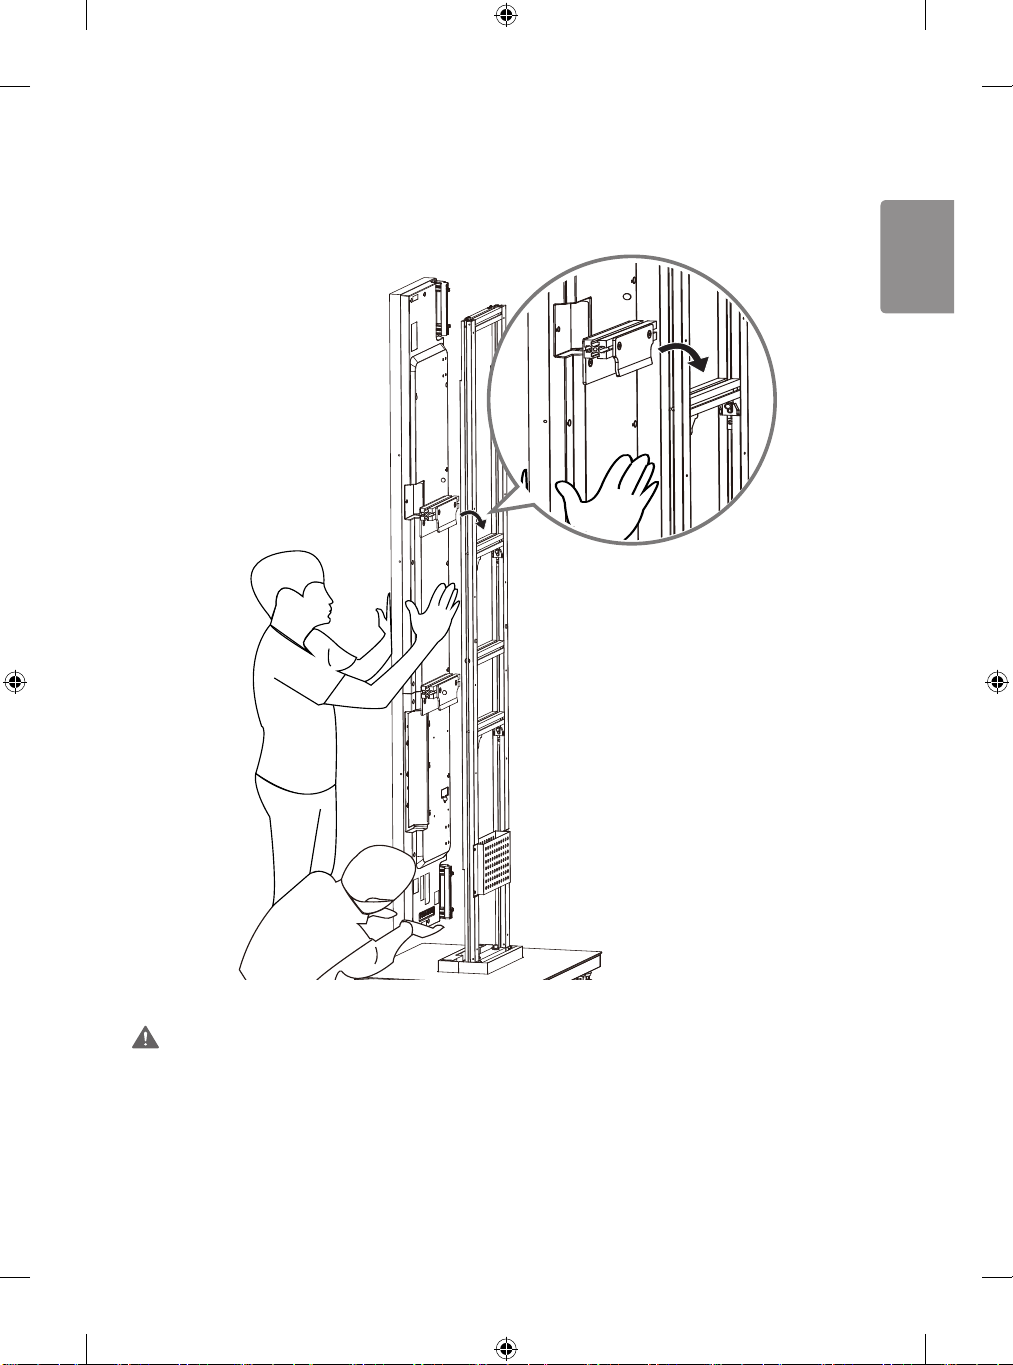
13
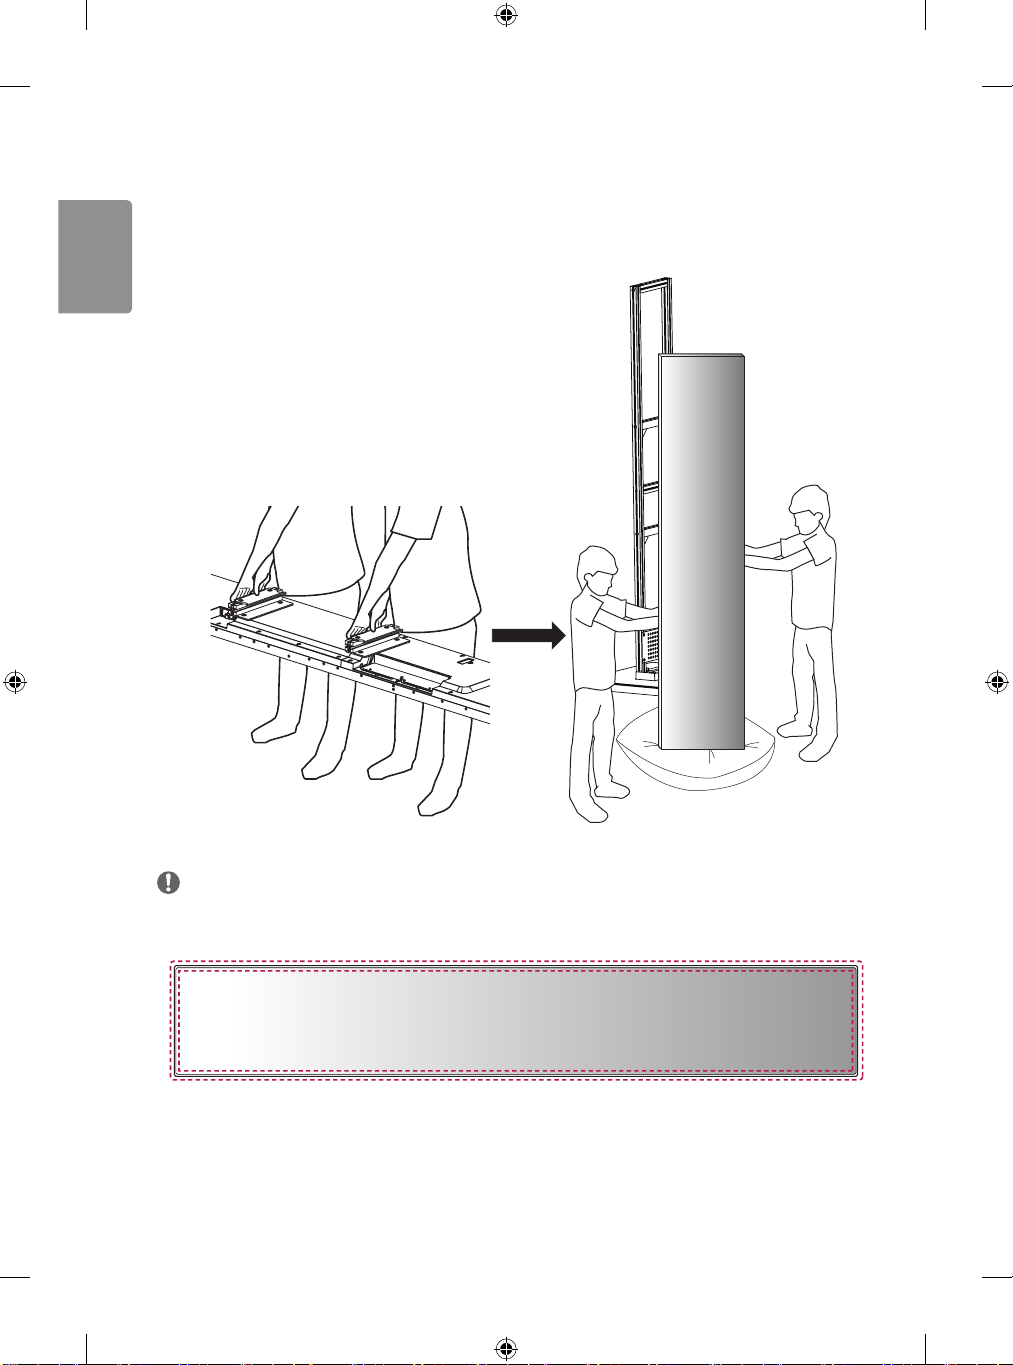
Refer to the image below and make sure one person is holding the top of the monitor set while the
other is holding the bottom panel, then lift it up. Use the brackets to hang the monitor set on the pillar.
11
WARNING
• If excessive force is applied to the front of the monitor set, the panel may be damaged.
• Make sure the power cord does not get caught between the brackets and pillar.
ENGLISH
12
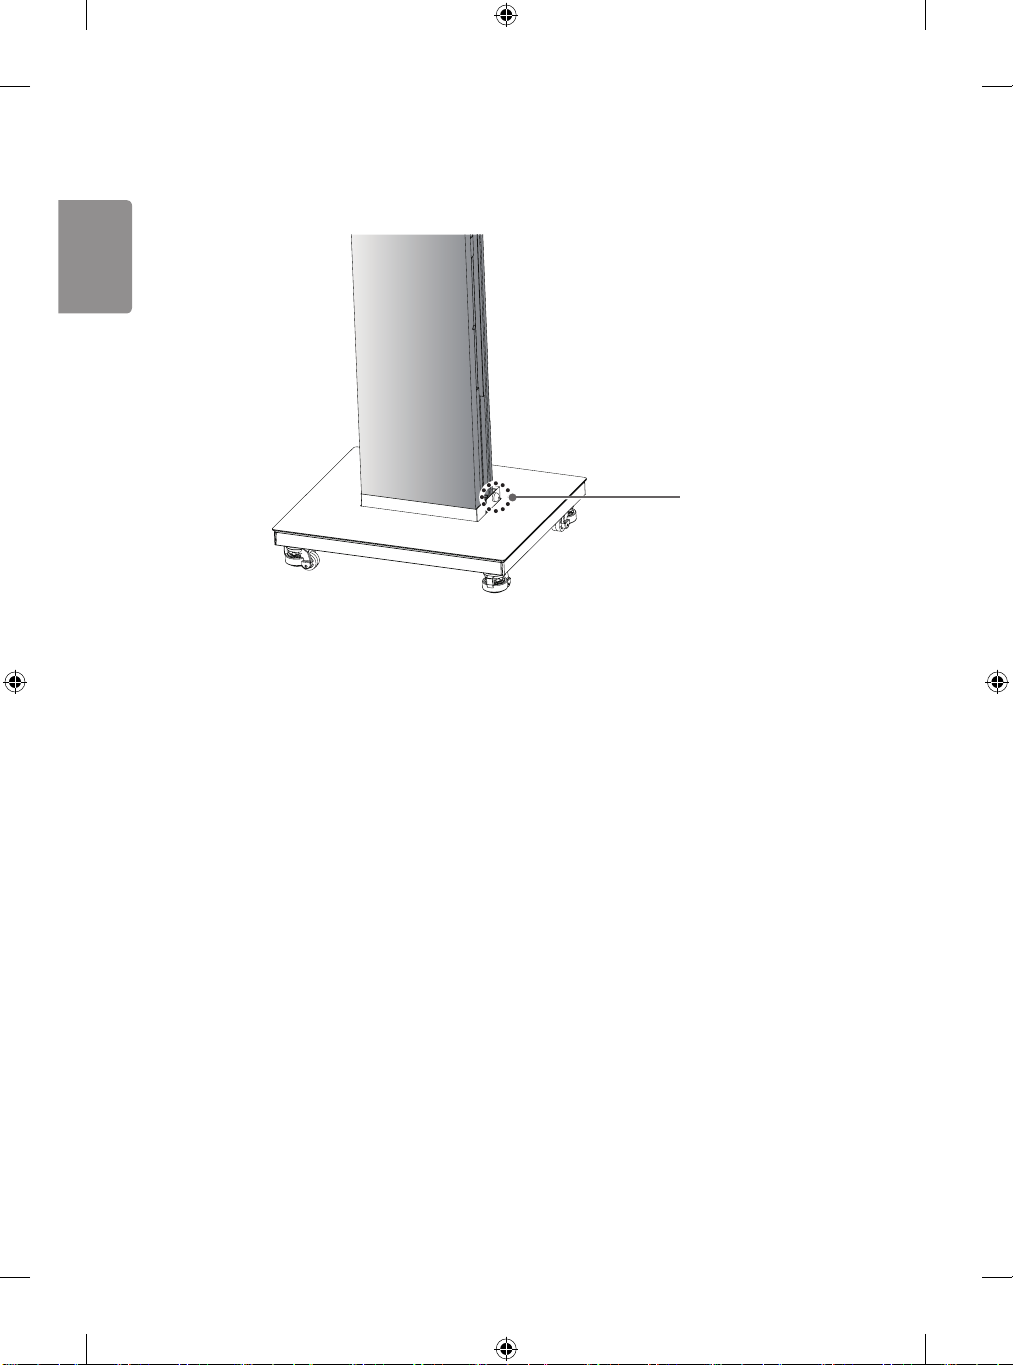
14
Insert the IR cable into the hole in the stand base and attach it to the side of the stand.
IR receiver
ENGLISH
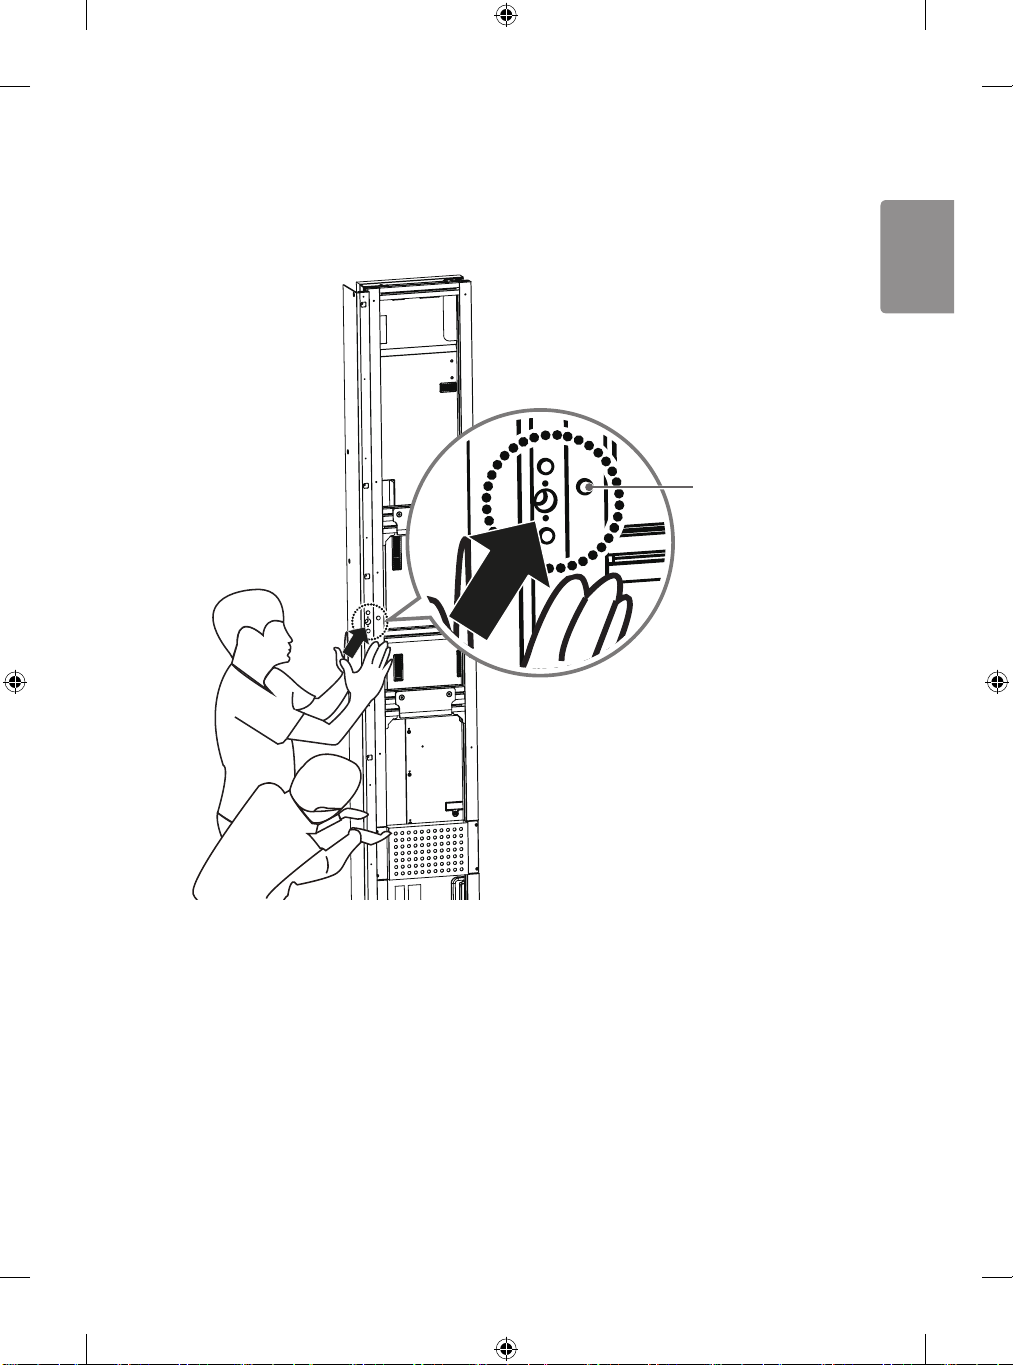
15
Match the screw projection in the middle of the pillar to the hole in the middle of the side cover and fix
it in place as shown in the image.
Repeat the steps for the opposite side cover to attach it.
Screw
projection
13
ENGLISH
14
16
Fasten the 6 screws (M4 x L12) provided in the holes in the side cover.
Repeat for the side cover on the opposite side.
ENGLISH
17 1
Fix the sides of the side cover in place using the 6 screws (M4 x L12) provided.
Repeat for the side cover on the opposite side.
2
Stick the rubbers provided on the fastened side cover screws.
15
ENGLISH
16
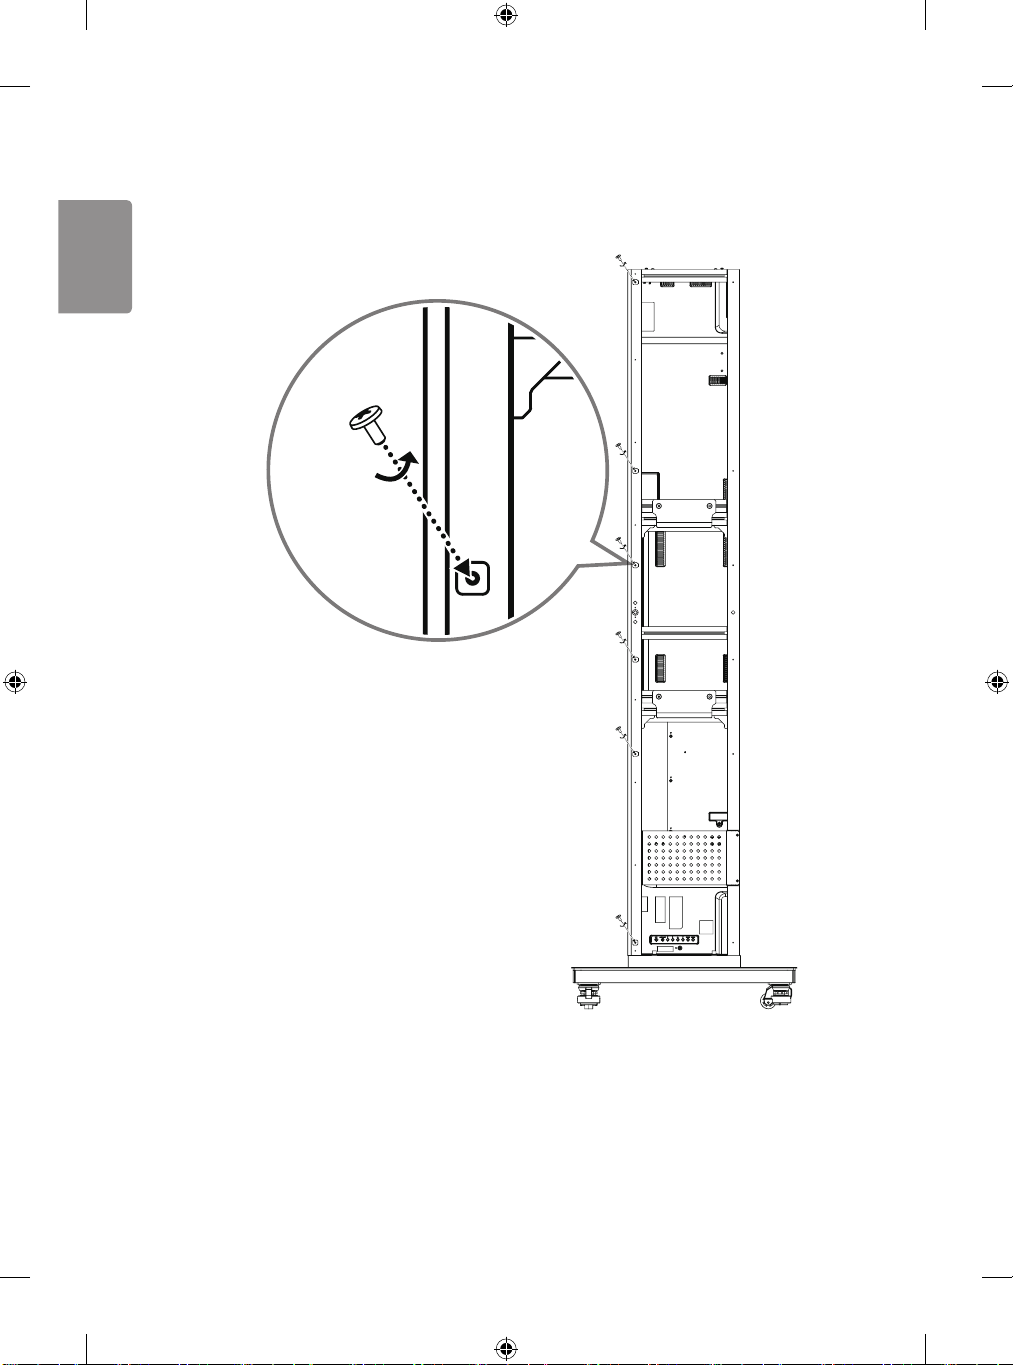
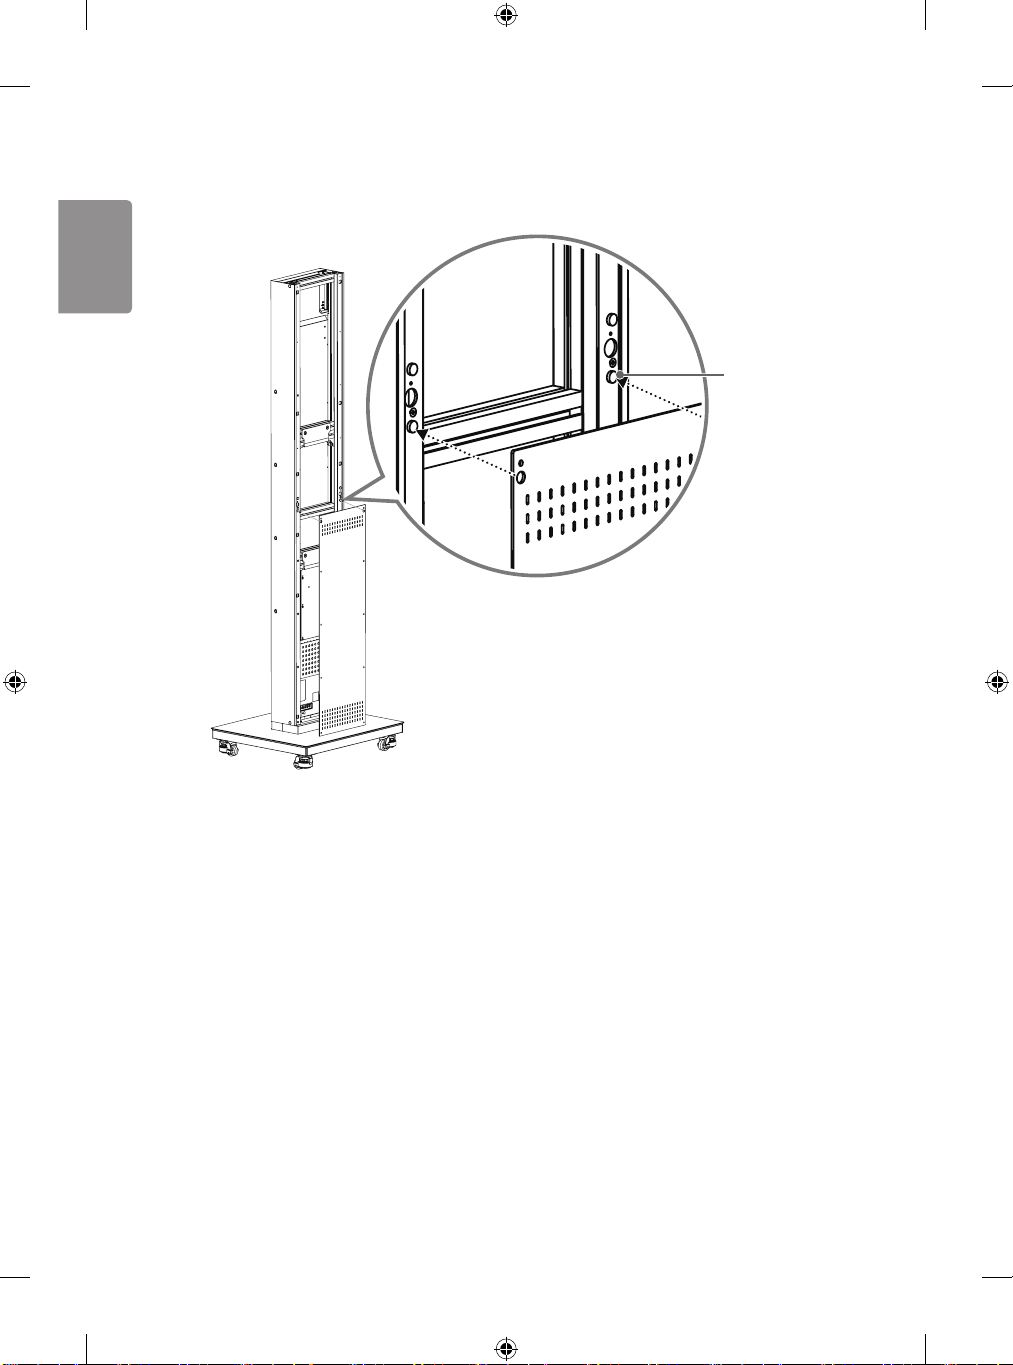
18
Attach the bottom back cover to the screw projection on the pillar as shown in the image.
Screw
projection
ENGLISH
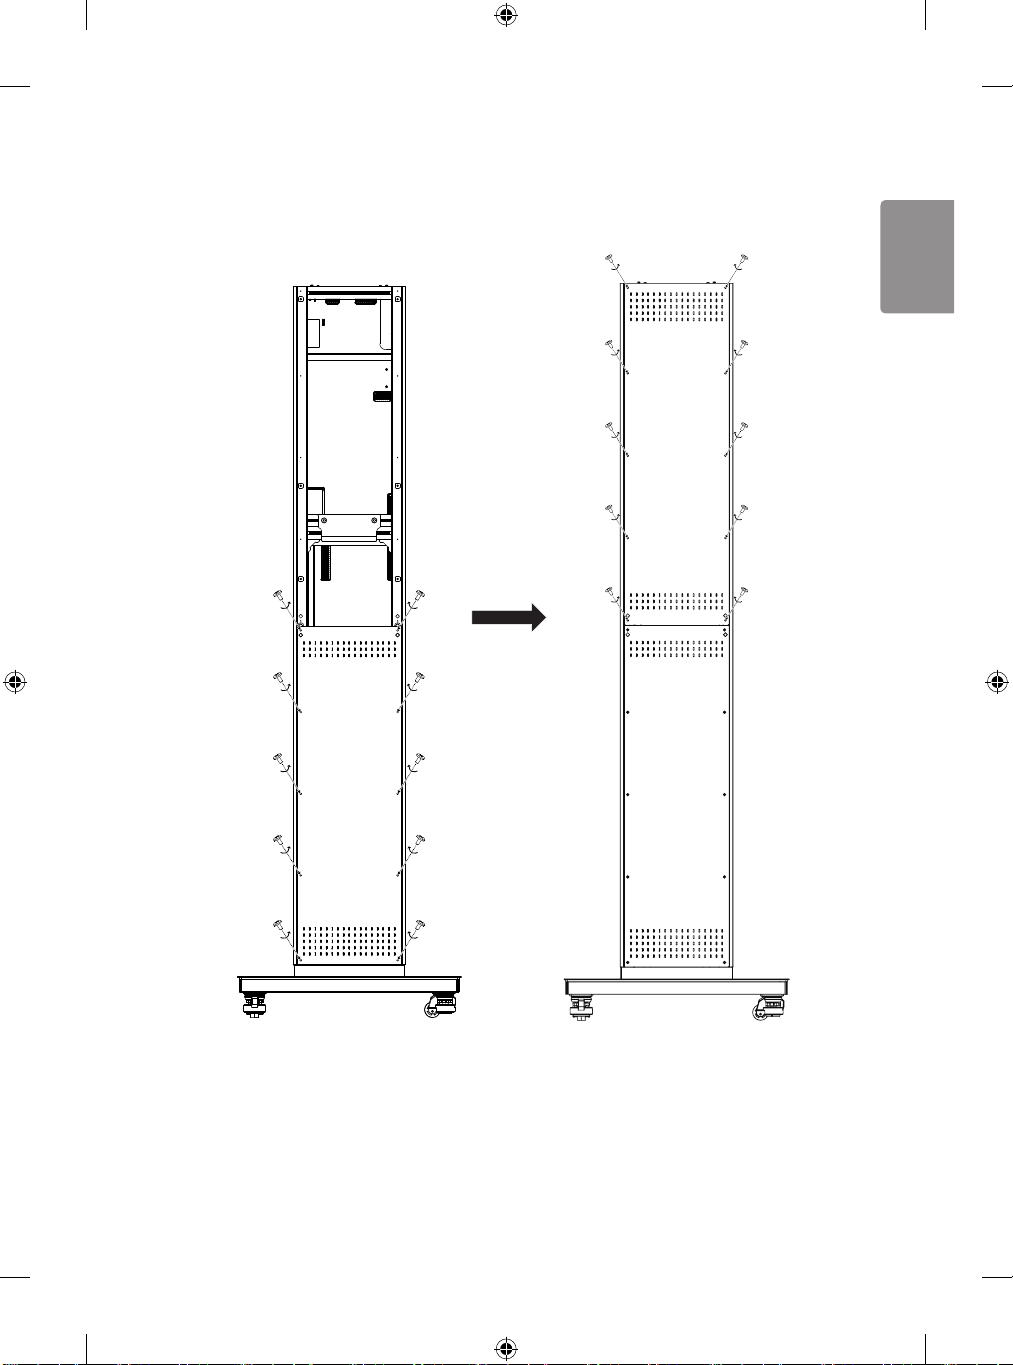
19
Use the 10 screws (M4 x L12) provided to fix the bottom back cover in place.
Attach the top back cover using the 10 screws (M4 x L12) provided.
17
ENGLISH
18
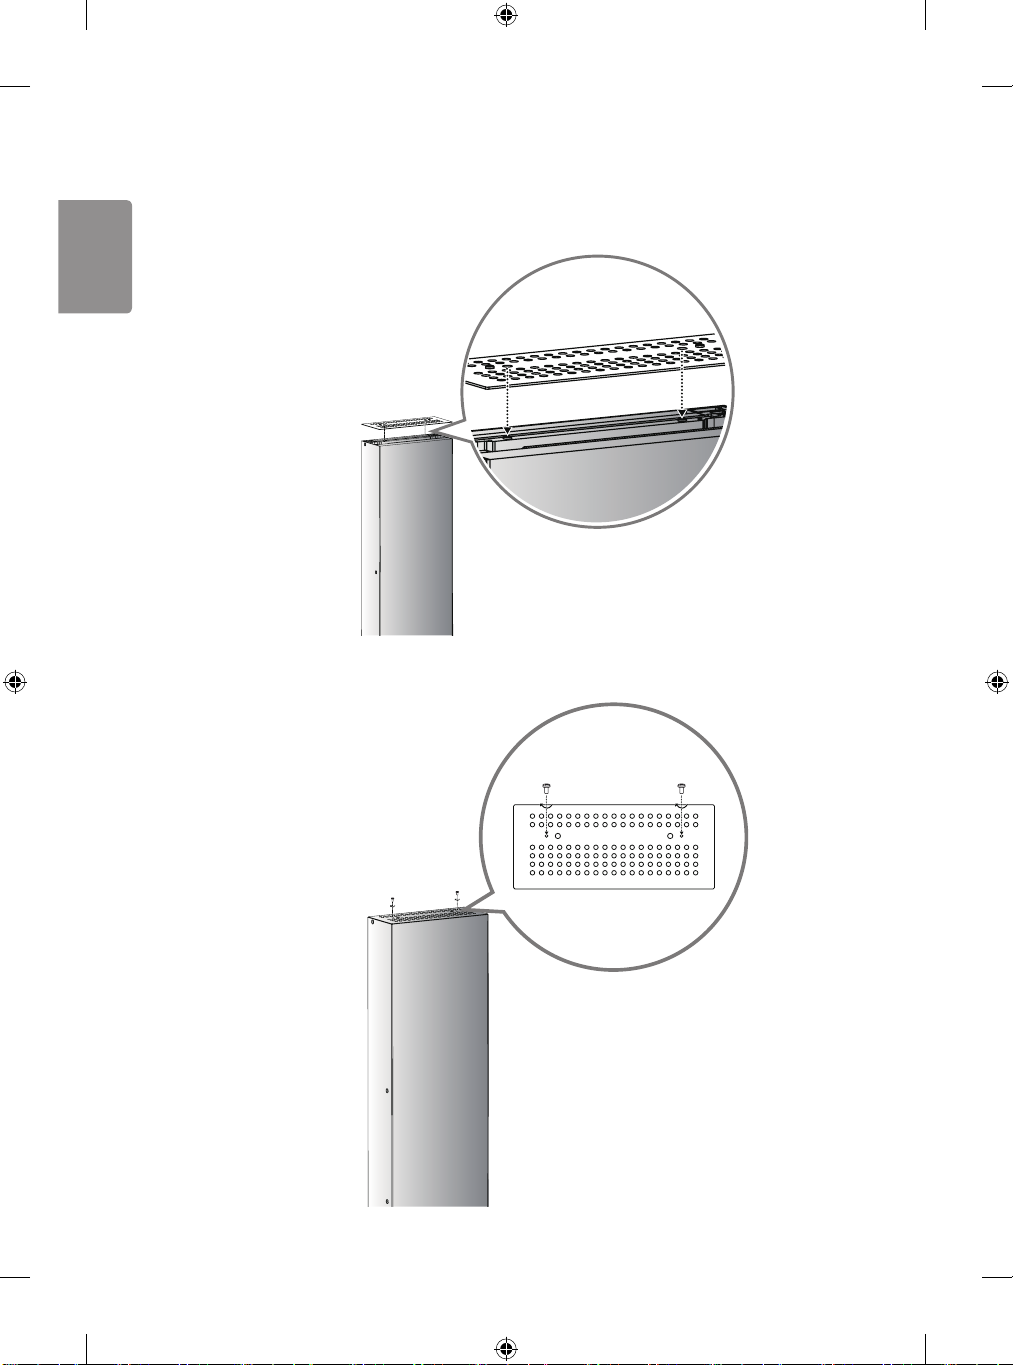
20
Attach the top cover as shown in the image below by matching the screws on the pillar to the holes in
the top cover.
21
After attaching the top cover, fix it in place using the two screws (M4 x L12) provided.
ENGLISH
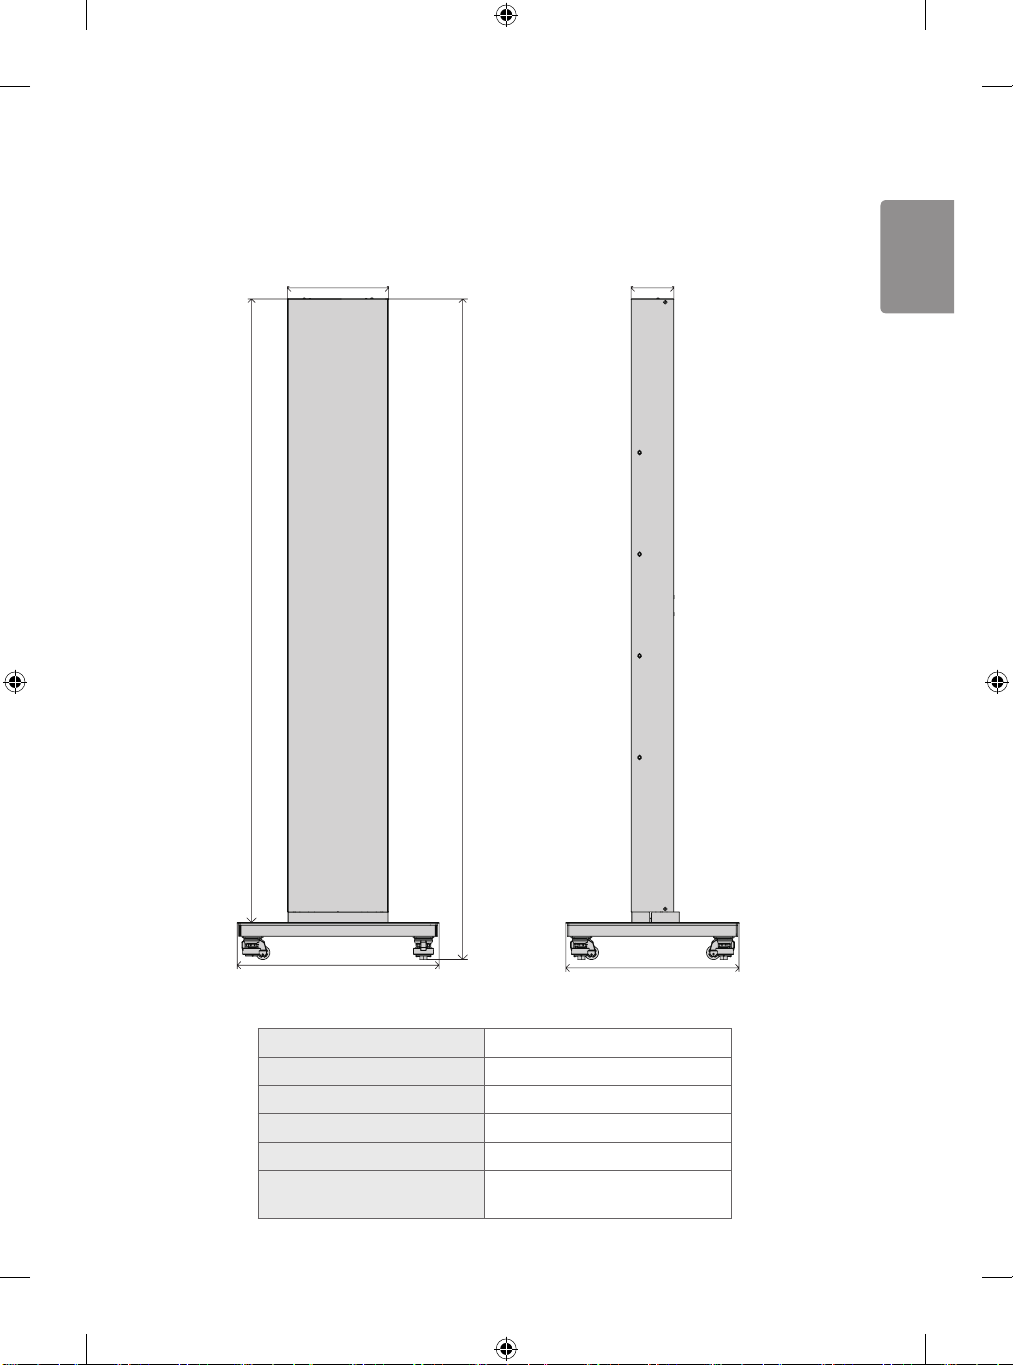
PRODUCT SPECIFICATIONS
19
2197.8
356.7
2328.8
151
710.4
710.4
Model name
Width (mm)
Height (mm)
Depth (mm)
Product weight (kg)
Product weight in package
(kg)
610.4
PL-S860
710.4
2328.8
610.4
78.2
115.3
The model name and serial number can be found on
the back of the product.
Please make a note of the following:
Model name
Serial No.
Contact your retailer for the applicable model.

Guide de l'utilisateur
Pied
numérique
Veuillez lire attentivement les informations relatives à la sécurité avant d'utiliser ce produit.
Après avoir lu ce guide, conservez-le dans un emplacement facilement accessible afin de
pouvoir vous y référer ultérieurement.
PL-S860
www.lg.com
FRANÇAIS
2
CONSIGNES DE SÉCURITÉ
Veuillez lire attentivement ce manuel afin d'installer le produit correctement.
Après avoir lu ce guide, conservez-le dans un emplacement facilement accessible afin de pouvoir vous y référer
ultérieurement.
AVERTISSEMENT
• Pour installer le produit, suivez les instructions du manuel.
- Le non-respect des instructions du manuel peut causer des blessures graves ou endommager le produit.
• Une fois le produit installé, veillez à ne pas grimper ou vous appuyer dessus.
- Le non-respect de cette consigne peut provoquer la chute du produit ainsi que des dommages.
• Protégez-le des chocs après l'installation.
- Le non-respect de cette consigne peut provoquer la chute du produit ainsi que des dommages.
• Utilisez toujours le produit sur une surface plane.
- S'il est utilisé sur une surface irrégulière ou instable, le produit risque de tomber et de provoquer des blessures.
• Ne fixez pas d'autres objets au support, mis à part un écran.
- En tombant, les objets peuvent provoquer des blessures ou s'endommager.
• Une fois les écrans installés, ne les utilisez qu'à l'intérieur.
- Si vous vous en servez à l'extérieur, de l'humidité risque d'infiltrer le produit, entraînant un risque d'incendie,
d'électrocution ou de dysfonctionnement du produit.
• N'apportez aucune modification au produit.
ATTENTION
• Avant de déplacer le produit, débranchez le cordon d'alimentation de toutes les prises.
- Déplacer le produit alors que le cordon d'alimentation est branché peut provoquer une électrocution ou un incendie.
• Ne nettoyez pas le produit avec un chiffon mouillé et ne placez pas de radiateur ou d'humidificateur sous le produit.
- De l'humidité, de la vapeur ou de la chaleur pénétrant dans le produit peuvent provoquer son dysfonctionnement, un
incendie ou une électrocution.
• Utilisez des gants de travail lors de l'installation du produit. Ne travaillez pas à mains nues.
- Si vous ne portez pas de gants, vous vous exposez à des risques de blessure.

FRANÇAIS
ASSEMBLAGE ET PRÉPARATION
ATTENTION
• Pendant l'installation et l'utilisation du produit, prenez toutes les précautions nécessaires pour éviter d'endommager
le produit et de compromettre votre sécurité.
• Si les instructions fournies dans le manuel ne vous semblent pas claires, arrêtez l'installation et contactez le centre
d'assistance.
• Avant de commencer l'installation, vérifiez que les accessoires fournis avec le produit sont tous inclus. LG Electronics
ne peut en aucun cas être tenu responsable de tout dommage ou perte des accessoires après l'ouverture de
l'emballage.
• Veillez à placer tous les accessoires hors de portée des enfants pour éviter tout risque d'accident, tel que
l'étouffement dû à l'ingestion de petites pièces.
• Assurez-vous que les vis sont correctement serrées.
• Le serrage excessif des vis risque de nuire aux performances du produit, de réduire sa résistance ou de l'endommager.
• Assurez-vous que l'écran installé ne dépasse pas la charge spécifiée et qu'aucune autre force externe n'y est
appliquée.
• Pour éviter tout accident, manipulez les outils avec précaution pendant l'installation du produit.
REMARQUE
• Enregistrez le contenu que vous avez l'intention d'utiliser sur votre moniteur avant d'installer le pied numérique.
3
 Loading...