LG PF391P-P User Guide

PF391P-P-ALVALLW-ENG 11/27/07 8:47 PM Page 1

ENGLISH

кмллдав

PF391P

LATVIEŠU

LIETUVIŲ

EESTI

P/NO : MFL42173813(R1)

PF391P-P-ALVALLW-ENG 11/27/07 8:35 PM Page 2

Safety Precaution

CAUTION

RISK OF ELECTRIC SHOCK

DO NOT OPEN

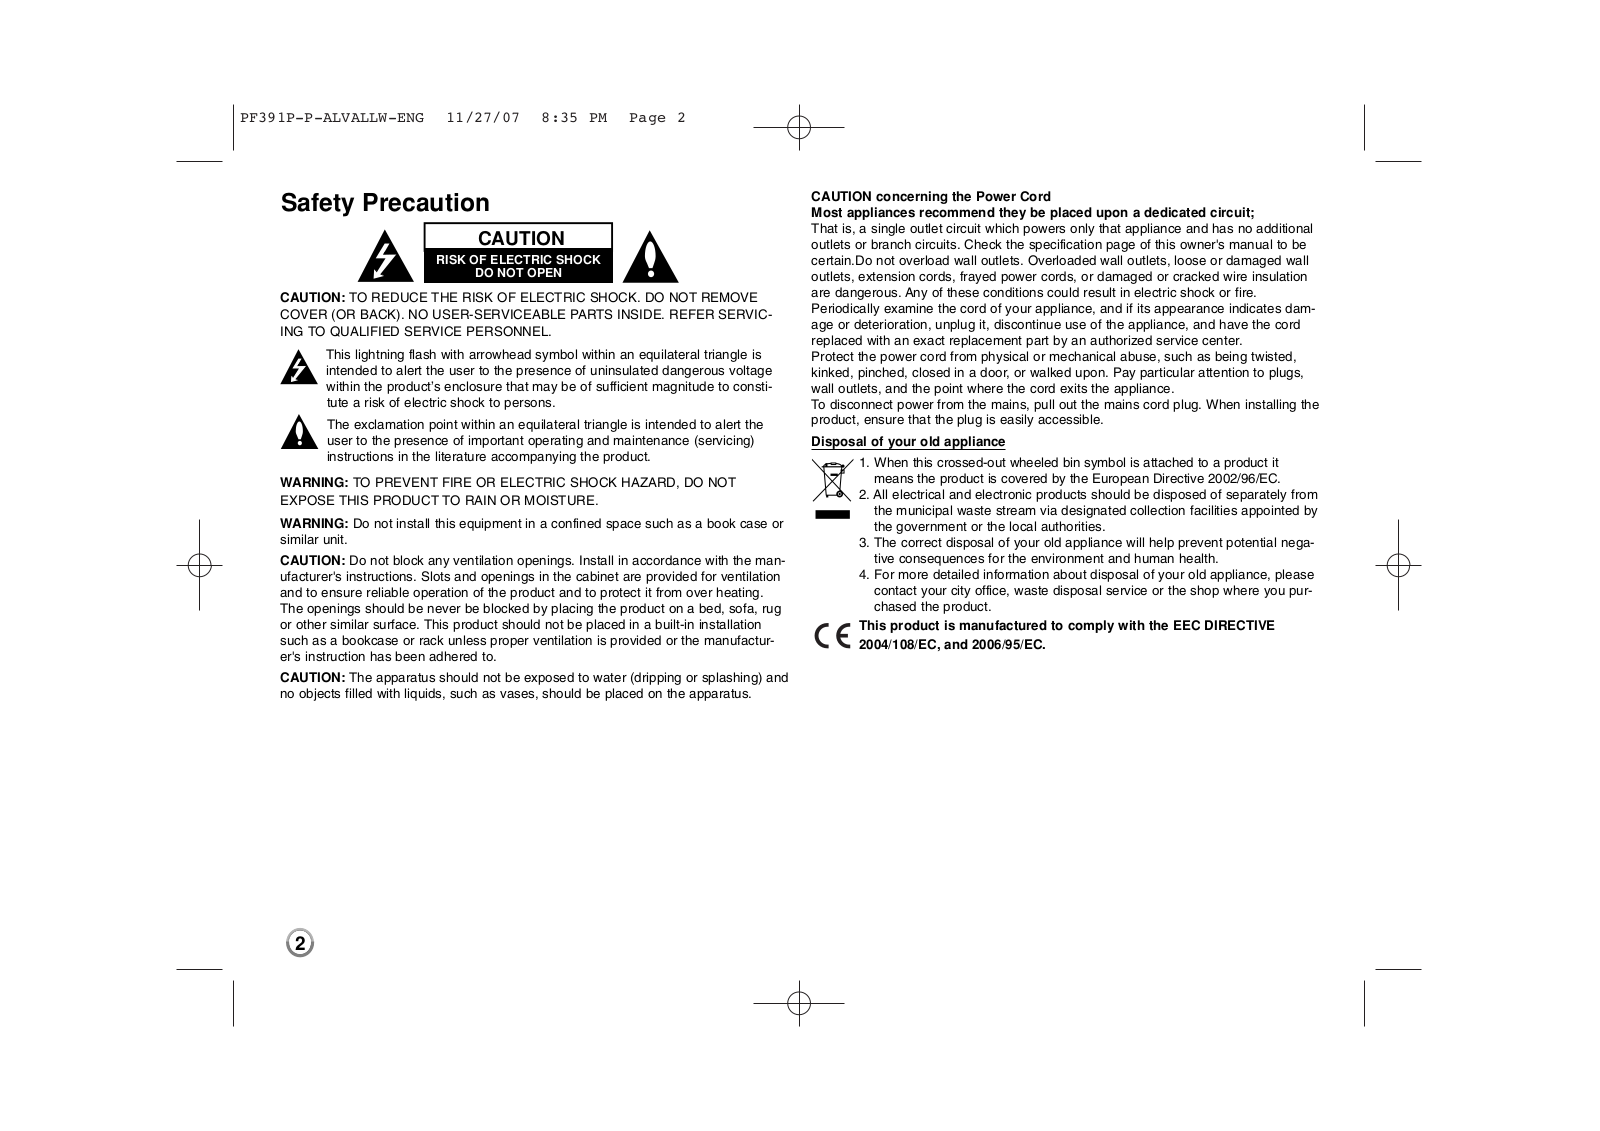
CAUTION: TO REDUCE THE RISK OF ELECTRIC SHOCK. DO NOT REMOVE COVER (OR BACK). NO USER-SERVICEABLE PARTS INSIDE. REFER SERVICING TO QUALIFIED SERVICE PERSONNEL.

This lightning flash with arrowhead symbol within an equilateral triangle is intended to alert the user to the presence of uninsulated dangerous voltage within the product’s enclosure that may be of sufficient magnitude to constitute a risk of electric shock to persons.

The exclamation point within an equilateral triangle is intended to alert the user to the presence of important operating and maintenance (servicing) instructions in the literature accompanying the product.

WARNING: TO PREVENT FIRE OR ELECTRIC SHOCK HAZARD, DO NOT EXPOSE THIS PRODUCT TO RAIN OR MOISTURE.

WARNING: Do not install this equipment in a confined space such as a book case or similar unit.

CAUTION: Do not block any ventilation openings. Install in accordance with the manufacturer's instructions. Slots and openings in the cabinet are provided for ventilation and to ensure reliable operation of the product and to protect it from over heating.

The openings should be never be blocked by placing the product on a bed, sofa, rug or other similar surface. This product should not be placed in a built-in installation such as a bookcase or rack unless proper ventilation is provided or the manufacturer's instruction has been adhered to.

CAUTION: The apparatus should not be exposed to water (dripping or splashing) and no objects filled with liquids, such as vases, should be placed on the apparatus.

CAUTION concerning the Power Cord

Most appliances recommend they be placed upon a dedicated circuit;

That is, a single outlet circuit which powers only that appliance and has no additional outlets or branch circuits. Check the specification page of this owner's manual to be certain.Do not overload wall outlets. Overloaded wall outlets, loose or damaged wall outlets, extension cords, frayed power cords, or damaged or cracked wire insulation are dangerous. Any of these conditions could result in electric shock or fire. Periodically examine the cord of your appliance, and if its appearance indicates damage or deterioration, unplug it, discontinue use of the appliance, and have the cord replaced with an exact replacement part by an authorized service center.

Protect the power cord from physical or mechanical abuse, such as being twisted, kinked, pinched, closed in a door, or walked upon. Pay particular attention to plugs, wall outlets, and the point where the cord exits the appliance.

To disconnect power from the mains, pull out the mains cord plug. When installing the product, ensure that the plug is easily accessible.

Disposal of your old appliance

1.When this crossed-out wheeled bin symbol is attached to a product it means the product is covered by the European Directive 2002/96/EC.

2.All electrical and electronic products should be disposed of separately from the municipal waste stream via designated collection facilities appointed by the government or the local authorities.

3.The correct disposal of your old appliance will help prevent potential negative consequences for the environment and human health.

4.For more detailed information about disposal of your old appliance, please contact your city office, waste disposal service or the shop where you purchased the product.

This product is manufactured to comply with the EEC DIRECTIVE 2004/108/EC, and 2006/95/EC.

2

PF391P-P-ALVALLW-ENG 11/27/07 7:50 PM Page 3

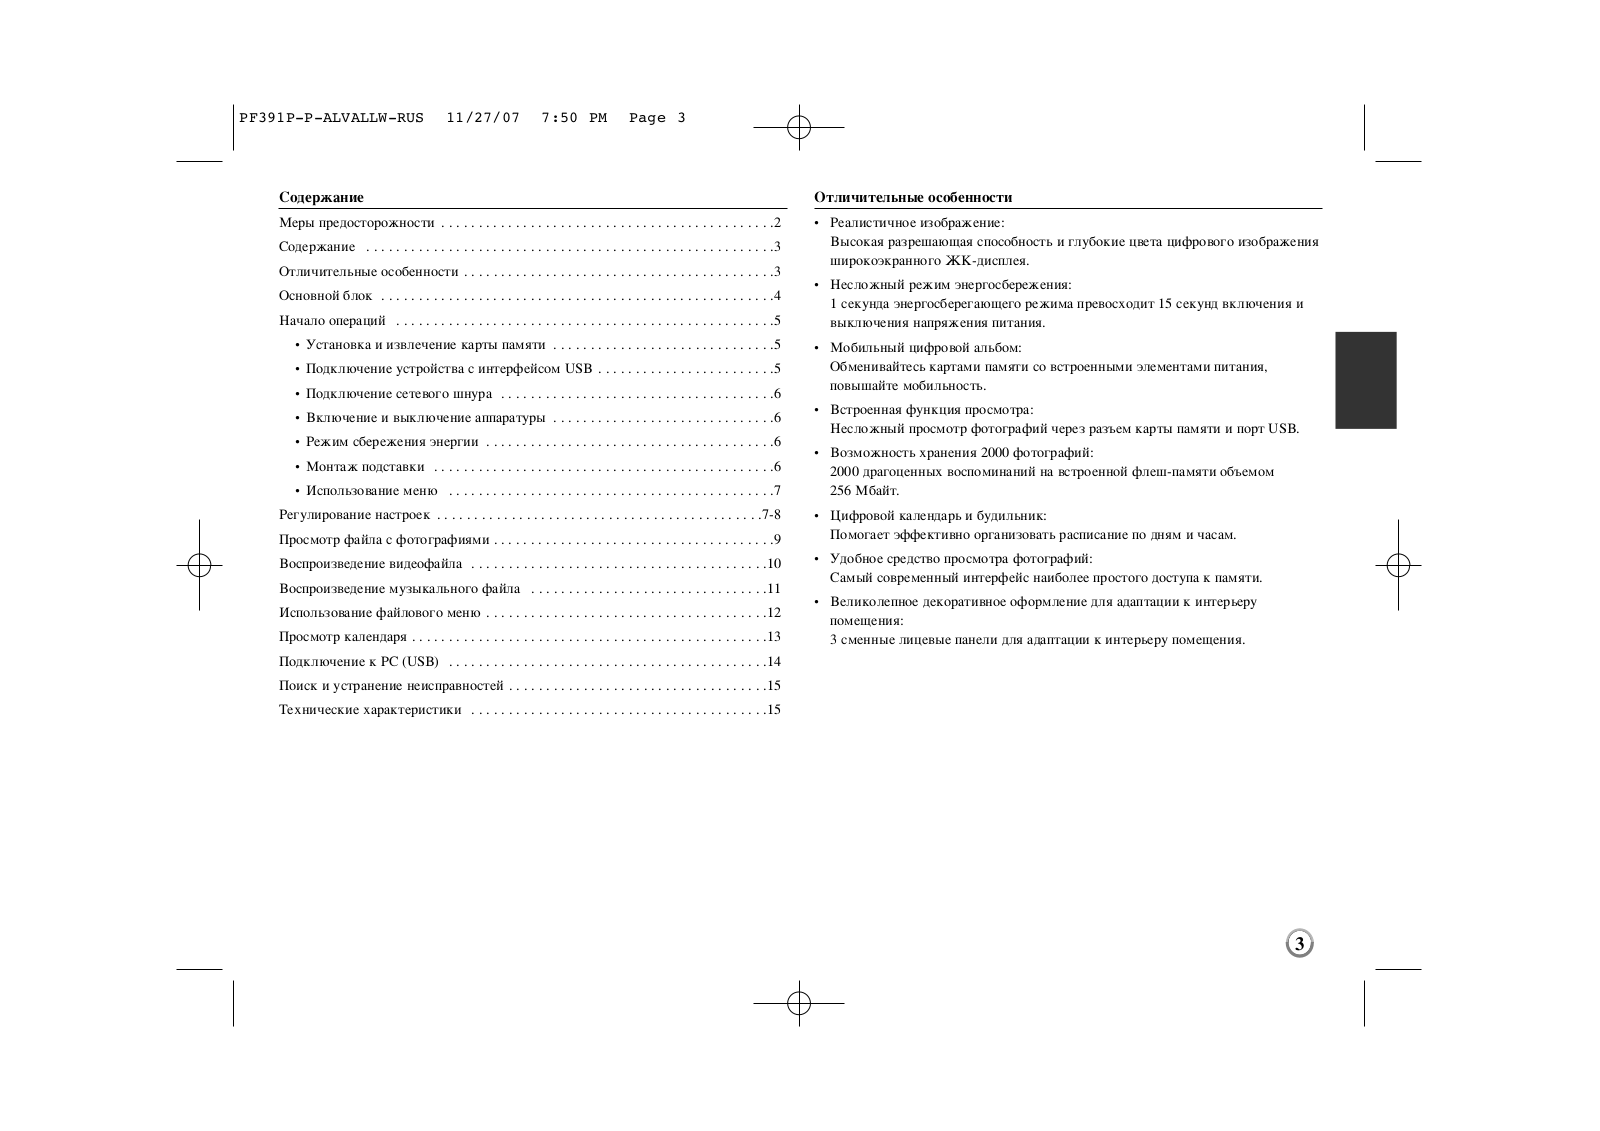
Contents


Safety Precaution . . . . . . . . . . . . . . . . . . . . . . . . . . . . . . . . . . . . . . . . . . .

. .2

Contents . . . . . . . . . . . . . . . . . . . . . . . . . . . . . . . . . . . . . . . . . . . . . . . . . .

. .3

Features . . . . . . . . . . . . . . . . . . . . . . . . . . . . . . . . . . . . . . . . . . . . . . . . . .

. .3

Main Unit . . . . . . . . . . . . . . . . . . . . . . . . . . . . . . . . . . . . . . . . . . . . . . . . . .

. .4

Getting Started . . . . . . . . . . . . . . . . . . . . . . . . . . . . . . . . . . . . . . . . . . . . .

. .5

• Inserting or removing a memory card . . . . . . . . . . . . . . . . . . . . . . . . .

. .5

• Connecting an USB Device . . . . . . . . . . . . . . . . . . . . . . . . . . . . . . . . .

. .5

• Connecting the Power Cable . . . . . . . . . . . . . . . . . . . . . . . . . . . . . . . .

. .6

• Turning On or Off the Unit . . . . . . . . . . . . . . . . . . . . . . . . . . . . . . . . . .

. .6

• Power Save mode . . . . . . . . . . . . . . . . . . . . . . . . . . . . . . . . . . . . . . . .

. .6

• Installing the Stand . . . . . . . . . . . . . . . . . . . . . . . . . . . . . . . . . . . . . . .

. .6

• Using the Device Menu . . . . . . . . . . . . . . . . . . . . . . . . . . . . . . . . . . . .

. .7

Adjust the settings . . . . . . . . . . . . . . . . . . . . . . . . . . . . . . . . . . . . . . . . . . .

7-8

Viewing a Photo file . . . . . . . . . . . . . . . . . . . . . . . . . . . . . . . . . . . . . . . . . .

. .9

Playing a Movie file . . . . . . . . . . . . . . . . . . . . . . . . . . . . . . . . . . . . . . . . . .

.10

Playing a Music file . . . . . . . . . . . . . . . . . . . . . . . . . . . . . . . . . . . . . . . . . .

.11

Using a File menu . . . . . . . . . . . . . . . . . . . . . . . . . . . . . . . . . . . . . . . . . . .

.12

Viewing the Calendar . . . . . . . . . . . . . . . . . . . . . . . . . . . . . . . . . . . . . . . . .

.13

PC Connection (USB) . . . . . . . . . . . . . . . . . . . . . . . . . . . . . . . . . . . . . . . .

.14

Troubleshooting . . . . . . . . . . . . . . . . . . . . . . . . . . . . . . . . . . . . . . . . . . . . .

.15

Specifications . . . . . . . . . . . . . . . . . . . . . . . . . . . . . . . . . . . . . . . . . . . . . .

.15

Features

Live picture gallery:

High resolution and deep digital color from LCD wide screen.

Easy power save mode:

Better 1 second power save mode than 15 seconds power off and on.

Portable digital album:

Share your memories with built-in battery for easy mobility

Plug-in viewer:

Easy viewing photos via memory card slot and USB port

2,000 photo storage:

2,000 precious memories with 256MB built-in flash memory

Digital calendar & alarm clock:

For your efficient date and time scheduling

Convenient photo explorer:

Coolest interface navigation for easiest access to your memory

Premium interior decorator

3 different changeable faceplate to suit various interior

3

PF391P-P-ALVALLW-ENG 11/27/07 7:50 PM Page 4

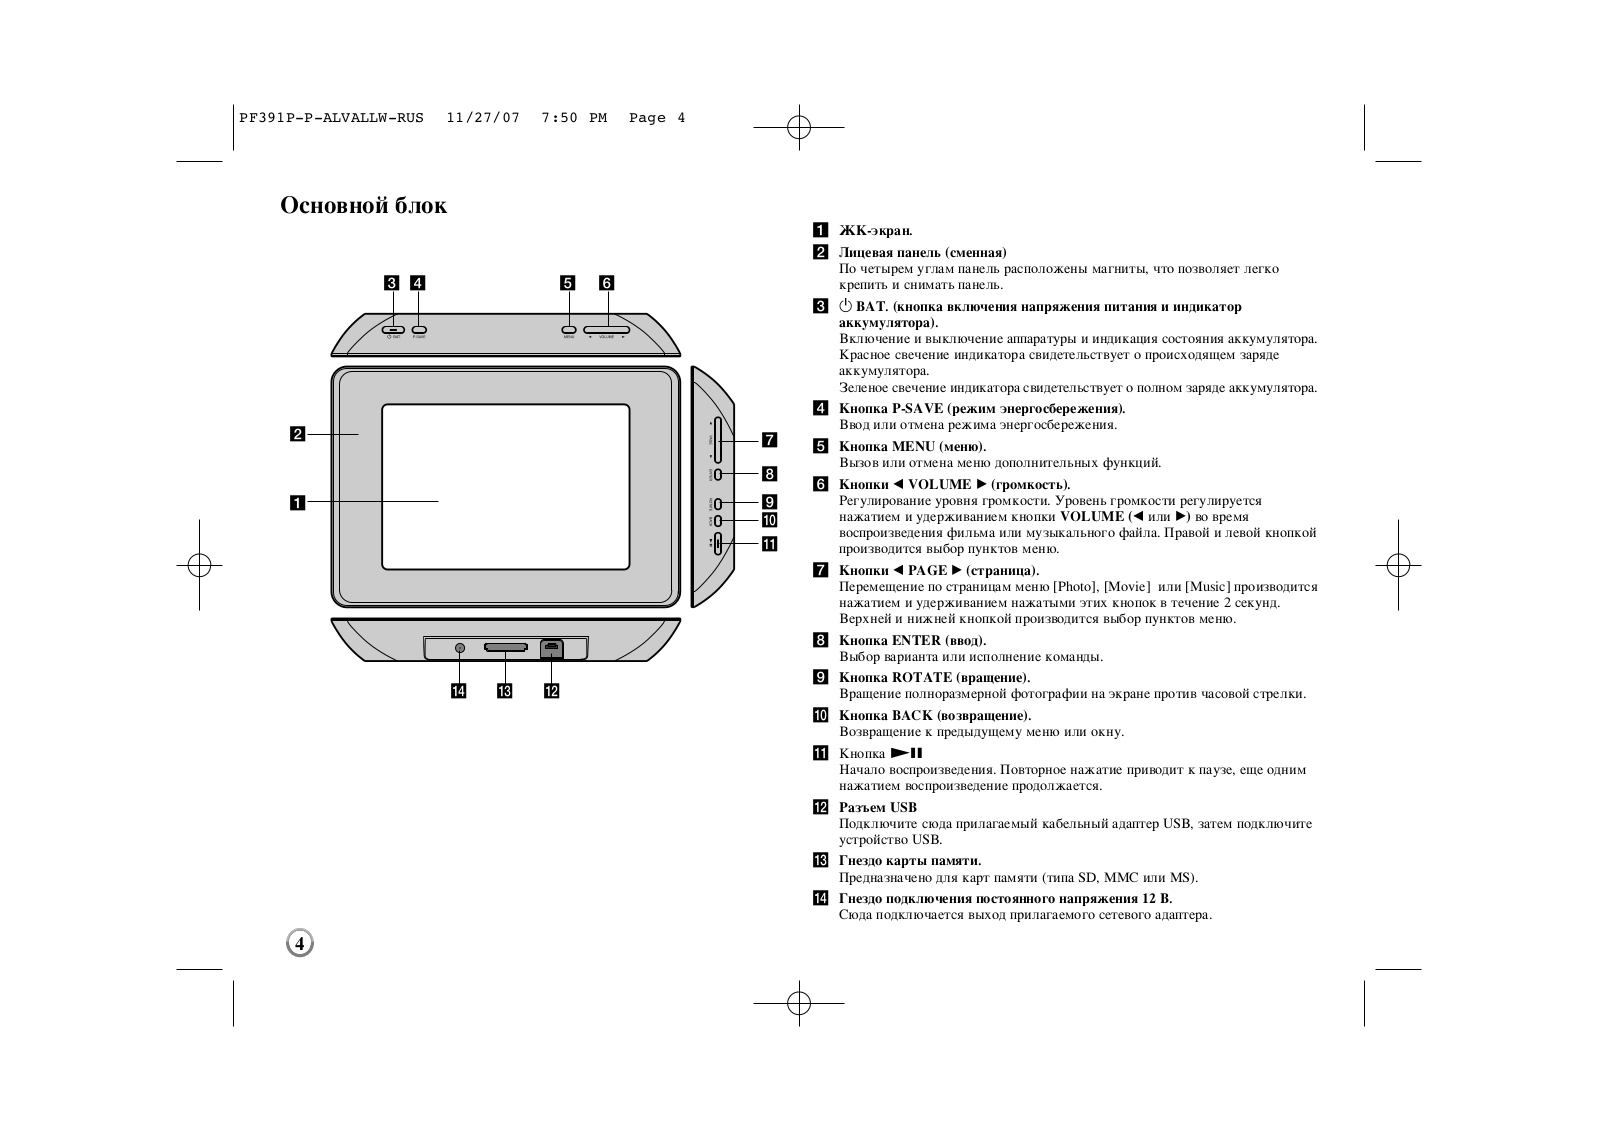
Main Unit

c d

e f

b

a

n m l


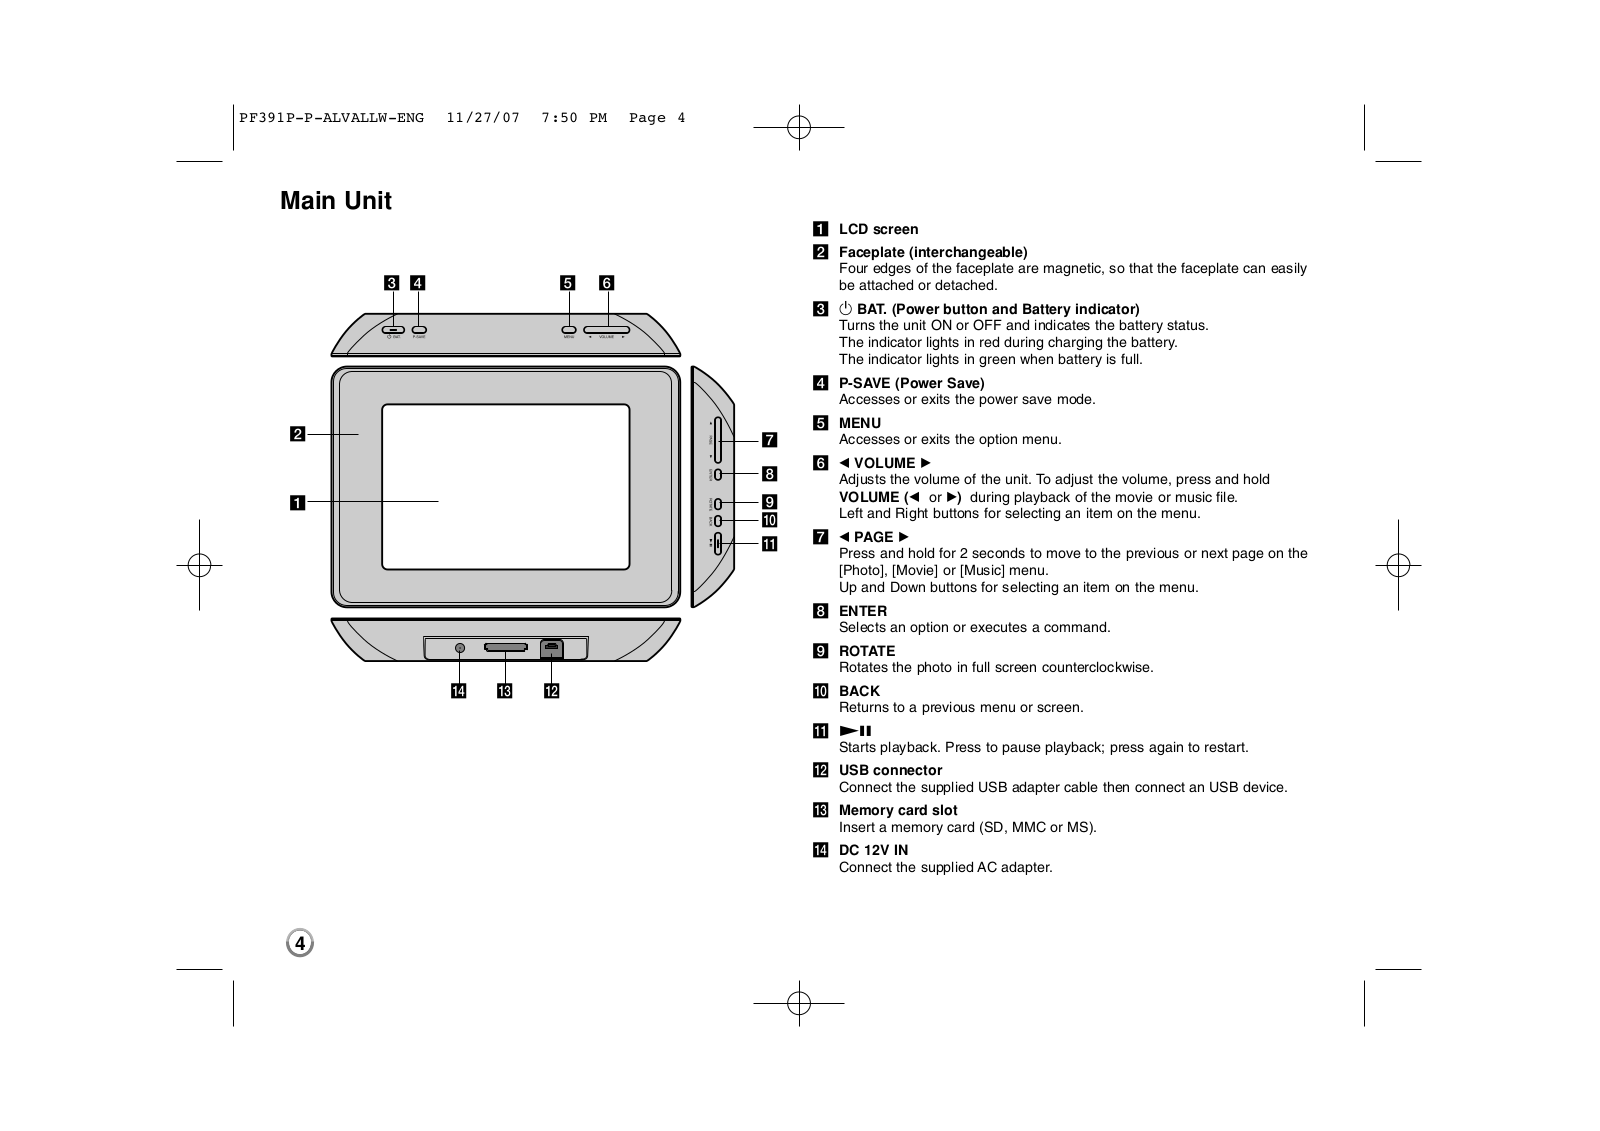
a LCD screen


b Faceplate (interchangeable)


Four edges of the faceplate are magnetic, so that the faceplate can easily


be attached or detached.


c 1 BAT. (Power button and Battery indicator)


Turns the unit ON or OFF and indicates the battery status.


The indicator lights in red during charging the battery.


The indicator lights in green when battery is full.


d P-SAVE (Power Save)


Accesses or exits the power save mode.


e MENU

g

Accesses or exits the option menu.

h f

i

j

k g

b VOLUME B

Adjusts the volume of the unit. To adjust the volume, press and hold VOLUME (b or B) during playback of the movie or music file.

Left and Right buttons for selecting an item on the menu.

b PAGE B

Press and hold for 2 seconds to move to the previous or next page on the [Photo], [Movie] or [Music] menu.

Up and Down buttons for selecting an item on the menu.

hENTER

Selects an option or executes a command.

iROTATE

Rotates the photo in full screen counterclockwise.

jBACK

Returns to a previous menu or screen.

kNX

Starts playback. Press to pause playback; press again to restart.

lUSB connector

Connect the supplied USB adapter cable then connect an USB device.

mMemory card slot

Insert a memory card (SD, MMC or MS).

nDC 12V IN

Connect the supplied AC adapter.

4

PF391P-P-ALVALLW-ENG 11/27/07 7:50 PM Page 5

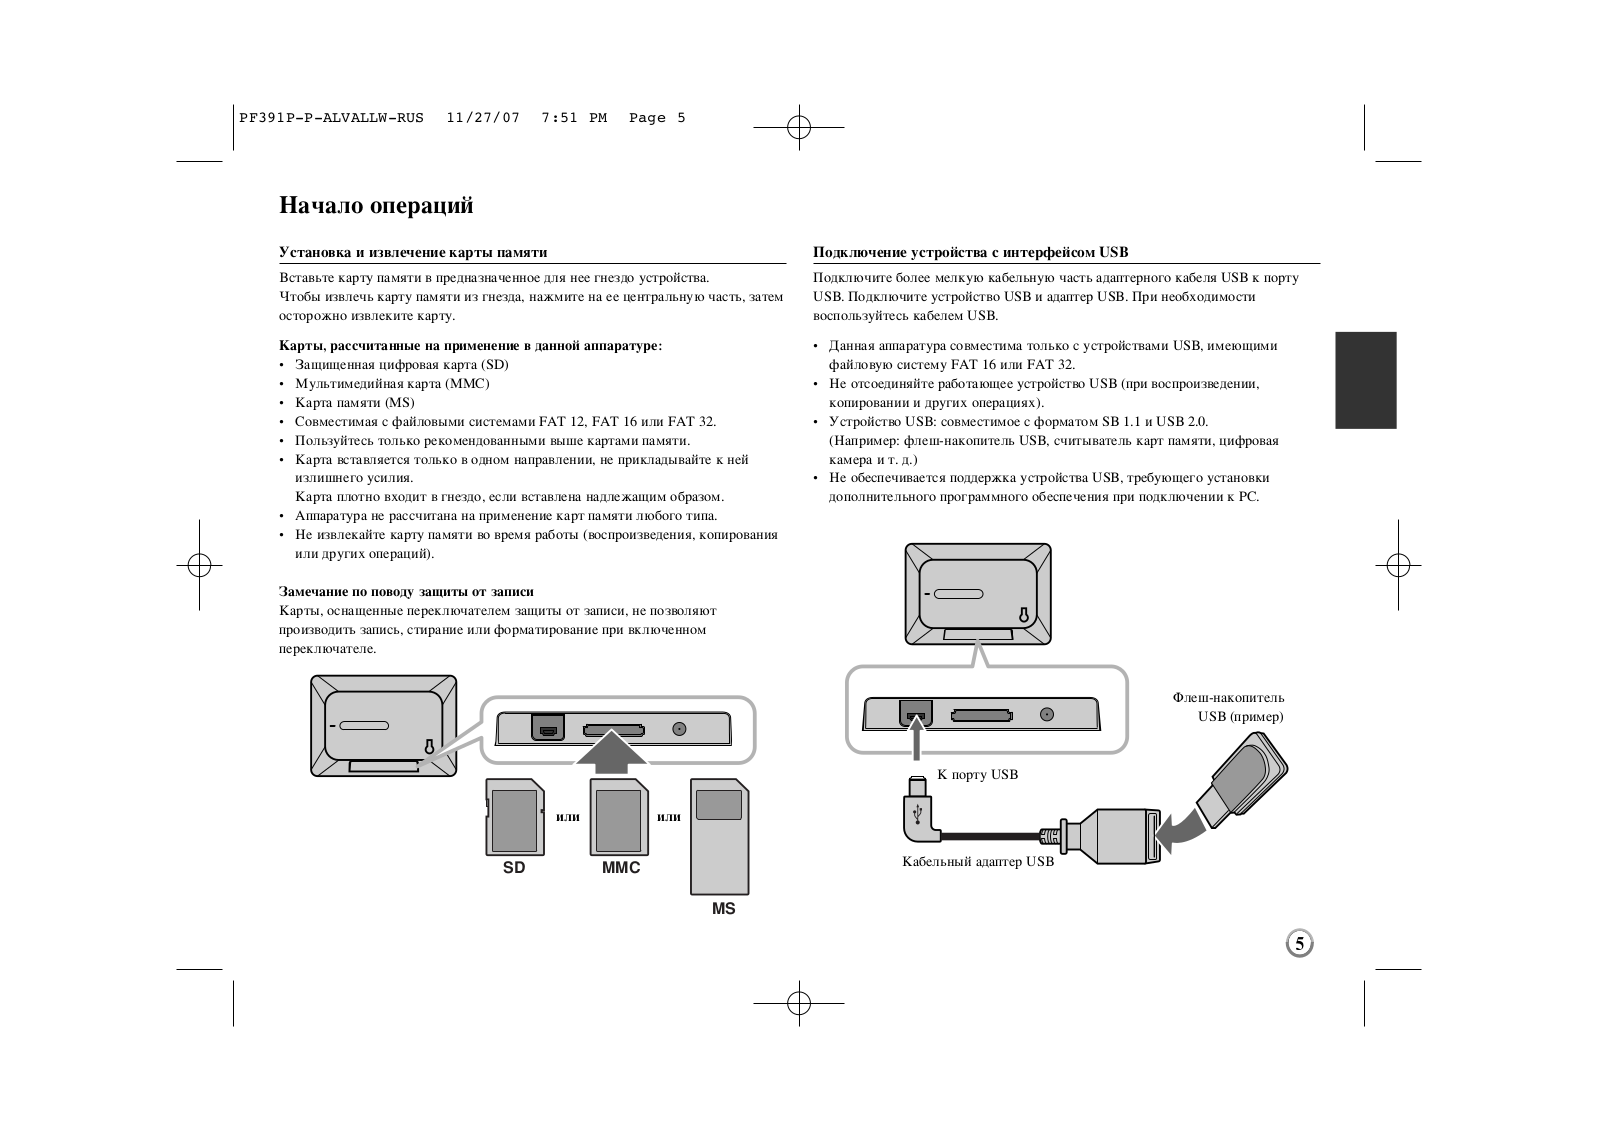
Getting Started

Inserting or removing a memory card

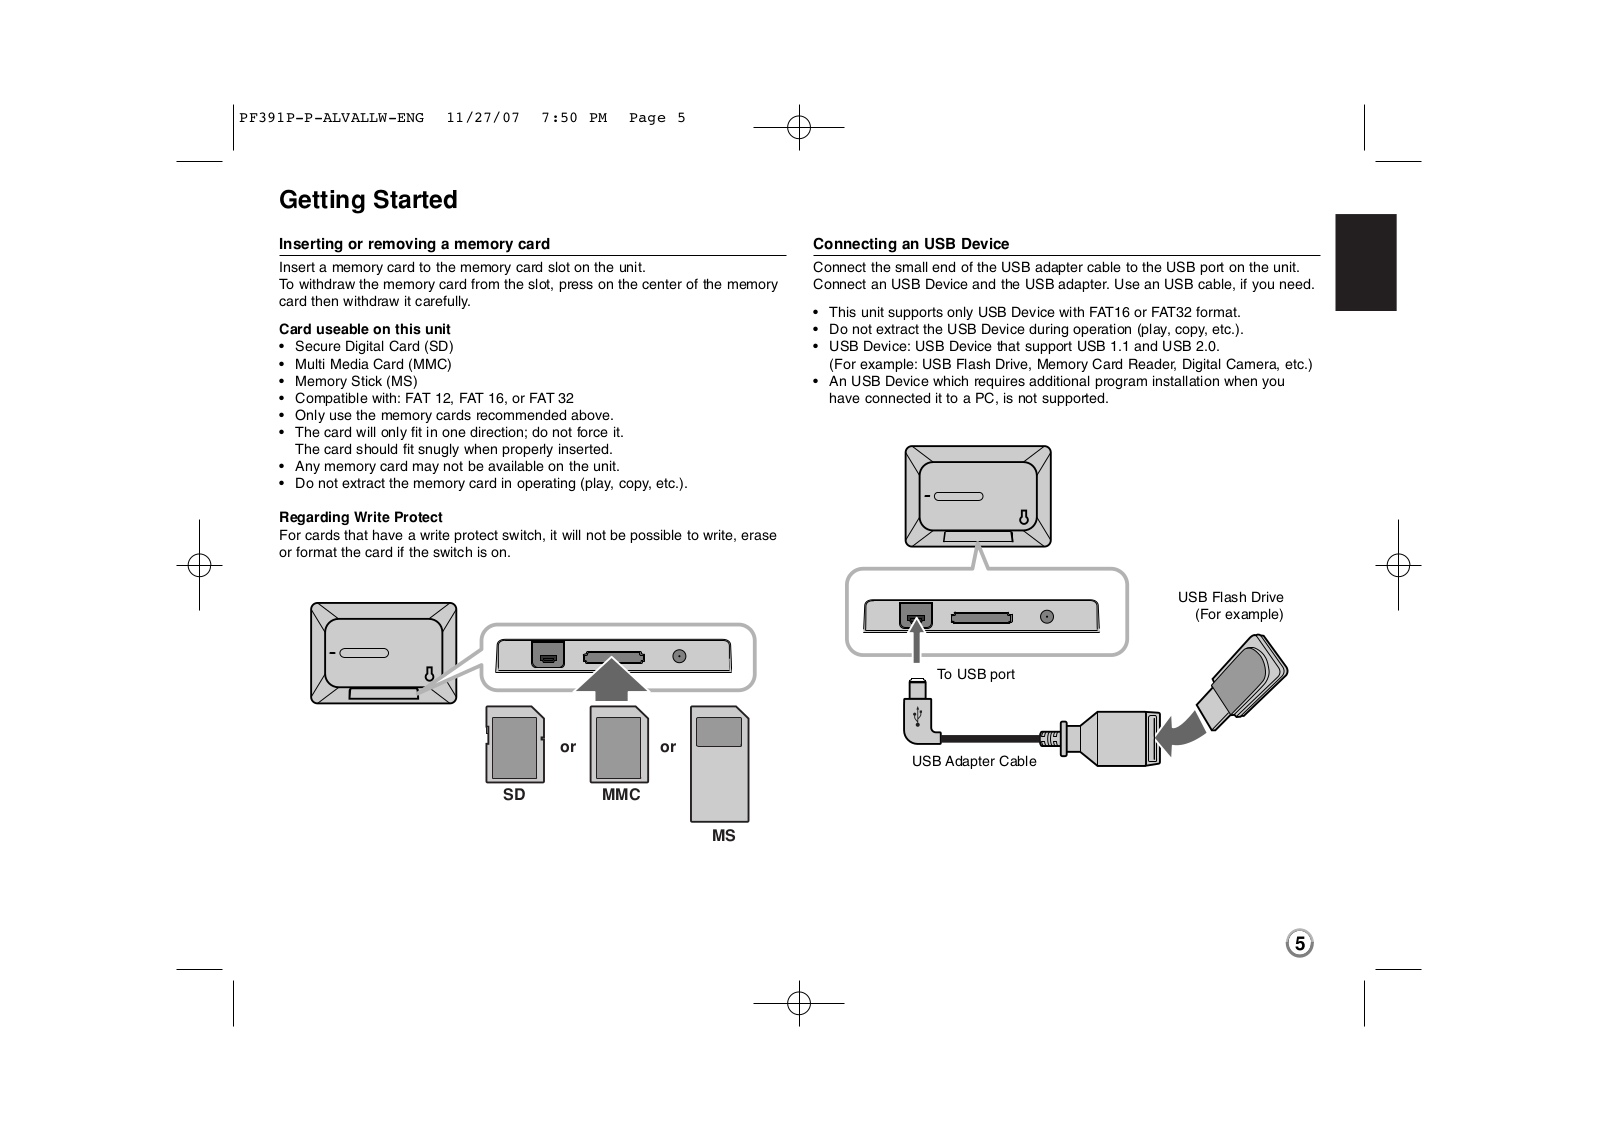
Insert a memory card to the memory card slot on the unit.

To withdraw the memory card from the slot, press on the center of the memory card then withdraw it carefully.

Card useable on this unit

Secure Digital Card (SD)

Multi Media Card (MMC)

Memory Stick (MS)

Compatible with: FAT 12, FAT 16, or FAT 32

Only use the memory cards recommended above.

The card will only fit in one direction; do not force it. The card should fit snugly when properly inserted.

Any memory card may not be available on the unit.

Do not extract the memory card in operating (play, copy, etc.).

Regarding Write Protect

For cards that have a write protect switch, it will not be possible to write, erase or format the card if the switch is on.

or or

SD MMC

MS

Connecting an USB Device

Connect the small end of the USB adapter cable to the USB port on the unit. Connect an USB Device and the USB adapter. Use an USB cable, if you need.

This unit supports only USB Device with FAT16 or FAT32 format.

Do not extract the USB Device during operation (play, copy, etc.).

USB Device: USB Device that support USB 1.1 and USB 2.0.

(For example: USB Flash Drive, Memory Card Reader, Digital Camera, etc.)

An USB Device which requires additional program installation when you have connected it to a PC, is not supported.

USB Flash Drive

(For example)

To USB port

USB Adapter Cable

5

LG PF391P-P User Guide

PF391P-P-ALVALLW-ENG 11/27/07 7:50 PM Page 6

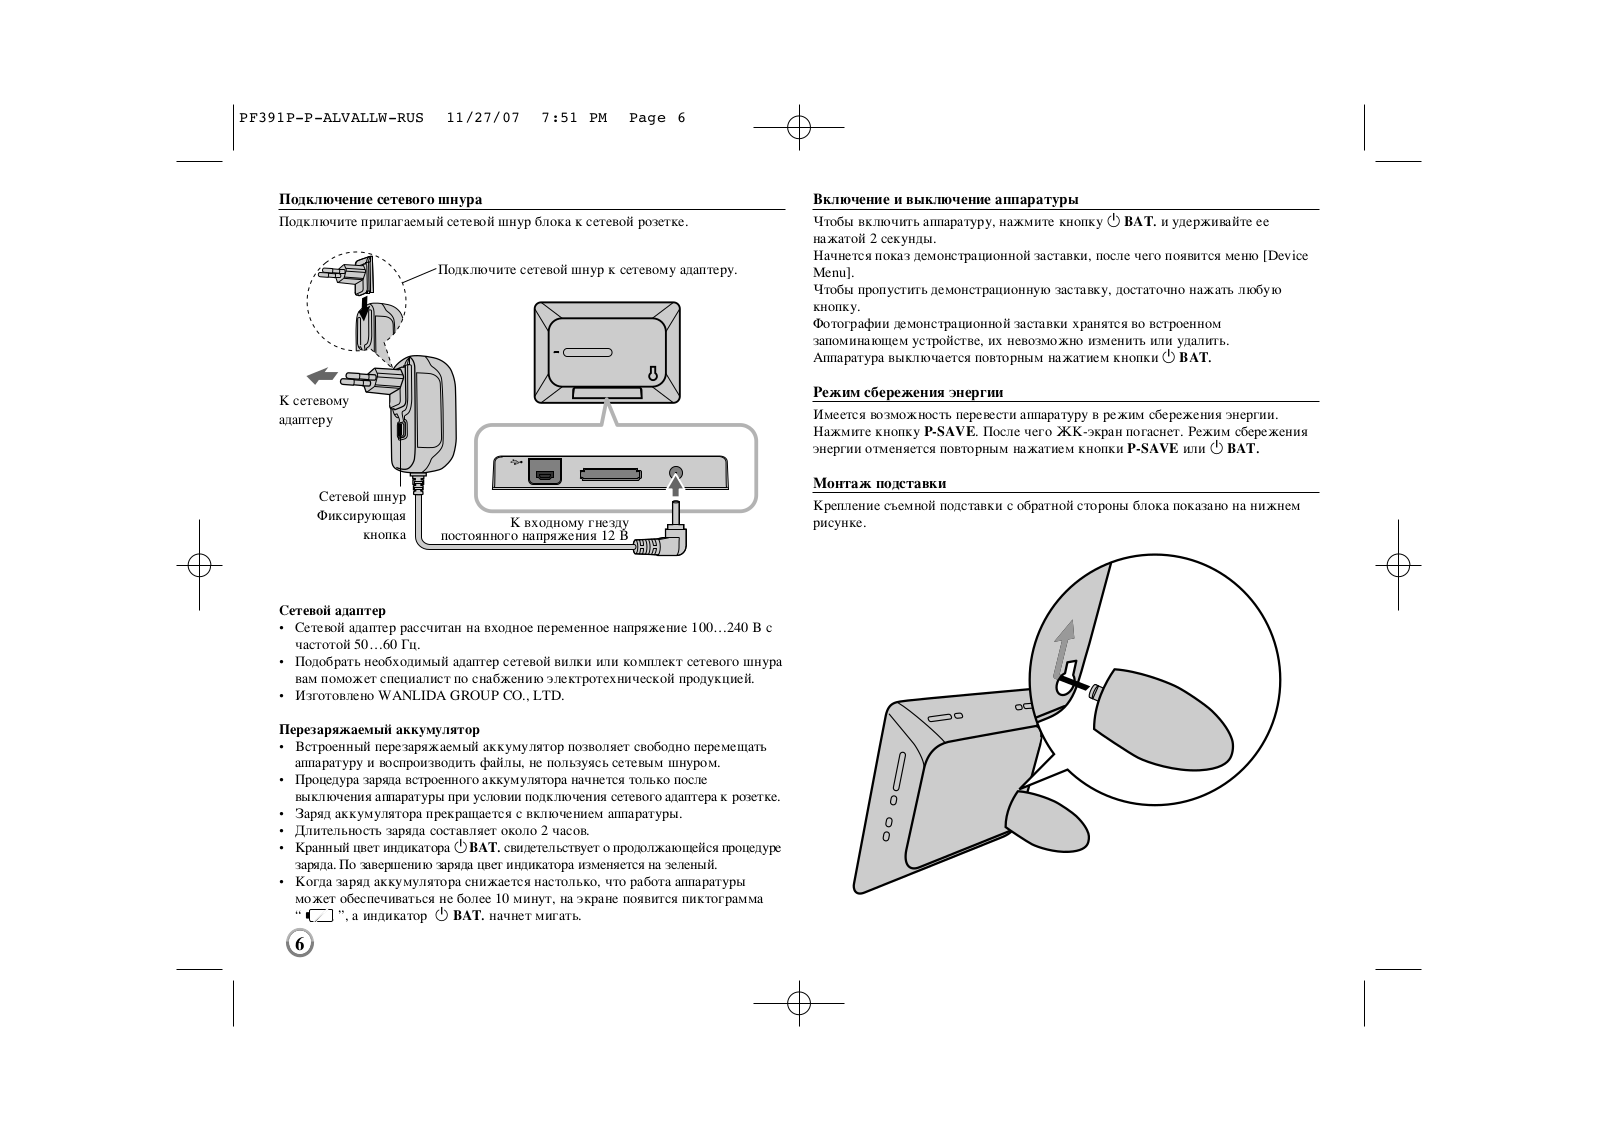
Connecting the Power Cable

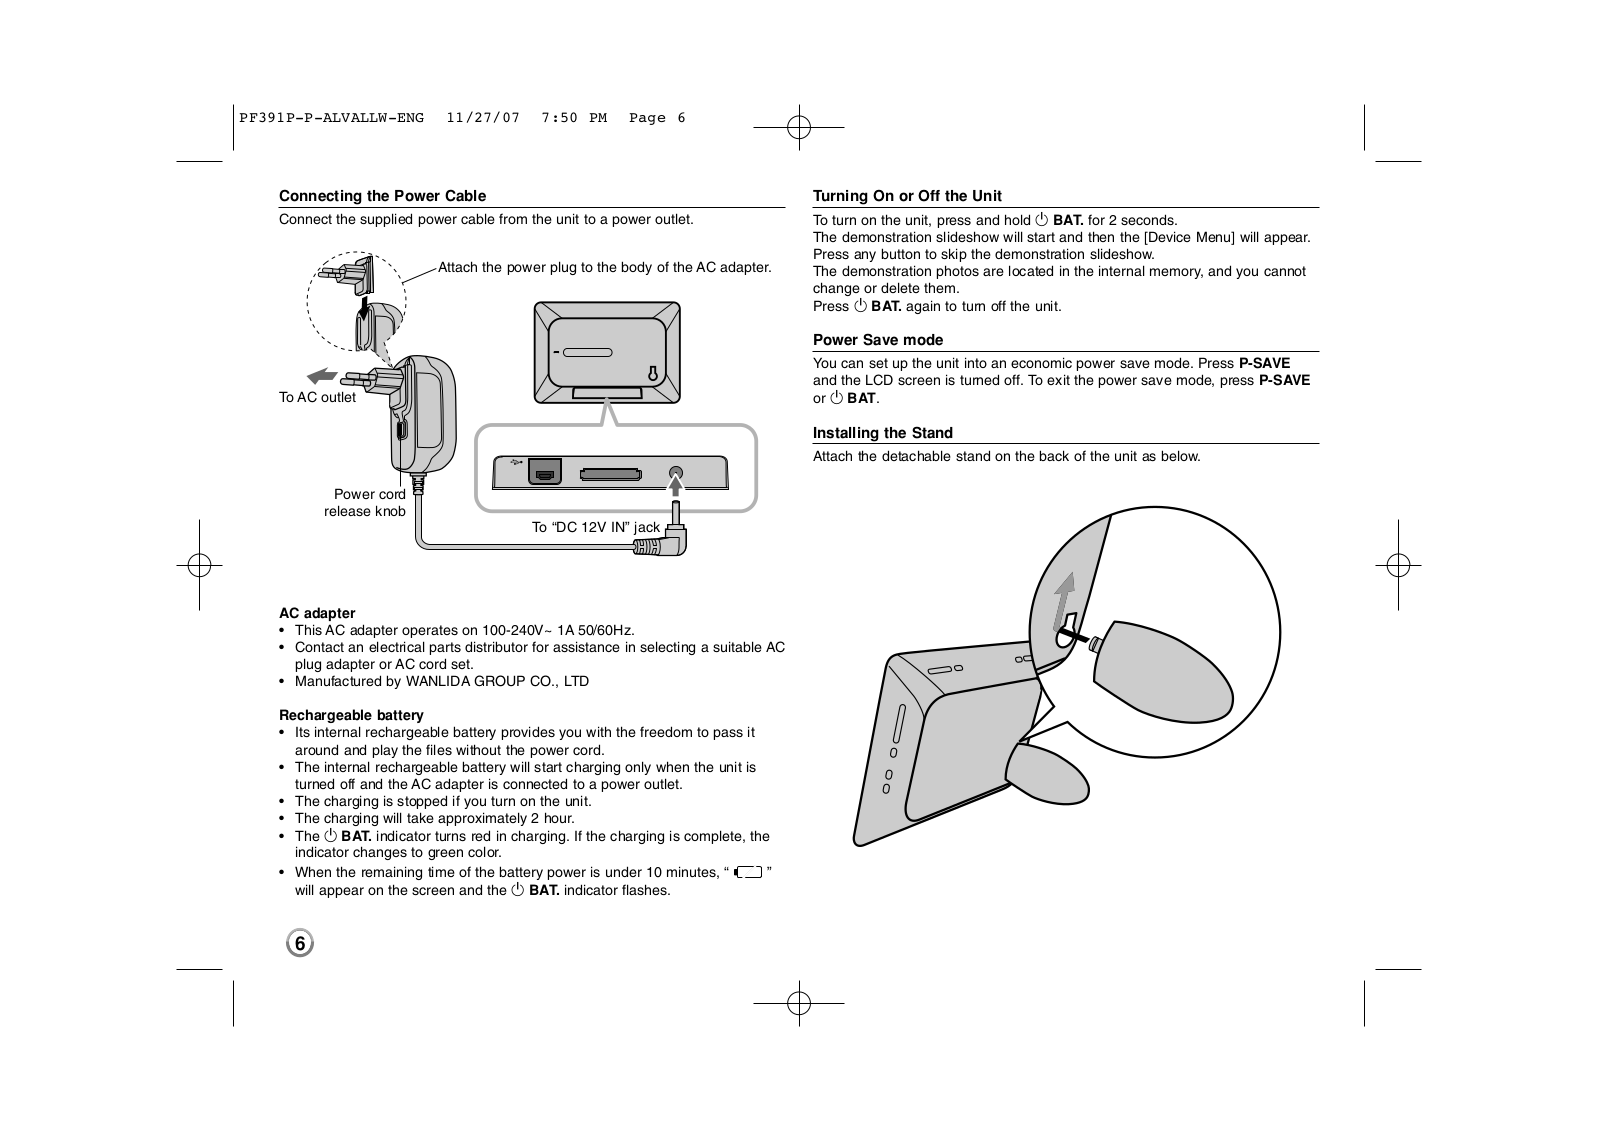
Connect the supplied power cable from the unit to a power outlet.

Attach the power plug to the body of the AC adapter.

To AC outlet

Power cord release knob

To “DC 12V IN” jack

AC adapter

This AC adapter operates on 100-240V~ 1A 50/60Hz.

Contact an electrical parts distributor for assistance in selecting a suitable AC plug adapter or AC cord set.

Manufactured by WANLIDA GROUP CO., LTD

Rechargeable battery

Its internal rechargeable battery provides you with the freedom to pass it around and play the files without the power cord.

The internal rechargeable battery will start charging only when the unit is turned off and the AC adapter is connected to a power outlet.

The charging is stopped if you turn on the unit.

The charging will take approximately 2 hour.

The 1 BAT. indicator turns red in charging. If the charging is complete, the indicator changes to green color.

When the remaining time of the battery power is under 10 minutes, “ ” will appear on the screen and the 1 BAT. indicator flashes.

Turning On or Off the Unit

To turn on the unit, press and hold 1 BAT. for 2 seconds.

The demonstration slideshow will start and then the [Device Menu] will appear. Press any button to skip the demonstration slideshow.

The demonstration photos are located in the internal memory, and you cannot change or delete them.

Press 1 BAT. again to turn off the unit.

Power Save mode

You can set up the unit into an economic power save mode. Press P-SAVE and the LCD screen is turned off. To exit the power save mode, press P-SAVE or 1 BAT.

Installing the Stand

Attach the detachable stand on the back of the unit as below.

6

PF391P-P-ALVALLW-ENG 11/27/07 7:50 PM

Page 7


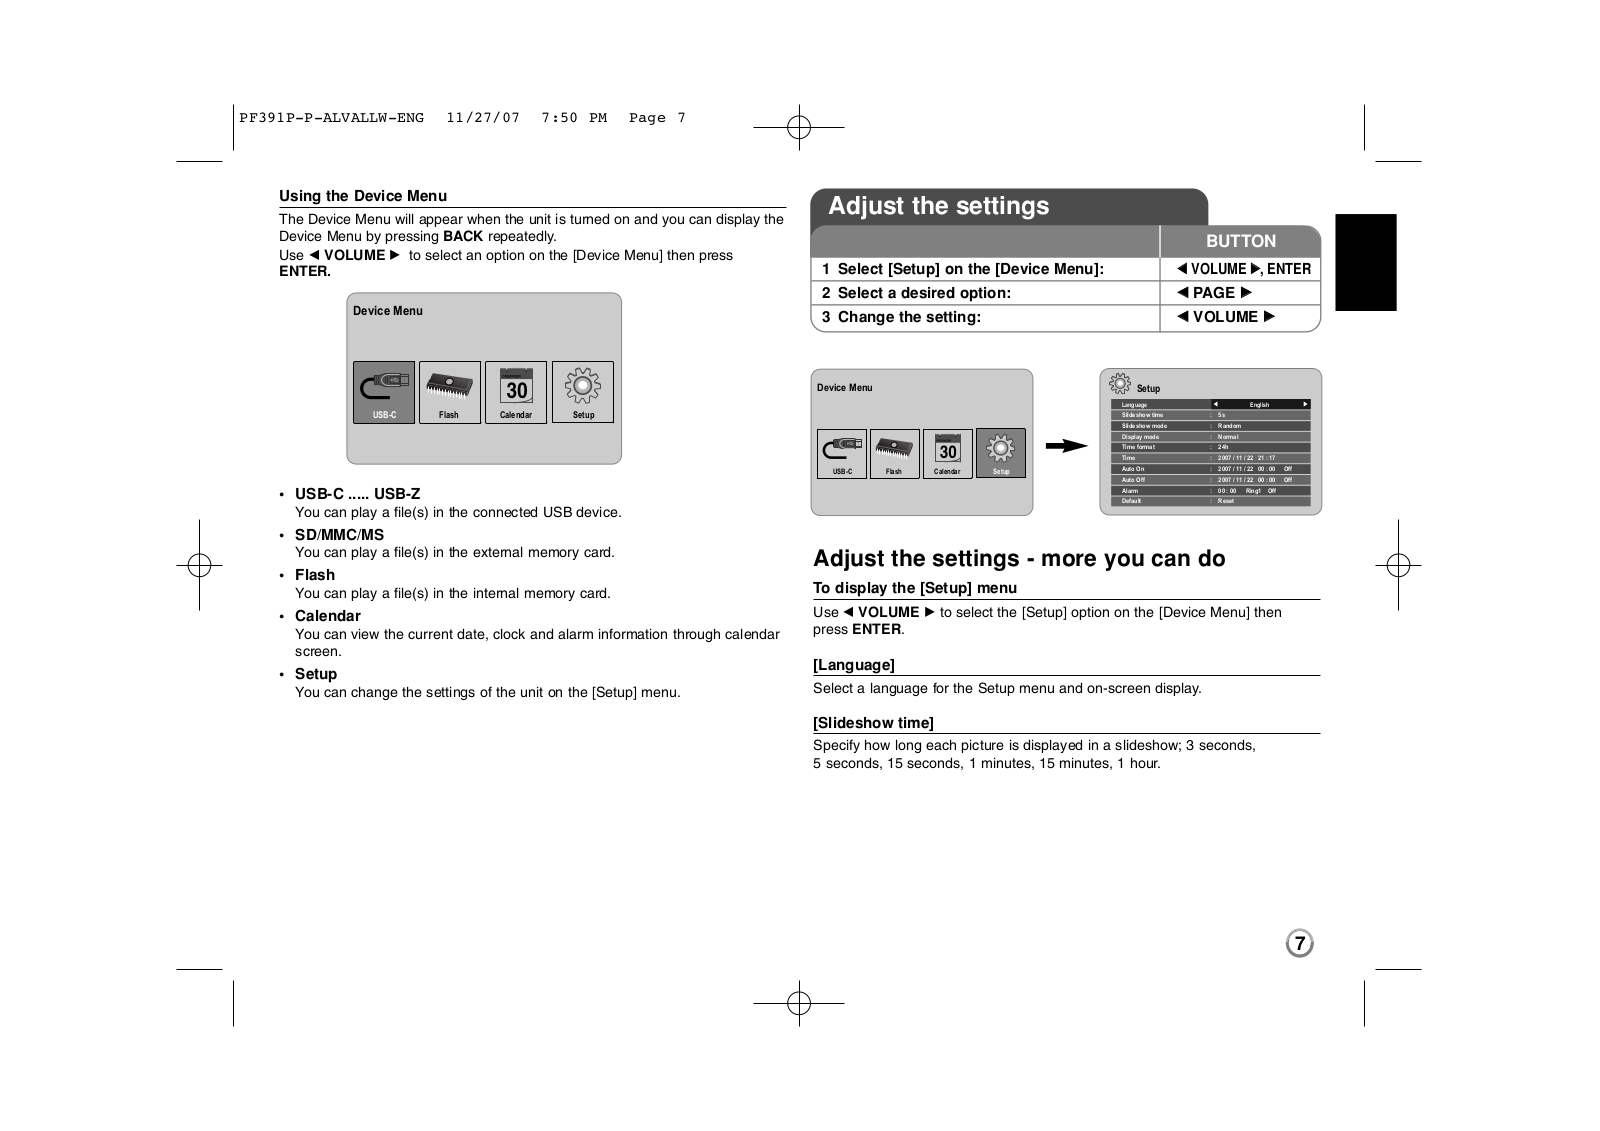
Using the Device Menu


Adjust the settings


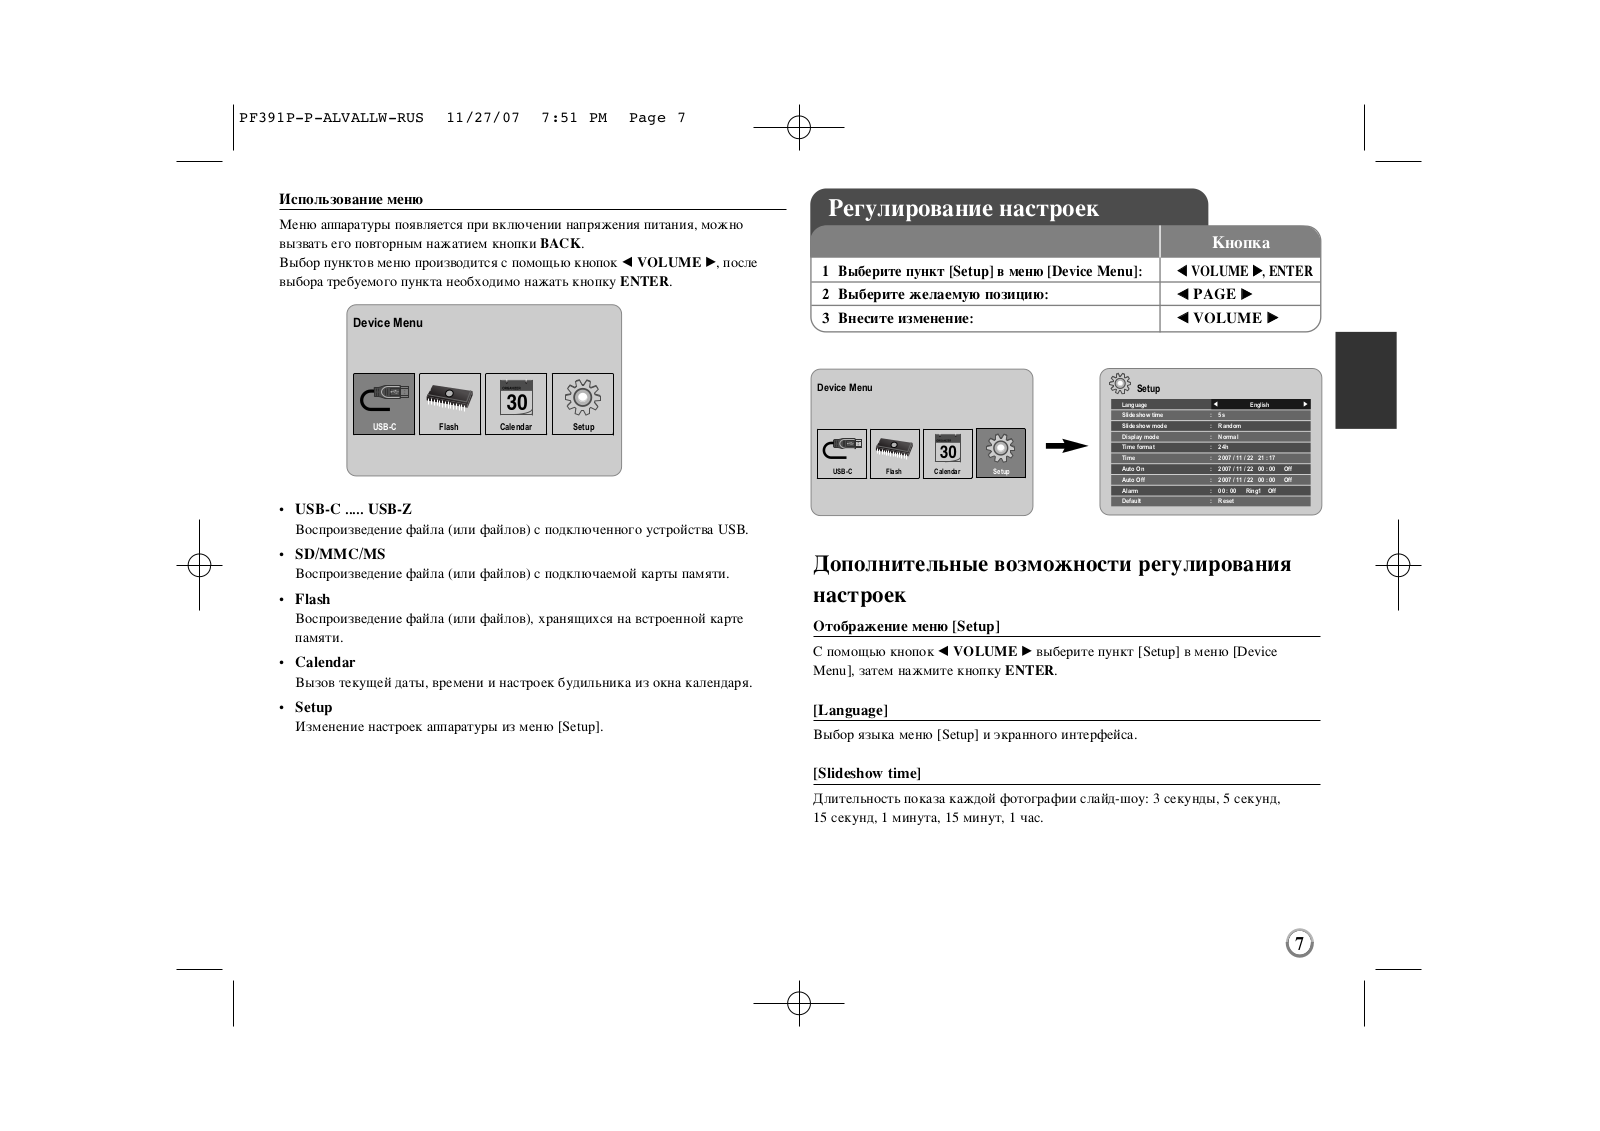
The Device Menu will appear when the unit is turned on and you can display the


Device Menu by pressing BACK repeatedly.


BUTTON


Use b VOLUME B to select an option on the [Device Menu] then press


ENTER.


1

Select [Setup] on the [Device Menu]:

b VOLUME B, ENTER


2

Select a desired option:

b PAGE B


Device Menu


3

Change the setting:

b VOLUME B


USB-C

Flash

Calendar

Setup

USB-C

You can

SD/MMC/MS

You can

Flash

You can

Calendar

You can

through calendar

screen.


• Setup


You can

menu.

Device Menu


Setup


Language


English


Slideshow time

:

5s


Slideshow mode

:

Random


Display mode

:

Normal


Time format

:

24h


Time

:

2007 / 11 / 22

21 : 17


USB-C

Flash

Calendar

Setup

Auto On

:

2007 / 11 / 22

00 : 00

Off


Auto Off

:

2007 / 11 / 22

00 : 00

Off


Alarm

:

00 : 00 Ring1 Off


Default

:

Reset


Adjust the settings - more you can do

To display the [Setup] menu

Use b VOLUME B to select the [Setup] option on the [Device Menu] then press ENTER.

[Language]

Select a language for the Setup menu and on-screen display.

[Slideshow time]

Specify how long each picture is displayed in a slideshow; 3 seconds, 5 seconds, 15 seconds, 1 minutes, 15 minutes, 1 hour.

7

PF391P-P-ALVALLW-ENG 11/27/07 7:50 PM Page 8

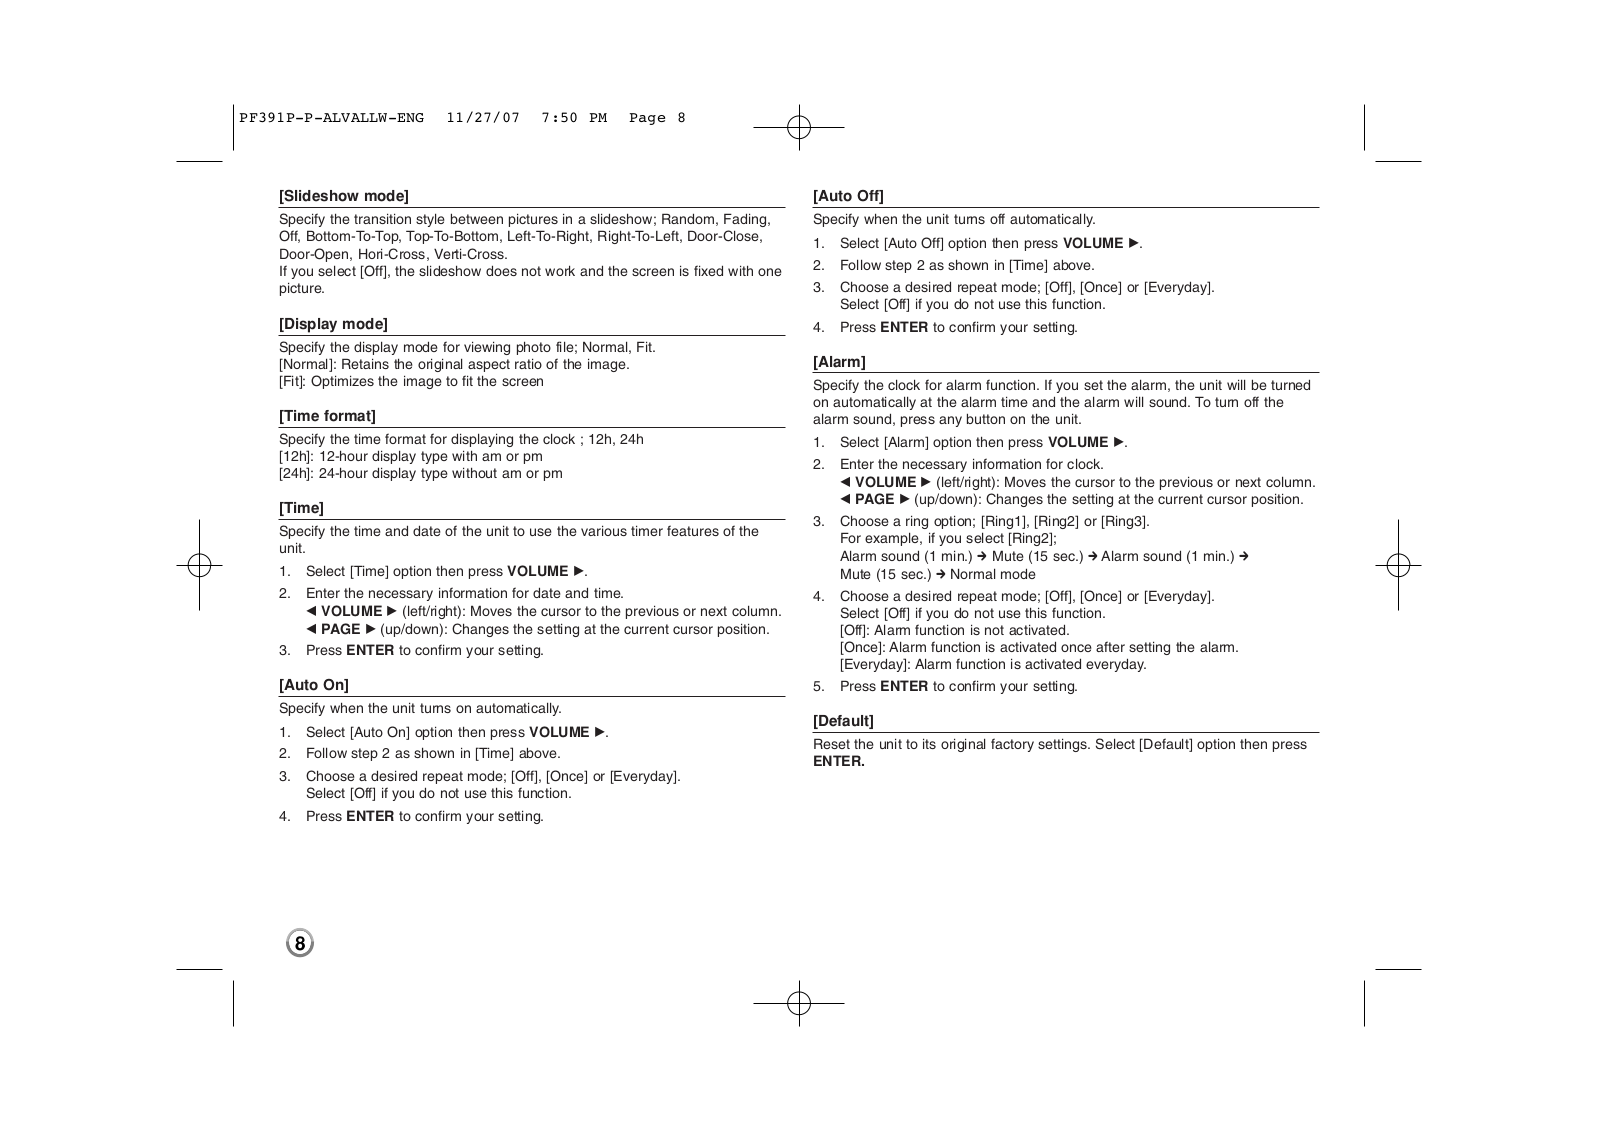
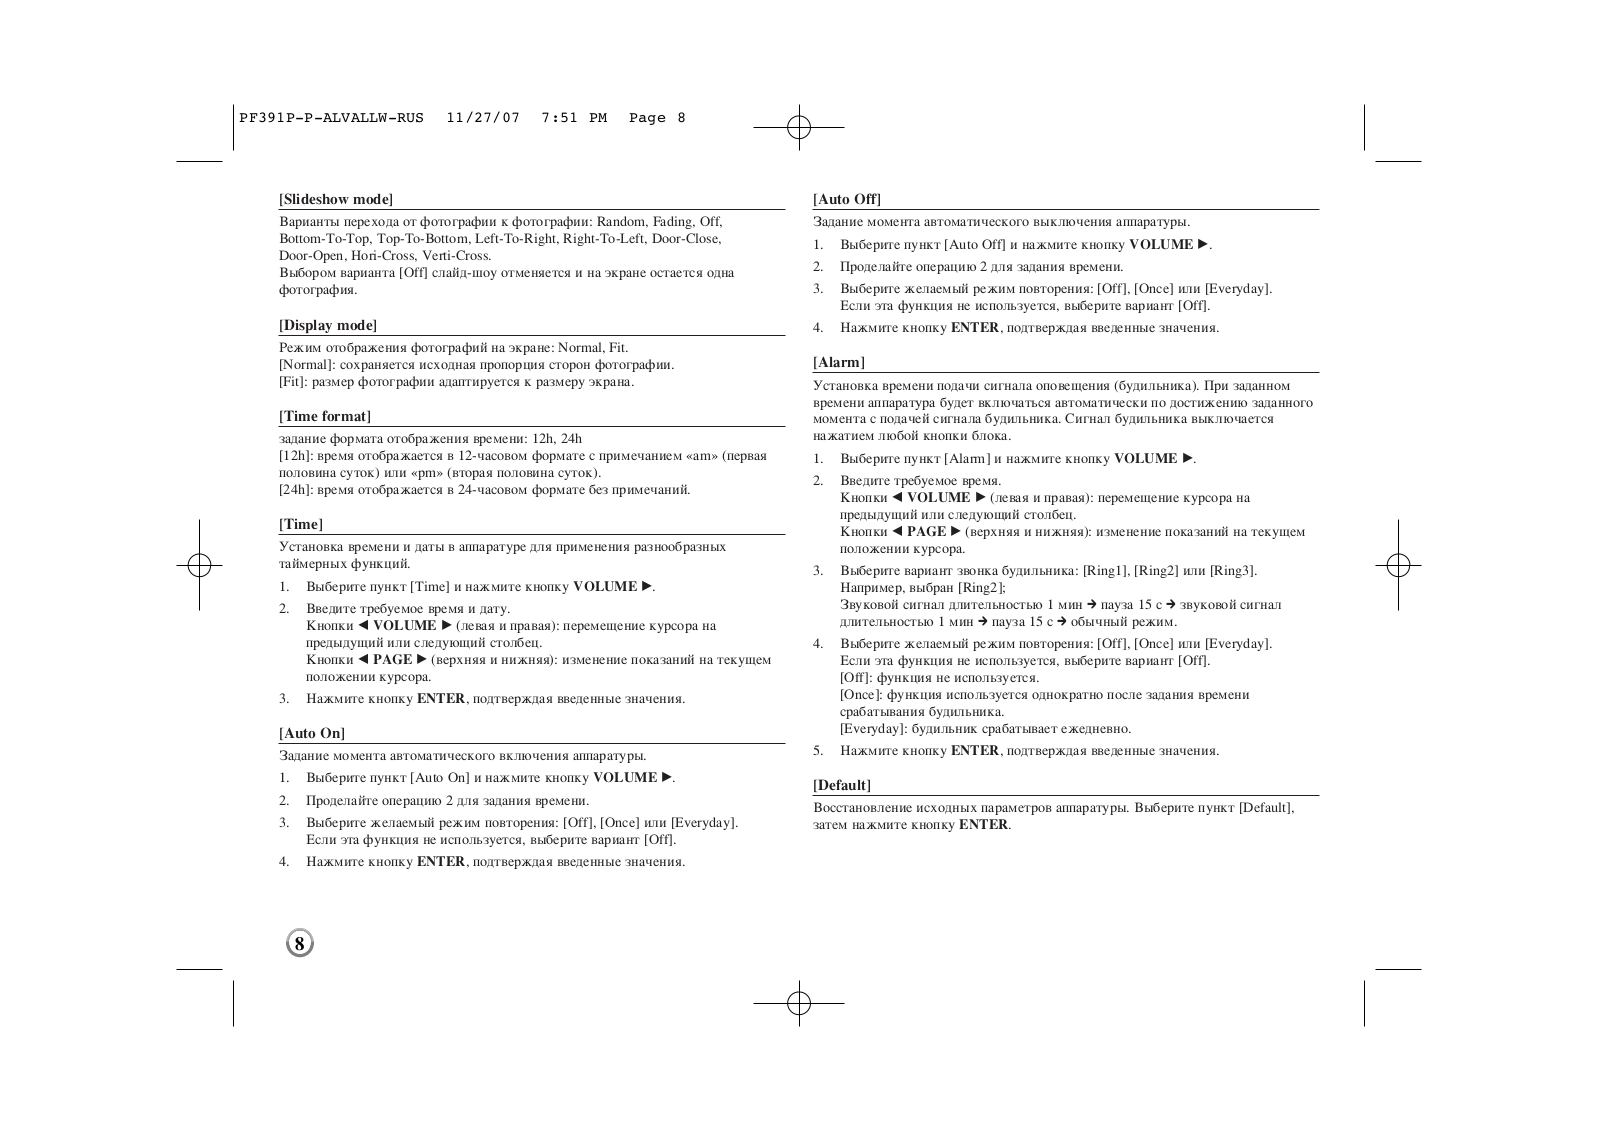
[Slideshow mode]

Specify the transition style between pictures in a slideshow; Random, Fading, Off, Bottom-To-Top, Top-To-Bottom, Left-To-Right, Right-To-Left, Door-Close, Door-Open, Hori-Cross, Verti-Cross.

If you select [Off], the slideshow does not work and the screen is fixed with one picture.

[Display mode]

Specify the display mode for viewing photo file; Normal, Fit. [Normal]: Retains the original aspect ratio of the image. [Fit]: Optimizes the image to fit the screen

[Time format]

Specify the time format for displaying the clock ; 12h, 24h [12h]: 12-hour display type with am or pm

[24h]: 24-hour display type without am or pm

[Time]

Specify the time and date of the unit to use the various timer features of the unit.

1.Select [Time] option then press VOLUME B.

2.Enter the necessary information for date and time.

b VOLUME B (left/right): Moves the cursor to the previous or next column. b PAGE B (up/down): Changes the setting at the current cursor position.

3.Press ENTER to confirm your setting.

[Auto On]

Specify when the unit turns on automatically.

1.Select [Auto On] option then press VOLUME B.

2.Follow step 2 as shown in [Time] above.

3.Choose a desired repeat mode; [Off], [Once] or [Everyday]. Select [Off] if you do not use this function.

4.Press ENTER to confirm your setting.

[Auto Off]

Specify when the unit turns off automatically.

1.Select [Auto Off] option then press VOLUME B.

2.Follow step 2 as shown in [Time] above.

3.Choose a desired repeat mode; [Off], [Once] or [Everyday]. Select [Off] if you do not use this function.

4.Press ENTER to confirm your setting.

[Alarm]

Specify the clock for alarm function. If you set the alarm, the unit will be turned on automatically at the alarm time and the alarm will sound. To turn off the alarm sound, press any button on the unit.

1.Select [Alarm] option then press VOLUME B.

2.Enter the necessary information for clock.

b VOLUME B (left/right): Moves the cursor to the previous or next column. b PAGE B (up/down): Changes the setting at the current cursor position.

3.Choose a ring option; [Ring1], [Ring2] or [Ring3]. For example, if you select [Ring2];

Alarm sound (1 min.) c Mute (15 sec.) c Alarm sound (1 min.) c Mute (15 sec.) c Normal mode

4.Choose a desired repeat mode; [Off], [Once] or [Everyday]. Select [Off] if you do not use this function.

[Off]: Alarm function is not activated.

[Once]: Alarm function is activated once after setting the alarm. [Everyday]: Alarm function is activated everyday.

5.Press ENTER to confirm your setting.

[Default]

Reset the unit to its original factory settings. Select [Default] option then press

ENTER.

8

PF391P-P-ALVALLW-ENG 11/27/07 7:50 PM Page 9

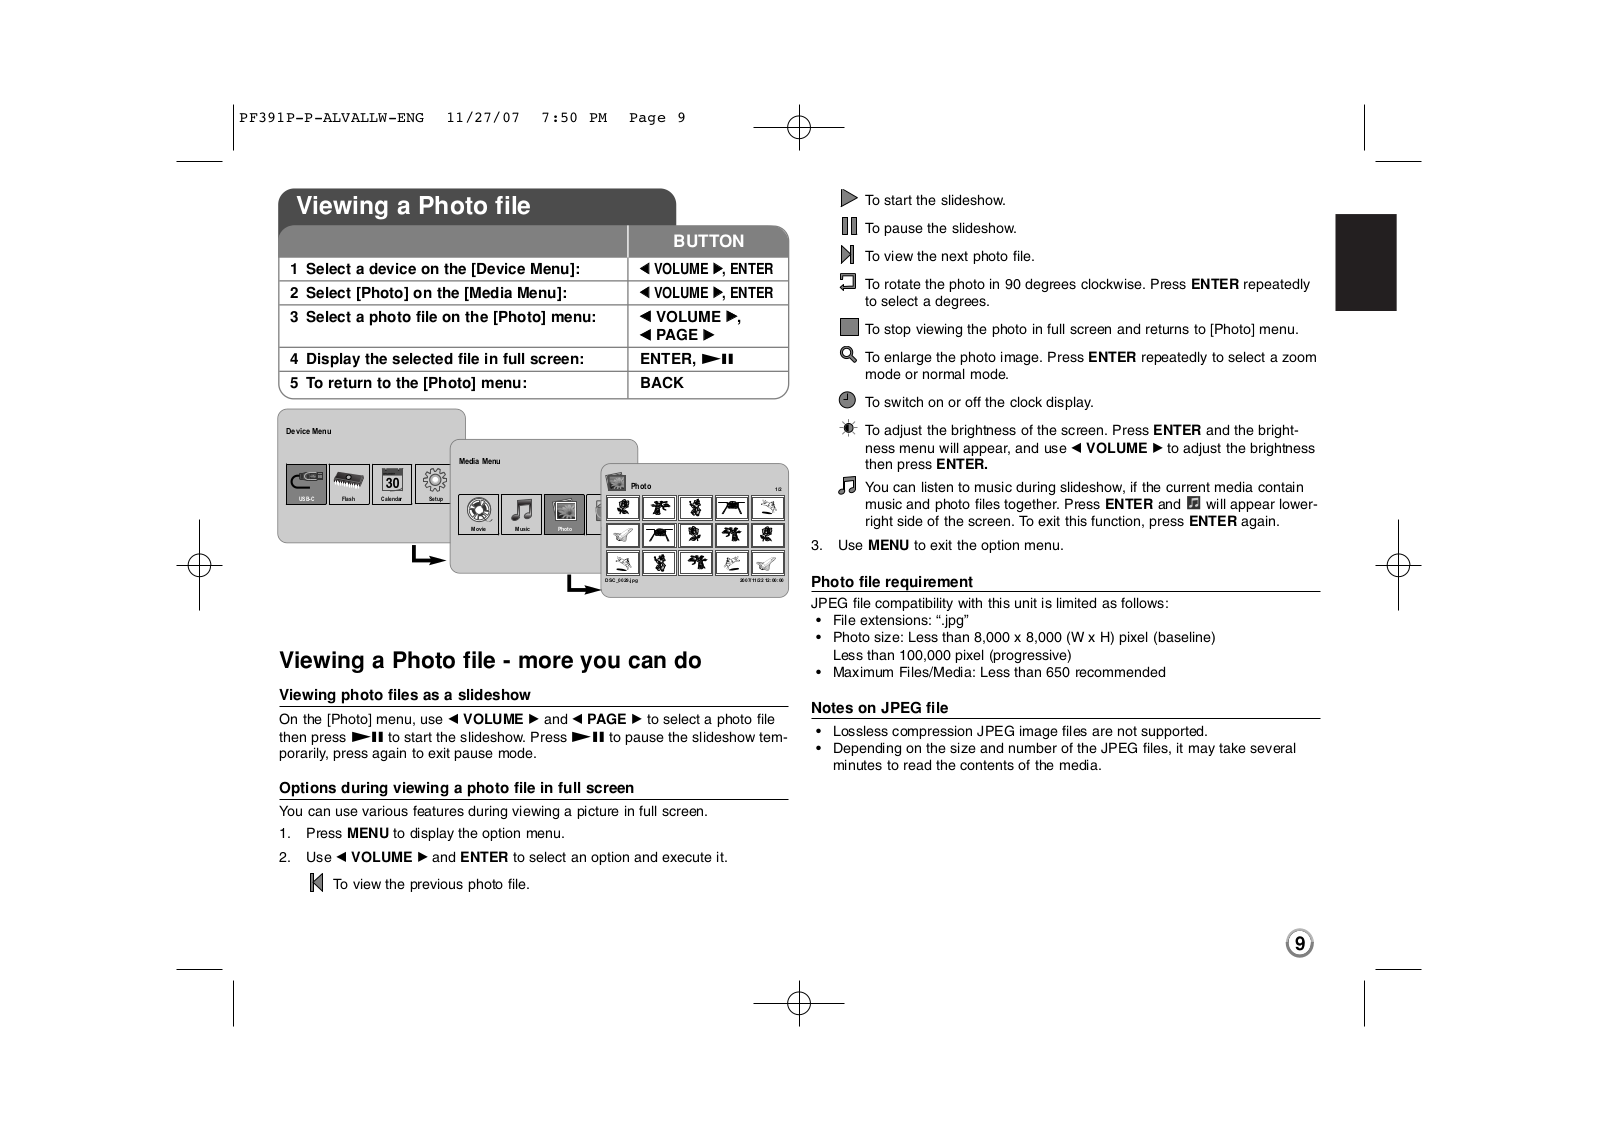
Viewing a Photo file


BUTTON

[Device Menu]:


b VOLUME B, ENTER


Menu]:


b VOLUME B, ENTER


[Photo] menu:


b VOLUME B,


b PAGE B


in full screen:


ENTER, NX


menu:


BACK


Device Menu

Media Menu

Photo

USB-C

Flash

Calendar

Setup

Movie

Music

Photo

DSC_0029.jpg

1/2

2007/11/22 12:00:00

Viewing a Photo file - more you can do

Viewing photo files as a slideshow

On the [Photo] menu, use b VOLUME B and b PAGE B to select a photo file then press NX to start the slideshow. Press NX to pause the slideshow temporarily, press again to exit pause mode.

Options during viewing a photo file in full screen

You can use various features during viewing a picture in full screen.

1.Press MENU to display the option menu.

2.Use b VOLUME B and ENTER to select an option and execute it.

To view the previous photo file.

To start the slideshow.

To pause the slideshow.

To view the next photo file.

To rotate the photo in 90 degrees clockwise. Press ENTER repeatedly to select a degrees.

To stop viewing the photo in full screen and returns to [Photo] menu.

To enlarge the photo image. Press ENTER repeatedly to select a zoom mode or normal mode.

To switch on or off the clock display.

To adjust the brightness of the screen. Press ENTER and the brightness menu will appear, and use b VOLUME B to adjust the brightness then press ENTER.

You can listen to music during slideshow, if the current media contain music and photo files together. Press ENTER and will appear lowerright side of the screen. To exit this function, press ENTER again.

3.Use MENU to exit the option menu.

Photo file requirement

JPEG file compatibility with this unit is limited as follows:

File extensions: “.jpg”

Photo size: Less than 8,000 x 8,000 (W x H) pixel (baseline) Less than 100,000 pixel (progressive)

Maximum Files/Media: Less than 650 recommended

Notes on JPEG file

Lossless compression JPEG image files are not supported.

Depending on the size and number of the JPEG files, it may take several minutes to read the contents of the media.

9

PF391P-P-ALVALLW-ENG 11/27/07 7:50 PM Page 10

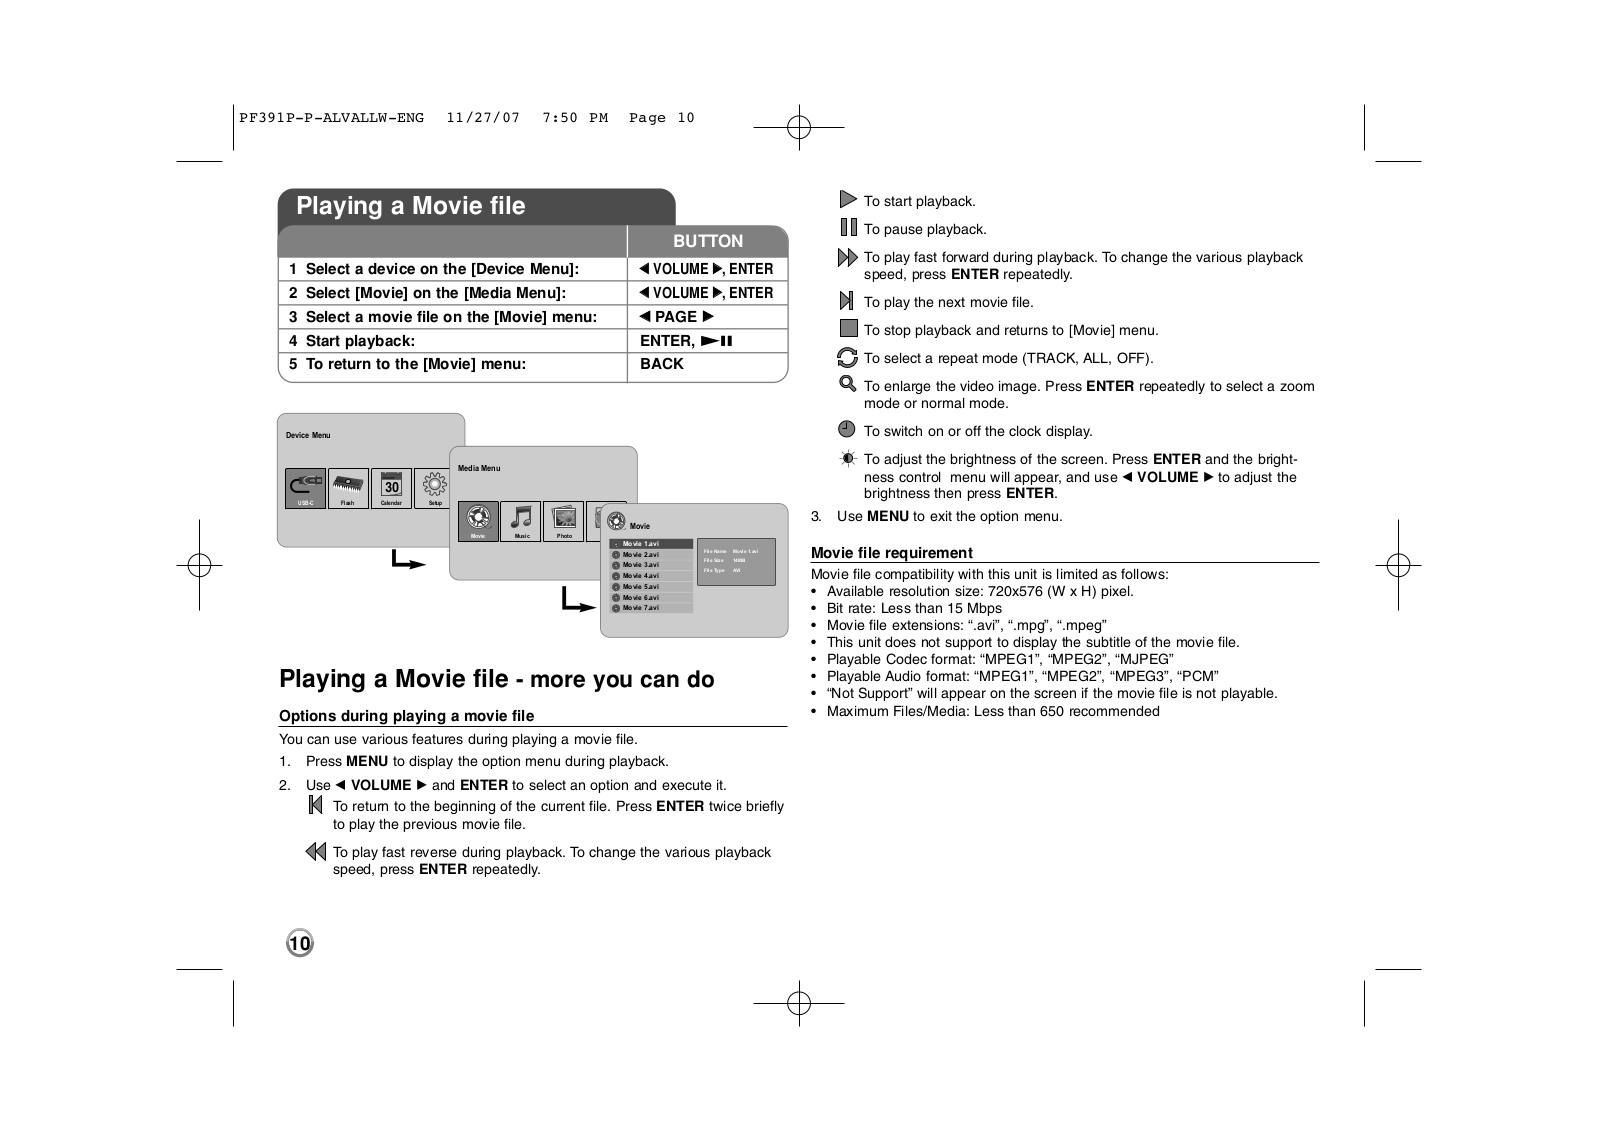
Playing a Movie file


BUTTON

[Device Menu]:

b VOLUME B, ENTER


Menu]:

b VOLUME B, ENTER

the [Movie] menu:

b PAGE B


ENTER, NX

menu:

BACK

Device Menu


Media Menu


USB-C Flash Calendar Setup


Movie


Movie

Music Photo


Movie 1.avi


Movie 2.avi

File Name Movie 1.avi


File Size 14MB


Movie 3.avi


File Type AVI


Movie 4.avi


Movie 5.avi


Movie 6.avi


Movie 7.avi


Playing a Movie file - more you can do

Options during playing a movie file

You can use various features during playing a movie file.

1.Press MENU to display the option menu during playback.

2.Use b VOLUME B and ENTER to select an option and execute it.

To return to the beginning of the current file. Press ENTER twice briefly to play the previous movie file.

To play fast reverse during playback. To change the various playback speed, press ENTER repeatedly.

To start playback.

To pause playback.

To play fast forward during playback. To change the various playback speed, press ENTER repeatedly.

To play the next movie file.

To stop playback and returns to [Movie] menu.

To select a repeat mode (TRACK, ALL, OFF).

To enlarge the video image. Press ENTER repeatedly to select a zoom mode or normal mode.

To switch on or off the clock display.

To adjust the brightness of the screen. Press ENTER and the brightness control menu will appear, and use b VOLUME B to adjust the brightness then press ENTER.

3.Use MENU to exit the option menu.

Movie file requirement

Movie file compatibility with this unit is limited as follows:

Available resolution size: 720x576 (W x H) pixel.

Bit rate: Less than 15 Mbps

Movie file extensions: “.avi”, “.mpg”, “.mpeg”

This unit does not support to display the subtitle of the movie file.

Playable Codec format: “MPEG1”, “MPEG2”, “MJPEG”

Playable Audio format: “MPEG1”, “MPEG2”, “MPEG3”, “PCM”

“Not Support” will appear on the screen if the movie file is not playable.

Maximum Files/Media: Less than 650 recommended

10

PF391P-P-ALVALLW-ENG 11/27/07 7:50 PM Page 11

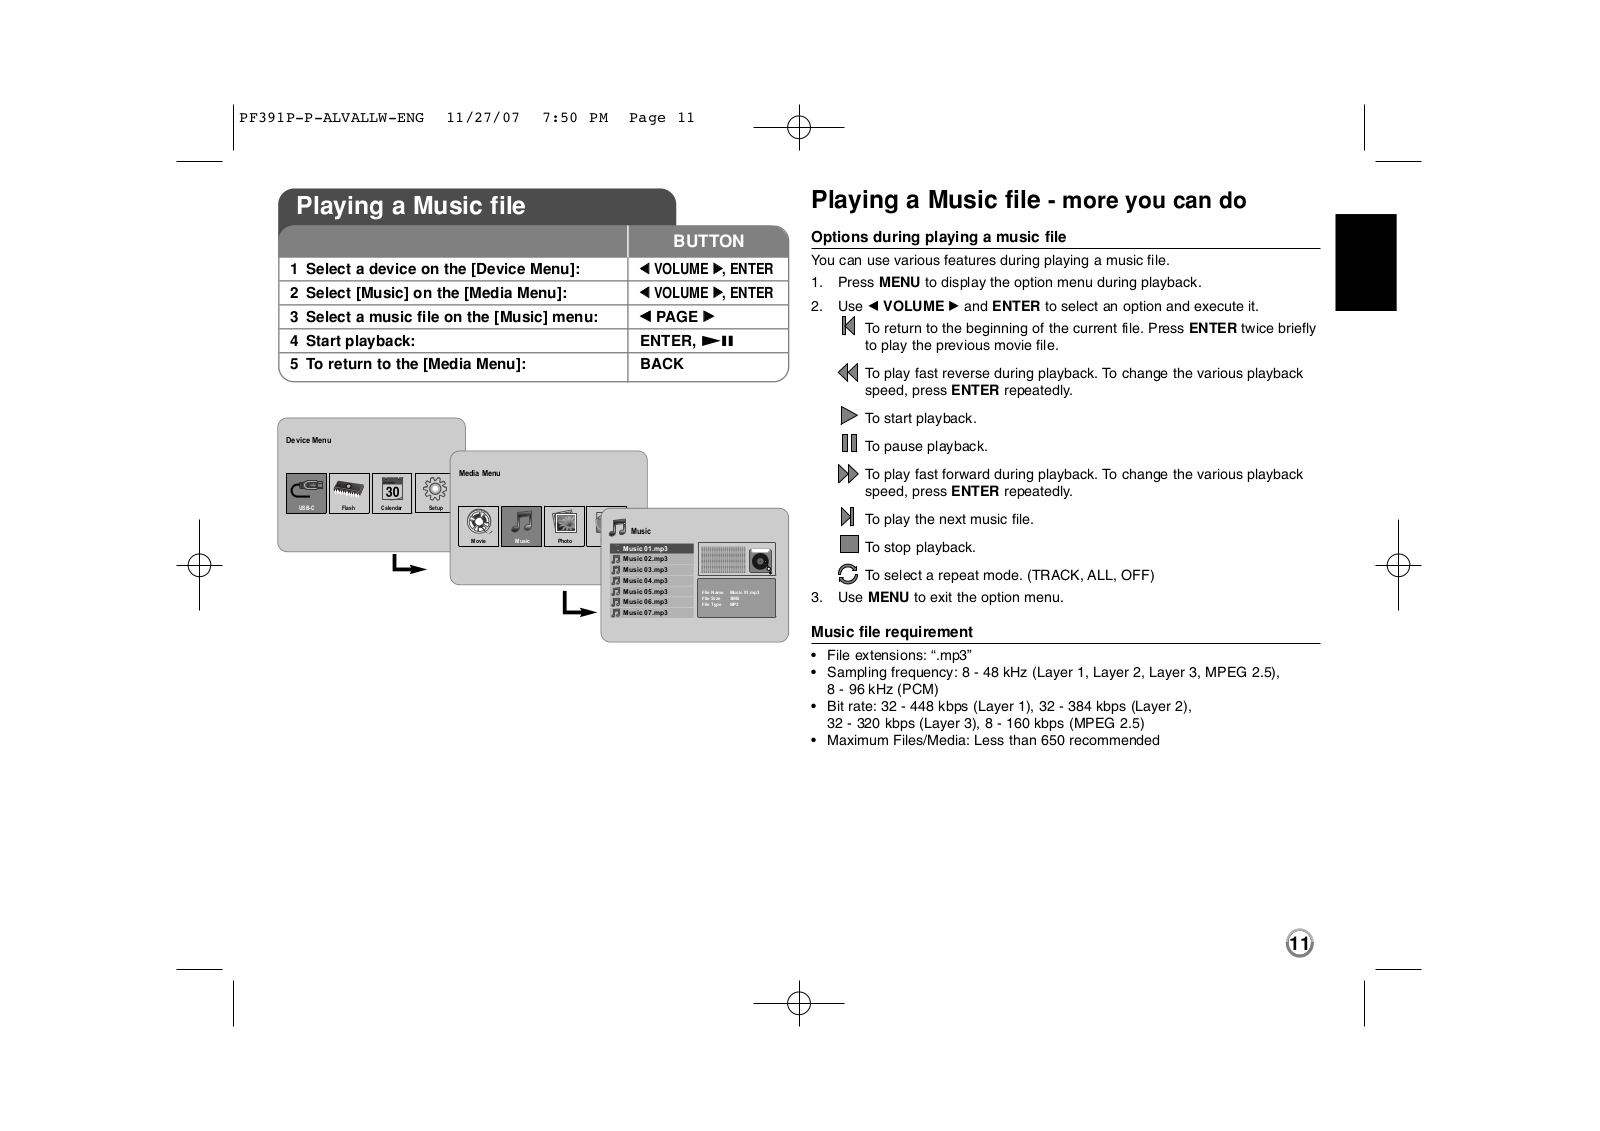
Playing a Music file


BUTTON

[Device Menu]:

b VOLUME B, ENTER


Menu]:

b VOLUME B, ENTER

the [Music] menu:

b PAGE B


ENTER, NX

Menu]:

BACK

Device Menu


Media Menu


USB-C Flash Calendar Setup


Music


Movie

Music Photo


Music 01.mp3


Music 02.mp3


Music 03.mp3


Music 04.mp3


Music 05.mp3

File Name Music 01.mp3


Music 06.mp3

File Size 3MB


File Type MP3


Music 07.mp3


Playing a Music file - more you can do

Options during playing a music file

You can use various features during playing a music file.

1.Press MENU to display the option menu during playback.

2.Use b VOLUME B and ENTER to select an option and execute it.

To return to the beginning of the current file. Press ENTER twice briefly to play the previous movie file.

To play fast reverse during playback. To change the various playback speed, press ENTER repeatedly.

To start playback.

To pause playback.

To play fast forward during playback. To change the various playback speed, press ENTER repeatedly.

To play the next music file.

To stop playback.

To select a repeat mode. (TRACK, ALL, OFF)

3.Use MENU to exit the option menu.

Music file requirement

File extensions: “.mp3”

Sampling frequency: 8 - 48 kHz (Layer 1, Layer 2, Layer 3, MPEG 2.5), 8 - 96 kHz (PCM)

Bit rate: 32 - 448 kbps (Layer 1), 32 - 384 kbps (Layer 2), 32 - 320 kbps (Layer 3), 8 - 160 kbps (MPEG 2.5)

Maximum Files/Media: Less than 650 recommended

11

PF391P-P-ALVALLW-ENG 11/27/07 7:50 PM Page 12

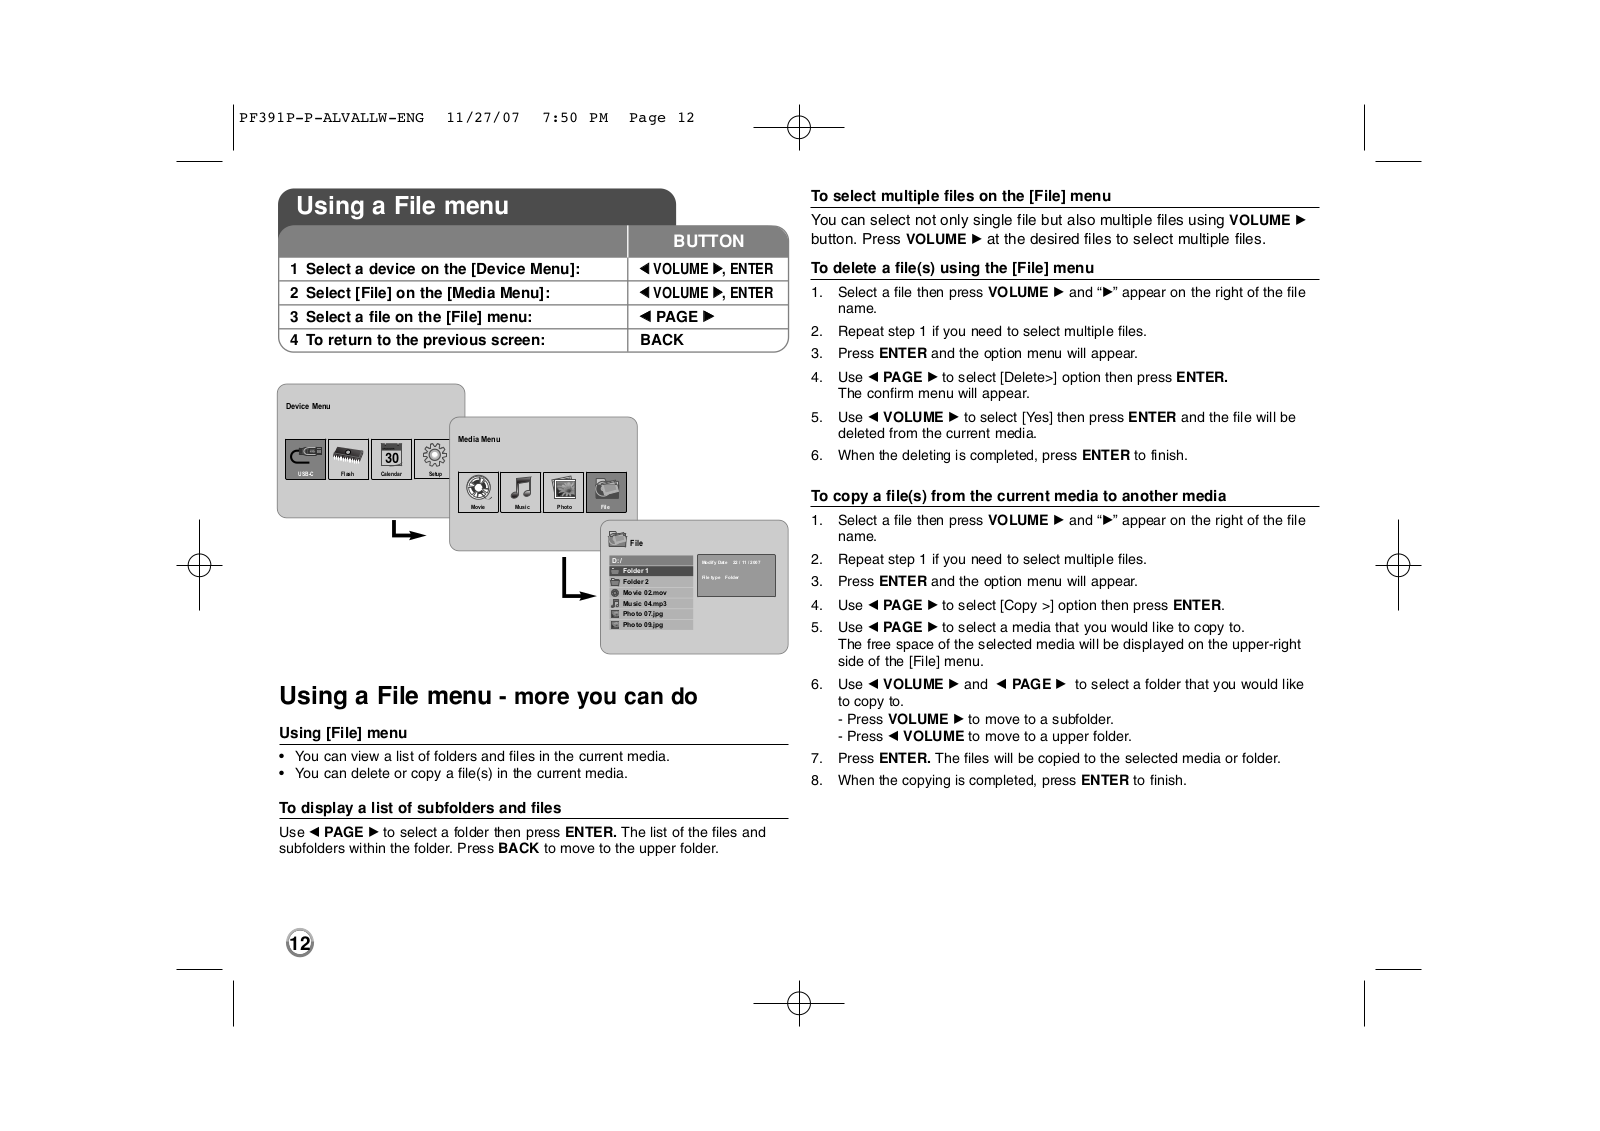
Using a File menu


BUTTON

[Device Menu]:

b VOLUME B, ENTER

Menu]:

b VOLUME B, ENTER

menu:

b PAGE B

screen:

BACK

Device Menu

Media Menu

USB-C

Flash

Calendar

Setup


Movie

Music

Photo

File


File

D:/

Modify Date 22 / 11 / 2007


Folder 1


File type Folder


Folder 2


Movie 02.mov


Music 04.mp3


Photo 07.jpg


Photo 09.jpg

Using a File menu - more you can do

Using [File] menu

• You can view a list of folders and files in the current media.

• You can delete or copy a file(s) in the current media.

To display a list of subfolders and files

Use b PAGE B to select a folder then press ENTER. The list of the files and subfolders within the folder. Press BACK to move to the upper folder.

To select multiple files on the [File] menu

You can select not only single file but also multiple files using VOLUME B button. Press VOLUME B at the desired files to select multiple files.

To delete a file(s) using the [File] menu

1.Select a file then press VOLUME B and “B” appear on the right of the file name.

2.Repeat step 1 if you need to select multiple files.

3.Press ENTER and the option menu will appear.

4.Use b PAGE B to select [Delete>] option then press ENTER. The confirm menu will appear.

5.Use b VOLUME B to select [Yes] then press ENTER and the file will be deleted from the current media.

6.When the deleting is completed, press ENTER to finish.

To copy a file(s) from the current media to another media

1.Select a file then press VOLUME B and “B” appear on the right of the file name.

2.Repeat step 1 if you need to select multiple files.

3.Press ENTER and the option menu will appear.

4.Use b PAGE B to select [Copy >] option then press ENTER.

5.Use b PAGE B to select a media that you would like to copy to.

The free space of the selected media will be displayed on the upper-right side of the [File] menu.

6.Use b VOLUME B and b PAGE B to select a folder that you would like to copy to.

-Press VOLUME B to move to a subfolder.

-Press b VOLUME to move to a upper folder.

7.Press ENTER. The files will be copied to the selected media or folder.

8.When the copying is completed, press ENTER to finish.

12

PF391P-P-ALVALLW-ENG 11/27/07 7:50 PM Page 13

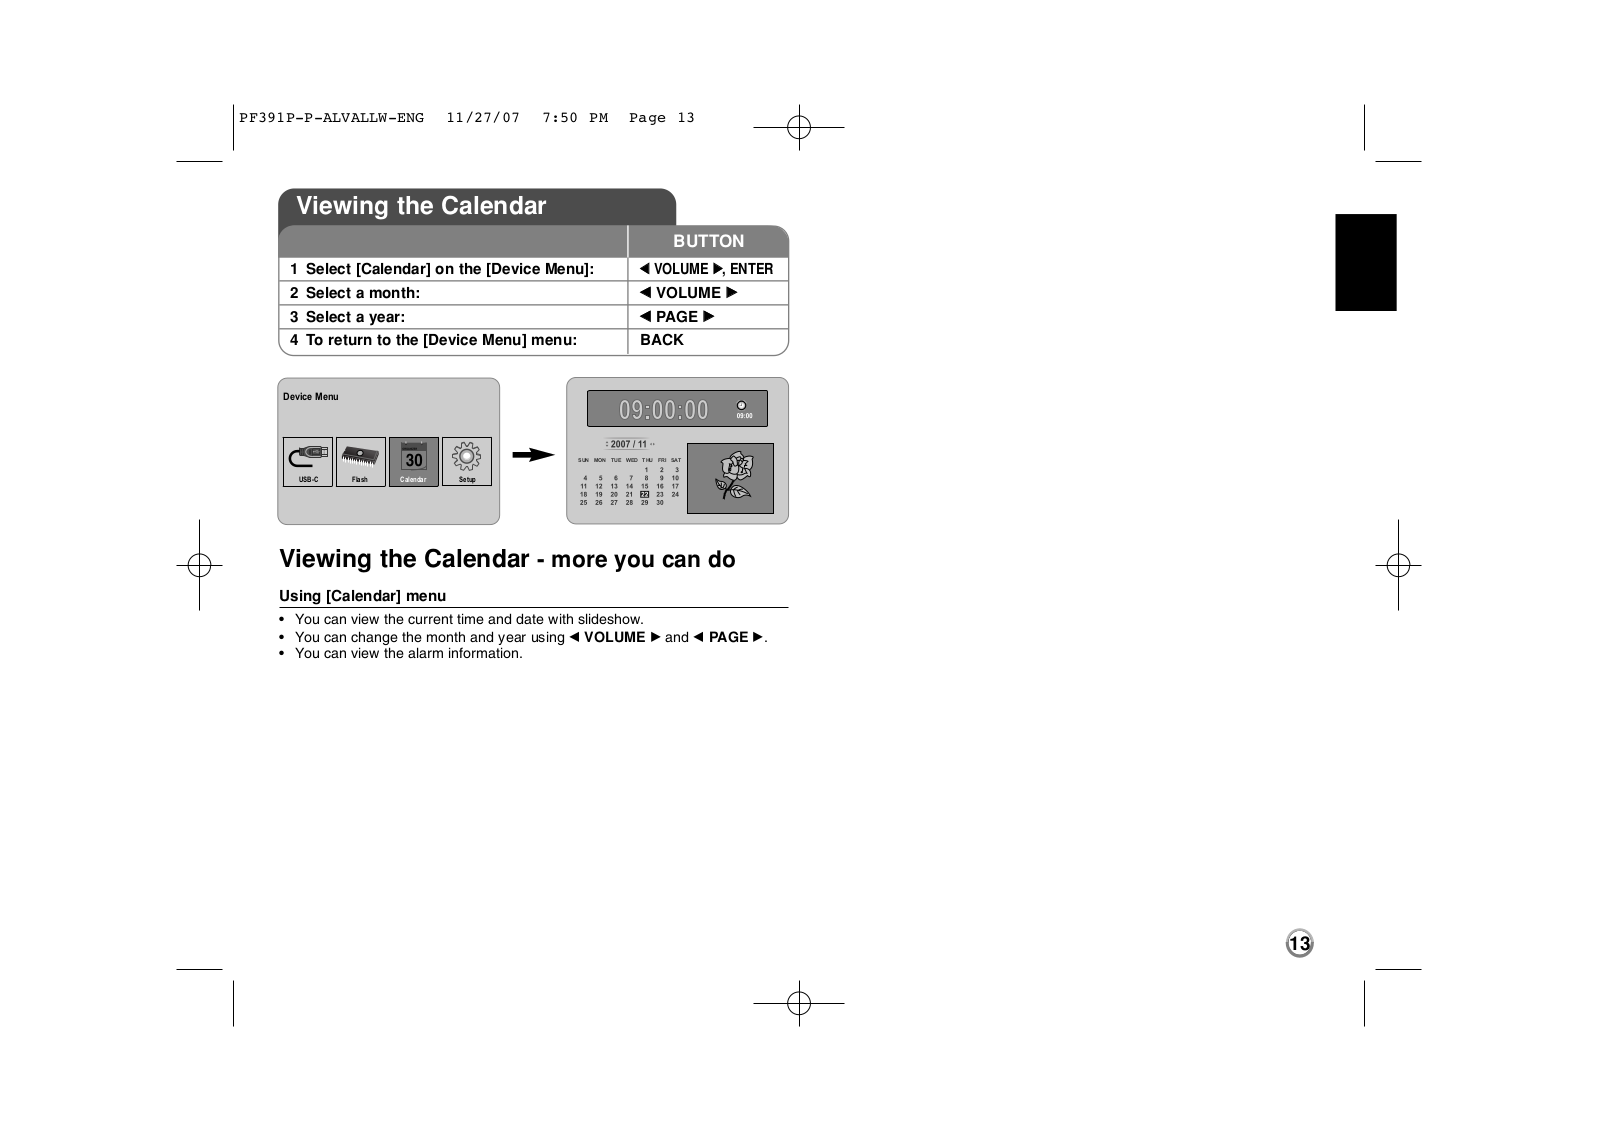
Viewing the Calendar

BUTTON

Menu]: b VOLUME B, ENTER

b VOLUME B

b PAGE B

menu: BACK

Device Menu

SUN MON TUE WED THU FRI SAT

USB-C

Flash

Calendar

Setup

Viewing the Calendar - more you can do

Using [Calendar] menu

You can view the current time and date with slideshow.

You can change the month and year using b VOLUME B and b PAGE B.

You can view the alarm information.

13

PF391P-P-ALVALLW-ENG 11/27/07 7:50 PM Page 14

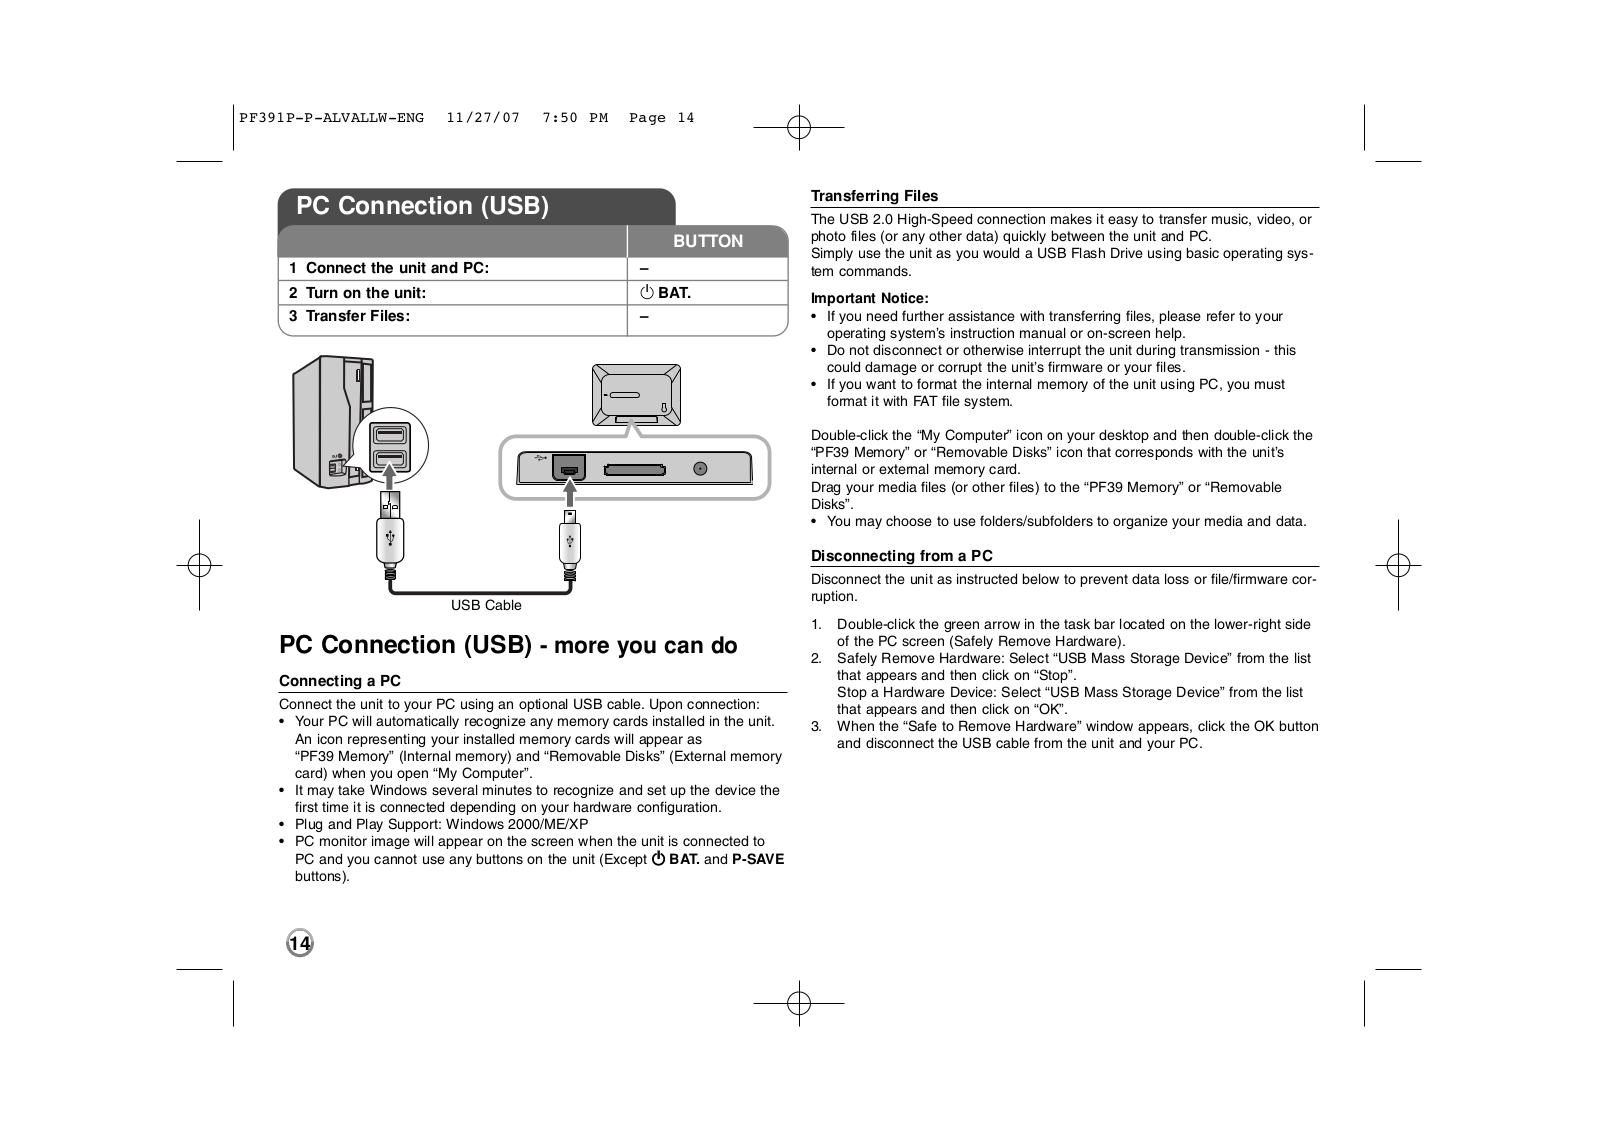
PC Connection (USB)


BUTTON

1

Connect the unit and PC:

2

Turn on the unit:

1 BAT.

3

Transfer Files:

USB Cable

PC Connection (USB) - more you can do

Connecting a PC

Connect the unit to your PC using an optional USB cable. Upon connection:

Your PC will automatically recognize any memory cards installed in the unit. An icon representing your installed memory cards will appear as

“PF39 Memory” (Internal memory) and “Removable Disks” (External memory card) when you open “My Computer”.

It may take Windows several minutes to recognize and set up the device the first time it is connected depending on your hardware configuration.

Plug and Play Support: Windows 2000/ME/XP

PC monitor image will appear on the screen when the unit is connected to PC and you cannot use any buttons on the unit (Except 1 BAT. and P-SAVE buttons).

Transferring Files

The USB 2.0 High-Speed connection makes it easy to transfer music, video, or photo files (or any other data) quickly between the unit and PC.

Simply use the unit as you would a USB Flash Drive using basic operating system commands.

Important Notice:

If you need further assistance with transferring files, please refer to your operating system’s instruction manual or on-screen help.

Do not disconnect or otherwise interrupt the unit during transmission - this could damage or corrupt the unit’s firmware or your files.

If you want to format the internal memory of the unit using PC, you must format it with FAT file system.

Double-click the “My Computer” icon on your desktop and then double-click the “PF39 Memory” or “Removable Disks” icon that corresponds with the unit’s internal or external memory card.

Drag your media files (or other files) to the “PF39 Memory” or “Removable Disks”.

• You may choose to use folders/subfolders to organize your media and data.

Disconnecting from a PC

Disconnect the unit as instructed below to prevent data loss or file/firmware corruption.

1.Double-click the green arrow in the task bar located on the lower-right side of the PC screen (Safely Remove Hardware).

2.Safely Remove Hardware: Select “USB Mass Storage Device” from the list that appears and then click on “Stop”.

Stop a Hardware Device: Select “USB Mass Storage Device” from the list that appears and then click on “OK”.

3.When the “Safe to Remove Hardware” window appears, click the OK button and disconnect the USB cable from the unit and your PC.

14

PF391P-P-ALVALLW-ENG 11/27/07 7:50 PM Page 15

Troubleshooting

Specifications

The power does not turned on.

b Ensure that the power cord has been properly connected to the power outlet.

The sound quality of the music is poor.

bTry playing the file on your PC. If the sound quality is still poor, try downloading the file again or re-encoding the file yourself.

bEnsure that the bit rate of the file is not too low. The higher the bit rate of the file, the better it will sound. Refer to “Music file requirement” on page 11.

Cannot transfer files to the unit from your PC.

bEnsure that your PC is running a supported operating system.

bEnsure that the USB cable is securely attached to the unit and the PC.

bIf you have connected the unit through a USB hub, try connecting the unit directly to your PC.

bEnsure that the capacity of the memory cards installed in the unit.

Cannot select a memory card.

bEnsure that a memory card has been installed.

bEnsure that the memory card is properly installed.

bEnsure that the memory card is not defective.

Cannot copy files to a target location.

b Ensure that the target media has enough memory to contain the file.

The unit will not play a music file.

bEnsure that the file is in a compatible format (MP3). Refer to “Music file requirement” on page 11.

The unit will not play a video file.

bEnsure that the video file is available on the unit. Refer to “Movie file requirement” on page 10.

There is no sound.

b Ensure that the volume has been set to a reasonable level.

The unit has malfunctioned.

b Press 1 BAT. button to turn off the unit then turn the unit back on.


Power Supply

DC 12 V, 2 A

Power consumption

10 W

Operating time on battery:

Approx. 1 hour

Set dimensions (W x H x D)

213 x 147 x 103.5 mm with stand

Net Weight

630g

Operating temperature

5˚C to 45˚C

Operating humidity

5 % to 90 %

Display Type

8” Wide (Full-Color TFT LCD)


Viewing area: 7.18”

Display Resolution

800 x 480 (WVGA)

Internal Memory

Flash Memory (256MB*)

Memory Card Slot

1 slot for SD/MMC/MS Card

Interface

USB 2.0 High-Speed (device)

Plug and Play Support

Windows 2000/ME/XP

* The 21MB is assigned for the unit’s software.

Accessory

AC Adapter (MPA-630)

USB Adapter Cable

USB Cable

Detachable Stand

3 different changeable faceplate

Designs and specifications are subject to change without prior notice.

15

PF391P-P-ALVALLW-ENG 11/27/07 7:50 PM Page 16

PF391P-P-ALVALLW-RUS 11/27/07 8:47 PM Page 1

кмллдав

PF391P

P/NO : MFL42173813(R1)

PF391P-P-ALVALLW-RUS 11/27/07 7:50 PM Page 2

еВ ˚ Ф В‰УТЪУ УКМУТЪЛ

éÒÚÓ ÓÊÌÓ

йФ‡ТМУТЪ¸ Ы‰‡ ‡ ˝ОВНЪ Л˜ВТНЛП ЪУНУП МВ УЪН ˚‚‡Ъ¸

éÒÚÓ ÓÊÌÓ: ‚У ЛБ·ВК‡МЛВ Ы‰‡ ‡ ˝ОВНЪ Л˜ВТНЛП ЪУНУП МВ ‰УФЫТН‡ВЪТfl ТМЛП‡Ъ¸ Н ˚¯НЫ (ЛОЛ Б‡‰М˛˛ ТЪВМНЫ). ЗМЫЪ Л ‡ФФ‡ ‡Ъ‡ УЪТЫЪТЪ‚Ы˛Ъ ‰ВЪ‡ОЛ, Ъ В·Ы˛˘ЛВ ЪВıМЛ˜ВТНУ„У У·ТОЫКЛ‚‡МЛfl ТЛО‡ПЛ ФУО¸БУ‚‡ЪВОfl. нВıМЛ˜ВТНУВ У·ТОЫКЛ‚‡МЛВ ‰УОКМУ Ф УЛБ‚У‰ЛЪ¸Тfl Н‚‡ОЛЩЛˆЛ У‚‡ММ˚П ТВ ‚ЛТМ˚П ФВ ТУМ‡ОУП.

бМ‡Н, М‡ НУЪУ УП ЛБУ· ‡КВМ‡ ПУОМЛfl ‚ ‡‚МУТЪУ УММВП Ъ ВЫ„УО¸МЛНВ, Ф В‰М‡БМ‡˜ВМ ‰Оfl Ф В‰ЫФ ВК‰ВМЛfl ФУО¸БУ‚‡ЪВОfl У М‡ОЛ˜ЛЛ МВЛБУОЛ У‚‡ММ˚ı ˝ОВНЪ УФ У‚У‰fl˘Лı ‰ВЪ‡ОВИ ФУ‰ УФ‡ТМ˚П М‡Ф flКВМЛВП ‚МЫЪ Л НУ ФЫТ‡, Ф В‰ТЪ‡‚Оfl˛˘ЛП Ы„ УБЫ Ы‰‡ ‡ ˝ОВНЪ Л˜ВТНЛП ЪУНУП.

ЗУТНОЛˆ‡ЪВО¸М˚И БМ‡Н ‚ ‡‚МУТЪУ УММВП Ъ ВЫ„УО¸МЛНВ Ф В‰М‡БМ‡˜ВМ ‰Оfl УФУ‚В˘ВМЛfl ФУО¸БУ‚‡ЪВОfl У М‡ОЛ˜ЛЛ ‚‡КМ˚ı ЛМТЪ ЫНˆЛИ ФУ ˝НТФОЫ‡Ъ‡ˆЛЛ Л ЪВıМЛ˜ВТНУПЫ У·ТОЫКЛ‚‡МЛ˛ (ТВ ‚ЛТЫ) ‚ Ф ЛО‡„‡ВПУИ ‰УНЫПВМЪ‡ˆЛЛ.

ÇÌËχÌËÂ: ‚У ЛБ·ВК‡МЛВ ФУК‡ ‡ ЛОЛ Ы‰‡ ‡ ˝ОВНЪ Л˜ВТНЛП ЪУНУП МВ ФУ‰‚В „‡ИЪВ ‡ФФ‡ ‡ЪЫ Ы ‚УБ‰ВИТЪ‚Л˛ ‰УК‰fl ЛОЛ ‚О‡„Л.

ÇÌËχÌËÂ: МВ ‰УФЫТН‡ВЪТfl ЫТЪ‡МУ‚Н‡ ˝ЪУИ ‡ФФ‡ ‡ЪЫ ˚ ‚ У„ ‡МЛ˜ВММУП Ф УТЪ ‡МТЪ‚В, Ъ‡НУП, Н‡Н НМЛКМ˚И ¯Н‡Щ ЛОЛ ФУ‰У·МУП.

éÒÚÓ ÓÊÌÓ: МВ ‰УФЫТН‡ВЪТfl ФВ ВН ˚‚‡МЛВ ‚ВМЪЛОflˆЛУММ˚ı УЪ‚В ТЪЛИ. мТЪ‡МУ‚Н‡ ‡ФФ‡ ‡ЪЫ ˚ ‰УОКМ‡ Ф УЛБ‚У‰ЛЪ¸Тfl ‚ ТУУЪ‚ВЪТЪ‚ЛЛ Т ЛМТЪ ЫНˆЛflПЛ ЛБ„УЪУ‚ЛЪВОfl. и У ВБЛ Л УЪ‚В ТЪЛfl ‚ НУ ФЫТВ Ф В‰М‡БМ‡˜ВМ˚ ‰Оfl ‚ВМЪЛОflˆЛЛ, У·ВТФВ˜Л‚‡˛˘ВИ М‡‰ОВК‡˘ЛВ ‡·У˜ЛВ ЫТОУ‚Лfl Л Ф В‰Уı ‡Мfl˛˘ВИ УЪ ФВ В„ В‚‡. д‡ЪВ„У Л˜ВТНЛ МВ ‰УФЫТН‡ВЪТfl ФВ ВН ˚‚‡МЛВ УЪ‚В ТЪЛИ Б‡ Т˜ВЪ ‡БПВ˘ВМЛfl ‡ФФ‡ ‡ЪЫ ˚ М‡ Н У‚‡ЪЛ, ‰Л‚‡МВ, НУ‚ В ЛОЛ ‰ Ы„Лı ‡М‡ОУ„Л˜М˚ı ФУ‚В ıМУТЪflı. зВ ‰УФЫТН‡ВЪТfl ‡БПВ˘ВМЛВ ‡ФФ‡ ‡ЪЫ ˚ ‚У ‚ТЪ УВММУИ ПВ·ВОЛ М‡ФУ‰У·ЛВ НМЛКМУ„У ¯Н‡Щ‡ ЛОЛ ТЪУИНЛ Б‡ ЛТНО˛˜ВМЛВП У·ВТФВ˜ВМЛfl М‡‰ОВК‡˘ВИ ‚ВМЪЛОflˆЛЛ ЛОЛ Ф flП˚ı ЫН‡Б‡МЛИ ЛБ„УЪУ‚ЛЪВОfl.

éÒÚÓ ÓÊÌÓ: МВ ‰УФЫТН‡ВЪТfl ‚УБ‰ВИТЪ‚ЛВ ‚У‰˚ ‚ ‚Л‰В Н‡ФВО¸ ЛОЛ · ˚Б„ М‡ ‡ФФ‡ ‡ЪЫ Ы Л ЫТЪ‡МУ‚Н‡ М‡ МВИ ВПНУТЪВИ Т КЛ‰НУТЪflПЛ, Ъ‡НЛı, Н‡Н ˆ‚ВЪУ˜М˚В ‚‡Б˚.

еВ ˚ Ф В‰УТЪУ УКМУТЪЛ Ф Л У· ‡˘ВМЛЛ Т ТВЪВ‚˚П ¯МЫ УП кВНУПВМ‰ЫВЪТfl ФУ‰НО˛˜‡Ъ¸ ‡ФФ‡ ‡ЪЫ Ы Н УЪ‰ВО¸МУИ ˆВФЛ ТВЪВ‚У„У М‡Ф flКВМЛfl.

СОfl ˝ЪУ„У ТОЫКЛЪ УЪ‰ВО¸М‡fl ТВЪВ‚‡fl УБВЪН‡ ·ВБ ‰УФУОМЛЪВО¸М˚ı УЪ‚У‰У‚, Н НУЪУ УИ ФУ‰НО˛˜‡ВЪТfl ЪУО¸НУ ‰‡ММ‡fl ‡ФФ‡ ‡ЪЫ ‡. СОfl ФУОМУИ Ы‚В ВММУТЪЛ У· ‡˘‡ИЪВТ¸ Н ТЪ ‡МЛˆВ Т ЪВıМЛ˜ВТНЛПЛ ı‡ ‡НЪВ ЛТЪЛН‡ПЛ. зВ ‰УФЫТН‡ВЪТfl ФВ В„ ЫБН‡ ТВЪВ‚˚ıУБВЪУН. иВ В„ ЫКВММ˚В ТВЪВ‚˚В УБВЪНЛ, УТО‡·ОВММ˚В ЛОЛ ФУ‚ ВК‰ВММ˚В „МВБ‰‡ ТВЪВ‚˚ı УБВЪУН, ЛБМУ¯ВММ˚В ТВЪВ‚˚В ¯МЫ ˚, ФУ‚ ВК‰ВММ‡fl ЛОЛ ‡ТЪ ВТН‡‚¯‡flТfl ЛБУОflˆЛfl Ф В‰ТЪ‡‚Оfl˛Ъ УФ‡ТМУТЪ¸. г˛·УИ ЛБ ФВ В˜ЛТОВММ˚ı ‚˚¯В ‰ВЩВНЪУ‚ ПУКВЪ ТЪ‡Ъ¸ Ф Л˜ЛМУИ Ы‰‡ ‡ ˝ОВНЪ Л˜ВТНЛП ЪУНУП ЛОЛ ФУК‡ ‡. иВ ЛУ‰Л˜ВТНЛ Ф У‚В flИЪВ ТУТЪУflМЛВ ТВЪВ‚У„У ¯МЫ ‡ ‚‡¯ВИ ‡ФФ‡ ‡ЪЫ ˚ Л Ф Л У·М‡ ЫКВМЛЛ ФУ‚ ВК‰ВМЛfl ЛОЛ ЛБМУТ‡ УЪТУВ‰ЛМЛЪВ В„У, Ф ВН ‡ЪЛЪВ ФУО¸БУ‚‡Ъ¸Тfl ‡ФФ‡ ‡ЪЫ УИ Л Б‡ПВМЛЪВ МВЛТФ ‡‚М˚И ТВЪВ‚УИ ¯МЫ ЪУ˜МУ Ъ‡НЛП КВ ‚ ‡‚ЪУ ЛБЛ У‚‡ММУП ТВ ‚ЛТМУП ˆВМЪ В.

и В‰Уı ‡МflИЪВ ТВЪВ‚УИ ¯МЫ УЪ ПВı‡МЛ˜ВТНУ„У ФУ‚ ВК‰ВМЛfl, Ъ‡НУ„У, Н‡Н ФВ ВН Ы˜Л‚‡МЛВ, ВБНУВ ЛБ„Л·‡МЛВ, Ф ЛКЛП‡МЛВ ‰‚В flПЛ ЛОЛ ФУФ‡‰‡МЛВ ФУ‰ МУ„Л. йТУ·У ‚МЛП‡ЪВО¸МУ ТОВ‰ЛЪВ Б‡ ‚ЛОН‡ПЛ ¯МЫ У‚, ТВЪВ‚˚ПЛ УБВЪН‡ПЛ Л УЪ‚В ТЪЛflПЛ ‚‚У‰‡ ТВЪВ‚У„У ¯МЫ ‡ ‚ НУ ФЫТ ‡ФФ‡ ‡ЪЫ ˚.

йЪТУВ‰ЛМflfl ТВЪВ‚УИ ¯МЫ ЛБ УБВЪНЛ, ‰В КЛЪВТ¸ Б‡ В„У ‚ЛОНЫ. к‡ТФУО‡„‡fl ‡ФФ‡ ‡ЪЫ Ы М‡ ПВТЪВ, У·ВТФВ˜¸ЪВ МВТОУКМ˚И ‰УТЪЫФ Н ‚ЛОНВ ТВЪВ‚У„У ¯МЫ ‡.

мЪЛОЛБ‡ˆЛfl УЪТОЫКЛ‚¯ВИ ‡ФФ‡ ‡ЪЫ ˚

1.з‡ОЛ˜ЛВ М‡ ‡ФФ‡ ‡ЪЫ В ТЛП‚УО‡ ФВ В˜В НМЫЪУИ ПЫТУ МУИ НУ БЛМ˚ М‡ НУОВТ‡ı УБМ‡˜‡ВЪ, ˜ЪУ М‡ ‰‡ММЫ˛ ‡ФФ‡ ‡ЪЫ Ы ‡ТФ УТЪ ‡МflВЪТfl ‰ВИТЪ‚ЛВ ‰Л ВНЪЛ‚˚ Цл 2002/96/EC.

2.ЗТВ ˝ОВНЪ УЪВıМЛ˜ВТНЛВ Л ˝ОВНЪ УММ˚В Ф Л·У ˚ ‰УОКМ˚ ЫЪЛОЛБЛ У‚‡Ъ¸Тfl УЪ‰ВО¸МУ УЪ ·˚ЪУ‚˚ı „У У‰ТНЛı УЪıУ‰У‚ ‚ ТФВˆЛ‡О¸МУ УЪ‚В‰ВММ˚ı ПВТЪ‡ı, УФ В‰ВОВММ˚ı ФУТЪ‡МУ‚ОВМЛflПЛ Ф ‡‚ЛЪВО¸ТЪ‚‡ ЛОЛ ПВТЪМ˚ı ‚О‡ТЪВИ.

3.мЪЛОЛБ‡ˆЛfl УЪТОЫКЛ‚¯ВИ ‡ФФ‡ ‡ЪЫ ˚, ‚˚ФУОМВММ‡fl М‡‰ОВК‡˘ЛП У· ‡БУП, ТФУТУ·ТЪ‚ЫВЪ Ф В‰УЪ‚ ‡˘ВМЛ˛ УЪ Лˆ‡ЪВО¸МУ„У ‚УБ‰ВИТЪ‚Лfl М‡ УН ЫК‡˛˘Ы˛ Т В‰Ы Л Б‰У У‚¸В О˛‰ВИ.

4.иУ‰ У·М˚В Т‚В‰ВМЛfl ФУ ФУ‚У‰Ы ЫЪЛОЛБ‡ˆЛЛ УЪТОЫКЛ‚¯ВИ ‡ФФ‡ ‡ЪЫ ˚ ПУКМУ ФУОЫ˜ЛЪ¸ „У У‰ТНУИ ‡‰ПЛМЛТЪ ‡ˆЛЛ, ТОЫК·В ЫЪЛОЛБ‡ˆЛЛ ЛОЛ П‡„‡БЛМВ, „‰В ·˚О‡ Ф ЛУ· ВЪВМ‡ ‡ФФ‡ ‡ЪЫ ‡.

чÌ̇fl ‡ÔÔ‡ ‡ÚÛ ‡ ËÁ„ÓÚÓ‚ÎÂ̇ ‚ ÒÓÓÚ‚ÂÚÒÚ‚ËË Ò ‰Ë ÂÍÚË‚ÓÈ Öë

2004/108/EC Ë 2006/95/EC.

2

PF391P-P-ALVALLW-RUS 11/27/07 7:50 PM Page 3

ëӉ ʇÌËÂ


еВ ˚ Ф В‰УТЪУ УКМУТЪЛ . . . . . . . . . . . . . . . . . . . . . . . . . . . . . . . . . . . . . . . . . . .

. .2

ëӉ ʇÌË . . . . . . . . . . . . . . . . . . . . . . . . . . . . . . . . . . . . . . . . . . . . . . . . . . . . .

. .3

йЪОЛ˜ЛЪВО¸М˚В УТУ·ВММУТЪЛ . . . . . . . . . . . . . . . . . . . . . . . . . . . . . . . . . . . . . . . .

. .3

éÒÌÓ‚ÌÓÈ ·ÎÓÍ . . . . . . . . . . . . . . . . . . . . . . . . . . . . . . . . . . . . . . . . . . . . . . . . . . .

. .4

燘‡ÎÓ ÓÔ ‡ˆËÈ . . . . . . . . . . . . . . . . . . . . . . . . . . . . . . . . . . . . . . . . . . . . . . . . .

. .5

• ìÒÚ‡Ìӂ͇ Ë ËÁ‚ΘÂÌË ͇ Ú˚ Ô‡ÏflÚË . . . . . . . . . . . . . . . . . . . . . . . . . . . .

. .5

• иУ‰НО˛˜ВМЛВ ЫТЪ УИТЪ‚‡ Т ЛМЪВ ЩВИТУП USB . . . . . . . . . . . . . . . . . . . . . .

. .5

• èÓ‰Íβ˜ÂÌË ÒÂÚÂ‚Ó„Ó ¯ÌÛ ‡ . . . . . . . . . . . . . . . . . . . . . . . . . . . . . . . . . . .

. .6

• ÇÍβ˜ÂÌËÂ Ë ‚˚Íβ˜ÂÌË ‡ÔÔ‡ ‡ÚÛ ˚ . . . . . . . . . . . . . . . . . . . . . . . . . . . .

. .6

• кВКЛП Т·В ВКВМЛfl ˝МВ „ЛЛ . . . . . . . . . . . . . . . . . . . . . . . . . . . . . . . . . . . . .

. .6

• åÓÌÚ‡Ê ÔÓ‰ÒÚ‡‚ÍË . . . . . . . . . . . . . . . . . . . . . . . . . . . . . . . . . . . . . . . . . . . .

. .6

• аТФУО¸БУ‚‡МЛВ ПВМ˛ . . . . . . . . . . . . . . . . . . . . . . . . . . . . . . . . . . . . . . . . . .

. .7

ê„ÛÎË Ó‚‡ÌË ̇ÒÚ ÓÂÍ . . . . . . . . . . . . . . . . . . . . . . . . . . . . . . . . . . . . . . . . . . . .

7-8

и УТПУЪ Щ‡ИО‡ Т ЩУЪУ„ ‡ЩЛflПЛ . . . . . . . . . . . . . . . . . . . . . . . . . . . . . . . . . . . .

. .9

ÇÓÒÔ ÓËÁ‚‰ÂÌË ‚ˉÂÓهȷ . . . . . . . . . . . . . . . . . . . . . . . . . . . . . . . . . . . . . . .

.10

ÇÓÒÔ ÓËÁ‚‰ÂÌË ÏÛÁ˚͇θÌÓ„Ó Ù‡È· . . . . . . . . . . . . . . . . . . . . . . . . . . . . . . .

.11

аТФУО¸БУ‚‡МЛВ Щ‡ИОУ‚У„У ПВМ˛ . . . . . . . . . . . . . . . . . . . . . . . . . . . . . . . . . . . . .

.12

и УТПУЪ Н‡ОВМ‰‡ fl . . . . . . . . . . . . . . . . . . . . . . . . . . . . . . . . . . . . . . . . . . . . . . .

.13

èÓ‰Íβ˜ÂÌËÂ Í PC (USB) . . . . . . . . . . . . . . . . . . . . . . . . . . . . . . . . . . . . . . . . . .

.14

иУЛТН Л ЫТЪ ‡МВМЛВ МВЛТФ ‡‚МУТЪВИ . . . . . . . . . . . . . . . . . . . . . . . . . . . . . . . . . .

.15

нВıМЛ˜ВТНЛВ ı‡ ‡НЪВ ЛТЪЛНЛ . . . . . . . . . . . . . . . . . . . . . . . . . . . . . . . . . . . . . . .

.15

йЪОЛ˜ЛЪВО¸М˚В УТУ·ВММУТЪЛ

кВ‡ОЛТЪЛ˜МУВ ЛБУ· ‡КВМЛВ:

З˚ТУН‡fl ‡Б В¯‡˛˘‡fl ТФУТУ·МУТЪ¸ Л „ОЫ·УНЛВ ˆ‚ВЪ‡ ˆЛЩ У‚У„У ЛБУ· ‡КВМЛfl ¯Л УНУ˝Н ‡ММУ„У Ьд-‰ЛТФОВfl.

зВТОУКМ˚И ВКЛП ˝МВ „УТ·В ВКВМЛfl:

1 ТВНЫМ‰‡ ˝МВ „УТ·В В„‡˛˘В„У ВКЛП‡ Ф В‚УТıУ‰ЛЪ 15 ТВНЫМ‰ ‚НО˛˜ВМЛfl Л ‚˚НО˛˜ВМЛfl М‡Ф flКВМЛfl ФЛЪ‡МЛfl.

åÓ·ËθÌ˚È ˆËÙ Ó‚ÓÈ ‡Î¸·ÓÏ:

й·ПВМЛ‚‡ИЪВТ¸ Н‡ Ъ‡ПЛ Ф‡ПflЪЛ ТУ ‚ТЪ УВММ˚ПЛ ˝ОВПВМЪ‡ПЛ ФЛЪ‡МЛfl, ФУ‚˚¯‡ИЪВ ПУ·ЛО¸МУТЪ¸.

ЗТЪ УВММ‡fl ЩЫМНˆЛfl Ф УТПУЪ ‡:

зВТОУКМ˚И Ф УТПУЪ ЩУЪУ„ ‡ЩЛИ ˜В ВБ ‡Б˙ВП Н‡ Ъ˚ Ф‡ПflЪЛ Л ФУ Ъ USB.

ЗУБПУКМУТЪ¸ ı ‡МВМЛfl 2000 ЩУЪУ„ ‡ЩЛИ:

2000 ‰ ‡„УˆВММ˚ı ‚УТФУПЛМ‡МЛИ М‡ ‚ТЪ УВММУИ ЩОВ¯-Ф‡ПflЪЛ У·˙ВПУП 256 е·‡ИЪ.

ñËÙ Ó‚ÓÈ Í‡ÎẨ‡ ¸ Ë ·Û‰ËθÌËÍ:

иУПУ„‡ВЪ ˝ЩЩВНЪЛ‚МУ У „‡МЛБУ‚‡Ъ¸ ‡ТФЛТ‡МЛВ ФУ ‰МflП Л ˜‡Т‡П.

м‰У·МУВ Т В‰ТЪ‚У Ф УТПУЪ ‡ ЩУЪУ„ ‡ЩЛИ:

л‡П˚И ТУ‚ ВПВММ˚И ЛМЪВ ЩВИТ М‡Л·УОВВ Ф УТЪУ„У ‰УТЪЫФ‡ Н Ф‡ПflЪЛ.

ЗВОЛНУОВФМУВ ‰ВНУ ‡ЪЛ‚МУВ УЩУ ПОВМЛВ ‰Оfl ‡‰‡ФЪ‡ˆЛЛ Н ЛМЪВ ¸В Ы ФУПВ˘ВМЛfl:

3 ТПВММ˚В ОЛˆВ‚˚В Ф‡МВОЛ ‰Оfl ‡‰‡ФЪ‡ˆЛЛ Н ЛМЪВ ¸В Ы ФУПВ˘ВМЛfl.

3

PF391P-P-ALVALLW-RUS 11/27/07 7:50 PM Page 4

éÒÌÓ‚ÌÓÈ ·ÎÓÍ

c d

e f

b

a

n m l


a Üä-˝Í ‡Ì.


b гЛˆВ‚‡fl Ф‡МВО¸ (ТПВММ‡fl)


иУ ˜ВЪ˚ ВП Ы„О‡П Ф‡МВО¸ ‡ТФУОУКВМ˚ П‡„МЛЪ˚, ˜ЪУ ФУБ‚УОflВЪ ОВ„НУ


Í ÂÔËÚ¸ Ë ÒÌËχڸ Ô‡ÌÂθ.


c 1 BAT. (НМУФН‡ ‚НО˛˜ВМЛfl М‡Ф flКВМЛfl ФЛЪ‡МЛfl Л ЛМ‰ЛН‡ЪУ


‡ННЫПЫОflЪУ ‡).


ЗНО˛˜ВМЛВ Л ‚˚НО˛˜ВМЛВ ‡ФФ‡ ‡ЪЫ ˚ Л ЛМ‰ЛН‡ˆЛfl ТУТЪУflМЛfl ‡ННЫПЫОflЪУ ‡.


ä ‡ÒÌÓ ҂˜ÂÌË Ë̉Ë͇ÚÓ ‡ ҂ˉÂÚÂθÒÚ‚ÛÂÚ Ó Ô ÓËÒıÓ‰fl˘ÂÏ Á‡ fl‰Â


‡ННЫПЫОflЪУ ‡.


бВОВМУВ Т‚В˜ВМЛВ ЛМ‰ЛН‡ЪУ ‡ Т‚Л‰ВЪВО¸ТЪ‚ЫВЪ У ФУОМУП Б‡ fl‰В ‡ННЫПЫОflЪУ ‡.


d дМУФН‡ к-SAVE ( ВКЛП ˝МВ „УТ·В ВКВМЛfl).


З‚У‰ ЛОЛ УЪПВМ‡ ВКЛП‡ ˝МВ „УТ·В ВКВМЛfl.

g

e дМУФН‡ MENU (ПВМ˛).

h

З˚БУ‚ ЛОЛ УЪПВМ‡ ПВМ˛ ‰УФУОМЛЪВО¸М˚ı ЩЫМНˆЛИ.

f дМУФНЛ b VOLUME B („ УПНУТЪ¸).

i

кВ„ЫОЛ У‚‡МЛВ Ы У‚Мfl „ УПНУТЪЛ. м У‚ВМ¸ „ УПНУТЪЛ В„ЫОЛ ЫВЪТfl

j

М‡К‡ЪЛВП Л Ы‰В КЛ‚‡МЛВП НМУФНЛ VOLUME (b ËÎË B) ‚Ó ‚ ÂÏfl

k

‚УТФ УЛБ‚В‰ВМЛfl ЩЛО¸П‡ ЛОЛ ПЫБ˚Н‡О¸МУ„У Щ‡ИО‡. и ‡‚УИ Л ОВ‚УИ НМУФНУИ

Ф УЛБ‚У‰ЛЪТfl ‚˚·У ФЫМНЪУ‚ ПВМ˛.


g дМУФНЛ b PAGE B (ТЪ ‡МЛˆ‡).


è ÂÏ¢ÂÌË ÔÓ ÒÚ ‡Ìˈ‡Ï ÏÂÌ˛ [Photo], [Movie] ËÎË [Music] Ô ÓËÁ‚Ó‰ËÚÒfl


М‡К‡ЪЛВП Л Ы‰В КЛ‚‡МЛВП М‡К‡Ъ˚ПЛ ˝ЪЛı НМУФУН ‚ ЪВ˜ВМЛВ 2 ТВНЫМ‰.


ЗВ ıМВИ Л МЛКМВИ НМУФНУИ Ф УЛБ‚У‰ЛЪТfl ‚˚·У ФЫМНЪУ‚ ПВМ˛.


h дМУФН‡ ENTER (‚‚У‰).


З˚·У ‚‡ Л‡МЪ‡ ЛОЛ ЛТФУОМВМЛВ НУП‡М‰˚.


i дМУФН‡ ROTATE (‚ ‡˘ВМЛВ).


З ‡˘ВМЛВ ФУОМУ ‡БПВ МУИ ЩУЪУ„ ‡ЩЛЛ М‡ ˝Н ‡МВ Ф УЪЛ‚ ˜‡ТУ‚УИ ТЪ ВОНЛ.


j дМУФН‡ BACK (‚УБ‚ ‡˘ВМЛВ).


ÇÓÁ‚ ‡˘ÂÌËÂ Í Ô Â‰˚‰Û˘ÂÏÛ ÏÂÌ˛ ËÎË ÓÍÌÛ.


k дМУФН‡ NX


燘‡ÎÓ ‚ÓÒÔ ÓËÁ‚‰ÂÌËfl. èÓ‚ÚÓ ÌÓ ̇ʇÚËÂ Ô Ë‚Ó‰ËÚ Í Ô‡ÛÁÂ, ¢ ӉÌËÏ


̇ʇÚËÂÏ ‚ÓÒÔ ÓËÁ‚‰ÂÌËÂ Ô Ó‰ÓÎʇÂÚÒfl.


l ê‡Á˙ÂÏ USB


èÓ‰Íβ˜ËÚÂ Ò˛‰‡ Ô Ë·„‡ÂÏ˚È Í‡·ÂθÌ˚È ‡‰‡ÔÚ USB, Á‡ÚÂÏ ÔÓ‰Íβ˜ËÚÂ


ÛÒÚ ÓÈÒÚ‚Ó USB.


m ÉÌÂÁ‰Ó ͇ Ú˚ Ô‡ÏflÚË.


è ‰̇Á̇˜ÂÌÓ ‰Îfl ͇ Ú Ô‡ÏflÚË (ÚËÔ‡ SD, MMC ËÎË MS).


n ЙМВБ‰У ФУ‰НО˛˜ВМЛfl ФУТЪУflММУ„У М‡Ф flКВМЛfl 12 З.


벉‡ ÔÓ‰Íβ˜‡ÂÚÒfl ‚˚ıÓ‰ Ô Ë·„‡ÂÏÓ„Ó ÒÂÚÂ‚Ó„Ó ‡‰‡ÔÚ ‡.

4

PF391P-P-ALVALLW-RUS 11/27/07 7:51 PM Page 5

燘‡ÎÓ ÓÔ ‡ˆËÈ

ìÒÚ‡Ìӂ͇ Ë ËÁ‚ΘÂÌË ͇ Ú˚ Ô‡ÏflÚË

ЗТЪ‡‚¸ЪВ Н‡ ЪЫ Ф‡ПflЪЛ ‚ Ф В‰М‡БМ‡˜ВММУВ ‰Оfl МВВ „МВБ‰У ЫТЪ УИТЪ‚‡.

уЪУ·˚ ЛБ‚ОВ˜¸ Н‡ ЪЫ Ф‡ПflЪЛ ЛБ „МВБ‰‡, М‡КПЛЪВ М‡ ВВ ˆВМЪ ‡О¸МЫ˛ ˜‡ТЪ¸, Б‡ЪВП УТЪУ УКМУ ЛБ‚ОВНЛЪВ Н‡ ЪЫ.

д‡ Ъ˚, ‡ТТ˜ЛЪ‡ММ˚В М‡ Ф ЛПВМВМЛВ ‚ ‰‡ММУИ ‡ФФ‡ ‡ЪЫ В:

ᇢˢÂÌ̇fl ˆËÙ Ó‚‡fl ͇ Ú‡ (SD)

åÛθÚËωËÈ̇fl ͇ Ú‡ (MMC)

ä‡ Ú‡ Ô‡ÏflÚË (MS)

лУ‚ПВТЪЛП‡fl Т Щ‡ИОУ‚˚ПЛ ТЛТЪВП‡ПЛ FAT 12, FAT 16 ЛОЛ FAT 32.

иУО¸БЫИЪВТ¸ ЪУО¸НУ ВНУПВМ‰У‚‡ММ˚ПЛ ‚˚¯В Н‡ Ъ‡ПЛ Ф‡ПflЪЛ.

д‡ Ъ‡ ‚ТЪ‡‚ОflВЪТfl ЪУО¸НУ ‚ У‰МУП М‡Ф ‡‚ОВМЛЛ, МВ Ф ЛНО‡‰˚‚‡ИЪВ Н МВИ ЛБОЛ¯МВ„У ЫТЛОЛfl.

д‡ Ъ‡ ФОУЪМУ ‚ıУ‰ЛЪ ‚ „МВБ‰У, ВТОЛ ‚ТЪ‡‚ОВМ‡ М‡‰ОВК‡˘ЛП У· ‡БУП.

ДФФ‡ ‡ЪЫ ‡ МВ ‡ТТ˜ЛЪ‡М‡ М‡ Ф ЛПВМВМЛВ Н‡ Ъ Ф‡ПflЪЛ О˛·У„У ЪЛФ‡.

ç ËÁ‚ÎÂ͇ÈÚ ͇ ÚÛ Ô‡ÏflÚË ‚Ó ‚ ÂÏfl ‡·ÓÚ˚ (‚ÓÒÔ ÓËÁ‚‰ÂÌËfl, ÍÓÔË Ó‚‡ÌËfl ËÎË ‰ Û„Ëı ÓÔ ‡ˆËÈ).

á‡Ï˜‡ÌË ÔÓ ÔÓ‚Ó‰Û Á‡˘ËÚ˚ ÓÚ Á‡ÔËÒË

д‡ Ъ˚, УТМ‡˘ВММ˚В ФВ ВНО˛˜‡ЪВОВП Б‡˘ЛЪ˚ УЪ Б‡ФЛТЛ, МВ ФУБ‚УОfl˛Ъ Ф УЛБ‚У‰ЛЪ¸ Б‡ФЛТ¸, ТЪЛ ‡МЛВ ЛОЛ ЩУ П‡ЪЛ У‚‡МЛВ Ф Л ‚НО˛˜ВММУП ФВ ВНО˛˜‡ЪВОВ.

ËÎËor ËÎËor

SD MMC

MS

иУ‰НО˛˜ВМЛВ ЫТЪ УИТЪ‚‡ Т ЛМЪВ ЩВИТУП USB

иУ‰НО˛˜ЛЪВ ·УОВВ ПВОНЫ˛ Н‡·ВО¸МЫ˛ ˜‡ТЪ¸ ‡‰‡ФЪВ МУ„У Н‡·ВОfl USB Н ФУ ЪЫ USB. иУ‰НО˛˜ЛЪВ ЫТЪ УИТЪ‚У USB Л ‡‰‡ФЪВ USB. и Л МВУ·ıУ‰ЛПУТЪЛ ‚УТФУО¸БЫИЪВТ¸ Н‡·ВОВП USB.

С‡ММ‡fl ‡ФФ‡ ‡ЪЫ ‡ ТУ‚ПВТЪЛП‡ ЪУО¸НУ Т ЫТЪ УИТЪ‚‡ПЛ USB, ЛПВ˛˘ЛПЛ Щ‡ИОУ‚Ы˛ ТЛТЪВПЫ FAT 16 ЛОЛ FAT 32.

зВ УЪТУВ‰ЛМflИЪВ ‡·УЪ‡˛˘ВВ ЫТЪ УИТЪ‚У USB (Ф Л ‚УТФ УЛБ‚В‰ВМЛЛ, НУФЛ У‚‡МЛЛ Л ‰ Ы„Лı УФВ ‡ˆЛflı).

мТЪ УИТЪ‚У USB: ТУ‚ПВТЪЛПУВ Т ЩУ П‡ЪУП SB 1.1 Л USB 2.0. (з‡Ф ЛПВ : ЩОВ¯-М‡НУФЛЪВО¸ USB, Т˜ЛЪ˚‚‡ЪВО¸ Н‡ Ъ Ф‡ПflЪЛ, ˆЛЩ У‚‡fl Н‡ПВ ‡ Л Ъ. ‰.)

зВ У·ВТФВ˜Л‚‡ВЪТfl ФУ‰‰В КН‡ ЫТЪ УИТЪ‚‡ USB, Ъ В·Ы˛˘В„У ЫТЪ‡МУ‚НЛ ‰УФУОМЛЪВО¸МУ„У Ф У„ ‡ППМУ„У У·ВТФВ˜ВМЛfl Ф Л ФУ‰НО˛˜ВМЛЛ Н PC.

оОВ¯-М‡НУФЛЪВО¸ USB (Ф ЛПВ )

ä ÔÓ ÚÛ USB

䇷ÂθÌ˚È ‡‰‡ÔÚ USB

5

PF391P-P-ALVALLW-RUS 11/27/07 7:51 PM Page 6

èÓ‰Íβ˜ÂÌË ÒÂÚÂ‚Ó„Ó ¯ÌÛ ‡

иУ‰НО˛˜ЛЪВ Ф ЛО‡„‡ВП˚И ТВЪВ‚УИ ¯МЫ ·ОУН‡ Н ТВЪВ‚УИ УБВЪНВ.

èÓ‰Íβ˜ËÚ ÒÂÚ‚ÓÈ ¯ÌÛ Í ÒÂÚ‚ÓÏÛ ‡‰‡ÔÚ Û.

ä ÒÂÚ‚ÓÏÛ ‡‰‡ÔÚ Û

ëÂÚ‚ÓÈ ¯ÌÛ


оЛНТЛ Ы˛˘‡fl

ä ‚ıÓ‰ÌÓÏÛ „ÌÂÁ‰Û

НМУФН‡

ФУТЪУflММУ„У М‡Ф flКВМЛfl 12 З

ëÂÚ‚ÓÈ ‡‰‡ÔÚÂ

лВЪВ‚УИ ‡‰‡ФЪВ ‡ТТ˜ЛЪ‡М М‡ ‚ıУ‰МУВ ФВ ВПВММУВ М‡Ф flКВМЛВ 100…240 З Т ˜‡ТЪУЪУИ 50…60 Йˆ.

иУ‰У· ‡Ъ¸ МВУ·ıУ‰ЛП˚И ‡‰‡ФЪВ ТВЪВ‚УИ ‚ЛОНЛ ЛОЛ НУПФОВНЪ ТВЪВ‚У„У ¯МЫ ‡ ‚‡П ФУПУКВЪ ТФВˆЛ‡ОЛТЪ ФУ ТМ‡·КВМЛ˛ ˝ОВНЪ УЪВıМЛ˜ВТНУИ Ф У‰ЫНˆЛВИ.

àÁ„ÓÚÓ‚ÎÂÌÓ WANLIDA GROUP CO., LTD.

иВ ВБ‡ flК‡ВП˚И ‡ННЫПЫОflЪУ

ЗТЪ УВММ˚И ФВ ВБ‡ flК‡ВП˚И ‡ННЫПЫОflЪУ ФУБ‚УОflВЪ Т‚У·У‰МУ ФВ ВПВ˘‡Ъ¸ ‡ФФ‡ ‡ЪЫ Ы Л ‚УТФ УЛБ‚У‰ЛЪ¸ Щ‡ИО˚, МВ ФУО¸БЫflТ¸ ТВЪВ‚˚П ¯МЫ УП.

и УˆВ‰Ы ‡ Б‡ fl‰‡ ‚ТЪ УВММУ„У ‡ННЫПЫОflЪУ ‡ М‡˜МВЪТfl ЪУО¸НУ ФУТОВ ‚˚НО˛˜ВМЛfl ‡ФФ‡ ‡ЪЫ ˚ Ф Л ЫТОУ‚ЛЛ ФУ‰НО˛˜ВМЛfl ТВЪВ‚У„У ‡‰‡ФЪВ ‡ Н УБВЪНВ.

б‡ fl‰ ‡ННЫПЫОflЪУ ‡ Ф ВН ‡˘‡ВЪТfl Т ‚НО˛˜ВМЛВП ‡ФФ‡ ‡ЪЫ ˚.

СОЛЪВО¸МУТЪ¸ Б‡ fl‰‡ ТУТЪ‡‚ОflВЪ УНУОУ 2 ˜‡ТУ‚.

ä ‡ÌÌ˚È ˆ‚ÂÚ Ë̉Ë͇ÚÓ ‡ 1BAT. Т‚Л‰ВЪВО¸ТЪ‚ЫВЪ У Ф У‰УОК‡˛˘ВИТfl Ф УˆВ‰Ы В Б‡ fl‰‡. иУ Б‡‚В ¯ВМЛ˛ Б‡ fl‰‡ ˆ‚ВЪ ЛМ‰ЛН‡ЪУ ‡ ЛБПВМflВЪТfl М‡ БВОВМ˚И.

дУ„‰‡ Б‡ fl‰ ‡ННЫПЫОflЪУ ‡ ТМЛК‡ВЪТfl М‡ТЪУО¸НУ, ˜ЪУ ‡·УЪ‡ ‡ФФ‡ ‡ЪЫ ˚ ПУКВЪ У·ВТФВ˜Л‚‡Ъ¸Тfl МВ ·УОВВ 10 ПЛМЫЪ, М‡ ˝Н ‡МВ ФУfl‚ЛЪТfl ФЛНЪУ„ ‡ПП‡ “ ”, ‡ Ë̉Ë͇ÚÓ 1 BAT. ̇˜ÌÂÚ ÏË„‡Ú¸.

ÇÍβ˜ÂÌËÂ Ë ‚˚Íβ˜ÂÌË ‡ÔÔ‡ ‡ÚÛ ˚

уЪУ·˚ ‚НО˛˜ЛЪ¸ ‡ФФ‡ ‡ЪЫ Ы, М‡КПЛЪВ НМУФНЫ 1 BAT. Л Ы‰В КЛ‚‡ИЪВ ВВ М‡К‡ЪУИ 2 ТВНЫМ‰˚.

з‡˜МВЪТfl ФУН‡Б ‰ВПУМТЪ ‡ˆЛУММУИ Б‡ТЪ‡‚НЛ, ФУТОВ ˜В„У ФУfl‚ЛЪТfl ПВМ˛ [Device Menu].

уЪУ·˚ Ф УФЫТЪЛЪ¸ ‰ВПУМТЪ ‡ˆЛУММЫ˛ Б‡ТЪ‡‚НЫ, ‰УТЪ‡ЪУ˜МУ М‡К‡Ъ¸ О˛·Ы˛ НМУФНЫ.

оУЪУ„ ‡ЩЛЛ ‰ВПУМТЪ ‡ˆЛУММУИ Б‡ТЪ‡‚НЛ ı ‡МflЪТfl ‚У ‚ТЪ УВММУП Б‡ФУПЛМ‡˛˘ВП ЫТЪ УИТЪ‚В, Лı МВ‚УБПУКМУ ЛБПВМЛЪ¸ ЛОЛ Ы‰‡ОЛЪ¸. ДФФ‡ ‡ЪЫ ‡ ‚˚НО˛˜‡ВЪТfl ФУ‚ЪУ М˚П М‡К‡ЪЛВП НМУФНЛ 1 BAT.

кВКЛП Т·В ВКВМЛfl ˝МВ „ЛЛ

аПВВЪТfl ‚УБПУКМУТЪ¸ ФВ В‚ВТЪЛ ‡ФФ‡ ‡ЪЫ Ы ‚ ВКЛП Т·В ВКВМЛfl ˝МВ „ЛЛ. з‡КПЛЪВ НМУФНЫ P-SAVE. иУТОВ ˜В„У Ьд-˝Н ‡М ФУ„‡ТМВЪ. кВКЛП Т·В ВКВМЛfl ˝МВ „ЛЛ УЪПВМflВЪТfl ФУ‚ЪУ М˚П М‡К‡ЪЛВП НМУФНЛ P-SAVE ËÎË 1 BAT.

åÓÌÚ‡Ê ÔÓ‰ÒÚ‡‚ÍË

д ВФОВМЛВ Т˙ВПМУИ ФУ‰ТЪ‡‚НЛ Т У· ‡ЪМУИ ТЪУ УМ˚ ·ОУН‡ ФУН‡Б‡МУ М‡ МЛКМВПЛТЫМНВ.

6

PF391P-P-ALVALLW-RUS 11/27/07 7:51 PM Page 7

аТФУО¸БУ‚‡МЛВ ПВМ˛

еВМ˛ ‡ФФ‡ ‡ЪЫ ˚ ФУfl‚ОflВЪТfl Ф Л ‚НО˛˜ВМЛЛ М‡Ф flКВМЛfl ФЛЪ‡МЛfl, ПУКМУ ‚˚Б‚‡Ъ¸ В„У ФУ‚ЪУ М˚П М‡К‡ЪЛВП НМУФНЛ BACK.

З˚·У ФЫМНЪУ‚ ПВМ˛ Ф УЛБ‚У‰ЛЪТfl Т ФУПУ˘¸˛ НМУФУН b VOLUME B, ФУТОВ ‚˚·У ‡ Ъ В·ЫВПУ„У ФЫМНЪ‡ МВУ·ıУ‰ЛПУ М‡К‡Ъ¸ НМУФНЫ ENTER.

Device Menu

USB-C Flash Calendar Setup

USB-C


ÇÓÒÔ

ÛÒÚ ÓÈÒÚ‚‡ USB.

SD/MMC/MS


ÇÓÒÔ

͇ Ú˚ Ô‡ÏflÚË.

Flash


ÇÓÒÔ

‚ТЪ УВММУИ Н‡ ЪВ


Ô‡ÏflÚË.


Calendar


Ç˚ÁÓ‚

ËÁ ÓÍ̇ ͇ÎẨ‡ fl.

Setup

аБПВМВМЛВ

ê„ÛÎË Ó‚‡ÌË ̇ÒÚ ÓÂÍ


дМУФН‡


1 З˚·В ЛЪВ ФЫМНЪ [Setup] ‚ ПВМ˛ [Device Menu]:

b VOLUME B, ENTER

2 Ç˚·Â ËÚ Ê·ÂÏÛ˛ ÔÓÁËˆË˛:


b PAGE B


3 ЗМВТЛЪВ ЛБПВМВМЛВ:


b VOLUME B


Device Menu


Setup


Language

English


Slideshow time

: 5s


Slideshow mode

: Random


Display mode

: Normal


Time format

: 24h


Time

: 2007 / 11 / 22

21 : 17


USB-C

Flash

Calendar

Setup

Auto On

: 2007 / 11 / 22

00 : 00

Off


Auto Off

: 2007 / 11 / 22

00 : 00

Off


Alarm

: 00 : 00 Ring1 Off


Default

: Reset


СУФУОМЛЪВО¸М˚В ‚УБПУКМУТЪЛ В„ЫОЛ У‚‡МЛfl М‡ТЪ УВН

йЪУ· ‡КВМЛВ ПВМ˛ [Setup]

л ФУПУ˘¸˛ НМУФУН b VOLUME B ‚˚·В ЛЪВ ФЫМНЪ [Setup] ‚ ПВМ˛ [Device Menu], Б‡ЪВП М‡КПЛЪВ НМУФНЫ ENTER.

[Language]

Ç˚·Ó flÁ˚͇ ÏÂÌ˛ [Setup] Ë ˝Í ‡ÌÌÓ„Ó ËÌÚ ÙÂÈÒ‡.

[Slideshow time]

СОЛЪВО¸МУТЪ¸ ФУН‡Б‡ Н‡К‰УИ ЩУЪУ„ ‡ЩЛЛ ТО‡И‰-¯УЫ: 3 ТВНЫМ‰˚, 5 ТВНЫМ‰, 15 ТВНЫМ‰, 1 ПЛМЫЪ‡, 15 ПЛМЫЪ, 1 ˜‡Т.

7

PF391P-P-ALVALLW-RUS 11/27/07 7:51 PM Page 8

[Slideshow mode]

LJ ˇÌÚ˚ Ô ÂıÓ‰‡ ÓÚ ÙÓÚÓ„ ‡ÙËË Í ÙÓÚÓ„ ‡ÙËË: Random, Fading, Off, Bottom-To-Top, Top-To-Bottom, Left-To-Right, Right-To-Left, Door-Close, Door-Open, Hori-Cross, Verti-Cross.

З˚·У УП ‚‡ Л‡МЪ‡ [Off] ТО‡И‰-¯УЫ УЪПВМflВЪТfl Л М‡ ˝Н ‡МВ УТЪ‡ВЪТfl У‰М‡ ЩУЪУ„ ‡ЩЛfl.

[Display mode]

кВКЛП УЪУ· ‡КВМЛfl ЩУЪУ„ ‡ЩЛИ М‡ ˝Н ‡МВ: Normal, Fit. [Normal]: ТУı ‡МflВЪТfl ЛТıУ‰М‡fl Ф УФУ ˆЛfl ТЪУ УМ ЩУЪУ„ ‡ЩЛЛ. [Fit]: ‡БПВ ЩУЪУ„ ‡ЩЛЛ ‡‰‡ФЪЛ ЫВЪТfl Н ‡БПВ Ы ˝Н ‡М‡.

[Time format]

Б‡‰‡МЛВ ЩУ П‡Ъ‡ УЪУ· ‡КВМЛfl ‚ ВПВМЛ: 12h, 24h

[12h]: ‚ ВПfl УЪУ· ‡К‡ВЪТfl ‚ 12-˜‡ТУ‚УП ЩУ П‡ЪВ Т Ф ЛПВ˜‡МЛВП «am» (ФВ ‚‡fl ФУОУ‚ЛМ‡ ТЫЪУН) ЛОЛ «pm» (‚ЪУ ‡fl ФУОУ‚ЛМ‡ ТЫЪУН).

[24h]: ‚ ÂÏfl ÓÚÓ· ‡Ê‡ÂÚÒfl ‚ 24-˜‡ÒÓ‚ÓÏ ÙÓ Ï‡Ú ·ÂÁ Ô ËϘ‡ÌËÈ.

[Time]

мТЪ‡МУ‚Н‡ ‚ ВПВМЛ Л ‰‡Ъ˚ ‚ ‡ФФ‡ ‡ЪЫ В ‰Оfl Ф ЛПВМВМЛfl ‡БМУУ· ‡БМ˚ı Ъ‡ИПВ М˚ı ЩЫМНˆЛИ.

1.З˚·В ЛЪВ ФЫМНЪ [Time] Л М‡КПЛЪВ НМУФНЫ VOLUME B.

2.З‚В‰ЛЪВ Ъ В·ЫВПУВ ‚ ВПfl Л ‰‡ЪЫ.

дМУФНЛ b VOLUME B (΂‡fl Ë Ô ‡‚‡fl): Ô ÂÏ¢ÂÌË ÍÛ ÒÓ ‡ ̇ Ô Â‰˚‰Û˘ËÈ ËÎË ÒÎÂ‰Û˛˘ËÈ ÒÚÓηˆ.

дМУФНЛ b PAGE B (‚В ıМflfl Л МЛКМflfl): ЛБПВМВМЛВ ФУН‡Б‡МЛИ М‡ ЪВНЫ˘ВП ФУОУКВМЛЛ НЫ ТУ ‡.

3.з‡КПЛЪВ НМУФНЫ ENTER, ÔӉڂ ʉ‡fl ‚‚‰ÂÌÌ˚ Á̇˜ÂÌËfl.

[Auto On]

ᇉ‡МЛВ ПУПВМЪ‡ ‡‚ЪУП‡ЪЛ˜ВТНУ„У ‚НО˛˜ВМЛfl ‡ФФ‡ ‡ЪЫ ˚.

1.З˚·В ЛЪВ ФЫМНЪ [Auto On] Л М‡КПЛЪВ НМУФНЫ VOLUME B.

2.и У‰ВО‡ИЪВ УФВ ‡ˆЛ˛ 2 ‰Оfl Б‡‰‡МЛfl ‚ ВПВМЛ.

3.З˚·В ЛЪВ КВО‡ВП˚И ВКЛП ФУ‚ЪУ ВМЛfl: [Off], [Once] ЛОЛ [Everyday]. ЦТОЛ ˝Ъ‡ ЩЫМНˆЛfl МВ ЛТФУО¸БЫВЪТfl, ‚˚·В ЛЪВ ‚‡ Л‡МЪ [Off].

4.з‡КПЛЪВ НМУФНЫ ENTER, ÔӉڂ ʉ‡fl ‚‚‰ÂÌÌ˚ Á̇˜ÂÌËfl.

[Auto Off]

ᇉ‡МЛВ ПУПВМЪ‡ ‡‚ЪУП‡ЪЛ˜ВТНУ„У ‚˚НО˛˜ВМЛfl ‡ФФ‡ ‡ЪЫ ˚.

1.З˚·В ЛЪВ ФЫМНЪ [Auto Off] Л М‡КПЛЪВ НМУФНЫ VOLUME B.

2.и У‰ВО‡ИЪВ УФВ ‡ˆЛ˛ 2 ‰Оfl Б‡‰‡МЛfl ‚ ВПВМЛ.

3.З˚·В ЛЪВ КВО‡ВП˚И ВКЛП ФУ‚ЪУ ВМЛfl: [Off], [Once] ЛОЛ [Everyday]. ЦТОЛ ˝Ъ‡ ЩЫМНˆЛfl МВ ЛТФУО¸БЫВЪТfl, ‚˚·В ЛЪВ ‚‡ Л‡МЪ [Off].

4.з‡КПЛЪВ НМУФНЫ ENTER, ÔӉڂ ʉ‡fl ‚‚‰ÂÌÌ˚ Á̇˜ÂÌËfl.

[Alarm]

мТЪ‡МУ‚Н‡ ‚ ВПВМЛ ФУ‰‡˜Л ТЛ„М‡О‡ УФУ‚В˘ВМЛfl (·Ы‰ЛО¸МЛН‡). и Л Б‡‰‡ММУП ‚ ВПВМЛ ‡ФФ‡ ‡ЪЫ ‡ ·Ы‰ВЪ ‚НО˛˜‡Ъ¸Тfl ‡‚ЪУП‡ЪЛ˜ВТНЛ ФУ ‰УТЪЛКВМЛ˛ Б‡‰‡ММУ„У ПУПВМЪ‡ Т ФУ‰‡˜ВИ ТЛ„М‡О‡ ·Ы‰ЛО¸МЛН‡. лЛ„М‡О ·Ы‰ЛО¸МЛН‡ ‚˚НО˛˜‡ВЪТfl М‡К‡ЪЛВП О˛·УИ НМУФНЛ ·ОУН‡.

1.З˚·В ЛЪВ ФЫМНЪ [Alarm] Л М‡КПЛЪВ НМУФНЫ VOLUME B.

2.З‚В‰ЛЪВ Ъ В·ЫВПУВ ‚ ВПfl.

дМУФНЛ b VOLUME B (΂‡fl Ë Ô ‡‚‡fl): Ô ÂÏ¢ÂÌË ÍÛ ÒÓ ‡ ̇ Ô Â‰˚‰Û˘ËÈ ËÎË ÒÎÂ‰Û˛˘ËÈ ÒÚÓηˆ.

дМУФНЛ b PAGE B (‚В ıМflfl Л МЛКМflfl): ЛБПВМВМЛВ ФУН‡Б‡МЛИ М‡ ЪВНЫ˘ВП ФУОУКВМЛЛ НЫ ТУ ‡.

3.Ç˚·Â ËÚ ‚‡ ˇÌÚ Á‚ÓÌ͇ ·Û‰ËθÌË͇: [Ring1], [Ring2] ËÎË [Ring3]. ç‡Ô ËÏ , ‚˚· ‡Ì [Ring2];

б‚ЫНУ‚УИ ТЛ„М‡О ‰ОЛЪВО¸МУТЪ¸˛ 1 ПЛМ c Ô‡ÛÁ‡ 15 Ò c Б‚ЫНУ‚УИ ТЛ„М‡О ‰ОЛЪВО¸МУТЪ¸˛ 1 ПЛМ c Ô‡ÛÁ‡ 15 Ò c Ó·˚˜Ì˚È ÂÊËÏ.

4.З˚·В ЛЪВ КВО‡ВП˚И ВКЛП ФУ‚ЪУ ВМЛfl: [Off], [Once] ЛОЛ [Everyday]. ЦТОЛ ˝Ъ‡ ЩЫМНˆЛfl МВ ЛТФУО¸БЫВЪТfl, ‚˚·В ЛЪВ ‚‡ Л‡МЪ [Off].

[Off]: ЩЫМНˆЛfl МВ ЛТФУО¸БЫВЪТfl.

[Once]: ЩЫМНˆЛfl ЛТФУО¸БЫВЪТfl У‰МУН ‡ЪМУ ФУТОВ Б‡‰‡МЛfl ‚ ВПВМЛ Т ‡·‡Ъ˚‚‡МЛfl ·Ы‰ЛО¸МЛН‡.

[Everyday]: ·Û‰ËθÌËÍ Ò ‡·‡Ú˚‚‡ÂÚ Âʉ̂ÌÓ.

5.з‡КПЛЪВ НМУФНЫ ENTER, ÔӉڂ ʉ‡fl ‚‚‰ÂÌÌ˚ Á̇˜ÂÌËfl.

[Default]

ЗУТТЪ‡МУ‚ОВМЛВ ЛТıУ‰М˚ı Ф‡ ‡ПВЪ У‚ ‡ФФ‡ ‡ЪЫ ˚. З˚·В ЛЪВ ФЫМНЪ [Default], Б‡ЪВП М‡КПЛЪВ НМУФНЫ ENTER.

8

Loading...
+ 56 hidden pages