

Page 1

PF391
P/NO : MFL42173816(R1)
ENGLISH
PF391P-P-AFRALLW-ENG 11/19/07 4:31 PM Page 1
Page 2
2
CAUTION: TO REDUCE THE RISK OF ELECTRIC SHOCK. DO NOT REMOVE
COVER (OR BACK). NO USER-SERVICEABLE PARTS INSIDE. REFER SERVICING TO QUALIFIED SERVICE PERSONNEL.
This lightning flash with arrowhead symbol within an equilateral triangle is
intended to alert the user to the presence of uninsulated dangerous voltage
within the product’s enclosure that may be of sufficient magnitude to constitute a risk of electric shock to persons.
The exclamation point within an equilateral triangle is intended to alert the
user to the presence of important operating and maintenance (servicing)
instructions in the literature accompanying the product.
WARNING: TO PREVENT FIRE OR ELECTRIC SHOCK HAZARD, DO NOT
EXPOSE THIS PRODUCT TO RAIN OR MOISTURE.
WARNING: Do not install this equipment in a confined space such as a book case or
similar unit.
CAUTION: Do not block any ventilation openings. Install in accordance with the manufacturer's instructions. Slots and openings in the cabinet are provided for ventilation
and to ensure reliable operation of the product and to protect it from over heating.
The openings should be never be blocked by placing the product on a bed, sofa, rug
or other similar surface. This product should not be placed in a built-in installation
such as a bookcase or rack unless proper ventilation is provided or the manufacturer's instruction has been adhered to.
CAUTION: The apparatus should not be exposed to water (dripping or splashing) and
no objects filled with liquids, such as vases, should be placed on the apparatus.
CAUTION concerning the Power Cord
Most appliances recommend they be placed upon a dedicated circuit;
That is, a single outlet circuit which powers only that appliance and has no additional
outlets or branch circuits. Check the specification page of this owner's manual to be
certain.Do not overload wall outlets. Overloaded wall outlets, loose or damaged wall
outlets, extension cords, frayed power cords, or damaged or cracked wire insulation
are dangerous. Any of these conditions could result in electric shock or fire.
Periodically examine the cord of your appliance, and if its appearance indicates damage or deterioration, unplug it, discontinue use of the appliance, and have the cord
replaced with an exact replacement part by an authorized service center.
Protect the power cord from physical or mechanical abuse, such as being twisted,
kinked, pinched, closed in a door, or walked upon. Pay particular attention to plugs,
wall outlets, and the point where the cord exits the appliance.
To disconnect power from the mains, pull out the mains cord plug. When installing the
product, ensure that the plug is easily accessible.
Disposal of your old appliance
1. When this crossed-out wheeled bin symbol is attached to a product it
means the product is covered by the European Directive 2002/96/EC.
2. All electrical and electronic products should be disposed of separately from
the municipal waste stream via designated collection facilities appointed by
the government or the local authorities.
3. The correct disposal of your old appliance will help prevent potential negative consequences for the environment and human health.
4. For more detailed information about disposal of your old appliance, please
contact your city office, waste disposal service or the shop where you purchased the product.
This product is manufactured to comply with the EEC DIRECTIVE
2004/108/EC, and 2006/95/EC.
Safety Precaution
CAUTION
RISK OF ELECTRIC SHOCK
DO NOT OPEN
PF391P-P-AFRALLW-ENG 11/19/07 4:31 PM Page 2
Page 3

3
Contents
Safety Precaution . . . . . . . . . . . . . . . . . . . . . . . . . . . . . . . . . . . . . . . . . . . . .2
Contents . . . . . . . . . . . . . . . . . . . . . . . . . . . . . . . . . . . . . . . . . . . . . . . . . . . .3
Features . . . . . . . . . . . . . . . . . . . . . . . . . . . . . . . . . . . . . . . . . . . . . . . . . . . .3
Main Unit . . . . . . . . . . . . . . . . . . . . . . . . . . . . . . . . . . . . . . . . . . . . . . . . . . . .4
Getting Started . . . . . . . . . . . . . . . . . . . . . . . . . . . . . . . . . . . . . . . . . . . . . . .5
• Inserting or removing a memory card . . . . . . . . . . . . . . . . . . . . . . . . . . .5
• Connecting an USB Device . . . . . . . . . . . . . . . . . . . . . . . . . . . . . . . . . . .5
• Connecting the Power Cable . . . . . . . . . . . . . . . . . . . . . . . . . . . . . . . . . .6
• Turning On or Off the Unit . . . . . . . . . . . . . . . . . . . . . . . . . . . . . . . . . . . .6
• Power Save mode . . . . . . . . . . . . . . . . . . . . . . . . . . . . . . . . . . . . . . . . . .6
• Installing the Stand . . . . . . . . . . . . . . . . . . . . . . . . . . . . . . . . . . . . . . . . .6
• Using the Device Menu . . . . . . . . . . . . . . . . . . . . . . . . . . . . . . . . . . . . . .7
Adjust the settings . . . . . . . . . . . . . . . . . . . . . . . . . . . . . . . . . . . . . . . . . . .7-8
Viewing a Photo file . . . . . . . . . . . . . . . . . . . . . . . . . . . . . . . . . . . . . . . . . . . .9
Playing a Movie file . . . . . . . . . . . . . . . . . . . . . . . . . . . . . . . . . . . . . . . . . . .10
Playing a Music file . . . . . . . . . . . . . . . . . . . . . . . . . . . . . . . . . . . . . . . . . . .11
Using a File menu . . . . . . . . . . . . . . . . . . . . . . . . . . . . . . . . . . . . . . . . . . . .12
Viewing the Calendar . . . . . . . . . . . . . . . . . . . . . . . . . . . . . . . . . . . . . . . . . .13
PC Connection (USB) . . . . . . . . . . . . . . . . . . . . . . . . . . . . . . . . . . . . . . . . .14
Troubleshooting . . . . . . . . . . . . . . . . . . . . . . . . . . . . . . . . . . . . . . . . . . . . . .15
Specifications . . . . . . . . . . . . . . . . . . . . . . . . . . . . . . . . . . . . . . . . . . . . . . .15
Features
• Live picture gallery:
High resolution and deep digital color from LCD wide screen.
• Easy power save mode:
Better 1 second power save mode than 15 seconds power off and on.
• Portable digital album:
Share your memories with built-in battery for easy mobility
• Plug-in viewer:
Easy viewing photos via memory card slot and USB port
• 2,000 photo storage:
2,000 precious memories with 256MB built-in flash memory
• Digital calendar & alarm clock:
For your efficient date and time scheduling
• Convenient photo explorer:
Coolest interface navigation for easiest access to your memory
• Premium interior decorator
3 different changeable faceplate to suit various interior
PF391P-P-AFRALLW-ENG 11/19/07 4:31 PM Page 3
Page 4
4
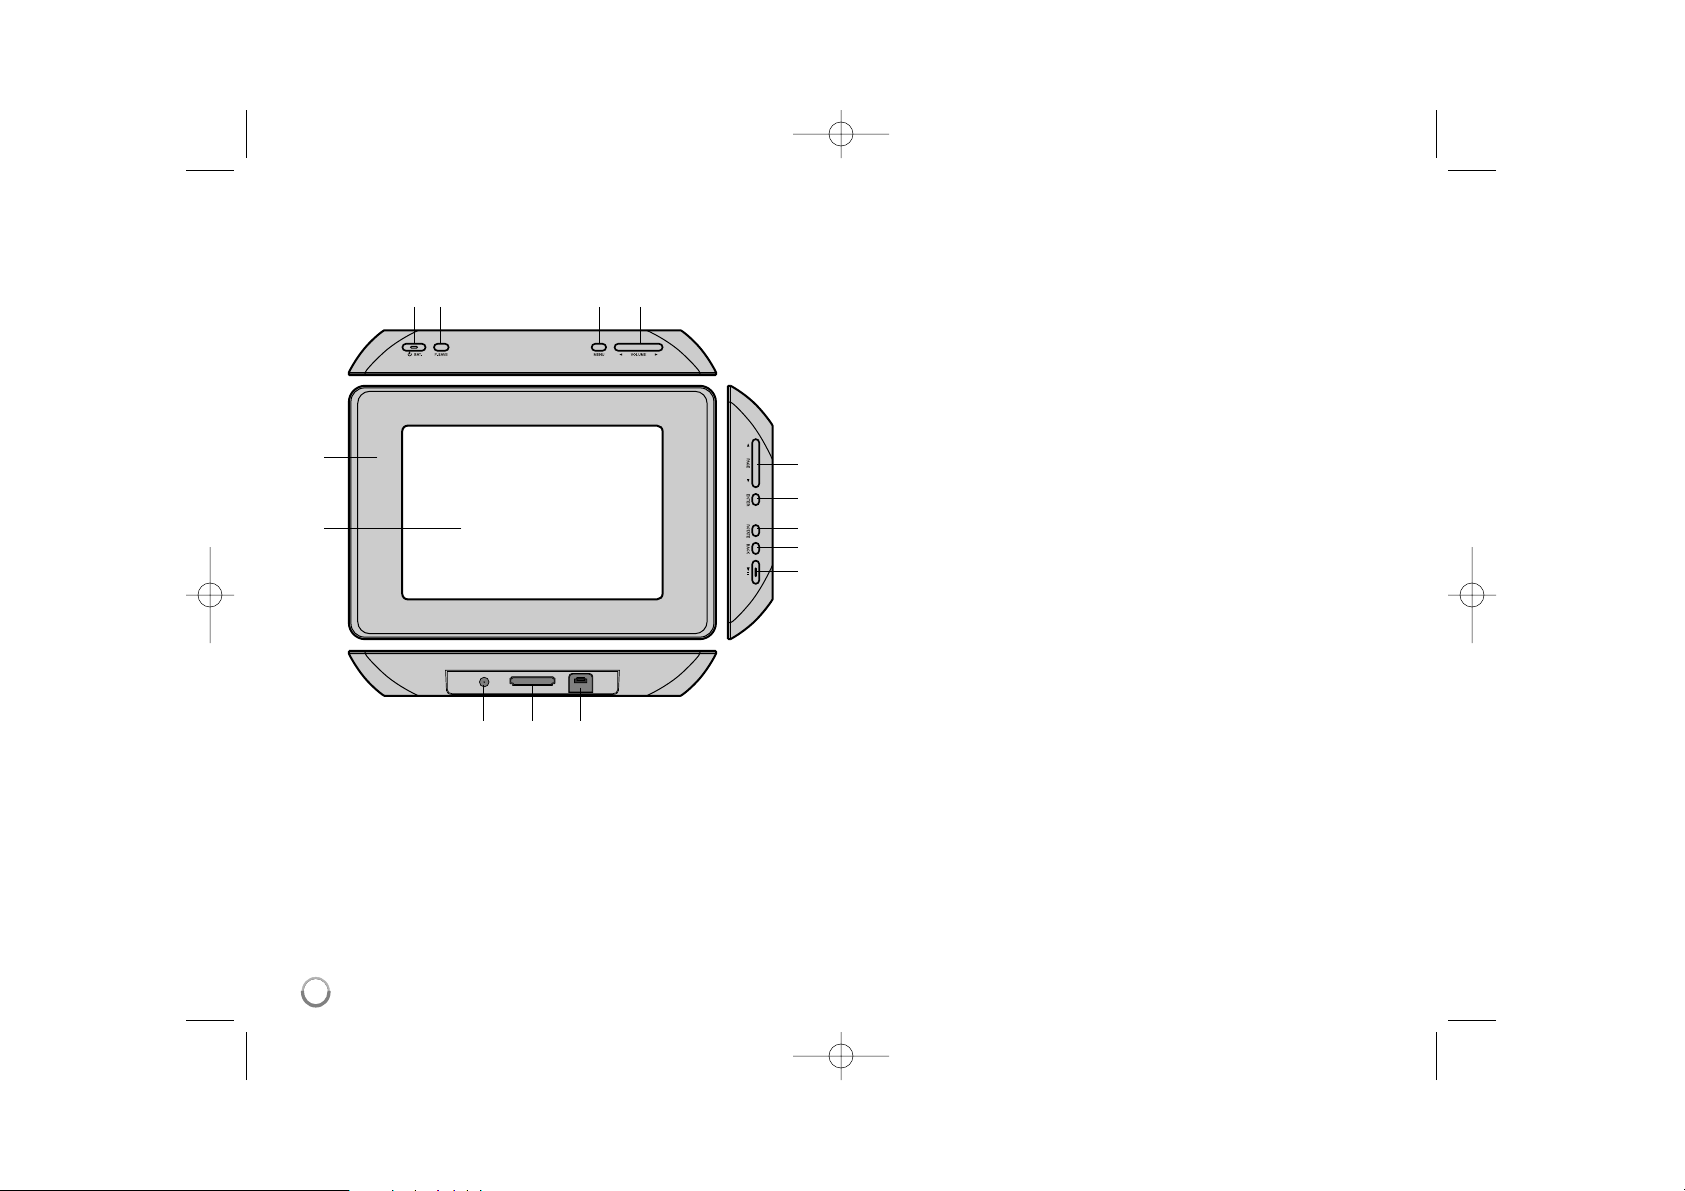
Main Unit
a LCD screen
b Faceplate (interchangeable)
Four edges of the faceplate are magnetic, so that the faceplate can easily
be attached or detached.
c 1 BAT. (Power button and Battery indicator)
Turns the unit ON or OFF and indicates the battery status.
The indicator lights in red during charging the battery.
The indicator lights in green when battery is full.
d P-SAVE (Power Save)
Accesses or exits the power save mode.
e MENU
Accesses or exits the option menu.
f b VOLUME B
Adjusts the volume of the unit. To adjust the volume, press and hold
VOLUME (b or B) during playback of the movie or music file.
Left and Right buttons for selecting an item on the menu.
g b PAGE B
Press and hold for 2 seconds to move to the previous or next page on the
[Photo], [Movie] or [Music] menu.
Up and Down buttons for selecting an item on the menu.
h ENTER
Selects an option or executes a command.
i ROTATE
Rotates the photo in full screen counterclockwise.
j BACK
Returns to a previous menu or screen.
k NX
Starts playback. Press to pause playback; press again to restart.
l USB connector
Connect the supplied USB adapter cable then connect an USB device.
m Memory card slot
Insert a memory card (SD, MMC or MS).
n DC 12V IN
Connect the supplied AC adapter.
cd e f
nml
b
a
g
h
i
j
k
PF391P-P-AFRALLW-ENG 11/19/07 4:31 PM Page 4
Page 5

5
Getting Started
Inserting or removing a memory card
Insert a memory card to the memory card slot on the unit.
To withdraw the memory card from the slot, press on the center of the memory
card then withdraw it carefully.
Card useable on this unit
• Secure Digital Card (SD)
• Multi Media Card (MMC)
• Memory Stick (MS)
• Compatible with: FAT 12, FAT 16, or FAT 32
• Only use the memory cards recommended above.
• The card will only fit in one direction; do not force it.
The card should fit snugly when properly inserted.
• Any memory card may not be available on the unit.
• Do not extract the memory card in operating (play, copy, etc.).
Regarding Write Protect
For cards that have a write protect switch, it will not be possible to write, erase
or format the card if the switch is on.
Connecting an USB Device
Connect the small end of the USB adapter cable to the USB port on the unit.
Connect an USB Device and the USB adapter. Use an USB cable, if you need.
• This unit supports only USB Device with FAT16 or FAT32 format.
• Do not extract the USB Device during operation (play, copy, etc.).
• USB Device: USB Device that support USB 1.1 and USB 2.0.
(For example: USB Flash Drive, Memory Card Reader, Digital Camera, etc.)
• An USB Device which requires additional program installation when you
have connected it to a PC, is not supported.
USB Flash Drive
(For example)
USB Adapter Cable
To USB port
SD
or or
MMC
MS
PF391P-P-AFRALLW-ENG 11/19/07 4:31 PM Page 5
Page 6
6
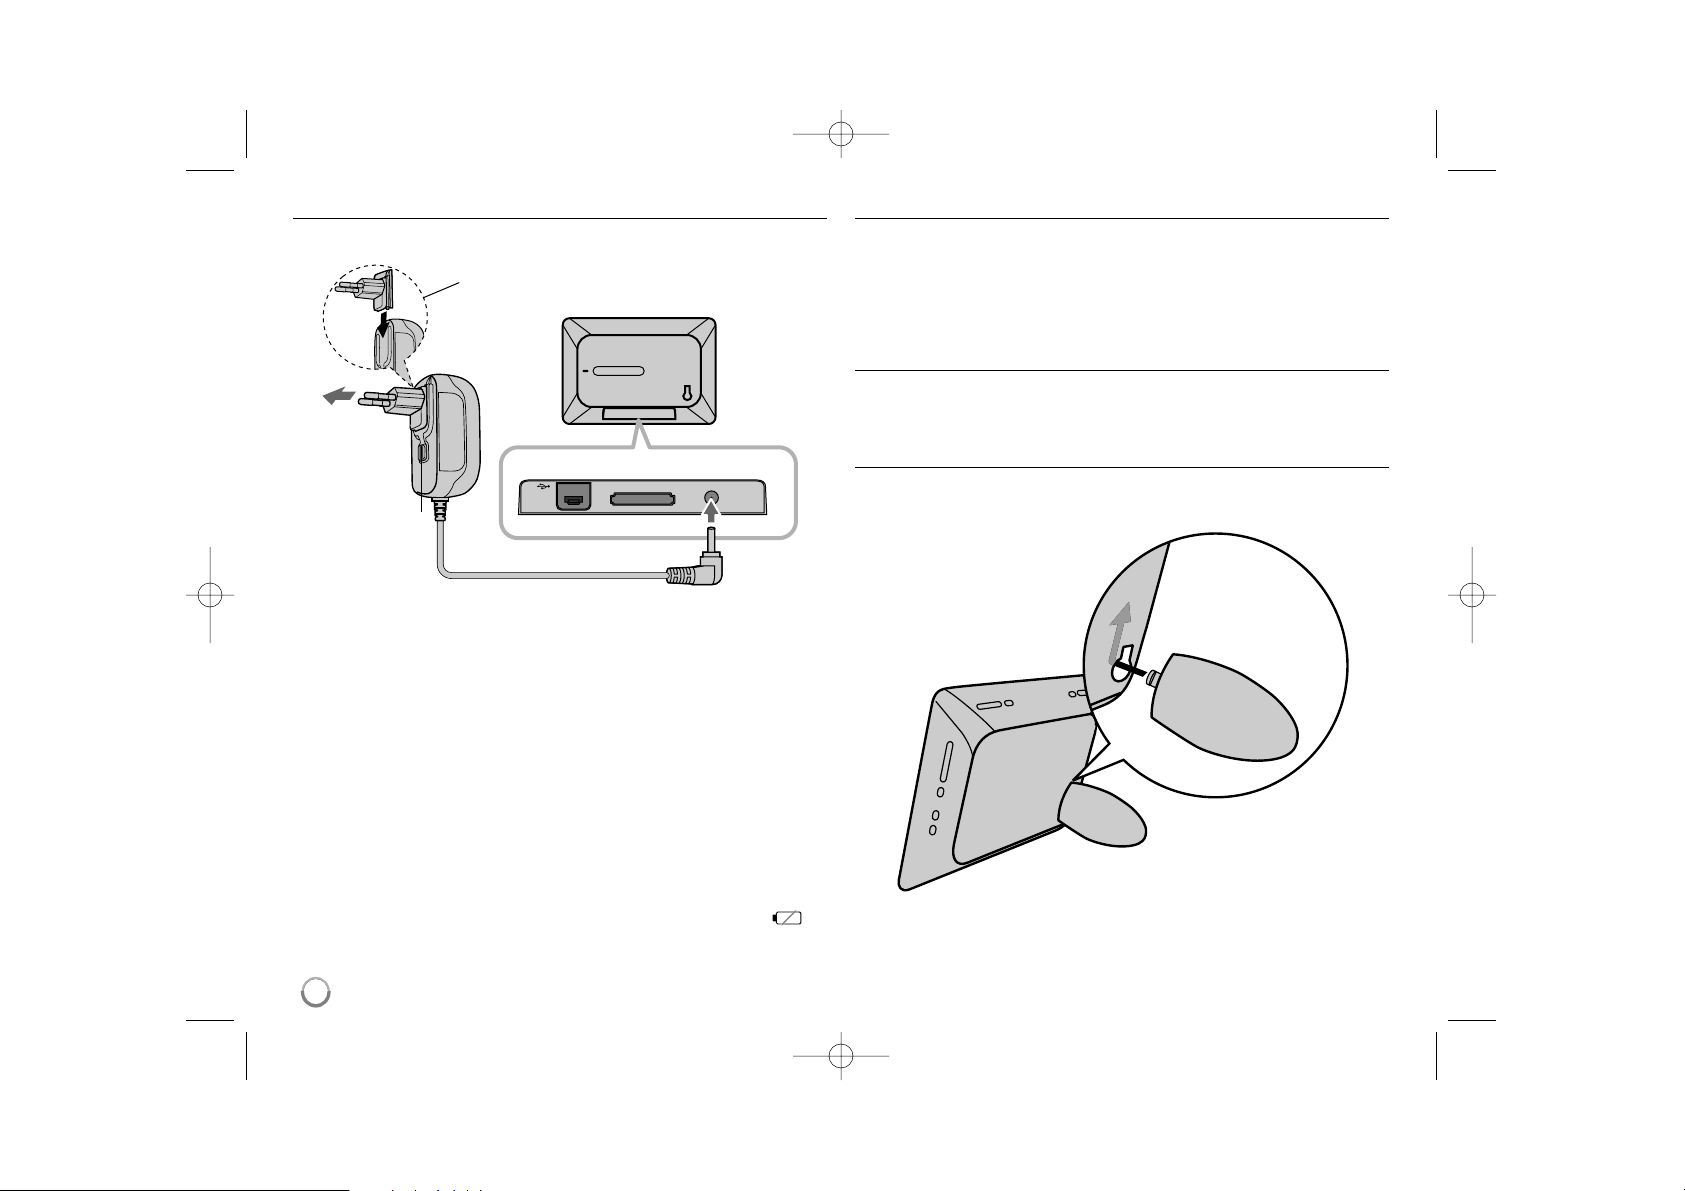
Connecting the Power Cable
Connect the supplied power cable from the unit to a power outlet.
AC adapter
• This AC adapter operates on 100-240V~ 1A 50/60Hz.
• Contact an electrical parts distributor for assistance in selecting a suitable AC
plug adapter or AC cord set.
• Manufactured by WANLIDA GROUP CO., LTD
Rechargeable battery
• Its internal rechargeable battery provides you with the freedom to pass it
around and play the files without the power cord.
• The internal rechargeable battery will start charging only when the unit is
turned off and the AC adapter is connected to a power outlet.
• The charging is stopped if you turn on the unit.
• The charging will take approximately 2 hour.
• The 1 BAT. indicator turns red in charging. If the charging is complete, the
indicator changes to green color.
• When the remaining time of the battery power is under 10 minutes, “ ”
will appear on the screen and the 1 BAT. indicator flashes.
Turning On or Off the Unit
To turn on the unit, press and hold 1 BAT. for 2 seconds.
The demonstration slideshow will start and then the [Device Menu] will appear.
Press any button to skip the demonstration slideshow.
The demonstration photos are located in the internal memory, and you cannot
change or delete them.
Press 1 BAT. again to turn off the unit.
Power Save mode
You can set up the unit into an economic power save mode. Press P-SAVE
and the LCD screen is turned off. To exit the power save mode, press P-SAVE
or 1 BAT.
Installing the Stand
Attach the detachable stand on the back of the unit as below.
To “DC 12V IN” jack
Attach the power plug to the body of the AC adapter.
Power cord
release knob
To AC outlet
PF391P-P-AFRALLW-ENG 11/19/07 4:31 PM Page 6
Page 7
7
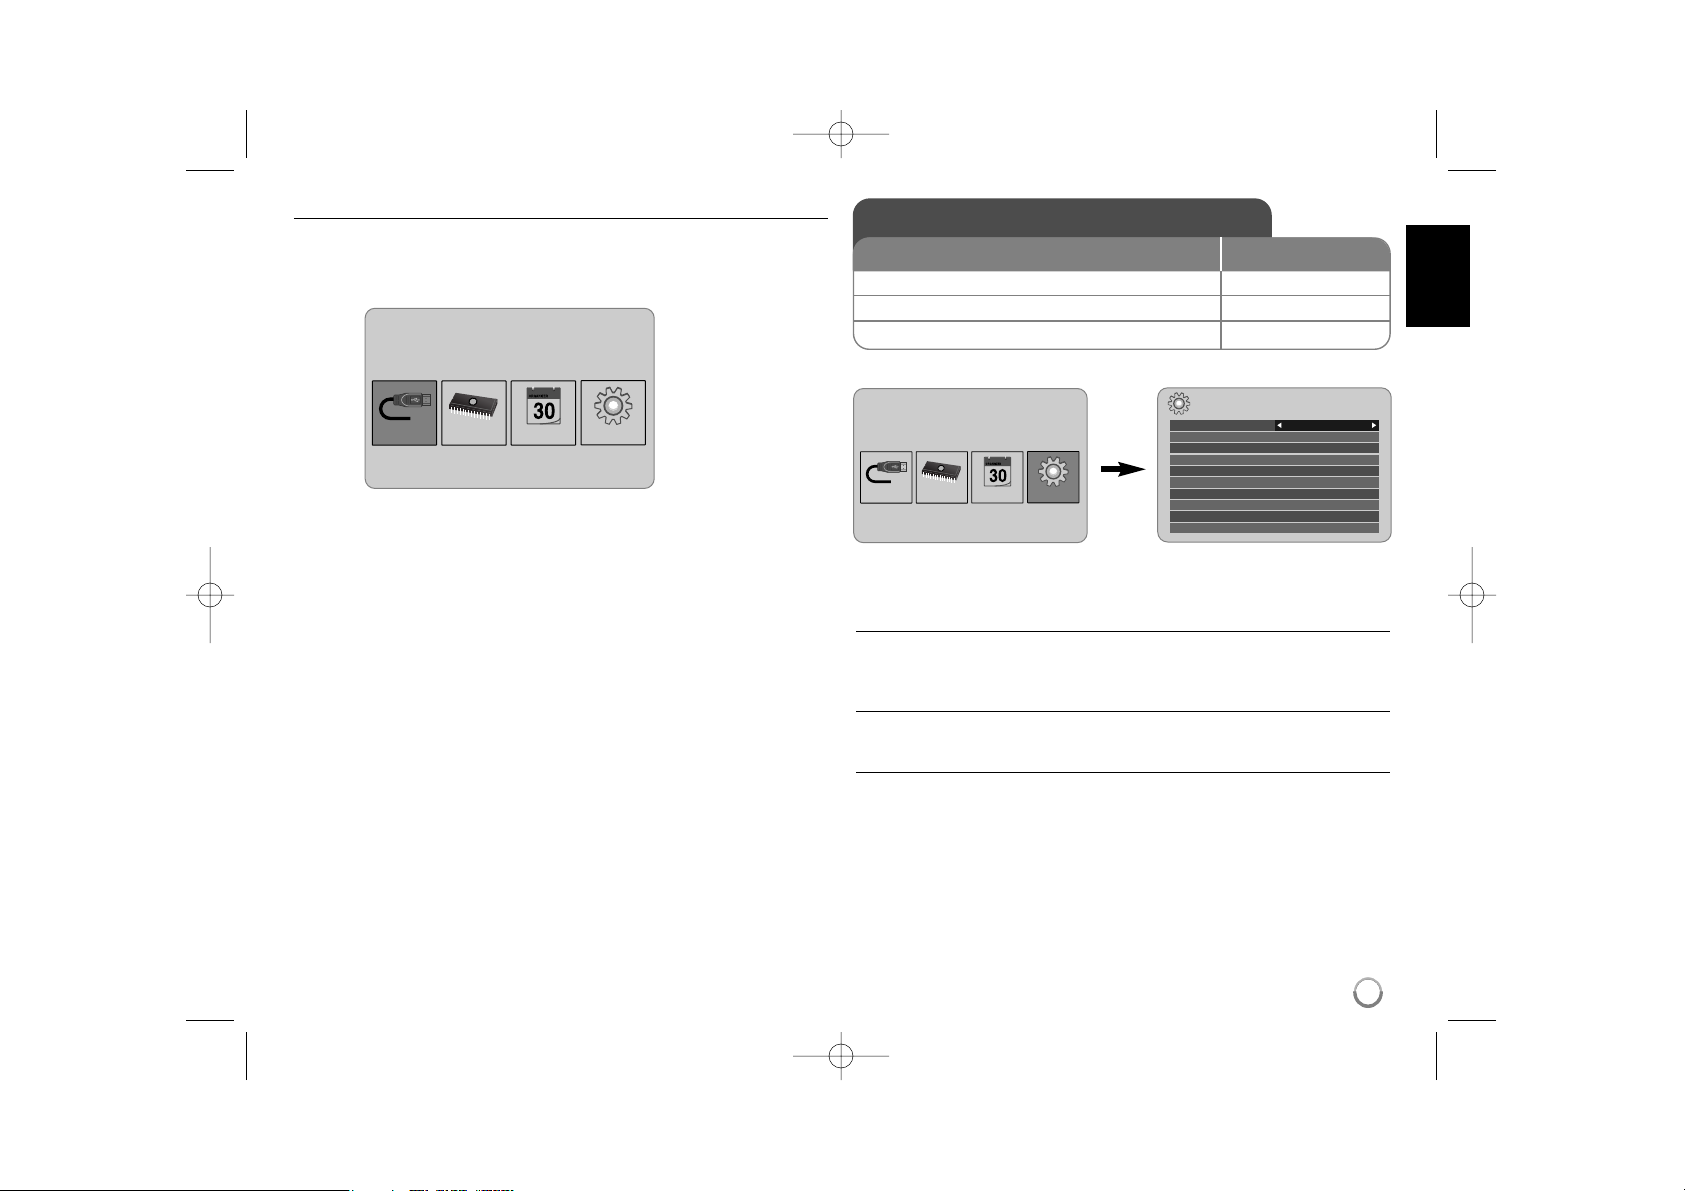
Using the Device Menu
The Device Menu will appear when the unit is turned on and you can display the
Device Menu by pressing BACK repeatedly.
Use b VOLUME B to select an option on the [Device Menu] then press
ENTER.
• USB-C ..... USB-Z
You can play a file(s) in the connected USB device.
• SD/MMC/MS
You can play a file(s) in the external memory card.
• Flash
You can play a file(s) in the internal memory card.
• Calendar
You can view the current date, clock and alarm information through calendar
screen.
• Setup
You can change the settings of the unit on the [Setup] menu.
Adjust the settings - more you can do
To display the [Setup] menu
Use b VOLUME B to select the [Setup] option on the [Device Menu] then
press ENTER.
[Language]
Select a language for the Setup menu and on-screen display.
[Slideshow time]
Specify how long each picture is displayed in a slideshow; 3 seconds,
5 seconds, 15 seconds, 1 minutes, 15 minutes, 1 hour.
Device Menu
USB-C Flash SetupCalendar
Device Menu
USB-C Flash SetupCalendar
Setup
Language
Slideshow time 5s:
Slideshow mode Random:
Display mode Normal:
Time format 24h:
Time 2007 / 11 / 22 21 : 17:
Auto On 2007 / 11 / 22 00 : 00 Off:
Auto Off 2007 / 11 / 22 00 : 00 Off:
Alarm 00 : 00 Ring1 Off:
Default Reset:
English
Adjust the settings
1 Select [Setup] on the [Device Menu]:
bb
VOLUME BB, ENTER
2 Select a desired option:
bb
PAGE
BB
3 Change the setting:
bb
VOLUME
BB
BUTTON
PF391P-P-AFRALLW-ENG 11/19/07 4:31 PM Page 7
Page 8

[Slideshow mode]
Specify the transition style between pictures in a slideshow; Random, Fading,
Off, Bottom-To-Top, Top-To-Bottom, Left-To-Right, Right-To-Left, Door-Close,
Door-Open, Hori-Cross, Verti-Cross.
If you select [Off], the slideshow does not work and the screen is fixed with one
picture.
[Display mode]
Specify the display mode for viewing photo file; Normal, Fit.
[Normal]: Retains the original aspect ratio of the image.
[Fit]: Optimizes the image to fit the screen
[Time format]
Specify the time format for displaying the clock ; 12h, 24h
[12h]: 12-hour display type with am or pm
[24h]: 24-hour display type without am or pm
[Time]
Specify the time and date of the unit to use the various timer features of the
unit.
1. Select [Time] option then press VOLUME B.
2. Enter the necessary information for date and time.
b VOLUME B (left/right): Moves the cursor to the previous or next column.
b PAGE B (up/down): Changes the setting at the current cursor position.
3. Press ENTER to confirm your setting.
[Auto On]
Specify when the unit turns on automatically.
1. Select [Auto On] option then press VOLUME B.
2. Follow step 2 as shown in [Time] above.
3. Choose a desired repeat mode; [Off], [Once] or [Everyday].
Select [Off] if you do not use this function.
4. Press ENTER to confirm your setting.
[Auto Off]
Specify when the unit turns off automatically.
1. Select [Auto Off] option then press VOLUME B.
2. Follow step 2 as shown in [Time] above.
3. Choose a desired repeat mode; [Off], [Once] or [Everyday].
Select [Off] if you do not use this function.
4. Press ENTER to confirm your setting.
[Alarm]
Specify the clock for alarm function. If you set the alarm, the unit will be turned
on automatically at the alarm time and the alarm will sound. To turn off the
alarm sound, press any button on the unit.
1. Select [Alarm] option then press VOLUME B.
2. Enter the necessary information for clock.
b VOLUME B (left/right): Moves the cursor to the previous or next column.
b PAGE B (up/down): Changes the setting at the current cursor position.
3. Choose a ring option; [Ring1], [Ring2] or [Ring3].
For example, if you select [Ring2];
Alarm sound (1 min.) c Mute (15 sec.) c Alarm sound (1 min.) c
Mute (15 sec.) c Normal mode
4. Choose a desired repeat mode; [Off], [Once] or [Everyday].
Select [Off] if you do not use this function.
[Off]: Alarm function is not activated.
[Once]: Alarm function is activated once after setting the alarm.
[Everyday]: Alarm function is activated everyday.
5. Press ENTER to confirm your setting.
[Default]
Reset the unit to its original factory settings. Select [Default] option then press
ENTER.
8
PF391P-P-AFRALLW-ENG 11/19/07 4:31 PM Page 8
Page 9
9
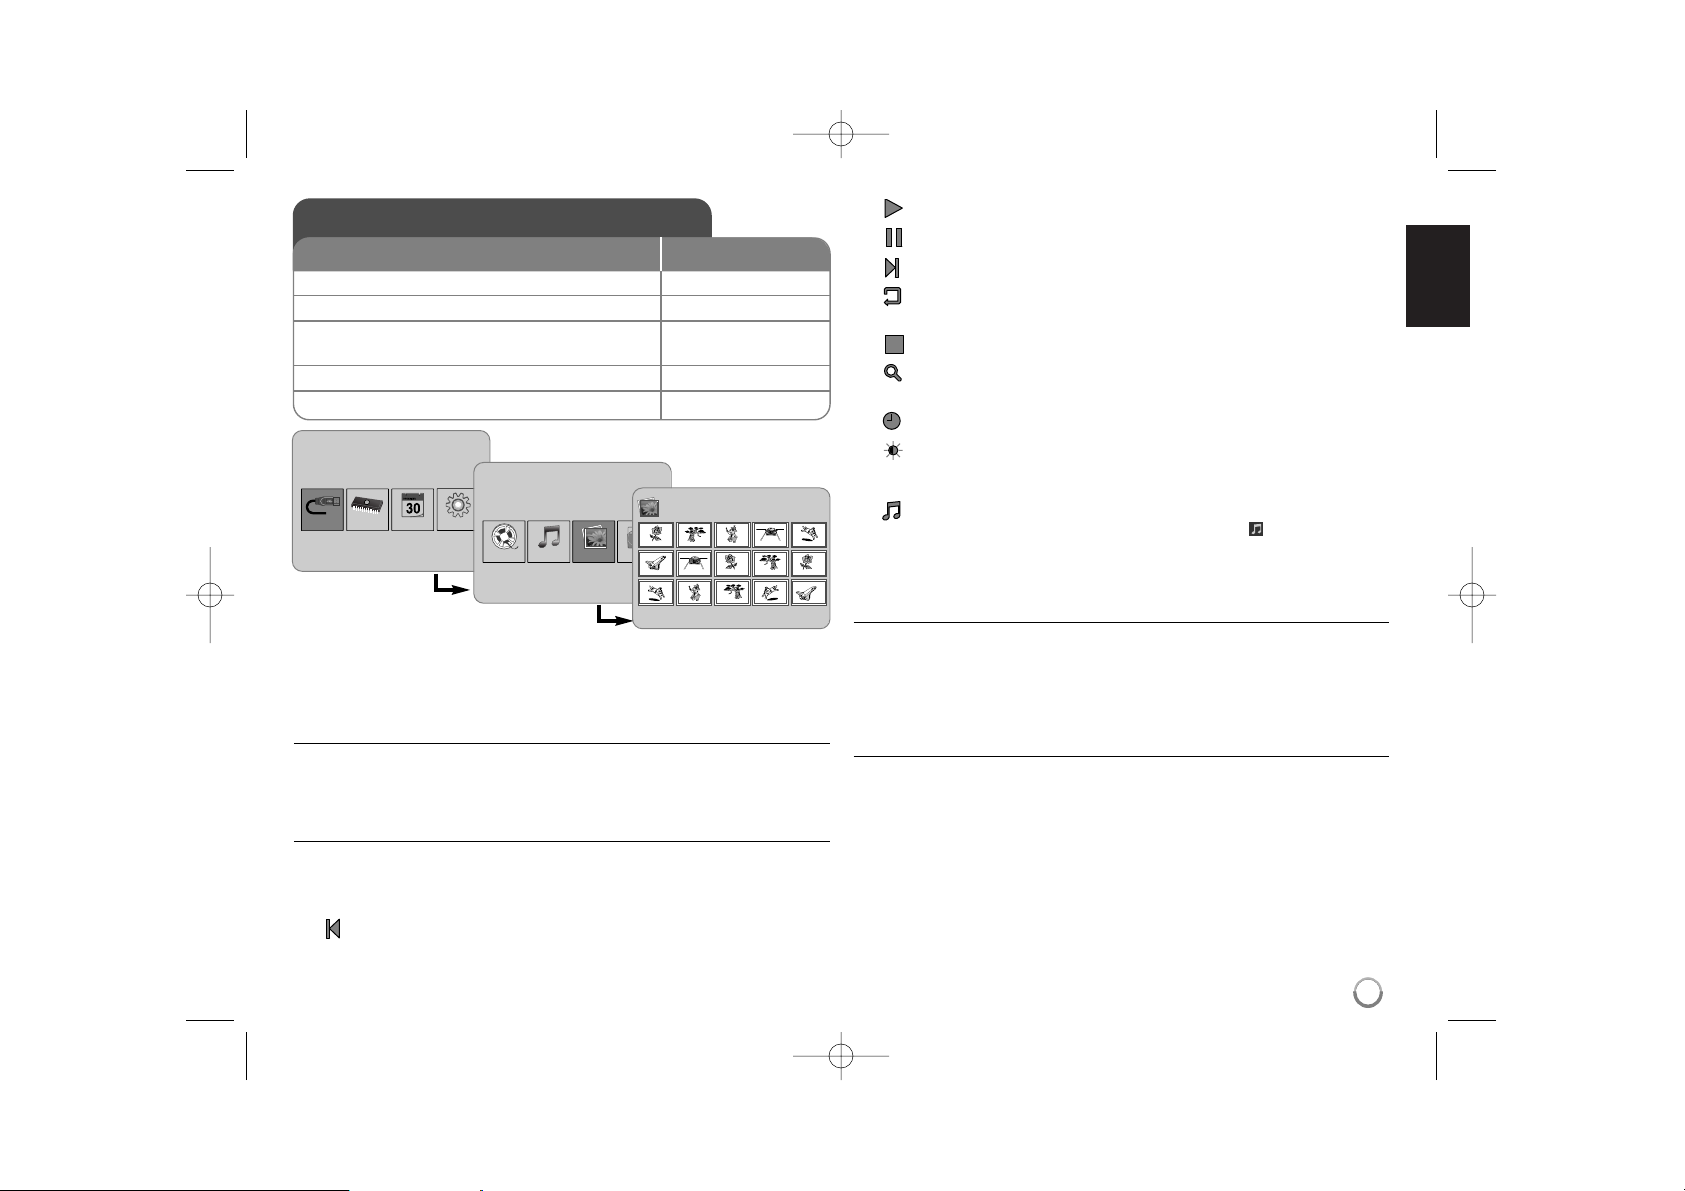
Viewing a Photo file - more you can do
Viewing photo files as a slideshow
On the [Photo] menu, use b VOLUME B and b PAGE B to select a photo file
then press NX to start the slideshow. Press NX to pause the slideshow temporarily, press again to exit pause mode.
Options during viewing a photo file in full screen
You can use various features during viewing a picture in full screen.
1. Press MENU to display the option menu.
2. Use b VOLUME B and ENTER to select an option and execute it.
To view the previous photo file.
To start the slideshow.
To pause the slideshow.
To view the next photo file.
To rotate the photo in 90 degrees clockwise. Press ENTER repeatedly
to select a degrees.
To stop viewing the photo in full screen and returns to [Photo] menu.
To enlarge the photo image. Press ENTER repeatedly to select a zoom
mode or normal mode.
To switch on or off the clock display.
To adjust the brightness of the screen. Press ENTER and the brightness menu will appear, and use b VOLUME B to adjust the brightness
then press ENTER.
You can listen to music during slideshow, if the current media contain
music and photo files together. Press ENTER and will appear lowerright side of the screen. To exit this function, press ENTER again.
3. Use MENU to exit the option menu.
Photo file requirement
JPEG file compatibility with this unit is limited as follows:
• File extensions: “.jpg”
• Photo size: Less than 8,000 x 8,000 (W x H) pixel (baseline)
Less than 100,000 pixel (progressive)
• Maximum Files/Media: Less than 650 recommended
Notes on JPEG file
• Lossless compression JPEG image files are not supported.
• Depending on the size and number of the JPEG files, it may take several
minutes to read the contents of the media.
Viewing a Photo file
1 Select a device on the [Device Menu]:
bb
VOLUME BB, ENTER
2 Select [Photo] on the [Media Menu]:
bb
VOLUME BB, ENTER
3 Select a photo file on the [Photo] menu:
bb
VOLUME BB,
bb
PAGE
BB
4 Display the selected file in full screen: ENTER, NX
5 To return to the [Photo] menu: BACK
BUTTON
Device Menu
USB-C Flash SetupCalendar
Media Menu
Movie
Music
Photo
File
Photo
1/2
DSC_0029.jpg 2007/11/22 12:00:00
PF391P-P-AFRALLW-ENG 11/19/07 4:31 PM Page 9
Page 10
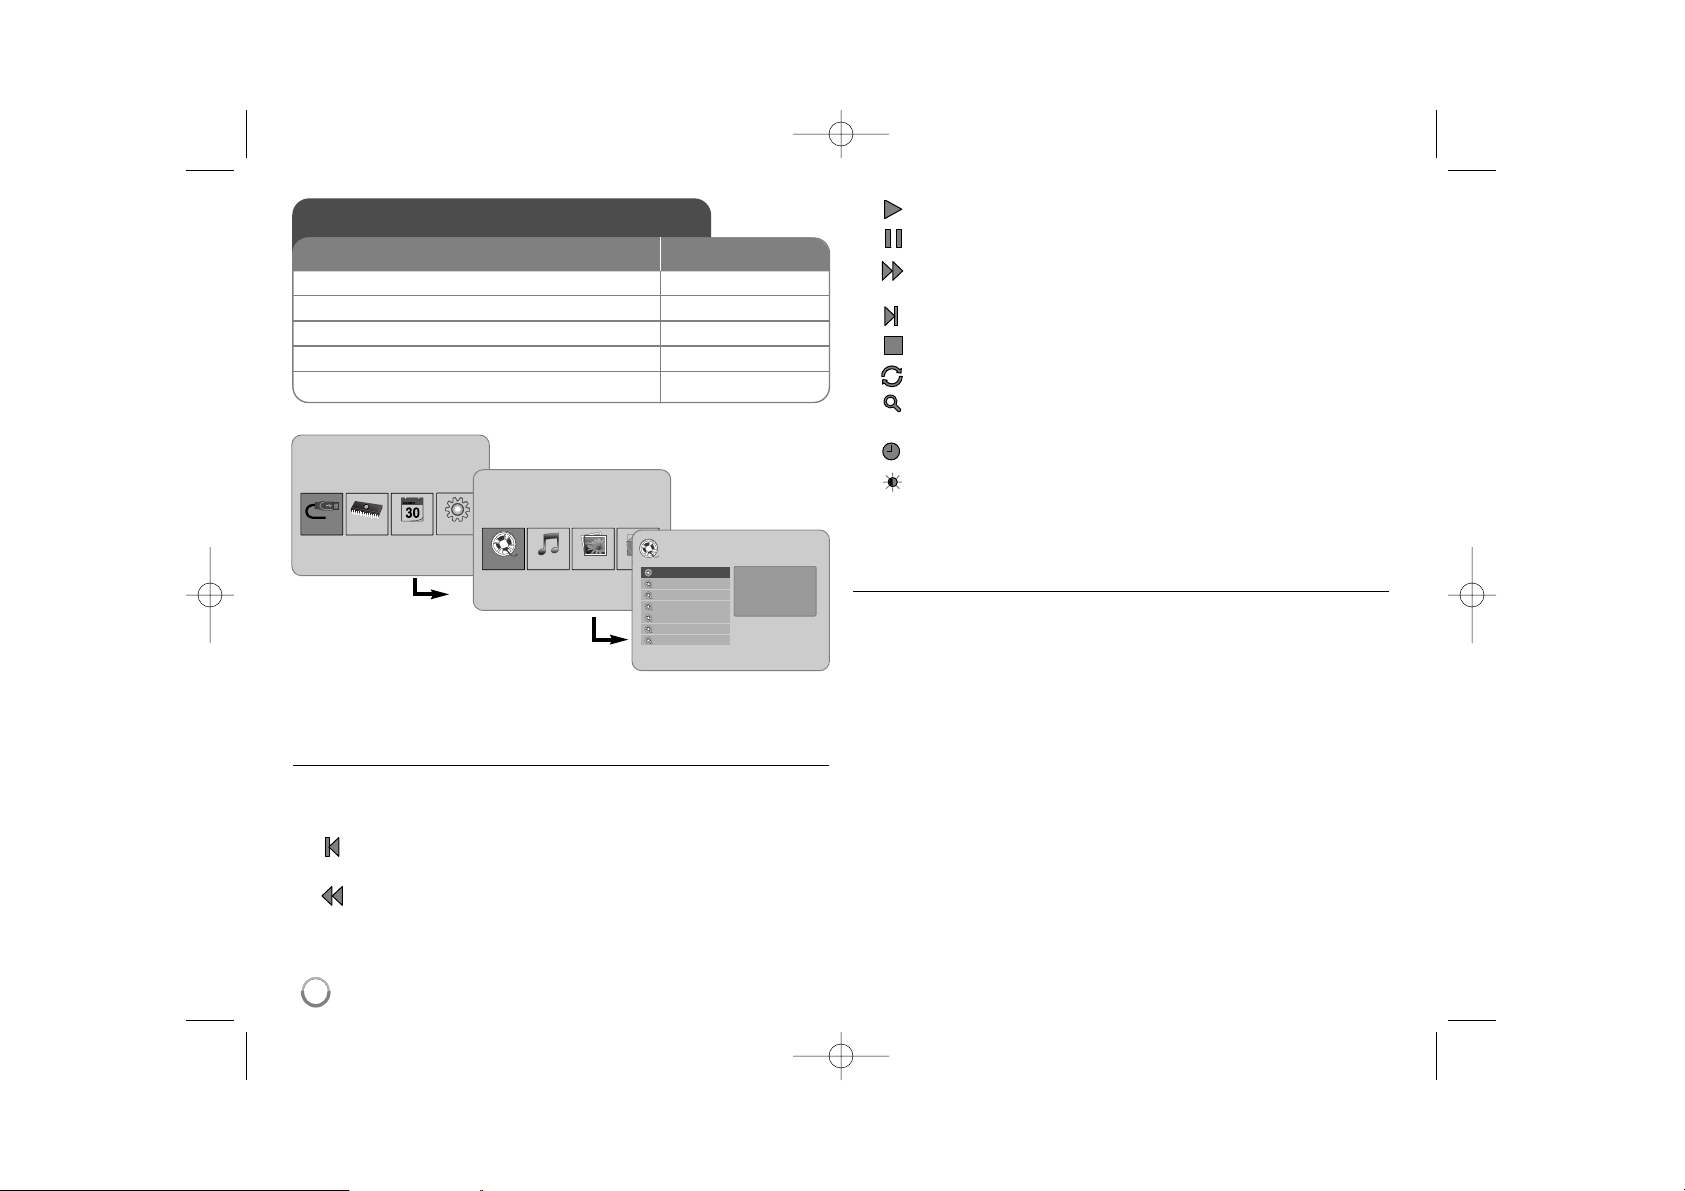
Playing a Movie file - more you can do
Options during playing a movie file
You can use various features during playing a movie file.
1. Press MENU to display the option menu during playback.
2. Use b VOLUME B and ENTER to select an option and execute it.
To return to the beginning of the current file. Press ENTER twice briefly
to play the previous movie file.
To play fast reverse during playback. To change the various playback
speed, press ENTER repeatedly.
To start playback.
To pause playback.
To play fast forward during playback. To change the various playback
speed, press ENTER repeatedly.
To play the next movie file.
To stop playback and returns to [Movie] menu.
To select a repeat mode (TRACK, ALL, OFF).
To enlarge the video image. Press ENTER repeatedly to select a zoom
mode or normal mode.
To switch on or off the clock display.
To adjust the brightness of the screen. Press ENTER and the brightness control menu will appear, and use b VOLUME B to adjust the
brightness then press ENTER.
3. Use MENU to exit the option menu.
Movie file requirement
Movie file compatibility with this unit is limited as follows:
• Available resolution size: 720x576 (W x H) pixel.
• Bit rate: Less than 15 Mbps
• Movie file extensions: “.avi”, “.mpg”, “.mpeg”
• This unit does not support to display the subtitle of the movie file.
• Playable Codec format: “MPEG1”, “MPEG2”, “MJPEG”
• Playable Audio format: “MPEG1”, “MPEG2”, “MPEG3”, “PCM”
• “Not Support” will appear on the screen if the movie file is not playable.
• Maximum Files/Media: Less than 650 recommended
10
Playing a Movie file
1 Select a device on the [Device Menu]:
bb
VOLUME BB, ENTER
2 Select [Movie] on the [Media Menu]:
bb
VOLUME BB, ENTER
3 Select a movie file on the [Movie] menu:
bb
PAGE
BB
4 Start playback: ENTER, NX
5 To return to the [Movie] menu: BACK
BUTTON
Device Menu
USB-C Flash SetupCalendar
Media Menu
Movie
Music
Photo
File
Movie
Movie 1.avi
Movie 2.avi
Movie 3.avi
Movie 4.avi
Movie 5.avi
Movie 6.avi
Movie 7.avi
File Name Movie 1.avi
File Size 14MB
File Type AVI
PF391P-P-AFRALLW-ENG 11/19/07 4:31 PM Page 10
Page 11

11
Playing a Music file - more you can do
Options during playing a music file
You can use various features during playing a music file.
1. Press MENU to display the option menu during playback.
2. Use b VOLUME B and ENTER to select an option and execute it.
To return to the beginning of the current file. Press ENTER twice briefly
to play the previous movie file.
To play fast reverse during playback. To change the various playback
speed, press ENTER repeatedly.
To start playback.
To pause playback.
To play fast forward during playback. To change the various playback
speed, press ENTER repeatedly.
To play the next music file.
To stop playback.
To select a repeat mode. (TRACK, ALL, OFF)
3. Use MENU to exit the option menu.
Music file requirement
• File extensions: “.mp3”
• Sampling frequency: 8 - 48 kHz (Layer 1, Layer 2, Layer 3, MPEG 2.5),
8 - 96 kHz (PCM)
• Bit rate: 32 - 448 kbps (Layer 1), 32 - 384 kbps (Layer 2),
32 - 320 kbps (Layer 3), 8 - 160 kbps (MPEG 2.5)
• Maximum Files/Media: Less than 650 recommended
Playing a Music file
1 Select a device on the [Device Menu]:
bb
VOLUME BB, ENTER
2 Select [Music] on the [Media Menu]:
bb
VOLUME BB, ENTER
3 Select a music file on the [Music] menu:
bb
PAGE
BB
4 Start playback: ENTER, NX
5 To return to the [Media Menu]: BACK
BUTTON
Device Menu
USB-C Flash SetupCalendar
Media Menu
Movie
Music
Photo
File
Music
Music 01.mp3
Music 02.mp3
Music 03.mp3
Music 04.mp3
Music 05.mp3
Music 06.mp3
Music 07.mp3
File Name Music 01.mp3
File Size 3MB
File Type MP3
PF391P-P-AFRALLW-ENG 11/19/07 4:31 PM Page 11
Page 12

12
Using a File menu - more you can do
Using [File] menu
• You can view a list of folders and files in the current media.
• You can delete or copy a file(s) in the current media.
To display a list of subfolders and files
Use b PAGE B to select a folder then press ENTER. The list of the files and
subfolders within the folder. Press BACK to move to the upper folder.
To select multiple files on the [File] menu
You can select not only single file but also multiple files using
VOLUME B
button. Press VOLUME B at the desired files to select multiple files.
To delete a file(s) using the [File] menu
1. Select a file then press VOLUME B and “B” appear on the right of the file
name.
2. Repeat step 1 if you need to select multiple files.
3. Press ENTER and the option menu will appear.
4. Use b PAGE B to select [Delete>] option then press ENTER.
The confirm menu will appear.
5. Use b VOLUME B to select [Yes] then press ENTER and the file will be
deleted from the current media.
6.
When the deleting is completed,
press ENTER to finish.
To copy a file(s) from the current media to another media
1. Select a file then press VOLUME B and “B” appear on the right of the file
name.
2. Repeat step 1 if you need to select multiple files.
3. Press ENTER and the option menu will appear.
4. Use b PAGE B to select [Copy >] option then press ENTER.
5. Use b PAGE B to select a media that you would like to copy to.
The free space of the selected media will be displayed on the upper-right
side of the [File] menu.
6. Use b VOLUME B and b PAGE B to select a folder that you would like
to copy to.
- Press VOLUME B to move to a subfolder.
- Press b VOLUME to move to a upper folder.
7. Press ENTER. The files will be copied to the selected media or folder.
8.
When the copying is completed,
press ENTER to finish.
Using a File menu
1 Select a device on the [Device Menu]:
bb
VOLUME BB, ENTER
2 Select [File] on the [Media Menu]:
bb
VOLUME BB, ENTER
3 Select a file on the [File] menu:
bb
PAGE
BB
4 To return to the previous screen: BACK
BUTTON
Device Menu
USB-C Flash SetupCalendar
Media Menu
Movie
Music
Photo
File
File
D:/
Folder 1
Folder 2
Movie 02.mov
Music 04.mp3
Photo 07.jpg
Photo 09.jpg
Modify Date 22 / 11 / 2007
File type Folder
PF391P-P-AFRALLW-ENG 11/19/07 4:31 PM Page 12
Page 13

13
Viewing the Calendar - more you can do
Using [Calendar] menu
• You can view the current time and date with slideshow.
• You can change the month and year using b VOLUME B and b PAGE B.
• You can view the alarm information.
Viewing the Calendar
1 Select [Calendar] on the [Device Menu]:
bb
VOLUME BB, ENTER
2 Select a month:
bb
VOLUME
BB
3 Select a year:
bb
PAGE
BB
4 To return to the [Device Menu] menu: BACK
BUTTON
Device Menu
USB-C Flash SetupCalendar
SUN MON TUE WED THU FRI SAT
PF391P-P-AFRALLW-ENG 11/19/07 4:31 PM Page 13
Page 14

14
PC Connection (USB) - more you can do
Connecting a PC
Connect the unit to your PC using an optional USB cable. Upon connection:
• Your PC will automatically recognize any memory cards installed in the unit.
An icon representing your installed memory cards will appear as
“PF39 Memory” (Internal memory) and “Removable Disks” (External memory
card) when you open “My Computer”.
• It may take Windows several minutes to recognize and set up the device the
first time it is connected depending on your hardware configuration.
• Plug and Play Support: Windows 2000/ME/XP
• PC monitor image will appear on the screen when the unit is connected to
PC and you cannot use any buttons on the unit (Except 11BAT. and P-SAVE
buttons).
Transferring Files
The USB 2.0 High-Speed connection makes it easy to transfer music, video, or
photo files (or any other data) quickly between the unit and PC.
Simply use the unit as you would a USB Flash Drive using basic operating system commands.
Important Notice:
• If you need further assistance with transferring files, please refer to your
operating system’s instruction manual or on-screen help.
• Do not disconnect or otherwise interrupt the unit during transmission - this
could damage or corrupt the unit’s firmware or your files.
• If you want to format the internal memory of the unit using PC, you must
format it with FAT file system.
Double-click the “My Computer” icon on your desktop and then double-click the
“PF39 Memory” or “Removable Disks” icon that corresponds with the unit’s
internal or external memory card.
Drag your media files (or other files) to the “PF39 Memory” or “Removable
Disks”.
• You may choose to use folders/subfolders to organize your media and data.
Disconnecting from a PC
Disconnect the unit as instructed below to prevent data loss or file/firmware corruption.
1. Double-click the green arrow in the task bar located on the lower-right side
of the PC screen (Safely Remove Hardware).
2. Safely Remove Hardware: Select “USB Mass Storage Device” from the list
that appears and then click on “Stop”.
Stop a Hardware Device: Select “USB Mass Storage Device” from the list
that appears and then click on “OK”.
3. When the “Safe to Remove Hardware” window appears, click the OK button
and disconnect the USB cable from the unit and your PC.
PC Connection (USB)
1 Connect the unit and PC: –
2 Turn on the unit: 1 BAT.
3 Transfer Files: –
BUTTON
USB Cable
PF391P-P-AFRALLW-ENG 11/19/07 4:31 PM Page 14
Page 15

15
Power Supply DC 12 V, 2 A
Power consumption 10 W
Operating time on battery: Approx. 1 hour
Set dimensions (W x H x D) 213 x 147 x 103.5 mm with stand
Net Weight 630g
Operating temperature 5˚C to 45˚C
Operating humidity 5 % to 90 %
Display Type 8” Wide (Full-Color TFT LCD)
Viewing area: 7.18”
Display Resolution 800 x 480 (WVGA)
Internal Memory Flash Memory (256MB*)
Memory Card Slot 1 slot for SD/MMC/MS Card
Interface USB 2.0 High-Speed (device)
Plug and Play Support Windows 2000/ME/XP
* The 21MB is assigned for the unit’s software.
Accessory
• AC Adapter (MPA-630)
• USB Adapter Cable
• USB Cable
• Detachable Stand
• 3 different changeable faceplate
Specifications
Troubleshooting
The power does not turned on.
b Ensure that the power cord has been properly connected to the power outlet.
The sound quality of the music is poor.
b Try playing the file on your PC. If the sound quality is still poor, try downloading the file
again or re-encoding the file yourself.
b Ensure that the bit rate of the file is not too low. The higher the bit rate of the file, the
better it will sound. Refer to “
Music file requirement”
on page 11.
Cannot transfer files to the unit from your PC.
b Ensure that your PC is running a supported operating system.
b Ensure that the USB cable is securely attached to the unit and the PC.
b If you have connected the unit through a USB hub, try connecting the unit directly to
your PC.
b Ensure that the capacity of the memory cards installed in the unit.
Cannot select a memory card.
b Ensure that a memory card has been installed.
b Ensure that the memory card is properly installed.
b Ensure that the memory card is not defective.
Cannot copy files to a target location.
b Ensure that the target media has enough memory to contain the file.
The unit will not play a music file.
b Ensure that the file is in a compatible format (MP3). Refer to “
Music file requirement”
on page 11.
The unit will not play a video file.
b Ensure that the video file is available on the unit. Refer to “
Movie file requirement”
on
page 10.
There is no sound.
b Ensure that the volume has been set to a reasonable level.
The unit has malfunctioned.
b Press 1 BAT. button to turn off the unit then turn the unit back on.
• Designs and specifications are subject to change without prior
notice.
PF391P-P-AFRALLW-ENG 11/19/07 4:31 PM Page 15
Page 16

PF391P-P-AFRALLW-ENG 11/19/07 4:31 PM Page 16
Page 17

PF391
P/NO : MFL42173816(R1)
FRANÇAIS
PF391P-P-AFRALLW-FRE 11/19/07 4:32 PM Page 1
Page 18

2
AVERTISSEMENT: POUR RÉDUIRE LES RISQUES DE CHOC ÉLECTRIQUE. NE
PAS RETIRER LE COUVERCLE (NI LE PANNEAU ARRIÈRE). AUCUNE PIÈCE
INTERNE NE PEUT ÊTRE RÉPARÉE PAR L’UTILISATEUR. L’ENTRETIEN DE
L’APPAREIL DOIT ÊTRE EFFECTUÉ PAR UN TECHNICIEN QUALIFIÉ.
Ce symbole représentant un éclair dans un triangle équilatéral est destiné à
alerter l’utilisateur de la présence d’une tension dangereuse non isolée dans
le boîtier du produit suffisamment importante pour présenter un risque de
choc électrique.
Ce symbole représentant un point d’exclamation dans un triangle équilatéral
est destiné à alerter l’utilisateur de la présence d’importantes instructions
d’utilisation et d’entretien dans la documentation accompagnant le produit.
AVERTISSEMENT: POUR PRÉVENIR TOUT INCENDIE OU RISQUE
D’ÉLECTROCUTION, NE PAS EXPOSER CE PRODUIT À LA PLUIE OU À
L’HUMIDITÉ.
AVERTISSEMENT: Ne pas installer l’équipement dans un espace confiné tel qu’une
bibliothèque ou un meuble similaire.
AVERTISSEMENT: Ne pas bloquer les orifices d’aération. Installer le produit
conformément aux instructions du fabricant. Les fentes et ouvertures aménagées
dans le boîtier sont prévues pour la ventilation, elles assurent un fonctionnement
fiable du produit et le protègent des surchauffes. Lorsque le produit est placé sur un
lit, un sofa, un tapis ou une surface similaire, veiller à ne jamais bloquer les
ouvertures. Ce produit ne doit pas être installé dans un meuble encastré, tel qu’une
bibliothèque ou une étagère à moins qu’une aération adéquate ne soit prévue ou que
l’installation respecte les instructions du fabricant.
AVERTISSEMENT: Ne pas exposer l’appareil à l’eau (aux gouttelettes ou aux
éclaboussures), ne pas placer de récipients contenant des liquides (tels que des
vases) sur l’appareil.
AVERTISSEMENT concernant le cordon d’alimentation.
La plupart des appareils exigent un circuit spécialisé;
Autrement dit, il ne doivent pas être raccordés à un bloc multiprise mais doivent être
directement branchés à une prise de courant murale.
Reportez-vous à la page des spécifications de ce manuel de l’utilisateur pour plus
d’informations. Ne surchargez pas les prises murales. Les prises murales
surchargées, lâches, ou endommagées, les rallonges, les cordons d’alimentation
effilochés, ou encore les fils isolants endommagés ou craquelés sont dangereux.
Chacune de ces conditions peut provoquer un incendie ou une décharge électrique.
Examinez périodiquement le cordon d’alimentation de votre appareil, et s’il présente
des signes de faiblesse, débranchez-le, et n’utilisez plus l’appareil tant que le cordon
d’alimentation n’aura pas été remplacé par une pièce de rechange originale obtenue
auprès d’un centre de service agréé. Protégez le cordon d’alimentation des
contraintes physiques ou mécaniques (torsion, nœud, pincement, coincement,
écrasement, piétinement…). Faites particulièrement attention aux fiches, prises de
courant, et à l’endroit où le cordon sort de l’appareil. Pour débrancher le cordon du
secteur, retirez la fiche du cordon d’alimentation. Lorsque vous installez le produit,
assurez-vous que la fiche soit facilement accessible.
Mise au rebut de votre ancien appareil
1. Le symbole représentant une poubelle sur roulette barrée d’une croix
indique que le produit est couvert par la directive européenne 2002/96/EC.
2. Les composants électriques et électroniques doivent faire l’objet d’un tri
avant d’être éliminés: ils doivent être jetés non pas dans les déchetteries
municipales mais dans les systèmes de récupération adaptés mis à
disposition par les autorités locales ou gouvernementales (administration
publique).
3. L’élimination correcte de votre vieil appareil aidera à prévenir les effets
négatifs sur l’environnement et la santé humaine des substances nocives
contenues dans les composants.
4. Pour des informations plus détaillées concernant la mise au rebut de votre
ancien appareil, veuillez contacter le bureau de votre municipalité, le
service de collecte des déchets, ou le magasin où vous avez acheté le
produit.
Ce produit a été conçu pour satisfaire aux directives européennes
2004/108/EC, et 2006/95/EC.
Consignes de sécurité
AVERTISSEMENT
RISQUE D’ÉLECTROCUTION
NE PAS OUVRIR
PF391P-P-AFRALLW-FRE 11/19/07 4:32 PM Page 2
Page 19

3
Sommaire
Consignes de sécurité . . . . . . . . . . . . . . . . . . . . . . . . . . . . . . . . . . . . . . . . . .2
Sommaire . . . . . . . . . . . . . . . . . . . . . . . . . . . . . . . . . . . . . . . . . . . . . . . . . . .3
Caractéristiques . . . . . . . . . . . . . . . . . . . . . . . . . . . . . . . . . . . . . . . . . . . . . . .3
Vue d’ensemble de l’unité . . . . . . . . . . . . . . . . . . . . . . . . . . . . . . . . . . . . . . .4
Démarrage rapide . . . . . . . . . . . . . . . . . . . . . . . . . . . . . . . . . . . . . . . . . . . . .5
• Insertion ou retrait d’une carte mémoire . . . . . . . . . . . . . . . . . . . . . . . . . .5
• Connexion d’un dispositif USB . . . . . . . . . . . . . . . . . . . . . . . . . . . . . . . . .5
• Connexion du cordon d’alimentation . . . . . . . . . . . . . . . . . . . . . . . . . . . .6
• Allumage et extinction de l’unité . . . . . . . . . . . . . . . . . . . . . . . . . . . . . . .6
• Mode d’économie d’énergie . . . . . . . . . . . . . . . . . . . . . . . . . . . . . . . . . . .6
• Installation du bras de support . . . . . . . . . . . . . . . . . . . . . . . . . . . . . . . . .6
• Utilisation du menu de gestion des dispositifs . . . . . . . . . . . . . . . . . . . . .7
Réglage des paramètres . . . . . . . . . . . . . . . . . . . . . . . . . . . . . . . . . . . . . . .7-8
Affichage d’un fichier photos . . . . . . . . . . . . . . . . . . . . . . . . . . . . . . . . . . . . .9
Lecture d’un fichier vidéo . . . . . . . . . . . . . . . . . . . . . . . . . . . . . . . . . . . . . . .10
Lecture d’un fichier audio . . . . . . . . . . . . . . . . . . . . . . . . . . . . . . . . . . . . . . .11
Gestion du menu fichiers . . . . . . . . . . . . . . . . . . . . . . . . . . . . . . . . . . . . . . .12
Affichage du calendrier . . . . . . . . . . . . . . . . . . . . . . . . . . . . . . . . . . . . . . . .13
Raccordement d’un PC (USB) . . . . . . . . . . . . . . . . . . . . . . . . . . . . . . . . . . .14
Dépannage . . . . . . . . . . . . . . . . . . . . . . . . . . . . . . . . . . . . . . . . . . . . . . . . .15
Caractéristiques techniques . . . . . . . . . . . . . . . . . . . . . . . . . . . . . . . . . . . .15
Caractéristiques
• Gallerie d’image Live:
Haute résolution et profondeur numérique des couleurs grâce au grand écran
LCD
• Dispositif d’économie d’énergie:
Mise en veille de l’unité quasi instantanée (1 sec.), 15 fois plus rapide que
l’extinction/allumage.
• Album numérique portable:
Partagez vos souvenirs grâce à la batterie intégrée assurant une plus grande
mobilité.
• Visionneuse:
Consultation facile des photos via le lecteur de carte mémoire et le port USB.
• Stockage de 2000 photos:
Grâce à la mémoire flash intégrée, d’une capacité de 256MB, conservez vos
précieux souvenirs (jusqu’à 2000 photos).
• Calendrier numérique & réveil:
Pour des programmations efficaces.
• Explorateur de photos pratique:
Interface de navigation agréable et ergonomique pour un accès rapide à vos
souvenirs numérisés.
• Ensemble personnalisable Premium
3 plateaux intercangeables différents pour adapter l’aspect de l’unité à votre
style d’intérieur.
PF391P-P-AFRALLW-FRE 11/19/07 4:32 PM Page 3
Page 20

4
Vue d’ensemble de l’unité
a Écran LCD
b Cadre (interchangeable)
Les 4 coins du plateau sont magnétiques, afin de pouvoir le fixer ou le
détacher facilement.
c 1 BAT. (bouton d’alimentation et témoin de charge de la batterie)
Allumage/extinction de l’unité et affichage de l’état de la batterie.
Le voyant est rouge pendant la recharge de la batterie.
Le voyant est vert lorsque la batterie est totalement chargée.
d P-SAVE (économie d’énergie)
Pour basculer en mode veille ou quitter le mode veille.
e MENU
Pour afficher le menu ou le quitter.
f b VOLUME B
Bouton de réglage du volume de l’unité. Pour régler le volume, appuyez sur
VOLUME (b ou B) en maintenant appuyé durant la lecture d’un fichier
audio ou vidéo.
Boutons Gauche/Droit de sélection d’un élément du menu.
g b PAGE B
Appuyez deux secondes sur ce bouton pour passer à la page précédente
ou à la page suivante dans le menu [Photo], [Film] ou [Musique].
Bouton Haut/Bas de sélection d’un élément du menu.
h ENTER
Pour sélectionner une option ou exécuter une commande.
i ROTATE
Pour faire tourner la photo dans le sens inverse des aiguilles d’une montre
(en plein écran).
j BACK
Pour revenir au menu ou à l’écran précédent.
k NX
Pour lancer la lecture. Appuyez pour l’arrêter provisoirement; appuyez de
nouveau pour la reprendre.
l Connecteur USB
Pour raccorder un dispositif USB par l’intermédiaire du câble adaptateur
USB fourni.
m Ouverture pour carte mémoire
Introduisez une carte mémoire (SD, MMC ou MS) dans cette ouverture.
n Entrée DC 12V
Brancher l’adaptateur AC fourni avec l’unité.
cd e f
nml
b
a
g
h
i
j
k
PF391P-P-AFRALLW-FRE 11/19/07 4:32 PM Page 4
Page 21

5
Démarrage rapide
Insertion ou retrait d’une carte mémoire
Introduisez une carte mémoire dans l’ouverture prévue à cet effet.
Pour extraire ensuite la carte mémoire, appuyez au centre de celle-ci puis
retirez-la avec précaution.
Cartes prises en charge par l’unité
• Secure Digital Card (SD)
• Multi Media Card (MMC)
• Memory Stick (MS)
• Cartes compatibles avec le système de fichier FAT 12, FAT 16, ou FAT 32.
• Utilisez uniquement les cartes recommandées mentionnées ci-dessus.
• Respectez le sens d’insertion de la carte ; ne pas forcer.
La carte rentre sans difficulté si le sens d’insertion est respecté.
• Certaines cartes peuvent ne pas fonctionner avec cette unité.
• Ne retirez pas une carte lorsque celle-ci est en cours d’utilisation (durant un
processus de lecture, copie, etc.).
Protection en écriture
Il est impossible d’écrire, formater ou effacer le contenu des cartes munies d’un
dispositif de protection en écriture si ce dispositif est activé.
Connexion d’un dispositif USB
Connectez la petite extrêmité du câble adapteur USB au port USB de l’unité.
Connectez un dispositif USB à l’autre bout du câble. Utilisez au besoin une
rallonge USB.
• Cette unité supporte uniquement les dispositifs USB formatés en FAT16 ou
FAT32.
• Ne retirez pas le dispositif USB s’il est en cours d’utilisation (lecture, copie,
etc.).
• Dispositif USB: tous les dispositifs prenant en charge les USB 1.1 et 2.0
(par exemple: dispositif USB à mémoire flash, lecteur de carte mémoire,
appareil photo numérique, etc.)
• Les dispositifs USB nécessitant l’installation de programmes
supplémentaires une fois connectés au PC ne sont pas pris en charge.
Dispositif USB à
mémoire flash
(Par exemple)
Câble adaptateur USB
Port USB
SD
or or
MMC
MS
ou
ou
PF391P-P-AFRALLW-FRE 11/19/07 4:32 PM Page 5
Page 22

6
Connexion du cordon d’alimentation
Branchez le cordon d’alimentation fourni avec l’unité à une prise électrique.
Adaptateur AC
• Cet adaptateur AC fonctionne en 100-240V~ 1A 50/60Hz.
• Contactez un électricien ou un revendeur de composants électriques si vous
avez besoin d’aide pour sélectionner le bon transformateur ou cordon AC.
• Fabriqué par WANLIDA GROUP CO., LTD
Batterie rechargeable
• La batterie rechargeable interne vous permet de profiter de l’appareil et de
lire les fichiers sans le cordon d'alimentation.
• La batterie rechargeable se recharge seulement lorsque l’unité est éteinte et
que l’adaptateur est branché à une prise électrique.
• Le chargement est interrompu si vous allumez l’unité.
• Le chargement prend environ 2 heures.
• Le témoin de charge 1 BAT. est rouge lors du chargement. Lorsque le
chargement est terminé, le témoin passe au vert.
• Lorsqu'il reste moins de 10 minutes de charge de la batterie, “ ” apparaît
à l'écran et le voyant 1 BAT. clignote.
Allumage et extinction de l’unité
Pour allumer l'appareil, maintenez appuyée la touche 1 BAT. pendant
2 secondes.
Le diaporama de démo démarrera puis le [Menu Appareil] apparaîtra.
Appuyez sur n'importe quelle touche pour sauter le diaporama de démo.
Les images de démo sont sauvegardées dans la mémoire interne et vous ne
pouvez ni les modifier ni les effacer.
Appuyez de nouveau sur 1 BAT. pour éteindre l'appareil.
Mode d’économie d’énergie
Vous pouvez mettre l'appareil en mode économie d'énergie.
Appuyez sur P-SAVE et l'écran LCD s'éteint. Pour quitter le mode économie
d'énergie, appuyez sur P-SAVE ou 1 BAT.
Installation du bras de support
Fixez le bras de support amovible à l’arrière de l’unité comme illustré montré
ci-après.
Vers connecteur « DC 12V IN »
Fixez le cordon d’alimentation au corps de l’adaptateur
AC.
Bouton de libération
du cordon
d’alimentation
Vers la sortie
AC
PF391P-P-AFRALLW-FRE 11/19/07 4:32 PM Page 6
Page 23

7
Utilisation du menu de gestion des dispositifs
Le menu de gestion des dispositifs apparaît lorsque l’unité est mise en marche.
Vous pouvez afficher le menu en appuyant plusieurs fois sur BACK.
Utilisez le bouton b VOLUME B pour sélectionner une option du menu puis
appuyez sur ENTER.
• USB-C ..... USB-Z
Vous pouvez lire le(s) fichier(s) du dispositif USB.
• SD/MMC/MS
Vous pouvez lire le(s) fichier(s) d’une carte mémoire externe.
• Flash
Vous pouvez lire le(s) fichier(s) d’une carte mémoire interne.
• Calendrier
Vous pouvez visualiser la date actuelle, les informations d’alarme/réveil à
partir de l’écran du calendrier.
• Config.
Vous pouvez modifier les paramètres de l’unité du menu de [Config.].
Réglage des paramètres - options avancées
Pour afficher le menu de [Config.]
Utilisez b VOLUME B pour sélectionner l’option [Config.] dans le menu de
gestion des dispositifs puis appuyez sur ENTER.
[Langue]
Sélectionnez la langue du menu de configuration et de l’affichage écran.
[Heure Diaporama]
Spécifiez ici la durée d’affichage de chacune des images du diaporama:
3 sec., 5 sec., 15 sec., 1 min., 15 min., 1 heure.
Menu Appareil
USB-C Flash Config.Calendrier
Menu Appareil
USB-C Flash Config.Calendrier
Config.
Langue
Heure Diaporama 5s:
Mode Diaporama Aléatoire:
Mode Affichage Normal:
Format heure 24h:
Heure 2007 / 11 / 22 21 : 17:
Marche 2007 / 11 / 22 00 : 00 Arrêt:
Arrêt auto 2007 / 11 / 22 00 : 00 Arrêt:
Alarme 00 : 00 Ring1 Arrêt:
Défaut Réinitialiser:
Français
Réglage des paramètres
1 Sélectionnez [Config.] dans le
bb
VOLUME BB, ENTER
[Menu Appareil]:
2 Sélectionnez l’option souhaitée:
bb
PAGE
BB
3 Modifiez le paramètre:
bb
VOLUME
BB
BOUTON
PF391P-P-AFRALLW-FRE 11/19/07 4:32 PM Page 7
Page 24

[Mode Diaporama]
Spécifiez le style de transition à appliquer pour agrémenter le diaporama;
Aléatoire, Fondu, Arrêt, Bas-vers le-haut, Haut-vers le-bas, Gauche-à-droite,
Droite-à-gauche, Fermer-Porte, Ouvrir-Porte, Croiser-Hori (Croiser Horizontal),
Croiser-Vert (Croiser Vertical).
Si vous sélectionnez [Arrêt] les effets de transition (aucune transition), le
diaporama ne fonctionne pas et l’écran n’affiche qu’une image fixe.
[Mode Affichage]
Spécifiez le mode d’affichage du dossier de photos: Normal, Encastrer.
[Normal]: respecte les dimensions originales de l’image.
[Encastrer]: optimise l’image pour s’adapter aux dimensions de l’écran.
[Format heure]
Spécifiez le format d’affichage de la date et de l’heure ; 12h, 24h
[12h]: notation sur 12 heures + symboles am/pm pour distinguer le matin de
l’après-midi
[24h]: notation sur 24 heures sans les symboles am/pm
[Heure]
Réglez la date et l’heure de l’unité afin de pouvoir exploiter les différentes
caractéristiques de l’unité se basant sur la minuterie.
1. Sélectionnez l’option [Heure] puis appuyez sur VOLUME B.
2. Saisissez les informations nécessaires de date et d’heure.
b VOLUME B (gauche/droit): déplace le curseur sur la colonne
précédente ou suivante.
b PAGE B (haut/bas): change les paramètres à la position actuelle du
curseur.
3. Appuyez sur ENTER pour confirmer vos paramètres.
[Marche]
Spécifiez quand l’unité doit s’allumer automatiquement.
1. Sélectionnez l’option [Marche] puis appuyez sur VOLUME B.
2. Suivez l’étape 2 comme illustré plus haut à [Heure].
3. Choisissez la fréquence de répétition: [Arrêt], [Une fois] ou [Tous les jours].
Sélectionnez [Arrêt] si vous n’utilisez pas cette fonction.
4. Appuyez sur ENTER pour confirmer vos paramètres.
[Arrêt auto]
Spécifiez quand l’unité doit s’éteindre automatiquement.
1. Sélectionnez l’option [Arrêt auto] puis appuyez sur VOLUME B.
2. Suivez l’étape 2 comme illustré plus haut à [Heure].
3. Choisissez la fréquence de répétition; [Arrêt], [Une fois] ou [Tous les jours].
Sélectionnez [Arrêt] si vous n’utilisez pas cette fonction.
4. Appuyez sur ENTER pour confirmer vos paramètres.
[Alarme]
Réglez l’horloge pour utiliser la fonction alarme. Si réglez l’alarme, l’unité
s’allume automatiquement à l’heure définie et l’alarme sonne. Pour couper le
son de l’alarme, appuyez sur n’importe quel bouton de l’unité.
1. Sélectionnez l’option [Alarme] puis appuyez sur VOLUME B.
2. Saisissez les informations nécessaires.
b VOLUME B (gauche/droit): déplace le curseur sur la colonne
précédente ou suivante.
b PAGE B (haut/bas): change les paramètres à la position actuelle du
curseur.
3. Choisissez une sonnerie; [Ring1], [Ring2] ou [Ring3].
Par exemple, si vous sélectionnez [Ring2];
Sonnerie (1 min.) c Sourdine (15 sec.) c Sonnerie (1 min.) c
Sourdine (15 sec.) c Mode normal
4. Choisissez la fréquence de répétition; [Arrêt], [Une fois] or [Tous les jours].
Sélectionnez [Arrêt] si vous n’utilisez pas cette fonction.
[Arrêt]: la fonction alarme n’est pas activée.
[Une fois]: la fonction alarme est activée une fois seulement, après avoir
configuré l’alarme.
[Tous les jours]: la fonction alarme est activée tous les jours.
5. Appuyez sur ENTER pour confirmer vos paramètres.
[Défaut]
Rétablissez les paramètres par défaut de l’unité définis en usine.
Selectionnez l’option [Défaut] puis appuyez sur ENTER.
8
PF391P-P-AFRALLW-FRE 11/19/07 4:32 PM Page 8
Page 25

9
Affichage d’un fichier photos - options avancées
Affichage des photos en mode diaporama
Dans le menu [Photo], utilisez b VOLUME B et b PAGE B pour sélectionner
un fichier photos puis appuyez sur NX pour démarrer le diaporama. Appuyez
sur NX pour interrompre provisoirement le diaporama, rappuyez pour
reprendre le diaporama.
Options disponibles pendant l’affichage d’un fichier photos en plein
écran
Vous avez accès à plusieurs fonctions durant l’affichage d’une photo en plein
écran.
1. Appuyez sur MENU pour afficher les options disponibles.
2. Utilisez b VOLUME B et ENTER pour sélectionner une option et l’exécuter.
Pour afficher le fichier photo précédent.
Pour démarrer le diaporama.
Pour interrompre le diaporama.
Pour afficher le prochain fichier photo.
Pour faire pivoter la photo de 90° dans le sens des aiguilles d’une
montre. Appuyez plusieurs fois sur ENTER pour déterminer le nombre
de degrés.
Pour quitter l’affichage en mode plein écran et revenir au menu [Photo].
Pour agrandir une photo. Appuyez à plusieurs reprises sur ENTER
pour sélectionner le mode Zoom ou le mode Normal.
Pour activer / désactiver l’affichage de l’horloge.
Pour régler la luminosité de l’écran. Appuyez sur ENTER et le menu
correspondant apparaît, utilisez b VOLUME B pour régler la luminosité
puis appuyez sur ENTER.
Vous pouvez écouter de la musique pendant le diaporama si le média
actuel contient des fichiers photos et musicaux. Appuyez sur ENTER,
puis apparaît en bas à droite de l'écran. Pour quitter cette fonction,
rappuyez sur ENTER.
3. Utilisez le MENU pour quitter le menu des options.
Type de fichier photo pris en charge
Cette unité prend en charge les fichiers JPEG suivants:
• Extension de fichier: « .jpg »
• Dimension des photos: moins de 8.000 x 8.000 (L x H) pixels (baseline)
Moins de 100.000 pixels (progressive)
• Nombre max. de fichiers/média: Moins de 650, recommandé
Remarques à propos des fichiers JPEG
• La compression sans perte n’est pas supportée.
• En fonction de la taille et du nombre de fichiers JPEG, l’accès au contenu
du média peut prendre plusieurs minutes.
Affichage d’un fichier photos
1 Sélectionnez un dispositif dans le
bb
VOLUME BB, ENTER
[Menu Appareil]:
2 Sélectionnez [Photo] dans le
bb
VOLUME BB, ENTER
[Menu Média]:
3 Sélectionnez un dossier photo dans le
bb
VOLUME BB,
menu [Photo]:
bb
PAGE
BB
4 Affichez le fichier sélectionné en mode ENTER, NX
plein écran:
5 Pour revenir au menu [Photo]: BACK
BOUTON
Menu Appareil
USB-C Flash Config.Calendrier
Menu Média
Film
Musique
Photo
Fichier
Photo
1/2
DSC_0029.jpg 2007/11/22 12:00:00
PF391P-P-AFRALLW-FRE 11/19/07 4:32 PM Page 9
Page 26

Lecture d’un fichier vidéo - options
avancées
Options disponibles pendant la lecture d’un fichier vidéo
Vous avez accès à plusieurs fonctions durant la lecture d’un fichier vidéo.
1. Appuyez sur MENU pour afficher les options disponibles durant la lecture.
2. Utilisez b VOLUME B et ENTER pour sélectionner une option et l’exécuter.
Pour revenir au début du fichier actuel. Appuyez deux fois brièvement
sur ENTER pour lire le fichier vidéo précédent.
Pour reculer rapidement durant la lecture. Pour modifier la vitesse de
lecture, appuyez plusieurs fois sur ENTER.
Pour lancer la lecture.
Pour interrompre provisoirement la lecture.
Pour avancer rapidement durant la lecture. Pour modifier la vitesse de
lecture, appuyez plusieurs fois sur ENTER.
Pour lire le prochain fichier vidéo.
Pour arrêter la lecture et revenir au menu [Film].
Pour choisir un mode de répétition (Piste, Tout, Arrêt)
Pour agrandir l'image vidéo. Appuyez à plusieurs reprises sur ENTER
pour sélectionner le mode Zoom ou le mode Normal.
Pour activer / désactiver l’affichage de l’horloge.
Pour régler la luminosité de l’écran. Appuyez sur ENTER et le menu
correspondant apparaît, et utilisez b VOLUME B pour régler la
luminosité puis appuyez sur ENTER.
3. Utilisez le MENU pour quitter le menu des options.
Type de fichier vidéo pris en charge
Cette unité prend en charge les fichiers vidéo suivants:
• Taille de résoluion disponible: 720 x 576 (L x H) pixels.
• Débit binaire: moins de 15 Mbps
• Extensions du fichier vidéo: « .avi », « .mpg », « .mpeg »
• Cette unité ne prend pas en charge l’affichage des sous-titres.
• Format vidéo: MPEG-1, MPEG-2, M-JPEG
• Format audio: MPEG-1, MPEG-2, MPEG-3, PCM
• Le message « Non Compatible » apparaît à l’écran si le fichier vidéo n’est
pas lisible.
• Nombre max. de fichiers/média: moins de 650, recommandé
10
Lecture d’un fichier vidéo
1 Sélectionnez un dispositif dans le
bb
VOLUME BB, ENTER
[Menu Appareil]:
2 Sélectionnez [Film] dans le [Menu Média]:
bb
VOLUME BB, ENTER
3 Sélectionnez un fichier vidéo dans le
bb
PAGE
BB
menu [Film]:
4 Lancez la lecture: ENTER, NX
5 Pour revenir au menu [Film]: BACK
BOUTON
Menu Appareil
USB-C Flash Config.Calendrier
Menu Média
Film
Musique
Photo
Fichier
Film
Film 1.avi
Film 2.avi
Film 3.avi
Film 4.avi
Film 5.avi
Film 6.avi
Film 7.avi
Nom Fichier Film 1.avi
Taille Fichier 14MB
Type Fichier AVI
PF391P-P-AFRALLW-FRE 11/19/07 4:32 PM Page 10
Page 27

11
Lecture d’un fichier audio - options
avancées
Options disponibles pendant la lecture d’un fichier audio
Vous avez accès à plusieurs fonctions durant la lecture d’un fichier audio.
1. Appuyez sur MENU pour afficher les options disponibles.
2. Utilisez b VOLUME B et ENTER pour sélectionner une option et
l’exécuter.
Pour revenir au début du fichier actuel. Appuyez deux fois brièvement
sur ENTER pour lire le fichier audio précédent.
Pour reculer rapidement durant la lecture. Pour modifier la vitesse de
lecture, appuyez plusieurs fois sur ENTER.
Pour lancer la lecture.
Pour interrompre provisoirement la lecture.
Pour avancer rapidement durant la lecture. Pour modifier la vitesse de
lecture, appuyez plusieurs fois sur ENTER.
Pour lire le prochain fichier audio.
Pour arrêter la lecture.
Pour choisir un mode de répétition. (Piste, Tout, Arrêt)
3. Utilisez le MENU pour quitter le menu des options.
Type de fichier audio pris en charge
• Extension de fichier: « .mp3 »
• Fréquence d’échantillonnage: 8 - 48 kHz (Layer 1, Layer 2, Layer 3,
MPEG 2.5), 8 - 96 kHz (PCM)
• Débit binaire: 32 - 448 kbps (Layer 1), 32 - 384 kbps (Layer 2),
32 - 320 kbps (Layer 3), 8 - 160 kbps (MPEG 2.5)
• Nombre max. de fichiers/média: moins de 650, recommandé
Lecture d’un fichier audio
1 Sélectionnez un dispositif dans le
bb
VOLUME BB, ENTER
[Menu Appareil]:
2 Sélectionnez [Musique] dans le
bb
VOLUME BB, ENTER
[Menu Média]:
3 Sélectionnez un fichier audio dans le
bb
PAGE
BB
menu [Musique]:
4 Lancez la lecture: ENTER, NX
5 Pour revenir au [Menu Média]: BACK
BOUTON
Menu Appareil
USB-C Flash Config.Calendrier
Menu Média
Film
Musique
Photo
Fichier
Musique
Musique 01.mp3
Musique 02.mp3
Musique 03.mp3
Musique 04.mp3
Musique 05.mp3
Musique 06.mp3
Musique 07.mp3
Nom Fichier Music 01.mp3
Taille Fichier 3MB
Type Fichier MP3
PF391P-P-AFRALLW-FRE 11/19/07 4:32 PM Page 11
Page 28

12
Gestion d’un menu fichiers - options
avancées
Utilisation du menu [Fichier]
• Vous pouvez afficher la liste des dossiers et des fichiers du média actuel.
• Vous pouvez effacer ou copier un ou plusieurs fichiers dans le média actuel.
Affichage de la liste des sous-dossiers et des fichiers
Utilisez le bouton b PAGE B pour sélectionner un dossier puis appuyez sur
ENTER. La liste des fichiers et des sous-dossiers du dossier apparaît. Appuyez
sur BACK pour aller sur le dossier supérieur.
Sélection multiple à partir du menu [Fichier]
Vous pouvez sélectionner non seulement un fichier mais également un
ensemble de fichiers avec le bouton VOLUME B. Appuyez sur VOLUME B en
sélectionnant les fichiers souhaités.
Suppression d’un ou de plusieurs fichiers depuis le menu [Fichier]
1. Sélectionnez un fichier et appuyez sur VOLUME B « B » apparaît à droite
du nom de fichier.
2. Répétez l’étape si vous devez sélectionner plusieurs fichiers.
3. Appuyez sur ENTER. Le menu des options apparaît.
4. Utilisez b PAGE B pour sélectionner l’option [Effacer >] puis appuyez sur
ENTER. Le menu de confirmation apparaît.
5. Utilisez b VOLUME B pour sélectionner [Oui] puis appuyez sur ENTER.
Le fichier est supprimé du média actuel.
6. Quand la suppression est effectuée, appuyez sur ENTER pour terminer.
Copier un ou plusieurs fichiers d’un média à l’autre.
1. Sélectionnez un fichier et appuyez sur VOLUME B « B » apparaît à droite
du nom de fichier.
2. Répétez l’étape 1 si vous devez sélectionner plusieurs fichiers.
3. Appuyez sur ENTER. Le menu des options apparaît.
4. Utilisez b PAGE B pour sélectionner l’option [Copier >] appuyez sur
ENTER.
5. Utilisez b PAGE B pour sélectionner un média que vous voulez copier.
L’espace libre du média sélectionné est affiché en haut à droite du menu
[Fichier].
6. Utilisez b VOLUME B et b PAGE B pour sélectionner un dossier vers
lequel vous souhaitez réaliser la copie.
- Appuyez sur VOLUME B pour passer à un sous-dossier.
- Appuyez sur b VOLUME pour revenir à un dossier supérieur.
7. Appuyez sur ENTER. Les fichiers seront copiés vers le média ou le dossier
sélectionné.
8. Quand la copie est effectuée, appuyez sur ENTER pour terminer.
Gestion du menu fichiers
1 Sélectionnez un dispositif dans le
bb
VOLUME BB, ENTER
[Menu Appareil]:
2 Sélectionnez [Fichier] dans le
bb
VOLUME BB, ENTER
[Menu Média]:
3
Sélectionnez un fichier dans le menu [Fichier]:bbPAGE
BB
4 Pour revenir à l’écran précédent: BACK
BOUTON
Menu Appareil
USB-C Flash Config.Calendrier
Menu Média
Film
Musique
Photo
Fichier
Fichier
D:/
Folder 1
Folder 2
Film 02.mov
Musique 04.mp3
Photo 07.jpg
Photo 09.jpg
Modifier Date 22 / 11 / 2007
Type Fichier Folder
PF391P-P-AFRALLW-FRE 11/19/07 4:32 PM Page 12
Page 29

13
Affichage du calendrier - options avancées
Utilisation du menu [Calendrier]
• Vous pouvez afficher la date et l’heure actuelles dans le diaporama.
• Vous pouvez changer le mois et l’année en utilisant les boutons
b VOLUME B et b PAGE B.
• Vous pouvez afficher les informations d’alarme.
Affichage du calendrier
1 Sélectionnez [Calendrier] dans le
bb
VOLUME BB, ENTER
[Menu Appareil]:
2 Sélectionnez un mois:
bb
VOLUME
BB
3 Sélectionnez une année:
bb
PAGE
BB
4 Pour revenir au [Menu Appareil]: BACK
BOUTON
Menu Appareil
USB-C Flash Config.Calendrier
DIM LUN MAR MER JEU VEN SAM
PF391P-P-AFRALLW-FRE 11/19/07 4:32 PM Page 13
Page 30

14
Raccordement d’un PC (USB) - options
avancées
Raccordement d’un PC
Raccordez votre PC à l’unité en utilisant le câble USB (non fourni). Suite à la
connexion:
• Votre PC devrait automatiquement détecter la carte mémoire introduite dans
l’unité.
L'icône représentant vos cartes mémoires installées apparaît comme “PF39
Memory” (Mémoire Interne) et “Removable Disks” (carte mémoire externe)
lorsque vous ouvrez “My Computer”.
• Windows peut prendre plusieurs minutes pour reconnaître et installer le
dispositif la première fois qu’il est connecté, en fonction de la configuration
de votre disque dur.
• Prise en charge du Plug et Play: Windows 2000/ME/XP
• L’image du moniteur du PC apparaît à l'écran lorsque vous connectez l’appareil à l’ordinateur. Vous ne pouvez pas utiliser les touches de l’appareil
(sauf 11BAT. et P-SAVE).
Transfert de fichiers
L’interface USB 2.0 autorise des transferts de données à haut débit: il devient
alors facile de transférer rapidement des fichiers de photos, des fichiers vidéo
ou de la musique (et tout autre type de données) entre l’unité et le PC.
Utilisez l’unité simplement, comme vous le feriez avec un dispositif USB à
mémoire flash, en utilisant les commandes de base du système d’exploitation.
Remarque importante:
• Si vous avez besoin d’aide concernant le transfert des fichiers, veuillez vous
reporter au manuel d’utilisation de votre système d’exploitation ou à l’aide en
ligne.
• Ne débranchez pas l’unité durant un transfert, vous risqueriez d’endommager
le micrologiciel (firmware) ou de corrompre les fichiers transmis.
• Si vous souhaitez formater la mémoire interne de l'appareil à l'aide du PC,
vous devez le faire avec le système de fichier FAT.
Faites un double clic sur l'icône “My Computer” sur votre bureau, puis
double-cliquez sur l’icône “PF39 Memory” ou “Removable Disks”
qui correspondent à la carte mémoire interne ou externe de l’unité.
Faites glisser vos fichiers multimédias (ou autres) vers “PF39 Memory” ou
“Removable Disks”.
• Vous pouvez organiser vos fichiers et vos données dans des dossiers et/ou
des sous-dossiers.
Débranchement de l’unité
Débranchez l’unité en respectant les instructions ci-dessous pour prévenir toute
perte de données ou corruption du micrologiciel.
1. Double-cliquez sur la flèche verte qui se trouve dans la barre des tâches,
en bas à droite de l’écran du PC (Retirez le périphérique en toute sécurité).
2. Supprimez le périphérique en toute sécurité: sélectionnez « Périphérique
de stockage de masse USB » dans la liste qui apparaît et cliquez sur
« Arrêter ».
Arrêt d’un périphérique matériel: sélectionnez « Périphérique de stockage
de masse USB » dans la liste qui apparaît et cliquez sur « OK ».
3. Lorsque la bulle d’information indiquant que « le matériel peut être retiré en
toute sécurité » apparaît, vous pouvez débrancher le câble USB qui relie le
PC à l’unité.
Raccordement d’un PC (USB)
1 Raccordez le PC à l’unité: –
2 Allumez l’appareil: 1 BAT
3 Transférez des fichiers: –
BOUTON
Câble USB
PF391P-P-AFRALLW-FRE 11/19/07 4:32 PM Page 14
Page 31

15
Alimentation électrique DC 12 V, 2 A
Consommation 10 W
Autonomie de la batterie: ~ 1 heure
Dimensions (L x H x P) 213 x 147 x 103.5 mm avec le
bras de support
Poids Net 630 g
Température de fonctionnement
5°C ~ 45°C
Humidité relative 5 % ~ 90 %
Type d’affichage 8” Largeur (Full-Color TFT LCD)
Zone de visionnage: 7.18”
Résolution affichage 800 x 480 (WVGA)
Capacité de la mémoire 256MB*
flash intégrée
Emplacement pour carte 1 ouverture pour carte
mémoire SD/MMC/MS
Interface USB 2.0 Grande Vitesse (dispositif)
Prise en charge du Windows 2000/ME/XP
Plug et Play
* 21MB est réservé au logiciel de l’unité.
Accessoires
• Transformateur AC (MPA-630)
• Câble adaptateur USB
• Câble USB
• Bras de support amovible
• 3 cadrans interchangeables
Caractéristiques techniques
Dépannage
L’unité ne s’allume pas.
b Assurez-vous que le cordon d’alimentation soit correctement branché à la prise
électrique.
Le son reproduit est de mauvaise qualité.
b Essayez de lire le fichier depuis votre PC. Si le son est toujours de mauvaise qualité,
essayez de télécharger de nouveau le fichier ou encodez-le vous-même.
b Assurez-vous que le débit binaire ne soit pas trop faible. Plus le débit du fichier est
élevé, meilleure est la restitution sonore. Reportez-vous à la section « Type de fichier
audio pris en charge » à la page 11.
Impossible de transférer des fichiers de l’unité vers le PC.
b Assurez-vous que le système d’exploitation installé dans le PC est compatible avec l’unité.
b Assurez-vous que le câble USB soit fermement attaché à l’unité et au PC.
b Si vous avez connecté l’unité via un hub USB, essayez plutôt de raccorder l’unité
directement au PC.
b Vérifiez la capacité de stockage de la carte mémoire installée dans l’unité.
Impossible de sélectionner une carte mémoire.
b Assurez-vous qu’une carte mémoire est présente dans l’unité.
b Assurez-vous que la carte mémoire a été correctement introduite dans l’unité.
b Assurez-vous que la carte mémoire n’est pas défectueuse.
Impossible de copier des fichiers vers un emplacement cible.
b Assurez-vous que le média de destination dispose de suffisamment d’espace libre.
L’unité refuse de lire un fichier audio.
b Assurez-vous que le format de fichier est compatible (MP3). Reportez-vous à la section
« Type de fichier audio pris en charge » à la page 11.
L’unité refuse de lire un fichier vidéo.
b Assurez-vous que le format de fichier est compatible. Reportez-vous à la section «
Type de fichier vidéo pris en charge » à la page 10.
Pas de son.
b Assurez-vous que le niveau du volume est suffisamment élevé.
L’unité a rencontré un problème de fonctionnement.
b Appuyez sur le bouton 1 BAT. pour éteindre l’unité. Attendez quelques secondes et
rallumez-la.
• Les illustrations et spécifications peuvent subir des modifications
sans préavis.
PF391P-P-AFRALLW-FRE 11/19/07 4:32 PM Page 15
Page 32

PF391P-P-AFRALLW-FRE 11/19/07 4:32 PM Page 16
 Loading...