

Page 1
LG MultiSITE
TM
Communications Manager
INSTALLATION MANUAL
Model Number: PBACNBTR0A
(PBACNBTR0 + ZSMA01BMS)
Page 2

PROPRIETARY DATA NOTICE
This document, as well as all reports, illustrations, data, information, and other
materials are the property of LG Electronics U.S.A., Inc., and are
disclosed by LG Electronics U.S.A., Inc., only in confidence.
Do not throw away, destroy, or lose this manual.
Please read carefully and store in a safe place for future reference.
Content familiarity required for proper installation.
The instructions included in this manual must be followed to prevent prod-
uct malfunction, property damage, injury, or death to the user or other
people. Incorrect operation due to ignoring any instructions will cause
harm or damage. A summary of safety precautions begins on page 4.
For more technical materials such as submittals, engineering
databooks, and catalogs, visit www.lghvac.com.
For continual product development, LG Electronics U.S.A., Inc., reserves the right to change specifications without notice.
This document, as well as all reports, illustrations, data, information, and other materials are the property of LG Electronics U.S.A., Inc.
IM_MultiSITE_Communications_Manager_PBACNBTR0A_08_17
©LG Electronics U.S.A., Inc.
Page 3

TABLE OF CONTENTS
Safety Instructions ....................................................................................................................................................................................... 4
Introduction .................................................................................................................................................................................................. 9
LG MultiSITETM Communications Manager Controller .................................................................................................................................................. 9
Items Included with the Controller ................................................................................................................................................................................ 9
Materials and Tools .................................................................................................................................................................................................... 10
Mounting Preparation ................................................................................................................................................................................ 11
Inserting or Removing the MicroSD Card ....................................................................................................................................................................11
Environmental Requirements ..................................................................................................................................................................................... 13
Mounting ................................................................................................................................................................................................... 14
Physical Mounting ...................................................................................................................................................................................................... 14
Mounting on DIN Rail ................................................................................................................................................................................................. 15
Wiring ........................................................................................................................................................................................................17
Earth Ground and Power ............................................................................................................................................................................................ 17
Communications Wiring .............................................................................................................................................................................................. 18
V-Net Wiring ............................................................................................................................................................................................................... 19
Ethernet Wiring ........................................................................................................................................................................................................... 19
Installation Manual
Power Up and Initial Checkout ..................................................................................................................................................................20
Status LEDs ..............................................................................................................................................................................................21
V-Net LEDs ................................................................................................................................................................................................................. 21
STAT (Status) LED ...................................................................................................................................................................................................... 22
BEAT (Heartbeat) LED ............................................................................................................................................................................................... 22
PRI, SEC (Ethernet) LEDs ......................................................................................................................................................................................... 22
Tab Mounting Dimensions .......................................................................................................................................................................23
Due to our policy of continuous product innovation, some specifications may change without notification.
©LG Electronics U.S.A., Inc., Englewood Cliffs, NJ. All rights reserved. “LG” is a registered trademark of LG Corp.
3
Page 4

SAFETY INSTRUCTIONS
DANGER
WARNING
CAUTION
DANGER
The instructions below must be followed to prevent product malfunction, property damage, injury or death to the user or other people. Incorrect operation due to ignoring any instructions will cause harm or damage. The level of seriousness is classified by the symbols described
below.
TABLE OF SYMBOLS
This symbol indicates an imminently hazardous situation which, if not avoided, will result in death or
serious injury.
This symbol indicates a potentially hazardous situation which, if not avoided, could result in death or
serious injury.
This symbol indicates a potentially hazardous situation which, if not avoided, may result in minor or
moderate injury.
Note:
Safety of personnel is the primary concern during all procedures. Read and understand this safety summary. Read and understand the installation procedure before beginning installation. Use the appropriate tools and accessories during installation. Plan your work and do not work
alone, if possible. Know how to obtain emergency medical and fire fighting assistance.
Do not use or store ammable gas or combustibles near the unit.
There is risk of re, explosion, and physical injury or death.
This symbol indicates situations that may result in equipment or property damage accidents only.
This symbol indicates an action that should not be performed.
Communications Manager
TM
Disconnect power before installing or servicing the unit.
There is risk of physical injury or death due to electric shock.
Properly size all circuit breakers or fuses.
There is risk of re, electric shock, explosion, physical injury, or death.
LG MultiSITE
Do not share the electrical circuit with other devices.
There is risk of re, electric shock, physical injury, or death due to heat generation.
Do not use damaged or loose power wiring. Do not modify or extend the outdoor unit’s power wiring randomly. Ensure
that the power wiring will not be pulled nor weight be placed on the power wiring during operation.
There is risk of re, electric shock, and physical injury or death.
4
Due to our policy of continuous product innovation, some specifications may change without notification.
©LG Electronics U.S.A., Inc., Englewood Cliffs, NJ. All rights reserved. “LG” is a registered trademark of LG Corp.
Page 5

SAFETY INSTRUCTIONS
WARNING
The information contained in this manual is intended for use by an industry-qualied, experienced, trained electrician familiar
with local, national, and regional codes and who is equipped with the proper tools and test instruments.
Failure to carefully read and follow all instructions in this manual can result in personal injury or death.
All electric work must be performed by a licensed electrician and conform to local building codes or, in the absence of
local codes, with the National Electrical Code, and the instructions given in this manual.
If the power source capacity is inadequate or the electric work is not performed properly, it may result in re, electric shock, physical injury or death.
Use copper conductors only. Refer to local, state, and federal codes, and use power wires of sufcient current capacity and
rating.
Wires that are too small may generate heat, cause a re and physical injury or death.
Before making power terminations during earth grounding, de-energize the 24V power source. Do not restore power until
completing all other mounting and wiring.
There is risk of electric shock and physical injury or death.
Installation Manual
Install in a controlled environment relatively free of contaminants.
There is risk of electric shock and physical injury or death.
Secure all eld wiring connections with appropriate wire strain relief.
Improperly securing wires will create undue stress on equipment power lugs. Inadequate connections may generate heat, cause a re and physical
injury or death.
Ensure the system is connected to a dedicated power source that provides adequate power.
If the power source capacity is inadequate or the electric work is not performed properly, it may result in re, electric shock, physical injury or death.
Do not change the settings of the protection devices.
If the pressure switch, thermal switch, or other protection device is shorted and forced to operate improperly, or parts other than those specied by
LG are used, there is risk of re, electric shock, explosion, and physical injury or death.
Properly tighten all power connections.
Loose wiring may overheat at connection points, causing a re, physical injury or death.
Dispose of any packing materials safely.
• Packing materials, such as nails and other metal or wooden parts may cause puncture wounds or other injuries.
• Tear apart and throw away plastic packaging bags so that children may not play with them and risk suffocation and death.
Do not install the MultiSITE Communications Manager unit if it will be exposed to rain or other precipitation. Do not
install the unit in a location exposed to open ame or extreme heat. Do not touch the unit with wet hands.
There is risk of re, electric shock, physical injury, and/or death.
Due to our policy of continuous product innovation, some specifications may change without notification.
©LG Electronics U.S.A., Inc., Englewood Cliffs, NJ. All rights reserved. “LG” is a registered trademark of LG Corp.
5
Page 6

SAFETY INSTRUCTIONS
CAUTION
Wear protective gloves when handling equipment.
Sharp edges may cause personal injury.
Note:
The information contained in this manual is intended for use by an industry-qualied, experienced, trained electrician familiar
with local, national, and regional codes and who is equipped with the proper tools and test instruments.
Failure to carefully read and follow all instructions in this manual can result in equipment malfunction or property damage.
Disconnect power before installing or servicing the unit.
There is risk of equipment damage or degraded performance.
MultiSITE Communications Manager is for use with select LG air conditioning systems only. Do not attempt to use this unit
with any other type of system.
There is risk of equipment damage or degraded performance.
Clean up the site after all procedures are nished, and check that no metal scraps, screws, or bits of wiring have been left
inside or surrounding the controller or indoor units.
Do not allow water, dirt, or animals to enter the controller.
There is risk of unit failure or degraded performance.
Communications Manager
TM
Do not spill water or other liquid on the inside of the controller. Do not drop the controller into water. If the unit is
immersed in water or other liquid, contact your local authorized LG distributor for support.
There is risk of unit failure or degraded performance.
Remove all power to controller before attaching (plug in) or detaching (unplug) any option module.
There is risk of possible equipment damage.
LG MultiSITE
Do not remove the controller’s cover.
No congurable or user-serviceable items (such as jumpers or a battery) require cover removal. All items are accessible as switches and connectors
on the unit’s top, bottom, and side, or behind the unit’s front access door or microSD card shutter.
This device is only intended for use as a monitoring and control device. Do not use it for any other purpose.
There is risk of data loss or equipment damage.
Before removing or inserting the microSD card, disconnect all power to the controller and use static discharge precautions.
There is risk of equipment damage.
The MultiSITE Communications Manager controller is not compatible with a Power-Over-Ethernet (POE) network. Do not
connect the controller on a network segment which carries power.
The unit may fail.
6
Due to our policy of continuous product innovation, some specifications may change without notification.
©LG Electronics U.S.A., Inc., Englewood Cliffs, NJ. All rights reserved. “LG” is a registered trademark of LG Corp.
Page 7

CERTIFICATIONS
The MultiSITE Communications Manager controller has the following agency listings, compliances, and certifications:
• UL-916, Energy Management Equipment - Edition 4
• FCC Part 15, Class B - Federal Communications Commission, with FCC Part 15, Subpart C - WiFi
• ICES-003, Class B - Industry Canada Interference-Causing Equipment Standard
• RoHS 2 (Restriction of Hazardous Substances), Directive 2011/65/EU.
CE Declaration of Conformity (Council Directive 004-108-EC)
ACMA, complies with the requirements of the relevant ACMA Standards. This document covers mounting and wiring of the following products.
Installation Manual
Due to our policy of continuous product innovation, some specifications may change without notification.
©LG Electronics U.S.A., Inc., Englewood Cliffs, NJ. All rights reserved. “LG” is a registered trademark of LG Corp.
7
Page 8

COMPLIANCE AND APPROVALS
Federal Communications Commission (FCC)
This device complies with Part 15 of the FCC Rules. Operation is subject to the following two conditions:
1. This device may not cause harmful interference, and
2. This device must accept any interference received, including interference that may cause undesired operation.
Changes or modifications not expressly approved by the party responsible for compliance could void the user’s authority to operate the
equipment.
This equipment has been tested and found to comply with the limits for a Class B digital device, pursuant to Part 15 of the FCC Rules. These
limits are designed to provide reasonable protection against harmful interference in a residential installation. This equipment generates,
uses, and can radiate radio frequency energy. If the equipment is not installed and used in accordance with the instructions, may cause
harmful interference to radio communications. However, there is no guarantee that interference will not occur in a particular installation. If this
equipment does cause harmful interference to radio or television reception, which can be determined by turning the equipment off and on,
the user is encouraged to try to correct the interference by one of the following measures:
• Reorient or relocate the receiving antenna.
• Increase the separation between the equipment and receiver.
• Connect the equipment into an outlet on a circuit different from that to which the receiver is connected.
• Consult the dealer or an experienced radio/TV technician for help.
Canadian Department of Communications (DOC)
This device complies with Industry Canada License-exempt RSS standard(s). Operation is subject to the following two conditions: 1) this
device may not cause interference, and 2)this device must accept any interference, including interference that may cause undesired operation of the device.
Under Industry Canada regulations, this radio transmitter may only operate using an antenna of a type and maximum (or lesser) gain ap-
Communications Manager
proved for the transmitter by Industry Canada. To reduce potential radio interference to other users, the antenna type and its gain should be
TM
so chosen that the equivalent isotropically radiated power (EIRP) is not more than that necessary for successful communication.
The device for operation in the band 5150–5250 MHz is only for indoor use to reduce the potential for harmful interference to co-channel
mobile satellite systems.
Approved Antenna Listing
• ANT-DB1-RAF-RPS
LG MultiSITE
Transmitter Module Listing
• Contains Transmitter Module FCC ID: W98-12977
• Contains Transmitter Module IC: 8339A-12977
To comply with FCC and Industry Canada RF exposure limits for general population /uncontrolled exposure, the antenna(s) used for this
transmitter must be installed to provide a separation distance of at least 20 cm from all persons and must not be co-located or operating in
conjunction with any other antenna or transmitter.
8
Due to our policy of continuous product innovation, some specifications may change without notification.
©LG Electronics U.S.A., Inc., Englewood Cliffs, NJ. All rights reserved. “LG” is a registered trademark of LG Corp.
Page 9

INTRODUCTION
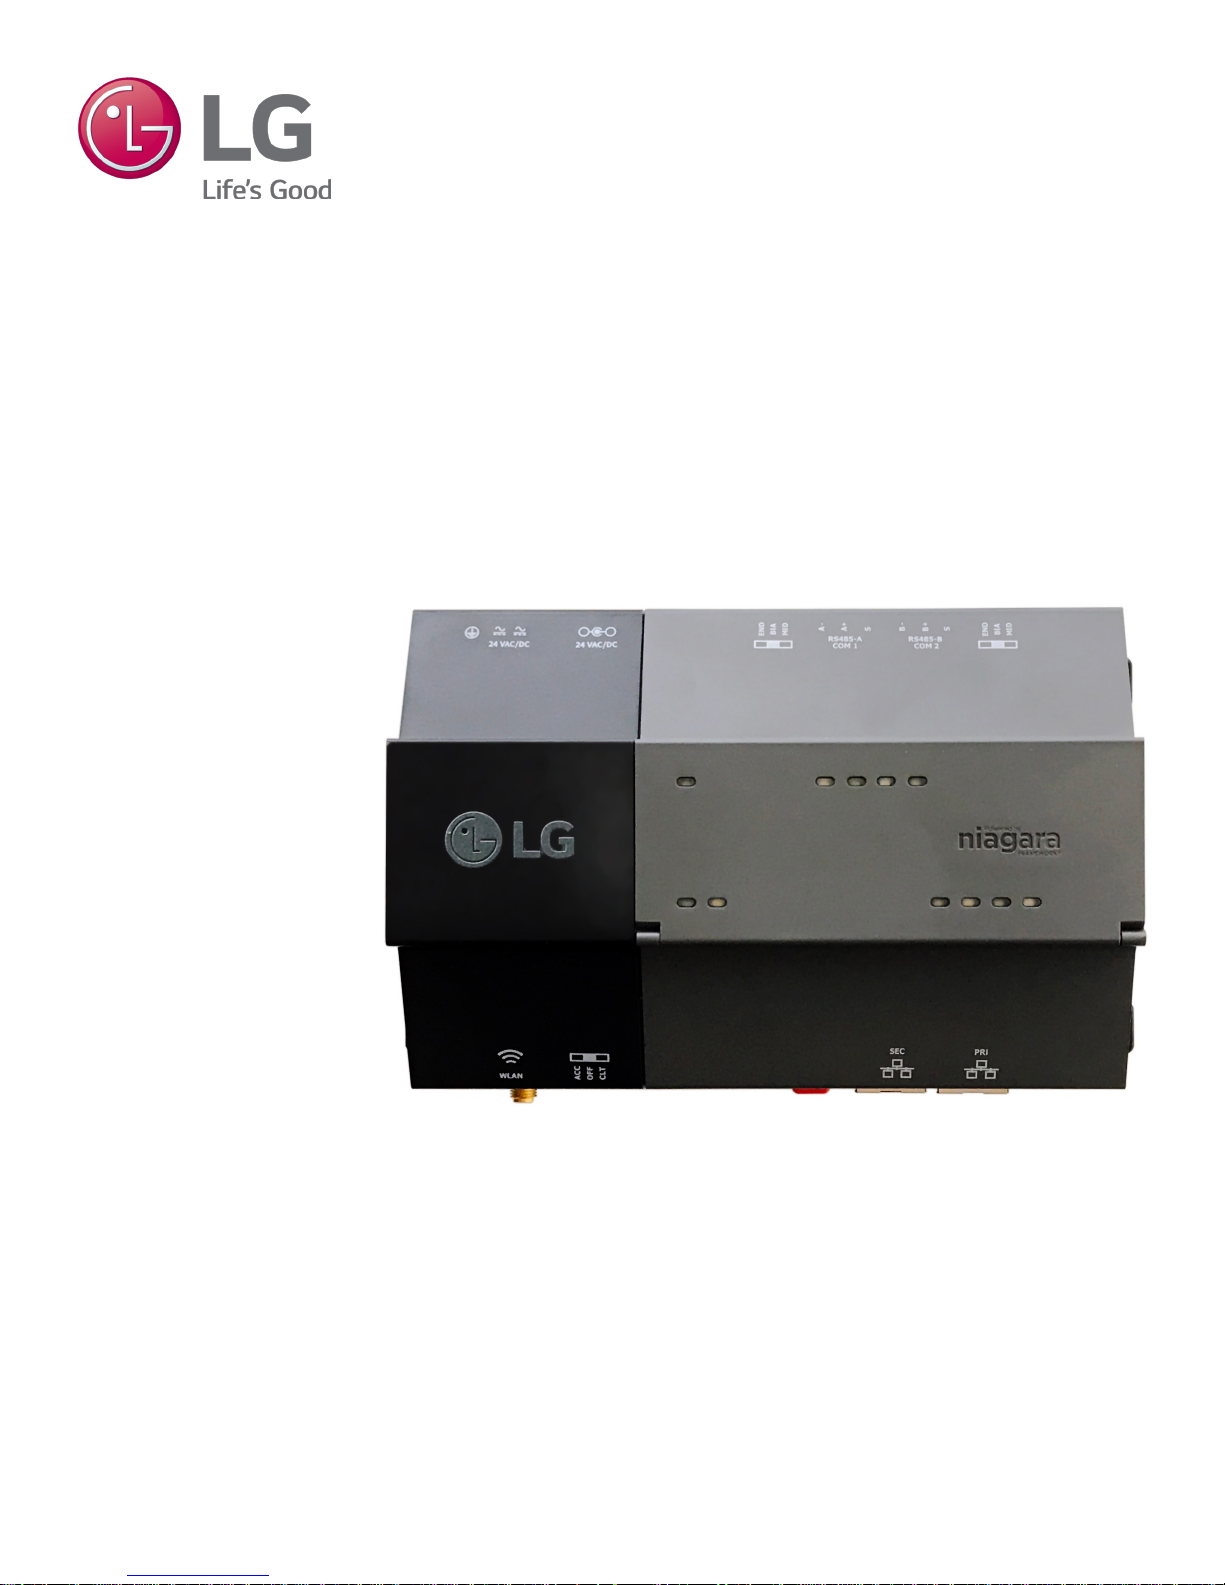
LG MultiSITETM Communications Manager Controller
This manual describes how to install the MultiSITE Communications Manager controller (Model Number: PBACNBTR0A). The MultiSITE
Communications Manager is a compact and powerful controller that allows third party integration of LG HVAC system into Building Management System via BACnet®, LonWorks® and Fox® protocols. The MultiSITE Communications Manager is a network ready, out of the box
integration solution and includes the LG pre-engineered, graphical user interface. The controller integrates all LG Multi V™ systems, Multi F
systems, and select LG single zone systems with third party building management systems.
Refer to the LG MultiSITE Communications Manager User Manual for details on the controller’s graphical user interface. User Manual can be
located on www.lghvac.com.
LG MultiSITE™ Communications Manager will be referred to as MultiSITE Communications Manager in this manual. PBACNBTR0 is the
model number for the MultiSITE Communications Manager controller. ZSMA01BMS is the model number for the software maintenance
agreement.
Figure 1: MultiSITE Communications Manager Controller.
Installation Manual
Items Included with the Controller
Table 1 lists the items included with the MultiSITE Communications Manager controller.
Table 1: Included items.
Part Quantity
MicroSD card in plastic case 1
Coax-mount, dual 2.4/5.8GHz antenna for WiFi 1
3-position RS-485 connector plugs 2
* Niagara Framework, Niagara 4 Framework, and the Niagara AX Framework are trademarks of Tridium, Inc. * LonWorks is a registered trademark
of Echelon. * BACnet is a registered trademark of ASHRAE. All other product names and services mentioned in this publication that is known to be
trademarks, registered trademarks, or service marks are the property of their respective owners.
Due to our policy of continuous product innovation, some specifications may change without notification.
©LG Electronics U.S.A., Inc., Englewood Cliffs, NJ. All rights reserved. “LG” is a registered trademark of LG Corp.
LonWorks®
9
Page 10

INTRODUCTION
Table 2 lists the optional accessories.
Model Description
Table 2: Optional accessories.
LON Module
Model Number: ZHWLONWK0
Wall Adapter
Model Number: ZHWPWADTR
Figure 2: MultiSITE Communications Manager controller (with one optional LON module).
Communications Manager
TM
DIN rail-mount LON modules directly attach for additional communications ports.
Wall-mount, Class 2 universal AC power adapter supplying 24V DC to a cable with a barrel-connector plug.
LG MultiSITE
Materials and Tools
Required Tools
You will need one of the following:
• UL listed, Class 2, 24Vac transformer, rated at minimum of 24Va. A dedicated transformer is required (cannot power additional equipment),
or
• UL listed Class 2 or LPS 24Vdc power supply, capable of supplying at least 1A (24W),
or
• (Optional) Wall-mount AC power adapter (Model Number: ZHWPWADTR) with barrel connector plug.
Optional Tools
• DIN rail, type NS35/7.5 (35mm x 7.5mm) and DIN rail end-clips (stop clips) are recommended for any installation with option modules. The
controller is also panel-mountable.
• Suitable tools, fasteners, and accessories for mounting.
10
Due to our policy of continuous product innovation, some specifications may change without notification.
©LG Electronics U.S.A., Inc., Englewood Cliffs, NJ. All rights reserved. “LG” is a registered trademark of LG Corp.
Page 11

MOUNTING PREPARATION
Inserting or Removing the MicroSD Card
Before mounting a new controller, you must insert the included microSD flash memory card. The microSD card includes the operating system
as well as the LG user interface. This card must be installed for the MultiSITE Communications Manager controller to function.
Before inserting or removing the microSD card
• The controller must be unmounted from any DIN rail or screw tab mounting, as accessing the card uses space behind the mounting base.
• Disconnect all power to the controller and use static discharge precautions.
Note:
The microprocessors and associated circuitry within the controller are sensitive to static discharge. Work in a static-free area. Discharge any
static electricity you may have accumulated. Discharge static electricity by touching a known, securely grounded object. Disconnect all power
to the controller and use these precautions before removing or inserting the microSD card. Otherwise, equipment damage is likely to occur.
Figure 3: MicroSD card location in controller.
Installation Manual
1
1 = Access shutter for microSD card (slide to open or close).
2 = Card carrier inside controller.
3 = MicroSD card to insert or remove from card carrier.
2
3
Due to our policy of continuous product innovation, some specifications may change without notification.
©LG Electronics U.S.A., Inc., Englewood Cliffs, NJ. All rights reserved. “LG” is a registered trademark of LG Corp.
11
Page 12

MOUNTING PREPARATION
Steps to insert or remove the card
1. Carefully slide the plastic microSD card shutter open. The shutter must remain captive in the base, revealing the microSD card socket.
2. To insert the microSD card, slide it into card carrier, label side up, until the spring catch engages. If properly inserted, the card is behind
the shutter track.
3. To remove the microSD card, push it in, until the spring release pushes it partially out of the card carrier. Grasp the card, pull it completely
out of the unit and store it in a static free protective case.
4. Carefully slide the card shutter back over the card carrier opening, until it clicks in place. When properly closed, the shutter must not
protrude behind the mounting base.
Note:
• Data on the microSD card is encrypted. If you swap in a card from a previously congured unit, you must change the MultiSITE Communi-
cations Manager system passphrase on the platform to match the passphrase on the new microSD card.
• Typically, the microSD card never needs removal. However if a controller has been electrically damaged or found faulty, you can remove
the card and install it in another similar unit, so it can become a functional replacement.
Communications Manager
TM
LG MultiSITE
12
Due to our policy of continuous product innovation, some specifications may change without notification.
©LG Electronics U.S.A., Inc., Englewood Cliffs, NJ. All rights reserved. “LG” is a registered trademark of LG Corp.
Page 13

MOUNTING
Mount the MultiSITE Communications Manager controller in a location that allows clearance for wiring, servicing, and module removal.
Environmental Requirements
Following are the ambient conditions for mounting the MultiSITE Communications Manager controller.
• Operating temperature range: -4°F to 140°F (-20°C to 60°C).
• Storage Temperature: -40°F to 185°F (-40°C to 85°C ).
• Relative humidity range: 5% to 95% non-condensing.
• Pollution Degree: 3.
• Supply (mains) voltage requirements: Allowable voltage fluctuation +/- 10%.
• For a unit mounted inside an enclosure, ensure that the enclosure is designed to keep the unit within its required operating temperature
range (considering a 24-watt dissipation by the controller). This is important if the controller is mounted inside an enclosure with other heatproducing equipment.
Do not mount the unit in the following areas:
• Any area with excessive moisture, corrosive fumes, or explosive vapors.
• Any area where vibration or shock is likely to occur.
• A location subject to electrical noise, such as in the proximity of large electrical contactors, electrical machinery, welding equipment,
and so on.
Note:
This product is for indoor use only, in an altitude of up to 2,000m (6,562 ft).
Installation Manual
Due to our policy of continuous product innovation, some specifications may change without notification.
©LG Electronics U.S.A., Inc., Englewood Cliffs, NJ. All rights reserved. “LG” is a registered trademark of LG Corp.
13
Page 14

MOUNTING
Physical Mounting
• Horizontal mounting (as shown in Figure 4) is strongly recommended, to achieve maximum heat dissipation and meet the operating temperature upper limit. Any other mounting orientation reduces this upper limit.
• Mounting on a 35mm wide DIN rail is recommended. The controller’s unit base has a molded DIN rail slot and locking clip, as do option
modules. DIN rail mounting ensures alignment of the connectors between all devices.
• Up to four option modules are supported. See Figure 4 for mounting dimensions.
Figure 4: Horizontal mounting.
2.17" (55)
4.33" (110)
Communications Manager
TM
LG MultiSITE
7.05" (179)
6.38" (162)
9.53" (242)
2.26"
(57.5)
LON
2.13" (54)
14
Due to our policy of continuous product innovation, some specifications may change without notification.
©LG Electronics U.S.A., Inc., Englewood Cliffs, NJ. All rights reserved. “LG” is a registered trademark of LG Corp.
Page 15

Mounting on DIN Rail
Prerequisites
Following are the prerequisites for mounting on DIN rail:
• The 35mm DIN rail must be securely mounted, with at least two screws near the rail ends.
• The microSD card must be installed in the controller. See “Inserting or Removing the MicroSD Card”.
1. Pull the controller’s locking clip down.
2. Tilt the controller to hook over the DIN rail.
3. Push down and in on the unit, fastening to the rail.
4. Push the locking clip up to secure.
Figure 5: Mounting on DIN rail.
MOUNTING
Installation Manual
Due to our policy of continuous product innovation, some specifications may change without notification.
©LG Electronics U.S.A., Inc., Englewood Cliffs, NJ. All rights reserved. “LG” is a registered trademark of LG Corp.
15
Page 16

MOUNTING
5. Mount any option module onto the DIN rail in the same way. Slide the module firmly into the controller’s connector to seat. Repeat for other
modules as needed. A maximum of 4 option modules can be installed for each controller.
6. Carefully secure both ends of the final assembly with DIN rail end-clips provided by the DIN rail vendor.
• To remove a unit from the DIN rail, pull down its locking clip. Then swing the bottom out and lift the unit away from the DIN rail.
Figure 6: Mounting on DIN rail.
LON
Communications Manager
TM
LG MultiSITE
LON
16
Due to our policy of continuous product innovation, some specifications may change without notification.
©LG Electronics U.S.A., Inc., Englewood Cliffs, NJ. All rights reserved. “LG” is a registered trademark of LG Corp.
Page 17

WIRING
WARNING
Earth Ground and Power
Earth grounding provides protection from electrostatic discharge or other forms of EMI.
Note:
There must be a nearby earth grounding point.
1. Install the included earth ground wire to the controller’s earth ground spade lug, and terminate the other end to a nearby earth ground.
2. Unplug the controller’s 2-position power connector plug and terminate the 24V supply source (AC or DC) to the connector. Leave connector unplugged for now.
Figure 7: Earth ground and power options.
Power source options:
50/60Hz
Installation Manual
LON
2.1 = (AC): Dedicated 24V transformer required, with neither side of the transformer secondary tied to ground.
2.2 = (DC): Polarity is unimportant (uses onboard diode bridge), with neither leg tied to ground.
2.3 = (Optional) Wall-mount AC adapter, (Model: ZHWPWADTR) instead of wiring 24V to 2-position connector.
Before making power terminations during earth grounding, de-energize the 24V power source. Do not restore power until
completing all other mounting and wiring.
There is risk of electric shock and physical injury or death.
Due to our policy of continuous product innovation, some specifications may change without notification.
©LG Electronics U.S.A., Inc., Englewood Cliffs, NJ. All rights reserved. “LG” is a registered trademark of LG Corp.
17
Page 18

WIRING
Communications Wiring
Ports for field communications are shown in Figure 8.
Figure 8: Communications ports on controller.
WLAN
Communications Manager
TM
1 = V-Net ports. See “V-Net wiring”.
2 = WiFi settings switch and antenna. See “WiFi”.
3 = Ethernet ports, 10/100-Mbit, RJ-45. See “Ethernet Wiring”.
LG MultiSITE
4 = Earth ground and 24V power input. See “Earth Ground and Power”.
WiFi
An integral WiFi adapter provides wireless connectivity using the IEEE 802.11a/b/g/n standard, and provides an RP-SMA antenna connector.
The WiFi configuration switch has the following operation modes:
• OFF - (Default, middle) WiFi adapter is disabled.
• ACC - Controller provides operation as a WiFi access point for up to 20 clients.
• CLT - Controller operates as a client to an existing 802.11a/b/g/n router or access point.
An associated LED remains lit whenever WiFi is enabled. See “Status LEDs”.
Refer to the MultiSITE Communications Manager User Manual for details on WiFi configuration and factory-default settings.
18
Due to our policy of continuous product innovation, some specifications may change without notification.
©LG Electronics U.S.A., Inc., Englewood Cliffs, NJ. All rights reserved. “LG” is a registered trademark of LG Corp.
Page 19

WIRING
V-Net Wiring
On the controller’s top side, two V-Net ports operate as COM1 and COM2. V-Net Communications to ODU must land on
COM1. Make sure that polarity is correct.
Use shielded, twisted-pair, 18 AWG cabling to wire. Figure 9 shows a wiring example.
Figure 9: Wiring example.
WhiteBlue
Blue
White
Only
ground
shield at
ODU.
Ethernet Wiring
Two RJ-45 10/100-Mbit Ethernet connectors are labeled PRI (LAN1) for primary, and SEC (LAN2) for secondary. Use a standard Ethernet
patch cable to an Ethernet switch.
The factory-default IP address for PRI is 192.168.1.140. The subnet mask is 255.255.255.0. By default, the SEC (LAN2) port is
disabled.
Installation Manual
Note:
The MultiSITE Communications Manager controller is not compatible with a Power-Over-Ethernet (POE) network. Connecting the Controller
on a network segment which carries power may cause the unit to fail. In that event, you must disconnect it from the POE network segment
and power-cycle the unit.
Due to our policy of continuous product innovation, some specifications may change without notification.
©LG Electronics U.S.A., Inc., Englewood Cliffs, NJ. All rights reserved. “LG” is a registered trademark of LG Corp.
19
Page 20

POWER UP AND INITIAL CHECKOUT
Prerequisite for power up
Ensure power and ground wiring to the controller is ready. See “Earth ground and power”. See Figure 10 for the location of status LEDs.
Steps
1. Apply power. To do this, do one of the following:
• Insert the 2-position 24V power connector plug, or
• Insert the barrel plug of the wall-mount AC adapter (Model Number: ZHWPWADTR).
2. Check the STAT (Status) and BEAT (Heartbeat) LEDs.
When power is applied, after 3-10 sec, the green “STAT” LED illuminates, indicating that the system is OK, with power applied. During
bootup, the “BEAT” LED may blink at 1 Hz with a 90%/10% on/off duty cycle, or in some other irregular pattern. When bootup completes, the
normal 1 Hz “BEAT” LED flash at 50%/50% on/off duty cycle returns.
If after applying power, the “STAT” LED goes out, or if the “BEAT” LED comes on (steady) and stays lit over 2 minutes, contact Technical
Support for assistance.
Communications Manager
TM
LG MultiSITE
20
Due to our policy of continuous product innovation, some specifications may change without notification.
©LG Electronics U.S.A., Inc., Englewood Cliffs, NJ. All rights reserved. “LG” is a registered trademark of LG Corp.
Page 21

The controller provides a number of status LEDs. See Figure 10.
Figure 10: Status LEDs.
STATUS LEDS
1
3
1 = WiFi (Green) - Lit whenever WiFi config switch is not Off.
2 = V-Net “B” (COM2): Transmit (TX) and Receive (RX).
3 = STAT (Green) - Remains lit. See “STAT (Status) LED”.
4 = BEAT (Yellow) - “Heartbeat” LED that blinks at 1Hz during normal operation. See “BEAT (Heartbeat) LED”.
5 = Primary Ethernet SEC (LAN1) “Link” (Green), “Activity” (Yellow). See “PRI, SEC (Ethernet) LEDs”.
4
2
5
Installation Manual
V-Net LEDs
V-Net port B (COM2) has two LEDs reflecting the following port activity:
• Yellow (TX): indicates the controller is transmitting data on the V-Net port.
• Green (RX): indicates the controller is receiving data from an V-Net device connected to this port.
These LEDs use a fixed “on time” when a message is detected on the port. If a receive LED is on constantly, this can indicate a wiring problem, such as a shorted wire or reversed wiring.
Due to our policy of continuous product innovation, some specifications may change without notification.
©LG Electronics U.S.A., Inc., Englewood Cliffs, NJ. All rights reserved. “LG” is a registered trademark of LG Corp.
21
Page 22

STATUS LEDS
STAT (Status) LED
The green “STAT” LED provides a CPU machine status check, and should remain lit whenever the controller is powered. See Figure 10. If
the status LED does not light while power is applied, contact Technical Support.
BEAT (Heartbeat) LED
In normal operation, the yellow heartbeat “BEAT” LED blinks at 1 Hz, at 50%/50% on/off duty cycle. See Figure 10.
During controller bootup, this LED may blink at 1 Hz with a 90%/10% on/off duty cycle, or in some other irregular pattern. When boot up
completes, the platform daemon starts, and the normal 1 Hz flash at 50%/50% on/off duty cycle returns.
If the “BEAT” LED stays on constantly, does not light, or blinks very fast, contact Technical Support.
Note:
The 1Hz, 90%/10% on/off “BEAT” flash at bootup also occurs during other critical operations, such as a firmware upgrade to the controller
and/or any attached modules. Do not remove power from the controller while its “BEAT” LED flashes with a 90%/10% on/off duty cycle.
Wait for the normal (50%/50%) flash to return before removing power.
PRI, SEC (Ethernet) LEDs
There are two LEDs for each of the two LAN ports.
Green (left-side) “Link” LED operates as follows:
• Off: No Ethernet link is made.
• On: Ethernet link is made.
Yellow (right-side) “Activity” LED operates as follows:
Communications Manager
TM
• Off: No Ethernet activity.
• On: Blinking indicates activity (typical if Link is On).
LG MultiSITE
22
Due to our policy of continuous product innovation, some specifications may change without notification.
©LG Electronics U.S.A., Inc., Englewood Cliffs, NJ. All rights reserved. “LG” is a registered trademark of LG Corp.
Page 23

TAB MOUNTING DIMENSIONS
7.05" (179)
2.44” (62)
See Figure 11 for tab mounting dimensions for the MultiSITE Communications Manager controller. Measurements shown below are in inches
and (mm).
Figure 11: Tab mounting dimensions.
6.71” (170.5)
0.34" (8.6)
0.165"
Dia.
(4.2)
1
3.31"
(84)
4.33"
(110)
2
LON
3.31"
(84)
6.71”
(170.5)
2.13
(54)
3
6.38" (162)
2.11” (53.5)
1 = MultiSITE Communications Manager controller. With no optional LON modules added, allow at least 1.5” (38mm) clearance around all
sides, and minimum 3”(76mm) at bottom for WiFi antenna.
2 = Optional LON module. Up to four (4) may be used.
3 = Distances between center of tabs from one unit to another unit.
Note:
DIN mounting is recommended over tab mounting. See “Mounting on DIN rail”.
Installation Manual
Due to our policy of continuous product innovation, some specifications may change without notification.
©LG Electronics U.S.A., Inc., Englewood Cliffs, NJ. All rights reserved. “LG” is a registered trademark of LG Corp.
23
Page 24

LG Electronics, U.S.A., Inc.
Commercial Air Conditioning Division
4300 North Point Parkway
LG Customer Information Center, Commercial Products
1-888-865-3026 USA
Follow the prompts for commercial A/C products and parts.
Alpharetta, Georgia 30022
www.lghvac.com
IM_MultiSITE_Communications_Manager_PBACNBTR0A_08_17
Supersedes: IM_MultiSITE_Communications_Manager_06_17
 Loading...