

LG MV-174DC Owner’s Manual

website:
e-mail:
http://www.LGEservice.com
http://www.LGEservice.com/techsup.html
MV-1760T/1761T
TABLE
OF
CONTENTS
.......................................
SAFETY................................................................
Important
Precautions
Excessive
Safety
To
Microwave
Instructions
Avoid
Possible
Energy
.............................
Exposure
...........................
To
INFORMATION.....................................................
Location
Oven
Electrical
Electrical
Grounding
Microwave
Oven
OPERATION
Learn
Clock
Kitchen
Light
Vent
Turntable
Child
Light
Custom
of
Model
Number
Specifications
.................................................
Rating
Requirements
Instructions
Oven
Features
Control
........................................................
about
...............................................................
Panel
your
...........................................
.....................................
......................................
...........................................
Microwave
.................................
.................................
Oven
.................
Timer..................................................
Timer
......................................................
Hi/Low/Off...............................................
On/Off
.............................................
Lock
.......................................................
Hi/Low/Off
Set
..............................................
.....................................................
Help.................................................................
Hold
Warm
......................................................
EZ
on
..............................................................
More/Less
Custom
Cooking
Cook
at
.......................................................
..................................................
Lower
Power
Levels
.....................
2
3
3
CookingatHigh
Cooking
Popcorn
Potato
Guide
.........................................................
............................................................
Cook..............................................................
Pizza
4
5
5
5
5
5
5
6
.............................................................
Cooking
Guide
Reheat...........................................................
Beverage
Cooking
Auto
Guide
Defrost
Defrosting
Auto
Defrost
Two
Position
7
COOKING
9
9
9
9
9
10
Getting
Fish&Shellfish
Appetizers/Sauces/Soups
Meat
Poultry
Pasta
...........................................................
the
..............................................................
...........................................................
and
10
MAINTENANCE..................................................
10
Care
10
10
11
11
11
11
12
12
BEFORE
and
Metal
Rack
Cleaning
Charcoal
Cooktop/Countertop
Oven
Light
Questions
Microwave
CALLING
Cook
Power
for
Lower
Power
........................
Levels
12
........
13
14
14
14
14
for
One
Touch
Cook
.............
15
16
.......................................................
..................................................
Tips
Chart
Metal
for
Reheat.............................
..............................................
........................................
Rack...............................
16
16
17
17
18
19
20
Best
Cooking
.............................................
Results
.............................
.................
20
20
21
21
23
Rice
..............................................
24
25
Cleaning
....................................................
the
Filter
........................................
Grease
Filters
..........................
Replacement.........................
Light
Replacement
Replacement...............................
and
Answers
Utensil
FOR
Guide
................................
..............................
SERVICE
...................
25
25
25
25
.......
26
26
26
27
28
-2-
IMPORTANT
The
safety
to
WARNING-To
shock,
microwave
?
?
?
?
?
?
?
?
?
?
?
oven.
your
fire,
Read
all
Do
allow
not
close
supervision.
Read
and
AVOID
POSSIBLE
MICROWAVE
Use
the
microwave
described
chemicals
of
oven
type
food.Itis
dry
laboratory
Do
use
kitchen
pool,
Do
leave
the
Clean
allow
filters.
When
Suitable
use
not
this
sink,
and
use
not
paper
cavity
the
grease
flaming
product
equipment
Use
care
Corrosive
cleaners,
When
cleaning
touch
the
or
soaps
injury
energy.
the
for
when
instructions
to
persons
instructions
children
follow
the
ENERGY"
in
its
manual.
or
vapors,
is
specifically
not
designed
use.
or
store
near
in
a
wet
the
like.
the
cavity
products,
when
not
ventilating
to
accumulate
foods
use
above
36
inches
cleaning
cleaning
may
damage
the
use
door,
detergents
SAFETY
below
reduce
the
or
before
use
to
specific
EXPOSURE
oven
only
Do
in
the
designed
for
this
appliance
water
basement,
for
storage
cooking
in
use.
hood
under
the
both
wideorless.
the
such
agents
the
filters.
door
and
mild,
only
and
a
will
tell
risk
of
exposure
using
oven
this
"PRECAUTIONS
TO
found
on
for
its
use
not
microwave
industrial
-for
example,
or
near a
purposes.
utensils,
frequently.
on
the
hoodorthe
hood,
and
gas
vent
hood
as
lye-based
surfaces
the
non-abrasive
sponge
INSTRUCTIONS
how
you
electric
burns,
to
excessive
oven.
your
without
TO
EXCESSIVE
4.
page
intended
corrosive
to
outdoors.
turn
electric
or
oven.
heat,
or
near a
swimming
or
food
Do
the
filters.
soft
use
This
cook
Do
Do
not
in
not
fan
cooking
oven
that
cloth.
to
use
as
or
not
on.
oven
your
?
Do
not
tamper
on
oven
the
switches
safety
the
door
?
If
oven
your
thoroughly
before
usingitagain.
?
To
avoidafire
-
Do
not
overcooked
Watch
the
paper,
Do
not store
in
etc.)
power
Do
not
remove
the
Keep
Turn
the
Disconnect
power
avoid
This
appliance
to
only
plastic,
lines,
should
at
a
-
-
?
Ifafire
-
-
-
?
To
-
electrical
-
Do
not
damaged
or
ifithas
-
Do
not
water.
-
-
?
the
Keep
This
appliance
service
Installorlocate
accordance
to
avoid
with the
door.
to
is
open.
is
dropped
checked
hazard:
severely
foods
oven
or
combustible
the
oven,
it
may
use
wire
them
before
start:
oven
door
oven
off.
the
fuse
the
electric
properly
grounding
operate
cord
or
been
damaged
immerse
cord
away
should
personnel.
the
with
the
harm
to
yourselfordamage
built-in
The
oven
make
sure
the
or
damaged,
byaqualified
overcook
can
carefully,
other
because
cause
twist-tiesinthe
power
or
shock:
must
grounded
instructions
this
plug,
the
microwave
starts
especially
combustibles
if
the
placing
closed.
cord
circuit
be
grounded.
appliance
ifitis
or
electrical
from
heated
be
serviced
food.
items
the
outlet.
dropped.
provided
safety
has
several
power
service
Severely
a
fireinthe
if
you
in
(bread,
to
oven.
iteminthe
shut
See
on
page
ifithas
not
working
cord
surfaces.
strikes
turn
off
panel.
Connect
or
lightning
oven
or
breaker
onlybyqualified
oven
only
installation
switches
built-in
is
off
have
technician
oven.
have
the
cookies,
on.
Be
the
the
5.
a
plug
in
when
it
oven.
the
sure
oven.
it
properly
in
to
instructions.
?
Do
not
mount
onen
a
sink.
?
Do
not
let
cord
hang
over
edge
of
table
or
counter.
-3-
?
To
-
Do
food.
cause
-
Do
syrup
-
Do
-
Do
microwave
-
Do
microwave
with
jars.
?
Do
Itismade
?
Do
?
Do
avoid
not
not
not
not
not
oil
not
not
not
improperly
heat
Uneven
personal
heat
bottles.
deep-fat
attempt
heat
or
These
use
for
cover
run
any
heating
small-necked
oven.
the
oven:
sealed
fat;
items
this
household
or
the
oven
types
injury.
in
fry
home
following
whole
may
oven
block
empty,
cooking
of
baby
may
your
canning
eggs
containers
explode.
for
commercial
use
any
openings
without
some
bottles
occur
and
containers,
microwave
in
your
itemsinthe
in
the
or
closed
only.
in
foodinit.
foods.
or
possibly
such
oven.
shell;
glass
purposes.
the
oven.
baby
water
-
Do
allow
packages
on
cook
read
dish.
damage
the
the
it.
use
metal
rack
to
remove
use
personnel.
facility
the
a
microwavable
anything
and
metal
metal
the
foilormetal
not
cooking
package
-
Do
not
a
as
microwavable
-
Keepabrowning
Carefully
browning
could
you
?
Preserve
-
Remove
not
using
-
Do
not
-
The
holders
-
Do
not
rack.
?
This
appliance
service
service
film
gray
to
touch
directly
dish.
dishatleast
follow
If
use
you
the
oven
rack:
rack
oven
empty
may
get
it
after
should
Contact
for
examination,
on
the
a
from
hot
containers
be
serviced
oven
on
3/16
the
microwave-
floor.
the
oven
inch
dish
oven
the
cooking.
above
when
metal
special
the
dish.
instructions
browning
floor.
with
while
cooking.
on
the
onlybyqualified
nearest
authorized
repairoradjustment.
Put
the
floor.
Use
floor.
for
the
incorrectly,
are
you
rackinit.
Use
pot
metal
PRECAUTIONS
EXPOSURE
ENERGY
?
Do
not
attempttooperate
to
operate
is
(bent)
and
seals
place
should
microwave
the
no
damage
latches
and
any
on
sealing
exposure
?
Do
that
-
door
-
hinges
-
door
?
Do
accumulate
?
The
not
there
not
oven
SAVE
TO
...
this
energy.
oven
ifitis
to
the:
(brokenorloosened)
sealing
surfaces.
between
object
surfaces.
be
not
adjustedorrepaired
THESE
TO
AVOID
EXCESSIVE
oven
with the
It
is
important
damaged.
the
It
oven
INSTRUCTIONS
door
open,
not
to
defeat
is
particularly
face
front
by
and
anyone
POSSIBLE
MICROWAVE
since
open-door
or
tamper
important
the
except
with
door,
properly
that
or
operation
the
safety
the
oven
allow
soilorcleaner
qualified
can
interlock.
door
service
resultinharmful
close
properly
residue
personnel.
and
to
-4-
Please
to
read
use
all
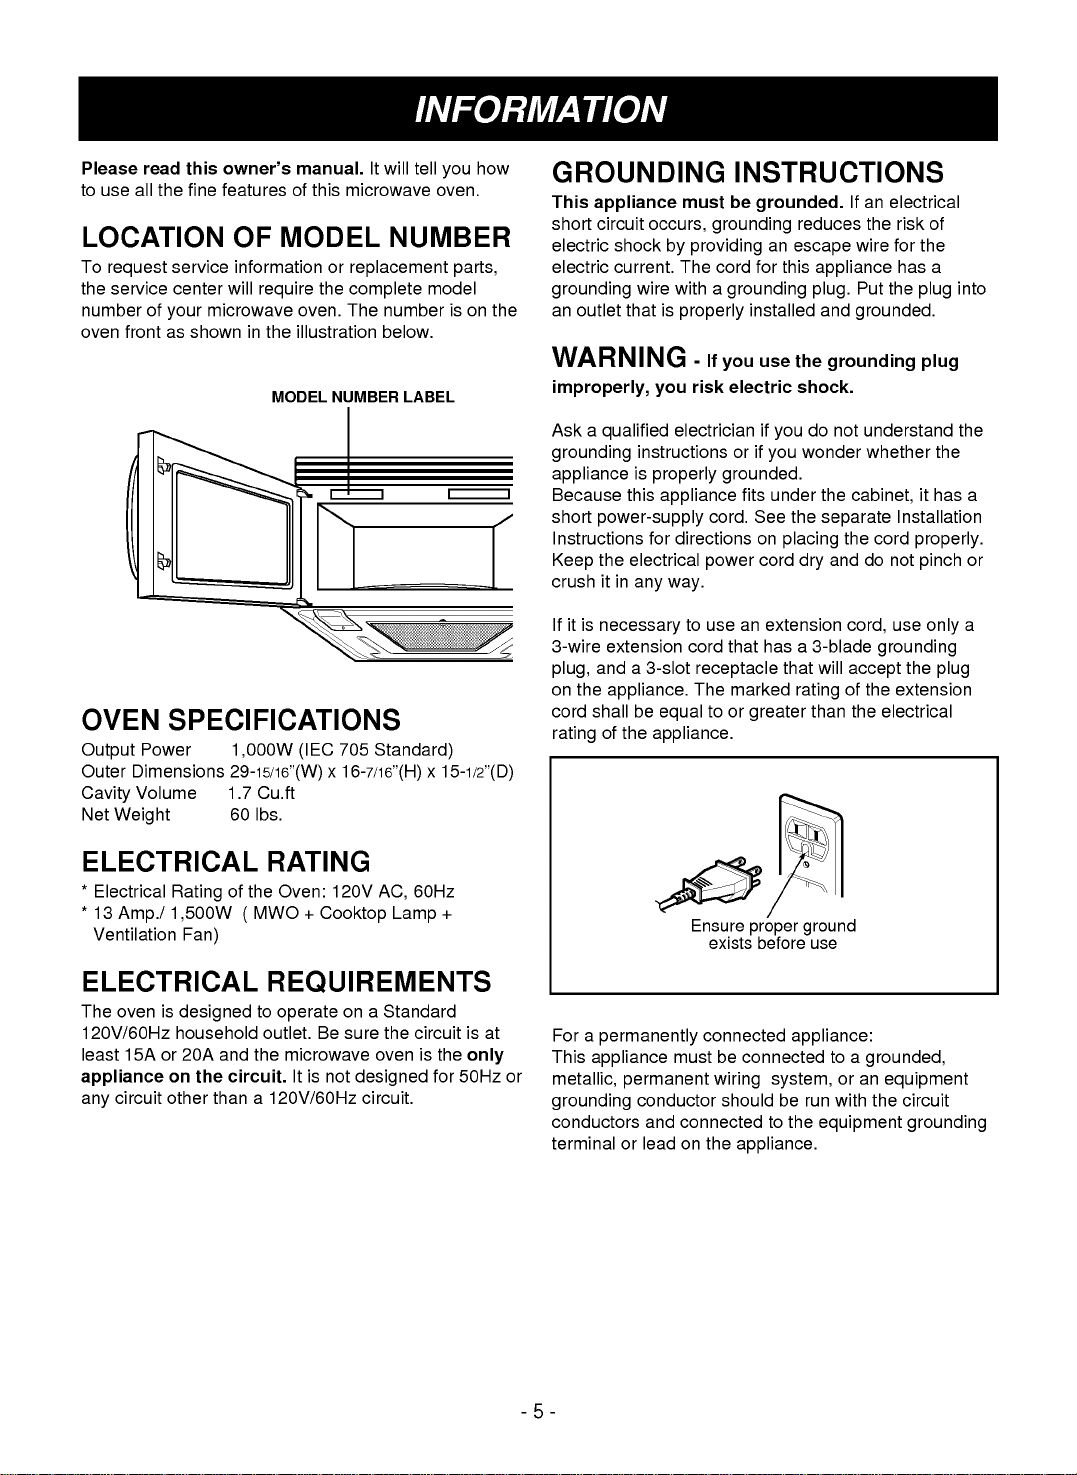
LOCATION
To
request
the
service
number
oven
of
frontasshown
the
service
your
owner's
this
fine
featuresofthis
center
microwave
OF
information
will
require
in
the
MODEL
manual.
MODEL
the
oven.
illustration
It
microwave
or
replacement
complete
The number
NUMBER
will
tell
NUMBER
below.
LABEL
you
oven.
model
isonthe
how
parts,
GROUNDING
This
appliance
short
circuit
electric
electric
shock
current.
grounding
an
outlet
WARNING
improperly,
Ask
a
qualified
grounding
applianceisproperly
Because
short
power-supply
Instructions
the
Keep
crushitin
must
occurs,
by
providing
The
wire
with
that
is
properly
-
risk
you
electrician
instructionsorif
this
appliance
for
directions
electrical
any
way.
INSTRUCTIONS
be
grounded.
grounding
an
cord
for
this
a
grounding
installed
If
use
you
electric
if
you
you
grounded.
fits
under
cord.
See
on
placing
cord
power
reduces
escape
appliance
plug.
and
the
grounding
shock.
do
wonder
the
the
separate
dry
Ifanelectrical
the
risk
wire
for
has
Put
the
grounded.
not
understand
whether
cabinet,
Installation
the
cord
and
do
not
of
the
a
into
plug
plug
the
the
it
has
a
properly.
or
pinch
OVEN
Output
Outer
Cavity
Net
SPECIFICATIONS
Power
Dimensions
Volume
Weight
ELECTRICAL
*
Electrical
*
13
Ventilation
Amp./
Rating
1,500W
ELECTRICAL
The
oven
is
120V/60Hz
least
15Aor20A
circuit
on
other
appliance
any
1,000W
(IEC
705
Standard)
29-15/16"(W)x16-7/16"(H)x15-1/2"(D)
1.7
Cu.ft
60
lbs.
RATING
of
the
Oven:
120V
MWO
(
+
Cooktop
AC,
Lamp
Fan)
REQUIREMENTS
designed
household
and
the
circuit.
thana120V/60Hz
to
outlet.
the
operate
Be
microwave
It
is
not
on
a
sure
oven
designed
circuit.
Standard
the
60Hz
+
circuit
is
the
for
is
only
50Hz
Ifitis
necessary
3-wire
extension
anda3-slot
plug,
on
the
appliance.
cord
shall
of
rating
at
or
For
This
metallic,
the
a
permanently
appliance
permanent
grounding
conductors
terminal
or
to
cord
be
equal
appliance.
Ensure
must
conductor
and
connected
leadonthe
use
an
that
receptacle
The
marked
to
or
greater
proper
exists
before
connected
be
connected
wiring
should
appliance.
extension
hasa3-blade
that
will
rating
than
ground
use
appliance:
to
be
the
or
run
with
equipment
system,
to
cord,
grounding
accept
of
the
the
electrical
a
grounded,
an
equipment
the
use
only
the
extension
circuit
grounding
a
plug
-5-
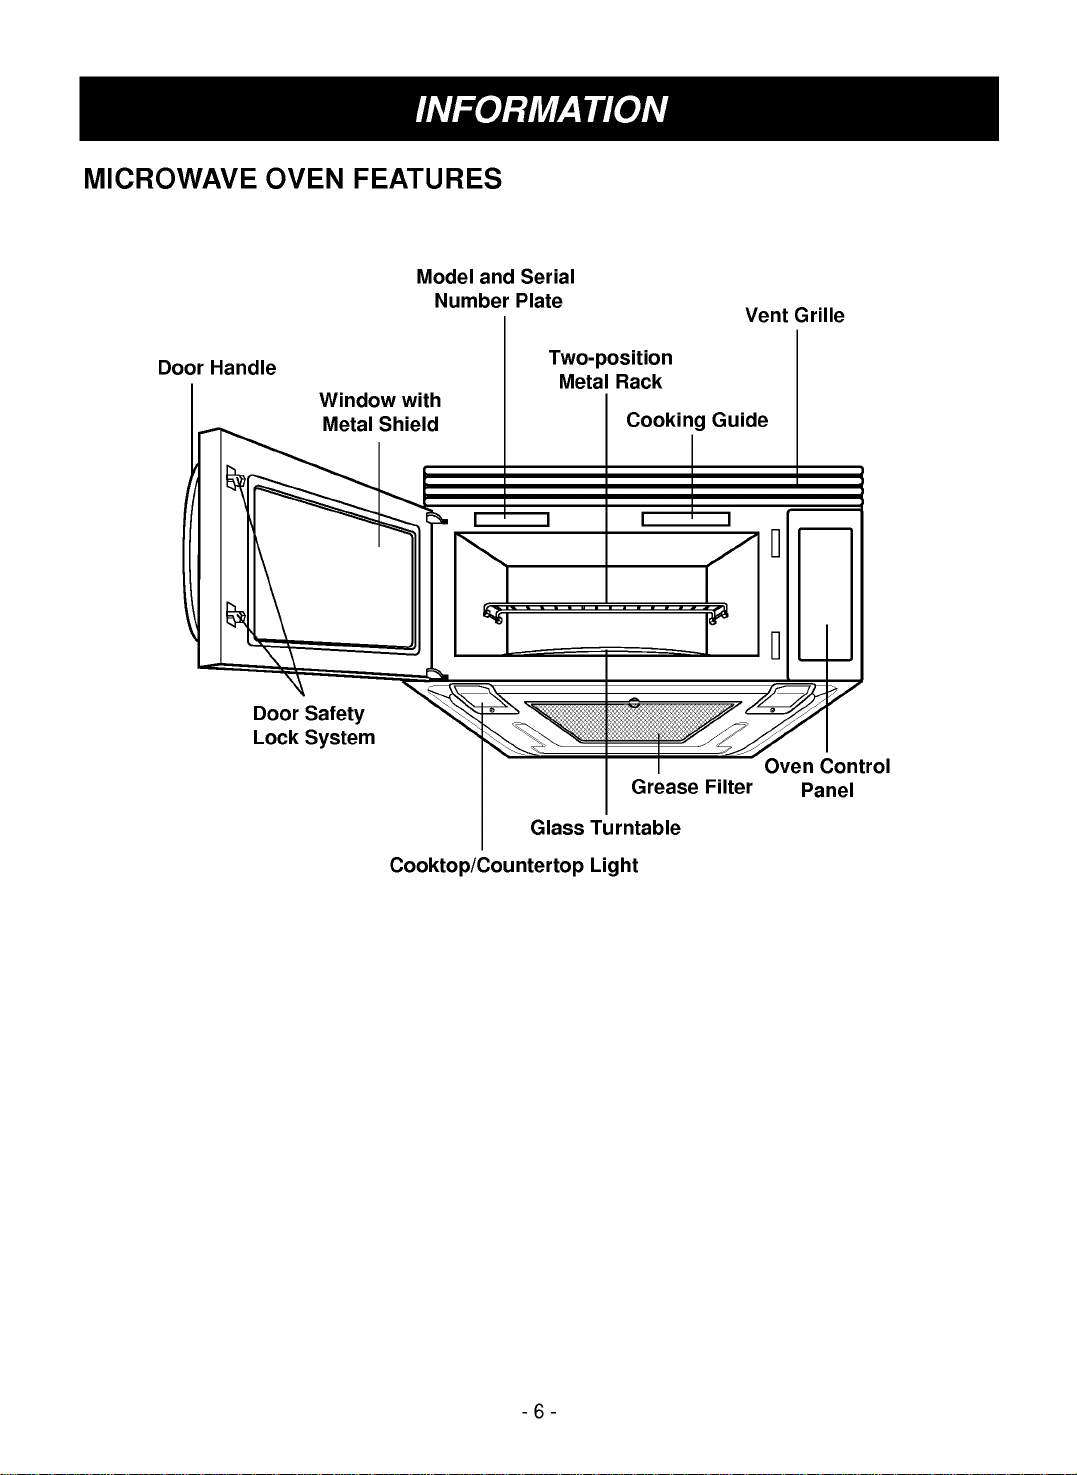
MICROWAVE
OVEN
FEATURES
Door
Handle
Door
Lock
Window
Metal
Safety
System
with
Shield
Model
Number
and
Serial
Plate
Two-position
Metal
Glass
Rack
Cooking
Grease
Turntable
Guide
Filter
Vent
Oven
Grille
Control
Panel
Cooktop/Countertop
-6-
Light

INFORMATION
OVEN
CONTROL
PANEL
1
2
3
5
More
One
Popcorn
Pizza
Less
Touch
Potato
Reheat
Control
123Power
Auto
Defrost
Beverage
Cook
Level
4
7
6
9
11
12
14
15
17
18
20
456
789Time
Stop/
Clear
Custom
Set
Custom
Cook
Turntable
On/Off
Vent
Hi-Low-Off
Hold
Warm
Light
Timer
Clock
Start
Ez
Kitchen
Light
Hi-Low-Off
0
Cook
On
Timer
Help
8
10
13
16
19
21
-7-
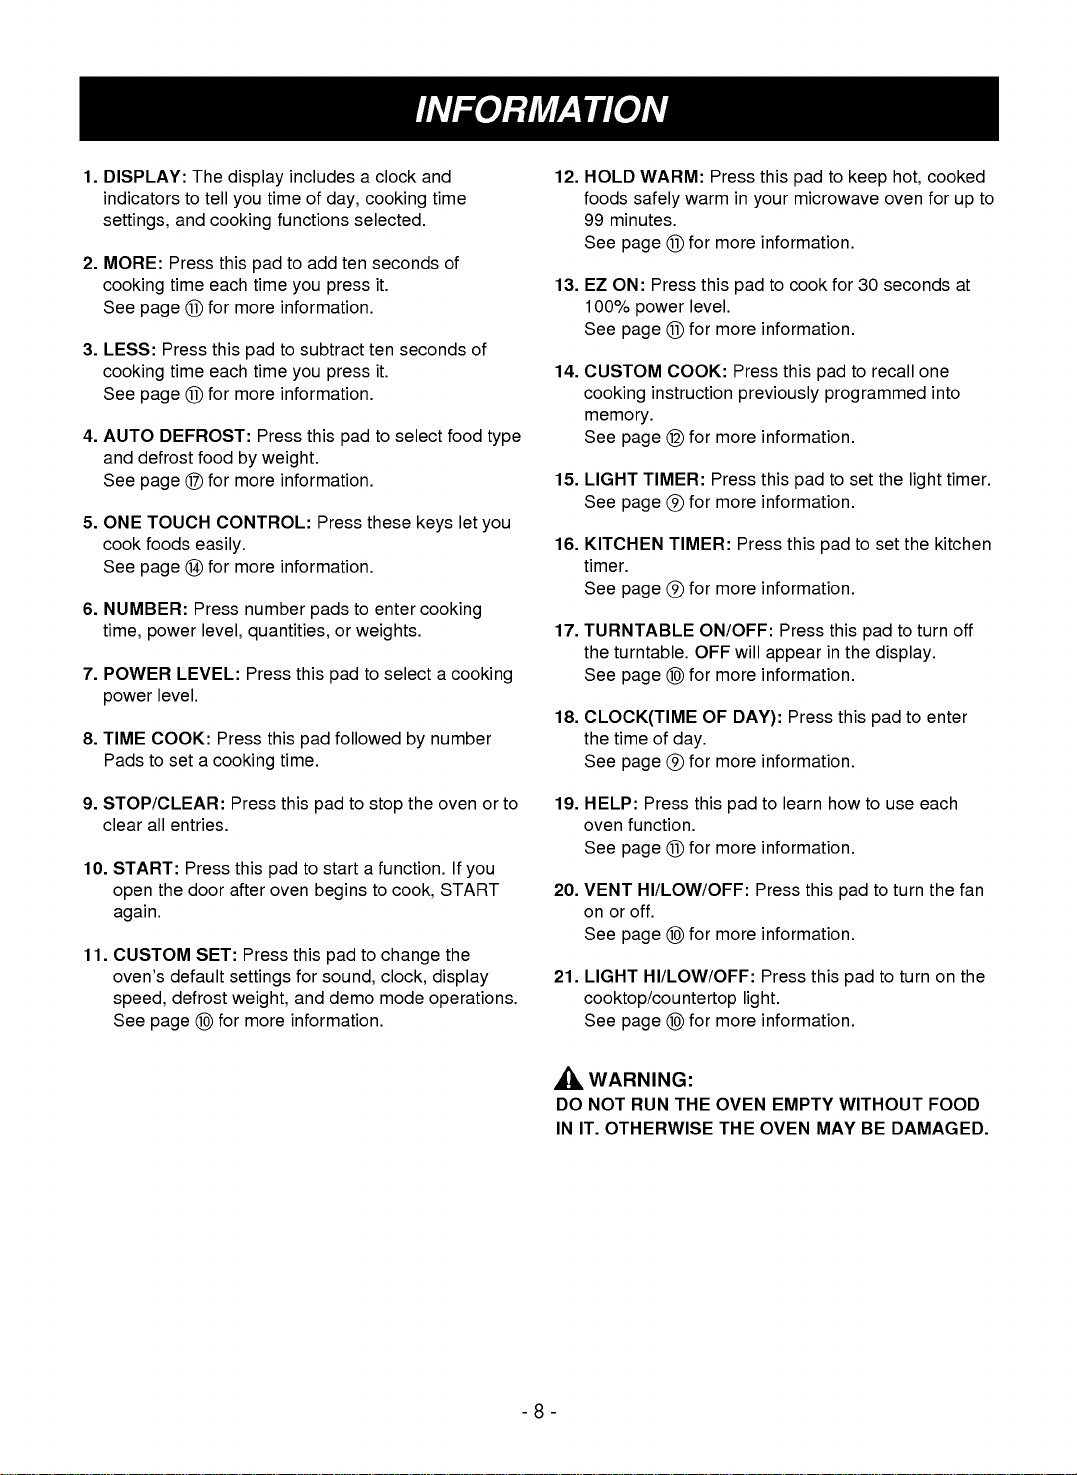
1.
DISPLAY:
indicatorstotell
settings,
2.
MORE:
cooking
See
3.
LESS:
cooking
See
4.
AUTO
and
See
5.
ONE
cook
See
6.
NUMBER:
time,
7.
POWER
power
8.
TIME
Pads
page
Press
page
DEFROST:
defrost
page
TOUCH
foods
page
power
level.
COOK:
to
Press
time
time
set
The
and
Press
LEVEL:
includesaclock
display
time
you
this
more
pad
more
by
more
CONTROL:
functions
pad
time
information.
to
time
information.
Press
weight.
information.
to
you
subtract
you
cooking
each
for
this
each
for
food
for
easily.
for
more
information.
number
level,
quantities,orweights.
Press
this
Press
this
a
cooking
pad
time.
of
add
this
Press
pads
day,
selected.
ten
press
press
pad
to
pad
followed
cooking
seconds
it.
ten
seconds
it.
to
select
these
enter
to
select
and
time
keys
cooking
a
number
by
of
of
food
let
cooking
type
you
12.
HOLD
foods
99
See
13.
EZ
100%
See
14.
CUSTOM
cooking
memory.
See
15.
LIGHT
See
16.
KITCHEN
timer.
See
17.
TURNTABLE
the
See
18.
CLOCK(TIME
the
See
WARM:
safely
minutes.
page
ON:
Press
power
page
instruction
page
TIMER:
page
page
turntable.
page
time
of
page
warm
for
level.
for
COOK:
for
for
TIMER:
for
for
day.
for
Press
more
this
more
more
Press
more
more
ON/OFF:
OFF
more
OF
more
this
padtokeep
in
microwave
your
information.
to
cook
pad
information.
Press
this
previously
information.
this
pad
information.
Press
this
information.
Press
will
appear
information.
Press
DAY):
information.
for30seconds
to
recall
pad
programmed
to
set
the
to
set
pad
this
pad
in
the
display.
this
pad
oven
hot,
the
to
to
cooked
for
one
into
light
kitchen
turn
enter
up
at
timer.
off
to
9.
STOP/CLEAR:
clear
10.
START:
open
again.
11.
CUSTOM
oven's
speed,
See
all
the
page
entries.
Press
door
SET:
default
defrost
Press
this
after
Press
settings
weight,
for
more
this
to
pad
oven
this
for
and
information.
to
pad
stop
start
a
function.
to
begins
padtochange
sound,
demo
clock,
mode
the
cook,
operations.
oven
If
you
START
the
display
or
to
19.
HELP:
Press
oven
function.
See
page
20.
VENT
HI/LOW/OFF:
on
or
off.
See
page
21.
LIGHT
HI/LOW/OFF:
cooktop/countertop
See
page
this
for
for
for
pad
more
more
more
to
learn
information.
Press
information.
Press
light.
information.
this
this
how
pad
pad
to
use
each
to
turn
the
fan
to
turn
on
the
WARNING:
DO
IN
NOT RUN
IT.
OTHERWISE
THE
OVEN
THE
OVEN
EMPTY
MAY
WITHOUT
BE
FOOD
DAMAGED.
-8-

OPERATION
LEARN
This
section
know
to
discusses
operate
CLOCK(TIME
This
oven
includesa24-hour
Example:
Stop/
Clear
Clock
00
8
Clock
KITCHEN
You
can
use
for
your
timing
Timer
ABOUT
your
TIMER
microwave
99
up
the
microwave
OF
To
1.
Press
2.
Press
(Press
PM.)
3.
Enter
number
4.
Press
minutes,
YOUR
concepts
oven.
DAY)
clock.
8:00
set
Stop/Clear.
Clock.
once
the
key.
Clock.
oven
99
behind
AM.
for
time
as a
seconds.
MICROWAVE
microwave
Please
twice
AM,
by
using
timer.
read
Use
the
for
the
this
cooking
information
LIGHT
You
automatically
on
and
introduces
before
can
set
at
the
Example:
Stop/
Clear
Light
Timer
2
Light
Timer
OVEN
TIMER
the
same
00
at
Turn
use.
time
LIGHT
any
you
on
time
every
1.
2.
3.
4.
to
the
to
turn
you
2:00
Press
Press
(Press
twice
Enter
LIGHT
Press
(Press
twice
basics
on
want.
until
day
AM,
Stop/Clear.
Light
once
for
the
to
Light
once
for
and
turn
PM.)
time
turn
PM.)
you
The
reset.
off
Timer.
for
Timer
for
off
you
on.
need
light
7:00
AM,
want
AM,
to
comes
AM.
the
again.
Kitchen
3
Start
Stop/
Clear
Timer
00
Example:
To
count
1.
Press
2.
Press
3.
Enter
number
4.
Press
When
will
and
displayed
3
minutes.
Stop/Clear.
Kitchen
the
time
key.
Start.
the
time
hear
seventh
TIMER
at
END
one
Timer.
by
is
using
over,
long
will
time.
be
the
you
beep
-9-
7
Light
Timer
NOTE:
Light
Timer
Stop/
Clear
NOTE:
If
operation,
00
To
reset
LIGHT,
Example:
want
you
you
should
5.
6.
that
repeat
To
cancel
1.
2.
to
cancel
Enter
LIGHT
Press
time
Press
Press
press
the
to
steps
the
the
time
you
to
turn
off.
Timer.
Light
turn
on
and
2to6.
Light
Timer.
Light
Stop/Clear.
Timer
Light
Light
key.
Timer
want
off
timer.
the
the
in

OPERATION
VENT
NOTE:
oven
Vent
Hi-Low-Off
gets
If
HI/LOW/OFF
the
too
automatically
oven.
the
oven.
off
It
When
manually.
TURNTABLE
Turntable
On/Off
NOTE:
Sometimes
touch.
and
WARNING:
DO
NOT
RUN
IN
OTHERWISE
IT,
CHILD
You
being
lock
may
accidentally
The
vapors
Press
twice
times
temperature
the
hot,
on
turn
may
stay
this
occurs,
For
turntable
large
to
Be
careful
after
cooking.
THE
LOCK
the
key
startedorused
To
set
Vent
for
to
at
on
ON/OFF
best
dishes.
turn
the
OVEN
THE
to
the
moves
from
Vent
Low
turn
around
fan
in
the
up
you
cooking
on.Itcan
the
turntable
turntable
touching
EMPTY
OVEN
prevent
Child
to
the
once
fan
the
the
LOW
an
can
Press
steam
surface
for
High
speed,
fan
off.
the
vent
setting
hourtocool
not
results,
be
Turntable
on
can
become
the
turntable
WITHOUT
MAY
BE
the
microwave
children.
by
lock.
and
cooking.
fan
or
microwave
hood
to
turn
the
leave
turned
or
off.
DAMAGED.
other
speed,
three
will
cool
off
during
FOOD
from
the
fan
the
for
On/Off
hot
LIGHT HI/LOW/OFF
Light
Hi-Low-Off
CUSTOM
You
can
clock,
display
operations.
See
following
NUMBER
1
to
2
3
4
5
change
Beep
control
Clock
control
Display
Demo
select
Defrost
mode
SET
the
speed,
chart
FUNCTION
ON/OFF
display
select
Press
twice
to
default
defrost
for
mode
weight
turn
more
Light
for
night
the
light
values
weight,
information.
NUMBER
once
1
2
1
2
3
2
1
1
2
1
2
for
light,
off.
for
beep
and
bright
or
demo
Sound
Sound
Clock
Clock
Slow
Normal
Fast
Demo
Demo
Lbs
Kg
three
sound,
RESULT
speed
speed
light,
times
mode
ON
OFF
ON
OFF
speed
ON
OFF
Stop/
Clear
0
or
Start
0
or
Start
1.
Press
2.
Press
than4seconds.
LOCKED
display
Stop/Clear.
and
hold
0
will
appear
window
with
or
Start
in
two
more
the
beeps.
Example:
Stop/
Clear
Custom
To
cancel
1.
Child
the
Press
and
hold
than4seconds.
disappear
beeps.
and
At
this
lock.
0
you
time
or
LOCKED
hear
the
Start
oven
more
will
two
is
ready.
Set
5
2
To
(from
change
Lbs.
1.
Press
2.
Press
3.
Press
4.
Press
defrost
to
Kg.)
Stop/Clear.
Custom
number
number
weight
Set.
5.
2.
mode.
-10-

HELP
The
Help
Help,
Example:
Stop/
Clear
Help
Popcorn
can
safely
Warm
Stop/
Clear
Hold
Warm
display
WARM
oven
by
Example:
Press
HOLD
You
microwave
Hold
automatically.
then
select
keep
for
itself
feature
To
1.
2.
3.
hot,
up
or
To
1.
2.
information
a
key.
learn
Press
Press
Press
cooked
to
99
to
follow
use
Press
Press
about
Popcorn.
Stop/Clear.
Help.
Popcorn.
food
minutes.
a
cooking
Hold
the
Stop/Clear.
Hold
Warm.
OPERATION
and
helpful
warm
in
You
can use
cycle
warm.
your
hints.
Ez
On
Ez
On
lets
Power.
100%
in
multiples
Example:
Stop/
Clear
Ez
MORE/LESS
using
cook
for
time
Example:
Stop/
Clear
the
a
longer
More
of
By
time
food
Pressing
each
seconds
cookorreheat
you
You
of
30
On
More
program
will
you
press
cooking
To
adjust
time
can
also
seconds,
To cook
1.
2.
or
Less
and
or
shorter
add
it.
time
for
1.
Press
use
up
Press
Press
When
will
you
END
keys,
etc.
time.
10
seconds
Pressing
each
1.75
the
a
longer
Stop/Clear.
food
for30seconds
ittoextend
to
99
minutes
for
1
minutes.
Stop/Clear.
Ez
On
the
cook
hear
four
will
display.
allofthe
can
be
adjusted
of
Less
time
you
oz
Popcorn
time.
twice.
time
the
will
press
cooking
59
seconds.
is
beeps
one
to
cooking
subtract
it.
cooking
at
time
over,
and
touch,
cook
time
10
NOTES:
?
Hold
?
Food
Hold
?
Pastry
uncovered
?
Complete
be
covered
Start
Warm
cooked
Warm.
items
operates
covered
(pies,
during
meals
during
3.
for
turnovers,
Hold
kept
Hold
Press
should
Warm.
warm
Warm.
2.
3.
4.
NOTE:
Press
Press
Press
Popcorn.
number
More.
Press
key
during
the
3.
More
time
or
Less
countdown.
Popcorn
Start.
3
to
99
on
minutes.
be
etc.)
a
dinner
covered
should
during
be
plate
More
could
up
-11-

OPERATION
CUSTOM
Custom
previously
quickly.
Example:
Stop/
Clear
Custom
Cook
2
Start
Example:
Stop/
Clear
Custom
Cook
Cook
placed
To
00
To
COOK
lets
memorize
recall
you
in
recall
memory
1.
Press
2.
Press
3.
Enter
4.
Press
the
1.
Press
2.
Press
one
and
for
2
minutes.
Stop/Clear.
Custom
the
Start.
Custom
Stop/Clear.
Custom
cooking
begin
cook
Cook.
instruction
cooking
Cook.
time.
Cook.
COOKING
LEVELS
HIGH
power
best
results
as
roasts
9
power
Example:
Stop/
7
Start
cooking
with
or
custards.
settings
To
at
Clear
30
Power
Level
7
AT
LOWER
does
foods
that
Your
in
additiontoHIGH.
cook
food
70%
power.
1.
Press
2.
Enter
3.
Press
4.
Enter
5.
Press
When
you
END
not
always
need
slower
oven
has
for
7
minutes
Stop/Clear.
the
cook
Power.
the
power
Start.
the
cook
will
hear
will
display.
POWER
give
cooking,
time.
level.
time
four
you
30
is
beeps
the
such
seconds
over,
and
Start
3.
Press
Start.
When
the
cook
time
is
you
END
will
will
hear
four
display.
beeps
over,
and
COOKING
POWER
Example:
8
Stop/
Clear
30
Start
AT
HIGH
To
cook
food
1.
Press
2.
Enter
3.
Press
When
you
END
for
8
minutes
Stop/Clear.
the
Start.
the
will
will
COOK
cook
cook
hear
four
display.
30
time.
time
seconds.
is
beeps
over,
and
-12-
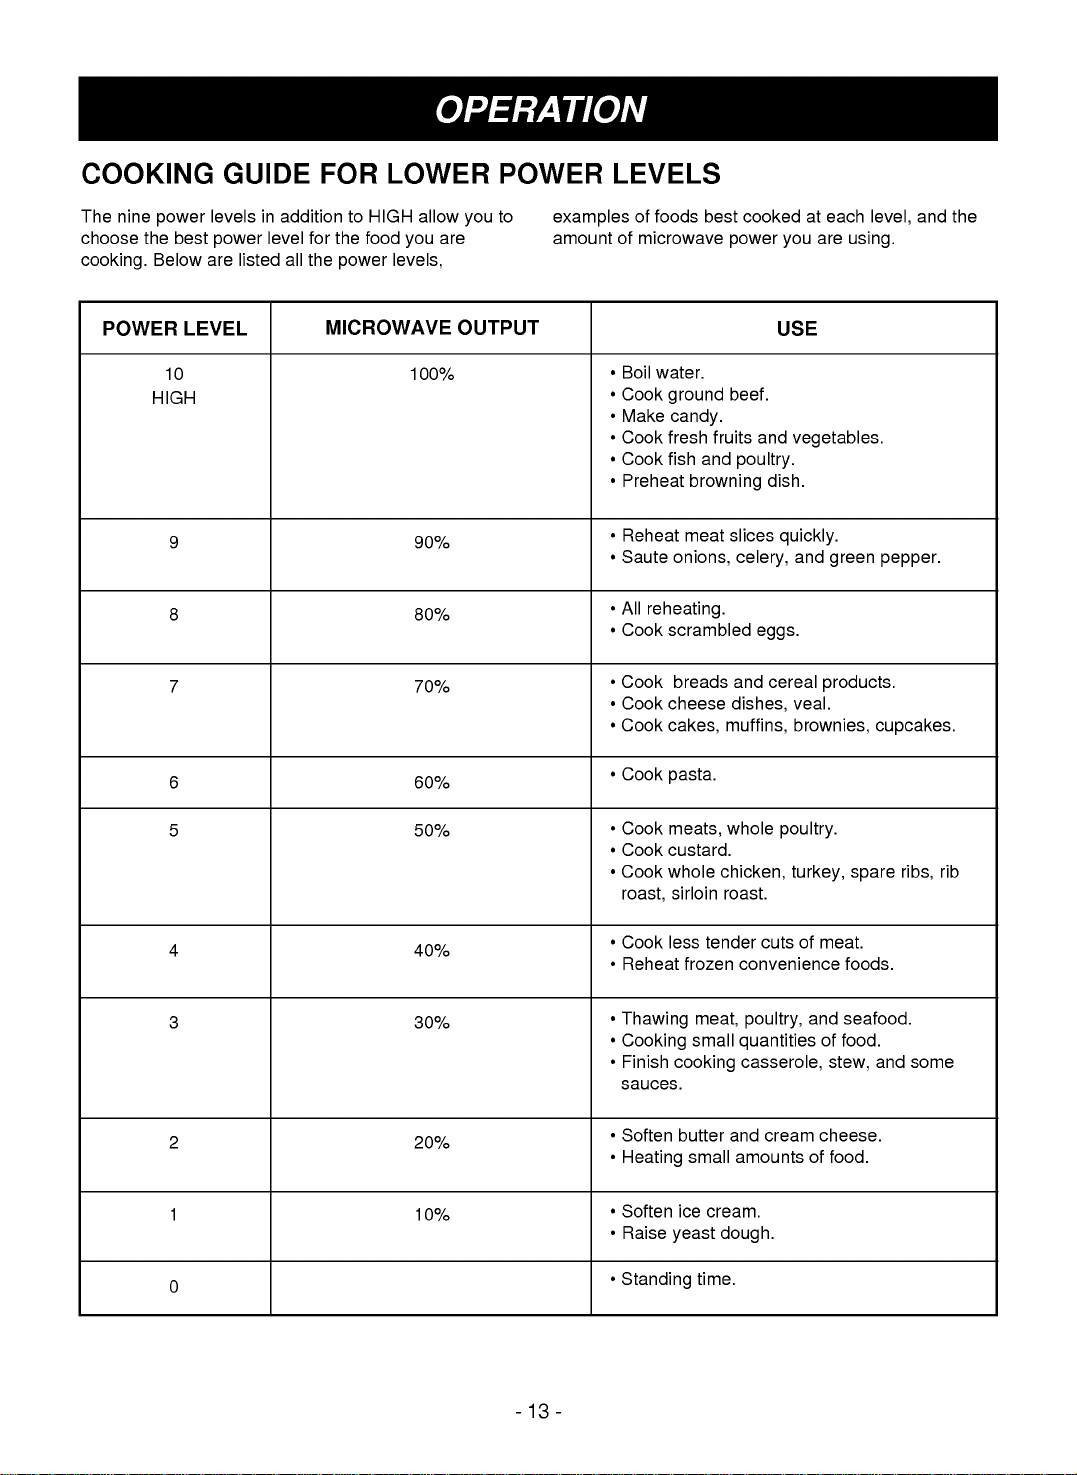
COOKING
The
nine
choose
cooking.
the
GUIDE
levelsinadditiontoHIGH
power
best
power
Below
are
listed
level
all
for
the
FOR
the
power
food
LOWER
allow
you
levels,
POWER
to
you
are
examples
amount
LEVELS
of
foods
of
microwave
best
cooked
power
you
at
are
each
using.
level,
and
the
POWER
HIGH
10
9
8
7
6
5
LEVEL
MICROWAVE
100%
90%
80%
70%
60%
50%
OUTPUT
?
Boil
?
Cook
?
Make
?
Cook
?
Cook
?
Preheat
?
Reheat
?
Saute
?
All
?
Cook
?
Cook
?
Cook
?
Cook
?
Cook
?
Cook
?
Cook
?
Cook
roast,
water.
ground
candy.
fresh
fruits
fish
and
browning
meat
onions,
reheating.
scrambled
breads
cheese
cakes,
pasta.
meats,
custard.
whole
sirloin
beef.
and
poultry.
slices
celery,
eggs.
and
dishes,
muffins,
whole
chicken,
roast.
USE
vegetables.
dish.
quickly.
and
cereal
veal.
brownies,
poultry.
turkey,
green
pepper.
products.
cupcakes.
spare
ribs,
rib
?
Cook
less
tender
4
3
2
1
0
40%
30%
20%
10%
?
Reheat
?
Thawing
?
Cooking
?
Finish
sauces.
?
Soften
?
Heating
?
Soften
?
Raise
?
Standing
frozen
meat,
small
cooking
butter
small
ice
yeast
time.
convenience
quantities
casserole,
and
amounts
cream.
dough.
cutsofmeat.
poultry,
cream
and
of
stew,
cheese.
of
foods.
seafood.
food.
food.
and
some
-13-

OPERATION
ONE
Your
Then
oven's
let
TOUCH
you
POPCORN
Popcorn
of
only
microwave
instructions.To
follow
Bag
Press
lets
commercially
one
package
this
Size-ounces
NUMBER
Popcorn
2
POTATO
The
Potato
and
cook
powers.
potatoes.
NOTE:
?
Cooking
potato.
?
Before
After
baking,
baking,
?
menu
microwave
you
popcorn
set
chart:
Example:
lets
you
times
let
Example:
CONTROL
has
1.75,
pop
packaged
at
a
time.
popper,
your
To
1.
2.
cook
You
are
based
pierce
stand
To cook
been
preprogrammed
oven
cook
and
3.0,
microwave
If
you
follow
microwave
3.5 3.0
1
a
3.0
pop
Press
Popcorn.
Press
number
When
the
will
you
END
hear
will
potatoes
can
choose
on
an
with
potato
for5minutes.
2
your
3.5
popcorn.
are
using
manufacturer's
oven
2 3
oz.
bag.
2.
cook
time
four
display.
with
preset
from
average
fork
several
Potatoes.
to
selections.
ounce
bags
a
correctly,
is
over.
beeps
times
1to4
8
ounce
times.
cook
Pop
1.75
and
food
automatically.
COOK
Cook
provides
Example:
Cook
3
2
Tell
four
the
preset
To cook
oven
categories
1.
Press
2.
Choose
3.
Enter
When
you
END
what
2
you
cups
Cook.
food
want.
for
cooking.
of
category.
Category
Fresh
vegetable
Frozen
vegetable
Rice
Casserole
Frozen
entree
quantity/servings.
Category
Fresh
vegetable
Frozen
vegetable
Rice
Casserole
Frozen
entree
the
cook
will
hear
four
will
display.
Rice.
Press
number
Number
1-4cups
1-4cups
1-2cups
1-4cups
10,
time
beeps
cups
is
20
pad
1
2
3
4
5
of
oz
over,
and
Potato
2
1.
Press
Potato.
2.
Press
When
you
END
number
the
will
will
cook
hear
four
display.
2.
time
is
beeps
over,
and
PIZZA
Pizza
lets
A
sliceisbased
NOTE:
?
Place
on
?
Do
not
Pizza
(Refrigerated)
you
a
low
cover.
Example:
2
reheat
on
plate
up
a5ounce
&
To
reheat
1.
2.
to
paper
Press
Press
When
you
END
3
will
slices
2
will
pizza.
slice.
towel.
slices of
Pizza.
number
the
cook
hear
display.
four
2.
time
Pizza.
beeps
is
over,
and
-14-
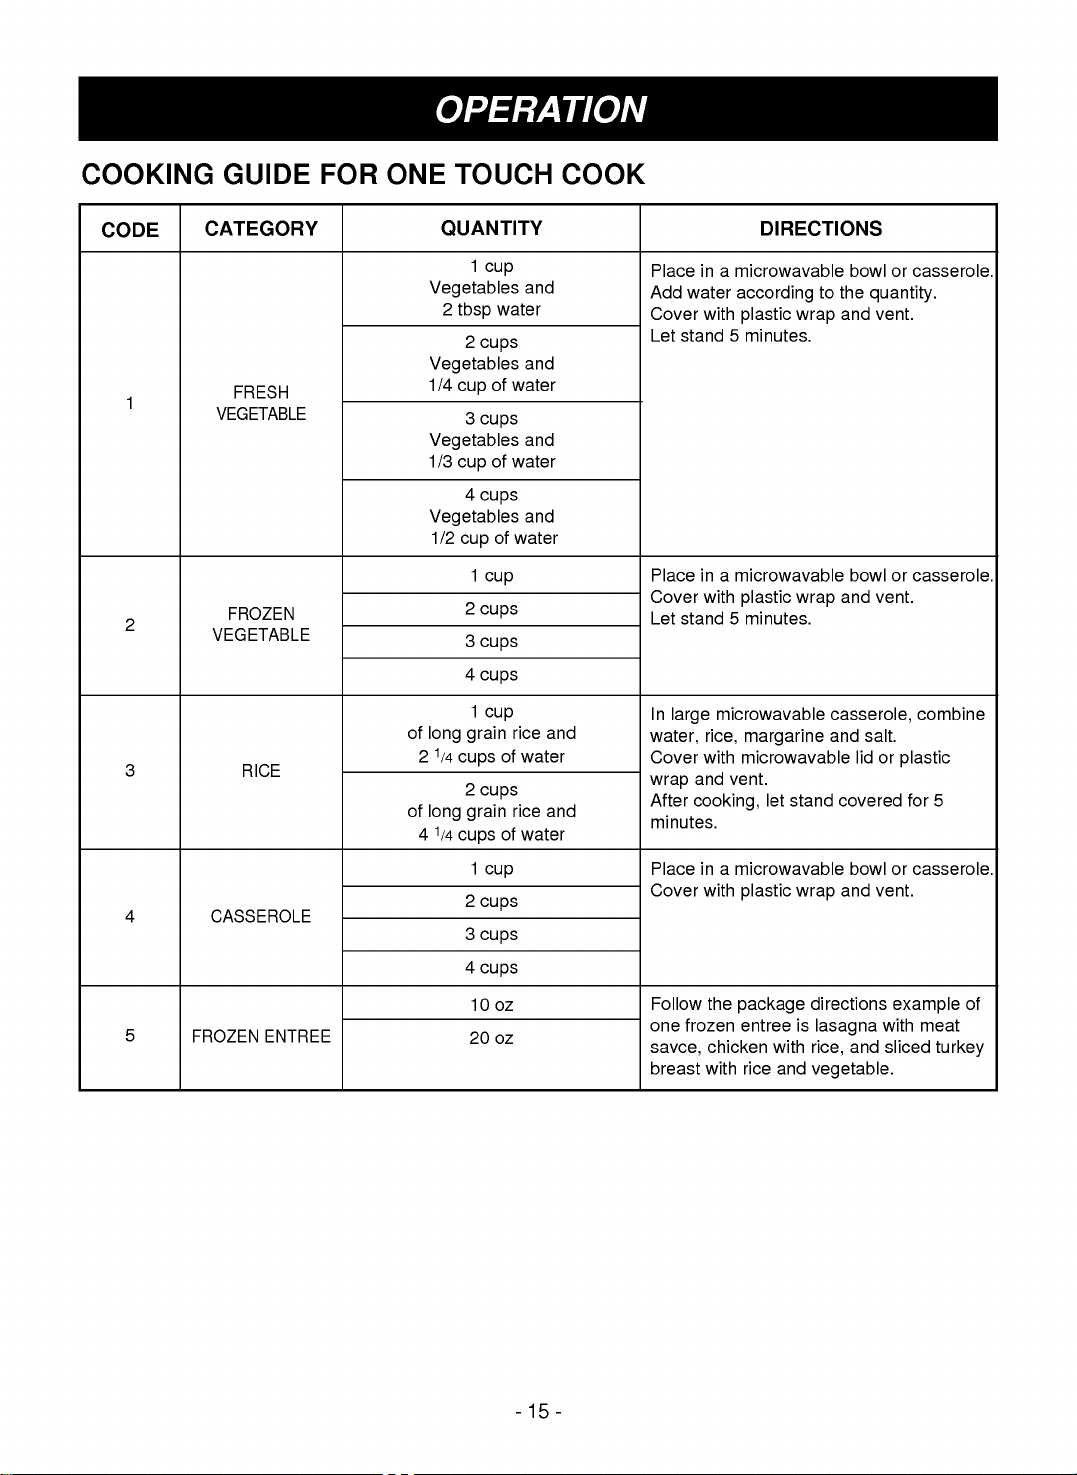
COOKING
GUIDE
FOR
ONE
TOUCH
COOK
CODE
CATEGORY
1
2
3
4
5
VEGETABLE
VEGETABLE
CASSEROLE
FROZEN
FRESH
FROZEN
RICE
ENTREE
QUANTITY
Vegetables
2
Vegetables
1/4
Vegetables
1/3
Vegetables
1/2
of
long
2
1/4
of
long
4
1/4
1
tbsp
2
cup
3
cup
4
cup
1
2
3
4
1
grain
cups
2
grain
cups
1
2
3
4
10
20
cup
cups
cups
cups
cup
cups
cups
cups
cup
cups
cup
cups
cups
cups
water
of
of
of
of
of
oz
oz
water
water
water
rice
water
rice
water
and
and
and
and
and
and
Place
inamicrowavable
Add
water
Cover
with
Let
stand5minutes.
Place
inamicrowavable
Cover
with
Let
stand5minutes.
In
water,
Cover
wrap
After
minutes.
Place
Cover
Follow
one
savce,
breast
microwavable
large
rice,
with
and
cooking,
inamicrowavable
with
the
frozen
chicken
with
DIRECTIONS
according
plastic
plastic
margarine
microwavable
vent.
let
plastic
package
entree
with
rice
and
to
wrap
wrap
casserole,
and
stand
wrap
directions
is
lasagna
rice,
vegetable.
bowlorcasserole.
the
quantity.
and
vent.
bowlorcasserole.
and
vent.
combine
salt.
lid
or
plastic
covered
and
for
5
bowlorcasserole.
vent.
example
with
meat
and
sliced
turkey
of
-15-

OPERATION
REHEAT
Reheat
Example:
provides
To
Reheat
1
2
four
reheat
preset
2
1.
Press
2.
Choose
3.
Enter
When
you
END
categories
Reheat.
food
of
category.
servings
Category
Dinner
plate
Soup/sauce
Casserole
Roll/Muffin
quantity/servings.
Category
Dinner
plate
Soup/sauce
Casserole
Roll/Muffin
the
cook
will
hear
four
will
display.
for
reheating.
Dinner
Press
number
2
3
4
Number
cups/Items
1-2
servings
1-4
1-4
1-4
pieces
time
is
beeps
plate.
pad
1
cups
cups
over,
and
BEVERAGE
Beverage
NOTE:
?
Reheat
?
Beverage
lets
times
Example:
Beverage
1
of
heat
you
based
maybevery
To
reheat
on
1.
2.
to
up
an8ounce
hot;
one
Press
Press
When
you
END
2
beverages.
remove
cup
Beverage.
number
the
will
hear
will
cup.
from
of
Beverage.
1.
cook
four
display.
oven
time
is
beeps
with
care.
over,
and
COOKING
CODE
1
2
3
4
GUIDE
CATEGORY
DINNER
SOUP/SAUCE
CASSEROLE
ROLL/MUFFIN
PLATE
FOR
REHEAT
SERVING
1
serving
2
servings
1
cup
2
cups
3
cups
4
cups
1
cup
2
cups
3
cups
4
cups
1
piece(2oz.)
2
pieces(4oz.)
3
pieces(6oz.)
4
pieces(8oz.)
AMOUNT
(small)
(large)
-16-
Placeinshallow
Cover
with
vented
Placeinshallow
Cover
with
vented
Place
inamicrowavable
Cover
with
plastic
Place
on
not
paper
cover.
Do
DIRECTION
microwavable
plastic
microwavable
plastic
wrap.
towel.
casserole.
wrap.
casserole.
wrap.
bowlorcasserole.

OPERATION
AUTO
Your
microwave
sequences.
defrost
below
three
defrost
Defrost
DEFROST
Using
frozen
provides
Example:
Stop/
Clear
Auto
1
1
2
Start
Start
oven
AUTO
foods.
some
sequences.
To
is
preset
DEFROST
The
Defrost
basic
defrost
1.
Press
2.
Press
3.
Choose
Category
Steaks/Chops
4.
Enter
5.
Press
6.
After
is
over,
prompt
Open
and
portions.
7.
Close
8.
When
over,
beeps
NOTE:
with
three
Sequence
guidelines
1.2
lbs.
Stop/Clear.
Auto
food
Meat
Poultry
the
weight.
Start.
1/2ofthe
The
you
door,
shield
any
the
door
the
defrost
will
you
and
END
If
do
you
door
within
the
display
the
countdown.
defrost
is
the
for
using
of
meat.
Defrost.
category.
Press
defrost
display
to
turn
turn
food
warm
and
hear
will
not
3
will
best
Table
number
1
2
3
will
food
over,
restart.
time
is
four
display.
open
seconds,
resume
way
the
pad
time
over.
the
to
Weight
You
are
and
4
However,
you
weight
you
decimals.
DEFROSTING
?
?
?
?
?
?
?
?
probably
ounces
ounces
must
on
can use
equals
specify
EQUIVALENT
OUNCE
11.2
12.0
12.8
14.4
16.0
When
using
is
the
net
of
weight
Use
Auto
best
gives
minimum
food
has
does
not
always
program
defrosting
If
food
the
20
minutes,
The
shape
Shallow
than
rectangular
a
deep
Separate
defrost
pieces
You
can
foods
like
the
foil
must
causes
Shield
start
For
includedinthe
areas
to
better
arcing,
become
conversion
usedtofood
that
are
fractions
1/4
in
order
pound).
to
enter
pounds
the
food
package
the
following
WEIGHT
1.6
3.2
4.0
4.8
6.4
8.0
9.6
TIPS
Auto
Defrost,
weightinpounds
the
food
minus
Defrost
of
been
maintain
piecesasthey
use
chicken
results
0˚F
stored
time)
is
stored
enter
of
the
block.
more
small
not
which
of
results,
defrosting
only
when
(taken
a
temperature
a
lower
to
prevent
a
lower
package
packets
easily.
pieces
wings,
touch
food
warm.
a
in
outside
can
with
preset
chart
weights
of
food
and
tenths
isinfractions
chart
to
NUMBER
.10
.20
.25
.30
.40
.50
.60
.70
.75
Three-Quarters
.80
.90
1.00
the
and
the
container).
for
raw
food.
foodtobe
directly
a
refrigerator-freezer
food
weight
cooking
the
food
alters
defrost
begin
of
leg
tips,
the
sideofthe
damage
small
a
pound
weight
of
convert
DECIMAL
One-Quarter
One-
One
weight
tenths
Auto
thawed
from
a
of
5˚F
(for
the
freezer
weight.
the
more
to
defrost.
aluminum
and
the
pieces
beinginpounds
in
a
Half
to
true
defrosting
fish
oven.
oven
standing
time.
(for
example
Auto
pound.
of
a
the
weight
AFTER
Pound
Pound
Pound
be
entered
of
pounds
Defrost
is
a
freezer).
or
below,
a
shorter
food.
for
up
quickly
Separated
foiltoshield
tails,
Foil
lining.
of
foil
is
time
Defrost,
If
the
pound,
Pound
(the
that
to
time.
but
if
they
to
If
-17-
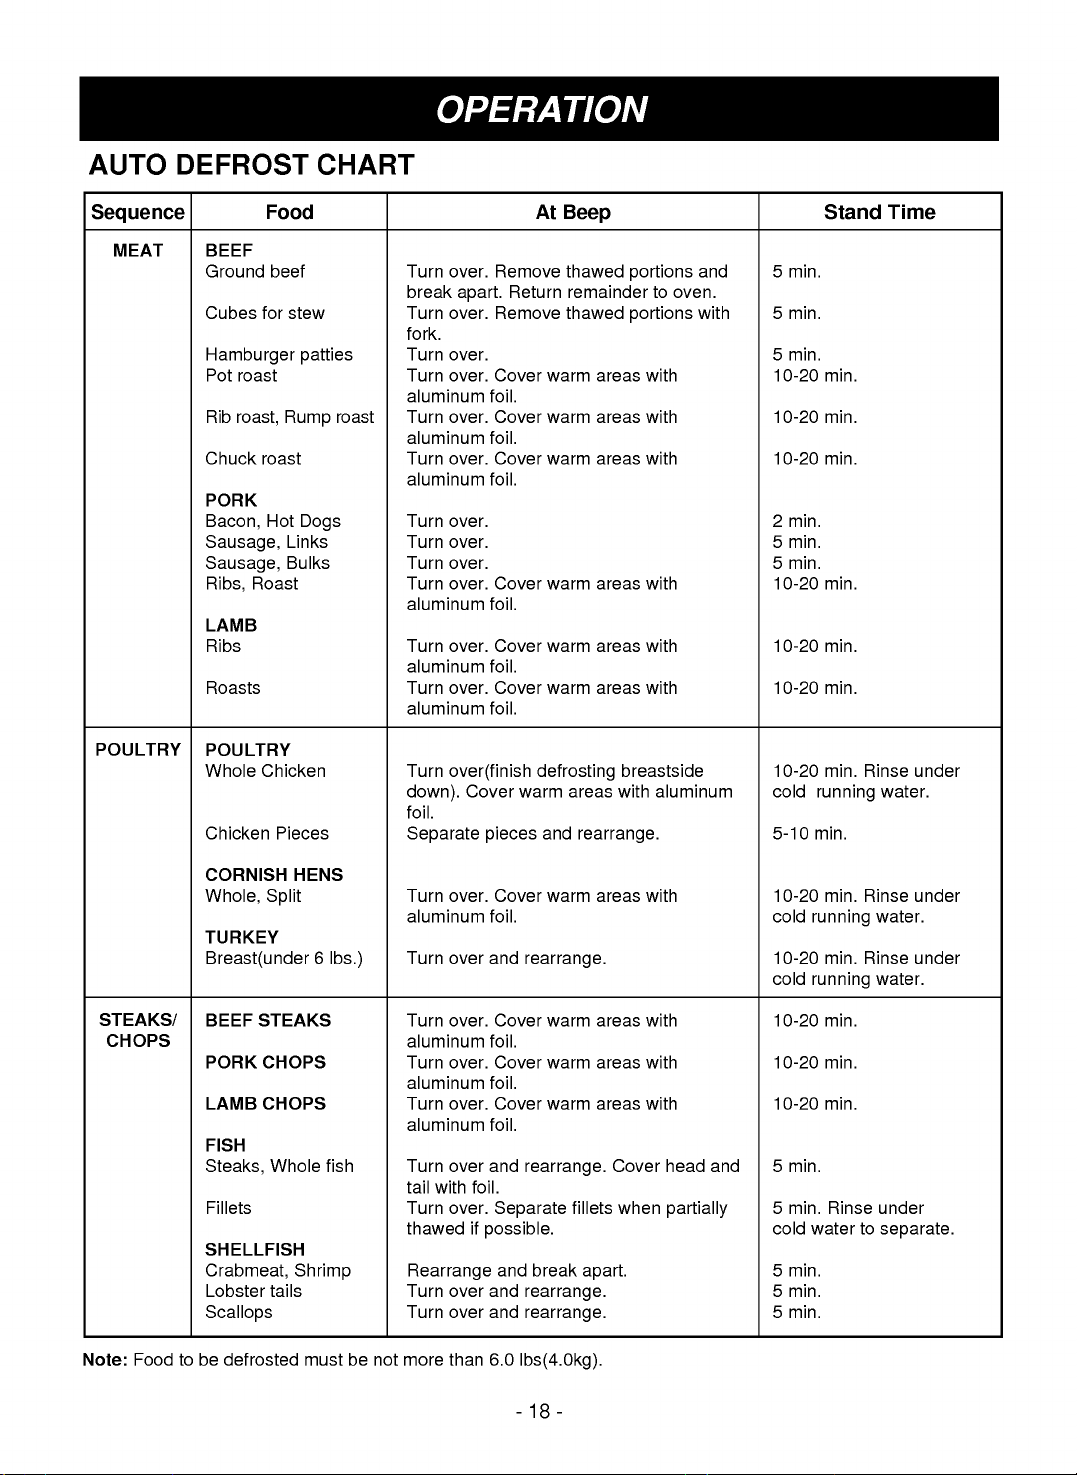
AUTO
DEFROST
CHART
Sequence
MEAT
POULTRY
BEEF
Ground
Cubes
for
Hamburger
Pot
roast
Rib
roast,
Chuck
roast
PORK
Bacon,
Sausage,
Sausage,
Roast
Ribs,
LAMB
Ribs
Roasts
POULTRY
Whole
Chicken
Chicken
Food
beef
Hot
Pieces
stew
patties
Rump
Dogs
Links
Bulks
roast
Turn
over.
break
Turn
over.
fork.
Turn
over.
Turn
over.
aluminum
Turn
over.
aluminum
Turn
over.
aluminum
Turn
over.
Turn
over.
Turn
over.
Turn
over.
aluminum
Turn
over.
aluminum
Turn
over.
aluminum
Turn
over(finish
down).
foil.
Separate
apart.
Cover
pieces
Remove
Return
Remove
Cover
foil.
Cover
foil.
Cover
foil.
Cover
foil.
Cover
foil.
Cover
foil.
At
Beep
warm
warm
warm
warm
warm
warm
defrosting
warm
and
thawed
remainder
thawed
areas
areas
areas
areas
areas
areas
areas
rearrange.
portions
to
portions
with
with
with
with
with
with
breastside
with
aluminum
oven.
and
with
5
5
5
10-20
10-20
10-20
2
5
5
10-20
10-20
10-20
10-20
cold
5-10
min.
min.
min.
min.
min.
min.
Stand
min.
min.
min.
min.
min.
min.
min.
running
min.
Rinse
water.
Time
under
STEAKS/
Note:
CHOPS
Foodtobe
CORNISH
Whole,
HENS
Split
TURKEY
Breast(under6lbs.)
BEEF
STEAKS
PORK
CHOPS
LAMB CHOPS
FISH
Whole
Steaks,
fish
Fillets
SHELLFISH
Crabmeat,
Lobster
Shrimp
tails
Scallops
defrosted
must
be
not
Turn
over.
aluminum
Turn
over
Turn
over.
aluminum
Turn
over.
aluminum
Turn
over.
aluminum
Turn
over
tail
with
Turn
over.
thawed
Rearrange
Turn
over
Turn
over
more
than
Cover
foil.
and
Cover
foil.
Cover
foil.
Cover
foil.
and
foil.
Separate
if
possible.
and
and
and
6.0
-18-
warm
areas
rearrange.
warm
areas
warm
areas
warm
areas
rearrange.
fillets
break
apart.
rearrange.
rearrange.
lbs(4.0kg).
Cover
when
with
with
with
with
head
partially
and
10-20
cold
10-20
cold
10-20
10-20
10-20
5
5
cold
5
5
5
min.
min.
min.
min.
min.
min.
running
min.
running
min.
min.
min.
Rinse
water
Rinse
water.
Rinse
water.
under
to
separate.
under
under
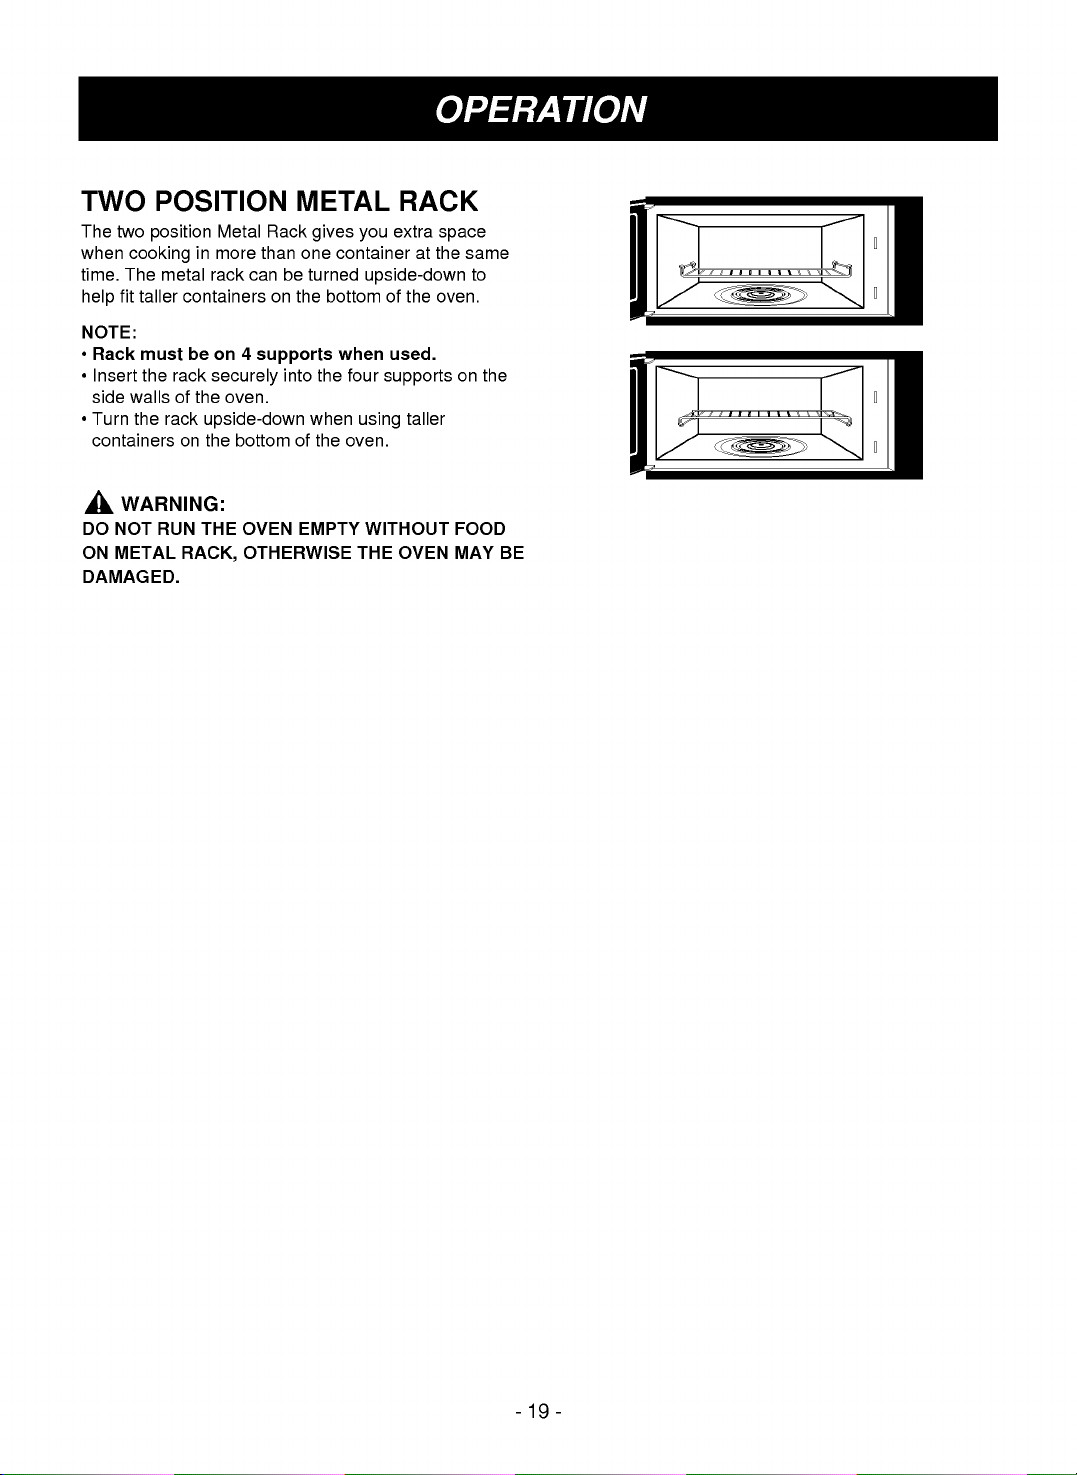
TWO
The
two
when
time.
help
NOTE:
?
Rack
?
Insert
side
?
Turn
containers
DO
NOT RUN
ON
METAL
DAMAGED.
POSITION
position
cooking
The
metal
fit
taller
must
the
rack
wallsofthe
the
rack
on
WARNING:
Metal
in
more
rack
containers
be
on
securely
oven.
upside-down
the
bottom
THE
RACK,
Rack
than
can
on
4
supports
OVEN
OTHERWISE
METAL
one
be
the
into
of
EMPTY
gives
turned
bottom
the
when
the
RACK
extra
you
containeratthe
upside-down
when
four
using
oven.
WITHOUT
THE
of
the
used.
supports
taller
OVEN
space
oven.
same
on
FOOD
MAY
to
the
BE
-19-
 Loading...