

LG MV-153XD Owner’s Manual

KM
OWNER'S
MANUAL,
INSTALLATION
website:
e-mail
COOKING
INSTRUCTIONS
http://www.lgservice.com
:
http://www.lgeservice.com/techsup.html
GUIDE
&
MV-1510M
MV-1511M
Table
Of
Contents
TABLE OF
SAFETY
Precautions
Excessive
Important
INFORMATION
Location
Electrical
Grounding
Microwave
Oven
Oven
OPERATION
Learn
Help
Clock.......................................................................
Kitchen
Custom
Vent
Light
Child
Ez
Hold
CookingatHigh
Cooking
Cooking
Cooking
Popcorn
Potato
Auto
Cooking
Auto
CONTENTS
....................................................................
To
Avoid
Microwave
Safety
.........................................................
of
Model
Requirements..........................................
Instructions
Oven
Specifications
Control
About
........................................................................
Hi/Lo/Off
Hi/Lo/Off.........................................................
Lock...............................................................
On
Warm..............................................................
Cook...............................................................
Reheat............................................................
.............................................................
Your
Timer
Set
.............................................................
.....................................................................
at
Lower
with
Guide
..................................................................
.....................................................................
Guide
Panel
.........................................................
.........................................................
More
for
for
...........................................
Possible
Energy
Instructions
Number
...........................................
Exposure
.................................
..................................
.....................................
To
4,5
Features......................................
................................................
................................................
Microwave
Cook
Power
Than
Lower
Auto
Oven........................
Power
.................................
Levels
.............................
One
Power
Cook
Levels
Cycle
.............
.................
Cook.................................
2
3
3
6
6
6
6
7
7
8
10
10
10
10
10
10
11
11
11
11
11
12
12
12
13
14
14
14
15
16
Guide
for
Auto
Cooking
Auto
Defrost............................................................
Defrosting
Auto
Defrost
COOKING
Getting
the
.......................................................
Tips
Chart..................................................
................................................................
Best
Cooking
Reheat..............................
Results
..........................
Fish&Shellfish.......................................................
Appetizers/Sauces/Soups.
.....................................
Meat........................................................................
Poultry
Pasta
....................................................................
And
Rice.......................................................
MAINTENANCE........................................................
Care
And
Cleaning
Charcoal
Cooktop/Night
Oven
Light
MICROWAVE
BEFORE
QUESTIONS
CALLING
Cleaning
the
Filter
Replacement
AND
.................................................
Grease
UTENSIL
Filters....................................
Replacement
Light
Replacement
.................................
.........................
........................................
GUIDE...............................
FOR
SERVICE.........................
ANSWERS.................................
INSTALLATION........................................................
Your
Parts,
Step
Step
Step
Step
Step
Step
SERVICE
2
3
4
5
6
First.....................................................
Safety
Materials............................................
Tools,
1
:
Prepare
:
Prepare
:
Prepare
:
Prepare
for
:
Install
:
Attach
CENTERS
the
the
the
the
Electrical
Venting
Venting
Wall
Connections...........
Upper
.....................
......................
Cabinet
System
Blower
and
Installation............................................
the
the
Mounting
Oven
Plate..........................
to
the
Wall
......................
LISTING.............................
16
17
17
18
20
20
20
21
21
23
24
25
25
25
25
26
26
27
28
28
29
29
32
34
35
37
39
41
42
44-47
-2-
Safety
Do
(a)
open
harmful
important
interlocks.
Do
(b)
face
to
PRECAUTIONS
not
attempttooperate
since
open-door
exposure
not
to
not
place
any
and
the
door
accumulate
defeat
on
EXPOSURE
operation
to
microwave
or
object
or
allow
sealing
MICROWAVE
this
oven
can
energy.
tamper
between
soilorcleaner
surfaces.
with
the
with
result
oven
the
the
in
It
is
safety
front
residue
door
TO
TO
AVOID
EXCESSIVE
ENERGY...
Do
(c)
(d)
not
operate
It
is
particularly
closes
to
(1)
(2)
(3)
The
anyone
properly
the:
Door
Hinges
Door
oven
except
personnel.
POSSIBLE
the
important
and
(bent),
and
latches
seals
and
should
not
properly
if
oven
that
it
that
there
is
damaged.
the
is
no
oven
(brokenorloosened),
sealing
surfaces.
be
adjustedorrepaired
qualified
service
door
damage
by
-3-

Safety
IMPORTANT
The
safety
oven.
your
To
reduce
?
Read
?
Do
not
close
?
Read
AVOID
MICROWAVE
?
Do
not
sulfide
oven
is
food.Itis
use.
?
Do
not
Do
not
near a
swimming
?
Do
not
Do
not
foodinthe
?
Clean
Do
not
the
filters.
SAFETY
instructions
the
risk
all
the
instructions
allow
children
supervision.
and
follow
POSSIBLE
ENERGY
use
corrosive
and
chloride,
specifically
not
designed
use
or
store
use
this
product
kitchen
use
leave
pool,
the
paper
sink,
and
cavity
cavity
the
ventilating
allow
grease
of
burns,
the
specific
EXPOSURE
in
designed
this
in
the
products,
when
to
INSTRUCTIONS
below
electric
before
to
use
found
chemicals
this
appliance.
for
industrial
appliance
near
a
wet
like.
for
storage
not
hood
accumulate
will
tell
you
shock,
using
this
oven
PRECAUTIONS
TO
on
page
or
vapors,
to
heat,
outdoors.
-
water
basement,
purposes.
cooking
in
use.
frequently.
on
how
fire,
your
without
EXCESSIVE
3.
This
cook,
or
laboratory
for
example,
or
utensils,
the
hood
to
injury
oven.
TO
such
type
or
dry
near a
use
your
WARNING
to
as
of
or
or
oven
persons,
?
Do
not
Itismade
?
When
touch
soaps
?
If
your
thoroughly
technician
?
To
avoidafire
-
Do
start
especially
combustibles
-
Do
cookies,
-
Do
to
inspect
remove
?
If
a
fire
-
Keep
-
Turn
-
Disconnect
power
and
avoid
or
exposure
use
cleaning
the
or
detergents
oven
not
overcook
a
fireinthe
not
store
not
use
them
should
the
the
at
harm
this
for
household
the
door,
is
dropped
checked
before
hazard:
if
you
in
combustible
in
etc.)
wire
purchased
before
start:
oven
oven
the
the
fuse
to
yourselfordamage
to
excessive
oven
for
commercial
use
door
and
use
only
and
mild,
a
or
byaqualified
usingitagain.
food.
Overcooked
oven.
Watch
have
paper,
the
oven.
the
oven.
twist-ties
items
placing
door
closed.
off.
or
cord
circuit
power
microwave
only.
the
surfaces
non-abrasive
sponge
damaged,
service
the
plastic,
items
in
the
for
wire
the
iteminthe
or
shut
breaker
purposes.
or
soft
have
foods
oven
or
(bread,
oven.
twist-ties
off
panel.
to
energy.
that
cloth.
it
can
carefully,
other
Be
sure
and
oven.
the
?
Use
Corrosive
cleaners,
?
Do
not
on
the
safety
the
door
?
When
?
Suitable
cooking
care
tamper
oven
switches
flaming
equipment
when
cleaning
may
door.
is
open.
foods
for
use
cleaning
agents
damage
with
The
to
make
above
36
the
under
the
the
built-in
oven
sure
both
inches
vent
such
filters.
has
the
the
gas
wide
as
safety
hood,
and
hood
filters.
lye-based
several
power
turn
electric
or
less.
switches
built-in
is
off
the
fan
oven
when
on.
-4-
?
To
-
This
Connect
See
on
-
Do
damaged
properly
-
Do
water.
-
Keep
-
Do
avoid
appliance
the
page
not
not
the
not
electric
it
only
electrical
6.
operate
cord
if
or
it
immerse
cord
use
extension
shock:
must
to
GROUNDING
this
or
has
the
away
be
a
properly
appliance
plug,
been
electrical
from
grounded.
grounded
if
it
is
damaged
heated
cord.
INSTRUCTIONS
if
it
has
not
working
or
dropped.
cord
surfaces.
outlet.
or
a
plug
in
Safety
?
To
-
Do
food.
cause
-
Do
syrup
-
Do
-
Do
microwave
-
Do
microwave
with
jars.
?
Do
?
Use
this
?
Do
avoid
not
not
not
not
not
oil
These
not
your
manual.
not
improperly
heat
Uneven
personal
heat
bottles.
deep-fat
attempt
heat
or
fat,
cover
oven
run
the
any
types
heating
injury.
small-necked
fry
home
oven.
the
following
oven:
sealed
items
may
or
block
for
only
oven
cooking
of
may
in
your
canning
whole
eggs
containers,
explode.
any
openings
the
operations
empty,
SAVE
some
bottles
baby
occur
and
containers,
microwave
in
items
in
the
or
without
foods.
or
possibly
such
oven.
your
in
the
shell,
closed
in
the
oven.
described
foodinit.
THESE
baby
as
water
glass
?
Do
not
?
Preserve
-
Do
not
-
Do
not
cooking
package
-
Do
not
turntable.
-
Keepabrowning
floor.
the
browning
incorrectly,
?
Installorlocate
with
the
in
?
This
appliance
service
service
INSTRUCTIONS
let
cord
hang
the
oven
heat
the
allow
the
packages
on
a
microwavable
cook
anything
Useamicrowavable
Carefully
read
dish.
could
you
this
provided
should
personnel.
facility
for
over
edge
floor:
oven
floor
film
gray
to
touch
directly
dishatleast
and
follow
If
use
you
damage
appliance
installation
be
serviced
Contact
examination,
the
of
table
or
counter.
excessively.
on
special
the
dish.
on
3/16
a
only
instructions.
oven
floor.
the
dish.
inch
the
instructions
browning
the
oven
in
accordance
microwave-
oven
above
dish
floor.
onlybyqualified
nearest
authorized
repair,oradjustment.
Put
floor
the
or
for
FEDERAL
STATEMENT
This
equipment
energy
in
strict
instructions,
television
found
pursuanttopart
and
accordance
reception.
to
comply
COMMUNICATIONS
U.S.A.
(
generates
if
not
installed
cause
may
with
18
designedtoprovide
such
interference
However,
not
occur
does
cause
reception,
equipment
to
correct
there
in
which
the
in
is
a
particular
interference
can
off
and
interference
following:
ONLY)
and
and
with
the
interference
It
has
been
limits
for
of
FCC
Rules,
reasonable
a
residential
no
guarantee
installation.Ifthis
to
radioortelevision
be
determined
the
on,
user
by
COMMISSION
uses
ISM
used
properly,
manufacturer's
to
tested
type
ISM
Equipment
which
protection
installation.
that
interference
by
is
encouraged
one
or
more
frequency
radio
and
are
against
equipment
turning
of
the
that
and
RADIO
?
is
?
FREQUENCY
Reorient
television.
Relocate
the
receiving
the
Microwave
INTERFERENCE
antenna
Oven
of
with
the
respect
radio
or
to
the
receiver.
?
Move
the
microwave
?
will
The
TV
modification
the
to
try
responsibility
the
Plug
that
the
different
manufacturer
interference
microwave
microwave
branch
to
of
caused
the
circuits.
is
this
user
oven
oven
oven
not
responsible
by
microwave
to
from
away
intoadifferent
and
the receiver
for
unauthorized
oven.
correct
such
the
receiver.
outlet
are
radio
any
Itisthe
interference.
so
on
or
-5-
Information
Please
to
read
use
all
the
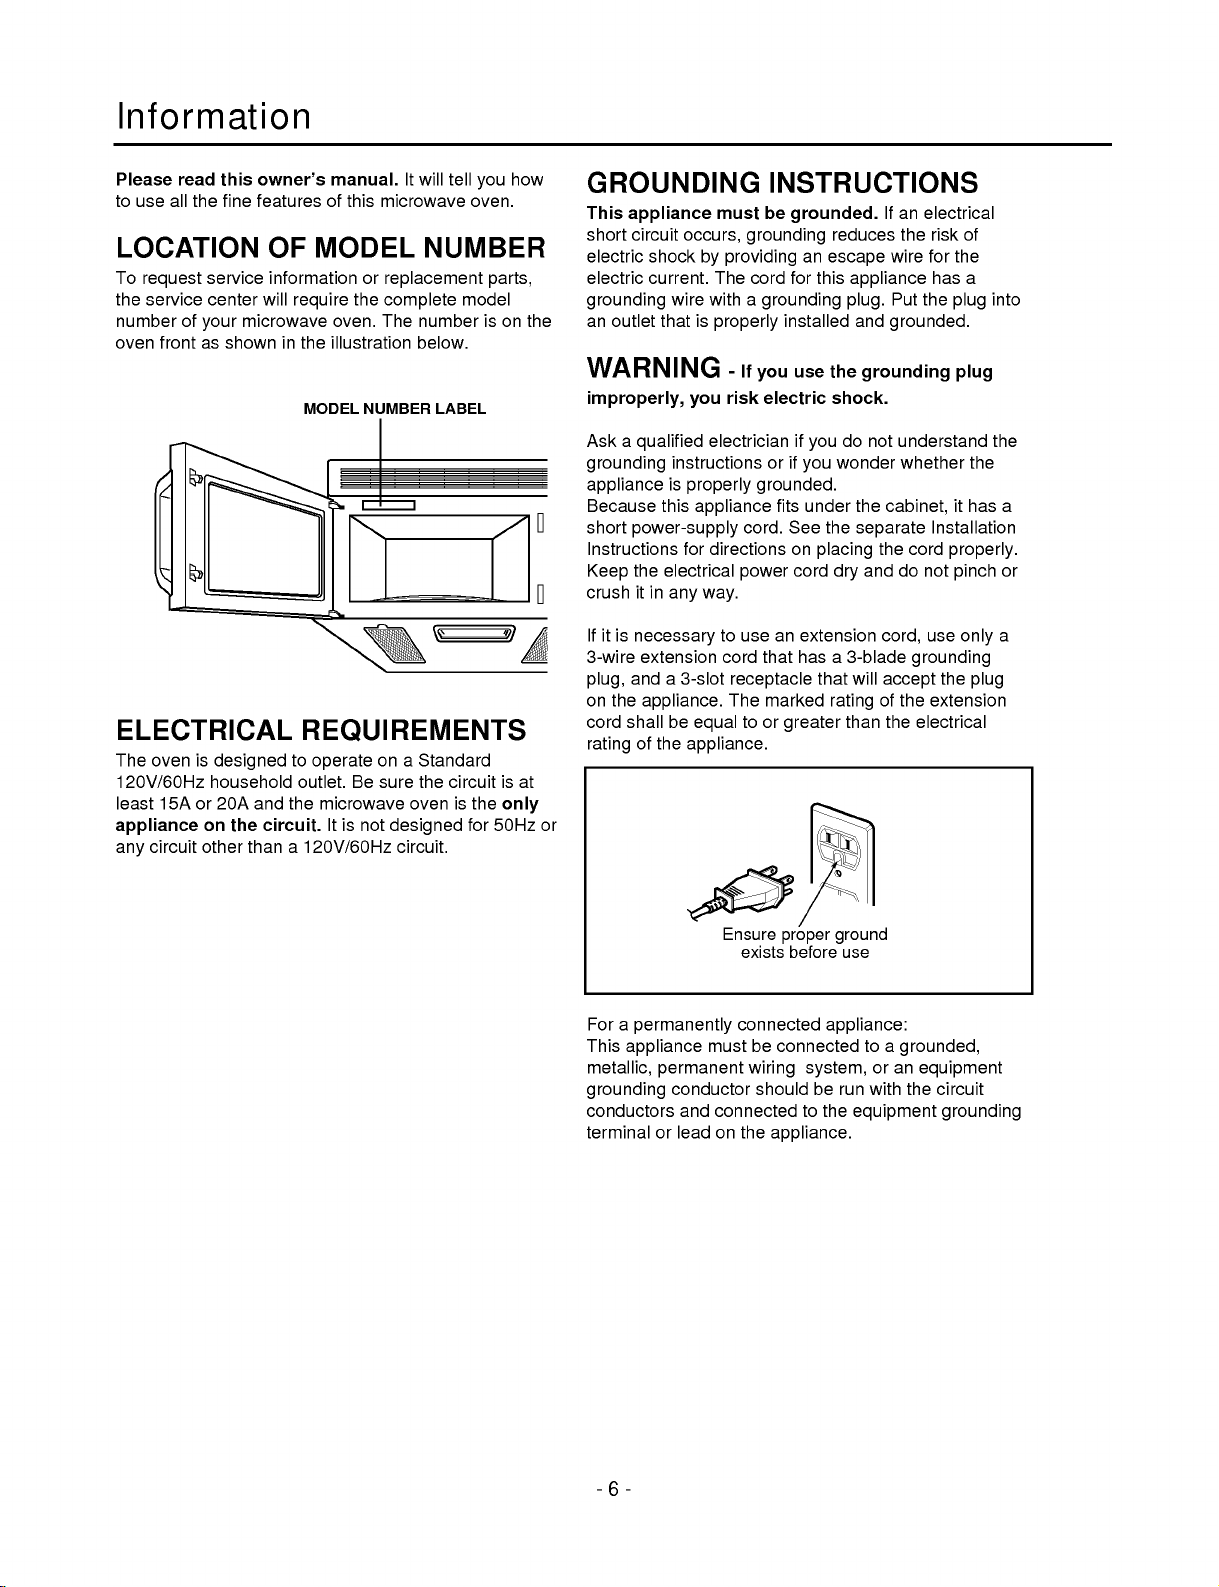
LOCATION
To
request
the
service
number
oven
of
your
frontasshown
ELECTRICAL
The
oven
is
120V/60Hz
least
15Aor20A
circuit
on
other
appliance
any
owner's
this
fine
featuresofthis
service
center
will
microwave
designed
household
and
the
circuit.
thana120V/60Hz
manual.
OF
MODEL
information
the
require
oven.
in
the
illustration
MODEL
REQUIREMENTS
to
operate
outlet.
Be
the
microwave
It
is
It
microwave
or
replacement
complete
The
NUMBER
on
a
sure
oven
not
designed
circuit.
will
tell
NUMBER
number
below.
LABEL
Standard
the
circuit
is
you
oven.
parts,
model
isonthe
the
for
is
only
50Hz
how
GROUNDING
This
appliance
short
circuit
electric
electric
grounding
an
outlet
shock
current.
wire
that
occurs,
by
with
is
WARNING
improperly,
Ask
a
grounding
applianceisproperly
Because
short
Instructions
Keep
crushitin
Ifitis
3-wire
plug,
on
the
cord
shall
rating
at
or
you
qualified
electrician
instructionsorif
this
appliance
power-supply
for
directions
the
electrical
any
way.
necessary
extension
anda3-slot
appliance.
be
equal
of
the
appliance.
INSTRUCTIONS
be
must
grounding
providing
The
cord
a
grounding
properly
-
If
you
risk
electric
grounded.
cord.
power
to
use
cord
that
receptacle
The
marked
to
or
grounded.
reduces
an
escape
for this
installed
use
the
shock.
if
you
you
fits
under
See
the
on
placing
cord
an
extension
hasa3-blade
that
rating
greater
appliance
plug.
and
grounding
do
not
wonder
the
separate
and
dry
will
than
Ifanelectrical
the
risk
wire
for
the
has
Put
the
plug
grounded.
plug
understand
whether
do
cord
not
it
Installation
properly.
pinch
use
only
cabinet,
the
cord,
grounding
the
accept
of
the
extension
the
electrical
of
a
the
has
plug
into
the
a
or
a
Ensure
exists
For
a
permanently
This
appliance
metallic,
grounding
conductors
terminalorleadonthe
permanent
conductor
and
connected
must
connected
-6-
proper
before
be
connected
wiring
should
appliance.
ground
use
appliance:
system,
be
run
to
the
to
a
grounded,
or
an
with
the
equipment
equipment
circuit
grounding
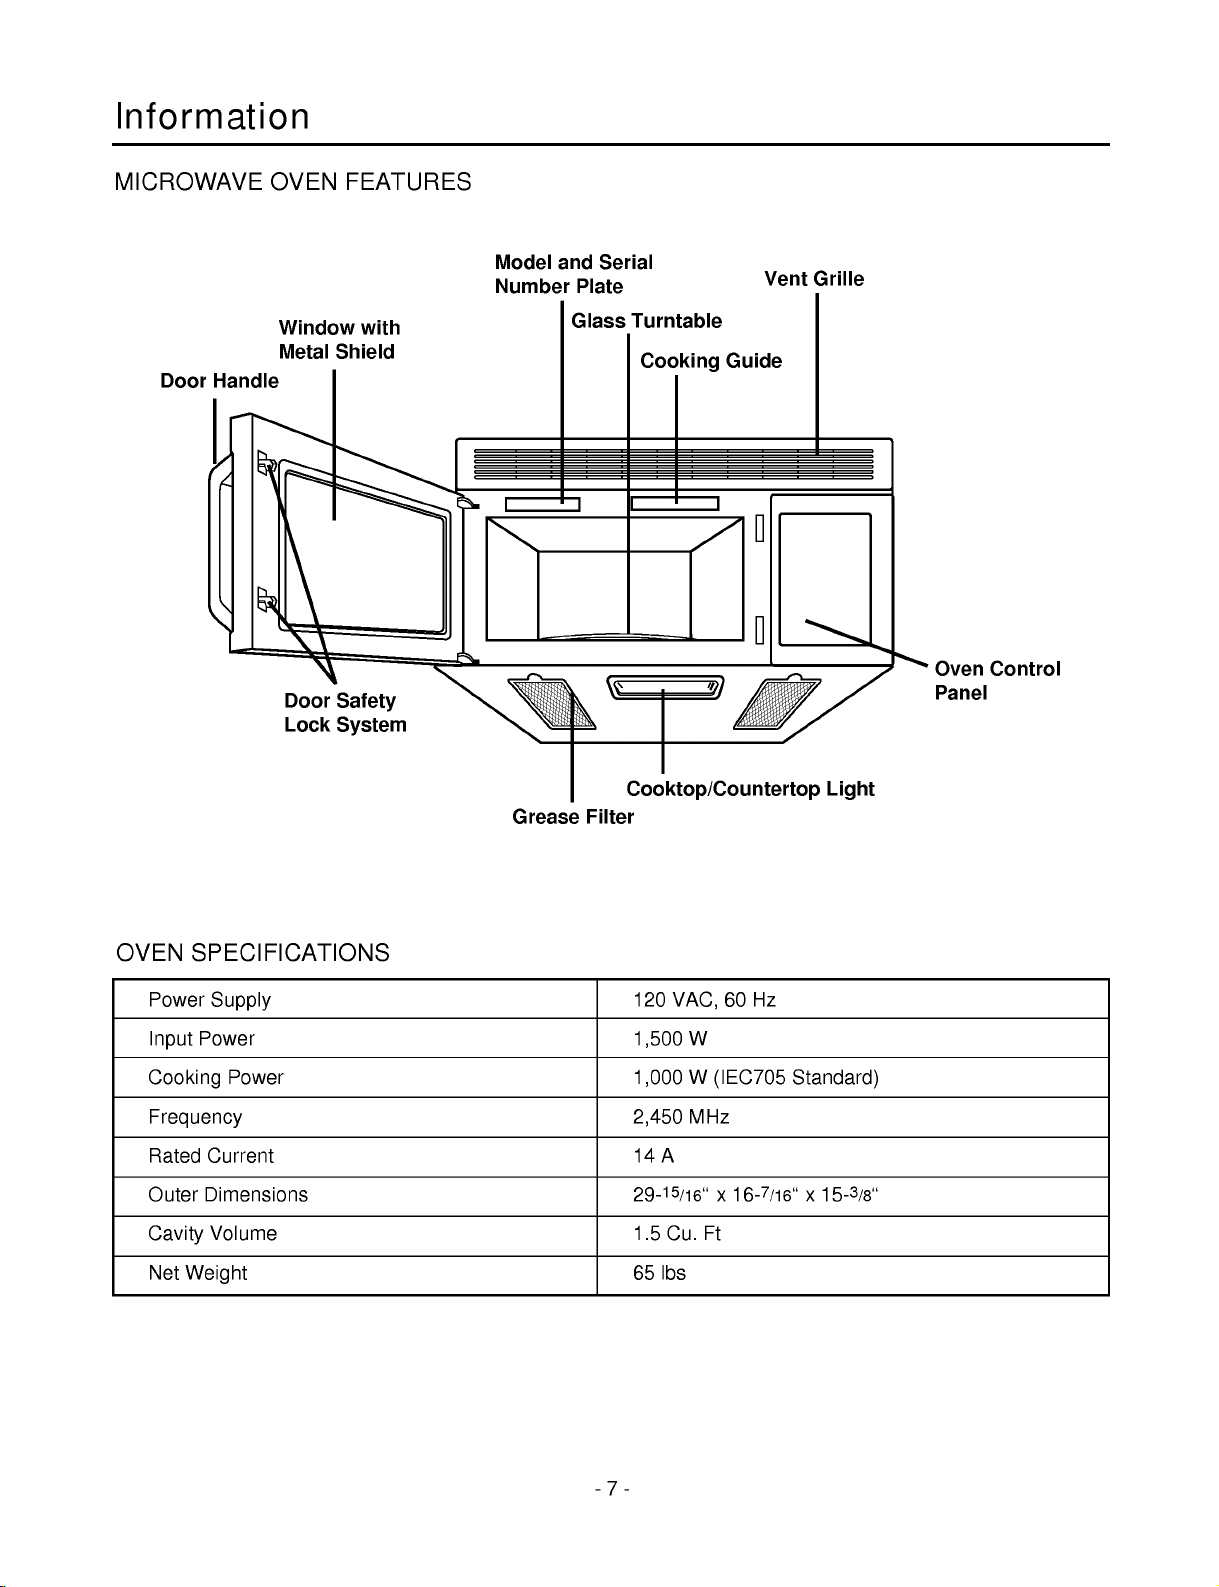
Information
MICROWAVE
Door
Handle
OVEN
Window
Metal
Door
Lock
FEATURES
with
Shield
Safety
System
Model
Number
and
Plate
Glass
Serial
Turntable
Cooking
Guide
Vent
Grille
Oven
Panel
Control
OVEN
Power
Input
Cooking
Frequency
Rated
Outer
Cavity
Net
SPECIFICATIONS
Supply
Power
Power
Current
Dimensions
Volume
Weight
Grease
Cooktop/Countertop
Filter
120
VAC,
W
1,500
W
1,000
MHz
2,450
14A
29-15/16"x16-7/16"x15-3/8"
1.5
Cu.
65
lbs
60
(IEC705
Ft
Hz
Light
Standard)
-7-

Information
OVEN
CONTROL
1
2
4
6
PANEL
3
5
10
12
13
15
16
7
8
9
11
14
17
18
19
-8-

Information
1.
Display:
indicatorstotell
settings,
2.
Popcorn:
microwave
your
information.
3.
Potato:
Touch
potatoes.
4.
Auto
Cook:
casseroles.
rice,
5.
Auto
Reheat:
plate,
soup/sauce,
See
page
6.
Auto
Defrost:
select
food
See
page
7.
Number:
time,
power
8.
Time
Cook:
The
and
See
16
17
Touch
Touch
Touch
type
level,
Touch
display
cooking
page
Touch
includesaclock
time
you
functions
this
pad
oven.
this
pad
14
this
See
page
this
See
for
to
pad
of
when
cook
pad
day,
page
more
to
14
casseroles,
for
more
information.
Meat,
poultry,
and
for
defrost
more
number
food
information.
pads
quantities,orweights.
this
pad
to
cooking
selected.
popping
14
from
information.
cook
for
more
to
reheat
roll/muffin.
fish.
Touch
by
to
enter
set
a
and
time
popcorn
for
more
1to4
vegetables,
information.
dinner
on
pad
weight.
cooking
cooking
time.
11.
Hold
Warm:
foods
warm
minutes
information.
in
12.
Clock:
See
page
13.
14.
Help:
oven
Custom
default
Touch
function.See
speed,
Touch
in
99
seconds.
Touch
10
for
this
Set:
Touch
settings
defrost
microwave
your
this
pad
more
pad
page
for
sound,
weight,
this
padtokeep
See
page
to
enter
information.
to
learn
10
this
padtochange
clock,
and
for
demo
oven
11
the
how
more
hot,
for
for
more
time
to
use
information.
display
mode
cooked
up
of
day.
each
the
scroll
to
oven's
99
operations.
See
15.
Fan
to
off.
16.
Stop/Clear:
clear
17.
Light
cooktop/countertop
information.
page
Hi/Lo/Off:
See
page
all
entries.
Hi/Lo/Off:
10
for
11
Touch
more
Touch
for
Touch
information.
this
more
this
pad
this
light.
to
pad
information.
to
stop
to
pad
See
page
turn
the
turn
11
the
for
oven
on
fan
more
the
on
or
or
to
9.
10.
Power
power
Kitchen
timer.
Level:
level.
Timer:
See
page
Touch
Touch
10
for
this
pad
this
more
to
select
to
set
pad
information.
a
cooking
the
kitchen
18.
Start:
open
start
Ez
19.
100%
information.
the
again.
On:
Touch
Touch
power
door
this
after
this
level.
pad
pad
oven
See
to
to
start
begins
set
page
a
function.
to
and
11
for
cook,
start
more
If
you
touch
quickly
at
-9-

Operation
LEARN
This
section
know
Help
HELP
The
helpful
Clock
This
oven
ABOUT
discusses
to
operate
pad
displays
hints.
Press
Example:
includesa24-hour
Example:
your
YOUR
the
microwave
HELP,
To
learn
concepts
feature
then
1.
Touch
2.
Touch
To
set
MICROWAVE
oven.
information
select
about
Popcorn.
Help
Popcorn
clock.
8:00
behind
DO
a
AM.
Please
NOT
key
pad.
OVEN
microwave
read
RUN
and
pad.
pad.
cooking
this
information
CAUTION
THE
OVEN
Kitchen
You
can use
the
Timer
and
introduces
before
EMPTY.
Timer
for
use.
microwave
your
timing
Example:
to
you
to
99
up
To
time3minutes.
1.
Touch
2.
Enter
number
3.
Touch
When
will
End
the
basics
oven
minutes,
the
the
hear
will
as
Kitchen
time
key
Start
time
seven
display.
you
a
timer.
99
pad.
pad.
need
seconds.
Timer
by
using
is
over,
beeps
to
Use
pad.
the
you
and
1.
2.
3.
Touch
(Press
twice
Enter
the
number
Touch
Clock
once
for
the
Clock
PM.)
time
key
pad.
for
pad.
by
AM,
using
pad.
Custom
You
can
change
clock,
display
operations.
See
following
NUMBER
1
2
3
4
5
Example:
Set
speed,
chart
FUNCTION
Beep
control
Clock
control
Display
Defrost
mode
Demo
select
the
ON/OFF
display
select
mode
To
change
(from
default
defrost
for
more
weight
Lbs.
1.
2.
3.
values
NUMBER
for
weight,
information.
and
beep
demo
Sound
Sound
Clock
Clock
Slow
Normal
Fast
Lbs.
sound,
mode
RESULT
ON
OFF
ON
OFF
speed
speed
speed
Kg.
Demo
ON
12121231212
Demo
OFF
defrost
to
Touch
Touch
Touch
weight
Kg.)
Custom
number
number
4
2
mode.
Set
pad.
pad.
pad.
-10-

Operation
Fan
Hi/Lo/OffThe
NOTE:
microwave
automatically
oven.
When
Light
Child
You
microwave
children.
The
the
programming
If
It
this
Hi/Lo/Off
Lock
may
Child
control
the
oven,
may
occurs,
lock
from
Lock
panel.
Example:
temperature
stay
vent
vapors
Touch
twice
for
times
to
the
faninthe
turnonat
on
up
Vent
Touch
twice
for
turn
the
the
control
being
featureisalso
Child
when
wiping
To
moves
from
Fan
Low
turn
the
to
fan
Light
night
light
panel
the
once
fan
the
too
gets
vent
LOW
an
hourtocool
starts
pad
light,
off.
to
steam
cooking
for
fan
accidentally
useful
Lock
prevents
the
control
set
the
Child
1.
Touch
Stop/Clear
and
other
surface.
fan
High
or
around
to
three
will
cool
the
speed,
off.
hot
hood
setting
automatically.
once
for
bright
or
three
times
prevent
startedorused
the
when
accidental
cleaning
panel.
Lock.
pad.
speed,
the
the
oven.
light,
to
by
Ez
On
A
time-saving
set
quickly
need
and
to
touch
Example:
NOTE:
If
you
minutes;
minute
Hold
You
can
oven
for
Hold
Warm
touch
up
Warm
after
to
keep
up
Ez
to
by
automatically.
Example:
pad,
start
Start
On,
3
99
cooked
99
itself
this
microwave
pad.
To
set
will
it
minutes,
min
59
minutes
or
To
simplified
Ez
On
1.
Touch
The
oven
and
display
counting
add
30
every
seconds.
food
warm
99
seconds.
to
follow
use
the
1.
Touch
2.
Touch
control
cooking
for2minutes.
Ez
without
On
pad
begins
shows
down.
seconds
will
touch
in
your
You
a
cooking
Hold
Warm.
Hold
Warm
Start
pad.
lets
you
4
times.
cooking
time
to
up
1
add
microwave
can use
cycle
pad.
the
3
Example:
2.
Touch
than4seconds.
will
window
To
cancel
1.
Touch
than4seconds.
will
two
oven
and
appear
with
the
child
and
disappear
beeps.
is
ready.
hold
in
two
hold
At
the
lock.
and
this
0
pad
LOCKED
display
beeps.
0
pad
LOCKED
you
time
more
more
hear
the
NOTES:
?
?
?
?
To
cycle:
?
?
?
-11-
Hold
Warm
seconds.
Food
cooked
Hold
Warm.
Pastry
uncovered
items
Complete
be
covered
make
Hold
While
you
are
instructions,
When
the
last
two
tones
and
display.
You
can
set
multi-cycle
operates
covered
(pies,
during
meals
during
Warm
programming
touch
cooking
"WARM"
Hold
cooking.
for
up
should
turnovers,
Hold
Warm.
warm
kept
Hold
Warm.
automatically
Hold
Warm
cycle
will
Warm
to
to
on
the
is
appear
follow
99
minutes
be
covered
etc.)
a
dinner
cooking
before
over,
Auto
should
follow
touching
you
in
the
Defrost,
99
during
be
plate
another
will
oven
could
Start.
hear
or

Operation
at
To
at
cooking
with
roasts,
To
at
Hich
Lower
settings
70%
Cooking
Example:
Cooking
HIGH
power
best
results
such
as
has10
power
Example:
cook
foods
baked
cook
Cook
food
1.
2.
Power
does
that
goods,
in
food
power.
1.
Power
for8minutes
Enter
Touch
the
cook
will
hear
END
will
not
always
need
or
addition
for7minutes
Enter
the
cook
Start
time
four
display.
Levels
slower
custards.
to
HIGH.
the
cook
30
seconds.
time.
pad.
is
over,
beeps
give
you
cooking,
Your
30
seconds
time.
When
and
the
you
oven
Cooking
For
best
Level
foracertain
Level
for
to
change
three
cycles
lastat0%
Example:
with
results,
another
from
if
the
power.
To
cook
then
some
one
70%
more
than
recipes
of
length
length
to
first
food
power
time,
of
time.
another
heating
for3minutesat100%
for7minutes30seconds.
1.
Enter
2.
Touch
3.
Enter
time.
4.
Touch
One
Cook
call
for
one
Power
and
another
Your
oven
automatically,
is
the
Time
the
Power
first
second
defrostorthe
cook
Cook
Level
cycle
Cycle
Power
can
for
power
time.
pad.
cook
be
up
pad.
set
to
and
5.
Enter
the
Start
the
you
and
power
will
2.
Touch
3.
Enter
4.
Touch
the
will
END
cook
hear
Power
the
Start
will
Level
power
pad.
time
is
four
beeps
display.
level.
When
over,
pad.
you
and
6.
Touch
When
over,
beeps
display.
cook
END
pad.
hear
level.
time
will
is
four
-12-
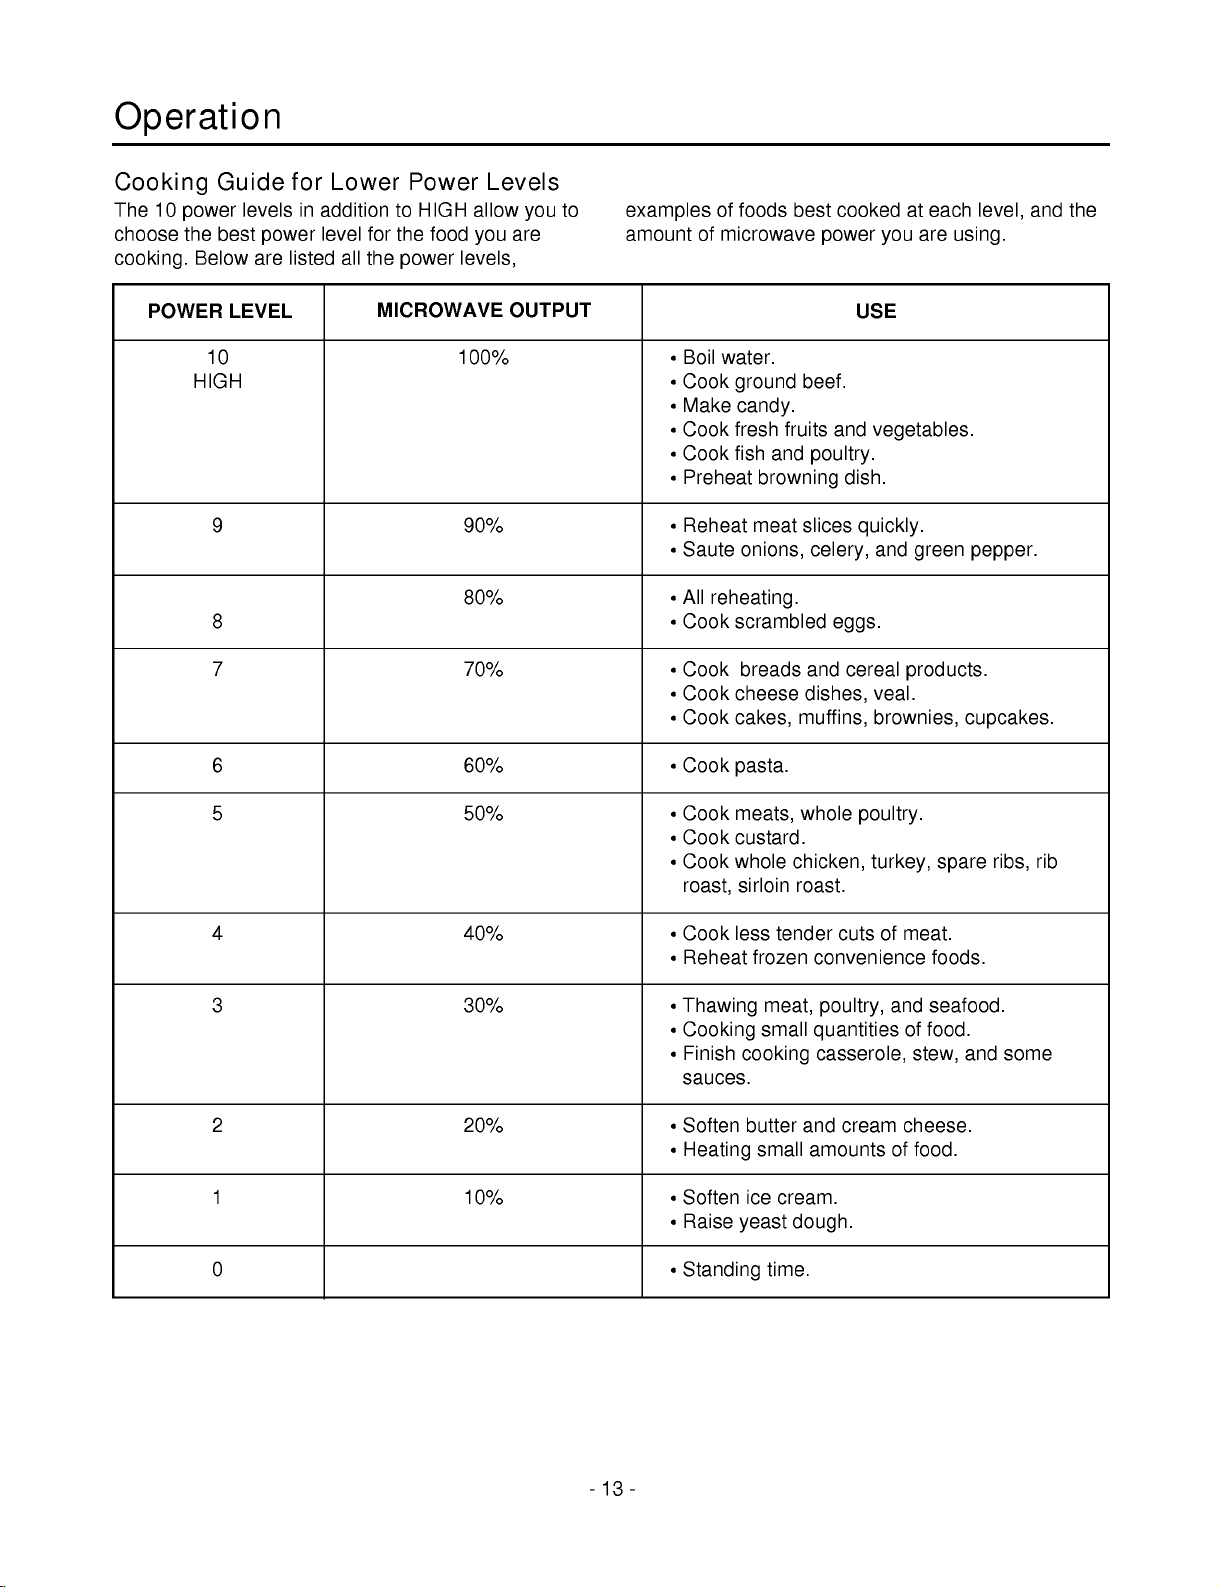
Operation
Cooking
The
10
choose
cooking.
POWER
Guide
levelsinaddition
power
the
best
Below
LEVEL
10
HIGH
9
8
7
6
power
are
for
listed
Lower
level
all
to
for
the
the
power
MICROWAVE
Power
HIGH
food
Levels
allow
you
levels,
100%
90%
80%
70%
60%
you
are
OUTPUT
to
examples
amount
of
of
microwave
foods
best
cooked
power
you
at
are
each
using.
level,
and
the
USE
?
Boil
water.
?
Cook
?
Make
?
Cook
?
Cook
?
Preheat
?
Reheat
?
Saute
?
All
?
Cook
?
Cook
?
Cook
?
Cook
?
Cook
ground
candy.
fresh
fish
onions,
reheating.
scrambled
breads
cheese
cakes,
pasta.
beef.
fruits
and
browning
meat
slices
dishes,
muffins,
and
poultry.
dish.
quickly.
celery,
eggs.
and
cereal
vegetables.
and
green
products.
veal.
brownies,
pepper.
cupcakes.
?
5
4
3
2
1
50%
40%
30%
20%
10%
0
Cook
?
Cook
?
Cook
roast,
?
Cook
?
Reheat
?
Thawing
?
Cooking
?
Finish
sauces.
?
Soften
?
Heating
?
Soften
?
Raise
?
Standing
meats,
custard.
whole
sirloin
less
yeast
tender
frozen
meat,
small
cooking
butter
small
ice
cream.
time.
whole
chicken,
roast.
cutsofmeat.
convenience
poultry,
quantities
casserole,
and
cream
amounts
dough.
poultry.
turkey,
and
of
stew,
cheese.
of
food.
spare
foods.
seafood.
food.
and
ribs,
some
rib
-13-

Operation
Popcorn
Popcorn
of
only
microwave
instructions.To
follow
Potato
Potato
powers.
NOTE:
?
Cooking
?
?
After
lets
commercially
one
package
this
Size-ounces
Bag
Touch
Before
NUMBER
lets
You
baking,
you
times
baking,
you
packaged
popcorn
set
chart:
Example:
cook
can
choose
are
let
Example:
pop
at
a
popper,
your
To
2.
potatoes
based
pierce
stand
1.75,
3.0,
microwave
If
time.
1.
To
you
follow
microwave
1.75
1
a
3.0
pop
Touch
Touch
When
you
END
from
potato
Popcorn
number
the
will
will
with
1to4
on an
average
with
for5minutes.
cook2Potatoes.
and
3.5
popcorn.
are
using
manufacturer's
oven
3.0 3.5
2
oz.
bag.
2
cook
hear
four
display.
times
preset
potatoes.
8
fork
ounce
bags
a
correctly,
pad.
pad.
time
is
over.
beeps
and
ounce
potato.
several
Pop
3
and
cook
times.
Auto
Auto
Cook
Cook
provides
Example:
four
To
preset
cook
1.
Touch
2.
Choose
3.
Enter
When
you
END
categories
2
cups
Auto
food
of
Rice.
Cook
category.
Category
Fresh
vegetable
Frozen
vegetable
Rice
Casserole
quantity/servings.
Category
Fresh
vegetable
Frozen
vegetable
Rice
Casserole
the
cook
will
hear
four
will
display.
for
cooking.
pad.
Touch
number
1
2
34
Number
cups
1-4cups
1-4cups
1-2cups
1-4cups
time
beeps
pad
is
of
over,
and
1.
Touch
2.
Touch
When
you
END
will
will
Potato
number
the
cook
hear
display.
pad.
four
2
time
pad.
beeps
is
over,
and
-14-
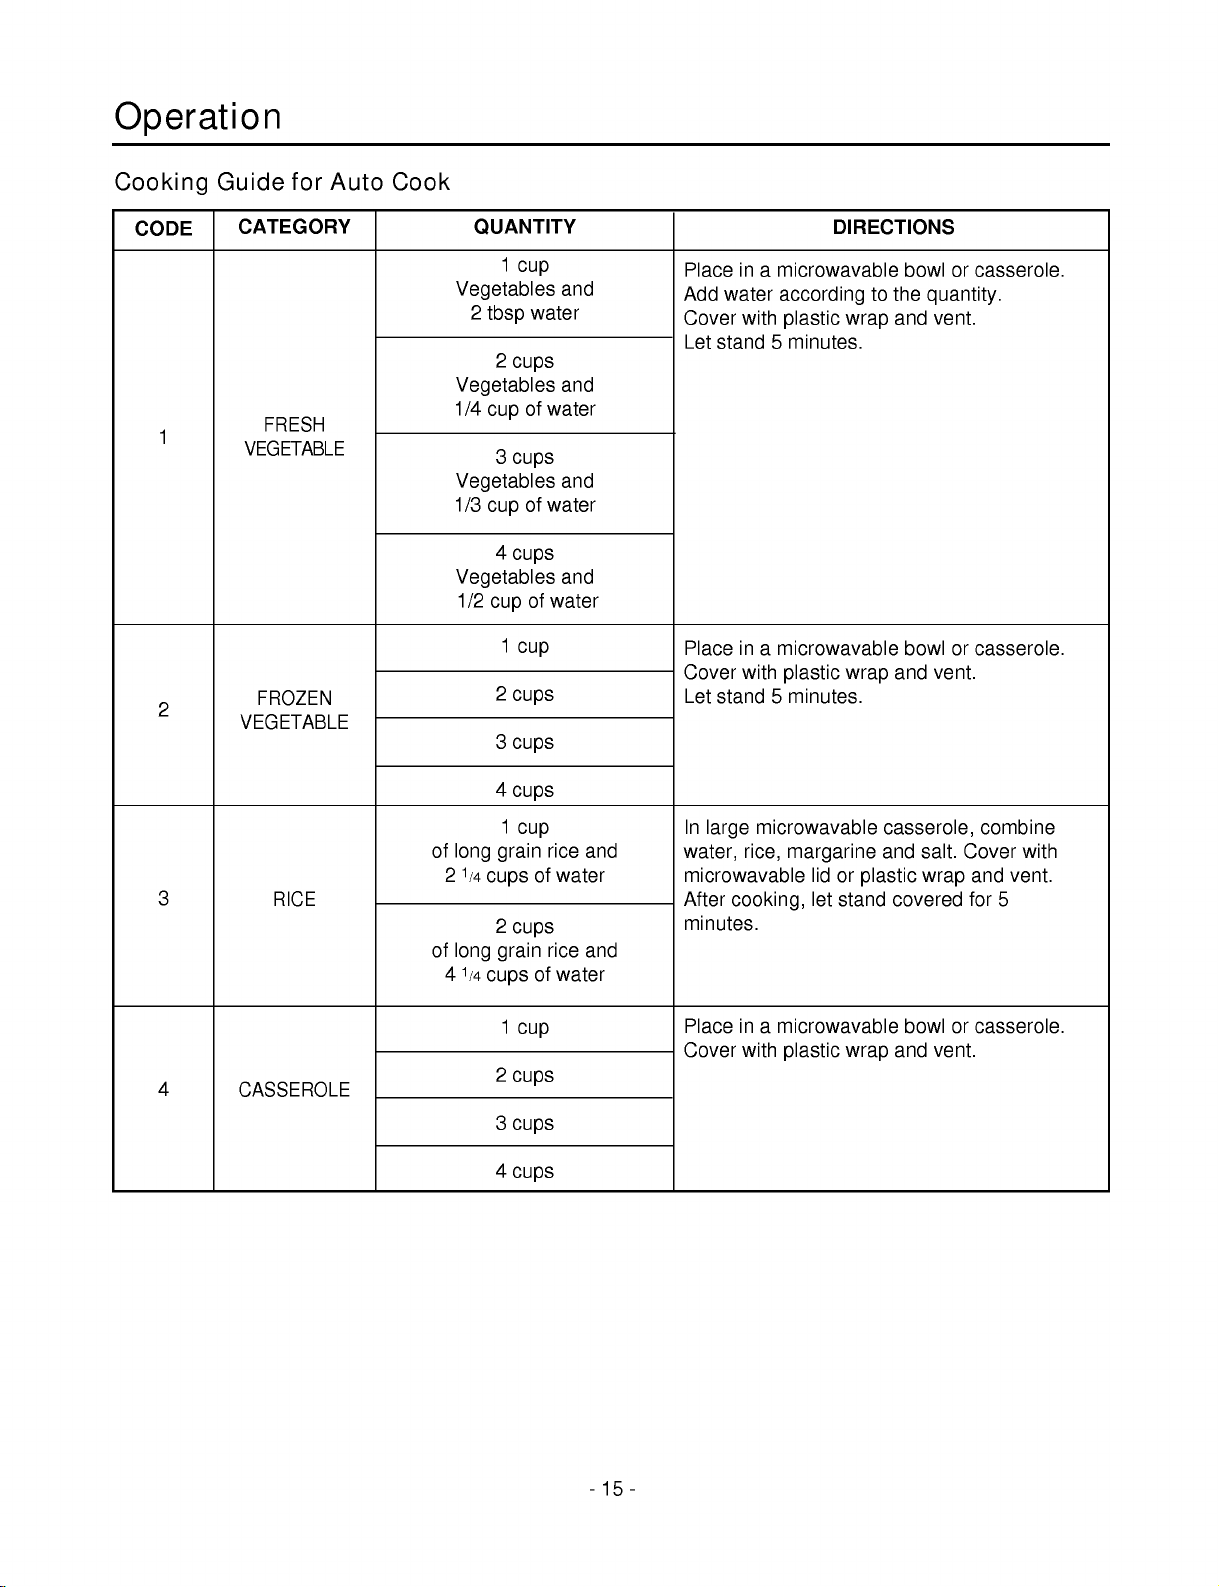
Operation
Cooking
CODE
1
2
Guide
CATEGORY
VEGETABLE
VEGETABLE
FRESH
FROZEN
for
Auto
Cook
QUANTITY
1
cup
Vegetables
2
tbsp
2
water
cups
Vegetables
1/4
cup
of
3
cups
Vegetables
1/3
cup
of
4
cups
Vegetables
1/2
cup
2
3
1
of
cup
cups
cups
and
and
water
and
water
and
water
in
Place
Add
Cover
Let
Place
Cover
Let
a
water
with
stand5minutes.
in
a
with
stand5minutes.
DIRECTIONS
microwavable
according
plastic
microwavable
plastic
wrap
wrap
to
bowl
the
and
bowl
and
or
casserole.
quantity.
vent.
or
casserole.
vent.
4
cups
1
cup
of
long
2
1/4
3
4
RICE
CASSEROLE
cups
of
long
4
1/4
cups
grain
2
cups
grain
1
cup
2
cups
3
cups
4
cups
rice
and
of
water
rice
and
of
water
In
large
water,
After
rice,
microwavable
cooking,
minutes.
in
Place
Cover
with
microwavable
margarine
lid
let
a
microwavable
plastic
or
plastic
stand
wrap
casserole,
and
salt.
wrap
covered
bowl
and
vent.
combine
Cover
and
for
or
casserole.
with
vent.
5
-15-
 Loading...